Introduction: How to Program a Clock
If you have ever wanted to create and control time, this is not exactly the right place. I can, however, teach you how to write a program for a clock. I will be showing you how to use Notepad on a Windows computer to design your very own program in the batch language.
To be honest with everyone reading this, if you don’t really want to read all that I type, the pictures are self-explanatory for the most part.
WARNING: IT IS ILLEGAL TO DISTRIBUTE BATCH FILES OVER THE INTERNET.
Materials: Windows Computer, Notepad
Step 1: Open Notepad
Open Notepad… If you don’t know how to open Notepad then you shouldn’t program a clock.
Step 2: Starting It
To start off, type
@echo off
this code is basically saying that you want your program to display something.
Step 3: Still Starting It
The next code on a new line is
:start
The » : » means that you have a specific point you want to return to. I then typed «start» to specify a name for this point. You can use whatever you want, i only used «start» for the sake of simplicity.
Step 4: Getting Into It
More code
cls
This code is just a shortened version of the words «Clear Screen». And that is what it does. Later on we will find that clearing the screen makes the program run smoother and visually attractive.
Step 5: Timing
Codes, codes, codes
echo %time%
The code «echo» tells the program to prompt whatever follows on that line.
The %time% just means to display the time that the computer has.
Step 6: Goto Step 6
[Insert funny one-liner here]
goto start
Whoever made this programming language honestly just put the words «go» and «to» together and made it go to a specified point. In this case, I made it go back to «start». Don’t Pass Go. Don’t Collect 200.
Step 7: Don’t Forget to Save
Saving a program from Notepad is different from saving a text document. There are a few step you must take for it to work correctly.
- Where it says «Save as type», choose the option «All Files».
- Save your program as Clock.bat . The «.bat» tells the computer what programming language you used
Choose a safe place to save this and hit save.
Step 8: You Are a Programmer Now
You have now officially written a program. Now if you open it you may notice that it looks a little sketchy, but no worries. These next few steps will show you how to amp up your program.
Step 9: Make It Pretty
Lets add some color to our project. Add the command
color 0a
to a new line under «@echo off». «0a» Is just a color code for light green text on a black background. You can use any color combination you want, but 0a is the most stereotypical color scheme for a hacker.
Step 10: Make It Prettier
If you opened the program then you would have noticed that it flashed each time at you. I found this to be distracting and ugly, so I added the command:
timeout 0 /nobreak>null
This is a more advanced command, so I won’t explain it all to you. It basically tell the program to wait for «0» seconds and then continue without letting the user know it paused. If you look up the «timeout command», you can learn more.
Step 11: It’s So Pretty
Almost done. Add the command:
title Clock
on the first line, on its own line.(Reference the picture above). This just make the name of window that will open «Clock».
And now you’re Done.
Step 12: It’s All Over Now
When you open it now it should look a lot nicer and more appealing. I simply shrunk mine down to a reasonable size.
This was the first program I ever wrote when I was first starting out (Not as advanced obviously) and still enjoy the look of it. I hope to have inspired all of you to carry on with writing programs, but if not, at least you have a new clock.
Have a good day while never having to worry about what time it is ever again.
WARNING: DO NOT DISTRIBUTE ANY BATCH FILES OVER THE INTERNET, THEY CAN CAUSE HARM TO OTHERS’ MACHINES EASILY. NEVER DOWNLOAD A BATCH FILE FROM THE INTERNET. NEVER OPEN A BATCH FILE BEFORE YOU ARE 105.7% SURE IT IS SAFE. I AM NOT RESPONSIBLE FOR ANY HARM CAUSED TO YOUR MACHINE.
Be the First to Share
Recommendations
Improve Article
Save Article
Improve Article
Save Article
In this article, we will discuss the Digital Clock in C++ Language. It is an application that allows for a personal clock that starts at a custom set time and shows the time from that point onwards. This article describes how to make such a clock in a 24-hour format with HH:MM:SS slots and start the time from where one would want it to be, and then it moves forward from there.
Features: It is a Simple Digital clock developed using basic C++ concepts that shows hour, minute, and second.
Approach: The requirements for this program are just the basic concepts of the data types, variables, manipulators, Control statements, Conditional statements, etc. Below are the steps:
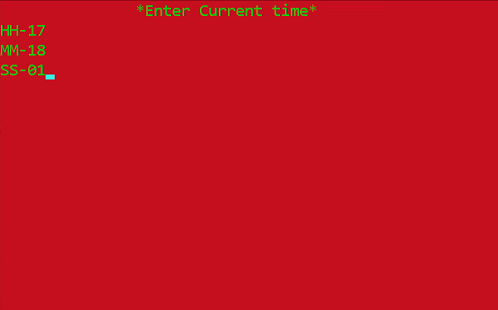
- Create a screen that will show “Current time” of your location which will be implemented using simple output methods used in C++ i.e., cout, and a manipulator “setw()“.
- In the fore mentioned screen, implement the HH column, MM column, SS column, that will contain the time.
- Implement colors using System(“color 4A”), the color will be in hexadecimal format and the console can be used to implement them using double-digit hex codes (0 to F) which will, in turn, change the text color in the console of the output.
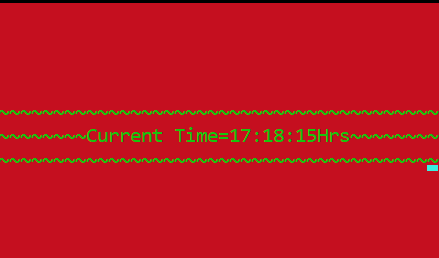
- In the last screen, a digital clock can be seen finally implemented and running from the inputted time.
Functions Used:
- System(“cls”): It is used to clear the Console or the Screen. It can be avoided if anyone wants to see whatever is appearing on the screen.
- setw(): This function is used to leave the space of particular characters that you can write in the parenthesis. It is declared in <iomanip> header file. Here setw(70) is used.
- System(“color 4A”): This function is used to make background RED and text as LIGHT GREEN.
- Sleep(): sleep is a function that is declared in <windows.h> header file. It actually suspends the execution of the program temporarily for a period of time in milliseconds.
Below is the implementation of the above approach:
C++
#include <iomanip>
#include <iostream>
#include <stdlib.h>
#include <windows.h>
using namespace std;
int main()
{
system("color 4A");
int hour, min, sec;
cout << setw(70)
<< "*Enter Current time*n";
cout << "HH- ";
cin >> hour;
cout << "MM- ";
cin >> min;
cout << "SS- ";
cin >> sec;
system("color 4A");
if (hour > 23) {
cout << "Wrong Time input";
}
else if (min > 60) {
cout << "Wrong Time Input";
}
else if (sec > 60) {
cout << "Wrong Time Input";
}
else {
while (1)
{
system("cls");
for (hour; hour < 24; hour++) {
for (min; min < 60; min++) {
for (sec; sec < 60; sec++) {
system("cls");
cout << "nnnn~~~~~~~~~"
"~~~~~~~~~~~~~~~~~~~~~"
"~~~~~~~~~~~~~~~~~~"
"Current Time = "
<< hour << ":" << min << ":"
<< sec
<< "Hrs~~~~~~~~~~~~~~~~~~"
"~~~~~~~~~~~~~~~~~~~~~"
"~~~~~~~~~";
Sleep(1000);
}
sec = 0;
}
min = 0;
}
}
}
}
Input:
Output:
Improve Article
Save Article
Improve Article
Save Article
In this article, we will discuss the Digital Clock in C++ Language. It is an application that allows for a personal clock that starts at a custom set time and shows the time from that point onwards. This article describes how to make such a clock in a 24-hour format with HH:MM:SS slots and start the time from where one would want it to be, and then it moves forward from there.
Features: It is a Simple Digital clock developed using basic C++ concepts that shows hour, minute, and second.
Approach: The requirements for this program are just the basic concepts of the data types, variables, manipulators, Control statements, Conditional statements, etc. Below are the steps:
- Create a screen that will show “Current time” of your location which will be implemented using simple output methods used in C++ i.e., cout, and a manipulator “setw()“.
- In the fore mentioned screen, implement the HH column, MM column, SS column, that will contain the time.
- Implement colors using System(“color 4A”), the color will be in hexadecimal format and the console can be used to implement them using double-digit hex codes (0 to F) which will, in turn, change the text color in the console of the output.
- In the last screen, a digital clock can be seen finally implemented and running from the inputted time.
Functions Used:
- System(“cls”): It is used to clear the Console or the Screen. It can be avoided if anyone wants to see whatever is appearing on the screen.
- setw(): This function is used to leave the space of particular characters that you can write in the parenthesis. It is declared in <iomanip> header file. Here setw(70) is used.
- System(“color 4A”): This function is used to make background RED and text as LIGHT GREEN.
- Sleep(): sleep is a function that is declared in <windows.h> header file. It actually suspends the execution of the program temporarily for a period of time in milliseconds.
Below is the implementation of the above approach:
C++
#include <iomanip>
#include <iostream>
#include <stdlib.h>
#include <windows.h>
using namespace std;
int main()
{
system("color 4A");
int hour, min, sec;
cout << setw(70)
<< "*Enter Current time*n";
cout << "HH- ";
cin >> hour;
cout << "MM- ";
cin >> min;
cout << "SS- ";
cin >> sec;
system("color 4A");
if (hour > 23) {
cout << "Wrong Time input";
}
else if (min > 60) {
cout << "Wrong Time Input";
}
else if (sec > 60) {
cout << "Wrong Time Input";
}
else {
while (1)
{
system("cls");
for (hour; hour < 24; hour++) {
for (min; min < 60; min++) {
for (sec; sec < 60; sec++) {
system("cls");
cout << "nnnn~~~~~~~~~"
"~~~~~~~~~~~~~~~~~~~~~"
"~~~~~~~~~~~~~~~~~~"
"Current Time = "
<< hour << ":" << min << ":"
<< sec
<< "Hrs~~~~~~~~~~~~~~~~~~"
"~~~~~~~~~~~~~~~~~~~~~"
"~~~~~~~~~";
Sleep(1000);
}
sec = 0;
}
min = 0;
}
}
}
}
Input:
Output:
Как написать программу часы
Сегодня существует множество мощнейших средств разработки программного обеспечения. Все они направлены на увеличение производительности труда программиста. При помощи многих из них решить простые задачи, например,
написать программу-часы, можно всего за несколько минут.

Вам понадобится
- — компилятор;
- — пакеты разработчика;
- — опционально: интегрированная среда разработки (IDE).
Инструкция
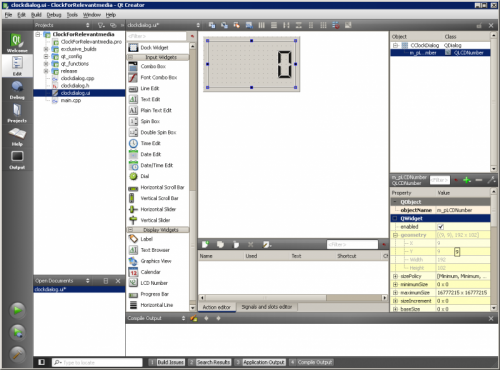
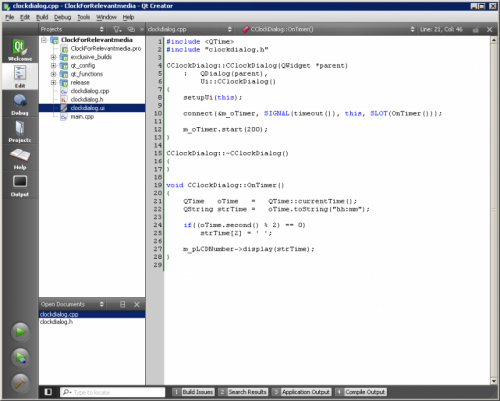
Сформируйте заготовку или проект приложения, которое будет реализовывать часы. В случае если используется IDE, запустите мастер создания проектов, выберите тип приложения, каталог хранения файлов и другие опции. Сгенерируйте проект.
При отсутствии IDE добавьте нужные файлы вручную. Используйте подходящий текстовый редактор. Создайте сценарии для используемой системы сборки (make, cmake, nmake, и т.д.) или файл проекта, если применяются средства вроде qmake.

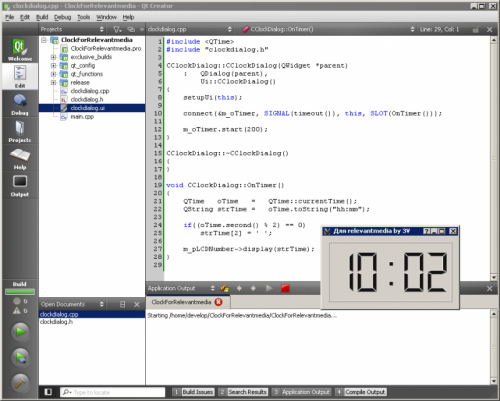
Разработайте интерфейс приложения. У такой простой программы как часы он может состоять всего из одного диалогового окна, в котором будет показано текущее время. Отображение текста в окне можно осуществлять непосредственно — при помощи доступных методов графического вывода. Однако гораздо удобнее использовать для этой цели походящие элементы управления. Если в IDE присутствует инструментарий для дизайна интерфейса, подготовьте в нем шаблон диалогового окна.
Добавьте в приложение функционал для обеспечения срабатывания определенного фрагмента кода через заданные промежутки времени. Как правило, это делается при помощи запуска таймера, обработчиком событий которого является функция или метод класса. Напишите код, реализующий подобный обработчик, а также код запуска таймера при инициализации приложения и остановки при завершении его работы. Период срабатывания таймера установите в районе 100-300 миллисекунд.
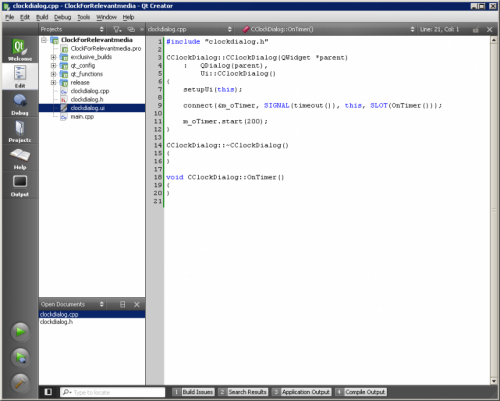
Реализуйте код обработчика событий таймера. Осуществляйте в нем получение текущего системного времени и его отображение в окне приложения. Получайте текущее время при помощи функций библиотеки C (localtime, localtime_r, gmtime, gmtime_r), платформ-специфических функций (таких как GetSystemTime в Windows) или соответствующих методов классов-оберток используемого фреймворка. Форматируйте полученное значение в строку и устанавливайте ее в качестве текста элемента управления, используемого для отображения времени или сохраняйте и выводите при обновлении окна с помощью соответствующих графических функций.
Проверьте работу созданной программы, реализующей часы. Соберите проект. Запустите полученный исполняемый модуль.
Видео по теме
Войти на сайт
или
Забыли пароль?
Еще не зарегистрированы?
This site is protected by reCAPTCHA and the Google Privacy Policy and Terms of Service apply.
Простые цифровые часы, которые делаются в «два клика»
Unit1.cpp
//---------------------------------------------------------------------------

#include <vcl.h>
#pragma hdrstop

#include "Unit1.h"
//---------------------------------------------------------------------------
#pragma package(smart_init)
#pragma resource "*.dfm"
TForm1 *Form1;
//---------------------------------------------------------------------------
__fastcall TForm1::TForm1(TComponent* Owner)
	: TForm(Owner)
{
}
//---------------------------------------------------------------------------
void __fastcall TForm1::Timer1Timer(TObject *Sender)
{
Form1->Label1->Caption=Time().FormatString("hh:mm:ss");
}
//---------------------------------------------------------------------------
Unit1.h
//---------------------------------------------------------------------------

#ifndef Unit1H
#define Unit1H
//---------------------------------------------------------------------------
#include <System.Classes.hpp>
#include <Vcl.Controls.hpp>
#include <Vcl.StdCtrls.hpp>
#include <Vcl.Forms.hpp>
#include <Vcl.ExtCtrls.hpp>
//---------------------------------------------------------------------------
class TForm1 : public TForm
{
__published:	// IDE-managed Components
	TTimer *Timer1;
	TLabel *Label1;
	void __fastcall Timer1Timer(TObject *Sender);
private:	// User declarations
public:		// User declarations
	__fastcall TForm1(TComponent* Owner);
};
//---------------------------------------------------------------------------
extern PACKAGE TForm1 *Form1;
//---------------------------------------------------------------------------
#endif
- Подробности
- Родительская категория: Уроки и примеры программирования C++ Embarcadero RAD Studio 10 | C++ Builder 10
- Категория: Часы и таймеры
-
Просмотров: 7201
В качестве примера использования событийной системы на таблице я выбрал такой популярный девайс как часы на микроконтроллере. Чтобы пример был понятен как можно более широкому кругу людей функционал часов ограничивается отображением и установкой времени. Программа носит учебный характер и не претендует на оптимальность.
Схема

Написание программы
Итак, попытаюсь сформулировать, как я кодил эту программу.
Программа учебная, а значит, все должно быть по минимуму. Отображение часов и минут, двоеточие, моргающее раз в секунду, и возможность это самое время выставить.
Из аппаратных средств нужен микроконтроллер AVR – atmega8535, символьный lcd и кнопки — для навигации по одноуровнему меню часов и установки времени. Трех штук — Enter, Up, Down вполне хватит. Кнопкой Cancel пренебрежем.
Кнопки будут опрашиваться в прерывании таймера Т0, а с помощью таймера Т1 будут формироваться секундные интервалы. Можно, конечно, использовать таймер Т2 с внешним часовым кварцем, но не суть.. точность сейчас не главное.
В прерываниях таймеров в очередь будут помещаться события. Событий будет четыре — по одному на каждую кнопку + секундный тик.
У часов будет три состояния — отображение времени, установка часов, установка минут.
Исходя из всего этого, можно расписать логику работы часов в виде таблице переходов.

Чтобы описать таблицу в Си коде, нужно определить коды состояний и событий, а также написать обработчики. Коды состояний и событий я вынес в заголовочный файл list_event.h, он используется в некоторых программных модулях.
//коды событий
#define EVENT_NULL 0
#define EVENT_KEY_UP 1
#define EVENT_KEY_DOWN 2
#define EVENT_KEY_ENTER 3
#define EVENT_SYS_TIMER 4
//коды состояний
#define STATE_NO_CHANGE 0
#define STATE_NORMAL 1
#define STATE_SET_HOUR 2
#define STATE_SET_MINUTE 3
Обработчики я поместил в модуль intrface.h, interface.c. На начальном этапе их можно заменить пустой функцией EmptyFunc (она есть в заготовке событийной системы) или создать функции-обработчики без тела, как делал я.
В модуле interface нет комментариев, но там все довольно просто — функции делают в точности то, что описано в последнем столбце таблицы переходов. Думаю, разберетесь.
//interface.h прототипы функций
void GUI_General(void);
void GUI_SelectHour(void);
void GUI_SelectMinute(void);
void GUI_IncHour(void);
void GUI_DecHour(void);
void GUI_IncMinute(void);
void GUI_DecMinute(void);
void GUI_SetTime(void);
void GUI_ChangeTime(void);
Таблицу переходов закодил в заготовке событийной системы — event-system.c
__flash struct ROW_TABLE table[] = {
//STATE EVENT NEXT STATE STATE_FUNC
{STATE_NORMAL, EVENT_KEY_ENTER, STATE_SET_HOUR, GUI_SelectHour},
{STATE_NORMAL, EVENT_SYS_TIMER, STATE_NO_CHANGE, GUI_ChangeTime},
{STATE_SET_HOUR, EVENT_KEY_ENTER, STATE_SET_MINUTE, GUI_SelectMinute},
{STATE_SET_HOUR, EVENT_KEY_UP, STATE_NO_CHANGE, GUI_IncHour},
{STATE_SET_HOUR, EVENT_KEY_DOWN, STATE_NO_CHANGE, GUI_DecHour},
{STATE_SET_MINUTE, EVENT_KEY_ENTER, STATE_NORMAL, GUI_General},
{STATE_SET_MINUTE, EVENT_KEY_UP, STATE_NO_CHANGE, GUI_IncMinute},
{STATE_SET_MINUTE, EVENT_KEY_DOWN, STATE_NO_CHANGE, GUI_DecMinute},
{ 0, 0, 0, EmptyFunc}
};
Дальше.
Сделал модуль timer.c, timer.h. Там три функции — функция инициализации таймеров Т0 и Т1 и функции прерываний. Т0 вызывает прерывания каждые 10мс, Т1 — каждую секунду.
void TIM_Init(void)
{
…..
}
//опрос кнопок
#pragma vector = TIMER0_COMP_vect
__interrupt void Timer0Comp(void)
{
BUT_Debrief(); //функция опроса кнопок из модуля button.c
}
//секундный таймер
#pragma vector = TIMER1_COMPA_vect
__interrupt void Timer1CompA(void)
{
ES_PlaceEvent(EVENT_SYS_TIMER);
}
Остальные модули buttons.c, bcd.c, lcd_lib.c у меня уже были готовы — остались от проекта «термометр на микроконтроллере». Я подключил их к проекту и настроил заголовочные файлы:
в button.h — пины, к которым подключены кнопки и порт
в lcd_lib.h – пины, к которым подключен lcd, порт, частоту кварца, опрос флага занятости и тип контроллера.
в bcd.h – переопределил функцию вывода на lcd
Далее, включил в main заголовочные файлы необходимых модулей и вписал функции инициализации — таймеров, дисплея, событийной системы и кнопок.
//модуль main
#include <ioavr.h>
#include <intrinsics.h>
#include «lcd_lib.h»
#include «buttons.h»
#include «event-system.h»
#include «interface.h»
#include «timer.h»
int main( void )
{
unsigned char event = 0;
LCD_Init();
BUT_Init();
TIM_Init();
ES_Init();
GUI_General();
__enable_interrupt();
while(1){
event = ES_GetEvent();
if (event){
ES_Dispatch(event);
}
}
return 0;
}
И последним этапом было написание кода обработчиков и отладка программы.
Вот собственно и все.