Я думаю что все знают голосового помощника Джарвиса из фильма «Железный человек». И много кто мечтал сделать голосового помощника своими руками. В этой статье мы его напишем.
Что понадобится
- Python версии 3.6.8
- Установленные по порядку модули: Librariespywin32, pipywin32, pyttsx3, SpeechRecognition, PyAudio, fuzzywuzzy, pyowm, python‑Levenshtein, CurrencyConverter.
Написание самого помощник
Создаём в папке вот такие файлы:
functions.py
Открываем файл functions.py и импортируем библиотеки и остальные файлы:
import pyttsx3
import speech_recognition as sr
import os
from fuzzywuzzy import fuzz
import datetime
import win32com.client as wincl
import site
import calculator
import envelope
import translator
После этого вставляем данный код и вписываем в строку alias название помощника(у нас pythonguru):
opts = {«alias»: (‘pythonguru’, ‘пайтонгуру’, ‘гурупайтон’),
«tbr»: (‘скажи’, ‘расскажи’, ‘покажи’, ‘сколько’, ‘произнеси’, ‘как’,’сколько’,’поставь’,’переведи’, «засеки»,’запусти’,’сколько будет’),
«cmds»:
{«ctime»: (‘текущее время’, ‘сейчас времени’, ‘который час’, ‘время’, ‘какое сейчас время’),
‘startStopwatch’: (‘запусти секундомер’, «включи секундомер», «засеки время»),
‘stopStopwatch’: (‘останови секундомер’, «выключи секундомер», «останови»),
«stupid1»: (‘расскажи анекдот’, ‘рассмеши меня’, ‘ты знаешь анекдоты’, «шутка», «прикол»),
«calc»: (‘прибавить’,’умножить’,’разделить’,’степень’,’вычесть’,’поделить’,’х’,’+’,’-‘,’/’),
«shutdown»: (‘выключи’, ‘выключить’, ‘отключение’, ‘отключи’, ‘выключи компьютер’),
«conv»: («валюта», «конвертер»,»доллар»,’руб’,’евро’),
«internet»: («открой», «вк», «гугл», «сайт», ‘вконтакте’, «ютуб»),
«translator»: («переводчик»,»translate»),
«deals»: («дела»,»делишки», ‘как сам’, ‘как дела’)}}
Дальше подключаем микрофон и голос самого помощника
startTime = 0
speak_engine = pyttsx3.init()
voices = speak_engine.getProperty(‘voices’)
speak_engine.setProperty(‘voice’, voices[2].id)
r = sr.Recognizer()
m = sr.Microphone(device_index=1)
voice = «str»
Если у вас не работает микрофон то пробуйте менять значение device_index=1 (например на device_index=2)
Далее вставляем весь этот код (функции разговора ассистента, фунции прослушки микрофона и возможности самого ассистента):
def speak(what):
print(what)
speak = wincl.Dispatch(«SAPI.SpVoice»)
speak.Speak(what)
def callback(recognizer, audio):
try:
global voice
voice = recognizer.recognize_google(audio, language=»ru-RU»).lower()
print(«[log] Распознано: » + voice)
if voice.startswith(opts[«alias»]):
cmd = voice
for x in opts[‘alias’]:
cmd = cmd.replace(x, «»).strip()
for x in opts[‘tbr’]:
cmd = cmd.replace(x, «»).strip()
voice = cmd
# распознаем и выполняем команду
cmd = recognize_cmd(cmd)
execute_cmd(cmd[‘cmd’])
except sr.UnknownValueError:
print(«[log] Голос не распознан!»)
except sr.RequestError as e:
print(«[log] Неизвестная ошибка, проверьте интернет!»)
def listen():
with m as source:
r.adjust_for_ambient_noise(source)
stop_listening = r.listen_in_background(m, callback)
while True: time.sleep(0.1)
def recognize_cmd(cmd):
RC = {‘cmd’: », ‘percent’: 0}
for c, v in opts[‘cmds’].items():
for x in v:
vrt = fuzz.ratio(cmd, x)
if vrt > RC[‘percent’]:
RC[‘cmd’] = c
RC[‘percent’] = vrt
return RC
ef execute_cmd(cmd):
global startTime
if cmd == ‘ctime’:
now = datetime.datetime.now()
speak(«Сейчас {0}:{1}».format(str(now.hour), str(now.minute)))
elif cmd == ‘shutdown’:
os.system(‘shutdown -s’)
speak(«Выключаю…»)
elif cmd == ‘calc’:
calc.calculator()
elif cmd == ‘conv’:
convert.convertation()
elif cmd == ‘translator’:
translate.translate()
elif cmd == ‘stupid1’:
anekdot.fun()
elif cmd == ‘internet’:
browser.browser()
elif cmd == ‘startStopwatch’:
speak(«Секундомер запущен»)
startTime = time.time()
elif cmd == «stopStopwatch»:
if startTime != 0:
Time = time.time() — startTime
speak(f»Прошло {round(Time // 3600)} часов {round(Time // 60)} минут {round(Time % 60, 2)} секунд»)
startTime = 0
else:
speak(«Секундомер не включен»)
elif cmd == ‘deals’:
speak(«Пока отлично.»)
else:
print(«Команда не распознана!»)
start.py
Этот файл будет служить для запуска всего ассистента
import functions
import time
import datetime
now = datetime.datetime.now()
if now.hour >= 6 and now.hour < 12:
funcs.speak(«Доброе утро!»)
elif now.hour >= 12 and now.hour < 18:
funcs.speak(«Добрый день!»)
elif now.hour >= 18 and now.hour < 23:
funcs.speak(«Добрый вечер!»)
else:
funcs.speak(«Доброй ночи!»)
funcs.listen()
site.py
С его помощью мы будем открывать любые сайты.
import webbrowser
import funcs
def browser():
sites = {«https://vk.com»:[«vk»,»вк»], ‘https://www.youtube.com/’:[‘youtube’, ‘ютуб’], ‘https://ru.wikipedia.org’: [«вики», «wiki»], ‘https://ru.aliexpress.com’:[‘али’, ‘ali’, ‘aliexpress’, ‘алиэспресс’], ‘http://google.com’:[‘гугл’,’google’], ‘https://www.amazon.com’:[‘амазон’, ‘amazon’], ‘https://www.apple.com/ru’:[‘apple’,’эпл’] ‘
https://telete.in/gurupython’:[‘пайтонгуру’, ‘pythonguru’]}
site = funcs.voice.split()[-1]
for k, v in sites.items():
for i in v:
if i not in site.lower():
open_tab = None
else:
open_tab = webbrowser.open_new_tab(k)
break
if open_tab is not None:
break
calculator.py
Самый простейший калькулятор на пайтоне
import funcs
def calculator():
try:
list_of_nums = funcs.voice.split()
num_1,num_2 = int((list_of_nums[-3]).strip()), int((list_of_nums[-1]).strip())
opers = [list_of_nums[0].strip(),list_of_nums[-2].strip()]
for i in opers:
if ‘дел’ in i or ‘множ’ in i or ‘лож’ in i or ‘приба’ in i or ‘выч’ in i or i == ‘x’ or i == ‘/’ or i ==’+’ or i == ‘-‘ or i == ‘*’:
oper = i
break
else:
oper = opers[1]
if oper == «+» or ‘слож’ in oper:
ans = num_1 + num_2
elif oper == «-» or ‘выче’ in oper:
ans = num_1 — num_2
elif oper == «х» or ‘множ’ in oper:
ans = num_1 * num_2
elif oper == «/» or ‘дел’ in oper:
if num_2 != 0:
ans = num_1 / num_2
else:
funcs.speak(«Делить на ноль невозможно»)
elif «степен» in oper:
ans = num_1 ** num_2
funcs.speak(«{0} {1} {2} = {3}».format(list_of_nums[-3], list_of_nums[-2], list_of_nums[-1], ans))
except:
funcs.speak(«Скажите, например: Сколько будет 5+5?»)
envelope.py
Конвертер денег
from currency_converter import CurrencyConverter
import funcs
def convertation():
class CurrencyError(Exception):
pass
c = CurrencyConverter()
money = None
from_currency = None
to_currency = None
list_of_conv = funcs.voice.split()
if len(list_of_conv) > 4:
list_of_conv = list_of_conv[1:]
else:
print()
while money is None:
try:
money = list_of_conv[0]
except ValueError:
funcs.speak(«Скажите, к примеру: 50 долларов в рубли»)
break
while from_currency is None:
try:
list_of_conv[0] = int(list_of_conv[0])
except ValueError:
funcs.speak(«Скажите, к примеру: 50 долларов в рубли»)
break
try:
if «руб» in list_of_conv[1]:
from_currency = «RUB»
elif «дол» in list_of_conv[1]:
from_currency = «USD»
elif «евр» in list_of_conv[1]:
from_currency = «EUR»
if from_currency not in c.currencies:
raise CurrencyError
except (CurrencyError, IndexError):
from_currency = None
funcs.speak(«Скажите, например: 50 долларов в рубли»)
break
while to_currency is None:
try:
list_of_conv[0] = int(list_of_conv[0])
except ValueError:
return None
try:
if «руб» in list_of_conv[3]:
to_currency = «RUB»
elif «дол» in list_of_conv[3]:
to_currency = «USD»
elif «евр» in list_of_conv[3]:
to_currency = «EUR»
if to_currency not in c.currencies:
raise CurrencyError
except (CurrencyError, IndexError):
to_currency = None
funcs.speak(«Скажите, например: 50 долларов в рубли»)
break
while True:
try:
funcs.speak(f»{money} {from_currency} в {to_currency} — »
f»{round(c.convert(money, from_currency, to_currency), 2)}»)
break
except ValueError:
funcs.speak(«Скажите, например: 50 долларов в рубли»)
break
translator.py
Простой переводчик
import requests
import funcs
def translate():
url = ‘https://translate.yandex.net/api/v1.5/tr.json/translate?’
key = ‘trnsl.1.1.20190227T075339Z.1b02a9ab6d4a47cc.f37d50831b51374ee600fd6aa0259419fd7ecd97’
text = funcs.voice.split()[1:]
lang = ‘en-ru’
r = requests.post(url, data={‘key’: key, ‘text’: text, ‘lang’: lang}).json()
try:
funcs.speak(r[«text»])
except:
funcs.speak(«Обратитесь к переводчику, начиная со слова ‘Переводчик'»)
Как видите сделать своего голосового помощника на Python не так уж сложно, главное иметь знания об основах языка и всё получится.
Совершенствуй знания по Python каждый день у нас на телеграм канале, PythonGuru.

Do you remember J.A.R.V.I.S., Tony Stark’s virtual personal assistant? If you’ve seen any of the Ironman or Avengers movies, I’m sure you do.
Have you ever wondered whether you could create your own personal assistant? Yes? Tony Stark can help us with that!

Oops, did you forget he is no more? It’s sad that he can no longer save us. But hey, your favorite programming language Python can help you with that.
Yes, you heard it right. We can create our own J.A.R.V.I.S. using Python. Let’s dive into it!
Project Setup
While you’re coding this project, you’ll come across various modules and external libraries. Let’s learn about them and install them. But before we install them, let’s create a virtual environment and activate it.
We are going to create a virtual environment using virtualenv. Python now ships with a pre-installed virtualenv library. So, to create a virtual environment, you can use the below command:
$ python -m venv envThe above command will create a virtual environment named env. Now, we need to activate the environment using the command:
$ . env/Scripts/activateTo verify if the environment has been activated or not, you can see (env) in your terminal. Now, we can install the libraries.
-
pyttsx3: pyttsx is a cross-platform text to speech library which is platform-independent. The major advantage of using this library for text-to-speech conversion is that it works offline. To install this module, type the below command in the terminal:
$ pip install pyttsx3 - SpeechRecognition: This allows us to convert audio into text for further processing. To install this module, type the below command in the terminal:
$ pip install SpeechRecognition - pywhatkit: This is an easy-to-use library that will help us interact with the browser very easily. To install the module, run the following command in the terminal:
$ pip install pywhatkit - wikipedia: We’ll use this to fetch a variety of information from the Wikipedia website. To install this module, type the below command in the terminal:
$ pip install wikipedia - requests: This is an elegant and simple HTTP library for Python that allows you to send HTTP/1.1 requests extremely easily. To install the module, run the following command in the terminal:
$ pip install requests
.env File
We need this file to store some private data such as API Keys, Passwords, and so on that are related to the project. For now, let’s store the name of the user and the bot.
Create a file named .env and add the following content there:
USER=Ashutosh
BOTNAME=JARVIS
To use the contents from the .env file, we’ll install another module called python-decouple as:
$ pip install python-decoupleLearn more about Environment Variables in Python here.
Before we start defining a few important functions, let’s create a speech engine first.
import pyttsx3
from decouple import config

USERNAME = config('USER')
BOTNAME = config('BOTNAME')


engine = pyttsx3.init('sapi5')

# Set Rate
engine.setProperty('rate', 190)

# Set Volume
engine.setProperty('volume', 1.0)

# Set Voice (Female)
voices = engine.getProperty('voices')
engine.setProperty('voice', voices[1].id)
Let’s analyze the above script. First of all, we have initialized an engine using the pyttsx3 module. sapi5 is a Microsoft Speech API that helps us use the voices. Learn more about it here.
Next, we are setting the rate and volume properties of the speech engine using setProperty method.
Now, we can get the voices from the engine using the getProperty method. voices will be a list of voices available in our system. If we print it, we can see as below:
[<pyttsx3.voice.Voice object at 0x000001AB9FB834F0>, <pyttsx3.voice.Voice object at 0x000001AB9FB83490>]The first one is a male voice and the other one is a female voice. JARVIS was a male assistant in the movies, but I’ve chosen to set the voice property to the female for this tutorial using the setProperty method.
Note: If you get an error related to PyAudio, download PyAudio wheel from here and install it within the virtual environment.
Also, using the config method from decouple, we are getting the value of USER and BOTNAME from the environment variables.
Enable the Speak Function
The speak function will be responsible for speaking whatever text is passed to it. Let’s see the code:
# Text to Speech Conversion
def speak(text):
    """Used to speak whatever text is passed to it"""

    engine.say(text)
    engine.runAndWait()
In the speak() method, the engine speaks whatever text is passed to it using the say() method. Using the runAndWait() method, it blocks during the event loop and returns when the commands queue is cleared.
Enable the Greet Function
This function will be used to greet the user whenever the program is run. According to the current time, it greets Good Morning, Good Afternoon, or Good Evening to the user.
from datetime import datetime


def greet_user():
    """Greets the user according to the time"""

    hour = datetime.now().hour
    if (hour >= 6) and (hour < 12):
        speak(f"Good Morning {USERNAME}")
    elif (hour >= 12) and (hour < 16):
        speak(f"Good afternoon {USERNAME}")
    elif (hour >= 16) and (hour < 19):
        speak(f"Good Evening {USERNAME}")
    speak(f"I am {BOTNAME}. How may I assist you?")
First, we get the current hour, that is if the current time is 11:15 AM, the hour will be 11. If the value of hour is between 6 and 12, wish Good Morning to the user. If the value is between 12 and 16, wish Good Afternoon and similarly, if the value is between 16 and 19, wish Good Evening. We are using the speak method to speak to the user.
How to Take User Input
We use this function to take the commands from the user and recognize the command using the speech_recognition module.
import speech_recognition as sr
from random import choice
from utils import opening_text


def take_user_input():
    """Takes user input, recognizes it using Speech Recognition module and converts it into text"""

    r = sr.Recognizer()
    with sr.Microphone() as source:
        print('Listening....')
        r.pause_threshold = 1
        audio = r.listen(source)

    try:
        print('Recognizing...')
        query = r.recognize_google(audio, language='en-in')
        if not 'exit' in query or 'stop' in query:
            speak(choice(opening_text))
        else:
            hour = datetime.now().hour
            if hour >= 21 and hour < 6:
                speak("Good night sir, take care!")
            else:
                speak('Have a good day sir!')
            exit()
    except Exception:
        speak('Sorry, I could not understand. Could you please say that again?')
        query = 'None'
    return query
We have imported speech_recognition module as sr. The Recognizer class within the speech_recognition module helps us recognize the audio. The same module has a Microphone class that gives us access to the microphone of the device. So with the microphone as the source, we try to listen to the audio using the listen() method in the Recognizer class.
We have also set the pause_threshold to 1, that is it will not complain even if we pause for one second during we speak.
Next, using the recognize_google() method from the Recognizer class, we try to recognize the audio. The recognize_google() method performs speech recognition on the audio passed to it, using the Google Speech Recognition API.
We have set the language to en-in, which is English India. It returns the transcript of the audio which is nothing but a string. We’ve stored it in a variable called query.
If the query has exit or stop words in it, it means we’re asking the assistant to stop immediately. So, before stopping, we greet the user again as per the current hour. If the hour is between 21 and 6, wish Good Night to the user, else, some other message.
We create a utils.py file which has just one list containing a few statements like this:
opening_text = [
    "Cool, I'm on it sir.",
    "Okay sir, I'm working on it.",
    "Just a second sir.",
]
If the query doesn’t have those two words (exit or stop), we speak something to tell the user that we have heard them. For that, we will use the choice method from the random module to randomly select any statement from the opening_text list. After speaking, we exit from the program.
During this entire process, if we encounter an exception, we apologize to the user and set the query to None. In the end, we return the query.
How to Set Up Offline Functions
Inside the functions folder, create a Python file called os_ops.py. In this file, we’ll create various functions to interact with the OS.
import os
import subprocess as sp

paths = {
    'notepad': "C:\Program Files\Notepad++\notepad++.exe",
    'discord': "C:\Users\ashut\AppData\Local\Discord\app-1.0.9003\Discord.exe",
    'calculator': "C:\Windows\System32\calc.exe"
}
In the above script, we have created a dictionary called paths which has a software name as the key and its path as the value. You can change the paths according to your system and add more software paths if you need to do so.
How to Open the Camera
We’ll use this function to open the camera in our system. We’ll be using the subprocess module to run the command.
def open_camera():
    sp.run('start microsoft.windows.camera:', shell=True)
How to Open Notepad and Discord
We’ll use these functions to open Notepad++ and Discord in the system.
def open_notepad():
    os.startfile(paths['notepad'])


def open_discord():
    os.startfile(paths['discord'])
How to Open the Command Prompt
We’ll use this function to open the command prompt in our system.
def open_cmd():
    os.system('start cmd')
How to Open the Calculator
We’ll use this function to open the calculator on our system.
def open_calculator():
    sp.Popen(paths['calculator'])
How to Set Up Online Functions
We’ll be adding several online functions. They are:
- Find my IP address
- Search on Wikipedia
- Play videos on YouTube
- Search on Google
- Send WhatsApp message
- Send Email
- Get Latest News Headlines
- Get Weather Report
- Get Trending Movies
- Get Random Jokes
- Get Random Advice
Let’s create a file called online_ops.py within the functions directory, and start creating these functions one after another. For now, add the following code in the file:
import requests
import wikipedia
import pywhatkit as kit
from email.message import EmailMessage
import smtplib
from decouple import config
Before we start working with APIs, if you’re not familiar with APIs and how to interact with them using Python, check out this tutorial.
How to Add the Find my IP Address Function
ipify provides a simple public IP address API. We just need to make a GET request on this URL: https://api64.ipify.org/?format=json. It returns JSON data as:
{
  "ip": "117.214.111.199"
}
We can then simply return the ip from the JSON data. So, let’s create this method:
def find_my_ip():
    ip_address = requests.get('https://api64.ipify.org?format=json').json()
    return ip_address["ip"]
How to Add the Search on Wikipedia Function
For searching on Wikipedia, we’ll be using the wikipedia module that we had installed earlier in this tutorial.
def search_on_wikipedia(query):
    results = wikipedia.summary(query, sentences=2)
    return results
Inside the wikipedia module, we have a summary() method that accepts a query as an argument. Additionally, we can also pass the number of sentences required. Then we simply return the result.
How to Add the Play Videos on YouTube Function
For playing videos on YouTube, we are using PyWhatKit. We have already imported it as kit.
def play_on_youtube(video):
    kit.playonyt(video)
PyWhatKit has a playonyt() method that accepts a topic as an argument. It then searches the topic on YouTube and plays the most appropriate video. It uses PyAutoGUI under the hood.
How to Add the Search on Google Function
Again we’ll be using PyWhatKit for searching on Google.
def search_on_google(query):
    kit.search(query)
It has a method search() that helps us search on Google instantly.
How to Add the Send WhatsApp Message Function
We’ll be using PyWhatKit once again for sending WhatsApp messages.
def send_whatsapp_message(number, message):
    kit.sendwhatmsg_instantly(f"+91{number}", message)
Our method accepts two arguments – the phone number number and the message. It then calls the sendwhatmsg_instantly() method to send a WhatsApp message. Make sure you’ve already logged in into your WhatsApp account on WhatsApp for Web.
How to Add the Send Email Function
For sending emails, we will be using the built-in smtplib module from Python.
EMAIL = config("EMAIL")
PASSWORD = config("PASSWORD")


def send_email(receiver_address, subject, message):
    try:
        email = EmailMessage()
        email['To'] = receiver_address
        email["Subject"] = subject
        email['From'] = EMAIL
        email.set_content(message)
        s = smtplib.SMTP("smtp.gmail.com", 587)
        s.starttls()
        s.login(EMAIL, PASSWORD)
        s.send_message(email)
        s.close()
        return True
    except Exception as e:
        print(e)
        return False
The method accepts receiver_address, subject, and message as arguments. We create an object of the SMTP class from the smtplib module. It takes host and port number as the parameters.
We then start a session and login with the email address and password and send the email. Make sure you add EMAIL and PASSWORD in the .env file.
How to Add the Get Latest News Headlines Function
To fetch the latest news headlines, we’ll be using NewsAPI. Signup for a free account on NewsAPI and get the API Key. Add the NEWS_API_KEY in the .env file.
NEWS_API_KEY = config("NEWS_API_KEY")


def get_latest_news():
    news_headlines = []
    res = requests.get(
        f"https://newsapi.org/v2/top-headlines?country=in&apiKey={NEWS_API_KEY}&category=general").json()
    articles = res["articles"]
    for article in articles:
        news_headlines.append(article["title"])
    return news_headlines[:5]
In the above method, we’re first creating an empty list called news_headlines. We are then making a GET request on the API URL specified in the NewsAPI Documentation. A sample JSON response from the request looks like this:
{
  "status": "ok",
  "totalResults": 38,
  "articles": [
    {
      "source": {
        "id": null,
        "name": "Sportskeeda"
      },
      "author": "Aniket Thakkar",
      "title": "Latest Free Fire redeem code to get Weapon loot crate today (14 October 2021) - Sportskeeda",
      "description": "Gun crates are one of the ways that players in Free Fire can obtain impressive and appealing gun skins.",
      "url": "https://www.sportskeeda.com/free-fire/latest-free-fire-redeem-code-get-weapon-loot-crate-today-14-october-2021",
      "urlToImage": "https://staticg.sportskeeda.com/editor/2021/10/d0b83-16341799119781-1920.jpg",
      "publishedAt": "2021-10-14T03:51:50Z",
      "content": null
    },
    {
      "source": {
        "id": null,
        "name": "NDTV News"
      },
      "author": null,
      "title": "BSF Gets Increased Powers In 3 Border States: What It Means - NDTV",
      "description": "Border Security Force (BSF) officers will now have the power toarrest, search, and of seizure to the extent of 50 km inside three newstates sharing international boundaries with Pakistan and Bangladesh.",
      "url": "https://www.ndtv.com/india-news/bsf-gets-increased-powers-in-3-border-states-what-it-means-2574644",
      "urlToImage": "https://c.ndtvimg.com/2021-08/eglno7qk_-bsf-recruitment-2021_625x300_10_August_21.jpg",
      "publishedAt": "2021-10-14T03:44:00Z",
      "content": "This move is quickly snowballing into a debate on state autonomy. New Delhi: Border Security Force (BSF) officers will now have the power to arrest, search, and of seizure to the extent of 50 km ins… [+4143 chars]"
    },
    {
      "source": {
        "id": "the-times-of-india",
        "name": "The Times of India"
      },
      "author": "TIMESOFINDIA.COM",
      "title": "5 health conditions that can make your joints hurt - Times of India",
      "description": "Joint pain caused by these everyday issues generally goes away on its own when you stretch yourself a little and flex your muscles.",
      "url": "https://timesofindia.indiatimes.com/life-style/health-fitness/health-news/5-health-conditions-that-can-make-your-joints-hurt/photostory/86994969.cms",
      "urlToImage": "https://static.toiimg.com/photo/86995017.cms",
      "publishedAt": "2021-10-14T03:30:00Z",
      "content": "Depression is a mental health condition, but the symptoms may manifest even on your physical health. Unexpected aches and pain in the joints that you may experience when suffering from chronic depres… [+373 chars]"
    },
    {
      "source": {
        "id": null,
        "name": "The Indian Express"
      },
      "author": "Devendra Pandey",
      "title": "Rahul Dravid likely to be interim coach for New Zealand series - The Indian Express",
      "description": "It’s learnt that a few Australian coaches expressed interest in the job, but the BCCI isn’t keen as they are focussing on an Indian for the role, before they look elsewhere.",
      "url": "https://indianexpress.com/article/sports/cricket/rahul-dravid-likely-to-be-interim-coach-for-new-zealand-series-7570990/",
      "urlToImage": "https://images.indianexpress.com/2021/05/rahul-dravid.jpg",
      "publishedAt": "2021-10-14T03:26:09Z",
      "content": "Rahul Dravid is likely to be approached by the Indian cricket board to be the interim coach for Indias home series against New Zealand. Head coach Ravi Shastri and the core of the support staff will … [+1972 chars]"
    },
    {
      "source": {
        "id": null,
        "name": "CNBCTV18"
      },
      "author": null,
      "title": "Thursday's top brokerage calls: Infosys, Wipro and more - CNBCTV18",
      "description": "Goldman Sachs has maintained its 'sell' rating on Mindtree largely due to expensive valuations, while UBS expects a muted reaction from Wipro's stock. Here are the top brokerage calls for the day:",
      "url": "https://www.cnbctv18.com/market/stocks/thursdays-top-brokerage-calls-infosys-wipro-and-more-11101072.htm",
      "urlToImage": "https://images.cnbctv18.com/wp-content/uploads/2019/03/buy-sell.jpg",
      "publishedAt": "2021-10-14T03:26:03Z",
      "content": "MiniGoldman Sachs has maintained its 'sell' rating on Mindtree largely due to expensive valuations, while UBS expects a muted reaction from Wipro's stock. Here are the top brokerage calls for the day:"
    }
  ]
}
Since the news is contained in a list called articles, we are creating a variable articles with the value res['articles']. Now we are iterating over this articles list and appending the article["title"] to the news_headlines list. We are then returning the first five news headlines from this list.
How to Add the Get Weather Report Function
To get the weather report, we’re using the OpenWeatherMap API. Signup for a free account and get the APP ID. Make sure you add the OPENWEATHER_APP_ID in the .env file.
OPENWEATHER_APP_ID = config("OPENWEATHER_APP_ID")


def get_weather_report(city):
    res = requests.get(
        f"http://api.openweathermap.org/data/2.5/weather?q={city}&appid={OPENWEATHER_APP_ID}&units=metric").json()
    weather = res["weather"][0]["main"]
    temperature = res["main"]["temp"]
    feels_like = res["main"]["feels_like"]
    return weather, f"{temperature}℃", f"{feels_like}℃"
As per the OpenWeatherMap API, we need to make a GET request on the above-mentioned URL with the city name. We’ll get a JSON response as:
{
    "coord": {
        "lon": 85,
        "lat": 24.7833
    },
    "weather": [
        {
            "id": 721,
            "main": "Haze",
            "description": "haze",
            "icon": "50d"
        }
    ],
    "base": "stations",
    "main": {
        "temp": 26.95,
        "feels_like": 26.64,
        "temp_min": 26.95,
        "temp_max": 26.95,
        "pressure": 1011,
        "humidity": 36
    },
    "visibility": 3000,
    "wind": {
        "speed": 2.57,
        "deg": 310
    },
    "clouds": {
        "all": 57
    },
    "dt": 1637227634,
    "sys": {
        "type": 1,
        "id": 9115,
        "country": "IN",
        "sunrise": 1637195904,
        "sunset": 1637235130
    },
    "timezone": 19800,
    "id": 1271439,
    "name": "Gaya",
    "cod": 200
}
We’ll just need the weather, temperature, and feels_like from the above response.
How to Add the Get Trending Movies Function
To get the trending movies, we’ll be using The Movie Database (TMDB) API. Signup for a free account and get the API Key. Add the TMDB_API_KEY in the .env file.
TMDB_API_KEY = config("TMDB_API_KEY")


def get_trending_movies():
    trending_movies = []
    res = requests.get(
        f"https://api.themoviedb.org/3/trending/movie/day?api_key={TMDB_API_KEY}").json()
    results = res["results"]
    for r in results:
        trending_movies.append(r["original_title"])
    return trending_movies[:5]
Just as we did for the latest news headlines, we are creating trending_movies list. Then, as per the TMDB API, we’re making a GET request. A sample JSON response looks like this:
{
  "page": 1,
  "results": [
    {
      "video": false,
      "vote_average": 7.9,
      "overview": "Shang-Chi must confront the past he thought he left behind when he is drawn into the web of the mysterious Ten Rings organization.",
      "release_date": "2021-09-01",
      "title": "Shang-Chi and the Legend of the Ten Rings",
      "adult": false,
      "backdrop_path": "/cinER0ESG0eJ49kXlExM0MEWGxW.jpg",
      "vote_count": 2917,
      "genre_ids": [28, 12, 14],
      "id": 566525,
      "original_language": "en",
      "original_title": "Shang-Chi and the Legend of the Ten Rings",
      "poster_path": "/1BIoJGKbXjdFDAqUEiA2VHqkK1Z.jpg",
      "popularity": 9559.446,
      "media_type": "movie"
    },
    {
      "adult": false,
      "backdrop_path": "/dK12GIdhGP6NPGFssK2Fh265jyr.jpg",
      "genre_ids": [28, 35, 80, 53],
      "id": 512195,
      "original_language": "en",
      "original_title": "Red Notice",
      "overview": "An Interpol-issued Red Notice is a global alert to hunt and capture the world's most wanted. But when a daring heist brings together the FBI's top profiler and two rival criminals, there's no telling what will happen.",
      "poster_path": "/wdE6ewaKZHr62bLqCn7A2DiGShm.jpg",
      "release_date": "2021-11-04",
      "title": "Red Notice",
      "video": false,
      "vote_average": 6.9,
      "vote_count": 832,
      "popularity": 1990.503,
      "media_type": "movie"
    },
    {
      "genre_ids": [12, 28, 53],
      "original_language": "en",
      "original_title": "No Time to Die",
      "poster_path": "/iUgygt3fscRoKWCV1d0C7FbM9TP.jpg",
      "video": false,
      "vote_average": 7.6,
      "overview": "Bond has left active service and is enjoying a tranquil life in Jamaica. His peace is short-lived when his old friend Felix Leiter from the CIA turns up asking for help. The mission to rescue a kidnapped scientist turns out to be far more treacherous than expected, leading Bond onto the trail of a mysterious villain armed with dangerous new technology.",
      "id": 370172,
      "vote_count": 1804,
      "title": "No Time to Die",
      "adult": false,
      "backdrop_path": "/1953j0QEbtN17WFFTnJHIm6bn6I.jpg",
      "release_date": "2021-09-29",
      "popularity": 4639.439,
      "media_type": "movie"
    },
    {
      "poster_path": "/5pVJ9SuuO72IgN6i9kMwQwnhGHG.jpg",
      "video": false,
      "vote_average": 0,
      "overview": "Peter Parker is unmasked and no longer able to separate his normal life from the high-stakes of being a Super Hero. When he asks for help from Doctor Strange the stakes become even more dangerous, forcing him to discover what it truly means to be Spider-Man.",
      "release_date": "2021-12-15",
      "id": 634649,
      "adult": false,
      "backdrop_path": "/vK18znei8Uha2z7ZhZtBa40HIrm.jpg",
      "vote_count": 0,
      "genre_ids": [28, 12, 878],
      "title": "Spider-Man: No Way Home",
      "original_language": "en",
      "original_title": "Spider-Man: No Way Home",
      "popularity": 1084.815,
      "media_type": "movie"
    },
    {
      "video": false,
      "vote_average": 6.8,
      "overview": "After finding a host body in investigative reporter Eddie Brock, the alien symbiote must face a new enemy, Carnage, the alter ego of serial killer Cletus Kasady.",
      "release_date": "2021-09-30",
      "adult": false,
      "backdrop_path": "/70nxSw3mFBsGmtkvcs91PbjerwD.jpg",
      "vote_count": 1950,
      "genre_ids": [878, 28, 12],
      "id": 580489,
      "original_language": "en",
      "original_title": "Venom: Let There Be Carnage",
      "poster_path": "/rjkmN1dniUHVYAtwuV3Tji7FsDO.jpg",
      "title": "Venom: Let There Be Carnage",
      "popularity": 4527.568,
      "media_type": "movie"
    }
  ],
  "total_pages": 1000,
  "total_results": 20000
}
From the above response, we just need the title of the movie. We get the results which is a list and then iterate over it to get the movie title and append it to the trending_movies list. In the end, we return the first five elements of the list.
How to Add the Get Random Jokes Function
To get a random joke, we just need to make a GET request on this URL: https://icanhazdadjoke.com/.
def get_random_joke():
    headers = {
        'Accept': 'application/json'
    }
    res = requests.get("https://icanhazdadjoke.com/", headers=headers).json()
    return res["joke"]
How to Add the Get Random Advice Function
To get a piece of random advice, we’re using the Advice Slip API.
def get_random_advice():
    res = requests.get("https://api.adviceslip.com/advice").json()
    return res['slip']['advice']
How to Create the Main Method
To run the project, we’ll need to create a main method. Create a main.py file and add the following code:
import requests
from functions.online_ops import find_my_ip, get_latest_news, get_random_advice, get_random_joke, get_trending_movies, get_weather_report, play_on_youtube, search_on_google, search_on_wikipedia, send_email, send_whatsapp_message
from functions.os_ops import open_calculator, open_camera, open_cmd, open_notepad, open_discord
from pprint import pprint


if __name__ == '__main__':
    greet_user()
    while True:
        query = take_user_input().lower()

        if 'open notepad' in query:
            open_notepad()

        elif 'open discord' in query:
            open_discord()

        elif 'open command prompt' in query or 'open cmd' in query:
            open_cmd()

        elif 'open camera' in query:
            open_camera()

        elif 'open calculator' in query:
            open_calculator()

        elif 'ip address' in query:
            ip_address = find_my_ip()
            speak(f'Your IP Address is {ip_address}.n For your convenience, I am printing it on the screen sir.')
            print(f'Your IP Address is {ip_address}')

        elif 'wikipedia' in query:
            speak('What do you want to search on Wikipedia, sir?')
            search_query = take_user_input().lower()
            results = search_on_wikipedia(search_query)
            speak(f"According to Wikipedia, {results}")
            speak("For your convenience, I am printing it on the screen sir.")
            print(results)

        elif 'youtube' in query:
            speak('What do you want to play on Youtube, sir?')
            video = take_user_input().lower()
            play_on_youtube(video)

        elif 'search on google' in query:
            speak('What do you want to search on Google, sir?')
            query = take_user_input().lower()
            search_on_google(query)

        elif "send whatsapp message" in query:
            speak('On what number should I send the message sir? Please enter in the console: ')
            number = input("Enter the number: ")
            speak("What is the message sir?")
            message = take_user_input().lower()
            send_whatsapp_message(number, message)
            speak("I've sent the message sir.")

        elif "send an email" in query:
            speak("On what email address do I send sir? Please enter in the console: ")
            receiver_address = input("Enter email address: ")
            speak("What should be the subject sir?")
            subject = take_user_input().capitalize()
            speak("What is the message sir?")
            message = take_user_input().capitalize()
            if send_email(receiver_address, subject, message):
                speak("I've sent the email sir.")
            else:
                speak("Something went wrong while I was sending the mail. Please check the error logs sir.")

        elif 'joke' in query:
            speak(f"Hope you like this one sir")
            joke = get_random_joke()
            speak(joke)
            speak("For your convenience, I am printing it on the screen sir.")
            pprint(joke)

        elif "advice" in query:
            speak(f"Here's an advice for you, sir")
            advice = get_random_advice()
            speak(advice)
            speak("For your convenience, I am printing it on the screen sir.")
            pprint(advice)

        elif "trending movies" in query:
            speak(f"Some of the trending movies are: {get_trending_movies()}")
            speak("For your convenience, I am printing it on the screen sir.")
            print(*get_trending_movies(), sep='n')

        elif 'news' in query:
            speak(f"I'm reading out the latest news headlines, sir")
            speak(get_latest_news())
            speak("For your convenience, I am printing it on the screen sir.")
            print(*get_latest_news(), sep='n')

        elif 'weather' in query:
            ip_address = find_my_ip()
            city = requests.get(f"https://ipapi.co/{ip_address}/city/").text
            speak(f"Getting weather report for your city {city}")
            weather, temperature, feels_like = get_weather_report(city)
            speak(f"The current temperature is {temperature}, but it feels like {feels_like}")
            speak(f"Also, the weather report talks about {weather}")
            speak("For your convenience, I am printing it on the screen sir.")
            print(f"Description: {weather}nTemperature: {temperature}nFeels like: {feels_like}")
While the above script looks quite lengthy, it is very simple and easy to understand.
If you look closely, all we have done is imported the required modules and the online and offline functions. Then within the main method, the first thing we do is greet the user using the greet_user() function.
Next, we run a while loop to continuously take input from the user using the take_user_input() function. Since we have our query string here, we can add if-else ladder to check for the different conditions on the query string.
Note: For Python 3.10, you can use Python Match Case instead of if-else ladder.
To run the program, you can use the following command:
$ python main.pyConclusion
We just created our very own virtual personal assistant with the help of Python. You can add more features to the application if you like. You can add this project to your résumé or just do it for fun!
Watch the demo video to see it in action:
For the full code, check out this GitHub repository: https://github.com/ashutoshkrris/Virtual-Personal-Assistant-using-Python
Learn to code for free. freeCodeCamp’s open source curriculum has helped more than 40,000 people get jobs as developers. Get started
![]()
Загрузить PDF
![]()
Загрузить PDF
Из этой статьи вы узнаете, как на компьютере под управлением Windows создать виртуального помощника в стиле Джарвиса (дворецкого Энтони Старка). Это можно сделать с помощью бесплатного приложения LINK Mark II.
Шаги
-

1
-
2
Нажмите Create an account (Создать учетную запись). Эта опция расположена под строками для авторизации в верхнем левом углу.
-
3
Щелкните по I agree (Согласиться). Это означает, что вы соглашаетесь с условиями пользования сервисом.
-
4
Заполните регистрационную форму и нажмите Sign up (Зарегистрироваться). Введите свое имя, адрес электронной почты, номер телефона, местоположение и пароль. Затем нажмите зеленую кнопку «Sign up».
- Если у вас уже есть учетная запись, введите адрес электронной почты и пароль в строках в верхнем правом углу и нажмите «Log in» (Войти).
-
5
Подтвердите свой электронный адрес. Для этого откройте почтовый ящик, щелкните по письму и нажмите «Confirm Email Address» (Подтвердить адрес электронной почты). Ваша учетная запись будет активирована.
-
6
Нажмите Download L.I.N.K.S (Загрузить L.I.N.K.S). Эта зеленая кнопка расположена в центре страницы.
- Также можно щелкнуть по второму значку, который выглядит как колесо и находится в правом верхнем углу веб-страницы.
-
7
Нажмите Go to Download Page (Перейти на страницу загрузки). Эта зеленая кнопка расположена в правом нижнем углу всплывающего окна.
-
8
Нажмите Links Mark II. Это первая опция слева. Она помечена круглым синим значком необычного дезайна.
-
9
Щелкните по Install (Установить). Эта зеленая кнопка расположена в нижнем углу. Скачается установочный файл.
-
10
Дважды щелкните по файлу «MARK-II Setup.exe». Загруженные файлы можно найти в папке «Загрузки» или в нижней части веб-браузера.
-
11
Нажмите Accept (Принять). Программа MARK-II будет установлена.
- Если появится запрос на разрешение вносить изменения в систему, нажмите «Да». Если Windows предупредит вас, что разработчика программы нельзя проверить, нажмите «Установить», чтобы все равно установить программу.
-
12
Выберите микрофон. Можно выбрать настольный микрофон, микрофон в наушниках или другой микрофон, подключенный к компьютеру.
-
13
Прочитайте предложение вслух и нажмите Next (Далее). Это необходимо, чтобы протестировать и подтвердить, что микрофон работает нормально.
-
14
Щелкните по Proceed (Продолжить). Процесс установки завершится. На экране появится короткая анимация, а затем в центре экрана отобразится круглый пользовательский интерфейс.
-
15
Нажмите на центр круглого интерфейса и перетащите его в верхний правый угол. Цветная вкладка появится за пределами круглого дисплея и зафиксируется между двумя черточками вверху и вверху справа.
-
16
Нажмите на цветную вкладку. Когда эта вкладка зафиксируется, щелкните по ней — появится значок в виде шестеренки и значок меню (☰).
-
17
Нажмите на значок в виде шестеренки. Откроется меню настроек.
-
18
Установите флажок у «Sir» (Он) или «Miss» (Она). Так вы сообщите виртуальному помощнику свой пол.
-
19
Введите свое имя в строке «User» (Пользователь). Так вы сообщите виртуальному помощнику свое имя.
-
20
Введите «Jarvis» (Джарвис) в строке «A.I.» (Искусственный интеллект). Так вы сообщите виртуальному помощнику его имя.
-
21
Нажмите на направленную вправо стрелку. Откроется страница настроек электронной почты.
-
22
Введите свой адрес электронной почты и пароль. Виртуальный помощник подключится к вашей электронной почте.[1]
-
23
Нажимайте на направленную вправо стрелку, пока не дойдете до раздела «Sound Effects» (Звуковые эффекты). Здесь можно выбрать голос виртуального помощника.
-
24
Выберите мужской голос. Откройте меню «A.I. Voice» (Голос помощника) и выберите в нем «Microsoft David» (это единственный доступный мужской голос).
-
25
Нажмите Apply (Применить). Изменения вступят в силу. Теперь можно пользоваться Джарвисом. Чтобы найти полный список голосовых команд, щелкните по значку «☰» на круглой вкладке в правом верхнем углу. Также в этом меню можно добавить собственные голосовые команды. Вот некоторые из команд:
- «Jarvis, open Google» (Джарвис, открой Google).
- «Jarvis, play music» (Джарвис, воспроизведи музыку).
- «Jarvis, what’s the weather» (Джарвис, узнай прогноз погоды).
- «Jarvis, get new email» (Джарвис, проверь почту).
Реклама


Советы
- Будьте терпеливы — выполнение описанных действий займет некоторое время.
- Добавьте голосовые команды в программе A.I. Assistant в меню «Customize» (Настройка).
- Возьмите хороший микрофон с функцией шумоподавления.
Реклама
Что вам понадобится
- Windows 7 или более поздняя версия
- Программа Links II A.I. Assistant
- RainMeter для Windows
- Микрофон с функцией шумоподавления
Об этой статье
Эту страницу просматривали 61 918 раз.
Была ли эта статья полезной?
Джарвис снова в деле
Время на прочтение
4 мин
Количество просмотров 50K
Наверняка, каждый мечтает о своем голосовом ассистенте, под катом еще одна реализация «Джарвиса» из известного фильма.

Давно не покидала мысль о своем «Jarvis» и управлении техникой в доме голосом. И вот, наконец, руки дошли до создания сего чуда. Над «мозгами» долго думать не пришлось, Raspberry Pi подходит идеально.
Итак, железо:
- Raspberry pi 3 model b
- USB камера logitech
Реализация
Работать наш ассистент будет по принципу Alexa/Hub:
- Активироваться оффлайн по определенному слову
- Распознать команду в облаке
- Выполнить команду
- Отчитаться о проделай работе либо сообщить запрашиваем информацию
Т.к. моя камера поддерживается из коробки, с драйверами возиться не пришлось, поэтому сразу переходим к программной части.
Оффлайн активация
Активация будет происходить с помощью CMU Sphinx, и все бы хорошо, но из коробки распознание происходит очень медленно, больше 10 сек, что абсолютно не подходит, для решения проблемы нужно очистить словарь от ненужных слов.
Устанавливаем все необходимое:
pip3 install SpeechRecognition
pip3 install pocketsphinx
далее
sudo nano /usr/local/lib/python3.4/dist-packages/speech_recognition/pocketsphinx-data/en-US
/pronounciation-dictionary.dict
удаляем все кроме нужного нам Джарвиса:
jarvis JH AA R V AH SТеперь pocketsphinx распознает довольно быстро.
Распознавание речи
Сначала была идея воспользоваться сервисом гугла, к тому же его поддержка есть в SpeechRecognition. Но как оказалось гугл берет за это деньги и не работает с физ. лицами.
Благо Яндекс тоже предоставляет такую возможность, бесплатно и предельно просто.
Регистрируемся, получаем API KEY. Все работу можно производить curl’om.
curl -X POST -H "Content-Type: audio/x-wav" --data-binary "@file" «https://asr.yandex.net/asr_xml?uuid=ya_uid&key=yf_api_key&topic=queries»Синтез речи
Тут нам опять поможет Яндекс. Посылаем текст в ответ получаем файл с синтезированным текстом
curl «https://tts.voicetech.yandex.net/generate?format=wav&lang=ru-RU&speaker=zahar&emotion=good&key=ya_api_key» -G --data-urlencode "text=text" > fileJarvis
Собираем все вместе и получаем такой скрипт.
#! /usr/bin/env python
# -*-coding:utf-8-*-
import os
import speech_recognition as sr
from xml.dom import minidom
import sys
import random

r = sr.Recognizer()
ya_uuid = ''
ya_api_key = ''


# os.system('echo "Ассист+ент зап+ущен" |festival --tts --language russian')


def convert_ya_asr_to_key():
    xmldoc = minidom.parse('./asr_answer.xml')
    itemlist = xmldoc.getElementsByTagName('variant')
    if len(itemlist) > 0:
        return itemlist[0].firstChild.nodeValue
    else:
        return False


def jarvis_on():
    with sr.WavFile("send.wav") as source:
        audio = r.record(source)

    try:
        t = r.recognize_sphinx(audio)
        print(t)
    except LookupError:
        print("Could not understand audio")

    return t == ("jarvis")


def jarvis_say(phrase):
    os.system(
        'curl "https://tts.voicetech.yandex.net/generate?format=wav&lang=ru-RU&speaker=zahar&emotion=good&key='+ya_api_key+'" -G --data-urlencode "text=' + phrase + '" > jarvis_speech.wav')
    os.system('aplay jarvis_speech.wav')


def jarvis_say_good():
    phrases = ["Готово", "Сделано", "Слушаюсь", "Есть", "Что-то еще?", ]
    randitem = random.choice(phrases)
    jarvis_say(randitem)


try:
    while True:
        os.system('arecord -B --buffer-time=1000000 -f dat -r 16000 -d 3 -D plughw:1,0 send.wav')
        if jarvis_on():
            os.system('aplay jarvis_on.wav')
            os.system('arecord -B --buffer-time=1000000 -f dat -r 16000 -d 3 -D plughw:1,0 send.wav')
            os.system(
                'curl -X POST -H "Content-Type: audio/x-wav" --data-binary "@send.wav" "https://asr.yandex.net/asr_xml?uuid='+ya_uuid+'&key='+ya_api_key+'&topic=queries" > asr_answer.xml')
            command_key = convert_ya_asr_to_key()
            if (command_key):
                if (command_key in [‘key_word', ‘key_word1’, ‘key_word2']):
                    os.system(‘’)
                    jarvis_say_good()
                    continue


except Exception:
jarvis_say('Что-то пошло не так')
Что тут происходит. Запускаем бесконечный цикл, arecord’om записываем три секунды и отправляем sphinx на распознание, если в файле встречается слово «jarvis»
if jarvis_on():проигрываем заранее записанный фаил оповещения об активации.
Опять записываем 3 секунды и отправляем Яндексу, в ответ получаем нашу команду. Далее выполняем действия исходя из команды.
На этом собственно все. Сценариев выполнения можно придумать великое множество.
Use-case
Теперь немного примеров реального моего использования
Philips Hue
Устанавливаем
pip install phueВ приложении Hue устанавливаем статический IP:
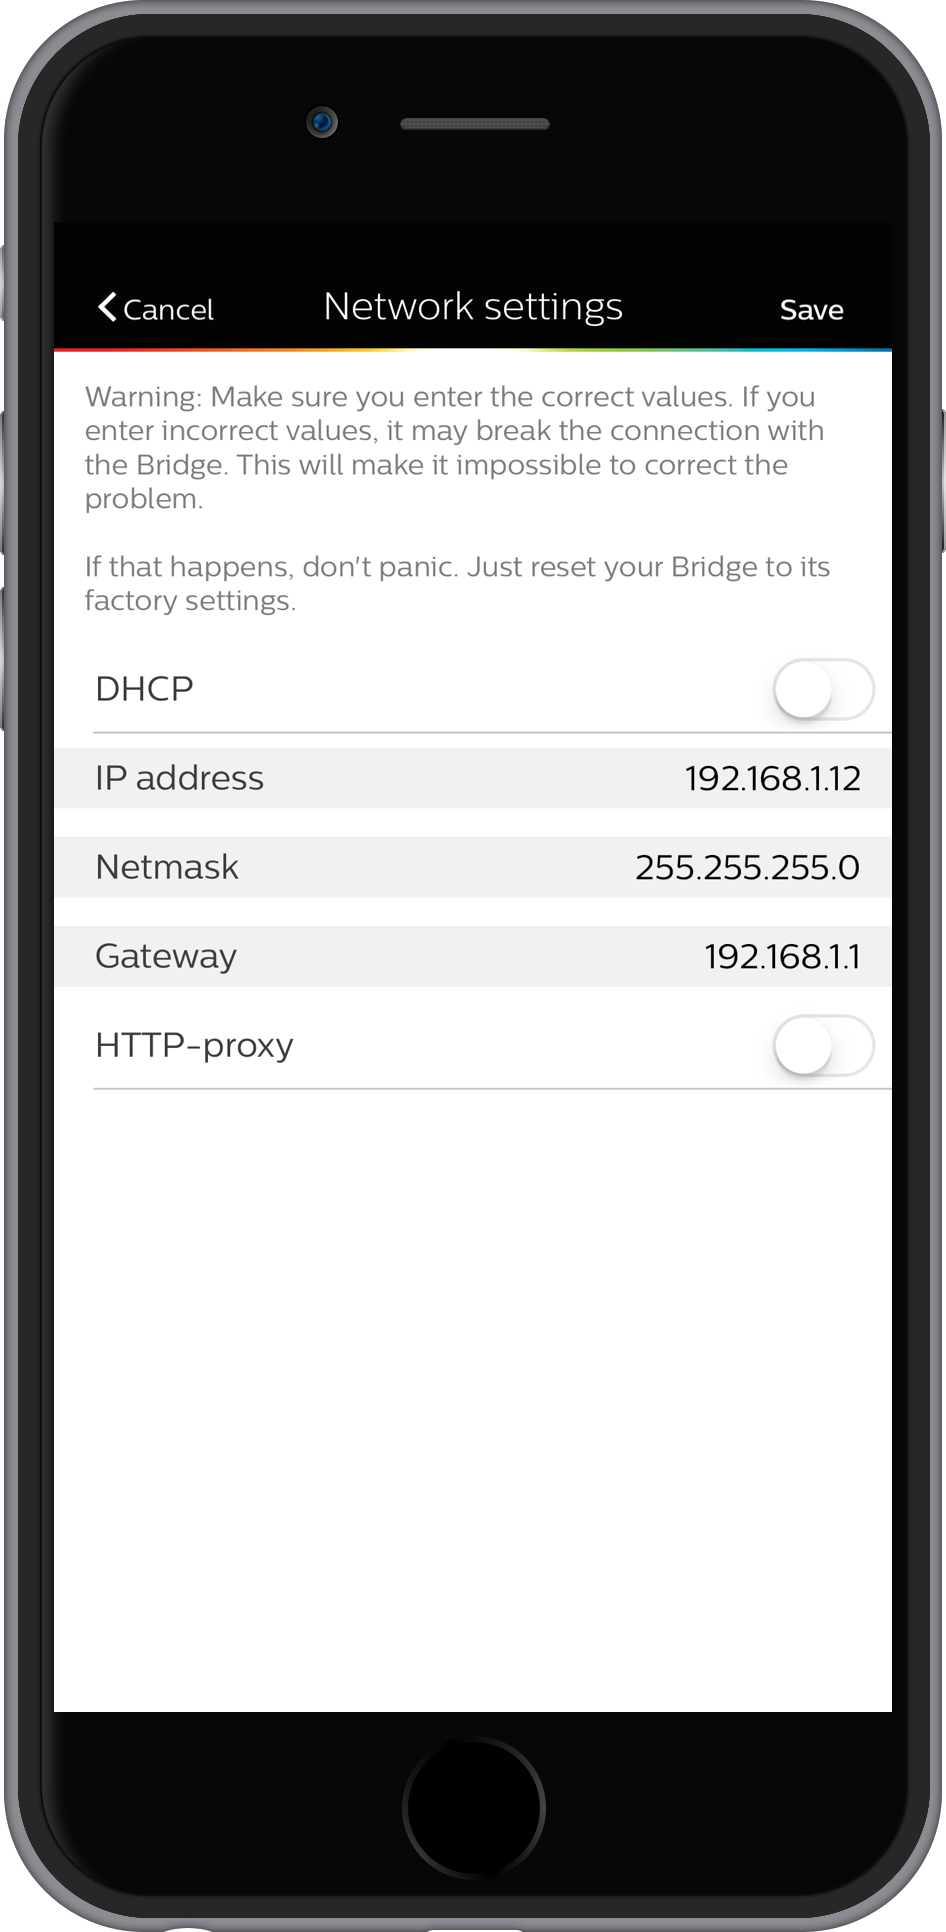
Запускаем:
#!/usr/bin/python
import sys
from phue import Bridge

b = Bridge('192.168.0.100') # Enter bridge IP here.

#If running for the first time, press button on bridge and run with b.connect() uncommented
#b.connect()

print (b.get_scene())
Выписываем ID нужных схем, вида «470d4c3c8-on-0»
Конечный вариант скрипта:
#!/usr/bin/python
import sys
from phue import Bridge


b = Bridge('192.168.0.100') # Enter bridge IP here.

#If running for the first time, press button on bridge and run with b.connect() uncommented
#b.connect()


if (sys.argv[1] == 'off'):
    b.set_light([1,2,3],'on', False)
else:
    b.activate_scene(1,sys.argv[1])
В джарвиса добавляем:
                if (command_key in ['включи свет', 'включить свет', 'свет']):
                    os.system('python3 /home/pi/smarthome/hue/hue.py a1167aa91-on-0')
                    jarvis_say_good()
                    continue

                if (command_key in ['приглуши свет', 'приглушить свет']):
                    os.system('python3 /home/pi/smarthome/hue/hue.py ac637e2f0-on-0')
                    jarvis_say_good()
                    continue

                if (command_key in ['выключи свет', 'выключить свет']):
                    os.system('python3 /home/pi/smarthome/hue/hue.py  "off"')
                    jarvis_say_good()
                    continue
LG TV
Берем скрипт отсюда. После первого запуска и ввода кода сопряжения, сам код не меняется, поэтому можно выпилить эту часть из скрипта и оставить только управляющую.
В джарвиса добавляем:
                #1 - POWER
                #24 - VOLUNE_UP
                #25 - VOLUME_DOWN
                #400 - 3D_VIDEO
                if (command_key in ['выключи телевизор', 'выключить телевизор']):
                    os.system('python3 /home/pi/smarthome/TV/tv2.py 1')
                    jarvis_say_good()
                    continue

	        if (command_key in [‘прибавь громкость', 'громче']):
                    os.system('python3 /home/pi/smarthome/TV/tv2.py 24')
                    jarvis_say_good()
                    continue
Радио
sudo apt-get install mpg123В джарвиса добавляем:
               if (command_key in ['новости', ‘выключи новости’,’что происходит’]):
                    os.system(‘mpg123 URL')
                    continue
Еще можно поставить homebridge и управлять всем через Siri, в случае если до джарвиса не докричаться.
Что касается качества распознавания речи, не Alexa конечно, но на расстоянии до 5 метров процент верного попадания приличный. Главная проблема — речь из телевизораколонок записывается вместе с командами и мешает распознаванию.
На этом все, спасибо.
Introduction: How to Create a JARVIS System or Real Life JARVIS / Own AI Assistance
Have you ever watched talking computer like JARVIS with Tony Stark in Iron Man movie? Have you ever wished to have a computer like that?
Am I right?
Don`t worry…You can fulfill this wish with your own computer. You can have a computer-like JARVIS and it’s totally free.
Your computer will respond to your voice by speaking to you like a human being.
Amazed?
Here is procedure how to make an AI System your own just by RAW coding and some tools.
So Ladies and Gentlemen fasten your belts and let’s begin this journey with me…………….
Step 1: Desktop Customization
First of all, you have to remove all thing (i.e. all the icons and files ) from desktop and set the taskbar to autohide mode.
Step 2: Desktop Customization..
Now download rainmeter from given link below:
http://rainmeter.net/
After installing rainmeter you will see some gadgets on the screen.
Step 3: Desktop Customization….
You can move these gadgets just by left-clicking and can do some operations just by a right click.
Step 4: Desktop Customization……
Now download these 2 themes from given links:
1.IRON man:http://scrollsofaryavart.deviantart.com/art/IronMan-Jarvis-Theme-Version-2-271590499
2.Avengers:http://chinni1991.deviantart.com/art/Elegant-Theme-1-1-387048490
after downloading these themes install the theme with Rainmeter.
Now you have various gadgets in your menu. you can apply any gadgets from the menu on the screen.
Step 5: Desktop Customization……..
you can customize your desktop as you want (i.e. change desktop background, gadgets etc).
Step 6: Voice Interaction
Now you have to download a plugin software for it, called Windows speech recognition Macros provided by Microsoft. This will make your computer to respond to your voice.
Download Official from Microsoft `s website if you have a Genuine copy of windows.
If your copy of windows is not genuine, You can download it from other third party servers by searching in Google by it`s name or given link below.
http://www.softpedia.com/dyn-postdownload.php/1623eb410c59bff2e18f42fbaaa7a2d4/553eff17/18216/0/1
Install it, It`s very easy.
After the successful completion of Installation
Go to Start Button > All Programs Right Click on Windows Speech Recognition Macros .
Choose Run as administrator . Then from Notification Area, Right Click on it`s Icon > Select New Speech Macro.
You can edit macro command using Edit speech macro..,if you want make changes to commands created before.
Step 7: Voice Interaction..
What you can do with Windows Speech Recognition Macros
1. You can Insert Text of your wish(personal info),you want computer to speak.
2. You can run applications or software with your voice instead of mouse or keyboard using Run a Program.
3. You can edit many commands according to your wish or need using Advanced.
In Advanced you have to do coding by yourself so that your computer will respond according to your commands.
Ex. You speak»What’s going on dude»,computer will say»Nothing special (your name)».
This coding will be done in Advanced by inserting xml.
Are you weak in coding ???
Don’t worry,It’s coding is very easy,i will guide you….
Code to Make your Computer like Jarvis
New Speech macro..>> Choose Advanced and change the code like this..
……
…..
You have to add a commands:
……..- computer listens the words you specify here and respond accordingly.
…………- computer speaks what is written in this field according to the command which it got.
Similarly, You can Edit more commands in the same way.
Hi,JARVIS whats going on
nothing special sir
This is just a basic command If you want more advanced commands.you can use Java Scripts and VB scripts.
Tell me the Time :
This is done by using VBScript.
time
tell me the time
dim currentTime currentTime = FormatDateTime(Time(), 1)
Application.Speak Time
Application.SetTextFeedback Time ]]>
Make your code like this.
When You will say Time or Give me the Time , Your Computer will speak the exact Time of instant.
Similarly …
Tell the date:
tell me the date
dim todaysDate todaysDate = Date
Application.Speak Date
Application.SetTextFeedback Date ]]>
Good Morning command:
Good moring
Gm,Jarvis
var today=new Date();
var t=today.getHours();
if(t<12)
{ var say=new Array();
say[0]=»Good morning sir»;
say[1]=»good morning,how are you»;
say[2]=»good morning sir , enjoy your your day»;
vsay=say[Math.floor(Math.random()*3)];
Application.Speak(vsay); }
else if(t<23 && t>19)
{ var say=new Array();
say[0]=»wrong, it’s night , Good night sir»;
say[1]=»lol it’s night , good night,how are you»;
say[2]=»he he he it is night , good night sir , how was your day»;
vsay=say[Math.floor(Math.random()*3)];
Application.Speak(vsay); }
else if (t>15 && t<19)
{ var say=new Array();
say[0]=»Good evening sir»;
say[1]=»What nonsense,good evening,how are you»;
say[2]=»lollipop,good evn «;
vsay=say[Math.floor(Math.random()*3)];
Application.Speak(vsay); }
else if (t<15 && t>12)
{ var say=new Array();
say[0]=»yo man ,Good afternoon sir»;
say[1]=»low iq ,good afternoon,how are you»;
say[2]=»gaf sir»;
vsay=say[Math.floor(Math.random()*3)];
Application.Speak(vsay); } ]]>
Note: You have to close all lines like this
Step 8: Coding Continued……
Shutdown the System
I m not able to post all the amazing commands here due to Instructables policy so please visit…
For all commands visit this link: All Jarvis voice Commands
Or you can download the PDF of Commands: Google Drive
For any query please comment below or you could Email me at : prayagnao@gmail.com
1 Person Made This Project!
Recommendations
Jarvis
Jarvis — это приложение для запуска команд c отображением результата в консоли или браузере.
Содержимое
- Создание команды
- Метод configure
- Аргументы и опции
- Определение аргументов и опций
- Метод execute
- Регистрация команды
- Запуск команды в консоли
- Запуск команды в php коде
- Вывод информации
- Справочная команда help
Создание команды
Команды определяются в классах, расширяющих AbstractCommand.
Например, вы можете захотеть, чтобы команда выводила информацию о человеке.
Для этого необходимо в директории Commands создать класс Example, который унаследован от AbstractCommand.
namespace класса должен соответствовать той директории, где этот класс располагается: JarvisCommands
<?php

namespace JarvisCommands;

use JarvisVendorCommandAbstractCommand;

class Example extends AbstractCommand
{

}
Далее необходимо реализовать публичный метод configure в котором определяется название команды, ее описание, а также аргументы и опции.
Метод configure
Для начала определим имя команды и её описание:
<?php

namespace JarvisCommands;

use JarvisVendorCommandAbstractCommand;

class Example extends AbstractCommand
{
    public function configure()
    {
        $this->setName('example')
             ->setDescription('Команда для демонстрации работы консольного приложения Jarvis');
    }
}
Как вы можете заметить, название команды устанавливается с помощью встроенного метода setName,
а описание — setDescription.
Хотя бы какое-то название команды обязательно нужно указать, иначе будет непонятно какому названию команды
соответствует наш класс.
Указание же описания команды необязательно, но желательно.
Аргументы и опции
Аргумент — это неименованный параметр команды для которого важен порядок его указания в команде.
Опция — это именованный параметр команды. При запуске команды из консоли опция пишется с префиксом в виде двух дефисов.
К примеру, в команде
php jarvis example arg1 arg2 arg3 --option1 --option2=value1 --option2=value2
аргументами являются параметры arg1, arg2, arg3, а опциями option1 и option2.
Опции отличаются от аргументов тем, что:
- порядок их указания в команде неважен:
или
не изменяет самого факта указания опций option1 и option2.
- могут как иметь значения, так и не иметь:
--option1 --option2=value1
здесь option1 не имеет значения, а option2 — имеет значение равное value1
- могут хранить в себе множество значений
--option2=value1 --option2=value2
здесь option2 имеет два значения: value1 и value2
Определение аргументов и опций
Аргументы определяются с помощью метода addArgument.
Этот метод имеет следующие параметры:
- название аргумента
- описание аргумента
- обязательность
Опции определяются с помощью метода addOption.
Этот метод имеет следующие параметры:
- название опции
- описание опции
- обязательность указания значения
Определим аргументы и опции в методе configure для реализации нашей задумки:
<?php

namespace JarvisCommands;

use JarvisVendorCommandAbstractCommand;

class Example extends AbstractCommand
{
    public function configure()
    {
        $this->setName('example')
             ->setDescription('Команда для демонстрации работы консольного приложения Jarvis')
             ->addArgument('name', 'имя')
             ->addArgument('surname', 'фамилия', false)
             ->addArgument('second-name', 'отчество', false)
             ->addOption('excellence', 'положительные качества', true)
             ->addOption('job', 'есть работа');
    }
}
Получать информацию о человеке мы будем из аргументов и опций.
Здесь определены следующие аргументы:
- имя (обязательное)
- фамилия (необязательное)
- отчество (необязательное)
И опции:
- положительные качества (каждое должно иметь значение)
- есть работа (значение необязательно)
Метод execute
Осталось сделать метод execute, который будет реализовывать логику команды на основе введённых аргументов и опций.
Этот метод принимает на вход экземпляр наследника класса AbstractOutput с помощью которого осуществляется вывод
информации в консоль/браузер.
Реализуем его:
<?php

namespace JarvisCommands;

use JarvisVendorCommandAbstractCommand;
use JarvisVendorOutputAbstractOutput;

class Example extends AbstractCommand
{
    public function configure()
    {
        $this->setName('example')
             ->setDescription('Команда для демонстрации работы консольного приложения Jarvis')
             ->addArgument('name', 'имя')
             ->addArgument('surname', 'фамилия', false)
             ->addArgument('second-name', 'отчество', false)
             ->addOption('excellence', 'положительные качества', true)
             ->addOption('job', 'есть работа');
    }

    public function execute(AbstractOutput $output)
    {
        $output->success('Результат выполнения команды:');
        $output->info("Имя: ".$this->getArgument('name'));
        if ($this->hasArgument('surname')){
            $output->info("Фамилия: ".$this->getArgument('surname'));
        }
        if ($this->hasArgument('second-name')){
            $output->info("Отчество: ".$this->getArgument('second-name'));
        }
        if ($this->hasOption('excellence')){
            $output->info("Положительные качества: ". implode(', ', $this->getOption('excellence')));
        }
        if ($this->hasOption('job')){
            $output->info("Работа: есть");
        }
    }
}
Здесь вы можете заметить методы:
hasArgumentgetArgumenthasOptiongetOption
Эти методы нужны для определения присутствия и получения значения аргументов и опций в введённой команде.
Регистрация команды
Чтобы нашу команду example можно было запустить, необходимо её добавить в конфигурационный файл config.php в блок
commands.
Для этого нужно вписать туда её namespace.
Запуск команды в консоли
Попробуем запустить нашу команду:
php jarvis example василий --excellence='веселый парень' --excellence='любит борщ' --job
На выходе получим:
Результат выполнения команды:
Имя: василий
Положительные качества: веселый парень, любит борщ
Работа: есть
Запуск команды в php коде
Если необходимо запустить команду не из консоли, а прямо в php коде, чтобы результат
выполнения отображался в браузере можно поступить так:
<?php

use JarvisVendorInputArrayInput;
use JarvisVendorOutputBrowser;
use JarvisVendorApplication;

try {
    require 'autoloader.php';
    $input = new ArrayInput([
        'command'   => 'example',
        'arguments' => [
            'Василий',
            'Пупкин'
        ],
        'options'   => [
            'excellence' => [
                'любит покушать',
                'обожает сериалы',
                'добряк'
            ],
            'job'        => null
        ]
    ]);
    $output = new Browser();
    $app = new Application($input, $output);
    $app->run();
} catch (Exception $e) {
    (new Browser())->error($e->getMessage());
}
Здесь команда, аргументы и опции определяются в массиве, который передаётся в конструктор класса ArrayInput.
Название ключей этого массива соответствует тому, что передаётся: команда, аргументы или опции.
Порядок аргументов важен — их нужно задавать в том же порядке, что и из-под консоли.
Результат выполнения:
Результат выполнения команды:
Имя: Василий
Фамилия: Пупкин
Положительные качества: любит покушать, обожает сериалы, добряк
Работа: есть
Вывод информации
Вывод информации производится за счет универсального класса-наследника AbstractOutput, любой из которых содержит в себе
следующие методы:
infoerrorsuccesswarning
Все эти методы принимают на вход строку и выводят её соответствующим цветом:
- серый (в консоли) / бирюзовый (в браузере)
- красный
- зеленый
- желтый
Для вывода в консоль используется класс Console.
Для вывода в браузер — класс Browser.
Справочная команда help
В Jarvis по умолчанию встроена команда help, с помощью которой можно получить информацию о списке зарегистрированных
команд:
либо о какой-то конкретной команде: