Contents | Previous (1.1 Python) | Next (1.3 Numbers)
1.2 A First Program
This section discusses the creation of your first program, running the
interpreter, and some basic debugging.
Running Python
Python programs always run inside an interpreter.
The interpreter is a «console-based» application that normally runs
from a command shell.
python3
Python 3.6.1 (v3.6.1:69c0db5050, Mar 21 2017, 01:21:04)
[GCC 4.2.1 (Apple Inc. build 5666) (dot 3)] on darwin
Type "help", "copyright", "credits" or "license" for more information.
>>>
Expert programmers usually have no problem using the interpreter in
this way, but it’s not so user-friendly for beginners. You may be using
an environment that provides a different interface to Python. That’s fine,
but learning how to run Python terminal is still a useful skill to know.
Interactive Mode
When you start Python, you get an interactive mode where you can experiment.
If you start typing statements, they will run immediately. There is no
edit/compile/run/debug cycle.
>>> print('hello world')
hello world
>>> 37*42
1554
>>> for i in range(5):
...     print(i)
...
0
1
2
3
4
>>>
This so-called read-eval-print-loop (or REPL) is very useful for debugging and exploration.
STOP: If you can’t figure out how to interact with Python, stop what you’re doing
and figure out how to do it. If you’re using an IDE, it might be hidden behind a
menu option or other window. Many parts of this course assume that you can
interact with the interpreter.
Let’s take a closer look at the elements of the REPL:
>>>is the interpreter prompt for starting a new statement....is the interpreter prompt for continuing a statement. Enter a blank line to finish typing and run what you’ve entered.
The ... prompt may or may not be shown depending on your environment. For this course,
it is shown as blanks to make it easier to cut/paste code samples.
The underscore _ holds the last result.
>>> 37 * 42
1554
>>> _ * 2
3108
>>> _ + 50
3158
>>>
This is only true in the interactive mode. You never use _ in a program.
Creating programs
Programs are put in .py files.
# hello.py
print('hello world')
You can create these files with your favorite text editor.
Running Programs
To execute a program, run it in the terminal with the python command.
For example, in command-line Unix:
bash % python hello.py
hello world
bash %
Or from the Windows shell:
C:SomeFolder>hello.py
hello world

C:SomeFolder>c:python36python hello.py
hello world
Note: On Windows, you may need to specify a full path to the Python interpreter such as c:python36python.
However, if Python is installed in its usual way, you might be able to just type the name of the program
such as hello.py.
A Sample Program
Let’s solve the following problem:
One morning, you go out and place a dollar bill on the sidewalk by the Sears tower in Chicago.
Each day thereafter, you go out double the number of bills.
How long does it take for the stack of bills to exceed the height of the tower?
Here’s a solution:
# sears.py
bill_thickness = 0.11 * 0.001 # Meters (0.11 mm)
sears_height = 442 # Height (meters)
num_bills = 1
day = 1

while num_bills * bill_thickness < sears_height:
    print(day, num_bills, num_bills * bill_thickness)
    day = day + 1
    num_bills = num_bills * 2

print('Number of days', day)
print('Number of bills', num_bills)
print('Final height', num_bills * bill_thickness)
When you run it, you get the following output:
bash % python3 sears.py
1 1 0.00011
2 2 0.00022
3 4 0.00044
4 8 0.00088
5 16 0.00176
6 32 0.00352
...
21 1048576 115.34336
22 2097152 230.68672
Number of days 23
Number of bills 4194304
Final height 461.37344
Using this program as a guide, you can learn a number of important core concepts about Python.
Statements
A python program is a sequence of statements:
a = 3 + 4
b = a * 2
print(b)
Each statement is terminated by a newline. Statements are executed one after the other until control reaches the end of the file.
Comments
Comments are text that will not be executed.
a = 3 + 4
# This is a comment
b = a * 2
print(b)
Comments are denoted by # and extend to the end of the line.
Variables
A variable is a name for a value. You can use letters (lower and
upper-case) from a to z. As well as the character underscore _.
Numbers can also be part of the name of a variable, except as the
first character.
height = 442 # valid
_height = 442 # valid
height2 = 442 # valid
2height = 442 # invalid
Types
Variables do not need to be declared with the type of the value. The type
is associated with the value on the right hand side, not name of the variable.
height = 442           # An integer
height = 442.0         # Floating point
height = 'Really tall' # A string
Python is dynamically typed. The perceived «type» of a variable might change
as a program executes depending on the current value assigned to it.
Case Sensitivity
Python is case sensitive. Upper and lower-case letters are considered different letters.
These are all different variables:
name = 'Jake'
Name = 'Elwood'
NAME = 'Guido'
Language statements are always lower-case.
while x < 0:   # OK
WHILE x < 0:   # ERROR
Looping
The while statement executes a loop.
while num_bills * bill_thickness < sears_height:
    print(day, num_bills, num_bills * bill_thickness)
    day = day + 1
    num_bills = num_bills * 2

print('Number of days', day)
The statements indented below the while will execute as long as the expression after the while is true.
Indentation
Indentation is used to denote groups of statements that go together.
Consider the previous example:
while num_bills * bill_thickness < sears_height:
    print(day, num_bills, num_bills * bill_thickness)
    day = day + 1
    num_bills = num_bills * 2

print('Number of days', day)
Indentation groups the following statements together as the operations that repeat:
    print(day, num_bills, num_bills * bill_thickness)
    day = day + 1
    num_bills = num_bills * 2
Because the print() statement at the end is not indented, it
does not belong to the loop. The empty line is just for
readability. It does not affect the execution.
Indentation best practices
- Use spaces instead of tabs.
- Use 4 spaces per level.
- Use a Python-aware editor.
Python’s only requirement is that indentation within the same block
be consistent. For example, this is an error:
while num_bills * bill_thickness < sears_height:
    print(day, num_bills, num_bills * bill_thickness)
        day = day + 1 # ERROR
    num_bills = num_bills * 2
Conditionals
The if statement is used to execute a conditional:
if a > b:
    print('Computer says no')
else:
    print('Computer says yes')
You can check for multiple conditions by adding extra checks using elif.
if a > b:
    print('Computer says no')
elif a == b:
    print('Computer says yes')
else:
    print('Computer says maybe')
Printing
The print function produces a single line of text with the values passed.
print('Hello world!') # Prints the text 'Hello world!'
You can use variables. The text printed will be the value of the variable, not the name.
x = 100
print(x) # Prints the text '100'
If you pass more than one value to print they are separated by spaces.
name = 'Jake'
print('My name is', name) # Print the text 'My name is Jake'
print() always puts a newline at the end.
print('Hello')
print('My name is', 'Jake')
This prints:
The extra newline can be suppressed:
print('Hello', end=' ')
print('My name is', 'Jake')
This code will now print:
User input
To read a line of typed user input, use the input() function:
name = input('Enter your name:')
print('Your name is', name)
input prints a prompt to the user and returns their response.
This is useful for small programs, learning exercises or simple debugging.
It is not widely used for real programs.
pass statement
Sometimes you need to specify an empty code block. The keyword pass is used for it.
if a > b:
    pass
else:
    print('Computer says false')
This is also called a «no-op» statement. It does nothing. It serves as a placeholder for statements, possibly to be added later.
Exercises
This is the first set of exercises where you need to create Python
files and run them. From this point forward, it is assumed that you
are editing files in the practical-python/Work/ directory. To help
you locate the proper place, a number of empty starter files have
been created with the appropriate filenames. Look for the file
Work/bounce.py that’s used in the first exercise.
Exercise 1.5: The Bouncing Ball
A rubber ball is dropped from a height of 100 meters and each time it
hits the ground, it bounces back up to 3/5 the height it fell. Write
a program bounce.py that prints a table showing the height of the
first 10 bounces.
Your program should make a table that looks something like this:
1 60.0
2 36.0
3 21.599999999999998
4 12.959999999999999
5 7.775999999999999
6 4.6655999999999995
7 2.7993599999999996
8 1.6796159999999998
9 1.0077695999999998
10 0.6046617599999998
Note: You can clean up the output a bit if you use the round() function. Try using it to round the output to 4 digits.
1 60.0
2 36.0
3 21.6
4 12.96
5 7.776
6 4.6656
7 2.7994
8 1.6796
9 1.0078
10 0.6047
Exercise 1.6: Debugging
The following code fragment contains code from the Sears tower problem. It also has a bug in it.
# sears.py

bill_thickness = 0.11 * 0.001    # Meters (0.11 mm)
sears_height   = 442             # Height (meters)
num_bills      = 1
day            = 1

while num_bills * bill_thickness < sears_height:
    print(day, num_bills, num_bills * bill_thickness)
    day = days + 1
    num_bills = num_bills * 2

print('Number of days', day)
print('Number of bills', num_bills)
print('Final height', num_bills * bill_thickness)
Copy and paste the code that appears above in a new program called sears.py.
When you run the code you will get an error message that causes the
program to crash like this:
Traceback (most recent call last):
  File "sears.py", line 10, in <module>
    day = days + 1
NameError: name 'days' is not defined
Reading error messages is an important part of Python code. If your program
crashes, the very last line of the traceback message is the actual reason why the
the program crashed. Above that, you should see a fragment of source code and then
an identifying filename and line number.
- Which line is the error?
- What is the error?
- Fix the error
- Run the program successfully
Contents | Previous (1.1 Python) | Next (1.3 Numbers)
If you landed here, I am assuming you heard about Python programming and want to learn it. Well, that’s great. And the first step in learning any new programming language is to write the infamous Hello World program.
Let’s write our first Python program to print “Hello World” on the console. Let’s first get to the program and then we will learn how a Python program works. But, before that, we have to install Python on our computer.
Downloading and Installing Python
Python comes with different installers for different operating systems. So, the installation process also differs slightly, but it’s super easy and quick to install Python on any operating system.
1. Installing Python on Windows
Python provides a UI-based full installer for Windows. Go to the Python Releases for Windows page and from the “Stable Releases” section, download the Windows Installer EXE file. Just run the installer and it will install Python in Windows. Make sure to check the option to add Python binary folder to PATH to save you extra effort.
2. Installing Python on Mac OS
Go to the Python Releases for macOS page and from the “Stable Releases” section, download the macOS 64-bit universal2 installer package. Run the installer and it will be done in a jiffy.
3. Installing Python on Linux/Unix
Most of the Linux operating systems comes pre-installed with Python. Just run the “python3 –version” command to confirm it and check the version. If you want to use the latest version, follow the instructions on this page on Python Docs.
PyCharm IDE
If you are serious about learning Python, PyCharm IDE is a must. Go to the PyCharm Downloads page and download the free Community version for your operating system and install it. It’s super easy and it will save you a lot of time.
Now that we have installed Python in our system, we are ready to write our Python program to print Hello World. Here is the python script to print “Hello World” on the console.
Yes, that’s it. It could not have been simpler than this.
Here is the output when this script is executed from the PyCharm IDE.
It’s the simplest program we will ever write. Let’s execute it from the python command line interpreter too.
$ cat hello_world.py
print("Hello World")
$ python3.7 hello_world.py
Hello World
$
Print “Hello World” from Python Command Line Interpreter
Python comes with an interpreter, which is a shell-like interface to run python scripts. Let’s see how to print the “Hello World” message on the console from the python interpreter.
$ python3.7
Python 3.7.3 (v3.7.3:ef4ec6ed12, Mar 25 2019, 16:52:21)
[Clang 6.0 (clang-600.0.57)] on darwin
Type "help", "copyright", "credits" or "license" for more information.
>>> print("Hello World")
Hello World
>>>
Understanding Python Hello World Program
- The print() function is one of the built-in functions. This function prints the argument to the console.
- We are calling the print() function with the string argument “Hello World” so that it would get printed on the console.
- When we are executing a python script file, statements get executed one by one. The print() statement gets executed and it prints the “Hello World” message onto the console.
Summary
We started our journey to learn Python programming with the conventional “Hello World” program. We installed Python and PyCharm IDE in our system. We learned that the python program can be executed from the PyCharm IDE and terminal. We also got some idea about the python interpreter tool, which is very useful in running small python code snippets.
What’s next?
If you have reached this far, you are destined to learn Python. I would suggest you go through these 5 tutorials next.
- Python Data Types
- Python Functions
- Strings in Python
- Python List
- Python Dictionary
В этом разделе мы обсудим основной синтаксис и разберем пример Python – запустим простую программу для печати Hello World на консоли.
Python предоставляет нам два способа запуска программы:
- Использование подсказки интерактивного помощника.
- Использование файла сценария.
Давайте подробно обсудим каждый из них.
Интерактивная подсказка помощника
Python предоставляет нам возможность выполнять инструкции интерактивного помощника. Это предпочтительнее в том случае, когда нас беспокоит вывод каждой строки программы Python.
Чтобы использовать интерактивный режим, откройте терминал(или командную строку) и введите python(python3 в случае, если в вашей системе установлены Python2 и Python3).
Откроется следующее приглашение, в котором мы можем выполнить оператор Python и проверить влияние на консоль.

После написания отчета о печати нажмите клавишу Enter.

Здесь мы получаем сообщение “Hello World!” на консоли.
Использование файла сценария(Программирование в режиме сценария)
Подсказка интерпретатора лучше всего подходит для выполнения однострочных операторов кода. Однако мы не можем писать код каждый раз на терминале. Не рекомендуется писать несколько строк кода.
Используя режим сценария, мы можем записать многострочный код в файл, который может быть выполнен позже. Для этого нам нужно открыть редактор, например блокнот, создать файл с именем и сохранить его с расширением .py, что означает «Python». Теперь мы реализуем приведенный выше пример, используя режим скрипта.
print("hello world"); #here, we have used print() function to print the message on the console.
Чтобы запустить этот файл с именем first.py, нам нужно запустить следующую команду на терминале.

Шаг – 1: Откройте интерактивную оболочку Python и нажмите «Файл», затем выберите «Создать», откроется новый пустой скрипт, в котором мы можем написать наш код.

Шаг 2: Теперь напишите код и нажмите «Ctrl + S», чтобы сохранить файл.

Шаг – 3: После сохранения кода мы можем запустить его, нажав «Выполнить» или «Выполнить модуль». Он отобразит вывод в оболочку.

Результат будет показан следующим образом.

Шаг – 4: Кроме того, мы также можем запустить файл с помощью терминала операционной системы. Но мы должны знать путь к каталогу, в котором мы сохранили наш файл.
- Откройте командную строку и перейдите в каталог.

- Нам нужно ввести ключевое слово python, затем имя файла и нажать Enter, чтобы запустить файл Python.

Многострочные операторы
Многострочные операторы записываются в блокнот как редактор и сохраняются с расширением .py. В следующем примере мы определим выполнение нескольких строк кода с помощью скрипта Python.
Код:
name = "Andrew Venis"
branch = "Computer Science"
age = "25"
print("My name is: ", name, )
print("My age is: ", age)
Файл сценария:


Плюсы и минусы режима сценария
Режим сценария также имеет несколько преимуществ и недостатков. Давайте разберемся в следующих преимуществах запуска кода в режиме скрипта:
- Мы можем запускать несколько строк кода.
- Отладка выполняется легко в режиме сценария.
- Подходит как для новичков, так и для экспертов.
Посмотрим на недостатки скриптового режима:
- Нужно сохранять код каждый раз, если мы вносим в него какие-либо изменения.
- Когда мы запускаем одну или несколько строк кода, это может быть утомительно.
Начало работы с PyCharm
В нашей первой программе мы использовали gedit в CentOS в качестве редактора. В Windows у нас есть альтернатива, например блокнот или блокнот ++, для редактирования кода. Однако эти редакторы не используются в качестве IDE для Python, поскольку они не могут отображать предложения, связанные с синтаксисом.
JetBrains предоставляет самую популярную и широко используемую кроссплатформенную IDE PyCharm для запуска программ Python.
Установка PyCharm
Как мы уже говорили, PyCharm – это кроссплатформенная IDE, поэтому ее можно установить в различных операционных системах. В этом разделе руководства мы рассмотрим процесс установки PyCharm в Windows, MacOS, CentOS и Ubuntu.
Windows
Установить PyCharm в Windows очень просто. Чтобы установить PyCharm в операционной системе Windows, перейдите по ссылке https://www.jetbrains.com/pycharm/download/download-thanks.html?platform=windows, чтобы загрузить установщика. Дважды щелкните файл установки(.exe) и установите PyCharm, нажимая «Далее» на каждом шаге.
Чтобы создать первую программу для Pycharm, выполните следующий шаг.
Шаг – 1. Откройте редактор Pycharm. Нажмите на «Создать новый проект», чтобы создать новый проект.

Шаг – 2. Выберите место для сохранения проекта.
- Мы можем сохранить созданный проект в выбранном по желанию месте памяти или оставить расположение файла как есть, но, по крайней мере, изменить имя проекта по умолчанию без названия на «FirstProject» или что-то значимое.
- Pycharm автоматически найдет установленный интерпретатор Python.
- После изменения имени нажмите кнопку «Создать».

Шаг – 3. Щелкните меню «Файл» и выберите «Новый». При нажатии на опцию «Новый» он покажет различные форматы файлов. Выберите «Файл Python».

Шаг – 4. Теперь введите имя файла Python и нажмите «ОК». Мы написали «Первую программу».

Шаг – 5. Теперь введите первую программу – print(«Hello World»), затем нажмите меню «Выполнить», чтобы запустить программу.

Шаг – 6. Результат появится внизу экрана.

Отступы в Python
Отступы – наиболее важная концепция языка программирования Python. Неправильное использование отступов приведет к ошибке “IndentationError” в нашем коде.
Отступы – это не что иное, как добавление пробелов перед оператором, когда это необходимо. Без отступа Python не знает, какой оператор выполнять следующим. Отступ также определяет, какие операторы принадлежат какому блоку. Если нет отступа или отступ неправильный, отобразится «IndentationError» и прервет наш код.

Отступы Python определяют, какая группа операторов принадлежит конкретному блоку. В языках программирования, таких как C, C ++, java, для определения блоков кода используются фигурные скобки {}.
В Python операторы, находящиеся на одном уровне справа, принадлежат одному блоку. Мы можем использовать четыре пробела для определения отступа. Давайте посмотрим на следующие строки кода.
Пример –
list1 = [1, 2, 3, 4, 5]
for i in list1:
    print(i)
    if i==4:
       break
print("End of for loop")
Выход:
1
2
3
4
End of for loop
Объяснение:
В приведенном выше коде цикл for имеет блоки кода, если оператор имеет блок кода внутри цикла for. Оба с четырьмя пробелами с отступом. Последний оператор print() без отступа; это означает, что он не принадлежит циклу for.
Комментарии в Python
Комментарии необходимы для определения кода и помогают нам и другим людям понять код. Просматривая комментарий, мы можем легко понять назначение каждой строки, написанной нами в коде. Мы также можем очень легко найти ошибки, исправить их и использовать в других приложениях.
В Python мы можем применять комментарии, используя символ решетки #. Интерпретатор Python полностью игнорирует строки, за которыми следует символ решетки. Хороший программист всегда использует комментарии, чтобы сделать код стабильным. Давайте посмотрим на следующий пример комментария.
name = "Thomas" # Assigning string value to the name variable
Мы можем добавить комментарий в каждую строку кода Python.
Fees = 10000      # defining course fees is 10000
Fees = 20000      # defining course fees is 20000
Хорошая идея – добавить код в любую строку раздела кода, цель которого неочевидна. Это лучший способ изучить при написании кода.
Типы комментариев
Python предоставляет возможность писать комментарии двумя способами – однострочный комментарий и многострочный комментарий.
Однострочный комментарий начинается с символа решетки #, за которым следует текст для дальнейшего объяснения.
# defining the marks of a student
Marks = 90
Мы также можем написать комментарий рядом с оператором кода. Рассмотрим следующий пример.
Name = "James"   # the name of a student is James
Marks = 90            # defining student's marks
Branch = "Computer Science"   # defining student branch
Многострочные комментарии – Python не имеет явной поддержки многострочных комментариев, но мы можем использовать символ решетки # для нескольких строк. Например –
# we are defining for loop
# To iterate the given list.
# run this code.
Мы также можем использовать другой способ.
" " "
This is an example
Of multi-line comment
Using triple-quotes
" " "
Это основное введение в комментарии. Просмотрите наш урок по комментариям Python, чтобы изучить его подробно.
Идентификаторы Python
Идентификаторы Python относятся к имени, используемому для идентификации переменной, функции, модуля, класса, модуля или других объектов. Есть несколько правил, которым нужно следовать при присвоении имени переменной Python.
- Имя переменной должно начинаться с английской буквы или символа подчеркивания(_).
- Имя переменной не может начинаться с числа.
- В имени переменной нельзя использовать специальные символы.
- Имя переменной чувствительно к регистру.
Пример –
number = 10
print(num)

_a = 100
print(_a)

x_y = 1000
print(x_y)
Выход:
10
100
1000
Мы определили базовый синтаксис языка программирования Python. Мы должны ознакомиться с основной концепцией любого языка программирования. Как только мы запомним концепции, упомянутые выше, изучение Python станет проще.


Изучаю Python вместе с вами, читаю, собираю и записываю информацию опытных программистов.
| Введение | |
| Hello World! — первый скрипт на Python | |
| Как запускать скрипты | |
| Отступы (indentation) | |
| Арифметика | |
| if __name__ == ‘__main__’ | |
| !#: Shebang | |
| Scopes: области видимости | |
| Полезные ссылки | |
| Похожие статьи |
Введение
Python, произностися как Пайтон, в русском языке распространено название Питон
— высокоуровневый язык программирования общего назначения, ориентированный на
повышение производительности разработчика и читаемости кода.
Синтаксис ядра Python минималистичен. В то же время стандартная библиотека
включает большой объём полезных функций.
Python поддерживает структурное, объектно-ориентированное, функциональное,
императивное и аспектно-ориентированное программирование.
Основные архитектурные черты — динамическая типизация, автоматическое управление
памятью, полная интроспекция, механизм обработки исключений, поддержка многопоточных
вычислений, высокоуровневые структуры данных.
Поддерживается разбиение программ на модули, которые, в свою очередь, могут объединяться в пакеты.
Эталонной реализацией Python является интерпретатор CPython, поддерживающий
большинство активно используемых платформ.
Он распространяется под свободной лицензией Python Software Foundation License,
позволяющей использовать его без ограничений в любых приложениях, включая проприетарные.
Есть реализация интерпретатора для JVM с возможностью компиляции, CLR, LLVM,
другие независимые реализации. Проект PyPy использует JIT-компиляцию, которая
значительно увеличивает скорость выполнения Python-программ.
Python — активно развивающийся язык программирования, новые версии с
добавлением/изменением языковых свойств выходят примерно раз в два
с половиной года.
Язык не подвергался официальной стандартизации, роль
стандарта де-факто выполняет CPython, разрабатываемый под контролем автора языка.
В настоящий момент (апрель 2021)
Python занимает третье место в рейтинге TIOBE с показателем 11,03%.
Аналитики отмечают, что это самый высокий балл Python за все время его присутствия в
рейтинге.
Посмотреть текущий рейтинг можно
здесь
Hello World!
Инструкция по запуску первой программы в Python
Убедитесь, что Python установлен и команда
python -V
Показывает версию Python, например
Python 3.9.1
Если вы работаете в
Linux,
UNIX
или
Bash в Windows
перейдите в свою домашнюю директорию
В Linux
cd ~
В Windows
cd /mnt/c/Users/username
Создайте директорию python
mkdir python
Перейдите в неё, создайте файл hello_world.py
и откройте его любым тестовым редактором
cd python
touch hello_world.py
vi hello_world.py
Вставьте туда следующий код
print("Hello World!")
Выполните
python hello_world.py
В терминале должно появиться сообщение
Hello World!
Больше деталей о запуске скриптов вы можете найти в следующем параграфе —
«Запуск Python скрипта»
и затем в
if __name__ == «__main__»:
Запуск скрипта
Чтобы запустить .py скрипт введите
python имя_файла.py
Результат такого запуска зависит от того, что указано после
if __name__ == «__main__»:
если это условие вообще есть
print(«Hello!»)
python sample.py
Hello!
Теперь то же самое но в функции
def say_hello():
print(«Hello!»)
python sample.py
Ничего не произошло потому что функцию никто не вызвал
Можно добавить вызов функции следующим образом
def say_hello():
print(«Hello!»)
say_hello()
python sample.py
Hello!
В этом случае функция будет вызываться всегда — как при запуске скрипта из терминала так и при импорте в другой модуль
настроить это поведение можно с помощью переменной __name__ а точнее — с помощью условия
if __name__ == «__main__»:
Отступы (indentation)
Python не является языком поддерживающим свободный формат. Блоки кода не
разделяются с помощью { }
Вместо этого блоки разделяются отступами по так называемому правилу оффсайда (Off-side rule)
Демонстрация
Рассмотрим файл for_loop.py
for i in range(1,4):print(i)
python for_loop.py
1
2
3
Всё работает прекрасно. Обратите внимание, что выведены были только i от 1 до 3. 4 python не вывел.
Если написать код не в одну строку, а следующим образом
for i in range(1,4):
print(i)
то работать код не будет. Получится ошибка
File «/home/andrei/python/for_loop.py», line 2
print(i)
^
IndentationError: expected an indented block
Поэтому нужно поставить перед print пробел
for i in range(1,3):
print(i)
python for_loop.py
1
2
3
Вместо одного пробела можно поставить табуляцию, но лучше поставить два или четыре пробела подряд.
PEP8
— документ, в котором собраны рекомендации по написанию Python кода говорит:
Use 4 spaces per indentation level
САМОЕ ВАЖНОЕ: Нельзя смешивать в одном файле отступы в виде табуляций и в виде
пробелов. Выберите один стиль и придерживайтесь его.
Про то как правильно переносить слишком длинные строки можете прочитать
здесь
Арифметика
/ — деление. Результат — число с плавающей точкой
>>> 5 / 2
2.5
// — целочисленное деление. Результат — округлённое до целого числа частное.
>>> 5 // 2
2
% — остаток от деления. Результат — остаток от //
>>> 5 % 2
1
Печать спецсимволов HTML
for i in range(100001,125000):
print "<tr><td>&#",i,";</td><td>&#",i,";</td></tr>"
Ссылки
Psyco
Shedskin
PyPy
Cython
Jython
IronPython
IDLE
Синтаксис
Set в фигурных скобках. Элемент добавляется с помощью .add()
if __name__ == ‘__main__’
Чтобы разобраться в смысле этой строки создадим два файла.
first_module.py
и
second_module.py
В первом напишем
print(f"Имя первого модуля: {__name__}")
# Если не любите f-string напишите:
print("Имя первого модуля: {}".format(__name__))
Запустим его
python3 first_module.py
Имя первого модуля: __main__
Во втором запишем
import first_module
Запустим его
python3 second_module.py
Имя первого модуля: __first_module__
Вывод: когда модуль запущен непосредственно, его __name__ это __main__
Когда модуль импортирован в другой модуль, его __name__ это __название_py_файла__
Теперь когда все ясно, можно добавить в наш код условие if __name__ == «__main__»
def say_hello():
print(«Hello!»)
def display_name():
print(f«Имя первого модуля: {__name__}»)
if __name__ == «__main__»:
say_hello()
Hello!
Или
def say_hello():
print(«Hello!»)
def display_name():
print(f«Имя первого модуля: {__name__}»)
if __name__ == «__main__»:
display_name()
Имя первого модуля: __main__
Суть в том, что теперь мы определяем что будет выполняться при вызове этого скрипта а что нет.
Пакеты Python в Linux
Узнать сколько всего python3 пакетов в репозитории
Ubuntu
apt-cache search python3 | wc -l
3472
Изучить их названия можно с помощью less
apt-cache search python3 | less
alembic — lightweight database migration tool for SQLAlchemy
brltty — Access software for a blind person using a braille display
debian-goodies — Small toolbox-style utilities for Debian systems
devscripts — scripts to make the life of a Debian Package maintainer easier
libcrack2-dev — pro-active password checker library — development files
…
Проверить, существует ли файл
hosts
#!/usr/bin/python3
import os.path
if os.path.exists("/etc/hosts"):
print("hosts file exists")
else:
print("no hosts file")
или
#!/usr/bin/python3
try:
f = open('/etc/hosts')
print("hosts file exists")
except FileNotFoundError:
print("no hosts file")
python3 check_hosts.py
hosts file exists
Shebang
Указывает на нужный интерпретатор. Примеры:
#!/usr/bin/env python
#!/home/andrei/.pyenv/shims/python
После написаний шебанга нужно сделать скрипт выполняемым файлом
chmod + x имя_скрипта.py
И теперь его можно запускать прямо из терминала
./имя_скрипта.py
Или
.имя_скрипта.py
Scopes
Local — внутри функции
Enclosing — внутри фукнции, которая вызвала функцию
Global — во всем модуле
Built-in — встроено в Python
LEGB
Ссылки на Local уничтожаются после выполнения функции
Рассмотрим функцию fetch_words()
из статьи про
docstring
url, story, story_words, line, line_words, word — это локальные переменные
def fetch_words(url):
«»»Fetch a list of words from a URL.
Args:
url: The URL of a UTF-8 text document.
Returns:
A list of strings containing the words from
the document
«»»
# PEP 257
# story = urlopen(«http://sixty-north.com/c/t.txt»)
story = urlopen(url)
story_words = []
for line in story:
line_words = line.decode(«utf8»).split()
for word in line_words:
story_words.append(word)
story.close()
return story_words
def print_items(story_words):
«»»Print items one per line.
Args:
An iterable series of printable items.
«»»
for word in story_words:
print(word)
def main(url):
words = fetch_words(url)
print_items(words)
if __name__ == «__main__»:
main(sys.argv[1])
Разберем поведение глобальных переменных
count = 0
def show_count():
print(count)
def set_count(c):
count = c
show_count() # 0
set_count(5)
show_count() # 0
0
0
Изменить поведение функции можно с помощью global
count = 0
def show_count():
print(count)
def set_count(c):
global count
count = c
show_count() # 0
set_count(5) # Now affects global variable
show_count() # 5
0
5
Полезные ссылки
| Основы Python | |
| Python | |
| Установка Python | |
| ООП в Python | |
| Функции | |
| docstring | |
| #!: Shebang | |
| Объекты | |
| Сложности при работе с Python |
Summary: in this tutorial, you’ll learn how to develop the first program in Python called “Hello, World!”.
If you can write “hello world” you can change the world.
Raghu Venkatesh
Creating a new Python project
First, create a new folder called helloworld.
Second, launch the VS code and open the helloworld folder.
Third, create a new app.py file and enter the following code and save the file:
Code language: Python (python)
print('Hello, World!')
The print() is a built-in function that displays a message on the screen. In this example, it’ll show the message 'Hello, Word!'.
What is a function
When you sum two numbers, that’s a function. And when you multiply two numbers, that’s also a function.
Each function takes your inputs, applies some rules, and returns a result.
In the above example, the print() is a function. It accepts a string and shows it on the screen.
Python has many built-in functions like the print() function to use them out of the box in your program.
In addition, Python allows you to define your functions, which you’ll learn how to do it later.
Executing the Python Hello World program
To execute the app.py file, you first launch the Command Prompt on Windows or Terminal on macOS or Linux.
Then, navigate to the helloworld folder.
After that, type the following command to execute the app.py file:
Code language: Python (python)
python app.py
If you use macOS or Linux, you use python3 command instead:
Code language: CSS (css)
python3 app.py
If everything is fine, you’ll see the following message on the screen:
Code language: Python (python)
Hello, World!
If you use VS Code, you can also launch the Terminal within the VS code by:
- Accessing the menu Terminal > New Terminal
- Or using the keyboard shortcut
Ctrl+Shift+`.
Typically, the backtick key (`) locates under the Esc key on the keyboard.
Python IDLE
Python IDLE is the Python Integration Development Environment (IDE) that comes with the Python distribution by default.
The Python IDLE is also known as an interactive interpreter. It has many features such as:
- Code editing with syntax highlighting
- Smart indenting
- And auto-completion
In short, the Python IDLE helps you experiment with Python quickly in a trial-and-error manner.
The following shows you step by step how to launch the Python IDLE and use it to execute the Python code:
First, launch the Python IDLE program:
A new Python Shell window will display as follows:

Now, you can enter the Python code after the cursor >>> and press Enter to execute it.
For example, you can type the code print('Hello, World!') and press Enter, you’ll see the message Hello, World! immediately on the screen:
Summary
- Use the
python app.pycommand from the Command Prompt on Windows or Terminal on macOS or Linux to execute theapp.pyfile. - Use the
print()function to show a message on the screen. - Use the Python IDLE to type Python code and execute it immediately.
Did you find this tutorial helpful ?
В настоящее время используются только версия Python 3. Разработка и поддержка Python 2 прекращены, так что мы работаем с третей версией во всех статьях.
В какой-то момент ваших приключений в программировании вы, в конце концов, столкнетесь с Python 2. Не беспокойтесь. Есть несколько важных отличий, о которых вы можете почитать здесь.
Если вы используете Apple или Linux, у вас уже установлен Python 2.7 и 3.6+ (в зависимости от версии OS). Некоторые версии Windows идут в комплекте с Python, но вам также потребуется установить Python 3.
Он очень прост в установке на Linux. В терминале запустите:
$ sudo apt-get install python3 idle3Это установит Python и IDLE для написания кода.
Для Windows и Apple я предлагаю вам обратиться к официальной документации, где вы найдете подробные инструкции: https://www.python.org/download
Запуск IDLE
IDLE означает «Интегрированная среда разработки». В вашей карьере программирования вы столкнетесь с многочисленными интегрированными средами разработки, хотя за пределами Python они называются IDE.
- Если у вас Windows, выберите IDLE из меню «Пуск».
- Для Mac OS, вы можете найти IDLE в приложениях > Python 3.
- Если у вас Linux, выберите IDLE из меню > Программирование > IDLE (используя Python 3.*).
Для Mac OS и Linux, в терминале, воспользуйтесь:
$ idle3Когда вы впервые запускаете IDLE, вы видите примерно следующее на экране:
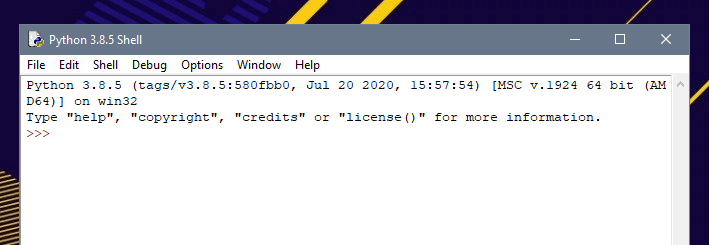
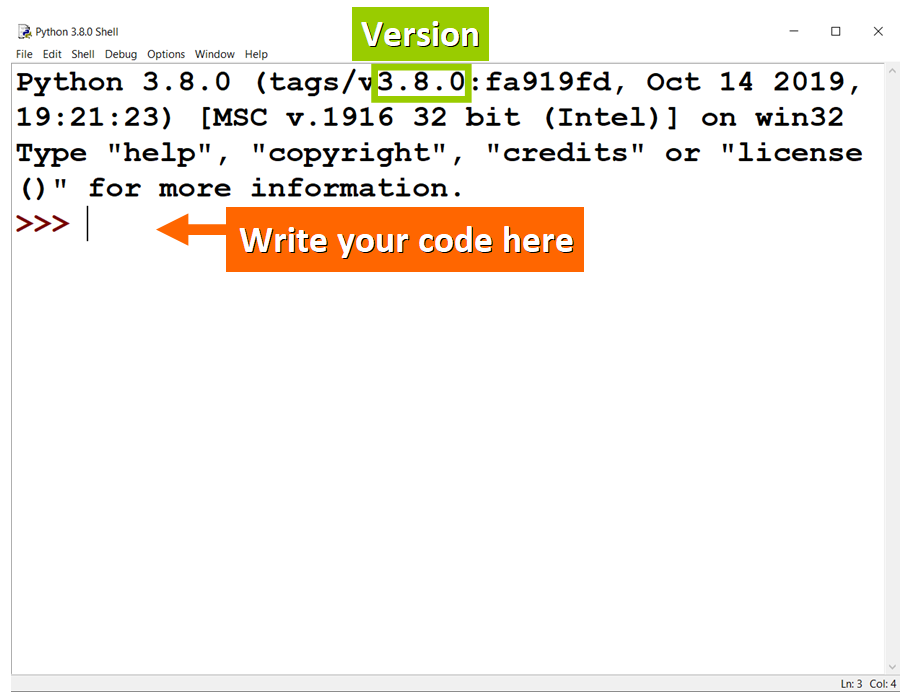
Это оболочка Python. А три стрелки называются шевронами.
>>>Они означают приглашение интерпретатора, в который вы вводите команды.
Как написать “Hello, World!”
Классическая первая программа — "Hello, World!". Давайте придерживаться традиции. Введите следующую команду и нажмите Enter:
Это может показаться не очень сложным и удивительным. Заскриньте вывод, будет приятно возвращаться и вспоминать как это было. Затем присоединитесь к нам в следующих уроках с темой: Уроки Python для начинающих.
Обучение с трудоустройством

Hi! if you are reading this article, then you are probably starting to dive into the amazing world of programming and computer science. That’s great.
In this article, you will learn:
- How to write your first
"Hello, World!"program in Python. - How to save your code in a Python file.
- How to run your code.
Writing this program when you are starting to learn how to code is a tradition in the developer community.
Enjoy this moment because it will definitely be part of your memories in the coming months and years when you remember your first steps.
Let’s begin.
🔸 «Hello, World!» in the Python Shell
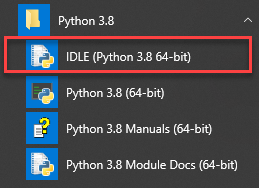
Step 1: Start IDLE
During this article, we will work with IDLE (Python’s Integrated Development and Learning Environment), which is automatically installed when you install Python. This is where you will write and run your Python code.
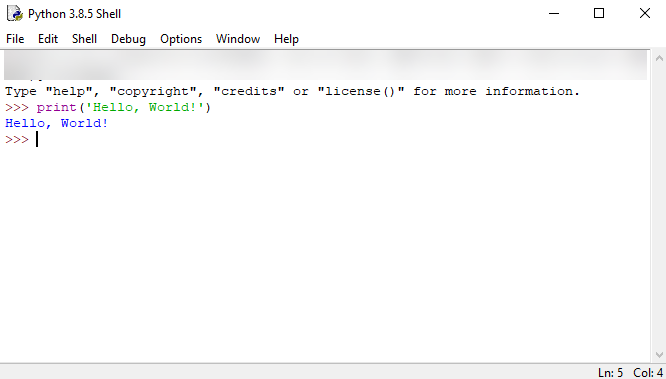
The first thing that you need to do is to open IDLE. You will immediately see the screen shown below.
This is called the Python shell (interactive interpreter). It is an interactive window where you can enter lines or blocks of code and run them immediately to see their effect and output.
💡 Tip: By default, you will see a smaller font size. You can customize this in «Options > Configure IDLE».
Step 2: Display the Message
You need to tell the program that you want to display a specific message by writing the appropriate line of code.
In Python, we use print() to do this:
- First, we write
print. - Then, within parentheses, we write the message or value that we want to display.

💡 Tip: The message "Hello, World!" is surrounded by double quotation marks because it is represented as a string, a data type that is used to represent sequences of characters in your code (for example, text).
Step 3: See the Output
You will see the following output if you write this line of code in the Python shell and press enter:
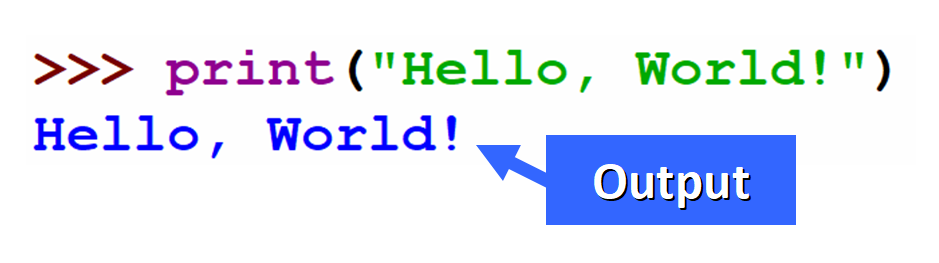
💡 Tip: You will notice that the color of the message inside print() changes to green when you add the last quotation mark.
This occurs because IDLE assigns different colors to the different types of elements that you can write in your code (notice that print is displayed in purple). This is called «syntax highlighting».
Great! You just wrote your first "Hello, World!" program in Python.
If you want to save it in order to run it later (or just to keep it as a nice memory of your first Python program!), you will need to create a Python file, so let’s see how you can do that.
🔹 «Hello, World!» in a Python File
Step 1: Create a File
To create a Python file in IDLE, you need to:
- Open the Python Shell.
- Click on
Filein the toolbar. - Click on
New File.
💡 Tips: You can also use the keyboard shortcut Ctrl + N.
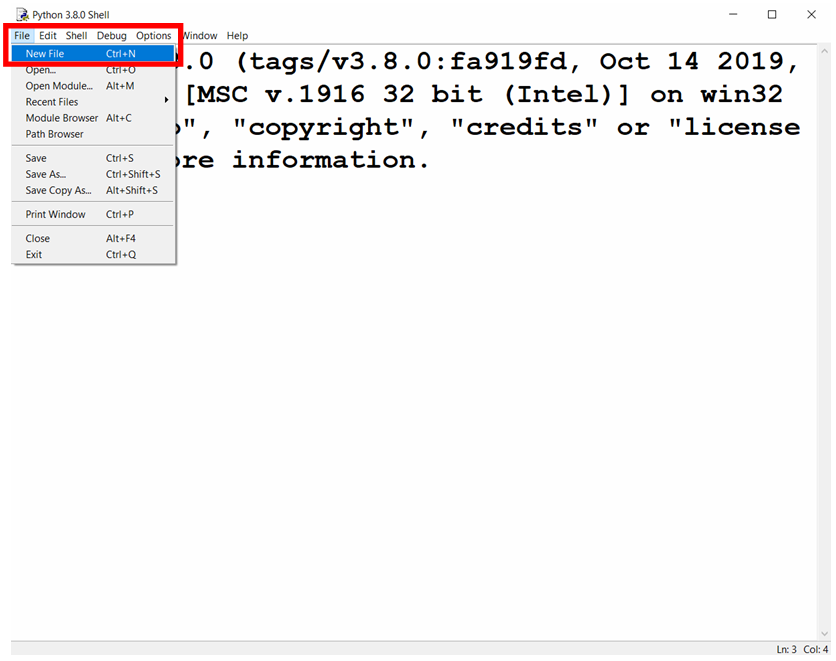
After you click on New File, you will immediately see a new file where you can write your code:

Step 2: Write the Code
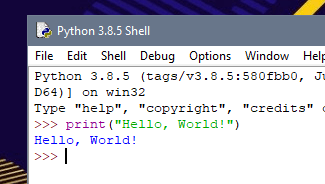
In the new file, write this line of code to print "Hello, World!":
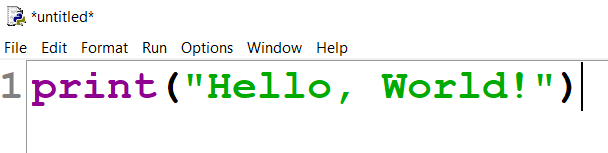
💡 Tip: The thick vertical black line shows where the cursor is currently at.
Step 3: Save the File
Save the new file by clicking on File > Save or by using the keyboard shortcut Ctrl + S. You will need to write a name for your file and choose where you want to save it.

After saving the file, you will see something very similar to this in the folder that you selected:

💡 Tips: By default, line numbers will not be displayed in the file. If you would like to display them (like in the images above) go to Options > Configure IDLE > General > Check the «Show line numbers in new windows» box.
Step 4: Run the Program
Now you can run your file by clicking on Run > Run Module:
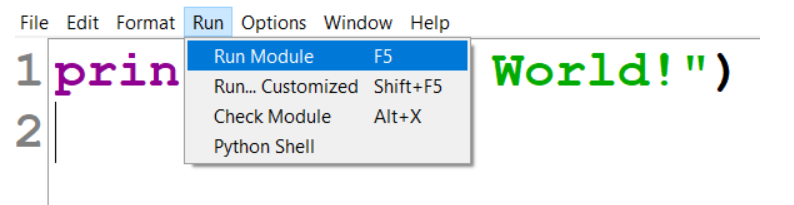
A new window will be opened and you should see the output of your program in blue:
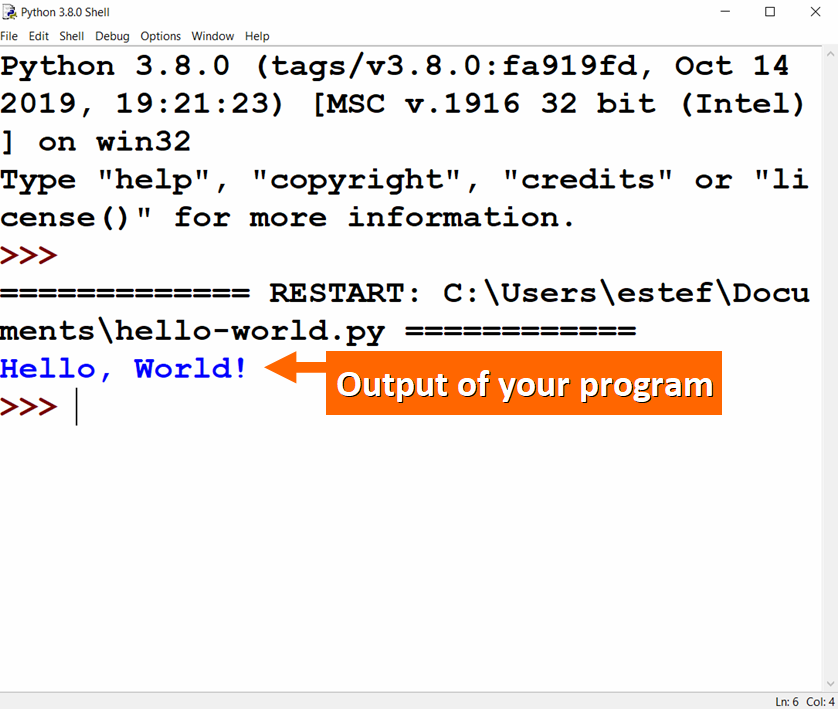
Now your program is safely stored in a Python file and you can run it whenever you need to.
Great work!
🔸 Customize Your Program
You can customize your program to make it unique. You just need to edit the Python file and change the string.
For example, you can add your name after Hello, World!:

If you run the file, you will see the string displayed in the Python shell:

🔹 First Python Program Completed
Awesome work. You just wrote your first Python program.
Programming and Computer Science will be key for the future of humanity. By learning how to code, you can shape that future.
You’ll create amazing new products and platforms, and help take us one step further towards a world where technology will be part of every single aspect of our daily lives.
To learn more about the coding uses of Python, you might like to read my article «What is Python Used For? 10+ Coding Uses for the Python Programming Language»
I really hope that you liked my article and found it helpful. Follow me on Twitter @EstefaniaCassN and check out my online courses. ⭐️
Learn to code for free. freeCodeCamp’s open source curriculum has helped more than 40,000 people get jobs as developers. Get started