https://gbcdn.mrgcdn.ru/uploads/post/2051/og_image/77676b51d58de913160ba53cde01cc70.jpg
Перед прочтением данной статьи рекомендую ознакомиться с предыдущей, «Быстрый старт с Java: начало», поскольку ожидается, что читатель владеет материалом, изложенным в ней — знает о переменных, условиях, циклах и импорте классов. Сегодня мы углублим знания о Java, создавая игру «Крестики-нолики», которая работает в командной строке (консоли). В процессе будет рассмотрена работа с массивами, а также некоторые аспекты объектно-ориентированного программирования (нестатические методы, нестатические поля, конструктор).
Массивы
При написании игры используется массив, поэтому давайте для начала рассмотрим, что это. Массивы хранят набор однотипных переменных. Если переменная похожа на коробочку, с написанным на боку типом, именем и со значением внутри, то массив похож на блок таких коробочек. И тип, и имя у блока одно, а доступ к той или иной коробочке (значению) происходит по номеру (индексу).
В Java массивы являются объектами, их создают с помощью директивы new. При создании указываем количество элементов массива или инициализируем его набором значений. Приведенный код иллюстрирует оба варианта:
class Arrays {
    public static void main(String[] args) {
        int[] arr = new int[5];
        int[] arrInit = {1, 2, 3, 4, 5};
        for (int i = 0; i < arr.length; i++) {
            arr[i] = i * 2 + arrInit[i];
        }
        for (int a : arr) {
            System.out.println(a);
        }
    }
}
С элементами массива можно работать как с обычными переменными, присваивая им результат выражения и читая хранимые значения. При этом в квадратных скобках указывается индекс элемента массива. Индексация в Java идёт с 0 (с нуля). Первый цикл инициализирует элементы массива arr при помощи значений из массива arrInit. Каждый массив имеет поле length, содержащее количество его элементов. Второй цикл выводит элементы массива в консоль, используя второй вариант for — без счётчика цикла.
Методы
Кроме main() класс может содержать и другие методы. Рассмотрим в качестве примера класс с методом add(), который вычисляет и возвращает сумму двух значений, переданных как параметры. Обратите внимание на тип int, который стоит перед именем метода — это тип возвращаемого значения. Две переменные в скобках — параметры. Совокупность имени и параметров называют сигнатурой метода. Вызов метода происходит по имени, в скобках указывают передаваемые значения. В методе они попадают в параметры-переменные. Команда return возвращает результат сложения этих двух переменных и обеспечивает выход из метода.
class MethodStatic {
    public static void main(String[] args) {
        int c = add(5, 6);
        System.out.println("5 + 6 = " + c);
    }

    static int add(int a, int b) {
        return a + b;
    }
}
Слово static означает, что метод статический. Если мы обращается к какому-либо методу из статического метода, то вызываемый тоже должен быть статическим. Вот почему add() статический — он вызывается из статического main(). Использование статических методов — скорее исключение, чем правило, поэтому давайте посмотрим как сделать add() нестатическим.
Решение одно — создать объект на основании класса. И затем вызывать метод через точку после имени объекта. В этом случае метод может быть нестатическим. Представленный ниже код это иллюстрирует.
class MethodNotStatic {
    public static void main(String[] args) {
        MethodNotStatic method = new MethodNotStatic();
        int c = method.add(5, 6);
        System.out.println("5 + 6 = " + c);
    }

    int add(int a, int b) {
        return a + b;
    }
}
Поля класса
Переменные существуют в рамках лишь того метода, где они объявлены. А если нужна переменная, доступная во всех методах класса, то пришло время использовать поля. Поля объявляются подобно переменным, с указанием типа и имени. Но располагаются они не в методах, а прямо в теле класса. Подобно методам, они могут быть статическими и нестатическими. Нестатические поля, как и методы, доступны только после создания объекта.
class FieldExample {
    int a;

    public static void main(String[] args) {
        FieldExample field = new FieldExample();
        field.a = 12;
        System.out.println("a = " + field.a);
        System.out.println(field.getA());
        field.printA();
    }

    int getA() {
        return a;
    }

    void printA() {
        System.out.println(a);
    }
}
Приведённый выше код иллюстрирует работу с нестатическим полем int a. Описание полей принято размещать первыми в коде класса, затем идут описания методов. Возможность обращаться к полю (запись, чтение) мы получаем только после создания объекта. Также видно, что это поле доступно во всех нестатических методах объекта, а в статическом main() — через точку после имени объекта.
Крестики-нолики. Шаблон класса
Приступим к написанию кода игры. Начнём с шаблона класса и определения нужных полей. Именно это содержит приведённый ниже код. Первые две строки — импорт классов. Первыми в теле класса идут описания полей, затем методов. Метод main() используется для создания объекта (так как поля и методы нестатические) и вызова метода game() с игровой логикой.
import java.util.Random;
import java.util.Scanner;

class TicTacToe {
    final char SIGN_X = 'x';
    final char SIGN_O = 'o';
    final char SIGN_EMPTY = '.';
    char[][] table;
    Random random;
    Scanner scanner;

    public static void main(String[] args) {
        new TicTacToe().game();
    }

    TicTacToe() {
        // конструктор: инициализация полей
    }

    void game() {
        // игровая логика
    }

    // дополнительные методы
}
В качестве полей используем три символьные константы: SIGN_X, SIGN_O и SIGN_EMPTY. Их значения нельзя изменять, об этом говорит модификатор final. Двумерный символьный массив table будет нашим игровым полем. Потребуется также объект random для генерации ходов компьютера и scanner для ввода данных от пользователя.
Имена методов принято писать с маленькой буквы. Однако в коде мы видим метод TicTacToe() — есть ли тут нарушение? Нет, поскольку этот метод особенный и в объектно-ориентированном программировании называется конструктор. Конструктор вызывается сразу после того, как объект создан. Его имя, как видим, должно совпадать с именем класса. Мы используем конструктор для инициализации полей.
TicTacToe() {
    random = new Random();
    scanner = new Scanner(System.in);
    table = new char[3][3];
}
Игровая логика
Игровая логика располагается в методе game() и базируется на бесконечном цикле while. Ниже в фрагменте кода последовательность действий описана через комментарии:
// инициализация таблицы
while (true) {
    // ход человека
    // проверка: если победа человека или ничья:
    //    сообщить и выйти из цикла
    // ход компьютера
    // проверка: если победа компьютера или ничья:
    //    сообщить и выйти из цикла
}
При написании рабочего кода, каждое действие — например, «ход человека», «ход компьютера», «проверка» — мы заменим на вызов соответствующего метода. При возникновении выигрышной или ничейной ситуации (все клетки таблицы заполнены), выходим из цикла с помощью break, завершая игру.
void game() {
    initTable();
    while (true) {
        turnHuman();
        if (checkWin(SIGN_X)) {
            System.out.println("YOU WIN!");
            break;
        }
        if (isTableFull()) {
            System.out.println("Sorry, DRAW!");
            break;
        }
        turnAI();
        printTable();
        if (checkWin(SIGN_O)) {
            System.out.println("AI WIN!");
            break;
        }
        if (isTableFull()) {
            System.out.println("Sorry, DRAW!");
            break;
        }
    }
    System.out.println("GAME OVER.");
    printTable();
}
Реализация вспомогательных методов
Пришло время написать код методов, вызываемых в game(). Самый первый, initTable(), обеспечивает начальную инициализацию игровой таблицы, заполняя её ячейки «пустыми» символами. Внешний цикл, со счетчиком int row, выбирает строки, а внутренний, со счётчиком int col, перебирает ячейки в каждой строке.
void initTable() {
    for (int row = 0; row < 3; row++)
        for (int col = 0; col < 3; col++)
            table[row][col] = SIGN_EMPTY;
}
Также потребуется метод, отображающий текущее состояние игровой таблицы printTable().
void printTable() {
    for (int row = 0; row < 3; row++) {
        for (int col = 0; col < 3; col++)
            System.out.print(table[row][col] + " ");
        System.out.println();
    }
}
В методе turnHuman(), который позволяет пользователю сделать ход, мы используем метод nextInt() объекта scanner, чтобы прочитать два целых числа (координаты ячейки) с консоли. Обратите внимание как используется цикл do-while: запрос координат повторяется в случае, если пользователь укажет координаты невалидной ячейки (ячейка таблицы занята или не существует). Если с ячейкой всё в порядке, туда заносится символ SIGN_X — «крестик».
void turnHuman() {
    int x, y;
    do {
        System.out.println("Enter X and Y (1..3):");
        x = scanner.nextInt() - 1;
        y = scanner.nextInt() - 1;
    } while (!isCellValid(x, y));
    table[y][x] = SIGN_X;
}
Валидность ячейки определяет метод isCellValid(). Он возвращает логическое значение: true — если ячейка свободна и существует, false — если ячейка занята или указаны ошибочные координаты.
boolean isCellValid(int x, int y) {
    if (x < 0 || y < 0 || x >= 3|| y >= 3)
        return false;
    return table[y][x] == SIGN_EMPTY;
}
Метод turnAI() похож на метод turnHuman() использованием цикла do-while. Только координат ячейки не считываются с консоли, а генерируются случайно, при помощи метода nextInt(3) объекта random. Число 3, передающееся как параметр, является ограничителем. Таким образом, генерируются случайные целые числа от 0 до 2 (в рамках индексов массива игровой таблицы). И метод isCellValid() снова позволяет нам выбрать только свободные ячейки для занесения в них знака SIGN_O — «нолика».
void turnAI() {
    int x, y;
    do {
        x = random.nextInt(3);
        y = random.nextInt(3);
    } while (!isCellValid(x, y));
    table[y][x] = SIGN_O;
}
Осталось дописать два последних метода — проверка победы и проверка на ничью. Метод checkWin() проверяет игровую таблицу на «победную тройку» — три одинаковых знака подряд, по вертикали или горизонтали (в цикле), а также по двум диагоналям. Проверяемый знак указан как параметр char dot, за счёт чего метод универсален — можно проверять победу и по «крестикам» и по «ноликам». В случае победы возвращается булевское значение true, в противном случае — false.
boolean checkWin(char dot) {
    for (int i = 0; i < 3; i++)
        if ((table[i][0] == dot && table[i][1] == dot &&
                         table[i][2] == dot) ||
                (table[0][i] == dot && table[1][i] == dot &&
                                  table[2][i] == dot))
            return true;
        if ((table[0][0] == dot && table[1][1] == dot &&
                  table[2][2] == dot) ||
                    (table[2][0] == dot && table[1][1] == dot &&
                      table[0][2] == dot))
            return true;
    return false;
}
Метод isTableFull() во вложенном двойном цикле проходит по всем ячейкам игровой таблицы и, если они все заняты, возвращает true. Если хотя бы одна ячейка ещё свободна, возвращается false.
boolean isTableFull() {
    for (int row = 0; row < 3; row++)
        for (int col = 0; col < 3; col++)
            if (table[row][col] == SIGN_EMPTY)
                return false;
    return true;
}
Теперь осталось собрать все эти методы внутри TicTacToe. Последовательность их расположения в теле класса не важна. А после этого можно попробовать сыграть с компьютером в крестики-нолики.
Заключение
На всякий случай прилагаю мой telegram — @biblelamp. Если вас заинтересовала тема, рекомендую почитать «Java-программирование для начинающих» Майка МакГрата и «Изучаем Java» Кэти Сьерра и Берт Бейтс.
Другие статьи из серии «Быстрый старт с Java»:
- «Быстрый старт с Java: начало»
- «Быстрый старт с Java: «лопни шарик»
Если язык Java вас заинтересовал — приглашаем на факультет Java-разработки. Если ещё не совсем уверены — посмотрите истории успеха наших Java-выпускников:
- Приключения бравого джависта в поисках пропитания. Как начать карьеру программиста Java, если в твоём городе пять вакансий и везде требуют опыт от года
- «Иногда за сутки я спал один час в метро перед работой». Из белорусской типографии — в московские тимлиды.
- Первая работа в IT с переездом в Москву: как это бывает. Опыт собеседований, тестовых заданий, учебных проектов и трудоустройства в международную компанию.
- Взгляд изнутри: как работается в «Альфа-Банке». Рассказывает Михаил Степнов, выпускник GeekUniversity и программист банка.

Если вы учитесь программировать, то программирование игр — это очень хороший способ освоить алгоритмы и структуры данных. В этом уроке мы разберем запрограммируем игру крестики нолики на Python. Полный код программы с искусственным интеллектом для игрока-компьютера занимает всего 140 строк. В варианте игры где человек играет против человека — раза в два меньше.
Игра крестики-нолики хороша тем, что ее правила знакомы всем с детства и понятны каждому. Это даст вам возможность сосредоточиться именно на процессе программирования, а не на анализе правил игры. В процессе работы над игрой крестики-нолики мы будем использовать только стандартные функции языка Python без подключения каких либо сторонних библиотек.
Шаг 1. Подбор структуры данных
Программирование любой игры начинается с моделирования ее объектов средствами языка программирования. Когда мы программируем игру крестики нолики нам нужно подумать где в программе хранить поле для игры с ходами которые сделали игроки.
В языке программирования Python наилучшим выбором будет список из 9 значений. Назовем его maps. Первоначально этот список будет заполнен цифрами от 1 до 9. Это сделано для удобства организации диалога с пользователем. Пользователю будет достаточно ввести символ от 1 до 9, что бы мы смогли понять куда он сделал ход. После того как ход сделан, цифру мы заменим на символ нолика или крестика. (Можно было заполнить цифрами от 0 до 8. В этом случает было бы удобнее работать — цифра и есть индекс элемента в списке, но первый нолик будет смущать игроков).
Еще мы создадим второй список victories в котором будем хранить информацию обо всех выигрышных комбинациях. И нам будет нужно создать функцию print_maps, которая будет выводить содержимое нашего списка maps на экран.
# Инициализация карты
maps = [1,2,3,
        4,5,6,
        7,8,9]

# Инициализация победных линий
victories = [[0,1,2],
             [3,4,5],
             [6,7,8],
             [0,3,6],
             [1,4,7],
             [2,5,8],
             [0,4,8],
             [2,4,6]]

# Вывод карты на экран
def print_maps():
    print(maps[0], end = " ")
    print(maps[1], end = " ")
    print(maps[2])

    print(maps[3], end = " ")
    print(maps[4], end = " ")
    print(maps[5])

    print(maps[6], end = " ")
    print(maps[7], end = " ")
    print(maps[8])
Со структурами данных разобрались.
Шаг 2. Выполнение очередного хода и проверка на выигрыш
Карта для игры у нас есть, отображать ее мы умеем. Теперь нужно создать две вспомогательные функции, прежде чем мы приступим к программированию основного цикла игры.
Первая функция будет рисовать на поле крестик или нолик, в зависимости от того что в нее передали. Позицию в нее так же нужно будет передавать. Вставлять переданный элемент мы будем по индексу. Индекс определим функцией index (если бы мы пронумеровали от 0 до 8 элементы в maps, то переданное значение и было бы индексом. Можете попробовать — будет на одну строчку кода меньше.)
# Сделать ход в ячейку
def step_maps(step,symbol):
    ind = maps.index(step)
    maps[ind] = symbol
После каждого ходы мы должны проверять — не победил ли кто то из игроков. Для этого переберем все победные линии из списка victories и проверим нет ли там комбинации из трех крестиков или трех ноликов.
# Получить текущий результат игры
def get_result():
    win = ""

    for i in victories:
        if maps[i[0]] == "X" and maps[i[1]] == "X" and maps[i[2]] == "X":
            win = "X"
        if maps[i[0]] == "O" and maps[i[1]] == "O" and maps[i[2]] == "O":
            win = "O"

    return win
Эта функция вернет «X» в случае победы крестиков и «O» в случае победы ноликов.
Шаг 3. Основный игровой цикл
Ну вот мы и подошли к созданию основного игрового цикла. Нам предстоит крутиться в цикле до момента пока кто нибудь не выиграет. Игроки будут по очереди делать ходы, мы будем проверять каждый раз не победил ли кто и как только кто то побеждает — выходим из цикла и завершаем программу.
# Основная программа
game_over = False
player1 = True

while game_over == False:

    # 1. Показываем карту
    print_maps()

    # 2. Спросим у играющего куда делать ход
    if player1 == True:
        symbol = "X"
        step = int(input("Человек 1, ваш ход: "))
    else:
        symbol = "O"
        step = int(input("Человек 2, ваш ход: "))

    step_maps(step,symbol) # делаем ход в указанную ячейку
    win = get_result() # определим победителя
    if win != "":
        game_over = True
    else:
        game_over = False

    player1 = not(player1)

# Игра окончена. Покажем карту. Объявим победителя.
print_maps()
print("Победил", win)
Вот полный код программы крестики-нолики на Python для двух игроков:
# Инициализация карты
maps = [1,2,3,
        4,5,6,
        7,8,9]

# Инициализация победных линий
victories = [[0,1,2],
             [3,4,5],
             [6,7,8],
             [0,3,6],
             [1,4,7],
             [2,5,8],
             [0,4,8],
             [2,4,6]]

# Вывод карты на экран
def print_maps():
    print(maps[0], end = " ")
    print(maps[1], end = " ")
    print(maps[2])

    print(maps[3], end = " ")
    print(maps[4], end = " ")
    print(maps[5])

    print(maps[6], end = " ")
    print(maps[7], end = " ")
    print(maps[8])

# Сделать ход в ячейку
def step_maps(step,symbol):
    ind = maps.index(step)
    maps[ind] = symbol

# Получить текущий результат игры
def get_result():
    win = ""

    for i in victories:
        if maps[i[0]] == "X" and maps[i[1]] == "X" and maps[i[2]] == "X":
            win = "X"
        if maps[i[0]] == "O" and maps[i[1]] == "O" and maps[i[2]] == "O":
            win = "O"

    return win

# Основная программа
game_over = False
player1 = True

while game_over == False:

    # 1. Показываем карту
    print_maps()

    # 2. Спросим у играющего куда делать ход
    if player1 == True:
        symbol = "X"
        step = int(input("Человек 1, ваш ход: "))
    else:
        symbol = "O"
        step = int(input("Человек 2, ваш ход: "))

    step_maps(step,symbol) # делаем ход в указанную ячейку
    win = get_result() # определим победителя
    if win != "":
        game_over = True
    else:
        game_over = False

    player1 = not(player1)

# Игра окончена. Покажем карту. Объявим победителя.
print_maps()
print("Победил", win)
Вот так выглядит процесс игры в крестики-нолики для 2 игроков:
1 2 3
4 5 6
7 8 9
Человек 1, ваш ход: 5
1 2 3
4 X 6
7 8 9
Человек 2, ваш ход: 1
O 2 3
4 X 6
7 8 9
Человек 1, ваш ход: 6
O 2 3
4 X X
7 8 9
Человек 2, ваш ход: 4
O 2 3
O X X
7 8 9
Человек 1, ваш ход: 3
O 2 X
O X X
7 8 9
Человек 2, ваш ход: 7
O 2 X
O X X
O 8 9
Победил O
Шаг 4. Добавление алгоритма для искусственного интеллекта в игре крестики-нолики
А вот теперь мы подобрались к самому интересному моменту в программировании. Нам нужно создать искусственный интеллект, который всегда будет выигрывать или сводить игру к ничьей. На самом деле в игре крестики-нолики такой алгоритм написать совсем не сложно.
Для написания такого алгоритма нам понадобится вспомогательная функция, которая будет проверять все победные линии в игре и подсчитывать в них количество крестиков и ноликов. Если функция находит такую линию, то она возвращает позицию на этой линии куда нужно сделать ход. Например мы будем отслеживать линии где противник поставил два крестика и обязательно поставим нолик, что бы не дать ему выиграть. Вот эта функция:
#Искусственный интеллект: поиск линии с нужным количеством X и O на победных линиях
def check_line(sum_O,sum_X):

    step = ""
    for line in victories:
        o = 0
        x = 0

        for j in range(0,3):
            if maps[line[j]] == "O":
                o = o + 1
            if maps[line[j]] == "X":
                x = x + 1

        if o == sum_O and x == sum_X:
            for j in range(0,3):
                if maps[line[j]] != "O" and maps[line[j]] != "X":
                    step = maps[line[j]]

    return step
А сейчас мы напишем функцию для поиска очередного лучшего хода для искусственного интеллекта. Запрограммируем такой алгоритм для каждого хода (компьютер играет ноликами):
- Если этим ходом можем выиграть — выигрываем (уже 2 нолика стоят на одной из линий). Иначе идем к шагу 2.
- Если можем помешать выиграть человеку — мешаем ( у человека уже 2 крестика на линии — ставим на нее нолик). Иначе идем к шагу 3.
- Если на линии одна наша фигура — ставим вторую. Если пока ни одной нашей фигуры — идем к шагу 4.
- Ставим нолик в центр. Если центр занят идем к шагу 5.
- Ставим в левый верхний угол.
А вот так все это выглядит в программе на Python:
#Искусственный интеллект: выбор хода
def AI():

    step = ""

    # 1) если на какой либо из победных линий 2 свои фигуры и 0 чужих - ставим
    step = check_line(2,0)


    # 2) если на какой либо из победных линий 2 чужие фигуры и 0 своих - ставим
    if step == "":
        step = check_line(0,2)


    # 3) если 1 фигура своя и 0 чужих - ставим
    if step == "":
        step = check_line(1,0)


    # 4) центр пуст, то занимаем центр
    if step == "":
        if maps[4] != "X" and maps[4] != "O":
            step = 5


    # 5) если центр занят, то занимаем первую ячейку
    if step == "":
        if maps[0] != "X" and maps[0] != "O":
            step = 1

    return step
Немного перепишем и основной цикл игры. Теперь вместо человека 2 ход будет делать компьютер. Компьютер каждый раз будет говорить куда делает ход. Если компьютер не дает ответ, значит наметилась ничья — завершаем партию и объявляем ничью. Вот таким станет основной цикл игры, когда мы перепишем программу крестики-нолики под игру против компьютера:
# Основная программа
game_over = False
human = True

while game_over == False:

    # 1. Показываем карту
    print_maps()

    # 2. Спросим у играющего куда делать ход
    if human == True:
        symbol = "X"
        step = int(input("Человек, ваш ход: "))
    else:
        print("Компьютер делает ход: ")
        symbol = "O"
        step = AI()

    # 3. Если компьютер нашел куда сделать ход, то играем. Если нет, то ничья.
    if step != "":
        step_maps(step,symbol) # делаем ход в указанную ячейку
        win = get_result() # определим победителя
        if win != "":
            game_over = True
        else:
            game_over = False
    else:
        print("Ничья!")
        game_over = True
        win = "дружба"

    human = not(human)

# Игра окончена. Покажем карту. Объявим победителя.
print_maps()
print("Победил", win)
Вот готовая программа для для игры против искусственного интеллекта.
# Инициализация карты
maps = [1,2,3,
        4,5,6,
        7,8,9]

# Инициализация победных линий
victories = [[0,1,2],
             [3,4,5],
             [6,7,8],
             [0,3,6],
             [1,4,7],
             [2,5,8],
             [0,4,8],
             [2,4,6]]

# Вывод карты на экран
def print_maps():
    print(maps[0], end = " ")
    print(maps[1], end = " ")
    print(maps[2])

    print(maps[3], end = " ")
    print(maps[4], end = " ")
    print(maps[5])

    print(maps[6], end = " ")
    print(maps[7], end = " ")
    print(maps[8])

# Сделать ход в ячейку
def step_maps(step,symbol):
    ind = maps.index(step)
    maps[ind] = symbol

# Получить текущий результат игры
def get_result():
    win = ""

    for i in victories:
        if maps[i[0]] == "X" and maps[i[1]] == "X" and maps[i[2]] == "X":
            win = "X"
        if maps[i[0]] == "O" and maps[i[1]] == "O" and maps[i[2]] == "O":
            win = "O"

    return win

#Искусственный интеллект: поиск линии с нужным количеством X и O на победных линиях
def check_line(sum_O,sum_X):

    step = ""
    for line in victories:
        o = 0
        x = 0

        for j in range(0,3):
            if maps[line[j]] == "O":
                o = o + 1
            if maps[line[j]] == "X":
                x = x + 1

        if o == sum_O and x == sum_X:
            for j in range(0,3):
                if maps[line[j]] != "O" and maps[line[j]] != "X":
                    step = maps[line[j]]

    return step

#Искусственный интеллект: выбор хода
def AI():

    step = ""

    # 1) если на какой либо из победных линий 2 свои фигуры и 0 чужих - ставим
    step = check_line(2,0)

    # 2) если на какой либо из победных линий 2 чужие фигуры и 0 своих - ставим
    if step == "":
        step = check_line(0,2)

    # 3) если 1 фигура своя и 0 чужих - ставим
    if step == "":
        step = check_line(1,0)

    # 4) центр пуст, то занимаем центр
    if step == "":
        if maps[4] != "X" and maps[4] != "O":
            step = 5

    # 5) если центр занят, то занимаем первую ячейку
    if step == "":
        if maps[0] != "X" and maps[0] != "O":
            step = 1

    return step

# Основная программа
game_over = False
human = True

while game_over == False:

    # 1. Показываем карту
    print_maps()

    # 2. Спросим у играющего куда делать ход
    if human == True:
        symbol = "X"
        step = int(input("Человек, ваш ход: "))
    else:
        print("Компьютер делает ход: ")
        symbol = "O"
        step = AI()

    # 3. Если компьютер нашел куда сделать ход, то играем. Если нет, то ничья.
    if step != "":
        step_maps(step,symbol) # делаем ход в указанную ячейку
        win = get_result() # определим победителя
        if win != "":
            game_over = True
        else:
            game_over = False
    else:
        print("Ничья!")
        game_over = True
        win = "дружба"

    human = not(human)

# Игра окончена. Покажем карту. Объявим победителя.
print_maps()
print("Победил", win)
Вот пример игрового процессе. В этой игре победил компьютер:
1 2 3
4 5 6
7 8 9
Человек, ваш ход: 1
X 2 3
4 5 6
7 8 9
Компьютер делает ход:
X 2 3
4 O 6
7 8 9
Человек, ваш ход: 2
X X 3
4 O 6
7 8 9
Компьютер делает ход:
X X O
4 O 6
7 8 9
Человек, ваш ход: 4
X X O
X O 6
7 8 9
Компьютер делает ход:
X X O
X O 6
O 8 9
Победил O
Вы можете прямо сейчас поиграть в крестики нолики против компьютера или друг против друга. Просто скопируйте текст программы на этой странице и вставьте его в поле программы в этом онлайн эмуляторе Python: https://replit.com/languages/python3 или тут https://www.onlinegdb.com/online_python_compiler
Домашнее задание
У нас получилась довольно беспощадная программа. Ее искусственный интеллект победить не возможно. Человек либо проигрывает, либо играет в ничью. Подумайте как можно дать человеку иногда выигрывать? Возможно вы захотите создать несколько уровней. Например в первом искусственный интеллект очень слаб, дальше он умнет. Или у вас будет на выбор несколько режимов игры на выбор: слабый ИИ, средний и непобедимый.
В общем ваша задача немного ослабить искусственный интеллект в нашей игре крестики-нолики. Сделать его чуть более человечным.

Немного о Java
Java — это не только язык, это целая экосистема, включающая в себя средства разработки, платформу для запуска готовых приложений, огромный свод документации и активное сообщество. Одним из преимуществ Java на начальном этапе была кросс-платформенность (принцип — «написано один раз — запускается везде»).
Дело в том, что программа на Java исполняется не на прямую процессором компьютера, а виртуальной машиной Java (JVM). Это позволяет абстрагироваться от многих нюансов конкретных платформ. Программу, написанную на Java, можно без изменений кода запускать на Windows, Linux, MacOS и других операционных системах (если, конечно, программа не использует специфичные для ОС функции).
Кто застал начало 2000х, наверное помнит огромное количество мобильных телефонов (тогда еще они не были смартфонами), на каждом телефоне была по сути своя маленькая ОС, но при этом почти на каждом можно было запустить Java игру или приложение.
На сегодняшний день Java по-прежнему входит в топ языков для изучения, а Java как платформа — в топ используемых технологий в мире IT и смежных областях.
Создание проекта, первые шаги
Сегодня мы начнем изучать Java, причем сразу с примера игры «Крестики-нолики».
Итак, поехали. Надеюсь как установить java SDK ты уже разобрался. Мы будем писать код в IDE IntelliJ IDEA, но если у вас какая-то другая, например Eclipse, то разницы большой не будет.
Итак, создаем новый проект: нажимаем «create new project», выбираем java и щелкаем «next» до окна, где требуется ввести имя проекта, вводим TicTacToe (крестики-нолики). В некоторых случаях на этапе создания потребуется выбрать шаблон проекта, тогда смело выбирай что-либо похожее на JavaConsoleApplication.
После этого нажимаем «Finish». Idea немного подумает и сгенерирует нам проект с классом Main, в котором определена функция main().
Давайте разберемся, что здесь что. Слева открыто окно структуры проекта «Project», как мы видим в папке src в пакете com.company находится единственный java-файл нашей программы с именем Main. Справа показано его содержимое. Тут надо сделать небольшое отступление, дело в том, что в Java почти все представлено классами. В том числе и файлы программы описывают классы, причем имя файла должно совпадать с классом, который описывается в этом файле (например, у нас файл Main.java описывает класс Main). Пусть слово «класс» не смущает на первом этапе. Пока лишь отмечу, что для глубокого изучения Java так или иначе придется познакомиться с объектно-ориентированным подходом. В двух словах, класс можно воспринимать как шаблон, идею, а экземпляры класса — как реализацию этой идеи. Экземпляры класса называются его объектами. Например, вы можете представить идею стола (нечто, на что можно класть предметы), однако конкретных экземпляров такого стола огромное множество (на одной ножке, на четырех, круглые, квадратные, из разных материалов). Примерно так соотносятся классы и объекты в объектно-ориентированном программировании.
Внутри нашего класса Main описана функция main(), в Java с этой функции начинается исполнение программы, это точка входа в наше приложение. Сейчас там написан только автоматический комментарий (комментарии в Java начинаются с двух символов //). Попробуем кое-что добавить в наш код и проверить работоспособность приложения. Внутри функции main() допишем две строки:
Встроенная функция println() просто выводит на экран текстовую информацию. Запустим наше приложение (нажимаем shift-F10 или зеленый треугольник). Внизу, во вкладке run появится вывод нашей программы:
Функция main() отработала и закончилась, вместе с ней закончилась наша программа.
В игре пользователю конечно захочется взаимодействовать с программой более продвинутым способом, поэтому нам понадобится окно. Набираем внутри функции main() следующие строки:
Смысл большинства строк понятен из комментариев к ним, отдельно отмечу строку window.setLayout() — здесь устанавливается менеджер расположения, который будет применяется к компонентам, добавляемым в наше окно. Менеджер BorderLayout может располагать новые компоненты относительно сторон света (North(верх), West(слева), East(справа), South(низ)), Center (центр)). По умолчанию он располагает компоненты по центру. Подробнее с менеджерами расположения можно познакомиться в документации.
Теперь, если запустить нашу программу, мы увидим окно:
Пока в этом окне ничего нет. Создадим свой компонент, который и будет отрисовывать графику игры.
Свой компонент для рисования
Очевидно, что рисовать в консоли у нас не получится, нужен какой-то компонент для более продвинутого взаимодействия с пользователем. Для этой цели создадим еще один класс, назовем его TicTacToe. Щелкаем правой клавишей мыши на имени пакета приложения (в данном случае это com.company)
И в появившемся меню выбираем пункт «New» → «Java Class». В окне создания класса набираем его имя «TicTacToe» и нажимаем «Enter».
У нас в проекте появился еще один класс. В главное окно можно добавлять только объекты класса JComponent, кроме того, нам нужна область для рисования. Поэтому наследуем наш класс TicTacToe от JComponent. Ой сколько непонятных слов! Сейчас постараюсь пояснить.
Наследование классов — это как создание уточненного шаблона на базе существующего. Например, есть класс Стол, описывающий идею стола вообще. Но нам очень часто приходится создавать столы на четырех ногах с деревянной столешницей, поэтому для удобства мы можем уточнить идею класса Стол и создать шаблон ДеревянныйСтол — он будет иметь все те же основные свойства, что и родительская идея, но зато часть свойств у него уже определены и понятны — это число ног, равное четырем и материал столешницы — дерево.
С JComponent то же самое — данный класс реализует идею некоторого графического компонента пользовательского интерфейса. Такой компонент можно добавить в окно и он умеет как-то себя отрисовывать. Например, класс JButton — наследник класса JComponent, это компонент, который выглядит, как кнопка и умеет показывать анимацию клика мышкой.
Здесь же, наследуя класс JComponent, мы создадим свой компонент, в котором сможем рисовать то, что нам нужно.
Итак дописываем extends JComponent в строку описания класса:
Слово extends говорит о том, что наш класс TicTacToe расширяет (наследует) класс JComponent.
У всех компонентов есть метод paintComponent(), который отвечает за их отрисовку. В параметры этого метода приходит объект Graphics, с помощью которого мы и будем рисовать то, что нам необходимо. Давайте переопределим метод paintComponent так, чтобы он рисовал окружность (это необязательно, но для проверки, что у нас все работает как надо, будет хорошим тоном это сделать).
Переопределим метод paintComponent() в классе TicTacToe следующим образом:
метод setColor() объекта graphics, как очевидно из названия, устанавливает цвет, которым мы будем рисовать, а метод drawOval(x, y, w, h) — в общем случае рисует овал с координатами центра x, y, шириной — w и высотой h. В данном случае рисуется окружность, так как ширина и высота заданы одинаковые — 100. Замечу, что экранные координаты отсчитываются от левого верхнего угла. То есть 0 по вертикали находится вверху.
Чтобы проверить, как выглядит наш объект класса TicTacToe надо создать его экземпляр и добавить в главное окно в качестве дочернего компонента. Создание новых объектов в Java осуществляется с помощью ключевого слова new.
Например, если у нас есть класс Стол и мы хотим создать объект этого класса (настоящий конкретный стол), то мы должны написать что-то такое: стол = new Стол(). Здесь «стол» имя, по которому мы будем обращаться к нашему объекту (взаимодействовать с ним), а Стол — имя класса, объект которого мы создаем.
Замечу сразу, что вместо «стол» мы могли написать любое имя, например «fdgdgdgfd», но программисты обычно стараются давать «говорящие» имена объектам, чтобы код было легче читать. Чтобы создать экземпляр класса TicTacToe мы можем также написать game = new TicTacToe(), а потом добавить его в окно методом add().
Теперь код класса Main выглядит вот так:
Если теперь запустить нашу программу, то мы увидим окно с окружностью:
Ну что ж. Рисовать в базе мы научились. Время приступать к созданию игры.
Создание игрового поля
Вернемся к классу TicTacToe. Для начала необходимо нарисовать игровое поле, состоящее из девяти клеточек. Для этого давайте нарисуем две горизонтальные и две вертикальные линии на нашем поле. Чтобы это сделать, воспользуемся методом drawLine(x1,y1,x2,y2) объекта Graphics, который приходит к нам в метод paintComponent() в качестве параметра. Метод drawLine() рисует линию от точки с координатами x1,y1 до точки x2,y2. Давайте подумаем как нарисовать игровое поле.
Если мы разобьем высоту поля на три (у нас же три клетки в ряду), то получим высоту одной клетки (назовем ее dh). Узнать высоту всего компонента можно методом getHeight(). Значит, мы должны нарисовать первую горизонтальную линию от точки 0,dh до точки w, dh, где w — ширина поля. Но это только одна горизонтальная линия, вторую рисуем также, но координаты будут уже: начало — 0, 2*dh, конец w, 2*dh. По аналогии, если высота поля равна h, а ширина одной клетки равна dw, то вертикальные линии рисуются в координатах d, 0 — d, h и dw*2, 0 — dw*2, h.
Теперь давайте немного поговорим о переменных. Если помните — в алгебре за буквой могло скрываться какое-то значение, например выражение x = 2*a, подразумевало, что на место буквы а можно подставить любое значение и вычислить x.
Примерно то же самое происходит с переменными в программировании. Имя переменной (идентификатор) сопоставлен с некоторым значением и «хранит» его «в себе» (на самом деле, с объектами классов все несколько сложнее, там мы имеем дело со ссылками, но это пока за рамками данного материала).
Помимо этого, в программах есть разные типы данных. Наверное, вы согласитесь, что строку и целое число надо хранить в памяти как-то по-разному? Даже целые и дробные числа требуют разного подхода, поэтому в программах данные соответствуют определенным типам. В нашем примере нам уже понадобились значения ширины и высоты ячейки игрового поля dw и dh. Чтобы вычислить и сохранить их значения в памяти, воспользуемся следующими выражениями:
Здесь int — означает тип данных «целое число». Выражение int a = 10 объявляет переменную с именем a и задает ей сразу значение 10. В нашем примере создаются четыре переменных, значения w и h получаются из методов самого компонента TicTacToe, а dw и dh вычисляются. Обратите внимание, что при делении w / 3 получается целый тип данных. В Java, как и во многих других языках, деление целого на целое дает в результате целое. При этом дробная часть просто отбрасывается (округления нет). Заметьте, что здесь не используется слово «new», так как создаются не объекты, а переменные простых (скалярных) типов данных, в данном случае типа int.
Мы могли бы уже написать код для рисования всех линий, но мы же программисты, а программисты любят все упрощать, правда для этого они пишут много дополнительного кода. Представим, что у нас было бы поле не 3 на 3 клетки а, например, 15х15. Как бы мы его разлиновали? Вручную набирать код для рисования 28 линий это уж слишком.
К счастью, во всех языках программирования (привет ассемблер) есть конструкции, позволяющие повторить заданное число раз тот или иной участок кода — циклы.
Разберем, как автоматизировать рисование линий, заметим, что все горизонтальные линии содержат одни и те же значения координат по горизонтали (от начала до конца ширины игрового поля), при этом их координаты по вертикали различаются на dh. У первой линии высота dh, у второй 2*dh, и так далее.
Для вертикальных линий рассуждения аналогичны, только в рассуждении приведенном выше надо поменять вертикальные и горизонтальные координаты местами.
Попробуем рисовать линии с помощью цикла, в классе TicTacToe создадим свой метод с названием drawGrid(), он будет у нас отвечать за рисование линий сетки игрового поля:
Еще раз пробежимся по коду. Первые четыре строки метода — необходимые нам значения ширины, высоты игрового поля и ширины, высоты одной ячейки. Цикл начинается с ключевого слова for, в скобках после него указывается переменная, которая будет счетчиком (у нас она еще и объявляется сразу int i = 1), условие при ложности которого цикл прервется и выражение изменяющее переменную-счетчик (i++ увеличивает i каждую итерацию цикла на единицу).
Внутри цикла каждую итерацию рисуются очередные горизонтальная и вертикальная линии поля.
Добавим вызов нашего метода drawGrid() в метод отрисовки всего компонента paintComponent():
Запускаем программу и видим разрисованное поле:
Скажи мне, куда ты кликнул?
Итак, наше игровое поле выглядит готовым к игре, но теперь нам надо узнать в какой из квадратов кликнул пользователь. Для этого давайте немного настроим наш компонент TicTacToe, чтобы он смог принимать события от мыши. Во-первых, нам необходимо включить получение таких событий. Делается это с помощью метода enableEvents(), но где его вызвать?
Конечно можно было бы добавить его вызов в наш метод drawGrid() или даже в paintComponent(), но эти методы по логике работы игры будут вызываться каждый раз, когда мы захотим что-то нарисовать. А включить события надо лишь один раз. Где бы найти метод, который вызывается у компонента единожды, например при его создании?
На самом деле такой метод есть у каждого класса и называется он конструктором. Именно конструктор вызывается при попытке создания нового объекта. Конструкторов может быть несколько, он так же как обычный метод может принимать параметры, но вот возвращаемого значения у него нет. Конструктор класса имеет то же имя, что и класс. Создадим конструктор в классе TicTacToe:
Как видим — ничего сложного, просто еще один метод. А как же наш компонент создавался до этого? Ведь в классе Main мы его уже создавали. Помните, game = new TicTacToe()? Тут тоже никакой магии — если конструктор не задан явно, используется конструктор по умолчанию.
Именно здесь мы включим получение событий от мыши:
Хорошо! Получение событий мы включили, а где же мы их будем получать? В методе processMouseEvent() конечно, именно он будет срабатывать каждый раз, когда указатель мыши каким-либо образом взаимодействует с нашим игровым полем.
Приведу на всякий случай полный код класса TicTacToe на текущий момент:
Мозг игры
Ну не то чтобы уж мозг, но некоторую начинку нам создать придется. Итак, давайте подумаем, как хранить состояние игры? Неплохо бы было хранить состояние каждой клетки игрового поля, для этой цели хорошо подойдет двумерный массив целых чисел размером 3х3. Создается он просто int[][] field = new int[3][3].
Массив это уже целый объект, на который выделяется память в отдельной области (куче), поэтому тут мы используем слово new. Создадим в классе TicTacToe новый метод под названием initGame(), он будет отвечать у нас за сброс игры к начальному состоянию, именно здесь мы будем «очищать» игровое поле.
Для хранения состояния ячейки поля создадим три константы со значениями 0, 10 и 200. Ноль будет соответствовать пустой ячейке, 10 — крестику, а 200 — нолику. Первоначально заполним массив нулями.
Теперь добавим немного кода в метод processMouseEvent(), который отвечает за клики мышью на игровом поле. Также заведем логическую переменную isXturn, которая будет показывать чей сейчас ход.
Пробежимся по коду. Переход от координат к индексам довольно прост: мы делим текущую координату на размер одной ячейки и получаем сколько целых ячеек укладывается до текущей (если совсем непонятно, то поясню: разделить на w/3 это то же самое, что умножить на 3/w).
В 42й строке кода стоит условный оператор (также называемый ветвлением), пора с ним познакомиться. Если условие в скобках истинно (в нашем случае если поле пустое), то мы заходим «внутрь» условного оператора (строки 43-46), если же условие ложно (ячейка уже занята), то мы пройдем дальше. Что же происходит если кликнутая ячейка пуста?
В 44й строке после «=» стоит еще один интересный оператор — тернарный, он дает возможность записать в строку ветвление, если в результате него присваивается значение. Записывают его так: isXturn? — это проверка, чей сейчас ход (ходит крестик, если значение «истина»), далее следует определенная нами константа FIELD_X, именно она будет результатом выражения, если isXturn — true.
После FIELD_X стоит двоеточии и константа FIELD_O — ее значение станет результатом выражения, если ход «нолика». После изменения значения в ячейке массива, меняем очередность хода: isXturn =! isXturn изменит значение переменной на противоположное. В конце всех действий — вызываем перерисовку компонента, так как теперь нужно нарисовать крестик или нолик, там где его не было раньше.
Теперь осталось научиться рисовать крестики или нолики. Создадим два метода: drawX() и draw0(). На данном этапе мы уже умеем рисовать линии и круги, поэтому обойдусь комментариями в коде:
Комментарии в коде достаточно очевидны. Коротко поясню, что крестик мы рисуем как пересечение двух линий из угла в угол ячейки, а нолик — как овал чуть вытянутый по вертикали. Теперь у нас есть методы, рисующие крестик и нолик по заданным индексам ячейки поля. Как же мы будем рисовать процесс игры? Пробежимся еще раз по коду. Игроки кликают мышкой на наш компонент, при этом срабатывает метод processMouseEvent(), в котором мы определяем, какое событие произошло, пуста ли ячейка, в которую кликнули и вызываем перерисовку компонента (repaint()). На момент перерисовки в массиве field содержатся актуальные данные о поставленных крестиках и ноликах, остается пробежаться циклами по всему массиву и если встречается нолик — рисовать нолик, а если крестик — рисовать крестик. Поехали, создаем метод drawXO(). Именно в нем будем «просматривать» массив:
Осталось вызвать данный метод в методе painComponent():
Теперь, если запустить нашу программу можно понаслаждаться постановкой крестиков и ноликов:
Определяем победителя
Все бы хорошо, но сейчас игра никак не отслеживает свое состояние, то есть крестики и нолики успешно ставятся, но выигрыш никак не определяется. Придется еще немного потрудиться! Как же нам определить, что игра закончилась? Давайте присмотримся к массиву field. Если в ряду будут стоять одни крестики, значит, там значения 10, 10, 10.
Если нолики — 200, 200, 200. Эврика! Давайте проверять сумму всех ячеек в ряду по горизонтали и вертикали, а также по двум диагоналям. Создаем еще один метод checkState(), он будет каждый ход проверять сложившуюся на поле ситуацию и возвращать -1, если ходов не осталось, 3*FIELD_X если выиграли крестики и 3*FIELD_O, если выиграли нолики, в случае продолжения игры — метод пусть вернет 0.
Основные комментарии даны в коде. Элементы, стоящие на главной диагонали вычисляются просто — их индексы равны ([0][0], [1][1] и т. д.). Побочная диагональ содержит элементы с индексами [0][N-1], [1][N-2] и так далее (N — длина массива).
Часть кода с 142й по 160ю строку отвечает за подсчет суммы значений в ячейках по вертикальным и горизонтальным рядам: каждую «большую» итерацию по i фиксируется вертикальный (горизонтальный) ряд с индексом i и запускается малый цикл с перебором всех ячеек в данном ряду (цикл по j).
Кроме того, проверяется наличие на поле хотя бы одной не занятой ячейки (hasEmpty=true), это нужно чтобы определить ситуацию, когда все ячейки заняты, но никто не выиграл (ничья). Наконец, если нигде ранее не произошел выход из метода мы проверяем значение hasEmpty, если пустые ячейки есть — возвращаем 0, а если нет, то -1 (ничья).
Осталось использовать данный метод. Немного подправим обработку нажатий.
Здесь добавилось получение результата из метода checkState() и его обработка. Метод showMessageDialog() показывает сообщение с заданным текстом и заголовком. В ветвлении проверяем, какое значение вернул метод checkState() и показываем соответствующие сообщения (или продолжаем игру, если результат 0).
На этом данный туториал подходит к концу. За не столь долгое время нам удалось создать игру с графическим интерфейсом и захватывающим геймплеем: ).
Задание на дом: наша игра все-таки ленивая, и почему-то не зачеркивает выигрышный ряд. Подумайте, как можно его зачеркнуть, ведь рисовать линии вы уже умеете (подсказка, обратите внимание на метод checkState() — там уже сделана почти вся работа по нахождению выигрышного ряда).
С помощью нашего шестимесячного курса «Профессия: Разработчик» вы научитесь писать в Java не только это! 👉 Узнать подробности!
- Download source files — 44.1 KB
Introduction
This C++ is fun series is intended to show that writing code in C++ can be as productive and fun as in other mainstream languages. In this second instalment, I will walk you through creating a tic tac toe game from scratch in C++. This article, and the entire series is targeted to developers that want to learn C++ or are curious about the capabilities of the language.
Many young people want to learn programming to write games. C++ is the most used language for writing games, though one needs to gain lots of programming experience before producing the next Angry Birds. A Tic Tac Toe game could be a good option to start, and in fact many years ago, it was the first game I wrote after I started learning C++. I hope this article can help both beginners and experienced developers, yet not very familiar with C++.
I am using Visual Studio 2012 for writing the source code for this article.
The Game
If you have not played Tic Tac Toe and are not familiar with the game, here is a description from Wikipedia.
Tic-tac-toe (or Noughts and crosses, Xs and Os) is a paper-and-pencil game for two players, X and O, who take turns marking the spaces in a 3×3 grid. The player who succeeds in placing three respective marks in a horizontal, vertical, or diagonal row wins the game.
The game is to be played between the computer and a human opponent. Either of the two can start first.
There are two things to implement for creating the game: the game logic and the game user interface. There are various possibilities for creating the UI on Windows, including Win32 API, MFC, ATL, GDI+, DirectX, etc. In this article, I will show how we can use the same game logic implementation to build applications using various technologies. We will create two applications, one with Win32 API and one with C++/CX for the Windows Runtime.
The Game Logic
A player can play a perfect game (that means win or draw) if he/she follows several simple rules in placing the next mark on the grid. The rules are described on Wikipedia, where you can also find the optimal strategy for the player that makes the first move.

The optimal strategies for both the first and second player are available on an xkcd drawing. Though it has several errors (it misses making winning moves in several situations and at least in one case is missing an X mark), I will be using this version for the playing strategy (with fixes the errors that I was able to find). Bear in mind, this means the computer will always play a perfect game. If you implement such a game, you probably want to also let the users win, in which case you need a different approach. But for the purpose of this article, this should suffice.
The first question that arises is what data structure can we use to model this picture in a C++ program. There could be different choices such as a tree, graph, an array or even bit fields (if one is really picky about memory consumption). The grid has 9 cells and the simplest choice in my opinion is to use an array of 9 integers, one for each cell: 0 can represent an empty cell, 1 a cell marked with X and 2 a cell marked with O. Let’s take the following picture and see how it can be encoded.

The picture can be read like this:
- Place an X in cell (0,0). The grid can be encoded as:
1, 0, 0, 0, 0, 0, 0, 0, 0 - If the opponent places an O in cell (0,1) then place an X in cell (1,1). The grid encoding is now:
1, 2, 0, 0, 1, 0, 0, 0, 0 - If the opponent places an O in cell (0,2) then place an X in cell (2,2). The grid encoding is now:
1, 2, 2, 0, 1, 0, 0, 0, 1. This represents a winning move. - …
- If the opponent places an O in cell (2,2) then place an X in cell (2,0). The grid encoding is now:
1, 2, 0, 0, 1, 0, 1, 0, 2. At this point, regardless of what move the opponent makes, X will win the game. - If the opponent places an O in cell (0,2) then place an X in cell (1,0). The grid encoding is now:
1, 2, 2, 1, 1, 0, 1, 0, 2. This represents a winning move. - …
With this in mind, we can go ahead and encode this in the program. We will use a std::array for representing the 9 cells board. This is a fixed-size container, with the size known at compile time, that stores its elements in a contiguous memory area. To simplify using the same array type over and over, I will define an alias for it.
#include <array>

typedef std::array<char, 9> tictactoe_status;
The optimal strategies described above are then represented as a sequence (another array) of such arrays.
tictactoe_status const strategy_x[] =
{
   {1,0,0,0,0,0,0,0,0},
   {1,2,0,0,1,0,0,0,0},
   {1,2,2,0,1,0,0,0,1},
   {1,2,0,2,1,0,0,0,1},
   };

tictactoe_status const strategy_o[] =
{
   {2,0,0,0,1,0,0,0,0},
   {2,2,1,0,1,0,0,0,0},
   {2,2,1,2,1,0,1,0,0},
   {2,2,1,0,1,2,1,0,0},
   };
strategy_x is the optimal strategy for the first player, and strategy_o is the optimal strategy for the second player. If you look in the source code available with the article, you’ll notice that the actual definition of these two arrays differs from what I have shown earlier.
tictactoe_status const strategy_x[] =
{
#include "strategy_x.h"
};

tictactoe_status const strategy_o[] =
{
#include "strategy_o.h"
};
This is a little trick, I’d argue, that allows us move the actual, long, content of the array in a separate file (the actual extension of these files is not important, it can be anything not just a C++ header) and keep the source file and the definition simple and clear. The content of the strategy_x.h and strategy_o.h files is brought into the source file during the pre-processing stage of the compilation, just like a regular header file. Here is a snippet of the strategy_x.h file.
1,0,0,0,0,0,0,0,0,

1,2,0,0,1,0,0,0,0,
1,2,2,0,1,0,0,0,1,
1,2,0,2,1,0,0,0,1,
1,2,0,0,1,2,0,0,1,
You should notice that if you use a C++11 compliant compiler, you can use a std::vector instead of the C-like array. This is not available for Visual Studio 2012, but is supported in Visual Studio 2013.
std::vector<tictactoe_status> strategy_o =
{
   {2, 0, 0, 0, 1, 0, 0, 0, 0},
   {2, 2, 1, 0, 1, 0, 0, 0, 0},
   {2, 2, 1, 2, 1, 0, 1, 0, 0},
   {2, 2, 1, 0, 1, 2, 1, 0, 0},
   {2, 2, 1, 1, 1, 0, 2, 0, 0},
};
To define what player these numbers in the arrays represent, I am defining a enumeration called tictactoe_player.
enum class tictactoe_player : char
{
   none = 0,
   computer = 1,
   user = 2,
};
The game logic will be implemented in a class called tictactoe_game. At a minimum, the class should have the following state:
- a boolean flag that indicates whether a game has started, represented by
started - the current state of the game (the marks on the grid), represented by
status - the set of moves that are possible to make in the future based on the current status of the game, represented by
strategy.
class tictactoe_game
{
   bool started;
   tictactoe_status status;
   std::set<tictactoe_status> strategy;

   };
During the game, we will need to know whether the game is started, finished, and if finished, if any of the players won or the game ended in a draw. The tictactoe_game provides three methods for this:
is_startedindicates whether a game has startedis_victorychecks if the specified player has won the gameis_finishedchecks if the game has finished. A game is finished when one of the players wins or when the grid is full and players cannot make any additional moves.
bool is_started() const {return started;}
bool is_victory(tictactoe_player const player) const {return is_winning(status, player);}
bool is_finished() const
{
  return is_full(status) ||
         is_victory(tictactoe_player::user) ||
         is_victory(tictactoe_player::computer);
}
The implementation of is_victory and is_finished actually relies on two private methods, is_full, that indicates whether the grid is full and no further moves are possible, and is_winning, that indicates whether on a given grid, a given player has won. Their implementation should be straight forward to understand. is_full counts the number of cells in the grid (array) that are empty (the value in the array is 0), and returns true if there is no such cell. is_winning checks the lines, rows and the two diagonals of the grid to see if the given player has scored a winning streak.
bool is_winning(tictactoe_status const & status, tictactoe_player const player) const
{
   auto mark = static_cast<char>(player);
   return
      (status[0] == mark && status[1] == mark && status[2] == mark) ||
      (status[3] == mark && status[4] == mark && status[5] == mark) ||
      (status[6] == mark && status[7] == mark && status[8] == mark) ||
      (status[0] == mark && status[4] == mark && status[8] == mark) ||
      (status[2] == mark && status[4] == mark && status[6] == mark) ||
      (status[0] == mark && status[3] == mark && status[6] == mark) ||
      (status[1] == mark && status[4] == mark && status[7] == mark) ||
      (status[2] == mark && status[5] == mark && status[8] == mark);
}

bool is_full(tictactoe_status const & status) const
{
   return 0 == std::count_if(std::begin(status), std::end(status),
               [](int const mark){return mark == 0;});
}
When a player wins a game, we want to draw a line over the column, row or diagonal that won the game. Therefore, we need to know which is that winning line. Method get_winning_line returns a pair of tictactoe_cells that indicate the two ends of the line. Its implementation is very similar to is_winning: it checks the rows, columns and diagonals and if one is a winning line, it returns its two ends (coordinates). It may look a bit verbose, but I believe checking the lines this way is simpler than running loops of three iterations for rows, columns and diagonals.
struct tictactoe_cell
{
   int row;
   int col;

   tictactoe_cell(int r = INT_MAX, int c = INT_MAX):row(r), col(c)
   {}

   bool is_valid() const {return row != INT_MAX && col != INT_MAX;}
};

std::pair<tictactoe_cell, tictactoe_cell> const get_winning_line() const
{
   auto mark = static_cast<char>(tictactoe_player::none);
   if(is_victory(tictactoe_player::computer))
      mark = static_cast<char>(tictactoe_player::computer);
   else if(is_victory(tictactoe_player::user))
      mark = static_cast<char>(tictactoe_player::user);

   if(mark != 0)
   {
      if(status[0] == mark && status[1] == mark && status[2] == mark)
         return std::make_pair(tictactoe_cell(0,0), tictactoe_cell(0,2));
      if(status[3] == mark && status[4] == mark && status[5] == mark)
         return std::make_pair(tictactoe_cell(1,0), tictactoe_cell(1,2));
      if(status[6] == mark && status[7] == mark && status[8] == mark)
         return std::make_pair(tictactoe_cell(2,0), tictactoe_cell(2,2));
      if(status[0] == mark && status[4] == mark && status[8] == mark)
         return std::make_pair(tictactoe_cell(0,0), tictactoe_cell(2,2));
      if(status[2] == mark && status[4] == mark && status[6] == mark)
         return std::make_pair(tictactoe_cell(0,2), tictactoe_cell(2,0));
      if(status[0] == mark && status[3] == mark && status[6] == mark)
         return std::make_pair(tictactoe_cell(0,0), tictactoe_cell(2,0));
      if(status[1] == mark && status[4] == mark && status[7] == mark)
         return std::make_pair(tictactoe_cell(0,1), tictactoe_cell(2,1));
      if(status[2] == mark && status[5] == mark && status[8] == mark)
         return std::make_pair(tictactoe_cell(0,2), tictactoe_cell(2,2));
   }

   return std::make_pair(tictactoe_cell(), tictactoe_cell());
}
The only things left at this point is starting a new game and making a move (both for the computer and the user).
For starting a new game, we need to know what player makes the first move, so that we can pick the appropriate strategy (of the two available). We also have to reset the array representing the game grid. Method start() initializes a new game. The set of possible future moves is reinitialized with the values from the strategy_x or strategy_o arrays. Notice that in the code below, strategy is a std::set, and strategy_x and strategy_o are arrays that have duplicate entries, because some of the positions in the tictactoe chart are duplicates. The set is a container of unique values and it preserves only the unique possible positions (for instance about half of the strategy_o array is represented by duplicates). std::copy from <algorithm> is used to copy the content of the array into the set, and method assign() is used to set a value (0 in our case) for all the elements of a std::array.
void start(tictactoe_player const player)
{
   strategy.clear();
   if(player == tictactoe_player::computer)
      std::copy(std::begin(strategy_x), std::end(strategy_x),
                std::inserter(strategy, std::begin(strategy)));
   else if(player == tictactoe_player::user)
      std::copy(std::begin(strategy_o), std::end(strategy_o),
                std::inserter(strategy, std::begin(strategy)));

   status.assign(0);

   started = true;
}
To place a move for a human player, all we need to do is make sure the selected cell is empty and if so, fill it with the appropriate mark. Method move() takes the coordinates of the cell, the mark of the player and returns true if the move was valid or false otherwise.
bool move(tictactoe_cell const cell, tictactoe_player const player)
{
   if(status[cell.row*3 + cell.col] == 0)
   {
      status[cell.row*3 + cell.col] = static_cast<char>(player);

      if(is_victory(player))
      {
         started = false;
      }

      return true;
   }

   return false;
}
Making a move for the computer requires more work, because we have to find the next best move the computer should do. An overload of the move() method looks up the next set of possible moves (the strategy) and then selects the best move from this set of possible moves. After making the move, it checks whether the move won the game for the computer and if so, marks the game as finished. The method returns the position where the computer placed its move.
tictactoe_cell move(tictactoe_player const player)
{
   tictactoe_cell cell;

   strategy = lookup_strategy();

   if(!strategy.empty())
   {
      auto newstatus = lookup_move();

      for(int i = 0; i < 9; ++i)
      {
         if(status[i] == 0 && newstatus[i]==static_cast<char>(player))
         {
            cell.row = i/3;
            cell.col = i%3;
            break;
         }
      }

      status = newstatus;

      if(is_victory(player))
      {
         started = false;
      }
   }

   return cell;
}
The lookup_strategy() method iterates through the current possible moves to find what moves are possible from the current one. It takes advantage of the fact that an empty cell is represented by a 0 and any filled cell, is either 1 or 2, and both these values are greater than 0. A cell value can only transform from a 0 into a 1 or 2. Never a cell transforms from 1 into 2 or from 2 into 1.
When the game begins, the grid is represented as 0,0,0,0,0,0,0,0,0 and any move is possible from this position. That’s why in the start() method, we copied the entire set of moves. Once a player makes a move, the set of possible moves decreases. For instance, a player makes a move into the first cell. The grid is then represented as 1,0,0,0,0,0,0,0,0. At this point, no move that has 0 or 2 on the first position in this array is possible anymore and should be filtered out.
std::set<tictactoe_status> tictactoe_game::lookup_strategy() const
{
   std::set<tictactoe_status> nextsubstrategy;

   for(auto const & s : strategy)
   {
      bool match = true;
      for(int i = 0; i < 9 && match; ++i)
      {
         if(s[i] < status[i])
            match = false;
      }

      if(match)
      {
         nextsubstrategy.insert(s);
      }
   }

   return nextsubstrategy;
}
When selecting the next move, we must make sure we select a move that only differs by a single mark from the current position. If the current position is 1,2,0,0,0,0,0,0,0 and we must move for player 1, we can only select moves that have a single 1 on the last 7 elements in the array: 1,2,1,0,0,0,0,0,0 or 1,2,0,1,0,0,0,0,0 … or 1,2,0,0,0,0,0,0,1. However, since more than just a single such move is available, we should pick the best one, and the best move is always a move that wins the game. Therefore, we have to check all the moves for a winning move. If no such winning move is available, then we can pick anyone.
tictactoe_status tictactoe_game::lookup_move() const
{
   tictactoe_status newbest = {0};
   for(auto const & s : strategy)
   {
      int diff = 0;
      for(int i = 0; i < 9; ++i)
      {
         if(s[i] > status[i])
            diff++;
      }

      if(diff == 1)
      {
         newbest = s;
         if(is_winning(newbest, tictactoe_player::computer))
         {
            break;
         }
      }
   }

   assert(newbest != empty_board);

   return newbest;
}
With this, we have everything in place for the game logic. For further details, you can read the code in files, game.h and game.cpp.
A Game Implementation with Win32 API
The first application that I’ll be creating will use Win32 API for the user interface. If you are not familiar with Win32 programming, there are plenty of resources where you can learn more. I will only present some essential aspects for understanding how we can build the final application. Also, I will not show and explain every piece of code for this part, but since the code is available to download, you can browse and read it.
At a minimum, a Win32 application requires the following:
- An entry point, that conventionally is WinMain, not
main. It takes parameters such as the handle to the current application instance, the command line and flags that indicate how the window should be shown. - A window class, that represents a template for creating a window. A window class contains a set of attributes used by the system, such as the class name, class styles (that are different from the window styles), icon, menu, background brush, pointer to the window procedure, etc. A window class is process specific and must be registered into the system prior to creating the window. To register the window class, use RegisterClassEx.
- A main window, created based on a window class. A window can be created with function CreateWindowEx.
- A window procedure, that is a function that processes messages for all the windows that were created based on a window class. The window procedure is associated with a window class, not a window.
- A message loop. A window can receive messages in two ways: with SendMessage, that directly calls the window procedure for the window and does not return until the window procedure has handled the message, or with PostMessage (or PostThreadMessage) that posts a messages to the message queue of the thread that created the window and returns without waiting for the thread to process the message. Therefore, the thread must run a loop where it fetches messages from the message queue and dispatches them to the window procedure.
You can find an example for simple Win32 application that registers a window class, creates a window and runs a message loop in MSDN. Conceptually, a Win32 application looks like this:
int WINAPI WinMain(HINSTANCE hInstance, HINSTANCE hPrevInstance, LPSTR lpCmdLine, int nCmdShow)
{
   WNDCLASS wc;

   if (!::RegisterClass(&wc))
      return FALSE;

   HWND wnd = ::CreateWindowEx(...);
   if(!wnd)
      return FALSE;

   ::ShowWindow(wnd, nCmdShow);

   MSG msg;
   while(::GetMessage(&msg, nullptr, 0, 0))
   {
      ::TranslateMessage(&msg);
      ::DispatchMessage(&msg);
   }

   return msg.wParam;
}
This is not enough though, we still need a window procedure to handle the messages sent to the window, such as painting commands, destroying messages, menu commands, and anything else that is necessary to handle. A window procedure can look like this:
LRESULT WndProc(HWND hWnd, UINT message, WPARAM wParam, LPARAM lParam)
{
   switch(message)
   {
   case WM_PAINT:
      {
         PAINTSTRUCT ps;
         HDC dc = ::BeginPaint(hWnd, &ps);
                  ::EndPaint(hWnd, &ps);
      }
      break;

   case WM_DESTROY:
      ::PostQuitMessage(0);
      return 0;

   case WM_COMMAND:
      {
         ...
      }
      break;
   }

   return ::DefWindowProc(hWnd, message, wParam, lParam);
}
I like to write more object oriented code and less procedural, so I put together a few classes for wrapping a window class, a window and a device context. You can find the implementation for these classes (that are very small) in the attached source code in framework.h and framework.cpp.
WindowClassis a RAII-style wrapper class for a window class. In the constructor, it fills a WNDCLASSEX structure and calls RegisterClassEx. In the destructor, it unregisters the window class by calling UnregisterClass.Windowis a thin wrapper over aHWNDexposing methods such asCreate,ShowWindowandInvalidate(their name should tell you what they do). It also has several virtual members representing message handlers that are called from the window procedure (OnPaint,OnMenuItemClicked,OnLeftButtonDown). This window is intended to be derived in order to provide specific implementations.DeviceContextis a RAII-style wrapper class for a device context (HDC). In the constructor, it calls BeginPaint and in the destructor, it calls EndPaint.
The game main window is TicTacToeWindow, derived from the Window class. It overrides the virtual methods for handling messages. The declaration of this class is shown below:
class TicTacToeWindow : public Window
{
   HANDLE hBmp0;
   HANDLE hBmpX;
   BITMAP bmp0;
   BITMAP bmpX;

   tictactoe_game game;

   void DrawBackground(HDC dc, RECT rc);
   void DrawGrid(HDC dc, RECT rc);
   void DrawMarks(HDC dc, RECT rc);
   void DrawCut(HDC dc, RECT rc);

   virtual void OnPaint(DeviceContext* dc) override;
   virtual void OnLeftButtonUp(int x, int y, WPARAM params) override;
   virtual void OnMenuItemClicked(int menuId) override;

public:
   TicTacToeWindow();
   virtual ~TicTacToeWindow() override;
};
Method OnPaint() handles the painting of the window. It has to draw the window background, the grid lines, the marks in the filled cells (if any) and if the game finished and a player won, a red line over the winning row, column or diagonal. To avoid flickering, we use double buffer technique: create an in-memory device context (compatible with the device context prepared for the window by a call to BeginPaint), an in-memory bitmap compatible for the in-memory device context, paint on this bitmap, and then copy the content of the in-memory device context over the window device context.
void TicTacToeWindow::OnPaint(DeviceContext* dc)
{
   RECT rcClient;
   ::GetClientRect(hWnd, &rcClient);

   auto memdc = ::CreateCompatibleDC(*dc);
   auto membmp = ::CreateCompatibleBitmap
                   (*dc, rcClient.right - rcClient.left, rcClient.bottom-rcClient.top);
   auto bmpOld = ::SelectObject(memdc, membmp);

   DrawBackground(memdc, rcClient);

   DrawGrid(memdc, rcClient);

   DrawMarks(memdc, rcClient);

   DrawCut(memdc, rcClient);

   ::BitBlt(*dc,
      rcClient.left,
      rcClient.top,
      rcClient.right - rcClient.left,
      rcClient.bottom-rcClient.top,
      memdc,
      0,
      0,
      SRCCOPY);

   ::SelectObject(memdc, bmpOld);
   ::DeleteObject(membmp);
   ::DeleteDC(memdc);
}
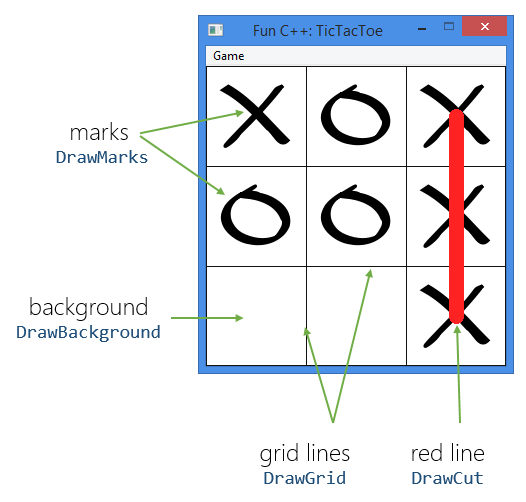
I will not list here the content of the DrawBackground, DrawGrid and DrawMarks functions. They are not very complicated, and you can read the source code. The DrawMarks function uses two bitmaps, ttt0.bmp and tttx.bmp, to draw the marks in the grid.


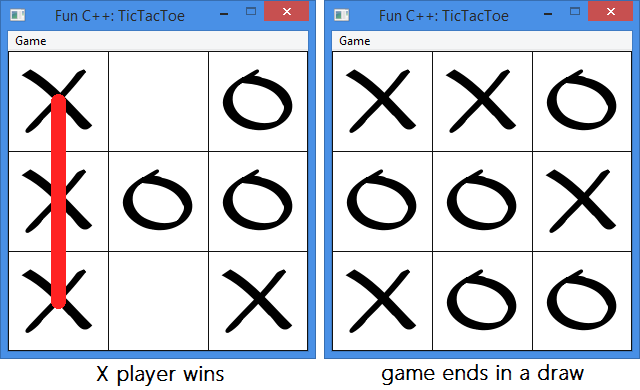
I will only show how to draw a red line over the winning row, column or diagonal. First, we have to check if the game is finished and if it is, then retrieve the winning line. If the two ends are both valid, then compute the center of the two cells, create and select a pen (a solid, 15 pixels width red line) and draw a line between the middle of the two cells.
void TicTacToeWindow::DrawCut(HDC dc, RECT rc)
{
   if(game.is_finished())
   {
      auto streak = game.get_winning_line();

      if(streak.first.is_valid() && streak.second.is_valid())
      {
         int cellw = (rc.right - rc.left) / 3;
         int cellh = (rc.bottom - rc.top) / 3;

         auto penLine = ::CreatePen(PS_SOLID, 15, COLORREF(0x2222ff));
         auto penOld = ::SelectObject(dc, static_cast<HPEN>(penLine));

         ::MoveToEx(
            dc,
            rc.left + streak.first.col * cellw + cellw/2,
            rc.top + streak.first.row * cellh + cellh/2,
            nullptr);

         ::LineTo(dc,
            rc.left + streak.second.col * cellw + cellw/2,
            rc.top + streak.second.row * cellh + cellh/2);

         ::SelectObject(dc, penOld);
      }
   }
}
The main window has a menu with three items: ID_GAME_STARTUSER that starts a game in which the user moves first, ID_GAME_STARTCOMPUTER that starts a game in which the computer moves first and ID_GAME_EXIT that closes the application. When a user clicks on one of the two start commands, we must start a game. If the computer moves first, then we should let if make the move and then, in both cases, redraw the window.
void TicTacToeWindow::OnMenuItemClicked(int menuId)
{
   switch(menuId)
   {
   case ID_GAME_EXIT:
      ::PostMessage(hWnd, WM_CLOSE, 0, 0);
      break;

   case ID_GAME_STARTUSER:
      game.start(tictactoe_player::user);
      Invalidate(FALSE);
      break;

   case ID_GAME_STARTCOMPUTER:
      game.start(tictactoe_player::computer);
      game.move(tictactoe_player::computer);
      Invalidate(FALSE);
      break;
   }
}
The only thing left to take care in the window is handling the user mouse clicks on the window. When the user clicks on a point in the window client area, we should check which grid cell it is, and if it is empty, fill it with the user’s mark. Then, if the game is not finished, let the computer make a move.
void TicTacToeWindow::OnLeftButtonUp(int x, int y, WPARAM params)
{
   if(game.is_started() && !game.is_finished())
   {
      RECT rcClient;
      ::GetClientRect(hWnd, &rcClient);

      int cellw = (rcClient.right - rcClient.left) / 3;
      int cellh = (rcClient.bottom - rcClient.top) / 3;

      int col = x / cellw;
      int row = y / cellh;

      if(game.move(tictactoe_cell(row, col), tictactoe_player::user))
      {
         if(!game.is_finished())
            game.move(tictactoe_player::computer);

         Invalidate(FALSE);
      }
   }
}
Finally, we need to implement the WinMain function, the entry point for the application. The code below is very similar to the one shown in the beginning on this section, with the difference that it uses my wrapper classes for the window class and the window.
int WINAPI WinMain(HINSTANCE hInstance, HINSTANCE hPrevInstance, LPSTR lpCmdLine, int nCmdShow)
{
   WindowClass wndcls(hInstance, L"TicTacToeWindowClass",
                      MAKEINTRESOURCE(IDR_MENU_TTT), CallWinProc);

   TicTacToeWindow wnd;
   if(wnd.Create(
      wndcls.Name(),
      L"Fun C++: TicTacToe",
      WS_OVERLAPPED | WS_CAPTION | WS_SYSMENU | WS_MINIMIZEBOX,
      CW_USEDEFAULT,
      CW_USEDEFAULT,
      300,
      300,
      hInstance))
   {
      wnd.ShowWindow(nCmdShow);

      MSG msg;
      while(::GetMessage(&msg, nullptr, 0, 0))
      {
         ::TranslateMessage(&msg);
         ::DispatchMessage(&msg);
      }

      return msg.wParam;
   }

   return 0;
}
If you are not familiar with Win32 API programming, you may find this a bit cumbersome, even though, in my opinion, the amount of code I put together is relatively small and simple. However, you have to explicitly take care of all the initialization of objects, and creation of windows, handling of messages, etc. Hopefully, you can find the next section more appealing.
A Game App for Windows Runtime
The Windows Runtime is a new Windows runtime engine introduced in Windows 8. It lives alongside Win32 and has a COM-based API. Applications built for the Windows Runtime are so badly called «Windows Store» applications. They run in the Windows Runtime, not in a Windows store, but people in the marketing division at Microsoft probably had a creativity hiatus. Windows Runtime applications and components can be written in C++ either with the Windows Runtime C++ Template Library (WTL) or with C++ Component Extensions (C++/CX). In this article, I will use XAML and C++/CX to build an application similar in functionality with the desktop one created in the previous section.
When you create a Windows Store blank XAML application, the project the wizard creates is not actually empty, but contains all the files and settings for building and running a Windows Store application. What is empty is the main page of the application.
The only thing we have to care about for the purpose of this article is the main page. The XAML code is available in file MainPage.xaml and the code behind in MainPage.xaml.h and MainPage.xaml.cpp. The simple application I’d like to build looks like in the following image.
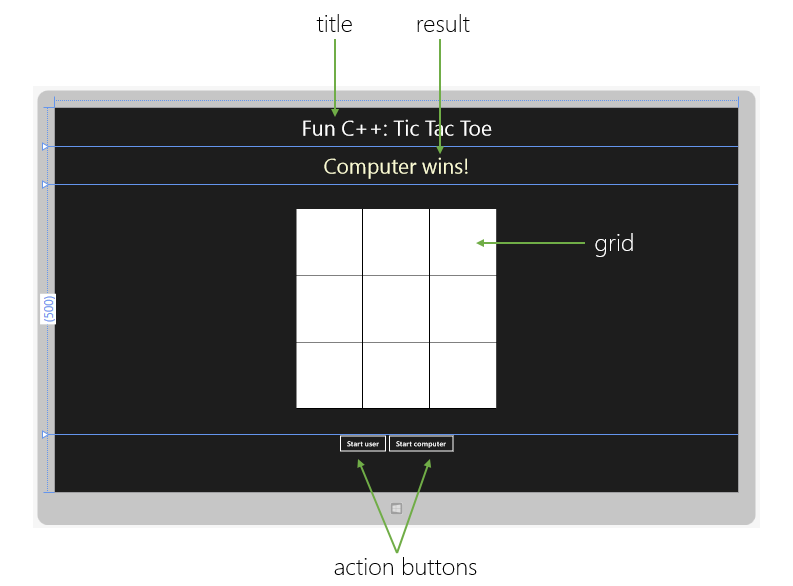
Here is how the XAML for the page may look like (in a real application, you probably want to use the application bar for actions like starting a new game, not buttons on the main page, but for simplicity, I’ll put them on the page):
<Page
    x:Class="TicTacToeWinRT.MainPage"
    xmlns="http://schemas.microsoft.com/winfx/2006/xaml/presentation"
    xmlns:x="http://schemas.microsoft.com/winfx/2006/xaml"
    xmlns:local="using:TicTacToeWinRT"
    xmlns:d="http://schemas.microsoft.com/expression/blend/2008"
    xmlns:mc="http://schemas.openxmlformats.org/markup-compatibility/2006"
    mc:Ignorable="d">

   <Grid Background="{StaticResource ApplicationPageBackgroundThemeBrush}">
      <Grid.RowDefinitions>
         <RowDefinition Height="Auto" />
         <RowDefinition Height="Auto" />
         <RowDefinition Height="Auto" />
         <RowDefinition Height="Auto" />
      </Grid.RowDefinitions>

      <TextBlock Grid.Row="0" Text="Fun C++: Tic Tac Toe"
                 Foreground="White" FontSize="42" FontFamily="Segoe UI"
                 Margin="10"
                 HorizontalAlignment="Center" VerticalAlignment="Center"
                 />

      <TextBlock Grid.Row="1" Text="Computer wins!"
                 Name="txtStatus"
                 Foreground="LightGoldenrodYellow"
                 FontSize="42" FontFamily="Segoe UI"
                 Margin="10"
                 HorizontalAlignment="Center" VerticalAlignment="Center" />

      <Grid Margin="50" Width="400" Height="400" Background="White"
            Name="board"
            PointerReleased="board_PointerReleased"
            Grid.Row="2">
         <Grid.ColumnDefinitions>
            <ColumnDefinition Width="1*" />
            <ColumnDefinition Width="1*" />
            <ColumnDefinition Width="1*" />
         </Grid.ColumnDefinitions>
         <Grid.RowDefinitions>
            <RowDefinition Height="1*" />
            <RowDefinition Height="1*" />
            <RowDefinition Height="1*" />
         </Grid.RowDefinitions>


         <Rectangle Grid.Row="0" Grid.ColumnSpan="3" Height="1" VerticalAlignment="Bottom" Fill="Black"/>
         <Rectangle Grid.Row="1" Grid.ColumnSpan="3" Height="1" VerticalAlignment="Bottom" Fill="Black"/>
         <Rectangle Grid.Row="2" Grid.ColumnSpan="3" Height="1" VerticalAlignment="Bottom" Fill="Black"/>

         <Rectangle Grid.Column="0" Grid.RowSpan="3" Width="1" HorizontalAlignment="Right" Fill="Black"/>
         <Rectangle Grid.Column="1" Grid.RowSpan="3" Width="1" HorizontalAlignment="Right" Fill="Black"/>
         <Rectangle Grid.Column="2" Grid.RowSpan="3" Width="1" HorizontalAlignment="Right" Fill="Black"/>

      </Grid>

      <StackPanel Orientation="Horizontal" HorizontalAlignment="Center" Grid.Row="3">
         <Button Name="btnStartUser" Content="Start user" Click="btnStartUser_Click" />
         <Button Name="btnStartComputer" Content="Start computer" Click="btnStartComputer_Click"/>
      </StackPanel>

   </Grid>
</Page>
Unlike the Win32 desktop version of the game, in the Windows Runtime app, we don’t have to explicitly take care of the painting of all the UI, but we still have to create the UI elements explicitly. For instance, when a user clicks in a cell during a game, we have to create a UI element that represents a mark. For this purpose, I will use the same bitmaps used in the desktop version (ttto.bmp and tttx.bmp) and display them in an Image control. I will also draw a red line over the winning row, column or diagonal, and for this purpose, I will use a Line shape.
We can directly add to the project the source code for the tictactoe_game (game.h, game.cpp, strategy_x.h and strategy_o.h). Alternatively, we can export them from a separate, common, DLL but for simplicity I will just use the same source files. Then, we just have to add an object of type tictactoe_game to the MainPage class.
#pragma once

#include "MainPage.g.h"
#include "..Commongame.h"

namespace TicTacToeWinRT
{
   public ref class MainPage sealed
   {
   private:
      tictactoe_game game;

         };
}
There are basically three event handlers that we have to implement:
- Handler for the
Clickedevent for the «Start user» button - Handler for the
Clickedevent for the «Start computer» button - Handler for the
PointerReleasedevent for the board’s grid, called when the pointer (mouse, finger) is released from the grid.
The logic for the two button click handlers is very similar to what we did in the Win32 desktop application. First, we have to reset the game (will see a bit later what that means). If the user starts first, then we just initialize the game object with the correct strategy. If the computer starts first, in addition to the strategy initialization, we also let the computer actually perform a move and then display a mark in the cell where the computer made the move.
void TicTacToeWinRT::MainPage::btnStartUser_Click(Object^ sender, RoutedEventArgs^ e)
{
   ResetGame();

   game.start(tictactoe_player::user);
}

void TicTacToeWinRT::MainPage::btnStartComputer_Click(Object^ sender, RoutedEventArgs^ e)
{
   ResetGame();

   game.start(tictactoe_player::computer);
   auto cell = game.move(tictactoe_player::computer);

   PlaceMark(cell, tictactoe_player::computer);
}
The PlaceMark() method creates a new Image control, sets its Source to either tttx.bmp or ttt0.bmp and adds the image control into the cell of the board grid where a move was made.
void TicTacToeWinRT::MainPage::PlaceMark
      (tictactoe_cell const cell, tictactoe_player const player)
{
   auto image = ref new Image();
   auto bitmap = ref new BitmapImage(
      ref new Uri(player == tictactoe_player::computer ?
      "ms-appx:///Assets/tttx.bmp" : "ms-appx:///Assets/ttt0.bmp"));
   bitmap->ImageOpened += ref new RoutedEventHandler(
      [this, image, bitmap, cell](Object^ sender, RoutedEventArgs^ e) {
         image->Width = bitmap->PixelWidth;
         image->Height = bitmap->PixelHeight;
         image->Visibility = Windows::UI::Xaml::Visibility::Visible;
   });

   image->Source = bitmap;

   image->Visibility = Windows::UI::Xaml::Visibility::Collapsed;
   image->HorizontalAlignment = Windows::UI::Xaml::HorizontalAlignment::Center;
   image->VerticalAlignment = Windows::UI::Xaml::VerticalAlignment::Center;

   Grid::SetRow(image, cell.row);
   Grid::SetColumn(image, cell.col);

   board->Children->Append(image);
}
When a new game starts, these Image controls added during a game to the grid must be removed. That’s what the ResetGame() method does. In addition, it also removes the red line displayed over a winning line and the text that displays the result of a game.
void TicTacToeWinRT::MainPage::ResetGame()
{
   std::vector<Windows::UI::Xaml::UIElement^> children;

   for(auto const & child : board->Children)
   {
      auto typeName = child->GetType()->FullName;
      if(typeName == "Windows.UI.Xaml.Controls.Image" ||
         typeName == "Windows.UI.Xaml.Shapes.Line")
      {
         children.push_back(child);
      }
   }

   for(auto const & child : children)
   {
      unsigned int index;
      if(board->Children->IndexOf(child, &index))
      {
         board->Children->RemoveAt(index);
      }
   }

   txtStatus->Text = nullptr;
}
When the user presses the pointer over a cell of the board grid, we make a move if that cell is opened. If the game is not finished at this point, we let the computer do a move. When the game ends after the computer or the user made a move, we display the result in a text box and if one of the two players won, we draw a red line over the winning row, column or diagonal.
void TicTacToeWinRT::MainPage::board_PointerReleased
    (Platform::Object^ sender, Windows::UI::Xaml::Input::PointerRoutedEventArgs^ e)
{
   if(game.is_started() && ! game.is_finished())
   {
      auto cellw = board->ActualWidth / 3;
      auto cellh = board->ActualHeight / 3;

      auto point = e->GetCurrentPoint(board);
      auto row = static_cast<int>(point->Position.Y / cellh);
      auto col = static_cast<int>(point->Position.X / cellw);

      game.move(tictactoe_cell(row, col), tictactoe_player::user);
      PlaceMark(tictactoe_cell(row, col), tictactoe_player::user);

      if(!game.is_finished())
      {
         auto cell = game.move(tictactoe_player::computer);
         PlaceMark(cell, tictactoe_player::computer);

         if(game.is_finished())
         {
            DisplayResult(
               game.is_victory(tictactoe_player::computer) ?
               tictactoe_player::computer :
               tictactoe_player::none);
         }
      }
      else
      {
         DisplayResult(
            game.is_victory(tictactoe_player::user) ?
            tictactoe_player::user :
            tictactoe_player::none);
      }
   }
}

void TicTacToeWinRT::MainPage::DisplayResult(tictactoe_player const player)
{
   Platform::String^ text = nullptr;
   switch (player)
   {
   case tictactoe_player::none:
      text = "It's a draw!";
      break;
   case tictactoe_player::computer:
      text = "Computer wins!";
      break;
   case tictactoe_player::user:
      text = "User wins!";
      break;
   }

   txtStatus->Text = text;

   if(player != tictactoe_player::none)
   {
      auto coordinates = game.get_winning_line();
      if(coordinates.first.is_valid() && coordinates.second.is_valid())
      {
         PlaceCut(coordinates.first, coordinates.second);
      }
   }
}

void TicTacToeWinRT::MainPage::PlaceCut(tictactoe_cell const start, tictactoe_cell const end)
{
   auto cellw = board->ActualWidth / 3;
   auto cellh = board->ActualHeight / 3;

   auto line = ref new Line();
   line->X1 = start.col * cellw + cellw / 2;
   line->Y1 = start.row * cellh + cellh / 2;

   line->X2 = end.col * cellw + cellw / 2;
   line->Y2 = end.row * cellh + cellh / 2;

   line->StrokeStartLineCap = Windows::UI::Xaml::Media::PenLineCap::Round;
   line->StrokeEndLineCap = Windows::UI::Xaml::Media::PenLineCap::Round;
   line->StrokeThickness = 15;
   line->Stroke = ref new SolidColorBrush(Windows::UI::Colors::Red);

   line->Visibility = Windows::UI::Xaml::Visibility::Visible;

   Grid::SetRow(line, 0);
   Grid::SetColumn(line, 0);
   Grid::SetRowSpan(line, 3);
   Grid::SetColumnSpan(line, 3);

   board->Children->Append(line);
}
And that is everything. You can build the application, start and play. It looks like this:
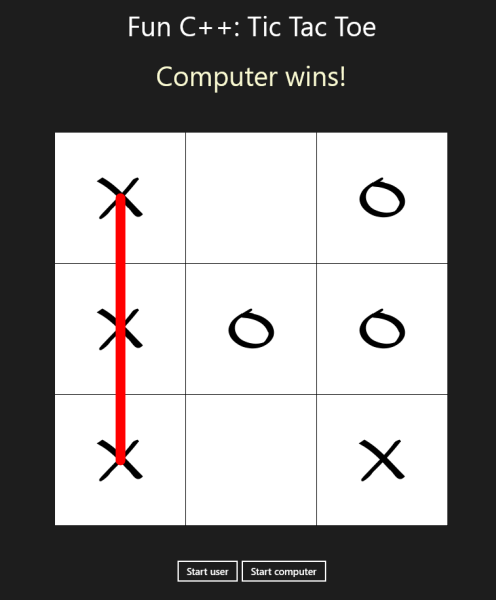
Conclusions
In this article, we’ve seen how we can create a simple game in C++ with different user interface using different technologies. We wrote the game logic once, using standard C++ and then used it to build two applications using totally different technologies: Win32 API, where we had to do more explicit work for things like creating a window and painting it, and Windows Runtime with XAML, where the framework did most of the work and we could concentrate on the game logic (and when we had to design the UI we did it in a rather declarative way, not only in XAML but also in the code behind). Among others, we saw how we could use standard containers such as std::array and std::set and how seamless we could use the pure C++ logic code in the C++/CX application for the Windows Runtime.
History
- 4th November, 2013: Initial version
Marius Bancila is the author of Modern C++ Programming Cookbook and The Modern C++ Challenge. He has been a Microsoft MVP since 2006, initially for VC++ and nowadays for Development technologies. He works as a system architect for Visma, a Norwegian-based company. He works with various technologies, both managed and unmanaged, for desktop, cloud, and mobile, mainly developing with VC++ and VC#. He keeps a blog at http://www.mariusbancila.ro/blog, focused on Windows programming. You can follow Marius on Twitter at @mariusbancila.
- Download source files — 44.1 KB
Introduction
This C++ is fun series is intended to show that writing code in C++ can be as productive and fun as in other mainstream languages. In this second instalment, I will walk you through creating a tic tac toe game from scratch in C++. This article, and the entire series is targeted to developers that want to learn C++ or are curious about the capabilities of the language.
Many young people want to learn programming to write games. C++ is the most used language for writing games, though one needs to gain lots of programming experience before producing the next Angry Birds. A Tic Tac Toe game could be a good option to start, and in fact many years ago, it was the first game I wrote after I started learning C++. I hope this article can help both beginners and experienced developers, yet not very familiar with C++.
I am using Visual Studio 2012 for writing the source code for this article.
The Game
If you have not played Tic Tac Toe and are not familiar with the game, here is a description from Wikipedia.
Tic-tac-toe (or Noughts and crosses, Xs and Os) is a paper-and-pencil game for two players, X and O, who take turns marking the spaces in a 3×3 grid. The player who succeeds in placing three respective marks in a horizontal, vertical, or diagonal row wins the game.
The game is to be played between the computer and a human opponent. Either of the two can start first.
There are two things to implement for creating the game: the game logic and the game user interface. There are various possibilities for creating the UI on Windows, including Win32 API, MFC, ATL, GDI+, DirectX, etc. In this article, I will show how we can use the same game logic implementation to build applications using various technologies. We will create two applications, one with Win32 API and one with C++/CX for the Windows Runtime.
The Game Logic
A player can play a perfect game (that means win or draw) if he/she follows several simple rules in placing the next mark on the grid. The rules are described on Wikipedia, where you can also find the optimal strategy for the player that makes the first move.
The optimal strategies for both the first and second player are available on an xkcd drawing. Though it has several errors (it misses making winning moves in several situations and at least in one case is missing an X mark), I will be using this version for the playing strategy (with fixes the errors that I was able to find). Bear in mind, this means the computer will always play a perfect game. If you implement such a game, you probably want to also let the users win, in which case you need a different approach. But for the purpose of this article, this should suffice.
The first question that arises is what data structure can we use to model this picture in a C++ program. There could be different choices such as a tree, graph, an array or even bit fields (if one is really picky about memory consumption). The grid has 9 cells and the simplest choice in my opinion is to use an array of 9 integers, one for each cell: 0 can represent an empty cell, 1 a cell marked with X and 2 a cell marked with O. Let’s take the following picture and see how it can be encoded.
The picture can be read like this:
- Place an X in cell (0,0). The grid can be encoded as:
1, 0, 0, 0, 0, 0, 0, 0, 0 - If the opponent places an O in cell (0,1) then place an X in cell (1,1). The grid encoding is now:
1, 2, 0, 0, 1, 0, 0, 0, 0 - If the opponent places an O in cell (0,2) then place an X in cell (2,2). The grid encoding is now:
1, 2, 2, 0, 1, 0, 0, 0, 1. This represents a winning move. - …
- If the opponent places an O in cell (2,2) then place an X in cell (2,0). The grid encoding is now:
1, 2, 0, 0, 1, 0, 1, 0, 2. At this point, regardless of what move the opponent makes, X will win the game. - If the opponent places an O in cell (0,2) then place an X in cell (1,0). The grid encoding is now:
1, 2, 2, 1, 1, 0, 1, 0, 2. This represents a winning move. - …
With this in mind, we can go ahead and encode this in the program. We will use a std::array for representing the 9 cells board. This is a fixed-size container, with the size known at compile time, that stores its elements in a contiguous memory area. To simplify using the same array type over and over, I will define an alias for it.
#include <array>

typedef std::array<char, 9> tictactoe_status;
The optimal strategies described above are then represented as a sequence (another array) of such arrays.
tictactoe_status const strategy_x[] =
{
   {1,0,0,0,0,0,0,0,0},
   {1,2,0,0,1,0,0,0,0},
   {1,2,2,0,1,0,0,0,1},
   {1,2,0,2,1,0,0,0,1},
   };

tictactoe_status const strategy_o[] =
{
   {2,0,0,0,1,0,0,0,0},
   {2,2,1,0,1,0,0,0,0},
   {2,2,1,2,1,0,1,0,0},
   {2,2,1,0,1,2,1,0,0},
   };
strategy_x is the optimal strategy for the first player, and strategy_o is the optimal strategy for the second player. If you look in the source code available with the article, you’ll notice that the actual definition of these two arrays differs from what I have shown earlier.
tictactoe_status const strategy_x[] =
{
#include "strategy_x.h"
};

tictactoe_status const strategy_o[] =
{
#include "strategy_o.h"
};
This is a little trick, I’d argue, that allows us move the actual, long, content of the array in a separate file (the actual extension of these files is not important, it can be anything not just a C++ header) and keep the source file and the definition simple and clear. The content of the strategy_x.h and strategy_o.h files is brought into the source file during the pre-processing stage of the compilation, just like a regular header file. Here is a snippet of the strategy_x.h file.
1,0,0,0,0,0,0,0,0,

1,2,0,0,1,0,0,0,0,
1,2,2,0,1,0,0,0,1,
1,2,0,2,1,0,0,0,1,
1,2,0,0,1,2,0,0,1,
You should notice that if you use a C++11 compliant compiler, you can use a std::vector instead of the C-like array. This is not available for Visual Studio 2012, but is supported in Visual Studio 2013.
std::vector<tictactoe_status> strategy_o =
{
   {2, 0, 0, 0, 1, 0, 0, 0, 0},
   {2, 2, 1, 0, 1, 0, 0, 0, 0},
   {2, 2, 1, 2, 1, 0, 1, 0, 0},
   {2, 2, 1, 0, 1, 2, 1, 0, 0},
   {2, 2, 1, 1, 1, 0, 2, 0, 0},
};
To define what player these numbers in the arrays represent, I am defining a enumeration called tictactoe_player.
enum class tictactoe_player : char
{
   none = 0,
   computer = 1,
   user = 2,
};
The game logic will be implemented in a class called tictactoe_game. At a minimum, the class should have the following state:
- a boolean flag that indicates whether a game has started, represented by
started - the current state of the game (the marks on the grid), represented by
status - the set of moves that are possible to make in the future based on the current status of the game, represented by
strategy.
class tictactoe_game
{
   bool started;
   tictactoe_status status;
   std::set<tictactoe_status> strategy;

   };
During the game, we will need to know whether the game is started, finished, and if finished, if any of the players won or the game ended in a draw. The tictactoe_game provides three methods for this:
is_startedindicates whether a game has startedis_victorychecks if the specified player has won the gameis_finishedchecks if the game has finished. A game is finished when one of the players wins or when the grid is full and players cannot make any additional moves.
bool is_started() const {return started;}
bool is_victory(tictactoe_player const player) const {return is_winning(status, player);}
bool is_finished() const
{
  return is_full(status) ||
         is_victory(tictactoe_player::user) ||
         is_victory(tictactoe_player::computer);
}
The implementation of is_victory and is_finished actually relies on two private methods, is_full, that indicates whether the grid is full and no further moves are possible, and is_winning, that indicates whether on a given grid, a given player has won. Their implementation should be straight forward to understand. is_full counts the number of cells in the grid (array) that are empty (the value in the array is 0), and returns true if there is no such cell. is_winning checks the lines, rows and the two diagonals of the grid to see if the given player has scored a winning streak.
bool is_winning(tictactoe_status const & status, tictactoe_player const player) const
{
   auto mark = static_cast<char>(player);
   return
      (status[0] == mark && status[1] == mark && status[2] == mark) ||
      (status[3] == mark && status[4] == mark && status[5] == mark) ||
      (status[6] == mark && status[7] == mark && status[8] == mark) ||
      (status[0] == mark && status[4] == mark && status[8] == mark) ||
      (status[2] == mark && status[4] == mark && status[6] == mark) ||
      (status[0] == mark && status[3] == mark && status[6] == mark) ||
      (status[1] == mark && status[4] == mark && status[7] == mark) ||
      (status[2] == mark && status[5] == mark && status[8] == mark);
}

bool is_full(tictactoe_status const & status) const
{
   return 0 == std::count_if(std::begin(status), std::end(status),
               [](int const mark){return mark == 0;});
}
When a player wins a game, we want to draw a line over the column, row or diagonal that won the game. Therefore, we need to know which is that winning line. Method get_winning_line returns a pair of tictactoe_cells that indicate the two ends of the line. Its implementation is very similar to is_winning: it checks the rows, columns and diagonals and if one is a winning line, it returns its two ends (coordinates). It may look a bit verbose, but I believe checking the lines this way is simpler than running loops of three iterations for rows, columns and diagonals.
struct tictactoe_cell
{
   int row;
   int col;

   tictactoe_cell(int r = INT_MAX, int c = INT_MAX):row(r), col(c)
   {}

   bool is_valid() const {return row != INT_MAX && col != INT_MAX;}
};

std::pair<tictactoe_cell, tictactoe_cell> const get_winning_line() const
{
   auto mark = static_cast<char>(tictactoe_player::none);
   if(is_victory(tictactoe_player::computer))
      mark = static_cast<char>(tictactoe_player::computer);
   else if(is_victory(tictactoe_player::user))
      mark = static_cast<char>(tictactoe_player::user);

   if(mark != 0)
   {
      if(status[0] == mark && status[1] == mark && status[2] == mark)
         return std::make_pair(tictactoe_cell(0,0), tictactoe_cell(0,2));
      if(status[3] == mark && status[4] == mark && status[5] == mark)
         return std::make_pair(tictactoe_cell(1,0), tictactoe_cell(1,2));
      if(status[6] == mark && status[7] == mark && status[8] == mark)
         return std::make_pair(tictactoe_cell(2,0), tictactoe_cell(2,2));
      if(status[0] == mark && status[4] == mark && status[8] == mark)
         return std::make_pair(tictactoe_cell(0,0), tictactoe_cell(2,2));
      if(status[2] == mark && status[4] == mark && status[6] == mark)
         return std::make_pair(tictactoe_cell(0,2), tictactoe_cell(2,0));
      if(status[0] == mark && status[3] == mark && status[6] == mark)
         return std::make_pair(tictactoe_cell(0,0), tictactoe_cell(2,0));
      if(status[1] == mark && status[4] == mark && status[7] == mark)
         return std::make_pair(tictactoe_cell(0,1), tictactoe_cell(2,1));
      if(status[2] == mark && status[5] == mark && status[8] == mark)
         return std::make_pair(tictactoe_cell(0,2), tictactoe_cell(2,2));
   }

   return std::make_pair(tictactoe_cell(), tictactoe_cell());
}
The only things left at this point is starting a new game and making a move (both for the computer and the user).
For starting a new game, we need to know what player makes the first move, so that we can pick the appropriate strategy (of the two available). We also have to reset the array representing the game grid. Method start() initializes a new game. The set of possible future moves is reinitialized with the values from the strategy_x or strategy_o arrays. Notice that in the code below, strategy is a std::set, and strategy_x and strategy_o are arrays that have duplicate entries, because some of the positions in the tictactoe chart are duplicates. The set is a container of unique values and it preserves only the unique possible positions (for instance about half of the strategy_o array is represented by duplicates). std::copy from <algorithm> is used to copy the content of the array into the set, and method assign() is used to set a value (0 in our case) for all the elements of a std::array.
void start(tictactoe_player const player)
{
   strategy.clear();
   if(player == tictactoe_player::computer)
      std::copy(std::begin(strategy_x), std::end(strategy_x),
                std::inserter(strategy, std::begin(strategy)));
   else if(player == tictactoe_player::user)
      std::copy(std::begin(strategy_o), std::end(strategy_o),
                std::inserter(strategy, std::begin(strategy)));

   status.assign(0);

   started = true;
}
To place a move for a human player, all we need to do is make sure the selected cell is empty and if so, fill it with the appropriate mark. Method move() takes the coordinates of the cell, the mark of the player and returns true if the move was valid or false otherwise.
bool move(tictactoe_cell const cell, tictactoe_player const player)
{
   if(status[cell.row*3 + cell.col] == 0)
   {
      status[cell.row*3 + cell.col] = static_cast<char>(player);

      if(is_victory(player))
      {
         started = false;
      }

      return true;
   }

   return false;
}
Making a move for the computer requires more work, because we have to find the next best move the computer should do. An overload of the move() method looks up the next set of possible moves (the strategy) and then selects the best move from this set of possible moves. After making the move, it checks whether the move won the game for the computer and if so, marks the game as finished. The method returns the position where the computer placed its move.
tictactoe_cell move(tictactoe_player const player)
{
   tictactoe_cell cell;

   strategy = lookup_strategy();

   if(!strategy.empty())
   {
      auto newstatus = lookup_move();

      for(int i = 0; i < 9; ++i)
      {
         if(status[i] == 0 && newstatus[i]==static_cast<char>(player))
         {
            cell.row = i/3;
            cell.col = i%3;
            break;
         }
      }

      status = newstatus;

      if(is_victory(player))
      {
         started = false;
      }
   }

   return cell;
}
The lookup_strategy() method iterates through the current possible moves to find what moves are possible from the current one. It takes advantage of the fact that an empty cell is represented by a 0 and any filled cell, is either 1 or 2, and both these values are greater than 0. A cell value can only transform from a 0 into a 1 or 2. Never a cell transforms from 1 into 2 or from 2 into 1.
When the game begins, the grid is represented as 0,0,0,0,0,0,0,0,0 and any move is possible from this position. That’s why in the start() method, we copied the entire set of moves. Once a player makes a move, the set of possible moves decreases. For instance, a player makes a move into the first cell. The grid is then represented as 1,0,0,0,0,0,0,0,0. At this point, no move that has 0 or 2 on the first position in this array is possible anymore and should be filtered out.
std::set<tictactoe_status> tictactoe_game::lookup_strategy() const
{
   std::set<tictactoe_status> nextsubstrategy;

   for(auto const & s : strategy)
   {
      bool match = true;
      for(int i = 0; i < 9 && match; ++i)
      {
         if(s[i] < status[i])
            match = false;
      }

      if(match)
      {
         nextsubstrategy.insert(s);
      }
   }

   return nextsubstrategy;
}
When selecting the next move, we must make sure we select a move that only differs by a single mark from the current position. If the current position is 1,2,0,0,0,0,0,0,0 and we must move for player 1, we can only select moves that have a single 1 on the last 7 elements in the array: 1,2,1,0,0,0,0,0,0 or 1,2,0,1,0,0,0,0,0 … or 1,2,0,0,0,0,0,0,1. However, since more than just a single such move is available, we should pick the best one, and the best move is always a move that wins the game. Therefore, we have to check all the moves for a winning move. If no such winning move is available, then we can pick anyone.
tictactoe_status tictactoe_game::lookup_move() const
{
   tictactoe_status newbest = {0};
   for(auto const & s : strategy)
   {
      int diff = 0;
      for(int i = 0; i < 9; ++i)
      {
         if(s[i] > status[i])
            diff++;
      }

      if(diff == 1)
      {
         newbest = s;
         if(is_winning(newbest, tictactoe_player::computer))
         {
            break;
         }
      }
   }

   assert(newbest != empty_board);

   return newbest;
}
With this, we have everything in place for the game logic. For further details, you can read the code in files, game.h and game.cpp.
A Game Implementation with Win32 API
The first application that I’ll be creating will use Win32 API for the user interface. If you are not familiar with Win32 programming, there are plenty of resources where you can learn more. I will only present some essential aspects for understanding how we can build the final application. Also, I will not show and explain every piece of code for this part, but since the code is available to download, you can browse and read it.
At a minimum, a Win32 application requires the following:
- An entry point, that conventionally is WinMain, not
main. It takes parameters such as the handle to the current application instance, the command line and flags that indicate how the window should be shown. - A window class, that represents a template for creating a window. A window class contains a set of attributes used by the system, such as the class name, class styles (that are different from the window styles), icon, menu, background brush, pointer to the window procedure, etc. A window class is process specific and must be registered into the system prior to creating the window. To register the window class, use RegisterClassEx.
- A main window, created based on a window class. A window can be created with function CreateWindowEx.
- A window procedure, that is a function that processes messages for all the windows that were created based on a window class. The window procedure is associated with a window class, not a window.
- A message loop. A window can receive messages in two ways: with SendMessage, that directly calls the window procedure for the window and does not return until the window procedure has handled the message, or with PostMessage (or PostThreadMessage) that posts a messages to the message queue of the thread that created the window and returns without waiting for the thread to process the message. Therefore, the thread must run a loop where it fetches messages from the message queue and dispatches them to the window procedure.
You can find an example for simple Win32 application that registers a window class, creates a window and runs a message loop in MSDN. Conceptually, a Win32 application looks like this:
int WINAPI WinMain(HINSTANCE hInstance, HINSTANCE hPrevInstance, LPSTR lpCmdLine, int nCmdShow)
{
   WNDCLASS wc;

   if (!::RegisterClass(&wc))
      return FALSE;

   HWND wnd = ::CreateWindowEx(...);
   if(!wnd)
      return FALSE;

   ::ShowWindow(wnd, nCmdShow);

   MSG msg;
   while(::GetMessage(&msg, nullptr, 0, 0))
   {
      ::TranslateMessage(&msg);
      ::DispatchMessage(&msg);
   }

   return msg.wParam;
}
This is not enough though, we still need a window procedure to handle the messages sent to the window, such as painting commands, destroying messages, menu commands, and anything else that is necessary to handle. A window procedure can look like this:
LRESULT WndProc(HWND hWnd, UINT message, WPARAM wParam, LPARAM lParam)
{
   switch(message)
   {
   case WM_PAINT:
      {
         PAINTSTRUCT ps;
         HDC dc = ::BeginPaint(hWnd, &ps);
                  ::EndPaint(hWnd, &ps);
      }
      break;

   case WM_DESTROY:
      ::PostQuitMessage(0);
      return 0;

   case WM_COMMAND:
      {
         ...
      }
      break;
   }

   return ::DefWindowProc(hWnd, message, wParam, lParam);
}
I like to write more object oriented code and less procedural, so I put together a few classes for wrapping a window class, a window and a device context. You can find the implementation for these classes (that are very small) in the attached source code in framework.h and framework.cpp.
WindowClassis a RAII-style wrapper class for a window class. In the constructor, it fills a WNDCLASSEX structure and calls RegisterClassEx. In the destructor, it unregisters the window class by calling UnregisterClass.Windowis a thin wrapper over aHWNDexposing methods such asCreate,ShowWindowandInvalidate(their name should tell you what they do). It also has several virtual members representing message handlers that are called from the window procedure (OnPaint,OnMenuItemClicked,OnLeftButtonDown). This window is intended to be derived in order to provide specific implementations.DeviceContextis a RAII-style wrapper class for a device context (HDC). In the constructor, it calls BeginPaint and in the destructor, it calls EndPaint.
The game main window is TicTacToeWindow, derived from the Window class. It overrides the virtual methods for handling messages. The declaration of this class is shown below:
class TicTacToeWindow : public Window
{
   HANDLE hBmp0;
   HANDLE hBmpX;
   BITMAP bmp0;
   BITMAP bmpX;

   tictactoe_game game;

   void DrawBackground(HDC dc, RECT rc);
   void DrawGrid(HDC dc, RECT rc);
   void DrawMarks(HDC dc, RECT rc);
   void DrawCut(HDC dc, RECT rc);

   virtual void OnPaint(DeviceContext* dc) override;
   virtual void OnLeftButtonUp(int x, int y, WPARAM params) override;
   virtual void OnMenuItemClicked(int menuId) override;

public:
   TicTacToeWindow();
   virtual ~TicTacToeWindow() override;
};
Method OnPaint() handles the painting of the window. It has to draw the window background, the grid lines, the marks in the filled cells (if any) and if the game finished and a player won, a red line over the winning row, column or diagonal. To avoid flickering, we use double buffer technique: create an in-memory device context (compatible with the device context prepared for the window by a call to BeginPaint), an in-memory bitmap compatible for the in-memory device context, paint on this bitmap, and then copy the content of the in-memory device context over the window device context.
void TicTacToeWindow::OnPaint(DeviceContext* dc)
{
   RECT rcClient;
   ::GetClientRect(hWnd, &rcClient);

   auto memdc = ::CreateCompatibleDC(*dc);
   auto membmp = ::CreateCompatibleBitmap
                   (*dc, rcClient.right - rcClient.left, rcClient.bottom-rcClient.top);
   auto bmpOld = ::SelectObject(memdc, membmp);

   DrawBackground(memdc, rcClient);

   DrawGrid(memdc, rcClient);

   DrawMarks(memdc, rcClient);

   DrawCut(memdc, rcClient);

   ::BitBlt(*dc,
      rcClient.left,
      rcClient.top,
      rcClient.right - rcClient.left,
      rcClient.bottom-rcClient.top,
      memdc,
      0,
      0,
      SRCCOPY);

   ::SelectObject(memdc, bmpOld);
   ::DeleteObject(membmp);
   ::DeleteDC(memdc);
}
I will not list here the content of the DrawBackground, DrawGrid and DrawMarks functions. They are not very complicated, and you can read the source code. The DrawMarks function uses two bitmaps, ttt0.bmp and tttx.bmp, to draw the marks in the grid.
I will only show how to draw a red line over the winning row, column or diagonal. First, we have to check if the game is finished and if it is, then retrieve the winning line. If the two ends are both valid, then compute the center of the two cells, create and select a pen (a solid, 15 pixels width red line) and draw a line between the middle of the two cells.
void TicTacToeWindow::DrawCut(HDC dc, RECT rc)
{
   if(game.is_finished())
   {
      auto streak = game.get_winning_line();

      if(streak.first.is_valid() && streak.second.is_valid())
      {
         int cellw = (rc.right - rc.left) / 3;
         int cellh = (rc.bottom - rc.top) / 3;

         auto penLine = ::CreatePen(PS_SOLID, 15, COLORREF(0x2222ff));
         auto penOld = ::SelectObject(dc, static_cast<HPEN>(penLine));

         ::MoveToEx(
            dc,
            rc.left + streak.first.col * cellw + cellw/2,
            rc.top + streak.first.row * cellh + cellh/2,
            nullptr);

         ::LineTo(dc,
            rc.left + streak.second.col * cellw + cellw/2,
            rc.top + streak.second.row * cellh + cellh/2);

         ::SelectObject(dc, penOld);
      }
   }
}
The main window has a menu with three items: ID_GAME_STARTUSER that starts a game in which the user moves first, ID_GAME_STARTCOMPUTER that starts a game in which the computer moves first and ID_GAME_EXIT that closes the application. When a user clicks on one of the two start commands, we must start a game. If the computer moves first, then we should let if make the move and then, in both cases, redraw the window.
void TicTacToeWindow::OnMenuItemClicked(int menuId)
{
   switch(menuId)
   {
   case ID_GAME_EXIT:
      ::PostMessage(hWnd, WM_CLOSE, 0, 0);
      break;

   case ID_GAME_STARTUSER:
      game.start(tictactoe_player::user);
      Invalidate(FALSE);
      break;

   case ID_GAME_STARTCOMPUTER:
      game.start(tictactoe_player::computer);
      game.move(tictactoe_player::computer);
      Invalidate(FALSE);
      break;
   }
}
The only thing left to take care in the window is handling the user mouse clicks on the window. When the user clicks on a point in the window client area, we should check which grid cell it is, and if it is empty, fill it with the user’s mark. Then, if the game is not finished, let the computer make a move.
void TicTacToeWindow::OnLeftButtonUp(int x, int y, WPARAM params)
{
   if(game.is_started() && !game.is_finished())
   {
      RECT rcClient;
      ::GetClientRect(hWnd, &rcClient);

      int cellw = (rcClient.right - rcClient.left) / 3;
      int cellh = (rcClient.bottom - rcClient.top) / 3;

      int col = x / cellw;
      int row = y / cellh;

      if(game.move(tictactoe_cell(row, col), tictactoe_player::user))
      {
         if(!game.is_finished())
            game.move(tictactoe_player::computer);

         Invalidate(FALSE);
      }
   }
}
Finally, we need to implement the WinMain function, the entry point for the application. The code below is very similar to the one shown in the beginning on this section, with the difference that it uses my wrapper classes for the window class and the window.
int WINAPI WinMain(HINSTANCE hInstance, HINSTANCE hPrevInstance, LPSTR lpCmdLine, int nCmdShow)
{
   WindowClass wndcls(hInstance, L"TicTacToeWindowClass",
                      MAKEINTRESOURCE(IDR_MENU_TTT), CallWinProc);

   TicTacToeWindow wnd;
   if(wnd.Create(
      wndcls.Name(),
      L"Fun C++: TicTacToe",
      WS_OVERLAPPED | WS_CAPTION | WS_SYSMENU | WS_MINIMIZEBOX,
      CW_USEDEFAULT,
      CW_USEDEFAULT,
      300,
      300,
      hInstance))
   {
      wnd.ShowWindow(nCmdShow);

      MSG msg;
      while(::GetMessage(&msg, nullptr, 0, 0))
      {
         ::TranslateMessage(&msg);
         ::DispatchMessage(&msg);
      }

      return msg.wParam;
   }

   return 0;
}
If you are not familiar with Win32 API programming, you may find this a bit cumbersome, even though, in my opinion, the amount of code I put together is relatively small and simple. However, you have to explicitly take care of all the initialization of objects, and creation of windows, handling of messages, etc. Hopefully, you can find the next section more appealing.
A Game App for Windows Runtime
The Windows Runtime is a new Windows runtime engine introduced in Windows 8. It lives alongside Win32 and has a COM-based API. Applications built for the Windows Runtime are so badly called «Windows Store» applications. They run in the Windows Runtime, not in a Windows store, but people in the marketing division at Microsoft probably had a creativity hiatus. Windows Runtime applications and components can be written in C++ either with the Windows Runtime C++ Template Library (WTL) or with C++ Component Extensions (C++/CX). In this article, I will use XAML and C++/CX to build an application similar in functionality with the desktop one created in the previous section.
When you create a Windows Store blank XAML application, the project the wizard creates is not actually empty, but contains all the files and settings for building and running a Windows Store application. What is empty is the main page of the application.
The only thing we have to care about for the purpose of this article is the main page. The XAML code is available in file MainPage.xaml and the code behind in MainPage.xaml.h and MainPage.xaml.cpp. The simple application I’d like to build looks like in the following image.
Here is how the XAML for the page may look like (in a real application, you probably want to use the application bar for actions like starting a new game, not buttons on the main page, but for simplicity, I’ll put them on the page):
<Page
    x:Class="TicTacToeWinRT.MainPage"
    xmlns="http://schemas.microsoft.com/winfx/2006/xaml/presentation"
    xmlns:x="http://schemas.microsoft.com/winfx/2006/xaml"
    xmlns:local="using:TicTacToeWinRT"
    xmlns:d="http://schemas.microsoft.com/expression/blend/2008"
    xmlns:mc="http://schemas.openxmlformats.org/markup-compatibility/2006"
    mc:Ignorable="d">

   <Grid Background="{StaticResource ApplicationPageBackgroundThemeBrush}">
      <Grid.RowDefinitions>
         <RowDefinition Height="Auto" />
         <RowDefinition Height="Auto" />
         <RowDefinition Height="Auto" />
         <RowDefinition Height="Auto" />
      </Grid.RowDefinitions>

      <TextBlock Grid.Row="0" Text="Fun C++: Tic Tac Toe"
                 Foreground="White" FontSize="42" FontFamily="Segoe UI"
                 Margin="10"
                 HorizontalAlignment="Center" VerticalAlignment="Center"
                 />

      <TextBlock Grid.Row="1" Text="Computer wins!"
                 Name="txtStatus"
                 Foreground="LightGoldenrodYellow"
                 FontSize="42" FontFamily="Segoe UI"
                 Margin="10"
                 HorizontalAlignment="Center" VerticalAlignment="Center" />

      <Grid Margin="50" Width="400" Height="400" Background="White"
            Name="board"
            PointerReleased="board_PointerReleased"
            Grid.Row="2">
         <Grid.ColumnDefinitions>
            <ColumnDefinition Width="1*" />
            <ColumnDefinition Width="1*" />
            <ColumnDefinition Width="1*" />
         </Grid.ColumnDefinitions>
         <Grid.RowDefinitions>
            <RowDefinition Height="1*" />
            <RowDefinition Height="1*" />
            <RowDefinition Height="1*" />
         </Grid.RowDefinitions>


         <Rectangle Grid.Row="0" Grid.ColumnSpan="3" Height="1" VerticalAlignment="Bottom" Fill="Black"/>
         <Rectangle Grid.Row="1" Grid.ColumnSpan="3" Height="1" VerticalAlignment="Bottom" Fill="Black"/>
         <Rectangle Grid.Row="2" Grid.ColumnSpan="3" Height="1" VerticalAlignment="Bottom" Fill="Black"/>

         <Rectangle Grid.Column="0" Grid.RowSpan="3" Width="1" HorizontalAlignment="Right" Fill="Black"/>
         <Rectangle Grid.Column="1" Grid.RowSpan="3" Width="1" HorizontalAlignment="Right" Fill="Black"/>
         <Rectangle Grid.Column="2" Grid.RowSpan="3" Width="1" HorizontalAlignment="Right" Fill="Black"/>

      </Grid>

      <StackPanel Orientation="Horizontal" HorizontalAlignment="Center" Grid.Row="3">
         <Button Name="btnStartUser" Content="Start user" Click="btnStartUser_Click" />
         <Button Name="btnStartComputer" Content="Start computer" Click="btnStartComputer_Click"/>
      </StackPanel>

   </Grid>
</Page>
Unlike the Win32 desktop version of the game, in the Windows Runtime app, we don’t have to explicitly take care of the painting of all the UI, but we still have to create the UI elements explicitly. For instance, when a user clicks in a cell during a game, we have to create a UI element that represents a mark. For this purpose, I will use the same bitmaps used in the desktop version (ttto.bmp and tttx.bmp) and display them in an Image control. I will also draw a red line over the winning row, column or diagonal, and for this purpose, I will use a Line shape.
We can directly add to the project the source code for the tictactoe_game (game.h, game.cpp, strategy_x.h and strategy_o.h). Alternatively, we can export them from a separate, common, DLL but for simplicity I will just use the same source files. Then, we just have to add an object of type tictactoe_game to the MainPage class.
#pragma once

#include "MainPage.g.h"
#include "..Commongame.h"

namespace TicTacToeWinRT
{
   public ref class MainPage sealed
   {
   private:
      tictactoe_game game;

         };
}
There are basically three event handlers that we have to implement:
- Handler for the
Clickedevent for the «Start user» button - Handler for the
Clickedevent for the «Start computer» button - Handler for the
PointerReleasedevent for the board’s grid, called when the pointer (mouse, finger) is released from the grid.
The logic for the two button click handlers is very similar to what we did in the Win32 desktop application. First, we have to reset the game (will see a bit later what that means). If the user starts first, then we just initialize the game object with the correct strategy. If the computer starts first, in addition to the strategy initialization, we also let the computer actually perform a move and then display a mark in the cell where the computer made the move.
void TicTacToeWinRT::MainPage::btnStartUser_Click(Object^ sender, RoutedEventArgs^ e)
{
   ResetGame();

   game.start(tictactoe_player::user);
}

void TicTacToeWinRT::MainPage::btnStartComputer_Click(Object^ sender, RoutedEventArgs^ e)
{
   ResetGame();

   game.start(tictactoe_player::computer);
   auto cell = game.move(tictactoe_player::computer);

   PlaceMark(cell, tictactoe_player::computer);
}
The PlaceMark() method creates a new Image control, sets its Source to either tttx.bmp or ttt0.bmp and adds the image control into the cell of the board grid where a move was made.
void TicTacToeWinRT::MainPage::PlaceMark
      (tictactoe_cell const cell, tictactoe_player const player)
{
   auto image = ref new Image();
   auto bitmap = ref new BitmapImage(
      ref new Uri(player == tictactoe_player::computer ?
      "ms-appx:///Assets/tttx.bmp" : "ms-appx:///Assets/ttt0.bmp"));
   bitmap->ImageOpened += ref new RoutedEventHandler(
      [this, image, bitmap, cell](Object^ sender, RoutedEventArgs^ e) {
         image->Width = bitmap->PixelWidth;
         image->Height = bitmap->PixelHeight;
         image->Visibility = Windows::UI::Xaml::Visibility::Visible;
   });

   image->Source = bitmap;

   image->Visibility = Windows::UI::Xaml::Visibility::Collapsed;
   image->HorizontalAlignment = Windows::UI::Xaml::HorizontalAlignment::Center;
   image->VerticalAlignment = Windows::UI::Xaml::VerticalAlignment::Center;

   Grid::SetRow(image, cell.row);
   Grid::SetColumn(image, cell.col);

   board->Children->Append(image);
}
When a new game starts, these Image controls added during a game to the grid must be removed. That’s what the ResetGame() method does. In addition, it also removes the red line displayed over a winning line and the text that displays the result of a game.
void TicTacToeWinRT::MainPage::ResetGame()
{
   std::vector<Windows::UI::Xaml::UIElement^> children;

   for(auto const & child : board->Children)
   {
      auto typeName = child->GetType()->FullName;
      if(typeName == "Windows.UI.Xaml.Controls.Image" ||
         typeName == "Windows.UI.Xaml.Shapes.Line")
      {
         children.push_back(child);
      }
   }

   for(auto const & child : children)
   {
      unsigned int index;
      if(board->Children->IndexOf(child, &index))
      {
         board->Children->RemoveAt(index);
      }
   }

   txtStatus->Text = nullptr;
}
When the user presses the pointer over a cell of the board grid, we make a move if that cell is opened. If the game is not finished at this point, we let the computer do a move. When the game ends after the computer or the user made a move, we display the result in a text box and if one of the two players won, we draw a red line over the winning row, column or diagonal.
void TicTacToeWinRT::MainPage::board_PointerReleased
    (Platform::Object^ sender, Windows::UI::Xaml::Input::PointerRoutedEventArgs^ e)
{
   if(game.is_started() && ! game.is_finished())
   {
      auto cellw = board->ActualWidth / 3;
      auto cellh = board->ActualHeight / 3;

      auto point = e->GetCurrentPoint(board);
      auto row = static_cast<int>(point->Position.Y / cellh);
      auto col = static_cast<int>(point->Position.X / cellw);

      game.move(tictactoe_cell(row, col), tictactoe_player::user);
      PlaceMark(tictactoe_cell(row, col), tictactoe_player::user);

      if(!game.is_finished())
      {
         auto cell = game.move(tictactoe_player::computer);
         PlaceMark(cell, tictactoe_player::computer);

         if(game.is_finished())
         {
            DisplayResult(
               game.is_victory(tictactoe_player::computer) ?
               tictactoe_player::computer :
               tictactoe_player::none);
         }
      }
      else
      {
         DisplayResult(
            game.is_victory(tictactoe_player::user) ?
            tictactoe_player::user :
            tictactoe_player::none);
      }
   }
}

void TicTacToeWinRT::MainPage::DisplayResult(tictactoe_player const player)
{
   Platform::String^ text = nullptr;
   switch (player)
   {
   case tictactoe_player::none:
      text = "It's a draw!";
      break;
   case tictactoe_player::computer:
      text = "Computer wins!";
      break;
   case tictactoe_player::user:
      text = "User wins!";
      break;
   }

   txtStatus->Text = text;

   if(player != tictactoe_player::none)
   {
      auto coordinates = game.get_winning_line();
      if(coordinates.first.is_valid() && coordinates.second.is_valid())
      {
         PlaceCut(coordinates.first, coordinates.second);
      }
   }
}

void TicTacToeWinRT::MainPage::PlaceCut(tictactoe_cell const start, tictactoe_cell const end)
{
   auto cellw = board->ActualWidth / 3;
   auto cellh = board->ActualHeight / 3;

   auto line = ref new Line();
   line->X1 = start.col * cellw + cellw / 2;
   line->Y1 = start.row * cellh + cellh / 2;

   line->X2 = end.col * cellw + cellw / 2;
   line->Y2 = end.row * cellh + cellh / 2;

   line->StrokeStartLineCap = Windows::UI::Xaml::Media::PenLineCap::Round;
   line->StrokeEndLineCap = Windows::UI::Xaml::Media::PenLineCap::Round;
   line->StrokeThickness = 15;
   line->Stroke = ref new SolidColorBrush(Windows::UI::Colors::Red);

   line->Visibility = Windows::UI::Xaml::Visibility::Visible;

   Grid::SetRow(line, 0);
   Grid::SetColumn(line, 0);
   Grid::SetRowSpan(line, 3);
   Grid::SetColumnSpan(line, 3);

   board->Children->Append(line);
}
And that is everything. You can build the application, start and play. It looks like this:
Conclusions
In this article, we’ve seen how we can create a simple game in C++ with different user interface using different technologies. We wrote the game logic once, using standard C++ and then used it to build two applications using totally different technologies: Win32 API, where we had to do more explicit work for things like creating a window and painting it, and Windows Runtime with XAML, where the framework did most of the work and we could concentrate on the game logic (and when we had to design the UI we did it in a rather declarative way, not only in XAML but also in the code behind). Among others, we saw how we could use standard containers such as std::array and std::set and how seamless we could use the pure C++ logic code in the C++/CX application for the Windows Runtime.
History
- 4th November, 2013: Initial version
Marius Bancila is the author of Modern C++ Programming Cookbook and The Modern C++ Challenge. He has been a Microsoft MVP since 2006, initially for VC++ and nowadays for Development technologies. He works as a system architect for Visma, a Norwegian-based company. He works with various technologies, both managed and unmanaged, for desktop, cloud, and mobile, mainly developing with VC++ and VC#. He keeps a blog at http://www.mariusbancila.ro/blog, focused on Windows programming. You can follow Marius on Twitter at @mariusbancila.
Пишем игры на C++, Часть 1/3 — Написание мини-фреймворка
Пишем игры на C++, Часть 2/3 — State-based программирование
Здравствуй, Хабрахабр!
Наконец-то мы будем писать игры! Это заключительная часть из цикла уроков
О чем эта часть?
- Напишем несколько довольно известных игр
Какие именно игры?
- Крестики-нолики
- Змейка
- Сапер
Исходники и .exe будут представлены в конце статьи
3.1 Крестики-нолики
Классика жанра начинающего девелопера — крестики-нолики.
Это будет небольшой разминкой.
Описывать код в статье не буду, берите попкорн и читайте комментарии в коде 
Открываем main.cpp
#include "Project.h"

// Размер поля. Размер крестиков и ноликов должен быть 200x200 пикселей
const int GRID_SIZE = 600;

class TicTacToeScreen : public Screen
{
private:
	Input* input;
	Graphics* graphics;

	// Изображения фона, крестиков и ноликов
	Image* back;
	(Image* player)[2];

	// Массив, обозначающий поле, и текущий игрок
	int grid[3][3], currplayer;

	void StartSettings()
	{
		// Берем объекты Graphics и Input и устанавливаем заголовок окна

		input = game->GetInput();
		graphics = game->GetGraphics();
		SDL_WM_SetCaption("Tic-Tac-Toe",0);
	}

	void LoadingImage()
	{
		// Загрузка изображений

		back = graphics->NewImage("C:\Users\HOME\Desktop\back.bmp");
		player[0] = graphics->NewImage("C:\Users\HOME\Desktop\X.bmp",255,255,255);
		player[1] = graphics->NewImage("C:\Users\HOME\Desktop\O.bmp",255,255,255);
	}

	void Reset()
	{
		// Очистка поля и вывод фона

		currplayer = 1;

		for(int i = 0; i < 3; i++)
		for(int j = 0; j < 3; j++)
			grid[i][j] = 0;

		graphics->DrawImage(back,0,0);
		graphics->Flip();
	}

	int GameOver()
	{
		// -1 - игра не окончена; 0 - ничья; 1 - победили крестики; 2 - победили нолики

		// Проверка на чью-нибудь победу
		for(int i = 1; i < 3; i++)
				// По горизонтали
			if( (grid[0][0] == i && grid[1][0] == i && grid[2][0] == i) ||
				(grid[0][1] == i && grid[1][1] == i && grid[2][1] == i) ||
				(grid[0][2] == i && grid[1][2] == i && grid[2][2] == i) ||

				// По вертикали
				(grid[0][0] == i && grid[0][1] == i && grid[0][2] == i) ||
				(grid[1][0] == i && grid[1][1] == i && grid[1][2] == i) ||
				(grid[2][0] == i && grid[2][1] == i && grid[2][2] == i) ||

				// По диагонали
				(grid[0][0] == i && grid[1][1] == i && grid[2][2] == i) ||
				(grid[2][0] == i && grid[1][1] == i && grid[0][2] == i) )
				return i;

		// Проверка на ничью
		int count = 0;
		for(int i = 0; i < 3; i++)
		for(int j = 0; j < 3; j++)
			if(grid[i][j] != 0)
				count++;
		// Заполнено все поле
		if(count == 9)
			return 0;

		return -1;
	}

	void GameOverHandle(int over)
	{
		// Обработка конца игры

		char* message;

		switch(over)
		{
		case 0:
			message = "Ничья! Желаете сыграть еще раз?";
			break;
		case 1:
			message = "Крестики победили! Желаете сыграть еще раз?";
			break;
		case 2:
			message = "Нолики победили! Желаете сыграть еще раз?";
			break;
		// Если игра не окончена, возвращаемся из функции
		default:
			return;
		}

		// Спрашиваем пользователя, хочет ли он сыграть еще раз
		if(MessageBox(0,message,"Игра окончена",MB_YESNO) == IDYES)
			Reset();
		else
			game->Exit();
	}

public:
	void Start()
	{
		StartSettings();
		LoadingImage();
		Reset();
	}

	void Update()
	{
		// Если нажат красный крестик в окне
		if(input->IsExit())
			game->Exit();

		// Если нажата левая кнопка мыши
		// P.S. 1 - ЛКМ, 2 - СКМ, 3 - ПКМ
		if(input->IsMouseButtonDown(1))
		{
			// Берем координаты нажатой клетки
			int x = input->GetButtonDownCoords().x / (GRID_SIZE / 3),
				y = input->GetButtonDownCoords().y / (GRID_SIZE / 3);

			// Если мы нажали на пустую клетку
			if(grid[x][y] == 0)
			{
				// Устанавливаем крестик или нолик в клетку
				grid[x][y] = currplayer;

				if(currplayer == 1)
					currplayer = 2;
				else
					currplayer = 1;

				// Рисуем задник
				graphics->DrawImage(back,0,0);

				// Рисуем крестики и нолики
				for(int i = 0; i < 3; i++)
				for(int j = 0; j < 3; j++)
					if(grid[i][j] != 0)
						graphics->DrawImage(player[ grid[i][j]-1 ], i * (GRID_SIZE / 3), j * (GRID_SIZE / 3));

				// Выводим на экран
				graphics->Flip();

				// Обрабатываем конец игры
				GameOverHandle(GameOver());
			}
		}
	}
};


int WINAPI WinMain(HINSTANCE,HINSTANCE,LPSTR,int)
{
	Game game;
	return game.Execute(new TicTacToeScreen(),GRID_SIZE,GRID_SIZE);
}
TO BE CONTINUED в ближайшее время.
Следите за этим постом
По всем вопросам обращайтесь в ЛС, а если вам не повезло быть зарегистрированным на хабре, пишите на мейл izarizar@mail.ru
Introduction: How to Write a Tic-Tac-Toe Program in Java
Introduction:
Tic-Tac-Toe is a very common game that is fairly easy to play. The rules of the game are simple and well-known. Because of these things, Tic-Tac-Toe is fairly easy to code up. In this tutorial, we will be looking at how to code a working game of Tic-Tac-Toe in Java. This tutorial assumes that you have knowledge of the basic syntax of Java, and access to a working Java compiler. This tutorial will use the Eclipse IDE.
General Outline:
There are many ways to implement a game of Tic-Tac-Toe in Java, so before we begin coding, we must think about how we will implement the game specifically. For this tutorial, we will be coding a text-based version of Tic-Tac-Toe. Our Tic-Tac-Toe will start out by printing the board, and then asking for input from the first player that will specify where on the board to place that player’s mark. After placing the mark, we will print the board state again and then ask the other player for their move. That process will be continued until one player wins or the board is filled up (indicating that a tie occurred). The input that will be taken in to specify where to place a mark will be in the format of two integers, which specify the row and column where the mark is to be placed. Below is a sample of what a game will play like.
Step 1: Creating Your Project
The first step in coding anything is to make a new project! In your IDE, create a new Java project named TicTacToe. In this Instructable, the default package is what will be used. Inside of your project package, create two classes: Main.java, and TTT.java. Main.java will host the main method and will be used to run the code in TTT.java. TTT.java will contain a Tic-Tac-Toe object that contains the state of the board and methods to manipulate the game.
Step 2: Starting the TTT Class
Before we can make code to run our TTT object, we need to create a working TTT object. Since a TTT object is representative of one game of Tic-Tac-Toe, it must contain two member variables. Below are the member variables that should be placed into the TTT class followed by descriptions of why they are needed.
private char[][] board;
This variable is a 2D array of characters that will be representative of the three-by-three board of a game of Tic-Tac-Toe. It will hold the state of the game inside of the TTT object at any given time.
private char currentPlayerMark;
This variable will hold either an ‘x’ or an ‘o’, representing which player’s turn it is at any given point of time. The methods of the TTT class will use this when marking the board to determine which type of mark will be placed.
Step 3: Initializing Method Prototypes in the TTT Class
The following is a general setup of the program. Below are all of the method headers for the methods that belong inside of the TTT class. These methods will act upon the member variables of the TTT class to make the game of Tic-Tac-Toe mutable. Each one has a short description of what the method will do under it. These behaviours are necessary for playing a full game of Tic-Tac-Toe.
public TTT()
This is the constructor. It will be responsible for ensuring the board gets initialized properly, and for setting who the first player will be.
public void initializeBoard()
This method will initialize the board variable such that all slots are empty.
public void printBoard()
This method will print the Tic-Tac-Toe board to standard output.
public boolean isBoardFull()
This method will check whether or not the board is full. It will return true if the board is full and a false otherwise.
public boolean checkForWin()
This method will check to see if a player has won, and if so, it will return true.
private boolean checkRowsForWin()
This method will specifically check the rows for a win.
private boolean checkColumnsForWin()
This method will specifically check the columns for a win.
private boolean checkDiagonalsForWin()
This method will specifically check the diagonals for a win.
private boolean checkRowCol(char c1, char c2, char c3)
This method will check the three specified characters taken in to see if all three are the same ‘x’ or ‘o’ letter. If so, it will return true.
Note: If you code method stubs for all of the method headers into your TTT class, your compiler will likely inform you that your code has errors. This is normal. The compiler is simply expecting for a value to be returned for all non-void methods.
Step 4: Initialize the Board
public void initializeBoard()
This will set the board to all empty values. Inside this method, you must create 2 for loops inside of each other that will loop through all the rows and columns setting each space to ‘-’. To loop through the rows, create a for loop and an integer, in this case named i, to represent which row we are currently observing.
for (int i = 0; i < 3; i++) { }
Inside of this for loop, we will create a second for loop with an integer j to represent which column we are currently observing.
for (int j = 0; j < 3; j++) { }
Inside of the second for loop, we set the board location to ‘-’. With both loops completed and nested properly, we can iterate through every place inside of the board 2D array.
board[i][j] = ‘-‘;
Attached to this step is an image showing one possible implementation of the initializeBoard() method.
Step 5: Printing the Board
The initial printed board will look like the first image .
It will be handled in the method public void printBoard(), which is located in the TTT class. To print the board we must access every place in the 2D array named board in our TTT class. Because we are dealing with a 2D array, this will be handled with nested for loops.
First, we just need to print a line of dashes (13 of them in this case) designating the top of the board. Below that, we need a for loop that will loop through each of the three rows. This loop will contain a call to print a ‘|’ character, another for loop to loop through the columns, and a call to the System.out.println() function to print a new line and the next 13 dashes to the screen.
Our inner for loop will also only loop through three columns. Since our outer for loop already printed the first | character of each row of the board, we can go ahead to print the character that belongs in the box. To do this, we’ll print the character at that row and column using board[i][j] (i being the variable used for the outer for loop, which was the row, and j being the variable used for the inner loop, which is the column.) This print statement will also contain a concatenated | character, to separate the boxes.
The only thing left is to print the last call to print the new line to separate each row, followed by the 13 dashes. The second attached image shows an example of what the described print function might look like.
Step 6: Checking for a Winner (Part 1)
There are three different functions to check for a win: rows, columns, and diagonals. Computers have to separate these into different conditions because they are all different in terms of arrays. checkForWin() will be our main function to test all 3 of these functions for each scenario that the user input has affected.
For checkForWin() method: You simply need a return statement that calls upon the three different functions. If checking the rows for win does not return true then check the columns for win, etc. Inside of the return statement should look like: checkRowsForWin() || checkColumnsForWin() || checkDiagonalsForWin()
For checkRowsForWin() method: We are looping through the rows to see if there are any winners. This will require one for loop with an if statement inside of it. The for loop will be incrementing through integer i so as to check each row. for (int i = 0; i < 3; i++) The if statement compares each space in the row to each other and gives a ‘true’ value if they are all equal. For instance if the row had three x’s in a row, the method would return true. if (checkRowCol(board[i][0], board[i][1], board[i][2]) == true) So, inside of this if statement, there should be a: return true; And after the for loop, if the method never stopped, then the method needs return that this row did not have three consecutive matching symbols. Therefore, right before closing off the method with its final ‘}’, we will write: return false; Satisfying the need to return a boolean.
For checkColumnsForWin() method: Copy and paste the contents of the checkRowsForWin() method. The only change will be inside of the if statement. Instead of incrementing through the rows, we will be incrementing through the columns. So while in checkRowsForWin has an if statement that says: if (checkRowCol(board[i][0], board[i][1], board[i][2]) == true) checkColumnsForWin() will have an if statement that says: if (checkRowCol(board[0][i], board[1][i], board[2][i]) == true) Other than that, everything else in the method remains the same.
For checkDiagonalsForWin() method: Everything written can be contained inside the parentheses of a return() statement. The first check we will perform is on the diagonal from the top left corner to the bottom right corner. To do this, we check all the spaces that would be included in this section. checkRowCol(board[0][0], board[1][1], board[2][2]) == true) Then we will have one more statement, but we will separate the two by an OR symbol: ‘||’ The second statement will check from the top right corner to the bottom left corner. checkRowCol(board[0][2], board[1][1], board[2][0]) == true) So your final product of the checkDiagonalsForWin() method should be a return(), and inside it should contain the first statement OR the second statement.
Step 7: Check for a Winner (Part 2)
Now we have to make sure if a player gets three in a row, he or she wins. checkRowCol() will be a function that will compare all three letters to each other, and if they do match, then return true.
For checkRowCol() method: This method is used by the other methods to send down three values. We first check to make sure the first value is not an empty one such as ‘-’. Then we compare the first value to the second, and the second to the third, and if and only if all three values are the same AND they are not empty statements, then this method will return true. So inside of one return() statement, our first statement will check this is not a ‘-’. (c1 != ‘-‘) Separate the first and second statements with an ‘&&’ The second statement will see if the first value is equal to the second value. (c1 == c2) Separate the second and third statements with an ‘&&’ The third statement will see if the second value is equal to the third. (c2 == c3) So your final checkRowCol() method will be one return() containing the first statement && the second statement && the third statement.
Step 8: Changing Between Players (x and O)
public void changePlayer()
The changePlayer() method will swap the variable currentPlayerMark between x and o. To do this, just check what the variable currently holds. If the variable is holding an ‘x’, then change it to an ‘o’. Otherwise, change it to an ‘x’.
public boolean placeMark(int row, int col)
The placeMark() method will place the correct letter onto the specified row and col in the board variable (taken in as parameters). It will return true if it was a valid placement. Otherwise, no modification to the board variable will be made, and the player will have to try and place their letter on a different place, as an invalid spot was selected or a spot where a player already placed their letter was selected. To accomplish this behavior, a few things must be checked. First, ensure (using an if statement) that the row argument was between 0 and 2. Next, check to ensure that the col argument was between 0 and 2. Finally, check to make sure that the spot in question currently contains a ‘-‘, signifying that no payer has marked that spot yet. If all three of these conditions check out, then place a mark (the type of which is specified by the class variable currentPlayerMark) at the location specified by row and col and then return true. If any of the three conditions are not met, then noting should happen and false should be returned.
Attached to this step are images showing possible implementations of the methods mentioned above.
Step 9: Player Input and Playing the Game
Now that the TTT class and all of its methods are completed, a main method that runs through an entire game of Tic-Tac-Toe using out TTT object must be created. The main method must do quite a few things in order to run a full game of Tic-Tac-Toe.
First, it must create a Scanner object to take input from System.in. Also, it must instantiate a TTT object to play the Tic-Tac-Toe game with. After these things, it must initialize the board of the TTT object by calling it’s initializeBoard() method.
After these steps are completed, actual game play must be accounted for. To go through turns, a do while loop is required. The loop should break out when the game is over, meaning whenever the TTT object’s board is full or has a winner. Inside the loop, the current board state should be printed before each turn so show the player what spaces are available and what spaces are taken. Then, two inputs should be taken in signifying the row and column to place a mark for the turn. After this input is taken in, the mark should be placed using the TTT object’s method, and the player should be changed as well using the TTT object’s method.
Below the while loop that handles all turns until the end of the game, it will be necessary to declare who the winner of the game is (or if the game was a tie). To do this, check if the game was a tie first by checking if both the board was full and there was no winner. If these things are the case, then print out that the game was a tie. Otherwise, print out who won by printing out the opposite of the current state of the TTT object’s currentPlayerMark variable. This can be accomplished by first calling the TTT object’s changePlayer() method and then using the TTT object’s getCurrentPlayerMark() method to get the state of the currentPlayerMark variable. It may also be nice to print the board out once more to show the final state of the board.
An example main method has been attached as an image.
Step 10: Use Class, Compile, and Run
Once you have gotten to this point, your project should be complete enough to run. If there are errors or missing parentheses or semicolons, now would be the time to find these and fix them. If you are at all lost as to how your project should look, we have included a downloadable file for you to compare your code to a working final product. Go ahead and compile your project. In Eclipse there is a play button that looks like the image attached to this step.
Be the First to Share