<html lang="en">
<head>
<meta charset="UTF-8">
<meta http-equiv="X-UA-Compatible" content="IE=edge">
<meta name="viewport"
content="width=device-width, initial-scale=1.0">
<link rel="stylesheet" href="resume.css">
</head>
<body>
<div class="full">
<div class="left">
<div class="image">
<img src=
alt="gfg-logo"
style="width:100px;height:100px;">
</div>
<div class="Contact">
<h2>Contact</h2>
<p><b>Email id:</b>xyz@gmail.com</p>
<p><b>Mobile no :</b>1234567890</p>
</div>
<div class="Skills">
<h2>Skills</h2>
<ul>
<li><b>Programming Languages :
Python, Java, C++</b></li>
<li><b>Frontend : HTML5, CSS3,
JavaScript, React</b></li>
<li><b>Backend : Node.js</b></li>
</ul>
</div>
<div class="Language">
<h2>Language</h2>
<ul>
<li>English</li>
<li>Hindi</li>
</ul>
</div>
<div class="Hobbies">
<h2>Hobbies</h2>
<ul>
<li>Playing cricket</li>
<li>Swimming</li>
</ul>
</div>
</div>
<div class="right">
<div class="name">
<h1>GeeksforGeeks</h1>
</div>
<div class="title">
<p>Web Developer</p>
</div>
<div class="Summary">
<h2>Summary</h2>
<p>To secure a challenging position in a
reputable organization
to expand my learning knowledge and skill
</p>
</div>
<div class="Experience">
<h2>Experience</h2>
<h3>Abc webdev pvt ltd - Senior Web Developer</h3>
<p>January 2022 to Present</p>
<ul>
<li>Actively engaged in web creative
design and development.</li>
<li>Designing project & planning</li>
</ul>
<h3>Xyz webdev pvt ltd - junior web developer</h3>
<p>August 2021 to December 2021</p>
<ul>
<li>Actively engaged in web creative
design and development.</li>
<li>Designing project & planning</li>
<li>Working on designing</li>
</ul>
</div>
<div class="Education">
<h2>Education</h2>
<table>
<tr>
<th>University/college </th>
<th>Passing year </th>
<th>percentage/cgpa</th>
</tr>
<tr>
<td>xyz</td>
<td>2020</td>
<td>8.9</td>
</tr>
<tr>
<td>pqr</td>
<td>2018</td>
<td>89%</td>
</tr>
</table>
</div>
<div class="project">
<ul>
<li>
<h2>Project1</h2>
<p>This project is based on html
& used React</p>
</li>
<li>
<h2>Project2</h2>
<p>This project is based on html
& used React</p>
</li>
</ul>
</div>
</div>
</div>
</body>
</html>
Standard word processors don’t hold a candle to HTML and CSS when it comes to controlling the finer details of styling and layout. I’ve had difficulty fine-tuning my resume in a word processor, so I started using HTML and CSS to create and maintain my resume instead. I’ve found it to work a lot better overall, but there are a few helpful things to know before beginning the transition.
Getting Started
First, a disclaimer: this guide is not meant to provide resume templates or styling advice. Rather, I’m detailing a process for handling a resume print layout in HTML/CSS. This includes setup, print styling, and a final PDF export.
Wireframe
It’s much easier to write HTML and CSS when working from a mockup or wireframe. I used an old resume from Word as my baseline, but you could just as easily mock something up in a free tool like Adobe XD or Figma (Figma even supports print sizes by default).
If you already have content from a past resume ready to go (like I did), you can break out your design into sections and add the details later:

We don’t have to adhere to the exact styling of a template or mockup, but it can be useful for organizing the overall layout.
Setting up a «Canvas»
To better visualize your resume as you code, I’d recommend creating a «canvas» – an HTML container with the same proportions as your resume. By placing this container on an empty page, you’ll get a view very similar to a typical word processor:

We can actually use physical measurement units in CSS (even though they end up mapping to pixels anyway), so it was quite easy to set this canvas up:
.canvas-container {
  margin: 0 auto; /* for centering, feel free to use flexbox or some other method*/
  box-sizing: border-box;
  padding: 0.5in; /* controls margins */
  width: 8.5in;
  height: 11in;
  background-color: white;
  box-shadow: 0 3px 8px -3px rgba(0, 0, 0, 0.7);
}
Enter fullscreen mode
Exit fullscreen mode
Here’s what that might look like on a barebones page (use 0.5x or 0.25x zoom for the best effect):
Use your canvas container to set default styles on your entire page, similar to defaults in a word processor. Other good properties to consider adding here are line-height and font properties like font-size and font-family.
Layout and Content
Using your wireframe for reference, map out how you will divide your canvas space into sections of content. This is where tools like Flexbox and Grid will come in handy if your layout is more complex.
My setup was fairly straightforward: each area of my resume was broken into a section element. Whenever I had content spanning two columns, I used a grid to split them up:
.multicolumn {
  display: grid;
  grid-template-columns: 1fr 1fr;
  gap: 1rem;
}
Enter fullscreen mode
Exit fullscreen mode
Here’s what that looks like in practice:
In my resume, I only needed a multicolumn layout for two sections, Experience and Certifications / Skills. I hid the content, but here’s how those grids are situated on my current layout:

One added bonus of using something like grid is maintainability; I could very easily add another instance of work experience and have the grid automatically adjust without destroying the rest of my layout:

Apart from using grid in those two instances, everything else fit nicely into sections using normal flow. Feel free to use whatever works best for you.
Exporting
Most companies and recruiters won’t accept an HTML page as a valid resume. Therefore, you’ll want to export your page as a PDF. Browsers can do this readily via the Print command, but we’ll need to do some adjustments to our CSS beforehand.
Print Styles
We’ll be taking advantage of the print media query to style our exported page. It allows us to apply styles specifically when a browser attempts to print.
If you followed my advice of building everything inside a container, this should be a straightforward process. For simplicity, I made the entire html element’s width and height match the print size of my container. You may also need to remove any margins (and box-shadows!) for elements between the body and your container, otherwise the added space might cause an extra page to render:
@media print {
  html {
    height: 11in;
    width: 8.5in;
    overflow: hidden;
  }

  body {
    margin: 0;
  }

  .canvas-container {
    width: 100%;
    box-shadow: none;
  }
}
Enter fullscreen mode
Exit fullscreen mode
Generating a PDF
With browser styles in place, we can use the browser’s Print dialog to save our page as a PDF.
While I love Firefox, Blink’s Print functionality tends to do a much better job of accurately exporting a page. I used Chrome for my final export – as detailed in the following instructions.
After opening the print dialog, set your Destination to «Save as PDF». Additionally, you’ll want to adjust a few settings before saving the final result. Expand the «More settings» option and check the following:
- Color is enabled if you are using anything other than shades of gray
- Paper size is set to your preferred size (I used Letter throughout this guide)
- Margins should be set to None
- Scale should be set to 100
- Background Graphics are enabled
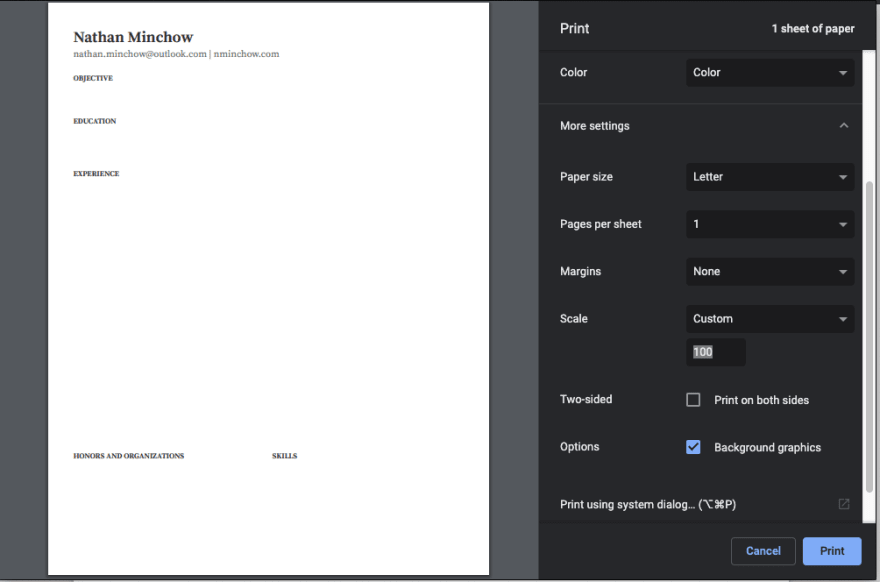
Go ahead and save the page. With that, you should have both an easily maintainable HTML resume and a PDF export to use for actual applications.
Conclusion
I hope this guide was a helpful starting point in how to create a resume in HTML and CSS.
If you’re curious for what my final result was, the source code for my current implementation is available here.
If you’ve gone through this process or have any additional tips for handling a print layout in HTML/CSS, please let me know in the comments below.
This post originally appeared on my personal blog, with a few modifications here for brevity.

Почти каждый в определенный момент нуждается в создании резюме. Когда работаешь фрилансером и соперничаешь за новые проекты с другими, возникает вопрос о том, как лучше всего кратко и быстро предоставить сведения о своих навыках и опыте потенциальному клиенту. Что может быть лучше, чем онлайн резюме? В данном уроке показано как построить адаптивное одностраничное резюме. Код будем писать в HTML5/CSS3, чтобы страница должным образом отображалась на экранах с различным расширением.

Демо Загрузить исходные материалы
Построение документа
Начинаем создание веб-страницы с документа HTML5 и стандартных мета элементов. Однако для того, чтобы сделать этот макет адаптивным, нам понадобится установить некоторые дополнительные элементы. Большинство из них это типичные мета-теги, которые будут поддерживаться во всех современных браузерах.
<!doctype html>
<html lang="en">
<head>
  <meta http-equiv="Content-Type" content="text/html; charset=utf-8" />
  <title>Online Responsive Resume Demo</title>
  <meta name="author" content="Jake Rocheleau">
  <meta http-equiv="X-UA-Compatible" content="IE=edge,chrome=1">
  <meta name="HandheldFriendly" content="true">
  <meta name="viewport" content="width=device-width, initial-scale=1,maximum-scale=1,user-scalable=no">
  <link rel="stylesheet" type="text/css" href="http://fonts.googleapis.com/css?family=Simonetta:400,900|Balthazar">
  <link rel="stylesheet" type="text/css" href="styles.css">
  <link rel="stylesheet" type="text/css" href="responsive.css">
  <!--[if lt IE 9]>
    <script src="http://html5shim.googlecode.com/svn/trunk/html5.js"></script>
    <script src="http://css3-mediaqueries-js.googlecode.com/svn/trunk/css3-mediaqueries.js"></script>
  <![endif]-->
</head>
Мета-тег viewport — это тег, который крайне важен для того, чтобы отзывчивая страница могла работать на смартфонах. Мы сбрасываем масштаб макета к 1:1. Отметим также, что был включен внешний стилевой файл для Google Web Fonts. Используем два пользовательских шрифта “Simonetta” и “Balthazar”. Уникальные шрифты, конечно, захватывают внимание посетителя и гармонично сочетаются в одностраничном дизайне. Также было установлено одно маленькое условие IE, которое включает открытый скрипт для прежних браузеров. Internet Explorer 8 и старее испытывают затруднения в отображении HTML5 элементов и CSS3 свойств, но благодаря некоторым умным разработчикам эти затруднения можно обойти, используя JavaScript.
Главные блоки с контентом
Весь документ состоит из множества различных блоков внутри. Шапка <header> включает фотографию, имя, адрес e-mail и другие важные данные. После этого каждый блок был разбит на <section> для остального контента.
Когда вы будете менять размер страницы, эти блочные элементы будут изящно падать друг под друга.
<header class="clearfix"> <div id="info"> <h1><span itemprop="name">Jake Rocheleau</span></h1> <h3><span itemprop="jobTitle">Freelance Writer & Web Developer</span></h3> <small itemprop="address" itemscope itemtype="http://schema.org/PostalAddress"> <span itemprop="addressLocality">Hudson</span>, <span itemprop="addressRegion">Massachusetts</span>, <span itemprop="addressCountry">USA</span> </small> <small><span itemprop="email">jakerocheleau@gmail.com</span></small> <small><a href="http://byjakewithlove.com/" itemprop="url">My Portfolio</a> • <a href="http://twitter.com/jakerocheleau" itemprop="url">@jakerocheleau</a></small> </div> <div id="photo"> <img src="images/jake-rocheleau-250.jpg" alt="Jake Rocheleau resume photo avatar" itemprop="image" /> </div> </header>
Перед тем, как мы перейдем к деталям CSS, хочется больше рассказать про использование микроданных. Если приглядеться, то есть атрибуты внутри многих элементов с именами itemtype, itemscope, и itemprop. Они все касаются проекта Schmea project, который предлагает структуру данных для сети.
Форматирование полезных микроданных
Все главные поисковые системы, включая Google, Yahoo!, и Bing приняли Schema в качестве лучшего синтаксиса для повышения данных. Маркировка деталей помогает поисковым системам выводить связанные результаты онлайн для вас. Давайте разберемся, как установить их.
<div id="w" itemscope itemtype="http://schema.org/Person">
Атрибут itemscope применен для любого блока, который держит информацию на пункте схемы. Это всегда сопровождается атрибутом itemtype, который является сценарием описания персоны. В этом блоке обертки можно маркировать любое содержание при помощи itemprop наряду с любой из деталей, которые перечислены на странице документации.
Рекомендованный метод должен обернуть ваш контент внутри тега span вместо того, чтобы добавлять его прямо к элементу. Когда вы маркируете что-либо, например, фотографию, вы должны прикреплять itemprop прямо к элементу img. Но в противном случае, вы будете иметь гораздо более чистую разметку, обернув свои данные в span теги.
Сколько это слишком много?
Можно отметить, что нет никаких ограничений по количеству деталей, которые можно поместить внутрь. Микроданные доступны, чтобы помочь компьютерам распознавать людей, организации, продукты, и другие предметы в онлайн контексте. Чем больше информации вы можете предложить, тем лучше.
Стоит непредвзято взглянуть на то, как вы можете использовать микроданные в аспектах вашего собственного сайта. Если вы проведете 10-15 минут, просматривая Schema, вы поймете, что она намного проще, чем вы думаете. Мы можем увидеть это на двух примерах из резюме демо версии:
<section id="skills" class="clearfix" itemscope itemtype="http://schema.org/ItemList"> <h2 itemprop="name">Skillset</h2> <section id="skills-left"> <h4 itemprop="about">Development</h4> <ul> <li itemprop="itemListElement">HTML5/CSS3</li> <li itemprop="itemListElement">JavaScript & jQuery</li> <li itemprop="itemListElement">PHP Backend</li> <li itemprop="itemListElement">SQL Databases</li> <li itemprop="itemListElement">WordPress</li> <li itemprop="itemListElement">Pligg CMS</li> <li itemprop="itemListElement">Some Objective-C</li> </ul> </section> <section id="skills-right"> <h4 itemprop="about">Software</h4> <ul> <li itemprop="itemListElement">Adobe Photoshop</li> <li itemprop="itemListElement">Adobe Dreamweaver</li> <li itemprop="itemListElement">MS Office 2007-2010</li> <li itemprop="itemListElement">cPanel & phpMyAdmin</li> <li itemprop="itemListElement">Xcode 4</li> </ul> </section> </section>
Когда мы перечисляем навыки и умения, установим новый блок, определяющий ItemList schema. Значение здесь имеет то, что Google может понять, что каждый itemListElement связан друг с другом. В этом случае у нас есть список языков и программ, с которыми известно как работать.
<section id="articles"> <h2>Recent Articles</h2> <p itemscope itemtype="http://schema.org/Article"> <span itemprop="name"> <a href="http://www.hongkiat.com/blog/css-javascript-fallback-methods/" itemprop="url" title="10 Useful Fallback Methods For CSS And Javascript">10 Useful Fallback Methods For CSS And Javascript</a></span> • Published in <span itemprop="datePublished">July 2012</span></p> <p itemscope itemtype="http://schema.org/Article"> <span itemprop="name"> <a href="http://www.hongkiat.com/blog/wordpress-url-rewrite/" itemprop="url"
title="Rewriting URLs In WordPress: Tips And Plugins">Rewriting URLs In WordPress: Tips And Plugins</a></span> • Published in <span itemprop="datePublished">July 2012</span></p> <p itemscope itemtype="http://schema.org/Article"> <span itemprop="name"> <a href="http://www.hongkiat.com/blog/jpeg-optimization-guide/" itemprop="url" title="JPEG Optimization For The Web – Ultimate Guide">JPEG Optimization For The Web – Ultimate Guide</a></span> • Published in <span itemprop="datePublished">July 2012</span></p> <p itemscope itemtype="http://schema.org/Article"> <span itemprop="name"> <a href="http://www.hongkiat.com/blog/design-perfect-newsletter/" itemprop="url" title="9 Tricks To Design The Perfect HTML Newsletter">9 Tricks To Design The Perfect HTML Newsletter</a></span> • Published in <span itemprop="datePublished">May 2012</span></p> <p itemscope itemtype="http://schema.org/Article"> <span itemprop="name"> <a href="http://www.hongkiat.com/blog/google-website-optimizer-ab-testing-guide/" itemprop="url" title="Guide To A/B Testing With Google Website Optimizer">Guide To A/B Testing With Google Website Optimizer</a></span> • Published in <span itemprop="datePublished">March 2012</span></p> </section>
Просто имейте в виду, что микроданные — это форматированный контент, который будет организован с помощью компьютеров. Одностраничное резюме является прекрасным примером для определения черт о конкретном человеке. Они не могут быть полезными для каждого сайта, но это захватывающая методология для понимания.
Относительные CSS стили
В последней секции давайте взглянем на стили всей страницы. К вершине нашего CSS-файла отнесем начальный сброс и основные свойства элемента. Они включают в себя заголовки, элементы списков и эффект наведения на ссылку.
* { margin: 0; padding: 0; }
html { height: 101%; }
body { background: #f2f2f2 url('http://media02.hongkiat.com/responsive-resume/bg-tile.png'); font-size: 62.5%; padding-bottom: 65px; }
h1 { font-family: "Simonetta", "Trebuchet MS", Arial, sans-serif; color: #454545; font-size: 3.6em; margin-bottom: 6px; }
h2 { font-family: "Simonetta", "Trebuchet MS", Arial, sans-serif; color: #484848; font-size: 2.5em; margin-bottom: 10px; text-decoration: underline; }
h3 { font-family: "Trebuchet MS", Verdana, Arial, sans-serif; color: #777; font-weight: normal; font-size: 1.8em; margin-bottom: 10px; }
h4 { font-family: "Trebuchet MS", Verdana, Arial, sans-serif; color: #656565; font-weight: bold; font-size: 1.75em; margin-bottom: 4px; }
p { font-family: "Balthazar", "Droid Serif", Times New Roman, serif; color: #565656; font-size: 1.8em; line-height: 1.4em; margin-bottom: 15px; padding-left: 35px; }
small { font-family: "Balthazar", serif; color: #656565; font-size: 1.6em; display: block; margin-bottom: 6px; }
ul { display: block; list-style: none; }
ul li { padding-left: 45px; list-style-type: none; vertical-align: top; background: url('http://media02.hongkiat.com/responsive-resume/bullet.png') 25px 5px no-repeat; margin-bottom: 5px; font-family: "Balthazar", serif; color: #666; font-size: 1.6em; line-height: 2.3em; }
img { border: 0; max-width: 100%; }
a { color: #5582d6; text-decoration: none; }
a:hover { text-decoration: underline; }
Ничего интересного, за исключением некоторых пользовательских шрифтов.
/** @group core layout **/
#w { margin: 0px 50px; padding: 20px 40px; padding-top: 35px; background: #fff; min-width: 260px; max-width: 900px; border-bottom-rightright-radius: 8px; border-bottom-left-radius: 8px; -webkit-border-bottom-left-radius: 8px; -webkit-border-bottom-rightright-radius: 8px; -moz-border-radius-bottomleft: 8px; -moz-border-radius-bottomright: 8px; }
header { width: 100%; }
/** @group personal settings **/
#info { float: left; margin-bottom: 12px; }
#photo { float: rightright; }
#photo img {
-webkit-border-radius: 3px;
-moz-border-radius: 3px;
border-radius: 3px;
-webkit-box-shadow: 0 2px 4px rgba(0, 0, 0, 0.2);
-moz-box-shadow: 0 2px 4px rgba(0, 0, 0, 0.2);
box-shadow: 0 2px 4px rgba(0, 0, 0, 0.2);
background-color: #fff;
border: 1px solid #ccc;
padding: 5px;
}
Есть только несколько важных областей блока, которые заслуживают внимание. Конечно, блок обертки настроен с дополнительными отступами — внутри блока и вокруг блока. Также максимальная ширина ограничена 900px, потому что при большем размере создается впечатление, что у страницы очень много пустого места. Также используем закругленные углы внизу страницы для более гладкого эффекта.
Адаптивный дизайн
Возможно, самым важным аспектом этого онлайн-резюме является его отзывчивая функциональность. Здесь есть пять разных точек, по достижению которых при изменении размера окна браузера начинается эффект перераспределения контента.
@media only screen and (max-width: 740px) {
    h1 { font-size: 4.5em; }
    h3 { font-size: 2.2em; }
    h2 { display: block; text-align: center; }
    #info { float: none; display: block; text-align: center; }
    #photo {
        float: none;
        display: block;
        text-align: center;
    }
    #w { padding: 20px 15px; }
    p { padding: 0; }
}
Первоначальный размер в 740px. Фотография будет конфликтовать с нашим заголовком. Помещаем оба элемента в центр всего макета. Увеличим также размер текста заголовка.
Когда окно становится меньше, удаляем некоторые внутренние отступы блока обертки и параграфы. Следующее, что нам нужно, это сместить элементы списка UL — навыки. Убираем две колонки и получаются плавающие друг за другом пункты.
@media only screen and (max-width: 570px) {
    ul li {
        display: inline-block;
        padding-left: 15px;
        width: 140px;
        background-position: -5px 0px;
        margin-right: 6px;
        line-height: 1.7em;
    }
    #skills-left, skills-rightright { margin-bottom: 15px; }
}
Также необходимо изменить многие текстовые свойства по умолчанию. Установим фиксированную ширину и сетка смотрится достаточно органично до следующей точки.
Кодирование для смартфонов
Последние три точки маленькие, но очень важные. При переключении между режимами пейзажа и портрета iPhone будет изменять размеры любого мобильного браузера. Это же относится и к большинству устройств Android и Windows Mobile Phones.
@media only screen and (max-width: 480px) {
    ul li { width: 120px; }
    #w { margin: 0 20px; }
}

@media only screen and (max-width: 320px) {
    #w { margin: 0 10px; }
}
/** iPhone only **/
@media screen and (max-device-width: 480px) {
    ul li { width: 150px; }
}
При достижении точки в 480px или меньше будут удалены внутренние отступы обертки и изменится размер элементов списка. В точке 320px удаляем отступы вокруг блока. Вы все еще можете увидеть фон из текстуры, но это не очень важно в данной точке.

Последнее — используем max-device-width — 480px. В данном случае делаем шире список, чтобы элементы списка заполняли весь экран.
Заключительное слово
Работая в сети Internet было бы полезно иметь портфолио онлайн, откуда потенциальный клиент может перейти на одностаничное резюме и ознакомиться со всеми навыками и способностями автора. Это показывает вас с серьезной стороны и раскрывает ваш профессионализм в веб-дизайне.
Надеемся, что данный урок вам понравился и пригодится в дальнейшем. Если вас заинтересовал материал, скачивайте код и делитесь своими мыслями о статье.
Перевод — Дежурка.
Автор — Jake Rocheleau.
Читайте также: Создание простой галереи изображений Lightbox на jQuery.
Есть много способов, как создать персональный сайт — резюме.
Вы можете использовать одни из множества сайтов-конструкторов, или вы можете адаптировать для этого одну из CMS систем, такие как WordPress, Drupal, или им подобные. А так же вы можете нанять профессионального разработчика, чтобы он сделал вам сайт.
С таким количеством вариантов, трудно решить с чего начать. Более того, каждый из этих вариантов имеет свои плюсы и минусы, не говоря уже о уровнях сложности или цене, которую придется заплатить исполнителям.
Однако есть другой, отличный способ, создать свой персональны сайт — резюме, за разумное количество времени. И этот вариант — использование HTML-шаблона сайта. Его очень легко использовать и просто загрузить на сайт хостинг-провайдера.
Вот несколько самых лучших вариантов (просмотрите их быстренько, прежде чем продолжите читать):
Кроме того, код профессионального шаблона для сайта-резюме гораздо менее сложен для новичков, чем более сложный код, используемые в системах управления контентом.
В этой части серии Создание Отличного Сайта-Резюме, мы покажем вам простой процесс создания и загрузки HTML-шаблона резюме.
Следуйте за описанием, чтобы создать собственный резюме сайт и настроить его под себя — и вы сможете запустить свой сайт в самое ближайшее время.
Что Вам Нужно, Чтобы Ваш Резюме Сайт Заработал?
Прежде чем мы начнем заниматься изменениями в шаблоне, давайте рассмотрим инструменты, которые нам понадобятся, что бы установить наш HTML-шаблон и запустить его:
1. Хороший Хостинг Провайдер
Покупка доменного имени для вашего сайта — это лишь первый шаг на пути. Также вам понадобится хостинг-сервер хостинг, куда вы загрузите файлы для вашего веб-сайта. Найти хорошего хостинг-провайдера не так-то просто, хотя бы потому, что их очень много. Большинство из них, предлагают базовые услуги хостинга за 5-10$ в месяц. Некоторые предлагают неограниченный канал трафика и место, у других есть ограничения.
Следует помнить, что почти все провайдеры поддерживают использование HTML-шаблонов. При выборе хостинг-компании, прочитайте FAQ на их сайте, чтобы убедиться в качестве клиентской поддержки, в случае, если вам понадобится какая-то помощь. Вы так же должны выполнить небольшой обзор, и почитать отзывы о конкретных хостингах на независимых сайтах, чтобы узнать, на сколько пользователи удовлетворены предоставляемыми услугами.
2. FTP-клиент
После того, как вы найдете хостинг-компанию, вам понадобится FTP-клиент. FTP-клиент позволит вам загрузить ваш шаблон на сервер хостинга. Выбор программы зависит от операционной системы , установленной на вашем компьютере.
Одна из наиболее популярных программ — это FileZilla. Это бесплатная FTP программа, которая проста в использовании и доступна под Windows, Mac, и Linux.
3. Редактор Кода
Вам также понадобится текстовый редактор, чтобы внести изменения в файлы вашего шаблона. Хотя можно использовать Блокнот или TextEdit, но вносить изменения, используя редактор кода будет намного проще. В отличие от обычных текстовых редакторов редактор кода включает в себя инструменты, которые облегчают редактирование, например с использованием различных цветов для разных частей кода, за счет чего легче видеть, что вы редактируете.
В рамках этого урока я буду использовать Sublime Text, который можно использовать под Mac, Windows и Linux. а пробную версию можно скачать бесплатно. Узнайте больше о том, как работать этим популярным редактором кода:
4. HTML-шаблон и изображения для вашего веб-сайта резюме
Последние две вещи, которые вам необходимы — это ваш HTML-шаблон резюме и изображения, которые вы планируете использовать на вашем сайте.
В этом уроке я буду использовать Flatrica HTML шаблон резюме веб-сайта, показанный здесь:


Вы можете найти ваш сайт шаблон в области Загрузка вашего Envato счета после того, как вы сделали покупку. После того как вы загрузили HTML шаблон сайта, распакуйте папку и сохраните его на рабочем столе для быстрого доступа.
Говоря об изображениях, вам понадобится ваш снимок и другие личные фотографии, которые вы может захотите использовать. Вы так же можете использовать картинку для фона или паттерн, так что убедитесь, что у вас подготовлены все эти изображения на вашем компьютере, и вы готовы использовать их в шаблоне.
Как Отредактировать Содержимое Шаблона Вашего Резюме Сайта
Теперь, когда у вас все готов, пришло время настроить шаблон, используя вашу личную информацию. Давайте разберем как настроить HTML-шаблон Flatrica:
1. Структура HTML-шаблона Резюме
Прежде чем мы начнем редактировать файлы, давайте взглянем на структуру этого HTML-шаблона. Когда вы распакуйте папку, вы заметите, что в ней две папки: одна с документацией и другая с файлами шаблона.


Папка с шаблоном сайта содержит все нескольго поддиректорий.
- Colors, в которой содержится информация о цветовом коде и переменных, которые испльзуются в этом шаблоне.
- Fonts, в этой папке содержаться все шрифты.
- Images — папка в которой находятся картинки.
- Папка, которая содержит в себе код на JavaScript, необходима для нормального функционирования шаблона. В большинстве случаев, вам никогда не придется редактировать содержимое этой папки или файлы в ней, так как JavaScript обеспечивает функционирование таких элементов, как выпадающее меню, анимация, подтверждение заполнения форм.
- Папка РНР, содержит в себе код, который обрабатывает заполнение контактной формы. Вам нужно будет отредактировать только одну строку кода, чтобы добавить адрес электронной почты.
- Папка Sass содержит в себе все переменные для таблиц стиля.
- Stylesheets — содержит CSS файлы, которые нужны, чтобы вы могли настроить шаблон в соответствии с вашим стилем и брендом.
Кроме этих папок, есть так же ряд других HTML файлов: index-normal.html, index-video.html, single-blog.html и single-portfolio.html.
Помните, что ваш шаблон, не обязательно будет содержать все эти файлы и папки, однако в большинстве случаев, у вас будут такие папки как stylesheets, images, JavaScript и PHP. Так же в вашем шаблоне может быть больше или меньше HTML файлов.
2. Замена Стандартной HTML Информации в Шаблоне
Дважды щелкните по файлу index-normal.html (или index.html если вы используете другой шаблон). В результате файл откроется в вашем браузере, и так вам будет легче понять какую часть кода вам нужно отредактировать, и где ее искать в вашем HTML-шаблоне.


Если вы посмотрите на шаблон в вашем браузере, вы увидите, что вам нужно редактировать:
- Ваше имя и контактную информацию.
- Рекламный текст над кнопкой для скачивания вашего резюме.
- Различные разделы, содержащие информацию о вашем образовании, навыках, опыте, портфолио, полседних клинетах и другое.
Теперь, когда вы знаете, что вам нужно изменить, вы можете искать соответствующие места в коде.
Щелкните правой кнопкой мыши по имени John Doe и выберите Inspect. Вы заметите выскакивающую панель внизу, которая показывает кусок HTML кода из нашего шаблона.
Линия, содержащая имя выделена в левой части панели Инспектора кода, а так же показан соответствующий стиль на правой стороне (прим. перевод.: в данном случае используются инструменты разработчика в браузере Chrome).
Как вы можете видеть на скриншоте выше, имя расположено между тегами <h4>, которые используются в HTML для создания заголовков.
В большинстве случаев, теги, как этот являются парными, т.е. есть открывающий и закрывающий тег, и между ними находится содержание, которое будет отображаться на станице сайте, вот так:
<h4>Jonn Doe</h4>
Для того, чтобы отредактировать ваш шаблон, вам нужно знать теги, которые содержат информацию, которую вам нужно отредактировать, найдите эти места в коде и отредактируйте информацию.
Откройте HTML-файл в редакторе
Теперь вренитесь назад в папку с шаблоном, щелкните правой кнопкой мыши по файлу index-normal.html и выберите в меню Open with Sublime Text (Открыть с помощью Sublime Text). И вы увидите весть HTML код, из которого состоит ваш шаблон.
Чтобы начать редактировать шаблон, вам нужно найти тот же код, который вы видели в панели Инспектора вашего бразуера.
Пролистайте вниз, до строк 150-151. Затем, щелкните между тегами <h4> и замените имя на ваше.


После этого, щелкните между тегами <h6>, удалите текст и напишите свою профессию.
Повтаряя эти шаги снова и снова, вы замените всю «шаблонную» информацию своей собственной.
Если в шаблоне есть раздел, который вам не нужен, просто удалите его. На скриншоте ниже, я выделила все в таблице Pricing и удалила эту часть кода.


Как Заменить Изображения на Ваши Собсвенные
Чтобы заменить изображения на ваши собственные, просто выберите все картинки в соответствующей папке, удалите их, и поместите туда свои изображения. Если вы следовали предыдущему совету, вы назвали изображения теми же именами, что и шаблоне, что позволяет его редактировать быстрее.
Если вы хотите добавить больше информации, выберите код в соответствующием разделе, копируйте его CTRL/CMD + C и затем вставьте ниже CTRL/CMD + V. На скриншоте ниже, я решила добавить, еще одну диаграмму для навыка, так что я выделила код, для диаграммы четвертого навыка и скопировала ее ниже:


И окончательный вариант выглядит следующим образом:


Как Изменить Вид Вашего HTML Сайта — резюме
После того, как вы поменяли всю информацию, на нужную вам, пришло время поработать над стилем вашего резюме шаблона, и сделать то, что вам понравится. По умолчанию, HTML шаблон — Flatrica, поставляется с несколькими различными стилями. Если вы посмотрите в папку со стилями, то вы можете заметить, что, в их названия вставлен цвет, который используется в данном стиле:


Вы можете быстро сменить цвет, сменив название стиля в заголовке документов, указав то стиль, который вам больше нравится. Посмторите на следующую строчку кода:
<!-- CUSTOM STYLE -->
<link href="stylesheets/style.css" id="switch_style" rel="stylesheet">
Изменив название на style_blue.css, вы получите шаблон в новом цвете, и который выглядит по-новому.


Если вы готовы к приключениям, вы можете отредактировать таблицу стилей style.css в которой можете указать шрифты и цвета на ваше усмотрение. Например, вы можете отредактировать цвет фона в style.css, введя HEX значение (шестнадцатиричный код) для цвета который вам больше нравится.
background-color: #65b5c1;
Редактировать CSS файл, можно так же как мы редактировали HTML. Щелкните правой кнопкой по элементу, который вы хотите настроить и нажмите Inspect. Теперь вам нужно смотреть на код с правой стороны таблицы Инспектора, и затем найти тот же код в редакторе кода.


Как Загрузить Файлы Вашего Сайта на Сервер
После того, как вы изменили файлы шаблона, по своему усмотрению, вам нужно загрузить их на сервер хостинга. У вас должно быть письмо от вашего хостинг-провайдера, в котором содержится вся необходимая информация для передачи данных по FTP.
Приступая к процессу загрузки, запустите ваш FTP-клиент. Я со своей стороны, использую FileZilla. Введите информацию, которую вы получили от хостинг-провайдера, и введите ее в верхней панели, а затем нажимте QuickConnect:


Расположите папку с вашим шаблоном в левой части экрана, и щелкните по ней, чтобы развернуть ее. В нижней левой части, выберите файлы и папки и перетяните их на правую часть экрана.
Убедитесь, что вы загрузили файлы в корневую папку вашего хостинг сервера, в папку public_html.


После того, как все файлы загружены, откройте ваш баузер и введите в нем ваше доменное имя. Поздравлюя, теперь ваш новый сайт-резюме доступен в сети!
Четыре Совета Которые Помогут Сделять Ваш Резюме-Сайт Особенным
Теперь, когда вы знаете как использовать HTML шаблон резюме-сайта, предлагаю вам четыре небольших совета, которые помогу сделать ваш сайт еще более привлекательным:
- Используйте Сжатие для Картинок — Перед тем как загрузить файлы на сервер, убедитесь, что вы уменьшили размер изображений до оптимального размера. Это поспособствет быстрой загрузке вашего сайта. Вы можете использовать инструмент TinyJPG, чтобы сжать изображения без особой потери качества.
- Минимизируйте Количество Стилей и Используемых JavaScript Файлов — Так же как и с картинками, это поможет вашему сайту загружаться быстрее. Такие инструменты как CSS Minifier и JSCompress, сделают работу за вас.
- Добавьте Ссылку на Ваш Сайт в Профили в Социальных Сетях — вы усердно поработали, создавая свой сайт, теперь пришло время поделиться им с миром. Повысьте шансы вашего сайта быть увиденным, добавив его в профили в социальных сетях.
- Используйте Ссылку на Сайт как Часть Вашей Подписи в Электронном Письме — Один из лучших способов продвижения вашего сайта — это добавить его в вашу подпись к электронным письмам. Это просто, бесплатно, делается за пару секунд, и еще имеет кучу плюсов.
Настройте Ваш HTML Шаблон Сайт-Резюме
Редактирование шаблона HTML может спрева показаться пугающим, но на самом деле это не так сложно, после того как вы разберетесь в структуре шаблона и в том, что вам нужно редактировать. Если вы уделите немного времени и прочтете несколько уроков, то вы быстро разберетесь с HTML и CSS. Используйте наше руководство по настройке шаблона сайта — резюме и увеличьте ваши шансы найти отличную работу.

Рекомендации к Выполнению
В левой верхней части отобразить фотографию соискателя, справа от фотографии должно быть написано имя соискателя и желаемая должность.
Далее, горизонтальная линия на все страницу. Затем указывается следующая информация о соискателе:
обо мне;
образование;
опыт работы;
интересы;
контакты.
Информация указывается следующим образом: заголовок (задать цвет, размер шрифта и выравнивание по центру), под ним горизонтальная линия (60-80% экрана), далее – основной текст. Чтобы размер линии не совпадал с размером экрана можно добавить к тегу следующие свойства: width=»70%» align=»left».
Указывая контакты (не менее 5), поместить рядом с каждым контактом соответствующую картинку (например, рядом с электронным адресом можно поместить конверт).
Пункты «Обо мне», «Опыт работы», «Образование», «Интересы» должны содержать не менее 10 предложений. Для всего текста должны быть заданы цвет, выравнивание и размер шрифта (название шрифта можно указать, используя свойство face тега font).
__________________
Помощь в написании контрольных, курсовых и дипломных работ, диссертаций здесь
Click here to directly go to the complete HTML resume sample
Know how to tag your HTML resume!
«The way to get started is to quit talking and begin doing.»
-Walt Disney
And to create a job-winning resume, you need professional assistance which we are here to provide.
Resume writing is not rocket science.
Anyone can write a resume.
But writing a perfect HTML resume — that is where the devil lies.
As a front-end web developer who creates the visual appearance of websites with coding languages, you need to be able to reflect that potential in your html5 resume.
You need to have a professional approach to resume writing if you want to curate a job-winning resume. And in this blog, we have covered every tip for each section of your HTML resume.
Read on to learn the art of curating an impeccable HTML resume to effectively communicate your professional expertise to a potential employer.
Here is a summary of our HTML Resume Blog:
- Provide the certifying authority, course name, time period, etc. in your HTML resume
- Mention about the projects that you have participated in or singlehandedly led.
- Communicate your work experience details in one-liners and list them in groups.
- List all your details in reverse chronological resume format.
- Give an overview of your resume by composing a suitable resume summary or an objective.
That’s not all.
By the end of this blog, you will be able to put together a job-winning HTML resume. Additionally, you will also learn:
- How to make your html resume ATS compliant and recruiters friendly.
- What are the 3 stages of resume writing and what are the distinct section of an html resume?
- How to describe your work experience in a professional manner on your HTML resume.
- How to highlight html skills on a resume like a professional?
- Whether to include education and certification details on an HTML resume.
- Is it necessary to include a summary or objective for your html resume?
Our Online Resume Builder has a huge library of examples and an HTML resume sample that will blow your mind!
Simply fill in with your details and your perfect resume is good to go.
What is HTML Resume & Why Do You Need It?
The best way to give an HTML resume definition is that it is the documentation of your professional experience and skills for the recruiters to recognize you as a suitable applicant for the targeted job profile.
And you must create a resume that highlights the most significant aspects of your potential.
- Creating a job-winning resume is not a piece of cake especially if you want to stand out amongst hundreds and thousands of applicants. But it is not something that cannot be accomplished.
- You need to curate a resume that can help you rank high on the ATS (Applicant Tracking System) which most recruiters use to filter through resumes and pick the most suitable ones.
Simply make sure that you use the keywords used by the recruiters in the job listing and are relevant to the job profile that you are applying for.
HTML is amongst the top programming languages and so the demand for html professionals would be high in the current job market.

Source: UC Berkley Extension
You can learn more about HTML resume definition by going through Hiration’s do’s and don’ts for your resume.
In the meanwhile, do get your existing resume professionally reviewed by Hiration’s Resume Review Service which is free.
How to Write Your HTML Resume
An effective way to write an impeccable resume is by following the three stages of resume writing that have been discussed below:
- Stage 1: Master HTML Resume
- Stage 2: First Draft of HTML Resume
- Stage 3: Final Draft of HTML Resume

Master HTML Resume
Starting by drafting a master resume can help you throughout your resume writing and make it easier for you to curate a job-winning resume.
A master folder of your HTML fresher resume can be created to gather your details and information that is most likely to be required in every resume.
Simply list down every detail of your work experience, education, training, certifications, awards, recognitions, etc.
Some details may not seem important in your current resume but do not hesitate to store them in your folder because they may be required in the future update of your resumes.
First Draft of HTML Resume
Next, create the first draft of your html5 resume wherein you need to compose the following sections as per your requirement:
- Header
- Personal Information
- Profile Title
- Professional Experience
- Education
- Certifications (if any)
- Awards & Recognition (if any)
- Additional Information (if any)
Final Draft of HTML Resume
In the final stage, you need to compose two important sections that can help you highlight both your professional skill and work experience:
-
Key Skills: Create a separate section to highlight your skills which you need to pick from the professional experience section. Simply scan through your work experience statements, then pick the most significant skills and list them under the «Key Skills» section.
-
Summary/Objective: If you have more than 3 years of work experience, compose a suitable resume summary. But if you have less nor no work experience, compose a resume objective. You must compose this section as it gives an overview of your resume.
HTML Resume Sections
Every section in a resume plays an important role in highlighting different details and information about you to the recruiters.
Your html resume layout should consist of various sections.
The below-given sections are the standard resume sections that are ideally required to be framed in a resume:
- Header
- Personal Information
- Profile Title
- Summary/Objective
- Key Skills
- Professional Experience
- Education
To enhance the standard sections of a simple HTML resume, the below-given optional sections can be framed:
- Certifications (if any)
- Additional Information (if any)
- Awards & Recognitions (if any)

Also, do read more about resume sections on Hiration’s Guide to sections in a resume.
Additionally, you can use Hiration’s Online Resume Builder to curate the perfect resume that can raise your chances of being shortlisted for your dream job.
Your resume header is the section that helps you label your resume with your name and give it a unique identity to stand out amongst any other resume.
It makes it easier for the recruiters to keep a track of your resume in a sea of resumes. Hence you should write your HTML development resume in the range of 16-20 font size at the topmost part of your section.
If you have a middle name write only the initial of your middle name followed by a period and place it between your first and last name.
Read Hiration’s Guide To Writing The Perfect Resume Header to learn how to curate the perfect header for your HTML developer resume.
We have given an HTML resume example for you to understand how an ideal resume header is framed:
Make the best use of Hiration’s Online Resume Builder to frame the perfect resume that can help you land your dream job.
Describe Your Professional Experience in Your HTML Resume
Most people make the mistake of taking their resumes for granted and hence end up losing the chance of landing their dream jobs despite having all the required skills and credentials.
Here is your chance to avoid making such avoidable mistakes and get closer to your dream job.
The following factors can help you curate a flawless resume if followed and applied while framing your HTML fresher resume.
- STAR Format
- Frame Points
- Grouping & Highlighting

STAR FORMAT
Always write action-oriented points that help you describe your work experience and highlight your roles and responsibilities while also mentioning your achievements and contributions.
The STAR format can help you describe your professional experience in the most effective manner.
STAR stands for the following points:
- S: The situation, backdrop, or context of work assigned to you.
- T: The actual task assigned to you.
- A: action or strategy you used to execute the assigned task.
- R: The result or outcome of your action in the form of achievement figures.
FRAMING POINTS
To understand the importance of framing your HTML resume points, let us compare the two HTML resume examples that have been given below:
AVOID THIS:
Resume Example 1:
«As a professional HTML developer, I have written 100% efficient, well designed, and testable codes by making use of Photoshop and Dreamweaver. While working on the given project, I cooperated with 10 web designers to match the visual design intent for 20+ websites. As part of my roles and responsibilities, I successfully updated 20+ client websites while designing, building, and maintaining software applications. I also identified any existing problems and corrected them to ensure 100% customer satisfaction at all times.»
PRACTICE THIS:
Resume Example 2:
- Wrote 100% efficient, well designed, and testable codes via Photoshop and Dreamweaver
- Cooperated with 10 web designers to match visual design intent for 20+ websites
- Updated 20+ client websites while designing, building, and maintaining software applications
- Identified problems and corrected them to ensure 100% customer satisfaction
Framing Points: Analysis
By comparing the two HTML resume examples, we can observe that framed points (example 1) are clear to read and understand as compared to the paragraph (example 1).
There is a huge difference between the framed points and the lengthy paragraph despite both the examples describing the same HTML resume points.
And for a recruiter, it would be easier to go through the framed points as compared to the paragraph where all the information is clustered together in a bulk.
In conclusion, always make sure that you frame your points in one-liners and avoid writing bulky paragraphs to describe your professional experience.
GROUPING & HIGHLIGHTING
Another important factor that can help you enhance your work experience section is by applying grouping and highlighting.
To understand its importance and how it can be implemented in your simple HTML resume, let us look at another set of HTML resume examples given below:
LESS IMPACT:
Resume Example 1:
- Created the UI for 60+ websites through standard HTML and CSS practices
- Maintained and updated 10+ HTML/CSS templates on a weekly basis
- Collaborated with the back-end Web Developer team and created 27+ new websites
- Drafted efficient codes via Dreamweaver & BootStrap to delivered high-quality codes
- Integrated accurate data from 90+ back-end services and databases
HIGH IMPACT:
Resume Example 2:
UI Designing & Web Development
- Created the UI for 60+ websites through standard HTML and CSS practices
- Maintained and updated 10+ HTML/CSS templates on a weekly basis
- Collaborated with the back-end Web Developer team and created 27+ new websites
Data Integration
- Drafted efficient codes via Dreamweaver & BootStrap to delivered high-quality codes
- Integrated accurate data from 90+ back-end services and databases
Grouping & Highlighting: Analysis
Now both the examples are clear to read but applying grouping and highlighting (example 2) effectively enhances your framed HTML resume points (example 1).
It is so because listing down all the similar points under the relevant group makes it look more organized and highlighting the main point in your statements.
The recruiters can easily make out your achievements and contributions as a professional and hence raise the chances of shortlisting you for the targeted job profile as the most suitable applicant.
Make sure that you make the best of grouping and highlighting to frame effective one-liner points that help you describe your professional experience.
Refer to the given resume HTML resume template showcasing what an ideal professional experience section looks like:
Create Separate Key Skills & Technical Skills Section in Your HTML Resume
The recruiters look for applicants who have the right set of html skills on resume to shoulder the responsibilities that come with the targeted job.
- You need to highlight the most significant skills that you possess as a professional in your HTML resume.
- Create a separate section under the heading «Key Skills» and align all the core skills that you have justified in your one-liners.
- But make sure that you mention only those significant skills that are relevant to the job profile.
Doing so can help you rank high on the ATS because you can highlight your skills by using relevant keywords used by the recruiters in the job listing.
Read Hiration’s Guide on what skills to put on a resume to get a better understanding of how to efficiently curate this section.
Here is an HTML resume sample showcasing the perfect html skills on resume. It illustrated what your HTML resume skills should look like when composed in this section:

Image credit: hackernoon.com
Include HTML Resume Summary
Compose an html resume summary if you have more than 3 years of work experience to give an overview of your resume.
A resume summary can help you highlight your most significant achievements and contributions to an organization through which the recruiters can easily recognize your potential.
You can compose an effective resume summary by following the given points:
- Write your summary at the end because that way you can easily decide what to skip and add.
- Scan through your work experience section and pick the highlights of your career.
- Avoid over flooding your resume summary with unnecessary details and information.
Go through Hiration’s Resume Summary Guide to learn how to write an effective summary for HTML resumes.
Look at the given HTML resume sample showcasing an ideal resume summary for your resume HTML templates:
HTML Resume Objective
An HTML fresher resume objective should be written if you do not have enough work experience or if you belong to any of the following categories:
- You are a fresh graduate.
- You are making a change of career.
- You have less or no work experience.
The role of your HTML fresher resume objective is to convince the recruiters that you are the most suitable applicant for the targeted job profile.
Your HTML resume objective is an overview of your resume that needs to be composed if you are not eligible to curate an HTML resume summary.
Learn the art of curating effective HTML fresher resume objective with the help of Hiration’s Guide on Resume Objectives.
HTML Resume: Personal Information
The personal information section is an important feature of your html5 resume because this is where you can list down your details of contact without which the recruiters cannot reach you for any likely shortlist.
Here is what an ideal personal information section should contain:
- Contact Number
- Email Address
- Current Location
Additionally, you can also include the following sections when required:
- LinkedIn profile link
- Link to an online portfolio
EXAMPLE:
| PERSONAL | INFORMATION |
|---|---|
| Contact Number: | +1 234 234 2345 |
| Email Address: | flynn@xyz.com |
| Location: | SF, US |
| LinkedIn: | www.linkedin.com/flynn |
Hiration Protip: In the Mideast, including details like gender, passport details, date of birth, etc. are required, but not in the US. So make sure to read through the hiring norms for the country you are targeting before you include (or don’t include) such details.
Contact Number
It is also possible that some recruiters may want to interview you over the phone or confirm with you before scheduling any face-to-face interviews.
Hence you must provide only the correct details of your contact number which is active and functional.
The correct format for writing your mobile number is documented below:
- Provide the ISD code of your country as a prefix before your phone number
- Add a plus sign (+) right before the ISD code
- Eg: +1 (623) 238 2151
Email Address
One of the most convenient means for the recruiters to get in touch with you is via email.
Give out your official email IDs that have your real name and not the ones that have fancy or made-up names to maintain a professional approach in your html programmer resume.
The right way to frame your email address is: james@xyz.com or jamesalter@xyz.com
Current Location
There are two important points you need to keep in mind while framing your current location in a resume:
- Avoid giving out unnecessary details like the name of your locality, house or street number, etc.
- Mention the city and state of your residence if you are looking for a job within your country. But if you are looking for a job outside your country then mention your city and country.
Read Hiration’s Guide to composing your contact information to learn more about this section.
Take a look at the given resume HTML template sample:
Use our Online Resume Builder to curate a perfectly fashioned resume.
It comes with a pre-designed & pre-filled resume template that you can easily enhance as per your requirements.
HTML Resume: Profile Title
Whether you are an HTML developer or an HTML programmer, you need to let the recruiters identify your professional status through your profile title.
Mention an accurate profile title to make the recruiters recognize the level of your professional expertise.
Your profile title helps conveys the following:
- Current designation
- Functional industry
- The level of seniority in your line of work
Ideally, your profile title should be written in the range of 14-16 font size.
Do not exaggerate your profile title because it may have a negative impact on your job application as it would be considered as lying to the recruiters.
Look at our HTML developer resume sample to get a better insight into how an ideal profile title is framed:
HTML Resume: Education
Provide the details of your educational qualification to make the recruiters recognize you as a suitable applicant for the targeted job profile.
The education section of your html css developer resume should ideally consist of:
- Name of the school/university.
- The courses you have pursued.
- Location of your school/university.
- Dates of enrollment and graduation in the month & year format.
Read an exhaustive guide on how to correctly curate the education section from Hiration’s Guide on how to list education on your resume.
Here is an HTML resume sample showcasing the ideal education section of your HTML resume template:
HTML Resume: Certifications
Being a certified professional can give you more credits as a suitable applicant and hence you should make sure to mention any relevant certifications that you possess.
Mention the details of the following in your certifications section:
- Certification course name.
- Name of the institute of affiliation.
- Location of the institute of affiliation.
- Enrollment and completion date of the course in the month & year format.
Read Hiration’s Guide on listing certifications on a resume and learn how to curate this section.
In the meanwhile, compose a job-winning resume with our professionally designed Online Resume Builder.
Resume Review & Free Resume Templates
Get your resume professionally reviewed by our resume experts at Hiration in compliance with the following parameters:
- Global Compatibility
- Compliance with industry norms
- Design Compatibility
- Recruiter Friendliness
- Conversion Scope
- ATS Compliance
- Content Relevance
- Performance Assessment
- Resume Formatting (font, margins, the order of sections, etc.)
Online Resume Builder for HTML Resume
Here is a list of the resources that come with our Online Resume Builder:
- 100+ resume templates
- 25+ resume designs
- Full rich-text editor
- Unlimited PDF downloads
- Live resume editor
- 1-click design change
- A sharable link
- Option to save unlimited resumes
Visit our Online Resume Builder and utilize the pre-filled templates.
Hiration Cover Letters
Create an HTML cover letter for your html programmer resume to give a clearer picture of where you professionally stand to the hiring managers.
Go ahead and get professional cover letters built today!
Hiration’s Cover Letter Builder provides:
- 10+ ready to use templates
- 15+ designs
- Freedom to customize templates
- Create multiple cover letters
- Easy downloading
This is not all!
There are other amazing products and services of Hiration that can help you create a name in the professional world.
Make sure to check out the following features:
- Digital Portfolio Builder
- LinkedIn Review
- Interview Prep
HTML Developer Resume Sample
To begin with, take a look at our html developer resume sample to know what an ideal resume should look like:
5+ years experienced HTML Developer highly skilled in conceptualizing & creating well designed, testable, efficient codes, and maintaining their compatibility with browsers, devices, or operating systems. Adept at creating the user interface and integrating data. Proficient in collaborating with web designers to build, maintain & update websites/applications.
• Coding • UI Designing • Data Integration • Application Development • Software Development • Code Evaluation
• Website Maintenance • Client Satisfaction • Backup & Recovery • Testing & Troubleshooting • Manual Testing
-
Languages: HTML, CSS, JavaScript, HTML5, and CSS3
-
Software: Dreamweaver, BootStrap, Photoshop
Start typing, then use the up and down arrows to select an option from the list
UI Designing & Web Development
-
Created the layout/user interface for 70+ websites via standard HTML/CSS practices
-
Maintained & updated 15+ HTML/CSS templates on a weekly basis
-
Collaborated with the back-end Web Developer team of 35 to create 27+ new websites and update 50+ existing ones
-
Drafted well designed, testable, efficient codes via Dreamweaver & BootStrap and delivered high-quality codes
-
Integrated data from 100+ back-end services & databases
-
Evaluated code to ensure it is valid & properly structured, and is compatible with browsers, devices, or operating systems
-
Tested background codes of 50+ websites & resolved issues like the inability to access the site or non-functioning links, etc
Start typing, then use the up and down arrows to select an option from the list
-
Wrote well designed, testable, and 100% efficient code via software such as Photoshop and Dreamweaver
-
Cooperated with a web designing team of 15 to match visual design intent for 25+ websites
Website Maintenance & Client Servicing
-
Played a key role in designing, building & maintaining websites & software applications and updating 30+ client websites
-
Identified problems uncovered by customer feedback & testing, & corrected them to ensure 100% customer satisfaction
Start typing, then use the up and down arrows to select an option from the list
Application Optimization & Collaboration
-
Developed new user-facing features for 15+ websites and ensured the technical feasibility of UI/UX designs
-
Optimized 7+ applications for maximum speed & scalability and built reusable code & libraries for future use
-
Collaborated with the back-end team of 20 & stakeholders to understand requirements & created 17 attractive websites
Start typing, then use the up and down arrows to select an option from the list
-
GPA: 4/4
The given html resume design is one of the many template designs made available on our Online Resume Builder.
You can create and download two pager or one pager html template without any hassle.
Key Takeaways
- Label your resume by writing your name as the resume header at the topmost part of your html css developer resume.
- Mention only the accurate profile title to make the recruiters recognize the level of your professional status.
- Frame your work experience in one-liner points and list them under different groups.
- Provide the details of your education and certifications to enhance your simple HTML resume.
Now that we have reached the end of this blog, make use of all the examples of resume HTML templates and tips that we have provided in this blog as they can help you in writing a great resume.
Go to Hiration resume builder and create a professional resume for yourself. Additionally, reach out to us at support@hiration.com and you can get 24/7 professional assistance with all your job & career-related queries.