Данная игра вряд ли пригодится для создания или оформления сайта, но в ней можно посмотреть, как реализованы некоторые элементы или просто поиграть.
Установка:
- Подключаем CSS minesweeper.css
- Подключаем JS minesweeper.js ниже HTML, который представлен ниже:
|
1 2 3 4 5 6 7 8 9 10 11 12 13 14 15 16 17 18 19 20 21 22 23 24 25 |
<div class=«col-left»> <div class=«settings»> <label for=«boardSize»>Размер поля:</label> <input id=«boardSize» type=«range» value=«10» min=«4» max=«20»> <!— <label for=»tileSize»>tile size</label> <input id=»tileSize» type=»range» min=»10″ max=»100″ step=»10″> —> <fieldset> <input type=«radio» id=«easy» name=«difficulty» value=«0.1» class=«difficulty»> <label for=«easy»>Легко</label> <input type=«radio» id=«normal» name=«difficulty» value=«0.2» class=«difficulty» checked> <label for=«normal»>Нормально</label> <input type=«radio» id=«hard» name=«difficulty» value=«0.4» class=«difficulty»> <label for=«hard»>Сложно</label> </fieldset> </div> </div> <div class=«col-right»> <a href=«#!» class=«minesweeper-btn»>Новая игра</a> </div> <div class=«board-wrap»> <div class=«board»></div> </div> <div class=«endscreen»></div> |
Найдено на codepen.io у пользователя creme
- Опубликовано: 13.08.2019
- Рубрики: Разное
- Метки: JavaScript
- 18224 просмотра
В этой статьи вы прочитаете, как сделать игру сапёр на JavaScript, но нужно предупредить, что этот код сделал не я, а был взять с сайта codepen.io у пользователя creme, поэтому если нужен оригинал, заходите к нему.
Также что бы понимать написанный тут код, стоит знать стандарты языка JavaScript ECMAScript 6 и Buble.
Создаём сапёр на JS:
Перейдём к созданию, но для начала нужно создать HTML документ, в котором и будет рендерится игра.
HTML:
|
<div class=«board-wrap»> <div class=«board»></div> </div> <div class=«endscreen»></div> <script src=«./scripts/minesweeper.js»></script> |
В HTML нет не чего сложного, тут создаём элемент для рендеринга поля и подключаем скрипт с нашем кодом.
CSS не буду показывать так как, там его слишком много, да и вы всё равно можете скачать внизу эту программу и разобрать весь CSS.
JavaScript:
Как говорилось выше я не буду особо сильно описывать код, так как, тут он очень сложный и если всё объяснять, то получится очень длинный текст.
В этом коде мы объявляем переменный, массивы которые пригодятся во время работы программ, всё написано в комментариях, что для чего нужно.
|
1 2 3 4 5 6 7 8 9 10 11 12 13 14 15 16 17 18 19 20 21 22 23 24 25 26 27 28 29 30 31 32 33 34 35 36 37 38 39 40 41 42 43 44 45 46 47 48 49 50 51 52 53 54 55 56 57 58 59 60 61 62 63 |
// Функция для запуска игры const setup = () => { for (let i = 0; i < Math.pow(size, 2); i++) { const tile = document.createElement(‘div’); tile.classList.add(’tile’); board.appendChild(tile); } tiles = document.querySelectorAll(‘.tile’); boardSize = Math.sqrt(tiles.length); board.style.width = boardSize * tileSize + ‘px’; document.documentElement.style.setProperty(‘—tileSize’, `${tileSize}px`); document.documentElement.style.setProperty(‘—boardSize’, `${boardSize * tileSize}px`); let x = 0; let y = 0; tiles.forEach((tile, i) => { // set tile coordinates tile.setAttribute(‘data-tile’, `${x},${y}`); // Добавление боб let random_boolean = Math.random() < bombFrequency; if (random_boolean) { bombs.push(`${x},${y}`); if (x > 0) numbers.push(`${x—1},${y}`); if (x < boardSize — 1) numbers.push(`${x+1},${y}`); if (y > 0) numbers.push(`${x},${y—1}`); if (y < boardSize — 1) numbers.push(`${x},${y+1}`); if (x > 0 && y > 0) numbers.push(`${x—1},${y—1}`); if (x < boardSize — 1 && y < boardSize — 1) numbers.push(`${x+1},${y+1}`); if (y > 0 && x < boardSize — 1) numbers.push(`${x+1},${y—1}`); if (x > 0 && y < boardSize — 1) numbers.push(`${x—1},${y+1}`); } x++; if (x >= boardSize) { x = 0; y++; } /* Обработка правого клика мыши */ tile.oncontextmenu = function(e) { e.preventDefault(); flag(tile); } /* Обработка левого клика мыши */ tile.addEventListener(‘click’, function(e) { clickTile(tile); }); }); // Цикл для назначения чисел numbers.forEach(num => { let coords = num.split(‘,’); let tile = document.querySelectorAll(`[data-tile=«${parseInt(coords[0])},${parseInt(coords[1])}»]`)[0]; let dataNum = parseInt(tile.getAttribute(‘data-num’)); if (!dataNum) dataNum = 0; tile.setAttribute(‘data-num’, dataNum + 1); }); } |
Тут грубо говоря запускаем игры и рендерим поле, блоки.
|
/* Функция для установки флага */ const flag = (tile) => { if (gameOver) return; if (!tile.classList.contains(’tile—checked’)) { if (!tile.classList.contains(’tile—flagged’)) { tile.innerHTML = ‘?’; tile.classList.add(’tile—flagged’); } else { tile.innerHTML = »; tile.classList.remove(’tile—flagged’); } } } |
Вот здесь просто создаём функцию, которая нужна для установки флага на определённый блог, функция запускается при правом клики мыши.
|
1 2 3 4 5 6 7 8 9 10 11 12 13 14 15 16 17 18 19 20 21 22 23 24 25 |
/* Проверка есть бомба или нет */ const clickTile = (tile) => { if (gameOver) return; if (tile.classList.contains(’tile—checked’) || tile.classList.contains(’tile—flagged’)) return; let coordinate = tile.getAttribute(‘data-tile’); // Условие, если есть бомба if (bombs.includes(coordinate)) { endGame(tile); } else { // Иначе /* Проверка, если боба поблизости */ let num = tile.getAttribute(‘data-num’); if (num != null) { tile.classList.add(’tile—checked’); tile.innerHTML = num; tile.style.color = numberColors[num—1]; setTimeout(() => { checkVictory(); }, 100); return; } checkTile(tile, coordinate); } tile.classList.add(’tile—checked’); } |
В этой части кода, мы уже проверяем, есть ли бомба или нет, если есть, то выводим конец игры, иначе, проверяем, если рядом ещё бомбы.
|
1 2 3 4 5 6 7 8 9 10 11 12 13 14 15 16 17 18 19 20 21 22 23 24 25 26 27 28 29 30 31 32 33 34 35 36 37 38 39 40 41 42 43 44 45 46 |
/* функция для правильного нажатия */ const checkTile = (tile, coordinate) => { console.log(‘✔’); let coords = coordinate.split(‘,’); let x = parseInt(coords[0]); let y = parseInt(coords[1]); /* check nearby tiles */ setTimeout(() => { if (x > 0) { let targetW = document.querySelectorAll(`[data-tile=«${x-1},${y}»`)[0]; clickTile(targetW, `${x—1},${y}`); } if (x < boardSize — 1) { let targetE = document.querySelectorAll(`[data-tile=«${x 1},${y}»`)[0]; clickTile(targetE, `${x 1},${y}`); } if (y > 0) { let targetN = document.querySelectorAll(`[data-tile=«${x},${y-1}»]`)[0]; clickTile(targetN, `${x},${y—1}`); } if (y < boardSize — 1) { let targetS = document.querySelectorAll(`[data-tile=«${x},${y 1}»]`)[0]; clickTile(targetS, `${x},${y 1}`); } if (x > 0 && y > 0) { let targetNW = document.querySelectorAll(`[data-tile=«${x-1},${y-1}»`)[0]; clickTile(targetNW, `${x—1},${y—1}`); } if (x < boardSize — 1 && y < boardSize — 1) { let targetSE = document.querySelectorAll(`[data-tile=«${x 1},${y 1}»`)[0]; clickTile(targetSE, `${x 1},${y 1}`); } if (y > 0 && x < boardSize — 1) { let targetNE = document.querySelectorAll(`[data-tile=«${x 1},${y-1}»]`)[0]; clickTile(targetNE, `${x 1},${y—1}`); } if (x > 0 && y < boardSize — 1) { let targetSW = document.querySelectorAll(`[data-tile=«${x-1},${y 1}»`)[0]; clickTile(targetSW, `${x—1},${y 1}`); } }, 10); } |
Здесь просто идёт обработка, если правый клик, правильный.
|
/* Обработка не правильного клика */ const endGame = (tile) => { console.log(‘? Booom! Game over.’); endscreen.innerHTML = endscreenContent.loose; endscreen.classList.add(‘show’); gameOver = true; tiles.forEach(tile => { let coordinate = tile.getAttribute(‘data-tile’); if (bombs.includes(coordinate)) { tile.classList.remove(’tile—flagged’); tile.classList.add(’tile—checked’, ’tile—bomb’); tile.innerHTML = ‘?’; } }); } |
Тут смотрим, если была нажата не верный блок, с бомбой, заканчиваем игру.
Запускаем игру, то есть для одного запуска, надо просто объявить нужную переменную.
Вывод:
В этой статье разобрали сложный вариант создания игры сапёр на JavaScript, это не для новичкам, а скорее для профессионала, кто хочет попробовать сделать что то, сложное, хотя начинающим тоже пригодиться, для понятие логики игры и создания своей версии, более простой.
Подписываетесь на соц-сети:
Оценка:
Загрузка…

Get this book -> Problems on Array: For Interviews and Competitive Programming
Minesweeper is a single-player puzzle game. The goal of the player is to clear a rectangular board containing hidden «mines» or bombs without detonating any of them, with help from clues about the number of neighboring mines in each cell.
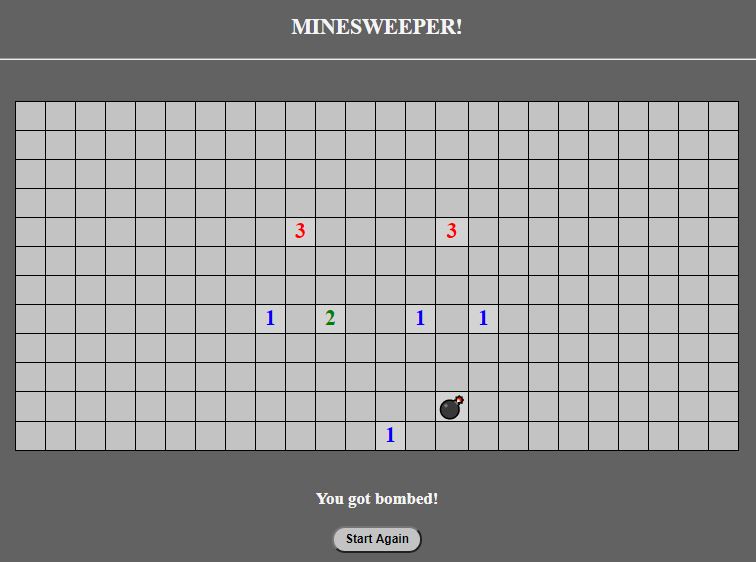
In this article, we’ll learn how to build a basic minesweeper game using JavaScript. This is how it will look:
Tech stack: The tech stack that will be used is:
- HTML
- CSS
- JavaScript
Yes, no frameworks or library is to be used, we’ll develop the game using Vanilla JS only.
Implementation rule and algorithm:
The rules based on which the game needs to be implemented are-
-
In the first step, the player has to click on a random square and just hope it’s not a bomb.
-
If the player clicks on a safe area, the square will either open up to be blank (which is mine) or will contain a number from 1 to 8.
These numbers specify the number of bombs that are adjacent to that square, i.e. n means there are n bombs adjacent to that square.
-
This way the player needs to go ahead with calculating which square can contain the bombs. These calculations are to be performed based on multiple squares which can determine the probability of a square having bombs.
-
If the player clicks on a unsafe square which contains bomb, the game gets over.
Colour code of different elements-
-
Background: #626262/rgb(98,98,98)
-
Blank Tiles: #C3C3C3/rgb(195,195,195)
-
Fonts: #F5F5F5/rgb(245,245,245)
-
Numbers: Multiple rainbow colors
Unicode for bomb emoji-
- Character: 💣
- Codepoints: U+1F4A3
- Shortcodes: :bomb:
Setting up the structure:
Let’s set the basic structure of the game using HTML.
First, we need to include the static files in our index.html file. So including these following links will set the path to our static CSS and JavaScript files, i.e. index.css and index.js.
<link rel="stylesheet" href="index.css" type="text/css">
<script type="text/javascript" src="./index.js"></script>
Now, let’s set the body part of html file.
<body>
      <div id="box">
         <h2>MINESWEEPER!</h2><hr><br><br>
            <div id="field"></div>
            <br>
          <div id="lost" style="display: none;">
            <h3>You got bombed!</h3>
            <button id="new-game-button" type="button" onclick="reload()">Start Again</button>
          </div>
      </div>
</body>
As shown in the above code, a heading is set as ‘MINESWEEPER’ by the h2 tag. the a div with id = ‘field’ element has been created for the table to show up. We’ll see how to do that in the JavaScript section. Also a div section is created fow showing the message when the user loses the game. A button is created with id = ‘new-game-button’, upon clicking that the game will restart.
Here’s the full HTML code-
<!DOCTYPE html>
<html>
  <head>
    <title>Minesweeper</title>
    <meta charset="UTF-8">
    <link rel="stylesheet" href="index.css" type="text/css">
    <script type="text/javascript" src="./index.js"></script>
  </head>
  <body>
      <div id="box">
         <h2>MINESWEEPER!</h2><hr><br><br>
            <div id="field"></div>
            <br>
          <div id="lost" style="display: none;">
            <h3>You got bombed!</h3>
            <button id="new-game-button" type="button" onclick="reload()">Start Again</button>
          </div>
      </div>
  </body>
</html>
Styling the elements:
Now, let’s add CSS to our HTML structure.
body{
    background-color: rgb(98, 98, 98);
}

h2, h3{
    color: whitesmoke;
}

#box {
    text-align: center;
}
As you can see, the background colour has been set to the value of rgb(98, 98, 98) by the background-color property. Also the heading tags are coloured as whitesmoke colour. the minesweeper table is centered to the page by the text-align property.
Next, let’ style the table with background colour as rgb(195, 195, 195), height and width as 30px and border with 1px width and solid black style.
#field table {
    border-collapse: collapse;
    font-size: 150%;
    font-family: san-serif;
    font-weight: bold;
    display: inline-block;
}

#field table td {
    background-color: rgb(195, 195, 195);
    width: 30px;
    min-width: 30px;
    height: 30px;
    min-height: 30px;
    border: 1px solid black;
}
Now, for styling the button, the colour is kept constant according to the theme. The widht is given as 100px and height as 30px, while the border radius are 20px in all side.
button {
    width: 100px;
    height: 30px;
    background-color:rgb(195, 195, 195);
    color: black;
    font-weight: bolder;
    border-radius: 20px 20px 20px 20px;
}
Here’s the full CSS code-
body{
    background-color: rgb(98, 98, 98);
}

h2, h3{
    color: whitesmoke;
}

#box {
    text-align: center;
}

#field table {
    border-collapse: collapse;
    font-size: 150%;
    font-family: san-serif;
    font-weight: bold;
    display: inline-block;
}

#field table td {
    background-color: rgb(195, 195, 195);
    width: 30px;
    min-width: 30px;
    height: 30px;
    min-height: 30px;
    border: 1px solid black;
}

button {
    width: 100px;
    height: 30px;
    background-color:rgb(195, 195, 195);
    color: black;
    font-weight: bolder;
    border-radius: 20px 20px 20px 20px;
}
Setting up the logic:
Now, it’s time to set up the logic and functionality of the game using JavaScript.
First of all, let;s set the different components as standard values in dictionary form. We’ll use these components repeatedly throughout the code.
var components = {
    num_of_rows : 12,
    num_of_cols : 24,
    num_of_bombs : 55,
    bomb : '💣',
    alive : true,
    colors : {1: 'blue', 2: 'green', 3: 'red', 4: 'purple', 5: 'maroon', 6: 'turquoise', 7: 'black', 8: 'grey'}
}
Number of rows and coloumns of the table are set as 12 nad 24. Also number of bombs is set to 55. This numbers can be changed. The bomb will be shown as special character ‘💣’ which is set to the ‘bomb’ variable in the dictionary. A flag variable is set as ‘true’, i.e. alive: true. Also, different colours are set to different numbers that will be shown in the table.
window.addEventListener('load', function() {
    document.getElementById('lost').style.display="none";
    startGame();
});
The goal of the above code is to invoke the startGame() function whenever the page is loaded. This is done by the addEventListener() method of the window DOM with ‘load’ parameter. The message section which is to be shown after losing the game is set as hidden here.
function startGame() {
    components.bombs = placeBombs();
    document.getElementById('field').appendChild(createTable());
}
This function is used to create the table and initialize the bombs.
placeBombs() and createTable() functions are used for creating the table and initializing the bombs. The table is created and the section is added to the ‘field’ division in the DOM by appendChild() method.
Now, let’s see the createTable() function first.
function cellID(i, j) {
    return 'cell-' + i + '-' + j;
}

function createTable() {
    var table, row, td, i, j;
    table = document.createElement('table');

    for (i=0; i<components.num_of_rows; i++) {
        row = document.createElement('tr');
        for (j=0; j<components.num_of_cols; j++) {
            td = document.createElement('td');
            td.id = cellID(i, j);
            row.appendChild(td);
            addCellListeners(td, i, j);
        }
        table.appendChild(row);
    }
    return table;
}
As shown in the code, ‘table’ element is created and stored to the table variable. Now by running a loop, table rows and coloumns are created according to the number of rows anf coloumns as initialized before in the dictionary. CellID() function returns the current cell id which is added to the row element.
Now, let’s see how to place the bombs.
placeBombs() runs a loop throughout the table, cell by cell and initialize the bombs in certain cells by calling the placeSingleBomb() function.
function placeBombs() {
    var i, rows = [];

    for (i=0; i<components.num_of_bombs; i++) {
        placeSingleBomb(rows);
    }
    return rows;
}
In the placeSingleBomb function, at first the probability of having a bomb in a certain row and coloumn number is selected randomly by the Math.random() function.
Now, if the particular cell is not clicked before or is not mine or is not bomb, we recursively call the placeSingleBomb functions again and when the particular probaility condition is met, the bomb is set.
function placeSingleBomb(bombs) {

    var nrow, ncol, row, col;
    nrow = Math.floor(Math.random() * components.num_of_rows);
    ncol = Math.floor(Math.random() * components.num_of_cols);
    row = bombs[nrow];

    if (!row) {
        row = [];
        bombs[nrow] = row;
    }

    col = row[ncol];

    if (!col) {
        row[ncol] = true;
        return
    }
    else {
        placeSingleBomb(bombs);
    }
}
Now, let’s see the code for handling the mouse click event is the cell and see what happens to the adjacent cells due to that.
adjacentBombs() and adjacentFlags() function returns the states of the adjacent cells, i.e. returns the number of flags in the adjacent cells or the bombs.
function adjacentBombs(row, col) {
    var i, j, num_of_bombs;
    num_of_bombs = 0;

    for (i=-1; i<2; i++) {
        for (j=-1; j<2; j++) {
            if (components.bombs[row + i] && components.bombs[row + i][col + j]) {
                num_of_bombs++;
            }
        }
    }
    return num_of_bombs;
}

function adjacentFlags(row, col) {
    var i, j, num_flags;
    num_flags = 0;

    for (i=-1; i<2; i++) {
        for (j=-1; j<2; j++) {
            cell = document.getElementById(cellID(row + i, col + j));
            if (!!cell && cell.flagged) {
                num_flags++;
            }
        }
Now, let’s see the function to handle the click events in the unclicked cells.
function handleCellClick(cell, i, j) {
    if (!components.alive) {
        return;
    }

    if (cell.flagged) {
        return;
    }

    cell.clicked = true;

    if (components.bombs[i][j]) {
        cell.style.color = 'red';
        cell.textContent = components.bomb;
        gameOver();

    }
    else {
        cell.style.backgroundColor = 'lightGrey';
        num_of_bombs = adjacentBombs(i, j);
        if (num_of_bombs) {
            cell.style.color = components.colors[num_of_bombs];
            cell.textContent = num_of_bombs;
        }
        else {
            clickAdjacentBombs(i, j);
        }
    }
}
At first, it is checked if the game is over or the cell is already clicked by the checking components.alive and cell.flagged value. Then if the condition of bombing the cell is met, i.e. bomb array has the threshold probability of bombing in that particular cell, bomb is placed in the cell and gameOver() function is called.
Else, the cell backgound colour is set as lightgrey and then adjacentBombs() is called. If the number of bombs surrounding the cell is not zero, then flags are set accordingly as 1, 2, 3, ….
Otherwise, clickAdjacenBombs() function is invoked.
function clickAdjacentBombs(row, col) {
    var i, j, cell;

    for (i=-1; i<2; i++) {
        for (j=-1; j<2; j++) {
            if (i === 0 && j === 0) {
                continue;
            }
            cell = document.getElementById(cellID(row + i, col + j));
            if (!!cell && !cell.clicked && !cell.flagged) {
                handleCellClick(cell, row + i, col + j);
            }
        }
    }
}

function performMassClick(cell, row, col) {
    if (adjacentFlags(row, col) === adjacentBombs(row, col)) {
        clickAdjacentBombs(row, col);
    }
}
Sometimes when the flag is set as the highest value, adjacent cells are automatically set as the flag values accordingly. This is done by the performMassClick() function.
If the adjacent flags and adjacent bombs value are same the clickAdjacentBombs() function is called.
At last the function for losing the game and restarting the game is set.
function gameOver() {
    components.alive = false;
    document.getElementById('lost').style.display="block";

}

function reload(){
    window.location.reload();
}
As you can see, the alive flag of the components is set as false and message section is shown.
In the reload() function, window.location.reload() method is invoked to restart the game.
Here’s the full JavaScript code-
var components = {
    num_of_rows : 12,
    num_of_cols : 24,
    num_of_bombs : 55,
    bomb : '💣',
    alive : true,
    colors : {1: 'blue', 2: 'green', 3: 'red', 4: 'purple', 5: 'maroon', 6: 'turquoise', 7: 'black', 8: 'grey'}
}

function startGame() {
    components.bombs = placeBombs();
    document.getElementById('field').appendChild(createTable());
}

function placeBombs() {
    var i, rows = [];

    for (i=0; i<components.num_of_bombs; i++) {
        placeSingleBomb(rows);
    }
    return rows;
}

function placeSingleBomb(bombs) {

    var nrow, ncol, row, col;
    nrow = Math.floor(Math.random() * components.num_of_rows);
    ncol = Math.floor(Math.random() * components.num_of_cols);
    row = bombs[nrow];

    if (!row) {
        row = [];
        bombs[nrow] = row;
    }

    col = row[ncol];

    if (!col) {
        row[ncol] = true;
        return
    }
    else {
        placeSingleBomb(bombs);
    }
}

function cellID(i, j) {
    return 'cell-' + i + '-' + j;
}

function createTable() {
    var table, row, td, i, j;
    table = document.createElement('table');

    for (i=0; i<components.num_of_rows; i++) {
        row = document.createElement('tr');
        for (j=0; j<components.num_of_cols; j++) {
            td = document.createElement('td');
            td.id = cellID(i, j);
            row.appendChild(td);
            addCellListeners(td, i, j);
        }
        table.appendChild(row);
    }
    return table;
}

function addCellListeners(td, i, j) {
    td.addEventListener('mousedown', function(event) {
        if (!components.alive) {
            return;
        }
        components.mousewhiches += event.which;
        if (event.which === 3) {
            return;
        }
        if (this.flagged) {
            return;
        }
        this.style.backgroundColor = 'lightGrey';
    });

    td.addEventListener('mouseup', function(event) {

        if (!components.alive) {
            return;
        }

        if (this.clicked && components.mousewhiches == 4) {
            performMassClick(this, i, j);
        }

        components.mousewhiches = 0;

        if (event.which === 3) {

            if (this.clicked) {
                return;
            }
            if (this.flagged) {
                this.flagged = false;
                this.textContent = '';
            } else {
                this.flagged = true;
                this.textContent = components.flag;
            }

            event.preventDefault();
            event.stopPropagation();

            return false;
        }
        else {
            handleCellClick(this, i, j);
        }
    });

    td.oncontextmenu = function() {
        return false;
    };
}

function handleCellClick(cell, i, j) {
    if (!components.alive) {
        return;
    }

    if (cell.flagged) {
        return;
    }

    cell.clicked = true;

    if (components.bombs[i][j]) {
        cell.style.color = 'red';
        cell.textContent = components.bomb;
        gameOver();

    }
    else {
        cell.style.backgroundColor = 'lightGrey';
        num_of_bombs = adjacentBombs(i, j);
        if (num_of_bombs) {
            cell.style.color = components.colors[num_of_bombs];
            cell.textContent = num_of_bombs;
        }
        else {
            clickAdjacentBombs(i, j);
        }
    }
}

function adjacentBombs(row, col) {
    var i, j, num_of_bombs;
    num_of_bombs = 0;

    for (i=-1; i<2; i++) {
        for (j=-1; j<2; j++) {
            if (components.bombs[row + i] && components.bombs[row + i][col + j]) {
                num_of_bombs++;
            }
        }
    }
    return num_of_bombs;
}

function adjacentFlags(row, col) {
    var i, j, num_flags;
    num_flags = 0;

    for (i=-1; i<2; i++) {
        for (j=-1; j<2; j++) {
            cell = document.getElementById(cellID(row + i, col + j));
            if (!!cell && cell.flagged) {
                num_flags++;
            }
        }
    }
    return num_flags;
}

function clickAdjacentBombs(row, col) {
    var i, j, cell;

    for (i=-1; i<2; i++) {
        for (j=-1; j<2; j++) {
            if (i === 0 && j === 0) {
                continue;
            }
            cell = document.getElementById(cellID(row + i, col + j));
            if (!!cell && !cell.clicked && !cell.flagged) {
                handleCellClick(cell, row + i, col + j);
            }
        }
    }
}

function performMassClick(cell, row, col) {
    if (adjacentFlags(row, col) === adjacentBombs(row, col)) {
        clickAdjacentBombs(row, col);
    }
}

function gameOver() {
    components.alive = false;
    document.getElementById('lost').style.display="block";

}

function reload(){
    window.location.reload();
}

window.addEventListener('load', function() {
    document.getElementById('lost').style.display="none";
    startGame();
});
Output:
Demo link: Click here
With this article at OpenGenus, you must have the complete idea of building a MineSweeper game in JavaScript. Enjoy.
Начиная с JavaScript, это копия игры тральщика под windows, игра тральщика на веб-странице. Написав эту программу, я больше знаком с идеями и схемами функционально-ориентированного программирования js. В то же время я глубоко осознал, что для того, чтобы хорошо выучить язык, нужно написать несколько кодов. Поделитесь кодом здесь, добро пожаловать всем, чтобы критиковать и исправлять.
<!DOCTYPE html PUBLIC "-//W3C//DTD HTML 4.01 Transitional//EN" "http://www.w3.org/TR/html4/loose.dtd">
<html>
<head>
<meta http-equiv="Content-Type" content="text/html; charset=UTF-8">
<title> JS minesweeper game </ title>
<script type="text/javascript" src="Mine.js"></script>
<script type="text/javascript">
 document.oncontextmenu=function(){
  event.returnValue=false
  }
</script>
<link type="text/css" rel="stylesheet" href="Mine.css">
</head>
<body onload="Interface(8,8);">
  <p>
     Количество оставшихся мин: <span id = "markNum" style = "color: red"> </ span>
     </ p> Пожалуйста, выберите сложность:
  <select id="level" onchange="selectLevel(this.value);">
     <option value = "1"> Начинающий
     <option value = "2"> Обычный игрок
     <option value = "3"> Продвинутые игроки
  </select>
  <table id="mainTab" cellpadding="0" cellspacing="0">
    <tbody id="mainInt"></tbody>
  </table>
</body>
</html>
@CHARSET "UTF-8";
.myButton{
width: 30px;
height: 30px;
background: silver;
}
.myButton0{
width: 30px;
height: 30px;
color:gray;
background:gray;
}
.myButton1{
background: gray;
color:blue;
font-size:10px;
width: 30px;
height: 30px;
}
.myButton2{
background: gray;
font-size:10px;
color:green;
width: 30px;
height: 30px;
}
.myButton3{
background: gray;
color:yellow;
width: 30px;
height: 30px;
}
.myButton4{
background: gray;
color: aqua;
width: 30px;
height: 30px;
}
.myButton5{
background: gray;
color: fuchsia;
width: 30px;
height: 30px;
}
.myButton6{
background: gray;
color:lime;
width: 30px;
height: 30px;
}
.myButton7{
background: gray;
color: teal;
width: 30px;
height: 30px;
}
.myButton8{
background: gray;
color: navy;
width: 30px;
height: 30px;
}
.myButton_{
background: gray;
color: red;
width: 30px;
height: 30px;
}/**********************************************
* JavaScript Сапер
*
* @author : Sailor
*
* @version : 1.0
*
* Date : 2010-03-15
*
* Email : [email protected]
*
**********************************************/
var Mine; // используется для записи значения, которому должен соответствовать каждый квадрат
var markNum = 8; // используется для записи количества пользовательских отметок
/**
* Размер интерфейса макета игры - это размер макета, а число - количество мин.
*/
function Interface(size,number){
markNum=number;
var mainFrame=$("mainInt");
$("markNum").innerText=markNum;
mainFrame.innerText="";
var mine=new Array(size);
for(var i=0;i<size;i++){
mine[i]=new Array(size);
}
mine=randomNumber(mine,number);
Mine=mine;
for(var i=0;i<size;i++){
mainFrame.appendChild(createRow(i,size,mine));
}
}
/**
* randomNumber
* Параметры mine и num соответственно представляют двумерный массив и количество мин
*/
function randomNumber(mine,num) {
var mine=mine;
var rows=mine.length;
var cols=mine.length;
var i=0;
// Завершить работы по кладке
while(i<num){
var row=Math.ceil((rows*Math.random()))-1;
var col=Math.ceil((cols*Math.random()))-1;
if (mine [row] [col]! = " ") {
моя [строка] [кол] = " ";
i++;
}
}
// Завершить количество напоминаний о молнии
for(var i=0;i<rows;i++){
for(var j=0;j<cols;j++){
var mineNum=0;
// Судите верхний левый
if((i-1>=0)&&(j-1>=0)){
if (mine [i-1] [j-1] == " ")
mineNum++;
}
// Судья окончен
if(i>=1){
if (mine [i-1] [j] == " ")
mineNum++;
}
// Судим верхний правый
if((i-1>=0)&&(j<=cols-2)){
если (мой [i-1] [j + 1] == " ")
mineNum++;
}
// Суди слева
if(j>=1){
if (mine [i] [j-1] == " ")
mineNum++;
}
// судить правильно
if(j<=cols-2){
if (mine [i] [j + 1] == " ")
mineNum++;
}
// Оцените левый нижний
if((i<=rows-2)&&(j-1>=0)){
if (мой [i + 1] [j-1] == " ")
mineNum++;
}
// судить напрямую
if(i<=rows-2){
если (мой [я + 1] [j] == " ")
mineNum++;
}
// Судите внизу справа
if((i<=rows-2)&&(j<=cols-2)){
if (мой [i + 1] [j + 1] == " ")
mineNum++;
}
if (mine [i] [j]! = " ") {
mine[i][j]=mineNum;
}
}
}
return mine;
}
/**
* Создать линию
*/
function createRow(row,len,mine){
var mine=mine;
var tr=document.createElement("tr");
for(var i=0;i<len;i++){
var td=document.createElement("td");
var button=document.createElement("input");
button.type="button";
button.id=row+"."+i;
button.className="myButton";
var context=mine[row][i];
button.onclick=function (){
//alert(this.id)
getValue(this);
if (this.value == " ") {
this.className="myButton_";
getValue("over");
alert («Вы попали в шахту, игра окончена!»);
if (подтвердите («Перезагрузить?»)) {
window.location.reload();
}
return false;
}
if(this.value==0){
showSpace2(this);
}
this.oncontextmenu=function (){
return false;
}
judge();
};
button.oncontextmenu=function (){
if (this.value == "OK") {
this.value="?";
markNum++;
$("markNum").innerHTML=markNum;
}else if(this.value=="?"){
this.value="";
}else{
this.value = "ОК";
markNum--;
$("markNum").innerHTML=markNum;
judge();
}
}
//button.value=mine[row][i];
td.appendChild(button);
tr.appendChild(td);
}
return tr;
}
// Вызываем следующую функцию, когда область щелчка не является пустой областью или громом
function getValue(object){
if("over"!=object){
var id=object.id;
var button=document.getElementById(id);
var row=id.split(".")[0];
var col=id.split(".")[1];
button.value=Mine[row][col];
button.className="myButton"+button.value;
}else{
for(var i=0;i<Mine.length;i++)
for(var j=0;j<Mine[i].length;j++){
var button = $(i+"."+j);
if (Mine [i] [j] == " ") {
button.value=Mine[i][j];
button.className="myButton_";
}
}
}
}
/**
* Следующая функция, вызываемая, когда выбранная область является пустой, отображает все пустые области, связанные с этой областью.
*/
function showSpace(object){
var id=object.id;
var button=document.getElementById(id);
var cols=Mine.length;
var rows=Mine.length;
var mark=0;
while(mark<cols){
for(var i=0;i<cols;i++)
for(var j=0;j<rows;j++){
var button2 = $(i+"."+j);
if(button2.value=="0"){
// Судите верхний левый
if((i-1>=0)&&(j-1>=0)){
var but=$((i-1)+"."+(j-1));
but.value = (Mine [i-1] [j-1] == " ")? "": Mine [i-1] [j-1];
but.className="myButton"+but.value;
}
// Судья окончен
if(i>=1){
var but=$((i-1)+"."+(j));
but.value = (Mine [i-1] [j] == " ")? "": Mine [i-1] [j];
but.className="myButton"+but.value;
}
// Судим верхний правый
if((i-1>=0)&&(j<=cols-2)){
var but=$((i-1)+"."+(j+1));
but.value = (Mine [i-1] [j + 1] == " ")? "": Mine [i-1] [j + 1];
but.className="myButton"+but.value;
}
// Суди слева
if(j>=1){
var but=$((i)+"."+(j-1));
but.value = (Mine [i] [j-1] == " ")? "": Mine [i] [j-1];
but.className="myButton"+but.value;
}
// судить правильно
if(j<=cols-2){
var but=$((i)+"."+(j+1));
but.value = (Mine [i] [j + 1] == " ")? "": Mine [i] [j + 1];
but.className="myButton"+but.value;
}
// Оцените левый нижний
if((i<=rows-2)&&(j-1>=0)){
var but=$((i+1)+"."+(j-1));
but.value = (Mine [i + 1] [j-1] == " ")? "": Mine [i + 1] [j-1];
but.className="myButton"+but.value;
}
// судить напрямую
if(i<=rows-2){
var but=$((i+1)+"."+(j));
but.value = (Mine [i + 1] [j] == " ")? "": Mine [i + 1] [j];
but.className="myButton"+but.value;
}
// Судите внизу справа
if((i<=rows-2)&&(j<=cols-2)){
var but=$((i+1)+"."+(j+1));
but.value = (Mine [i + 1] [j + 1] == " ")? "": Mine [i + 1] [j + 1];
but.className="myButton"+but.value;
}
}
}
mark++;
}
}
/**
* 18 марта, на основе метода showSpace (), он был улучшен с помощью рекурсивного алгоритма, который намного быстрее.
*/
function showSpace2(object){
var id=object.id;
var row=parseInt(id.split(".")[0]);
var col=parseInt(id.split(".")[1]);
//alert(row+"."+col);
var cols=Mine.length;
var rows=Mine.length;
// Судите верхний левый
if((row-1>=0)&&(col-1>=0)){
var but=$((row-1)+"."+(col-1));
if(but.value!="0"){
but.value = (Mine [row-1] [col-1] == " ")? "": Mine [row-1] [col-1];
but.className="myButton"+but.value;
if(but.value=="0"){
showSpace2(but);
}
}
}
// Судья окончен
if(row>=1){
var but=$((row-1)+"."+(col));
if(but.value!="0"){
but.value = (Mine [row-1] [col] == " ")? "": Mine [row-1] [col];
but.className="myButton"+but.value;
if(but.value=="0"){
showSpace2(but);
}
}
}
// Судим верхний правый
if((row-1>=0)&&(col<=cols-2)){
var but=$((row-1)+"."+(col+1));
if(but.value!="0"){
but.value = (Mine [row-1] [col + 1] == " ")? "": Mine [row-1] [col + 1];
but.className="myButton"+but.value;
if(but.value=="0"){
showSpace2(but);
}
}
}
// Суди слева
if(col>=1){
var but=$((row)+"."+(col-1));
if(but.value!="0"){
but.value = (Mine [row] [col-1] == " ")? "": Mine [row] [col-1];
but.className="myButton"+but.value;
if(but.value=="0"){
showSpace2(but);
}
}
}
// судить правильно
if(col<=cols-2){
var but=$((row)+"."+(col+1));
if(but.value!="0"){
but.value = (Mine [row] [col + 1] == " ")? "": Mine [row] [col + 1];
but.className="myButton"+but.value;
if(but.value=="0"){
showSpace2(but);
}
}
}
// Оцените левый нижний
if((row<=rows-2)&&(col-1>=0)){
var but=$((row+1)+"."+(col-1));
if(but.value!="0"){
but.value = (Mine [row + 1] [col-1] == " ")? "": Mine [row + 1] [col-1];
but.className="myButton"+but.value;
if(but.value=="0"){
showSpace2(but);
}
}
}
// судить напрямую
if(row<=rows-2){
var but=$((row+1)+"."+(col));
if(but.value!="0"){
but.value = (Mine [row + 1] [col] == " ")? "": Mine [row + 1] [col];
but.className="myButton"+but.value;
if(but.value=="0"){
showSpace2(but);
}
}
}
// Судите внизу справа
if((row<=rows-2)&&(col<=cols-2)){
var but=$((row+1)+"."+(col+1));
if(but.value!="0"){
but.value = (Mine [row + 1] [col + 1] == " ")? "": Mine [row + 1] [col + 1];
but.className="myButton"+but.value;
if(but.value=="0"){
showSpace2(but);
}
}
}
}
/**
* Определить, правильно ли найдены некоторые сетки
*/
function judge(){
var cols=Mine.length;
var rows=Mine.length;
var allTrue=true;
for(var i=0;i<cols;i++)
for(var j=0;j<rows;j++){
var button = $(i+"."+j);
if (Mine [i] [j] == " " && button.value! = "OK") {
allTrue=false;
}
еще если (Mine [i] [j]! = " " && button.value! = Mine [i] [j]) {
allTrue=false;
}
}
if(allTrue){
если (подтвердите («Все мины вырыты, вы выиграли! Перезагрузите?»)) {
window.location.reload();
}
}
}
/**
* Выберите сложность
*/
function selectLevel(level){
if(level=="1"){
Interface(8,6);
}else if(level=="2"){
Interface(12,15);
}else if(level=="3"){
Interface(12,25);
}
}
function $(id){
return document.getElementById(id);
}

Minesweeper.js

A WebWorker powered Minesweeper game written in JavaScript, HTML and CSS.
Features:
- Configurable grid size (X, Y)
- User can choose difficulty level
- Configurable number of mines
- Stopwatch with score keeping (LocalStorage)
- Stack based grid traversal algorithm for memory efficiency
- HTML5 web worker (required) will be used to perform the stack algorithm outside of the UI
thread - Left and right mouse button used simultaneously clears multiple cells
How to use:
Download all the files and open index.html in a modern web browser. Due to Javascript security
restrictions with loading external scripts, you must serve it from at least a basic web server. For example,
navigate to the directory and run php -S localhost:9797 then open http://localhost:9797/index.html
in a browser. Or with Python, run python -m SimpleHTTPServer 9797.
Example HTML usage:
<!-- requires jQuery -->
<h1 class="logo">JavaScript MineSweeper
<div class="invisible ajax-loading"><img src="load.gif" alt="Processing..."/></div>
</h1>
<div id="minesweeper"></div>

<script src="js/MineSweeper.js" type="text/javascript"></script>
<script>
// set a global instance of Minesweeper
minesweeper = new MineSweeper();
minesweeper.init();
</script>
To Do:
- Add animation and better graphics
- Enhance UI for a sleek new look
License:
Minesweeper.js is free software: you can redistribute it and/or modify
it under the terms of the GNU General Public License as published by
the Free Software Foundation, either **version 3** of the License, or
(at your option) any later version.

Minesweeper.js is distributed in the hope that it will be useful,
but WITHOUT ANY WARRANTY; without even the implied warranty of
MERCHANTABILITY or FITNESS FOR A PARTICULAR PURPOSE. See the
GNU General Public License for more details.

You should have received a copy of the GNU General Public License
along with Minesweeper.js. If not, see <http://www.gnu.org/licenses/>.
- Download source files — 5.66 Kb
Introduction
This is my first attempt at a game as well as my first article here at The Code Project.
I have always wanted to create a game and the first thing that came to my mind that
I might be able to make, was the classic game Minesweeper, that has always come along with
the Microsoft OS (at least to my knowledge). Since my skills are mainly in the area of
web application development, I immediately jumped into creating the game board with HTML
and scripted it along with JavaScript. I learned many cool tricks developing this game
and I hope that you find some of them useful and interesting as I share them in
this article.
Planning
I know that planning is a good idea and all … but … I just jumped in
head first and tried to make different parts of the game work as they seemed
logical to me. After coming back through and cleaning up my code, I can see many
future possibilities of expanding the features of the game but for now, it works
and can be played as many times as you want.
The game board
The game board itself is represented by a two-dimensional array filled with
mineNodes. Each mine node captures its own events (left and right-clicking,
along with some useful information in the status bar on mouse-overs) and holds information
about itself and its surroundings.
function mineNode() {

    this.strStatus = "unclicked";
    this.boolIsMine = false;
    this.intSurroundingMines = 0;
}
Making it versatile
Originally I just made the game very sloppily (no planning will do that)
and it would only do the novice level of the Minesweeper game one time. After
thinking about it, and remembering that I did learn how to make object oriented
programs back in college, I knew the logic should be basically the same for any size game.
So, that’s what I did. A bunch of thinking, removing unwanted and ugly code,
and one huge recursive function later I developed a
mineGame object.
This takes in three arguments to define the number of columns, rows, and mines.
function mineGame(rows, cols, mines) {

    this.boolGameOver = false;
    this.intFlags = 0;
    this.intQuestions = 0;
    this.intRows = parseInt(rows);
    this.intCols = parseInt(cols);
    this.intMines = parseInt(mines);
    this.intRemainingSpaces = this.intRows * this.intCols;
    this.strDivHTML = "";
    this.arrRows = new Array(rows);


    ...
}
Current drawbacks
Unfortunately the game is not completely independent in its design. The game
has only been tested with Internet Explorer 6.0 on a WinXP machine. I don’t think
any version of Netscape will run it properly and have no idea how other OS’s will
handle the game. It relies on DIVs to place the game
board, mines remaining, and the
timer on a web page. Images are used to display the different states of a
mineNode and they must load for their first use, which can delay
the game play. Oh, and what fun is it to play a game if you can’t keep track of
your high-score (or other people’s high-scores too) and try to beat that mark?
Alas, the game is not as fast as a compiled game (of course) and will fluctuate
in performance depending on your Internet connection (mainly the image issue) and
CPU speed. If you are a serious Minesweeper player this maybe a very frustrating
version to play.
Bugs
For the most part, the game is rather «bug free». The bug that I have found is
that sometimes (mainly in the Intermediate or Advanced games) the game will end
in a «You Win» prompt before you have actually cleared all of the remaining squares.
My bet is that the counting is messed up somewhere in the hairy recursive function
to clear large areas. As of yet I have not had the time to find the error and
correct it, however, any comments or suggestions are most appreciated.
The future
Here is what I would like to do with the game in the future:
- Create different style-sheets to apply different themes / looks
- Keep high scores
- Gotta validate users with some sort of login
- Use server side scripting (probably ASP.NET / C# … maybe a web service?)
to save high scores - Keep track of individual and overall high scores
- Maybe make the game into a HTML Component (HTC)
- Update the high-scores dynamically using XMLDOM (to avoid refreshing
the entire page)
Versions
- 1.0 — This was the original version of the JavaScript Minesweeper game that I
created using images to display the different states of the
mineNodes. You can still
play this game here. - 2.0 — The images have been removed from the game and replaced with style sheets.
This helps reduce the load time and will allow for people to easily create a
different look for the game. You can play this version
here.
Conclusion
It was a ton of fun creating this game. Please feel free to send suggestions
for this project. I’d love to hear any feedback people might have …