This is the documentation for discord.py-self, a library for Python to aid
in creating bots running on user accounts that utilise the Discord API.
Prerequisites
discord.py-self works with Python 3.8 or higher. Support for earlier versions of Python
is not provided.
Installing
You can get the library directly from PyPI:
python3 -m pip install -U discord.py-self
If you are using Windows, then the following should be used instead:
py -3 -m pip install -U discord.py-self
To get voice support, you should use discord.py-self[voice] instead of discord.py, e.g.
python3 -m pip install -U discord.py-self[voice]
On Linux environments, installing voice requires getting the following dependencies:
-
libffi
-
libnacl
-
python3-dev
For a Debian-based system, the following command will get these dependencies:
$ apt install libffi-dev libnacl-dev python3-dev
Remember to check your permissions!
Virtual Environments
Sometimes you want to keep libraries from polluting system installs or use a different version of
libraries than the ones installed on the system. You might also not have permissions to install libraries system-wide.
For this purpose, the standard library as of Python 3.3 comes with a concept called “Virtual Environment”s to
help maintain these separate versions.
A more in-depth tutorial is found on Virtual Environments and Packages.
However, for the quick and dirty:
-
Go to your project’s working directory:
$ cd your-bot-source
$ python3 -m venv bot-env
-
Activate the virtual environment:
$ source bot-env/bin/activate
On Windows you activate it with:
$ bot-envScriptsactivate.bat
-
Use pip like usual:
$ pip install -U discord.py-self
Congratulations. You now have a virtual environment all set up.
Basic Concepts
discord.py revolves around the concept of events.
An event is something you listen to and then respond to. For example, when a message
happens, you will receive an event about it that you can respond to.
A quick example to showcase how events work:
import discord

class MyClient(discord.Client):
    async def on_ready(self):
        print(f'Logged on as {self.user}!')

    async def on_message(self, message):
        print(f'Message from {message.author}: {message.content}')

client = MyClient()
client.run('token')

Discord SelfBot
Dropped development beacuse of Discords stance towards Selfbots.
With a little cleanup here and there it should however still work with the rewrite version of discord.py
This Project uses the rewrite version of discord.py as well as Python 3.6 or higher. Please keep this in mind when using the bot.
This SelfBot has a lot of useful features like a bunch of Moderation commands as well as fun commands or a Mention logger.
Disclaimer: Use this on your own risk. If you get banned somewhere because of using it I won’t take responsibility.
Table of Contents
- Features
- Setup
- Running the Bot
- Hosting
- Commands
- Custom Commands
- Mention Logger
- Adding Your Own Stuff
- Google API
- Acknowledgements
Features
- Moderation (Works only if you have the permissions to use it on a Server)
- Add/Remove a role of a Server-Member.
- Change Role-Colors without leaving the Chat.
- Lock/Unlock a Channel in spammy situations to clean up a mess.
- Kick/Ban Members if they misbehave.
- Softban a Member if a kick would be necessary but you want to clean up the last messages they sent in one.
- Mute/Unmute Members if they need a cool of phase.
- Prune a Member’s Messages of a certain type or your own if necessary.
- Show Permissions of a Member.
- Mention Logging
- Set a Channel on your own Server to log all your mentions and Keywords too.
- Add Keywords to your logger to trigger it in whole Servers or specific Channels.
- Don’t like a user/channel? Simply add them to your blacklist and you’ll never log them again.
- Information:
- Love this SelfBot as much as I do? Use «About» to share it with others.
- Display interesting information about Users, Servers, Roles, Channels or Emotes.
- Google
- Search for information or images directly in the Chat.
- MyAnimeList
- Display information about your favorite Anime/Manga within a nice looking embed.
- Custom Commands
- Add quickly links per commands to a json and then use them like normal commands of the bot.
- Show off those reaction gifs.
- Tools
- Return the Ping or Uptime of your SelfBot.
- Set a game so you will even have a status when you are on mobile.
- Show several interesting Stats about your usage of the bot.
- Quote Messages when you are replying to something.
- Color command.
- Display your favorite Emote larger than normal.
- Misc
- 8ball / choose / learn to google command.
- embed text or an image link.
- Urban Dictionary
- Giphy search
- add reaction text with a command.
- convert a message to Alphanumeric Emotes.
- Debug
- Use Python within a channel.
Setup
Clone this repo or download it as Zip and move/unpack it to the location where you wanna have it.
Go into the config folder and rename all three files by simply removing the .example ending and saving again.
Now after this is done, open the config file and start adding your information. Notepad should be enough to edit the file.
{
  "token":"",
  "prefix":["/"],
  "gamestatus":"",
  "custom_search_engine":"",
  "google_api_key":"",
  "mal_username":"",
  "mal_password":"",
  "webhook_token":"",
  "log_channel": ,
  "setlog":"off",
  "embed_color":""
}
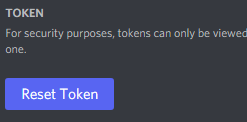
token— On Discord hitCtrl + Shift + Ito open the Development Console. Then move to the tabApplicationand open theLocal Storageon the left bar. Once that’s done, get your token here and paste it into your config. Do not give this to anyone as they will be able to gain access to your account with it.prefix— This can be anything you like. You even can set multiple prefixes by doing something like["/", "self."]. I’d suggest you to take a prefix which won’t easily trigger common bots as it might get spammy.gamestatus— You can set this to whatever you want your game as. There is a command to change it while the bot is running so if you don’t know what to choose you can skip this step.custom_search_engineandgoogle_api_key— For this take a look at the Google API section below.mal_usernameandmal_password— MyAnimeList username and password to use the Anime and Manga command. This will simply log into your account to obtain information about Anime or Manga. Your normal account is totally okay for it. If you don’t own one till now, simply create a throwaway account.webhook_token- Go to your private Server, create a logging channel and set it so only you see it.
- Change the Notification settings to «All» Messages in that Channel
- Open the Channel settings of the Server where you want to log your keywords and mentions.
- Click on Webhooks, create a New Webhook (Give it a nice name an Avatar if you want eg: «Mention Bot», Avi) It should look like this.
- Copy the Webhook URL at the bottom, add it to
webhook_tokenand don’t forget to save.
log_channel- For this you need to activate Developer Mode.
- Go into settings, select Appearance and toggle Developer Mode
- Then go to your log channel and right-click on the name in your channel selector.
- Click the last point to copy the id and paste it to
log_channel. It should look like"log_channel": 123456789123456789,. Do not use quotes here as we need it as number, not as Text.
embed_color— This can be a lot of things. Even empty! If you leave it empty, every command that uses this will get a random color per call. You can insert several different values thought. A web color likepurpleor RGB values in the format of(155, 89, 182)or155, 89, 182or HEX values like9b59b6or#9b59b6or0x9b59b6.
Running the Bot
Mind that this description is written for
Windows, it shouldn’t differ too much on other Systems though.
You can skip any step if your System already fulfills the step.
Installing Python
As mentioned above we need to install Python 3.6 or higher, anything below won’t work with this SelfBot.
- Go and download anything above 3.6.0 here.
- Once selected the Version you like/need, click onto
Downloadand scroll down toFiles. - Select your System. You can find that in
System Informationor similar. - Then run the installer and pay attention to select
Add Python ** to PATHlike here and finish withInstall Now. - After finishing the install open your Command-Line (Windows + R, cmd.exe, enter) or PowerShell and type
python -V. - If you see the Version you just installed before you are set to go (image).
Installing Git
- Download the latest Git Version for your System.
- Once downloaded start the installation.
- On this step pay attention to select
Windows Command Prompt. - Go through the installation and adjust it to your likings. The default settings should be enough though.
Starting the Bot Automatically
- Go to the folder you unpacked in Setup.
- Click on the
run.bat - Logging in may take up to a minute or more, depending on your connection speed.
- Have fun using the bot. Check Commands, Custom Commands and Mention Logger to see what you can do.
Starting the Bot Manually
- Go to the folder you unpacked in Setup.
- Hold
shiftand right-click onto anything within the folder aside of the files - On this menu then select
Open Command Prompt / PowerShell window here - Type
pip install -r .requirements.txtinto the console and let it install all dependencies we need. - Then type
python loop.pyand wait for it to login. - This may take up to a minute or more, depending on your connection speed.
- Have fun using the bot. Check Commands, Custom Commands and Mention Logger to see what you can do.
Hosting on Linux
WIP
Commands
WIP
Custom Commands
WIP
Quick Commands
In the config folder you’ll find the file quickcmds. You can add there any quick command you want. This will react only if the exact key is said.
Like if I say flip in chat the SelfBot will edit the message to (╯°□°)╯︵ ┻━┻.
Here you see the base commands I added, you can add anything you want here of course. (command to do it while the bot is running #SoonTM)
{
  "shrug": "¯\_(ツ)_/¯",
  "flip": "(╯°□°)╯︵ ┻━┻",
  "unflip": "┬─┬ノ( ゜-゜ノ)",
  "lenny": "( ͡° ͜ʖ ͡°)",
  "fite": "(ง’̀-‘́)ง"
}
Keep in mind that if you have a in your text you need to do 2 of them. like you can see with shrug.
Mention Logger
WIP
Adding Your Own Stuff
WIP
Google API
In order to use the /i command to image search, you will need a Google API key and a Custom Search Engine ID.
Follow these steps to obtain them:
- Visit the Google API Console. Once you are in the Console, create a new project.
- Go to
Libraryand searchCustom Search API. Click it and enable it. - Go to
Credentialsand clickcreate credentialsand chooseAPI Key(no need to restrict the key). The value under «Key» is your api key. Paste this into the config.json undergoogle_api_key. - Go here and click
Addand thenCreate(if asked to specify a site, just do www.google.com) - On the home page of the Custom Search webpage, click on the newly created search engine and change the
Sites to Searchoption toSearch the entire web but emphasize included sites. - Make sure the
Image searchoption is enabled and make sure to click theUpdatebutton at the bottom when you are done with the changes! - Go to
Detailssection and clickSearch Engine IDto grab the ID. Copy this and add it forcustom_search_enginein the config.json.
Note: Google may take a little while to properly register your key so the search feature may not work right away. If it’s still not working after a few hours, then you may have messed up somewhere.
Acknowledgements
Thanks to
- Appu for even getting me into doing this. As well as several ideas, suggestions and the Google API part.
- Danny for especially larger parts of the google and debug commands and now and there so minor improvements.
~ Discord Selfbot ~
A selfbot for Discord that is setup and ready to go in less than 5 minutes.
(If you already have the required programs installed)
Index
- Before Setup
- SelfBot Setup
- Install Required Programs
- Download Project Files
- Setup Config Files
- Start the Bot
- Windows
- Linux / Mac
- Commands
- License
Before Setup
Selfbots on Discord
Selfbots are officially banned. Those caught using one, will most likely be banned from Discord and have their account disabled. It has been considered as an API abuse and is no longer tolerated. Today (19/06/2018), I have decided to archive this repository and provide no more help for this project. You are still free to use it at your own risk, although like I have said many times before I am not responsible for anything you decide to do with your selfbot. Most of the code on this repository is very outdated, and if it were today, I would probably do it completely different. Maybe some day I will make another project that you will enjoy. Thanks to everyone that has used it! 
Rules
Please remember that selfbots arent fully suported by Discord and that it should only be used to make YOUR life easier and not others. Also keep in mind that discord has a set of semi-offical rules regarding selfbots:
- A selfbot must not, under any circumstance, respond to other user’s messages. This means it should not respond to commands, should not autoreply to certain keywords, etc. You must be the only one that can control it.
- A selfbot must not, under any circumstance, do «invite scraping». This is the action of detecting server invites in chat, and automatically joining a server using that invite.
- As selfbots run under your account they are subject to the same Terms of Service. Meaning they should not spam, insult or demean others, post NSFW material, spread viruses or illegal material, etc. They have to follow the same rules that you follow.
IF, and only if, you accept the above rules of selfbots, then you may proceed.
SelfBot Setup
— Install Required Programs —
Before you can download and setup the bot, there are 2 programs you need to have installed on your computer to make sure everything runs on first go:
- Git
- Node.js
— Download Project Files —
After you have the required programs installed, you can go ahead and download the project files. To do that, you either download the ZIP folder or do git clone https://github.com/TheRacingLion/Discord-SelfBot.git if you are a console person. Once you finish downloading it,you will be ready to setup the config files.
— Setup Config Files —
Once you download the project files you will see a folder named config. Inside of it will be 4 files and 1 folder:
avatarsconfig.jsongames.jsonkeywords.jsonpaste.json
avatars
This is the folder where you drag and drop your avatar images if you enabled avatar rotating.
config.json
This is the main config file. Inside you will see several options. This is what each one means:
tokenis your Discord token. (if you don’t know what a Discord token is, or how to get yours, check out this tutorial made by me)ownerIDis your discord IDprefixis the desired prefix for bot commands (can use@mentionif you want the prefix to be your Discord mention)rotatePlayingGame, if you want your Discord playing game to rotate games (from thegames.jsonfile)rotatePlayingGameTime, if you do want the game to rotate, this is the time interval you want for it (in milliseconds)rotatePlayingGameInStreamingStatus, if you do want the game to rotate, if you want it to rotate in streaming statusrotateAvatarImage, if you want your Discord avatar image to rotate (from the images inconfig/avatarsfolder)rotateAvatarImageTime, if you do want the avatar to rotate, this is the time interval you want for it (in milliseconds)defaultStatus, the default Discord status to show on your account. Either «online», «idle», «dnd» (Do Not Disturb) or «invisible»mentionNotificator(if you want to have your mentions notified)inConsole(as a log to console)inNotificationChannel(as a message sent to the notification channel)logBlockedUsers(if you want users you blocked to be logged or not)ignoredServers(an array of server ID’s you want the bot to ignore when searching for mentions)
keywordNotificator(if you want to have specific keywords notified)inConsole(as a log to console)inNotificationChannel(as a message sent to the notification channel)logBlockedUsers(if you want users you blocked to be logged or not)caseInsensitive(if you want the bot to search for the keywords while paying attention to the letter case or not)ignoredServers(an array of server ID’s you want the bot to ignore when searching for keywords)
eventNotificator(if you want to have events like guild creations, or friend requests notified)inConsole(as a log to console)inNotificationChannel(as a message sent to the notification channel)
notificationChannelID, if you setinNotificationChanneltotrueat least once, the channel ID to make notifications indefaultEmbedColoris the hex color code for the default color for embedsdeleteCommandMessagesif command messages and error messages should be deleted after a bitdeleteCommandMessagesTimeif you do want the command messages deleted, this is the time the bot should wait before doing it (in milliseconds)PSNPSN Status setupenabled(if you want to use PSN Status reporting)emailis your PSN emailpasswordis your PSN passwordpsnidis the PSN ID you want to report on
XBOXXBOX Status setupenabled(if you want to use XBOX Status reporting)gamertagis the XBOX Gamertag you want to report onapikeyis your apikey from http://xboxapi.com sign up for a free account
games.json
This is where the game names you want to use for the rotating playing game option are. To add or delete games, just follow the structure of the games that are already on it. (If you have set the rotatePlayingGame option in the config.json file to false, then you dont need to worry about this file)
keywords.json
This is where the keywords that you want the bot to search for go in. (If you have set the keywordNotificator options in the config.json file to false, then you dont need to worry about this file)
paste.json
This file is where the meme texts are stored for the paste command, if you wish to add more to use with paste just follow the structure of the file and add them in. If an array is specified for one of the options then the bot will choose a random item from the array.
— Start the bot —
When you have the required programs installed, have all project files, and have setup config files, you can start the bot:
Windows
Open the installer.bat file. This will install the required node modules (so you dont have to do it yourself) and create a run.bat file. You can use this file to start the bot. If you did everything correctly, the bot should start up fine.
If for some reason you have ran installer.bat, it disapeared and it didnt create run.bat, then re-download installer.bat and try again. Most likely either git or node were not installed correctly. Check if they work and try again.
Linux / Mac
Executable files are kind of weird in Linux, and users most likely use console to do their work, so to setup this selfbot on linux or mac open a terminal in the directory you downloaded the files to and type npm i. Once it is finished you can start the selfbot by using npm start or node self.js. If you did everything correctly, the bot should start up fine.
Commands
All commands get logged to console, are case insensentive and are tested to see if the owner of the bot was the one who triggered the command. It should be easy to create commands if you know the basics of JavaScript. The library used is Eris.
— Default Commands —
The bot has several default commands. (Each command is explained inside their own file.) You can find a detailed command list here.
— Creating Commands —
When you want to create a new command, just add a new file to the commands folder and name it something like mycommand.js and then follow the basic structure below. If your command needs some kind of special options like permissions or you just want to set it to be used on guilds only, then you can use the pre-made command options shown below. There are also some helper functions built in to the function.
/*
  Optional comment string to describe the command.
*/
module.exports = (self) => {
  self.registerCommand('mycommand', function (msg, args) {
    // Do something with msg or args

    this.send(msg, 'This is some text', deleteDelay) // Send a message

    this.embed(msg, { // Send an embed
      title: 'Embed title',
      description: 'Embed description',
      color: 4627433
    }, deleteDelay)

    this.findMember(msg, args[0]) // Find a guild member
  }, {
    noPms: false, // Will only work on guilds (No PM's)
    aliases: ['cmd', 'mycmd'], // Will make "cmd" and "mycmd" be an alias of "mycommand"
    perms: [ // Will only do the command if you have the "Manage channels" AND the "Manage Nicknames" permissions
      'manageChannels',
      'manageNicknames'
    ],
    deleteAfter: false // Delete the command message after the command was done or not
  })
}
— Logging —
The selfbot comes with its own logger file, which includes a few options to log things to console. If you know what you are doing, you can add many more. It uses Chalk to change the color of the logged text, so you can change the colors if you do not like them.
Normal Logs
If you just want to log text to console, you can do:
log.log('Text you want to log', 'Logger title', 'Chalk color that you want for the logger title', timed)
/*
  Logger title is optional
  Check all chalk colors at https://www.npmjs.com/package/chalk#colors
  "timed" is either true or false. Adds a timestamp to the log. (Default is false)
*/
Warning Logs
If you want to log a warning to console, you can do:
log.warn('Something weird but non-breaking happened', 'Warning origin')
// Warning origin means the place where the warning came from (optional)
Error Logs
If you want to log errors to console, you can do:
let err = 'This is an error'
log.err(err, 'Error origin')
// Error origin means the place where the error came from (optional)
License
MIT. Copyright © 2016, 2017, 2018 TheRacingLion.
~ Discord Selfbot ~
A selfbot for Discord that is setup and ready to go in less than 5 minutes.
(If you already have the required programs installed)
Index
- Before Setup
- SelfBot Setup
- Install Required Programs
- Download Project Files
- Setup Config Files
- Start the Bot
- Windows
- Linux / Mac
- Commands
- License
Before Setup
Selfbots on Discord
Selfbots are officially banned. Those caught using one, will most likely be banned from Discord and have their account disabled. It has been considered as an API abuse and is no longer tolerated. Today (19/06/2018), I have decided to archive this repository and provide no more help for this project. You are still free to use it at your own risk, although like I have said many times before I am not responsible for anything you decide to do with your selfbot. Most of the code on this repository is very outdated, and if it were today, I would probably do it completely different. Maybe some day I will make another project that you will enjoy. Thanks to everyone that has used it!
Rules
Please remember that selfbots arent fully suported by Discord and that it should only be used to make YOUR life easier and not others. Also keep in mind that discord has a set of semi-offical rules regarding selfbots:
- A selfbot must not, under any circumstance, respond to other user’s messages. This means it should not respond to commands, should not autoreply to certain keywords, etc. You must be the only one that can control it.
- A selfbot must not, under any circumstance, do «invite scraping». This is the action of detecting server invites in chat, and automatically joining a server using that invite.
- As selfbots run under your account they are subject to the same Terms of Service. Meaning they should not spam, insult or demean others, post NSFW material, spread viruses or illegal material, etc. They have to follow the same rules that you follow.
IF, and only if, you accept the above rules of selfbots, then you may proceed.
SelfBot Setup
— Install Required Programs —
Before you can download and setup the bot, there are 2 programs you need to have installed on your computer to make sure everything runs on first go:
- Git
- Node.js
— Download Project Files —
After you have the required programs installed, you can go ahead and download the project files. To do that, you either download the ZIP folder or do git clone https://github.com/TheRacingLion/Discord-SelfBot.git if you are a console person. Once you finish downloading it,you will be ready to setup the config files.
— Setup Config Files —
Once you download the project files you will see a folder named config. Inside of it will be 4 files and 1 folder:
avatarsconfig.jsongames.jsonkeywords.jsonpaste.json
avatars
This is the folder where you drag and drop your avatar images if you enabled avatar rotating.
config.json
This is the main config file. Inside you will see several options. This is what each one means:
tokenis your Discord token. (if you don’t know what a Discord token is, or how to get yours, check out this tutorial made by me)ownerIDis your discord IDprefixis the desired prefix for bot commands (can use@mentionif you want the prefix to be your Discord mention)rotatePlayingGame, if you want your Discord playing game to rotate games (from thegames.jsonfile)rotatePlayingGameTime, if you do want the game to rotate, this is the time interval you want for it (in milliseconds)rotatePlayingGameInStreamingStatus, if you do want the game to rotate, if you want it to rotate in streaming statusrotateAvatarImage, if you want your Discord avatar image to rotate (from the images inconfig/avatarsfolder)rotateAvatarImageTime, if you do want the avatar to rotate, this is the time interval you want for it (in milliseconds)defaultStatus, the default Discord status to show on your account. Either «online», «idle», «dnd» (Do Not Disturb) or «invisible»mentionNotificator(if you want to have your mentions notified)inConsole(as a log to console)inNotificationChannel(as a message sent to the notification channel)logBlockedUsers(if you want users you blocked to be logged or not)ignoredServers(an array of server ID’s you want the bot to ignore when searching for mentions)
keywordNotificator(if you want to have specific keywords notified)inConsole(as a log to console)inNotificationChannel(as a message sent to the notification channel)logBlockedUsers(if you want users you blocked to be logged or not)caseInsensitive(if you want the bot to search for the keywords while paying attention to the letter case or not)ignoredServers(an array of server ID’s you want the bot to ignore when searching for keywords)
eventNotificator(if you want to have events like guild creations, or friend requests notified)inConsole(as a log to console)inNotificationChannel(as a message sent to the notification channel)
notificationChannelID, if you setinNotificationChanneltotrueat least once, the channel ID to make notifications indefaultEmbedColoris the hex color code for the default color for embedsdeleteCommandMessagesif command messages and error messages should be deleted after a bitdeleteCommandMessagesTimeif you do want the command messages deleted, this is the time the bot should wait before doing it (in milliseconds)PSNPSN Status setupenabled(if you want to use PSN Status reporting)emailis your PSN emailpasswordis your PSN passwordpsnidis the PSN ID you want to report on
XBOXXBOX Status setupenabled(if you want to use XBOX Status reporting)gamertagis the XBOX Gamertag you want to report onapikeyis your apikey from http://xboxapi.com sign up for a free account
games.json
This is where the game names you want to use for the rotating playing game option are. To add or delete games, just follow the structure of the games that are already on it. (If you have set the rotatePlayingGame option in the config.json file to false, then you dont need to worry about this file)
keywords.json
This is where the keywords that you want the bot to search for go in. (If you have set the keywordNotificator options in the config.json file to false, then you dont need to worry about this file)
paste.json
This file is where the meme texts are stored for the paste command, if you wish to add more to use with paste just follow the structure of the file and add them in. If an array is specified for one of the options then the bot will choose a random item from the array.
— Start the bot —
When you have the required programs installed, have all project files, and have setup config files, you can start the bot:
Windows
Open the installer.bat file. This will install the required node modules (so you dont have to do it yourself) and create a run.bat file. You can use this file to start the bot. If you did everything correctly, the bot should start up fine.
If for some reason you have ran installer.bat, it disapeared and it didnt create run.bat, then re-download installer.bat and try again. Most likely either git or node were not installed correctly. Check if they work and try again.
Linux / Mac
Executable files are kind of weird in Linux, and users most likely use console to do their work, so to setup this selfbot on linux or mac open a terminal in the directory you downloaded the files to and type npm i. Once it is finished you can start the selfbot by using npm start or node self.js. If you did everything correctly, the bot should start up fine.
Commands
All commands get logged to console, are case insensentive and are tested to see if the owner of the bot was the one who triggered the command. It should be easy to create commands if you know the basics of JavaScript. The library used is Eris.
— Default Commands —
The bot has several default commands. (Each command is explained inside their own file.) You can find a detailed command list here.
— Creating Commands —
When you want to create a new command, just add a new file to the commands folder and name it something like mycommand.js and then follow the basic structure below. If your command needs some kind of special options like permissions or you just want to set it to be used on guilds only, then you can use the pre-made command options shown below. There are also some helper functions built in to the function.
/*
  Optional comment string to describe the command.
*/
module.exports = (self) => {
  self.registerCommand('mycommand', function (msg, args) {
    // Do something with msg or args

    this.send(msg, 'This is some text', deleteDelay) // Send a message

    this.embed(msg, { // Send an embed
      title: 'Embed title',
      description: 'Embed description',
      color: 4627433
    }, deleteDelay)

    this.findMember(msg, args[0]) // Find a guild member
  }, {
    noPms: false, // Will only work on guilds (No PM's)
    aliases: ['cmd', 'mycmd'], // Will make "cmd" and "mycmd" be an alias of "mycommand"
    perms: [ // Will only do the command if you have the "Manage channels" AND the "Manage Nicknames" permissions
      'manageChannels',
      'manageNicknames'
    ],
    deleteAfter: false // Delete the command message after the command was done or not
  })
}
— Logging —
The selfbot comes with its own logger file, which includes a few options to log things to console. If you know what you are doing, you can add many more. It uses Chalk to change the color of the logged text, so you can change the colors if you do not like them.
Normal Logs
If you just want to log text to console, you can do:
log.log('Text you want to log', 'Logger title', 'Chalk color that you want for the logger title', timed)
/*
  Logger title is optional
  Check all chalk colors at https://www.npmjs.com/package/chalk#colors
  "timed" is either true or false. Adds a timestamp to the log. (Default is false)
*/
Warning Logs
If you want to log a warning to console, you can do:
log.warn('Something weird but non-breaking happened', 'Warning origin')
// Warning origin means the place where the warning came from (optional)
Error Logs
If you want to log errors to console, you can do:
let err = 'This is an error'
log.err(err, 'Error origin')
// Error origin means the place where the error came from (optional)
License
MIT. Copyright © 2016, 2017, 2018 TheRacingLion.
Время на прочтение
12 мин
Количество просмотров 152K
Введение
В этой статье я подробно расскажу о том, как работать с библиотекой discord.js, создать своего Discord-бота, а также покажу несколько интересных и полезных команд.
Сразу хочу отметить, что я планирую сделать ряд подобных статей, начиная с простых команд, заканчивая музыкой, системой экономики и распознаванием голоса ботом.
Начало работы
Если вы уже знакомы с приведёнными ниже материалами, — смело можете пролистать этот раздел.
Установка среды разработки
Для начала работы с кодом нам нужно установить среду разработки, это может быть:
- Sublime Text
- Notepad++
- Atom
- Brackets
- InteliJ Idea
- Eclipse
- Visual Studio Code
… и так далее.
Среда разработки выбирается по удобству использования и практичности, она у вас может быть любая, но мы рассмотрим её на примере Visual Studio Code, так как она является одной из самых приемлемых для новичков, а также для опытных программистов.
Для установки переходим по этой ссылке.
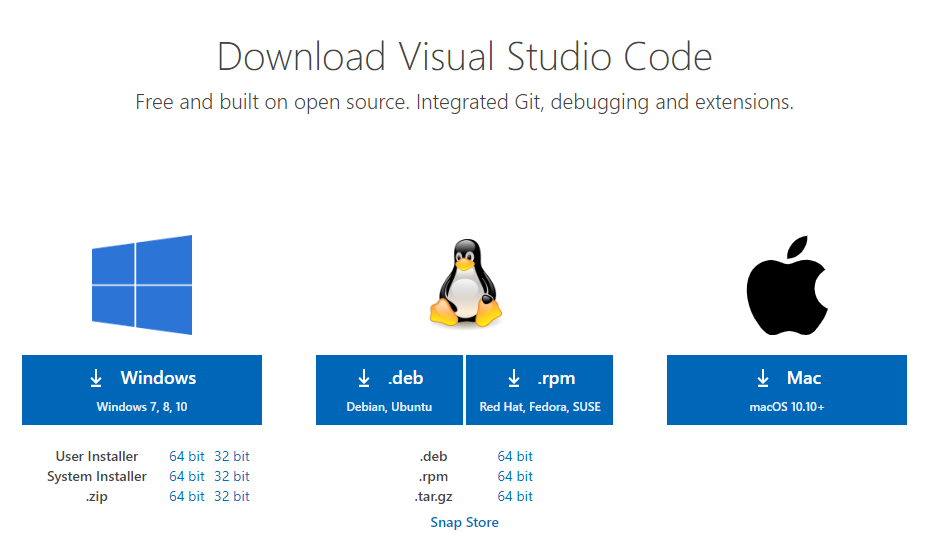
Выбираем свою операционную систему и запускаем скачивание.
Установка среды выполнения
Для создания бота мы используем среду выполнения node.js. Для её установки нам необходимо перейти на этот сайт.

На данный момент нас интересует версия долгосрочной поддержки (LTS), скачиваем её.
Установка полезных расширений
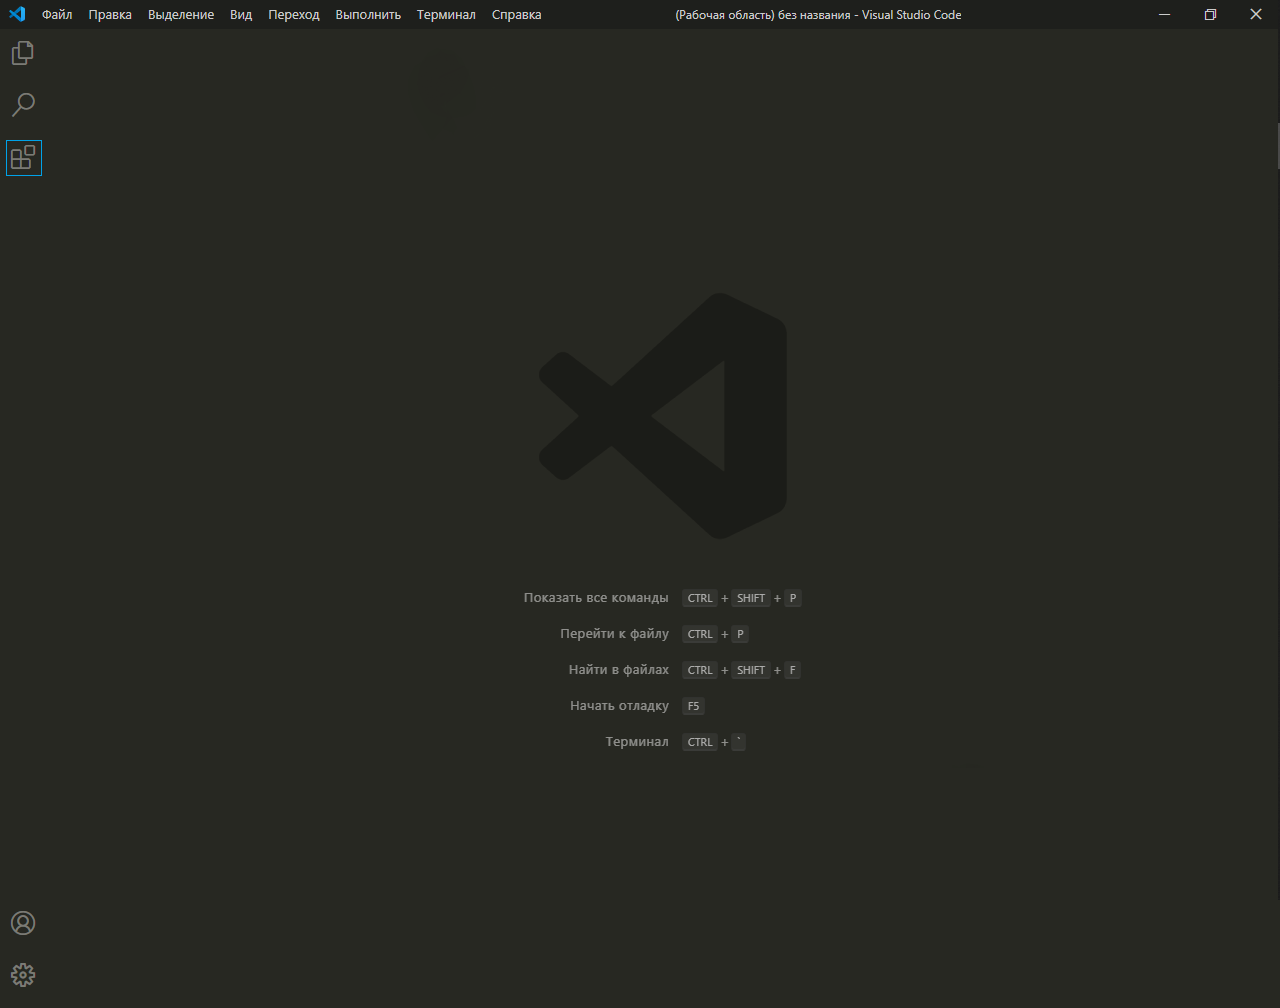
В Visual Studio Code присутствует возможность устанавливать расширения.
Для этого, кликните по отмеченной ниже иконке.
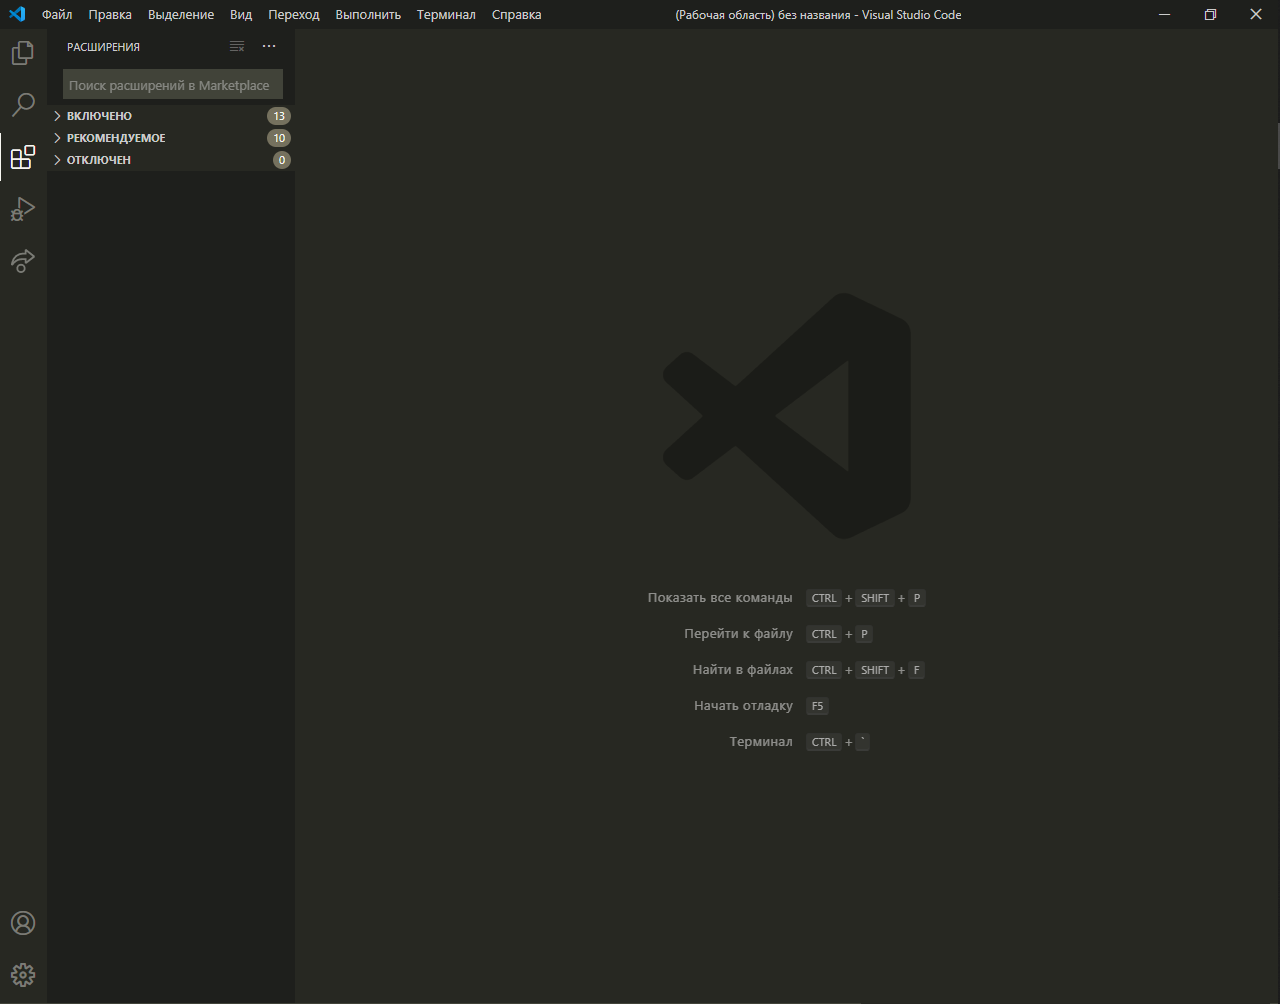
В открывшемся окне вписываем название название/идентификатор нужного нам расширения, после чего устанавливаем его.
Из полезных расширений могу отметить:
- Discord Presence — расширение, позволяющее отображать рабочую область и файл, в котором вы работаете в вашей игровой активности (функция работает только при использовании приложения Discord).
Идентификатор расширения: icrawl.discord-vscode
- Code runner — расширение, с помощью которого предоставляется возможность запускать определённые фрагменты кода.
Идентификатор расширения: formulahendry.code-runner

Создание бота
Теперь, когда вы установили все нужные компоненты, мы можем приступить к созданию самого бота.
Здесь всё просто. Переходим на портал разработчиков и нажимаем на кнопку с надписью «New Application» — она находится в правом верхнем углу.
В открывшемся окне вписываем имя бота, после чего, нажимаем на кнопку с надписью «Create».
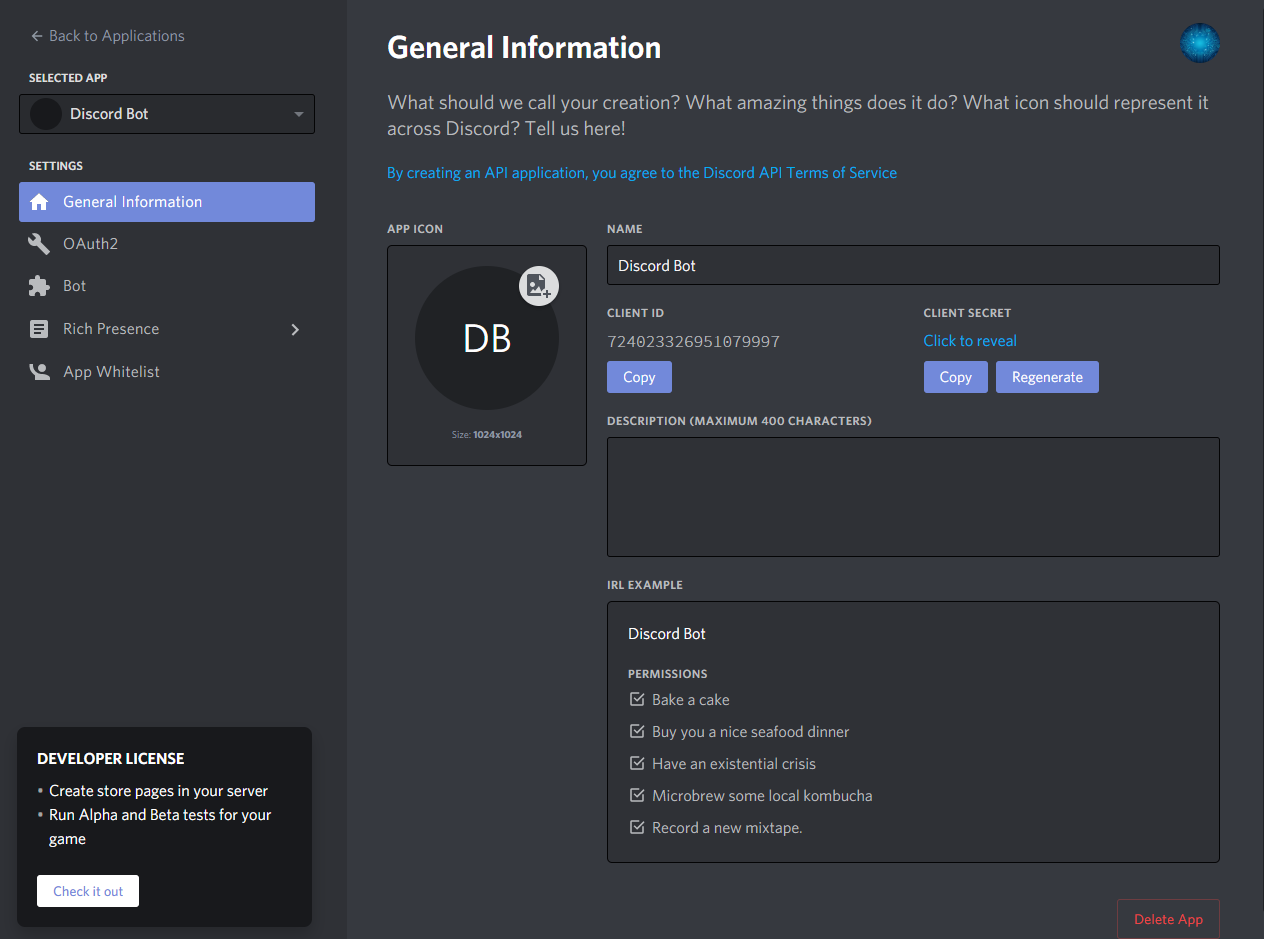
На этой странице мы можем изменить имя бота, загрузить для него иконку, заполнить описание.
Теперь наша задача — воплотить бота в жизнь. Для этого переходим во вкладку «Bot».
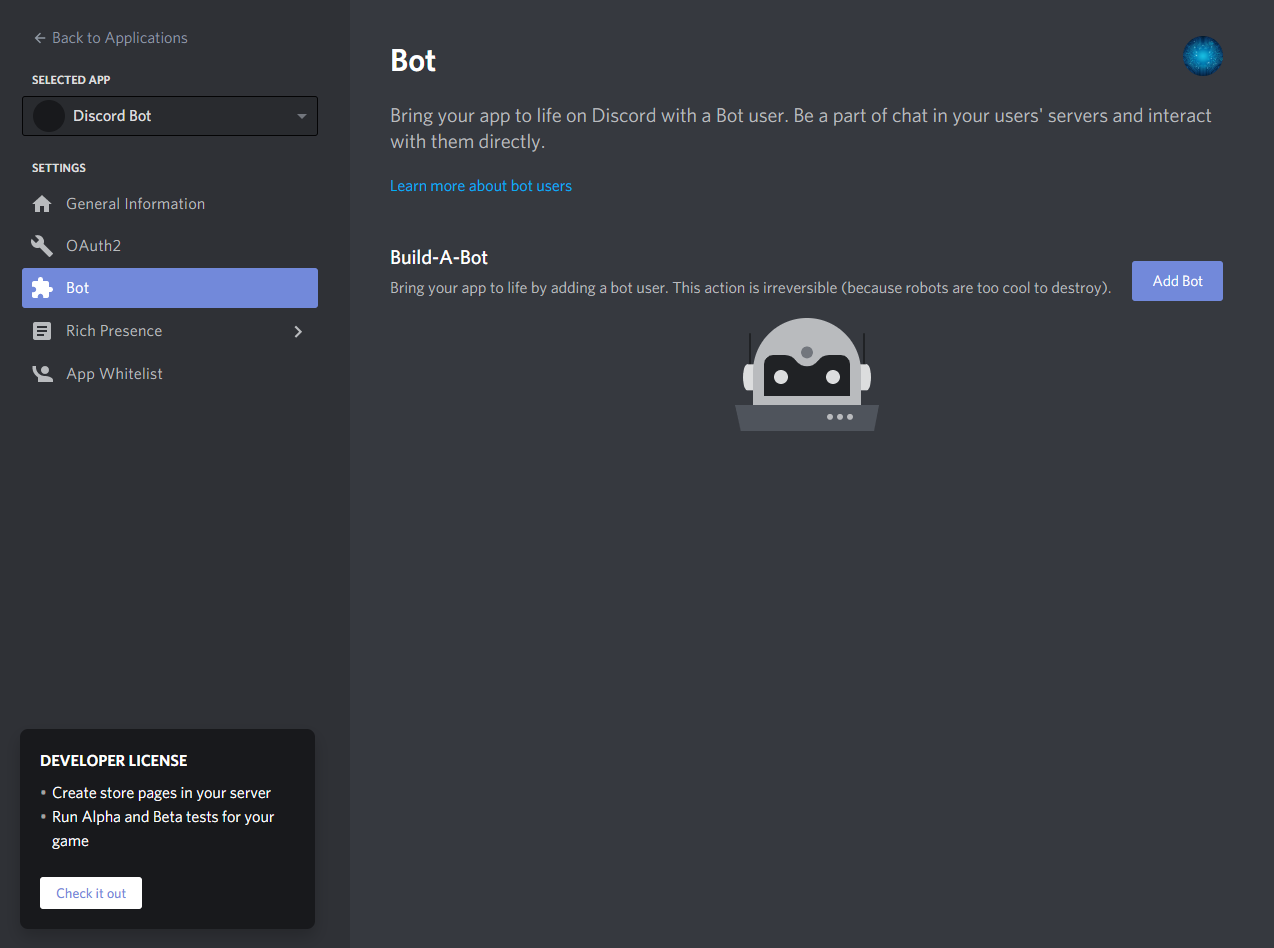
Нажимаем на кнопку с надписью «Add Bot» и воплощаем бота в жизнь.
Поздравляю! Вы создали аккаунт для вашего бота. Теперь у него есть тег, токен, ник и иконка.
Подготовка к написанию кода
После создания аккаунта для бота, мы должны установить нужные пакеты и модули, чтобы в дальнейшем он корректно работал.
Первым делом создаём папку, после чего открываем её в VS Code (Файл > Открыть папку) / (Ctrl + K Ctrl + O)
Далее нам нужно открыть терминал (Терминал > Создать терминал) / (Ctrl + Shift + `)
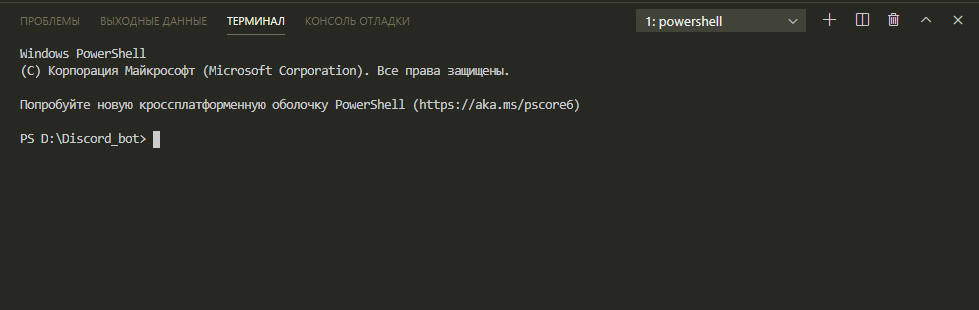
Теперь мы должны создать файл с неким «описанием» нашего бота, сделаем это через терминал.
Вписываем данную строку в терминал и нажимаем Enter:
npm init
После каждой появившейся строки нажимаем Enter или вписываем свои значения.
Значения в этом файле можно будет изменить в любой момент.
Далее, мы должны поочерёдно вводить в терминал эти строки:
npm installnpm install discord.js«Install» также можно сокращать в «I», но необязательно.
Итого, если вы следовали инструкциям и всё сделали правильно, в вашей папке должны были появиться 3 объекта:

Написание кода
Об удобстве написания кода
Для того, чтобы наш бот появился в сети и мог реагировать на команды, нам нужно написать для него код.
Существует множество вариантов для его написания: используя один файл, два, несколько, и т.д
Мы рассмотрим вариант с двумя файлами, так как его использовать очень легко и удобно, но у каждого варианта есть свои недостатки — например, у этого недостатком является сложность в написании начального кода.
Но не волнуйтесь, весь код вам писать не придётся.
О хранении данных
Для начала, нам нужно где-то хранить основные параметры и информацию о боте.
Мы можем сделать это двумя способами:
- Создать отдельный файл
- Записать всё в константы
Я не советую вам использовать второй вариант, так как в будущем вам придётся работать с большим объёмом информации, и такая запись будет доставлять неудобства.
Разберём хранение параметров в отдельном файле.
Итак, создаем файл config.json
Вставляем в него следующий код:
{
    "token" : "Ваш_токен",
    "prefix" : "Ваш_префикс"
}
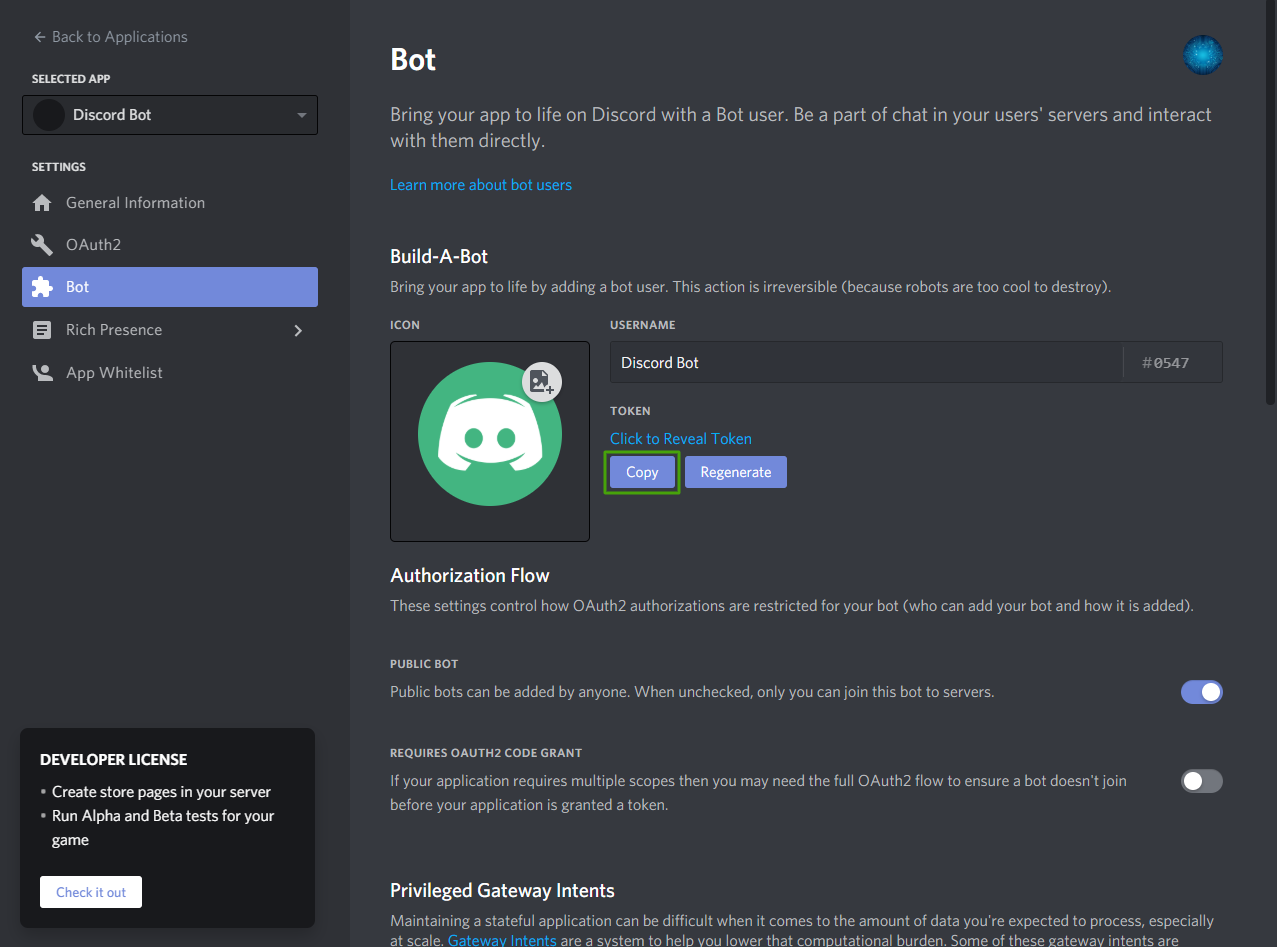
* Для получения токена зайдите на портал разработчиков, перейдите во вкладку «Bot» и скопируйте его.
* Самым распространённым среди разработчиков префиксом является !
Далее нам нужно создать файл bot.js и вставить в него данный код:
const Discord = require('discord.js'); // Подключаем библиотеку discord.js
const robot = new Discord.Client(); // Объявляем, что robot - бот
const comms = require("./comms.js"); // Подключаем файл с командами для бота
const fs = require('fs'); // Подключаем родной модуль файловой системы node.js
let config = require('./config.json'); // Подключаем файл с параметрами и информацией
let token = config.token; // «Вытаскиваем» из него токен
let prefix = config.prefix; // «Вытаскиваем» из него префикс

robot.on("ready", function() {
  /* При успешном запуске, в консоли появится сообщение «[Имя бота] запустился!» */
  console.log(robot.user.username + " запустился!");
});


robot.on('message', (msg) => { // Реагирование на сообщения
  if (msg.author.username != robot.user.username && msg.author.discriminator != robot.user.discriminator) {
    var comm = msg.content.trim() + " ";
    var comm_name = comm.slice(0, comm.indexOf(" "));
    var messArr = comm.split(" ");
    for (comm_count in comms.comms) {
      var comm2 = prefix + comms.comms[comm_count].name;
      if (comm2 == comm_name) {
        comms.comms[comm_count].out(robot, msg, messArr);
      }
    }
  }
});


robot.login(token); // Авторизация бота
Теперь создаём файл comms.js, в нём будут сами команды.
В нём должен быть следующий код:
const config = require('./config.json'); // Подключаем файл с параметрами и информацией
const Discord = require('discord.js'); // Подключаем библиотеку discord.js
const prefix = config.prefix; // «Вытаскиваем» префикс

// Команды //

function test(robot, mess, args) {
  mess.channel.send('Test!')
}


// Список команд //

var comms_list = [{
  name: "test",
  out: test,
  about: "Тестовая команда"
}];

// Name - название команды, на которую будет реагировать бот
// Out - название функции с командой
// About - описание команды

module.exports.comms = comms_list;
Чтобы добавить больше команд — просто объявляйте больше функций и добавляйте их в список, например:
const config = require('./config.json');
const Discord = require('discord.js');
const prefix = config.prefix;
const versions = config.versions;


// Команды //

function test(robot, mess, args) {
  mess.channel.send("Тест!")
}

function hello(robot, mess, args) {
  mess.reply("Привет!")
}


// Список комманд //

var comms_list = [{
    name: "test",
    out: test,
    about: "Тестовая команда"
  },
  {
    name: "hello",
    out: hello,
    about: "Команда для приветствия!"
  }
}

module.exports.comms = comms_list;
И вот, мы вышли на финишную прямую!
Осталось всего ничего — запустить бота.
Для этого открываем терминал и вставляем в него следующую строку:
node bot.js
Готово! Бот запущен и вы можете им пользоваться, ура!
Чтобы пригласить бота на свой сервер, воспользуемся нам уже известным порталом разработчиков.
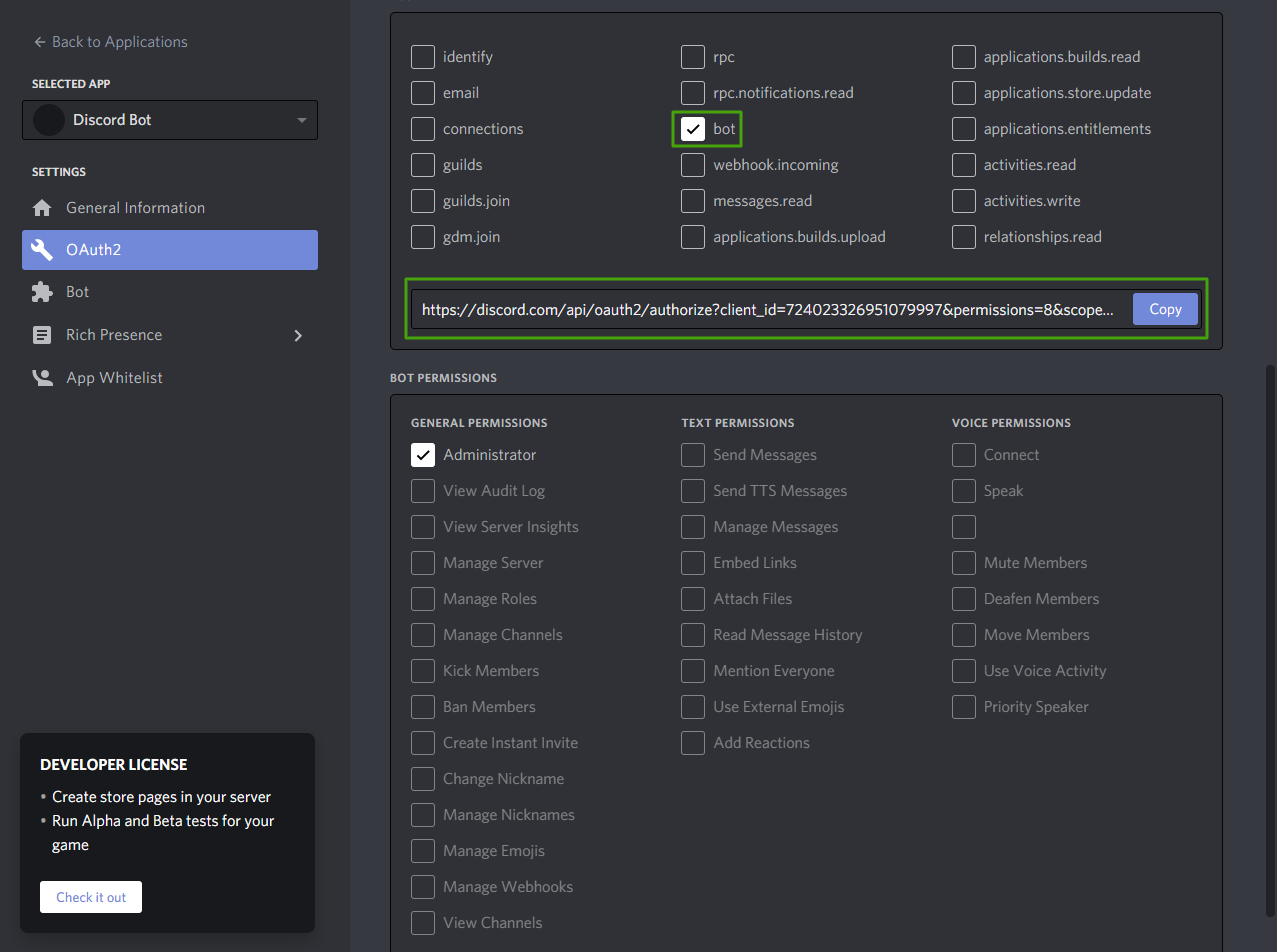
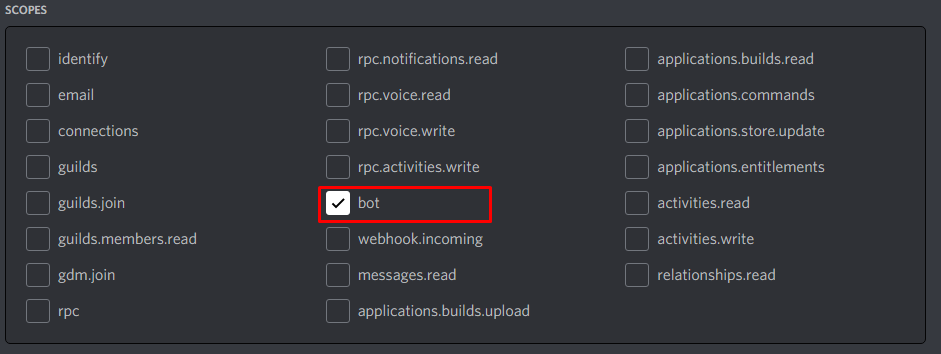
Перейдём во вкладку OAuth2, пролистаем чуть ниже, выберем «Bot» и отметим нужные боту привилегии.
Теперь осталось скопировать ссылку-приглашение и добавить бота на свой сервер.
Как вывести ссылку-приглашение в терминал, при запуске бота?
Существует два способа:
- Заранее отметить нужные привилегии.
Для этого, сначала мы должны скопировать ссылку-приглашение.
После чего перейти в файл bot.js и вставить данную строчку кода сюда:robot.on("ready", function(){ console.log(robot.user.username + " запустился!"); console.log("Ссылка-приглашение") // << // })Итоговый код должен быть таким:
const Discord = require('discord.js'); const robot = new Discord.Client(); var comms = require("./comms.js"); const fs = require('fs'); let config = require('./config.json'); let token = config.token; let prefix = config.prefix; robot.on("ready", function(){ console.log(robot.user.username + " запустился!"); console.log("Ссылка-приглашение") }) robot.on('message', (msg) => { if(msg.author.username != robot.user.username && msg.author.discriminator != robot.user.discriminator){ var comm = msg.content.trim()+" "; var ok = false; var comm_name = comm.slice(0, comm.indexOf(" ")); var messArr = comm.split(" "); for(comm_count in comms.comms){ var comm2 = prefix + comms.comms[comm_count].name; if(comm2 == comm_name){ comms.comms[comm_count].out(robot, msg, messArr); } } } }); robot.login(token) robot.login(token); - Отметить нужные привилегии в самом коде.
Повторяем процедуры из первого способа, но уже с другими строками кода:robot.on("ready", function(){ console.log(robot.user.username + " запустился!"); robot.generateInvite(["ADMINISTRATOR"]).then((link) => { // < // console.log(link); // < // })})Итоговый код:
const Discord = require('discord.js');
const robot = new Discord.Client();
var comms = require("./comms.js");
const fs = require('fs');
let config = require('./config.json');
let token = config.token;
let prefix = config.prefix;

robot.on("ready", function(){
    console.log(robot.user.username + " запустился!");
    robot.generateInvite(["ADMINISTRATOR"]).then((link) => {
        console.log(link);
})})


robot.on('message', (msg) => {
	if(msg.author.username != robot.user.username && msg.author.discriminator != robot.user.discriminator){
    	var comm = msg.content.trim()+" ";
	    var ok = false;
	    var comm_name = comm.slice(0, comm.indexOf(" "));
	    var messArr = comm.split(" ");
	    for(comm_count in comms.comms){
	    	var comm2 = prefix + comms.comms[comm_count].name;
	    	if(comm2 == comm_name){
	    		comms.comms[comm_count].out(robot, msg, messArr);
	    	}
	    }
    }
});


robot.login(token);
Чтобы указать несколько привилегий, мы должны перечислить их в квадратных скобках, через запятую:
    robot.generateInvite(['KICK_MEMBERS', 'BAN_MEMBERS', 'SEND_MESSAGES']).then((link) => {
        console.log(link);
* Все привилегии указываются заглавными буквами
Список доступных привилегий:
ADMINISTRATOR
CREATE_INSTANT_INVITE
KICK_MEMBERS
BAN_MEMBERS
MANAGE_CHANNELS
MANAGE_GUILD
ADD_REACTIONS
VIEW_AUDIT_LOG
PRIORITY_SPEAKER
STREAM
VIEW_CHANNEL
SEND_MESSAGES
SEND_TTS_MESSAGES
MANAGE_MESSAGES
EMBED_LINKS
ATTACH_FILES
READ_MESSAGE_HISTORY
MENTION_EVERYONE
USE_EXTERNAL_EMOJIS
VIEW_GUILD_INSIGHTS
CONNECT
SPEAK
MUTE_MEMBERS
DEAFEN_MEMBERS
MOVE_MEMBERS
USE_VAD
CHANGE_NICKNAME
MANAGE_NICKNAMES
MANAGE_ROLES
MANAGE_WEBHOOKS
MANAGE_EMOJISЯ не советую вам из привилегий выбирать только ADMINISTRATOR, поэтому лучше указать только те привилегии, которые бот действительно использует для корректной работы
Полезные и интересные команды
В предыдущем разделе я показал вам, как запустить бота и как писать для него команды.
Теперь я хочу поделиться с вами несколькими своими командами.
- !say — с помощью этой команды бот может повторить ваше сообщение.
Код:
if (!mess.member.hasPermission("MANAGE_MESSAGES")) return mess.channel.send("У вас нет прав"); /* Если у исполнителя команды нету привилегии MANGAGE_MESSAGES, он не сможет её использовать */ args = mess.content.split(' '); args.shift(); args = args.join(' '); mess.delete().catch(); // Удаление сообщения пользователя после отправки mess.channel.send(args) - !heads_or_tails — игра «Орёл или Решка».
Код:
mess.channel.send('Монета подбрасывается...') var random = Math.floor(Math.random() * 4) + 1; // Объявление переменной random - она вычисляет случайное число от 1 до 3 if (random === 1) { // Если вычислено число 1, то выпадает орёл. mess.channel.send(':full_moon: Орёл!') } else if (random === 2) { // Если вычислено число 2, то выпадает решка. mess.channel.send(':new_moon: Решка!') } else if (random === 3) { // Если вычислено число 3, то монета падает ребром. mess.channel.send(':last_quarter_moon: Монета упала ребром!') } - !clear — удаление определённого количества сообщений.
Код:
const arggs = mess.content.split(' ').slice(1); // Все аргументы за именем команды с префиксом const amount = arggs.join(' '); // Количество сообщений, которые должны быть удалены if (!amount) return mess.channel.send('Вы не указали, сколько сообщений нужно удалить!'); // Проверка, задан ли параметр количества if (isNaN(amount)) return mess.channel.send('Это не число!'); // Проверка, является ли числом ввод пользователя if (amount > 100) return mess.channel.send('Вы не можете удалить 100 сообщений за раз'); // Проверка, является ли ввод пользователя числом больше 100 if (amount < 1) return mess.channel.send('Вы должны ввести число больше чем 1'); // Проверка, является ли ввод пользователя числом меньше 1 async function delete_messages() { // Объявление асинхронной функции await mess.channel.messages.fetch({ limit: amount }).then(messages => { mess.channel.bulkDelete(messages) mess.channel.send(`Удалено ${amount} сообщений!`) }) }; delete_messages(); // Вызов асинхронной функции - !random_name — генерация случайного имени.
Не стоит пугаться большого кода, здесь всё предельно просто.
Код:
var name = [ // Объявление массива name и занесение в него большого количества имён
  'Абрам', ' Аваз', ' Аввакум', ' Август', ' Августин',
  ' Авдей', ' Авраам', ' Автандил', ' Агап', ' Агафон',
  ' Аггей', ' Адам', ' Адис', ' Адольф', ' Адриан',
  ' Азамат', ' Айдар', ' Айнур', ' Айрат', ' Аким',
  ' Алан', ' Алей', ' Александр', ' Алексей', ' Али',
  ' Альберт', ' Альфред', ' Амадей', ' Амадеус',
  ' Амаяк', ' Амвросий', ' Ананий', ' Анастасий',
  ' Анатолий', ' Анвар', ' Ангел', ' Андоим', ' Андрей',
  ' Аникита', ' Антон', ' Арам', ' Арий', ' Аристарх',
  ' Аркадий', ' Арман', ' Арно', ' Арнольд', ' Арон', ' Арсен',
  ' Арсений', ' Арслан', ' Артем', ' Артемий', ' Артур', ' Архип', ' Аскар', ' Аскольд', ' Аслан', ' Афанасий', ' Ахмет', ' Ашот', ' Бальтазар', ' Бежен', ' Бенедикт', ' Берек', ' Бернард',
  ' Бертран', ' Богдан', ' Болеслав', ' Борис', ' Бронислав',
  ' Булат', ' Вадим', ' Валентин', ' Валерий', ' Вальтер',
  ' Варфоломей', ' Василий', ' Вацлав', ' Велизар', ' Венедикт', ' Вениамин', ' Викентий', ' Виктор', ' Вилли', ' Вильгельм', ' Виссарион', ' Виталий', ' Витольд', ' Владимир', ' Владислав', ' Владлен', ' Володар', ' Вольдемар', ' Всеволод', ' Вячеслав', ' Гавриил', ' Галактион', ' Гарри', ' Гастон', ' Гаяс', ' Гевор', ' Геннадий', ' Генрих', ' Георгий', ' Геракл', ' Геральд', ' Герасим', ' Герман', ' Глеб', ' Гордей', ' Гордон', ' Горислав', ' Градимир', ' Григорий', ' Гурий', ' Густав', ' Давид', ' Дамир', ' Даниил', ' Даниэль', ' Данияр', ' Дарий', ' Дементий', ' Демид', ' Демосфен', ' Демьян', ' Денис', ' Джамал', ' Джордан', ' Дмитрий', ' Добрыня', ' Дональд', ' Донат', ' Дорофей', ' Евгений', ' Евграф', ' Евдоким', ' Евсевий', ' Евсей', ' Евстафий', ' Егор', ' Елеазар', ' Елисей', ' Емельян', ' Еремей', ' Ермолай', ' Ерофей', ' Ефим', ' Ефрем', ' Жан', ' Ждан', ' Жорж', ' Захар', ' Зиновий', ' Ибрагим', ' Иван', ' Игнатий', ' Игорь', ' Илларион', ' Ильдар', ' Ильнар', ' Ильнур', ' Илья', ' Ильяс', ' Иннокентий', ' Иоанн', ' Иосиф', ' Ипполит', ' Искандер', ' Ислам', ' Камиль', ' Карим', ' Карл', ' Кирилл', ' Клим', ' Кондрат', ' Константин', ' Корней', ' Кузьма', ' Лавр', ' Лаврентий', ' Лев', ' Леон', ' Леонид', ' Леонтий', ' Леопольд', ' Лука', ' Лукьян', ' Любим', ' Макар', ' Максим', ' Максимилиан', ' Марат', ' Марк', ' Марсель', ' Мартин', ' Матвей', ' Мирон', ' Мирослав', ' Митрофан', ' Михаил', ' Михей', ' Мишель', ' Мстислав', ' Мурат', ' Муслим', ' Назар', 'Абрам', ' Аваз', ' Аввакум', ' Август', ' Августин', ' Авдей', ' Авраам', ' Автандил', ' Агап', ' Агафон', ' Аггей', ' Адам', ' Адис', ' Адольф', ' Адриан', ' Азамат', ' Айдар', ' Айнур', ' Айрат', ' Аким', ' Алан', ' Алей', ' Александр',
  ' Алексей', ' Али', ' Альберт', ' Альфред', ' Амадей', ' Амадеус', ' Амаяк', ' Амвросий', ' Ананий', ' Анастасий', ' Анатолий', ' Анвар', ' Ангел', ' Андоим', ' Андрей', ' Аникита', ' Антон', ' Арам', ' Арий', ' Аристарх', ' Аркадий', ' Арман', ' Арно', ' Арнольд', ' Арон', ' Арсен', ' Арсений', ' Арслан', ' Артем', ' Артемий', ' Артур', ' Архип', ' Аскар', ' Аскольд', ' Аслан', ' Афанасий', ' Ахмет', ' Ашот', ' Бальтазар', ' Бежен', ' Бенедикт', ' Берек', ' Бернард', ' Бертран', ' Богдан', ' Болеслав', ' Борис', ' Бронислав', ' Булат', ' Вадим', ' Валентин', ' Валерий', ' Вальтер', ' Варфоломей', ' Василий', ' Вацлав', ' Велизар', ' Венедикт', ' Вениамин', ' Викентий', ' Виктор', ' Вилли', ' Вильгельм', ' Виссарион', ' Виталий', ' Витольд', ' Владимир', ' Владислав', ' Владлен', ' Володар', ' Вольдемар', ' Всеволод', ' Вячеслав', ' Гавриил', ' Галактион', ' Гарри', ' Гастон',
  ' Гаяс', ' Гевор', ' Геннадий', ' Генрих', ' Георгий', ' Геракл',
  ' Геральд', ' Герасим', ' Герман', ' Глеб', ' Гордей', ' Гордон',
  ' Горислав', ' Градимир', ' Григорий', ' Гурий', ' Густав',
  ' Давид', ' Дамир', ' Даниил', ' Даниэль', ' Данияр',
  ' Дарий', ' Дементий', ' Демид', ' Демосфен',
  ' Демьян', ' Денис', ' Джамал', ' Джордан', ' Дмитрий', ' Добрыня',
  ' Дональд', ' Донат', ' Дорофей', ' Евгений', ' Евграф', ' Евдоким', ' Евсевий', ' Евсей', ' Евстафий', ' Егор', ' Елеазар', ' Елисей', ' Емельян', ' Еремей', ' Ермолай', ' Ерофей', ' Ефим', ' Ефрем', ' Жан', ' Ждан', ' Жорж', ' Захар', ' Зиновий', ' Ибрагим', ' Иван', ' Игнатий', ' Игорь', ' Илларион', ' Ильдар', ' Ильнар', ' Ильнур', ' Илья', ' Ильяс', ' Иннокентий', ' Иоанн', ' Иосиф', ' Ипполит', ' Искандер', ' Ислам', ' Камиль', ' Карим', ' Карл', ' Кирилл', ' Клим', ' Кондрат', ' Константин', ' Корней', ' Кузьма', ' Лавр', ' Лаврентий', ' Лев', ' Леон', ' Леонид', ' Леонтий', ' Леопольд', ' Лука', ' Лукьян', ' Любим', ' Макар', ' Максим', ' Максимилиан', ' Марат', ' Марк', ' Марсель', ' Мартин', ' Матвей', ' Мирон', ' Мирослав', ' Митрофан', ' Михаил', ' Михей', ' Мишель', ' Мстислав', ' Мурат',
  ' Муслим', ' Назар'
];

var RandElement = name[Math.floor(Math.random() * (name.length))]; // Выбор случайного элемента из массива
mess.channel.send(RandElement) // Отправка сообщения со случайным элементом из массива в чат

Заключение
Вот и подошла к концу первая часть обучения, как вы могли заметить, создать бота, используя библиотеку discord.js очень просто.
Итого, из этой статьи мы выяснили:
- Как установить нужные модули и пакеты
- Как установить среду разработки
- Как установить среду выполнения
- Как установить полезные расширения
- Как создать аккаунт для бота
- Как воплотить бота в жизнь
- Как запустить бота
- Как научить бота реагировать на команды
- Как пригласить бота на свой сервер
- Как писать код для работы команд
А также научились некоторым интересным и полезным командам.
Надеюсь, что вам понравилась моя статья и вы узнали из неё что-то новое.
Сайты для самостоятельного изучения
- Основная документация discord.js
- Документация discord.js №2
- Руководство discord.js
- Руководство discord.js №2
Dec 11, 2021
Simple but complicated one!
`So to abord it, let’s begin with what is a self-bot?
A self-bot is basically a bot inside your own account. It uses your token to post messages like you. It reacts to you and you only.
A token is a small piece of encrypted text. It basically is the key all Discord applications will need to connect to the account the app should run on. That’s why both bot accounts and user accounts have tokens.
Since self bots have access to the DiscordAPI (Application Programming Interface, a.k.a. the direct link between code and code being able to work on Discord), they can use functions that normally only bots would be able to use, such as the previously mentioned embeds. They can also bypass any restrictions coded only in the client.
Needless say that
Using selfbots is forbidden, and anyone that use them and are detected can be banned for it.
So to activate, you only need to assign a channel, generally where the users that join will land and fill the verification requirement being said Password, Captcha, or Advanced.
Read the related blog about it
Verification System | Securing your Discord Server
Secure your server from alts and raiders. Enforce a verification system and we provide three modes: basic, captcha & advanced!
 Joshua V

So first run,
;self-bot [channel]
Then set the action that the bot should take towards this kind of creature by running
;self-bot action [kick/ban/none]
To disable it type
self-bot disable
And that it’s all that you need to know to maintain your server safe and sound from any menace.

Go back to autopilot
Join our Discord
Get instant support in our Discord Support Server.
Recommended for you
No posts found
Apparently there are no posts at the moment, check again later.
Всем привет, сегодня мы напишем Discord-бота на Python и discord.py + бонусом посмотрим на примеры ботов. Приступим 🙂
Перед работой
Перед тем, как начать, вам нужны:
- Python 3;
- discord.py;
- Discord-аккаунт и свой сервер.
Для установки discord.py воспользуйтесь пакетным менеджером:
pip3 install discord.pyСоздаём нашего бота
Перейдите на Developer Portal и нажмите на New application.
Вы создали своё приложение, на странице приложение перейдите в Bot >> Add Bot и создайте своего Discord-бота.
Сохраните токен бота! Дальше он нам понадобится!
Если всё прошло успешно, поздравляю, половина дела сделана 😀
Добавление бота на сервер
Теперь можно добавить бота на сервер.
Перейдите в OAuth2 >> URL Generator, в Scopes выбираем Bot и ниже — права бота, копируем сгенерированный URL. Вставляем в браузер, и добавляем на наш сервер.
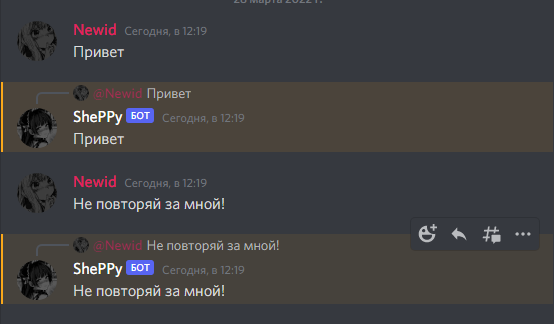
Эхо-бот
Напишем традиционного эхо-бота, и разберём каждую строчку кода.
Код:
import discord
from discord.ext import commands

config = {
    'token': 'your-token',
    'prefix': 'prefix',
}

bot = commands.Bot(command_prefix=config['prefix'])

@bot.event
async def on_message(ctx):
    if ctx.author != bot.user:
        await ctx.reply(ctx.content)

bot.run(config['token'])
Пример работы:
Разбор:
import discord
from discord.ext import commands
Нужные нам импорты.
config = {
    'token': 'your-token',
    'prefix': 'prefix',
}
Вспомогательный словарь config в котором храним токен и префикс команд (далее расскажу зачем нужен префикс команд).
bot = commands.Bot(command_prefix=config['prefix'])Создаём нашего бота, в аргументе передаём префикс.
@bot.eventДекоратор, предназначенный для обработки событий, подробнее здесь.
async def on_message(ctx):Создаём асинхронную функцию, с параметром ctx, представляет из себя сообщение.
if ctx.author != bot.user:Проверка, не является ли автор сообщения нашим Discord-ботом. Дело в том, что если бот отправит сообщение, это будет новым событием, и тогда получается цикл.
await ctx.reply(ctx.content)Отвечаем на сообщение (ctx.reply), в аргументы передаём сообщение (ctx.content).
bot.run(config['token'])Запускаем нашего бота, в аргументы передаём токен бота.
Надеюсь вы разобрались с кодом, и мы можем переходить далее.
Обработка команд
Перед тем, как обрабатывать команды, нам пригодится наш префикс.
Рассмотрим код:
import random
import discord
from discord.ext import commands

config = {
    'token': 'your-token',
    'prefix': '$',
}

bot = commands.Bot(command_prefix=config['prefix'])

@bot.command()
async def rand(ctx, *arg):
    await ctx.reply(random.randint(0, 100))

bot.run(config['token'])
Результат работы:

Разбор:
@bot.command()Декоратор обработки команд
async def rand(ctx, *arg):Асинхронная функция rand
await ctx.reply(random.randint(0, 100))Отвечаем на сообщение, в аргументы передаём случайное число от 0 до 100
Бонус
Проверка роли:
import random
import discord
from discord.ext import commands

config = {
    'token': 'your-token',
    'prefix': '$',
}

bot = commands.Bot(command_prefix=config['prefix'])

@bot.command()
@commands.has_role("Хозяин")
async def rand(ctx, *arg):
    await ctx.reply(random.randint(0, 100))

bot.run(config['token'])
Выгнать пользователя
import discord
from discord.ext import commands

config = {
    'token': 'your-token',
    'prefix': '$',
}

bot = commands.Bot(command_prefix=config['prefix'])

@bot.command()
async def kick(ctx, user : discord.User(), *arg, reason='Причина не указана'):
    await bot.kick(user)
    await ctx.send('Пользователь {user.name} был изгнан по причине "{reason}"')

bot.run(config['token'])