Конечно программ для сканирования портов хоть пруд пруди, известные типа Nmap и не очень. Но все равно хочется изобрести велосипед и попробовать написать что нибудь свое, простое.
Первым делом напишем функцию самого сканирования портов. Будем использовать socket для попытки подключиться к порту.
import socket

def scan_port(ip,port):
  sock = socket.socket(socket.AF_INET, socket.SOCK_STREAM)
  sock.settimeout(0.5)
  try:
     connect = sock.connect((ip,port))
     print('Port :',port,' its open.')
     sock.close()
  except:
     pass
Тут все просто, создаем сокет. Обернем в обработку исключений(try — except) попытку подключения. Если подключение удалось пишем что порт открыт. Нет , просто выходим. Sock.settimeout(0.5) задает тайм-аут подключения равный пол секунды, попытаемся ускорить процесс сканирования.
Теперь вызовем просто эту функцию в цикле с указанием IP адреса для сканирования и номера порта:
ip = '192.168.0.1'
for i in range(1000):
  scan_port(ip,i)

Ура, все просто великолепно работает. Тысяча портов где то за 10 секунд, я бы сказал даже не плохой результат. Но что делать если нам надо просканировать тысяча IP и все порта ? Получиться очень долго, но мы можем добавить многопоточность. Будем каждый порт сканировать в отдельном потоке:
import threadingfor i in range(1000):
 potoc = threading.Thread(target=scan_port, args=(ip,i))
 potoc.start()
target=scan_port говорить что функция scan_port будет вызываться в потоке и передадим ей аргументы args=(ip,i).
potoc.start() — запускает сам поток.

На сканирование тех же тысячу портов у нас ушло меньше секунды. Мне кажется это не плохой результат для такой не сложной программы. Ну, а все фичи для удобства оставляю на вашу фантазию.
Кому интересно как я засекал время вот код:
from datetime import datetimestart = datetime.now()
код
ends = datetime.now()
print('Time : {}'.format(ends-start))
Ошибка в тексте? Выделите её и нажмите «Ctrl + Enter»
Просмотров: 197
Здравствуйте, дорогие друзья. Рассмотрим самописные инструменты для сканирования.
Теперь, прежде чем мы начнем писать код, давайте посмотрим, что на самом деле означает сканирование.
В Kali Linux есть инструмент, который называется nmap.
Он позволяет нам сканировать цель на наличие открытых портов, которые могут потенциально запускать программы на машине, которую будем атаковать.
Первая часть фактического сбора информации о цели — это проверка на открытые порты.
И мы также хотим посмотреть, какую версию программного обеспечения они используют на этих открытых портах.
После того, как мы это выясним, нам необходимо, например, посмотреть, является ли эта версия программного обеспечения уязвимой к какой-либо атаке.
Для наглядности, протестируем, как все работает с помощью Nmap, введя в терминале команду: (nmap 10.0.2.7):
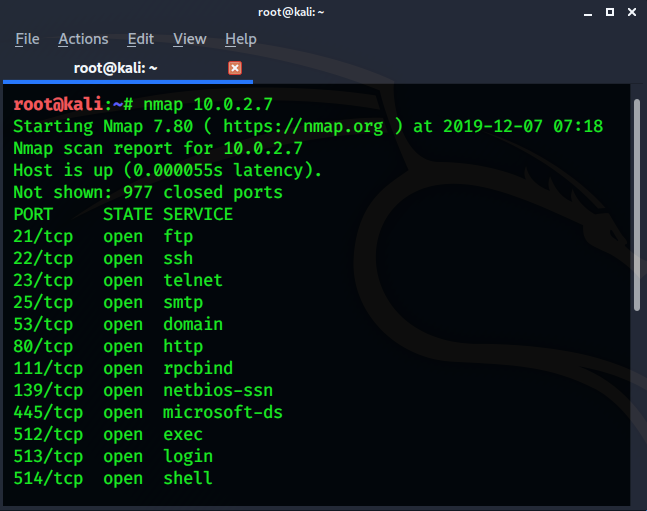
Видим открытые порты, с помощью которых мы сможем реализовать дальнейший вектор атаки. Но сейчас не об этом.
Итак, давайте попробуем написать код простейшего сканера портов.
Давайте создадим актуальную директорию, в которую мы будем сохранять только файлы для нашего сканирования. У меня это Desktop/Python/portscanner:
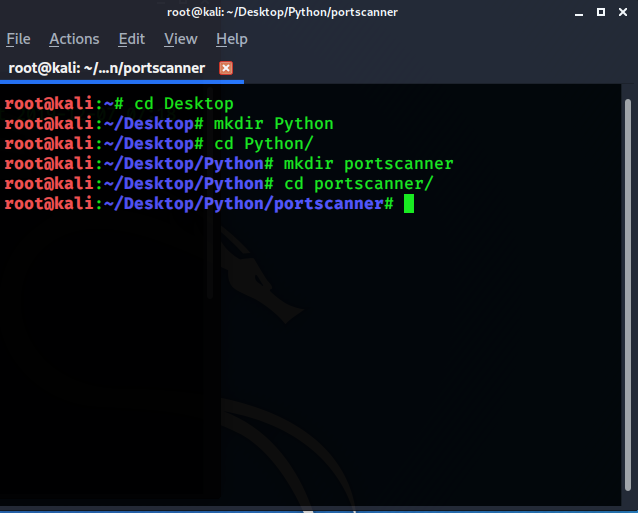
Назовем программу «portscanner».
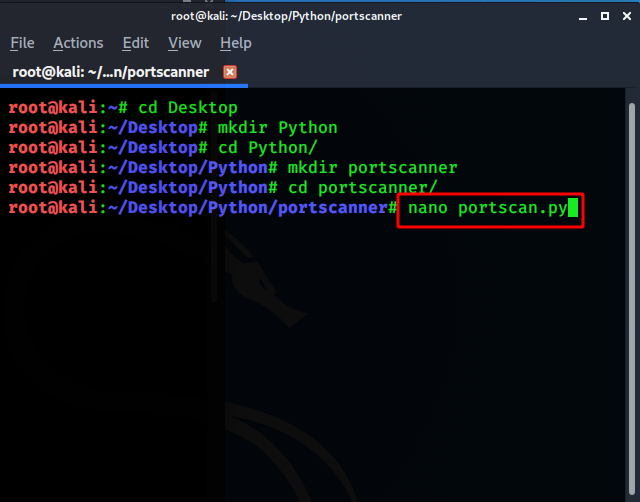
Я буду использовать редактор «Nano», для написания кода:
Давайте попробуем написать простой сканер портов, который будет просто сканировать простой порт.
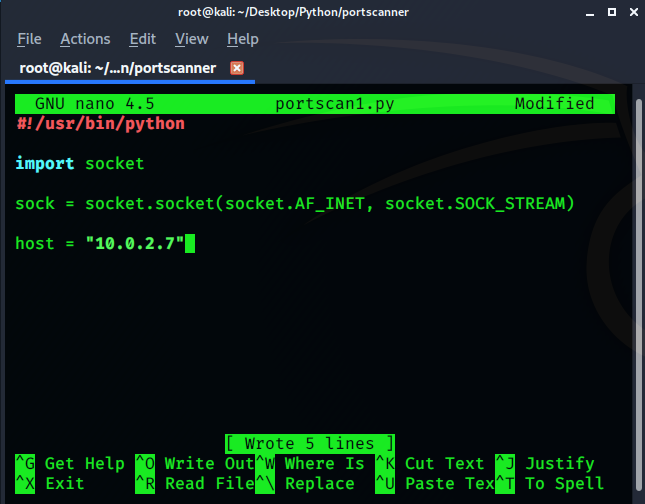
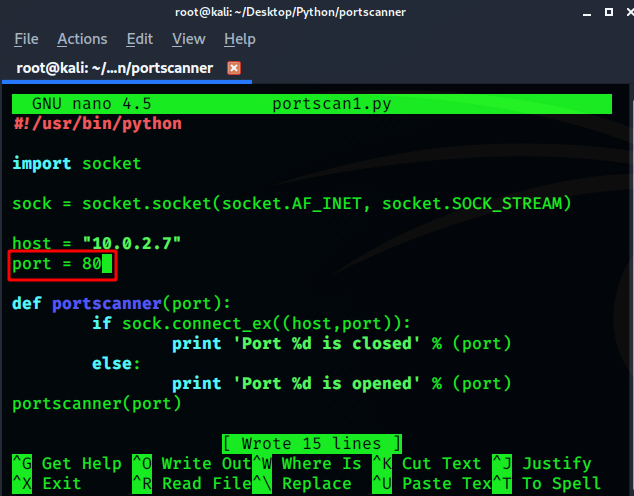
Так как мы можем это сделать? Разумеется, начнем мы с начала написания скрипта на языке программирования Python, записью: «#!/usr/bin/python»:

Первым делом импортируем библиотеку socket, для импорта функций соответственно.
Мы хотим создать объект сокета, а затем выполнить функцию, которая на самом деле будет подключаться к самому порту.
Таким образом, для создания объекта сокета может иметь немного хитрый синтаксис.
Поэтому обязательно следуйте за мной, вы можете называть его как угодно. В моем случае — это переменная «sock», и мы хотим сделать его объектом сокета.
Как нам это делать?
Мы просто после знака равенства, открываем и закрываем скобки, и внутри скобок вводим сокет, через точку и символ подчеркивания AF_INET, запятая сокет точка, socket.SOCK_STREAM:
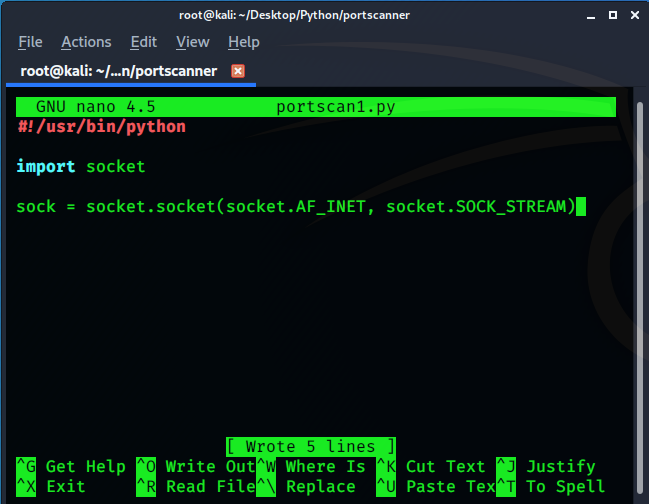
Вот так мы на самом деле определяем сам объект сокета, и мы фактически помещаем его в качестве значения для этой переменной SOCK.
Запись socket.AF_INET, обозначает IP адрес.
Таким образом, мы будем выполнять подключение к IP-адресу перед хостом, который является IP-адресом для него, а не IP-адресом 6.
Мы будем пытаться выполнить трехстороннее рукопожатие с каждым портом хоста.
Но сейчас давайте просто попробуем выполнить это только с одним портом, а затем посмотрим, как мы можем на самом деле сканировать несколько портов, а не только один.
Пишем далее код, и нам нужно ввести адрес хоста машины, которую будем сканировать на открытые порты.
Можем просто выбрать любой IP-адрес, который вы хотите, например, IP-адрес вашего текущего компьютера.
Таким образом, Вы можете сканировать себя или IP-адрес вашего фактического основного P.C. или Windows машину например.
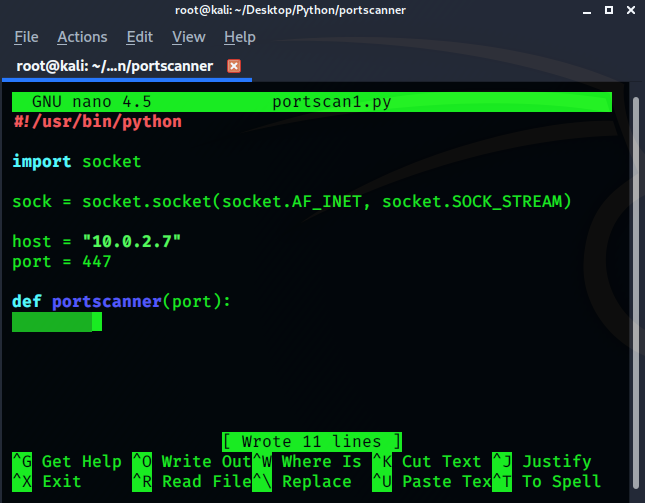
В моем случае, IP-адрес машины будет выглядеть как «10.0.2.7», а запись примет вид: host = „10.0.2.7“:
Нам нужно указать порт, поэтому давайте его пропишем например, порт 447, и, мы попытаемся выполнить функцию подключения к этому порту на этом хосте:

Напомню, что это самый простой сканер портов, который вы можете сделать и мы напишем более продвинутый.
Давайте попробуем подключиться, чтобы сделать это, нам нужно создать функцию def. Далее вводим в скобках порт.
Чтобы объявить функцию в Python, вам нужно использовать def перед ней. Тогда сканер портов — это имя функции, которую мы хотим создать, а порт — аргумент.
Теперь после этого все, что нужно сделать, это указать двоеточие, что в основном означает, что код ниже, будет частью самой функции:
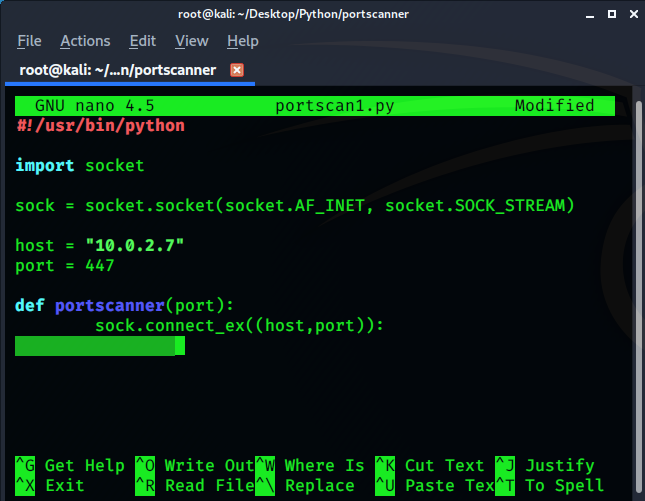
После этого нужно нажать на ввод, и применить табуляцию.
Если sock.connect_ соединяется с подчеркиванием ex через нижнее подчеркивание, а затем в sock.connect_ вы указываете двойное открытие
двойные закрытые скобки и внутри них вы указываете код: ((host,port)). Не забываем про двоеточие в конце строки:
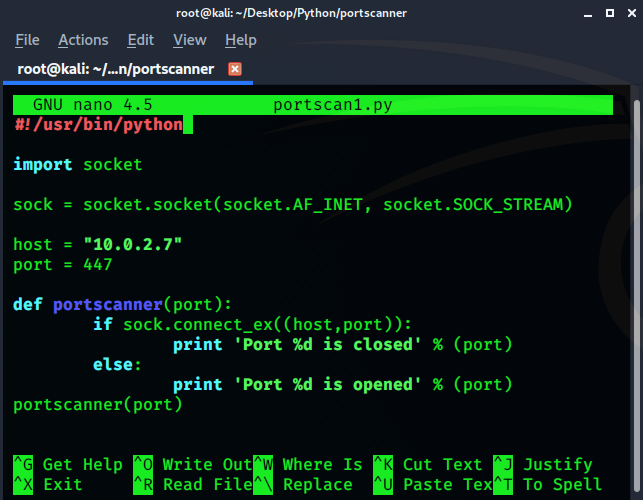
Далее нужно дописать код с условными операторами. Код будет выглядеть вот так: «if sock,connect__ex((host.port)):
print «Port %d is closed» % (port)
else:
print «Port %d is opened» % (port)»:
portscanner(port):
Так что это наш самый простой сканер портов.
Давайте протестируем нашу программу, предварительно задав параметры на выполнение:
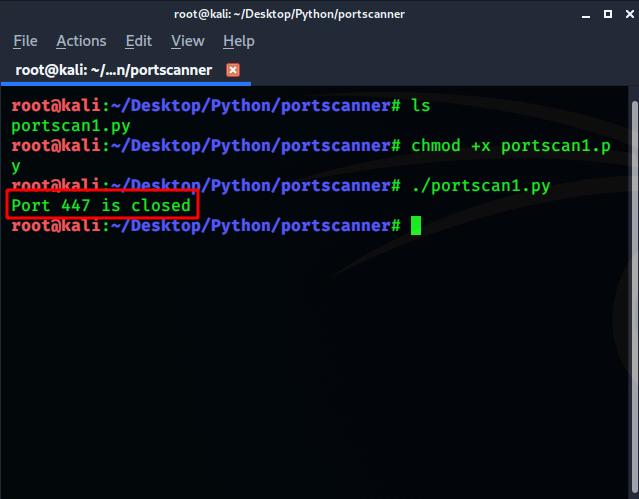
Как видим, программа сработала корректно.
Изменим значение порта, предварительно просканировав машину на Linux (Metasploitable2). Нас интересуют открытые порты:

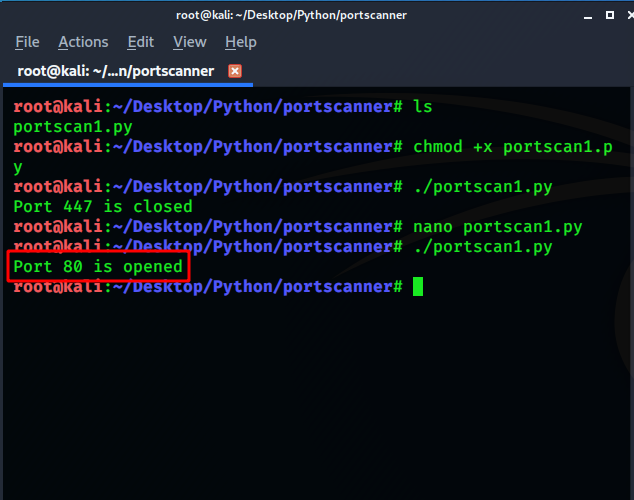
Видим, что выбор есть. Остановимся на 80 порту, и отредактируем это значение в коде:
Как видим порт 80 открыт, о чем нас уведомляет программа:
На этом все. Всем хорошего дня!
Читайте предыдущие статьи:
Первая часть: Этичный хакинг с Python.
Вторая часть: Этичный хакинг с Python.
Третья часть: Этичный хакинг с Python.
Четвертая часть: Этичный хакинг с Python.
Пятая часть. Этичный хакинг с Python.
Шестая часть. Этичный хакинг с Python.
Седьмая часть. Этичный хакинг с Python.

Существует множество различных сканеров портов, но настоящий тру хакер должен знать, как работают подобные инструменты. Так что в этой статье я покажу, как написать сканер портов на Python.
Еще по теме: Сканер уязвимостей из Nmap с помощью Vulscan
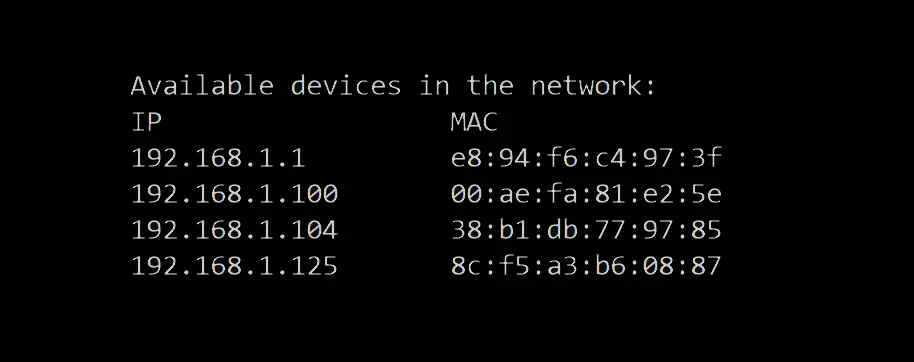
Взаимодействие устройств в сети
Для взаимодействие подключенных к сети устройств используются сокеты, которые легче изобразить ввиде трубы. Где концы трубы — это и есть наши сокеты. Один выход распологается на одном компе, другой — на другом, а приложения помещают или читают данные из этой «трубы».
Есть два вида сокетов:
- TCP-сокет гарантирует, что пакеты будут без потерь.
- UDP-сокеты работают на скорость, но с возможной потерей пакетов.
Кроме этого TCP можно сказать незащищенный, а UDP защишенный, но это не имеет значения в данном случае.
При передачи видеопотока испульзуется UDP. Если с каналом звязи будут какие-то временные проблемы, просто потеряются пакеты, а оставшиеся будут переданы в срок, и все равно будет хоть какая-то картинка .
Как написать сканер портов на Python на сокетах
Данный сканер портов — самый очевидный и простой. Чтобы определить, какие порты открыты, надо просто попытаться к ним поочередно подключиться и посмотреть результат.
Для этого примера будут использовать Python 3.10 и мой любимый PyCharm.
Создадим приложение и добавим основные модули:
|
import socket from datetime import datetime import sys |
Запоминаем время запуска приложения — в будущем это понадобится для определения времени сканирования.
Сохранят пары из названий сервисов и портов можно прямо в коде. Если будет желании можете улучшить данный метод, до файлов JSON.
|
ports = { 20: «FTP-DATA», 21: «FTP», 22: «SSH», 23: «Telnet», 25: «SMTP», 43: «WHOIS», 53: «DNS», 80: «http», 115: «SFTP», 123: «NTP», 143: «IMAP», 161: «SNMP», 179: «BGP», 443: «HTTPS», 445: «MICROSOFT-DS», 514: «SYSLOG», 515: «PRINTER», 993: «IMAPS», 995: «POP3S», 1080: «SOCKS», 1194: «OpenVPN», 1433: «SQL Server», 1723: «PPTP», 3128: «HTTP», 3268: «LDAP», 3306: «MySQL», 3389: «RDP», 5432: «PostgreSQL», 5900: «VNC», 8080: «Tomcat», 10000: «Webmin» } |
Преобразовываем переданный аргумент в IP-адрес. Для этого подсунем первый аргумент командной строки сканера портов функции
socket.gethostbyname(string) — как бонус получим разрешение DNS, если передан не IP-адрес, а доменное имя.
|
host_name = sys.argv[1] ip = socket.gethostbyname(host_name) |
Далее в цикле обходим все порты из списка и проверяем возможность подключения к ним. В случае если порт закрыт, будет вызвано исключение, которое мы перехватим, и приложение не вылетит.
В завершении сохраним время окончания отобразим время сканирования.
|
ends = datetime.now() print(«<Time:{}>».format(ends — start)) input(«Press Enter to the exit….») |
Теперь, для проверки работы сканера портов, открываем терминал, переходим в папку со сканером и выполняем команду:
|
python.exe socket.py 45.33.32.156 |
Если вы работаете на Linux, используйте команду python3, чтобы ненароком не нарваться на старую версию Python.
Разумеется, вместо IP-адреса можно указать любой хост.
Давайте посмотрим, как это выглядит со стороны сервера. Для этого заюзаем Netcat. Скачиваем и запускаем его таким образом:
Имейте ввиду. Антивирь будет ругаться на Netcat, так как его часто юзают хакеры для поднятия шелла на взломанных машинах.
В соседнем терминале запускаем сканер портов:
В другом в окне с Netcat произойдет это.

На скрине видно, что было установлено полноценное соединение, скрытое сканирование не получится.
Также давайте теперь попробуем просканировать сервер scanme.nmap.org:

Сканер портов выявил два открытых порта — 22 и 80. Но вам придет идет просканировать данный хост с помощью Nmap, вы увидите большее количество открытых портов.

Почему так происходит? Популярный Nmap проходит по большему списку портов, чем наш сканер портов на Python, и, поэтому, находит больше. Если добавить эти порты в наш сканер, он тоже их отыщет.
Понятно, что такой сканер вряд ли применим в реальных условиях, кроме совсем уж экзотических: например, когда сканировать надо с машины, на которую невозможно доставить полноценный сканер, но на которой уже есть Python.
Давайте лучше попробуем сделать сканер, который не станет так палиться и работать будет куда быстрее.
Оптимизация сканера портов на Python
Чтобы сделать наш сканер более эффективным и скрытным, нужно не устанавливать соединение, ведь это требует целых три пакета (трехэтапное рукопожатие) плюс дополнительное время, чтобы закрыть соединение. Но как узнать, открыт ли порт, не пытаясь подключиться?
Оказывается, метод есть. Заключается он в том, что необязательно завершать все три этапа рукопожатия — тогда соединение не будет установлено, а значит, не нужно будет и закрывать его.
Узнать, открыт ли порт, можно в ответе на первый же пакет, отправленный серверу, так что здорово сэкономите время, если искусственно делать неполное рукопожатие.
Бонусом получаем скрытность: если соединение не установлено, то программы на целевом хосте и не узнают, что их кто‑то сканирует.
Как работает трехэтапное рукопожатие? Сначала инициатор соединения отправляет другой машине на интересующий порт пакет с флагом SYN. Если порт открыт, должен прийти ответ с флагами SYN и ACK. Если порт закрыт, поведение может быть разным, но в нормальном случае в ответе должен быть флаг RST.
Если инициатор еще не раздумал открывать соединение, он должен отправить еще один пакет, но уже только с флагом ACK, после чего соединение будет считаться установленным.
Ключевой момент тут в том, что отправлять финальный ACK совершенно не обязательно, так как узнаем статус порта мы уже после второго пакета, а третий заберет у нас драгоценное время и лишит скрытности.
Чтобы закрыть соединение, нужно отправить пакет с флагами FIN и ACK. Эта информация нам сегодня не понадобится и нужна только для более полного понимания, что происходит с TCP-соединением на разных этапах его жизни.
SYN-сканер на Python
Создаем новый скрипт на Python и импортируем нужные модули:
|
from scapy.layers.inet import ICMP, IP, TCP, sr1 import socket from datetime import datetime |
Если вы получили ошибку вида:
|
ModuleNotFoundError: No module named ‘scapy’ |
Значит, нужно доустановить модуль scapy из PyPI:
В этот раз перед сканированием неплохо бы проверить, доступна ли целевая машина. Для этого можно отправить ICMP Echo Request (в простонародье — пинг):
|
start = datetime.now() # Здесь проверяется, в сети ли сервер def icmp_probe(ip): icmp_packet = IP(dst=ip) / ICMP() # Отправка и прием одного пакета resp_packet = sr1(icmp_packet, timeout=10) return resp_packet is not None |
Теперь напишем саму функцию сканирования. Она будет обходить все порты, слать SYN-пакеты и ожидать ответа.
|
def syn_scan(ip, ports): # Проходимся по каждому порту for port in ports: # Флаг S означает SYN-пакет syn_packet = IP(dst=ip) / TCP(dport=port, flags=«S») # Время ожидания пакета можно ставить свое resp_packet = sr1(syn_packet, timeout=10) if resp_packet is not None: if resp_packet.getlayer(‘TCP’).flags & 0x12 != 0: print(f«{ip}:{port} is open/{resp_packet.sprintf(‘%TCP.sport%’)}») ends = datetime.now() |
Порт будет считаться открытым, если в ответном пакете установлены флаги SYN и ACK (или хотя бы один из них).
Чтобы узнать, какой сервис соответствует какому порту, в этот раз мы не будем изобретать свой список, а воспользуемся готовым, который предоставляет сам Scapy. Можно использовать функцию
resp_packet.show(), в выводе которой указывается сервис, соответствующий целевому порту.
|
1 2 3 4 5 6 7 8 9 10 11 12 13 14 15 16 17 18 19 20 21 22 23 24 25 26 |
###[ IP ]### version = 4 ihl = 5 tos = 0x0 len = 44 id = 0 flags = DF frag = 0 ttl = 57 proto = tcp chksum = 0x71c4 src = ip_цели dst = ip_атакующего options ###[ TCP ]### sport = ssh dport = ftp_data seq = 986259409 ack = 1 dataofs = 6 reserved = 0 flags = SA window = 65535 chksum = 0x6d61 urgptr = 0 options = [(‘MSS’, 1436)] |
Осталось всего ничего: скормить функции список портов для проверки и реализовать ввод информации о цели. Этим и займется функция
main. В этот раз сделаем интерактивный ввод адреса цели и предварительную проверку доступности цели перед сканированием.
|
1 2 3 4 5 6 7 8 9 10 11 12 13 14 15 16 17 18 19 20 21 |
if __name__ == «__main__»: name = input(«Hostname / IP Address: «) # Узнаем IP цели ip = socket.gethostbyname(name) # Обозначаем порты для сканирования ports = [20, 21, 22, 23, 25, 43, 53, 80, 115, 123, 143, 161, 179, 443, 445, 514, 515, 993, 995, 1080, 1194, 1433, 1723, 3128, 3268, 3306, 3389, 5432, 5060, 5900, 8080, 10000] # Перехватываем исключения в момент, когда заканчивается кортеж try: # Если не удалось подключиться к серверу, выводим ошибку if icmp_probe(ip): syn_ack_packet = syn_scan(ip, ports) syn_ack_packet.show() else: print(«Failed to send ICMP packet») except AttributeError: print(«Scan completed!») print(«<Time:{}>».format(ends — start)) |
В массив
ports нужно записать порты, которые вы собираетесь сканировать. Необязательно перебирать все: даже Nmap по умолчанию сканирует только топ-1000 самых популярных, а остальные ускользают и от него, если явно не затребовать полное сканирование (
—p—).
На последней итерации цикла происходит ошибка (массив заканчивается), а значит, можно использовать это событие, чтобы сообщить о завершении работы.
Поскольку мы теперь запрашиваем адрес в самом скрипте, его можно запускать без всяких параметров.
Если снова открыть Netcat и просканировать его, то сканер покажет открытый порт, но никакого подключения не случится. Проверка на скрытность пройдена!
![]()
Полный код смотрите в репозитории на GitHub. Там есть и доработки, которые не были рассмотрены в статье, например графический интерфейс на PyQt.
Теперь давайте просканим какой‑нибудь публичный сервер (тот же scanme.nmap.org) и с помощью Wireshark посмотрим, какие пакеты ходят. Запустим Wireshark, а затем и сканирование.
Чтобы не запутаться и не утонуть в потоке информации, который извергает Wireshark, давайте применим фильтр. Достаточно будет показать пакеты, которые отправлены или получены от хоста с IP 45.33.32.156.
После применения фильтра окно Wireshark выглядит так.

Первым в списке видим ICMP-пакет (пинг), который отправлялся для проверки доступности. Дальше идут пакеты с флагами RST/ACK (закрытые порты) и SYN/ACK (открытые порты).
Заключение
В статье рассмотрели два метода сканирования: с установлением соединения и без него. За рамками статьи осталось сканирование портов UDP, так как оно намного сложнее и нужно реже. Тем не менее Scapy позволит реализовать и его, если вам это вдруг понадобится.
Не забывайте, что подобные программы — это в первую очередь опыт, а не замена готовым инструментам. Именно знание того, как все устроено внутри, делает вас настоящим тру хакером!
РЕКОМЕНДУЕМ:
- Обзор топовых сканеров уязвимостей
- Создание сканера Wi-Fi сетей на Python и Scapy
·
8 min read
· Updated
jul 2022
· Ethical Hacking
Port scanning is a scanning method for determining which ports on a network device are open, whether it’s a server, a router, or a regular machine. A port scanner is just a script or a program that is designed to probe a host for open ports.
In this tutorial, you will be able to make your own port scanner in Python using the socket library. The basic idea behind this simple port scanner is to try to connect to a specific host (website, server, or any device connected to the Internet/network) through a list of ports. If a successful connection has been established, that means the port is open.
For instance, when you loaded this web page, you made a connection to this website on port 80. Similarly, this script will try to connect to a host but on multiple ports. These kinds of tools are useful for hackers and penetration testers, so don’t use this tool on a host that you don’t have permission to test!
Table of content:
- Simple Port Scanner
- Fast (Threaded) Port Scanner
- Conclusion
GET: Build 24 Ethical Hacking Scripts & Tools with Python EBook
Optionally, you need to install colorama module for printing in colors:
pip3 install coloramaSimple Port Scanner
First, let’s start by making a simple port scanner. Let’s import the socket module:
import socket # for connecting
from colorama import init, Fore

# some colors
init()
GREEN = Fore.GREEN
RESET = Fore.RESET
GRAY = Fore.LIGHTBLACK_EX
Note: socket module is already installed on your machine, it is a built-in module in the Python standard library, so you don’t have to install anything.
The socket module provides us with socket operations, functions for network-related tasks, etc. They are widely used on the Internet, as they are behind any connection to any network. Any network communication goes through a socket. More details are in the official Python documentation.
We will use colorama here just for printing in green colors whenever a port is open, and gray when it is closed.
Let’s define the function that is responsible for determining whether a port is open:
def is_port_open(host, port):
    """
    determine whether `host` has the `port` open
    """
    # creates a new socket
    s = socket.socket()
    try:
        # tries to connect to host using that port
        s.connect((host, port))
        # make timeout if you want it a little faster ( less accuracy )
        # s.settimeout(0.2)
    except:
        # cannot connect, port is closed
        # return false
        return False
    else:
        # the connection was established, port is open!
        return True
s.connect((host, port)) function tries to connect the socket to a remote address using the (host, port) tuple, it will raise an exception when it fails to connect to that host, that is why we have wrapped that line of code into a try-except block, so whenever an exception is raised, that’s an indication for us that the port is actually closed, otherwise it is open.
Now let’s use the above function and iterate over a range of ports:
# get the host from the user
host = input("Enter the host:")
# iterate over ports, from 1 to 1024
for port in range(1, 1025):
    if is_port_open(host, port):
        print(f"{GREEN}[+] {host}:{port} is open      {RESET}")
    else:
        print(f"{GRAY}[!] {host}:{port} is closed    {RESET}", end="r")
The above code will scan ports ranging from 1 all the way to 1024, you can change the range to 65535 if you want, but that will take longer to finish.
When you try to run it, you’ll immediately notice that the script is quite slow. Well, we can get away with that if we set a timeout of 200 milliseconds or so (using settimeout(0.2) method). However, this actually can reduce the accuracy of the reconnaissance, especially when your latency is quite high. As a result, we need a better way to accelerate this.
Read also: How to Use Shodan API in Python.
Fast (Threaded) Port Scanner
Now let’s take our simple port scanner to a higher level. In this section, we’ll write a threaded port scanner that can scan 200 or more ports simultaneously.
The below code is actually the same function we saw previously, which is responsible for scanning a single port. Since we’re using threads, we need to use a lock so only one thread can print at a time. Otherwise, the output will be messed up, and we won’t read anything useful:
import argparse
import socket # for connecting
from colorama import init, Fore
from threading import Thread, Lock
from queue import Queue

# some colors
init()
GREEN = Fore.GREEN
RESET = Fore.RESET
GRAY = Fore.LIGHTBLACK_EX

# number of threads, feel free to tune this parameter as you wish
N_THREADS = 200
# thread queue
q = Queue()
print_lock = Lock()

def port_scan(port):
    """
    Scan a port on the global variable `host`
    """
    try:
        s = socket.socket()
        s.connect((host, port))
    except:
        with print_lock:
            print(f"{GRAY}{host:15}:{port:5} is closed  {RESET}", end='r')
    else:
        with print_lock:
            print(f"{GREEN}{host:15}:{port:5} is open    {RESET}")
    finally:
        s.close()
So this time, the function doesn’t return anything; we just want to print whether the port is open (feel free to change it, though).
We used Queue() class from the built-in queue module that will help us with consuming ports, the two below functions are for producing and filling up the queue with port numbers and using threads to consume them:
def scan_thread():
    global q
    while True:
        # get the port number from the queue
        worker = q.get()
        # scan that port number
        port_scan(worker)
        # tells the queue that the scanning for that port
        # is done
        q.task_done()


def main(host, ports):
    global q
    for t in range(N_THREADS):
        # for each thread, start it
        t = Thread(target=scan_thread)
        # when we set daemon to true, that thread will end when the main thread ends
        t.daemon = True
        # start the daemon thread
        t.start()
    for worker in ports:
        # for each port, put that port into the queue
        # to start scanning
        q.put(worker)
    # wait the threads ( port scanners ) to finish
    q.join()
Related: Ethical Hacking with Python EBook
The job of the scan_thread() function is to get port numbers from the queue and scan it, and then add it to the done tasks, whereas main() function is responsible for filling up the queue with the port numbers and spawning N_THREADS threads to consume them.
Note the q.get() will block until a single item is available in the queue. q.put() puts a single item into the queue and q.join() waits for all daemon threads to finish (clearing the queue).
Finally, let’s make a simple argument parser so we can pass the host and port numbers range from the command line:
if __name__ == "__main__":
    # parse some parameters passed
    parser = argparse.ArgumentParser(description="Simple port scanner")
    parser.add_argument("host", help="Host to scan.")
    parser.add_argument("--ports", "-p", dest="port_range", default="1-65535", help="Port range to scan, default is 1-65535 (all ports)")
    args = parser.parse_args()
    host, port_range = args.host, args.port_range

    start_port, end_port = port_range.split("-")
    start_port, end_port = int(start_port), int(end_port)

    ports = [ p for p in range(start_port, end_port)]

    main(host, ports)
Here is a screenshot of when I tried to scan my home router: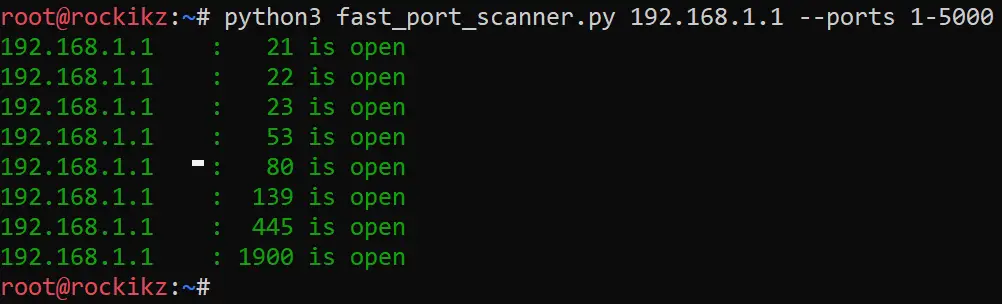
Conclusion
Awesome! It finished scanning 5000 ports in less than 2 seconds! You can use the default range (1 to 65535), which will take a few seconds to finish.
If you see your scanner is freezing on a single port, that’s a sign you need to decrease your number of threads. If the server you’re probing has a high ping, you should reduce N_THREADS to 100, 50, or even lower, try to experiment with this parameter.
Port scanning proves to be useful in many cases. An authorized penetration tester can use this tool to see which ports are open and reveal the presence of potential security devices such as firewalls, as well as test the network security and the strength of a device.
It is also a popular reconnaissance tool for hackers that are seeking weak points to gain access to the target machine.
Most penetration testers often use Nmap to scan ports, as it does not just provide port scanning, but shows services and operating systems that are running, and much more advanced techniques.
In our Ethical Hacking with Python EBook, we’ve built a port scanner with Nmap along with other 23 hacking tools & scripts. Make sure to check it out here if you’re interested!
You can check the full version of both scripts here.
Disclaimer: Note that this script is intended for individuals to test on their devices and learn Python. I will take no responsibility if it is misused.
Learn Also: How to Brute Force FTP Servers in Python.
Happy Scanning ♥
View Full Code
Read Also
Comment panel
Improve Article
Save Article
Improve Article
Save Article
In this article, we will learn how to program a port scanner using the ‘nmap‘ module in Python. The program will take a range of port numbers as input and print the state (open or closed) of all the ports in that range.
Nmap: Nmap is a free and open-source network scanning tool. To run the program discussed in this article, you will need to have ‘nmap’ tool installed in your system. If it is not installed, visit Nmap download page.
Modules used
We will be using the ‘python-nmap‘ module to achieve this task. Install the package (if not already installed) by the following command –
pip install python-nmap
Note: Doing ‘nmap’ scans on a target without proper permission and authority is illegal. Use localhost (127.0.0.1) as your target
Example:
import nmap
begin = 75
end = 80
target = '127.0.0.1'
scanner = nmap.PortScanner()
for i in range(begin,end+1):
res = scanner.scan(target,str(i))
res = res['scan'][target]['tcp'][i]['state']
print(f'port {i} is {res}.')
Output:
port 75 is closed.
port 76 is closed.
port 77 is closed.
port 78 is closed.
port 79 is closed.
port 80 is open.
Note: The output can vary depending on the present status of the ports.
Can you code for windows in c/c++ if so, continue reading, as we are going to code a basic windows port scanner in the c/c++ language. This is a command line port scanner tool made from source (c++).

So, why building a port scanner? and why in c?
As the nature or this site, open port, we are into port checker, and port scanning so why not understanding deeper this field by developing a small basic open port scanner for the windows operation system.
If we simplify the subject we need to code a small piece of code that can check one port at the time and then we can loop it with a list of ports that we want to check, slow? yes, not elegant? yes, but will do the job Yes!
Once we have this piece of code we can build on top of it something more elegant that use threads to check more then one port at the time as an example.
We can also use more then one method to check if port is open, it will be more advanced port scanner but we can use the Winpcap library to add more scan methods, like the SYN scan, I may do this scanner upgrade in another post.
Why C/C++?
C/C++ is a great language and I love developing all kind of tools using this language, it also support deeper option as if we want to change this tool to a more advanced port scanner c/c++ is my chosen language, if you need to dive deep into the system internal or deeper into drivers this is your language..
Yes, we are going to develop a windows port scanner using windows sockets for IPv4, its a connect() base port scanner, this will be a free port scanner that you can use, change and give.
It will be base on a console application, aka command line tool that you can run against a remoter host to check what ports are open on that host.
Port scanner tool commands:
The Port scanner tool will handle the following parameters from the command line:
- -h host : the target host we want to check its ports.
- -p [port, port range]: the ports that we want to check on the target host.
- -v : verbose more, show more information.
- -?: show this help.
As a base rule only the -h (target host) is a mandatory field, we will have a list of defaults port to scan, in a case that we do not get port or ports to check as a parameter to the tool.
Here is an example of open port, using the tool:

So what is advanced port scanner?
Advanced port scanner will have to support more scanning methods, like mentioned above, for example a half connection test, also known as SYN scan, where we only send the first packet and base on the replay we can say if the port is open or not.
Multi threader scanner, for fast performance, can also be use to scan full subnet – range of IP addresses.
Lets do some code!
Here is the function that do the test, it get an IP address and a port number.
The bold line is the connect method that try to connect to the port, if mange port is open..
BOOL PortScannerFunc(char *ip, unsigned int port)
{
char cMsg[1024]={0};
SOCKET sock;

int iResult;
sockaddr_in clientService;
memset(&clientService,0x00,sizeof(clientService));
clientService.sin_family = AF_INET;
clientService.sin_addr.s_addr = inet_addr(ip);

sock = INVALID_SOCKET;
sock = socket (AF_INET, SOCK_STREAM, IPPROTO_TCP);
if(sock == INVALID_SOCKET)
{
printf("Socket return error, code: %dn",WSAGetLastError());
closesocket(sock);
return FALSE;
}

if(g_pTarget->verbus == 1)
printf("Checking port %ld: ",port);
clientService.sin_port = htons(port);
iResult = connect(sock, (SOCKADDR *) & clientService, sizeof (clientService));
if (iResult != SOCKET_ERROR)
{
printf(" Found Open Port: %ld (",port);
ShowPortNumberInfo(port);
printf(")n");

}
else
{
if(g_pTarget->verbus == 1)
printf(" closed!n");
}

return TRUE;
}
Download the full tool code here (c/c++):
WindowsPortScannerSrc (1155 downloads)
Here is the tool help screen:

FreePortScanner - A small command line port scanner, with source code in c.
How To Use:
FreePortScanner -h <host> -p [port, port range] -v
Options:
-h <host>: the target host we want to check its ports.
-p [port, port range]: the ports that we want to check on the target host.
-v: verbose more, show more information.
-?: show this help.
Example:
FreePortScanner -h openport.net -p 80-500
Will scan from port 80 to port 500 on the openport.net web site.
Page on site: https://openport.net/windows-port-scanner/
Coded for and by the OpenPort.net team.
Copyright (c) 2018 by OpenPort.net, All rights reserved.
Disclaimer:
The software is provided “AS IS” without any warranty,
either expressed or implied, including, but not limited to,
the implied warranties of merchantability and fitness for a particular
purpose. The author will not be liable for any special, incidental,
consequential or indirect damages due to loss of data or any other reason.
License:
This utility is released as freeware. You are allowed to freely distribute
this utility via floppy disk, DVD/CD-ROM, USB Devices, Internet, or in any
other way, as long as you don’t charge anything for this. If you distribute
this utility, you must include all files in the distribution package,
without any modification!
Source Code:
In addition to the above, in the source code section you are allow to freely
do what ever you want with the code, as long as you drop a line for the
OpenPort.net in your code and/or credits page.
This program is free software: you can redistribute it and/or modify
it under the terms of the GNU General Public License as published by
the Free Software Foundation, either version 3 of the License, or
(at your option) any later version.
This program is distributed in the hope that it will be useful,
but WITHOUT ANY WARRANTY; without even the implied warranty of
MERCHANTABILITY or FITNESS FOR A PARTICULAR PURPOSE. See the
GNU General Public License for more details.
You should have received a copy of the GNU General Public License
along with this program. If not, see <https://www.gnu.org/licenses/>.
Compile and build using Visual Studio:
I am using visual studio version 2015 for the development of this tool, here are the steps to create a console application add the code to it compile it and run the Free Port Scanner tool.
Please do the following:
- Open visual studio.
- Press File->New-Project and press enter.
- Under Templates->Visual C++ -> Windows>Win32 (In the New Project dialog).
- Select Win32 Console Application.
- In the name enter: FreePortScanner ( you can also set your project folder).
- Verify that Create Directory for the solution is selected.
- Now press OK.
- Press Next and select the Empty Project.
- And press Finish.
In Visual Studio Project Window do the following:
- Press on solution.
- Expend the FreePortScanner->Source Files
- Right Click on Source File -> Add.
- Here you have 2 options:
- 1 add new item, select cpp set the name to FreePortScanner and press add.
- 2 add existing item and navigate to the file you downloaded from this site (source)
- If you chose option1, to add an item, copy the code from this site and paste it into the new file.
- Press Build->Rebuild Solution in the top menu.
- If all pass well you will have an exe file that you can run.
You need to open the command line, navigate to the debug folder and run the tool.
- Right click on the solution name
- Select open folder in file explorer.
- Go one folder up and enter debug folder.
- Select and copy the folder location
- Press Windows +R
- Write CMD and press enter.
- Type cd <debug folder name> use right click paste and press enter.
- Type FreePortScanner -? and press enter to show the tool help.
- To run a scan use FreePortScanner -h <host name>
Where to go from here:
You can start by coding the functionality that I write about under advanced port scanner.
It is also possible to create a nice to use GUI for the tool.