LONG WINAPI ScreenSaverProc(HWND hWnd, UINT message, WPARAM wParam, LPARAM lParam)
{
//Определяем необходимые переменные
static HDC hDC;
static HPEN hPen;
static UINT timer_id;
static RECT rect;
static PAINTSTRUCT ps = {0};
//Предвычисленные массивы для хранения значений sin/cos
static double s[360], c[360];
//Массивы для хранения оригинальных координат линий и координат после поворота
static double lO[12][2][4], lR[12][2][4];
//Размер куба
static int side_size = 500;
//Координаты центра куба
static int xCenter = 0, yCenter = 0, zCenter = 0;
//Углы поворота
static int theta = 0, phi = 0;
static int thetaRot = 2, phiRot = 2;
//Массивы для хранения координат ребер куба
static double scrX[12][2], scrY[12][2];
static int i;
switch(message)
{
case WM_CREATE:
//Загружаем настройки в структуру
LoadSaveSettings(FALSE);
//Задаем цвет и толщину линий куба
hPen = CreatePen(PS_SOLID, 5, RGB(scr_settings.r, scr_settings.g, scr_settings.b));
//Вычисляем центры проекции куба на основе разрешения экрана
xCenter = GetSystemMetrics (SM_CXSCREEN) / 2;
yCenter = GetSystemMetrics (SM_CYSCREEN) / 2;
zCenter = xCenter + yCenter — 4;
//Задаем область, которую в дальнейшем будем перерисовывать
rect.left = xCenter — side_size;
rect.top = yCenter — side_size;
rect.right = xCenter + side_size;
rect.bottom = yCenter + side_size;
//Вычисляем значения sin и cos
for(i = 0; i < 360; i++)
{
s[i] = sin(i * (M_PI / 180));
c[i] = cos(i * (M_PI / 180));
}
//Задаем координаты ребер куба
lO[0][0][0] = —side_size; lO[0][0][1] = side_size; lO[0][0][2] = side_size;
lO[0][1][0] = side_size; lO[0][1][1] = side_size; lO[0][1][2] = side_size;
lO[1][0][0] = side_size; lO[1][0][1] = —side_size; lO[1][0][2] = side_size;
lO[1][1][0] = side_size; lO[1][1][1] = side_size; lO[1][1][2] = side_size;
lO[2][0][0] = side_size; lO[2][0][1] = side_size; lO[2][0][2] = —side_size;
lO[2][1][0] = side_size; lO[2][1][1] = side_size; lO[2][1][2] = side_size;
lO[3][0][0] = —side_size; lO[3][0][1] = —side_size; lO[3][0][2] = side_size;
lO[3][1][0] = —side_size; lO[3][1][1] = side_size; lO[3][1][2] = side_size;
lO[4][0][0] = —side_size; lO[4][0][1] = side_size; lO[4][0][2] = —side_size;
lO[4][1][0] = —side_size; lO[4][1][1] = side_size; lO[4][1][2] = side_size;
lO[5][0][0] = —side_size; lO[5][0][1] = —side_size; lO[5][0][2] = side_size;
lO[5][1][0] = side_size; lO[5][1][1] = —side_size; lO[5][1][2] = side_size;
lO[6][0][0] = —side_size; lO[6][0][1] = side_size; lO[6][0][2] = —side_size;
lO[6][1][0] = side_size; lO[6][1][1] = side_size; lO[6][1][2] = —side_size;
lO[7][0][0] = —side_size; lO[7][0][1] = —side_size; lO[7][0][2] = —side_size;
lO[7][1][0] = side_size; lO[7][1][1] = —side_size; lO[7][1][2] = —side_size;
lO[8][0][0] = —side_size; lO[8][0][1] = —side_size; lO[8][0][2] = —side_size;
lO[8][1][0] = —side_size; lO[8][1][1] = side_size; lO[8][1][2] = —side_size;
lO[9][0][0] = side_size; lO[9][0][1] = —side_size; lO[9][0][2] = —side_size;
lO[9][1][0] = side_size; lO[9][1][1] = —side_size; lO[9][1][2] = side_size;
lO[10][0][0] = side_size; lO[10][0][1] = —side_size; lO[10][0][2] = —side_size;
lO[10][1][0] = side_size; lO[10][1][1] = side_size; lO[10][1][2] = —side_size;
lO[11][0][0] = —side_size; lO[11][0][1] = —side_size; lO[11][0][2] = —side_size;
lO[11][1][0] = —side_size; lO[11][1][1] = —side_size; lO[11][1][2] = side_size;
//Запускаем таймер, по которому будет перерисовываться куб
timer_id = SetTimer(hWnd, 1, 500 — 5 * scr_settings.pos + 1, NULL);
break;
case WM_DESTROY:
//При закрытии окна скринсейвера останавливаем таймер и удаляем созданный объект
if(timer_id)
KillTimer(hWnd, timer_id);
if(hPen)
DeleteObject(hPen);
//Сообщаем системе о том, что текущий поток сделал запрос на прекращение работы
PostQuitMessage(0);
break;
case WM_TIMER:
//Вычисляем координаты ребер куба
for(i = 0; i < 12; i++)
{
lR[i][0][0] = —lO[i][0][0] * s[theta] + lO[i][0][1] * c[theta];
lR[i][0][1] = —lO[i][0][0] * c[theta] * s[phi] — lO[i][0][1] * s[theta] * s[phi] — lO[i][0][2] * c[phi] + 1;
lR[i][0][2] = —lO[i][0][0] * c[theta] * c[phi] — lO[i][0][1] * s[theta] * c[phi] + lO[i][0][2] * s[phi];
lR[i][1][0] = —lO[i][1][0] * s[theta] + lO[i][1][1] * c[theta];
lR[i][1][1] = —lO[i][1][0] * c[theta] * s[phi] — lO[i][1][1] * s[theta] * s[phi] — lO[i][1][2] * c[phi] + 1;
lR[i][1][2] = —lO[i][1][0] * c[theta] * c[phi] — lO[i][1][1] * s[theta] * c[phi] + lO[i][1][2] * s[phi];
if(lR[i][0][2] + zCenter > 0 || lR[i][0][2] + zCenter < 0)
{
scrX[i][0] = 256 * (lR[i][0][0] / (lR[i][0][2] + zCenter)) + xCenter;
scrY[i][0] = 256 * (lR[i][0][1] / (lR[i][0][2] + zCenter)) + yCenter;
}
if(lR[i][1][2] + zCenter > 0 || lR[i][1][2] + zCenter < 0)
{
scrX[i][1] = 256 * (lR[i][1][0] / (lR[i][1][2] + zCenter)) + xCenter;
scrY[i][1] = 256 * (lR[i][1][1] / (lR[i][1][2] + zCenter)) + yCenter;
}
}
//Помечаем область, содержащую куб, как требующую перерисовки
InvalidateRect(hWnd, &rect, TRUE);
break;
case WM_PAINT:
//Вызываем функцию, подготавливающую окно к выводу графической информации
hDC = BeginPaint(hWnd, &ps);
//fChildPreview — глобальная переменная, показывающая смотрим мы превью или полноэкранную версию скринсейвера
if(!fChildPreview)
{
//Выбираем перо, которое будет использоваться для рисования куба
SelectObject(hDC, hPen);
//Рисуем ребра куба
for(i = 0; i < 12; i++)
{
MoveToEx(hDC, (int)scrX[i][0], (int)scrY[i][0], NULL);
LineTo(hDC, (int)scrX[i][1], (int)scrY[i][1]);
}
theta = (theta + thetaRot) % 360;
phi = (phi + phiRot) % 360;
}
else
{
//Выводим текст с описанием скринсейвера
SetBkColor(hDC, RGB(0, 0, 0));
SetTextColor(hDC, RGB(0, 255, 0));
TextOut(hDC, 35, 30, scr_name, strlen(scr_name));
TextOut(hDC, 50, 50, scr_auth, strlen(scr_auth));
}
//Завершаем рисование в окне
EndPaint(hWnd, &ps);
break;
default:
return DefScreenSaverProc(hWnd, message, wParam, lParam);
}
return 0;
}
Приветствую всех! Многие из вас, да и я в том числе пользуюсь заставками на своем компьютере, их такое множество, и не которые из них действительно требуют хороших навыков программирования. Сегодня я покажу пример который позволит вам с легкостью написать свой собственный скринсейвер. Для начала нам необходимо придумать что мы будет отображать можно использовать картинку или анимацию, возможно так же вам потребуется какая нибудь фоновая музыка. Я не долго думая в поисковике нашел гифвку водопада, а так же скачать соответствующую фоновую музыку. На этом наша предварительная работа закончена.
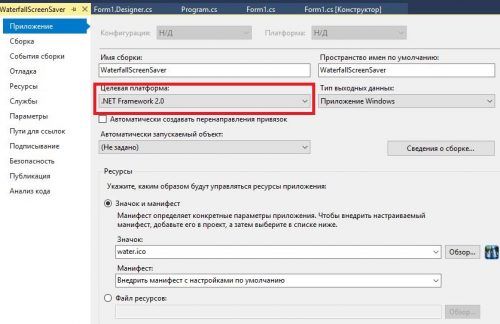
Приступаем части по написанию кода. А именно нам необходимо создать проект winform приложение и в свойствах проекта указать целевую платформу .Net Framework 2.0
Далее нам необходимо на форме в конструкторе разместить PictureBox размер и прочие настройки нас пока не особо беспокоят. Теперь нажмите два раза по форме, что бы создалась событие Form1_Load.
Далее приступаем к уже написанию кода.
|
1 2 3 4 5 6 7 8 9 10 11 12 13 14 15 16 17 18 19 20 21 22 23 24 25 26 27 28 29 30 31 32 33 34 35 36 37 38 39 40 41 42 43 44 45 46 47 48 49 50 51 52 53 54 55 |
using System; using System.Drawing; using System.Media; using System.Windows.Forms; using WaterfallScreenSaver.Properties; namespace WaterfallScreenSaver { public partial class Form1 : Form { private Point MouseXY; private int ScreenNumber; SoundPlayer simpleSound; public Form1(int scrn) { InitializeComponent(); this.FormBorderStyle = FormBorderStyle.None; //Убираем рамку вокруг формы pictureBox1.Dock = DockStyle.Fill; //заполняем размером по всей форме ScreenNumber = scrn;//это пригодится если у вас заставка будет иметь какие либо параметры } private void Form1_Load(object sender, EventArgs e) { this.Bounds = Screen.AllScreens[ScreenNumber].Bounds; //размер во весь экран Cursor.Hide(); //прячем курсор TopMost = true; //отображаем форму поверх других simpleSound = new SoundPlayer(Resources.zvuk); //загрузка звука simpleSound.Play(); //воспроизведение звука } private void OnMouseEvent(object sender, System.Windows.Forms.MouseEventArgs e) { if (!MouseXY.IsEmpty) //вслучаи событий на мышь закрываем форму и приложение { if (MouseXY != new Point(e.X, e.Y)) { Close(); simpleSound.Stop(); //останавливаем звук } if (e.Clicks > 0) { Close(); simpleSound.Stop(); } } MouseXY = new Point(e.X, e.Y); } } } |
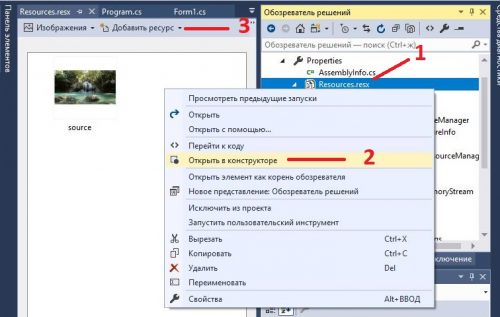
В общем то это и есть основной код, я постарался и за комментировал почти все, однако хочу акцентировать внимание на методе OnMouseEvent который связан с событиями PictureBox, его необходимо привязать к событию на MouseClick и MouseMove MouseDown это все необходимо что бы выйти из запущенного скринсейвера. Так же вам необходимо добавь изображение и музыку в папку ресурсы. Сделать это можно как показано ниже:
Теперь нам необходимо перейти в фаил Program.cs и заменить код на следующий:
|
1 2 3 4 5 6 7 8 9 10 11 12 13 14 15 16 17 18 19 20 21 22 23 24 25 26 27 28 29 30 31 32 33 34 35 |
using System; using System.Windows.Forms; namespace WaterfallScreenSaver { static class Program { /// <summary> /// Главная точка входа для приложения. /// </summary> [STAThread] static void Main(string[] args) { if (args.Length > 0) { if (args[0].ToLower().Trim().Substring(0, 2) == «/c») { MessageBox.Show(«Эта заставка не имеет опций, которые вы можете установить.», «.NET Screen Saver», MessageBoxButtons.OK, MessageBoxIcon.Exclamation); } else if (args[0].ToLower() == «/s») { for (int i = Screen.AllScreens.GetLowerBound(0); i <= Screen.AllScreens.GetUpperBound(0); i++) System.Windows.Forms.Application.Run(new Form1(i)); } } else { for (int i = Screen.AllScreens.GetLowerBound(0); i <= Screen.AllScreens.GetUpperBound(0); i++) System.Windows.Forms.Application.Run(new Form1(i)); } } } } |
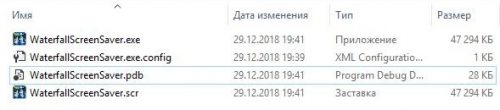
Теперь нам необходимо собрать весь проект и врезультате мы получим приложение .EXE В котором необходимо изменить расширение на .scr
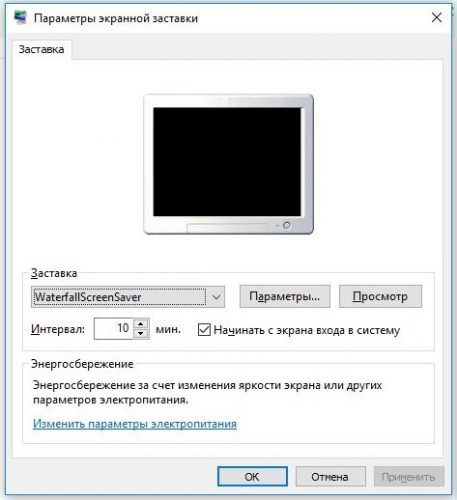
Теперь дело за малым, необходимо перенести этот фаил в папку WindowsSystem32

Все готовы, осталось выбрать свою заставку и посмотреть, что же у нас получилось 🙂

Вот, что в итоге у меня вышло, делитесь своими работами, будет интересно 🙂 Мою работу вы можете скачать ниже:
![]()
Время на прочтение
10 мин
Количество просмотров 3.2K
Предисловие
Этот материал никоим образом не призывает читателя к написанию скринсейверов, а предназначается, прежде всего, для обзора некоторых возможностей библиотеки wxWidgets. Тем, кто еще не знаком с wxWidgets, но хочет узнать больше, можно почитать статьи на CodeProject.com (эту и эту)
Мозг – это то, что нам нужно
Итак, о том, как собрать wxWidgets и о том, как создать приложение с использованием этой библиотеки я уже писал неоднократно, поэтому начнем сразу с примера. Для начала нам необходимо минимальное приложение с одной формой. Это будет скелет для создания скринсейвера.
Изобретать велосипед мы сегодня также не будем, а возьмем в качестве иллюстрации простейший скринсейвер с бегущими символами а-ля Matrix.
Основным объектам, который отображается на экране, у нас является символ. Каждый символ характеризуется следующими параметрами:
- Координаты
- Отображаемое значение
- Скорость перемещения
- Цвет
Для хранения информации о символе создадим такой класс:
- class MatrixSymbol
- {
- wxPoint m_Position;
- wxChar m_Symbol;
- int m_Speed;
- wxColour m_Colour;
- public:
- MatrixSymbol()
- : m_Position(wxDefaultPosition), m_Symbol(wxT('0')),
- m_Speed(1), m_Colour(*wxGREEN) {}
- MatrixSymbol(const wxPoint & position, wxChar symbol,
- int speed, const wxColour & colour)
- : m_Position(position), m_Symbol(symbol),
- m_Speed(speed), m_Colour(colour) {}
- const wxPoint & GetPosition() {return m_Position;}
- void SetPosition(const wxPoint & value) {m_Position = value;}
- wxChar GetSymbol() {return m_Symbol;}
- void SetSymbol(wxChar value) {m_Symbol = value;}
- int GetSpeed() {return m_Speed;}
- void SetSpeed(int value) {m_Speed = value;}
- const wxColour & GetColour() {return m_Colour;}
- void SetColour(const wxColour & value) {m_Colour = value;}
- };
* This source code was highlighted with Source Code Highlighter.
Таких символов у нас на экране должно быть много и, соответственно, для хранения всего этого добра нам необходим массив:
- #include <wx/dynarray.h>
- ...
- WX_DECLARE_OBJARRAY(MatrixSymbol, MatrixSymbolArray);
- ...
- #include <wx/arrimpl.cpp>
- WX_DEFINE_OBJARRAY(MatrixSymbolArray);
* This source code was highlighted with Source Code Highlighter.
Лепим графический интерфейс
Отлично, подготовительный этап мы закончили, теперь можно приступать к реализации графического интерфейса.
Создадим новый компонент, унаследованный от wxWindow, и добавим в него в виде переменной-члена класса массив объектов MatrixSymbol, а также метод, инициализирующий этот массив значениями:
- class MatrixCanvas: public wxWindow
- {
- ...
- void InitMatrix();
- ...
- MatrixSymbolArray m_Symbols;
- ...
- };
- void MatrixCanvas::InitMatrix()
- {
- int width(0), height(0);
- int sw(0), sh(0);
- GetTextExtent(wxT("0"), &sw, &sh);
- GetClientSize(&width, &height);
- m_Symbols.Clear();
- for(int x = 0; x < width; x += sw+2)
- {
- m_Symbols.Add(MatrixSymbol(
- wxPoint(x, 0),
- rand()%2 ? wxT('0') : wxT('1'),
- 3+rand()%5,
- wxColour(0, rand()%200+56, 0)));
- }
- }
* This source code was highlighted with Source Code Highlighter.
Что у нас делает метод InitMatrix()? В зависимости от размеров клиентской области компонента в массив добавляется некоторое количество объектов MatrixSymbol со случайными координатами, отображаемым значением «0» или «1», и различными цветами (выбирается случайная градация зеленого).
Теперь нам нужно обеспечить отображение символов на экране. Для этого создадим обработчики событий wxEVT_PAINT и wxEVT_ERASE_BACKGROUND.
- BEGIN_EVENT_TABLE( MatrixCanvas, wxWindow )
- EVT_PAINT( MatrixCanvas::OnPaint )
- EVT_ERASE_BACKGROUND( MatrixCanvas::OnEraseBackground )
- END_EVENT_TABLE()
- void MatrixCanvas::OnPaint( wxPaintEvent& event )
- {
- wxBufferedPaintDC dc(this);
- dc.SetBackground(wxBrush(GetBackgroundColour()));
- dc.Clear();
- wxFont font = GetFont();
- #if defined(__WXWINCE__)
- int fontSize = 14;
- #else
- int fontSize = 48;
- #endif
- font.SetPointSize(fontSize);
- dc.SetFont(font);
- dc.SetTextForeground(wxColour(00, 20, 00));
- dc.DrawLabel(wxT("http://wxwidgets.info"),
- wxRect(0, 0, dc.GetSize().GetWidth(), dc.GetSize().GetHeight()),
- wxALIGN_CENTER_HORIZONTAL|wxALIGN_CENTER_VERTICAL);
- dc.SetFont(GetFont());
- for(size_t i = 0; i < m_Symbols.Count(); i++)
- {
- dc.SetTextForeground(m_Symbols[i].GetColour());
- dc.DrawText(wxString::Format(wxT("%c"), m_Symbols[i].GetSymbol()),
- m_Symbols[i].GetPosition());
- }
- }
- void MatrixCanvas::OnEraseBackground( wxEraseEvent& event )
- {
- }
* This source code was highlighted with Source Code Highlighter.
Обработчик события wxEVT_ERASE_BACKGROUND пустой (без вызова event.Skip()). Это обеспечит нам перерисовку компонента без мерцания.
В обработчике события wxEVT_PAINT у нас создается контекст устройства, устанавливается цвет фона равный цвету фона нашего компонента, затем происходит очистка (это равноценно заливке цветом). После этого в центре компонента отрисовывается надпись и затем в цикле происходит отрисовка всех символов из массива.
Далее нам необходимо добавить обработчик события wxEVT_SIZE для того чтобы при изменении размера компонента символы отображались по всей ширине. В обработчике мы просто будем вызывать метод InitMatrix(), который заполняет массив символами.
- BEGIN_EVENT_TABLE( MatrixCanvas, wxWindow )
- ...
- EVT_SIZE( MatrixCanvas::OnSize )
- END_EVENT_TABLE()
- ...
- void MatrixCanvas::OnSize( wxSizeEvent& event )
- {
- InitMatrix();
- Refresh();
- }
* This source code was highlighted with Source Code Highlighter.
Так, отображения символов мы добились, но нам еще необходимо сделать так чтобы символы перемещались по экрану. Код, обеспечивающий перемещение символов по экрану, лучше всего выполнять в обработчике события таймера.
- class MatrixCanvas: public wxWindow
- {
- ...
- wxTimer * m_MovementTimer;
- };
- MatrixCanvas::MatrixCanvas(wxWindow* parent, wxWindowID id, const wxPoint& pos, const wxSize& size, long style)
- {
- Init();
- Create(parent, id, pos, size, style);
- }
- bool MatrixCanvas::Create(wxWindow* parent, wxWindowID id, const wxPoint& pos, const wxSize& size, long style)
- {
- wxWindow::Create(parent, id, pos, size, style);
- CreateControls();
- return true;
- }
- MatrixCanvas::~MatrixCanvas()
- {
- wxDELETE(m_MovementTimer);
- }
- void MatrixCanvas::Init()
- {
- m_PreviewMode = false;
- }
- void MatrixCanvas::CreateControls()
- {
- this->SetForegroundColour(wxColour(0, 255, 0));
- this->SetBackgroundColour(wxColour(0, 0, 0));
- int timerID = wxNewId();
- m_MovementTimer = new wxTimer(this, timerID);
- Connect(timerID, wxEVT_TIMER,
- wxTimerEventHandler(MatrixCanvas::OnMovementTimer));
- InitMatrix();
- Refresh();
- m_MovementTimer->Start(30);
- }
- void MatrixCanvas::OnMovementTimer( wxTimerEvent & event )
- {
- for(size_t i = 0; i < m_Symbols.Count(); i++)
- {
- int y = m_Symbols[i].GetPosition().y + m_Symbols[i].GetSpeed();
- if(y > GetClientSize().GetHeight())
- {
- y = -20;
- m_Symbols[i].SetSpeed(3+rand()%5);
- m_Symbols[i].SetColour(wxColour(0, rand()%200+56, 0));
- m_Symbols[i].SetSymbol(rand()%2 ? wxT('0') : wxT('1'));
- }
- m_Symbols[i].SetPosition(wxPoint(
- m_Symbols[i].GetPosition().x, y));
- }
- Refresh();
- }
* This source code was highlighted with Source Code Highlighter.
Как видно, в методе CreateControls() создается таймер и с помощью метода Connect() ему назначается обработчик события. В деструкторе таймер удаляется.
Отлично. Скринсейвер может работать в обычном режиме и в режиме предварительного просмотра. В обычном режиме нам необходимо обеспечить реакцию на действия пользователя, а именно на нажатия клавиш, а также на клик мышкой. Для этого мы создадим переменную-член класса bool m_PreviewMode и, в зависимости от ее значения, в обработчиках событий нажатия клавиш и нажатия кнопок мыши будем закрывать главную форму приложения.
- void MatrixCanvas::OnMouse( wxMouseEvent& event )
- {
- if(event.LeftDown() || event.MiddleDown() || event.RightDown())
- {
- if(!m_PreviewMode)
- {
- wxFrame * frame = wxDynamicCast(wxTheApp->GetTopWindow(), wxFrame);
- if(frame) frame->Close();
- }
- }
- }
- void MatrixCanvas::OnChar( wxKeyEvent& event )
- {
- if(!m_PreviewMode)
- {
- wxFrame * frame = wxDynamicCast(wxTheApp->GetTopWindow(), wxFrame);
- if(frame) frame->Close();
- }
- }
* This source code was highlighted with Source Code Highlighter.
Собственно, на этом работа над компонентом завершена. Теперь надо поместить его на главную форму:
- void MatrixEffectMainFrame::CreateControls()
- {
- MatrixEffectMainFrame* itemFrame1 = this;
- wxBoxSizer* itemBoxSizer2 = new wxBoxSizer(wxVERTICAL);
- itemFrame1->SetSizer(itemBoxSizer2);
- m_Canvas = new MatrixCanvas( itemFrame1, ID_CANVAS, wxDefaultPosition, wxSize(100, 100), wxNO_BORDER );
- itemBoxSizer2->Add(m_Canvas, 1, wxGROW, 0);
- }
* This source code was highlighted with Source Code Highlighter.
Вообще супер. На этом работу над графическим интерфейсом мы закончим.

Обработка параметров командной строки
Итак, теперь нам осталась самая интересная часть работы, а именно обработка параметров командной строки.
Скринсейвер в Windows может запускаться с тремя различными аргументами командной строки:
- “/s” или “/S” – непосредственно для запуска скринсейвера
- “/c:” – для вызова окна настройки скринсейвера, где — численное представление дескриптора родительского окна.
“/p:” – для запуска скринсейвера в режиме предварительного просмотра, где — численное представление дескриптора родительского окна.Для обработки аргументов командной строки в wxWidgets существует класс
wxCmdLineParser. Его мы и будем использовать.- bool wxMatrixEffectApp::OnInit()
- {
- #if defined(__WXMSW__) && !defined(__WXWINCE__)
- wxCmdLineParser parser(argc, argv);
- parser.AddSwitch(wxT("S"), wxEmptyString,
- wxEmptyString, wxCMD_LINE_PARAM_OPTIONAL);
- parser.AddSwitch(wxT("s"), wxEmptyString,
- wxEmptyString, wxCMD_LINE_PARAM_OPTIONAL);
- parser.AddOption(wxT("c"), wxEmptyString,
- wxEmptyString, wxCMD_LINE_VAL_NUMBER, wxCMD_LINE_PARAM_OPTIONAL);
- parser.AddOption(wxT("p"), wxEmptyString,
- wxEmptyString, wxCMD_LINE_VAL_NUMBER, wxCMD_LINE_PARAM_OPTIONAL);
- if(parser.Parse(false) == 0)
- {
- long parentHWND(0);
- if(parser.Found(wxT("S")) || parser.Found(wxT("s")))
- {
- MatrixEffectMainFrame* mainWindow =
- new MatrixEffectMainFrame( NULL );
- mainWindow->ShowFullScreen(true);
- return true;
- }
- else if(parser.Found(wxT("c")))
- {
- wxMessageBox(
- _("No settings for this screensaver. For more information visit wxwidgets.info"));
- return false;
- }
- else if(parser.Found(wxT("p"), &parentHWND))
- {
- wxWindow * parent = new wxWindow;
- parent->SetHWND((HWND)parentHWND);
- RECT r;
- GetWindowRect((HWND)parent->GetHWND(), &r);
- MatrixCanvas* mainWindow = new MatrixCanvas(
- parent, ID_MATRIXEFFECTMAINFRAME,
- wxPoint(0,0), wxSize(r.right-r.left, r.bottom-r.top),
- wxNO_BORDER);
- mainWindow->SetPreviewMode(true);
- SetTopWindow(mainWindow);
- mainWindow->Show(true);
- return true;
- }
- }
- return false;
- #else
- MatrixEffectMainFrame* mainWindow =
- new MatrixEffectMainFrame( NULL );
- SetTopWindow(mainWindow);
- #if defined(__WXWINCE__)
- mainWindow->Show(true);
- #else
- mainWindow->ShowFullScreen(true);
- #endif
- return true;
- #endif
- }
* This source code was highlighted with Source Code Highlighter.
Как видно из кода, в методе
OnInit()класса приложения мы создаем объектwxCmdLineParser, добавляем описания всех возможных параметров:- Метод AddSwitch() указывает что командная строка может содержать аргумент вида /<argument> или —<argument> без дополнительных параметров.
- Метод AddOption() указывает, что командная строка может содержать аргумент вида /<argument>=<value> или —= или /<argument>:<value>, т.е. параметр командной строки, содержащий значение (строковое, численное, дату).
После настройки объекта
wxCmdLineParserпроисходит вызов методаParse(), который проверяет соответствие командной строки указанным настройкам.
Затем происходит проверка наличия параметров.- Если программа запущена с параметром “/s” или “/S”, то отображается главное окно приложения.
- Если программа запущена с параметром “/c”, то отображается окно сообщения о том, что наш скринсейвер не требует настройки.
- Если программа запущена с параметром “/p”, то извлекается дескриптор родительского окна, из него создается объект wxWindow и вместо главного окна приложения создается компонент MatrixCanvas, который размещается на родительском окне.
Еще раз посмотрим на код, создающий
wxWindowиз дескриптора окна:
wxWindow * parent = new wxWindow;

parent->SetHWND((HWND)parentHWND);
На самом деле это очень полезный прием и может быть использован для взаимодействия wxWidgets-приложений с приложениями, написанными с помощью других библиотек.
Ну вот, собственно и все. В результате мы получим что-то вроде этого:

PDF-версия статьи
Исходный код примера, проект для Win32 и Windows Mobile, исполняемый файл для Win32.

Сегодня попытаемся написать простенькую заставку для ОС Windows на языке программирования C#. Прошу меня строго не судить, т.к. я не специализируюсь в программировании на данном языке. Иногда, для разнообразия, пишу по мелочам на нем ;-).
В качестве среды разработке мы воспользуемся Microsoft Visual Studio 2015. А также нам понадобятся такие файлы как изображение для нашего логотипа (например, размером 300×300 пикселей и в формате png) и любая иконка (16×16 пикселей) в формате ico.
Я не буду описывать все подробно, а остановлюсь лишь на важных моментах. Для удобства исходный код максимально покрою комментариями.
Итак, при первом запуске среды разработки создаем приложение типа Windows Forms Application. Для названия проекта и его решения я выбрал следующее название — SampleScreenSaver. Имя файла основной формы мы изменим на FormMain. Дополнительно добавим еще одну форму в наш проект и назовем ее как FormConfigure.
Свойства формы FormMain
| Название свойства | Значение свойства |
| (Name) | frmMain |
| FormBorderStyle | None |
| BackColor | White |
| WindowState | Maximized |
Я не стал описывать подробнее указанные свойства, т.к. здесь все итак понятно. При возникновении вопросов всегда существует возможность воспользоваться справочной системой среды программирования (клавиша F1).

Рис. 1. Пример расположения элементов управления на основной форме
Свойства элемента управления PictureBox
| Название свойства | Значение свойства |
| (Name) | pbLogo |
| BackColor | Transparent |
| Image | ваш файл с изображением |
| SizeMode | AutoSize |
Пример моего изображения см. на рис. 1.
Свойства элемента управления Label
| Название свойства | Значение свойства |
| (Name) | lblCopyright |
| ForeColor | Silver |
| Text | Программирование и не только |
Свойства элемента управления Timer
| Название свойства | Значение свойства |
| (Name) | tmrTimer |
| Interval | 300 |
Свойства формы FormConfigure
| Название свойства | Значение свойства |
| (Name) | FormConfigure |
| Icon | ваш файл с иконкой |
| ShowInTaskbar | false |
| Text | Настройки |
| StartPosition | CenterScreen |
| MaximizeBox | false |
| MinimizeBox | false |
Сразу скажу, насчет формы FormConfigure, я не предусматриваю какие-либо настройки для нашей заставки. При желании вы самостоятельно сможете добавить свои настройки (например, сохранять значения настроек в реестре Windows).
Пришла очередь рассмотреть исходный код форм и нашего проекта.
Файл Program.cs.
using System;
using System.Collections.Generic;
using System.Linq;
using System.Threading.Tasks;
using System.Windows.Forms;namespace SampleScreenSaver
{
static class Program
{
/// <summary>
/// Главная точка входа для приложения.
/// </summary>
[STAThread]
static void Main(string[] args)
{
if (args.Length > 0)
{
if (args[0].ToLower().Trim().Substring(0, 2) == "/s")
{
// Отобразить заставку
Application.EnableVisualStyles();
Application.SetCompatibleTextRenderingDefault(false);
ShowScreenSaver();
Application.Run();
}
else if (args[0].ToLower().Trim().Substring(0, 2) == "/p")
{
// Предварительный просмотр заставки
Application.EnableVisualStyles();
Application.SetCompatibleTextRenderingDefault(false);
Application.Run(new frmMain(new IntPtr(long.Parse(args[1]))));
}
else if (args[0].ToLower().Trim().Substring(0, 2) == "/c")
{
// Отображение окна с настройками заставки
Application.EnableVisualStyles();
Application.SetCompatibleTextRenderingDefault(false);
Application.Run(new FormConfigure());
}
}
else
{
// Отобразить заставку
Application.EnableVisualStyles();
Application.SetCompatibleTextRenderingDefault(false);
ShowScreenSaver();
Application.Run();
}
}Если вы нашли ошибку, пожалуйста, выделите фрагмент текста и нажмите Ctrl+Enter.
- Download PixieSaver demo (requires .NET 2.0) — 25.5 Kb
- Download source code for .NET 2.0 — 6.05 Kb
- Download source code for .NET 1.1 — 6.06 Kb
Introduction
Screensavers are nice. They don’t serve much of a practical purpose anymore now that monitors don’t «burn» images onto the screen, but they do turn your computer into a pretty decoration when you’re not around, and it’s a lot more healthy to be staring at screensavers all day than to be hooked on MMORPGs.
What’s not so nice about them is the way a lot of them behave, and the way they have to be written. Screensavers seem easy enough to set up; on Windows, all you have to do is to rename an .exe to .scr, and voila. But there’s a bunch of quirks along the way. Here are some of the most bothersome ones for users:
- Multiple monitor support is often flakey, especially when monitors aren’t of equal sizes.
- Previews often don’t show up properly in the Display Properties dialog box.
- There’s often no Settings box, not even a really simple one.
- Some screensavers use the «game loop» design, crippling background applications and causing a lot of modern CPUs to overheat.
- Behavior in response to mouse and keyboard input is inconsistent; some screensavers don’t snap out until you actually click on the mouse.
And here are some of the troubles for developers:
- You decide you want to use a timer to avoid pinning the CPU, maybe
System.Timers.Timer, but on Windows 9x/2K/XP, it doesn’t provide enough precision to run a screensaver at even 30 frames per second. - Debugging screensavers can be a nightmare when they’re running in full screen.
- You’ve written your whole screensaver in a Windows Form… only to realize that you have to use a native handle in order for it to show up in the preview window.
- When you’re writing a screensaver, you want to get right down to the fun stuff while the inspiration’s still fresh in your mind. You don’t want to deal with boring initialization and shutdown code.
Screensavers are luxury items, not necessities. Any one of these problems is enough to discourage people from using them. There are so many awesome screensavers out there, yet screensavers as a whole category of apps is becoming less and less popular as computer setups become more diverse and problems are becoming more exposed.
The Screensaver base class attempts to lessen these problems and make screensaver development easier by providing a backbone that handles the mechanical aspects of writing screensavers. Its aim is not to create a whole new API, but simply to help make things work properly.
Using the code
A basic example
To avoid cluttering deployment, the Screensaver class and all of its satellite objects are contained in a single file, Screensaver.cs, which you can drop right in your project. Compiled with the default settings using Visual Studio or Microsoft’s C# compiler (csc.exe), it adds up to about 32 KB. Though some neat freaks may say that this is «bloated», I feel it’s a fair price to pay for consistent behavior and reusable code, two things that too many screensavers lack.
Here is a basic example screensaver using the Screensaver class:
class MyCoolScreensaver : Screensaver
{
   public MyCoolScreensaver()
   {
      Initialize += new EventHandler(MyCoolScreensaver_Initialize);
      Update += new EventHandler(MyCoolScreensaver_Update);
      Exit += new EventHandler(MyCoolScreensaver_Exit);
   }

   void MyCoolScreensaver_Initialize(object sender, EventArgs e)
   {
   }

   void MyCoolScreensaver_Update(object sender, EventArgs e)
   {
      Graphics0.Clear(Color.Black);
      Graphics0.DrawString(
         DateTime.Now.ToString(),
         SystemFonts.DefaultFont, Brushes.Blue,
         0, 0);
   }

   void MyCoolScreensaver_Exit(object sender, EventArgs e)
   {
   }

   [STAThread]
   static void Main()
   {
      Screensaver ss = new MyCoolScreensaver();
      ss.Run();
   }
}
And that’s it! This example prints the current time in the top left corner of the primary monitor, in blue. The Initialize event is fired right after the windows are created. Update is fired 30 times per second, by default; this speed can be changed by changing the value of Framerate. Exit is called just before the windows are closed.
Run mode
The run mode is determined automatically by Screensaver.Run(). Without any parameters, the screensaver will show the Settings window if the file extension is .scr; if it is .exe, it will show the screensaver in a window 9/10th the size of the screen.
You can change this by sending a ScreensaverMode value to Run(): Normal will start the screensaver in full screen, Settings will start the Settings dialog, and Windowed will start the screensaver in windowed mode. The value can’t be Preview; preview mode only works when the Windows Display Properties gives it the right parameters (the handle to the preview control to be specific). The run mode is overridden by the command line arguments which are passed to the screensaver by the Display Properties.
Rendering with System.Drawing
Graphics0 provides the System.Drawing.Graphics object for the primary window. To paint in the other windows, you can use Windows[n].Graphics, where n is the number of the monitor. Note that you are responsible for clearing the screen first.
Double buffering is enabled, by default, but to avoid excess overhead, it doesn’t actually kick in until the Window.Graphics object or the Window.DoubleBuffer property is first used. It’s a good idea to turn it off explicitly if you are using other rendering methods, such as DirectX. Double buffering is not as efficient in the .NET 1.1 version as it is in the .NET 2.0 version.
Installing the screensaver
To install a screensaver on Windows XP, all you have to do is to change the screensaver executable’s file extension to .scr, right click in the shell, and click Install. On older versions of Windows, the .scr goes into the Windows System32 folder. The same can be done on XP to have it always appear in the screensaver menu, but I prefer not to touch the Windows folder.
You can have Visual Studio automatically make a .scr copy of the executable, by adding this command to the post-build event under the project properties:
copy "$(TargetFileName)" "$(TargetName).scr" /y
A slightly more complex example with Direct3D
Any of the available rendering technologies can be used with the Screensaver class — DirectX, OpenGL, WPF (Avalon) etc.. Here is an example of using Managed Direct3D with the Screensaver class.
Setting up Managed Direct3D is not much trouble, assuming you have some knowledge of DirectX. If not, there are plenty of good tutorials out there that you can find with a Google search. Skim through a few, and study one that you like.
class MyCoolScreensaver : Screensaver
{
   public MyCoolScreensaver()
      : base(FullscreenMode.MultipleWindows)
   {
      Initialize += new EventHandler(MyCoolScreensaver_Initialize);
      Update += new EventHandler(MyCoolScreensaver_Update);
      Exit += new EventHandler(MyCoolScreensaver_Exit);
   }

   Device device;

   Microsoft.DirectX.Direct3D.Font font;
   int updates;

   void MyCoolScreensaver_Initialize(object sender, EventArgs e)
   {
      PresentParameters pp = new PresentParameters();

      if (this.Mode != ScreensaverMode.Normal)
         pp.Windowed = true;
      else
      {
         pp.Windowed = false;
         pp.BackBufferCount = 1;
         pp.BackBufferWidth =
            Manager.Adapters[Window0.DeviceIndex].CurrentDisplayMode.Width;
         pp.BackBufferHeight =
            Manager.Adapters[Window0.DeviceIndex].CurrentDisplayMode.Height;
         pp.BackBufferFormat =
            Manager.Adapters[Window0.DeviceIndex].CurrentDisplayMode.Format;
      }

      pp.SwapEffect = SwapEffect.Flip;
      device = new Device(
         Window0.DeviceIndex, DeviceType.Hardware,
         Window0.Handle, CreateFlags.HardwareVertexProcessing, pp);

      Window0.DoubleBuffer = false;
      font = new Microsoft.DirectX.Direct3D.Font(
         device, System.Drawing.SystemFonts.DefaultFont);
   }

   void MyCoolScreensaver_Update(object sender, EventArgs e)
   {
      System.IO.StringWriter writer = new System.IO.StringWriter();
      writer.WriteLine("Time: " + DateTime.Now);
      writer.WriteLine("Achieved framerate: " + this.AchievedFramerate);
      writer.WriteLine("Update count: " + updates++);
      writer.WriteLine("Device: " + Window0.DeviceIndex);

      device.Clear(ClearFlags.Target, System.Drawing.Color.Black, 0, 0);

      device.BeginScene();

      font.DrawText(null, writer.ToString(), 0, 0,
                    System.Drawing.Color.Blue.ToArgb());

      device.EndScene();
      device.Present();
   }

   void MyCoolScreensaver_Exit(object sender, EventArgs e)
   {
      device.Dispose();
   }

   [STAThread]
   static void Main()
   {
      Screensaver ss = new MyCoolScreensaver();
      ss.Run();
   }
}
To compile this example, you need the Managed DirectX Runtime. You can get the latest (as of May 2006) version here. Add references to Microsoft.DirectX, Microsoft.DirectX.Direct3D, and Microsoft.DirectX.Direct3DX.
Initializing DirectX for screensavers is, actually, somewhat easier than for a typical application, because you don’t have to worry about device resets and resizes and such. Just be sure to dispose the device at the end, or you’ll get erratic shutdowns.
Fullscreen mode
An overridden constructor of the Screensaver class takes in a FullscreenMode value: SingleWindow to cover all screens with one single window, and MultipleWindows to cover each screen with a window of its own. For DirectX, we want to use MultipleWindows, and draw in just one window. The default value is MultipleWindows, but in this example, I specify it explicitly just to demonstrate.
Note that ScreensaverMode.Normal is the only mode in which the screensaver will run in full screen mode. Though you can skip most of that full screen initialization and just run it as a windowed app, it’s a good idea to initialize full screen properly to get the extra performance boost.
The Window class
Just as Graphics0 is an alias to Windows[0].Graphics, Window0 is an alias to Windows[0]. The Screensaver.Window class encapsulates either a Windows form or just a window handle if the screensaver is running in preview mode. Various properties related to the graphical aspects are available in these objects.
Miscellaneous functionality
- Settings dialog — you can either use the default Settings dialog, which simply shows a message box with some text gathered from the assembly information, or you can show your own dialog box by overriding
ShowSettingsDialog(). If you choose to stick with the default dialog, you can enter some additional text by setting theSettingsTextproperty. In this example, I set it to my e-mail address. - Keyboard and mouse events — the full array of Windows Forms keyboard and mouse events are available in the
Windowclass. Additionally, you can use theFormproperty to access the underlying WindowsForm, but this value will not necessarily be set, so these are provided as well for convenience. - Frame rate settings — the
AchievedFramerateproperty retrieves the actual number of frames processed in the past second, while theFramerateproperty sets the target frame rate. TheScreensaverclass uses the multimedia timer, so you can expect it to be quite precise. Note, however, that there is no frame skipping. - CloseOnClick, CloseOnMouseMove, CloseOnKeyboardInput — these properties can be set to change the conditions on which to close the screensaver. By default, in normal mode, all three of these properties are set to
true. - Debug mode differences — to make life easier, certain behaviors are slightly different when the app is compiled in debug mode. Here are the differences for the current version:
- Windows are not topmost in debug mode. This is so that you can see your debugger.
Run()offers to launch a debugger when the screensaver is started in preview mode.
PixieSaver sample application
PixieSaver is a simple, fully functional screensaver, written using the Screensaver base class, in around 150 lines of code including whitespace. It uses the SingleWindow full screen mode, and draws using System.Drawing. Each pixie starts at the bottom, flickering as it makes its way to the top. For cuteness value, each one has its own tendency to drift a little to the left or to the right. This is the screensaver that I’m using right now. I’m quite fond of it since I have my computer in my room, and flashy screensavers tend to keep me awake.
Let me know if you have any questions or suggestions, and let me know if you make any cool screensavers.
History
- 2006.05.12 — First release.
- 2006.05.16 — Uploaded .NET 1.1 compatible version of the code. Minor change in shutdown code to match the .NET 1.1 version; should not have any real effect.
This article, along with any associated source code and files, is licensed under The MIT License
The cows are here to take me home now…
Screensaver is normal *.exe file. Just change extension to *.scr, and you will be able to install it.
However you should handle 3 command line arguments to show it correctly in settings.
s — Start screen saver in full screen (usual case). This is when you don’t move your mouse and keyboard for a while, or if user click preview in screen saver settings, or if user double click screen saver file.
c or no argument at all — Show settings window specific for your screen saver. This is when user will click «settings» button in «Screen Saver Settings» window. You can just display MessageBox saying that there are no settings.
p 1234 — Run screen saver in preview window. This is when user will open Screen Saver Settings window, and select your screen saver. In this case you should display your screen saver in window 1234 (this number is just example). Number will be in decimal. Convert it to int, and cast to HWND, and use for rendering.
Some people like to create they own window, and place it over window give to you by Windows. Both options have some downsides.
Example. For simplicity I didn’t do any error checking, and you should really do error checking:
#include <Windows.h>
#include <d3d11.h>
#include <string>

/// DirectX 11 lib (works only in Visual Studio, in other compilers add this lib in linker settings)
/// this is just for DirectX. Skip if you are going to use different API.
#pragma comment(lib, "d3d11")


/// function for handling window messages
LRESULT WINAPI wndProc( HWND hWnd, UINT msg, WPARAM wParam, LPARAM lParam ){
    switch(msg){
        case WM_MOUSEMOVE:{
            int x= LOWORD( lParam ); /// new mouse position
            int y= HIWORD( lParam );
            static int startX; /// mouse position at start of screen saver
            static int startY;
            static int timesCalled= 0; /// WM_MOUSEMOVE message is sent at creation of window, and later every time user move mouse
            if( timesCalled < 1 ){ /// remember starting position at first call
                startX= x;
                startY= y;
            }
            else if( startX != x && startY != y ){ /// if mouse was moved to different position, then exit
                ::PostQuitMessage( 0 );
            }
            timesCalled++;
        }break;
        case WM_KEYDOWN:{
            ::PostQuitMessage( 0 ); /// exit when user press any key
        }break;
        case WM_DESTROY:{ /// standard exiting from winapi window
            ::PostQuitMessage(0);
            return 0;}
    }
    return ::DefWindowProc(hWnd, msg, wParam, lParam);
}


/// starting point
int WINAPI WinMain( HINSTANCE hInstance, HINSTANCE hPrevInstance, LPSTR lpCmdLine, int nCmdShow ){
    int width;
    int height;
    HWND hwnd= NULL;
    const char* windowClassName= "simpleScreenSaverInDirectX11";
    MSG msg= {};
    WNDCLASSEX wc= {};
    bool isInPreviewWindow= false; /// are we in preview in screen saver settings window

    /// variables for directX (ignore if you are planning to use different API or library)
    ID3D11Device* device= NULL;
    ID3D11DeviceContext* context= NULL;
    IDXGISwapChain* swapChain= NULL;
    ID3D11RenderTargetView* renderTargetView= NULL;

    /// read command line arguments
    {
        bool showSettingsDialog= true;

        /// read command line
        std::string s= std::string(lpCmdLine).substr( 0, 2 ); /// first 2 letters from command line argument
        if( s=="\c" || s=="\C" || s=="/c" || s=="/C" || s=="" ){
            showSettingsDialog= true;
        }else if( s=="\s" || s=="\S" || s=="/s" || s=="/S" ){
            showSettingsDialog= false;
        }else if( s=="\p" || s=="\P" || s=="/p" || s=="/P" ){
            showSettingsDialog= false;
            isInPreviewWindow= true;
            hwnd= (HWND)atoi(lpCmdLine+3);
        }

        /// show screen server settings window
        if( showSettingsDialog ){
            ::MessageBox( NULL, "There are no settings for this", "Info", MB_OK );
            return 0;
        }
    }

    /// check are we the only instance
    /// sometimes windows starts screen saver multiple times over time
    if( !isInPreviewWindow && FindWindow( windowClassName, NULL ) ){
        return -1;
    }

    /// register windows class
    if( !isInPreviewWindow ){
        wc= {sizeof(WNDCLASSEX), CS_CLASSDC, wndProc, 0, 0, hInstance, NULL, NULL, NULL, NULL, windowClassName, NULL};
        ::RegisterClassEx( &wc );
    }

    /// create window or read size
    if( !isInPreviewWindow ){
        width= GetSystemMetrics(SM_CXSCREEN);
        height= GetSystemMetrics(SM_CYSCREEN);
        hwnd= ::CreateWindow( wc.lpszClassName, "DirectX 11 Screensaver", WS_POPUP|WS_VISIBLE, 0, 0, width, height, NULL, NULL, wc.hInstance, NULL );
    }else{
        RECT rc; GetWindowRect( hwnd, &rc );
        width= rc.right - rc.left;
        height= rc.bottom - rc.top;
    }

    /// init DirectX (ignore if you are planning to use different API or library)
    {
        DXGI_SWAP_CHAIN_DESC swapChainDesc= {};
        swapChainDesc.BufferCount= 2;
        swapChainDesc.BufferDesc.Width= 0;
        swapChainDesc.BufferDesc.Height= 0;
        swapChainDesc.BufferDesc.Format= DXGI_FORMAT_R8G8B8A8_UNORM;
        swapChainDesc.BufferDesc.RefreshRate.Numerator= 60;
        swapChainDesc.BufferDesc.RefreshRate.Denominator= 1;
        swapChainDesc.Flags= DXGI_SWAP_CHAIN_FLAG_ALLOW_MODE_SWITCH;
        swapChainDesc.BufferUsage= DXGI_USAGE_RENDER_TARGET_OUTPUT;
        swapChainDesc.SampleDesc.Count= 1;
        swapChainDesc.SampleDesc.Quality= 0;
        swapChainDesc.Windowed= TRUE;
        swapChainDesc.SwapEffect= DXGI_SWAP_EFFECT_DISCARD;
        swapChainDesc.OutputWindow= hwnd;

        D3D_FEATURE_LEVEL featureLevel;
        const D3D_FEATURE_LEVEL featureLevelArray[]= {D3D_FEATURE_LEVEL_11_0, D3D_FEATURE_LEVEL_10_0, D3D_FEATURE_LEVEL_9_1, };
        D3D11CreateDeviceAndSwapChain( NULL, D3D_DRIVER_TYPE_HARDWARE, NULL, D3D11_CREATE_DEVICE_DEBUG, featureLevelArray, 3, D3D11_SDK_VERSION, &swapChainDesc, &swapChain, &device, &featureLevel, &context);

        ID3D11Texture2D* pBackBuffer;
        swapChain->GetBuffer( 0, IID_PPV_ARGS( &pBackBuffer ) );
        device->CreateRenderTargetView( pBackBuffer, NULL, &renderTargetView );
        pBackBuffer->Release( );

        D3D11_VIEWPORT viewport;
        viewport.Width= float( width );
        viewport.Height= float( height );
        viewport.MinDepth= 0;
        viewport.MaxDepth= 1;
        viewport.TopLeftX= 0;
        viewport.TopLeftY= 0;
        context->RSSetViewports( 1u, &viewport );
    }

    /// show window and hide cursor
    if( !isInPreviewWindow ){
        ::ShowWindow( hwnd, SW_SHOWDEFAULT );
        ::UpdateWindow( hwnd );
        ::ShowCursor( false );
    }

    /// main loop
    while( msg.message != WM_QUIT ){
        if( ::PeekMessage(&msg, NULL, 0U, 0U, PM_REMOVE) ){
            ::TranslateMessage(&msg);
            ::DispatchMessage(&msg);
            continue;
        }

        /// draw single color on whole window
        float clear_color[]= { (rand()%100)/100.0, (rand()%100)/100.0, (rand()%100)/100.0, 0.0 };
        context->ClearRenderTargetView( renderTargetView, (float*)clear_color );
        if( swapChain->Present( 1, 0 ) != S_OK )
            break; /// probably we were in preview and user have closed settings window. exiting.
    }

    /// shutdown
    renderTargetView->Release();
    swapChain->Release();
    context->Release();
    device->Release();
    if( !isInPreviewWindow ){
        ::ShowCursor( true );
        ::DestroyWindow( hwnd );
        ::UnregisterClass( windowClassName, hInstance );
    }
    return msg.wParam;
}
If you want to display your screensaver on multiple monitors you have to create multiple windows, one for each monitor, and render each window separately (sometimes you can share resources between windows). Exactly like in normal application using multiple monitors.