In this article, we will see how to create an auto-clicker using Python. The code will take input from the keyboard when the user clicks on the start key and terminates auto clicker when the user clicks on exit key, the auto clicker starts clicking wherever the pointer is placed on the screen. We are going to use the pynput module here.
What is Auto Clicker?
Auto-Clicker is a script where you can auto control mouse and keyboard as many numbers of times as you want. It is controlled using user-defined keys. It works on various platforms like Windows, Mac and Linux. Auto clicker is present in pywin32 module.
Approach:
In this project, we will use a cross-platform module pynput to control the mouse and monitor the keyboard at the same time to create simple auto-clicker. To check for mouse events we will install pynput module (used to control the mouse) for this execute, pip install pynput in cmd.
Note: If you’re stuck on how to set up python-pip package on your system then click here
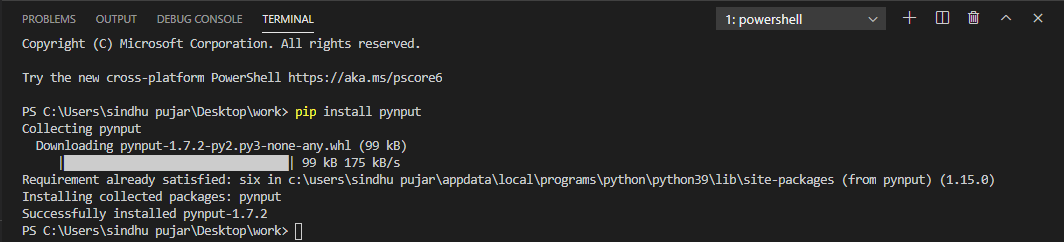
Installation of pynput module
Verify whether the pynput module has been successfully installed into your working environment for this, open IDLE on the system that is cmd or Python Shell. Execute the command import pynput, after executing this the output should give zero errors which means your module is successfully installed.
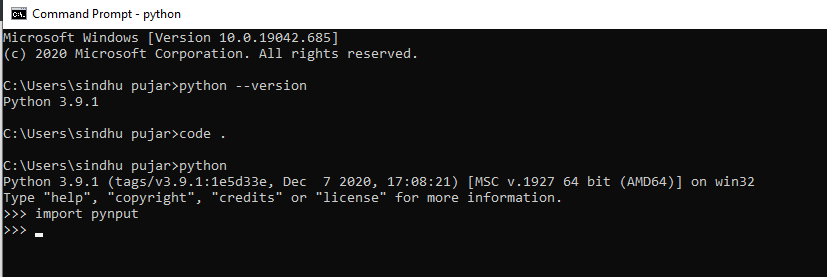
Verifying module installation
Implementation:
Let’s now proceed with the code that is required to build an Auto-clicker using Python. Follow the below steps to create an auto-clicker:
Step 1: Import time and threading then import Button and Controller from pynput.mouse module. Import Listener and KeyCode from pynput.keyboard.
Python3
import time
import threading
from pynput.mouse import Button, Controller
from pynput.keyboard import Listener, KeyCode
Step 2: Create four variables as mentioned below,
- delay: Delay between each click (in seconds)
- button: Button is used to click in whatever direction you want to. Button.left | Button.middle | Button.right
- start_stop_key: The key used for start and stop of the click while you run the program for executing the auto clicker. It should be from a key class or set using KeyCode.
- exit_key: The key used to terminate the auto clicker that is being executed. This should be from the key class or set using KeyCode.
Python3
delay = 0.001
button = Button.right
start_stop_key = KeyCode(char='a')
stop_key = KeyCode(char='b')
Step 3: Create a class extending threading.Thread. Pass delay and button to the class that have two flags to check if the program is executed or not.
Python3
class ClickMouse(threading.Thread):
def __init__(self, delay, button):
super(ClickMouse, self).__init__()
self.delay = delay
self.button = button
self.running = False
self.program_running = True
Step 4: Add methods to control the threads externally.
Python3
def start_clicking(self):
self.running = True
def stop_clicking(self):
self.running = False
def exit(self):
self.stop_clicking()
self.program_running = False
Step 5: A method is created when the thread starts, the program_running runs on loop until the value comes out to be true and also create another loop inside the existing loop where it checks if running is set to true or not. In case, we are inside both loops, it will click on the set button and sleep for the set delay.
Python3
def run(self):
while self.program_running:
while self.running:
mouse.click(self.button)
time.sleep(self.delay)
time.sleep(0.1)
Step 6: Creating an instance for the mouse controller, then create ClickMouse thread. Start the instance to move into the loop inside the run method.
Python3
mouse = Controller()
click_thread = ClickMouse(delay, button)
click_thread.start()
Step 7: Create a method on_press which takes a key as an argument and sets up a keyboard listener. The start_stop_key matches with a start key (a) when it is executed. Then the click is to be terminated when running flag is set to True in the thread. Exit method is called in the method if the exit key (b) is executed and stop the listener.
Python3
def on_press(key):
if key == start_stop_key:
if click_thread.running:
click_thread.stop_clicking()
else:
click_thread.start_clicking()
elif key == stop_key:
click_thread.exit()
listener.stop()
with Listener(on_press=on_press) as listener:
listener.join()
After the code is run we can see in the output as shown below, it shows the number of clicks the auto-clicker has made after the code is implemented. It is compatible with Windows, Mac and Linux. Auto-Clicker is helpful software for the systems as it let’s save a reasonable amount of time that is spent on repeated amount of clicks.
Below is the complete program:
Python3
import time
import threading
from pynput.mouse import Button, Controller
from pynput.keyboard import Listener, KeyCode
delay = 0.001
button = Button.right
start_stop_key = KeyCode(char='a')
stop_key = KeyCode(char='b')
class ClickMouse(threading.Thread):
def __init__(self, delay, button):
super(ClickMouse, self).__init__()
self.delay = delay
self.button = button
self.running = False
self.program_running = True
def start_clicking(self):
self.running = True
def stop_clicking(self):
self.running = False
def exit(self):
self.stop_clicking()
self.program_running = False
def run(self):
while self.program_running:
while self.running:
mouse.click(self.button)
time.sleep(self.delay)
time.sleep(0.1)
mouse = Controller()
click_thread = ClickMouse(delay, button)
click_thread.start()
def on_press(key):
if key == start_stop_key:
if click_thread.running:
click_thread.stop_clicking()
else:
click_thread.start_clicking()
elif key == stop_key:
click_thread.exit()
listener.stop()
with Listener(on_press=on_press) as listener:
listener.join()
Now let’s execute the python program we’ve written and then press the start (a) and stop (a) keys in order to initiate the auto clicker.
Output:
In this article, we will see how to create an auto-clicker using Python. The code will take input from the keyboard when the user clicks on the start key and terminates auto clicker when the user clicks on exit key, the auto clicker starts clicking wherever the pointer is placed on the screen. We are going to use the pynput module here.
What is Auto Clicker?
Auto-Clicker is a script where you can auto control mouse and keyboard as many numbers of times as you want. It is controlled using user-defined keys. It works on various platforms like Windows, Mac and Linux. Auto clicker is present in pywin32 module.
Approach:
In this project, we will use a cross-platform module pynput to control the mouse and monitor the keyboard at the same time to create simple auto-clicker. To check for mouse events we will install pynput module (used to control the mouse) for this execute, pip install pynput in cmd.
Note: If you’re stuck on how to set up python-pip package on your system then click here
Installation of pynput module
Verify whether the pynput module has been successfully installed into your working environment for this, open IDLE on the system that is cmd or Python Shell. Execute the command import pynput, after executing this the output should give zero errors which means your module is successfully installed.
Verifying module installation
Implementation:
Let’s now proceed with the code that is required to build an Auto-clicker using Python. Follow the below steps to create an auto-clicker:
Step 1: Import time and threading then import Button and Controller from pynput.mouse module. Import Listener and KeyCode from pynput.keyboard.
Python3
import time
import threading
from pynput.mouse import Button, Controller
from pynput.keyboard import Listener, KeyCode
Step 2: Create four variables as mentioned below,
- delay: Delay between each click (in seconds)
- button: Button is used to click in whatever direction you want to. Button.left | Button.middle | Button.right
- start_stop_key: The key used for start and stop of the click while you run the program for executing the auto clicker. It should be from a key class or set using KeyCode.
- exit_key: The key used to terminate the auto clicker that is being executed. This should be from the key class or set using KeyCode.
Python3
delay = 0.001
button = Button.right
start_stop_key = KeyCode(char='a')
stop_key = KeyCode(char='b')
Step 3: Create a class extending threading.Thread. Pass delay and button to the class that have two flags to check if the program is executed or not.
Python3
class ClickMouse(threading.Thread):
def __init__(self, delay, button):
super(ClickMouse, self).__init__()
self.delay = delay
self.button = button
self.running = False
self.program_running = True
Step 4: Add methods to control the threads externally.
Python3
def start_clicking(self):
self.running = True
def stop_clicking(self):
self.running = False
def exit(self):
self.stop_clicking()
self.program_running = False
Step 5: A method is created when the thread starts, the program_running runs on loop until the value comes out to be true and also create another loop inside the existing loop where it checks if running is set to true or not. In case, we are inside both loops, it will click on the set button and sleep for the set delay.
Python3
def run(self):
while self.program_running:
while self.running:
mouse.click(self.button)
time.sleep(self.delay)
time.sleep(0.1)
Step 6: Creating an instance for the mouse controller, then create ClickMouse thread. Start the instance to move into the loop inside the run method.
Python3
mouse = Controller()
click_thread = ClickMouse(delay, button)
click_thread.start()
Step 7: Create a method on_press which takes a key as an argument and sets up a keyboard listener. The start_stop_key matches with a start key (a) when it is executed. Then the click is to be terminated when running flag is set to True in the thread. Exit method is called in the method if the exit key (b) is executed and stop the listener.
Python3
def on_press(key):
if key == start_stop_key:
if click_thread.running:
click_thread.stop_clicking()
else:
click_thread.start_clicking()
elif key == stop_key:
click_thread.exit()
listener.stop()
with Listener(on_press=on_press) as listener:
listener.join()
After the code is run we can see in the output as shown below, it shows the number of clicks the auto-clicker has made after the code is implemented. It is compatible with Windows, Mac and Linux. Auto-Clicker is helpful software for the systems as it let’s save a reasonable amount of time that is spent on repeated amount of clicks.
Below is the complete program:
Python3
import time
import threading
from pynput.mouse import Button, Controller
from pynput.keyboard import Listener, KeyCode
delay = 0.001
button = Button.right
start_stop_key = KeyCode(char='a')
stop_key = KeyCode(char='b')
class ClickMouse(threading.Thread):
def __init__(self, delay, button):
super(ClickMouse, self).__init__()
self.delay = delay
self.button = button
self.running = False
self.program_running = True
def start_clicking(self):
self.running = True
def stop_clicking(self):
self.running = False
def exit(self):
self.stop_clicking()
self.program_running = False
def run(self):
while self.program_running:
while self.running:
mouse.click(self.button)
time.sleep(self.delay)
time.sleep(0.1)
mouse = Controller()
click_thread = ClickMouse(delay, button)
click_thread.start()
def on_press(key):
if key == start_stop_key:
if click_thread.running:
click_thread.stop_clicking()
else:
click_thread.start_clicking()
elif key == stop_key:
click_thread.exit()
listener.stop()
with Listener(on_press=on_press) as listener:
listener.join()
Now let’s execute the python program we’ve written and then press the start (a) and stop (a) keys in order to initiate the auto clicker.
Output:
Hello coders!! In this article, we will understand the concept of auto clicker in python. We will first understand its meaning and its implementation in python. So without wasting any time, let’s get straight into the topic.
What is an auto clicker?
Auto clicker is a script available in python that facilitates the user to repeatedly clicking their mouse within small delay intervals. It is controlled by user-defined keys and works on every environment – Windows, Mac, and Linux. To achieve this, we will use a module called PyAutoGUI in Python. This will allow us to control the mouse and monitor the keyboard at the same time.
Ways to Create an Auto Clicker in Python:
- Using PyAutoGui
- Using Pynput
PyAutoGUI Installation:
To install pyautogui, type the following command:
pip install pyautogui
Key features of PyAutoGUI:
- Sends Keystrokes to applications
- Moves the mouse and clicks in the windows of other applications
- Locate an application’s window
- Display of message boxes for user interaction
Keyboard and Mouse Controls using PyAutoGUI:
PyAutoGUI uses the (x,y) coordinate with the origin (0,0) at the screen’s top-left corner. The x coordinates increase as we go to the right, whereas the ‘y’ coordinates increase as we go down. Currently, PyAutoGUI works only on the primary monitor. It isn’t reliable for the screen of a second monitor. All the presses on the keyboard done by PyAutoGUI are delivered to the window that currently has focus.
Making auto clicker in Python using PyAutoGUI:
import pyautogui
import time

def click():
    time.sleep(0.1)
    pyautogui.click()

def main():
    for i in range(20):
        click()

main()
Making Auto Clicker in Python using Pynput:
Pynput is a module available in python used to control mouse movements. It can be used to make an auto clicker in python.
Installation of Pynput:
To install pynput, type the following command:
pip install pynput
import time
import threading
from pynput.mouse import Button, Controller
from pynput.keyboard import Listener, KeyCode


delay = 0.001
button = Button.left
start_stop_key = KeyCode(char='s')
exit_key = KeyCode(char='e')


class ClickMouse(threading.Thread):
    def __init__(self, delay, button):
        super(ClickMouse, self).__init__()
        self.delay = delay
        self.button = button
        self.running = False
        self.program_run = True

    def start_clicking(self):
        self.running = True

    def stop_clicking(self):
        self.running = False

    def exit(self):
        self.stop_clicking()
        self.program_run = False

    def run(self):
        while self.program_run:
            while self.running:
                mouse.click(self.button)
                time.sleep(self.delay)
            time.sleep(0.1)


mouse = Controller()
thread = ClickMouse(delay, button)
thread.start()


def on_press(key):
    if key == start_stop_key:
        if thread.running:
            thread.stop_clicking()
        else:
            thread.start_clicking()
    elif key == exit_key:
        thread.exit()
        listener.stop()

with Listener(on_press=on_press) as listener:
    listener.join()
Explanation:
Importing required modules:
- Button and controller: to control the mouse.
- Listener and KeyCode: to watch for keyboard events to start and stop the python auto clicker.
Declaring important variables:
- button: a button that will be clicked.
- begin_end: the key that we will use to start and stop the auto clicker.
- exit_key: to close and reset the program and reset everything.
Creating a class to extend threading:
The thread created will allow us to control the mouse clicks. There are two parameters – delay and button. There are also two flags about whether the program is running or not.
Creating methods to handle the thread externally:
- begin(): starts the thread
- end(): stops the thread
- exit(): exits the program and resets
Creating a method that will run when the thread starts:
This method will run once the thread starts. We will keep iterating through the loop till the value of run_prgm is True. The loop inside the first loop is iterated till the value of a run is True. Once we are inside both the loops, we click the set button.
Creating an instance for mouse controller:
The Mouse_click thread that we created will start when the user gets into the loop in the run method.
Creating a method to setup keyboard listener:
If the key pressed is the begin_end, it will stop clicking given that the flag is set to true. Otherwise, it will start it. If the key pressed is the exit_key, the exit method is called in the thread and stop the listener.
More >> Interesting Python Frameworks You Should Know
Conclusion: Python Auto Clicker
These are two different ways in which one can create an auto clicker in python. It can be further modified as per one’s requirement.
However, if you have any doubts or questions, do let me know in the comment section below. I will try to help you as soon as possible.
Happy Pythoning!
Как отмечалось на странице загрузки, кликкерманн имеет два способа записи сценария: производить запись действий с экрана или написать программу самому. Встроенный язык программирования создан максимально для новичков, поэтому большинство людей смогут его освоить.
Содержание
- Запись сценария
- Программируем сценарий
- Видео уроки
Запись сценария
Чтобы записать сценарий, нажмите на красный квадрат — программа начнет записывать ваши действия.

После того как необходимо запись остановить, нажмите на синий квадрат.
Если вы перейдет в редактор программы то там будут тысячи строк с функцией move. Это записываются движения мыши. В настройках снимите галочку «записывать движения мыши». Теперь код будет намного компактнее.
Программируем сценарий
В примере будет показан скрипт для очистки корзины.
Перед написанием программы необходимо продумать ее алгоритм. Необходимо кликнуть по корзине правой кнопкой и из контекстного меню выбрать пункт «очистить корзину», затем подтвердить удаление. Теперь, когда знаем последовательнось действий, запрограммируем этот пример.
- Запускаете программу Clickermann. В разделе скрипт перейдите в «Редактор».

Переход в редактор - Очистим редактор нажатием на кнопку с белым листком.

Очистка редактора - Запрограммируем действия клика правой кнопкой мыши по корзине. Перейдите в Команды => Мышь => RCLICK. Все команды Clickermann можно узнать на нашем сайте, в программе или документации.

Программирование правого клика мыши - В редакторе появилась команда RCLICK(10,10). Где параметры команды содежрат координаты курсора мыши. Чтобы узнать координаты курсора мыши, обратите внимание на нижнее окно слева в разделе X,Y, наведите свой курсор на корзину и запишите параметры в команду RCLICK. В моем случае получилась команда с координатами RCLICK(1857,940).

Как узнать координаты мыши в Clickermann - После каждого действия необходимо ставить задержку, поставлю задержку на 1 секунду командой WAIT(1).
- Теперь нужно нажать левой кнопкой по пункту «очистить корзину». По аналогии вызываю команду LCLICK и записываю координаты. Также ставлю задержку в 1 секунду.

Поиск координат для левой кнопки - Последний пункт, необходимо подтвердить удаление. И в самом конце программы необходимо указать команду «Стоп» ключевым словом HALT. Получился такой код:


RCLICK(1857,940)
WAIT(1)
LCLICK(1700,830)
WAIT(1)
LCLICK(1040,540)
HALT
Сохраните программу, чтобы скрипт могли воспроизводить в будущем. Чтобы запустить программу нажмите зеленую кнопку PLAY.
Видео уроки
 Как писать скрипты в Clickermann | Пример решения реальной задачи с помощью кода
 Автокликер(Clickermann)Обучение!
 Как автоматизировать выполнение действий на компьютере в Clickermann
 ПОИСК ФРАГМЕНТА КАРТИНКИ Как писать сценарии для кликермана Clickermann
 как написать бота программой Clickermann
Автокликер, авто-нажатие на клавиши, скрипт, имитирующий клавиатуру
(Всего: 119 259, сегодня: 42 )

За пару минут вы запустите свой кликер по клавишам. Когда понадобилось автоматом нажимать на кнопки клавиатуры, нормального решения в сети именно для клавиш я так и не нашел и случайно нашел ролик на Ютубе вот с этим.
Мы будем писать циклический скрипт, который будет обрабатывать программа AutoHotKey (AHK). Скрипт будет выполнять цикл и запускаться бесконечное количество раз. Итак, поехали.
В моем случае я использую всего две клавиши – пробел (space) и эскейп (esc). Коды всех остальных клавиш и других возможностей программы можно найти в документации AutoHotKey
Скрипт цикла нажатия на клавиши
Home::
Loop
{
send, {Esc}
sleep, 2000
send, {Space}
sleep, 2000
}
Return

End::
ExitApp
Return
Описание к коду выше
Home:: - а-ля "Паскалевское" начало программы - ключевое слово, которое изменять нельзя
Loop - слово, указывающее на начало цикла
{ - открытие цикла
send, {Esc) - дословно - нажимаить на
sleep, 2000 - ждать 2 тыс. миллисекунд (2 секунды)
} - закрытие цикла
Return - обязательное слово, для зацикливания кода
End::
ExitApp
Return - - обязательное слово, для зацикливания всего кода в целом
Сохраняем файл в формате *.ahk и скачиваем и устанавливаем программу AutoHotKey
Теперь ваш скрипт понятен для ОС Windows. Для удобства его можно скомпилировать в *.exe нажав правой кнопкой мыши и выбрав соответствующий пункт контекстного меню.
Файл запускается сразу в трей, активируется кнопкой HOME, деактивируется (удаляется из трея) – End.