Contents
- Intro
- Bash — Everyday Ubuntu life
-
Commands
- Creating folders
- Deleting files
- Deleting folders and their sub-folders
- Running commands as root
- Opening GUI applications as root
- Backing up your files
- Backing up your Directories
- Checking system performance
- Check Devices
- Show network Information
- Show wireless information
-
Scripting
- Variables
- If Statements
-
Storing application stdout to a variable:
- Example
- Example 2
-
FUNctions
-
Example
- Debugging
-
Example
-
Other Scripting Languages related to Bash
-
tr
- Example
- Example
-
AWK
- pidof clone
-
SED
- Basic Substitution
-
tr
Bash scripting is one of the easiest types of scripting to learn, and is best compared to Windows Batch scripting. Bash is very flexible, and has many advanced features that you won’t see in batch scripts.
However if you are a ‘non-computer-savvy’ person that won’t mean a thing to you. Bash is the language that you will learn to love as much of everyday Ubuntu life is done/can be done using the Terminal. You will soon learn that most things can be done through both GUI (Graphical User Interface) and CLI (Command Line Interface), however some things are more easily achieved from one or the other. For example, changing file permissions of a folder and all its sub folders is more easily achieved using cli instead gui.
NOTE: Text that is inside the box are to be entered into a terminal as follows:
If it's inside a box like this... enter it into a terminal unless instructed to do otherwise. Except this box. Of course. Silly.
You can also just copy and paste if needed.
Intro
In this document we will discuss useful everyday commands, as well as going a bit more in depth into scripting and semi-advanced features of Bash. Bash is not only used to run programs and applications, but it can also be used to write programs or scripts.
Bash — Everyday Ubuntu life
During your time as an Ubuntu user you will use the terminal to perform tasks such as
- Creating folders
- Deleting files
- Deleting folders and their sub-folders
- Opening applications as root
- Backing up your files
- Backing up your folders
- Checking system performance
- Check Devices
- Checking wireless connection
Along with many other things, the list above will be the commands we will discuss.
Commands
Creating folders
Creating folders can be done simply in the file manager nautilus by right clicking and selecting ‘Create Folder’, but if you want to do this from a cli environment you would type the following in the terminal:
mkdir /home/joe/Desktop/new_folder
the mkdir (make directory) command creates the folder then the file path tells it where to create the folder.
Deleting files
Deleting files are done with the rm command as follows:
rm /home/joe/file_to_be_deleted
the rm (remove) command is used to remove anything through a cli environment.
Deleting folders and their sub-folders
The command you are about to read can potentially (if used incorrectly) destroy your system!
rm -r /home/joe/useless_Parent_folder
To force (note most of the time you will not need to use -f)
rm -rf /home/joe/useless_Parent_folder
This command is slightly different to the one before, it uses two options ‘-r’ which means recursive (will delete the folder and all sub-folders) and ‘-f’ means force (will not ask for your permission). This command is perfectly fine for deleting a dir and all its sub-dirs. The next commands should !!**!!NEVER!!**!! be run. Unless you want to say goodbye to your system.
rm -rf /*
rm -rf /
This will delete everything from your root folder downwards, which if you did a standard install would be everything.
Running commands as root
When working on the command line, you usually want to work with the default permissions. This way you insure that you won’t accidentally break anything belonging to the system or other users, so long as the system and other users haven’t altered their file permissions. Yet there will be times when you wish to copy a file to a system folder (like /usr/local/bin) to make it available to all users of the system. Only the system administrator (i.e. the user ‘root’) should have permission to alter the contents of system directories like /usr/local/bin. Therefore trying to copy a file (like a program downloaded from the Internet) into that folder is forbidden by default.
cp Downloads/some_downloaded_program /usr/local/bin
cp: cannot create regular file `/usr/local/bin/some_downloaded_program': Permission denied
Since it would be very tedious to always login as root to do administrative work (in fact you should avoid logging in as root with a graphical desktop) you can use the sudo program to execute a single command as root.
sudo cp Downloads/some_downloaded_program /usr/local/bin
The default Ubuntu installation is configured so that the user who was created during system installation is allowed to use this command. It will prompt for the password and execute the command as the root user.
Opening GUI applications as root
Sometimes you will want to edit a config file in your root folder, in order to save changes to this file you need root privileges so we need to open our text editor as root. All you will need is just sudo or pkexec to show a gui password popup.
sudo gedit
Note a lot of kde apps will not work like kate or dolphin.
Backing up your files
To create a backup of a file, we’re going to use the cp (copy) command. The basic syntax for cp is as follows:
cp source_file dest_file
This will copy the ‘source_file’ to the ‘dest_file’. Now, using the previous example, we want to backup ‘/path/to/conf_file.txt’. To accomplish this, we type the following:
sudo cp /path/to/conf_file.txt /path/to/conf_file.txt.old
That’s fine and dandy, but what if I want to copy my file to another directory? Well that’s just as easy. Let’s say instead of copying /path/to/conf_file.txt to the /path/to/ directory, you want to copy it to a directory where you store all of your backup files, say /my/backup/folder/. In order to accomplish this you would type:
cp /path/to/conf_file.txt /my/backup/folder/    #saves conf_file.txt to /my/backup/folder/
#OR
cp /path/to/conf_file.txt /my/backup/folder/conf_file_new_name.txt
***This is a typical safety measure that has saved many users in the past from a complete disaster.***
Okay, so we know how to copy a file: a) to a different filename and b) to a different folder. But how do we copy entire directories?
Backing up your Directories
To backup one directory to another, we introduce cp -r (recursive) option. The basic syntax is as follow:
cp -r /directory/to/be/copied/ /where/to/copy/to/
So if we wanted to copy all of the contents of our /path/to/ folder to our /my/backup/folder, we would type the following:
cp -r /path/to/ /my/backup/folder/foldername #foldername can be whatever you want the foldername to be
Checking system performance
If your computer starts to lag, you can see which applications are using the most CPU power with this command:
top
This is generally the same information given as the GUI application ‘System Monitor’.
Check Devices
USB Devices:
If a USB device stops working, you may want to see if it is still connected/detected. To check if a device is connected/detected, type the following:
lsusb
PCI Devices:
As PCI devices are checked with:
lspci
Show network Information
To see the status of your network connection, use the command:
ip addr
This command will show you your ip, what type of connection you are using, etc.
Show wireless information
Like the command ip stated above, you can use iwconfig to check the settings of your wireless connection without editing anything. In a terminal enter:
iwconfig
This also shows packets sent/received.
Scripting
NOTE: The commands given in the scripting section are to be put into the text editor and not in the terminal unless instructed otherwise.
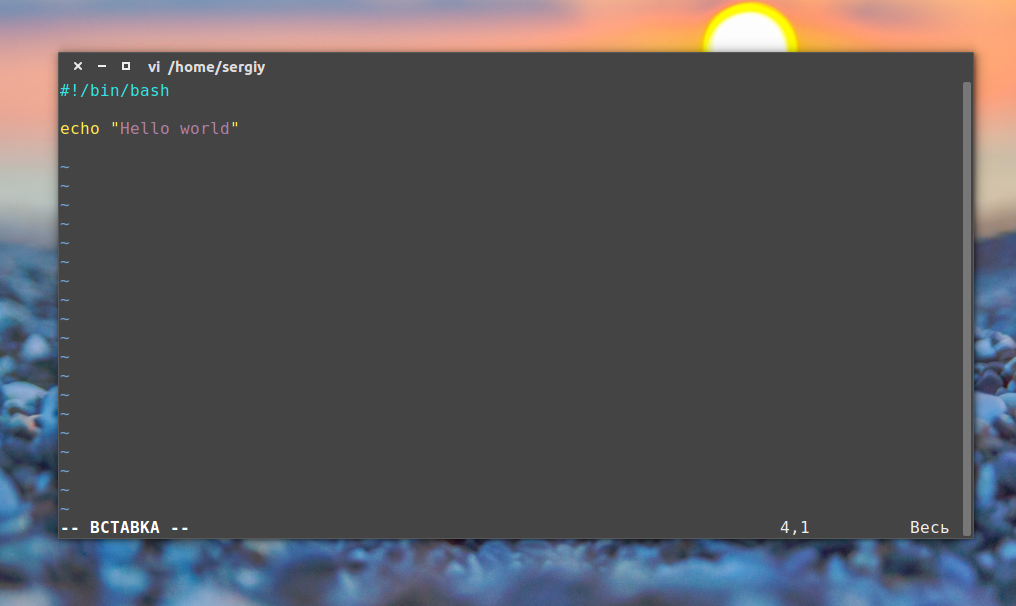
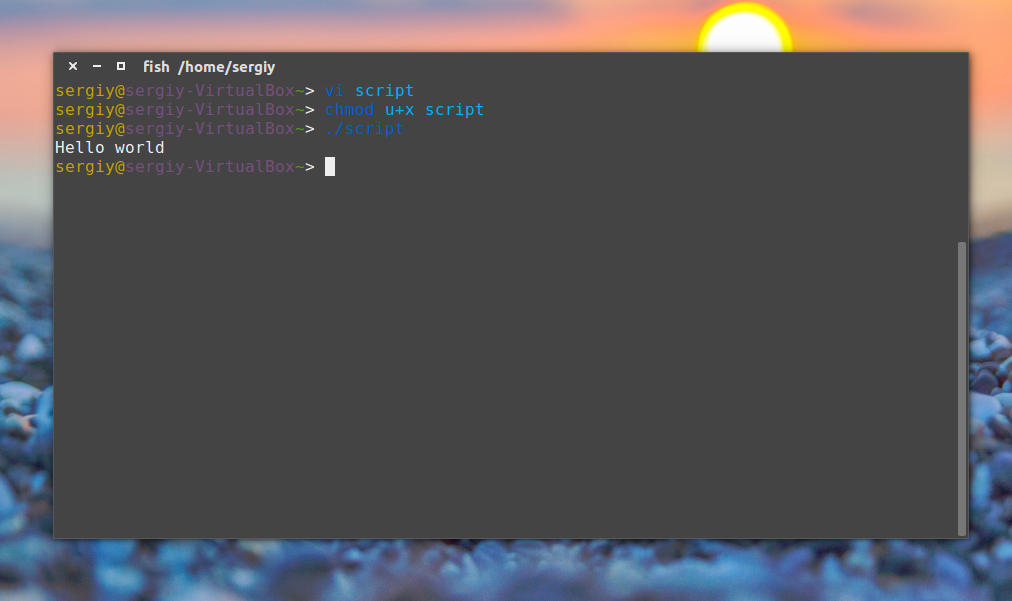
Bash is primarily a scripting language, so it would be a crime not to talk about scripting. Let’s dive straight in with a bash script. More precisely the infamous «Hello World» script. You can create a bash script by opening your favorite text editor to edit your script and then saving it (typically the .sh file extension is used for your reference, but is not necessary. In our examples, we will be using the .sh extension but instead Linux uses #!/path/to/runtime or in this case #!/bin/bash).
 #!/bin/bash

echo "Hello, World"
The first line of the script just defines which interpreter to use. NOTE: There is no leading whitespace before #!/bin/bash. That’s it, simple as that. To run a bash script you first have to have the correct file permissions. We do this with chmod command in terminal (change mode) as follows:
chmod a+x /where/i/saved/it/hello_world.sh   #Gives everyone execute permissions
# OR
chmod 700 /where/i/saved/it/hello_world.sh   #Gives read,write,execute permissions to the Owner
This will give the file the appropriate permissions so that it can be executed. Now open a terminal and run the script like this:
/where/i/saved/it/hello_world.sh
Hopefully you should have seen it print Hello, World onto your screen. If so well done! That is your first Bash script.
TIP If you type:
pwd
You will see the directory that you are currently working in (pwd stands for ‘print working directory’). If your current working directory is /where/i/saved/it/, then you can shorten the above command to:
prompt$ pwd
/where/i/saved/it
prompt$ ./hello_world.sh
Now, lets get to more interesting aspects of Bash programming, Variables!
Variables
Variables basically store information. You set variables like this using text editor:
var="FOO"
‘var’ can be anything you want as long as it doesn’t begin with a number. «FOO» can be anything you want.
To access the information from the variable you need to put a ‘$’ in front of it like this:
var="FOO"
echo $var
Try entering those lines into a terminal one at a time; you will see that the first one just gives you another prompt and the second one prints FOO.
But that’s all a bit boring. So let’s make a script to ask the user for some information and then echo that information.
 #!/bin/bash
clear
echo "Please enter your name"
read name
echo "Please enter your age"
read age
echo "Please enter your sex. Male/Female"
read sex
echo "So you're a $age year old $sex called $name"
read allows the user to input information where it is then stored in the variable defined after the read. read variable would take whatever input the user entered and store it in $variable. We then access this with echo and set up a neat sentence. This script is reasonably messy though; read has another function that could halve the size of this script.
clear
read -p "Please enter your name  : " name
read -p "Please enter your age  : " age
read -p "Please enter your sex. Male/Female  : " sex
echo "So you're a $age year old $sex called $name"
That is more efficient code. However it’s still a bit messy when run. A solution? Good old white spaces!
clear
read -p "Please enter your name  : " name
echo ""
read -p "Please enter your age  : " age
echo ""
read -p "Please enter your sex. Male/Female  : " sex
echo ""
echo "So you're a $age year old $sex called $name"
Now we have an efficient and clean Bash script.
If Statements
An if statement can be used to check for something and do something else depending on the outcome of the check. For example, if I had an ‘apple’, I would want to make sure it’s still an ‘apple’ and not an ‘orange’ because I don’t like Oranges!
The syntax for an if statement is
if [something]
        then
        elif
        then
        elif
        then
        ....etc....
        else
fi
The else if statement or (elif) is not necessary, but it can be used if needed.
An if statement to check if our $fruit variable is an ‘apple’ would look like this
echo "Please enter type of fruit"
read fruit

if [ $fruit = apple ]
        then echo "Good, I like Apples"
        else echo "Oh no, I hate Oranges!"
fi
Just to explain this statement,
if [ the contents of $fruit is 'apple' ]
        then say "Good, I like Apples"
        if it's not, then say "Oh no, I hate Oranges!"
finish
If statements are an easy concept to grasp as they are similar to the «if» used in spoken English. But say you wanted to have 4 or 5 checks, the answer may be to write 4 or 5 statements but that’s not the most practical way. This is where elif comes in handy.
if [ $fruit = apple ]
        then echo "Good, I like Apples"
elif [ $fruit = pear ]
        then echo "Good, I like Pears"
elif [ $fruit = banana ]
        then echo "Good, I like Bananas"
        else echo "Oh no, I hate Oranges!"
fi
This saves us from from repetitive scripting. There are better ways to check what the fruit is, but we won’t go into that now.
Storing application stdout to a variable:
Application stdout ( what you see on the terminal screen, with an un-piped application ) can be saved and used in Bash. The simplest and most elegant way is to use command substitution, by wrapping the code in $(…)
Example
fooVar=$(who)
echo $fooVar
This code should output the current users, their respective ttys, and date of login. Note that this strips newlines. Be sure to do any parsing in line ( | grep, etc ) and then pass it to a variable. We will try this again, but grep for tty7, the GUI’s tty.
Example 2
fooVar=$(who | grep tty7)
echo $fooVar
This should output the single user that is currently logged into the WM. Let’s move on to more advanced data manipulation within command substitution.
FUNctions
Bash lets you create a function on the fly, really handy if you plan on using a code block more then once. Functions reduce the amounts of editing you have to do in a script, if and when you have to update your script. Let’s get to it!
Example
Here is an example script:
echo "echo is Called"
echo "Functions are FUN!"
echo "echo is Called"
Although this example is simple, you can see that if you want to change «echo is Called» to say «foo is Called» you would have to edit twice.
Below is the same app using functions.
echoFunction() {
  echo "echo is Called"
}
fooBar() {
  echo "Functions are FUN!"
}

echoFunction;
fooBar;
echoFunction;
# You call functions without (), just the function name then a semicolon.
This example, as you can see may be longer now, but you can imagine how, adding features, this will eliminate code and reduce complexity. Also, you can see if you want to change the echo call, you have to edit one line, not two.
Debugging
I always find it useful to trace a script to find out why something does not work as expected. To trace, start it through bash explicitly and use the -x option, like so:
bash -x ./script.sh
This will write each command to standard error (preceded by a ‘+ ’) before it is executed.
tr
tr is one of the most basic applications to pipe data through that uses a basic scripting syntax. In this case, it accepts Regular Expressions. Let’s do a normally complicated task, transforming a string to all uppercase.
Example
read foo
var=$(echo $foo | tr "{a-z}" "{A-Z}")
 # {a-z} Matches a through z
 # {A-Z} matches A through Z
echo $var
The output should look something like this:
this is a test
THIS IS A TEST
tr also can TRanslate strings, so let’s translate all «tar» in $foo to «bar».
Example
echo "Type in: I love tars"
read foo
var=$(echo $foo | tr "t" "b")
echo $var
the output should look something like this:
I love tars
I love bars
AWK
AWK ( Short for Aho, Weinberger & Kernighan )
awk has its own custom scripting language, suitable for a tutorial by itself, so I will cover only the basics to help assist when you are bash scripting. This is not meant to be complete or comprehensive in any way.
pidof clone
Let’s make a quick pidof clone that prompts for a process identifier, then echoes the process ID.
read pname
ps -ef | grep -v grep | grep $pname | awk '{print $2}'
Let’s take some pipes out and use only awk for the filtering
read pname
ps -ef | awk -v p=${pname} '$8 ~ p { print $2 }'
Single quotes are used to pass the awk command(s). The curly braces are to use the awk language (for stuff like prints, ifs, etc.). Print prints the column passed given by the $ markup, space delimited.
The awk -v option allow passing a shell value into an awk variable, the $8 is a field variable (column 8 of the ps -ef command’s output) and the operator ~ is a regular expression match.
There are a lot more commands than the print command, including if statements, etc., and is worth looking into if you are interested in what you see here!
SED
sed is one of the most complicated scripting languages on the GNU / Linux system. I am only going to cover the s/ command here.
Basic Substitution
Try this out to show that sed can not only replace inline, but unlike tr, replace with a longer or shorter string than before.
read foo
echo $foo | sed "s/foo/bars/"
When this command is run, it should substitute the first appearance of «foo» with «bars».
This is an example of the output.
I love to go to foo
I love to go to bars
CategoryCommandLine
Каким бы простым ни был графический интерфейс в Linux и сколько бы там ни было функций, все равно есть задачи, которые удобнее решать через терминал. Во-первых, потому что это быстрее, во-вторых — не на всех машинах есть графический интерфейс, например, на серверах все действия выполняются через терминал, в целях экономии вычислительных ресурсов.
Если вы уже более опытный пользователь, то, наверное, часто выполняете различные задачи через терминал. Часто встречаются задачи, для которых нужно выполнять несколько команд по очереди, например, для обновления системы необходимо сначала выполнить обновление репозиториев, а уже затем скачать новые версии пакетов. Это только пример и таких действий очень много, даже взять резервное копирование и загрузку скопированных файлов на удаленный сервер. Поэтому, чтобы не набирать одни и те же команды несколько раз можно использовать скрипты. В этой статье мы рассмотрим написание скриптов на Bash, рассмотрим основные операторы, а также то как они работают, так сказать, bash скрипты с нуля.
Основы скриптов
Скрипт или как его еще называют — сценарий, это последовательность команд, которые по очереди считывает и выполняет программа-интерпретатор, в нашем случае это программа командной строки — bash.
Скрипт — это обычный текстовый файл, в котором перечислены обычные команды, которые мы привыкли вводить вручную, а также указанна программа, которая будет их выполнять. Загрузчик, который будет выполнять скрипт не умеет работать с переменными окружения, поэтому ему нужно передать точный путь к программе, которую нужно запустить. А дальше он уже передаст ваш скрипт этой программе и начнется выполнение.
Простейший пример скрипта для командной оболочки Bash:
#!/bin/bash

echo "Hello world"
Утилита echo выводит строку, переданную ей в параметре на экран. Первая строка особая, она задает программу, которая будет выполнять команды. Вообще говоря, мы можем создать скрипт на любом другом языке программирования и указать нужный интерпретатор, например, на python:
#!/usr/bin/env python

print("Hello world")
Или на PHP:
#!/usr/bin/env php

echo "Hello world";
В первом случае мы прямо указали на программу, которая будет выполнять команды, в двух следующих мы не знаем точный адрес программы, поэтому просим утилиту env найти ее по имени и запустить. Такой подход используется во многих скриптах. Но это еще не все. В системе Linux, чтобы система могла выполнить скрипт, нужно установить на файл с ним флаг исполняемый.
Этот флаг ничего не меняет в самом файле, только говорит системе, что это не просто текстовый файл, а программа и ее нужно выполнять, открыть файл, узнать интерпретатор и выполнить. Если интерпретатор не указан, будет по умолчанию использоваться интерпретатор пользователя. Но поскольку не все используют bash, нужно указывать это явно.
Чтобы сделать файл исполняемым в linux выполните:
chmod ugo+x файл_скрипта
Теперь выполняем нашу небольшую первую программу:
./файл_скрипта
Все работает. Вы уже знаете как написать маленький скрипт, скажем для обновления. Как видите, скрипты содержат те же команды, что и выполняются в терминале, их писать очень просто. Но теперь мы немного усложним задачу. Поскольку скрипт, это программа, ему нужно самому принимать некоторые решения, хранить результаты выполнения команд и выполнять циклы. Все это позволяет делать оболочка Bash. Правда, тут все намного сложнее. Начнем с простого.
Переменные в скриптах
Написание скриптов на Bash редко обходится без сохранения временных данных, а значит создания переменных. Без переменных не обходится ни один язык программирования и наш примитивный язык командной оболочки тоже.
Возможно, вы уже раньше встречались с переменными окружения. Так вот, это те же самые переменные и работают они аналогично.
Например, объявим переменную string:
string="Hello world"
Значение нашей строки в кавычках. Но на самом деле кавычки не всегда нужны. Здесь сохраняется главный принцип bash — пробел — это специальный символ, разделитель, поэтому если не использовать кавычки world уже будет считаться отдельной командой, по той же причине мы не ставим пробелов перед и после знака равно.
Чтобы вывести значение переменной используется символ $. Например:
echo $string
Модифицируем наш скрипт:
#!/bin/bash

string1="hello "

string2=world

string=$string1$string2

echo $string
И проверяем:
./script
Hello world
Bash не различает типов переменных так, как языки высокого уровня, например, С++, вы можете присвоить переменной как число, так и строку. Одинаково все это будет считаться строкой. Оболочка поддерживает только слияние строк, для этого просто запишите имена переменных подряд:
#!/bin/bash

string1="hello "

string2=world

string=$string1$string2 and me

string3=$string1$string2" and me"

echo $string3
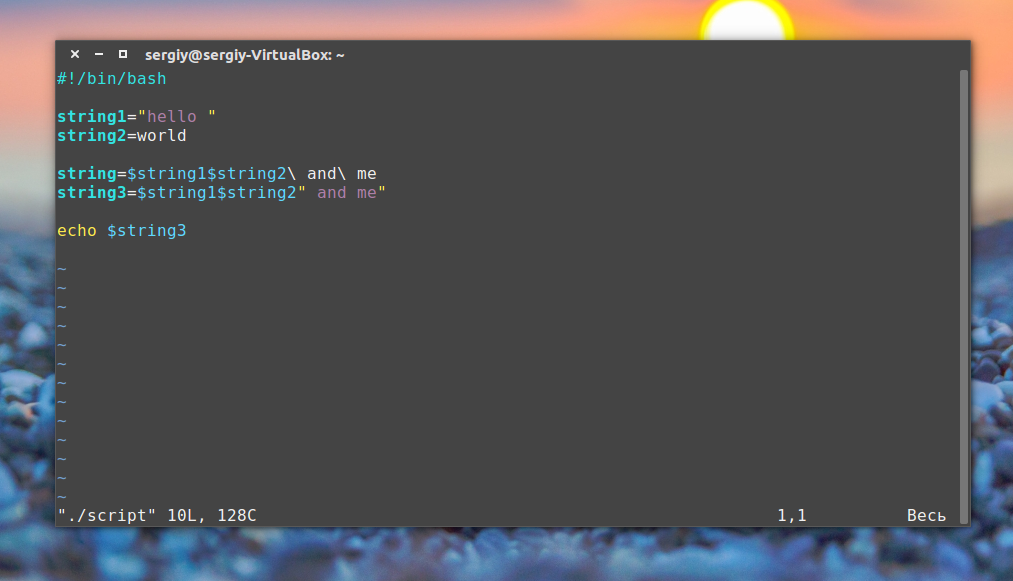
Проверяем:
./script
Обратите внимание, что как я и говорил, кавычки необязательны если в строке нет спецсимволов. Присмотритесь к обоим способам слияния строк, здесь тоже демонстрируется роль кавычек. Если же вам нужны более сложные способы обработки строк или арифметические операции, это не входит в возможности оболочки, для этого используются обычные утилиты.
Переменные и вывод команд
Переменные не были бы настолько полезны, если бы в них невозможно было записать результат выполнения утилит. Для этого используется такой синтаксис:
$(команда)
С помощью этой конструкции вывод команды будет перенаправлен прямо туда, откуда она была вызвана, а не на экран. Например, утилита date возвращает текущую дату. Эти команды эквивалентны:
date
echo $(date)
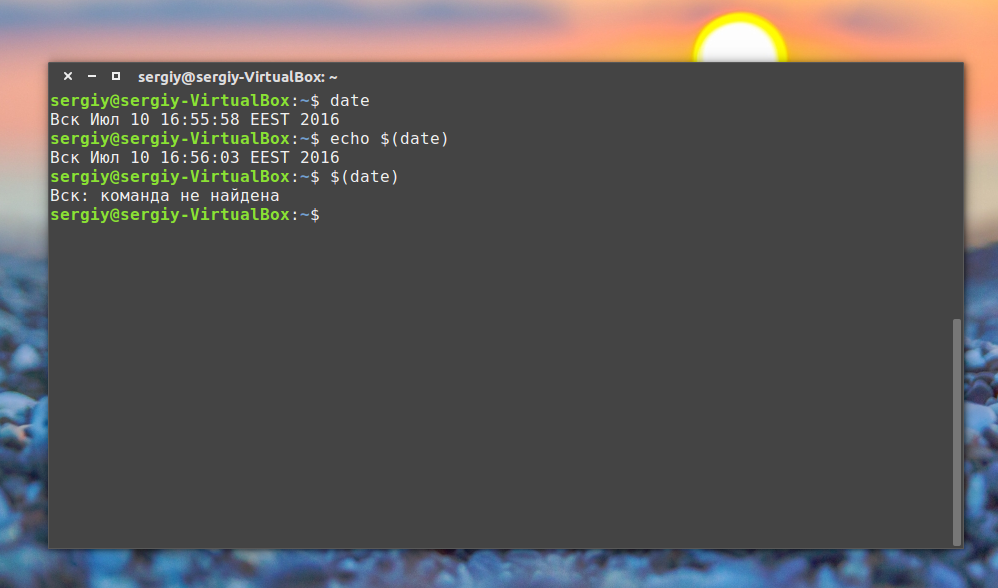
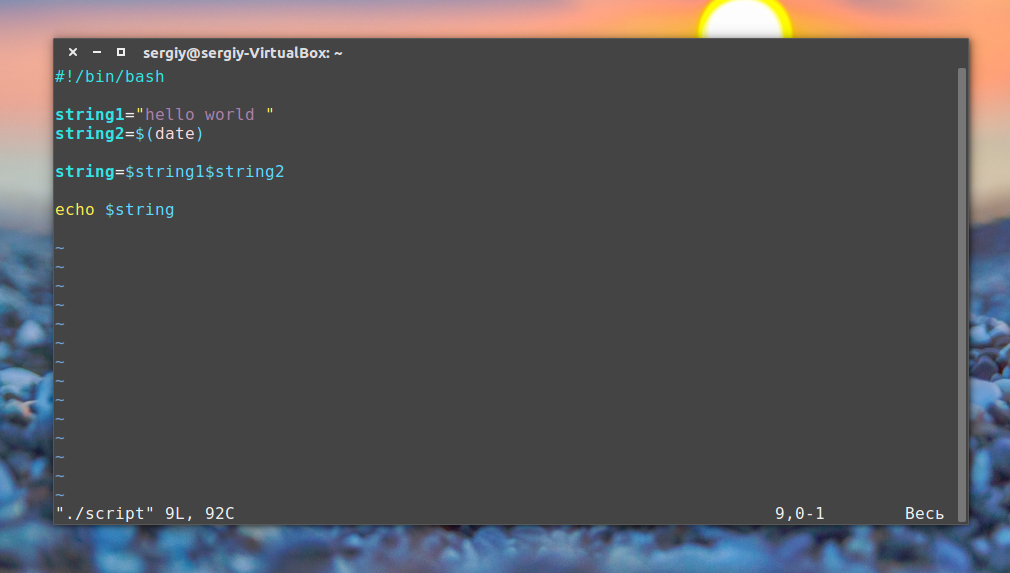
Понимаете? Напишем скрипт, где будет выводиться hello world и дата:
#!/bin/bash

string1="hello world "

string2=$(date)

string=$string1$string2

echo $string
Теперь вы знаете достаточно о переменных, и готовы создать bash скрипт, но это еще далеко не все. Дальше мы рассмотрим параметры и управляющие конструкции. Напомню, что это все обычные команды bash, и вам необязательно сохранять их в файле, можно выполнять сразу же на ходу.
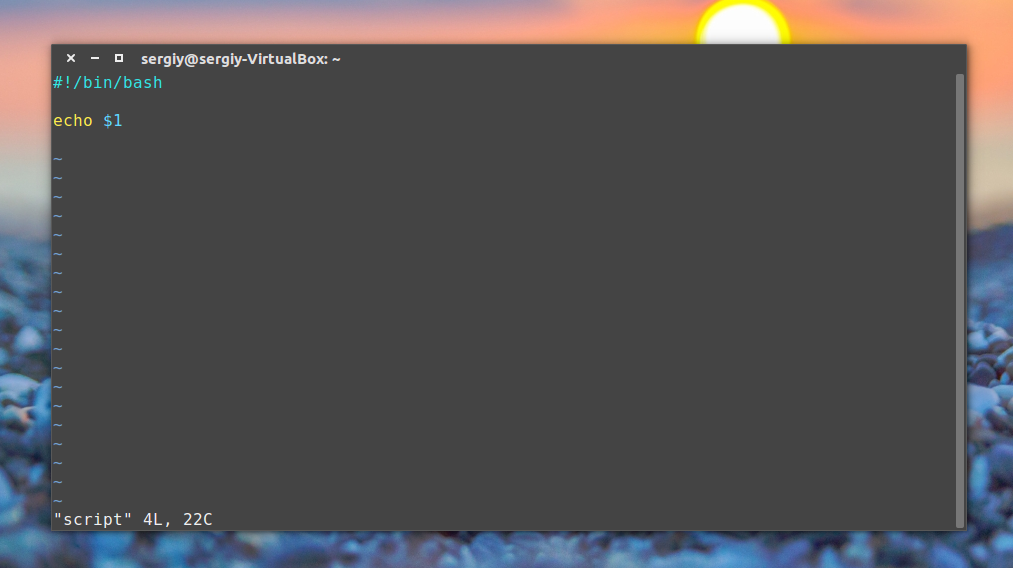
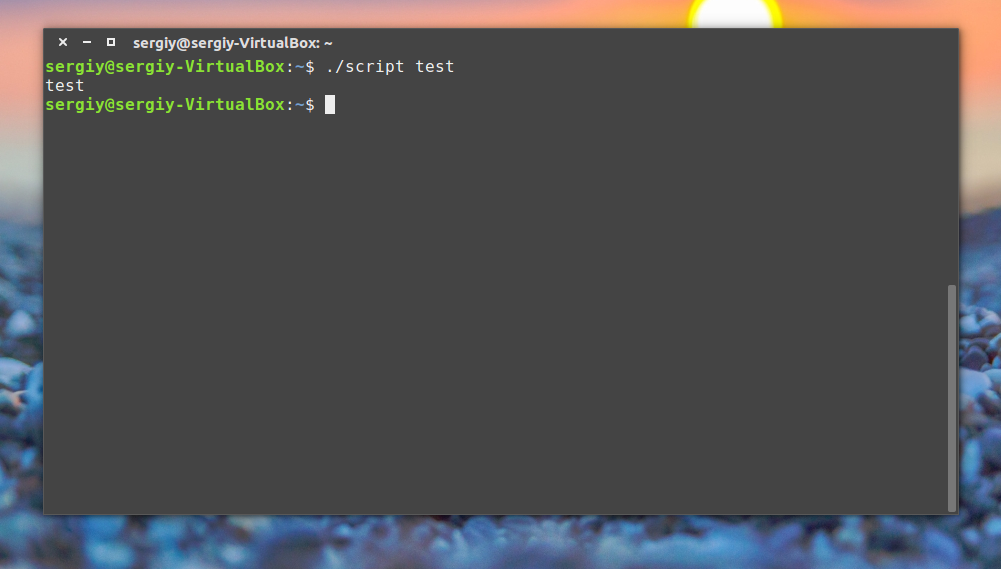
Параметры скрипта
Не всегда можно создать bash скрипт, который не зависит от ввода пользователя. В большинстве случаев нужно спросить у пользователя какое действие предпринять или какой файл использовать. При вызове скрипта мы можем передавать ему параметры. Все эти параметры доступны в виде переменных с именами в виде номеров.
Переменная с именем 1 содержит значение первого параметра, переменная 2, второго и так далее. Этот bash скрипт выведет значение первого параметра:
#!/bin/bash

echo $1
Управляющие конструкции в скриптах
Создание bash скрипта было бы не настолько полезным без возможности анализировать определенные факторы, и выполнять в ответ на них нужные действия. Это довольно-таки сложная тема, но она очень важна для того, чтобы создать bash скрипт.
В Bash для проверки условий есть команда Синтаксис ее такой:
if команда_условие
then
команда
else
команда
fi
Эта команда проверяет код завершения команды условия, и если 0 (успех) то выполняет команду или несколько команд после слова then, если код завершения 1 выполняется блок else, fi означает завершение блока команд.
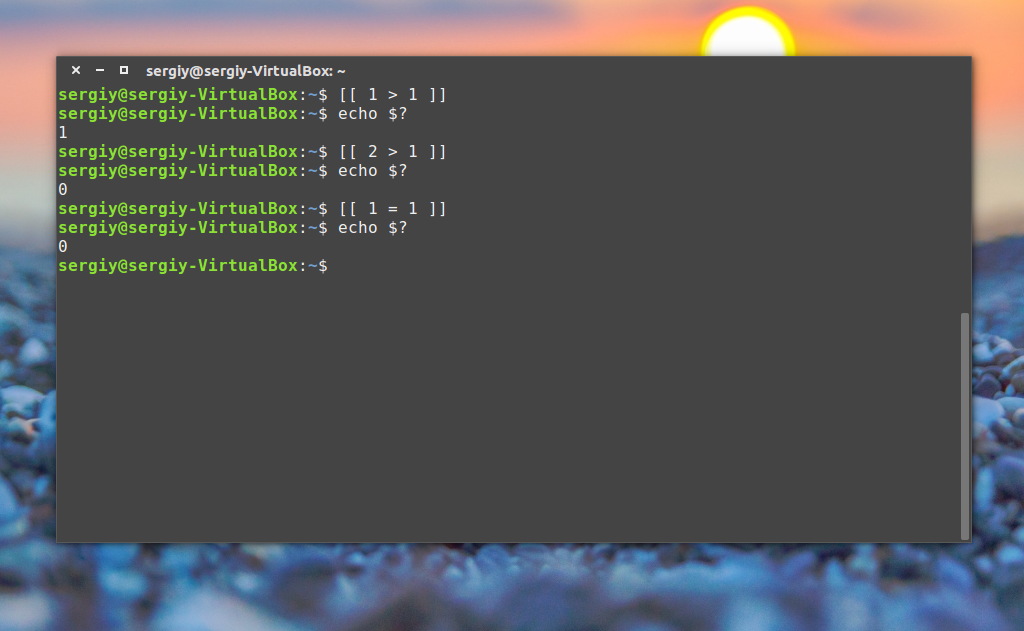
Но поскольку нам чаще всего нас интересует не код возврата команды, а сравнение строк и чисел, то была введена команда [[, которая позволяет выполнять различные сравнения и выдавать код возврата зависящий от результата сравнения. Ее синтаксис:
[[ параметр1 оператор параметр2 ]]
Для сравнения используются уже привычные нам операторы <,>,=,!= и т д. Если выражение верно, команда вернет 0, если нет — 1. Вы можете немного протестировать ее поведение в терминале. Код возврата последней команды хранится в переменной $?:
Теперь объединением все это и получим скрипт с условным выражением:
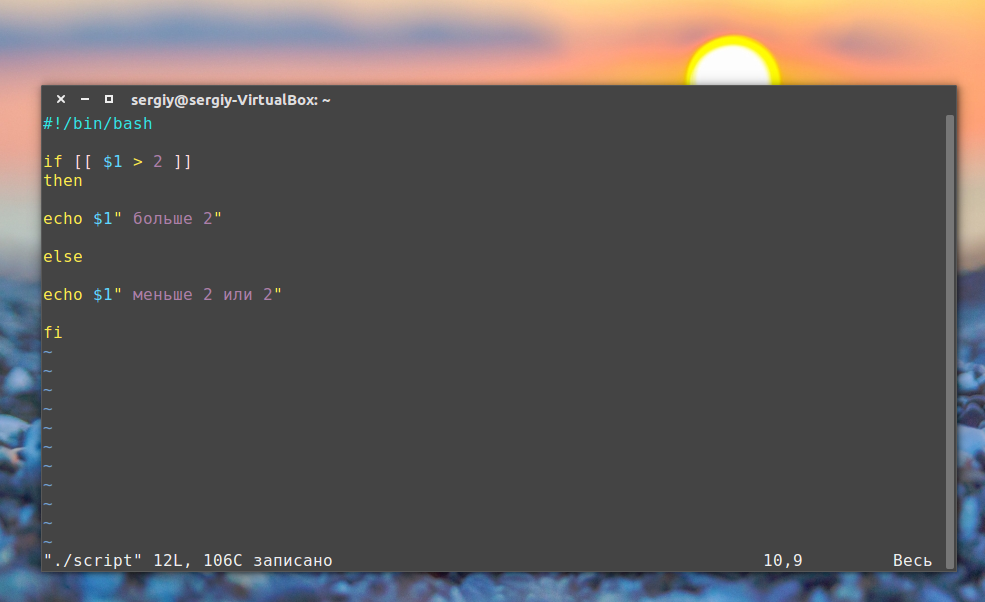
#!/bin/bash

if [[ $1 > 2 ]]

then

echo $1" больше 2"

else

echo $1" меньше 2 или 2"

fi
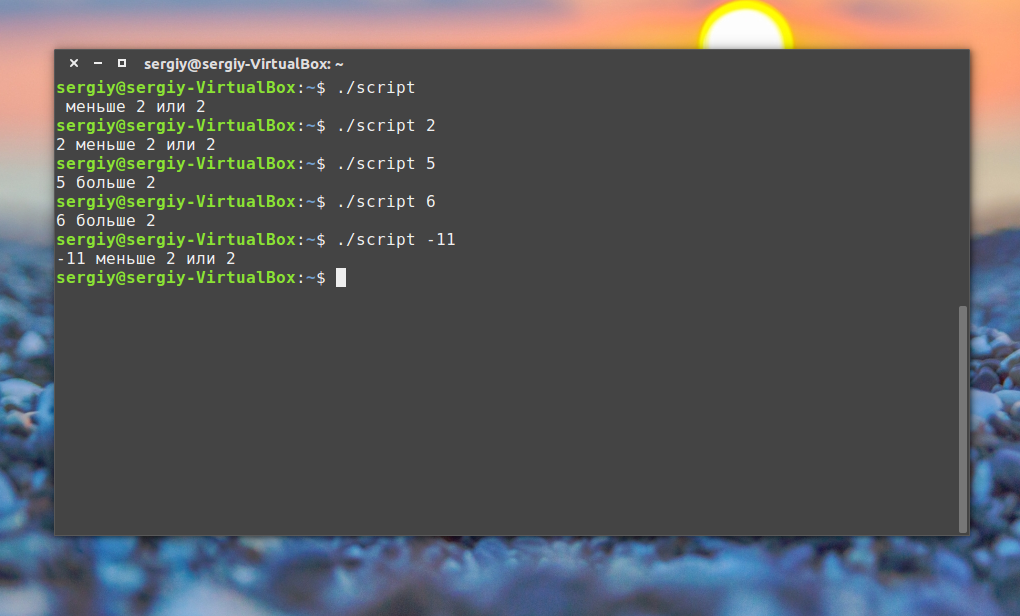
Конечно, у этой конструкции более мощные возможности, но это слишком сложно чтобы рассматривать их в этой статье. Возможно, я напишу об этом потом. А пока перейдем к циклам.
Циклы в скриптах
Преимущество программ в том, что мы можем в несколько строчек указать какие действия нужно выполнить несколько раз. Например, возможно написание скриптов на bash, которые состоят всего из нескольких строчек, а выполняются часами, анализируя параметры и выполняя нужные действия.
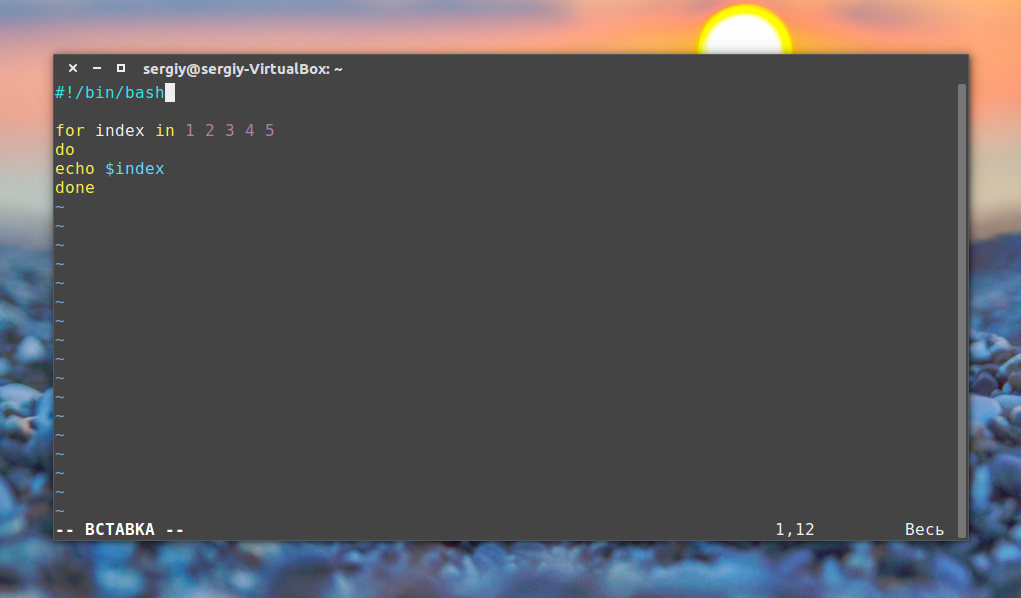
Первым рассмотрим цикл for. Вот его синтаксис:
for переменная in список
do
команда
done
Перебирает весь список, и присваивает по очереди переменной значение из списка, после каждого присваивания выполняет команды, расположенные между do и done.
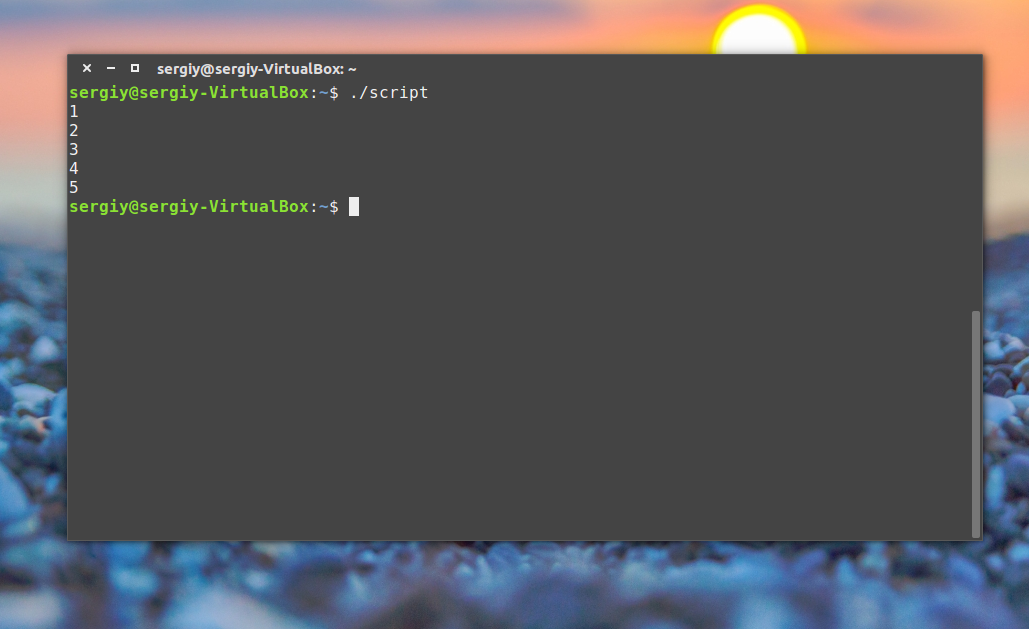
Например, переберем пять цифр:
#!/bin/bash

for index in 1 2 3 4 5

do

echo $index

done
Или вы можете перечислить все файлы из текущей директории:
for file in $(ls -l); do echo "$file"; done
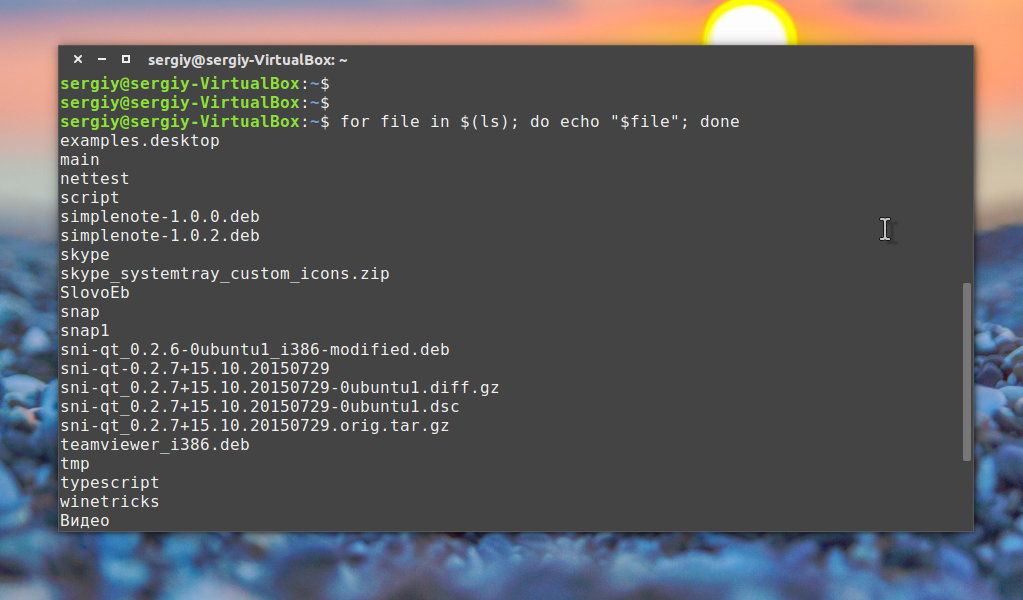
Как вы понимаете, можно не только выводить имена, но и выполнять нужные действия, это очень полезно когда выполняется создание bash скрипта.
Второй цикл, который мы рассмотрим — это цикл while, он выполняется пока команда условия возвращает код 0, успех. Рассмотрим синтаксис:
while команда условие
do
команда
done
Рассмотрим пример:
#!/bin/bash

index=1

while [[ $index < 5 ]]

do

echo $index

let "index=index+1"

done
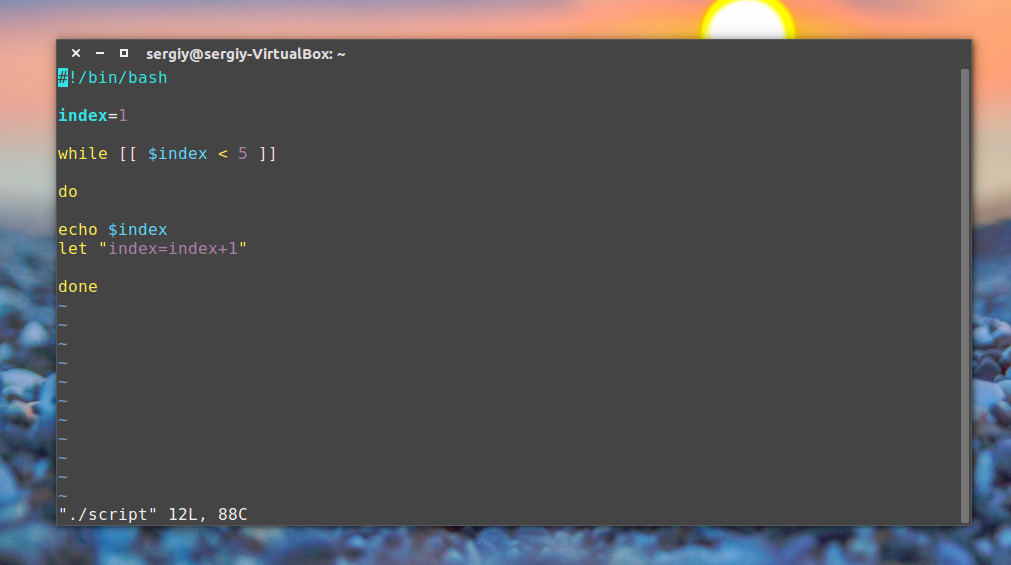
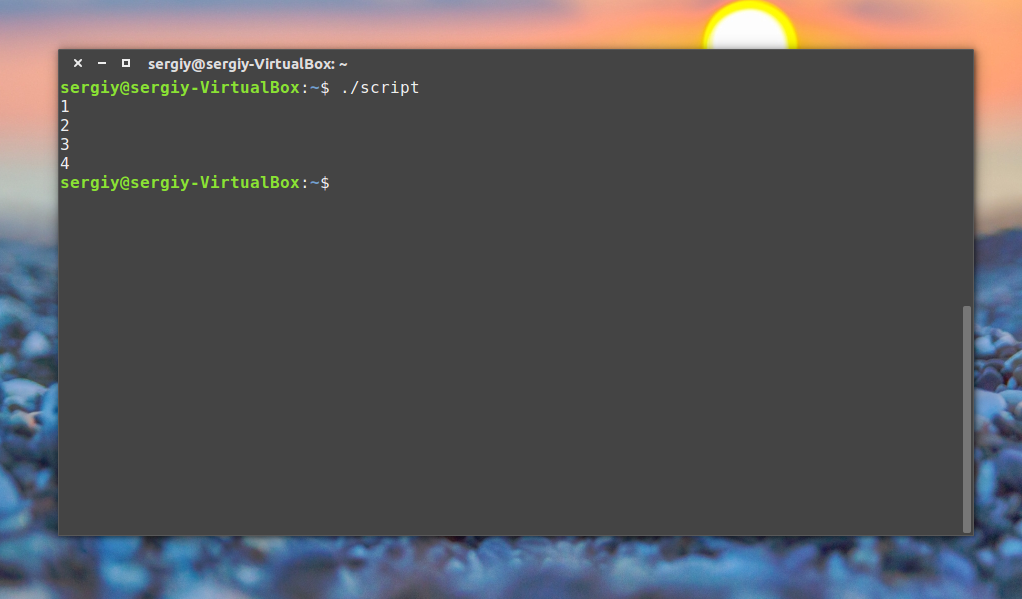
Как видите, все выполняется, команда let просто выполняет указанную математическую операцию, в нашем случае увеличивает значение переменной на единицу.
Хотелось бы отметить еще кое-что. Такие конструкции, как while, for, if рассчитаны на запись в несколько строк, и если вы попытаетесь их записать в одну строку, то получите ошибку. Но тем не менее это возможно, для этого там, где должен быть перевод строки ставьте точку с запятой «;». Например, предыдущий цикл можно было выполнить в виде одной строки:
index=1; while [[ $index < 5 ]]; do echo $index; let "index=index+1"; done;
Все очень просто я пытался не усложнять статью дополнительными терминами и возможностями bash, только самое основное. В некоторых случаях, возможно, вам понадобиться сделать gui для bash скрипта, тогда вы можете использовать такие программы как zenity или kdialog, с помощью них очень удобно выводить сообщения пользователю и даже запрашивать у него информацию.
Выводы
Теперь вы понимаете основы создания скрипта в linux и можете написать нужный вам скрипт, например, для резервного копирования. Я пытался рассматривать bash скрипты с нуля. Поэтому далеко не все аспекты были рассмотрены. Возможно, мы еще вернемся к этой теме в одной из следующих статей.

Статья распространяется под лицензией Creative Commons ShareAlike 4.0 при копировании материала ссылка на источник обязательна .
Shell scripting is an important part of process automation in Linux. Scripting helps you write a sequence of commands in a file and then execute them.
This saves you time because you don’t have to write certain commands again and again. You can perform daily tasks efficiently and even schedule them for automatic execution.
You can also set certain scripts to execute on startup such as showing a particular message on launching a new session or setting certain environment variables.
The applications and uses of scripting are numerous, so let’s dive in.
In this article, you will learn:
- What is a bash shell?
- What is a bash script and how do you identify it?
- How to create your first bash script and execute it.
- The basic syntax of shell scripting.
- How to see a system’s scheduled scripts.
- How to automate scripts by scheduling via cron jobs.
The best way to learn is by practicing. I highly encourage you to follow along using Replit. You can access a running Linux shell within minutes.
Introduction to the Bash Shell
The Linux command line is provided by a program called the shell. Over the years, the shell program has evolved to cater to various options.
Different users can be configured to use different shells. But most users prefer to stick with the current default shell. The default shell for many Linux distros is the GNU Bourne-Again Shell (bash). Bash is succeeded by Bourne shell (sh).
When you first launch the shell, it uses a startup script located in the .bashrc or .bash_profile file which allows you to customize the behavior of the shell.
When a shell is used interactively, it displays a $ when it is waiting for a command from the user. This is called the shell prompt.
[username@host ~]$
If shell is running as root, the prompt is changed to #. The superuser shell prompt looks like this:
[root@host ~]#
Bash is very powerful as it can simplify certain operations that are hard to accomplish efficiently with a GUI. Remember that most servers do not have a GUI, and it is best to learn to use the powers of a command line interface (CLI).
What is a Bash Script?
A bash script is a series of commands written in a file. These are read and executed by the bash program. The program executes line by line.
For example, you can navigate to a certain path, create a folder and spawn a process inside it using the command line.
You can do the same sequence of steps by saving the commands in a bash script and running it. You can run the script any number of times.
How Do You Identify a Bash Script?
File extension of .sh.
By naming conventions, bash scripts end with a .sh. However, bash scripts can run perfectly fine without the sh extension.
Scripts start with a bash bang.
Scripts are also identified with a shebang. Shebang is a combination of bash # and bang ! followed the the bash shell path. This is the first line of the script. Shebang tells the shell to execute it via bash shell. Shebang is simply an absolute path to the bash interpreter.
Below is an example of the shebang statement.
#! /bin/bashThe path of the bash program can vary. We will see later how to identify it.
Execution rights
Scripts have execution rights for the user executing them.
An execution right is represented by x. In the example below, my user has the rwx (read, write, execute) rights for the file test_script.sh
![]()
File colour
Executable scripts appear in a different colour from rest of the files and folders.
In my case, the scripts with execution rights appear as green.

How to Create Your First Bash Script
Let’s create a simple script in bash that outputs Hello World.
Create a file named hello_world.sh
touch hello_world.shFind the path to your bash shell.
which bash
In my case, the path is /usr/bin/bash and I will include this in the shebang.
Write the command.
We will echo «hello world» to the console.
Our script will look something like this:
#! usr/bin/bash
echo "Hello World"
Edit the file hello_world.sh using a text editor of your choice and add the above lines in it.
Provide execution rights to your user.
Modify the file permissions and allow execution of the script by using the command below:
chmod u+x hello_world.shchmod modifies the existing rights of a file for a particular user. We are adding +x to user u.
Run the script.
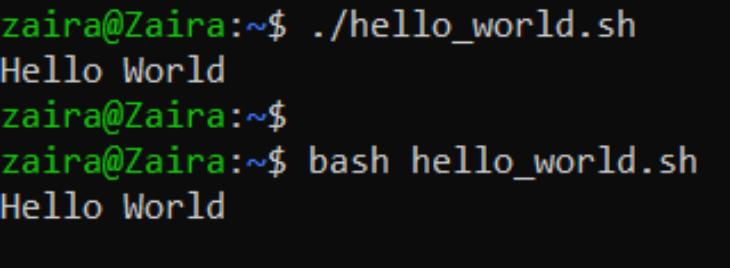
You can run the script in the following ways:
./hello_world.sh
bash hello_world.sh.
Here’s the output:
The Basic Syntax of Bash Scripting
Just like any other programming language, bash scripting follows a set of rules to create programs understandable by the computer. In this section, we will study the syntax of bash scripting.
How to define variables
We can define a variable by using the syntax variable_name=value. To get the value of the variable, add $ before the variable.
#!/bin/bash
# A simple variable example
greeting=Hello
name=Tux
echo $greeting $name
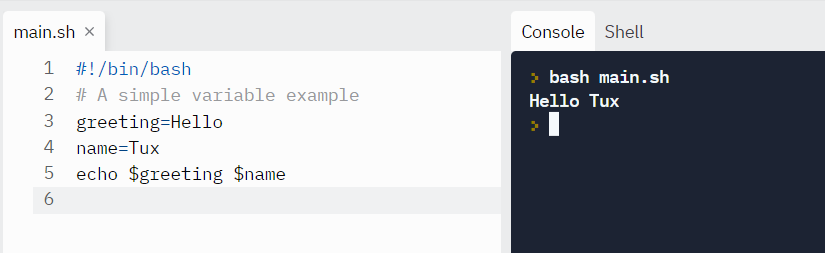
Tux is also the name of the Linux mascot, the penguin.

Arithmetic Expressions
Below are the operators supported by bash for mathematical calculations:
| Operator | Usage |
|---|---|
| + | addition |
| — | subtraction |
| * | multiplication |
| / | division |
| ** | exponentiation |
| % | modulus |
Let’s run a few examples.
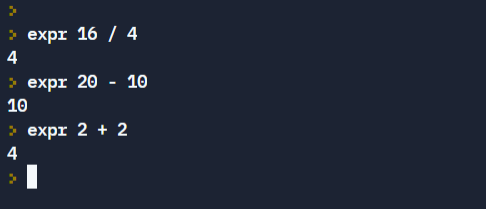
Numerical expressions can also be calculated and stored in a variable using the syntax below:
var=$((expression))
Let’s try an example.
#!/bin/bash

var=$((3+9))
echo $var
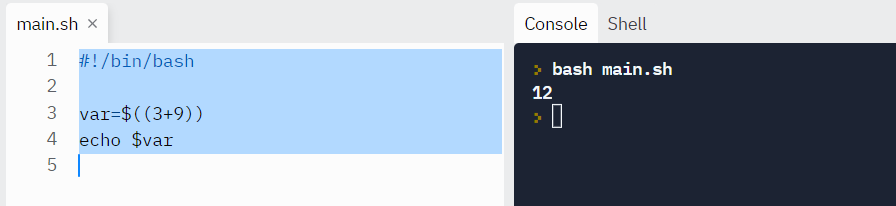
Fractions are not correctly calculated using the above methods and truncated.
For decimal calculations, we can use bc command to get the output to a particular number of decimal places. bc (Bash Calculator) is a command line calculator that supports calculation up to a certain number of decimal points.
echo "scale=2;22/7" | bc
Where scale defines the number of decimal places required in the output.

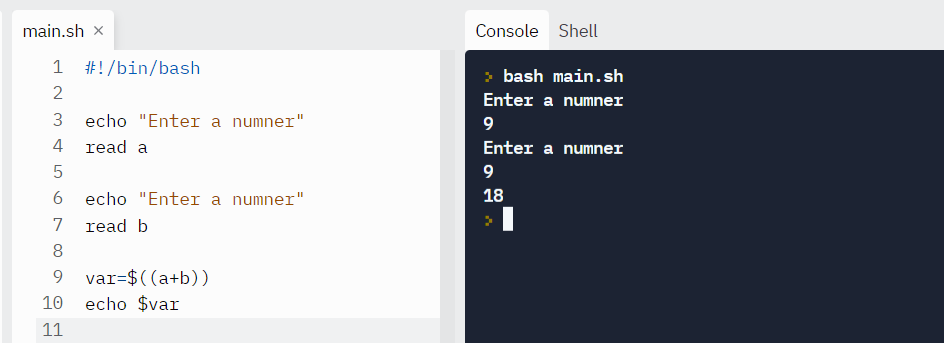
How to read user input
Sometimes you’ll need to gather user input and perform relevant operations.
In bash, we can take user input using the read command.
read variable_nameTo prompt the user with a custom message, use the -p flag.
read -p "Enter your age" variable_name
Example:
#!/bin/bash

echo "Enter a numner"
read a

echo "Enter a numner"
read b

var=$((a+b))
echo $var
Numeric Comparison logical operators
Comparison is used to check if statements evaluate to true or false. We can use the below shown operators to compare two statements:
| Operation | Syntax | Explanation |
|---|---|---|
| Equality | num1 -eq num2 | is num1 equal to num2 |
| Greater than equal to | num1 -ge num2 | is num1 greater than equal to num2 |
| Greater than | num1 -gt num2 | is num1 greater than num2 |
| Less than equal to | num1 -le num2 | is num1 less than equal to num2 |
| Less than | num1 -lt num2 | is num1 less than num2 |
| Not Equal to | num1 -ne num2 | is num1 not equal to num2 |
Syntax:
if [ conditions ]
    then
         commands
fiExample:
Let’s compare two numbers and find their relationship:
read x
read y

if [ $x -gt $y ]
then
echo X is greater than Y
elif [ $x -lt $y ]
then
echo X is less than Y
elif [ $x -eq $y ]
then
echo X is equal to Y
fi
Output:

Conditional Statements (Decision Making)
Conditions are expressions that evaluate to a boolean expression (true or false). To check conditions, we can use if, if-else, if-elif-else and nested conditionals.
The structure of conditional statements is as follows:
if...then...fistatementsif...then...else...fistatementsif..elif..else..fiif..then..else..if..then..fi..fi..(Nested Conditionals)
Syntax:
if [[ condition ]]
then
	statement
elif [[ condition ]]; then
	statement
else
	do this by default
fi
To create meaningful comparisons, we can use AND -a and OR -o as well.
The below statement translates to: If a is greater than 40 and b is less than 6.
if [ $a -gt 40 -a $b -lt 6 ]
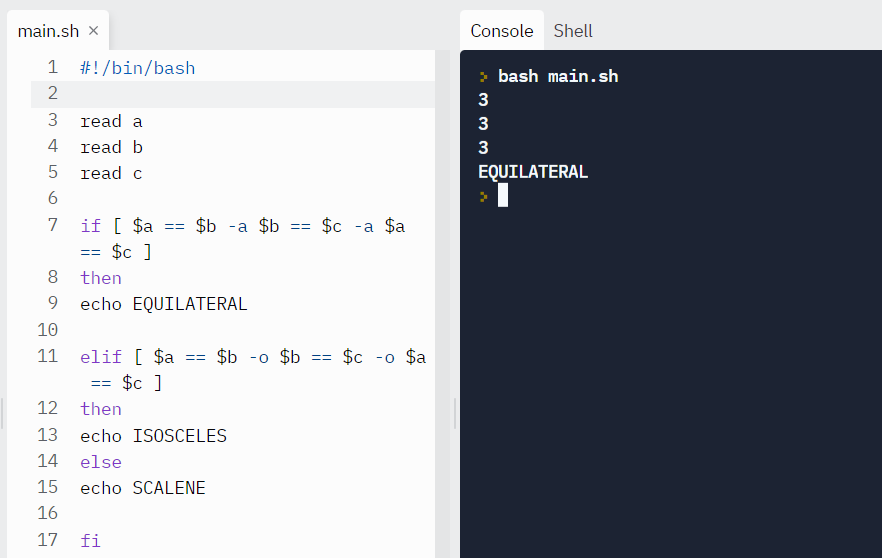
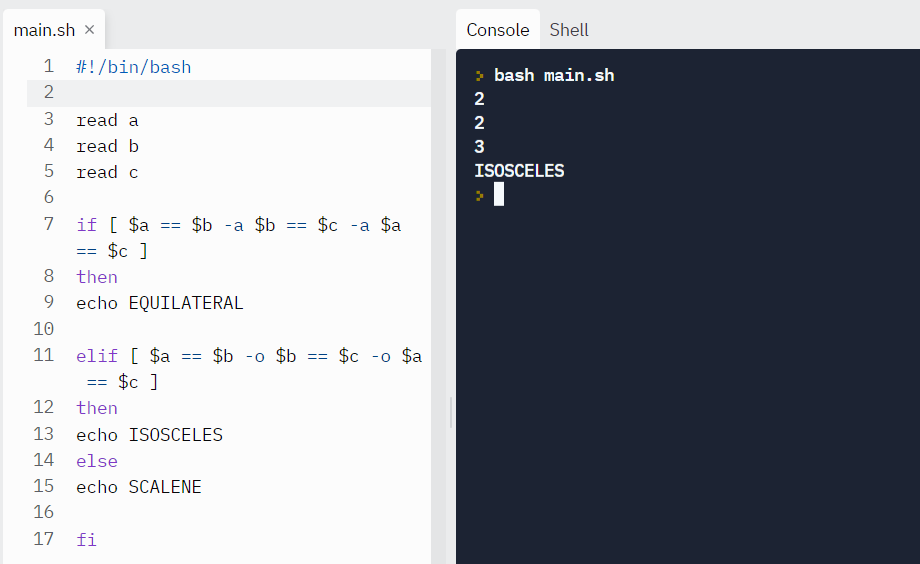
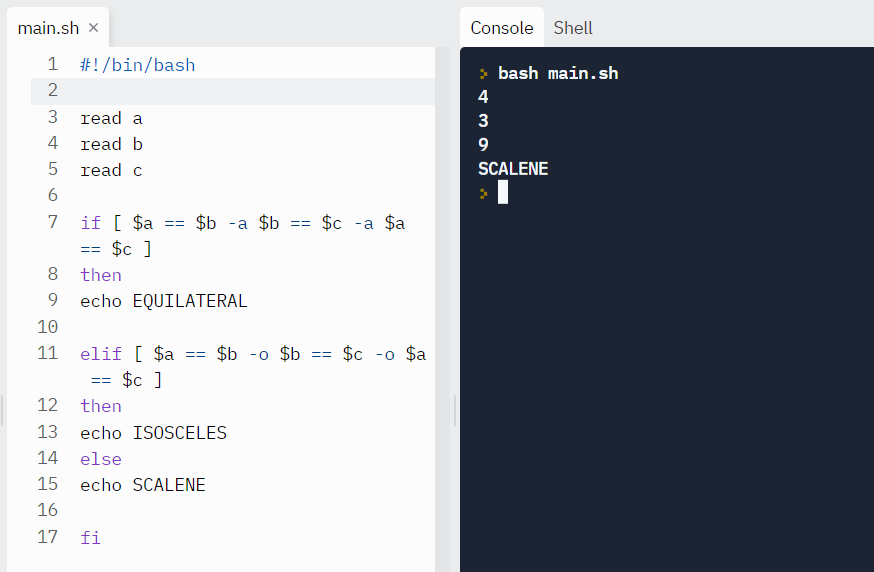
Example: Let’s find the triangle type by reading the lengths of its sides.
read a
read b
read c

if [ $a == $b -a $b == $c -a $a == $c ]
then
echo EQUILATERAL

elif [ $a == $b -o $b == $c -o $a == $c ]
then
echo ISOSCELES
else
echo SCALENE

fiOutput:
Test case #1
Test case #2
Test case #3
Looping and skipping
For loops allow you to execute statements a specific number of times.
Looping with numbers:
In the example below, the loop will iterate 5 times.
#!/bin/bash

for i in {1..5}
do
    echo $i
done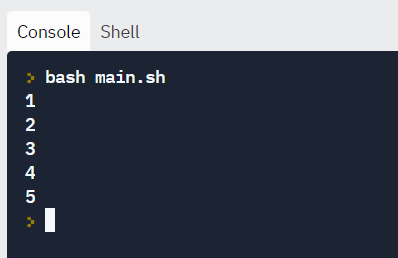
Looping with strings:
We can loop through strings as well.
#!/bin/bash

for X in cyan magenta yellow
do
	echo $X
done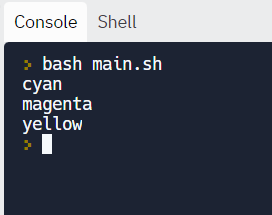
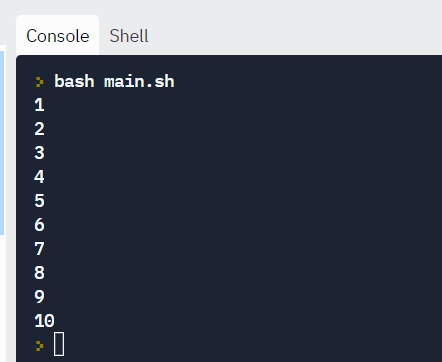
While loop
While loops check for a condition and loop until the condition remains true. We need to provide a counter statement that increments the counter to control loop execution.
In the example below, (( i += 1 )) is the counter statement that increments the value of i.
Example:
#!/bin/bash
i=1
while [[ $i -le 10 ]] ; do
   echo "$i"
  (( i += 1 ))
done
Reading files
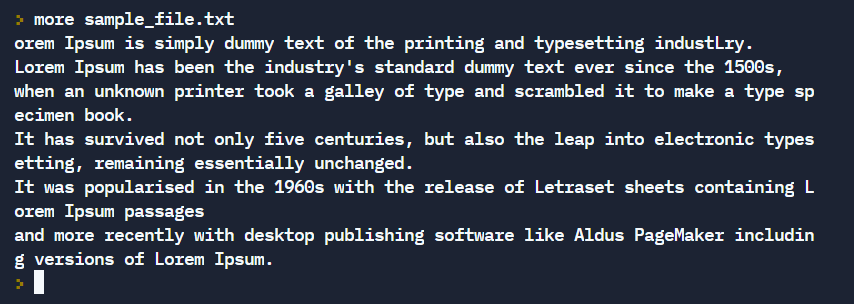
Suppose we have a file sample_file.txt as shown below:
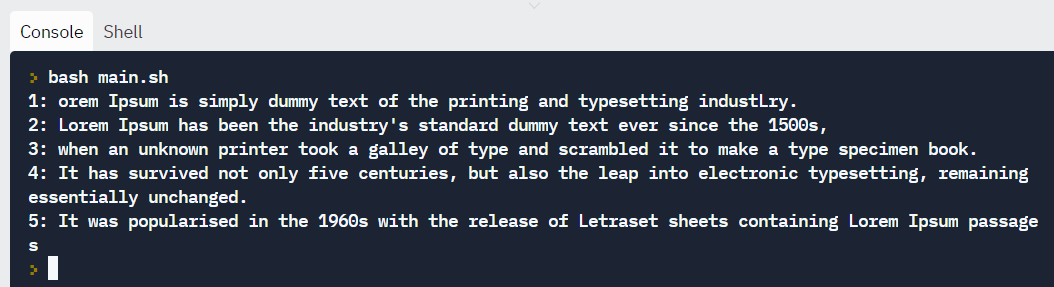
We can read the file line by line and print the output on the screen.
#!/bin/bash

LINE=1

while read -r CURRENT_LINE
	do
		echo "$LINE: $CURRENT_LINE"
    ((LINE++))
done < "sample_file.txt"
Output:
How to execute commands with back ticks
If you need to include the output of a complex command in your script, you can write the statement inside back ticks.
Syntax:
var= ` commands `
Example: Suppose we want to get the output of a list of mountpoints with tmpfs in their name. We can craft a statement like this: df -h | grep tmpfs.
To include it in the bash script, we can enclose it in back ticks.
#!/bin/bash

var=`df -h | grep tmpfs`
echo $var
Output:

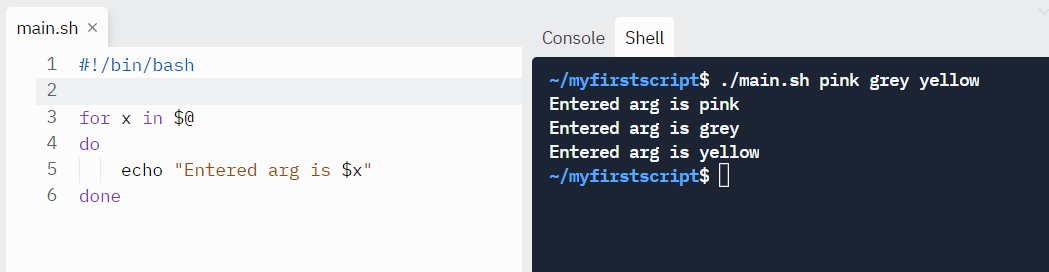
How to get arguments for scripts from the command line
It is possible to give arguments to the script on execution.
$@ represents the position of the parameters, starting from one.
#!/bin/bash

for x in $@
do
    echo "Entered arg is $x"
done
Run it like this:
./script arg1 arg2
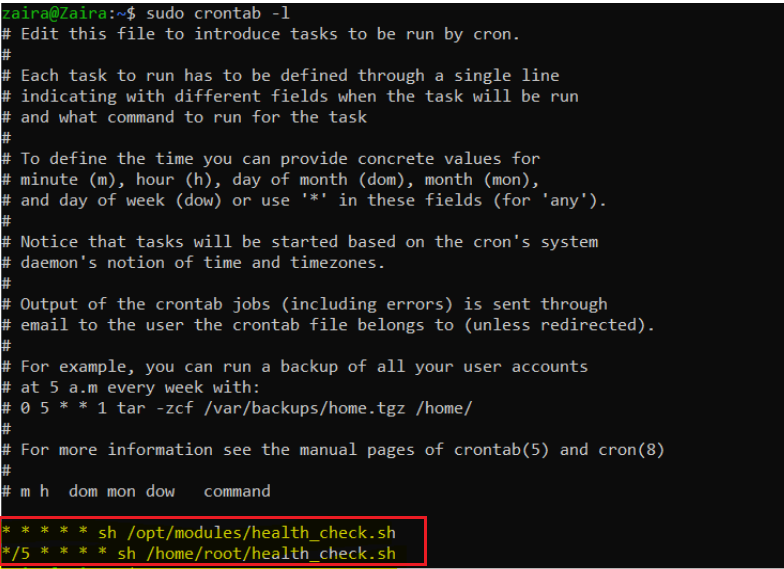
How to Automate Scripts by Scheduling via cron Jobs
Cron is a job scheduling utility present in Unix like systems. You can schedule jobs to execute daily, weekly, monthly or in a specific time of the day. Automation in Linux heavily relies on cron jobs.
Below is the syntax to schedule crons:
# Cron job example
* * * * * sh /path/to/script.sh
Here, * represent represents minute(s) hour(s) day(s) month(s) weekday(s), respectively.
Below are some examples of scheduling cron jobs.
| SCHEDULE | SCHEDULED VALUE |
|---|---|
| 5 0 * 8 * | At 00:05 in August. |
| 5 4 * * 6 | At 04:05 on Sunday. |
| 0 22 * * 1-5 | At 22:00 on every day-of-week from Monday through Friday. |
You can learn about cron in detail in this blog post.
How to Check Existing Scripts in a System
Using crontab
crontab -l lists the already scheduled scripts for a particular user.
Using the find command
The find command helps to locate files based on certain patterns. As most of the scripts end with .sh, we can use the find script like this:
find . -type f -name "*.sh"Where,
.represents the current directory. You can change the path accordingly.-type findicates that the file type we are looking for is a text based file.*.shtells to match all files ending with.sh.
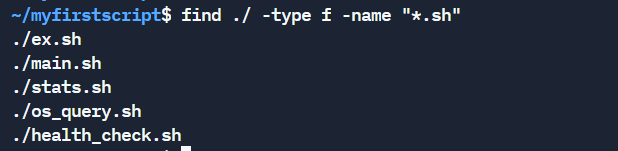
If you are interested to read about the find command in detail, check my other post.
Wrapping up
In this tutorial we learned the basics of shell scripting. We looked into examples and syntax which can help us write meaningful programs.
What’s your favorite thing you learned from this tutorial? Let me know on Twitter!
You can read my other posts here.
Work vector created by macrovector — www.freepik.com
Learn to code for free. freeCodeCamp’s open source curriculum has helped more than 40,000 people get jobs as developers. Get started
Бесплатная книга-сайт на русском, полный гайд
Advanced Bash-Scripting Guide
Введение
BASH — Bourne-Again SHell (что может переводится как «перерожденный шел», или «Снова шел Борна(создатель sh)»), самый популярный командный интерпретатор в юниксоподобных системах, в особенности в GNU/Linux. Ниже приведу ряд встроенных команд, которые мы будем использовать для создания своих скриптов.
breakвыход из цикла for, while или until
continueвыполнение следующей итерации цикла for, while или until
echoвывод аргументов, разделенных пробелами, на стандартное устройство вывода
exitвыход из оболочки
exportотмечает аргументы как переменные для передачи в дочерние процессы в среде
hashзапоминает полные имена путей команд, указанных в качестве аргументов, чтобы не искать их при следующем обращении
killпосылает сигнал завершения процессу
pwdвыводит текущий рабочий каталог
readчитает строку из ввода оболочки и использует ее для присвоения значений указанным переменным.
returnзаставляет функцию оболочки выйти с указанным значением
shiftперемещает позиционные параметры налево
testвычисляет условное выражение
timesвыводит имя пользователя и системное время, использованное оболочкой и ее потомками
trapуказывает команды, которые должны выполняться при получении оболочкой сигнала
unsetвызывает уничтожение переменных оболочки
waitждет выхода из дочернего процесса и сообщает выходное состояние.
И конечно же кроме встроенных команд мы будем использовать целую кучу внешних, отдельных команд-программ, с которыми мы познакомимся уже в процессе
Что необходимо знать с самого начала
- Любой bash-скрипт должен начинаться со строки:
#!/bin/bash
в этой строке после #! указывается путь к bash-интерпретатору, поэтому если он у вас установлен в другом месте(где, вы можете узнать набрав whereis bash) поменяйте её на ваш путь.
- Коментарии начинаются с символа # (кроме первой строки).
- В bash переменные не имеют типа(о них речь пойдет ниже)
Переменные и параметры скрипта
Приведу как пример небольшой пример, который мы разберем:
#!/bin/bash#указываем где у нас хранится bash-интерпретатор
#присваиваем переменной parametr1 значение первого параметра скрипта
parametr1=$1
#присваиваем переменной script_name значение имени скрипта
script_name=$0
# команда echo выводит определенную строку, обращение к переменным осуществляется через $имя_переменной.
echo "Вы запустили скрипт с именем $script_name и параметром $parametr1"
# здесь мы видим другие кавычки, разница в том, что в одинарных кавычках не происходит подстановки переменных.
echo 'Вы запустили скрипт с именем $script_name и параметром $parametr1'
#Выход с кодом 0 (удачное завершение работы скрипта)
exit 0
Результат выполнения скрипта:
ite@ite-desktop:~$ ./test.sh qwerty
Вы запустили скрипт с именем ./test.sh и параметром qwerty
Вы запустили скрипт с именем $script_name и параметром $parametr1
После того как мы познакомились как использовать переменные и передавать скрипту параметры, время познакомиться с зарезервированными переменными:
$DIRSTACK— содержимое вершины стека каталогов
$EDITOR— текстовый редактор по умолчанию
$EUID— Эффективный UID. Если вы использовали программу su для выполнения команд от другого пользователя, то эта переменная содержит UID этого пользователя, в то время как…
$UID— …содержит реальный идентификатор, который устанавливается только при логине.
$FUNCNAME— имя текущей функции в скрипте.
$GROUPS— массив групп к которым принадлежит текущий пользователь
$HOME— домашний каталог пользователя
$HOSTNAME— ваш hostname
$HOSTTYPE— архитектура машины.
$LC_CTYPE— внутренняя переменная, котороя определяет кодировку символов
$OLDPWD— прежний рабочий каталог
$OSTYPE— тип ОС
$PATH— путь поиска программ
$PPID— идентификатор родительского процесса
$SECONDS— время работы скрипта(в сек.)
$#— общее количество параметров переданных скрипту
$*— все аргументы переданыне скрипту(выводятся в строку)
$@— тоже самое, что и предыдущий, но параметры выводятся в столбик
$!— PID последнего запущенного в фоне процесса
$$— PID самого скрипта
Условия
Условные операторы, думаю, знакомы практически каждому, кто хоть раз пытался на чем-то писать программы. В bash условия пишутся след. образом (как обычно на примере):
#!/bin/bash
#в переменную source засовываем первый параметр скрипта
source=$1
#в переменную dest засовываем второй параметр скрипта
dest=$2# в ковычках указываем имена переменных для сравнения. -eq — логическое сравнение обозначающие «равны»
if [[ "$source" -eq "$dest" ]]
# если они действительно равны, то
then
#выводим сообщение об ошибке, т.к. $source и $dest у нас равны
echo "Применик $dest и источник $source один и тот же файл!"
# выходим с ошибкой (1 — код ошибки)
exit 1
# если же они не равны
else
# то выполняем команду cp: копируем источник в приемник
cp $source $dest
echo "Удачное копирование!"
fi#обозначаем окончание условия.
Результат выполнения скрипта:
ite@ite-desktop:~$ ./primer2.sh 1 1
Применик 1 и источник 1 один и тот же файл!
ite@ite-desktop:~$ ./primer2.sh 1 2
Удачное копирование!
Структура if-then-else используется следующим образом:
if<команда или набор команд возвращающих код возврата(0 или 1)>
then
<если выражение после if истино, то выполняется этот блок>
else
<если выражение после if ложно, тот этот>
В качестве команд возвращающих код возврата могут выступать структуры [[ , [ , test, (( )) или любая другая(или несколько) linux-команда.
test— используется для логического сравнения. после выражения, неоьбходима закрывающая скобка «]»
[— синоним команды test
[[— расширенная версия «[» (начиная с версии 2.02)(как в примере), внутри которой могут быть использованы || (или), & (и). Долна иметь закрывающуб скобку «]]»
(( ))— математическое сравнение.
для построения многоярусных условий вида:
if ...
then ....
else
if ....
then....
else ....
для краткости и читаемости кода, можно использовать структуру:
if ..
then ...
elif ...
then ...
elif ...
Условия. Множественный выбор
Если необходимо сравнивать какоую-то одну переменную с большим количеством параметров, то целесообразней использовать оператор case.
#!/bin/bash
echo "Выберите редатор для запуска:"
echo "1 Запуск программы nano"
echo "2 Запуск программы vi"
echo "3 Запуск программы emacs"
echo "4 Выход"
#здесь мы читаем в переменную $doing со стандартного ввода
read doing
case $doing in
1)
/usr/bin/nano# если $doing содержит 1, то запустить nano
;;
2)
/usr/bin/vi# если $doing содержит 2, то запустить vi
;;
3)
/usr/bin/emacs# если $doing содержит 3, то запустить emacs
;;
4)
exit 0
;;
*)#если введено с клавиатуры то, что в case не описывается, выполнять следующее:
echo "Введено неправильное действие"
esac#окончание оператора case.
Результат работы:
ite@ite-desktop:~$ ./menu2.sh
Выберите редатор для запуска:
1 Запуск программы nano
2 Запуск программы vi
3 Запуск программы emacs
4 Выход
После выбор цифры и нажатия Enter запуститься тот редактор, который вы выбрали(если конечно все пути указаны правильно, и у вас установлены эти редакторы  )
)
Прведу список логических операторв, которые используются для конструкции if-then-else-fi:
-z# строка пуста
-n# строка не пуста
=, (==)# строки равны
!=# строки неравны
-eq# равно
-ne# неравно
-lt,(< )# меньше
-le,(<=)# меньше или равно
-gt,(>)#больше
-ge,(>=)#больше или равно
!#отрицание логического выражения
-a,(&&)#логическое «И»
-o,(||)# логическое «ИЛИ»
С основами языка и условиями мы разобрались, чтобы не перегружать статью, разобью её на несколько частей(допустим на 3). Во второй части разберем операторы цикла и выполнение математических операций.
Основы BASH. Часть 2
Циклы. Цикл for-in.
Оператор for-in предназначен для поочередного обращения к значениям перечисленным в списке. Каждое значение поочередно в списке присваивается переменной.
Синтаксис следующий:
for переменная in список_значений
do
команды
done
Рассмотрим небольшой пример:
#!/bin/bash
for i in 0 1 2 3 4 #переменной $i будем поочередно присваивать значения от 0 до 4 включительно
do
echo "Console number is $i" >> /dev/pts/$i #Пишем в файл /dev/pts/$i(файл виртуального терминала) строку "Console number is $i"
done #цикл окончен
exit 0
После выполнения примера в первых 5 виртуальных консолях(терминалах) появится строка с её номером. В переменную $i поочередно подставляются значения из списка и в цикле идет работа со значением этой переменной
Циклы. Цикл while.
Цикл while сложнее цикла for-in и используется для повторения команд, пока какое-то выражение истинно( код возврата = 0).
Синтаксис оператора следующий:
while выражение или команда возвращающая код возврата
do
команды
done
Пример работы цикла рассмотрим на следующем примере:
#!/bin/bash
again=yes #присваиваем значение "yes" переменной again
while [ "$again" = "yes" ] #Будем выполнять цикл, пока $again будет равно "yes"
do
echo "Please enter a name:"
read name
echo "The name you entered is $name"

echo "Do you wish to continue?"
read again
done
echo "Bye-Bye"
А теперь результат работы скрипта:
ite@ite-desktop:~$ ./bash2_primer1.sh
Please enter a name:
ite
The name you entered is ite
Do you wish to continue?
yes
Please enter a name:
mihail
The name you entered is mihail
Do you wish to continue?
no
Bye-Bye
Как видим цикл выполняется до тех пор, пока мы не введем что-то отличное от «yes». Между do и done можно описывать любые структуры, операторы и т.п., все они будут выполнятся в цикле.Но следует быть осторожным с этим циклом, если вы запустите на выполнение в нём какую-либо команду, без изменения переменной выражения, вы можете попасть в бесконечный цикл.
Теперь об условии истинности. После while, как и в условном операторе if-then-else можно вставлять любое выражение или команду, которая возвращает код возврата, и цикл будет исполнятся до тех пор, пока код возврата = 0! Оператор [ аналог команды test, которая проверяет истинность условия, которое ей передали.
Рассмотрим еще один пример, я взял его из книги Advanced Bash Scripting. Уж очень он мне понравился :), но я его немного упростил. В этом примере мы познакомимся с еще одним типом циклов UNTIL-DO. Эта практически полный аналог цикла WHILE-DO, только выполняется пока какое-то выражение ложно.
Вот пример:
#!/bin/bash
echo "Введите числитель: "
read dividend
echo "Введите знаменатель: "
read divisor

dnd=$dividend #мы будем изменять переменные dividend и divisor,
#сохраним их знания в других переменных, т.к. они нам
#понадобятся
dvs=$divisor
remainder=1

until [ "$remainder" -eq 0 ]
do
let "remainder = dividend % divisor"
dividend=$divisor
divisor=$remainder
done

echo "НОД чисел $dnd и $dvs = $dividend"
Результат выполнения скрипта:
ite@ite-desktop:~$ ./bash2_primer3.sh
Введите числитель:
100
Введите знаменатель:
90
НОД чисел 100 и 90 = 10
Математические операции
Команда let.
Команда let производит арифметические операции над числами и переменными.
Рассмотрим небольшой пример, в котором мы производим некоторые вычисления над введенными числами:
#!/bin/bash
echo "Введите a: "
read a
echo "Введите b: "
read b

let "c = a + b" #сложение
echo "a+b= $c"
let "c = a / b" #деление
echo "a/b= $c"
let "c <<= 2" #сдвигает c на 2 разряда влево
echo "c после сдвига на 2 разряда: $c"
let "c = a % b" # находит остаток от деления a на b
echo "$a / $b. остаток: $c "
Результат выполнения:
ite@ite-desktop:~$ ./bash2_primer2.sh
Введите a:
123
Введите b:
12
a+b= 135
a/b= 10
c после сдвига на 2 разряда: 40
123 / 12. остаток: 3
Ну вот, как видите ничего сложного, список математических операций стандартный:
+— сложение
—— вычитание
*— умножение
/— деление
**— возведение в степень
%— модуль(деление по модулю), остаток от деления
letпозволяет использовать сокращения арифметических команд, тем самым сокращая кол-во используемых переменных. Например:a = a+bэквивалентноa +=bи т.д
Работа с внешними программами при написании shell-скриптов
Для начала немного полезной теории.
Перенаправление потоков.
В bash (как и многих других оболочках) есть встроенные файловые дескрипторы: 0 (stdin), 1 (stdout), 2 (stderr).
stdout — Стандартный вывод. Сюда попадает все что выводят программы
stdin — Стандартный ввод. Это все что набирает юзер в консоли
stderr — Стандартный вывод ошибок.
Для операций с этими дескрипторами, существуют специальные символы: > (перенаправление вывода), < (перенаправление ввода). Оперировать ими не сложно. Например:
cat /dev/random > /dev/null #перенаправить вывод команды cat /dev/random в /dev/null (абсолютно бесполезная операция :)) )
или
ls -la > listing #записать в файл listing содержание текущего каталога (уже полезней)
Если есть необходимость дописывать в файл(при использовании «>» он заменятеся), необходимо вместо «>» использовать «>>«
sudo < my_password
после просьбы sudo ввести пароль, он возьмется из файла my_password, как будто вы его ввели с клавиатуры.
Если необходимо записать в файл только ошибки, которые могли возникнуть при работе программы, то можно использовать:
./program_with_error 2> error_file
цифра 2 перед «>» означает что нужно перенаправлять все что попадет в дескриптор 2(stderr).
Если необходимо заставить stderr писать в stdout, то это можно след. образом:
./program_with_error 2>&1
символ «&» означает указатель на дескриптор 1(stdout)
(Поумолчанию stderr пишет на ту консоль, в котрой работает пользователь(вренее пишет на дисплей)).
2. Конвееры.
Конвеер — очень мощный инструмент для работы с консолью Bash. Синтаксис простой:
команда1 | команда 2 — означает, что вывод команды 1 передастся на ввод команде 2
Конвееры можно группировать в цепочки и выводить с помощью перенаправления в файл, например:
ls -la | grep «hash» |sort > sortilg_list
вывод команды ls -la передается команде grep, которая отбирает все строки, в которых встретится слово hash, и передает команде сортировке sort, которая пишет результат в файл sorting_list. Все довольно понятно и просто.
Чаще всего скрипты на Bash используются в качестве автоматизации каких-то рутинных операций в консоли, отсюда иногда возникает необходимость в обработке stdout одной команды и передача на stdin другой команде, при этом результат выполнения одной команды должен быть неким образом обработан. В этом разделе я постораюсь объяснить основные принципы работы с внешними командами внутри скрипта. Думаю что примеров я привел достаточно и можно теперь писать только основные моменты.
1. Передача вывода в переменную.
Для того чтобы записать в переменную вывод какой-либо команды, достаточно заключить команду в `` ковычки, например
a = ` echo «qwerty» `
echo $a
Результат работы: qwerty
Однако если вы захотите записать в переменную список директорий, то необходимо, должным образом обработать результат для помещения данных в переменную. Рассмотрим небольшой, пример:
LIST=`find /svn/ -type d 2>/dev/null| awk '{FS="/"} {print $4}'| sort|uniq | tr 'n' ' '`
for ONE_OF_LIST in $LIST
do
svnadmin hotcopy /svn/$ONE_OF_LIST /svn/temp4backup/$ONE_OF_LIST
done
Здесь мы используем цикл for-do-done для архивирование всех директорий в папке /svn/ с помощью команды svnadmin hotcopy(что в нашем случае не имеет никого значения, просто как пример). Наибольшй интерес вызывает строка: LIST=find /svn/ -type d 2>/dev/null| awk '{FS="/"} {print $4}'| sort|uniq | tr 'n' ' ' В ней переменной LIST присваивается выполнение команды find, обработанной командами awk, sort, uniq,tr(все эти команды мы рассматривать не будем, ибо это отдельная статья). В переменной LIST будут имена всех каталогов в папке /svn/ пгомещенных в одну строку(для того чтобы её стравить циклу.

Прежде всего давайте разберём, что такое script и для чего он нужен.
Script в переводе с английского — сценарий. Все мы смотрим фильмы, многие из нас — спектакли. Чтобы создать фильм/спектакль, сценаристы пишут к ним сценарии, на основании которых артисты, сценка за сценкой исполняют на сцене свои роли, из чего и складывается фильм/спектакль. Работа по созданию сценария довольно кропотливая, где нужно учесть всё до мелочей, чтобы в конечном итоге артисты могли выполнить задуманное сценаристом, а зритель увидел целостное произведение.
Подобным же образом пишутся скрипты для выполнения списка задач, которые пользователь составляет вместе (код), чтобы сделать их выполнение проще и быстрее в операционной системе. Для написания простых скриптов совсем не обязательно иметь образование программиста.
Для начала давайте создадим самый, что ни на есть, простейший скрипт-Shell для обновления системы.
Все действия я буду проводить с системе Ubuntu, но они применимы и к другим системам Linux, производных от Ubuntu. Для этого нам понадобятся: Текстовый редактор, чтобы наполнить его нужными задачами для создания скрипта (кода) и Терминал — для выполнения созданного скрипта. Эти инструменты установлены в любом дистрибутие Linux по умолчанию.
Итак, открываем текстовый редактор Gedit и вводим в него первые обязательные символы под названием shebang.
shebang в программировании, это последовательность из двух символов: решётки и восклицательного знака (#!) в начале файла скрипта. И добавляем к данным символам без пробелов /bin/sh — интерпретатор, где будет выполняться скрипт. /bin/sh — это обычно Bourne shell или совместимый интерпретатор командной строки, который передаёт «path/to/script» как первый параметр.
Первая обязательная строка скрипта будет выглядеть следующим образом:
#!/bin/sh
Далее, следующей строкой следует описание того, что должен выполнить наш первый скрипт/сценарий:
# Мой первый Script обновления Ubuntu
Знак решётки (#) в самом начале строки даёт понять интерпретатору/терминалу, что эту строку читать и выполнять не нужно. Строка нужна в коде данного скрипта для того чтобы сам создатель скрипта знал, что он собирается выполнить на данном отрезке/сценке в коде, чтобы не запутаться в дальнейшем, когда таких строк будет много. Такие строки с знаком решётки называются —
закомментированные
.
Далее в скрипте следуют выполняемые строки с командами, в данном случае для обновления системы Ubuntu:
sudo apt update
sudo apt upgrade -y
-y в конце второй команды даёт понять интерпретатору/терминалу, что это действие/команду нужно выполнить автоматически, без дополнительного подтверждения пользователем, нажатия клавиши Ввод. y — сокращённо от английского yes, т.е. да.
Вот и всё. Ваш первый скрипт создан. У вас должно получиться как на снимке:

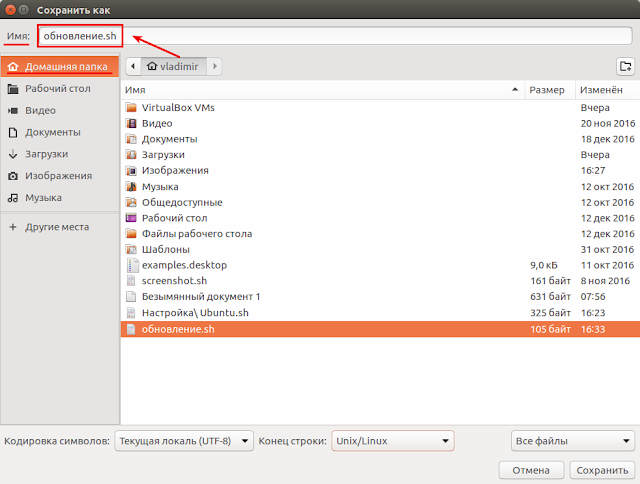
Остаётся сохранить созданный файл/скрипт и дать ему Имя с обязательным расширением в конце — .sh. Расширение .sh присваивается исполняемому файлу.
Я дал ему Имя — обновление.sh, сохранив в Домашней папке пользователя:
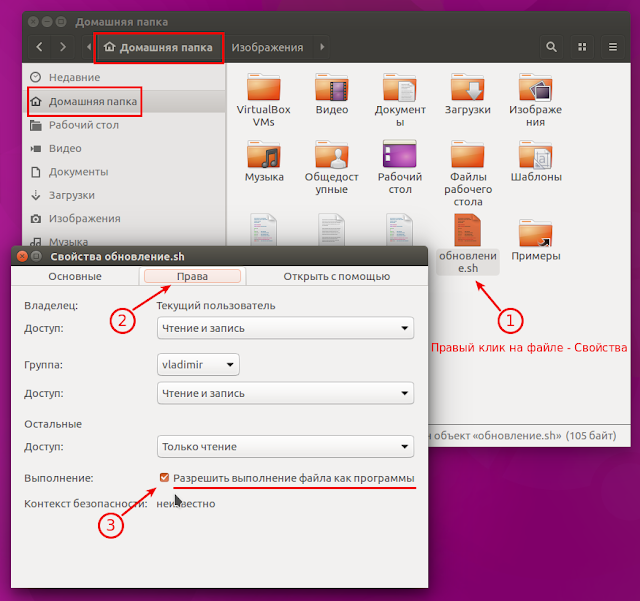
Для того чтобы созданный файл/скрипт был исполняемый, ему нужно дать на это разрешение. Сделать это можно двумя способами.
1. Выполнить следующую команду в терминале:
sudo chmod +x обновление.sh
2. Либо открыть файловый менеджер в Домашней папке (где вы сохранили созданный скрипт), правый клик на файле, в контекстном меню — Свойства — Права и активировать пункт — Выполнение: Разрешить выполнение файла как программы:
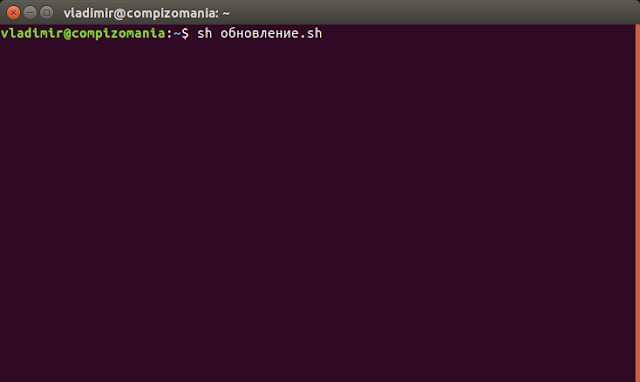
Чтобы выполнить созданный скрипт, нужно открыть терминал ( о чём я писал в самом начале статьи, что терминал — необходимый атрибут/инструмент для выполнения скрипта), ввести sh, через пробел название скрипта — обновление.sh и нажать клавишу Ввод:
Либо в терминале вводим sh и перетаскиваем из файлового менеджера созданный файл с скриптом (также через пробел):
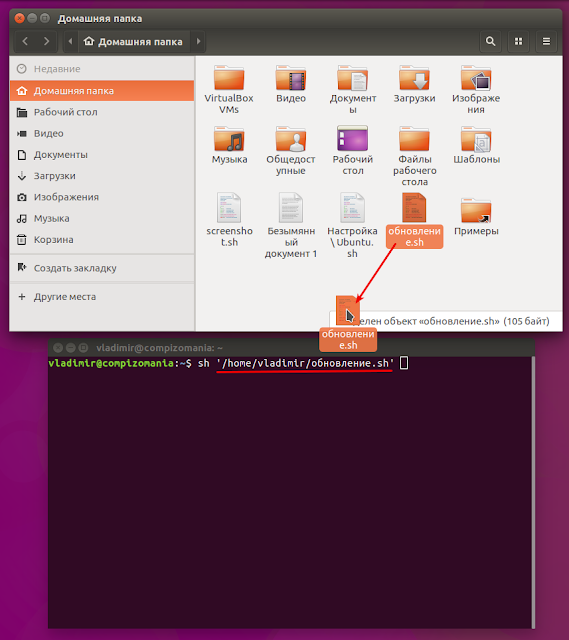
После того как путь к файлу отобразится после команды sh и пробела, достаточно нажать клавишу Enter (Ввод), чтобы выполнить обновление системы:

Теперь в любой момент вы можете сделать обновление системы созданным собственным скриптом.
Да, кто-то может возразить, что обновление системы не сложно сделать выполнением этих двух команд в терминале, зачем пыжиться и создавать какие-то скрипты? Всё верно. Но это пример создания простейшего скрипта, чтобы показать, что «не боги горшки обжигают» 😃.
Научившись писать и использовать простейшие скрипты, можно создать скрипт по настройке системы, с тем чтобы в случае переустановки системы могли воспользоваться созданным сценарием без необходимости искать каждый раз в сети сайты с подобными настройками.
Многие из вас, скорее всего, пользуются сайтами по настройке системы, типа тех что я публикую после выхода очередного релиза Ubuntu — Ubuntu после установки или подобными сайтами. Откройте один из таких сайтов: http://compizomania.blogspot.com/2016/04/ubuntu-1604.html, затем текстовый редактор для создания скрипта.
Для примера я сделал следующую заготовку.
В текстовом редакторе вводим первую обязательную строку:
#!/bin/bash
Далее закомментированные строки с описанием:
# Настройка Ubuntu после уставновки
# Обновление системы
Ниже следуют команды обновления системы:
sudo apt update
sudo apt upgrade -y
Строка описания: Добавление репозиториев:
# Добавление репозиториев
И добавляете необходимые репозитории для дальнейшей установки программного обеспечения:
sudo add-apt-repository «deb http://archive.canonical.com/ $(lsb_release -sc) partner» -y
sudo add-apt-repository ppa:atareao/telegram -y
sudo add-apt-repository ppa:atareao/atareao -y
sudo add-apt-repository ppa:nemh/systemback -y
sudo add-apt-repository ppa:gerardpuig/ppa -y
sudo add-apt-repository ppa:haecker-felix/gradio-daily -y
После того как необходимые репозитории добавлены (повторюсь, у вас могут быть свои репозитории, у меня пример), необходимо обновить систему:
Строка с описанием:
# Обновление системы после подключения репозиториев
И команда на выполнение:
sudo apt update
Теперь, когда репозитории добавлены и система обновлена, наступила очередь в установке программ:
# Установка программ
Для установки программ достаточно один раз ввести команду sudo apt install, а затем через пробел в данную строку добавлять сколько угодно программ, главное чтобы они были правильно составлены. Если какая-то программа состоит из нескольких слов, её команда должна быть монолитной, т.е. все слова в ней должны вводится через чёрточку, например: unity-tweak-tool:
sudo apt install my-weather-indicator telegram skype lm-sensors hddtemp psensor gdebi systemback unity-tweak-tool ubuntu-cleaner gradio -y
Установка дополнительных кодеков
# Мультимедиа и кодеки
sudo apt install ubuntu-restricted-extras -y
Отключение о сбоях в системе
# Отключить отчёты о сбоях в системе
sudo sed -i «s/enabled=1/enabled=0/g» ‘/etc/default/apport’
Ну вот, пожалуй, и всё. Данный созданный файл сценария должен выглядеть следующим образом:

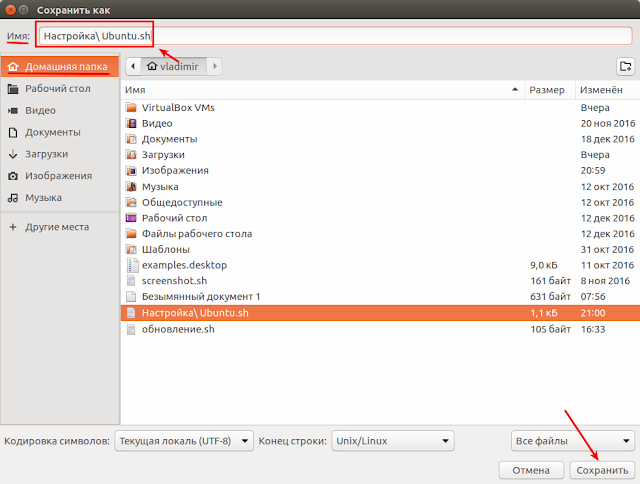
Необходимо сохранить его (нажать кнопку Сохранить) и дать Имя с расширением .sh. Я назвал его Настройка Ubuntu.sh (вы можете назвать по-другому, но обязвтельно с расширением .sh):
Делаем созданный скрипт исполняемым:
sudo chmod +x Настройка Ubuntu.sh
Для выполнения созданного скрипта введите в терминале sh и название созданного скрипта через пробел, либо sh, пробел и перетащить в терминал созданный файл, как объяснялось ранее в простейшем скрипте и нажмите клавишу Ввод, для его выполнения.
Примечание. Обратный слэш в команде Настройка Ubuntu.sh экранирует пробел в названии файла для терминала между двумя отдельными словами.
После того как скрипт будет выполнен, хранить его на будущее, для возможной переустановки системы и повторной настройки, лучше всего на отдельном разделе ж/диска в папке /home. Если таковой нет, то в облачном сервисе (Облачное хранилище данных) типа: DropBox, Облако Mail.Ru, Mega.co и т.п., чтобы в любой момент воспользоваться скриптом самому, либо помочь знакомым или родственникам в настройке системы.
Удачи.
![]()
Download Article
![]()
Download Article
Have you ever wanted to automate operations in your operating system? Have you ever wanted to write a program that could create a file and copy that file to a specific directory? Have you ever thought about doing these tasks using the BASH Shell in Ubuntu? If so, then this is the article for you!
-

Launch the Terminal. You can launch the terminal by opening the dash and searching for it by name. You could also open it using the keyboard shortcut Ctrl+Alt+T.

Advertisement
-
Launch the vi or vim editor and create a new script. Vim is a free and popular text editor that uses the command line interface. To create a script called ListDir.sh:
- Type vim ListDir.sh and hit ↵ Enter.
- Once inside the Editor, type «I» or «i.» This will allow you to insert/start typing your shell script.

-
Type the following code: #!/bin/bash. This is known as a Shebang line.

Advertisement
-
Type the code as shown in the figure. The first line (echo «Welcome») prints the line «Welcome» into the terminal. echo is used to return the given text and a new line. The second line (ls) lists the contents of the directory. ls is short for list. The final line (another echo statement) returns the text This completes the list of directories.

-
Exit vim. Type Esc, then :, and then + wq to save and quit. This will write the changes to the file and bring you back to the terminal. Save the file as ListDir.sh

Advertisement
-
Change the permissions. Enter the following command: chmod +x ListDir.sh. chmod is a command used in Unix like operating systems to change the access permissions to a file.

-
Run the script from the command line. Type ./ListDir.sh to run this script. You should get the list of directories and the message as shown in the above image.

Advertisement
Add New Question
-
Question
After typing in «sudo apt install», «(sudo) password for jenneta» appears. What do I do?

Living Concrete
Top Answerer
It is prompting you for the password to your account. Type in your password and then press Enter.
-
Question
How do I learn shell scripting?
Aryaa Vashisth
Community Answer
Install Python shell scripting and watch tutorials of how to script on Python.
-
Question
How? I would like to stop the «file already exists» function at the OS level and instead rename the file on the disk before writing whatever to the original file name specified.
Nithik Ramesh
Community Answer
You may have a file of the exact same name and that is why it shows up. Try using another name for your shell script «vim » Or if you want to rename an existing file, do «mv » without the quotes and the angular brackets.


Ask a Question
200 characters left
Include your email address to get a message when this question is answered.
Submit
Advertisement
-
By default, vim is not installed.
-
Use vim <yourfile.sh> to edit your shell scripts.
-
Enter your password and let Ubuntu do the magic.
Show More Tips
Thanks for submitting a tip for review!
Advertisement
-
For starters, place your shell scripts in your home directory as you begin your shell script journey. Once comfortable, place them in your required directory system.
-
Ensure that the files you create, do not reside in any system directories of the / = root file system.
Advertisement
About This Article
Thanks to all authors for creating a page that has been read 267,794 times.
Is this article up to date?
![]()
Download Article
![]()
Download Article
Have you ever wanted to automate operations in your operating system? Have you ever wanted to write a program that could create a file and copy that file to a specific directory? Have you ever thought about doing these tasks using the BASH Shell in Ubuntu? If so, then this is the article for you!
-
Launch the Terminal. You can launch the terminal by opening the dash and searching for it by name. You could also open it using the keyboard shortcut Ctrl+Alt+T.
Advertisement
-
Launch the vi or vim editor and create a new script. Vim is a free and popular text editor that uses the command line interface. To create a script called ListDir.sh:
- Type vim ListDir.sh and hit ↵ Enter.
- Once inside the Editor, type «I» or «i.» This will allow you to insert/start typing your shell script.
-
Type the following code: #!/bin/bash. This is known as a Shebang line.
Advertisement
-
Type the code as shown in the figure. The first line (echo «Welcome») prints the line «Welcome» into the terminal. echo is used to return the given text and a new line. The second line (ls) lists the contents of the directory. ls is short for list. The final line (another echo statement) returns the text This completes the list of directories.
-
Exit vim. Type Esc, then :, and then + wq to save and quit. This will write the changes to the file and bring you back to the terminal. Save the file as ListDir.sh
Advertisement
-
Change the permissions. Enter the following command: chmod +x ListDir.sh. chmod is a command used in Unix like operating systems to change the access permissions to a file.
-
Run the script from the command line. Type ./ListDir.sh to run this script. You should get the list of directories and the message as shown in the above image.
Advertisement
Add New Question
-
Question
After typing in «sudo apt install», «(sudo) password for jenneta» appears. What do I do?
Living Concrete
Top Answerer
It is prompting you for the password to your account. Type in your password and then press Enter.
-
Question
How do I learn shell scripting?
Aryaa Vashisth
Community Answer
Install Python shell scripting and watch tutorials of how to script on Python.
-
Question
How? I would like to stop the «file already exists» function at the OS level and instead rename the file on the disk before writing whatever to the original file name specified.
Nithik Ramesh
Community Answer
You may have a file of the exact same name and that is why it shows up. Try using another name for your shell script «vim » Or if you want to rename an existing file, do «mv » without the quotes and the angular brackets.
Ask a Question
200 characters left
Include your email address to get a message when this question is answered.
Submit
Advertisement
-
By default, vim is not installed.
-
Use vim <yourfile.sh> to edit your shell scripts.
-
Enter your password and let Ubuntu do the magic.
Show More Tips
Thanks for submitting a tip for review!
Advertisement
-
For starters, place your shell scripts in your home directory as you begin your shell script journey. Once comfortable, place them in your required directory system.
-
Ensure that the files you create, do not reside in any system directories of the / = root file system.
Advertisement
About This Article
Thanks to all authors for creating a page that has been read 267,794 times.