![]()
Download Article
![]()
Download Article
- Getting Started
- Start Practicing
- Video
- Q&A
|
|
|
Roblox is an online gaming platform that allows user to create, share, and play games online with other Roblox players. Building things in Roblox Studio is a lot of fun. However, if you want to make a game, you need to learn how to script. This wikiHow teaches you how to script in Roblox.
-

1
Understand what a script is. Scripts are lines of code that contain instructions for a game or program to follow. In Roblox, scripts can be used to do everything from giving (or taking away) a player’s health points, making objects move, or anything you can think of. Roblox uses a programming language called Lua. In Roblox, there are three types of scripts, which are as follows:[1]
- Server Script: A server script is a script that is stored on the server. A server script creates actions in a game that can be seen by all players.
- Local Script: A local script is a script that is specific to a single player. A local script creates actions that can be seen by one player only.
- Module Script: A module script contains frequently used script functions that can be used by other scripts. This is a good way to organize frequently used code so that you don’t have to copy and paste or reuse the same code in multiple scripts.
-
2
Open Roblox Studio. Roblox Studio has an icon that resembles a blue square. Click the Roblox Studio icon on your desktop, Windows Start menu, or Applications folder on Mac.
- If you haven’t already downloaded Roblox Studio, go to https://www.roblox.com/create and click Start Creating. Then click Download Studio.
Advertisement
-
3
Click View. It’s in the menu bar at the top. This displays a panel of windows you can open in Roblox Studio.
-
4
Click Output. It’s in the View panel at the top of the screen. This opens the Output window. The Output window allows you to view your script in action and see any error messages your script creates.
-
5
Click Explorer. It’s in the upper-left corner of the View menu. This opens the Explorer window. You can use the Explorer menu to browse objects in your game and add new objects.
-
6
Click «Workspace» in the Explorer window. To view its contents, click the arrow icon next to «Workspace».
-
7
Click + next to «Workspace». This displays a pop-up menu with the different scripts and various instances you can add to the Workspace.
-
8
Click Script. It’s next to an icon that resembles a blue page. This creates a new server script with a print function, with the message «Hello World!».
- You can also find the options to create a new local script and a new module script in the upper-right corner.
- Try changing the text in quotation marks. The «print» function is used to display text in the Output window.
-
9
Give the script a name. To give the script a name, click the name of the script below «Script» in the Explorer menu. Then type the name you want to give it.
-
10
Run your script. Press the «Play» button at the top of the Roblox Studio window. If you see your message in the output window, then congratulations! You have written your first script!


Advertisement
-
1
Open the toolbox. Navigate to the «VIEW» tab at the top of the Roblox Studio window. Next, select the «Toolbox» button.
-
2
Select Plugins. Open the dropdown menu and select «Plugins». This will allow for us to search for a resource, which will help us learn how to script on the platform.
-
3
Install ScriptMate. Search for «ScriptMate», select it, and install it to Roblox Studio.
-
4
Open ScriptMate. Navigate to the «PLUGINS» tab, and open the ScriptMate plugin.
-
5
Give plugin permissions. Select «Allow» to any windows that initially appear. This allows for the plugin to grab the latest educational information, and read your solutions to scripting exercises.
-
6
Select the episode. Select «Episode 1» to begin learning how to script on Roblox.
-
7
Start learning & practicing. Watch the tutorial video linked in the script. Once you have finished, start solving the scripting challenges and continue the tutorial content.


Advertisement
Add New Question
-
Question
Can I type capital letters in scripts?

Yes, but only if it is needed to make it right. Here is an example to show you: player.Name
-
Question
How do I make a script that will make a model talk and answer questions?
Most people use the dialogue elements that can be entered by right-clicking the object in the explorer, clicking the «Insert Object» button, and finding dialogue. It doesn’t require scripting.
-
Question
How do parents and child work in scripts?
Destinid10_2
Community Answer
They are easy to understand and apply. You can use .Parent to reference to the Parent of a item. For example: local part = script.Parent. Another practical example: local workspace = Part.Parent. For referencing Childs is a little more complex, because .Child doesn’t exist. So I recommend you that when you’re going to reference a Child, use basic referencing code, for example, like this: local part = game.Workspace.Part.
See more answers
Ask a Question
200 characters left
Include your email address to get a message when this question is answered.
Submit
Advertisement
Video
Thanks for submitting a tip for review!
References
About This Article
Article SummaryX
1. Open Roblox Studio.
2. Insert a new block and name it «Deathblock».
3. Right-click the deathblock and click Insert Object.
4. Insert a new script.
5. Write «function onTouch(Deathblock)» on the first line.
6. Write «local humanoid = Deathblock.Parent:FindFirstChild(«Humanoid»)» on the next line.
7. Write «if (humanoid ~= nil) then» on the next line.
8. Write «humanoid.Health = 0» on the next line.
9. Write «end» on the next line.
10. Write «end» again on the next line.
11. Write «script.Parent.Touched:connect(onTouch)» on the last line.
Did this summary help you?
Thanks to all authors for creating a page that has been read 79,603 times.
Did this article help you?
![]()
Download Article
![]()
Download Article
- Getting Started
- Start Practicing
- Video
- Q&A
|
|
|
Roblox is an online gaming platform that allows user to create, share, and play games online with other Roblox players. Building things in Roblox Studio is a lot of fun. However, if you want to make a game, you need to learn how to script. This wikiHow teaches you how to script in Roblox.
-
1
Understand what a script is. Scripts are lines of code that contain instructions for a game or program to follow. In Roblox, scripts can be used to do everything from giving (or taking away) a player’s health points, making objects move, or anything you can think of. Roblox uses a programming language called Lua. In Roblox, there are three types of scripts, which are as follows:[1]
- Server Script: A server script is a script that is stored on the server. A server script creates actions in a game that can be seen by all players.
- Local Script: A local script is a script that is specific to a single player. A local script creates actions that can be seen by one player only.
- Module Script: A module script contains frequently used script functions that can be used by other scripts. This is a good way to organize frequently used code so that you don’t have to copy and paste or reuse the same code in multiple scripts.
-
2
Open Roblox Studio. Roblox Studio has an icon that resembles a blue square. Click the Roblox Studio icon on your desktop, Windows Start menu, or Applications folder on Mac.
- If you haven’t already downloaded Roblox Studio, go to https://www.roblox.com/create and click Start Creating. Then click Download Studio.
Advertisement
-
3
Click View. It’s in the menu bar at the top. This displays a panel of windows you can open in Roblox Studio.
-
4
Click Output. It’s in the View panel at the top of the screen. This opens the Output window. The Output window allows you to view your script in action and see any error messages your script creates.
-
5
Click Explorer. It’s in the upper-left corner of the View menu. This opens the Explorer window. You can use the Explorer menu to browse objects in your game and add new objects.
-
6
Click «Workspace» in the Explorer window. To view its contents, click the arrow icon next to «Workspace».
-
7
Click + next to «Workspace». This displays a pop-up menu with the different scripts and various instances you can add to the Workspace.
-
8
Click Script. It’s next to an icon that resembles a blue page. This creates a new server script with a print function, with the message «Hello World!».
- You can also find the options to create a new local script and a new module script in the upper-right corner.
- Try changing the text in quotation marks. The «print» function is used to display text in the Output window.
-
9
Give the script a name. To give the script a name, click the name of the script below «Script» in the Explorer menu. Then type the name you want to give it.
-
10
Run your script. Press the «Play» button at the top of the Roblox Studio window. If you see your message in the output window, then congratulations! You have written your first script!
Advertisement
-
1
Open the toolbox. Navigate to the «VIEW» tab at the top of the Roblox Studio window. Next, select the «Toolbox» button.
-
2
Select Plugins. Open the dropdown menu and select «Plugins». This will allow for us to search for a resource, which will help us learn how to script on the platform.
-
3
Install ScriptMate. Search for «ScriptMate», select it, and install it to Roblox Studio.
-
4
Open ScriptMate. Navigate to the «PLUGINS» tab, and open the ScriptMate plugin.
-
5
Give plugin permissions. Select «Allow» to any windows that initially appear. This allows for the plugin to grab the latest educational information, and read your solutions to scripting exercises.
-
6
Select the episode. Select «Episode 1» to begin learning how to script on Roblox.
-
7
Start learning & practicing. Watch the tutorial video linked in the script. Once you have finished, start solving the scripting challenges and continue the tutorial content.
Advertisement
Add New Question
-
Question
Can I type capital letters in scripts?
Yes, but only if it is needed to make it right. Here is an example to show you: player.Name
-
Question
How do I make a script that will make a model talk and answer questions?
Most people use the dialogue elements that can be entered by right-clicking the object in the explorer, clicking the «Insert Object» button, and finding dialogue. It doesn’t require scripting.
-
Question
How do parents and child work in scripts?
Destinid10_2
Community Answer
They are easy to understand and apply. You can use .Parent to reference to the Parent of a item. For example: local part = script.Parent. Another practical example: local workspace = Part.Parent. For referencing Childs is a little more complex, because .Child doesn’t exist. So I recommend you that when you’re going to reference a Child, use basic referencing code, for example, like this: local part = game.Workspace.Part.
See more answers
Ask a Question
200 characters left
Include your email address to get a message when this question is answered.
Submit
Advertisement
Video
Thanks for submitting a tip for review!
References
About This Article
Article SummaryX
1. Open Roblox Studio.
2. Insert a new block and name it «Deathblock».
3. Right-click the deathblock and click Insert Object.
4. Insert a new script.
5. Write «function onTouch(Deathblock)» on the first line.
6. Write «local humanoid = Deathblock.Parent:FindFirstChild(«Humanoid»)» on the next line.
7. Write «if (humanoid ~= nil) then» on the next line.
8. Write «humanoid.Health = 0» on the next line.
9. Write «end» on the next line.
10. Write «end» again on the next line.
11. Write «script.Parent.Touched:connect(onTouch)» on the last line.
Did this summary help you?
Thanks to all authors for creating a page that has been read 79,603 times.
Did this article help you?
Скриптинг на Lua, Урок 1.
Всем Привет!
Подробная гайд — статься
Чтобы начать учится писать скрипты нужно ознакомится с интерфейсом в Roblox Studio. Это можно будет сделать по гайду который скоро выйдет.
-Чтобы написать первый скрипт нужно создать проект!
1. Заходим в Roblox Studio (Если нету необходимо установить! Инструкцию по установке можно найти в интернет ресурсах!)
2. Создаем проект! Рекомендуется «Classic Baseplate»
3. Запускаем шаблон и идем дальше…
-Как создать скрипт.
1. Открываем окно «Exploer» и ищем там вкладку «ServerScriptService» наводим курсор на нее.
2. У вас появился «+» рядом!
3. Нажимаем на «+» и ищем там самый простой ‘Script’ (Скрин в цитате)
Цитата


-Что делать после создания скрипта
1. Когда вы создали script кликаем на него 2 раза и в пвнеле окон появится ваш скрипт
2. Нажимаем на него и вас встречает фраза «print(‘Hello World’)» что переводится как привет мир!
3. Запускаем игру!
4. У вас не чего не должно было появится! Эта строчка выводит слово в так называемую игровую консоль! Открыть и посмтореть ее можно в: На главной панеле сверху нажимаем «View» и снизу в панеле инструментов нажимаем на «OutPut»
5. Снова запускаем игру! В появившейся панеле «OutPuy» Должна появится фраза Hello World.(Рис.1 (снизу)) Эту фразу в скрипте можно заменить на любою! Это можно сделать зайдя в скрипт и поменяв фразу в ковычках после Print-a!
6. Разберем скрипт!(разбор в циатете)
Цитата
Print(«Hello World»)
Давайте разабем по действиям для рабора!
(1)Print(2)(«(3)Hello World»)1. Команда Print — Выводит содержимое в консоль!
2. Скобки () — в емх находится содержимое того что будет выводися например значение цвета состоящие из цифр
3. Двойные кавычки «» — В них указывается текствовое содержимое которое выводится текстом!
-Как создать скрипт который будет делать действие и виден игрокам?
1. Очистим наш скрипт!
2. Создадим самый простой Part с помощью скрипта
3. Перепишем этот скрипт
Instance.new("Part",Workspace)
4. С помощью скрипта зайдя в игру у вас появится по середине карты самый обычный блок
5. Запустим игру и проверим!
6. Разбор скрипта в цитате!
Цитата
Instance.new(«Part»,Workspace)
Разабем по действием разбора
(1)Instance.(2)new(«(3)Part»,(4)Workspace)
1. Экземпляр (добаить)
2. Новый (Экземпляр)
3. Текстовое название эказемпляра
4. Где он заспавнится
Гайд 1 основы скрипта закончен
В сл. гайде рассмотрим Slep. Переменные, Изменения пораметров обьекта по скрипту
Есть вопросы пишите отвечу)
How to script in Roblox Studio
How to script in Roblox Studio
To be able to change something about a part or object in your game you need to be able to reference that part. You can think of this like moving through a tree.
To be able to change something about a part or object in your game you need to be able to reference that part. You can think of this like moving through a tree.

The biggest part of the tree is the trunk. From the trunk there are many different large branches that you can navigate to, and on each large branch there are many small branch that eventually end in a leaf.
The biggest part of the tree is the trunk. From the trunk there are many different large branches that you can navigate to, and on each large branch there are many small branch that eventually end in a leaf.
I thought I came here to learn Roblox Studio. . .
I thought I came here to learn Roblox Studio. . .
Well when trying to reference a part in a script you can use the same idea as trying to reference a particular leaf on a tree. Start with the biggest part then move to smaller and smaller parts until you get to the part you want!
Well when trying to reference a part in a script you can use the same idea as trying to reference a particular leaf on a tree. Start with the biggest part then move to smaller and smaller parts until you get to the part you want!
In Roblox Studio the largest section is called «game»
In Roblox Studio the largest section is called «game»
After «game» the next largest sections are found in the explorer menu
After «game» the next largest sections are found in the explorer menu


When ever you add a part into the game it goes into the workspace section by default
When ever you add a part into the game it goes into the workspace section by default
So if I wanted to reference a part that I just added into the game it would look something like this:
So if I wanted to reference a part that I just added into the game it would look something like this:
Starting with the biggest section and moving to smaller sections until you get to the object you want
Starting with the biggest section and moving to smaller sections until you get to the object you want

If I wanted to reference the part labeled «ThisOne» how would I do it?
If I wanted to reference the part labeled «ThisOne» how would I do it?
Try it yourself then check your answer below!
Try it yourself then check your answer below!
game.Workspace.Model1.Model2.ThisOne
game.Workspace.Model1.Model2.ThisOne
Programming in Roblox Studio works by adding what are called scripts to objects that you want code for.
Programming in Roblox Studio works by adding what are called scripts to objects that you want code for.
To add a script to a part:
To add a script to a part:
1. Find that part in the explorer menu
1. Find that part in the explorer menu
3. Click the + sign next to the name
3. Click the + sign next to the name
4. Type script in the search bar
4. Type script in the search bar

After you do that you will now have a new script that you can begin write you code on!
After you do that you will now have a new script that you can begin write you code on!
Variables in programming are used to store information.
Variables in programming are used to store information.
In Roblox Studio variables are especially useful for storing part references. For example to talk about the part above I would have to write
In Roblox Studio variables are especially useful for storing part references. For example to talk about the part above I would have to write
Then if i wanted to change one of its properties then I would write something like this
Then if i wanted to change one of its properties then I would write something like this
game.Workspace.Part.Transparency = 1
game.Workspace.Part.Transparency = 1
Now this may not seem so bad if this is the only thing I am doing with this part, however as you begin writing longer and more complex programs writing out the entire part reference everything you want to make a change to it will become tedious.
Now this may not seem so bad if this is the only thing I am doing with this part, however as you begin writing longer and more complex programs writing out the entire part reference everything you want to make a change to it will become tedious.
Instead we can use a variable to «store a part» which makes it much easier to talk about later on in the script
Instead we can use a variable to «store a part» which makes it much easier to talk about later on in the script

Hopefully from the example above, you can begin to use the usefulness of variables in scripts!
Hopefully from the example above, you can begin to use the usefulness of variables in scripts!
Changing Properties of Parts
Changing Properties of Parts
Some part properties can be change by simply setting that property equal to a new number. For example:
Some part properties can be change by simply setting that property equal to a new number. For example:

Other properties can be changed by giving the property a new set of numbers called a vector. Examples include:
Other properties can be changed by giving the property a new set of numbers called a vector. Examples include:

There are other properties that can only be set to true/false such as the examples below. These are called boolean values.
There are other properties that can only be set to true/false such as the examples below. These are called boolean values.

Changing the color of a part is slightly different that the example above, so this is how it looks:
Changing the color of a part is slightly different that the example above, so this is how it looks:


The names for the different colors can be found in the colors section by hovering your mouse over a color!
The names for the different colors can be found in the colors section by hovering your mouse over a color!
Changing Player Properties
Changing Player Properties
How to script GUI Buttons
How to script GUI Buttons
How to use keyboard inputs
How to use keyboard inputs
Learning Roblox scripting with Lua is a lot of fun. Once you understand the basics you’ll be able to use these skills to build your creative ideas in Roblox.
This starter guide is for the absolute beginner that has never written any code. Understanding each of these topics will help you become a better programmer.
Let me know in the comments if there’s anything that’s confusing or needs more explanation.
Before we start, visit this online Lua interpreter to try out the examples.
Let’s get started!
- How to create a script in Roblox
- Lua variables
- Types and values
- Types
- Nil type
- Scopes
- Local scope
- Global scope
- Operators
- Arithmetic Operators
- Logic Operators
- Code comments
- Logic statements
- Assigning values
- Condition statements
- Lua loops
- Lua functions
- Working with strings
- Functions
- Tables demystified
- Arrays
- Linked lists
- Object Oriented Programming with Lua
- Classes
- Types of Roblox scripts
- Tips for learning Roblox scripting & Lua
How to create a script in Roblox
- Install Roblox Studio if it’s not already installed
- To download Roblox Studio, visit the Create section
- Click the green “Create New Experience” button
- Open Roblox Studio
- Start a new project by selecting a template or theme
- From the toolbox add a model to your scene such as a sword
- Move the sword to your workspace
- From the explorer, expand the sword to reveal its properties
- Double click the SwordScript
This is a quick way to get started with Roblox scripting. You can of course create your own object and add a script for it using the same steps.
Lua variables
Types and values
Lua is a dynamically-typed language. Dynamic typing means that a variable can store any type of data.
Types
- Text
- Numbers
- Boolean (true or false)
- Class
- Function
- Nil
Nil type
A variable uses the nil type when it should have no value. You might think this is zero but it’s not. The best way to think of nil is that the value does not exist.
Scopes
A scope determines how long a variable exists in memory while the script is running. You can have variables in a local or global scope. Scopes help organize your variables and help to control allocated memory.
Local scope
Variables with a local scope only exist until the function or script finishes. Once the script finishes, these variables get cleaned up by releasing the memory used. If this doesn’t happen then our programs will use up all the available memory and eventually crash your computer or device.
Example:
local a = 5
function multiplyByFive (num)
  local multiplier = 5
  return num * multiplier
end
local p = multiplyByFive(a)
In this example, the variable ‘a’ exists in memory until the script finishes. Within the function multiplyByFive(), the multiplier variable exists until the function finishes and does not exist outside of it.
Adding this to the end of the script would fail.
local product = a * multiplierGlobal scope
Variables in a global scope exist until the entire program finishes. It is important to carefully use global variables since any other script can access them. Mis-using global variables may lead to confusing behavior in your script.
Example:
local a = 5
multiplier = 5
function multiplyByFive (num)
  return num * multiplier
end
local p = multiplyByFive(a)
In this instance, the multiplier variable becomes a global by defining it without the local keyword.
Adding this to the end of the script executes just fine.
local product = a * multiplierTo avoid any confusing issues or bugs in your code, it’s always best to declare your variables with local. Use global scope sparingly.
Operators
Operators allow us to define code that changes a variable’s value.
Arithmetic Operators
There are mathematical operators for addition, subtraction, multiplication, and division.
Addition uses the + symbol.
Example: 1 + 1
Subtraction uses the – symbol.
Example: 2 – 1
Multiplication uses the * symbol.
Example: 2 * 1
Division uses the / symbol.
Example: 2 / 1
These mathematical operators only work with variables holding numeric values. You will get an error if it’s used with non-numeric values.
Example of code that will fail:
local x = 10
local y = "red25"
local z = x + y
print("Sum of x+y =",z)
To test if a variable equals another, you’ll use the == operator.
To test if a variable does NOT equal another, you’ll use the ~= operator.
To test if a variable is greater than another, you’ll use the > operator or >= operator.
To test if a variable is less than another, you’ll use the < operator or <= operator.
Logic Operators
Logic operators include the and keyword, such as when you want to test if two expressions are true.
Example:
local a = 5
local b = 100
local aGreaterThanZero = a > 0
local aLessThanB = a < b
local someNumberIsInRange = aGreaterThanZero and aLessThanB
This example shows that the someNumberIsInRange variable is true when a is greater than zero and less than 100.
The or operator is a bit similar to the and keyword except either expression can be true.
Code comments
Commenting your code is good for explaining the purpose of a block of code. To add a comment in Lua you can use — symbols. Lua will not execute anything within the comment.
Example:
-- this is a commentYou can add multiple line comments by starting with –[[ and closing your comments with –]]
Example:
--[[
    This is
    a multiple line comment block
--]]
Logic statements
Assigning values
You assign a value to a variable by using the = symbol.
You can also assign multiple variables in a single statement.
Example:
local someNumber, someWord = 5, "hello"When using multiple variables, you must assign a value for each one.
local someNumber, someNil = 5, nilCondition statements
An if-then-else statement defines a condition for a block of code to execute.
Example:
local playerHasWeapon = player.weapon ~= nil
if playerHasWeapon then
  player.weapon.shoot()
else
  player.hand.punch()
end
Here we’re testing if a player has a weapon and then running its shoot() function, otherwise we execute the punch() function of the player’s hand.
Lua loops
Loops use the for and while language keywords. We use for loops to iterate or run a piece of code on a list. We use while loops to run a block of code until the while loop condition becomes false.
Example:
local gameIsRunning = true
while gameIsRunning do
  local inputKey = inputHandler.run()
  physicsEngine.run()
  renderer.run()
  if inputKey == “q” then
    gameIsRunning = false
  end
end
In this basic game loop, we run each step from our input handler (in this case a keyboard), the physics engine, and then the renderer. When the inputKey variable becomes “q” we stop the while loop and end the game.
local allGameObjects = []
for i, gameObject in allGameObjects do
  print(gameObject.name)
end
In this for loop, we’re going through each game object in the allGameObjects list and printing its name.
When you need to stop your loop for any condition you can use the break or return keywords.
Example:
local allGameObjects = []
for i, gameObject in allGameObjects do
  print(gameObject.name)
  if gameObject.name == “Tandem Coder” then break end
  end
end
Lua functions
Functions are great for organizing our code into logical pieces. Instead of putting everything into a single function, we can reuse code with simpler functions.
Example:
function render(gameObject)
  gameObject.render()
end
function renderAllGameObjects(gameObjects)
  for i,gameObject in gameObjects do
    render(gameObject)
  end
end
Working with strings
Lua has a string library or a set of functions used just for working with strings.
Functions
- string.lower(“ALL UPPERCASE”)
- Returns the input with all lowercase characters
- string.upper(“all lowercase”)
- Returns the input with all uppercase characters
- string.sub(input, startIndex, endIndex)
- Returns a sub string of input
- Example:
local s = “test”
local t = string.sub(s, 0, 2)
– returns “te”
- local startIndex, endIndex = string.find(input, sub string)
- Returns start and end position for sub string within the input string
Tables demystified
In Lua, tables are used for all data structures such as lists, queues, and sets.
To define a table, we use curly brackets such as {}.
Arrays
Arrays is a type of data structure for holding a list of data. Lua uses integers (a whole number) as the index of a table to hold an array value.
Example:
local someArray = {}
for i=1, 10 do
  someArray[i] = 0
end
A script that creates an array filled with ten zeros.
The typical convention is to start arrays from index = 1, unlike other languages that start with 0. Starting with index = 1 allows us to use other lua libraries.
An example of creating a array in one line.
local anotherArray = {2, 5, 7, 9, 20, 55}Linked lists
A linked list is an efficient data structure for lists when inserting or removing items in a list. In contrast, an array is more memory efficient since it does not need to hold a reference to an item’s value.
Example:
-- linked list root
local root = nil
root = { next = root, value = someValue }
-- add another value
root.next = { next = nil, value = anotherValue }
Object Oriented Programming with Lua
With Object-Oriented programming (OOP for short) we treat everything as an object that has its own functions and structure. With OOP we have literal types and object types. Literal types include actual numbers and strings while objects include additional functions.
Classes
For example you can have an Animal object that has functions for eating, walking, and sleeping. We can reuse the basic definition of Animal to then create a more specific object such as Cat or Dog. These object definitions are called classes.
Example:
Animal = { energy = 10 }
-- creates a new Animal object
function Animal:new (o)
  o = o or {}
  setmetatable(o, self)
  self.__index = self
  return o
end

function Animal:eat()
-- increase energy by 10
  self.energy = self.energy + 10
end

local someAnimal = Animal:new()
someAnimal:eat()
print(someAnimal.energy) -- prints out 20

Cat = Animal:new() -- starts out with energy of 10
function Cat:eat()
  self.energy = self.energy + 20 -- cat gets more energy when it eats
end

local someCat = Cat:new()
someCat:eat()
print(someCat.energy) -- prints 30
The self keyword that you see in these functions refers to the unique object that it’s being called with. These class definitions are a blueprint for your object and do not create an object. The new function is used to create an object with these functions and properties.
You can call the new function again to create more individual cats that have their own energy level.
Example:
local anotherCat = Cat:new()
local specialCat = Cat:new()
-- now we have 3 cats in our script
Types of Roblox scripts
Roblox scripting uses many types of scripts for different purposes.
- LocalScript is used for code that runs on the player’s device.
- PlayerScripts contain all LocalScripts to set up a player when they join the game.
- Script is a type of script that runs on Roblox servers.
- CoreScript is used within the Roblox system and can not be changed by a game or player.
- ModuleScript provides developers a way of reusing code.
Since Roblox is a multiplayer game, it’s important to have the server keep the game state consistent. Having the server do all the heavy lifting keeps your game secure and reduces the possibility of other player’s cheating.
There will be a separate Roblox scripting post that goes into more depth on Roblox client-server communication and which types of scripts to use.
Tips for learning Roblox scripting & Lua
There’s a lot to digest here and I hope you’ve learned a lot from this post!
As a Roblox scripting beginner, I would focus on simple and basic concepts to get a better grasp of how Lua works. I’d suggest creating a starter world in Roblox and create a script for a model that you like. You can learn a lot about how to manipulate that model’s properties such as its position and orientation. You can also try animating the model by changing its position within a loop.
Remember, always ask questions!
There will be more beginner level Roblox scripting examples coming soon!
Continue your Roblox scripting journey by learning the fundamentals of programming and learn how Roblox games work.
Want more?
Learn more about Roblox CFrames or how to make a Roblox Cutscene.
Please consider joining my email newsletter for more Roblox guides and updates!
Thank you for reading Tandem Coder, stay curious!.
Tutorial page
This article is an intermediate tutorial.
Welcome to Intermediate scripting! If you have not already, please check out the Beginner guide to scripting. This scripting tutorial will teach you about how to script at an intermediate level. We’ll move beyond the simply equal sign statement and use more complex coding conventions.
Just a Quick Review
Here are some concepts you should know beforehand:
Newbie’s Guide
- The Home Tab contains several tools to insert and manipulate shapes.
- Three-dimensional shapes in Roblox are called parts, and you can modify its shape, size, colour, texture and name.
- A script contains the code.
- The Explorer window is the list of all the objects in the game, and it has a hierarchal structure.
- To create a path to an instance, you start with the word game then work your way down the hierarchy.
- In the Explorer window’s hierarchy, a parent is one step above its child.
- A complete statement must perform an action on an instance.
Beginners’ Guide
- The properties of an object determine its visible characteristics.
- The output window is the primary tool for fixing coding errors.
- A variable is a piece of text representing numbers, text, booleans or instances.
- Variables can be declared, updated and accessed.
- The .new() constructor creates a new value for certain properties.
- Vector3 is a value type that determine the coordinates of an object in a three-dimensional space.
- A function is a piece of code that can be used multiple times.
You should have Roblox Studio open for this, and you should also have a script open as well as your Explorer, Properties, and Output open.
If Statements
If statements are everywhere in life. If I wake up late, then I will be late for school. The same principle exists in coding. An if statement would run a piece of code if a condition is met. For example:
local Var = 1
if Var == 1 then
   print("condition met")
end
In Line 1, I am declaring a variable. I am using one equals sign because I am defining the variable.
In line 2, I am checking the variable to see if it is equal to 1. I use the double equals sign (==) operator to see if the condition is met.
What do you think would happen with this script?
local Var = 8
if Var + 8 == 40 then
   print("condition met")
end
Relational Operators
A relational operator compares two numbers.
- == (equal to)
- ~=(not equal to)
- < (less than)
- > (greater than)
- <= (less than or equal to)
- >= (greater than or equal to)
So for example, some statements would be:
 (4 is less than 5.)
 (1 is equal to 1.)
 (49 is greater than 38.)
For reference, if you are confusing the greater than (>) and less than (<) symbols, I like to think of these symbols as an alligator mouth that «eats» the greater number. In the above equations, the alligator is eating the 5 and the 49 because they are the bigger numbers.
Arithmetic Operators
If you have any knowledge of mathematics, you should know that numbers can be changed with operators. These are:
- + (add/plus)
- — (subtract/minus)
- * (multiply/times)
- / (divide/divided by)
- % (modulus/mod)
- ^ (exponents/to the power of)
So…
 (3 plus 6 is equal to 9.)
 (18 times 59 is equal to 1062.)
 (89 plus 21 is less than 102.)
You probably aren’t familiar with two of these operators. Let me explain them:
Modulus
If you’re familiar with division, you probably know that some numbers don’t divide evenly. For example:

7 cannot be divided by 2 because there is 1 left over. Therefore…

Therefore, 7 mod 2 is 1. We call this the modulus operation, where we find the remainder of a number when it is divided. This operation is really only used in coding and you probably won’t encounter this when dealing with regular math. Can you solve this one?

Well, 14 divided by 5 is 2, but 4 is left over. Therefore, 14 mod 5 is 4.
Exponents
Exponents are just repeated multiplication. In math, the little number on top tells you how many times you’re multiplying the number by itself.

In this case, the little number tells you to multiply 5 by itself 3 times. Can you solve this one?

Well, the little number tells you to multiply 3 times itself four times. So…

Remember, there are no little numbers in coding. You need to use the caret symbol (^) to express exponents.
Performing an Operation on a Variable
It isn’t very useful to only use operators on constant numbers. You can use these operators on variables, as long as the variable is a float or int value.
value = value + 1 --Adds 1 to the value.
value = value - 1 --Subtracts 1 from the value.
value = value / 2 --Divides the value by 2.
value = value * 3 --Multiplies the value by 3.
value = value % 3 --Divides the value by 3, then returns the remainder.
value = value ^ 5 --Multiplies the value by itself 5 times.
For added simplicity, these operations can be shortened, as these examples show:
value += 1 --adds 1 onto value
value -= 1 --(takes 1 off of value)
value *= 2 --(multiplies value by 2)
Here is an example of an arithmetic operator that tests whether or not the player has enough money:
if plr.Money.Value >= 120 then
    plr.Money.Value -= 120
end
Here, it checks if the player owns $120 or more. If so, it would subtract it.
Logical Operators
A logical operator combines two operators together into one. These are:
- and (checks if BOTH conditions are true)
- or (checks if EITHER condition is true)
- not (checks if the current state is the OPPOSITE of the condition)
if value < 30 and value > 15 then
    --Code
end

if value == "cheese" or value == "pie" then
    --Code
end

if not value == 12 then
    --Code
end
The first if statement checks if the value is less than 30, but greater than 15. In other words, it checks if the value is between 15 and 30. The second if statement checks if the value is «cheese» or «pie», and the third checks if the value is not 12.
Truthy/Falsy Values
But what does this mean?
if value then
    print("Oof")
end
If there are no operators, the if statement checks if the value is truthy or falsy.
To be clear, a falsy value (also known as a falsey value), is a value that is either false or nil.
All other values are considered truthy values.
Most of the time, this is used to find if an instance exists. So, if I were to do this,
local Head = script.Parent:FindFirstChild("Head")

if Head then
    print("My parent has a head.")
end
I will explain later on what FindFirstChild() does later on, but basically, it finds the part named Head.
This script will check if its parent has a child named «Head». If it does, it prints.
Else, Elseif, and Nesting If Statements
You can also put one if statement inside another. This is called nesting an if statement.
local Var1 = 1
local Var2 = false
if Var1 == 1 then
    if Var2 == false
        print("Oof")
    end
end
The script will see that both conditions are met, so it prints. Remember, each, if statement needs its own end tag.
Placing else in the if statement will cause the script to run alternate code should the first condition not be met.
local Var1 = 1
if Var1 == 2 then
     print("condition met")
else
     print("condition not met")
end
An elseif is basically just combining «else» with an if statement. If the first condition is not met, it will check if a second condition is met.
local Var1 = 1
local Var2 = false
if Var1 == 2 then
     print("condition 1 met")
elseif Var2 == false then
     print("condition 2 met")
end
So, the system defines both variables, then has to decide whether Var1 is equal to 2. It is not, so it checks the other condition. It is met, so it prints out «condition 2 met.» You can make if statements as crazy as you want, with as many elseifs and nested if statements as you want.
Service
Now, go to your Explorer window and close all the ˅ icons you see. You should see this:
-

Workspace
-
Players
-
Lighting
-
ReplicatedStorage
-
ServerScriptService
-
ServerStorage
-
StarterGui
-
StarterPack
-
SoundService
-
Chat
-
LocalizationService
These are services, which are of the highest level in the Explorer window. They all serve their individual functions. Here are the
- Workspace: A service that holds all the parts and physical objects in the game.
- Players: A service that manages all the players that enter the game.
- Lighting: Manages the lighting effects, time of day, and the sun, moon and sky.
- ReplicatedStorage: Service containing objects replicated to all clients
- ServerScriptService: Service containing server scripts; scripts to be used for the whole game, i.e.: for leaderboards.
- ServerStorage: Storage for objects to be used later.
- StarterGui: Service that stores ScreenGuis.
- StarterPack: Service that stores player tools.
- SoundService: Storage for audio assets.
- Chat: Manages chat.
- LocalizationService: Manages auto-translation.
This is a lot to unpack, so focus on Workspace, as it is the most frequently used service, and the only one used in this tutorial. In the Advanced tutorial, we will start using StarterGui and ReplicatedStorage.
There are also two services you can manually add to the Explorer window: ReplicatedScriptService and Teams. To add them, open the View Tab > Command bar. Then, enter both of these commands in the bar:
game:GetService("ReplicatedScriptService")
game:GetService("Teams")
These services will then appear in your Explorer.
-
ReplicatedScriptService
-
Teams
Of course, there are many other services hidden away from the Explorer window. To access them inside a script, you need to use the GetService() function to get the service. For example:
local UserInputService = game:GetService("UserInputService")
Now, within the script, the service UserInputService will be contained inside the «UserInputService» variable.
Parameters
Think of a microwave and how it works. It can heat up your food, but you need to input some information: how long you want it to run, and how hot it needs to be. After you enter that information, the microwave then uses that information to cook your food.
This is like a function. You can create a function that needs you to input a few values for it to run. These values, which can only be used inside the function, are called parameters or arguments.
Let’s try this; start by declaring a function.
Now, name your parameter, placing the name in the brackets ().
function write(MyNumber)

end
Now, when you call the function, you have to insert the value for MyNumber in the brackets.
function write(MyNumber)

end
write(3)
Here, I am defining the parameter MyNumber as 3. Now, I can use MyNumber as a variable in the function. With the below code, what do you think will appear in the output?
function write(MyNumber)
    MyNumber += 2
    print(MyNumber)
end
write(3)
This function inputs the number 3, adds 2 to it, then prints the final result in the output. Therefore, «5» will appear in the output window.
Tuples
We can also do this:
function write(stuff, morestuff)
    print(stuff)
    print(morestuff)
end
write("Hello","world!")
The above script expects two parameters: stuff and morestuff. When calling the function, we define stuff as Hello and morestuff as world!.
You can have as many parameters as you want as long as you separate them with commas. When we use more than one argument, we call it a tuple.
Returning
We know how to input values into a function, but how do you output it? It isn’t very useful to print the result in the output window because you can’t use that value within the script.
Let’s use the example from the parameters section. We have already created a function that takes in an input.
function write(MyNumber)
    MyNumber += 2
    print(MyNumber)
end
write(3)
This code posts the final result, 5, in the output window, but what if I want to use that value again? You have to use the return function.
function write(MyNumber)
    MyNumber += 2
    return MyNumber
end
local answer = write(3)
When you return a value, you place the final value inside a variable. The above function returns the number 5 and places it inside the answer variable. This way, you can do this:
function write(MyNumber)
    MyNumber += 2
    return MyNumber
end

local answer = write(3)

function writeagain(Number2)
    Number2 += 6
    return Number2
end
local finalanswer = writeagain(answer)
Here, I’m creating a second function, using the previous answer. Can you guess what finalanswer would be?
Events
How does a mousetrap work? When it detects a mouse on it, it snaps shut and traps the mouse. This is basically how an event works: it detects something and reacts to it by firing a function. Let’s try this. We’re going to create a script that reacts when a part is touched. Create the following:
-

Workspace
-
Part
-
Script
-
-
Make sure that the part is floating a little bit over the baseplate and anchor it. Now, enter the script.
Declare a function that fires the code you want when the part is touched.
function onTouch()
   print("i was touched D=")
end
Here, I am declaring a function called onTouch that prints the message «i was touched D=» in the output. One part is missing: you’ve declared the function but you can’t activate it.
All baseparts have an event called Touched that fires whenever it is touched. You reference them like this:
function onTouch()
   print("i was touched D=")
end
script.Parent.Touched:Connect()
There are a few things to cover. Firstly, script.Parent refers to the part being touched. You use the Touched event. Lastly, you use Connect() to connect the event to the function onTouch(). In other words, whenever the event is fired, the function is fired as well.
Events also have built-in parameters. In the Touched event, its parameter is the person or thing that touched it.
function onTouch(whotouched)
   whotouched:Destroy()
end

script.Parent.Touched:connect(onTouch)
In this case, you call the thing who touched the object «whotouched.» So, when you trigger the event, it fires the function, and the function destroys the thing that triggered the event.
There are a plethora of other events, but for intermediate scripters, Touched will be the most important one.
Another way to fire an event is to do this:
script.Parent.Touched:Connect(function(whoTouched)
    whoTouched:Destroy()
end)
This is a way to use less lines.
Instance
We already know that an instance is any object or property in the game. What if you want to create a script that creates a part out of nowhere? We use the .new() constructor to create a new instance.
local Brick = Instance.new("Part",game.Workspace)
Here, I am creating a new instance. The first parameter, «Part,» is the class name of the instance, or what type of object it is. So, I am creating a part. It also has a second parameter, for its parent.
However, this is a common bad practice. It’s never a good idea to use the Parent parameter. This only makes the function slower.
Instead, define the parent in the next line.
local Brick = Instance.new("Part")
Brick.Parent = game.Workspace
What if we want to set properties? Simple. After the above code, type this:
Brick.Transparency = 1
Brick.Name = "Block"
The system already knows what Brick means. Just set the properties.
Built-In Functions
These are the functions that are set in the game, and no custom function can be declared with the name.
Destroy()
This function effectively sets the object’s parent to nil, removing it from the game. For example:
Clone()
Makes a duplicate of the part, with all of the same properties, except the parent. You still need to define it in the next line.
local Clone = script.Parent:Clone()
Clone.Parent = game.Workspace
ClearAllChildren()
Destroys all of the object’s children. As an example, if you were to use this on workspace, it would delete everything in the workspace.
script.Parent:ClearAllChildren()
FindFirstChild()
If you are unsure of whether or not a variable or Instance exists, FindFirstChild() will access the object if it exists; if not, then the script will still run. Without a FindFirstChild function, you are essentially trying to access an instance that doesn’t exist, so the code will break.
local fire = script.Parent:FindFirstChild("Fire")
If you want to run code if something exists, you simply use an if statement.
local fire = script.Parent:FindFirstChild("Fire")
if fire then
    print("FIIIREEE!")
end
WaitForChild()
Similar to FindFirstChild, but instead of returning a nil value if the object doesn’t exist, it would yield, or wait. In other words, it will stop the script until it finds the object.
game.Workspace:WaitForChild("Part")
print(1)
Here, the script will wait for an instance named «Part,» and will never continue on until it exists.
Wait()
Delays a code a set number of seconds. Set the time in seconds as the parameter in the brackets. If you don’t put a number in the brackets, it will wait one second by default.
wait(0.5) --Delays half a second.
wait() --Delays 1 second.
wait(2) --Delays 2 seconds.
Tables
Tables, also known as arrays, are a type of variable in Lua that can be used to store multiple pieces of data in the same variable, for example:
local MyTable = {"a","b","c"}
MyTable is a variable that stores three string values: «a,» «b,» and «c.»
All the values in a table have two values: an i value and a v value. i represents the index position, meaning its position in the table. Therefore, the first value has an i value of 1, the second value has an i value of 2, and so on. v represents the value itself, so in the above example the v values are a, b, and c
So, if you want to find the v value given the i value, you would have to do this.
What this basically does is tells our script to access the second value in the table a. Now, say we wanted to print the last 2 values out of the following table:
a = {"three thousand","nine hundred","and one"}
What we would do is this:
We can also assign values to individual spaces within a table:
This would print the text lol in our output, because the value of the second space in the table «a» was changed to «lol».
Loops
A loop is basically a chunk of code that executes repeatedly. Note that regardless of what type of loop you use, you MUST use a wait function (delay). This is because the system can run the code so many times so infinitely fast that without a delay, the server will crash and stop responding.
While Loops
The most simple loop is a «while» loop, that basically acts like this:
 a = true
 while a == true do
     wait(0.1)
     print("I can swing my sword")
 end
Basically what this does is the script continually checks if a is still true every .1 seconds, and if a is still true then the code within the loop will execute again.
If you wanted a while loop to keep executing code unconditionally, you would do this:
Remember to keep a wait statement!
For Loops
A second, more complicated loop is the «for» loop, which can repeat a set number of times, for example:
 for i = 1,6 do
     wait(0.1)
     print("Hello mom!")
 end
Basically what this does is it makes the script count from 1 to 6, executing the code each time. So, «Hello mom!» would be printed 6 times.
If you want to get fancy…
Adding the third part causes our for loop to count in 2’s meaning our script will count from 2 to 6 in 2’s, and run every time you can add 2 to 2 before it becomes 6.
 for i = 2,6,2 do
     wait(0.1)
     print("Hello dad!")
 end
We can also print i:
 for i = 1,6 do
    wait(0.1)
    print(i)
 end
What this basically makes our script do is count from 1 to 6 and every single time it counts up 1, it prints whatever value it is at.
In Pairs Loops
This loop will require an understanding of tables, which you should have learned about above.
An in pairs loop is a loop that involves the values in a table.
local Parts = game.Workspace.Folder:GetChildren()
for index,Part in ipairs(Parts) do
     print(index)
     Part:Destroy()
     wait(0.5)
end
What GetChildren() does is that it returns an array containing all instance values inside each folder. Then, I renamed i to index and v to Part. Then, I told the script what table I wanted to use after «in pairs.» Then, between half-second intervals, the script would count the number of parts as it destroys each part one by one.
What Does ‘local’ Mean?
In the Beginners’ Tutorial, I mentioned that variables should have ‘local’ in front of it. Now that you’ve learned some important skills, I can explain what it means.
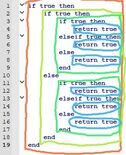
To understand this, you need to understand blocks. You will notice that I asked that you indented code in if statements, functions and loops. The entire code is a block of code within itself, and any code inside loops, functions, and if statements are another block. You can see with the image on the right that there are four levels of blocks in that script.
So what does ‘local’ mean? Well, it means that the variable can only be accessed within that block. This keyword is similar to JavaScript let. So if I were to use the following code:
local db = false
if db == false then
    local var = 1
end
print(var)
The script would error, because the print statement is trying to access a variable that can only be accessed within the if statement.
local db = false
local var
if db == false then
    var = 1
end
print(var)
You can see that on the second line, I have not given a value to var, therefore it is automatically set to nil. Then, the if statement will cause var to equal 1. It is no longer ‘local’ because the if statement is simply updating an already-existing variable.
Intermediate Scripting: Examples
Multi-Purpose Killing/Healing Brick (Difficulty: Medium-Hard)
Great! Now that we have our concepts down, let’s get cracking. Say, we wanted a brick that removed Shedletsky’s head whenever he stepped on it, but it would heal other players when they stepped on it. So, create a script and put it inside a brick using the explorer — Next, let’s create our function that will be called by the Touched event and our value that will be assigned by the Touched event (to check if it’s actually Shedletsky, of course!):
function touch(shedletskycheck)
Great! We have the function touch with the argument shedletskycheck. Now we have to state what our function does. We want our function to first check for Shedletsky:
 function touch(shedletskycheck)
 '''if shedletskycheck.Parent.Name == "Shedletsky" then'''
The script now checks for if whatever touched the brick’s parent’s name was Shedletsky. Now we must create a path leading from the touching brick to Shedletsky’s head:
 function touch(shedletskycheck)
 if shedletskycheck.Parent.Name == "Shedletsky" then
 shedletskycheck.Parent.Head:remove()
--We navigated from shedletskycheck to its Parent, which is the Shedletsky model itself, then we found the Head within the Shedletsky model.
Now, let’s say that something that WASN’T Shedletsky touched the brick. According to our script description, we must check if whatever that touched the brick that wasn’t Shedletsky was even a player, then we must heal it. As such, we must find if the touching part’s parent had a Humanoid in it. To do this, we must use a ;findFirstChild() method (If you don’t know what this is, see Beginner guide to scripting.)
 function touch(shedletskycheck)
 if shedletskycheck.Parent.Name == "Shedletsky" then
 shedletskycheck.Parent.Head:remove()
 elseif shedletskycheck.Parent:findFirstChild("Humanoid") ~= nil then
Using the elseif statement, if the conditions for the previous «if» (Which is whoever touched the brick being Shedletsky») are not met, then the elseif statement checks the following condition (in this case, if the brick’s parent actually even had a Humanoid in it, indicating whether or not whatever touched the brick was even a player), and then we ran a :findFirstChild() method on the touching part’s parent, and if it found a Humanoid in the touching part’s parent, it returns ~= nil, however if it did not find one, it returns nil.
Now, we need to heal them:
 function touch(shedletskycheck)
 if shedletskycheck.Parent.Name == "Shedletsky" then
 shedletskycheck.Parent.Head:remove()
 elseif shedletskycheck.Parent:findFirstchild("Humanoid") ~= nil then
 shedletskycheck.Parent.Humanoid.Health = shedletsky.Parent.Humanoid.MaxHealth
This basically sets the value of their health to their maxhealth, effectively healing them to full capacity.
Hooray! We almost have our script. Now all we have to do is add one «end» for every «function» and «if» we have, excluding «elseif»s.
 function touch(shedletskycheck)
 if shedletskycheck.Parent.Name == "Shedletsky" then
 shedletskycheck.Parent.Head:remove()
 elseif shedletskycheck.Parent:findFirstChild("Humanoid") ~= nil then
 shedletskycheck.Parent.Humanoid.Health = shedletsky.Parent.Humanoid.MaxHealth
 end
 end
We have one function and one if, excluding the «if» in «elseif», so we added two ends.
Lastly, we need to add the connection:
 function touch(shedletskycheck)
 if shedletskycheck.Parent.Name == "Shedletsky" then
 shedletskycheck.Parent.Head:remove()
 elseif shedletskycheck.Parent:findFirstChild("Humanoid") ~= nil then
 shedletskycheck.Parent.Humanoid.Health = shedletsky.Parent.Humanoid.MaxHealth
 end
 end
 script.Parent.Touched:connect(touch)
Hooray! Now if we run our script in Play Solo, if you rename a character Shedletsky, when it touches the brick, its head should be removed! However, if you damage yourself and you touch the brick, you should be healed back up to full health!
Extension: Extended Healing Effect
Now let’s say that we didn’t want our brick to heal other players up instantly, but instead it would heal them in 20’s every 5 seconds 5 times. You guessed it: We’re using «for» loops.
 function touch(shedletskycheck)
 if shedletskycheck.Parent.Name == "Shedletsky" then
 shedletskycheck.Parent.Head:remove()
 elseif shedletskycheck.Parent:findFirstChild("Humanoid") ~= nil then
 for i = 1,5 do
 end
 end
 script.Parent.Touched:connect(touch)
So we replaced the initial healing code with a «for» loop that counts from 1 to 5 (from 1 to 5 times), next we must add the healing code to make the Humanoid gain 20 extra health (I used a variable to define the humanoid in this case to shorten the code, however it’s not necessary) and add the wait method that makes the script wait 5 seconds before adding more health:
 function touch(shedletskycheck)
 if shedletskycheck.Parent.Name == "Shedletsky" then
 shedletskycheck.Parent.Head:remove()
 elseif shedletskycheck.Parent:findFirstChild("Humanoid") ~= nil then
 for i = 1,5 do
 wait(5)
 b = shedletskycheck.Parent:findFirstChild("Humanoid")
 b.Health = b.Health + 20
 end
 end
 script.Parent.Touched:connect(touch)
So we added a wait statement that makes the script wait 5 seconds, then it — of course — found the Humanoid, and set its value to its original value plus 20. (A Variable’s value is non-constant, it is whatever it was when its value was set. The variable does not continually update itself. Hence:
 a = 1
 b = a
 wait(1)
 a = 2
 print(b)
Would actually display 1, since at the time b was set to a, a was 1, however later on a was changed to 2, but since variables are non-constant, b remained 1.)
Now, lastly, we must end the loop with an «end»:
 function touch(shedletskycheck)
 if shedletskycheck.Parent.Name == "Shedletsky" then
 shedletskycheck.Parent.Head:remove()
 elseif shedletskycheck.Parent:findFirstChild("Humanoid") ~= nil then
 for i = 1,5 do
 wait(5)
 b = shedletskycheck.Parent:findFirstChild("Humanoid")
 b.Health = b.Health + 20
 end
 end
 end
 script.Parent.Touched:connect(touch)
If you did this correctly, when you step on the scripted block in Play Solo, if you’re damaged, you should slowly be gaining Health (unless your name is Shedletsky.)
Extension: Disappearance Effect
Now, let’s say we wanted our script to continually increase the transparency of Shedletsky’s head every .1 second, and when his head’s transparency reaches 1, ONLY THEN the script will remove Shedletsky’s head. We’re going to be using some more «for» loops. (I used a variable to define shedletsky’s head’s transparency, but you don’t have to)
 function touch(shedletskycheck)
 if shedletskycheck.Parent.Name == "Shedletsky" then
 trans = shedletskycheck.Parent.Head.Transparency
 for i = 1,10 do
 elseif shedletskycheck.Parent:findFirstChild("Humanoid") ~= nil then
 for i = 1,5 do
 b = shedletskycheck.Parent:findFirstChild("Humanoid")
 b.Health = b.Health + 20
 end
 end
 end
 script.Parent.Touched:connect(touch)
So we replaced the basic transparency setting code with a «for» loop that counted from 1 to 10 and defined shedletsky’s head’s transparency as the variable trans. Now, we must add the part where his transparency is increased:
 function touch(shedletskycheck)
 if shedletskycheck.Parent.Name == "Shedletsky" then
 trans = shedletskycheck.Parent.Head.Transparency
 for i = 1,10 do
 trans = trans + 0.1
 elseif shedletskycheck.Parent:findFirstChild("Humanoid") ~= nil then
 for i = 1,5 do
 b = shedletskycheck.Parent:findFirstChild("Humanoid")
 b.Health = b.Health + 20
 end
 end
 end
 script.Parent.Touched:connect(touch)
So now this will increase the head’s transparency by .1 10 times (a transparency value of 1 causes a brick to be fully invisible). Now we have to add the statement that makes the script wait .1 seconds between transparency increases:
 function touch(shedletskycheck)
 if shedletskycheck.Parent.Name == "Shedletsky" then
 trans = shedletskycheck.Parent.Head.Transparency
 for i = 1,10 do
 wait(0.1)
 trans = trans + 0.1
 elseif shedletskycheck.Parent:findFirstChild("Humanoid") ~= nil then
 for i = 1,5 do
 b = shedletskycheck.Parent:findFirstChild("Humanoid")
 b.Health = b.Health + 20
 end
 end
 end
 script.Parent.Touched:connect(touch)
Lastly, we add the end statement:
 function touch(shedletskycheck)
 if shedletskycheck.Parent.Name == "Shedletsky" then
 trans = shedletskycheck.Parent.Head.Transparency
 for i = 1,10 do
 wait(0.1)
 trans = trans + 0.1
 end
 elseif shedletskycheck.Parent:findFirstChild("Humanoid") ~= nil then
 for i = 1,5 do
 b = shedletskycheck.Parent:findFirstChild("Humanoid")
 b.Health = b.Health + 20
 end
 end
 end
 script.Parent.Touched:connect(touch)
And the part that removes Shedletsky’s head:
 function touch(shedletskycheck)
 if shedletskycheck.Parent.Name == "Shedletsky" then
 trans = shedletskycheck.Parent.Head.Transparency
 for i = 1,10 do
 wait(0.1)
 trans = trans + 0.1
 end
 shedletskycheck.Parent.Head:remove()
 elseif shedletskycheck.Parent:findFirstChild("Humanoid") ~= nil then
 for i = 1,5 do
 b = shedletskycheck.Parent:findFirstChild("Humanoid")
 b.Health = b.Health + 20
 end
 end
 end
 script.Parent.Touched:connect(touch)
So now, when you run the script in Play Solo, if you name yourself Shedletsky, when you step on the brick your head should gradually disappear until you die.
Player Recording
So let’s say at this point you wanted to record all the non-Shedletsky players that will step on this brick, for this we must use a table:
 t = {one}
 function touch(shedletskycheck)
 if shedletskycheck.Parent.Name == "Shedletsky" then
 trans = shedletskycheck.Parent.Head.Transparency
 for i = 1,10 do
 wait(0.1)
 trans = trans + 0.1
 end
 shedletskycheck.Parent.Head:remove()
 elseif shedletskycheck.Parent:findFirstChild("Humanoid") ~= nil then
 for i = 1,5 do
 b = shedletskycheck.Parent:findFirstChild("Humanoid")
 b.Health = b.Health + 20
 end
 end
 end
 script.Parent.Touched:connect(touch)
We’ve created a table with the content «one». This will help later on. Next, get the max number of our table by using the table.maxn() method, which returns the highest space in the table:
 t = {one}
 function touch(shedletskycheck)
 maxn = table.maxn(t)
 if shedletskycheck.Parent.Name == "Shedletsky" then
 trans = shedletskycheck.Parent.Head.Transparency
 for i = 1,10 do
 wait(0.1)
 trans = trans + 0.1
 end
 shedletskycheck.Parent.Head:remove()
 elseif shedletskycheck.Parent:findFirstChild("Humanoid") ~= nil then
 for i = 1,5 do
 b = shedletskycheck.Parent:findFirstChild("Humanoid")
 b.Health = b.Health + 20
 end
 end
 end
 script.Parent.Touched:connect(touch)
Now, we must have our table insert the names of the recorded players using the table.insert() method — table.insert(table,location,value):
 t = {one}
 function touch(shedletskycheck)
 maxn = table.maxn(t)
 if shedletskycheck.Parent.Name == "Shedletsky" then
 trans = shedletskycheck.Parent.Head.Transparency
 for i = 1,10 do
 wait(0.1)
 trans = trans + 0.1
 end
 shedletskycheck.Parent.Head:remove()
 elseif shedletskycheck.Parent:findFirstChild("Humanoid") ~= nil then
 for i = 1,5 do
 b = shedletskycheck.Parent:findFirstChild("Humanoid")
 b.Health = b.Health + 20
 end
 table.insert(t,(maxn - 1),shedletskycheck.Parent.Name)
 end
 end
 script.Parent.Touched:connect(touch)
What this does is it gets the highest place in the table, subtracts it by one, and inserts the name value there. We do this to make sure that the table will add in a new name in a new space. Now, let’s make it print the entire table when it’s touched using two methods: the tostring method and the table.concat method. The table.concat method basically takes all the values in a table and squishes them together. The tostring method converts any value (such as a table value) to a string value.
 t = {one}
 function touch(shedletskycheck)
 maxn = table.maxn(t)
 print(tostring(table.concat(t,' ')))
 if shedletskycheck.Parent.Name == "Shedletsky" then
 trans = shedletskycheck.Parent.Head.Transparency
 for i = 1,10 do
 wait(0.1)
 trans = trans + 0.1
 end
 shedletskycheck.Parent.Head:remove()
 elseif shedletskycheck.Parent:findFirstChild("Humanoid") ~= nil then
 for i = 1,5 do
 b = shedletskycheck.Parent:findFirstChild("Humanoid")
 b.Health = b.Health + 20
 end
 table.insert(t,(maxn - 1),shedletskycheck.Parent.Name)
 end
 end
 script.Parent.Touched:connect(touch)
The VIP Door (Difficulty: Medium)
Now let’s say you wanted a brick that only allows a certain person to pass through it but kills all others. Create a brick, firstly. Put a script in the brick, next, open its source. Firstly, we must create a function to be called by the Touched event and the value that will be defined by the Touched event:
So we have a function onTouch and an argument «vip». Next, we create an «if» statement to check if whatever touched the brick was a player named «Bob»:
 function onTouch(vip)
 if vip.Parent.Name == "Bob" then
Our script now checks if the name of the parent of whatever touched the brick was Bob. Next, since we want our script to allow Bob to pass through, we set the value of the brick’s cancollide to «false» for 1 second. The CanCollide property is the property that causes a brick to be solid.
 function onTouch(vip)
 if vip.Parent.Name == "Bob" then
 script.Parent.CanCollide = false
 wait(1)
 script.Parent.CanCollide = true
Our script now, when touched by Bob, sets the brick’s CanCollide to false, allowing Bob to pass through, and after 1 second — wait(1), it sets the brick’s CanCollide to true, not letting others pass through. Now, we want Bob to know when the door is open, so we’ll make the brick semitransparent while the brick’s CanCollide is false:
 function onTouch(vip)
 if vip.Parent.Name == "Bob" then
 script.Parent.Transparency = 0.5
 script.Parent.CanCollide = false
 wait(1)
 script.Parent.Transparency = 0
 script.Parent.CanCollide = true
Our script now, when touched by Bob, not only changes the value of the brick’s CanCollide, but also makes it semitransparent so Bob knows when the door is open. After 1 second — wait(1), at the same time the CanCollide is set to true, the transparency is set to 0 so that Bob knows when the door is closed. Next, we add the part that checks if (hypothetically speaking) whatever that touched the block that WASN’T Bob was even a player.
 function onTouch(vip)
 if vip.Parent.Name == "Bob" then
 script.Parent.Transparency = 0.5
 script.Parent.CanCollide = false
 wait(1)
 script.Parent.Transparency = 0
 script.Parent.CanCollide = true
 elseif vip.Parent:findFirstChild("Humanoid") ~= nil then
So if the conditions for the first «if» statement (the toucher being Bob) aren’t met, then it performs an additional check that indicates whether the toucher was even a player. Now, the fun part: Killing the player.
 function onTouch(vip)
 if vip.Parent.Name == "Bob" then
 script.Parent.Transparency = 0.5
 script.Parent.CanCollide = false
 wait(1)
 script.Parent.Transparency = 0
 script.Parent.CanCollide = true
 elseif vip.Parent:findFirstChild("Humanoid") ~= nil then
 vip.Parent.Humanoid.Health = 0
So our statement will now set the found Humanoid’s health to zero. Lastly, let’s close our «function» and or «if» (excluding our «elseif»)
 function onTouch(vip)
 if vip.Parent.Name == "Bob" then
 script.Parent.Transparency = 0.5
 script.Parent.CanCollide = false
 wait(1)
 script.Parent.Transparency = 0
 script.Parent.CanCollide = true
 elseif vip.Parent:findFirstChild("Humanoid") ~= nil then
 vip.Parent.Humanoid.Health = 0
 end
 end
And lastly, let’s create the connection statement (which makes everything happen:)
 function onTouch(vip)
 if vip.Parent.Name == "Bob" then
 script.Parent.Transparency = 0.5
 script.Parent.CanCollide = false
 wait(1)
 script.Parent.Transparency = 0
 script.Parent.CanCollide = true
 elseif vip.Parent:findFirstChild("Humanoid") ~= nil then
 vip.Parent.Humanoid.Health = 0
 end
 end
 script.Parent.Touched:connect(onTouch)
Congratulations! If your script worked, anyone named «Bob» should be able to pass through the door, but anyone that isn’t Bob will be killed by the door! You can change «Bob» to the name of your liking once you’re ready to implement this into your place!
That’s it for the intermediate guide! Go to the advanced scripting guide to continue.