Программируемый блок — блок, добавленный в обновлении 1.063. Позволяет контролировать системы кораблей с помощью скриптов на языке С#. На данный момент способен управлять всем стандартным функционалом терминала.
Contents
- 1 Ограничения
- 2 Обзор интерфейса
- 2.1 Программируемый блок
- 2.2 Редактор
- 2.3 Экран «Workshop»
- 2.4 Детали (локальный скрипт)
- 2.5 Детали («workshop» скрипт)
- 3 Гайд по программированию
- 3.1 Доступ к редактору
- 3.2 Метод Main
- 3.3 Видимость переменных
- 3.4 Компиляция
- 3.5 Выполнение скрипта
- 3.6 Вычисление команд
- 4 Доступные интерфейсы
- 4.1 Возможные действия
- 4.2 Переменная GridTerminalSystem
- 4.3 IMyCubeBlock
- 4.4 IMyTerminalBlock
- 4.5 ITerminalAction
- 4.6 IMyFunctionalBlock
- 5 Блоки и действия
- 5.1 Дисклеймер
- 5.2 Родитель
- 5.3 Поля
- 5.4 Действия
- 5.5 Свойства терминала
- 5.6 Субтип
- 5.7 Список блоков и действий
- 6 Обновления
- 6.1 Обновление от 02/01/15
- 7 Перевод
Ограничения
Ниже вы найдете список известных ограничений о которых мы знаем, а так же возможные их решения.
- Оператор «foreach» не работает на 64-битной системе.
- Проблема:
- На данный момент использование оператора «foreach» внутри скрипта приведет к «bad program expection» и остановит запуск скрипта. Мы работаем над устранением этой проблемы.
- Решение:
- Все наши внутри-игровые интерфейсы работают со списками «list» как с коллекциями. Пожалуйста, используйте итерационный цикл «for» для работы с ними.
- Лямбда-выражения не работают.
- Проблема:
- На данный момент лямбда-выражения не поддерживаются. Если вы воспользуетесь ими в скрипте, то это вызовет исключение и скрипт не запустится.
- Решение:
- Пожалуйста, используйте методы вместо лямбда-выражений.
- Переменные, устанавливаемые пользователем — не сохраняются.
- Проблема:
- Пользовательские переменные используемые в скрипте не сохраняются и после загрузки возвращаются к своим значениям по умолчанию.
- Решение:
- Отсутствует.
Обзор интерфейса
Программируемый блок
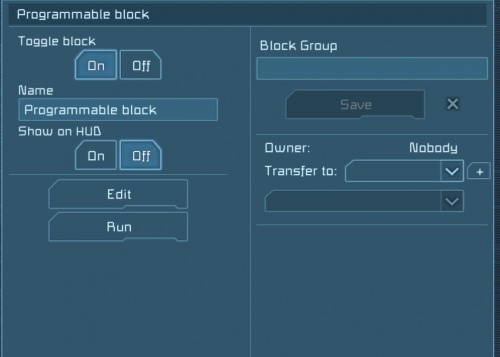
Панель программируемого блока на данный момент содержит следующие кнопки:
Edit – открыть редактор для редактирования скриптов и возможности сохранения/загрузки их на диск.
Также вы можете загрузить свои скрипты в «workshop» или загрузить себе скрипты, на которые вы подписаны.
Run – запустить скрипт сохраненный в редакторе. Скрипт будет запущен один раз. Однако эта кнопка является действием в терминале и вы можете соединить ее с сенсором, таймером или добавить на панель быстрого доступа.
Редактор

Редактор кода содержит следующие кнопки:
Help – открыть мануал по программированию в игре.
Check code – проверить код на наличие ошибок, а так же возможность использовать данный код.
Remember & Exit – сохранить ваш код, закрывает экран редактора и переведет к панели терминала.
Remember code – сохранить ваш код и оставит экран редактора открытым.
Browse Workshop – открыть окно для управления скриптами, вы можете сохранить/загрузить скрипты на диск, загрузить свои скрипты в «workshop» или загрузить себе скрипты, на которые вы подписаны.
Line counter – отобразить текущую строку кода и общее количество строк в коде.
Экран «Workshop»
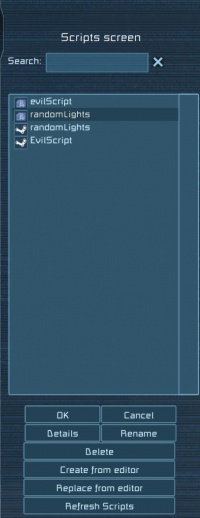
Этот экран аналогичный экрану с чертежами и содержит следующие кнопки:
Ok – загрузить выбранный скрипт в редактор и закроет экран.
Cancel – закрыть экран (изменения не будут внесены в редактор)
Details – открыть экран «детали», где вы можете увидеть описание скрипта.
Rename (только для локальных скриптов) – переименовать выбранный скрипт, если вы попытаетесь переименовать существующий скрипт, игра попросит подтверждение.
Delete (только для локальных скриптов) – удалить выбранный скрипт, после подтверждения.
Create from editor – создать новый скрипт с именем по умолчанию Script_XX, которое начинается с 0, и если скрипт с уже выбранным именем существует, то числовое значение в названии будет повышено. Для примера, первым будет Script_0, далее Script_1 и т.д…
Replace from editor (только для локальных скриптов) – заменить (после подтверждения пользователя) выбранный скрипт на скрипт из редактора.
Refresh Scripts – обновить локальные скрипты и скрипты на которые вы подписаны.
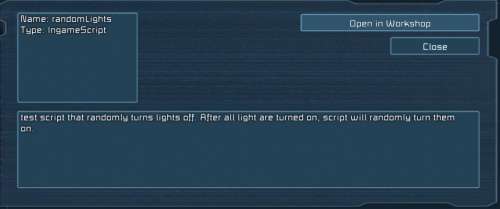
Детали (локальный скрипт)

Этот экран показывает детали для локальных скриптов и содержит следующие кнопки:
Rename – переименовать выбранный скрипт, если вы попытаетесь переименовать существующий скрипт, игра попросит подтверждение.
Delete – удалить выбранный скрипт, после подтверждения.
Publish – опубликовать выбранный скрипт в «workshop» и показать странницу с опубликованным скриптом.
Browse Workshop – открыть экран «workshop» для просмотра, а также подписаться на скрипты.
Close – закрыть экран.
Детали («workshop» скрипт)
Этот экран показывает детали для скриптов из «workshop» и содержит следующие кнопки:
Open in Workshop – открыть «workshop» страницу скрипта.
Close – закрыть экран.
Гайд по программированию
Доступ к редактору
Только один игрок может редактировать скрипт. Если кто-нибудь откроет занятый программируемый блок и попытается открыть редактор, он получит уведомление о том, что редактор уже открыт.
Метод Main
Метод Main — создается при первом открытии редактора, этот метод является основной точкой входа в ваш скрипт. При переименовании или удалении этого метода скрипт не запустится и вы получите уведомление.
Пользовательские методы/переменные могут быть определены, но использованы только внутри главного метода «main».
Видимость переменных
Есть два типа переменных для скрипта:
-Local (внутри методов) — эти переменные будут хранить значение только во время выполнения метода.
Подробнее — локальная переменная находится в области видимости до тех пор, пока закрывающая фигурная скобка не укажет конец блока операторов или метода, в котором она объявлена.А так же, объявленная в операторах цикла «for», «while» или подобных им, видима в пределах тела цикла.
-Global (за пределами методов) — эти переменные будут хранить значения при работе всего скрипта.
Подробнее — если переменная должна сохранить значение между отдельными блоками программы, она должна быть определена вне этих методов т.е. глобально.
-После нажатия «Remember & Exit» или «Remember» кнопки, предыдущий скрипт будет переписан и все глобальные переменные будут потеряны.
Компиляция
Когда вы нажмете кнопку “Check code”, код будет скомпилирован, также будет показан результат компиляции.
Процесс компиляции состоит из двух этапов:
-Во первых, код внутри редактора будет проверен на синтаксические ошибки, внутри языка C#
Если во время компиляции возникнут какие-либо ошибки, компиляция будет прервана и вы получите уведомление:
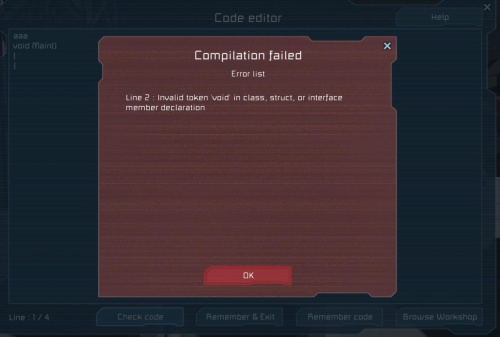
К примеру «ааа» строка была помещена перед главным методом. Это неправильное языковое построение, поэтому компиляция будет прервана.
Также в сообщении об ошибке будет показана строка, в которой допущена ошибка и описание ошибки.
-Во-вторых, код будет проверен на наличие недопустимых имен или типов. Если во время компиляции возникнут какие-либо ошибки, компиляция будет прервана и вы получите уведомление:
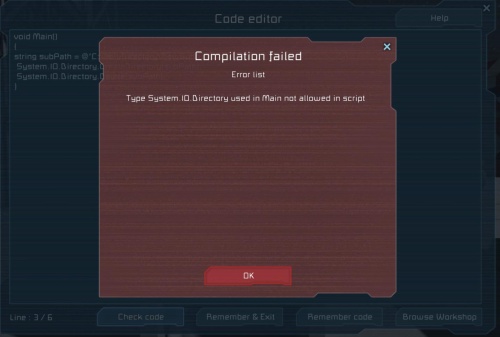
К примеру System.IO.Directory был использован для удаления другого каталога. Это запрещено, и вы получите уведомление: “Not allowed type was used in script”.
-Если компиляция и проверка проходит успешно, вы получите уведомление:

Это означает, что код не содержит ошибок в языке или неразрешенные методы.
Выполнение скрипта
Когда вы нажимаете кнопку «Run» или добавляете действие на панель быстрого доступа, скрипт будет выполнен. На данный момент «Run» должен быть использован вручную, т.е. пользователю нужно нажать кнопку «Run» или добавить действие на панель быстрого доступа.
Скрипт будет выполнен только на сервере, даже если был запущен из клиента, все клиенты будут уведомлены, если запуск скрипта будет прерван.
В случае, если работа скрипта будет прервана, скрипт не запустится до того момента, пока пользователь не откроет редактор и не отредактирует скрипт.
Вычисление команд
Каждый раз, когда скрипт будет запущен, происходит расчет каждой команды внутри скрипта.
Если количество команд внутри скрипта превышает лимит, запуск будет приостановлен и пользователь получит уведомление о том, что скрипт слишком сложный для выполнения.
Лимит помогает избежать «заморозки» игры при выполнении скрипта.
Доступные интерфейсы
Возможные действия
На данный момент в скрипте вы можете использовать только действия, доступные в панели управления.
Пользователь имеет доступ только к объектам, расположенным в одной сети, где находится программируемый блок.
Переменная GridTerminalSystem
В настоящее время, кроме «встроенных» переменных, пользователь может использовать переменную GridTerminalSystem.
Она является точкой входа во всю сеть корабля, и имеет следующие доступные методы:
List<IMyTerminalBlock> Blocks {get;}
List<IMyBlockGroup> BlockGroups {get;}
void GetBlocksOfType<T>(List<IMyTerminalBlock> blocks, Func<IMyTerminalBlock, bool> collect = null);
void SearchBlocksOfName(string name,List<IMyTerminalBlock> blocks, Func<IMyTerminalBlock, bool> collect = null);
IMyTerminalBlock GetBlockWithName(string name);
С помощью этих методов все «терминальные» блоки внутри сети могут быть собраны.
Blocks — данное свойство возвращает все блоки из сети терминала, данный метод внутренне выделяет новую память.
BlockGroups — возвращает все группы блоков из сети терминала, этот метод внутренне выделяет новую память.
GetBlocksOfType — возвращает все блоки указанного типа.
SearchBlocksOfName — данный метод является полнотекстовым поиском между всеми блоками и возвращает блок, который содержит искомую строку, поиск не чувствителен к регистру.
GetBlockWithName — данный метод возвращает первый блок с точным названием, которое было задано, поиск чувствителен к регистру.
Func<IMyTerminalBlock, BOOL> — данный «collect» метод определяет условие поиска внутри другого метода поиска. ( для примера: метод передается как параметр в метод поиска GetBlocksOfType или SearchBlocksOfName).
Метод «collect» интерфейса «IMyRadioAntenna» может использоваться для поиска включенных антенн или антенн с необходимым вам радиусом вещания.
IMyCubeBlock
IMyCubeBlock это базовый класс для каждого «терминального» блока. Он имеет следующие свойства и методы:
BOOL IsBeingHacked {get; }
BOOL IsFunctional {get; }
BOOL IsWorking {get; }
VRageMath.Vector3I Position {get; }
IsFunctional — свойство сообщает, если блок достроен до уровня, когда он может работать.
IsWorking — свойство сообщает, имеет ли данный блок достаточное питание для работы.
IMyTerminalBlock
IMyTerminalBlock это базовый класс для каждого «терминального» блока. Он имеет следующие свойства и методы:
string CustomName
string CustomNameWithFaction
string DetailedInfo
bool HasLocalPlayerAccess()
bool HasPlayerAccess(long playerId)
void RequestShowOnHUD(bool enable)
void SetCustomName(string text)
void SetCustomName(StringBuilder text)
bool ShowOnHUD
void GetActions(List<Sandbox.ModAPI.Interfaces.ITerminalAction> resultList, Func<Sandbox.ModAPI.Interfaces.ITerminalAction, bool> collect = null);
void SearchActionsOfName(string name,List<Sandbox.ModAPI.Interfaces.ITerminalAction> resultList, Func<Sandbox.ModAPI.Interfaces.ITerminalAction, bool> collect = null);
Sandbox.ModAPI.Interfaces.ITerminalAction GetActionWithName(string name);
GetActions — данный метод возвращает все доступные действия для текущего блока.
SearchActionsOfName — данный метод является полнотекстовым поиском между всеми действиями блока и возвращает действия, название которых содержит искомую строку, например, если блок имеет действия: «OnOff, OnOff_On, OnOff_Off».
SearchActionsOfName с «OnOff» — вернет все действия
SearchActionsOfName с «_On» — вернется только «OnOff_On», поиск «On» вернет все действия. Поиск не чувствителен к регистру.
GetActionWithName — данный метод вернет первое найденное действие с точно заданным названием, поиск чувствителен к регистру.
ITerminalAction
ITerminalAction предоставляет определенные действия, которые могут быть выполнены.
Он имеет следующие свойства и методы:
string Id { get; }
StringBuilder Name { get; }
void Apply(Sandbox.ModAPI.Ingame.IMyCubeBlock block);
Id — это обозначение действия, к примеру: «OnOff», «OnOff_On»
Name — это название действия, которое будет показано в интерфейсе, к примеру: «Toggle block On/Off ,Toggle block On»
Apply — применяет действие к выбранному блоку (вам нужно определить блок, из которого вы берете действие).
IMyFunctionalBlock
IMyFunctionalBlock — это базовый класс для каждого блока, который может быть включен или выключен, он наследуется от «IMyTerminalBlock». Для примера, каждый блок имеющий функции, является «терминальным», но не все «терминальные» блоки могут быть включены или выключены.
Он имеет одно свойство:
bool Enabled
Это свойство отображает: включен или выключен данный блок пользователем.
Блоки и действия
Дисклеймер
Все «терминальные» блоки имеют следующие свойства:
Имя интерфейса: это имя определенного блока в коде, название может отличаться от названия отображаемого на экране постройки. К примеру антенна имеет имя интерфейса «IMyRadioAntenna» — вам нужно использовать этот интерфейс, если вы хотите получить все антенны.
Родитель
Каждый блок имеет родителя (все блоки имеют «IMyTerminalBlock» как родителя), это нужно для того, чтобы получить все блоки одного типа, вместо конкретного блока.
К примеру, если вы хотите получить все блоки света, следует использовать «IMyLightningBlock», а если вы хотите использовать только блок ламы, вы используете «IMyInteriorLight».
Поля
Данное свойство блока доступно только для чтения.
К примеру из «IMyBeacon» вы можете получить свойство радиуса. И основываясь на этом свойстве вы можете увеличить/уменьшить радиус маяка.
Действия
Все действия, которые вы можете применить к блоку, доступны вам в скрипте, так что если вы хотите уменьшить радиус вещания антенны, вам нужно использовать «DecreaseRadius» действие для блока.
Свойства терминала
Это свойства терминала, которые вы можете получить или выставить. Эти свойства аналогичные значениям, которые находятся внутри терминала. Для установки плавающих значений, таких как радиус антенны, используйте GetValueFloat(String propertyName). Вы можете найти названия свойств для каждого блока в этом руководстве. Чтобы установить значение, используйте SetValueFloat(String propertyName,float value).
Пример: для антенны GetValueFloat(“Radius”) вы получите текущий радиус (аналогично использованию Радиуса в антенне) и SetValueFloat(“Radius”,10) установит значение радиуса на 10.
Вы также можете использовать void GetProperties(List<ITerminalProperty> resultList, Func<ITerminalProperty, bool> collect = null) чтобы получить все свойства этого блока.
Субтип
Одинаковые блоки, которые имеют тех же родителей (к примеру <TypeId> в файле «cubeblocks.sbc») и различаются только по субтипу (к примеру<SubtypeId>).
Это значит, что различия между этими блоками в коде нет.
Примером таких блоков являются грузовые контейнеры: в игре есть три типа грузовых контейнеров: малый, средний и большой. Они различаются только по субтипу, но имеют общий тип.
К примеру «Id» большого контейнера:
<Id>
<TypeId>CargoContainer</TypeId>
<SubtypeId>LargeBlockLargeContainer</SubtypeId>
</Id>
Средний контейнер:
<Id>
<TypeId>CargoContainer</TypeId>
<SubtypeId>SmallBlockMediumContainer</SubtypeId>
</Id>
Малый контейенер:
<Id>
<TypeId>CargoContainer</TypeId>
<SubtypeId>LargeBlockSmallContainer</SubtypeId>
</Id>
В этом случае есть только один класс «IMyCargoContainer» для всех типов грузовых контейнеров.
Список блоков и действий
Антенна
- Имя интерфейса:
- IMyRadioAntenna
- Родитель:
- IMyFunctionalBlock
- Поля:
- float Radius
- Свойства терминала:
- Radius — Радиус
- Действия:
- OnOff — Переключить блок вкл/выкл
- OnOff_On — Переключить блок вкл
- OnOff_Off — Переключить блок выкл
- IncreaseRadius — Увеличить радиус вещания
- DecreaseRadius — Уменьшить радиус вещания
Дуговая печь
- Имя интерфейса:
- IMyRefinery
- Родитель:
- IMyProductionBlock
- IMyFunctionalBlock
- Поля:
- bool UseConveyorSystem
- Действия:
- OnOff — Переключить блок вкл/выкл
- OnOff_On — Переключить блок вкл
- OnOff_Off — Переключить блок выкл
- UseConveyor — Использовать систему конвейеров вкл/выкл
Искусственная масса
- Имя интерфейса:
- IMyVirtualMass
- Родитель:
- IMyFunctionalBlock
- Поля:
- None
- Действия:
- OnOff — Переключить блок вкл/выкл
- OnOff_On — Переключить блок вкл
- OnOff_Off — Переключить блок выкл
Сборщик
- Имя интерфейса:
- IMyAssembler
- Родитель:
- IMyProductionBlock
- IMyFunctionalBlock
- Поля:
- bool UseConveyorSystem
- Действия:
- OnOff — Переключить блок вкл/выкл
- OnOff_On — Переключить блок вкл
- OnOff_Off — Переключить блок выкл
- UseConveyor — Использовать систему конвейеров вкл/выкл
Батарея
- Имя интерфейса:
- IMyBatteryBlock
- Родитель:
- IMyFunctionalBlock
- Поля:
- bool HasCapacityRemaining
- Действия:
- OnOff — Переключить блок вкл/выкл
- OnOff_On — Переключить блок вкл
- OnOff_Off — Переключить блок выкл
- Recharge — Перезарядка вкл/выкл
Маяк
- Имя интерфейса:
- IMyBeacon
- Родитель:
- IMyFunctionalBlock
- Поля:
- float Radius
- Свойства терминала:
- Radius — Радиус
- Действия:
- OnOff — Переключить блок вкл/выкл
- OnOff_On — Переключить блок вкл
- OnOff_Off — Переключить блок выкл
- IncreaseRadius — Увеличить радиус вещания
- DecreaseRadius — Уменьшить радиус вещания
Кнопочная панель
- Имя интерфейса:
- IMyButtonPanel
- Поля:
- bool AnyoneCanUse
- Действия:
- AnyoneCanUse — Все могут использовать вкл/выкл
Камера
- Имя интерфейса:
- IMyCameraBlock
- Родитель:
- IMyFunctionalBlock
- Поля:
- None
- Действия:
- OnOff — Переключить блок вкл/выкл
- OnOff_On — Переключить блок вкл
- OnOff_Off — Переключить блок выкл
- View — Вид
Кабина
- Имя интерфейса:
- IMyCockpit
- Родитель:
- IMyShipController
- Поля:
- bool ControlWheels
- bool ControlThrusters
- bool HandBrake
- bool DampenersOverride
- Действия:
- ControlThrusters — Управление ускорителями вкл/выкл
- ControlWheels — Управление колесами вкл/выкл
- HandBrake — Ручной тормоз вкл/выкл
- DampenersOverride — Гаситель инерции вкл/выкл
Сборщик
- Имя интерфейса:
- IMyCollector
- Родитель:
- IMyFunctionalBlock
- Поля:
- bool UseConveyorSystem
- Действия:
- OnOff — Переключить блок вкл/выкл
- OnOff_On — Переключить блок вкл
- OnOff_Off — Переключить блок выкл
- UseConveyor — Использовать систему конвейеров вкл/выкл
Коннектор
- Имя интерфейса:
- IMyShipConnector
- Родитель:
- IMyFunctionalBlock
- Поля:
- bool ThrowOut
- bool CollectAll
- bool IsLocked
- Действия:
- OnOff — Переключить блок вкл/выкл
- OnOff_On — Переключить блок вкл
- OnOff_Off — Переключить блок выкл
- ThrowOut — Выбросить вкл/выкл
- CollectAll — Собирать всё вкл/выкл
- SwitchLock — Переключить стыковки
Панель управления
- Имя интерфейса:
- IMyControlPanel
- Поля:
- None
- Действия:
- None
Терминал управления
- Имя интерфейса:
- IMyCockpit
- Родитель:
- IMyShipController
- Поля:
- bool ControlWheels
- bool ControlThrusters
- bool HandBrake
- bool DampenersOverride
- Действия:
- ControlThrusters — Управление ускорителями вкл/выкл
- ControlWheels — Управление колесами вкл/выкл
- HandBrake — Ручной тормоз вкл/выкл
- DampenersOverride — Гаситель инерции вкл/выкл
Дверь
- Имя интерфейса:
- IMyDoor
- Родитель:
- IMyFunctionalBlock
- Поля:
- bool Open
- Действия:
- OnOff — Переключить блок вкл/выкл
- OnOff_On — Переключить блок вкл
- OnOff_Off — Переключить блок выкл
- Open — Открыто/Закрыто
- Open_On — Открыто
- Open_Off — Закрыто
Бур
- Имя интерфейса:
- IMyShipDrill
- Родитель:
- IMyFunctionalBlock
- Поля:
- bool UseConveyorSystem
- Действия:
- OnOff — Переключить блок вкл/выкл
- OnOff_On — Переключить блок вкл
- OnOff_Off — Переключить блок выкл
- UseConveyor — Использовать систему конвейеров вкл/выкл
Кресло пилота
- Имя интерфейса:
- IMyCockpit
- Родитель:
- IMyShipController
- Поля:
- bool ControlWheels
- bool ControlThrusters
- bool HandBrake
- bool DampenersOverride
- Действия:
- ControlThrusters — Управление ускорителями вкл/выкл
- ControlWheels — Управление колесами вкл/выкл
- HandBrake — Ручной тормоз вкл/выкл
- DampenersOverride — Гаситель инерции вкл/выкл
Турель Гатлинга
- Имя интерфейса:
- IMyLargeGatlingTurret
- Родитель:
- IMyLargeConveyorTurretBase
- IMyLargeTurretBase
- IMyFunctionalBlock
- Поля:
- bool UseConveyorSystem
- bool CanControl
- float Range
- Свойства терминала:
- Radius — Радиус
- Действия:
- OnOff — Переключить блок вкл/выкл
- OnOff_On — Переключить блок вкл
- OnOff_Off — Переключить блок выкл
- Control — Управление
- IncreaseRange — Увеличить радиус
- DecreaseRange — Уменьшить радиус
- UseConveyor — Использовать систему конвейеров вкл/выкл
Генератор гравитации
- Имя интерфейса:
- IMyGravityGenerator
- Родитель:
- IMyGravityGeneratorBase
- IMyFunctionalBlock
- Поля:
- float FieldWidth
- float FieldHeight
- float FieldDepth
- float Gravity
- Свойства терминала:
- Width — Ширина поля
- Height — Высота поля
- Depth — Глубина поля
- Gravity — Ускорение
- Действия:
- OnOff — Переключить блок вкл/выкл
- OnOff_On — Переключить блок вкл
- OnOff_Off — Переключить блок выкл
- IncreaseWidth — Увеличить ширину поля
- DecreaseWidth — Уменьшить ширину поля
- IncreaseHeight — Увеличить высоту поля
- DecreaseHeight — Уменьшить высоту поля
- IncreaseDepth — Увеличить глубину поля
- DecreaseDepth — Уменьшить глубину поля
- IncreaseGravity — Увеличить ускорение
- DecreaseGravity — Уменьшить ускорение
Резак
- Имя интерфейса:
- IMyShipGrinder
- Родитель:
- IMyShipToolBase
- Родитель:
- IMyFunctionalBlock
- Поля:
- None
- Действия:
- OnOff — Переключить блок вкл/выкл
- OnOff_On — Переключить блок вкл
- OnOff_Off — Переключить блок выкл
- UseConveyor — Использовать систему конвейеров вкл/выкл
Гироскоп
- Имя интерфейса:
- IMyGyro
- Родитель:
- IMyFunctionalBlock
- Поля:
- float GyroPower
- bool GyroOverride
- float Yaw
- float Pitch
- float Roll
- Действия:
- OnOff — Переключить блок вкл/выкл
- OnOff_On — Переключить блок вкл
- OnOff_Off — Переключить блок выкл
- IncreasePower — Увеличить мощность
- DecreasePower — Уменьшить мощность
- Override — Перехват управления вкл/выкл
- IncreaseYaw — Увеличить рысканье
- DecreaseYaw — Уменьшить рысканье
- IncreasePitch — Увеличить тангаж
- DecreasePitch — Уменьшить тангаж
- IncreaseRoll — Увеличить крен
- DecreaseRoll — Уменьшить крен
Лампа
- Имя интерфейса:
- IMyInteriorLight
- Родитель:
- IMyLightingBlock
- IMyFunctionalBlock
- Поля:
- float Radius
- float Intensity
- float BlinkIntervalSeconds
- float BlinkLenght
- float BlinkOffset
- Свойства терминала:
- Color — Цвет
- Radius — Радиус
- Falloff — Спад
- Intensity — Интенсивность
- Blink Interval — Интервал вспышек
- Blink Lenght — Продолжительность вспышек
- Blink Offset — Задержка вспышек
- Действия:
- OnOff — Переключить блок вкл/выкл
- OnOff_On — Переключить блок вкл
- OnOff_Off — Переключить блок выкл
- IncreaseRadius — Увеличить радиус
- DecreaseRadius — Уменьшить радиус
- IncreaseBlink Interval — Увеличить интервал вспышек
- DecreaseBlink Interval — Уменьшить интервал вспышек
- IncreaseBlink Lenght — Увеличить продолжительность вспышек
- DecreaseBlink Lenght — Уменьшить продолжительность вспышек
- IncreaseBlink Offset — Увеличить задержку вспышек
- DecreaseBlink Offset — Уменьшить задержку вспышек
Турель
- Имя интерфейса:
- IMyLargeInteriorTurret
- Родитель:
- IMyLargeTurretBase
- Имя интерфейса:
- IMyFunctionalBlock
- Поля:
- bool CanControl
- float Range
- Свойства терминала:
- Radius — Радиус
- Действия:
- OnOff — Переключить блок вкл/выкл
- OnOff_On — Переключить блок вкл
- OnOff_Off — Переключить блок выкл
- Control — Управление
- IncreaseRange — Увеличить радиус
- DecreaseRange — Уменьшить радиус
Посадочные шасси
- Имя интерфейса:
- IMyLandingGear
- Родитель:
- IMyFunctionalBlock
- Поля:
- float BreakForce
- Свойства терминала:
- BreakForce — Сила отрыва
- Действия:
- OnOff — Переключить блок вкл/выкл
- OnOff_On — Переключить блок вкл
- OnOff_Off — Переключить блок выкл
- Lock — Запереть
- Unlock — Отпереть
- SwitchLock — Переключить стыковки
- Autolock — Автозацеп вкл/выкл
- IncreaseBreakForce — Увеличить силу отрыва
- DecreaseBreakForce — Уменьшить силу отрыва
Малый грузовой контейнер
- Имя интерфейса:
- IMyCargoContainer
- Поля:
- None
- Действия:
- None
Средний грузовой контейнер
- Имя интерфейса:
- IMyCargoContainer
- Поля:
- None
- Действия:
- None
Большой грузовой контейнер
- Имя интерфейса:
- IMyCargoContainer
- Поля:
- None
- Действия:
- None
Малый реактор
- Имя интерфейса:
- IMyReactor
- Родитель:
- IMyFunctionalBlock
- Поля:
- bool UseConveyorSystem
- Действия:
- OnOff — Переключить блок вкл/выкл
- OnOff_On — Переключить блок вкл
- OnOff_Off — Переключить блок выкл
- UseConveyor — Использовать систему конвейеров вкл/выкл
Большой реактор
- Имя интерфейса:
- IMyReactor
- Родитель:
- IMyFunctionalBlock
- Поля:
- bool UseConveyorSystem
- Действия:
- OnOff — Переключить блок вкл/выкл
- OnOff_On — Переключить блок вкл
- OnOff_Off — Переключить блок выкл
- UseConveyor — Использовать систему конвейеров вкл/выкл
Малый ускоритель
- Имя интерфейса:
- IMyThrust
- Родитель:
- IMyFunctionalBlock
- Поля:
- float ThrustOverride
- Свойства терминала:
- Override — Тяга
- Действия:
- OnOff — Переключить блок вкл/выкл
- OnOff_On — Переключить блок вкл
- OnOff_Off — Переключить блок выкл
- IncreaseOverride — Увеличить тягу
- DecreaseOverride — Уменьшить тягу
Большой ускоритель
- Имя интерфейса:
- IMyThrust
- Родитель:
- IMyFunctionalBlock
- Поля:
- float ThrustOverride
- Свойства терминала:
- Override — Тяга
- Действия:
- OnOff — Переключить блок вкл/выкл
- OnOff_On — Переключить блок вкл
- OnOff_Off — Переключить блок выкл
- IncreaseOverride — Увеличить тягу
- DecreaseOverride — Уменьшить тягу
Медпункт
- Имя интерфейса:
- IMyMedicalRoom
- Родитель:
- IMyFunctionalBlock
- Поля:
- None
- Действия:
- OnOff — Переключить блок вкл/выкл
- OnOff_On — Переключить блок вкл
- OnOff_Off — Переключить блок выкл
Стыковочный блок
- Имя интерфейса:
- IMyShipMergeBlock
- Родитель:
- IMyFunctionalBlock
- Поля:
- None
- Действия:
- OnOff — Переключить блок вкл/выкл
- OnOff_On — Переключить блок вкл
- OnOff_Off — Переключить блок выкл
Ракетная турель
- Имя интерфейса:
- IMyLargeMissileTurret
- Родитель:
- IMyLargeConveyorTurretBase
- IMyLargeTurretBase
- IMyFunctionalBlock
- Поля:
- bool UseConveyorSystem
- bool CanControl
- float Range
- Свойства терминала:
- Range — Радиус
- Действия:
- OnOff — Переключить блок вкл/выкл
- OnOff_On — Переключить блок вкл
- OnOff_Off — Переключить блок выкл
- Control — Управление
- IncreaseRange — Увеличить радиус
- DecreaseRange — Уменьшить радиус
- UseConveyor — Использовать систему конвейеров вкл/выкл
Детектор руды
- Имя интерфейса:
- IMyOreDetector
- Родитель:
- IMyFunctionalBlock
- Поля:
- float Range
- bool BroadcastUsingAntennas
- Действия:
- OnOff — Переключить блок вкл/выкл
- OnOff_On — Переключить блок вкл
- OnOff_Off — Переключить блок выкл
Пассажирское кресло
- Имя интерфейса:
- IMyCockpit
- Родитель:
- IMyShipController
- Поля:
- bool ControlWheels
- bool ControlThrusters
- bool HandBrake
- bool DampenersOverride
- Действия:
- ControlThrusters — Управление ускорителями вкл/выкл
- ControlWheels — Управление колесами вкл/выкл
- HandBrake — Ручной тормоз вкл/выкл
- DampenersOverride — Гаситель инерции вкл/выкл
Поршень
- Имя интерфейса:
- IMyPistonBase
- Родитель:
- IMyFunctionalBlock
- Поля:
- float Velocity
- float MinLimit
- float MaxLimit
- Свойства терминала:
- Velocity — Скорость
- UpperLimit — Максимальная дистанция
- LowerLimit — Минимальная дистанция
- Действия:
- OnOff — Переключить блок вкл/выкл
- OnOff_On — Переключить блок вкл
- OnOff_Off — Переключить блок выкл
- Reverse — Реверс
- IncreaseVelocity — Увеличить скорость
- DecreaseVelocity — Уменьшить скорость
- ResetVelocity — Сбросить скорость
- IncreaseUpperLimit — Увеличить максимальную дистанцию
- DecreaseUpperLimit — Уменьшить максимальную дистанцию
- IncreaseLowerLimit — Увеличить минимальную дистанцию
- DecreaseLowerLimit — Уменьшить минимальную дистанцию
Programmable block
- Имя интерфейса:
- IMyProgrammableBlock
- Родитель:
- IMyFunctionalBlock
- Поля:
- bool IsRunning
- Действия:
- OnOff — Переключить блок вкл/выкл
- OnOff_On — Переключить блок вкл
- OnOff_Off — Переключить блок выкл
- Run — Run
Проэктор
- Interface name:
- IMyProjector
- Parent:
- IMyFunctionalBlock
- Поля:
- int ProjectionOffsetX
- int ProjectionOffsetY
- int ProjectionOffsetZ
- int ProjectionRotX
- int ProjectionRotY
- int ProjectionRotZ
- Свойства терминала:
- X — Ось X
- Y — Ось Y
- Z — Ось Z
- RotX — Поворот по оси X
- RotY — Поворот по оси Y
- RotZ — Поворот по оси Z
- Действия:
- OnOff- Переключить блок вкл/выкл
- OnOff_On — Переключить блок вкл
- OnOff_Off — Переключить блок выкл
- IncreaseX — Увеличить смещение по оси X
- DecreaseX — Уменьшить смещение по оси X
- IncreaseY — Увеличить смещение по оси Y
- DecreaseY — Уменьшить смещение по оси Y
- IncreaseZ — Увеличить смещение по оси Z
- DecreaseZ — Уменьшить смещение по оси Z
- IncreaseRotX — Увеличить вращение по оси X
- DecreaseRotX — Уменьшить вращение по оси X
- IncreaseRotY — Увеличить вращение по оси Y
- DecreaseRotY — Уменьшить вращение по оси Y
- IncreaseRotZ — Увеличить вращение по оси Z
- DecreaseRotZ — Уменьшить вращение по оси Z
Перезаряжаемая ракетница
- Имя интерфейса:
- IMySmallMissileLauncherReload
- Родитель:
- IMyFunctionalBlock
- Поля:
- bool UseConveyorSystem
- Действия:
- OnOff — Переключить блок вкл/выкл
- OnOff_On — Переключить блок вкл
- OnOff_Off — Переключить блок выкл
- UseConveyor — Использовать систему конвейеров вкл/выкл
Очистительный завод
- Имя интерфейса:
- IMyRefinery
- Родитель:
- IMyFunctionalBlock
- IMyProductionBlock
- Поля:
- bool UseConveyorSystem
- Действия:
- OnOff — Переключить блок вкл/выкл
Прожектор
- Имя интерфейса:
- IMyReflectorLight
- Родитель:
- IMyLightingBlock
- IMyFunctionalBlock
- Поля:
- float Radius
- float Intensity
- float BlinkIntervalSeconds
- float BlinkLenght
- float BlinkOffset
- Свойства терминала:
- Color — Цвет
- Radius — Радиус
- Falloff — Спад
- Intensity — Интенсивность
- Blink Interval — Интервал вспышек
- Blink Lenght — Продолжительность вспышек
- Blink Offset — Задержка вспышек
- Actions:
- OnOff — Переключить блок вкл/выкл
- OnOff_On — Переключить блок вкл
- OnOff_Off — Переключить блок выкл
- IncreaseRadius — Увеличить радиус
- DecreaseRadius — Уменьшить радиус
- IncreaseBlink Interval — Увеличить интервал вспышек
- DecreaseBlink Interval — Уменьшить интервал вспышек
- IncreaseBlink Lenght — Увеличить продолжительность вспышек
- DecreaseBlink Lenght — Уменьшить продолжительность вспышек
- IncreaseBlink Offset — Увеличить задержку вспышек
- DecreaseBlink Offset — Уменьшить задержку вспышек
- OnOff_On — Переключить блок вкл
- OnOff_Off — Переключить блок выкл
- UseConveyor — Использовать систему конвейеров вкл/выкл
Удаленное управление
- Имя интерфейса:
- IMyRemoteControl
- Родитель:
- IMyShipController
- Поля:
- bool ControlWheels
- bool ControlThrusters
- bool HandBrake
- bool DampenersOverride
- Действия:
- ControlThrusters — Управление ускорителями вкл/выкл
- ControlWheels — Управление колесами вкл/выкл
- HandBrake — Ручной тормоз вкл/выкл
- DampenersOverride — Гаситель инерции вкл/выкл
- Control — Управление
Ракетная установка
- Имя интерфейса:
- IMySmallMissileLauncher
- Родитель:
- IMyFunctionalBlock
- Поля:
- bool UseConveyorSystem
- Действия:
- OnOff — Переключить блок вкл/выкл
- OnOff_On — Переключить блок вкл
- OnOff_Off — Переключить блок выкл
- UseConveyor — Использовать систему конвейеров вкл/выкл
Двигатель
- Имя интерфейса:
- IMyMotorStator
- Родитель:
- IMyMotorBase
- IMyFunctionalBlock
- Поля:
- bool IsAttached
- float Torque
- float BrakingTorque
- float Velocity
- float LowerLimit
- float UpperLimit
- float Displacement
- Свойства терминала
- Torque — Вращающий момент
- BrakingTorque — Тормозной момент
- Velocity — Скорость
- LowerLimit — Нижний предел
- UpperLimit — Верхний предел
- Displacement — Смещение
- Действия:
- OnOff — Переключить блок вкл/выкл
- OnOff_On — Переключить блок вкл
- OnOff_Off — Переключить блок выкл
- Reverse — Реверс
- Detach — Открепить
- Attach — Прикрепить
- IncreaseTorque — Увеличить вращающий момент
- DecreaseTorque — Уменьшить вращающий момент
- IncreaseBrakingTorque — Увеличить тормозной момент
- DecreaseBrakingTorque — Уменьшить тормозной момент
- IncreaseVelocity — Увеличить скорость
- DecreaseVelocity — Уменьшить скорость
- ResetVelocity — Сбросить скорость
- IncreaseLowerLimit — Увеличить нижний предел
- DecreaseLowerLimit — Уменьшить нижний предел
- IncreaseUpperLimit — Увеличить верхний предел
- DecreaseUpperLimit — Уменьшить верхний предел
- IncreaseDisplacement — Увеличить смещение ротора
- DecreaseDisplacement — Уменьшить смещение ротора
Сенсор
- Имя интерфейса:
- IMySensorBlock
- Родитель:
- IMyFunctionalBlock
- Поля:
- float LeftExtend
- float RightExtend
- float TopExtend
- float BottomExtend
- float FrontExtend
- float BackExtend
- bool DetectPlayers
- bool DetectFloatingObjects
- bool DetectSmallShips
- bool DetectLargeShips
- bool DetectStations
- bool DetectAsteroids
- Свойства терминала:
- Left — Охват слева
- Right — Охват справа
- Bottom — Охват снизу
- Top — Охват сверху
- Back — Охват сзади
- Front — Охват спереди
- Действия:
- OnOff — Переключить блок вкл/выкл
- OnOff_On — Переключить блок вкл
- OnOff_Off — Переключить блок выкл
- IncreaseLeft — Увеличить охват слева
- DecreaseLeft — Уменьшить охват слева
- IncreaseRight — Увеличить охват справа
- DecreaseRight — Уменьшить охват справа
- IncreaseBottom — Увеличить охват снизу
- DecreaseBottom — Уменьшить охват снизу
- IncreaseTop — Увеличить охват сверху
- DecreaseTop — Уменьшить охват сверху
- IncreaseBack — Увеличить охват сзади
- DecreaseBack — Уменьшить охват сзади
- IncreaseFront — Увеличить охват спереди
- DecreaseFront — Уменьшить охват спереди
- Detect Players — Реагировать на игроков вкл/выкл
- Detect Floating Objects — Реагировать на летящие объекты вкл/выкл
- Detect Small Ships — Реагировать на маленькие корабли вкл/выкл
- Detect Large Ships — Реагировать на большие корабли вкл/выкл
- Detect Stations — Реагировать на станции вкл/выкл
- Detect Asteroids — Реагировать на астероиды вкл/выкл
Солнечная панель
- Имя интерфейса:
- IMySolarPanel
- Поля:
- None
- Действия:
- None
Sound Block
- Имя интерфейса:
- IMySoundBlock
- Родитель:
- IMyFunctionalBlock
- Поля:
- float Volume
- float Range
- bool IsSoundSelected
- float LoopPeriod
- Свойства терминала:
- VolumeSlider — Громкость
- RangeSlider- Радиус
- LoopableSlider — Время цикла
- Действия:
- OnOff — Переключить блок вкл/выкл
- OnOff_On — Переключить блок вкл
- OnOff_Off — Переключить блок выкл
- IncreaseVolumeSlider — Увеличить громкость
- DecreaseVolumeSlider — Уменьшить громкость
- IncreaseRangeSlider — Увеличить дальность
- DecreaseRangeSlider — Уменьшить дальность
- PlaySound — Играть
- StopSound — Остановить
- IncreaseLoopableSlider — Увеличить время цикла
- DecreaseLoopableSlider — Уменьшить время цикла
Сферический генератор гравитации
- Имя интерфейса:
- IMyGravityGeneratorSphere
- Родитель:
- IMyGravityGeneratorBase
- IMyFunctionalBlock
- Поля:
- float Radius
- float Gravity
- Свойства терминала:
- Radius — Радиус
- Gravity — Ускорение
- Действия:
- OnOff — Переключить блок вкл/выкл
- OnOff_On — Переключить блок вкл
- OnOff_Off — Переключить блок выкл
- IncreaseRadius — Увеличить радиус
- DecreaseRadius — Уменьшить радиус
- IncreaseGravity — Увеличить ускорение
- DecreaseGravity — Уменьшить ускорение
Таймер
- Имя интерфейса:
- IMyTimerBlock
- Родитель:
- IMyFunctionalBlock
- Поля:
- bool IsCountingDown
- float TriggerDelay
- Свойства терминала:
- TriggerDelay — Задержка
- Действия:
- OnOff — Переключить блок вкл/выкл
- OnOff_On — Переключить блок вкл
- OnOff_Off — Переключить блок выкл
- IncreaseTriggerDelay — Увеличить задержку
- DecreaseTriggerDelay — Уменьшить задержку
- TriggerNow — Активировать
- Start — Старт
- Stop — Стоп
Боеголовка
- Имя интерфейса:
- IMyWarhead
- Поля:
- bool IsCountingDown
- float DetonationTime
- Свойства терминала:
- DetonationTime — Задержка взрыва
- Действия:
- IncreaseDetonationTime — Увеличить задержку подрыва
- DecreaseDetonationTime — Уменьшить задержку подрыва
- StartCountdown — Запустить отсчет
- StopCountdown — Остановить отсчет
- Safety — Предохранитель вкл/выкл
- Detonate — Подорвать
Сварщик
- Имя интерфейса:
- IMyShipWelder
- Родитель:
- IMyShipToolBase
- IMyFunctionalBlock
- Действия:
- OnOff — Переключить блок вкл/выкл
- OnOff_On — Переключить блок вкл
- OnOff_Off — Переключить блок выкл
- UseConveyor — Использовать систему конвейеров вкл/выкл
Подвеска колес 1×1
- Имя интерфейса:
- IMyMotorSuspension
- Родитель:
- IMyMotorBase
- IMyFunctionalBlock
- Поля:
- bool Steering
- bool Propulsion
- float Damping
- float Strength
- float Friction
- float Power
- Свойства терминала:
- Damping — Амортизация
- Strength — Сила
- Friction — Трение
- Power — Мощность
- Действия:
- OnOff — Переключить блок вкл/выкл
- OnOff_On — Переключить блок вкл
- OnOff_Off — Переключить блок выкл
- Steering — Рулевое управление вкл/выкл
- Propulsion — Движущая сила вкл/выкл
- IncreaseDamping — Увеличить амортизацию
- DecreaseDamping — Уменьшить амортизацию
- IncreaseStrength — Увеличить силу
- DecreaseStrength — Уменьшить силу
- IncreaseFriction — Увеличить трение
- DecreaseFriction — Уменьшить трение
- IncreasePower — Увеличить мощность
- DecreasePower — Уменьшить мощность
Подвеска колес 3×3
- Имя интерфейса:
- IMyMotorSuspension
- Родитель:
- IMyMotorBase
- IMyFunctionalBlock
- Поля:
- bool Steering
- bool Propulsion
- float Damping
- float Strength
- float Friction
- float Power
- Свойства терминала:
- Damping — Амортизация
- Strength — Сила
- Friction — Трение
- Power — Мощность
- Действия:
- OnOff — Переключить блок вкл/выкл
- OnOff_On — Переключить блок вкл
- OnOff_Off — Переключить блок выкл
- Steering — Рулевое управление вкл/выкл
- Propulsion — Движущая сила вкл/выкл
- IncreaseDamping — Увеличить амортизацию
- DecreaseDamping — Уменьшить амортизацию
- IncreaseStrength — Увеличить силу
- DecreaseStrength — Уменьшить силу
- IncreaseFriction — Увеличить трение
- DecreaseFriction — Уменьшить трение
- IncreasePower — Увеличить мощность
- DecreasePower — Уменьшить мощность
Подвеска колес 5×5
- Имя интерфейса:
- IMyMotorSuspension
- Родитель:
- IMyMotorBase
- IMyFunctionalBlock
- Поля:
- bool Steering
- bool Propulsion
- float Damping
- float Strength
- float Friction
- float Power
- Свойства терминала:
- Damping — Амортизация
- Strength — Сила
- Friction — Трение
- Power — Мощность
- Действия:
- OnOff — Переключить блок вкл/выкл
- OnOff_On — Переключить блок вкл
- OnOff_Off — Переключить блок выкл
- Steering — Рулевое управление вкл/выкл
- Propulsion — Движущая сила вкл/выкл
- IncreaseDamping — Увеличить амортизацию
- DecreaseDamping — Уменьшить амортизацию
- IncreaseStrength — Увеличить силу
- DecreaseStrength — Уменьшить силу
- IncreaseFriction — Увеличить трение
- DecreaseFriction — Уменьшить трение
- IncreasePower — Увеличить мощность
- DecreasePower — Уменьшить мощность
Обновления
Обновление от 02/01/15
Изменения: Доступные пространства имен.
В настоящее время вы можете использовать только следующие пространства имен из Modding API:
Sandbox.ModAPI.Ingame
Sandbox.ModAPI.Interfaces
Sandbox.Common.ObjectBuilders
VRageMath
VRage
Вы не можете использовать остальные пространства имен из Sandbox.ModAPI или любые другие пространства имен игры.
Перевод
Автор:
Who You
Благодарность за помощь в переводе:
Александр Онищук
Денис Пикущий
Никита Строганов aka Findoss
Денис Пушкарёв
Programmable Blocks are an in-game way that lets players execute custom scripts that can interact with any other block in the game.
Fake pseudo script for illustration, don’t use 

You write scripts using the C# language and the SE API (Application Programmable Interface) which can perform any functionality or access any data normally retrieved through the control panel of a block.
This page will act as a basic guide on writing scripts and outline how to interact with various blocks. It is not intended as an introduction to C#/programming principles — if you have never written code before, please look up basic guides elsewhere.
Aside: Scripts from the Steam Workshop
This guide is about writing your own scripts, but be aware that PC users can alternatively also subscribe to scripts in the Steam Workshop, and load them into the programmable block.
When searching the Workshop, select the filter “Type: IngameScript” (not “Mod category: Script”)!
Requirements
Space Engineers runs scripts only if Experimental mode is enabled. And each saved game runs scripts only if its World Settings allow in-game scripts. On Xbox, Scripts are disallowed by Microsoft.
It’s very helpful to install and set up an Integrated Development Environment (IDE) for C#, specifically, many SE developers use [Visual Studio]. Point it to the SE API doc to get in-editor help.
Script Layout
In game, build a Programmable Block. On first opening the code editor inside it, you will see 3 empty methods already in place:
- Program() — Serves as a constructor to intialise objects. Executed once at the start, after the script has been compiled.
- Save() — Executed once at the end of a session, useful in case you need the script to save its state.
- Main() — Runs every time the script is executed by the player. This is the only method that is mandatory for the script to run.
Main() will hold most of the functionality for the script.
Looking up Documentation
Bookmark the Quick Introduction to Space Engineers Ingame Scripts.
Many blocks have been renamed over time, and their C# objects still have the old names. An IDE has features that help you orient yourself in the API: For example, if you are looking for «o2/h2 generator», typing IMyOxygen… in the IDE’s editor shows IMyOxygenGenerator, and it then reminds you that object is obsolete and to use IMyGasGenerator.
You’ll also get helpful responses from the #programmable-block channel in Keen’s discord server.
Block Types
To interact with a block, it has to be read into a local variable as an object. It is considered good practice to assign blocks to variables only in the Program() method.
All blocks are subclasses of the IMyTerminalBlock class. There are a number of classes used to represent various kinds of blocks, with different public methods and properties.
For example, a Refinery is represented by the IMyRefinery object which includes specialised functions like IsProducing() and NextItemInQueue(), but also inherits generic functions and properties like ‘CustomName’ from IMyTerminalBlock.
The main block classes worth mentioning are:
- IMyTerminalBlock — As already mentioned, forms the base class from which all other block definitions inherit, either directly or through multiple layers of the hierarchy. Mostly includes generic functionality for checking ownership, naming, show on HUD etc.
- IMyProductionBlock — This is the class definition for all blocks which produce items (e.g. Refinery, Assembler, Arc Furnace). It defines useful interfaces for these blocks, including:
- IsProducing — Boolean showing whether the block is currently processing something or not.
- IsQueueEmpty — Boolean showing whether items are currently in the queue
- IMyTextSurface — Definition for all LCD screens. It includes functionality to format and display text or icons on a screen, such as:
- WriteText(string value, bool append=false) — This function sets the text for a screen to the string specified by the value parameter. The optional ‘append’ parameter can be set to true to append the string to the end of the current content rather than overwriting. Text displayed this way will be visible by anyone on the server.
- Don’t forget to look at the section «Using LCD screens» for more info!
GridTerminalSystem
All interaction with in-game blocks has to take place through the GridTerminalSystem interface. It provides access to all blocks connected to the same in-game grid as the programmable block being used.
In order to start using a block, a local reference to the object must be intialised from the GridTerminalSystem. For example, to intialise an LCD Panel with the name ‘LCD Panel 1’:
IMyTextPanel panel = (IMyTextPanel)GridTerminalSystem.GetBlockWithName("LCD Panel 1");
Note that the value returned by GridTerminalSystem has to be cast into the relevant type (including IMyTerminalBlock).
Fetching a block by name
IMyTerminalBlock block = (IMyTerminalBlock)GridTerminalSystem.GetBlockWithName("Example Name");
Fetching all blocks of a type
List<IMyTerminalBlock> blocks = new List<IMyTerminalBlock>();
GridTerminalSystem.GetBlocksOfType<IMyRefinery>(blocks);
- Populates the ‘blocks’ list with all blocks of the specified type (e.g. all Refineries) so you can loop over them.
Fetching blocks by group
List<IMyTerminalBlock> blocks = new List<IMyTerminalBlock>();
GridTerminalSystem.GetBlockGroupWithName("Example Group").GetBlocksOfType<IMyTerminalBlock>(blocks);
- Populates the ‘blocks’ list with all blocks which are part of the specified group. Note that ‘GetBlockGroupWithName()’ returns an object representing the group rather than the individual blocks — using a GetBlocksOfType<IMyTerminalBlock> next fetches all blocks from this group.
Searching for blocks by name
List<IMyTerminalBlock> blocks = new List<IMyTerminalBlock>();
GridTerminalSystem.SearchBlocksOfName("Refinery", blocks);
- Populates the ‘blocks’ list with all blocks which contain the specified string in their name. For example this search here would match blocks of name «Refinery», «Station Refinery 1», etc.
Block Actions
This section is a work in progress
For now, refer to https://spaceengineerswiki.com/Programming_Guide/Action_List and https://github.com/malware-dev/MDK-SE/wiki to find most actions.
Using LCD Screens
There are 2 types of LCD screens.
IMyTextSurfaceare normal LCD blocks)IMyTextSurfaceProvideris any block with multiple LCDs built in, like a cockpit or a programmable block.
Using an LCD Block
IMyTextSurface textSurface;LCDscreen = GridTerminalSystem.GetBlockWithName("LCD");textSurface = (IMyTextSurface)LCDscreen;
- This will give you a variable (
textSurface) that you can use to display text on usingtextSurface.WriteText("Hello world !", false);
Using Multi-Screen Blocks
IMyTextSurface textSurface;LCDscreen = GridTerminalSystem.GetBlockWithName("LCD");textSurface = ((IMyTextSurfaceProvider)LCDscreen).GetSurface(int screenNumber);
- This will give you a variable (
textSurface) that you can use to display text just like a normal LCD screen.
Unlike the normal LCD, an IMyTextSurfaceProvider requires a number to indicate which screen to use. In the block terminal, you can see a list of screens. (For example, a programmable block has 2: Large Display and Keyboard.) The topmost screen is 0, and the second screen is 1. In many cockpits, there are more LCDs, but the list always starts at 0.
Displaying Text
The method WriteText(); accepts 2 arguments, string Text and bool Append.
- The string is the text the screen will display. Don’t forget to use the
ncharacter to start new lines, as the string will otherwise always continue on the same line, often making text go off screen. - The Append option lets you choose if the entire screen gets cleared first (
Append = false), or your text will be added after the current text (Append = true).
Usage example: textSurface.WriteText("Hello world!", false);
Using Both Types In The Same Variable
In order to use the 2 types of screens in the same variable, we will need to check which type of screen it is. The following code is an example of how to tackle this problem.
IMyTextSurface textSurface;LCDscreen = GridTerminalSystem.GetBlockWithName("LCD");int screenNumber = 0;if (LCDscreen is IMyTextSurface) //If the screen is an LCD block{textSurface = (IMyTextSurface)LCDscreen;}else if (LCDscreen is IMyTextSurfaceProvider) //If the screen is a cockpit / programmable block{textSurface = ((IMyTextSurfaceProvider)LCDscreen).GetSurface(screenNumber);}else //If the screen is not set, use the current programmable block{textSurface = ((IMyTextSurfaceProvider)Me).GetSurface(screenNumber);}
After this code, you can write anything to the screen using textSurface.WriteText(); Despite the different screen types.
More Actions
You can find more actions at Malware’s Development Kit for Space Engineers (Search IMyTextSurface and IMyTextSurfaceProvider)
Accessing Inventories
This section is a work in progress
Programmable Blocks are an in-game way that lets players execute custom scripts that can interact with any other block in the game.
Fake pseudo script for illustration, don’t use
You write scripts using the C# language and the SE API (Application Programmable Interface) which can perform any functionality or access any data normally retrieved through the control panel of a block.
This page will act as a basic guide on writing scripts and outline how to interact with various blocks. It is not intended as an introduction to C#/programming principles — if you have never written code before, please look up basic guides elsewhere.
Aside: Scripts from the Steam Workshop
This guide is about writing your own scripts, but be aware that PC users can alternatively also subscribe to scripts in the Steam Workshop, and load them into the programmable block.
When searching the Workshop, select the filter “Type: IngameScript” (not “Mod category: Script”)!
Requirements
Space Engineers runs scripts only if Experimental mode is enabled. And each saved game runs scripts only if its World Settings allow in-game scripts. On Xbox, Scripts are disallowed by Microsoft.
It’s very helpful to install and set up an Integrated Development Environment (IDE) for C#, specifically, many SE developers use [Visual Studio]. Point it to the SE API doc to get in-editor help.
Script Layout
In game, build a Programmable Block. On first opening the code editor inside it, you will see 3 empty methods already in place:
- Program() — Serves as a constructor to intialise objects. Executed once at the start, after the script has been compiled.
- Save() — Executed once at the end of a session, useful in case you need the script to save its state.
- Main() — Runs every time the script is executed by the player. This is the only method that is mandatory for the script to run.
Main() will hold most of the functionality for the script.
Looking up Documentation
Bookmark the Quick Introduction to Space Engineers Ingame Scripts.
Many blocks have been renamed over time, and their C# objects still have the old names. An IDE has features that help you orient yourself in the API: For example, if you are looking for «o2/h2 generator», typing IMyOxygen… in the IDE’s editor shows IMyOxygenGenerator, and it then reminds you that object is obsolete and to use IMyGasGenerator.
You’ll also get helpful responses from the #programmable-block channel in Keen’s discord server.
Block Types
To interact with a block, it has to be read into a local variable as an object. It is considered good practice to assign blocks to variables only in the Program() method.
All blocks are subclasses of the IMyTerminalBlock class. There are a number of classes used to represent various kinds of blocks, with different public methods and properties.
For example, a Refinery is represented by the IMyRefinery object which includes specialised functions like IsProducing() and NextItemInQueue(), but also inherits generic functions and properties like ‘CustomName’ from IMyTerminalBlock.
The main block classes worth mentioning are:
- IMyTerminalBlock — As already mentioned, forms the base class from which all other block definitions inherit, either directly or through multiple layers of the hierarchy. Mostly includes generic functionality for checking ownership, naming, show on HUD etc.
- IMyProductionBlock — This is the class definition for all blocks which produce items (e.g. Refinery, Assembler, Arc Furnace). It defines useful interfaces for these blocks, including:
- IsProducing — Boolean showing whether the block is currently processing something or not.
- IsQueueEmpty — Boolean showing whether items are currently in the queue
- IMyTextSurface — Definition for all LCD screens. It includes functionality to format and display text or icons on a screen, such as:
- WriteText(string value, bool append=false) — This function sets the text for a screen to the string specified by the value parameter. The optional ‘append’ parameter can be set to true to append the string to the end of the current content rather than overwriting. Text displayed this way will be visible by anyone on the server.
- Don’t forget to look at the section «Using LCD screens» for more info!
GridTerminalSystem
All interaction with in-game blocks has to take place through the GridTerminalSystem interface. It provides access to all blocks connected to the same in-game grid as the programmable block being used.
In order to start using a block, a local reference to the object must be intialised from the GridTerminalSystem. For example, to intialise an LCD Panel with the name ‘LCD Panel 1’:
IMyTextPanel panel = (IMyTextPanel)GridTerminalSystem.GetBlockWithName("LCD Panel 1");
Note that the value returned by GridTerminalSystem has to be cast into the relevant type (including IMyTerminalBlock).
Fetching a block by name
IMyTerminalBlock block = (IMyTerminalBlock)GridTerminalSystem.GetBlockWithName("Example Name");
Fetching all blocks of a type
List<IMyTerminalBlock> blocks = new List<IMyTerminalBlock>();
GridTerminalSystem.GetBlocksOfType<IMyRefinery>(blocks);
- Populates the ‘blocks’ list with all blocks of the specified type (e.g. all Refineries) so you can loop over them.
Fetching blocks by group
List<IMyTerminalBlock> blocks = new List<IMyTerminalBlock>();
GridTerminalSystem.GetBlockGroupWithName("Example Group").GetBlocksOfType<IMyTerminalBlock>(blocks);
- Populates the ‘blocks’ list with all blocks which are part of the specified group. Note that ‘GetBlockGroupWithName()’ returns an object representing the group rather than the individual blocks — using a GetBlocksOfType<IMyTerminalBlock> next fetches all blocks from this group.
Searching for blocks by name
List<IMyTerminalBlock> blocks = new List<IMyTerminalBlock>();
GridTerminalSystem.SearchBlocksOfName("Refinery", blocks);
- Populates the ‘blocks’ list with all blocks which contain the specified string in their name. For example this search here would match blocks of name «Refinery», «Station Refinery 1», etc.
Block Actions
This section is a work in progress
For now, refer to https://spaceengineerswiki.com/Programming_Guide/Action_List and https://github.com/malware-dev/MDK-SE/wiki to find most actions.
Using LCD Screens
There are 2 types of LCD screens.
IMyTextSurfaceare normal LCD blocks)IMyTextSurfaceProvideris any block with multiple LCDs built in, like a cockpit or a programmable block.
Using an LCD Block
IMyTextSurface textSurface;LCDscreen = GridTerminalSystem.GetBlockWithName("LCD");textSurface = (IMyTextSurface)LCDscreen;
- This will give you a variable (
textSurface) that you can use to display text on usingtextSurface.WriteText("Hello world !", false);
Using Multi-Screen Blocks
IMyTextSurface textSurface;LCDscreen = GridTerminalSystem.GetBlockWithName("LCD");textSurface = ((IMyTextSurfaceProvider)LCDscreen).GetSurface(int screenNumber);
- This will give you a variable (
textSurface) that you can use to display text just like a normal LCD screen.
Unlike the normal LCD, an IMyTextSurfaceProvider requires a number to indicate which screen to use. In the block terminal, you can see a list of screens. (For example, a programmable block has 2: Large Display and Keyboard.) The topmost screen is 0, and the second screen is 1. In many cockpits, there are more LCDs, but the list always starts at 0.
Displaying Text
The method WriteText(); accepts 2 arguments, string Text and bool Append.
- The string is the text the screen will display. Don’t forget to use the
ncharacter to start new lines, as the string will otherwise always continue on the same line, often making text go off screen. - The Append option lets you choose if the entire screen gets cleared first (
Append = false), or your text will be added after the current text (Append = true).
Usage example: textSurface.WriteText("Hello world!", false);
Using Both Types In The Same Variable
In order to use the 2 types of screens in the same variable, we will need to check which type of screen it is. The following code is an example of how to tackle this problem.
IMyTextSurface textSurface;LCDscreen = GridTerminalSystem.GetBlockWithName("LCD");int screenNumber = 0;if (LCDscreen is IMyTextSurface) //If the screen is an LCD block{textSurface = (IMyTextSurface)LCDscreen;}else if (LCDscreen is IMyTextSurfaceProvider) //If the screen is a cockpit / programmable block{textSurface = ((IMyTextSurfaceProvider)LCDscreen).GetSurface(screenNumber);}else //If the screen is not set, use the current programmable block{textSurface = ((IMyTextSurfaceProvider)Me).GetSurface(screenNumber);}
After this code, you can write anything to the screen using textSurface.WriteText(); Despite the different screen types.
More Actions
You can find more actions at Malware’s Development Kit for Space Engineers (Search IMyTextSurface and IMyTextSurfaceProvider)
Accessing Inventories
This section is a work in progress
Overview
Здесь будет описано устройство полноценной РЛС в игре, их виды, устройство, частые ошибки и применение.Кроме того здесь автор вместе с вами создаст первую и самую простую РЛС, показав процесс и принцип написания подобных систем.
Введение
Введение
Вступление
Вступление
Необходимо сразу отметить, что автор руководства не является профессиональным программистом и потому код, приведённый в качестве примера может оказаться не идеальным.
РЛС в игре является целой системой обнаружения, опознавания и сопровождения целей и при этом не является РЛС по принципу своей работы (в игре нет радиоволн).
Гораздо корректнее подобную систему называть лидаром или как-либо ещё, но, в качестве потакания привычному названию, примем за данность, что подобную поисковую систему мы называем РЛС или просто – радаром.
Подобные системы необходимы для различных задач. Их на самом деле неисчислимое множество, поэтому перечислим и разберём наиболее очевидные из них:
- Автопилот
- Ракетные системы
- Поиск целей на запредельных дистанциях
- Опознавание и целеуказание
Так или иначе приведённые выше задачи пересекаются друг с другом и поэтому рассматривать их в полном отрыве друг от друга принципиально невозможно (технические решения для радаров любой из этих целей практически одинаковы).
Так повелось, что в мастерской Steam (работы, публикуемые для этой игры) есть некоторый ассортимент радиолокационных систем. Относительно разнообразный и с разной степенью полезности. Причины того, что подобных систем не слишком много очевидны.
Перечислим наиболее распространенные из них:
- Засекреченность подобных систем (военное оружие обычно делают для себя, а не для других)
- Сложность (РЛС имеющая смысл не самый простой скрипт в описании, пусть и в то же время, при наличии знаний и опыта, простой)
- Ограниченность кол-ва авторов выбившихся “в люди” (сложные скрипты пишут преимущественно те, чей труд хоть как-то оценивают).
- “Специфика” задач РЛС (будет рассмотрено в конце)
Термины
Ниже приведён список терминов и сокращений использующихся в этом руководстве. Некоторые термины выдуманы и используются автором.
- РЛС – Радиолокационная Система
- УР – Управляемая Ракета
- Лидар – поисковая система основанная на лазерах
- Рейкаст – Raycast, функция пуска луча
- ЗРК – Зенитно-Ракетный Комплекс
- ЗУР – Зенитная Управляемая Ракета
Примеры РЛС в мастерской, рассмотрение задач РЛС
Продолжение темы РЛС в мастерской
Было бы неплохо разделить РЛС в мастерской на две категории: устаревшие и актуальные.
Смысл этих категорий максимально прост: устаревшие радары используют функцию удаленную по жалобам игроков – GetFreeDestination() (GFD). Определить такой радар по фотографии очень просто – он не имеет камер, турелей и использует только блок дистанционного управления (далее – ДУ). Подобные радары отличались эффективностью, но, на данный момент, их использование просто невозможно.
Актуальных же радаров немного – из наиболее популярных можно было бы выделить только два радара: Whip’s Turret Based Radar и Lidar Mapping Script.
Отсеивая бесполезные радары не имеющие практического, а не декоративного функционала из этой двойки останется только один радар – Lidar Mapping Script.
Определить не по названию их так же просто: они используют турели и камеры. Пример подобной РЛС можно видеть наглядно на этом истребителе:


(РЛС “Сапфир”)
Если же искать эффективные в военных целях РЛС, то, к сожалению, подобных в мастерской в открытом доступе на данный момент не существует. Причиной такого в основном является отсутствие цельного опыта боевого применения подобных систем, а потому своя РЛС будет всегда лучше (при условии реализации в ней боевого опыта).
Продолжение темы разновидности РЛС
Вспомним основные задачи, которые могут выполняться системой:
- Автопилот
- Ракетные системы
- Поиск целей на запредельных дистанциях
- Опознавание и целеуказание
Рассмотрим их по порядку.
1. Автопилот.

Подобные РЛС обычно подключены модулем или встроены в скрипт автопилота. Автопилоту подобные системы необходимы для определения помех передвижению и поиска поверхностей. Автопилот в данном случае может быть любым – речь может идти даже о роботах.
Подобные РЛС обязательно используют камеры (почему – будет рассмотрено ниже), иногда – сенсоры и сканируют ограниченные пространства, но – максимально часто.
2. Ракетные системы.

Выбранная в данном случае задача не совсем удачна – дело в том, что ракетная система может быть разной. Для краткости выделим два основных типа: автоматическая и ручная.
Автоматическая ракетная система это автономный ЗРК. К радарам подобных систем требования самые серьёзные – они должны максимально быстро обнаружить цель типа “истребитель” на расстоянии 2 км+, после чего взять цель на сопровождение и поразить её ракетой. По причине того, что добиться обнаружения целей с помощью рейкаста в режиме близком к реальному времени целей класса “истребитель” на такой дистанции невероятно сложно (но – можно), подобных систем дальности выше, чем 1 км в мастерской практически нет.
Ручная ракетная система это стандартная схема “Оператор – РЛС”. Обнаружение целей в такой системе берёт на себя оператор, РЛС осуществляет лишь захват и сопровождение целей. Нередко реализуют и комбинированные системы – когда работа оператора дополняется поисковой системой самой РЛС.
3. Поиск целей на запредельных дистанциях.

РЛС, выполняющие подобные задачи, как правило, называют телескопами. Скриптов на такие системы обычно немного и назвать их в полной мере эффективными довольно затруднительно. Подобные системы, как правило, занимаются исключительно поиском целей, причем – разово. Сканирование проводится на дистанцию 20 км+ (бывают системы и на 1000 км) один раз. Координаты всех обнаруженных целей записываются.
Длительность сканирования в обычных условиях при условии отсутствия заряда у камер и сканирования на дистанции 100 км может идти часами (в зависимости от плотности лучей сканирования).
4. Опознавание и целеуказание.

Большая часть РЛС, за исключением РЛС автопилотов, способны так или иначе выполнить эти задачи. Но необходимо заметить, что если речь идёт о целеуказании с помощью статичных координат и опознавании цели, то для этих задач используется крохотный “огрызок” от РЛС – дальномер (или сканер).
Основы РЛС
Основы РЛС
Блоки используемые в РЛС, устройство, принцип работы
Начать данный раздел следует с описания блоков, которые могут использоваться в РЛС и уточнения тех функций, которые нам в них понадобятся.
Блоки используемые в РЛС
Рассмотрим по порядку перечень основных блоков:
- Турели
- Блок ДУ (или кабина)
- Дисплеи (отображение информации)
- Камеры
1. Турели

Турели необходимы для гарантированного обнаружения целей на дистанции до 600 м. (малая сетка) и на дистанции до 800 м. (большая сетка).
Для их работы в качестве “сенсора” необходимы следующие условия:
1. Наличие боекомплекта у турели
2. Турель может обнаружить цель
При соблюдении этих условий турель атакует обнаруженную цель и передает данные о цели в скрипт, если требуется.
Некоторые нужные функции:
– GetTargetedEntity();
– ResetTargetingToDefault();
2. Блок ДУ

Блок ДУ необходим для определения ориентации корабля (если принять одну из проекций ДУ за проекцию всего корабля) и для определения своей точной скорости.
Некоторые нужные функции:
– GetShipVelocities().LinearVelocity;
– GetShipSpeed();
3. Дисплей

Дисплеи необходимы для передачи информации оператору в удобном для него виде. Это может быть как текст, так и изображение.
Некоторые нужные функции:
– WriteText();
4. Камеры

Камеры
Камеры необходимы
Некоторые нужные функции:
– Raycast();
Принцип работы РЛС
Принцип работы любой РЛС заключается в использовании функций блоков доступных для скрипта и обработки и использования получаемой информации.
Процесс работы стандартной РЛС можно расписать следующим образом:
– РЛС получает информацию с турелей и камер
– РЛС обрабатывает информацию
– РЛС использует информацию (захват и сопровождение цели, поиск целей и т.д.)
– РЛС выводит заданную информацию пользователю
– РЛС запускается сначала
Простейшую РЛС, которая не имеет практического функционала, написать очень просто, написание такой РЛС будет рассмотрено позже.
Эффективное использование блоков РЛС
Здесь будут рассмотрены способы наиболее эффективно использовать блоки РЛС, их недостатки. Начать данный раздел стоит с описания недостатков блоков.
Слабые стороны блоков и их решение
Было бы неплохо рассмотреть их по установившемуся распорядку:
Слабые стороны турелей:
– Большой, но ограниченный угол обзора
– Зависимость от боекомплекта (отсутствует в творческом режиме)
– Малая дальность видимости
– Невозможность видеть цели за препятствиями (препятствием считается любой объект не имеющий функциональных блоков и двигающийся со скоростью менее 5 мс (или стационарный))
Решения:
– Подача боекомплекта через конвейеры
– Размещение турелей на обширной площади, в том числе вдали от базы
– Уничтожение всех препятствий
– Дополнение турелей камерами
Слабые стороны использования дисплеев и ДУ:
– Вывод из строя РЛС при уничтожении единственного ориентира
– Отсутствие обратной связи с оператором при уничтожении дисплеев
Решения:
– Добавление поддержки РЛС сразу двух ориентиров: кабины оператора и блока ДУ, привязка к другим ориентирам
– Дублирование дисплеев, повышение ремонтопригодности, дополнение дисплеев другими способами обратной связи (антенны, звуковые сигналы, проекторы)
Наиболее эффективное использование блоков РЛС
Продолжая установленный распорядок:
Эффективное использование турелей:
К счастью, эффективное использование турелей в целях РЛС значительно проще, нежели их расстановка для эффективного военного применения.
Необходимо понимать, что одна турель может сопровождать и атаковать только одну цель. Таким образом выполняется формула одна турель = одна цель. Турель захватывает ближайшую к себе цель наводясь преимущественно на её ловушки и функциональные блоки.
Тем не менее, турель может обнаружить цель и находясь под бронёй корабля, не имея прямой видимости на цель (при условии, что линия обзора закрыта самим кораблём, а не чем-либо ещё). К сожалению, по непонятным причинам зачастую такое наведение непостоянно, а иногда и вовсе отсутствует (частота обновления цели недостаточная для целеуказания), но, зато, турель автоматически переключается на более близкую цель.
Кроме того, важно знать, что скрипт не может брать целеуказание с турелей, которые он сам наводит. И хотя вопроса наведения турелей через скрипт мы касаться не будем, это знание пригодится в будущем.
Поэтому турели можно назначить любые – главное обеспечить круговой обзор. Проще всего для поиска целей использовать турели расставленные для обороны. На эффективность турелей это никак не повлияет, но, зато, упростит конструкцию и сделает её рациональнее. Не забудьте выставить настройки для турелей.
Эффективное использование блока ДУ и дисплеев:
Пожалуй самое очевидное, что ДУ (наш ориентир) должен быть как можно ближе к прицелу, которым мы хотим захватить цель (в случае, если ручного захвата цели в РЛС нет, то это не понадобится).
Дисплеи же должны быть защищены (даже пара пуль выведет их из строя, учтите это!), желательно находиться под остеклением и не закрывать минимально необходимый для пилота обзор. Будет разумно распределить дисплеи между несколькими местами, куда
часто смотрит оператор: прицел и кабина. Расстановка дисплеев перед прицелом (камерой) и кабиной не составит труда, но не должна в итоге закрыть оператору обзор.
Эффективное использование камер:
Многие аспекты эффективного использования камер в целях рейкаста были подняты в предыдущих руководствах, поэтому стоит остановиться на основном тезисе: суммарный угол обзора всех камер на корабле должен быть максимален.
У одной камеры угол обзора равен 45′. Повысить угол обзора можно с помощью специального расположения оных.
Виды расположения:
“Пирамидка”

“Плоскость”

“Копьё”

Как видно по схемам наиболее эффективными схемами покрытия являются “Пирамидка” и “Копьё”, следовательно, использовать необходимо именно их.
Однако таким образом можно решить лишь проблему угла видимости, а ведь у камер есть ещё одна серьёзная проблема: малая скорость заряда (2 кмс).
Это означает, что раз в секунду камера может просканировать только 2 км, однако до рестарта при условии включения функции рейкаста у камеры через скрипт этот заряд накапливается в камере, позволяя в будущем просканировать либо большее расстояние, либо тоже самое, но чаще.
Сгладить эту проблему можно четырьмя способами:
1. Увеличение числа камер (они будут сканировать поочерёдно)
2. Предварительная “накачка” камер
3. Третий способ автором рассматриваться наглейшим образом не будет.
4. Перенос отслеживания целей на допустимых для того дистанциях с камер на турели
Создаем свою РЛС
Создаем свою РЛС
Строим аппаратуру для РЛС
Перед тем, как написать скрипт для РЛС необходимо “рабочее место” для этого скрипта – сама РЛС!
Строительство РЛС
Для РЛС нам необходимы только конкретные блоки, с которыми РЛС будет взаимодействовать. Где они будут находиться для нас значения не имеет, главное – чтобы на одном строении. Таким образом можно начать строительство нашего радара на любом корабле или станции, однако, для удобства тестирования, мы будем строить РЛС на корабле.


Для уточнения вот перечисление блоков на нашем корабле:
- Ускорители
- Гироскоп
- ДУ (ориентир)
- Кабина
- Камера
- Дисплеи
- Программируемый блок (“рабочее тело” скрипта)
- Динамик
- Источник питания
- Блоки брони
- Турель
Для отсутствия путаницы условимся назвать требуемые нам блоки на корабле одинаково:
- Программируемый блок – ПБ
- Дистанционное управление – ДУ
- Динамик – ДНМК
- Камера – ПРИЦЕЛ
- Дисплей 1×1 1 – Дисплей РЛС 1
- Дисплей 1×1 2 – Дисплей РЛС 2
- Дисплей 1×1 3 – Дисплей РЛС 3
- Дисплей 1×1 4 – Дисплей РЛС 4
- “название турели” – Турель
После проверки функционирования корабля, если всё хорошо, то можно приступить к написанию скрипта (не забудьте впихнуть куда-нибудь турель!).
Пишем скрипт для РЛС ч.1
Очевидно, что если вы не знаете C# на базовом уровне, то написать скрипт вы самостоятельно не сможете. Однако совершенно так же очевидно, что рядом с вами находится автор (не забудьте пихнуть его, пока он не уснул)
Список необходимых действий
Ещё раз напомню, что автор не является профессиональным программистом.
Само собой разумеется, что как и в любом другом языке программирования, перед началом работы нам необходимо обозначить переменные (типы данных), которые мы будем использовать. Без этого никакая дальнейшая работа невозможна. Пример объявления переменной типа <string>:
string Dda = “”;
string – тип данных (string – строка, текстовый тип данных).
Dda – название переменной.
В данном примере переменной при объявлении сразу же присваивается значение, на самом деле присваивать ей значение при объявлении обычно необязательно.
Далее необходимо присвоить переменным значение для его использования (если это не было сделано)
Dda = “Хорошо живёт на свете Винни-Пух!”;
Учтите, что переменная Dda должна быть объявлена перед этим, иначе компьютер не поймет что вы имеете ввиду.
Сразу же после этого можно начинать писать “рабочую часть” скрипта
Таким образом, выделим следующий порядок действий:
- Объявление переменных
- Присвоение значения переменным (до их использования)
- Написание рабочего тела скрипта
Пишем скрипт
Перед началом работы полностью очистите редактор программируемого блока (убедитесь, что в вашем мире включены скрипты и зайдите в меню “редактировать” программируемого блока). Это понадобиться для того, чтобы избежать путаницы.
Первым, что мы напишем, разумеется, будет объявление переменных.
Не пропускайте “;”!
[НАПИСАТЬ]
string RC_name = “ДУ”; string LCD_name = “Дисплей РЛС”; string dyn_name = “ДНМК”; string cam_name = “ПРИЦЕЛ”; string tur_name = “Турель”; string s = “”; // List<IMyTextPanel> LCD = new List<IMyTextPanel>(); IMyRemoteControl RC; IMyLargeTurretBase turret; IMySoundBlock dyn; IMyCameraBlock cam; // MyDetectedEntityInfo target; Vector3D MyPos; MyDetectedEntityInfo camray;
[НЕ ПИСАТЬ]
Теперь по-видимому надо объяснить что сейчас произошло.
В ряду переменных string мы объявили переменные с названиями блоков (они должны совпадать с названиями на корабле, они точно такие же, какие мы условились сделать).
Очевидно, что они нам понадобятся для поиска блоков.
А вот здесь
List<IMyTextPanel> LCD = new List<IMyTextPanel>();
всё сложнее.
Здесь был объявлен список, этакий массив блоков. В нём будут храниться все дисплеи, что мы найдем. Обратиться к конкретному дисплею в списке можно будет по индексу.
Следующие переменные объявляют один блок, тип которого обозначен перед названием.
IMyRemoteControl RC; // Блок ДУ IMyLargeTurretBase turret; // Турель (любая) IMySoundBlock dyn; // Блок, издающий звук (любой) IMyCameraBlock cam; // Камера
Остальные переменные понадобятся позже.
Далее пишем блок Program(). Он нам необходим для разового исполнения этой части кода (сразу при компиляции). То есть код, помещённый в блок Program() выполняется при нажатии кнопки “сохранить и выйти” или при нажатии “рекомпилировать”.
[НАПИСАТЬ]
Program() { RC = GridTerminalSystem.GetBlockWithName(RC_name) as IMyRemoteControl; GridTerminalSystem.GetBlocksOfType(LCD); dyn = GridTerminalSystem.GetBlockWithName(dyn_name) as IMySoundBlock; turret = GridTerminalSystem.GetBlockWithName(tur_name) as IMyLargeTurretBase; cam = GridTerminalSystem.GetBlockWithName(cam_name) as IMyCameraBlock; Runtime.UpdateFrequency |= UpdateFrequency.Update10; }
[НЕ ПИСАТЬ]
Объяснение на примере отдельно взятых строчках:
RC = GridTerminalSystem.GetBlockWithName(RC_name) as IMyRemoteControl;
здесь переменной RC присваивается через функцию GridTerminalSystem.GetBlockWithName(RC_name). Эта функция ищет на корабле блок с заданным названием. В нашем случае в качестве названия мы взяли переменную RC_name (берётся её значение).
as IMyRemoteControl – подразумевается тип блока, который ищется. В нашем случае – блок ДУ.
GridTerminalSystem.GetBlocksOfType(LCD);
Здесь дается команда на поиск всех блоков типа “Дисплей”. Все найденные блоки помещаются в список LCD.
Runtime.UpdateFrequency |= UpdateFrequency.Update10;
Здесь скрипт ставится на самозапуск. То есть скрипт будет запускаться каждые 10 тиков.
Можно выбрать другую частоту, всего их несколько:
Runtime.UpdateFrequency |= UpdateFrequency.None; Runtime.UpdateFrequency |= UpdateFrequency.Once; Runtime.UpdateFrequency |= UpdateFrequency.Update1; Runtime.UpdateFrequency |= UpdateFrequency.Update10; Runtime.UpdateFrequency |= UpdateFrequency.Update100;
Далее пишем блок Main(). Этот блок скрипта будет выполняться каждый раз при вызове скрипта.
[НАПИСАТЬ]
void Main(string args) { target = turret.GetTargetedEntity(); // Взятие информации о цели с турели if (LCD.Count > 0) { foreach (IMyTextPanel lcd in LCD) // Цикл перебора дисплеев в списке { if (lcd.CustomName == LCD_name + ” 1″) // Выбор дисплеев с названием и еденицей в конце { lcd.Enabled = true; // Включение дисплея lcd.WriteText(“РАДАР :ВИННИ-ПУХ: n”); // Пишем инфо о радаре в дисплей if (turret.HasTarget) lcd.WriteText(“РАДАР :ВИННИ-ПУХ: n” + “Название цели: ” + target.Name + “n Скорость цели: ” + target.Velocity.Length() + “n Расстояние до цели: ” + (RC.GetPosition() – target.Position).Length()); // Ввод информации в дисплей вместо предыдущей если у турели есть цель lcd.ContentType = VRage.Game.GUI.TextPanel.ContentType.TEXT_AND_IMAGE; // Установление типа отображаемой на дисплее информации } if (turret.HasTarget && lcd.CustomName == LCD_name + ” 2″) // Выбор дисплеев с названием и //двойкой в конце если у турели есть цель { // Векторы v1 = Vector3D.Dot(RC.WorldMatrix.Down, Vector3D.Normalize(RC.GetPosition() – target.Position)); v2 = Vector3D.Dot(RC.WorldMatrix.Left, Vector3D.Normalize(RC.GetPosition() – target.Position)); // Указываем на цель lcd.Enabled = true; if (v2 < 0) s = “<“; // Если цель слева, то стрелку влево if (v2 > 0) s = “>”; if (v1 < 0) s += “nv”; // Если цель ниже, то стрелку вниз if (v1 > 0) s += “n^”; lcd.WriteText(s); lcd.ContentType = VRage.Game.GUI.TextPanel.ContentType.TEXT_AND_IMAGE; } } } }
[НЕ ПИСАТЬ]
Для краткости лучше объяснить что тут творится:
0. Код выполняется только если дисплеев больше одного
1. За “//” пишется комментарий, он не участвует в коде.
2. С турели берётся целеуказание.
3. Список дисплеев перебирается .
4. На первый дисплей передается информация о цели, на второй – направление на неё.
5. ‘n’ в строке это литера новой строки.
6. ‘string args’ в скобках void Main это переменная аргумента, который вводится при выполнении скрипта. Если аргументы не планируются скобки можно оставить пустыми.

Учтите, что LCD.Write() переписывает всю информацию с дисплея, поэтому для того, чтобы удобнее вписать туда что-либо стоит использовать какую-то переменную, которой будет присваиваться значение, например ‘StringBuilder’ или ‘String’, которая затем и будет писаться.
Таким образом получен код работающей РЛС на одной турели.
Теперь добавим сканер и сброс цели у турели (с помощью аргументов).
Пишем скрипт для РЛС ч.2
Дописываем в блок Main().
[НАПИСАТЬ]
cam.EnableRaycast = true; // Включаем рейкаст у камеры if (args == “СКАН”) camray = cam.Raycast(1000, 0, 0); // При выполнении скрипта с аргументом “СКАН” происходит пуск луча из камеры по прямой длиной 1000 метров if (!camray.IsEmpty()) { dyn.Play(); // При обнаружении чего-либо лучом делаем звук динамиком! foreach (IMyTextPanel lcd in LCD) // Цикл перебора дисплеев в списке { if (lcd.CustomName == LCD_name + ” 3″) // Выбор дисплеев с названием и тройкой в конце { lcd.Enabled = true; // Включение дисплея lcd.WriteText(“РАДАР :ВИННИ-ПУХ: n” + “Название цели: ” + camray.Name + “n Скорость цели: ” + camray.Velocity.Length() + “n Расстояние до цели: ” + (RC.GetPosition() -target.Position).Length()); // Ввод информации в дисплей вместо предыдущей если у турели есть цель lcd.ContentType = VRage.Game.GUI.TextPanel.ContentType.TEXT_AND_IMAGE; // Установление типа отображаемой на дисплее информации } if (lcd.CustomName == LCD_name + ” 4″) // Выбор дисплеев с названием и тройкой в конце { lcd.Enabled = true; // Включение дисплея lcd.WriteText(“Координаты: n” + “GPS:ЦЕЛЬ #1: ” + camray.Position.X + “:” + camray.Position.Y + “:” + camray.Position.Z + “:”); // Ввод координат цели в дисплей lcd.ContentType = VRage.Game.GUI.TextPanel.ContentType.TEXT_AND_IMAGE; // Установление типа отображаемой на дисплее информации } } } Echo(cam.AvailableScanRange.ToString()); // Выводим в инфо программного блока доступный заряд камеры для себя if (args == “СБРОС”) turret.ResetTargetingToDefault(); // Сбрасываем цель у турели по аргументу “СБРОС”
[НЕ ПИСАТЬ]
Как и прежде, проще объяснить, чем разобрать по косточкам:
1. Включаем заряд у камеры
2. По аргументу проводим сканирование на 1000 метров по прямой
3. При обнаружении цели проигрываем звук
4. Полученную информацию выводим на дисплеи
5. Координаты выводятся на панель 4, можно загрузить координаты в скафандр
6. Успех!

Таким образом, был написан код простейшего радара на турелях, пусть и с такими ограничениями, как использование только одной турели и камеры (несложно исправить при повторении опыта дисплеев).
К сожалению, полностью понять код без знания C# не получится, а потому значительные изменения в коде могут быть только при достижении понимания хотя бы основ этого языка.
Учебники по этому языку можно поискать в интернете, в том числе на официальном сайте microsoft.
Итоговый код:
string RC_name = “ДУ”; string LCD_name = “Дисплей РЛС”; string dyn_name = “ДНМК”; string cam_name = “ПРИЦЕЛ”; string tur_name = “Турель”; string s = “”; // List<IMyTextPanel> LCD = new List<IMyTextPanel>(); IMyRemoteControl RC; IMyLargeTurretBase turret; IMySoundBlock dyn; IMyCameraBlock cam; // MyDetectedEntityInfo target; MyDetectedEntityInfo camray; Vector3D MyPos; double v1; double v2; Program() { RC = GridTerminalSystem.GetBlockWithName(RC_name) as IMyRemoteControl; GridTerminalSystem.GetBlocksOfType(LCD); dyn = GridTerminalSystem.GetBlockWithName(dyn_name) as IMySoundBlock; turret = GridTerminalSystem.GetBlockWithName(tur_name) as IMyLargeTurretBase; cam = GridTerminalSystem.GetBlockWithName(cam_name) as IMyCameraBlock; Runtime.UpdateFrequency |= UpdateFrequency.Update10; } void Main(string args) { target = turret.GetTargetedEntity(); // Взятие информации о цели с турели if (LCD.Count > 0) { foreach (IMyTextPanel lcd in LCD) // Цикл перебора дисплеев в списке { if (lcd.CustomName == LCD_name + ” 1″) // Выбор дисплеев с названием и еденицей в конце { lcd.Enabled = true; // Включение дисплея lcd.WriteText(“РАДАР :ВИННИ-ПУХ: n”); // Пишем инфо о радаре в дисплей if (turret.HasTarget) lcd.WriteText(“РАДАР :ВИННИ-ПУХ: n” + “Название цели: ” + target.Name + “n Скорость цели: ” + target.Velocity + “n Расстояние до цели: ” + (RC.GetPosition() – target.Position).Length()); // Ввод информации в дисплей вместо предыдущей если у турели есть цель lcd.ContentType = VRage.Game.GUI.TextPanel.ContentType.TEXT_AND_IMAGE; // Установление типа отображаемой на дисплее информации } if (turret.HasTarget && lcd.CustomName == LCD_name + ” 2″) // Выбор дисплеев с названием и двойкой в конце если у турели есть цель { // Векторы v1 = Vector3D.Dot(RC.WorldMatrix.Down, Vector3D.Normalize(RC.GetPosition() – target.Position)); v2 = Vector3D.Dot(RC.WorldMatrix.Left, Vector3D.Normalize(RC.GetPosition() – target.Position)); // Указываем на цель lcd.Enabled = true; if (v2 < 0) s = “<“; // Если цель слева, то стрелку влево if (v2 > 0) s = “>”; if (v1 < 0) s += “nv”; // Если цель ниже, то стрелку вниз if (v1 > 0) s += “n^”; lcd.WriteText(s); lcd.ContentType = VRage.Game.GUI.TextPanel.ContentType.TEXT_AND_IMAGE; } } cam.EnableRaycast = true; if (args == “СКАН”) camray = cam.Raycast(1000, 0, 0); // При выполнении скрипта с аргументом “СКАН” происходит пуск луча из камеры по прямой длиной 1000 метров if (!camray.IsEmpty()) { dyn.Play(); // При обнаружении чего-либо лучом делаем звук динамиком! foreach (IMyTextPanel lcd in LCD) // Цикл перебора дисплеев в списке { if (lcd.CustomName == LCD_name + ” 3″) // Выбор дисплеев с названием и тройкой в конце { lcd.Enabled = true; // Включение дисплея lcd.WriteText(“РАДАР :ВИННИ-ПУХ: n” + “Название цели: ” + camray.Name + “n Скорость цели: ” + camray.Velocity.Length() + “n Расстояние до цели: ” + (RC.GetPosition() – target.Position).Length()); // Ввод информации в дисплей вместо предыдущей если у турели есть цель lcd.ContentType = VRage.Game.GUI.TextPanel.ContentType.TEXT_AND_IMAGE; // Установление типа отображаемой на дисплее информации } if (lcd.CustomName == LCD_name + ” 4″) // Выбор дисплеев с названием и тройкой в конце { lcd.Enabled = true; // Включение дисплея lcd.WriteText(“Координаты: n” + “GPS:ЦЕЛЬ #1: ” + camray.Position.X + “:” + camray.Position.Y + “:” + camray.Position.Z + “:”); // Ввод координат цели в дисплей lcd.ContentType = VRage.Game.GUI.TextPanel.ContentType.TEXT_AND_IMAGE; // Установление типа отображаемой на дисплее информации } } } Echo(cam.AvailableScanRange.ToString()); // Выводим в инфо программного блока доступный заряд камеры для себя if (args == “СБРОС”) turret.ResetTargetingToDefault(); // Сбрасываем цель у турели по аргументу “СБРОС” } }
Наиболее вероятная ошибка, что можно получить:
Object reference not set…. – ссылка на несуществующий объект, скрипт не может найти блок, на который вы ссылаетесь (нет на кораблеошибка в названииблок повреждён).
Дальнейшие модернизации РЛС “Винни-Пух”
Пути модернизации
Дальнейшие модернизации этой РЛС после решения её очевидных проблем вроде использования только одной камеры и одной турели, довольно разные. Имеет смысл рассмотреть следующие шаги:
- 1. Добавление захвата и сопровождения целей
- 2. Добавление графики
- 3. Передача целеуказания другим скриптам
- 4. Расширение ассортимента команд
- 5. Добавление компьютера упреждения
Детально разбирать их можно бесконечно, имеет смысл просто объяснить на чем это все основано.
Учтите, что в дальнейшей модернизации требования к вашим познаниям в векторной алгебре будут повышаться шаг от шагу.
Добавление захвата и сопровождения целей:
Для подобного необходимо создать список целей, по которым каждый вызов камеры, проходящие по циклу, будут “пробегать” по целям из списка обновляя их.
Подробно это наиболее наглядно можно посмотреть в моей РЛС “Изумруд-1”, она написана довольно просто и понятно (пусть и далека от идеала).
Добавление графики:
Графика может быть разной: спрайтовой, символьной и векторной.
Векторно-символьная графика пишется через функции и рисуется, таким образом, самим компьютером. Опять же, через символы.
При наличии практики рисуется довольно просто. Совмещает красоту и понятность, но может нагрузить компьютер.
Символьная графика это обычный массив, символы в котором выполняют роль этаких “пикселов”, в которые вписываются символы в различные позиции. Наверное самая простая и наименее лагающая графика, подобная используется в РЛС “Изумруд-1” и в старых РЛС в мастерской. “Нарисована” заранее.
Спрайтовая графика использует спрайты из игры, её использование влечёт за собой ньюансы, о ней можно почитать на форумах игры (познания автора об этом довольно скромные). Кол-во спрайтов ограничено (без модов добавить спрайты вроде бы нельзя), однако размеры, месторасположение спрайтов регулируются двумерными векторами.
Передача целеуказания:
Опять же – сбор данных о целях в строку или хранилище Tuple и передача другим скриптам напрямую (через аргумент) или опосредованно (через антенну).
Можно найти в РЛС “Изумруд-1” или подсмотреть в других скриптах.
Остальное:
Четвёртый пункт зависит от функциональности РЛС и предпочтений оператора, а пятый пункт реализовать можно и на существующей РЛС, просто необходимо изменить вектор направления на цель таким образом, чтобы он давал вектор упреждения. Знаний средней школы должно хватать для написания подобной формулы.
Итоги
Итоги
Итоги написания скрипта
Итоги
Совершенно невероятно, однако мы сумели написать радар на турелях. Какое чудо, что подобные простейшие радары, которые можно обвешать большим количеством “бонусов” в виде графики и тому подобного, которые можно написать почти не зная языка C#, иногда могут получить тонны лайков!
Однако теперь у нас есть свой радар и мы можем делать с ним что угодно. Например, захватить мир. Если повезёт.
А теперь необходимо подвести итоги:
- Написание скриптов возможно при минимальных познаниях в языке.
- Написание различных скриптов позволяет с интересом провести время и укрепить знания о языке.
- Скрипты – единственный путь получения абсолютного преимущества над противником.
- Своё – всегда лучше.
- На изученном примере возможно написание других скриптов подобного же уровня.
- Не всё то злато, что блестит. Даже если это умеет передавать координаты по радиосвязи.
Команды, функции и прочее, что может пригодиться, можно найти здесь:
[link]
Проще всего писать скрипты установив Visual Studio и подключив проект на ней к библиотекам Space Engineers.
Как это сделать – можно найти на канале Renesco Rocketman
https://www.youtube.com/channel/UCBC9faYOxS0yBBSS3uOx7LQ
Там же – большое число примеров и уроков.
А на этом всё!
Другие полезные руководства
[link]
[link]
[link]
[link]
[link]
Keen’s official guide for using the Visual Scripting Tool (VST) to create or modify game scenarios for Space Engineers.
Note: This guide assumes a base knowledge of Space Engineers and its mechanics.
GENERAL DESCRIPTION
VST was designed to allow users to design game scenarios for Space Engineers without needing previous coding experience. Mod developers can utilize this tool to create scripted gameplay events, play cutscenes, or modify game values at runtime.
Glossary of Terms
VST: Visual Scripting Tool. Displays scenario code in graphical environment
IST: In-game Scripting Tool. Screen accessed inside Space Engineers to modify in-world entities
Scenario: A custom game in Space Engineers, consisting of multiple script and data files
Mission: An individual segment of a Scenario, connected to a specific World
World: The entire game environment played in during a Mission. Can include multiple planets.
Entity: Generic term for most objects existing inside a World. Includes blocks, whole grids, Waypoints, Trigger volumes, and characters.
Waypoint: Different from GPS positions in-game, these are created with either IST or VST’s World Outliner, and mark specific positions in the World which can be referenced by VST.
Trigger: Volumes in the World which can detect when players and other Entities enter or exit their space.
Node: The base unit for visual scripting, Nodes represent an individual code function, and are connected together on the Graph to script game logic.
Graph: The visual representation of a script’s logic for editing in VST. Viewed in the Script Editor pane.
Script: A collection of game logic, represented as interconnected Nodes on the Graph
Connection Pin: The circle on the outer edges of a node. Pull connections from outputs (right side) and drag them to inputs (left side) to form a connection line
Sequence Line: White connection lines between Nodes which controls the order of node execution. Always the top-most connection on “sequence dependent” nodes.
Value Line: Connection lines between nodes for passing values from one node to another. Color-coded based on value type, such as Bools, Ints, or Strings.
Event: A type of node which begins a Sequence Line when the specified event occurs when playing the scenario.
Mission Script: Main script for gameplay code during the entirety of a Mission
State Machine: Controls flow of Objective scripts while a Mission script is running
Cursor: Location of an active State along the Sequence Line of a State Machine.
Objective Script: Higher level script which is only active during specific times in a Mission
Common Script: Modular scripts containing generalized and repeatable node logic
Start Workspace: Window which opens by default when starting VST, and provides options for creating or opening a Scenario.
World Outliner: Panel in VST which interfaces with any World currently running in an instance of Space Engineers, allowing designers to view, create, edit, and delete Waypoints outside of IST.
1. RIBBON BAR
This is where basic application functions are performed, such as saving and opening scenarios.
- Find: Search for instances of specific nodes, able to search for node titles & IDs
- Build: Test script for compile-time errors
- Code Debugger: View raw code for opened script
- Center: Reset view to 0,0 position on graph
- Snap to Grid: Draw & snap nodes grid lines on graph
- Run: Open Space Engineers & play the current scenario (in-game edits not saved)
- Run Scenario: Open Space Engineers & play the current scenario (in-game edits saved)

2. SCENARIO EDITOR
This tab is used for controlling over-arching attributes of the scenario, including what Missions are played and in what order, and the scenario’s difficulty rating.
3. SCENARIO EXPLORER
This pane lists all available scripts in the open scenario. From here you can open scripts to edit, create new scripts, and drag Common scripts onto open Objective graphs.
Scripts are organized by type (See Script Types section below) and listed alphabetically by file name. New scripts can be created through this pane by right clicking the parent directory you want to create or import a script under.When creating a new Mission script, VST will automatically create an accompanying State Machine script in addition to the required World directory and files. Only one State Machine can be run per Mission, so there is no need to create new State Machines by themselves.
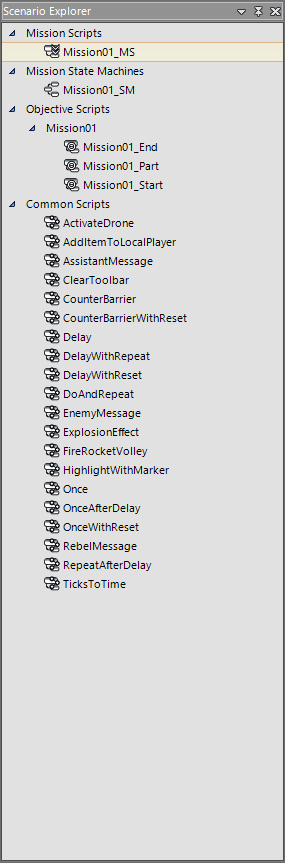
4. TOOLBOX
The Toolbox pane lists all available Nodes which can be used in Mission, Objective, and Common scripts.
Click on any item in the tree to select it. At the bottom of the pane there is a contextual description box, with a brief summary of the selected node’s functionality.
Use the search bar to look for specific nodes by name, or browse the tree for node categories, then drag and drop your selected item onto an open graph to create a new node.
5. LOG
The Log pane is used for monitoring the state of VST. Events such as file saves and error reports will be shown here.
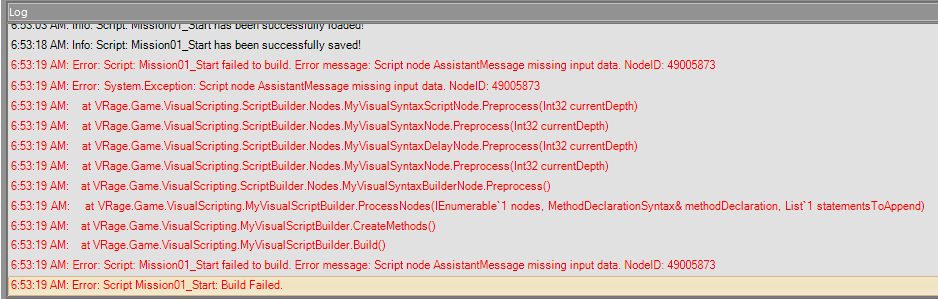
6. WORLD OUTLINER
This pane interfaces with Space Engineers, allowing designers to view, create, edit, and delete Waypoints inside an open World. The World does not need to be connected to the open Scenario however, and the Outliner will connect to any running game World. If no World is currently running, the Outliner will be greyed out and inactive.
The top buttons are useful for quick actions, such as adding a new Waypoint or Saving. When a new Waypoint is added via the New Waypoint button, it is created at the camera’s current position in the world. In IST the new Waypoint can be moved in 3d space with its gizmo, or have its position values set manually.

7. SCRIPT EDITOR
The Script Editor is where the majority of work is done in VST, displaying the Graphs for any Mission, Objective, or Common script you open. State Machine graphs function slightly differently, and will be discussed in the next section. All open scripts are listed as tabs at the top with their names, and can be reorganized as individual panes in your workspace.
Gameplay scripting is designed by creating and connecting Nodes in a script’s Graph in this pane. Nodes are called in sequence going from left to right along the white Sequence Line, starting at an orange Event node.
By default, all Mission scripts start with the following Events:
- GameStarted
- GameFinished
- Update
- Dispose
- PlayerDied
Objective scripts start with the following default Events:
- Init
- Update
- Deserialize
- Dispose
Common scripts only start with an Input node, though they need an Output node connected in order to call any nodes which come after it.
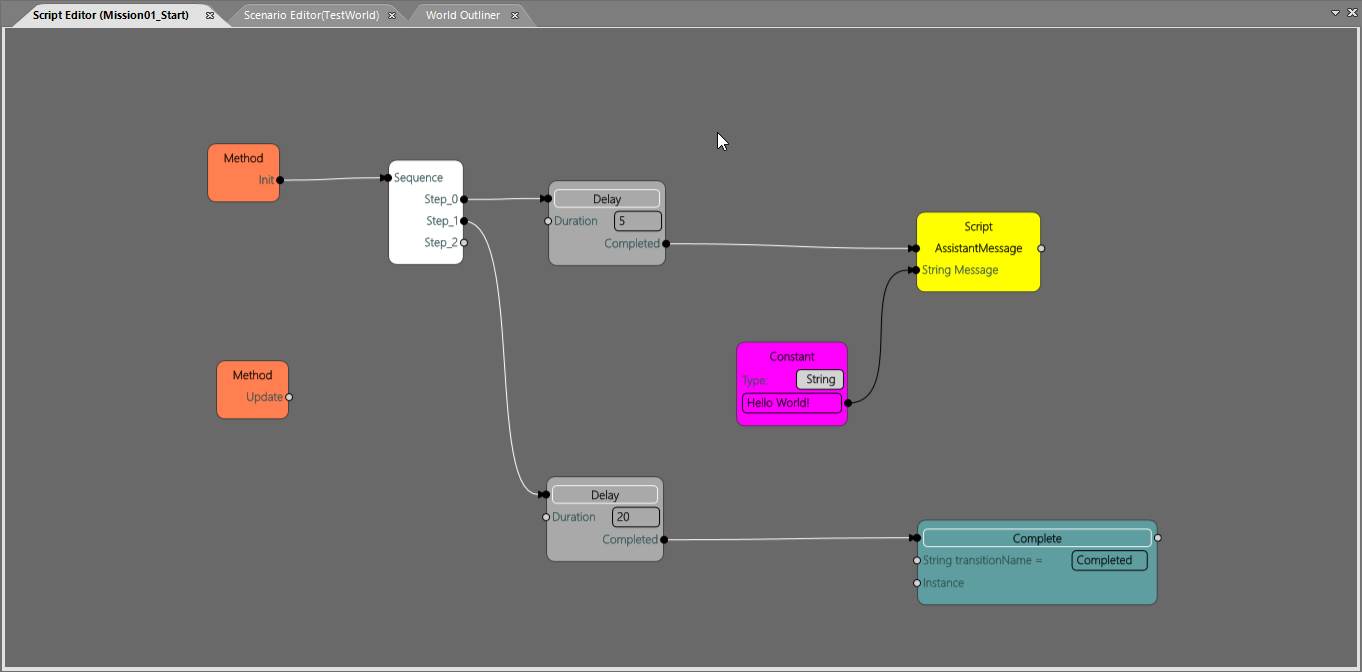
8. STATE MACHINE
The State Machine graph can be opened by double-clicking a State Machine in the Scenario Explorer pane. This Graph works similarly to the Script Editor, but only uses a small number of node types unique to State Machines:
- State
- Spread
- WaitForAll
- Final
State Machines control when and in what order Objective scripts are run, allowing for some code to only be run at specific times. While code in a Mission script is accessible at any time during the Mission, code inside Objective scripts are only accessible when a State Machine is running the Objective.
A State Machine can be started from a Mission script by calling the StartStateMachine node. Using a State Machine to run Objective scripts allows you to better organize and optimize your scripts, but it is not required.
States can be connected through transitions, which determines the order in which the states will be run. Each transition has a name given when it is made, which must be referenced when completing an Objective script.
When a State Machine is started, it begins by running the state denoted in the World’s Sandbox.sbc data file under the VisualScriptManagerSessionComponent section. If this node is deleted and no longer exists on the Graph, Space Engineers will select a different node with no incoming connections as the initial state to run.
To progress the State Machine’s Cursor to the next state, the Objective script needs to call a Complete node, and specify the name of the transition to progress down. This stop the current Objective, and begins running the Objective associated with the connected State in the named transition.
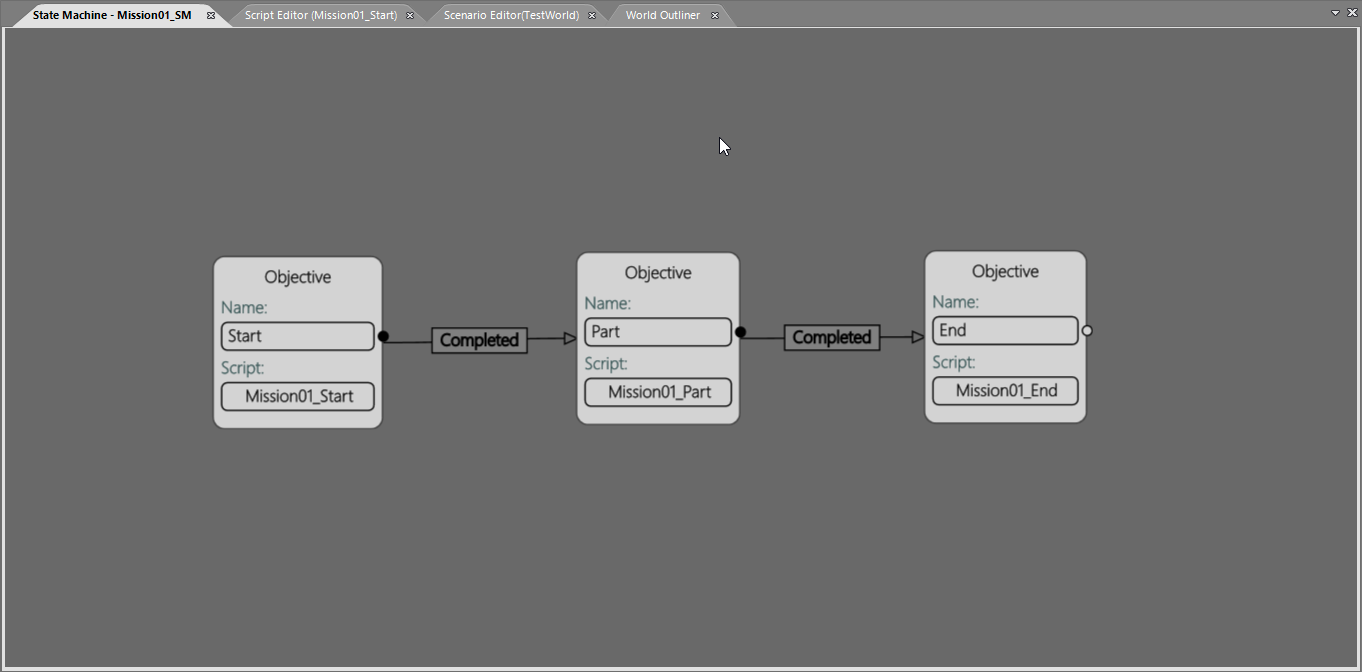
GETTING STARTED
Opening VST
- In your Steam Library, search for “Space Engineers – Mod SDK” under Tools
- Install if needed, then click Launch to open the SpaceEngineersModSDK folder
- Open the Tools folder, then the VRageEditor folder. Run VST.bat
- Helpful tip: Make a shortcut to this Batch file for easier access!
- If this is your first time running VST, you’ll be prompted to “Select Content folder of the game.” Navigate to the Steam installation folder on your computer, and select …SteamsteamappscommonSpaceEngineersContent
When opening VST you’ll be presented with the Start workspace, which shows options to start a New Scenario or Load Scenario.
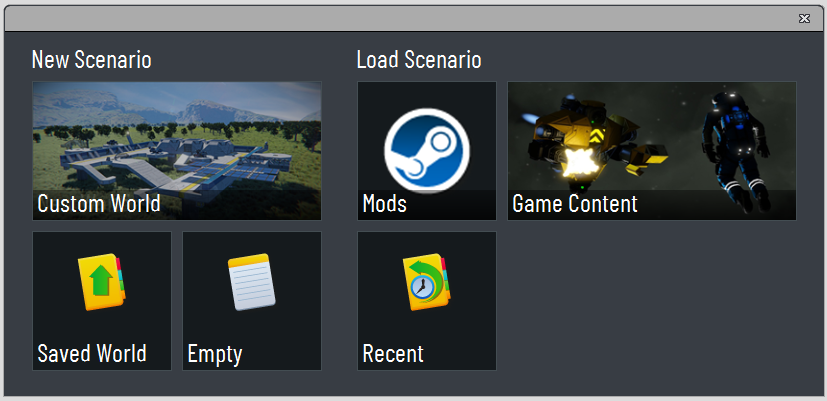
Creating A New Scenario
New scenarios can be created from:
- Custom World: Stock environments such as Green Station, Crashed Red Ship, and more
- Saved World: Your saved game environments, located in AppDataRoamingSpaceEngineersSaves
- Empty: A default blank world
- Run VST, or click New on the Ribbon Bar to open the Start workspace
- In the Start workspace window, click Empty under New Scenario
- Enter a name for your new Scenario
- Scenario is set up and opened. All associated files can be found in AppDataRoamingSpaceEngineersMods*Your Mod Name*
Playing Your New Scenario
If Space Engineers is already running, you can open your scenario by selecting New Game on the Main Menu, then scrolling down the list of official scenarios to view your Local scenarios. These local scenario directories can be found in your AppData folder for Space Engineers, in the AppDataRoamingSpaceEngineersMods folder.
You can open Space Engineers and directly load directly into your scenario by clicking “Run” on the Ribbon bar. The “Run Scenario” button can be used to also save all changes directly to the scenario folder in Mods, rather than to your Saves folder, making it easier to edit and save changes to your World. This method requires that Space Engineers not have any instances already running on your computer.
When the game has finished loading and you gain control of the character in the world, the GameStarted Event in the Mission script will be called. If you left the StartStateMachine node connected to this event, the State Machine will also start running its first State node’s Objective script, and the code prints a Hello World message to the Chat window.
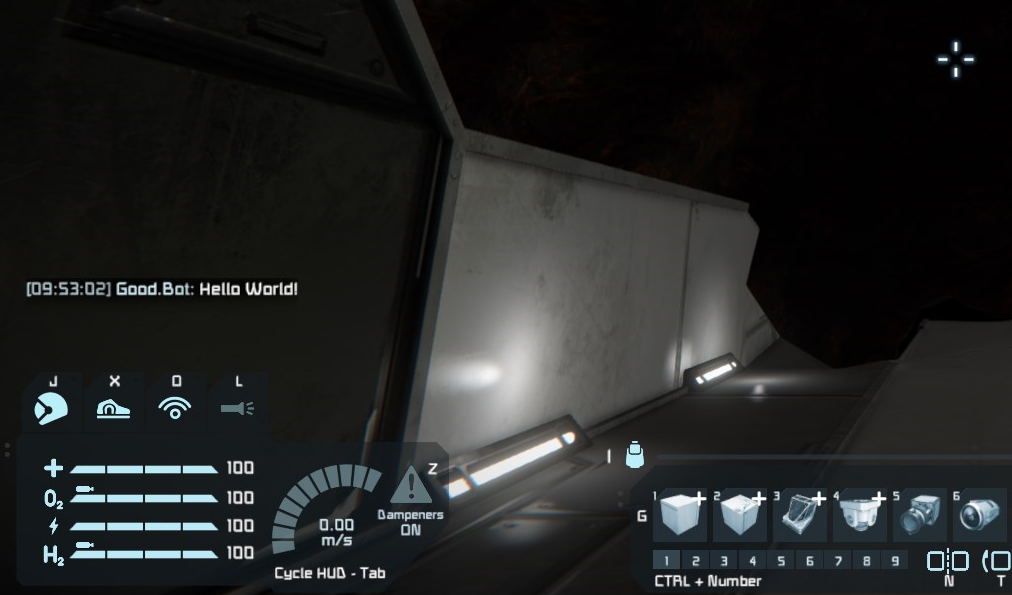
Detecting Your Events
Regardless of what kind of scenario you’re making, all scripting in VST begins with Event nodes. These nodes fire when their associated event takes place in the game. GameStarted, for instance, fires immediately when the scenario begins for the first time, and any connected nodes will be called when that happens.
The easiest Event node to begin scripting with is ButtonPressedTerminalName, which fires any time a button panel is activated in the game. This event is great for causing scripts to run at specific times, since the player has direct control over when it fires.
It can sometimes be difficult to know what specific code is running in your script, since many nodes do not produce visible changes in the level. An easy way to debug your code is to use the SendChatMessage node to print messages to the in-game Chat window. Printing messages this way can help you determine when an Event is firing, as well as enables you to print variable values through the message field.
Connecting all this together, you can make a simple interactable button with ButtonPressedTerminalName and SendChatMessage nodes. Click and drag both of these nodes from the Toolbox pane onto an empty area on your Mission Graph. Then, click and drag the white circle at the top right side of the Event node. Notice the visual changes to the connection pins on the SendChatMessage, with solid red pins being incompatible, and white empty pins being valid input pins. Drag the connection line to the top white circle on SendChatMessage, and release when the connection line turns orange.
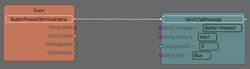
Next, click Run Scenario on the Ribbon bar to launch Space Engineers and load directly into this scenario with saving enabled. When you gain control of the character, create a button panel block, and assign any block action to the first slot.
Now you are able to press the button, and print your chat message! Save your game to retain your changes.
Next, we can add logical statements to the code to better control what happens and when.
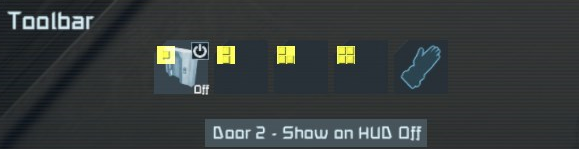
Making Your Code Smarter
In the previous section you created a simple button event, connected to a chat message node. Since there are no logical checks, and the Event node is on the Mission script’s Graph, this message will be printed to the Chat window when any button is pressed at any time during the Mission. You can easily constrain this code to only one specific button by checking some of the event’s parameters.
First, you’ll need to have a Branch node connected along the Sequence Line between the Event and the SendChatMessage nodes. Branch nodes check a boolean value, much like a traditional If / Else statement, and only executes one of its two output connections. We’ll use this Branch node to check the name of the button panel block provided by the Event node, so connect the True output to the SendChatMessage node.
Next, click and drag the magenta circle to the right of “String name” at the top of the ButtonPressedTerminalName node, and release it in an open area of the Graph. This displays the Function Selection window, allowing you to quickly search for and place a node with the dragged connection. Click into the Search field, type “String Contains”, and double click the returned item. The node is created on your Graph, and it is automatically connected to the name output of your Event node.
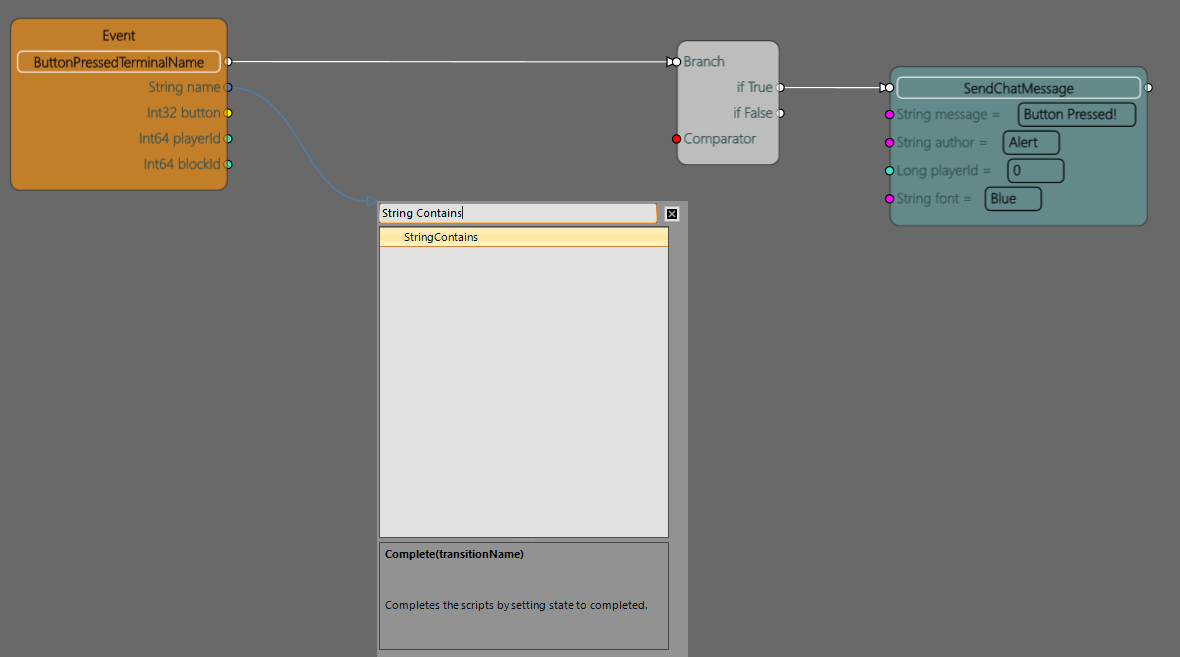
StringContains is a great way to analyze strings such as Entity names, and determine if a sample string can be identified within the value string. For our event, we’ll want to check the button panel’s terminal name, and only print the message if it contains a specific string. Double click into the “contains” field on the StringContains node, type “test”, then click “OK” to confirm. This will cause the StringContains to evaluate “true” for its output boolean value only when the Event’s output name string contains the word “test”.
Now connect the “ret” output pin to the “Comparator” input pin on the Branch node, and the True output of the Branch node to the SendChatMessage node from earlier, so it will print for any button with “test” in its terminal name.
To test your changes, click Run Scenario in the Ribbon bar to load your scenario. Pressing the button no longer prints the chat message, because the block’s terminal name does not contain the string “test”.
Open the panel’s terminal, and click the Name field to edit the block’s name. Adding the test string to the name will now allow the chat message to print. Keep in mind that StringContains is case sensitive, so adding “Test” or “TEST” to the terminal name will evaluate to false in our logic.
Next, we’ll learn how to start and progress through a series of Objective scripts via the State Machine. Don’t forget to save your changes to retain the updated terminal name!
Progressing Through Your Mission
In the previous section, you learned how to target a specific button by name, but it is still accessible at any time during the Mission. Moving the nodes into an Objective script allows the code to only be run during specific States.
First, click and drag in an open space on the graph to create a selection box. Drag the box around the Event, Branch, and SendChatMessage nodes, and release to select all the newly created nodes. Press Ctrl+C on your keyboard to copy these nodes to your clipboard.
Next, open the Mission01_Start Objective script by double clicking it in the Scenario Explorer pane. Press Ctrl+V on your keyboard to paste the nodes into the Objective script. Now that you have successfully pasted the nodes, return to the Mission script and delete the selected nodes there. The button can now only print your message when the Start state is active.
By default, new scenarios are set up with code to start the State Machine on GameStarted, and print a Hello World message before moving to the Part state. Go back to the _Start Objective script, and move the Complete node from the Init event to the end of your ButtonPressed event. This way, the State Machine will not progress past this state until the test button is pressed.
Save the scenario, and click Run to launch your scenario. Now the button will only print your message once, and never again. This is because after the first press, the Start state is completed and exited, and code in this State is no longer accessible during play until the scenario is restarted.

Using the State Machine and Objective scripts in this way can allow you to design unique scripted events, and control when they are called during your scenario. It also helps keep the scripts stay organized and optimized, since large amounts of nodes can slow down viewing a script in VST.
Next, we’ll go over how to post your new scenario online for other players to experience.
Publishing Your Scenario
Once you’re happy with how your scenario plays, you should get it ready to share it online! Publishing to the Steam Workshop is quick and easy, but first you’ll want to set up a few things to help it stand out.
The thumbnail and loading images are located in the ModsScenarioNameScenariosScenarioNameScreens folder. You can edit these image files, or select a different image on the Scenario Editor pane in VST. “Scenario” is the thumbnail image, and each Mission will have its own loading image named after it.
In order to set your scenario’s description, you’ll need to open your scenario’s .SCF data file in a text editor program, such as Notepad. You can find this data file in the ModsScenarioNameScenariosScenarioName folder, and it will be named the same as your scenario’s name. Between the <Description> and </Description> tags, you can write out a custom description to display to players on the Scenario selection screen.
After you’ve set up these cosmetic extras, your scenario is ready to publish. On the Main Menu for Space Engineers, click New Game to view the Scenario selection screen. Here you can review your changes to the thumbnail and description, and click Publish at the bottom when you’re ready to share.
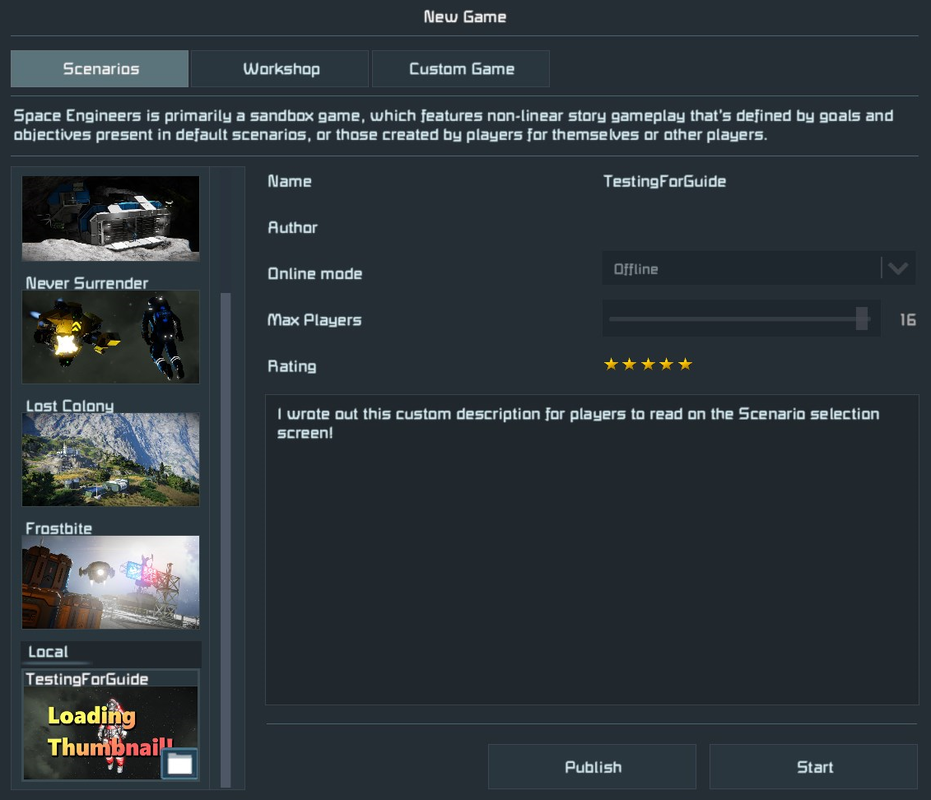
Once you confirm that you want to Publish, your new scenario will be added to the Steam Workshop for other players to enjoy.
Thank you for adding your amazing creations to the Space Engineers experience!
USING IST
The In-game Scripting Tool (IST), also known as the “Scripting Tools” screen, is used to create and modify entities in a World. IST is ideal for placing Waypoints, creating Trigger volumes, and naming grids or blocks for referencing with VST.
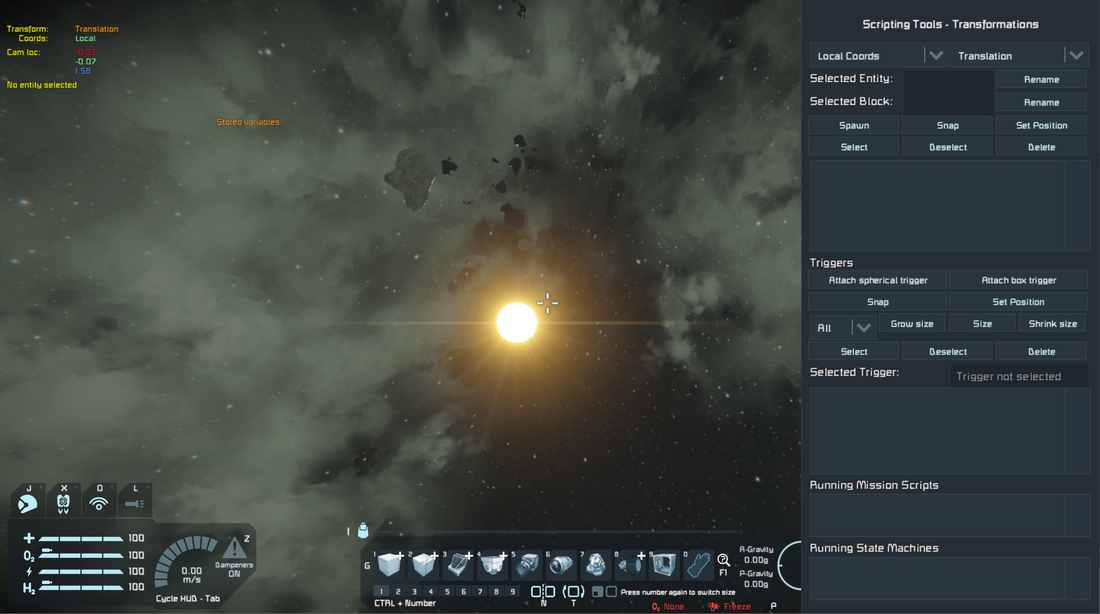
Accessing the Screen
- Open Space Engineers
- Run a scenario you want to work on, such as the one created in the previous section
- On the keyboard, press the F11 key twice
- Press the Esc key to return to controlling your character
Setting Up Waypoints
- In the upper right section of the screen, click Spawn to create a new Waypoint entity at the camera position
- Click and drag the gizmo handles to modify the Waypoint’s position or rotation (transformation type in the upper right, or switched with the R key)
- Move the camera, and click Snap to teleport the Waypoint to the camera’s current position
- Click Set Position to manually enter a position vector
- Click Rename to the right of the Selected Entity name to set a custom name for the Waypoint
Setting Up Triggers
- With the Waypoint still selected, click “Attach spherical trigger” to create a new trigger volume at the camera’s position
- Provide a name for the new trigger
- Move the camera to view the new trigger
- With the trigger selected, click Size and type 10, then click Confirm
- Select the Waypoint, and use the gizmo handles to move the Waypoint, which moves the trigger volume as well.
- Below the “Selected Trigger” field. Double click the trigger’s name to enter a new name
Working with Grids and Blocks
- Click on a grid to select it
- Click and drag the gizmo handles to move the grid
- Click Rename to the right of Selected Entity to enter a new EntityName for the grid
- Click on a functional block (Ex: Button Panel, Thruster, etc) to select it
- Click Rename to the right of Selected Block to enter a new EntityName for this specific block
- Click Attach box trigger to create a new trigger volume attached to this specific block
- Move the grid, which moves the trigger volume as well.
SCRIPT TYPES
There are four basic types of scripts you can create and implement to control what happens in your Scenario.
1) Mission Scripts:
These are the main scripts for a Scenario, and are set up in sequence on the Scenario Editor tab. A Scenario can have multiple Missions, but only one Mission can be run at a time. Each mission requires its own World, which is generated automatically when creating a new Scenario or Mission script.
These scripts begin running when the game is loaded, based on their order in the Scenario Editor tab, and will run until the SessionClose node is executed. Events and logic in this script can run at any point while playing this Mission.
To create a new Mission in your Scenario, right click in the Scenario Explorer and select Add New Mission. You will be prompted to input a Name, select a World and Loading Image to use as templates, and input an optional Loading Text. After clicking Create VST will generate a new Mission script, State Machine, and all required World files.
Default Events:
- GameStarted: Fires once when Scenario is first run (not when reloading a save).
- Update: Fires once per frame while Mission is active
- PlayerDied: Fires any time a player character dies
To transition between Missions during play, the node SessionClosed will need to be executed. This will close the current Mission, and load the next World as defined on the Scenario Editor tab. If the current Mission is the last in the sequence, SessionClosed will exit the Scenario and return the player to the Main Menu.
2) State Machine Scripts:
These scripts control the flow of individual Objective scripts in sequence during a Mission. The State Machine can be started from any script with the StartStateMachine node. Each State in the State Machine represents a specific Objective script, which are connected through Transition connections. States without input Transitions will be treated as starting nodes, and run when the State Machine is started.
All Transitions have an identifying name, which is input when connecting two States and creating the Transition. The Cursor moves along Transitions, activating the Objective scripts associated with its current State. To move the Cursor from one State to the next during play, the associated Objective script must execute the Complete node and specify the Transition name.
The flow of execution through these States can also be controlled by the Spread and WaitForAll nodes. Spread takes a single input Transition and branches to multiple States simultaneously. WaitForAll can take multiple input Transitions, and only progresses to the next State when all input Transitions have completed.
3) Objective Scripts:
Specific scripts that are only run at certain times during the mission, and controlled by the State Machine. Code in these scripts do not run if a State Machine Cursor is not active on its State. When a Complete node is executed in an Objective script, the script is stopped and the Cursor moves to the next State in the State Machine.
Objective scripts are useful for segmenting your code, and only running what is needed to at a given time. This can keep your Scenario organized, making it easier to navigate and debug, as well as maintain steady run-time performance.
Default Events:
- Init: Fires once when Objective script first starts
- Update: Fires once per frame while Objective is active
4) Common Scripts
This script type is used for generalized, modular logic which can be repeated multiple in places. Common scripts can be placed in Mission or Objective scripts as nodes by clicking and dragging them onto a graph from the Scenario Explorer pane.
Two node types are specific to Common scripts: Input and Output, which mark the beginning and end of the Common script respectively. Both of these nodes can have parameters added to them, allowing for variables to be passed in or returned out.
NODES
Nodes are graphical representations of a self-contained function, and can be connected in sequence to create new game behaviors without needing to write out code.
New nodes can be created on a graph in a number of ways:
- Click and drag from the Toolbox pane
- Right click an empty space
- Click and drag a different node’s connection pin and release in empty space
Nodes can be connected via Sequence Lines, Value Lines, or both. To connect two nodes, click and hold a Connection Pin from one node, and drag it to an accepting Pin on another node. To accept the connection, both pins must share the same connection type. For instance, a Sequence Line connection can only be made between two Sequence type Connection Pins, while an integer Value Line connection can only be made between two integer type pins. Accepting pins will display hollow circles when dragging a connection, while invalid connections will display solid red circles.
Nodes can either be considered “sequence dependent” if they require a Sequence Line input to function, or “sequence independent” if they do not. Sequence dependent nodes have a connection pin to the left or right of their title, and are executed one at a time along a Sequence Line. Sequence independent nodes only have connection pins next to their values, and will be executed when their output values are referenced by a sequence dependent node.
-Types
-Events:
-Begins a Sequence Line execution when the associated event occurs in the game.
-Single Sequence Line output and parameter pins, no input pins
-Dark orange
-Key Events:
-Functions similarly to normal Events, but with user-specified “key” values
-Only fires when parameters with the specified values are triggered
-Functions:
-Methods loaded from C# libraries
-Input and output connections for parameters
-Green
-Script Nodes:
-Basic nodes for performing specific actions
-Includes sequence controllers, variables, and logic gates
-Colors vary
To view more information about a specific node, select it in the Toolbox to display details at the bottom of the pane.
Programming in Space Engineers is done with the Programmable Block which can be given scripts written in C# (pronounced C Sharp). This can be used to make autonomous mining drones, long-range player-killing torpedoes, automated welding arms for ship construction, and much more.
Contents
- Introduction
- Editor access
- Main method
- Variable lifetime and scoping
- Compiling
- Script execution
- Counting of instructions
- Whitelist
- Available interfaces
- Possible Actions
- Block Classes (Action List)
- Same block class for different SubTypeID
- Example programs
- Hello world
- Getting your position
- Checking a sensor
- Firing Thrusters
- Compilation errors
Introduction
Editor access
Only one player can edit the same script at a time. If someone else has an editor for the current block open and someone else tries to open that block’s editor, a notification will be shown that the editor is already open.
Main method
When the editor is opened for the first time, void Main() method is present inside the code editor. This is the entry point that will be called when executing the script. If the Main method is removed / renamed, the script will not run and you will be notified in the programmable block details area. Custom methods/variables can be defined and used, but only the Main method will be called without reference.
Variable lifetime and scoping
There are two types of variables for scripting:
- Local (inside the methods)
- these variables will keep their value only during the execution of a method. The value will be “lost” when the method ends.
- Global (outside the methods)
- these variables will keep their values during the lifetime of the script. For example, if the variable needs to keep its value between separate runs of the script, it needs to be defined outside the methods.
After pressing the “Remember & Exit” or “Remember” buttons, the previous script will be overwritten and all Global variables will be lost.
All variables, local and global except for the built-in Storage variable will lose their value or return to their default value when recompiling the code and between saved game loads. The Storage variable is unique in that it will store the data as a string for use between saved sessions and recompile.
Compiling
When the “Check code” button is pressed, the code will be compiled and the result of the compilation will be shown. There are two steps in the compilation process: First, the code inside the editor is compiled by C# compiler for language errors. If there are any errors during compilation the following dialog is shown: In this case, “aaa” string is placed before the Main method. This is the wrong language construction and the compilation failed. In the error dialog, the Line number error and description of the error are shown.
After compilation, the code is checked for the usage of disallowed namespaces and types. In case that check fails, the following dialog is shown: In this case, System.IO.Directory was used to delete some directories. This is forbidden and an error is shown that “Not allowed type was used in script”.
If compilation and checks pass, a dialog is shown, confirming the checks passed, and the code is saved.
Script execution
Script can be triggered by the following means:
1. By pressing the “Run” button in the terminal properties of the programmable block.
2. By assigning terminal action and manually pressing the action button (1-9) while controlling the grid using cockpit, control station or remote control.
3. By pressing the button on a button panel with the assigned action “Run”.
4. By a timer with assigned action “Run”.
5. By another script in another programmable block in the same grid.
6. By antenna with assigned programmable block, when received message from another antenna. (see Antenna#Programming)
7. By the script itself, by assigning a value to Runtime.UpdateFrequency variable. In this case, no argument can be specified, however, you can use the following Main method signature: void Main(string argument, UpdateType updateSource) to gain access to the information about what exactly triggered the script and so make the script “know” if it was triggered by Update1, Update10, Update100 events or manually or whatever event was the reason of trigger execution.
Script is executed only on the server even if it’s triggered from the client. If there is any exception during script execution, all clients will be notified in the programmable block details area about failure. In case of an exception during script execution, the script will not run again unless the User opens the editor and changes the script.
Counting of instructions
Every time script is executed, every instruction of the script is counted. If the script executes more instructions than limit, execution is stopped and the user is notified that the script is too complex for execution. This prevents scripts from freezing the game.
Whitelist
The types and classes allowed in scripts are restricted. Refer to the Scripting Whitelist to see what you are allowed to use.
Available interfaces
Possible Actions
Currently, only terminal actions can be triggered inside scripts. Users can access the terminal system for the grid on which the programmable block is located and trigger any terminal action on any block at the grid.
-
- API List
Block Classes (Action List)
-
- Block Action List
Same block class for different SubTypeID
Some blocks have the same parent (e.g. <TypeId> in cubeblocks.sbc) and differs only by subtype (e.g. <SubtypeId>). This means there is no distinction between these blocks in code.
An example of these blocks is the Cargo Container: there are 3 types of cargo containers in the game: small, medium, and large. These three types differ only by the Subtype and Type is the same for them e.g. large cargo container id is:
Простейший скрипт отображения основных ресурсов на LCD дисплее в Space Engineers. Единственное, что нужно поменять в скрипте — это имя LCD дисплея (у меня это «Text panel 1»).
The simplest script to display base resources on LCD in Space Engineers. There is only one thing to change — the name of the LCD (in my script it’s the «Text panel 1»).
public Program()
{
}
public void Save()
{
}
public void Main(string argument, UpdateType updateSource)
{
int Ice=0, Stone=0, Scrap=0, Iron=0, Silicon=0, Nickel=0, Cobalt=0, Silver=0, Gold=0, Uranium=0, Magnesium=0, Platinum=0;
int ingotStone=0, ingotIron=0, ingotSilicon=0, ingotNickel=0, ingotCobalt=0, ingotSilver=0, ingotGold=0, ingotUranium=0, ingotMagnesium=0, ingotPlatinum=0;
int i=0;
int a=0;
int j=0;
int k;
String s;
IMyInventory inv;
List<MyInventoryItem> items;
MyInventoryItem item;
String panelText=»»;
List<IMyTerminalBlock> blocks = new List<IMyTerminalBlock>();
GridTerminalSystem.GetBlocks(blocks);
a=blocks.Count;
for (i=0;i<blocks.Count;i++) {
if (blocks[i].HasInventory) {
a=blocks[i].InventoryCount;
for (j=0;j<blocks[i].InventoryCount;j++) {
inv = blocks[i].GetInventory(j);
items = new List<MyInventoryItem>();
inv.GetItems(items);
for (k=0; k<items.Count;k++) {
item=items[k];
s=item.ToString();
a=(int)item.Amount;
if (s.Contains(«Ore/Ice») ) Ice+=a;
if (s.Contains(«Ore/Stone») ) Stone+=a;
if (s.Contains(«Ore/Scrap») ) Scrap+=a;
if (s.Contains(«Ore/Iron») ) Iron+=a;
if (s.Contains(«Ore/Silicon») ) Silicon+=a;
if (s.Contains(«Ore/Nickel») ) Nickel+=a;
if (s.Contains(«Ore/Cobalt») ) Cobalt+=a;
if (s.Contains(«Ore/Silver») ) Silver+=a;
if (s.Contains(«Ore/Gold») ) Gold+=a;
if (s.Contains(«Ore/Uranium») ) Uranium+=a;
if (s.Contains(«Ore/Magnesium») ) Magnesium+=a;
if (s.Contains(«Ore/Platinum») ) Platinum+=a;
if (s.Contains(«Ingot/Stone») ) ingotStone+=a;
if (s.Contains(«Ingot/Iron») ) ingotIron+=a;
if (s.Contains(«Ingot/Silicon») ) ingotSilicon+=a;
if (s.Contains(«Ingot/Nickel») ) ingotNickel+=a;
if (s.Contains(«Ingot/Cobalt») ) ingotCobalt+=a;
if (s.Contains(«Ingot/Silver») ) ingotSilver+=a;
if (s.Contains(«Ingot/Gold») ) ingotGold+=a;
if (s.Contains(«Ingot/Uranium») ) ingotUranium+=a;
if (s.Contains(«Ingot/Magnesium») ) ingotMagnesium+=a;
if (s.Contains(«Ingot/Platinum») ) ingotPlatinum+=a;
}
}
}
}
IMyTextSurface surface = GridTerminalSystem.GetBlockWithName(«Text panel 1») as IMyTextSurface;
surface.FontSize=0.8f;
panelText=»Resources ( raw / ingot ) :»;
panelText=panelText+»n»+»Ice : «+Ice.ToString() ;
panelText=panelText+»n»+»Stone : «+Stone.ToString()+ » / «+ingotStone.ToString();
panelText=panelText+»n»+»Iron : «+Iron.ToString()+ » / «+ingotIron.ToString();
panelText=panelText+»n»+»Silicon : «+Silicon.ToString()+ » / «+ingotSilicon.ToString();
panelText=panelText+»n»+»Nickel : «+Nickel.ToString()+ » / «+ingotNickel.ToString();
panelText=panelText+»n»+»Cobalt : «+Cobalt.ToString()+ » / «+ingotCobalt.ToString();
panelText=panelText+»n»+»Silver : «+Silver.ToString()+ » / «+ingotSilver.ToString();
panelText=panelText+»n»+»Gold : «+Gold.ToString()+ » / «+ingotGold.ToString();
panelText=panelText+»n»+»Uranium : «+Uranium.ToString()+ » / «+ingotUranium.ToString();
panelText=panelText+»n»+»Magnesium : «+Magnesium.ToString()+ » / «+ingotMagnesium.ToString();
panelText=panelText+»n»+»Platinum : «+Platinum.ToString()+ » / «+ingotPlatinum.ToString();
surface.WriteText(panelText);
}