Table of Contents
The name of the script.
Internationalization is done by adding an appendix naming the locale.
// @name    A test
// @name:de Ein Test
The namespace of the script.
A copyright statement shown at the header of the script’s editor right below the script name.
The script version. This is used for the update check and needs to be increased at every update.
In this list the next entry is considered to be a higher version number, eg: Alpha-v1 < Alpha-v10 and 16.4 == 16.04
Alpha-v1Alpha-v10Alpha-v2Beta0.5pre30.5prelimiary0.6pre40.6pre50.7pre40.7pre101.-11==1.==1.0==1.0.01.1a1.1aa1.1ab1.1b1.1c1.1.-11.1==1.1.0==1.1.001.1.1.1.11.1.1.1.21.1.1.11.102.016.4==16.04
A short significant description.
Internationalization is done by adding an appendix naming the locale.
// @description    This userscript does wonderful things
// @description:de Dieses Userscript tut wundervolle Dinge
The script icon in low res.
This scripts icon in 64×64 pixels. If this tag, but @icon is given the @icon image will be scaled at some places at the options page.
@grant is used to whitelist GM_* and GM.* functions, the unsafeWindow object and some powerful window functions.
// @grant GM_setValue
// @grant GM_getValue
// @grant GM.setValue
// @grant GM.getValue
// @grant GM_setClipboard
// @grant unsafeWindow
// @grant window.close
// @grant window.focus
// @grant window.onurlchange
Since closing and focusing tabs is a powerful feature this needs to be added to the @grant statements as well.
In case @grant is followed by none the sandbox is disabled. In this mode no GM_* function but the GM_info property will be available.
// @grant none
If no @grant tag is given an empty list is assumed. However this different from using none.
The scripts author.
@homepage, @homepageURL, @website, @source
The authors homepage that is used at the options page to link from the scripts name to the given page. Please note that if the @namespace tag starts with http:// its content will be used for this too.
This tag allows script developers to disclose whether they monetize their scripts. It is for example required by GreasyFork.
Syntax: <tag> <type> <description>
<type> can have the following values:
- ads
- tracking
- miner
// @antifeature       ads         We show you ads
// @antifeature:fr    ads         Nous vous montrons des publicités
// @antifeature       tracking    We have some sort of analytics included
// @antifeature       miner       We use your computer's resources to mine a crypto currency
Internationalization is done by adding an appendix naming the locale.
Points to a JavaScript file that is loaded and executed before the script itself starts running.
Note: the scripts loaded via @require and their «use strict» statements might influence the userscript’s strict mode!
// @require https://code.jquery.com/jquery-2.1.4.min.js
// @require https://code.jquery.com/jquery-2.1.3.min.js#sha256=23456...
// @require https://code.jquery.com/jquery-2.1.2.min.js#md5=34567...,sha256=6789...
// @require tampermonkey://vendor/jquery.js
// @require tampermonkey://vendor/jszip/jszip.js
Please check the sub-resource integrity section for more information how to ensure integrity.
Multiple tag instances are allowed.
Preloads resources that can by accessed via GM_getResourceURL and GM_getResourceText by the script.
// @resource icon1       http://www.tampermonkey.net/favicon.ico
// @resource icon2       /images/icon.png
// @resource html        http://www.tampermonkey.net/index.html
// @resource xml         http://www.tampermonkey.net/crx/tampermonkey.xml
// @resource SRIsecured1 http://www.tampermonkey.net/favicon.ico#md5=123434...
// @resource SRIsecured2 http://www.tampermonkey.net/favicon.ico#md5=123434...;sha256=234234...
Please check the sub-resource integrity section for more information how to ensure integrity.
Multiple tag instances are allowed.
The pages on that a script should run. Multiple tag instances are allowed.
@include doesn’t support the URL hash parameter. You have to match the path without the hash parameter and make use of window.onurlchange
// @include http://www.tampermonkey.net/*
// @include http://*
// @include https://*
// @include /^https://www.tampermonkey.net/.*$/
// @include *
Note: When writing something like *://tmnk.net/* many script developers expect the script to run at tmnk.net only, but this is not the case.
It also runs at https://example.com/?http://tmnk.net/ as well.
Therefore Tampermonkey interprets @includes that contain a :// a little bit like @match. Every * before :// only matches everything except : characters to makes sure only the URL scheme is matched.
Also, if such an @include contains a / after ://, then everything between those strings is treat as host, matching everything except / characters. The same applies to * directly following ://.
More or less equal to the @include tag. You can get more information here
.
Note: the <all_urls> statement is not yet supported and the scheme part also accepts http*://.
Multiple tag instances are allowed.
Exclude URLs even it they are included by @include or @match.
Multiple tag instances are allowed.
Defines the moment the script is injected. In opposition to other script handlers, @run-at defines the first possible moment a script wants to run. This means it may happen, that a script that uses the @require tag may be executed after the document is already loaded, cause fetching the required script took that long. Anyhow, all DOMNodeInserted and DOMContentLoaded events that happended after the given injection moment are cached and delivered to the script when it is injected.
// @run-at document-start
The script will be injected as fast as possible.
// @run-at document-body
The script will be injected if the body element exists.
// @run-at document-end
The script will be injected when or after the DOMContentLoaded event was dispatched.
// @run-at document-idle
The script will be injected after the DOMContentLoaded event was dispatched. This is the default value if no @run-at tag is given.
// @run-at context-menu
The script will be injected if it is clicked at the browser context menu (desktop Chrome-based browsers only).
Note: all @include and @exclude statements will be ignored if this value is used, but this may change in the future.
@sandbox allows Tampermonkey to decide where the userscript is injected:
- MAIN_WORLD — the page
- ISOLATED_WORLD — the extension’s content script
- USERSCRIPT_WORLD — a special context created for userscripts
But instead of specifying an environment, the userscript can express what exactly it needs access to. @sandbox supports three possible arguments:
-
raw
«Raw» access means that a script for compatibility reasons always needs to run in page context, the MAIN_WORLD.
At the moment this mode is the default if@sandboxis omitted. -
JavaScript
«JavaScript» access mode means that this script needs access tounsafeWindow.
At Firefox a special context, the USERSCRIPT_WORLD, is created which should also bypass all remaining CSP issues. It however, might create new issues since nowcloneIntoandexportFunctionare necessary to share objects with the page.
rawmode is used as fallback at other browsers. -
DOM
Use this access mode if the script only needs DOM and no directunsafeWindowaccess.
If enabled these scripts are executed inside the extension context, the ISOLATED_WORLD, or at any other enabled context otherwise, because they all grant DOM access.
// @sandbox JavaScript
This tag defines the domains (no top-level domains) including subdomains which are allowed to be retrieved by GM_xmlhttpRequest
// @connect <value>
<value> can have the following values:
- domains like tampermonkey.net (this will also allow all sub-domains)
- sub-domains i.e. safari.tampermonkey.net
- self to whitelist the domain the script is currently running at
- localhost to access the localhost
- 1.2.3.4 to connect to an IP address
- *
If it’s not possible to declare all domains a userscript might connect to then it’s a good practice to do the following:
Declare all known or at least all common domains that might be connected by the script.
This way the confirmation dialog can be avoided for most of the users.
Additionally add @connect * to the script. By doing so Tampermonkey will still ask the user whether the next connection to a not mentioned domain is allowed, but also offer a «Always allow all domains» button.
If the user clicks at this button then all future requests will be permitted automatically.
Users can also whitelist all requests by adding * to the user domain whitelist at the script settings tab.
Notes:
- both, the initial and the final URL will be checked!
- for backward compatibility to Scriptish
@domaintags are interpreted as well.
Multiple tag instances are allowed.
This tag makes the script running on the main pages, but not at iframes.
An update URL for the userscript.
Note: a @version tag is required to make update checks work.
Defines the URL where the script will be downloaded from when an update was detected. If the value none is used, then no update check will be done.
Defines the URL where the user can report issues and get personal support.
@webRequest takes a JSON document that matches GM_webRequest‘s rule parameter. It allows the rules to apply even before the userscript is loaded.
Injects the userscript without any wrapper and sandbox into the page, which might be useful for Scriptlets.
Application Programming Interface
unsafeWindow
The unsafeWindow object provides access to the window object of the page that Tampermonkey is running on, rather than the window object of the Tampermonkey extension. This can be useful in some cases, such as when a userscript needs to access a JavaScript library or variable that is defined on the page.
Subresource Integrity
Subresource Integrity (SRI) is a security feature that allows userscript developers to ensure that the external resources (such as JavaScript libraries and CSS files) that they include in their userscript have not been tampered with or modified. This is accomplished by generating a cryptographic hash of the resource and including it in @require and @resource tags. When the userscript is installed, Tampermonkey will calculate the hash of the resource and compare it to the included hash. If the two hashes do not match, Tampermonkey will refuse to load the resource, preventing attackers from injecting malicious code into your userscript.
The hash component of the URL of @resource and @require tags is used for this purpose.
// @resource SRIsecured1 http://example.com/favicon1.ico#md5=ad34bb...
// @resource SRIsecured2 http://example.com/favicon2.ico#md5=ac3434...,sha256=23fd34...
// @require              https://code.jquery.com/jquery-2.1.1.min.js#md5=45eef...
// @require              https://code.jquery.com/jquery-2.1.2.min.js#md5-ac56d...,sha256-6e789...
// @require              https://code.jquery.com/jquery-3.6.0.min.js#sha256-/xUj+3OJU...ogEvDej/m4=
Tampermonkey supports SHA-256 and MD5 hashes natively, all other (SHA-1, SHA-384 and SHA-512) depend on window.crypto.
In case multiple hashes (separated by comma or semicolon) are given the last currently supported one is used by Tampermonkey. All hashes need to be encoded in either hex or Base64 format.
GM_addElement(tag_name, attributes), GM_addElement(parent_node, tag_name, attributes)
GM_addElement allows Tampermonkey scripts to add new elements to the page that Tampermonkey is running on. This can be useful for a variety of purposes, such as adding script and img tags if the page limits these elements with a content security policy (CSP).
It creates an HTML element specified by «tag_name» and applies all given «attributes» and returns the injected HTML element. If a «parent_node» is given, then it is attached to it or to document head or body otherwise.
For suitable «attributes», please consult the appropriate documentation. For example:
- script tag
- img tag
- style tag
GM_addElement('script', {
  textContent: 'window.foo = "bar";'
});

GM_addElement('script', {
  src: 'https://example.com/script.js',
  type: 'text/javascript'
});

GM_addElement(document.getElementsByTagName('div')[0], 'img', {
  src: 'https://example.com/image.png'
});

GM_addElement(shadowDOM, 'style', {
  textContent: 'div { color: black; };'
});
Note: this feature is experimental and the API may change.
GM_addStyle(css)
Adds the given style to the document and returns the injected style element.
GM_download(details), GM_download(url, name)
GM_download allows userscripts to download a file from a specified URL and save it to the user’s local machine.
The GM_download function takes the following parameters:
details can have the following attributes:
- url: The URL of the file to download. This must be a valid URL and must point to a file that is accessible to the user.
- name: The name to use for the downloaded file. This should include the file’s extension, such as .txt or .pdf.
For security reasons the file extension needs to be whitelisted at Tampermonkey’s options page - headers: An object containing HTTP headers to include in the download request. See
GM_xmlhttpRequestfor more details. - saveAs: A boolean value indicating whether to use the user’s default download location, or to prompt the user to choose a different location.
- conflictAction: A string that control what happens when a file with this name already exists. This option works only in browser API mode. Possible values are
uniquify,overwriteandprompt. Please check this link for more details. - onload: A function to call when the download has completed successfully.
- onerror: A function to call if the download fails or is cancelled.
- onprogress A callback to be executed if this download made some progress.
- ontimeout A callback to be executed if this download failed due to a timeout.
The download argument of the onerror callback can have the following attributes:
- error: error reason
- not_enabled — the download feature isn’t enabled by the user
- not_whitelisted — the requested file extension is not whitelisted
- not_permitted — the user enabled the download feature, but did not give the downloads permission
- not_supported — the download feature isn’t supported by the browser/version
- not_succeeded — the download wasn’t started or failed, the details attribute may provide more information
- details: detail about that error
Returns an object with the following property:
- abort: A function which can be called to cancel this download.
Depending on the download mode GM_info provides a property called downloadMode which is set to one of the following values: native, disabled or browser.
GM_download("http://example.com/file.txt", "file.txt");

const download = GM_download({
    url: "http://example.com/file.txt",
    name: "file.txt",
    saveAs: true
});

// cancel download after 5 seconds
window.setTimeout(() => download.abort(), 5000);
Note: The browser might modify the desired filename. Especially a file extension might be added if the browser finds this to be safe to download at the current OS.
GM_getResourceText(name)
Allows userscripts to access the text of a resource (such as a JavaScript or CSS file) that has been included in a userscript via @resource.
The function takes a single parameter, which is the «name» of the resource to retrieve. It returns the text of the resource as a string.
Here is an example of how the function might be used:
const scriptText = GM_getResourceText("myscript.js");
const script = document.createElement("script");
script.textContent = scriptText;
document.body.appendChild(script);
GM_getResourceURL(name)
GM_getResourceURL allows userscripts to access the URL of a resource (such as a CSS or image file) that has been included in the userscript via a @resource tag at the script header.
The function takes a single parameter, which is the «name» of the resource to retrieve. It returns the URL of the resource as a string.
const imageUrl = GM_getResourceURL("myimage.png");
const image = document.createElement("img");
image.src = imageUrl;
document.body.appendChild(image);
GM_info
Get some info about the script and TM. The object might look like this:
type ScriptGetInfo = {
    downloadMode: string,
    isFirstPartyIsolation?: boolean,
    isIncognito: boolean,
    sandboxMode: SandboxMode,
    scriptHandler: string,
    scriptMetaStr: string | null,
    scriptUpdateURL: string | null,
    scriptWillUpdate: boolean,
    version?: string,
    script: {
        antifeatures: { [antifeature: string]: { [locale: string]: string } },
        author: string | null,
        blockers: string[],
        connects: string[],
        copyright: string | null,
        deleted?: number | undefined,
        description_i18n: { [locale: string]: string } | null,
        description: string,
        downloadURL: string | null,
        excludes: string[],
        fileURL: string | null,
        grant: string[],
        header: string | null,
        homepage: string | null,
        icon: string | null,
        icon64: string | null,
        includes: string[],
        lastModified: number,
        matches: string[],
        name_i18n: { [locale: string]: string } | null,
        name: string,
        namespace: string | null,
        position: number,
        resources: Resource[],
        supportURL: string | null,
        system?: boolean | undefined,
        'run-at': string | null,
        unwrap: boolean | null,
        updateURL: string | null,
        version: string,
        webRequest: WebRequestRule[] | null,
        options: {
            check_for_updates: boolean,
            comment: string | null,
            compatopts_for_requires: boolean,
            compat_wrappedjsobject: boolean,
            compat_metadata: boolean,
            compat_foreach: boolean,
            compat_powerful_this: boolean | null,
            sandbox: string | null,
            noframes: boolean | null,
            unwrap: boolean | null,
            run_at: string | null,
            tab_types: string | null,
            override: {
                use_includes: string[],
                orig_includes: string[],
                merge_includes: boolean,
                use_matches: string[],
                orig_matches: string[],
                merge_matches: boolean,
                use_excludes: string[],
                orig_excludes: string[],
                merge_excludes: boolean,
                use_connects: string[],
                orig_connects: string[],
                merge_connects: boolean,
                use_blockers: string[],
                orig_run_at: string | null,
                orig_noframes: boolean | null
            }
        }
    }
};

type SandboxMode = 'js' | 'raw' | 'dom';

type Resource = {
    name: string,
    url: string,
    error?: string,
    content?: string,
    meta?: string
};

type WebRequestRule = {
    selector: { include?: string | string[], match?: string | string[], exclude?: string | string[] } | string,
    action: string | {
        cancel?: boolean,
        redirect?: {
            url: string,
            from?: string,
            to?: string
        } | string
    }
};
GM_log(message)
Log a message to the console.
GM_notification(details, ondone), GM_notification(text, title, image, onclick)
GM_notification allows users to display notifications on the screen, using a provided message and other optional parameters.
The function takes several parameters. Either a details object or multiple parameters.
The details object can have the following attributes, from which some can also be used as direct parameter.
The available options include:
- text: A string containing the message to display in the notification.
- title: The title of the notification.
- image: The URL of an image to display in the notification.
- highlight: A boolean flag whether to highlight the tab that sends the notfication (required unless text is set)
- silent: A boolean flag whether to not play a sound
- timeout: The time, in milliseconds, after which the notification should automatically close.
- onclick: A callback function that will be called when the user clicks on the notification.
- ondone A callback function that will be called when the notification is closed (no matter if this was triggered by a timeout or a click) or the tab was highlighted
The function does not return a value.
Here is an example of how the function might be used:
GM_notification({
  text: "This is the notification message.",
  title: "Notification Title",
  onclick: () => alert('I was clicked!')
});
GM_openInTab(url, options), GM_openInTab(url, loadInBackground)
GM_openInTab allows userscripts to open a new tab in the browser and navigate to a specified URL.
The function takes two parameters:
A string names «url» containing the URL of the page to open in the new tab.
An optional options object that can be used to customize the behavior of the new tab. The available options include:
- active: A boolean value indicating whether the new tab should be active (selected) or not. The default is false.
- insert: An integer indicating the position at which the new tab should be inserted in the tab strip. The default is false, which means the new tab will be added to the end of the tab strip.
- setParent: A boolean value indicating whether the new tab should be considered a child of the current tab. The default is false.
- incognito A boolean value that makes the tab being opened inside a incognito mode/private mode window.
- loadInBackground A boolean value has the opposite meaning of active and was added to achieve Greasemonkey 3.x compatibility.
The function returns an object with the function close, the listener onclose and a flag called closed.
Here is an example of how the function might be used:
// Open a new tab and navigate to the specified URL
GM_openInTab("https://www.example.com/");
GM_registerMenuCommand(name, callback, accessKey)
GM_registerMenuCommand allows userscripts to add a new entry to the userscript’s menu in the browser, and specify a function to be called when the menu item is selected.
The function takes three parameters:
- name: A string containing the text to display for the menu item.
- callback: A function to be called when the menu item is selected. The function will be passed a single parameter, which is the currently active tab. As of Tampermonkey 4.14 a MouseEvent or KeyboardEvent is passed as function argument.
- accessKey: An optional access key for the menu item. This can be used to create a shortcut for the menu item. For example, if the access key is «s», the user can select the menu item by pressing «s» when Tampermonkey’s popup-menu is open.
The function return a menu entry ID that can be used to unregister the command.
Here is an example of how the function might be used:
const menu_command_id = GM_registerMenuCommand("Show Alert", function(event: MouseEvent | KeyboardEvent) {
  alert("Menu item selected");
}, "a");
GM_unregisterMenuCommand(menuCmdId)
GM_unregisterMenuCommand removes an existing entry from the userscript’s menu in the browser.
The function takes a single parameter, which is the ID of the menu item to remove. It does not return a value.
Here is an example of how the function might be used:
const menu_command_id = GM_registerMenuCommand(...);
GM_unregisterMenuCommand(menu_command_id);
GM_setClipboard(data, info)
GM_setClipboard sets the text of the clipboard to a specified value.
The function takes a parameter «data», which is the string to set as the clipboard text and a parameter «info».
«info» can be just a string expressing the type text or html or an object like
{
    type: 'text',
    mimetype: 'text/plain'
}
GM_setClipboard("This is the clipboard text.", "text");
GM_getTab(callback)
The GM_getTab function takes a single parameter, a callback function that will be called with an object that is persistent as long as this tab is open.
GM_getTab((tab) => console.log(tab));
GM_saveTab(tab)
The GM_saveTab function allows a userscript to save information about a tab for later use.
The function takes a «tab» parameter, which is an object containing the information to be saved about the tab.
The GM_saveTab function saves the provided tab information, so that it can be retrieved later using the GM_getValue function.
Here is an example of how the GM_saveTab function might be used in a userscript:
GM_getTab(function(tab) {
    tab.newInfo = "new!";
    GM_saveTab(tab);
});
In this example, the GM_saveTab function is called with the tab object returned by the GM_getTab function, and a new key called «newInfo».
GM_getTabs(callback)
The GM_getTabs function takes a single parameter: a callback function that will be called with the information about the tabs.
The «tabs» object that is passed to the callback function contains objects, with each object representing the saved tab information stored by GM_saveTab.
GM_getTabs((tabs) => {
    for (const [tabId, tab] of Object.entries(tabs)) {
        console.log(`tab ${tabId}`, tab);
    }
});
GM_setValue(key, value)
The GM_setValue allows a userscript to set the value of a specific key in the userscript’s storage.
The GM_setValue function takes two parameters:
- A string specifying the key for which the value should be set.
- The value to be set for the key. This value can be of any type (string, number, object, etc.).
The GM_setValue function does not return any value. Instead, it sets the provided value for the specified key in the userscript’s storage.
Here is an example of how GM_setValue and its async pendant GM.setValue might be used in a userscript:
GM_setValue("someKey", "someData");
await GM.setValue("otherKey", "otherData");
GM_getValue(key, defaultValue)
The GM_getValue function allows a userscript to retrieve the value of a specific key in the extension’s storage.
It takes two parameters:
- A string specifying the key for which the value should be retrieved.
- A default value to be returned if the key does not exist in the extension’s storage. This default value can be of any type (string, number, object, etc.).
The GM_getValue function returns the value of the specified key from the extension’s storage, or the default value if the key does not exist.
Here is an example of how the GM_getValue function might be used in a userscript:
const someKey = GM_getValue("someKey", null);
const otherKey = await GM.getValue("otherKey", null);
In this example, the GM_getValue function is called with the key «someKey» and a default value of null.
If the «someKey» key exists in the extension’s storage, its value will be returned and stored in the someKey variable.
If the key does not exist, the default value of null will be returned and stored in the savedTab variable.
GM_deleteValue(key)
Deletes «key» from the userscript’s storage.
GM_deleteValue("someKey");
await GM.deleteValue("otherKey");
GM_listValues()
The GM_listValues function returns a list of keys of all stored data.
const keys = GM_listValues();
const asyncKeys = await GM.listValues();
GM_addValueChangeListener(key, (key, old_value, new_value, remote) => void)
The GM_addValueChangeListener function allows a userscript to add a listener for changes to the value of a specific key in the userscript’s storage.
The function takes two parameters:
- A string specifying the key for which changes should be monitored.
- A callback function that will be called when the value of the key changes. The callback function should have the following signature:
  function(key, oldValue, newValue, remote) {
      // key is the key whose value has changed
      // oldValue is the previous value of the key
      // newValue is the new value of the key
      // remote is a boolean indicating whether the change originated from a different userscript instance
  }
The GM_addValueChangeListener function returns a «listenerId» value that can be used to remove the listener later using the GM_removeValueChangeListener function.
The very same applies to GM.addValueChangeListener and GM.removeValueChangeListener with the only difference that both return a promise;
Here is an example of how the GM_addValueChangeListener function might be used in a userscript:
// Add a listener for changes to the "savedTab" key
var listenerId = GM_addValueChangeListener("savedTab", function(key, oldValue, newValue, remote) {
  // Print a message to the console when the value of the "savedTab" key changes
  console.log("The value of the '" + key + "' key has changed from '" + oldValue + "' to '" + newValue + "'");
});
GM_addValueChangeListener can be used by userscripts to communicate with other userscript instances at other tabs.
GM_removeValueChangeListener(listenerId)
GM_removeValueChangeListener and GM.removeValueChangeListener both get one argument called «listenerId» and remove the change listener with this ID.
GM_xmlhttpRequest(details)
The GM_xmlhttpRequest allows a userscripts to send an HTTP request and handle the response.
The function takes a single parameter: an object containing the details of the request to be sent and the callback functions to be called when the response is received.
The object can have the following properties:
- method one of GET, HEAD, POST
- url the destination URL
- headers ie. user-agent, referer, …
(some special headers are not supported by Safari and Android browsers) - data some string to send via a POST request
- cookie a cookie to be patched into the sent cookie set
- binary send the data string in binary mode
- nocache don’t cache the resource
- revalidate revalidate maybe cached content
- timeout a timeout in ms
- context a property which will be added to the response object
- responseType one of arraybuffer, blob, json or stream
- overrideMimeType a MIME type for the request
- anonymous don’t send cookies with the requests
(please see the fetch notes) - fetch (beta) use a fetch instead of a xhr request
(at Chrome this causes details.timeout and xhr.onprogress to not work and makes xhr.onreadystatechange receive only readyState 4 events) - user a user name for authentication
- password a password
- onabort callback to be executed if the request was aborted
- onerror callback to be executed if the request ended up with an error
- onloadstart callback to be executed on load start, provides access to the stream object if responseType is set to «stream»
- onprogress callback to be executed if the request made some progress
- onreadystatechange callback to be executed if the request’s ready state changed
- ontimeout callback to be executed if the request failed due to a timeout
- onload callback to be executed if the request was loaded.
  function(response) {
    // response is an object containing the details of the response
  }
response has the following attributes:
- finalUrl — the final URL after all redirects from where the data was loaded
- readyState — the ready state
- status — the request status
- statusText — the request status text
- responseHeaders — the request response headers
- response — the response data as object if details.responseType was set
- responseXML — the response data as XML document
- responseText — the response data as plain string
GM_xmlhttpRequest returns an object with the following property:
- abort — function to be called to cancel this request
Here is an example of how the GM_xmlhttpRequest function might be used in a userscript:
GM_xmlhttpRequest({
  method: "GET",
  url: "https://example.com/",
  headers: {
    "Content-Type": "application/json"
  },
  onload: function(response) {
    console.log(response.responseText);
  }
});
Note: the synchronous flag at details is not supported
Important: if you want to use this method then please also check the documentation about @connect.
GM_webRequest(rules, listener)
Note: this API is experimental and might change at any time. It might also disappear or change during manifest v3 migration.
GM_webRequest (re-)registers rules for web request manipulations and the listener of triggered rules.
If you need to just register rules it’s better to use @webRequest header.
Note, webRequest proceeds only requests with types sub_frame, script, xhr and websocket.
Parameters:
- rules — object[], array of rules with following properties:
- selector — string|object, for which URLs the rule should be triggered, string value is shortening for
{ include: [selector] }, object properties:- include — string|string[], URLs, patterns, and regexpes for rule triggering;
- match — string|string[], URLs and patterns for rule trigering;
- exclude — string|string[], URLs, patterns, and regexpes for not triggering the rule;
- action — string|object, what to do with the request, string value
"cancel"is shortening for{ cancel: true }, object properties:- cancel — boolean, whether to cancel the request;
- redirect — string|object, redirect to some URL which must be included in any @match or @include header. When a string, redirects to the static URL. If object:
- from — string, a regexp to extract some parts of the URL, e.g.
"([^:]+)://match.me/(.*)"; - to — string, pattern for substitution, e.g.
"$1://redirected.to/$2";
- from — string, a regexp to extract some parts of the URL, e.g.
- selector — string|object, for which URLs the rule should be triggered, string value is shortening for
- listener — function, is called when the rule is triggered, cannot impact on the rule action, arguments:
- info — string, type of action:
"cancel","redirect"; - message — string,
"ok"or"error"; - details — object, info about the request and rule:
- rule — object, the triggered rule;
- url — string, URL of the request;
- redirect_url — string, where the request was redirected;
- description — string, error description.
- info — string, type of action:
Example
GM_webRequest([
    { selector: '*cancel.me/*', action: 'cancel' },
    { selector: { include: '*', exclude: 'http://exclude.me/*' }, action: { redirect: 'http://new_static.url' } },
    { selector: { match: '*://match.me/*' }, action: { redirect: { from: '([^:]+)://match.me/(.*)',  to: '$1://redirected.to/$2' } } }
], function(info, message, details) {
    console.log(info, message, details);
});
GM_cookie.list(details[, callback])
Note: the GM_cookie API is experimental and might return a not supported error at some Tampermonkey versions.
Tampermonkey checks if the script has @include or @match access to given details.url arguments!
Parameters:
- details object, containing properties of the cookies to retrieve
- url string?, representing the URL to retrieve cookies from (defaults to current document URL)
- domain string?, representing the domain of the cookies to retrieve
- name string?, representing the name of the cookies to retrieve
- path string?, representing the path of the cookies to retrieve
- callback function?, to be called when the cookies have been retrieved. The function will be passed two arguments:
- cookies object[], representing the retrieved cookies
- error string, representing an error message if an error occurred, null otherwise.
The cookie objects have the following properties:
- domain string, representing the domain of the cookie
- firstPartyDomain string?: the first party domain of the cookie.
- hostOnly boolean, indicating whether the cookie is a host-only cookie
- httpOnly boolean, indicating whether the cookie is an HTTP-only cookie
- name string, representing the name of the cookie
- path string, representing the path of the cookie
- sameSite string, indicating the SameSite attribute of the cookie
- secure boolean, indicating whether the cookie requires a secure connection
- session boolean, indicating whether the cookie is a session cookie
- value string, representing the value of the cookie
Example usage:
// Retrieve all cookies with name "mycookie"
GM_cookie.list({ name: "mycookie" }, function(cookies, error) {
  if (!error) {
    console.log(cookies);
  } else {
    console.error(error);
  }
});

// Retrieve all cookies for the current domain
const cookies = await GM.cookies.list()
console.log(cookies);
GM_cookie.set(details[, callback])
Sets a cookie with the given details. Supported properties are defined here.
Parameters:
- details: An object containing the details of the cookie to be set. The object can have the following properties:
- url string?, the URL to associate the cookie with. If not specified, the cookie is associated with the current document’s URL.
- name string, the name of the cookie.
- value string, the value of the cookie.
- domain string?, the domain of the cookie.
- firstPartyDomain string?: the first party domain of the cookie.
- path string?, the path of the cookie.
- secure boolean?, whether the cookie should only be sent over HTTPS.
- httpOnly boolean?, whether the cookie should be marked as HttpOnly.
- expirationDate number?, the expiration date of the cookie in seconds since the Unix epoch. If not specified, the cookie never expires.
- callback function?, a function to be called when the operation is complete. The function is passed one argument:
- error string?, if there was an error setting the cookie, this contains an error message. Otherwise, it is
undefined.
- error string?, if there was an error setting the cookie, this contains an error message. Otherwise, it is
Example:
GM_cookie.set({
  url: 'https://example.com',
  name: 'name',
  value: 'value',
  domain: '.example.com',
  path: '/',
  secure: true,
  httpOnly: true,
  expirationDate: Math.floor(Date.now() / 1000) + (60 * 60 * 24 * 30) // Expires in 30 days
}, function(error) {
  if (error) {
    console.error(error);
  } else {
    console.log('Cookie set successfully.');
  }
});

GM.cookie.set({
  name: 'name',
  value: 'value'
})
.then(() => {
  console.log('Cookie set successfully.');
})
.catch((error) => {
  console.error(error);
});
GM_cookie.delete(details, callback)
Deletes a cookie.
Parameters:
The details object must contain at least one of the following properties:
- url string?, the URL associated with the cookie. If
urlis not specified, the current document’s URL will be used. - name string?, the name of the cookie to delete.
- firstPartyDomain string?: the first party domain of the cookie to delete.
The callback function is optional and will be called when the cookie has been deleted or an error has occurred. It takes one argument:
- error string?, an error message, or
undefinedif the cookie was deleted successfully.
Example:
GM_cookie.delete({ name: 'cookie_name' }, function(error) {
    if (error) {
        console.error(error);
    } else {
        console.log('Cookie deleted successfully');
    }
});
window.onurlchange
If a script runs on a single-page application, then it can use window.onurlchange to listen for URL changes:
// ==UserScript==
...
// @grant window.onurlchange
// ==/UserScript==

if (window.onurlchange === null) {
    // feature is supported
    window.addEventListener('urlchange', (info) => ...);
}
window.close
Usually JavaScript is not allowed to close tabs via window.close.
Userscripts, however, can do this if the permission is requested via @grant.
Note: for security reasons it is not allowed to close the last tab of a window.
// ==UserScript==
...
// @grant window.close
// ==/UserScript==

if (condition) {
    window.close();
}
window.focus
window.focus brings the window to the front, while unsafeWindow.focus may fail due to user settings.
// ==UserScript==
...
// @grant window.focus
// ==/UserScript==

if (condition) {
    window.focus();
}
<><![CDATA[…]]></>
CDATA-based way of storing meta data is supported via compatibility option.
Tampermonkey tries to automatically detect whether a script needs this option to be enabled.
var inline_src = (<><![CDATA[
    console.log('Hello World!');
]]></>).toString();

eval(inline_src);
Предисловие
Плагин Tampermonkey я обнаружил недавно и, боже, как же он хорош. А хорош он тем, что позволяет любой сайт подстроить под себя.
Tampermonkey — это плагин, позволящий писать пользовательские JS скрипты для вебсайтов.
С помощью него вы сможете:
- Изменять содержимое сайта.
- Посылать запросы на другие сайты.
- Скачивать файлы.
А также, все то что возможно в Javascript, доступно и здесь. Хорошо, приступим к первому скрипту.
Пишем Hello World.
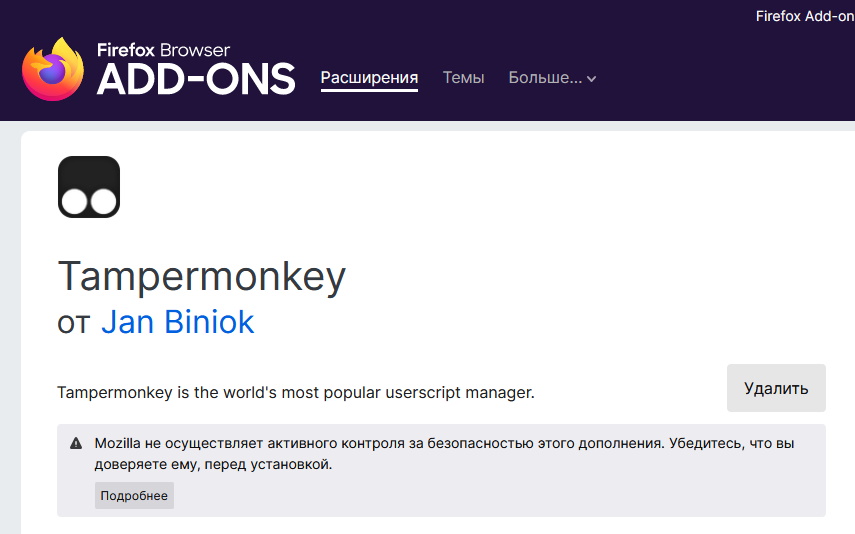
Сперва установите Tampermonkey.
- Скачать для Firefox
- Скачать для Google Chrome
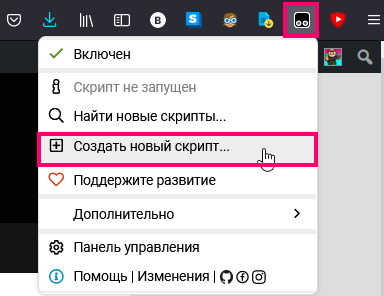
Зайдите на сайт, к которому хотите прицепить скрипт. И нажмите «Создать новый скрипт»
У вас отроется редактор кода, с созданной основой скрипта.
Вставьте функцию
alert("Hello World");После этого комментария
// Your code here...И нажмите Ctrl+S, чтобы сохранить скрипт.
Теперь, перезагрузите страницу, к которой привязан скрипт.
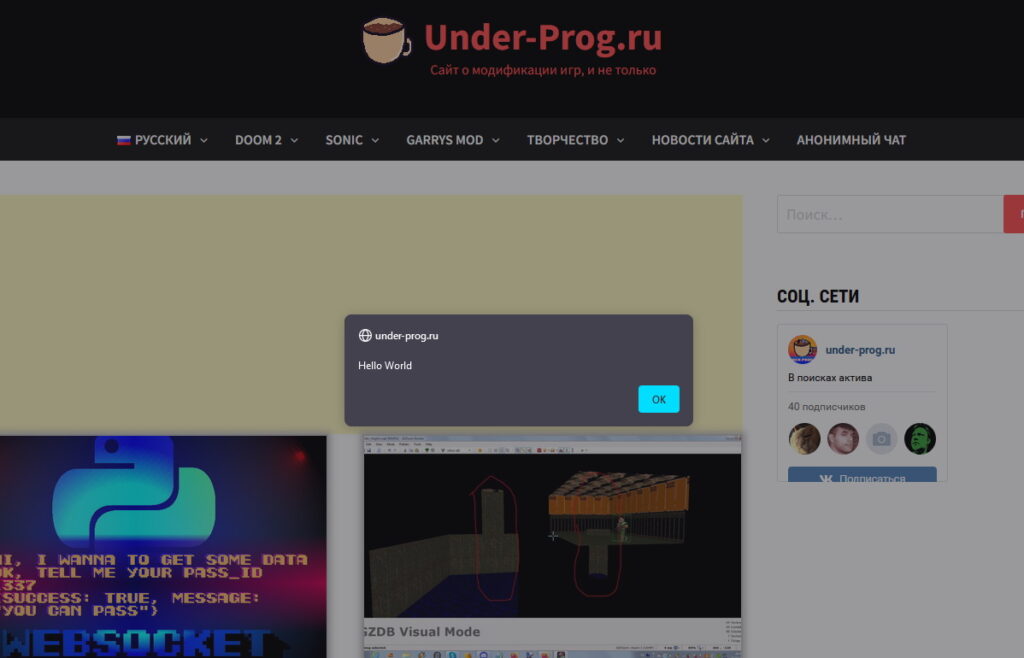
Скрипт работает. Теперь разберем код.
Разбор простейшего скрипта
// ==UserScript==
// @name         New Userscript
// @namespace    http://tampermonkey.net/
// @version      0.1
// @description  try to take over the world!
// @author       You
// @match        https://under-prog.ru/
// @icon         https://www.google.com/s2/favicons?domain=under-prog.ru
// @grant        none
// ==/UserScript==

(function() {
    'use strict';

    // Your code here...
    alert("Hello World");
})();
Комментарии находящийся в этом промежутке, называются заголовками пользовательского скрипта (Userscript header)
// ==UserScript==
   ...
// ==/UserScript==
Они содержат информацию о скрипте, а также, о специальных разрешениях. Имеют следующий вид.
// @name         имя_скрипта
// @namespace    пространство_имен_скрипта
// @version      вверсия
// @description  описание
// @author       имя_автора
// @match        url_сайта_на_котором_будет_воспроизводится_скрипт
// @icon         ссылка_на_иконку_скрипта
// @grant        дополнительные_разрешения
Также, стоит отметить, что иконку можно будет достать из base64 кода, например вот так.
// @icon data:image/gif;base64,R0lGODlhAQABAAAAACH5BAEKAAEALAAAAAABAAEAAAICTAEAOw==Данный способ хорош тем, что не нужно заливать изображение на хостинг.
Если вы хотите, применять скрипт для всех страниц данного сайта, а не только к одной. То, просто поставьте * в конце ссылки, в поле match.
// @match https://under-prog.ru/*Подробнее про userscript header, вы можете почитать в документации.
Далее идет функция.
(function() {
    'use strict';

    // Your code here...
    alert("Hello World");
})();
Фунуции подобного типа
(function() { ... })();Вызываются в момент, загрузки скрипта на сайт.
'use strict';Включаем строгий режим.
alert("Hello World");При помощи функции alert, выводим сообщение на экран.
С основой разобрались, перейдем к чему-нибудь, более интересному.
Способы получения элементов в JS.
В JS есть 2 основных способа получения элемента:
- Классический — через document.querySelector()
- Библиотека JQuery — существовала до появления document.querySelector() в JS, за что заслужила популярность. Имеет более короткий синтаксис.
В данном гайде, я буду использовать классический метод.
Еще, для получения элемента используются 2 функции:
- querySelector — принимает css-селектор в качестве аргумента. Возвращает, первый попавшийся элемент.
- querySelectorAll — то же самое что и querySelector, но возвращает все найденные элементы в виде массива.
Css-селекторы я разбирал первом уроке этого курса.
Меняем содержимое сайта.
Получив элемент, с помощью querySelector, можно производить всевозможные манипуляции. Такие как:
- Добавление elem2 в внутри element, в конце — element.append(elem2) или element.appendChild(elem2)
- Добавление elem2 в внутри element, в началае — element.prepend(elem2)
- Вставка elem2 перед element — element.before(elem2)
- Вставка elem2 после element — element.after(elem2)
Также, можно создать новый элемент с помощью document.createElement(). Вот пример создания div‘а.
document.createElement('div');Остальные типы элементов создаются по аналогии.
Что-бы получить доступ к html-коду элемента, используйте element.innerHTML.
let html_text = element.innerHTML //Получили код элемента
element.innerHTML = "<div>Новый код элемента</div>" //Изменили код элемента
Краткий курс по добавлению элементов закончен, двигаемся дальше.
Отправляем запрос на сайт.
Предположим, вы находитесь на торговой площадке, и вам бы хотелось, получить информацию с других торговых площадок, что-бы сравнить цены, и найти самую выгодную. И что-бы эта информация была втроенна в страницу.
Встраивание будете делать через appendChild. А вот информацию с сайта, будете получать путем отправки запроса на сайт.
Ниже, я привел пример подобного запроса.
let req = new XMLHttpRequest(); //Создаем обьект запроса
req.open('GET', link, true); //Настраиваем запрос
req.send(); //Отправляем запрос на сайт
req.onreadystatechange = function() { //Ответ получен
  if(req.readyState == 4 && req.status == 200) { //Если статус ответа, удовлетворительный
    let tmp = document.createElement('div'); //То создаем div элемент
    tmp.innerHTML = req.responseText; //Запоняем его внутренности полученными данными (html код сайта)
    //И дальше, парсим что нужно.
    let cur_price = tmp.querySelector("div.current_price");
    console.log(cur_price);
  }
}
Все обьяснение в комментариях.
req.open имеет следующий синтаксис:
req.open('тип запроса', ссылка, ассинхронность);- Тип запроса — может быть GET или POST (в редких случаях DELETE, PUT, ).
- Ссылка — задает ссылку на сайт.
- Ассинхронность — если false, то запрос делается синхронно (последовательно), в противном — ассинхронно (парралельно).
Теперь вы знаете как посылать запросы. Двигаемся дальше.
Скачиваем файлы по ссылке.
Сперва, получим доступ к функции GM_download:
// @grant GM_downloadИ используем её внутри функции.
GM_download({
         url:fileLink,
         name:fileName,
         saveAs:false
       });
Разберем аргументы этой функции.
- url — ссылка на файл
- name — имя файла, с расширением
- saveAs — задает, нужно ли открывать окно, при скачивании файла.
Таким образом и скачиваются файлы.
Я прочитал статью, что дальше?
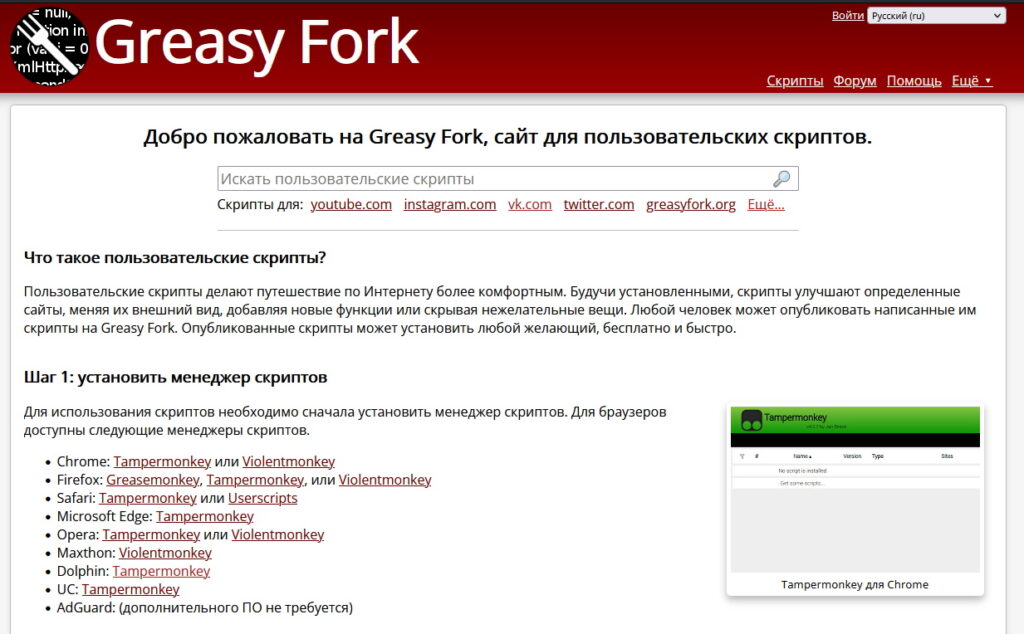
Дальше идите на сайт greasyfork.org. На данном сайте, обычные люди делятся своими скриптами, которые вы можете установить и, при желании, изучить.
Итоговый результат.
Свой скрипт для чужого сайта
Даже для многих опытных пользователей интернета сайт представляется чем-то статичным, неизменяемым. Здесь имеется в виду чужой сайт – на который вы заходите с помощью своего браузера. Вы действительно не можете напрямую, к примеру, влиять на внешний вид ресурса, но вот опосредованные варианты присутствуют. Рассмотрим способы решения задачи.
Вот, к примеру, вам не нравится, что в блоке «Мои услуги» на моем блоге читающего программиста цвет заголовка не зеленый. Как можно его изменить?
Самый простой способ – это посмотреть исходный код страницы, скопировать его к себе на диск, изменить код (добавить style=»color: green;” к элементу zaglav) и затем открыть файл в браузере. Или можно в контекстном меню правой клавиши мыши выбрать пункт «Посмотреть код» (или «Посмотреть код элемента» – в зависимости от браузера) и задать стиль выбранного элемента: color: green;.
Эти способы очень просты, но по большому счету проблему они не решают: как только вы в следующий раз зайдете на мой блог upread.ru, цвет заголовка «Мои услуги» будет все также серо-фиолетовым, а не зеленым. Раз и навсегда заставить менять его цвет, а также самостоятельно менять внешний вид чужих сайтов можно с помощью другого способа. Итак, план действий:
- Ставим в свой браузер расширение под названием Tampermonkey.
- Добавляем новый скрипт:
- Заменяем код в нем на свой
// ==UserScript== // @name upread // @namespace http://tampermonkey.net/ // @version 1.0 // @description // @author upread.ru // @match http://upread.ru/* // @grant none // ==/UserScript== 'use strict'; document.getElementById('myservices').style.color="green"; - Сохраняем и запускаем его.
Теперь, когда мы перейдем на любую страницу сайта upread.ru, заголовок «Мои услуги» будет окрашиваться в зеленый цвет. Этим занимается строка номер 12 — как можно заметить, это обычная строка с синтаксисом javascript. Именно ниже её (или вместо) уже надо писать свой код — то, чтобы исполнялось в вашем браузере на чужом сайте. Сайт, на котором будет работать скрипт задается в строке номер 7.
Возможности пользовательских скриптов от Tampermonkey на самом деле не ограничиваются изменениями внешнего вида сайта. С помощью них, в частности, можно создавать «роботов», делающих на сайтах онлайн игр рутинную работу, создавать онлайн переводчики и многое другое. Напоследок стоит отметить тот факт, что чужой сайт мы своим скриптом все же не меняем — все изменения происходят только в браузере с уже загруженным сайтом.

Автор этого материала — я — Пахолков Юрий. Я оказываю услуги по написанию программ на языках Java, C++, C# (а также консультирую по ним) и созданию сайтов. Работаю с сайтами на CMS OpenCart, WordPress, ModX и самописными. Кроме этого, работаю напрямую с JavaScript, PHP, CSS, HTML — то есть могу доработать ваш сайт или помочь с веб-программированием. Пишите сюда.
![]() заметки, javascript, tampermonkey, скрипты, браузер
заметки, javascript, tampermonkey, скрипты, браузер
We use a popular brand of network camera as a baby monitor at home. The camera’s been great, but I have one minor quibble with its web interface. It doesn’t work very well in small window sizes.
If I place the window in the corner of my screen while I do something else, for example, the video frame becomes obnoxiously small:
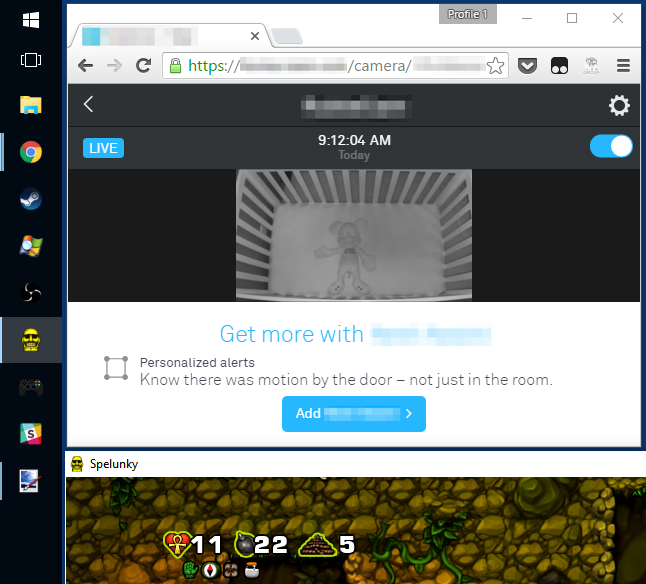
The camera’s image occupies just a small fraction the page area! If only there were a way I could change this.
Helper Monkeys
Enter the userscript. First popularized with the [Greasemonkey](http://www.greasespot.net/) add-on for Firefox, userscripts alter websites on the fly as you visit them. Today I’m running them with [Tampermonkey](https://tampermonkey.net/) for Chrome. Public repositories offer customization scripts for all sorts of websites, but it’s also pretty easy to write your own.
To get started, install Tampermonkey. Tap its toolbar icon, and select `Add a new script`. An editor opens with a default script. There’s a bunch of [metadata](https://tampermonkey.net/documentation.php) at the top; fill out the `@match` field to control where the script will run. (The pattern is specified according to Chrome’s [Match Patterns](https://developer.chrome.com/extensions/match_patterns)).
Here’s a minimum working example:
// ==UserScript==
// @name         New Userscript
// @namespace    http://tampermonkey.net/
// @version      0.1
// @description  try to take over the world!
// @author       You
// @match        https://atomicobject.com/*
// @grant        none
// ==/UserScript==

(function() {
    'use strict';
    console.log("hello, world!");
})();
The Script
Now that we can easily execute our own code on this page, what should we do?
Initially, I’m interested in removing the big white box at the bottom of the window. I’d like my script to detect whenever the element appears and remove it. I’d like this to work even as I click around different screens within the app, so it’s not enough to do it just once.
I started with a polling approach, but I later settled on a [MutationObserver](https://hacks.mozilla.org/2012/05/dom-mutationobserver-reacting-to-dom-changes-without-killing-browser-performance/), which reacts faster and is much more efficient:
var observer = new MutationObserver(function(mutations) {
    if($('.player-footer').length > 0){
        console.log("removing footer..");
        $('.player-footer').detach();
    }
});
observer.observe(document.querySelector('#home-container'), {
    subtree: true,
    childList: true,
    attributes: false,
    characterData: false,
    attributeOldValue: false,
    characterDataOldValue: false
});
It works! The big white box is gone, and the page has become much more usable in a small window.
But wait, there’s more! While I was rummaging around under the hood, I noticed that the video is a flash object, of the form:
<object name="flash-player" type="application/x-shockwave-flash" data="/flash/video.swf">
  <param name="flashvars" value="uuid=123&sessionToken=456&cameraScale=1&cameraCenterX=0.5&...">
</object>
Hmm. That `flashvars` value looks a lot like a [query string](https://en.wikipedia.org/wiki/Query_string). I wonder if I could visit the `.swf` file directly, supplying the `flashvars` via the URL? Yep–it worked! Now I have access to the video frame without a website wrapped around it.
This enables a fun new challenge: creating a “pop-out” link. I added some code in the mutation observer callback to extract the URL and flashvars, and then inserted a link positioned at the top of the page next to the settings gear:
var fp = $('.cards object');
if (fp.length === 1 && $('.my-swf-link').length === 0) {
    console.log('adding button..');
    var link_to_swf = fp.attr('data') + '?' + fp.children("[name='flashvars']").attr('value');
    var myButton = $('⬈');
    myButton.css({
        "position": "absolute",
        "right": "5rem",
        "color": "white",
        "top": "1.5rem",
        "font-size": "1.9rem",
        "outline": "0"
    });
    myButton.insertAfter("h1.card-title");
}
New and Improved
Here’s how it looks with my enhancements:
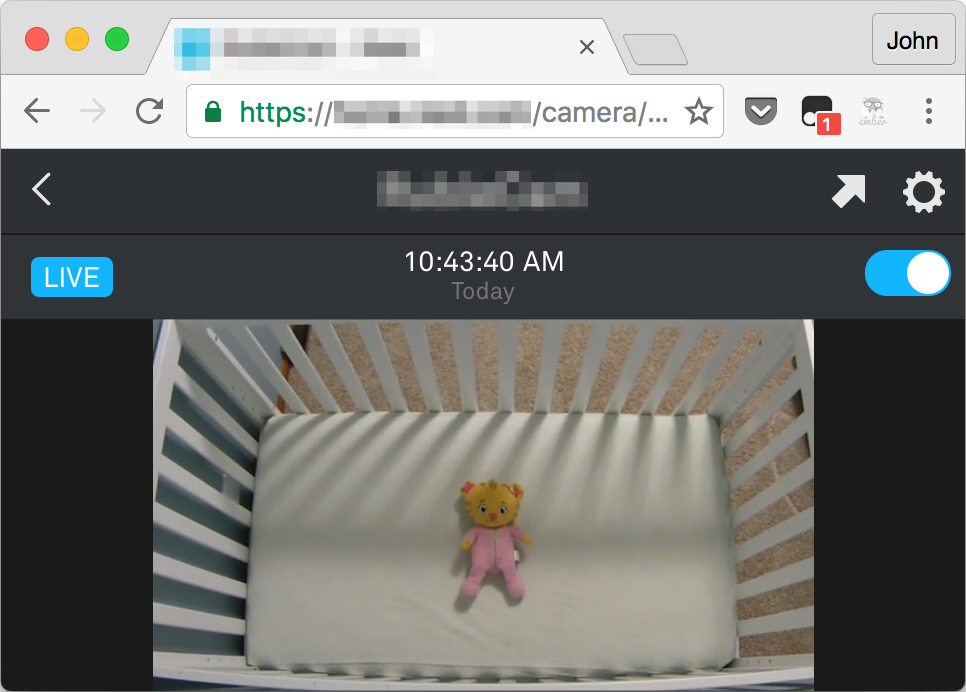
Use the same camera? [Here’s](https://gist.github.com/jrr/b6503e39888f3be4e3c670ac0122c673) the current version of my script.
Conclusion
One of my favorite things about the web is how open and accessible software can be. See a cool effect, and wonder how they did it? The implementation is right there for your inspection!
Another side to this openness is that it enables users to exert more control over software running on their own computer, even if the software wasn’t created with this [freedom](https://www.gnu.org/philosophy/free-sw.en.html) in mind. It’d be very difficult to make changes like these as a user of phone or desktop software!
Like [Tron](http://tron.wikia.com/wiki/Tron), userscripts fight for the users. Do you use any regularly? What for? If not, I’d encourage you install Tampermonkey or Greasemonkey to try writing a few to tackle frustrations with websites you use regularly.
TamperMonkey script writing
- Foreword
- First, what is Tampermonkey?
- Second, features
-
- Convenient scripting management
- 2. Script Overview
- 3. Set diversity
- 4. Script automatic update
- 5. Safety
- 6. Compatibility
- 7.chrome synchronization
- 8.codemirror editor
- 9.jShint syntax check
- 10. Rapid development
- Third, download
-
- 1.Tampermonkey Stable
- 2.Tampermonkey Beta
- Fourth, grammar
- V. User script
-
- Userscript.Zone Search
- GitHub/Gist
- GreasyFork
- OpenUserJS
Foreword
More and more people use scripts, and one of the most popular Chrome script plugins is TamperMonkey (black monkey). This article introduces the syntax of Tampermonkey on the basis of the reader’s JavaScript. If you don’t js, please go to learn.
The following is the textual content of this article, the following case is available for reference
First, what is Tampermonkey?
TamperMonkey is a free browser extension and the most popular User Script Manager, which is available for Chrome, Microsoft Edge, Safari, Opera next, and Firefox.
Although some supported browsers have native user script support, Tampermonkey will provide more convenience in your user scripting management. It provides many functions such as footprints such as convenient script installation, automatic update check, and built-in editor, etc., while TamperMonkey may have a script that is not compatible with normal operation.
Second, features
Convenient scripting management
TamperMonkey makes it easy to manage your user script. The TAMPERMONKEY icon in the top right displays the number of scripts running, click the icon to see the script running and the script that may run on this web page.
2. Script Overview
TamperMonkey overview clearly displays all installed scripts. You can see their last update time, if they have their own homepage, you can also classify them and more other features …
Tips: You can also manage the scripts that are installed as a chromium plugin here.
3. Set diversity
You can choose from three different levels for the settings page. The uncommon options will be hidden, and the page is simplified in this way.
4. Script automatic update
You can set the script’s check update frequency. No longer causes vulnerabilities because of the outdated scripts. 
5. Safety
Only paranoid can survive! All websites whose scripts should be included in blacklist.
6. Compatibility
Many user scripts written by Firefox User Script Manager are Greasemonkey (<= 3.x), which is why TamperMonkey provides a compatible layer and automatically detects supporting settings.
7.chrome synchronization
You are using multiple Chrome browsers, a home, a job? Do you want you to synchronize your own script? So you only need to set the TamperMonkey synchronization.
8.codemirror editor
Do you need to develop and edit a script? No problem! Tampermonkey provides an embedded editor.
9.jShint syntax check
Your script can’t run? Tampermonkey’s syntax check may help you find a problem …:)
10. Rapid development
TamperMonkey editor is great, however you have your own editor, it’s faster, better … solution is to enable «Allow access to file URL», then you can call your script from your script by @Require. .
Third, download
1.Tampermonkey Stable
Download address (Google)
This plugin can also be downloaded from major Chrome applications.
2.Tampermonkey Beta
Download address (Google)
This plugin can also be downloaded from major Chrome applications.
Fourth, grammar
Practical example:
// ==UserScript==
@name new userscript // Script Name
// @namespace    https://example.net
 @version 0.1 // Script version
 @Description Try to Take over the world! // Script Function Description
 @AuThor you // Author name
 @Match https://example.net / / What website is to use this script, or use include, you can use Exclude to exclude the page contained in some websites.
// @grant        none
 @note // code notes, will be public in the script
// ==/UserScript==

(function() {
    'use strict';

         / / Write the JavaScript code required
})();
Script elements property list:
§@name
The name of the script. This item will appear on the header and link content, and must be filled.
§@name:XX-YY
The script is in a specific language area. XX refers to ISO 639-1 national code and YY means an optional ISO 3166 area code. This option is used to provide a multilingual @Name script name.
§@description
The description of the script function is displayed below the script title, and there must be items.
§@description:XX-YY
A script description written in a language written. XX refers to ISO 639-1 national code and YY means an optional ISO 3166 area code. This option is used to provide a multilingual @Description script introduction.
§@namespace
@namespace with @Name These two properties are unique identifiers as scripts, and the User Script Manager determines if a script is installed according to them. Greasy Fork also needs these properties. If the user changes any of the two, it will issue a warning.
§@version
The script version tag will use the Mozilla version format and displayed on the script. Greasy Fork requires that a warning will be issued when the user updates the script or when the version number is not updated or the version number is lowered.
§@include, @exclude,@match
Description The script runs on which websites are running. The list is parsed and displayed to the script of the script and used for the classification of the script. Each script must have at least one @match or @Include. Understand the format rules.
§@require
Refer to other external scripts in your script. See the usage regulations containing external scripts.
§@updateURL, @installURL, @downloadURL
Tell the user script manager which address should get the script update. The Greasy Fork will automatically modify this property to update it through the Greasy Fork.
§@license
The license agreement describes whether you allow others to copy or modify your script in some form. It is recommended to select «Full Name» or «Identifier» from the SPDX license agreement. If you do not provide a license agreement, it means that only personal use is allowed to be distributed. The license agreement will be displayed on the profile of the script.
§@supportURL
The script’s technical support link (such as error feedback system, forum, email, etc.), which will display the feedback page of the script.
§@contributionURL
Used to donate the link of the author’s author, the link will appear on the feedback page of the script. The URL can be an HTTP, HTTPS, or the URL of the bitcoin protocol. If you need to link to PayPal donation page, use, for example, https://www.paypal.com/cgi-bin/webscr?cmd=_donations&business [email protected]&itm_name=greasy +fork +donation Format, replace with your own mailbox.
§@contributionAmount
If the donation amount is recommended, please cooperate with @ContributionURL.
§@compatible
Mark this script is compatible with a browser, and the compatibility information will appear on the strip of the script. You can also add additional compatible instructions, such as @Compatible Firefox Firefox must close the format such as the ad filter. The browser names that are currently identified by the website are: Firefox, Chrome, Opera, Safari, Edge.
§@incompatible
Mark this script is not compatible with a browser, and the compatibility information will appear on the strip of the script. You can also add additional compatibility, such as @Incompatible Firefox from Phuket 23 is not compatible with such a way. The browser names that are currently identified by the website are: Firefox, Chrome, Opera, Safari, Edge.
§@antifeature
The disclosure of the function of the script author instead of the user to bring additional benefits. You can disclose the method of adding @ntifeature <type> <description> value in the script’s metadata. Greasy Fork will resolve these types: ADS (this script will show the ads to the script), Tracking tracks the user’s activity), Miner (this script contains virtual currency mining code) and Referral-Link (script) Rewinding or redirecing the link to add a recommended / rebate code), while other types of values will be ignored. Even so, the script must also follow the rules of Greasy Fork. The description segment can be left blank.
§@antifeature:XX-YY
You can use multiple languages to declare the @ntifeature property, where xx is the code of the two characters defined in ISO 639-1, and YY is a country code defined in an optional ISO 3166. Each type in @antifeature is customizes its localization instructions.
V. User script
You can also search here here to download the scripts released by others.
Userscript.Zone Search
UserScript.zone Search is a new website that allows the user script to be searched by entering the appropriate URL or domain.
A large number of script resources
It is easy to find the right user script
Only the audited user script page or at least user script in the page with a comment function
GitHub/Gist
You can search for scripting resources in GitHub and Gist.
GreasyFork
GreasyFork may be the most popular. It is created by Jason Barnabe, and Jason Barnab is also the founder of the Stylish website, with a large number of script resources in its repository.
A large number of script resources
Have functions that can be synchronized from GitHub
Very active open source code development model
OpenUserJS
OpenUserJS begins to create after GreasyFork. It is created by Sizzle MctWizzle, in the same manner, also has a lot of script resources in its repository.
A large number of script resources
Have functions that can be synchronized from Github, fork Scripts
Very active open source code development model
@SquareBlock
A general high school student
Tampermonkey — расширение для браузера, с помощью которого можно управлять пользовательскими скриптами для различных сайтов. Данное расширение является чрезвычайно популярным, потому что оно позволяет автоматизировать повседневные задачи, улучшать определенные сайты, меняя их внешний вид, добавляя новые функции или скрывая нежелательные вещи.
Установка расширения Tampermonkey
Ссылки для скачивания можно найти на официальном сайте расширения. Расширение существует для Chrome, Microsoft Edge, Safari, Opera Next и Firefox.
Как пользоваться Tampermonkey
После установки расширения вам необходимо найти пользовательский скрипт с необходимыми вам функциями для нужного сайта или написать собственный скрипт.
Давайте рассмотрим процесс написания собственного скрипта для автоматизации какого-нибудь действия.
Есть футбольный онлайн менеджер Живи Футболом. Один из способов заработать там виртуальную валюту для своего клуба — это заключать контракты на показ рекламы во время домашних матчей. На бесплатном аккаунте необходимо заходить раз в 15 минут на страницу и проверять возможность заключить более выгодный контракт. Если есть возможность заключить новый контракт, то надо нажать на зеленую стрелочку.

Давайте автоматизируем данное действие с помощью Tampermonkey и нашего скрипта в браузере Google Chrome.
Для создания нового скрипта необходимо нажать на значок расширения, а потом выбрать «Создать новый скрипт…».

В открывшемся окошке мы будем писать наш скрипт. Сначала заполняем начальные параметры:
 // ==UserScript==
 // @name         Живи Футболом! Рекламные контракты…
 // @namespace    https://pogrommist.ru/
 // @version      0.1
 // @description  Живи Футболом! Подписывай лучшие рекламные контракты!
 // @author       pogrommist.ru
 // @match        *://soccerlife.ru/base.php?mode=adverts
 // @grant        GM_setValue
 // @grant        GM_getValue
 // ==/UserScript==
Дальше напишем код, который будет запрашивать разрешение на вывод уведомлений в браузере.
document.addEventListener('DOMContentLoaded', function () {
  if (!Notification) {
    alert('Оповещения недоступны в вашем браузере. Используйте Chrome!');
    return;
  }

  if (Notification.permission !== 'granted') {
    Notification.requestPermission();}
});
Наш скрипт запускается только на странице *://soccerlife.ru/base.php?mode=adverts, поэтому если мы сейчас зайдем на главную страницу, то ничего не увидим нового. А если зайдем на страницу с рекламными контрактами, то браузер запросит у нас разрешение на показ уведомлений.

Теперь напишем функцию, которая будет показывать нам уведомления:
function notifyMe(text) {
   if (Notification.permission !== 'granted'){
     Notification.requestPermission();}
   else {
     var notification = new Notification('Активное предложение', {
       icon: 'https://img.icons8.com/color/48/000000/money-bag.png',
       body: text,
     });
 }
 }
Дальше опишем логику наших действий. Нам необходимо на странице найти стрелочки и посмотреть активна хотя бы одна из них или нет. Если хотя бы одна стрелочка активна, значит есть возможность заключить контракт.
Если посмотреть исходный код страницы, то видно, что у активных и неактивных стрелочек есть определенный class. Его мы и будем использовать.
function check() {
     var div_up = document.getElementById("billboard_arrow_up").className;
     var div_down = document.getElementById("billboard_arrow_down").className;
     var div_left = document.getElementById("billboard_arrow_left").className;
     var div_right = document.getElementById("billboard_arrow_right").className;
     if (div_up=="billboard_arrow billboard_hidden" && div_down=="billboard_arrow billboard_hidden" &&
         div_left=="billboard_arrow billboard_hidden" && div_right=="billboard_arrow billboard_hidden") {
         //notifyMe("Ничего интересного. Ждем следующее предложение…");
     }
     else {notifyMe("Можно заключить контракт!");
           document.getElementById("billboard_arrow_left").click();
           document.getElementById("billboard_arrow_up").click();
           document.getElementById("billboard_arrow_right").click();
           document.getElementById("billboard_arrow_down").click();
           notifyMe("Заключили контракт!");
          }
 }
Остается только написать периодический вызов функции для проверки доступности активных предложений:
(function() {
    'use strict';
     var div = document.getElementById("billboard_offer_cost");
     setInterval(function(){
     check();
     location.reload();},
                 300000);
 })();
Теперь пока открыта вкладка с рекламными предложениями наш скрипт каждые 5 минут будет проверять возможность заключить контракт, перезагружая страницу для обновления информации.


Вот так мы автоматизировали один из процессов в онлайн игре.
Последние статьи:
Tampermonkey — это бесплатное расширение браузера и популярный менеджер UserScript пользовательских скриптов для браузеров Chrome, Microsoft Edge, Safari, Opera Next, и Firefox. Расширение поддерживает такие функции, как простая установка скрипта, автоматические проверки обновлений, простой обзор скриптов, запущеных на вкладке, а также имеет встроенный редактор. Кроме того, есть хорошие шансы на то, что несовместимые скрипты будут нормально работать при использовании расширения.
Tampermonkey: настройка UserScript в браузере
Основные настройки расширения:
- легкий доступ к скриптам
- легко конфигурируемая страница настроек
- автоматическое обновление скриптов через определённые (настраиваемые) промежутки времени
- использование встроенного редактора
- Проверка синтаксиса пользовательского скрипта при помощи JSHint (!)
Что можно написать на пользовательских скриптах?
- Автоматическое размещение новостей в социальных сетях
- Автоматический репостинг сообщений из групп (но придётся постараться)
- Автоматическая отметка «Мне нравится»
- Много разных и интересных вещей 🙂
Что посмотреть о пользовательских скриптах?
- Greasemonkey (пользовательские скрипты под Firefox)
- Учимся писать userscript’ы
- Зеркало старого http://userscripts.org/