Создание службы для Windows
Последнее обновление: 16.10.2019
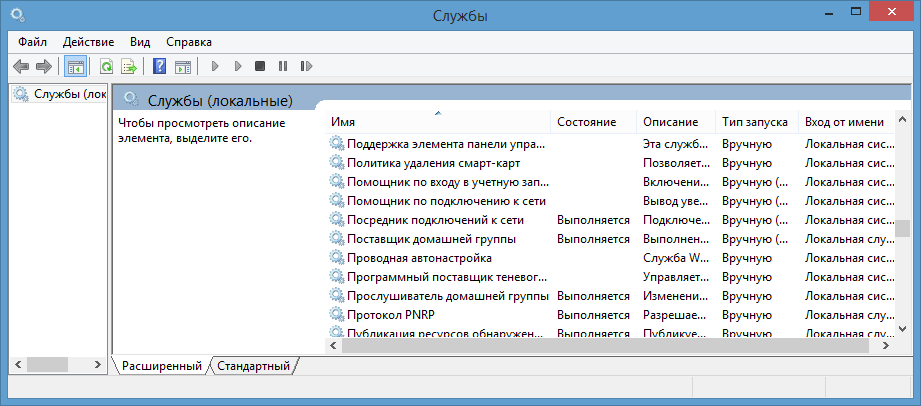
Одним из важнейших компонентов ОС Windows являются службы. Фактически это отдельные приложения, которые не имеют графического интерфейса и
которые выполняют различные задачи в фоновом режиме. Службы могут быть запущены при старте операционной системы, так и в любой другой момент работы пользователя.
Распространенным примером служб являются различные веб-серверы, которые в фоновом режиме прослушивают
определенный порт на наличие подключений, и если подключения имеются, то взаимодействуют с ними. Это могут быть также различные вспомогательные сервисы
обновлений для других установленных программ, которые обращаются к серверу, чтобы узнать, есть ли новая версия приложения. В общем то мы можем
открыть панель служб и сами увидеть все установленные и запущенные службы:
Рассмотрим, как создавать свои службы в C#. В качестве реализуемой задачи выберем наблюдение за изменениями в определенной папке в файловой системе.
Теперь создадим для ее выполнения службу.
Вначале создадим новый проект, который будет иметь тип Windows Service. Назовем проект FileWatcherService:
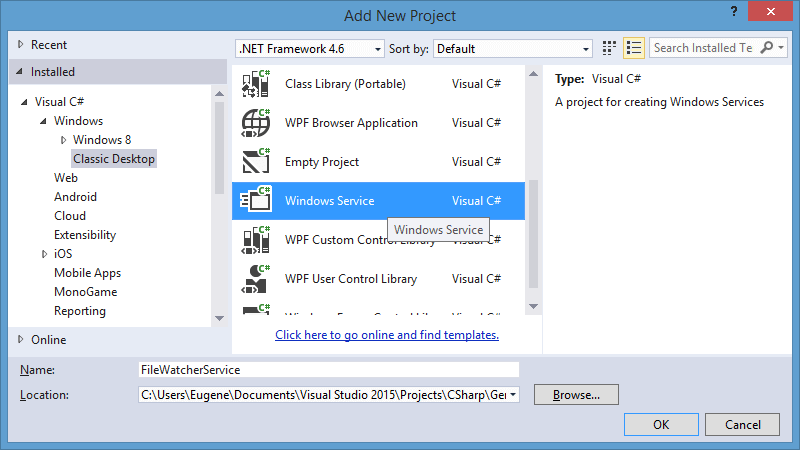
После этого Visual Studio генерирует проект, который имеет все необходимое. Хотя в принципе нам необязательно выбирать именно этот тип проекта,
можно было бы создать проект библиотеки классов, и затем в нем определить все необходимые классы.
Итак, новый проект выглядит следующим образом:
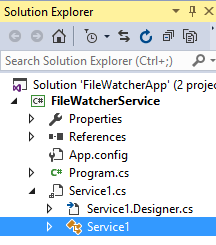
Здесь также есть файл Program.cs и есть собственно узел службы Service1.cs.
Служба представляет обычное приложение, но она не запускаетс сама по себе. Все вызовы и обращения к ней проходят через менеджер управления службами
(Service Control Manager или SCM). Когда служба запускается автоматически при старте системы или вручную, то SCM обращается к методу Main в классе Program:
static class Program
{
    static void Main()
    {
        ServiceBase[] ServicesToRun;
        ServicesToRun = new ServiceBase[]
        {
            new Service1()
        };
        ServiceBase.Run(ServicesToRun);
    }
}
Метод Main по умолчанию определен таким образом, чтобы запускать сразу несколько служб, которые определены в массиве ServicesToRun. Однако по умолчанию
проект содержит только одну службу Service1. Сам запуск производится с помощью метода Run: ServiceBase.Run(ServicesToRun).
Сама запускаемая служба представлена узлом Service1.cs. Однако на самом деле
это не простой файл кода. Если мы откроем этот узел, то увидим в нем файл дизайнера службы Service1.Designer.cs и класс Service1.
Класс Service1 собственно представляет службу. По умолчанию он имеет следующий код:
using System;
using System.Collections.Generic;
using System.ComponentModel;
using System.Data;
using System.Diagnostics;
using System.Linq;
using System.ServiceProcess;
using System.Text;
using System.Threading.Tasks;

namespace FileWatcherService
{
    public partial class Service1 : ServiceBase
    {
        public Service1()
        {
            InitializeComponent();
        }

        protected override void OnStart(string[] args)
        {
        }

        protected override void OnStop()
        {
        }
    }
}
Класс службы должен наследоваться от базового класса ServiceBase. Этот класс определяет ряд методов, важнейшие из которых
метод OnStart(), который запускает действия, выпоняемые службой, и метод OnStop(), останавливающий
службу.
После того, как SCM вызовет метод Main и зарегистрирует службу, происходит непосредственный ее вызов через запуск метода OnStart.
Когда в консоли служб или через командную строку мы посылаем команду на остановку службы, то SCM обращается к методу OnStop для ее остановки.
Кроме этих двух методов в классе службы можно переопределить еще несколько методов базового класса ServiceBase:
-
OnPause: вызывается при приостановке службы
-
OnContinue: вызывается при возобновлении работы службы после ее приостановки
-
OnShutdown: вызывается при завершении работы Windows
-
OnPowerEvent: вызывается при изменении режима электропитания
-
OnCustomCommand: вызывается при получении службой пользовательской команды от Менеджера Управления Службами (Service Control Manager / SCM)
В конструкторе класса Service1 вызывается метод InitializeComponent(), который определен в файле дизайнера Service1.Designer.cs:
namespace FileWatcherService
{
    partial class Service1
    {
        private System.ComponentModel.IContainer components = null;

        protected override void Dispose(bool disposing)
        {
            if (disposing && (components != null))
            {
                components.Dispose();
            }
            base.Dispose(disposing);
        }
        private void InitializeComponent()
        {
            components = new System.ComponentModel.Container();
            this.ServiceName = "Service1";
        }
    }
}
Единственное, что надо в нем отметить, это установка названия службы (свойство ServiceName):
this.ServiceName = "Service1";
Это то название, которое будет отображаться в консоли служб после установки данной службы. Мы можем его изменить, а можем и оставить как есть.
Теперь изменим код службы следующим образом:
using System;
using System.ServiceProcess;
using System.IO;
using System.Threading;

namespace FileWatcherService
{
    public partial class Service1 : ServiceBase
    {
        Logger logger;
        public Service1()
        {
            InitializeComponent();
            this.CanStop = true;
            this.CanPauseAndContinue = true;
            this.AutoLog = true;
        }

        protected override void OnStart(string[] args)
        {
            logger = new Logger();
            Thread loggerThread = new Thread(new ThreadStart(logger.Start));
            loggerThread.Start();
        }

        protected override void OnStop()
        {
            logger.Stop();
            Thread.Sleep(1000);
        }
    }

    class Logger
    {
        FileSystemWatcher watcher;
        object obj = new object();
        bool enabled = true;
        public Logger()
        {
            watcher = new FileSystemWatcher("D:\Temp");
            watcher.Deleted += Watcher_Deleted;
            watcher.Created += Watcher_Created;
            watcher.Changed += Watcher_Changed;
            watcher.Renamed += Watcher_Renamed;
        }

        public void Start()
        {
            watcher.EnableRaisingEvents = true;
            while(enabled)
            {
                Thread.Sleep(1000);
            }
        }
        public void Stop()
        {
            watcher.EnableRaisingEvents = false;
            enabled = false;
        }
		// переименование файлов
        private void Watcher_Renamed(object sender, RenamedEventArgs e)
        {
            string fileEvent = "переименован в " + e.FullPath;
            string filePath = e.OldFullPath;
            RecordEntry(fileEvent, filePath);
        }
		// изменение файлов
        private void Watcher_Changed(object sender, FileSystemEventArgs e)
        {
            string fileEvent = "изменен";
            string filePath = e.FullPath;
            RecordEntry(fileEvent, filePath);
        }
		// создание файлов
        private void Watcher_Created(object sender, FileSystemEventArgs e)
        {
            string fileEvent = "создан";
            string filePath = e.FullPath;
            RecordEntry(fileEvent, filePath);
        }
		// удаление файлов
        private void Watcher_Deleted(object sender, FileSystemEventArgs e)
        {
            string fileEvent = "удален";
            string filePath = e.FullPath;
            RecordEntry(fileEvent, filePath);
        }

        private void RecordEntry(string fileEvent, string filePath)
        {
            lock (obj)
            {
                using (StreamWriter writer = new StreamWriter("D:\templog.txt", true))
                {
                    writer.WriteLine(String.Format("{0} файл {1} был {2}",
                        DateTime.Now.ToString("dd/MM/yyyy hh:mm:ss"), filePath, fileEvent));
                    writer.Flush();
                }
            }
        }
    }
}
Ключевым классом, который инкапсулирует всю функциональность, является класс Logger. С помощью объекта FileSystemWatcher он будет вести мониторинг изменений в папке D://Temp.
В методе Start() устанавливается, что мы будем отслеживать изменения через объект FileSystemWatcher. И вся работа будет идти, пока булевая переменная enabled равна true. А метод Stop() позволит
завершить работу класса.
События FileSystemWatcher позволяют отслеживать все изменения в наблюдаемой папке.
При этом будет вестись запись изменений в файл templog.txt. Чтобы не было гонки ресурсов
за файл templog.txt, в который вносятся записи об изменениях, процедура записи блокируется заглушкой lock(obj).
В итоге после создания, изменения, переименования и удаления файл лога будет содержать что-то наподобие:
30.07.2015 12:15:40 файл D:TempНовый текстовый документ.txt был создан
30.07.2015 12:15:46 файл D:TempНовый текстовый документ.txt был переименован в D:Temphello.txt
30.07.2015 12:15:55 файл D:Temphello.txt был изменен
30.07.2015 12:15:55 файл D:Temphello.txt был изменен
30.07.2015 12:16:01 файл D:Temphello.txt был удален
В самом классе службы Service1 в конструкторе устанавливается ряд опций:
this.CanStop = true; // службу можно остановить
this.CanPauseAndContinue = true; // службу можно приостановить и затем продолжить
this.AutoLog = true; // служба может вести запись в лог
В методе OnStart() для запуска объекта Logger вызывется новый поток:
protected override void OnStart(string[] args)
{
    logger = new Logger();
    Thread loggerThread = new Thread(new ThreadStart(logger.Start));
    loggerThread.Start();
}
Новый поток нужен, так как текущий поток обрабатывает только команды SCM и должен возвращаться из метода OnStart как можно быстрее.
Когда от менеджера SCM поступает команда на остановку службы, срабатывает метод OnStop, который вызывает метод logger.Stop(). Дополнительная задержка
позволит потоку логгера остановиться:
protected override void OnStop()
{
    logger.Stop();
    Thread.Sleep(1000);
}
Однако самого класса службы еще недостаточно. Нам необходимо еще создать устанощик службы.
Время на прочтение
3 мин
Количество просмотров 141K
Многие из нас сталкиваются с такой задачей, когда нужно запускать своё приложение при запуске компьютера. Конечно можно поместить ярлык в автозагрузку, но как-то это неправильно. Да к тому же если комп перегрузился, а пользователь не залогинелся, то и ваше приложение тоже не запустится.
Самым верным решением в данной ситуации является написание Windows сервиса.
Пример создания сервиса в Studio 2010, .Net C# под катом
Шаг 1. Создание проекта.
Создайте новый проект, выбрав шаблон Windows Service

Переименуйте класс сервиса как вам нужно.

Получили такой вод код:
namespace ExampleSrv

{

  public partial class MyService : ServiceBase

  {

    public MyService()

    {

      InitializeComponent();

    }protected override void OnStart(string[] args)

    {

    }protected override void OnStop()

    {

    }

  }

}* This source code was highlighted with Source Code Highlighter.
Это и есть, собственно, сам сервис.
Используйте OnStart и OnStop события для реализации своей поставленной задачи.
Шаг 2. Добавление установщика.
Чтобы ваш сервис заставить работать, его нужно установить.
Чтобы его установить, он должен иметь установщик.
Клик правой кнопкой… Add installer

Теперь у нас есть serviceProcessInstaller и serviceInstaller

В первом можете поставить значение Account в LocalSystem.
Во втором укажите имя сервиса, описание и не забудьте поставить StartType — Automatic.

Установщик готов.
Шаг 3. Логирование.
Для того чтобы вы смогли узнать что делал ваш сервис, когда он стартовал, завершался или что-нибудь еще, вы можете использовать системное логирование.
Делается это очень легко.
Перетаскиваете из Toolbox в свой сервис EventLog.

Примерно так делается логирование:
public partial class MyService : ServiceBase

  {

    public MyService()

    {

      InitializeComponent();

    }protected override void OnStart(string[] args)

    {

      AddLog("start");

    }protected override void OnStop()

    {

      AddLog("stop");

    }public void AddLog(string log)

    {

      try

      {

        if (!EventLog.SourceExists("MyExampleService"))

        {

          EventLog.CreateEventSource("MyExampleService", "MyExampleService");

        }

        eventLog1.Source = "MyExampleService";

        eventLog1.WriteEntry(log);

      }

      catch{}

    }

  }* This source code was highlighted with Source Code Highlighter.
Шаг 4. Установка.
Чтобы установить сервис, нужно вызвать утилиту установки и передать параметром путь к своему сервису.
Для этого я создал install.bat такого вида:
C:WindowsMicrosoft.NETFrameworkv4.0.30319installutil.exe D:...ExampleSrvbinDebugExampleSrv.exe

pause
Если вы выбрали в serviceProcessInstaller значением поля Account — User, то при установке вы должны будете ввести логин и пароль учетной записи, под которой будет запускаться сервис. Внимание! Писать домен перед именем пользователя обязательно!
Запускаем батник обязательно с правами администратора и наблюдаем в конце:
The Commit phase completed successfully.
The transacted install has completed.
Это значит что сервис установлен.
Проверяем:

Установился.
Пару раз делаем запуск и остановку. Смотрим логи:

Видим когда сервис запускался и останавливался.
Наш сервис готов.
Материал частично взят от сюда:
msdn.microsoft.com/en-us/library/zt39148a(VS.80).aspx
This article introduces Windows Services in .NET and how to create a Windows Service in C# and .NET using Visual Studio.
What is a Windows Service?
Windows Services are non-UI software applications that run in the background. Windows services usually start when an operating system boots and is scheduled to run in the background to execute some tasks. Windows services can also be started automatically or manually. You can also manually pause, stop and restart Windows services.
Windows service is a computer program that runs in the background to execute some tasks. Some examples of Windows services are auto-update of Windows, check emails, print documents, SQL Server Agent, file and folder scanning and indexing, etc. If you open your Task Manager and click on the Services tab, you will see hundreds of services running on your machine. You can also see the statuses of these services. Some services are running, some have paused, and some have stopped. You can start, stop, and pause a service from here by right click on the service.
You may also find all services running on your machine in the following ways:
- Go to Control Panel and select «Services» inside «Administrative Tools.»
- Next, open the Run window (Window + R), type services.msc, and press ENTER.
How to create a Windows service in C#?
Let’s create a Windows Service in C# using Visual Studio.
Step 1
Open Visual Studio, click File > New, and select a project. Next, select a new project from the Dialog box, select «Window Service,» and click the OK button.

Step 2
Go to Visual C# ->» Windows Desktop» ->» Windows Service,» give an appropriate name and then click OK.

Once you click the OK button, the below screen will appear, which is your service.

Step 3
Right-click on the blank area and select «Add Installer.»
How to Add an Installer to a Windows Service
Before you can run a Windows Service, you need to install the Installer, which registers it with the Service Control Manager.

After Adding Installer, ProjectInstaller will add to your project, and ProjectInstakker.cs file will be open. Don’t forget to save everything (by pressing the ctrl + shift + s key)

Solution Explore looks like this:

Step 4
Right-click on the blank area and select «View Code»

Step 5
It has Constructor, which contains the InitializeComponent method:
The InitializeComponent method contains the logic which creates and initializes the user interface objects dragged on the forming surface and provides the Property Grid of Form Designer.
Very important: Don’t ever try to call any method before the call of the InitializeComponent process.

Step 6
Select the InitializeComponent method and press the F12 key to go definition.
Step 7
Now add the below line:
this.serviceProcessInstaller1.Account = System.ServiceProcess.ServiceAccount.LocalSystem;
You also can add a description and display the service name (optionally).
this.serviceInstaller1.Description = "My First Service demo";
this.serviceInstaller1.DisplayName = "MyFirstService.Demo"; 
Step 8
In this step, we will implement a timer and code to call the service at a given time. Then, we will create a text file and write the current time in the text file using the service.

Service1.cs class
using System;
using System.Collections.Generic;
using System.ComponentModel;
using System.Data;
using System.Diagnostics;
using System.IO;
using System.Linq;
using System.ServiceProcess;
using System.Text;
using System.Threading.Tasks;
using System.Timers;
namespace MyFirstService {
    public partial class Service1: ServiceBase {
        Timer timer = new Timer(); // name space(using System.Timers;)
        public Service1() {
            InitializeComponent();
        }
        protected override void OnStart(string[] args) {
            WriteToFile("Service is started at " + DateTime.Now);
            timer.Elapsed += new ElapsedEventHandler(OnElapsedTime);
            timer.Interval = 5000; //number in milisecinds
            timer.Enabled = true;
        }
        protected override void OnStop() {
            WriteToFile("Service is stopped at " + DateTime.Now);
        }
        private void OnElapsedTime(object source, ElapsedEventArgs e) {
            WriteToFile("Service is recall at " + DateTime.Now);
        }
        public void WriteToFile(string Message) {
            string path = AppDomain.CurrentDomain.BaseDirectory + "\Logs";
            if (!Directory.Exists(path)) {
                Directory.CreateDirectory(path);
            }
            string filepath = AppDomain.CurrentDomain.BaseDirectory + "\Logs\ServiceLog_" + DateTime.Now.Date.ToShortDateString().Replace('/', '_') + ".txt";
            if (!File.Exists(filepath)) {
                // Create a file to write to.
                using(StreamWriter sw = File.CreateText(filepath)) {
                    sw.WriteLine(Message);
                }
            } else {
                using(StreamWriter sw = File.AppendText(filepath)) {
                    sw.WriteLine(Message);
                }
            }
        }
    }
}
Code explanation — the above code will call service every 5 seconds, create a folder if none exists, and write our message.
Step 9. Rebuild your application.
Right-click on your project or solution and select Rebuild.

Step 10
Search «Command Prompt» and run as administrator.

Step 11
Fire the below command in the command prompt and press ENTER.
cd C:WindowsMicrosoft.NETFrameworkv4.0.30319

Step 12
Now Go to your project source folder > bin > Debug and copy the full path of your Windows Service exe file.


Installing a Windows Service
Open the command prompt and fire the below command and press ENTER.
Syntax
InstallUtil.exe + Your copied path + your service name + .exe
Our path
InstallUtil.exe C:UsersFaisal-PathansourcereposMyFirstServiceMyFirstServicebinDebugMyFirstService.exe

Check the status of a Windows Service.
Open services by following the below steps:
- Press the Window key + R.
- Type services.msc
- Find your Service.


You may notice that the Windows service is running.

Check Windows Service Output
The service will create a text file with the following text in it.

The log folder will be created in your bin folder.
Uninstalling a Windows Service
If you want to uninstall your service, fire the below command.
- Syntax InstallUtil.exe -u + Your copied path + your service name + .exe
- Our path InstallUtil.exe -u C:UsersFaisal-PathansourcereposMyFirstServiceMyFirstServicebinDebugMyFirstService.exe
Summary
This article taught us how to create a Windows Service and install/Uninstall it using InstallUtil.exe from the command prompt.
I hope you found this tutorial easy to follow and understand.
I also uploaded this project on GitHub; here is the URL https://github.com/faisal5170/WindowsService.
This article introduces Windows Services in .NET and how to create a Windows Service in C# and .NET using Visual Studio.
What is a Windows Service?
Windows Services are non-UI software applications that run in the background. Windows services usually start when an operating system boots and is scheduled to run in the background to execute some tasks. Windows services can also be started automatically or manually. You can also manually pause, stop and restart Windows services.
Windows service is a computer program that runs in the background to execute some tasks. Some examples of Windows services are auto-update of Windows, check emails, print documents, SQL Server Agent, file and folder scanning and indexing, etc. If you open your Task Manager and click on the Services tab, you will see hundreds of services running on your machine. You can also see the statuses of these services. Some services are running, some have paused, and some have stopped. You can start, stop, and pause a service from here by right click on the service.
You may also find all services running on your machine in the following ways:
- Go to Control Panel and select «Services» inside «Administrative Tools.»
- Next, open the Run window (Window + R), type services.msc, and press ENTER.
How to create a Windows service in C#?
Let’s create a Windows Service in C# using Visual Studio.
Step 1
Open Visual Studio, click File > New, and select a project. Next, select a new project from the Dialog box, select «Window Service,» and click the OK button.
Step 2
Go to Visual C# ->» Windows Desktop» ->» Windows Service,» give an appropriate name and then click OK.
Once you click the OK button, the below screen will appear, which is your service.
Step 3
Right-click on the blank area and select «Add Installer.»
How to Add an Installer to a Windows Service
Before you can run a Windows Service, you need to install the Installer, which registers it with the Service Control Manager.
After Adding Installer, ProjectInstaller will add to your project, and ProjectInstakker.cs file will be open. Don’t forget to save everything (by pressing the ctrl + shift + s key)
Solution Explore looks like this:
Step 4
Right-click on the blank area and select «View Code»
Step 5
It has Constructor, which contains the InitializeComponent method:
The InitializeComponent method contains the logic which creates and initializes the user interface objects dragged on the forming surface and provides the Property Grid of Form Designer.
Very important: Don’t ever try to call any method before the call of the InitializeComponent process.
Step 6
Select the InitializeComponent method and press the F12 key to go definition.
Step 7
Now add the below line:
this.serviceProcessInstaller1.Account = System.ServiceProcess.ServiceAccount.LocalSystem;
You also can add a description and display the service name (optionally).
this.serviceInstaller1.Description = "My First Service demo";
this.serviceInstaller1.DisplayName = "MyFirstService.Demo";
Step 8
In this step, we will implement a timer and code to call the service at a given time. Then, we will create a text file and write the current time in the text file using the service.
Service1.cs class
using System;
using System.Collections.Generic;
using System.ComponentModel;
using System.Data;
using System.Diagnostics;
using System.IO;
using System.Linq;
using System.ServiceProcess;
using System.Text;
using System.Threading.Tasks;
using System.Timers;
namespace MyFirstService {
    public partial class Service1: ServiceBase {
        Timer timer = new Timer(); // name space(using System.Timers;)
        public Service1() {
            InitializeComponent();
        }
        protected override void OnStart(string[] args) {
            WriteToFile("Service is started at " + DateTime.Now);
            timer.Elapsed += new ElapsedEventHandler(OnElapsedTime);
            timer.Interval = 5000; //number in milisecinds
            timer.Enabled = true;
        }
        protected override void OnStop() {
            WriteToFile("Service is stopped at " + DateTime.Now);
        }
        private void OnElapsedTime(object source, ElapsedEventArgs e) {
            WriteToFile("Service is recall at " + DateTime.Now);
        }
        public void WriteToFile(string Message) {
            string path = AppDomain.CurrentDomain.BaseDirectory + "\Logs";
            if (!Directory.Exists(path)) {
                Directory.CreateDirectory(path);
            }
            string filepath = AppDomain.CurrentDomain.BaseDirectory + "\Logs\ServiceLog_" + DateTime.Now.Date.ToShortDateString().Replace('/', '_') + ".txt";
            if (!File.Exists(filepath)) {
                // Create a file to write to.
                using(StreamWriter sw = File.CreateText(filepath)) {
                    sw.WriteLine(Message);
                }
            } else {
                using(StreamWriter sw = File.AppendText(filepath)) {
                    sw.WriteLine(Message);
                }
            }
        }
    }
}
Code explanation — the above code will call service every 5 seconds, create a folder if none exists, and write our message.
Step 9. Rebuild your application.
Right-click on your project or solution and select Rebuild.
Step 10
Search «Command Prompt» and run as administrator.
Step 11
Fire the below command in the command prompt and press ENTER.
cd C:WindowsMicrosoft.NETFrameworkv4.0.30319
Step 12
Now Go to your project source folder > bin > Debug and copy the full path of your Windows Service exe file.
Installing a Windows Service
Open the command prompt and fire the below command and press ENTER.
Syntax
InstallUtil.exe + Your copied path + your service name + .exe
Our path
InstallUtil.exe C:UsersFaisal-PathansourcereposMyFirstServiceMyFirstServicebinDebugMyFirstService.exe
Check the status of a Windows Service.
Open services by following the below steps:
- Press the Window key + R.
- Type services.msc
- Find your Service.
You may notice that the Windows service is running.
Check Windows Service Output
The service will create a text file with the following text in it.
The log folder will be created in your bin folder.
Uninstalling a Windows Service
If you want to uninstall your service, fire the below command.
- Syntax InstallUtil.exe -u + Your copied path + your service name + .exe
- Our path InstallUtil.exe -u C:UsersFaisal-PathansourcereposMyFirstServiceMyFirstServicebinDebugMyFirstService.exe
Summary
This article taught us how to create a Windows Service and install/Uninstall it using InstallUtil.exe from the command prompt.
I hope you found this tutorial easy to follow and understand.
I also uploaded this project on GitHub; here is the URL https://github.com/faisal5170/WindowsService.
Table of Contents
- Introduction
- Create the Windows Service Project
- Create an Installer
- Configure the Installer
- Create a sample recurring task
- Installing the Service
- Alternative install using SC CREATE
- Testing the Service
- Removing the Service
- Troubleshooting
- Conclusion
In this post I’ll briefly explain how to create and configure a custom Windows Service in C# using Visual Studio 2019. Before we start, it could be wise to quickly summarize what a Windows Service actually is and how it differs from a standard console program or desktop application.
NOTE: the most recent version of the source code explained in this post is now fully available on GitHub: if you like it, be sure to give it a star!
Introduction
In Windows-based operating systems, the term Windows Service refers to a computer program without a user-interface that completely operates in the background. If you know Unix-based environments, you could think of it as a Windows version of a typical Unix daemon. A Windows service must conform to the interface rules and protocols of the Service Control Manager, the kernel component responsible for managing Windows services.
Once installed, the Windows Service can be configured using the Service Control Manager (services.exe) to start when the operating system is started and run in the background as long as Windows is running; alternatively, they can be started manually or by an event. It’s also possible to manually pause, stop and restart the service.
Each service can also be configured to run within a context of a specific user or system account: for example, most Windows services that come shipped with the OS are pre-configured to run within the context of three system accounts: System, Network Service and Local Service. Such behaviours allow them to operate even when the machine is unmanaged and/or a standard user is not logged on.
To get a glimpse of all services running on a Windows machine you can either:
- Open Control Panel, then navigate to the Administrative Tools and click on the Services icon.
- Press Window + R to open the Run window, then type services.msc and press ENTER.
Create the Windows Service Project
Open Visual Studio 2019 and select Create a new project from the initial dashboard. Type Windows Service into the filter textbox near the top to quickly find out the project template we’re looking for: select the Windows Service (.NET Framework) project template and click Next.
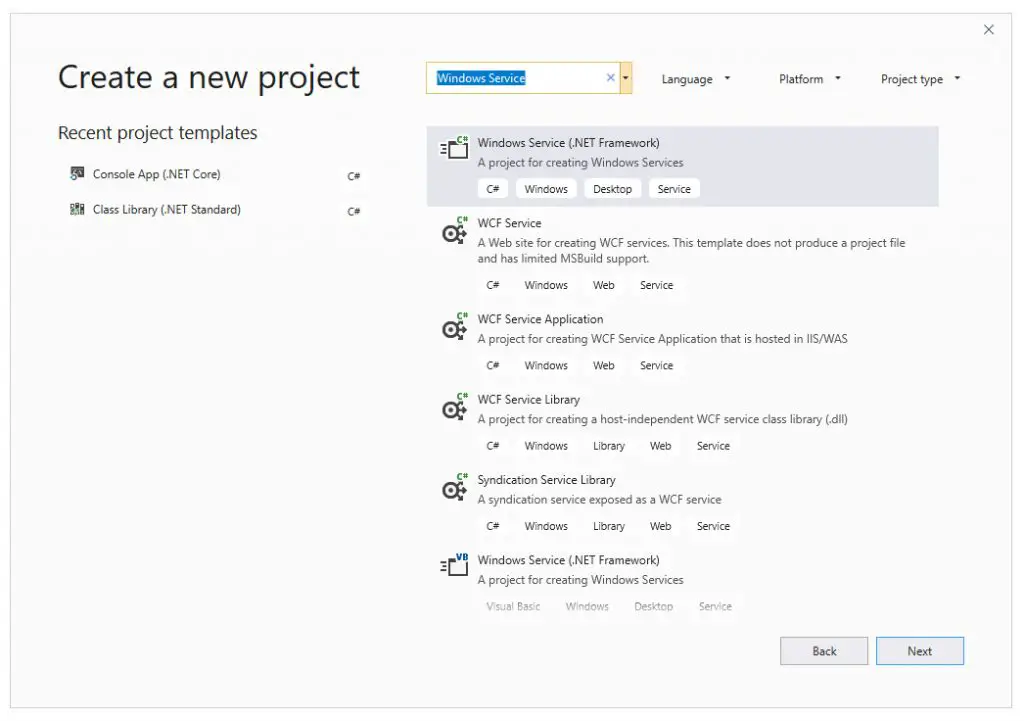
Give the project a name and create it. After a few seconds, you should be prompted with your newly-created project and a blank page showing the Service1.cs file in Design Mode.
Create an Installer
The next thing we have to do is to create an Installer, which is the component that will register our Service with the Service Control Manager.
To do that, right-click on the blank area in the Design View of the Service1.cs file and select Add Installer from the contextual menu, as shown in the screenshot below:
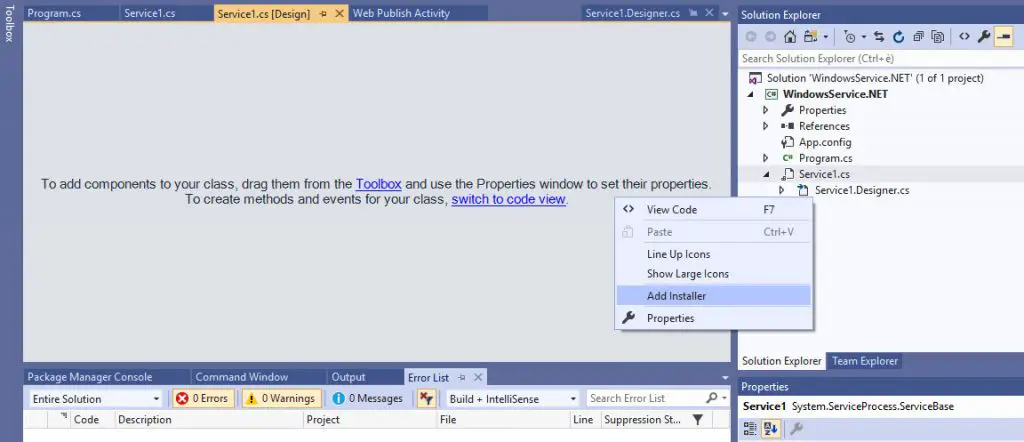
Once you do that, a new ProjectInstaller.cs file will be added to the project. Save everything (CTRL + SHIFT + S), then open the ProjectInstaller.Designer.cs file and take a look at the InitializeComponent() method, which defines some important settings of our service: its name and display name, the account context used to run it, and so on.
Configure the Installer
Locate the lines defining the Username and Password (both set to null by default) and add the following line right above them to make our service use the LocalSystem account context:
|
this.serviceProcessInstaller1.Account = System.ServiceProcess.ServiceAccount.LocalSystem; |
Right after that, locate the line of code defining the ServiceName and change it accordingly:
|
this.serviceInstaller1.ServiceName = «WindowsService.NET»; |
You can also specify a Display Name and a Description by adding the relevant source code lines, in the following way:
|
this.serviceInstaller1.DisplayName = «WindowsService.NET»; this.serviceInstaller1.Description = «A sample Windows Service boilerplate written in C# using NET Framework and VS2019»; |
Here’s how your InitializeComponent() method should look like after the changes:
|
1 2 3 4 5 6 7 8 9 10 11 12 13 14 15 16 17 18 19 20 21 22 23 24 25 |
private void InitializeComponent() { this.serviceProcessInstaller1 = new System.ServiceProcess.ServiceProcessInstaller(); this.serviceInstaller1 = new System.ServiceProcess.ServiceInstaller(); // // serviceProcessInstaller1 // this.serviceProcessInstaller1.Account = System.ServiceProcess.ServiceAccount.LocalSystem; this.serviceProcessInstaller1.Password = null; this.serviceProcessInstaller1.Username = null; // // serviceInstaller1 // this.serviceInstaller1.ServiceName = «WindowsService.NET»; this.serviceInstaller1.DisplayName = «WindowsService.NET»; this.serviceInstaller1.Description = «A sample Windows Service boilerplate written in C# using NET Framework and VS2019»; // // ProjectInstaller // this.Installers.AddRange(new System.Configuration.Install.Installer[] { this.serviceProcessInstaller1, this.serviceInstaller1}); } |
That’s it for the installer: now let’s switch to the Windows Service code itself.
Create a sample recurring task
Open the Service1.cs file and switch to Code View. As we can see, there are three main methods here:
- the Service1() method, aka the constructor, which internally calls the InitializeComponents() method that we modified in the previous paragraph.
- The OnStart() method, which is called once when the service is started.
- The OnStop() method, which will be called once when the service is stopped.
For our sample boilerplate we’ll just add a basic timelapse logging feature to the default code:
|
1 2 3 4 5 6 7 8 9 10 11 12 13 14 15 16 17 18 19 20 21 22 23 24 25 26 27 28 29 30 31 32 33 34 35 36 37 38 39 40 41 42 43 44 45 46 47 48 49 50 |
public partial class Service1 : ServiceBase { Timer Timer = new Timer(); int Interval = 10000; // 10000 ms = 10 second public Service1() { InitializeComponent(); this.ServiceName = «WindowsService.NET»; } protected override void OnStart(string[] args) { WriteLog(«Service has been started»); Timer.Elapsed += new ElapsedEventHandler(OnElapsedTime); Timer.Interval = Interval; Timer.Enabled = true; } private void OnElapsedTime(object source, ElapsedEventArgs e) { WriteLog(«{0} ms elapsed.»); } protected override void OnStop() { Timer.Stop(); WriteLog(«Service has been stopped.»); } private void WriteLog(string logMessage, bool addTimeStamp = true) { var path = AppDomain.CurrentDomain.BaseDirectory; if (!Directory.Exists(path)) Directory.CreateDirectory(path); var filePath = String.Format(«{0}\{1}_{2}.txt», path, ServiceName, DateTime.Now.ToString(«yyyyMMdd», CultureInfo.CurrentCulture) ); if (addTimeStamp) logMessage = String.Format(«[{0}] — {1}», DateTime.Now.ToString(«HH:mm:ss», CultureInfo.CurrentCulture), logMessage); File.AppendAllText(filePath, logMessage); } } |
As we can see, we added the following stuff:
- The Timer private variable, which host a standard timer (from System.Timers namespace).
- The Interval private variable, which globally defines the timer interval in milliseconds.
- The OnElapsedTime() private method, which will be called upon each timer interval cycle.
- The WriteLog() private method, which logs a custom log message to a daily log file persisted on disk: such file will be created within the folder that hosts the service executable.
- A minimal implementation in the existing OnStart() and OnStop() methods to put everything together.
While we were there, we also changed the service’s default name from Service1 to WindowsService.NET by adding the following line in the constructor, rightbelow the InitializeComponent() call:
|
this.ServiceName = «WindowsService.NET»; |
Alternatively, the ServiceName property can also be changed from within the Service1.Designer.cs file’s InitializeComponent() method.
IMPORTANT: be sure to use the same ServiceName specified in the Service1.Designer.cs class!
That’s basically it: our service is ready to be installed and tested!
Installing the Service
To install our service, build the project in Release mode: once done, copy the WindowsService.NET.exe file from /bin/Release/ to a more «handy» folder — such as C:TempWindowsInstaller.
Right after that, open a Command Prompt with administrative rights and type the following:
|
«C:WindowsMicrosoft.NETFrameworkv4.0.30319installutil.exe» «C:TempWindowsService.NETWindowsService.NET.exe» |
You should receive a quick confirmation message saying that everything went good.
Alternative install using SC CREATE
If you don’t want to use installutil.exe, you can also install your service using the sc create command with the following syntax:
|
sc create «WindowsService.NET» binPath=«C:TempWindowsService.NETWindowsService.NET.exe» |
However, if you do that, you’ll have to manually specify the service name: also, the service Description won’t be shown in the service list UI window (see below).
Testing the Service
Use Control Panel > Administrative Tools > Services to open the service list and scroll down until you’ll find our new service:
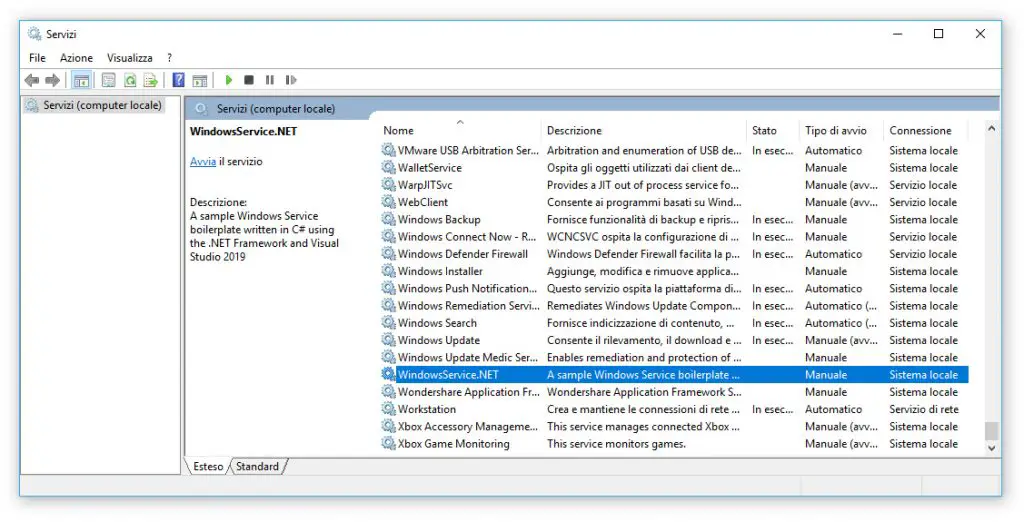
That’s our boy! From here we can either manually start it or set it to automatic, so that it will be started whenever the system starts. However, I strongly suggest to not do that for now, since it would permanently drain your system resources if you forget to disable it — it’s just a sample service after all! Let’s just start it and take a look at the log file, which should be found in the executable folder:
|
C:TempWindowsService.NET |
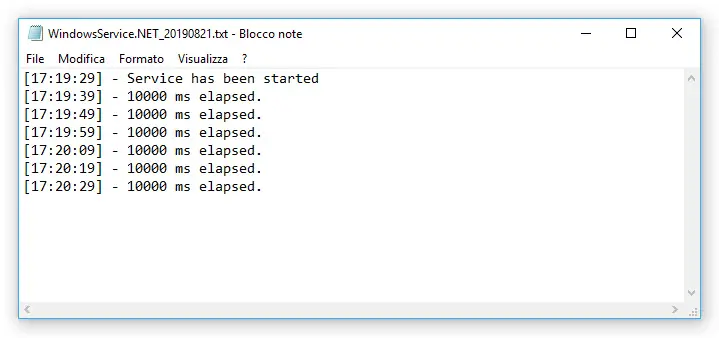
If everything went good, the log should be similar to this screenshot:
Removing the Service
To remove our service, open a Command Prompt with administrative rights and type the following command:
|
sc delete «WindowsService.NET»; |
Troubleshooting
It’s worth noting that, whenever the service encounters an unhandled exceptions while operating, it will crash without writing anything to the Windows event log. For that very reason, I strongly suggest to wrap your main execution methods within a try/catch block and log any possible exceptions on disk — or somewhere else — so you can better understand what’s going on. Such task can be very easy using the WriteLog() function within our sample code: don’t forget to do that!
Conclusion
That’s it: I hope that this guide will help other ASP.NET C# developers to create awesome Windows Services to fullfill their needs! If you like my project, feel free to give me a virtual hug by starring the GitHub project and/or putting a like on our Facebook/Twitter pages!


Всем доброго времени суток. На связи Алексей Гулынин. В данной статье мы напишем простую WCF-службу Windows на C#, и установим её. Её можно будет запускать, останавливать, как и все другие службы Windows.
Клиентская часть будет та же, что и в прошлых двух статьях — это Windows Forms — приложение, которое шлёт сообщения по адресу http://localhost:343/IContract.
Создадим проект WindowsService, который является консольным приложением. Не забываем добавлять в проект необходимые ссылки. Сразу приведу код:
Файл Service.cs:
// не забываем добавлять данные ссылки в проект
using System.ServiceProcess;
using System.ServiceModel;
using System.ComponentModel;
using System.Configuration.Install;

namespace WindowsService
{
  // это служебный класс для служб Windows
  [RunInstaller(true)]
  public class ProjectInstaller : Installer
  {
    private ServiceProcessInstaller serviceProcess;
    private ServiceInstaller serviceInstaller;

    public ProjectInstaller()
    {
      serviceProcess = new ServiceProcessInstaller();
      // учетная запись, под которой будет запускаться служба
      serviceProcess.Account = ServiceAccount.LocalSystem;

      serviceInstaller = new ServiceInstaller();
      serviceInstaller.ServiceName = "Приём сообщений";
      serviceInstaller.Description = @"Служба, которая ожидает приёма сообщений по адресу http://localhost:343/IContract";
      // указываем, чтобы служба запускалась автоматически при запуске рабочей станции
      serviceInstaller.StartType = ServiceStartMode.Automatic;

      Installers.Add(serviceProcess);
      Installers.Add(serviceInstaller);
    }
  }

  // Наш контракт
  [ServiceContract]
  interface IContract
  {
    [OperationContract]
    string Print(string str);
  }


  // Наш сервис, который реализует контракт
  class Service : IContract
  {
    public string Print(string str)
    {
      return "Сообщение клиента: " + str;
    }
  }

  // Наша служба Windows
  public partial class WindowsService : ServiceBase
  {
    ServiceHost serviceHost = null;

    // Запуск службы
    protected override void OnStart(string[] args)
    {
      if (serviceHost == null)
      {
        serviceHost = new ServiceHost(typeof(Service));
        serviceHost.Open();
      }
    }
    // Остановка службы
    protected override void OnStop()
    {
      if (serviceHost != null)
      {
        serviceHost.Close();
      }
    }
  }
}
Не забываем добавить файл App.config:
<?xml version="1.0" encoding="utf-8" ?>

<configuration>
  <system.serviceModel>
    <services>
      <service name ="WindowsService.Service">
        <host>
          <baseAddresses>
            <add baseAddress="http://localhost:343/IContract"/>
          </baseAddresses>
        </host>
        <!-- указываем адрес, привязку и контракт -->
        <endpoint address=""
                  binding="basicHttpBinding"
                  contract="WindowsService.IContract" />
      </service>
    </services>
  </system.serviceModel>
</configuration>
Класс Program.cs:
using System.ServiceProcess;

namespace WindowsService
{
  class Program
  {
    // В данном методе запускается наша служба
    static void Main(string[] args)
    {
      ServiceBase[] ServicesToRun;
      ServicesToRun = new ServiceBase[]
      {
        new WindowsService()
      };
      ServiceBase.Run(ServicesToRun);
    }
  }
}
При попытке запустить нашу службу из Visual Studio мы увидим следующую ошибку:

Давайте установим нашу службу правильно с помощью утилиты installutil.exe. Создадим на диске «C» папку «WindowsService». В эту папку поместим файлы «WindowsService.exe» и «WindowsService.exe.config», который создаётся в момент компиляции программы. Создадим 2 текстовых файла, которые будут устанавливать и удалять нашу службу. У этих двух файлов изменим расширение с «txt» на «bat».
Содержимое файла InstallService.bat:
C:WindowsMicrosoft.NETFrameworkv4.0.30319installutil.exe WindowsService.exe
Содержимое файла UninstallService.bat:
C:WindowsMicrosoft.NETFrameworkv4.0.30319InstallUtil.exe /u WindowsService.exe
Установим нашу службу. Видим, что служба была установлена:

В панели управления на вкладке «Администрирование — Службы» мы видим, что служба появилась. Запустим её:

После того, как у нас служба запустилась, запустим клиентскую часть и убедимся, что всё работает (сообщения отправляются):

В предыдущих статьях наш сервис являлся простым приложением. Для сервиса такой вариант не совсем удобен. Первое, что приходит в голову, — это вариант, когда сервис располагается на сервере. Если у нас сервис не является службой Windows, то при перезагрузке сервера администратору необходимо будет зайти и вручную запустить программу. Чтобы этого не делать, сервис необходимо делать службой, устанавливая автоматический тип запуска.
В данной статье вы создали простую WCF-службу Windows на C#.
На связи был Алексей Гулынин, оставляйте свои комментарии, увидимся в следующих статьях.
This article provides a solution to facilitate debugging and administration of Windows Service created in C#/.Net.
The source code is available in the
MSDN Gallery.
Remark: all screenshots are created on a french Visual Studio, so the images are in french, but I’ll try to convert the terms in English.
Table of Contents
- Motivation
- Create a Windows Service
- Debugging Windows Service
- Convert a Service to Console Application for Debugging
- Advantages
- Disadvantages
- Remarks
- Install and Unistall the service
- Start and Stop the service
- Do More
- Command to combine installation and startup
- Run the services in interactive mode
- See Also
- Other Languages
Motivation
When we develop .Net Windows Services we are soon faced of debugging problem.
In addition we regularly start, stop the service, as well install and uninstall it. All of these actions require to use different commandlines (installutil, net start, etc.).
This article propose to transform our Windows Service to application console to allow to debug more easier, as well as manage all service through command line parameters, and thus simplify its management.
All that will be presented is not new, you will find a lot of articles on the subject across the Web, we just to gather all in one article, as a reminder.
Create a Windows Service
Quick reminder for the create of a service named «My Service»:
- Start the new project creation
- Select the template «Templates > Visual C# > Windows Desktop > Windows Service»

We rename the class «Service1» to «svcMyService» and the name of the service «My Service» in the property grid opened:

So, in the Solution Explorer, we rename the file «Service1.cs» of the service «svcMyService.cs»:

The underlying files will be automatically renamed.
The last step is to create a service installer. From the designer of the service (if it’s closed, open it with a double click on «svcMyService.cs» from the Solution Explorer), right click on the designer and select «Add installer».

In the opened designer, select «serviceProcessInstaller1» to change the running service account, in our case choose «LocalSystem».

By selecting «serviceInstaller1» we can change the display informations in the services manager.

Build the program with the menu «Build > Build the solution». If you run the program a dialog is displayed to inform you that is a service that need to be installed and started.
We make a test by installing the service, and by starting it:
- Open a command shell as administrator
- Go to the folder where is the compiled service «bindebug» of the folder solution
We can open directly the folder of the solution from the Solution Explorer, right click on the project et choose «Open in the Explorer» and navigate to «bindebug». On Windows 8.1 use the menu «File > Open command shell > Open command shell as administrator».
Install the service:
"%SystemRoot%Microsoft.NETFrameworkv4.0.30319InstallUtil.exe" WinServiceTest.exe
And we start our service.
net start "My Service"
Normally all it works:
- In the exe folder we can find the log files.
- In the Services Manager we can find our service (with the informations defined in the service installer).
- In the events viewer a new source is available «My Service» if you keep «True» the value of «AutoLog» property from the service designer.
We can stop all:
net stop "My Service""%SystemRoot%Microsoft.NETFrameworkv4.0.30319InstallUtil.exe" /u WinServiceTest.exe
Debugging Windows Service
Reminder : to debug a service you need to do many things:
- Install the service with «InstallUtil.exe»
- Start the service with «net start»
- Run Visual Studio as Administrator
- Attach the debuger to the running service
Of course, before update your code and recompile your service, you must at least stop your service with «net stop».
This whole procedure is sometimes tedious, and also poses a problem in debugging, if the service does not correctly startup, you haven’t time to attach the debugger to trace what happens.
Convert a Service to Console Application for Debugging
The idea to help us debugging is to create a console application that simulate the service execution when it run under Visual Studio.
The first step is to change the project application type.
- Right click on the service project («WinServiceTest» in our case) and select «Properties».
- In the «Application» tab, «Output type» select «Console Application» («Windows Application» by default).
- Save the changes.
After, the idea is to check if we are in service mode or debug mode, for this we need to known if we are in interactive mode, we use the
Environment.UserInteractive property for that, and we need to know if we are in debug mode with the
System.Diagnostics.Debugger.IsAttached property.
In the «Program.cs» file we change the Main code like this
/// <summary>
/// Main entry point of the application.
/// </summary>
static
void
Main()
{
// Initialize the service to start
ServiceBase[] ServicesToRun;
ServicesToRun =
new
ServiceBase[]
{
new
svcMyService()
};
// In interactive and debug mode ?
if
(Environment.UserInteractive && System.Diagnostics.Debugger.IsAttached)
{
// Simulate the services execution
RunInteractiveServices(ServicesToRun);
}
else
{
// Normal service execution
ServiceBase.Run(ServicesToRun);
}
}
Then we adding the «RunInteractiveServices» method that start each service :
/// <summary>
/// Run services in interactive mode
/// </summary>
static
void
RunInteractiveServices(ServiceBase[] servicesToRun)
{
Console.WriteLine();
Console.WriteLine("Start the services in interactive mode.");
Console.WriteLine();
// Get the method to invoke on each service to start it
MethodInfo onStartMethod =
typeof(ServiceBase).GetMethod("OnStart", BindingFlags.Instance | BindingFlags.NonPublic);
// Start services loop
foreach
(ServiceBase service in
servicesToRun)
{
Console.Write("Starting {0} ... ", service.ServiceName);
onStartMethod.Invoke(service,
new
object[] { new
string[] { } });
Console.WriteLine("Started");
}
// Waiting the end
Console.WriteLine();
Console.WriteLine("Press a key to stop services et finish process...");
Console.ReadKey();
Console.WriteLine();
// Get the method to invoke on each service to stop it
MethodInfo onStopMethod =
typeof(ServiceBase).GetMethod("OnStop", BindingFlags.Instance | BindingFlags.NonPublic);
// Stop loop
foreach
(ServiceBase service in
servicesToRun)
{
Console.Write("Stopping {0} ... ", service.ServiceName);
onStopMethod.Invoke(service,
null);
Console.WriteLine("Stopped");
}
Console.WriteLine();
Console.WriteLine("All services are stopped.");
// Waiting a key press to not return to VS directly
if
(System.Diagnostics.Debugger.IsAttached)
{
Console.WriteLine();
Console.Write("=== Press a key to quit ===");
Console.ReadKey();
}
}
Each service start on its own thread, we do not have to manage it.
Advantages
Therefore the first advantage is to be able to debug the entire chain to start your service.
Another advantage is that you can create a log system that display message on the console, it’s direct and readable.
Disadvantages
However ther are some disadvantages.
A Windows Service generally run as an Administrator account (LocalSystem, LocalNetwork, etc.), wich can cause some rights problems depending of what the service doing. You can resolve this problem, by running Visual Studio as Administrator,
and the when the service is launched it get the administrator rights.
A service, when it starting, do some tasks (create an event log source, etc.), our small application don’t do that. It’s your job to d all it’s needed for your service.
Remarks
Caution, this mode don’t make you free to debug as service mode, it allows you to quickly debug your service, but your to test in service mode to ensure the correct behavior of the service in is normal mode.
Install and Unistall the service
A service for running, need to be installed (it is registered to the Windows ServiceManager). To install a .Net Service we need to run the command «InstallUtil.exe» in the .Net Framework folder.
This command is sometimes a bit long to write, even when it is necessary to install the service with an installer, it is necessary to locate the folder of the corresponding framework, etc.
As we have now a console application, we can use it to facilitate the work. For example with the command line arguments to install/uninstall the service.
To manage the install/uninstall service we can use the class
System.Configuration.Install.ManagedInstallerClass that contains some helpers methods to do it.
We will change our console application to supports ‘commands’ like
install and uninstall.
We will need to change the application behavior:
- if we are in debug mode we run the services in interactive mode
- if we are in interactive mode, we check if we have somme commands. In this case we run the commands, otherwise we print a message usage.
- if we are not in interative mode, we run normally the services.
We create a HasCommand method to check if there are a command in the command line:
/// <summary>
/// Helper for check if we are a command in the command line arguments
/// </summary>
static bool HasCommand(String[] args, String command)
{
if (args == null || args.Length == 0 || String.IsNullOrWhiteSpace(command)) return false;
return args.Any(a => String.Equals(a, command, StringComparison.OrdinalIgnoreCase));
}
The we change the Main method to supports arguments, and to process the commands:
/// <summary>
/// Main entry point of the application.
/// </summary>
static void Main(String[] args)
{
// Initialize the service to start
ServiceBase[] ServicesToRun;
ServicesToRun = new ServiceBase[]
{
new svcMyService()
};
// In interactive mode ?
if (Environment.UserInteractive)
{
// In debug mode ?
if (System.Diagnostics.Debugger.IsAttached)
{
// Simulate the services execution
RunInteractiveServices(ServicesToRun);
}
else
{
try
{
bool hasCommands = false;
// Having an install command ?
if (HasCommand(args, "install"))
{
ManagedInstallerClass.InstallHelper(new String[] { typeof(Program).Assembly.Location });
hasCommands = true;
}
// Having an uninstall command ?
if (HasCommand(args, "uninstall"))
{
ManagedInstallerClass.InstallHelper(new String[] { "/u", typeof(Program).Assembly.Location });
hasCommands = true;
}
// If we don't have commands we print usage message
if (!hasCommands)
{
Console.WriteLine("Usage : {0} [command] [command ...]", Environment.GetCommandLineArgs());
Console.WriteLine("Commands : ");
Console.WriteLine(" - install : Install the services");
Console.WriteLine(" - uninstall : Uninstall the services");
}
}
catch (Exception ex)
{
var oldColor = Console.ForegroundColor;
Console.ForegroundColor = ConsoleColor.Red;
Console.WriteLine("Error : {0}", ex.GetBaseException().Message);
Console.ForegroundColor = oldColor;
}
}
}
else
{
// Normal service execution
ServiceBase.Run(ServicesToRun);
}
}
Start and Stop the service
Same as the installation, for starting and stopping our service we must use a command «net start/stop» or the service manager.
For the same reasons as before, we will use some command line arguments of our console application. And for this we use the
System.ServiceProcess.ServiceController class.
So we add deux commands start and stop between our two commands insall and uninstall.
...
// Having a start command ?
if (HasCommand(args, "start"))
{
foreach (var service in ServicesToRun)
{
ServiceController sc = new ServiceController(service.ServiceName);
sc.Start();
sc.WaitForStatus(ServiceControllerStatus.Running, TimeSpan.FromSeconds(10));
}
hasCommands = true;
}
// Having a stop command ?
if (HasCommand(args, "stop"))
{
foreach (var service in ServicesToRun)
{
ServiceController sc = new ServiceController(service.ServiceName);
sc.Stop();
sc.WaitForStatus(ServiceControllerStatus.Stopped, TimeSpan.FromSeconds(10));
}
hasCommands = false;
}
...
How we process the commands, allows us to combine installation and startup in one command line. Same for stop and uninstall.
WinServiceTest.exe install start
WinServiceTest.exe uninstall stop
The order of the commands in the command line is not important, because we process the commands in the good order (we test ‘stop’ before ‘uninstall’).
Do More
Of course we can add more commands helpers.
Command to combine installation and startup
We can create a command to process in one command the installation and the startup. Same as for stopping and uninstall the service.
In our example, we implement it with the commands ‘start-services’ and ‘stop-services’, we process these commands first.
Run the services in interactive mode
We run the services in interactive mode only in debug mode. But it could be usefull to run the services in interactive mode. Si we can add a command for it.
In our example, we implement it with the command ‘run-services’.
See Also
- Source code on MSDN Gallery
- Source code on Github
- Original French Blog Post
Other Languages
- C# : Service Windows en mode console pour le débogage et l’administration
(fr-FR)