«Видеоурок»
Код на Github
В этом уроке мы собираемся запустить простое приложение для социальных сетей. Это приложение будет очень похоже на Twitter. Пользователи смогут зарегистрироваться и публиковать короткие текстовые сообщения, а другие пользователи смогут комментировать сообщения. У нас также будут лайки и антипатии к каждому посту. Пользователи будут иметь возможность подписываться на других пользователей и видеть их подписчиков. В этом первом руководстве мы настроим аутентификацию с помощью Django AllAuth и настроим целевую страницу для гостевых посетителей. В этом руководстве мы будем использовать Bootstrap 5, который является очень новым и имеет некоторые небольшие изменения по сравнению с Bootstrap 4. Большинство классов те же самые, но будут некоторые новые классы, которые мы будем использовать здесь. Приступим к работе с этим приложением.
Для начала нам нужно создать новый проект:
django-admin startproject socialnetwork
cd socialnetwork
python3 manage.py startapp social
python3 manage.py startapp landing
python3 manage.py migrate
python3 manage.py createsuperuser
pip install django-allauth django-crispy-forms
Социальная сеть будет содержать все наши маршруты, которые связаны с реальной социальной сетью, а на лендинге будут отображаться некоторые просмотры, чтобы познакомить новых пользователей с приложением. Теперь давайте зарегистрируем эти два приложения:
INSTALLED_APPS = [ 'landing', 'social','allauth', 'allauth.account', 'allauth.socialaccount', 'crispy_forms','django.contrib.admin', 'django.contrib.auth', 'django.contrib.contenttypes', 'django.contrib.sessions', 'django.contrib.messages', 'django.contrib.staticfiles', 'django.contrib.sites' ]
Теперь давайте настроим базовое представление и шаблон URL в нашем целевом приложении. Сначала в нашем лендинге / views.py:
from django.shortcuts import render from django.views import Viewclass Index(View): def get(self, request, *args, **kwargs): return render(request, 'landing/index.html')
Теперь давайте настроим URL-адрес в файле Landing / urls.py:
from django.urls import path from landing.views import Indexurlpatterns = [ path('', Index.as_view(), name='index'), ]
Теперь мы включим это в наш корневой urls.py:
from django.contrib import admin from django.urls import path, includeurlpatterns = [ path('admin/', admin.site.urls), path('', include('landing.urls')), ]
Наконец, давайте создадим HTML-шаблон целевой страницы. Он будет расположен по адресу Landing / templates / Landing / index.html:
<h1>Index</h1>Мы должны иметь возможность перейти к корневому URL-адресу проекта по адресу localhost: 8000 и просмотреть индекс слов на экране.
Теперь, когда эта базовая настройка выполнена, и теперь мы знаем, что все работает и настроено правильно, давайте создадим настоящую целевую страницу, сначала давайте настроим базовый шаблон, который будет связан с Bootstrap 5:
<!doctype html> <html lang="en"> <head> <!-- Required meta tags --> <meta charset="utf-8"> <meta name="viewport" content="width=device-width, initial-scale=1"><!-- Font Awesome --> <link rel="stylesheet" href="https://use.fontawesome.com/releases/v5.8.2/css/all.css"><!-- Bootstrap CSS --> <link href="https://cdn.jsdelivr.net/npm/[email protected]/dist/css/bootstrap.min.css" rel="stylesheet" integrity="sha384-giJF6kkoqNQ00vy+HMDP7azOuL0xtbfIcaT9wjKHr8RbDVddVHyTfAAsrekwKmP1" crossorigin="anonymous"><title>Social Network</title> </head> <body> {% include 'landing/navbar.html' %} {% block content %} {% endblock content %}<!-- Optional JavaScript; choose one of the two! --><!-- Option 1: Bootstrap Bundle with Popper --> <script src="https://cdn.jsdelivr.net/npm/[email protected]/dist/js/bootstrap.bundle.min.js" integrity="sha384-ygbV9kiqUc6oa4msXn9868pTtWMgiQaeYH7/t7LECLbyPA2x65Kgf80OJFdroafW" crossorigin="anonymous"></script><!-- Option 2: Separate Popper and Bootstrap JS --> <!-- <script src="https://cdn.jsdelivr.net/npm/@popperjs/[email protected]/dist/umd/popper.min.js" integrity="sha384-q2kxQ16AaE6UbzuKqyBE9/u/KzioAlnx2maXQHiDX9d4/zp8Ok3f+M7DPm+Ib6IU" crossorigin="anonymous"></script> <script src="https://cdn.jsdelivr.net/npm/[email protected]/dist/js/bootstrap.min.js" integrity="sha384-pQQkAEnwaBkjpqZ8RU1fF1AKtTcHJwFl3pblpTlHXybJjHpMYo79HY3hIi4NKxyj" crossorigin="anonymous"></script> --> </body> </html>
Теперь вернемся к нашему шаблону index.html:
{% extends 'landing/base.html' %}{% block content %} <div class="container"> <div class="row justify-content-center mt-5"> <div class="col-md-10 col-sm-12 text-center"> <h1 class="display-2">Connect With Your Friends!</h1> <p class="mt-3 lead">Follow people who interest you, stay up to date on the latest news and join conversations with your friends!</p> <div class="d-flex justify-content-center mt-5"> <a href="#" class="btn btn-light mr-2">Log In</a> <a href="#" class="btn btn-dark">Register</a> </div> </div> </div> </div> {% endblock content %}
Настройка AllAuth
Теперь, когда целевая страница готова, пора настроить AllAuth для аутентификации пользователей. Сначала нам нужно добавить некоторые настройки в наш файл settings.py.
AUTHENTICATION_BACKENDS = [ # Needed to login by username in Django admin, regardless of `allauth` 'django.contrib.auth.backends.ModelBackend',# `allauth` specific authentication methods, such as login by e-mail 'allauth.account.auth_backends.AuthenticationBackend', ]INSTALLED_APPS = [ 'landing', 'social','allauth', 'allauth.account', 'allauth.socialaccount', 'crispy_forms','django.contrib.admin', 'django.contrib.auth', 'django.contrib.contenttypes', 'django.contrib.sessions', 'django.contrib.messages', 'django.contrib.staticfiles', 'django.contrib.sites' ]SITE_ID = 1LOGIN_REDIRECT_URL = 'index' ACCOUNT_EMAIL_REQUIRED = True EMAIL_BACKEND = 'django.core.mail.backends.console.EmailBackend'
Здесь мы настраиваем идентификатор сайта, установленные приложения и серверы аутентификации. Все это есть в документации AllAuth. Мы также меняем несколько настроек, чтобы перенаправлять пользователя на страницу индекса после входа в систему и запрашивать электронное письмо при регистрации. Мы настроили бэкэнд электронной почты консоли так, чтобы все отправляемые нами электронные письма отображались в консоли, вместо того, чтобы настраивать фактическое электронное письмо для тестирования.
Наконец, нам нужно перенести изменения в базу данных:
python3 manage.py migrateТеперь, когда все настроено, у нас должна быть рабочая навигация. Давайте добавим ссылку для входа и регистрации на нашу целевую страницу в файле Landing / templates / Landing / index.html:
{% extends 'landing/base.html' %}{% block content %} <div class="container"> <div class="row justify-content-center mt-5"> <div class="col-md-10 col-sm-12 text-center"> <h1 class="display-2">Connect With Your Friends!</h1> <p class="mt-3 lead">Follow people who interest you, stay up to date on the latest news and join conversations with your friends!</p> <div class="d-flex justify-content-center mt-5"> <a href="{% url 'account_login' %}" class="btn btn-light mr-2">Log In</a> <a href="{% url 'account_signup' %}" class="btn btn-dark">Register</a> </div> </div> </div> </div> {% endblock content %}
Теперь это все, что нам нужно сделать, чтобы все настроить, хотя сейчас наши шаблоны выглядят очень плохо. Вместо того, чтобы тратить время на прохождение более простого начального этапа здесь. У меня будут шаблоны в корневом каталоге проекта github. Вы можете скопировать их, чтобы улучшить базовые стили, или можете сами добавить собственные стили. Однако, чтобы переопределить их, нам нужно сообщить Django, что мы хотим использовать шаблоны в папке шаблонов корневого каталога проекта.
TEMPLATES = [
    {
        'BACKEND': 'django.template.backends.django.DjangoTemplates',
        'DIRS': [BASE_DIR / 'templates'],
        'APP_DIRS': True,
        'OPTIONS': {
            'context_processors': [
                'django.template.context_processors.debug',
                'django.template.context_processors.request',
                'django.contrib.auth.context_processors.auth',
                'django.contrib.messages.context_processors.messages',
            ],
        },
    },
]
Обратите внимание, как в новой версии Django пути к файлам создаются немного иначе. Вместо os.path.join (BASE_DIR, «шаблоны»). Мы можем просто указать BASE_DIR / tempates.
На этом мы закончим этот урок. Мы вернемся в будущем и добавим больше функций в наше приложение.
In this four-part tutorial series, you’ll build a social network with Django that you can showcase in your portfolio. This project will strengthen your understanding of relationships between Django models and show you how to use forms so that users can interact with your app and with each other. You’ll also learn how to make your site look good by using the Bulma CSS framework.
In the first part of this tutorial series, you’ll learn how to:
- Implement one-to-one and many-to-many relationships between Django models
- Extend the Django user model with a custom
Profilemodel - Customize the Django admin interface
After finishing the first part of this series, you’ll move on to the second part, where you’ll learn to integrate Bulma to style your app and implement the front-end interface and logic so that your users can follow and unfollow each other.
You can download the code for the first part of this project by clicking the link below and going to the source_code_final/ folder:
Demo
In this four-part tutorial series, you’ll build a small social network that allows users to post short text-based messages. The users of your app can follow other users to see their posts or unfollow them to stop seeing their posts:
By the end of this tutorial series, you’ll also learn to use the CSS framework Bulma to give your app a user-friendly appearance and make it an impressive part of your web development portfolio that you can be proud to show off.
In the first part of this series, you’ll plan the project, create a base Django web app, and extend the built-in user model with a post-save hook. At the end of this part, you’ll be able to create new users through the Django admin interface and your app will automatically generate a profile for each new user and set up the necessary connection:
The back-end user implementation lays the foundation that you’ll build on in the upcoming parts.
Project Overview
In this section, you’ll get a solid idea of what you’ll build and why you’ll build it in this way. You’ll also dig into the database relationships that you’ll implement, and you’ll come up with a complete project outline ready to go. In short, you’ll set some time aside to brainstorm your project idea.
Once you’ve worked out your plan, you’ll start the practical implementation steps for the first part of the series, which focuses on Django models and their relationships:
To get a high-level idea of how you’ll work through all four parts of this series on building your Django social network, you can expand the collapsible section below:
You’ll implement the project in a series of steps spread out over four parts. There’s a lot to cover, and you’ll go into detail along the way:
📍 Part 1: Models and Relationships
- Step 1: Set Up the Base Project
- Step 2: Extend the Django User Model
- Step 3: Implement a Post-Save Hook
⏭ Part 2: Templates and Front-End Styling
- Step 4: Create a Base Template With Bulma
- Step 5: List All User Profiles
- Step 6: Access Individual Profile Pages
⏭ Part 3: Follows and Dweets
- Step 7: Follow and Unfollow Other Profiles
- Step 8: Create the Back-End Logic For Dweets
- Step 9: Display Dweets on the Front End
⏭ Part 4: Forms and Submissions
- Step 10: Submit Dweets Through a Django Form
- Step 11: Prevent Double Submissions and Handle Errors
- Step 12: Improve the Front-End User Experience
Each of these steps will provide links to any necessary resources and give you a chance to pause and come back at a later point, in case you want to take a break.
You might be eager to start programming, but before beginning to work on any coding project, it helps to think about the structure of what you want to build.
You can use pseudocode, written specifications, database diagrams, notebook scribbles, or anything that feels accessible and helps you think. Don’t skip this part! It’s an essential step for building any project. The time that you invest in planning will drastically reduce your implementation time.
So, what do you need for a social network? In its most basic form, you need two things:
- User-to-user connections that allow people to connect with one another
- Content creation and display functionality so that your users can create output for their connected users to view
You can think of these two topics as separate from each other, but you’ll need them both for your social network to function as expected.
Profiles for User-to-User Connections
For the first part of this tutorial series, you’ll need to map out how you can allow users to connect and how this translates to a database schema. This part focuses on connections.
How can you implement connections in Django models? First, you’ll jot down what a basic version of these connections could look like:
- You’ll have multiple users in your social network.
- They need to know about each other so that they can decide whom they want to follow.
For this project, you’ll implement the connections between users of your social network following a couple of assumptions that expand on the two cornerstones mentioned above:
- Your users will be able to either follow or not follow another user.
- If they follow someone, they’ll see that user’s content. If they don’t, they won’t.
- Your users can follow a person without being followed back. Relationships in your social network can be asymmetrical, meaning that a user can follow someone and see their content without the reverse being true.
- Your users need to be aware of who exists so that they know whom they can follow.
- Users should also be aware of who follows them.
- In your app’s most basic form, users won’t have many extra features available to them. You won’t implement a way to block people, and there won’t be a way to directly respond to content that someone else posted.
Essentially, you can think of your social network as a repository of short-form blogs or RSS feeds that users can either subscribe to or not. This is the implementation that you’ll build in this four-part series. Later on, you can build on top of this foundation to make your social network more specific and complex.
You’ll capture the functionality that you need by combining Django’s built-in User model with a custom Profile model that extends this default User model:
In the graphic above, you can see a draft of an entity–relationship (ER) diagram showing that every user will have exactly one profile and that profiles can follow one another asymmetrically.
This diagram doesn’t aim to be perfect or complete. For your own process, maybe you’ll want to sketch out something slightly different on a piece of paper. You’re brainstorming, so use whatever format works best for you.
Text-Based Content
In addition to establishing relationships between users, your platform also needs a way for users to create and share content. The content could be anything. It could include images, text, videos, webcomics, and more.
In this project, you’re building a social network that handles limited-character text-based messages, similar to Twitter. Because you’ll make it using the Django web framework, it’ll carry the fashionable name Dwitter.
Your Dwitter network will need a model for storing the text-based messages that users can create, which you’ll refer to as dweets. You’ll record only three pieces of information about each dweet:
- Who wrote it
- What the message says
- When the user wrote it
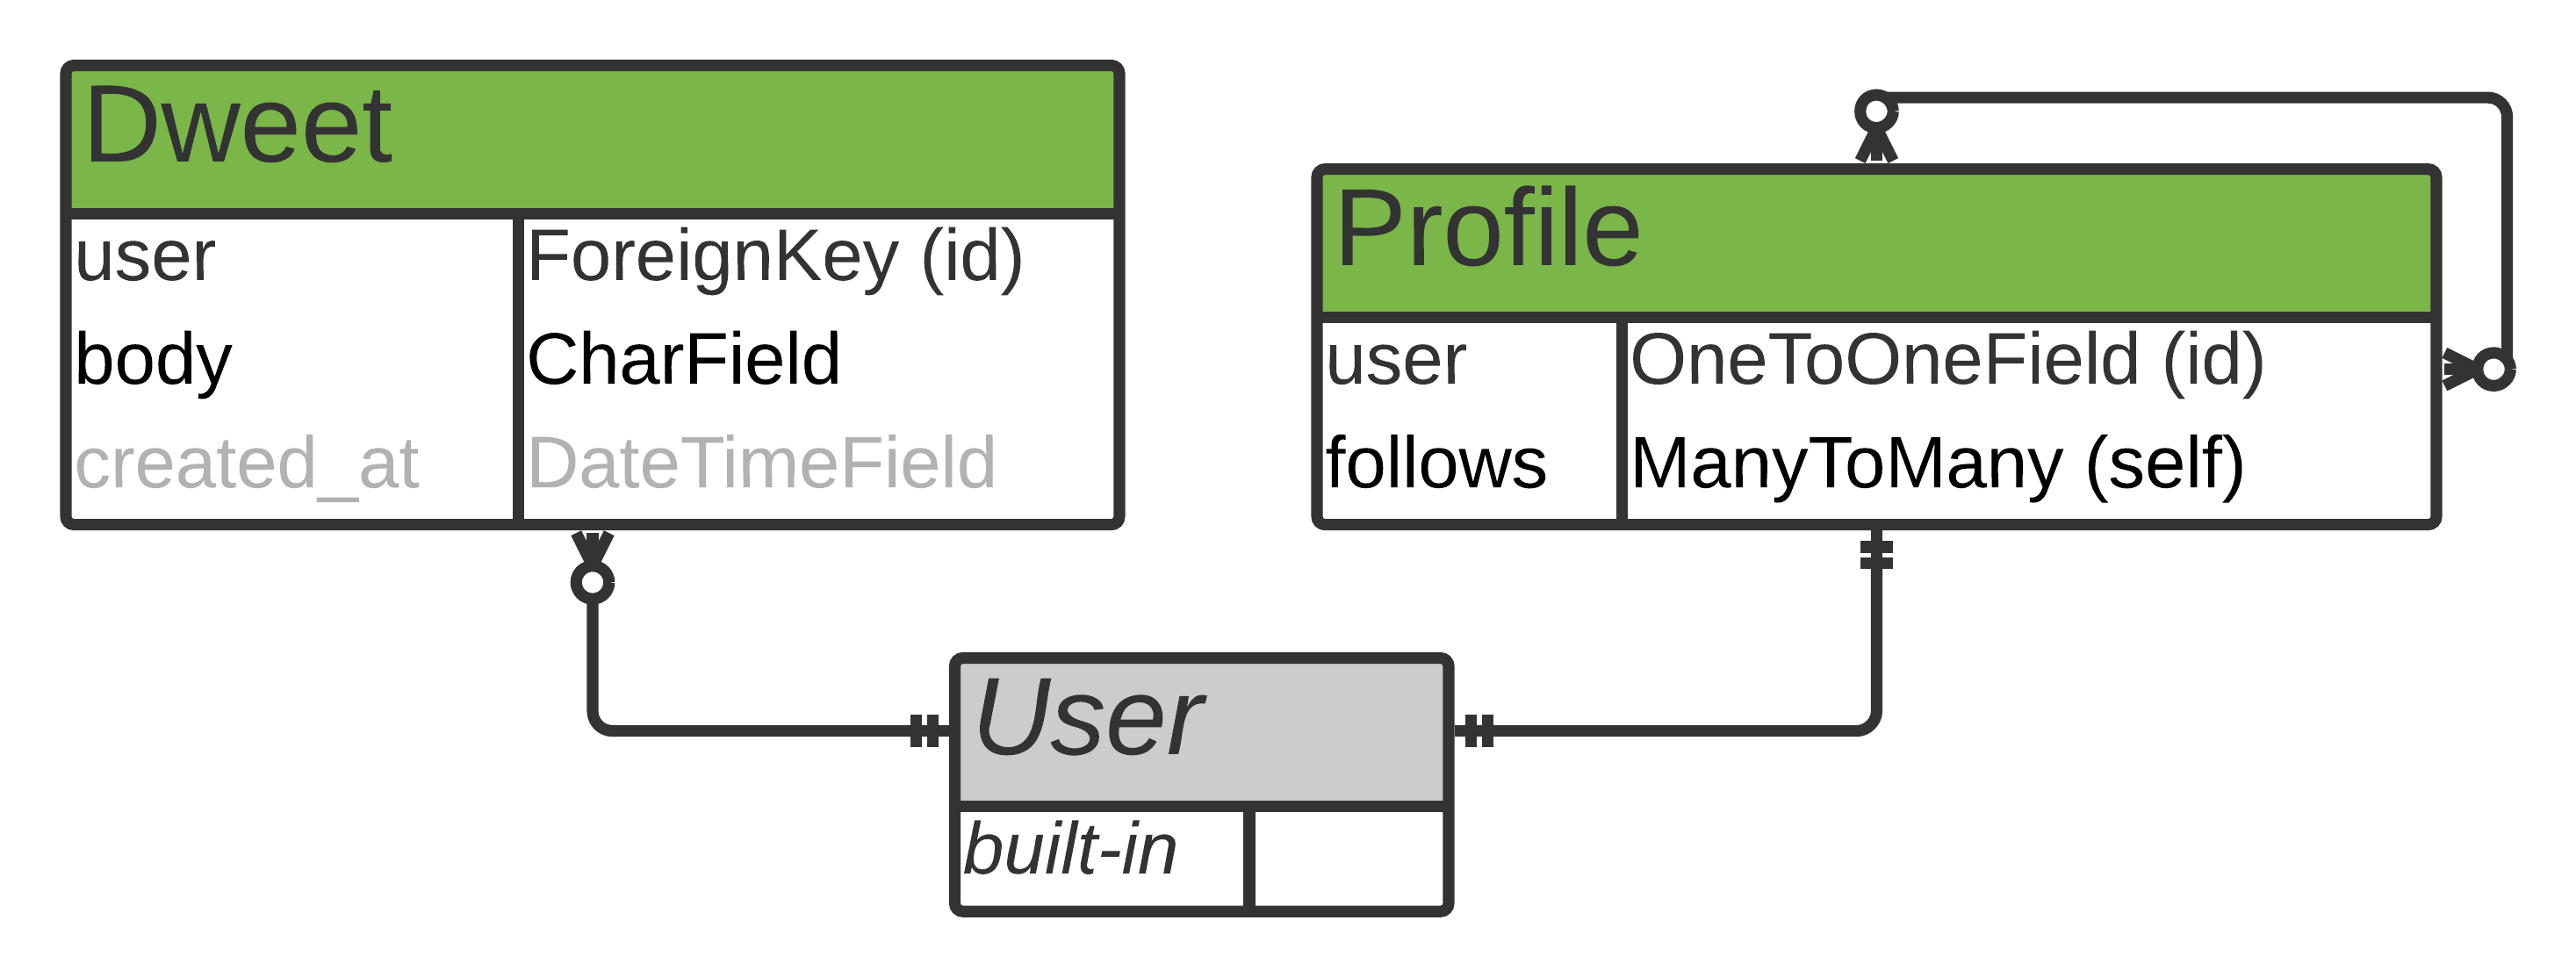
There’s only one relationship that you need to define for your Dweet model, which is its connection to the built-in User model:
The ER diagram shows how the built-in User table connects to the Dweet table through a one-to-many relationship. This type of relationship means that one user can have many dweets and each dweet belongs to exactly one user.
You can also see the different fields in the table that correspond to the information that you want to collect about each dweet:
user: holds information about who wrote the messagebody: holds the text content of the messagecreated_at: holds the date and time when the user posted the message
The created_at field is grayed out in the ER diagram because you won’t allow your users to edit this themselves. Instead, Django will automatically fill the field whenever a user submits a new message.
You’ll also need a way for your users to create content and view the content that they and others in their network have created. For the convenience of your users, you’ll have to do some of the following tasks to set up the front end:
- Provide a form for submitting content
- Create views to handle these submissions
- Build templates to display existing content
- Make it look decent
Most of the topics that you’ll cover in this series are general topics that are applicable to many Django web apps. You might already know how to do some of them, but here you’ll get to explore them in the context of a completely new project. And even if you haven’t yet encountered any of the tasks involved, you’ll learn how to tackle each challenge one after another.
Now that you’ve taken some time to brainstorm your project idea, you can get ready to build it!
Prerequisites
To complete this tutorial series, you should be comfortable with the following concepts:
- Using object-oriented programming in Python
- Setting up a basic Django project
- Managing routing and redirects, view functions, templates, models, and migrations in Django
- Using and customizing the Django admin interface
- Reading and writing HTML with class attributes
If you don’t have all of this knowledge before starting this tutorial, that’s okay! You might learn more by just going ahead and getting started. You can always stop and review the resources linked above if you get stuck.
Because you’ll use Django to build the back end for your social network, you’ll want to be familiar with the Django framework to get the most out of this series. If you haven’t used Django much before, you might want to try building a Django project that focuses on the basics first. For a good introduction, you can learn about Django by building a portfolio app.
Step 1: Set Up the Base Project
At this point, you know what you’ll build and you understand the database relationships that you’ll implement. At the end of this step, you’ll have set up a Django project and edited the Django admin interface to allow focused and minimalistic user creation.
You’ll tackle a few steps one after another:
- Create a virtual environment and install Django
- Create a Django project and app
- Customize the Django admin interface
- Create users for your app
Before doing anything else, you’ll first create a virtual environment and install Django.
Create a Virtual Environment and Install Django
Start by creating a new project root folder where you’ll put all the files that you’ll make while working on this project, then navigate into that folder:
$ mkdir django-social
$ cd django-social
After navigating to the parent folder where you’ll develop your project, you can create and activate a virtual environment and install Django from the Python Packaging Index (PyPI):
$ python3 -m venv venv --prompt=social
$ source ./venv/bin/activate
(social) $ python -m pip install django==3.2.5
These commands create a new virtual environment named social, activate this environment, and install Django.
Create a Django Project and App
Once the installation is complete, then you can start a new Django project named social. The name of your project doesn’t have to align with the name of your virtual environment, but this way, it’ll be more straightforward to remember.
After creating the Django project, create a new Django app called dwitter to go along with it:
(social) $ django-admin startproject social .
(social) $ python manage.py startapp dwitter
You’ll also need to register your new dwitter app to INSTALLED_APPS in social/settings.py:
# social/settings.py

# ...

INSTALLED_APPS = [
    "django.contrib.admin",
    "django.contrib.auth",
    "django.contrib.contenttypes",
    "django.contrib.sessions",
    "django.contrib.messages",
    "django.contrib.staticfiles",
    "dwitter",
]
Adding the name of your app to this list will make Django aware that you want to include the app in your Django project. This step is necessary so that the edits you make in dwitter will affect your project.
Before you continue working on this tutorial, make sure that you have:
- An activated virtual environment
- A new Django project called
social - A Django app called
dwitter - Your project’s
settings.pyfile withdwitterregistered as an app
If you get stuck on any of these steps, then you’ll find all the necessary setup steps described in detail in the dedicated tutorial on how to set up Django, which is linked above.
Customize the Django Admin Interface
Django’s built-in admin interface is a powerful tool for managing your application, and you’ll use it to handle user creation and management in this tutorial.
To keep your experience with the admin interface focused on the essentials, you’ll apply some customization. Before doing that, you’ll take a look at the default state. You need to set up Django’s default SQLite database and create a superuser so you can log in to the Django admin portal:
(social) $ python manage.py migrate
(social) $ python manage.py createsuperuser
Username: admin
Email address: admin@example.com
Password:
Password (again):
After running these two commands and entering information for the superuser account, you can start Django’s development server:
(social) $ python manage.py runserver
Navigate to the /admin URL on your localhost at port 8000 and log in to the admin portal:
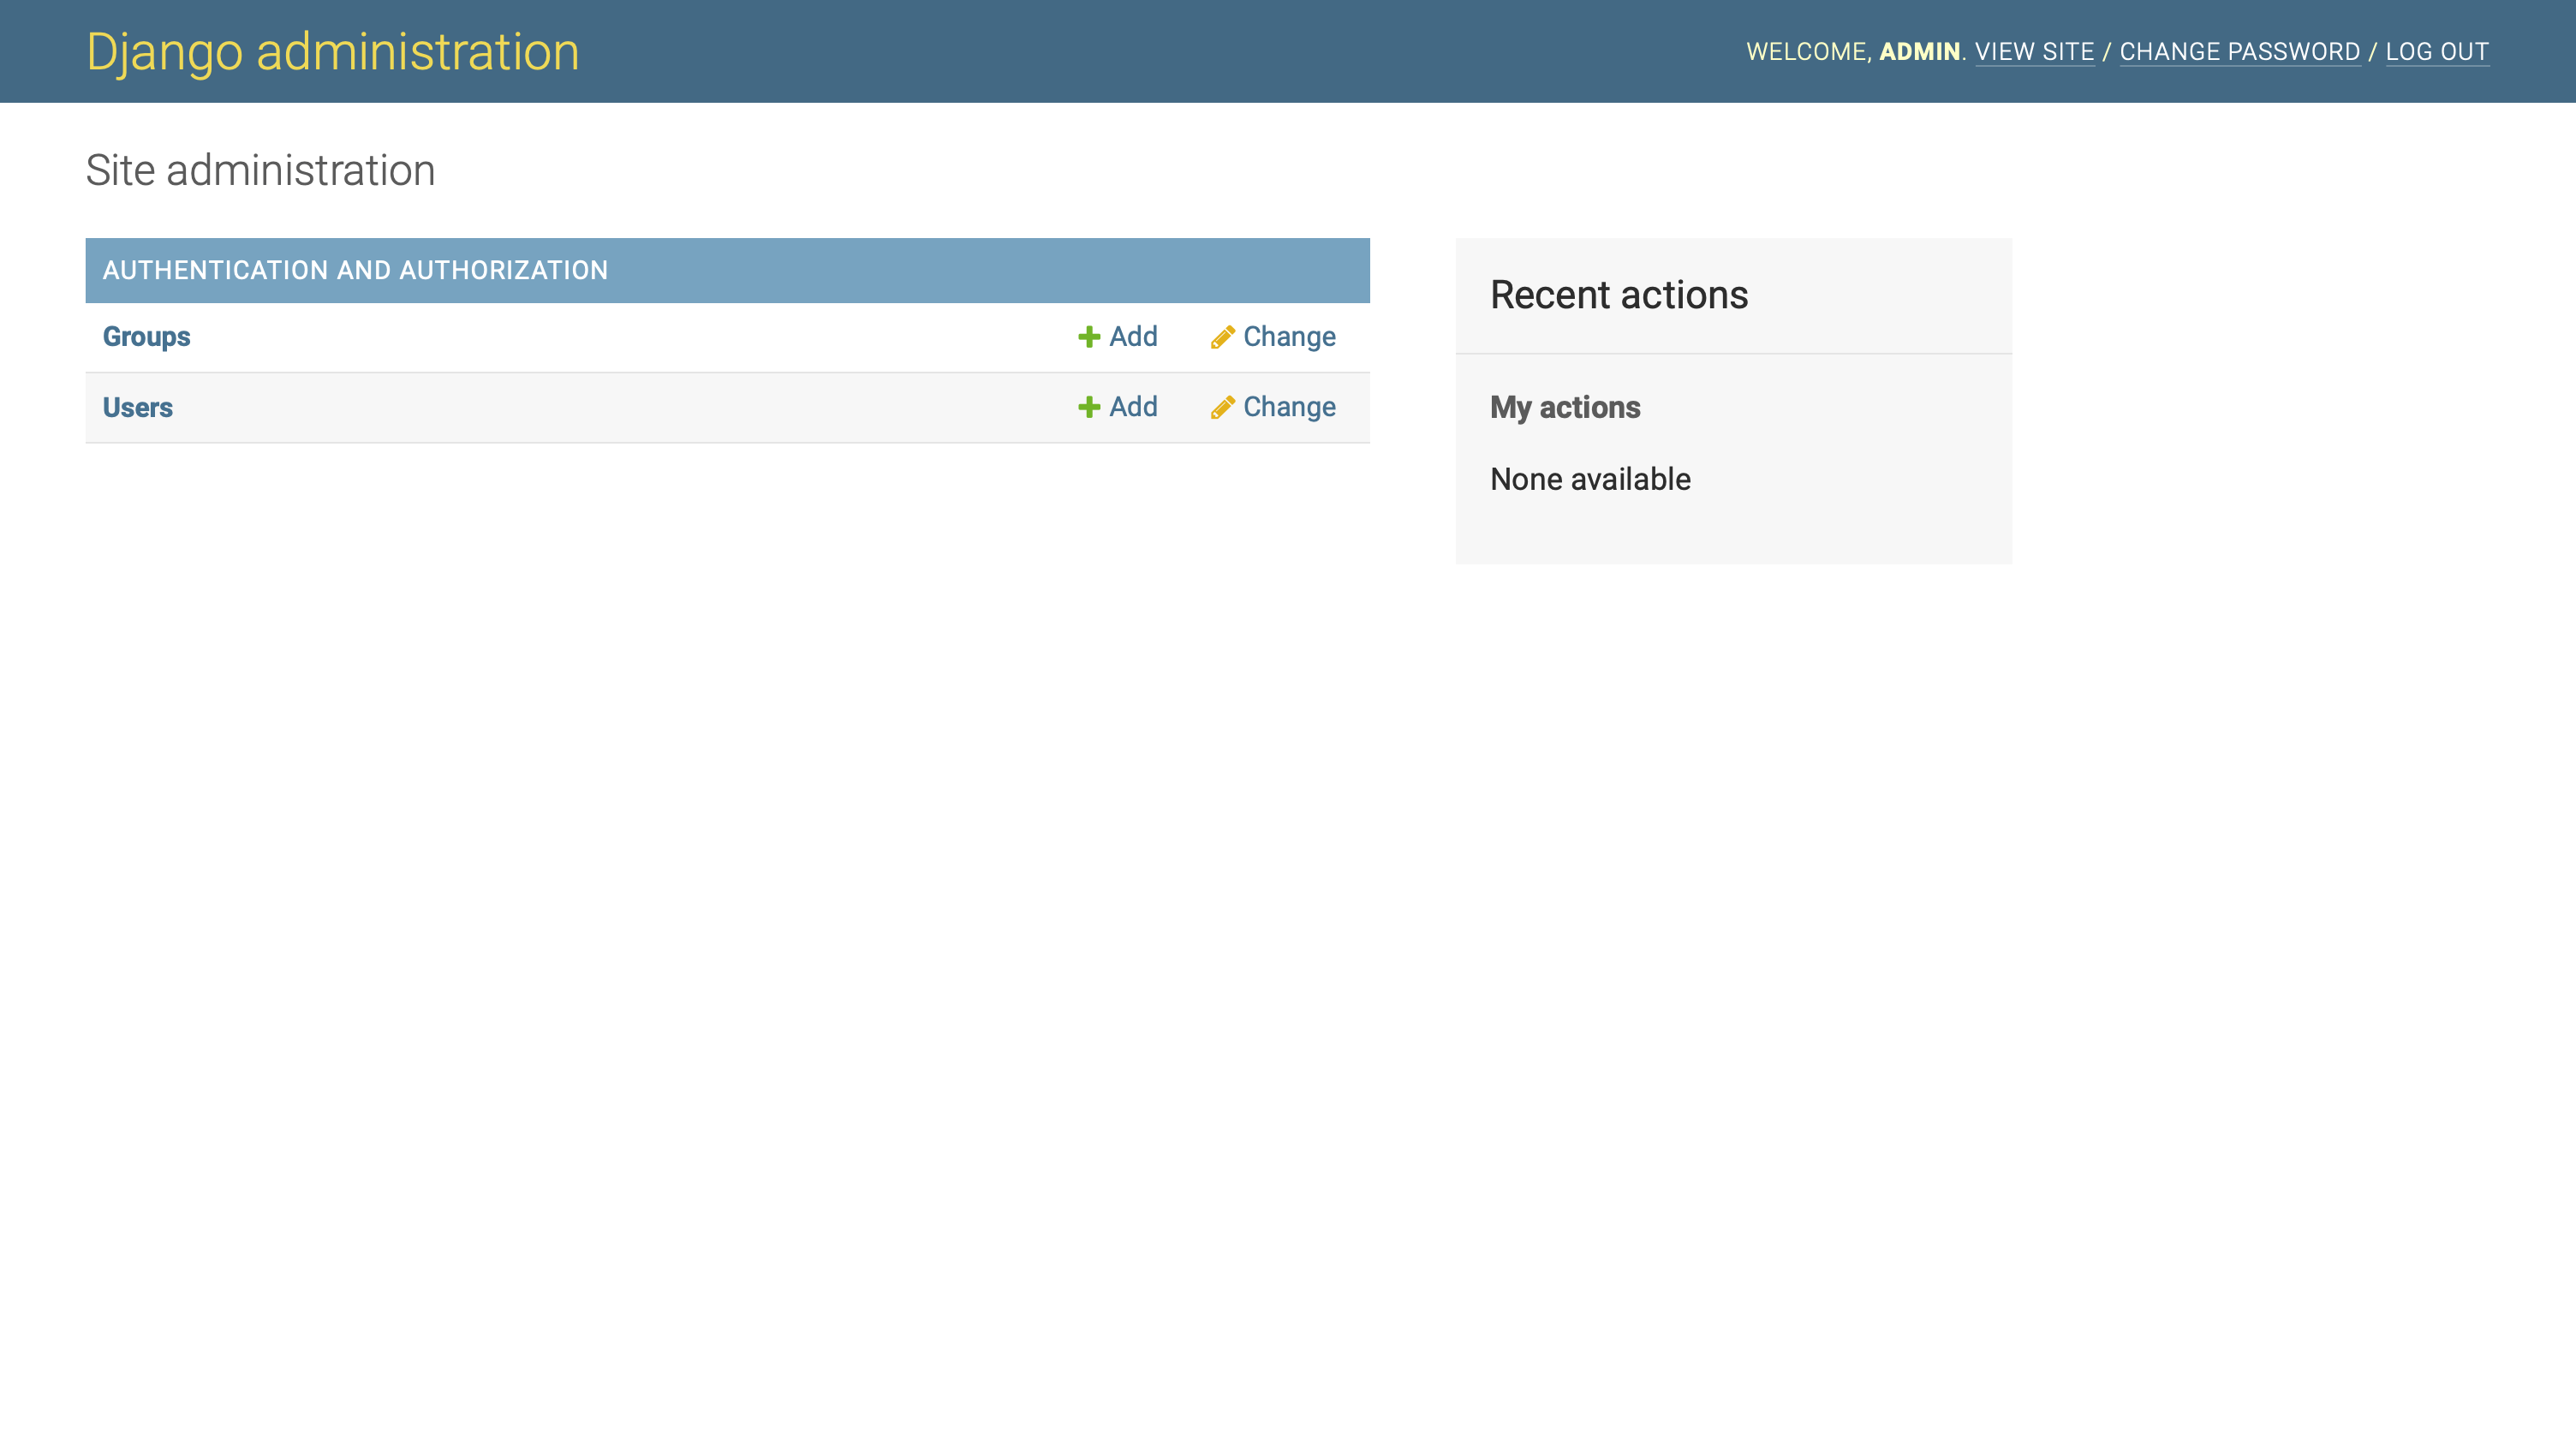
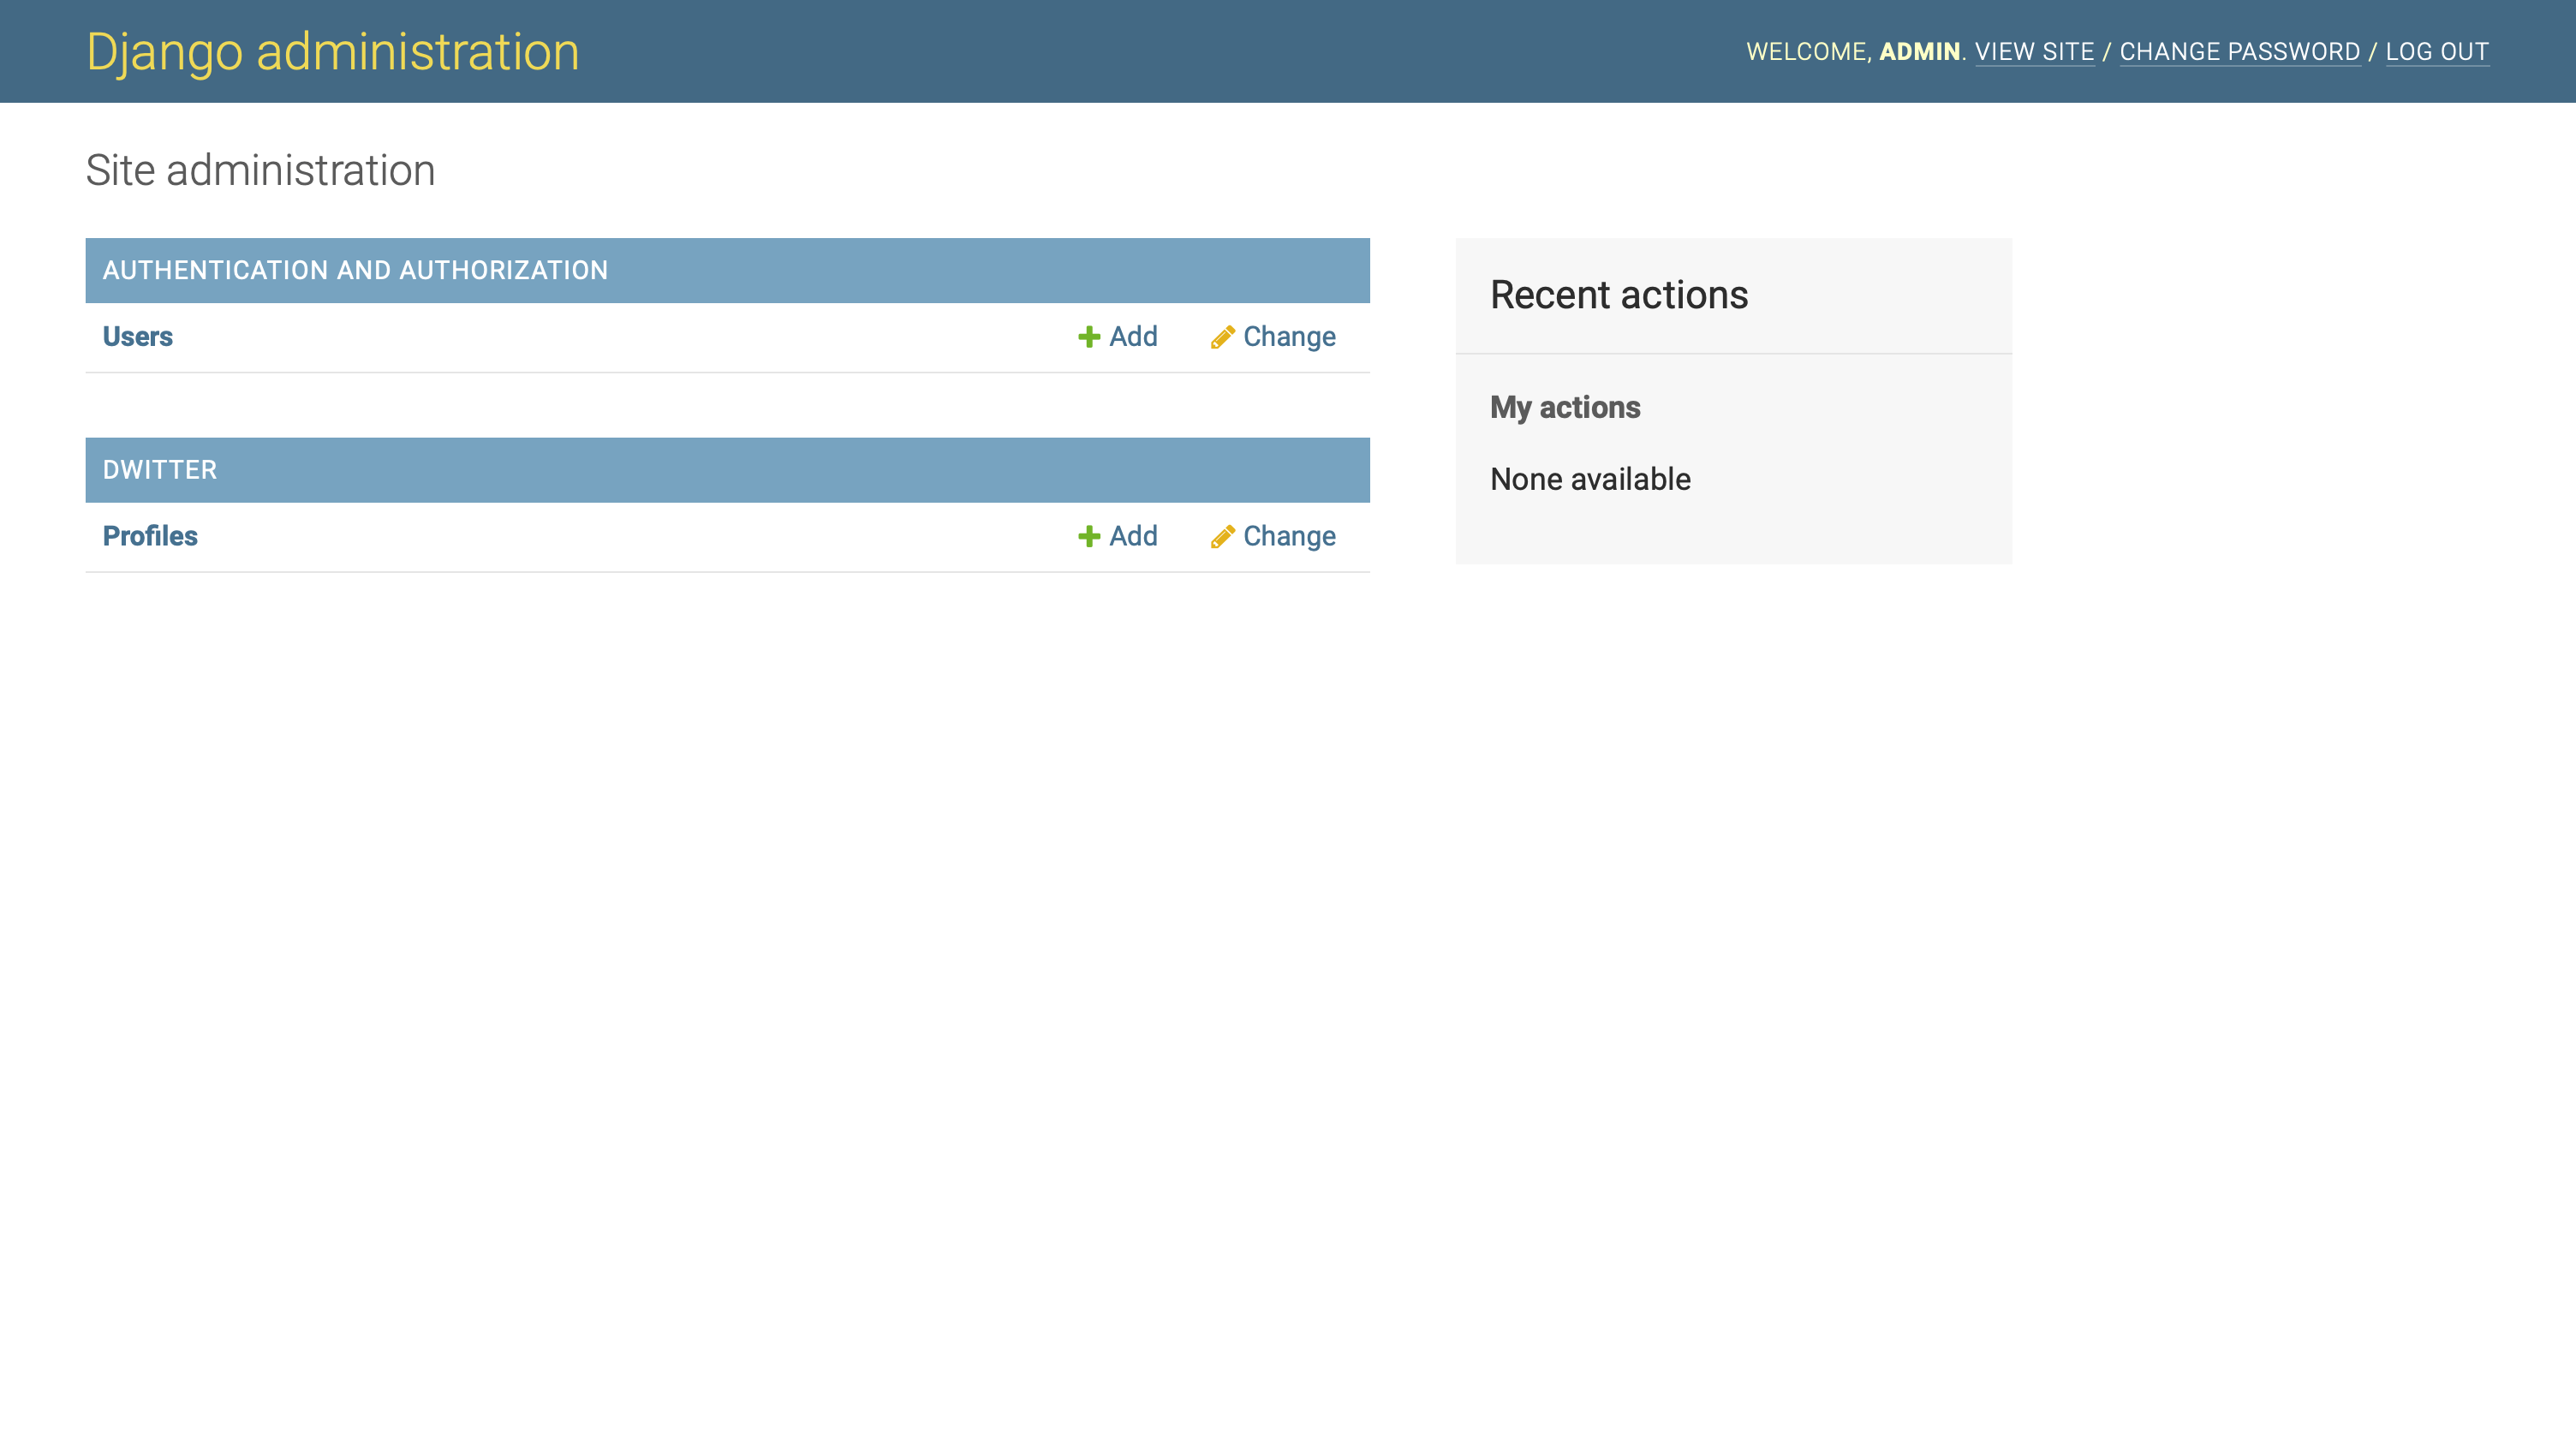
You can see the default model entries for Groups and Users. These come from Django’s built-in authentication and user management apps. Feel free to look around if you’re not yet familiar with them.
There’s a lot in there! However, you want to keep this project as close to the fundamentals as possible to focus on model relationships and the content of your social network.
To simplify your admin, there are a few things you can cut down on:
- You won’t use Django’s Groups, so you can remove it from your admin view altogether.
- The most basic way to create a user in Django is by passing just a username. You can remove all the other fields from the Users model display as well.
Start by unregistering the Group model, which removes that model from your admin interface:
# dwitter/admin.py

from django.contrib import admin
from django.contrib.auth.models import Group

admin.site.unregister(Group)
To unregister Group, first import it from django.contrib.auth.models. Then, use .unregister() to remove it from your admin display.
Check back in your admin interface and notice how the entry for Groups is gone after doing this.
Next, you’ll change the fields displayed in the admin section of Django’s built-in User model. To do this, you need to first unregister it since the model comes registered by default. Then, you can re-register the default User model to limit which fields the Django admin should display. To do this, you’ll use a custom UserAdmin class:
 1# dwitter/admin.py
 2
 3from django.contrib import admin
 4from django.contrib.auth.models import User, Group
 5
 6class UserAdmin(admin.ModelAdmin):
 7    model = User
 8    # Only display the "username" field
 9    fields = ["username"]
10
11admin.site.unregister(User)
12admin.site.register(User, UserAdmin)
13admin.site.unregister(Group)
Adding this code to your admin.py file simplifies the content displayed in the admin site for User, as well as the information you need to enter when creating a new user. To recap, here’s what you’re doing in the different lines of code:
-
Line 4: You add another import where you fetch the built-in
Usermodel fromdjango.contrib.auth.models. -
Lines 6 to 9: You create
UserAdmin, a custom class based on the importedUsermodel. -
Line 9: You limit the fields that the admin interface displays to only
username, which is enough to create a test user. -
Line 11: You unregister the
Usermodel that comes registered by default in the admin interface. -
Line 12: You register the
Usermodel again, additionally passing the customUserAdminclass you created, which applies the changes that you want.
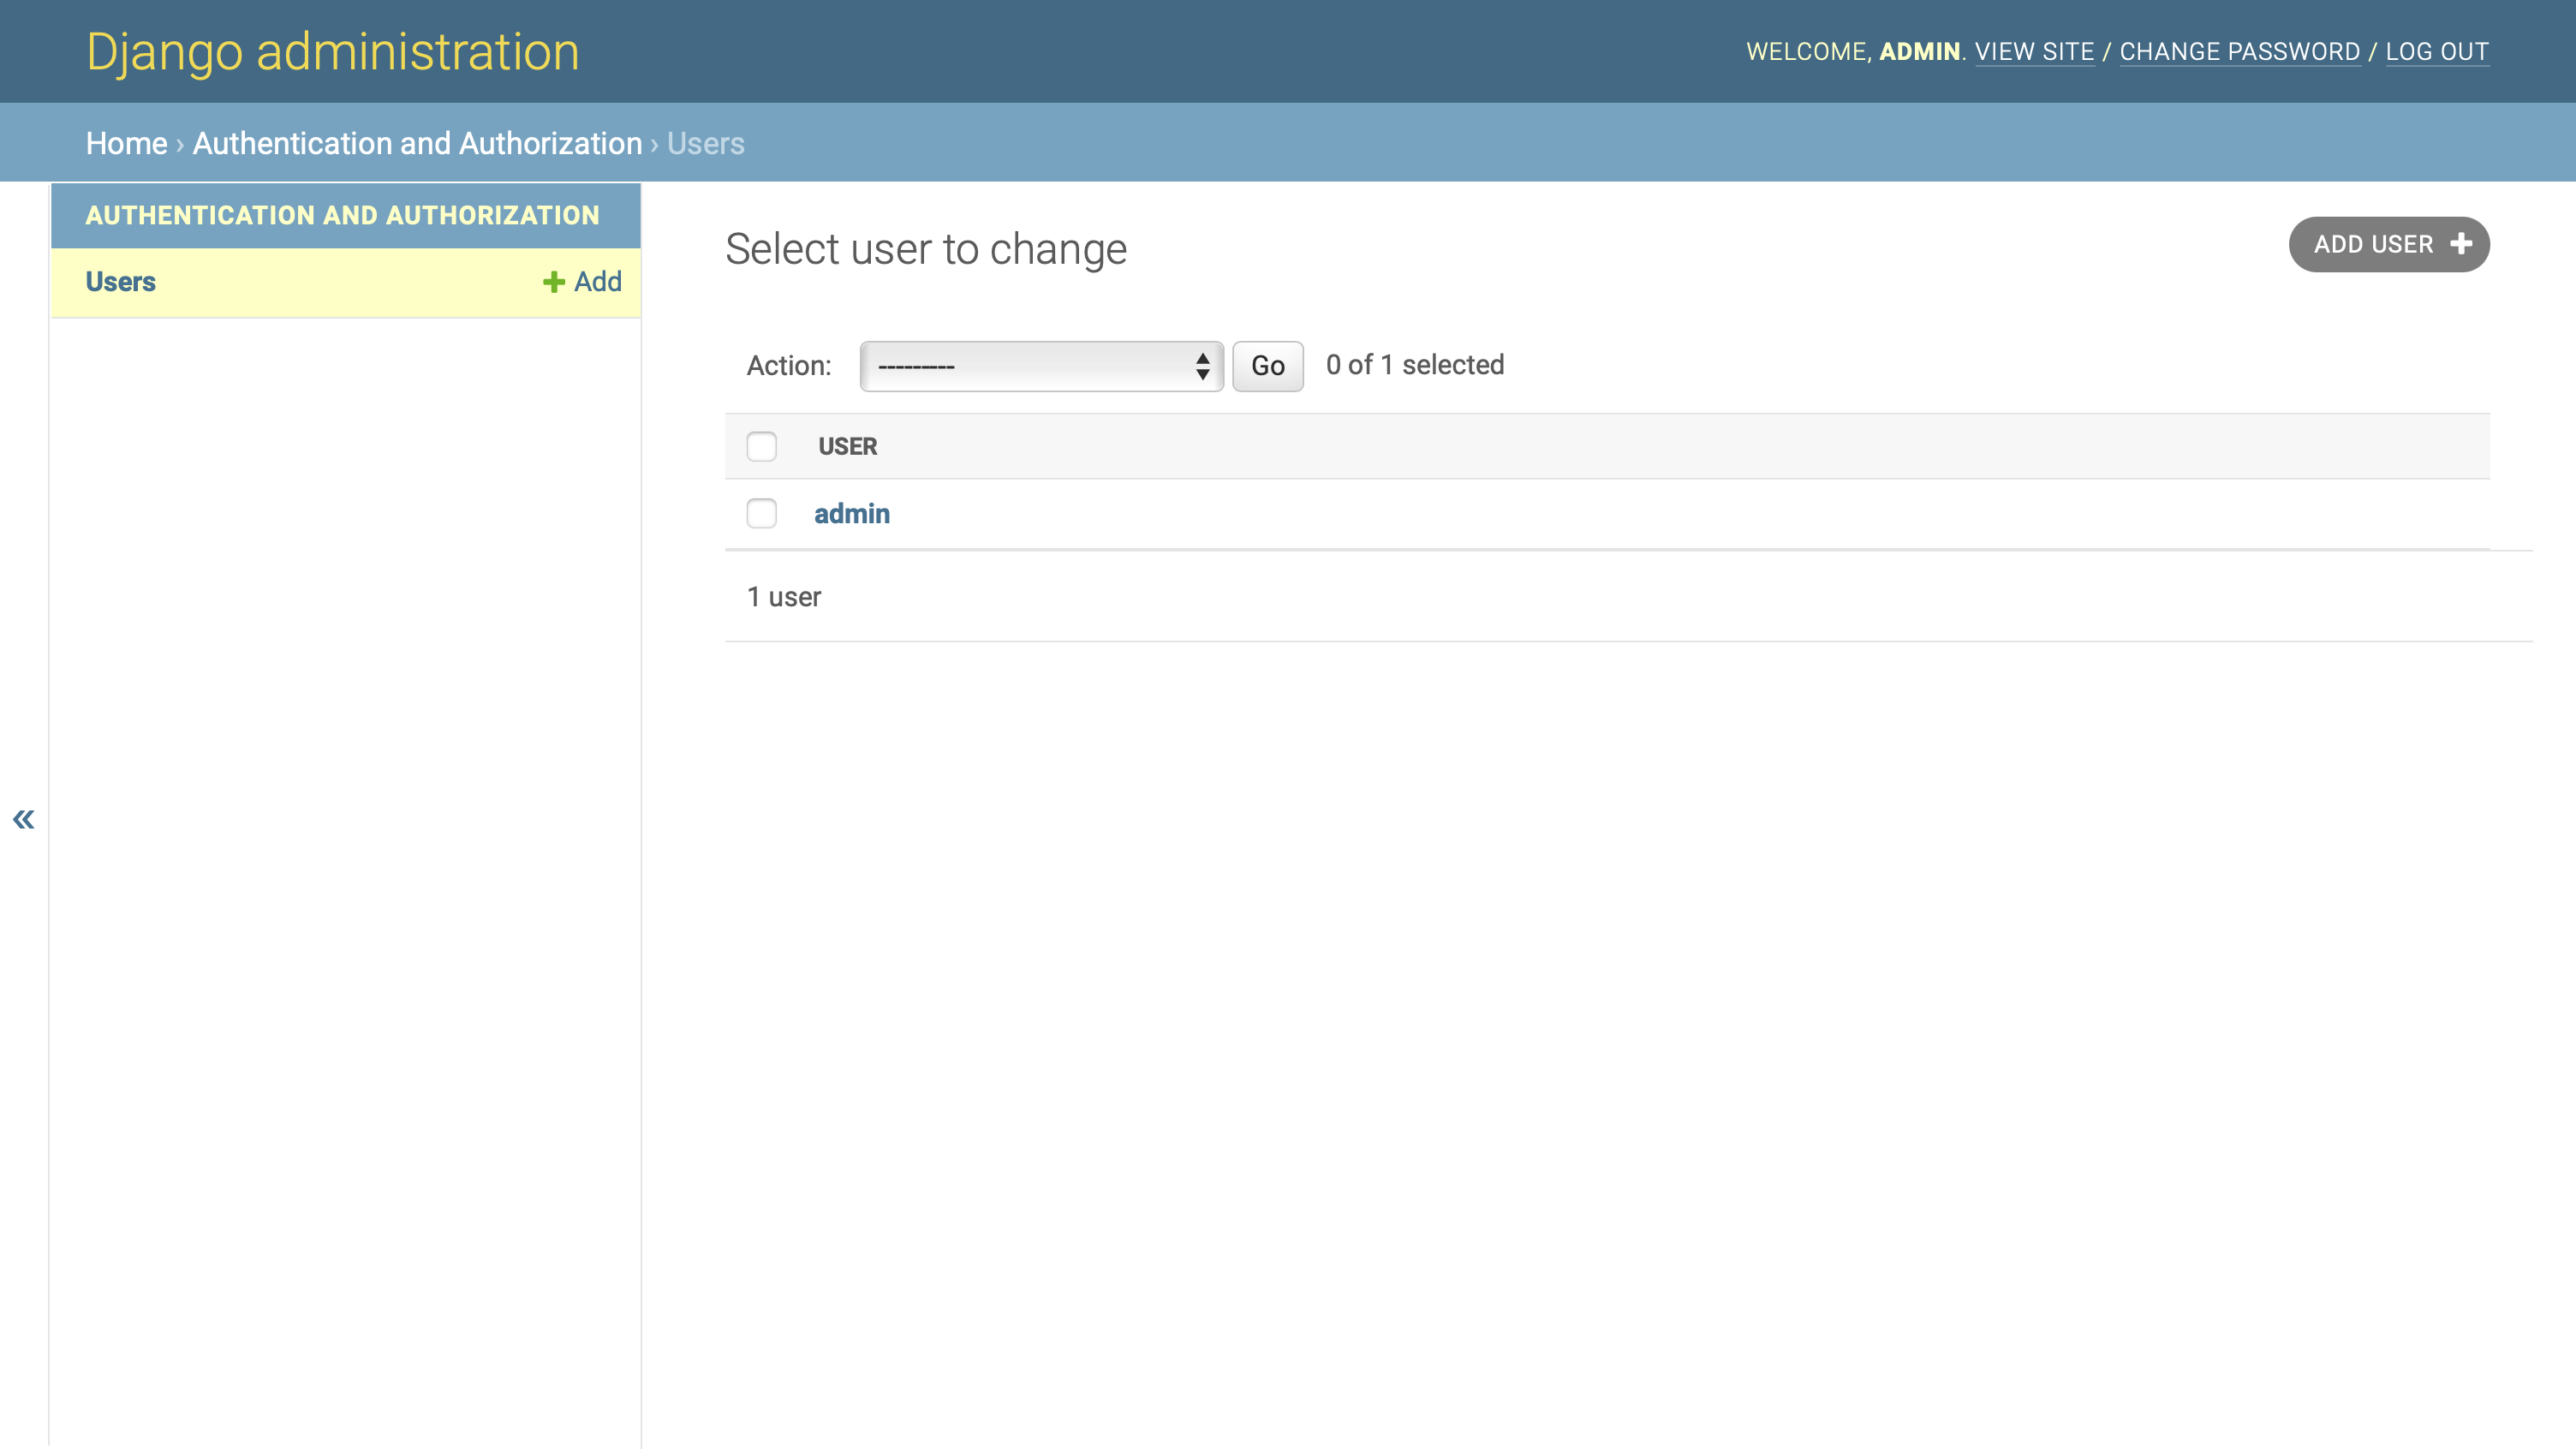
If you now navigate to the User overview page in Home → Authentication and Authorization → Users, then you’ll notice that your admin portal displays much less information than it did before:
With these customizations of your Django admin interface set up, you can now quickly create test users for your app by providing only a username for them.
Create Users for Your App
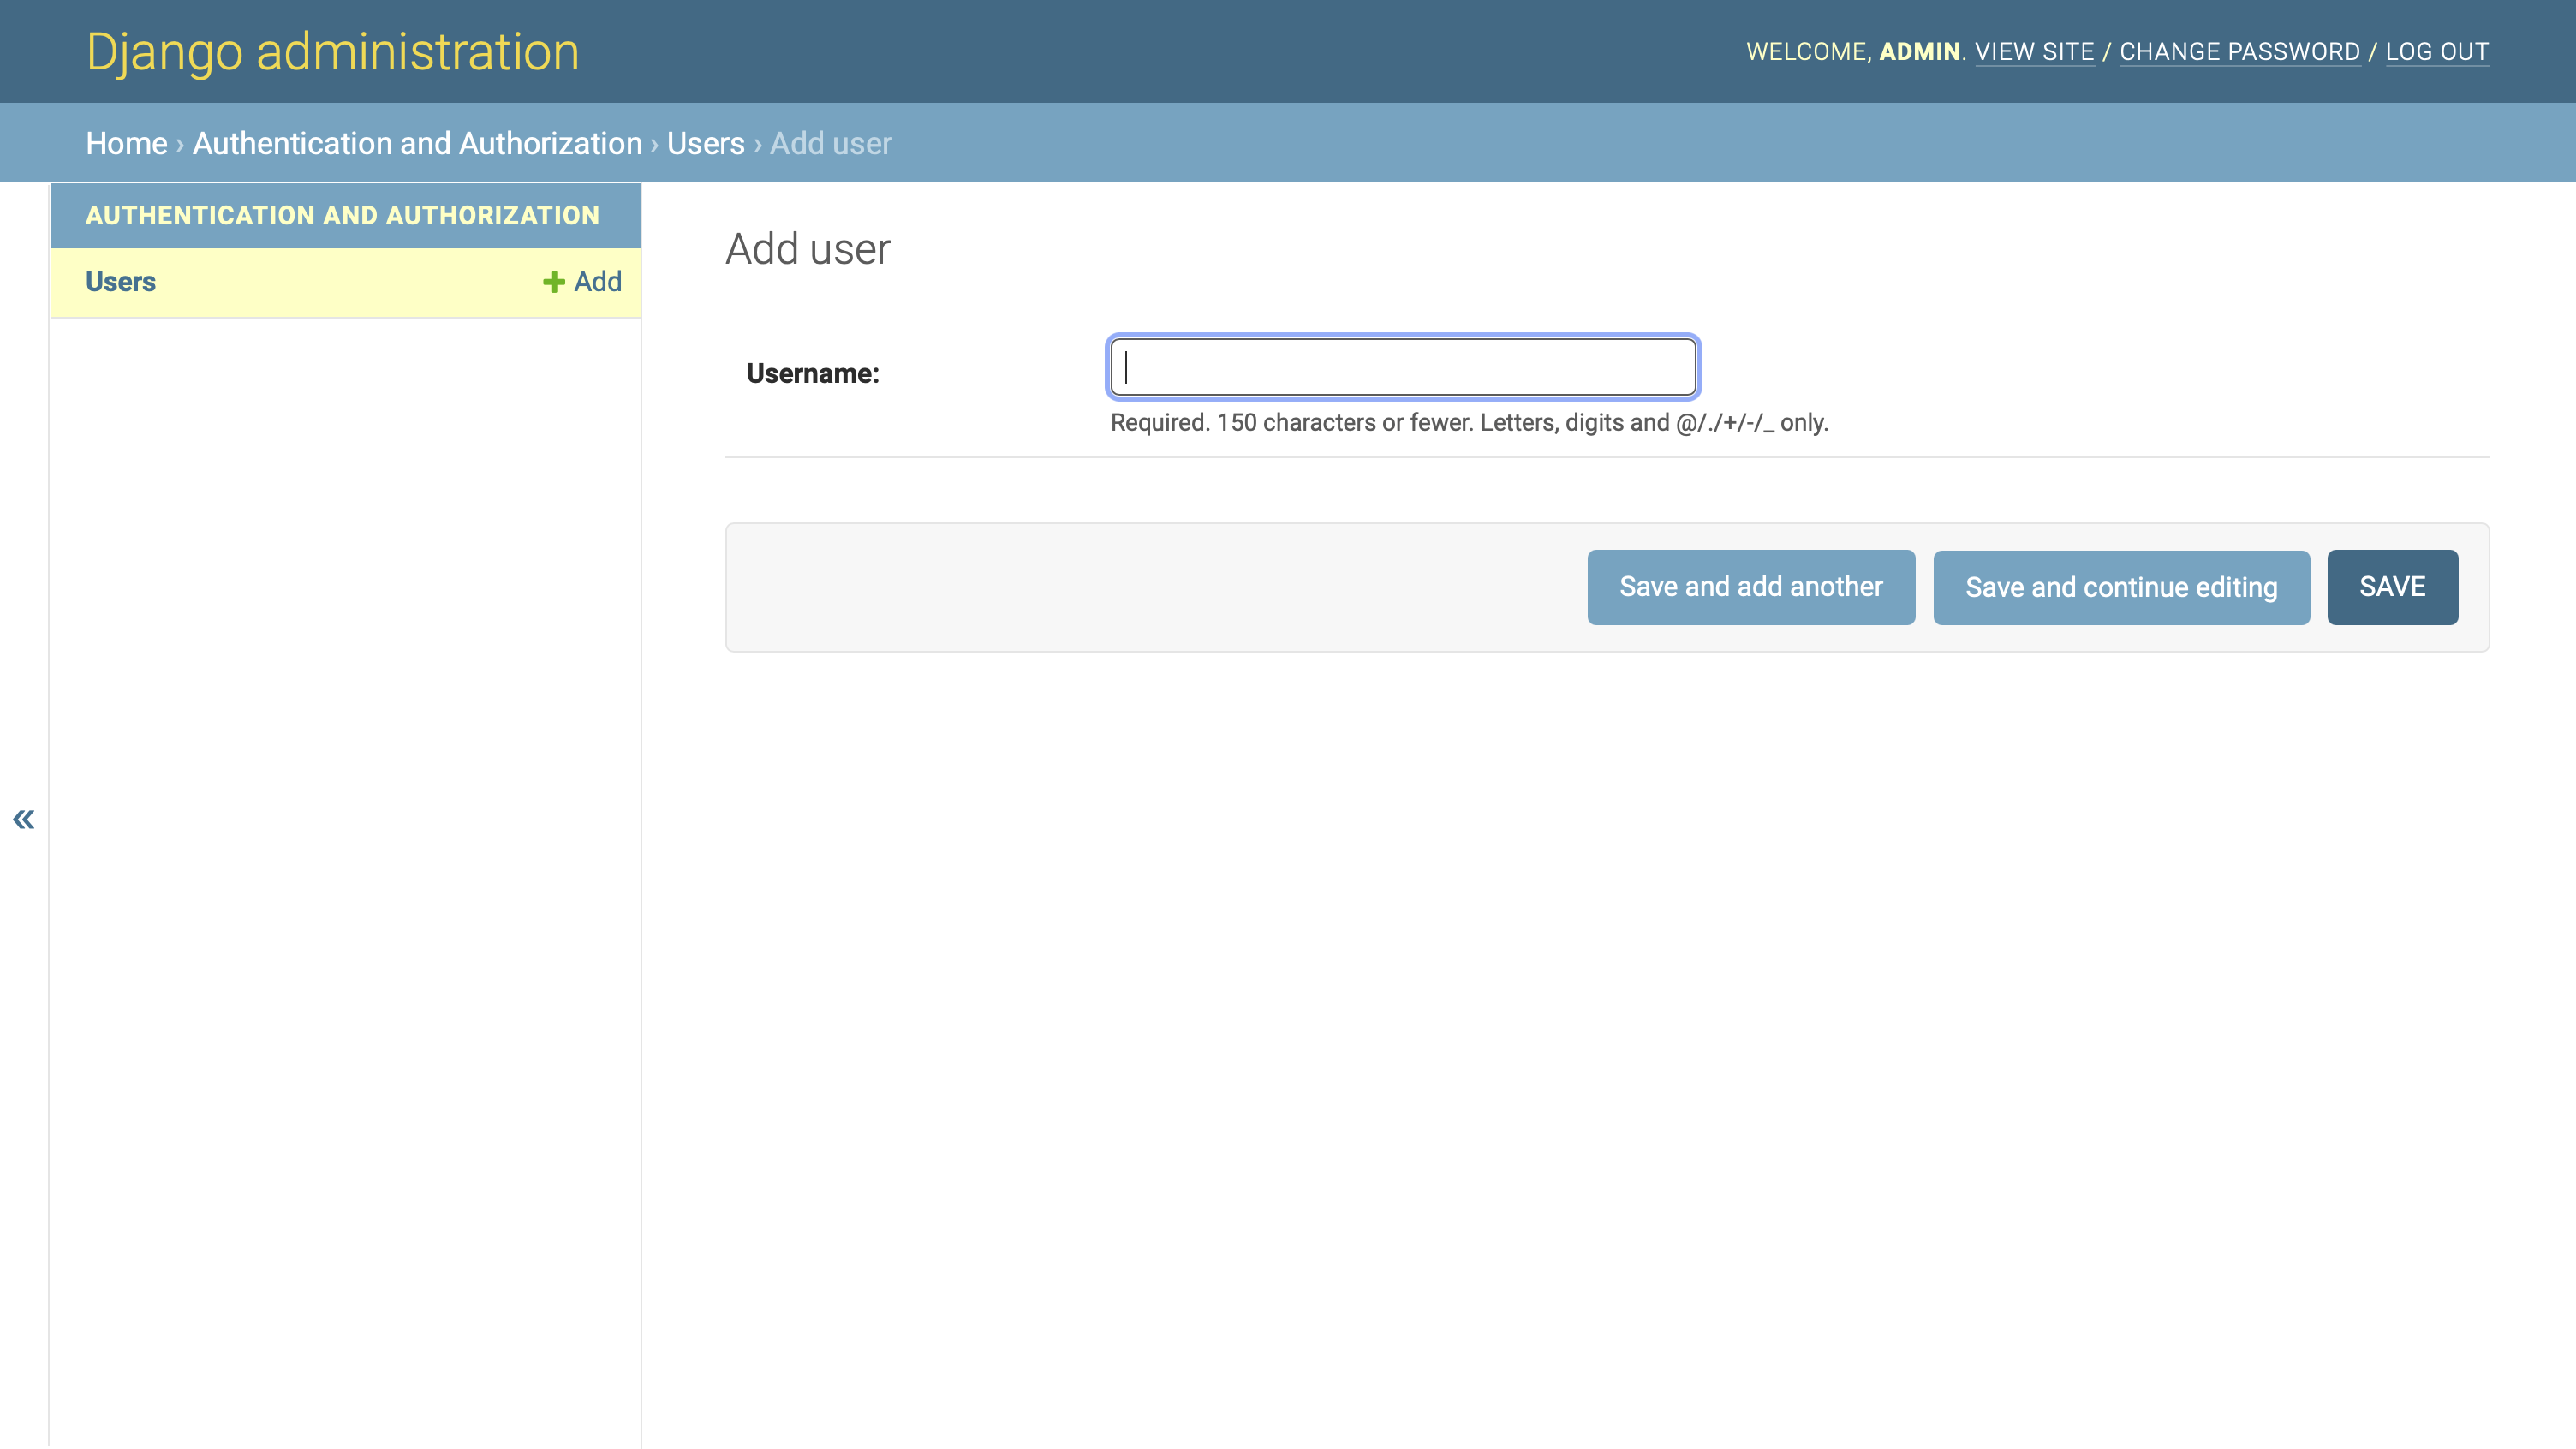
Navigate to Home → Authentication and Authorization → Users → Add user by clicking on the ADD USER button in the top right corner of the interface. Clicking on this button will take you to the default Django user model’s user creation form:
This reduced admin portal allows you to quickly create additional test users for your Django social network whenever you need them, and you’ll only need to provide a username for them.
Go ahead and create two additional users through this interface. You can give them any name you like, such as alice and bob. Once you’ve set up the extra users, then you’ve finished the initial setup for your project.
At this point, you’ve gotten a few essential things done:
- You created a Django project called
social. - You created a Django app called
dwitter. - You cleaned up your admin portal to focus on the essential functionality you need.
- You created a few users for your social network.
Now it’s time to think about the functionality that you want to implement in your social network. If you investigate the Django users that you just created, you might notice that the built-in User model doesn’t have any functionality that allows users to connect. To model connections between users, you’ll need to extend the default Django User model.
Step 2: Extend the Django User Model
At this point, you have a functional Django project with a few registered users. At the end of this step, you’ll have a profile for each user linked to the built-in Django User model, allowing users to connect.
You’ll need a way to hold information about the users of your app. If you started from scratch, you’d have to build an entirely new user model for that. Instead, you’re going to use the built-in Django User model to rely on Django’s well-tested implementation so that you can avoid reinventing the authentication wheel.
However, you’ll also need additional functionality that the default User model doesn’t cover: How can one user follow another user? You’ll need a way to connect users to other users.
While the built-in User model in Django is helpful, it often won’t be enough when building custom apps since it focuses on the minimum setup necessary for authentication. A great way to keep capitalizing on Django’s built-in capacities for user management, while adding your specific customizations, is to extend the User model.
In this tutorial, you’ll link two separate models using a one-to-one relationship, which is one of the officially suggested ways of tackling this challenge.
Create a Profile Model
You’ll extend Django’s built-in User model by using a one-to-one relationship with a small and focused new model, Profile. You’ll build this Profile from scratch. This Profile model will keep track of the additional information that you want to collect about each user.
What do you need in addition to the user information that the Django User model already includes? Take out your notebook and brainstorm the additional user attributes that you need for your basic social network before looking at a possible solution:
There are at least three pieces of information that you’ll need to collect about each user:
- Whom they follow
- Who follows them
- Which dweets they wrote
You’ll implement the first two of these in the Profile model, while you’ll save the dweets for a later part of this tutorial series.
You could add even more details about each user than what’s outlined above, such as biographical information. After you complete this tutorial series, adding more details to the Profile model will be an excellent exercise.
The Profile model only contains information that your users create after they already have a user account, which allows you to let Django handle the sign-up and authentication process. This is one of the suggested ways for extending the existing User model, so you’ll stick with it.
Your Profile model should record the user’s connections to other user profiles. That’s the fundamental piece of information that’s still missing before you can successfully model user-to-user connections. This means that your main focus with the Profile model will be setting it up to record who follows a profile and, from the other direction, whom a profile follows.
You’ll only need to create one field to model both of these connections. This is because Django can treat the profile that’s doing the following as having an inverse relationship with the profile that’s being followed:
The ER diagram shows that the Profile model connects to itself through the follows many-to-many relationship.
Open models.py in your dwitter app and write the code for your new Profile model:
 1# dwitter/models.py
 2
 3from django.db import models
 4from django.contrib.auth.models import User
 5
 6class Profile(models.Model):
 7    user = models.OneToOneField(User, on_delete=models.CASCADE)
 8    follows = models.ManyToManyField(
 9        "self",
10        related_name="followed_by",
11        symmetrical=False,
12        blank=True
13    )
By setting up Profile this way, you couple each profile to precisely one user:
-
Line 4: You import the built-in
Usermodel that you want to extend. -
Line 7: You define a
OneToOneFieldobject calleduser, representing the profile’s connection to the user that was created with Django’s built-in user management app. You also define that any profile will get deleted if the associated user gets deleted. -
Lines 8 to 13: You define a
ManyToManyFieldobject with the field namefollows, which can hold connections to other user profiles. -
Line 10: In this line, you pass a value for the
related_namekeyword on yourfollowsfield, which allows you to access data entries from the other end of that relationship through the descriptive name"followed_by". -
Line 11: You also set
symmetricaltoFalseso that your users can follow someone without them following back. -
Line 12: Finally, you set
blank=True, which means your users don’t need to follow anyone. Thefollowsfield can remain empty.
With Profile set up, you can run Django’s database commands to propagate the model updates to your database:
(social) $ python manage.py makemigrations
(social) $ python manage.py migrate
Running makemigrations creates a migration file that registers the changes to your database, and migrate applies the changes to the database.
You can now register the Profile model to your admin interface so that the admin will display it in addition to the built-in User model:
# dwitter/admin.py

# ...
from .models import Profile

# ...
admin.site.register(Profile)
After importing Profile from your current app and registering it with the admin interface, you can restart your development server:
(social) $ python manage.py runserver
Once it’s running, head over to your admin interface. Profiles shows up underneath your User model in the DWITTER panel:
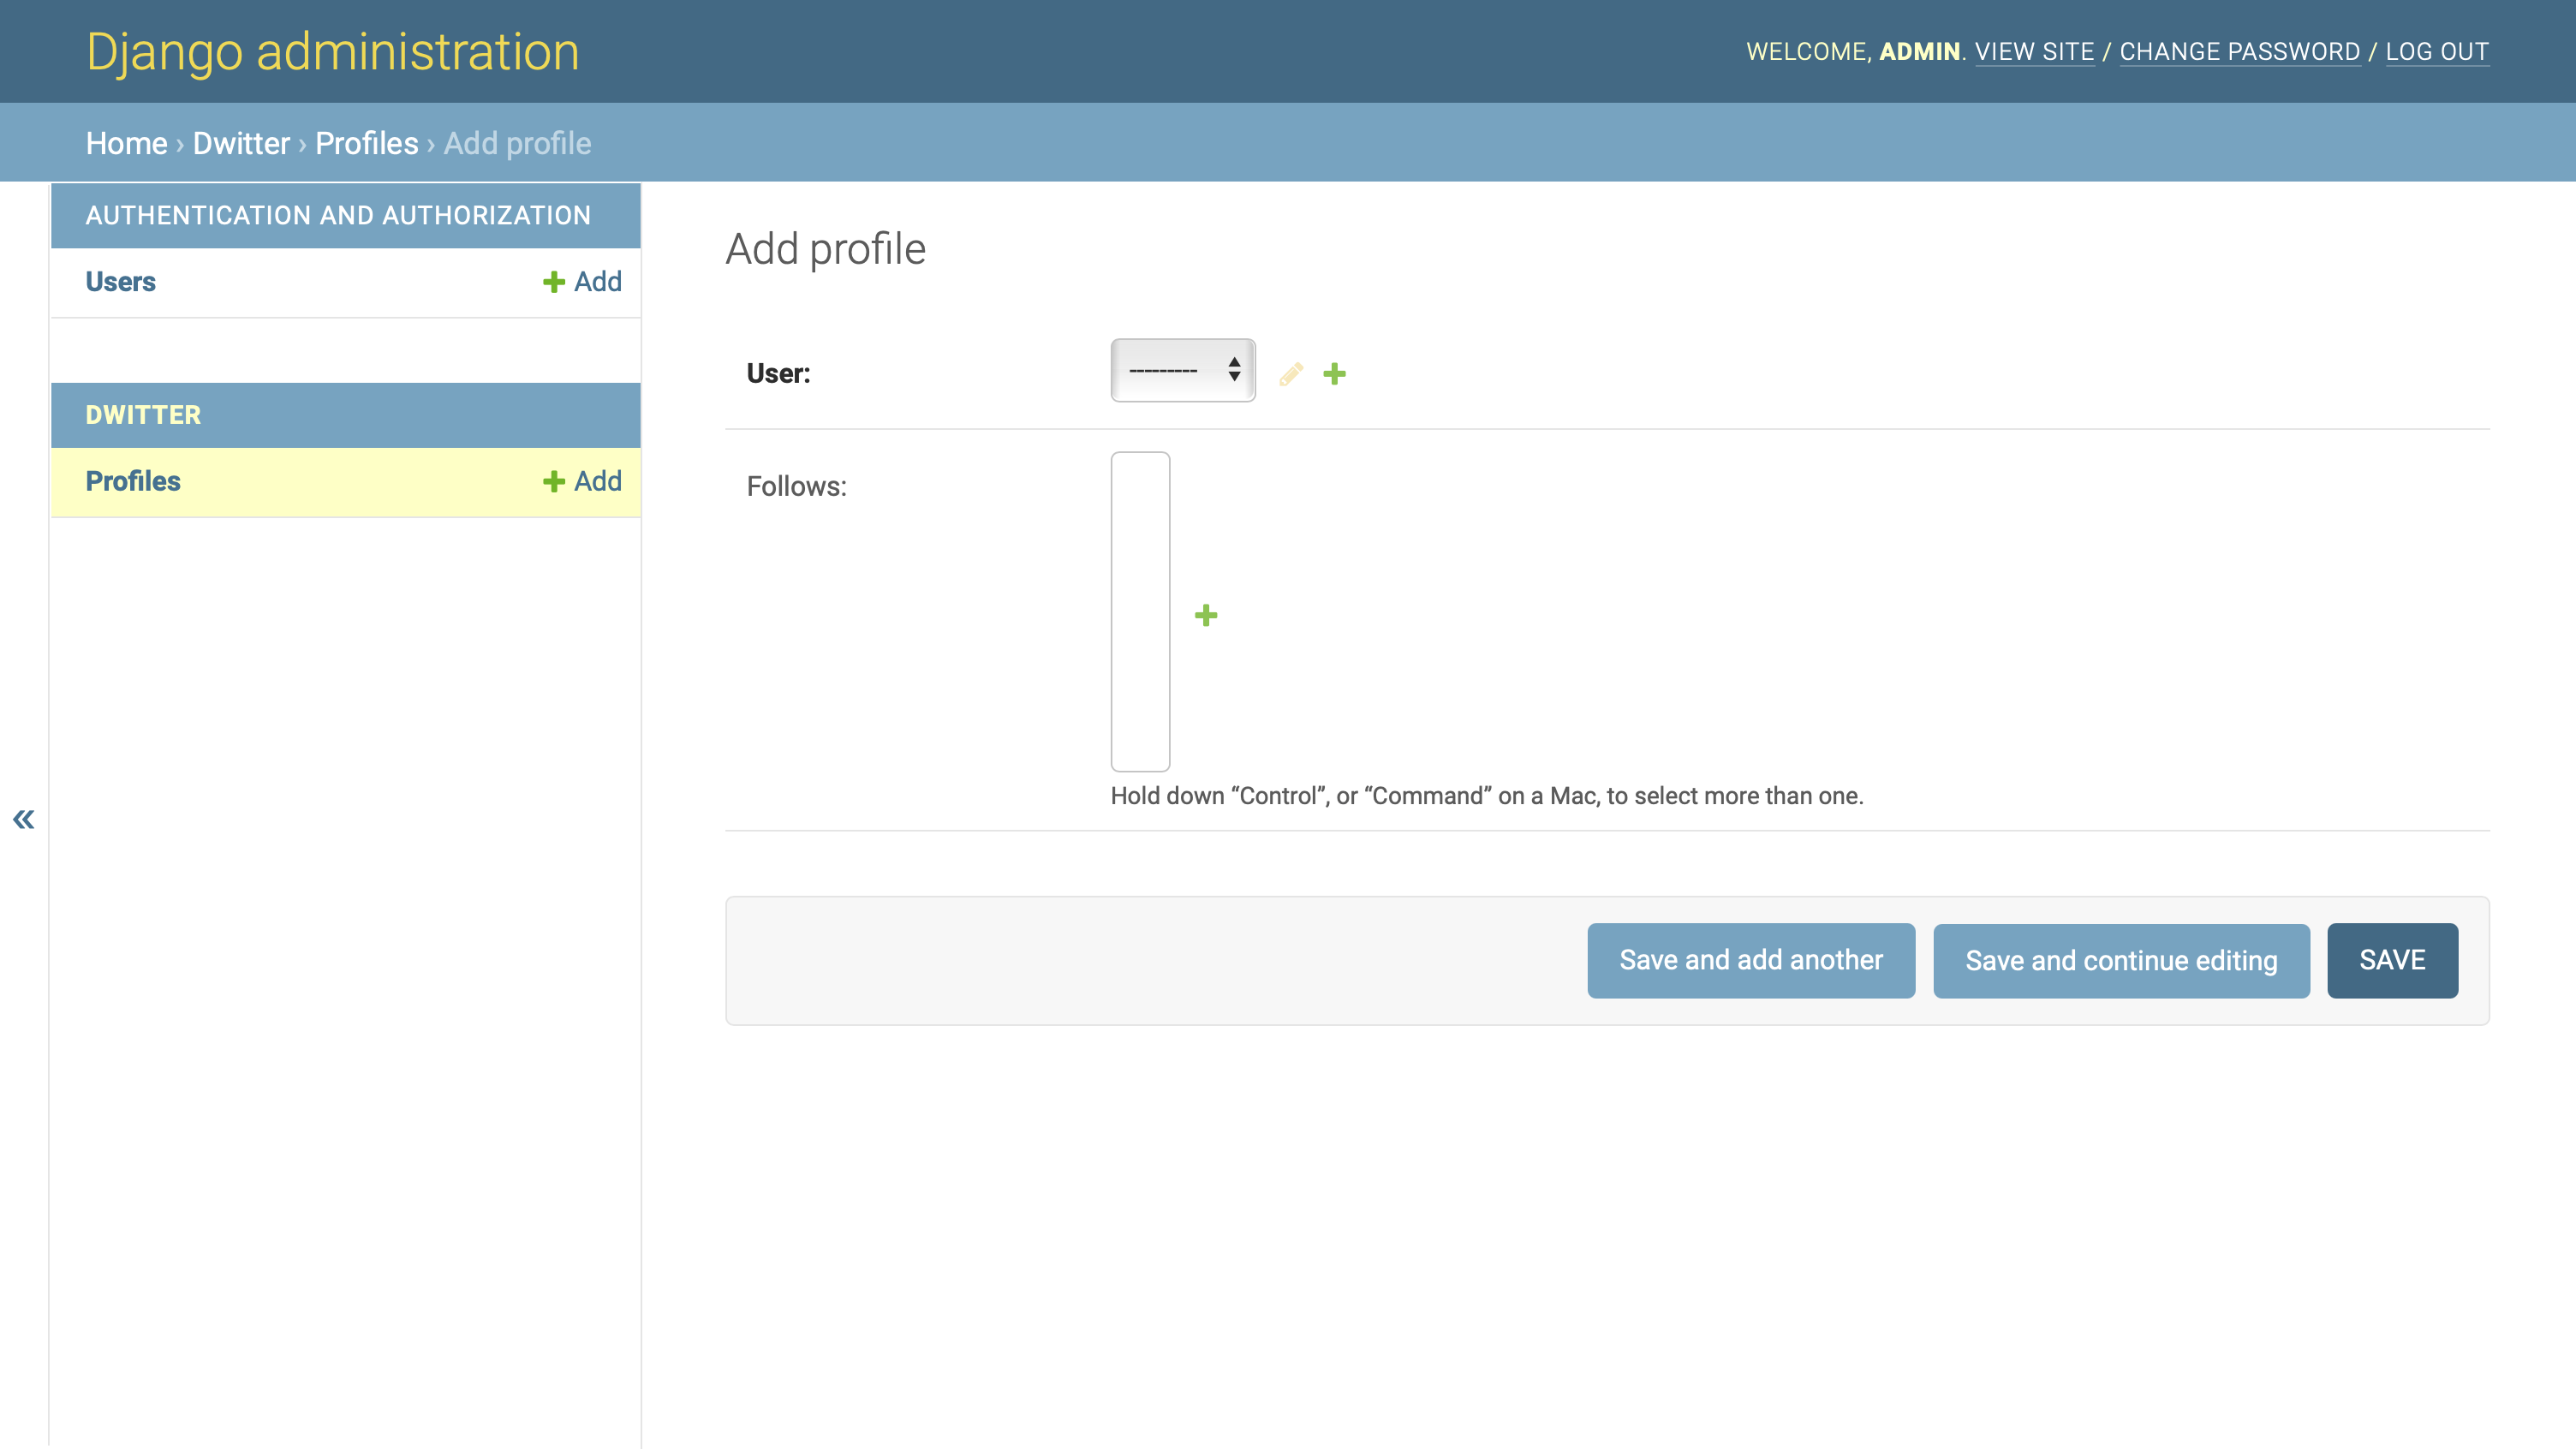
If you click on + Add next to Profiles, Django will present you with a profile create view:
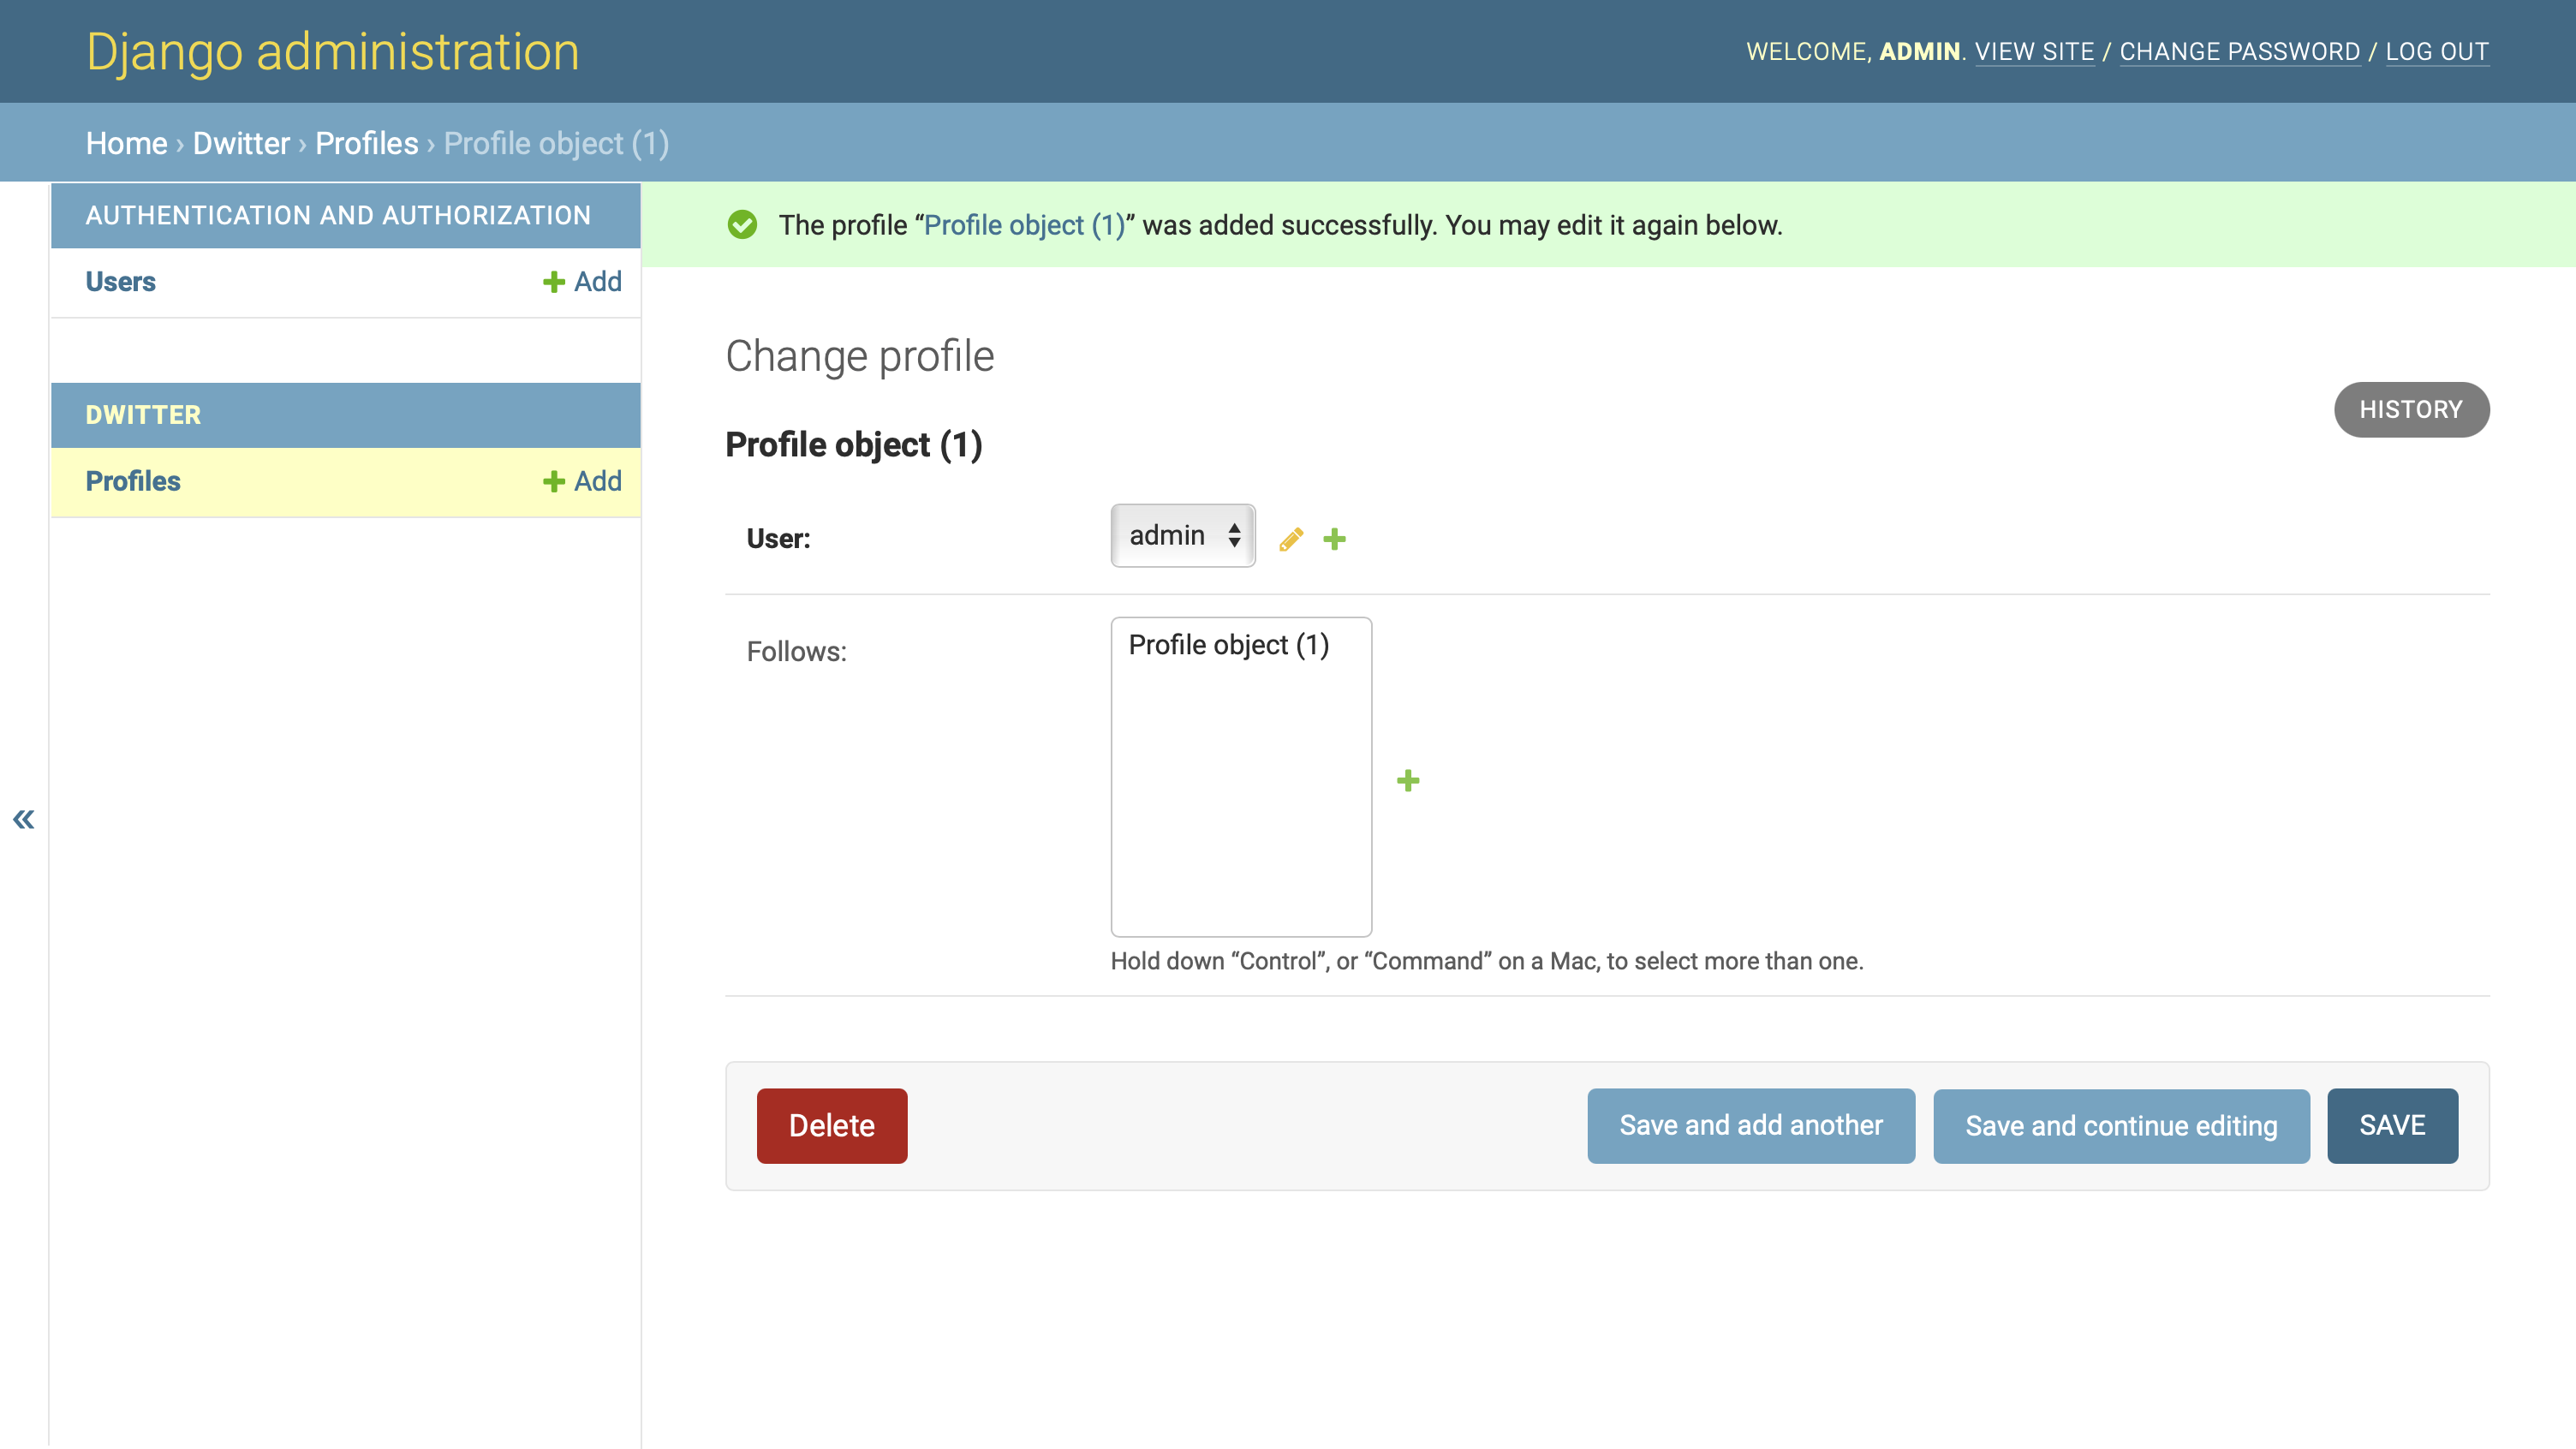
You need to select a User to associate with the profile. Once you’ve chosen a user from your dropdown, you can click on SAVE to create your first user profile. After that, the profile will show up as a selectable object inside of Follows:
You can select the new profile object Profile object (1) and click on SAVE again to follow your own user profile.
If you already created other users at this point, then make sure to create a profile for them as well.
At this point, you already have all the functionality that you need to create profiles and follow other profiles. However, having User and Profile displayed in two separate places when they’re so tightly connected and minimally informative might seem inconvenient. With some more customization of your admin interface, you can improve this setup.
Display Profile Information Within the User Admin Page
Throughout this tutorial series, you’ll handle user creation through your admin. Each of your users needs a user account and a profile, and these two need to be connected.
Instead of creating the user and their profile in two different places, you’ll customize your admin interface by adding an admin inline, which allows you to edit both in one area.
Head back to dwitter/admin.py to register your new Profile model as a stacked inline instead of the standard way of registering a model. You can use the UserAdmin class that you created earlier and customize it by adding the related model as an inline:
# dwitter/admin.py

# ...

class ProfileInline(admin.StackedInline):
    model = Profile

class UserAdmin(admin.ModelAdmin):
    model = User
    fields = ["username"]
    inlines = [ProfileInline]

admin.site.unregister(User)
admin.site.register(User, UserAdmin)
admin.site.unregister(Group)
# Remove: admin.site.register(Profile)
In this code snippet, you create a stacked inline for Profile by creating ProfileInline and inheriting from admin.StackedInline. You can then add ProfileInline as a member of inlines to your UserAdmin.
Finally, you’ve also removed the last line, where you previously registered the Profile model separately.
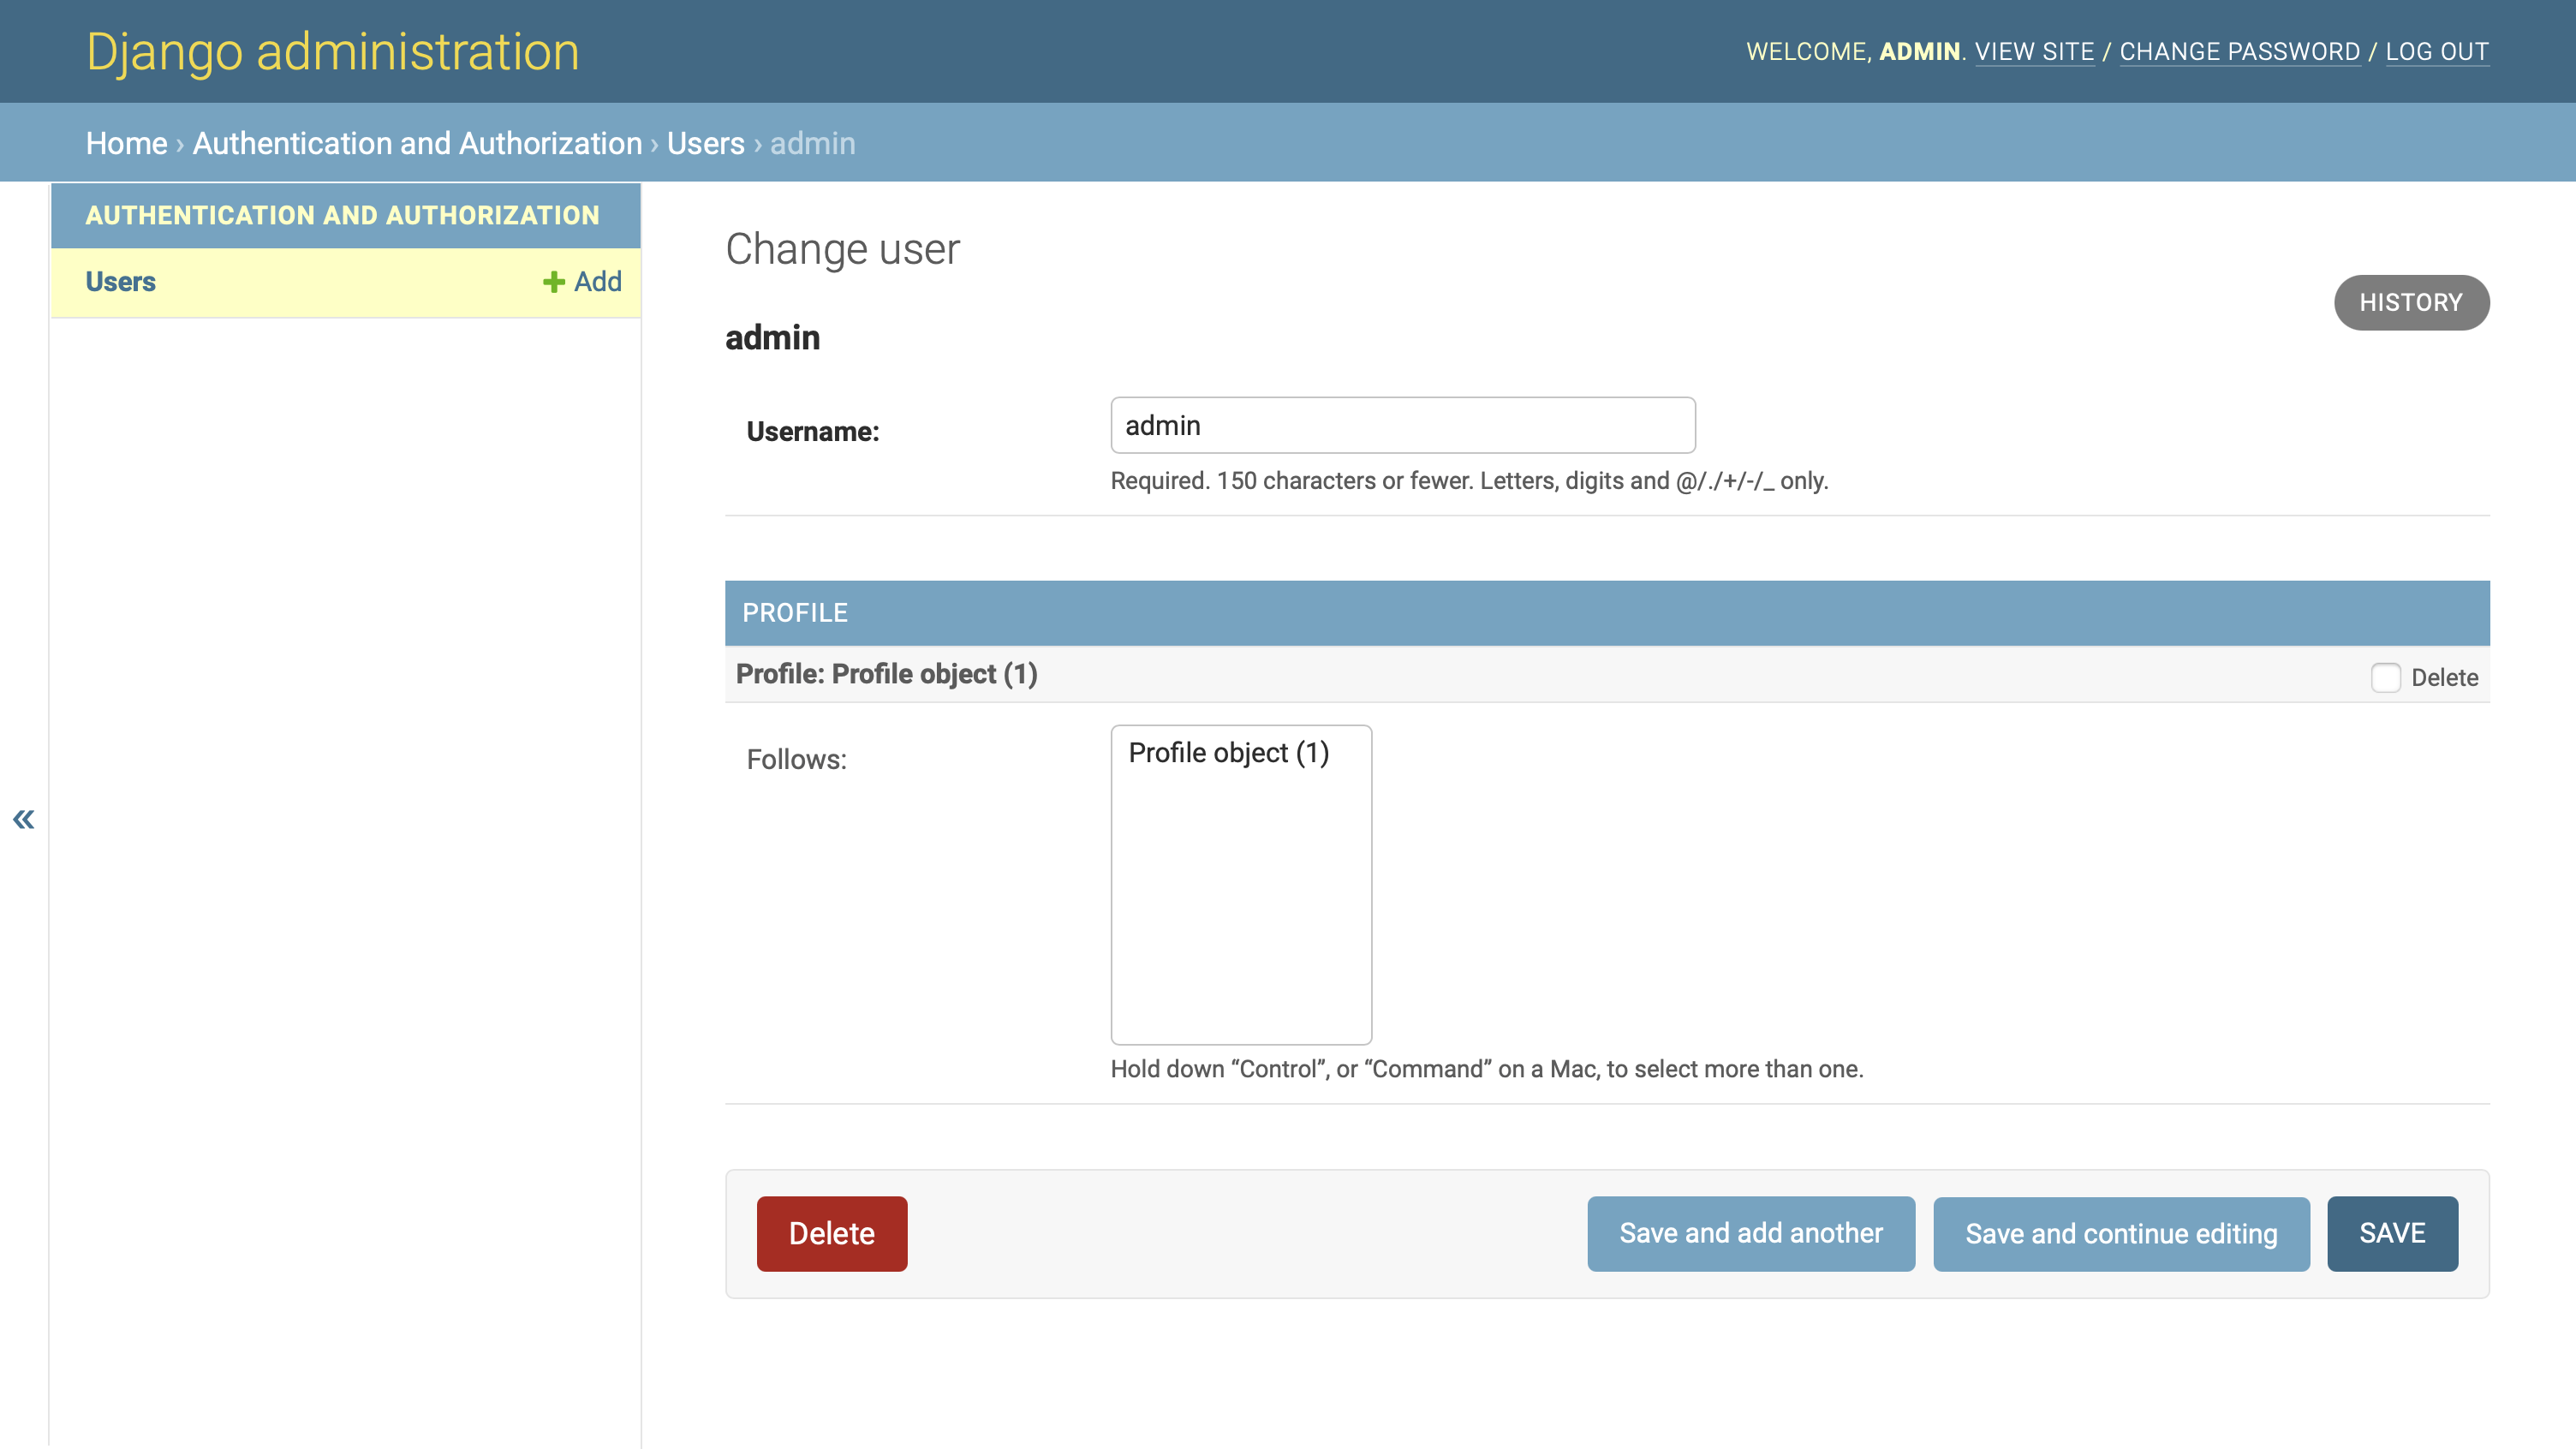
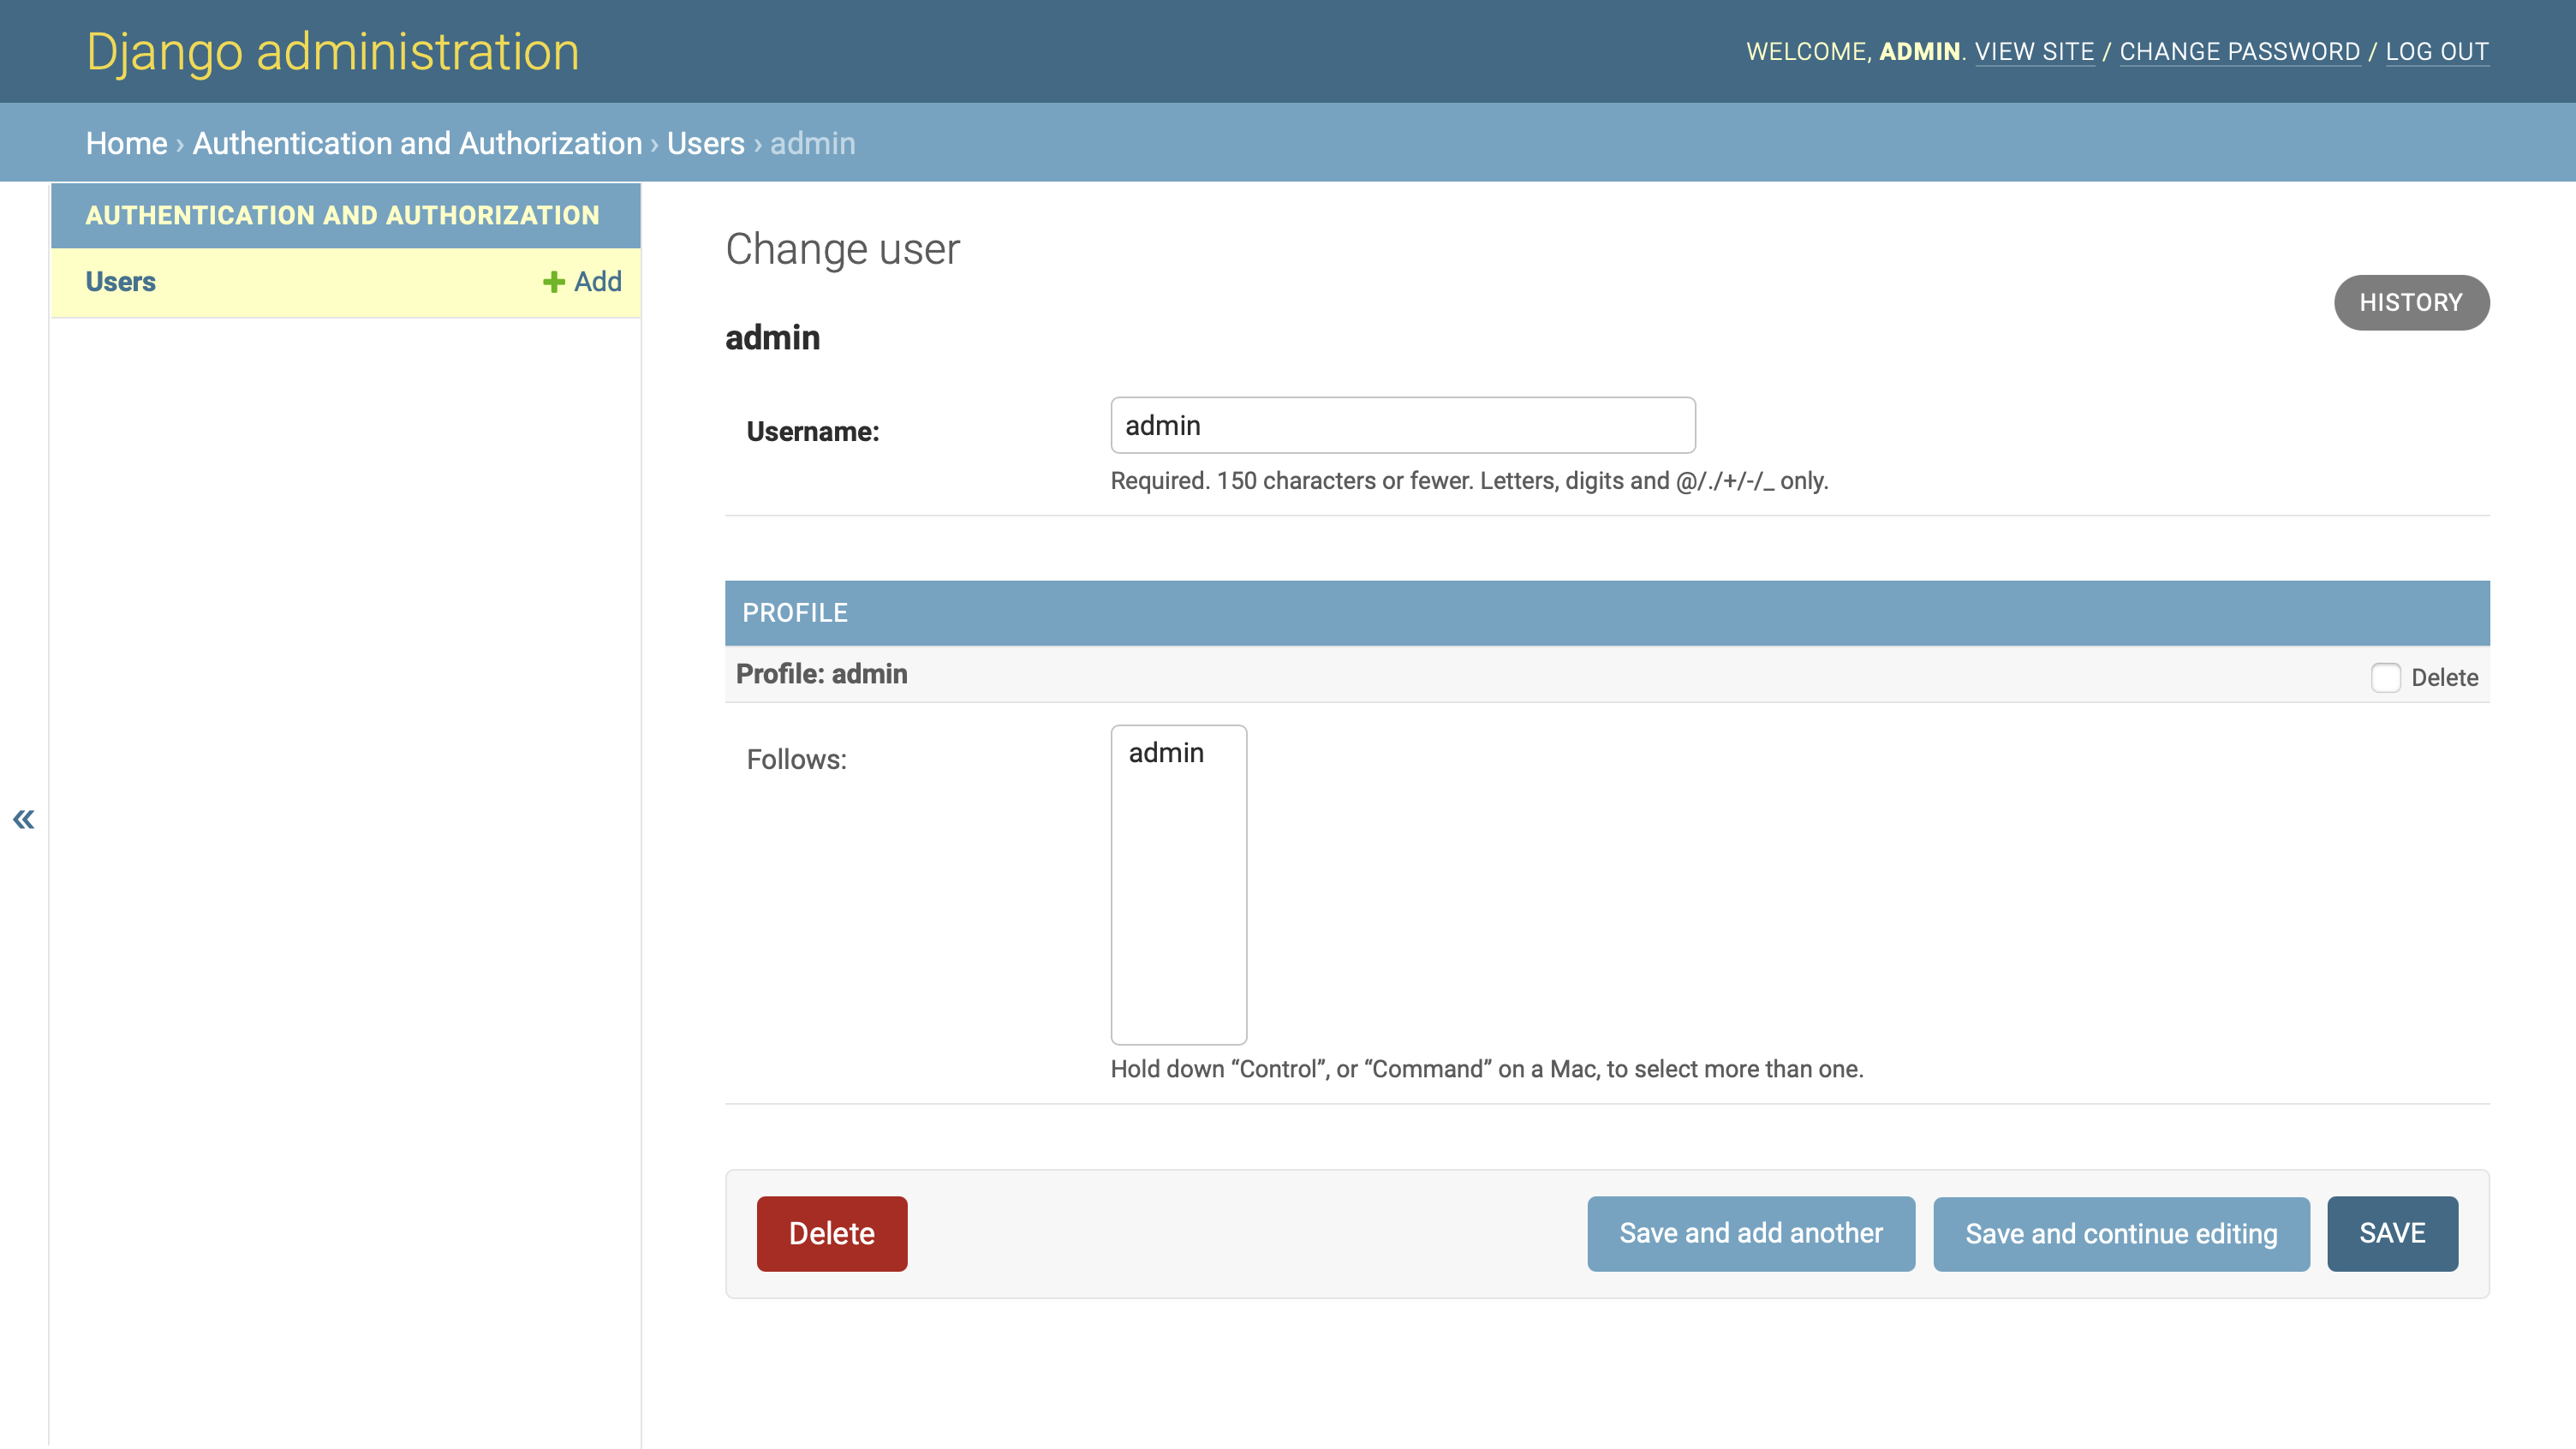
When you go to your admin interface, you’ll see that the entry for Profiles is gone from the main page. However, when you navigate to one user entry through the Users page, you’ll see the profile information next to your user information:
The information from Profile now gets displayed together with the information from Django’s built-in User model, which you restricted to only showing the username field.
That’s a significant improvement and makes handling your users through the admin interface much more convenient!
However, your profile names are currently hard to interpret. How would you know that Profile object (1) is the user profile of admin? Without descriptive information associated with your Profile model, this is hard to guess. To change that, head back to dwitter/models.py and add a .__str__() method to Profile:
# dwitter/models.py

class Profile(models.Model):
    user = models.OneToOneField(User, on_delete=models.CASCADE)
    follows = models.ManyToManyField(
        "self", related_name="followed_by", symmetrical=False, blank=True
    )

    def __str__(self):
        return self.user.username
With this addition, you overloaded the default .__str__() method so that it returns the value of username from the associated instance of the User model. Check the results in the admin interface by reloading the page:
After this change, the profile object connected to the admin user displays that user’s name in the Follows list.
However, none of the additional users that you’ve created so far has a profile. Eventually, you’ll want each user to have a profile that holds additional information associated with that user.
You can give your model setup a try by creating a new profile in your admin interface and associating it with a user account through your admin inline.
After you’ve created more users with associated profiles, you’ll see them populate the Follows list. You can select one or more of the profiles shown in this list. Once you click on SAVE, then the profile will start following them.
Can you come up with an idea of how you could improve this process?
Since you want each user to always have one profile associated with them, you can set up Django to do this task for you. Every time you create a new user, Django should create the fitting user profile automatically as well. Furthermore, it should be associated with that user right away. You can implement this in models.py by using a signal.
Step 3: Implement a Post-Save Hook
You now have users and profiles and a way to create and associate them with one another through your admin interface. At the end of this step, you’ll have connected them so that creating a new user will automatically create a new profile and associate one with the other. In this step, you’ll also practice interpreting Django’s error messages and finding ways to investigate and solve challenges through error-driven development.
Coordinate Users and Profiles With a Signal
You’ve extended the built-in User model, but you haven’t created an automatic connection between users and profiles. Until now, you could only create users and profiles and associate a profile with a user manually through the admin interface.
If you haven’t tried doing this manually, give it a go now. Create a new profile in the Django admin, then associate it with an existing user account.
It’d be pretty nice to associate a new profile with a user automatically when the user is created, wouldn’t it? You can make that happen with Django signals. Head back to your dwitter/models.py file.
You’ve already mapped out what you want to achieve: When you create a new user in the database, you also want to create a new profile and link it to that user.
You can implement this functionality with the help of post_save, which will call the create_profile function object every time your code executes the user model’s .save(). Note that create_profile() is a top-level function that you define outside of Profile:
 1# dwitter/models.py
 2
 3from django.db.models.signals import post_save
 4
 5# ...
 6
 7def create_profile(sender, instance, created, **kwargs):
 8    if created:
 9        user_profile = Profile(user=instance)
10        user_profile.save()
11
12# Create a Profile for each new user.
13post_save.connect(create_profile, sender=User)
You’ve added additional lines of code to your models.py file:
-
Line 3: You start by importing
post_save. -
Lines 7 to 10: You write a new function called
create_profilethat usescreated, whichpost_saveprovides, to decide whether to create a newProfileinstance. Your code will only continue if the post-save signal indicates that Django created the user object successfully. -
Line 9: Because of the one-to-one connection you set up between
UserandProfile, you need to pass aUserobject to theProfileconstructor. You do that by passinginstanceas an argument toProfile. -
Line 10: Here, you commit the new profile to your database with
.save(). -
Line 13: You set the post-save signal to execute
create_profile()every time theUsermodel executes.save(). You do this by passingUseras a keyword argument tosender.
This implementation of a post-save signal creates a new profile for each new user. You automatically associate one with the other by passing the newly created user to the Profile constructor.
You could end it here with a sparkling clean and empty profile for each new user. However, you’ll automatically add the user’s own profile to the list of profiles they follow, so each user will also see the dweets they wrote themselves.
When you venture out to learn something new, you’re likely to run into errors left and right. In the next section, you’ll practice your calm in the face of error messages and learn how you can keep moving in the right direction when you inevitably find yourself in a communication breakdown with Django.
Add Functionality Through Error-Driven Development
If you use the post-save signal exactly how you built it in the previous section, you won’t see any of your dweets when you’re actually on the dashboard that you’ll set up later. But since it can be fun to reminisce on your own personal musings and posts, you’ll change your code so that it defaults for users to follow themselves automatically when their profile is created.
It’s often hard to get code right the first time when you try to do your own thing outside of following a step-by-step tutorial. At the same time, learning how to keep going and find solutions is essential! So you’ll practice running into errors while developing this feature and learn how you can solve these challenges.
Because you want to follow your own profile immediately when it gets created, think back to the optional follows field in Profile. Maybe you could add instance in the post-save hook function through the follows keyword when you create the Profile instance:
def create_profile(sender, instance, created, **kwargs):
    if created:
        user_profile = Profile(user=instance, follows=[instance])
        user_profile.save()
That seemed quick! Fire up your development server and create a new user to check whether it works as expected.
Well, not quite. You’ll end up encountering an error message:
Direct assignment to the forward side of a many-to-many set is prohibited.
Use follows.set() instead.
Django didn’t know what to do with your instructions, but it tried to guess and then gave you a suggestion. Remove follows=[instance] from Profile and try to use follows.set() instead, as suggested by the error message:
def create_profile(sender, instance, created, **kwargs):
    if created:
        user_profile = Profile(user=instance)
        user_profile.follows.set(instance)
        user_profile.save()
Rinse and repeat your manual test by creating another new user in your Django admin. Django still isn’t entirely satisfied with your code, but it understands a bit more, which means it’ll give you a different error message:
ValueError at /admin/auth/user/add/
"<Profile: name>" needs to have a value for field "id" before this
many-to-many relationship can be used.
You might remember that you need to commit your objects with .save() before they have an entry in your database. When Django creates the database entry, it also automatically creates the id field in the entry.
In this error message, Django tells you that a User instance first needs to exist in your database so that you can use .set() to add an instance to follows. That’s an actionable tip! Maybe you can first save the new profile to your database, then add it to follows and save again:
def create_profile(sender, instance, created, **kwargs):
    if created:
        user_profile = Profile(user=instance)
        user_profile.save()
        user_profile.follows.set(instance)
        user_profile.save()
Your hopes are high this time as you create a new user! However, Django gets confused yet again:
TypeError at /admin/auth/user/add/
'User' object is not iterable
The error message reads as if Django is trying to iterate over instance, which refers to the newly created User object. Is that what .set() does? It’s time to check out Django’s documentation on many-to-many relationships:
Relation sets can be set:
>>>
>>> a4.publications.all()
<QuerySet [<Publication: Science News>]>
>>> a4.publications.set([p3])
>>> a4.publications.all()
<QuerySet [<Publication: Science Weekly>]>
(Source)
It seems like .set() really requires an iterable input, which Django tried to tell you in the error message. So you might be able to pass a list with instance as a single item, just like the Django documentation tells you to:
def create_profile(sender, instance, created, **kwargs):
    if created:
        user_profile = Profile(user=instance)
        user_profile.save()
        user_profile.follows.set([instance])
        user_profile.save()
This change should allow .set() to iterate over the list you’re passing and add the profile associated with your new user account to the list of accounts that the user is following. Fingers crossed, you try yet again to create a new user, but another error comes up:
TypeError at /admin/auth/user/add/
TypeError: Field 'id' expected a number but got <User: name>.
That’s great! Your error messages keep changing, which gives you additional information. You’re on the right path.
Now Django is telling you that it got a User object but expected an id field instead. You set up profiles to follow other profiles, yet Django is only looking for the Profile object’s .id. After extending the User model, you can access a user’s profile through their user instance with .profile and then step deeper into the object to get .id:
def create_profile(sender, instance, created, **kwargs):
    if created:
        user_profile = Profile(user=instance)
        user_profile.save()
        user_profile.follows.set([instance.profile.id])
        user_profile.save()
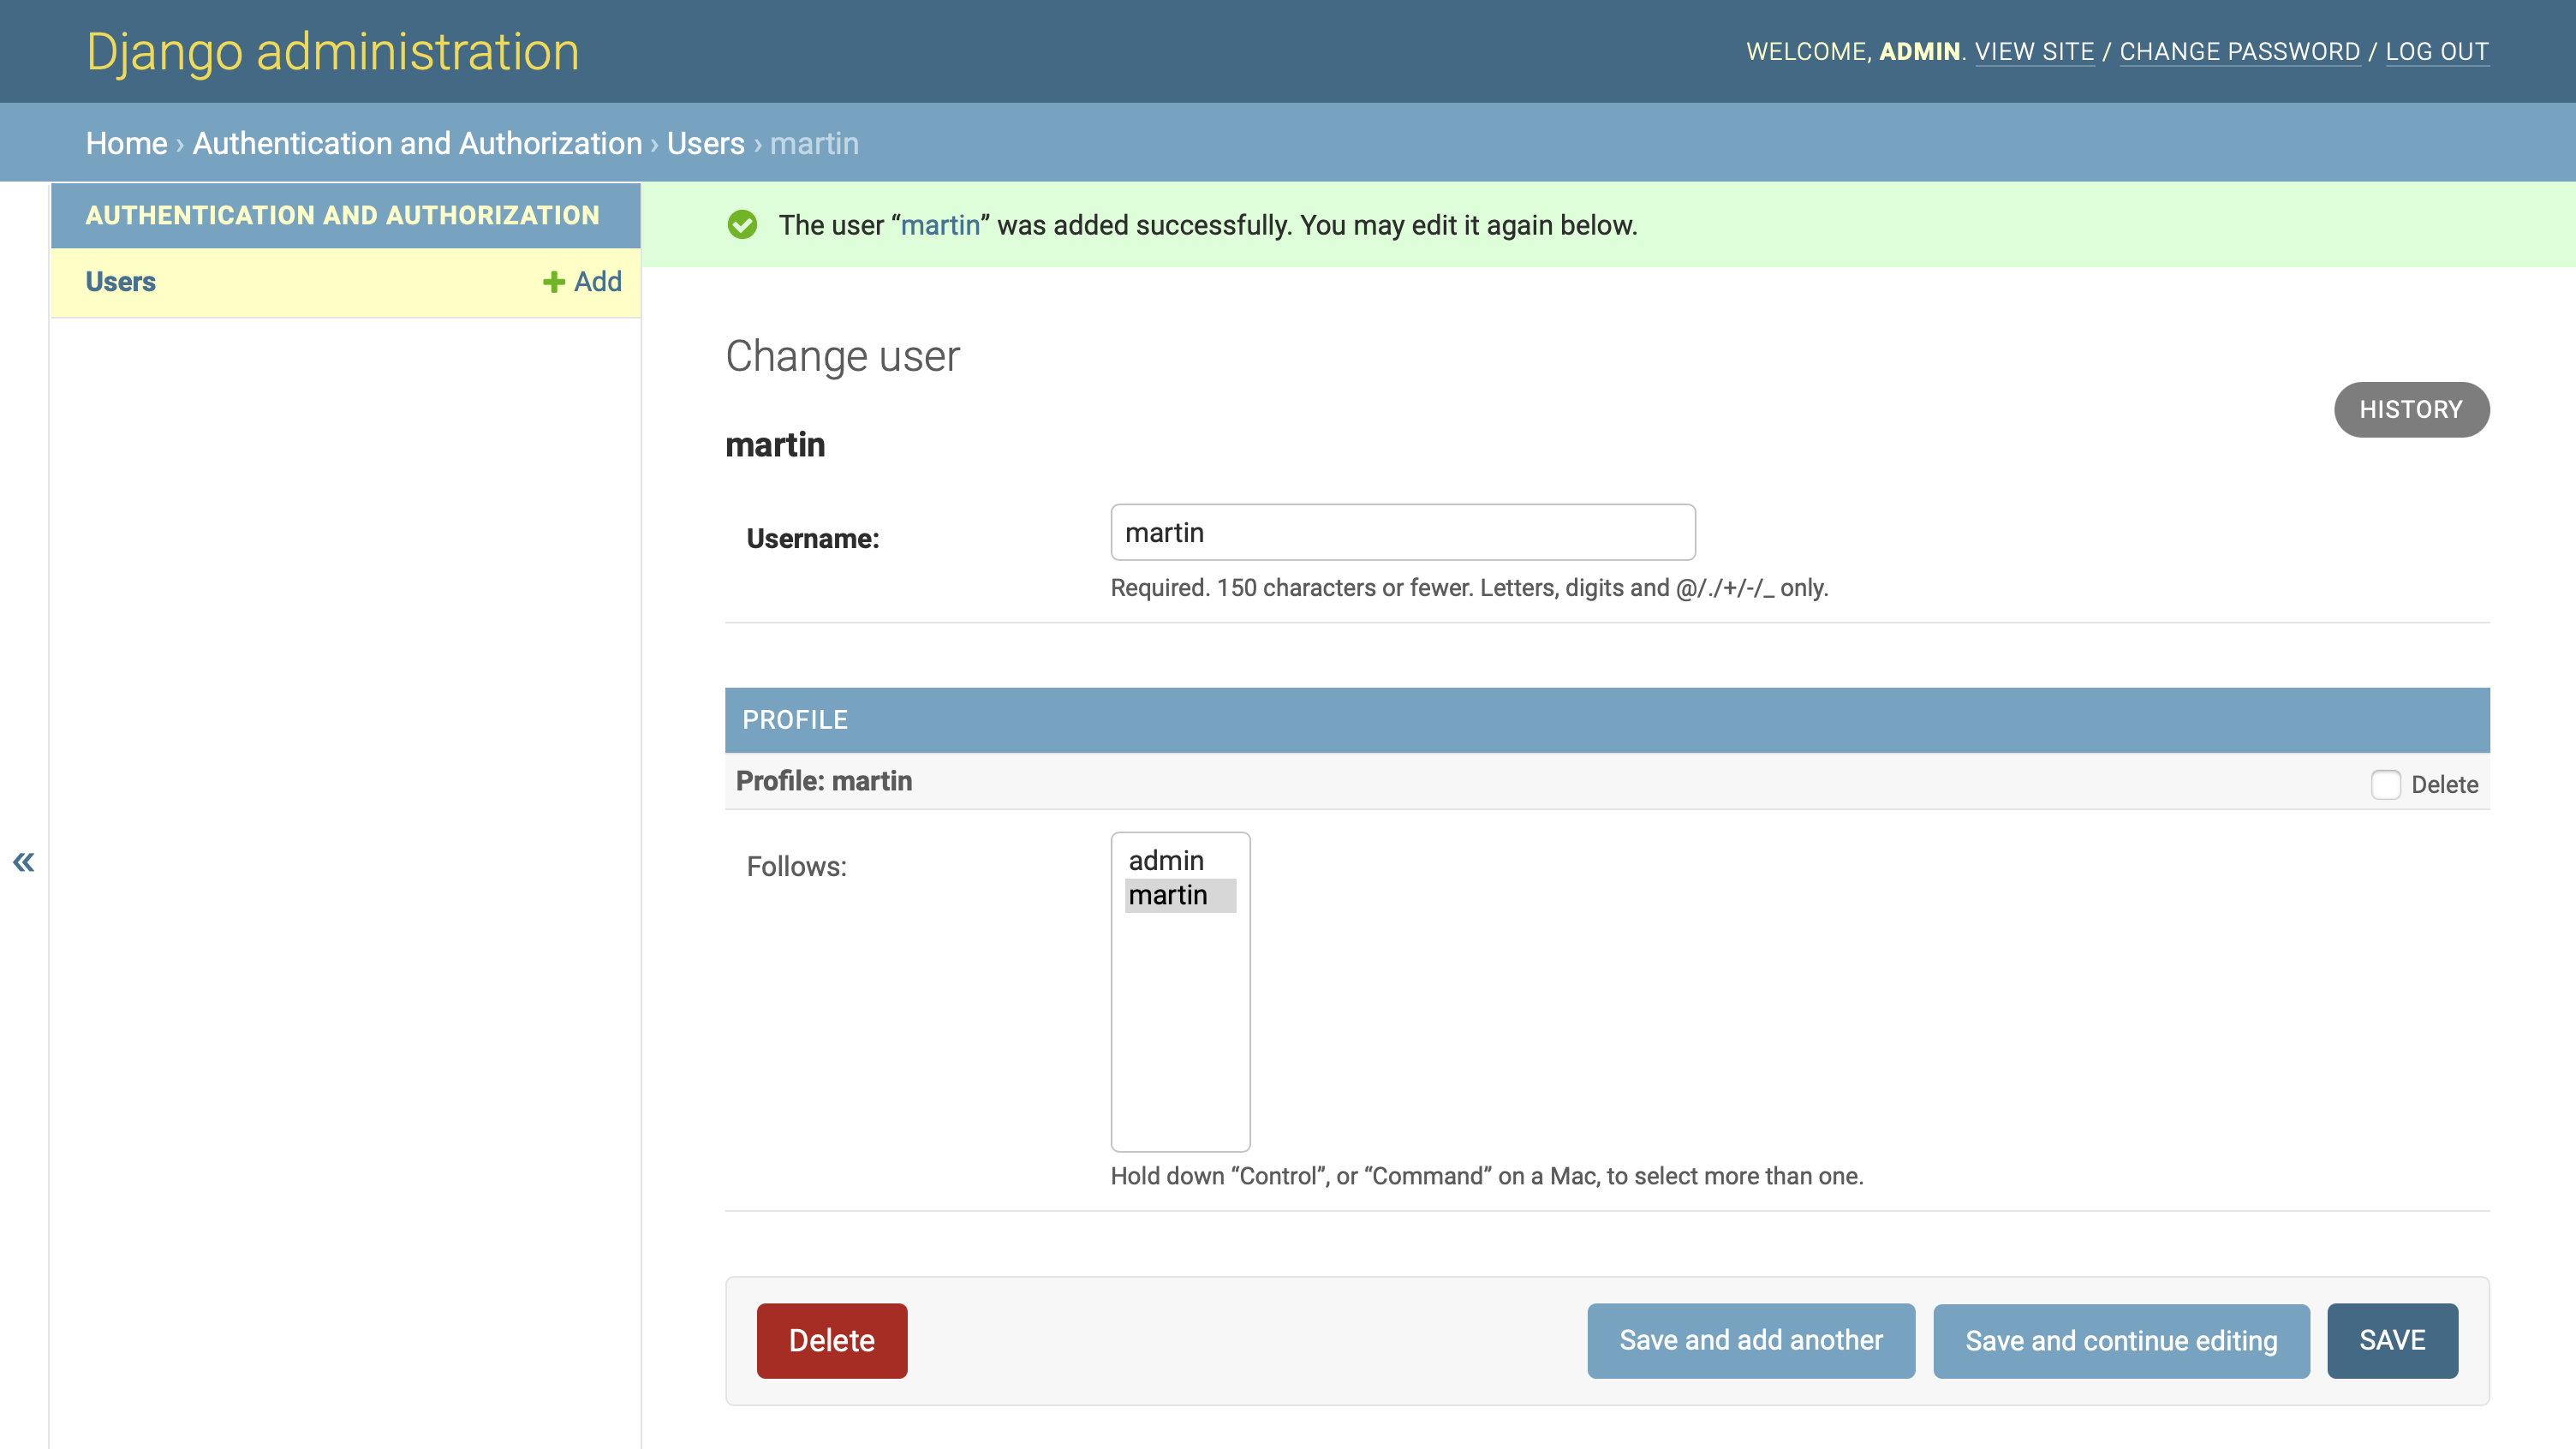
Time for another spin. You use the admin interface to create a new user—for example, martin—and now it works:
Congratulations! You set up your post-save hook so that a newly created user automatically follows their own profile. That same post-save hook also automatically created the profile.
While making this functionality, you also practiced staying calm in the face of repeated error messages. You improved your understanding of how Django communicates with you when misunderstandings occur.
You could have solved this challenge differently, following the suggested way of adding single objects to a many-to-many relationship using .add() instead of .set(). Search the many-to-many relationships documentation and refactor your code so it works using .add().
You can refactor your code to use .add() instead of .set(), which is the recommended way to add a single instance:
def create_profile(sender, instance, created, **kwargs):
    if created:
        user_profile = Profile(user=instance)
        user_profile.save()
        user_profile.follows.add(instance.profile)
        user_profile.save()
You might also notice that you don’t need to pass .id of the linked Profile object, but that you can pass the whole object instead. This also works for the previous solution, but for that one you followed Django’s error message, which pointed you toward using .id.
All of these solutions work! Keep in mind that there’s always more than one way to solve a task in programming. It’s most important to get it to work, but it’s good practice to then revisit and refactor your code.
In this case, because you’re always adding only one instance to the set, you don’t need to iterate. This means that it’ll be more efficient to use .add() instead of .set(). Also, since it has the same effect and is more descriptive, you can pass instance.profile directly instead of using .id.
With this change, you’ve solved the issue that your users wouldn’t see their own dweets on their dashboard. Now their dweets will show up together with those of everyone else that they’re following.
At this point, you could leave this code as is, but Django also provides a more elegant way to register signals by using a decorator. In the next section, you’ll refactor your post-save hook using receiver.
Refactor Your Code Using a Decorator
Django comes with a receiver decorator, which allows you to make the code you wrote more concise, without changing its functionality:
 1# dwitter/models.py
 2
 3from django.db.models.signals import post_save
 4from django.dispatch import receiver
 5
 6# ...
 7
 8@receiver(post_save, sender=User)
 9def create_profile(sender, instance, created, **kwargs):
10    if created:
11        user_profile = Profile(user=instance)
12        user_profile.save()
13        user_profile.follows.add(instance.profile)
14        user_profile.save()
15
16# Remove: post_save.connect(create_profile, sender=User)
With this refactoring, you’ve applied three changes to your codebase:
-
Line 4: You add an import for
receiverfromdjango.dispatch. -
Line 8: You apply the decorator to
create_profile, passing itpost_saveand passing theUsermodel tosender. By passing the model, you associatepost_savewith the events related to theUsermodel the same way you did with.connect()before. -
Line 16: You delete the line of code that previously connected
post_savewithUseras the sender since you’ve already made that association through the arguments provided to your decorator on line 8.
Remember that you need to save the newly created Profile object first to will it into existence. Only then can you add the newly created user’s .profile to your new user_profile. Finally, you need to save the changes a second time to propagate the updated association to your database.
Congratulations, you’ve successfully set up most of the back end of your Django social network. You implemented the model relationships between your users and your Django social network profiles! Every time you create a new user, they’ll also receive a user profile and immediately follow their own profile. Additionally, user profiles can follow each other. But does it work?
Confirm the Automatic Association in Your Admin
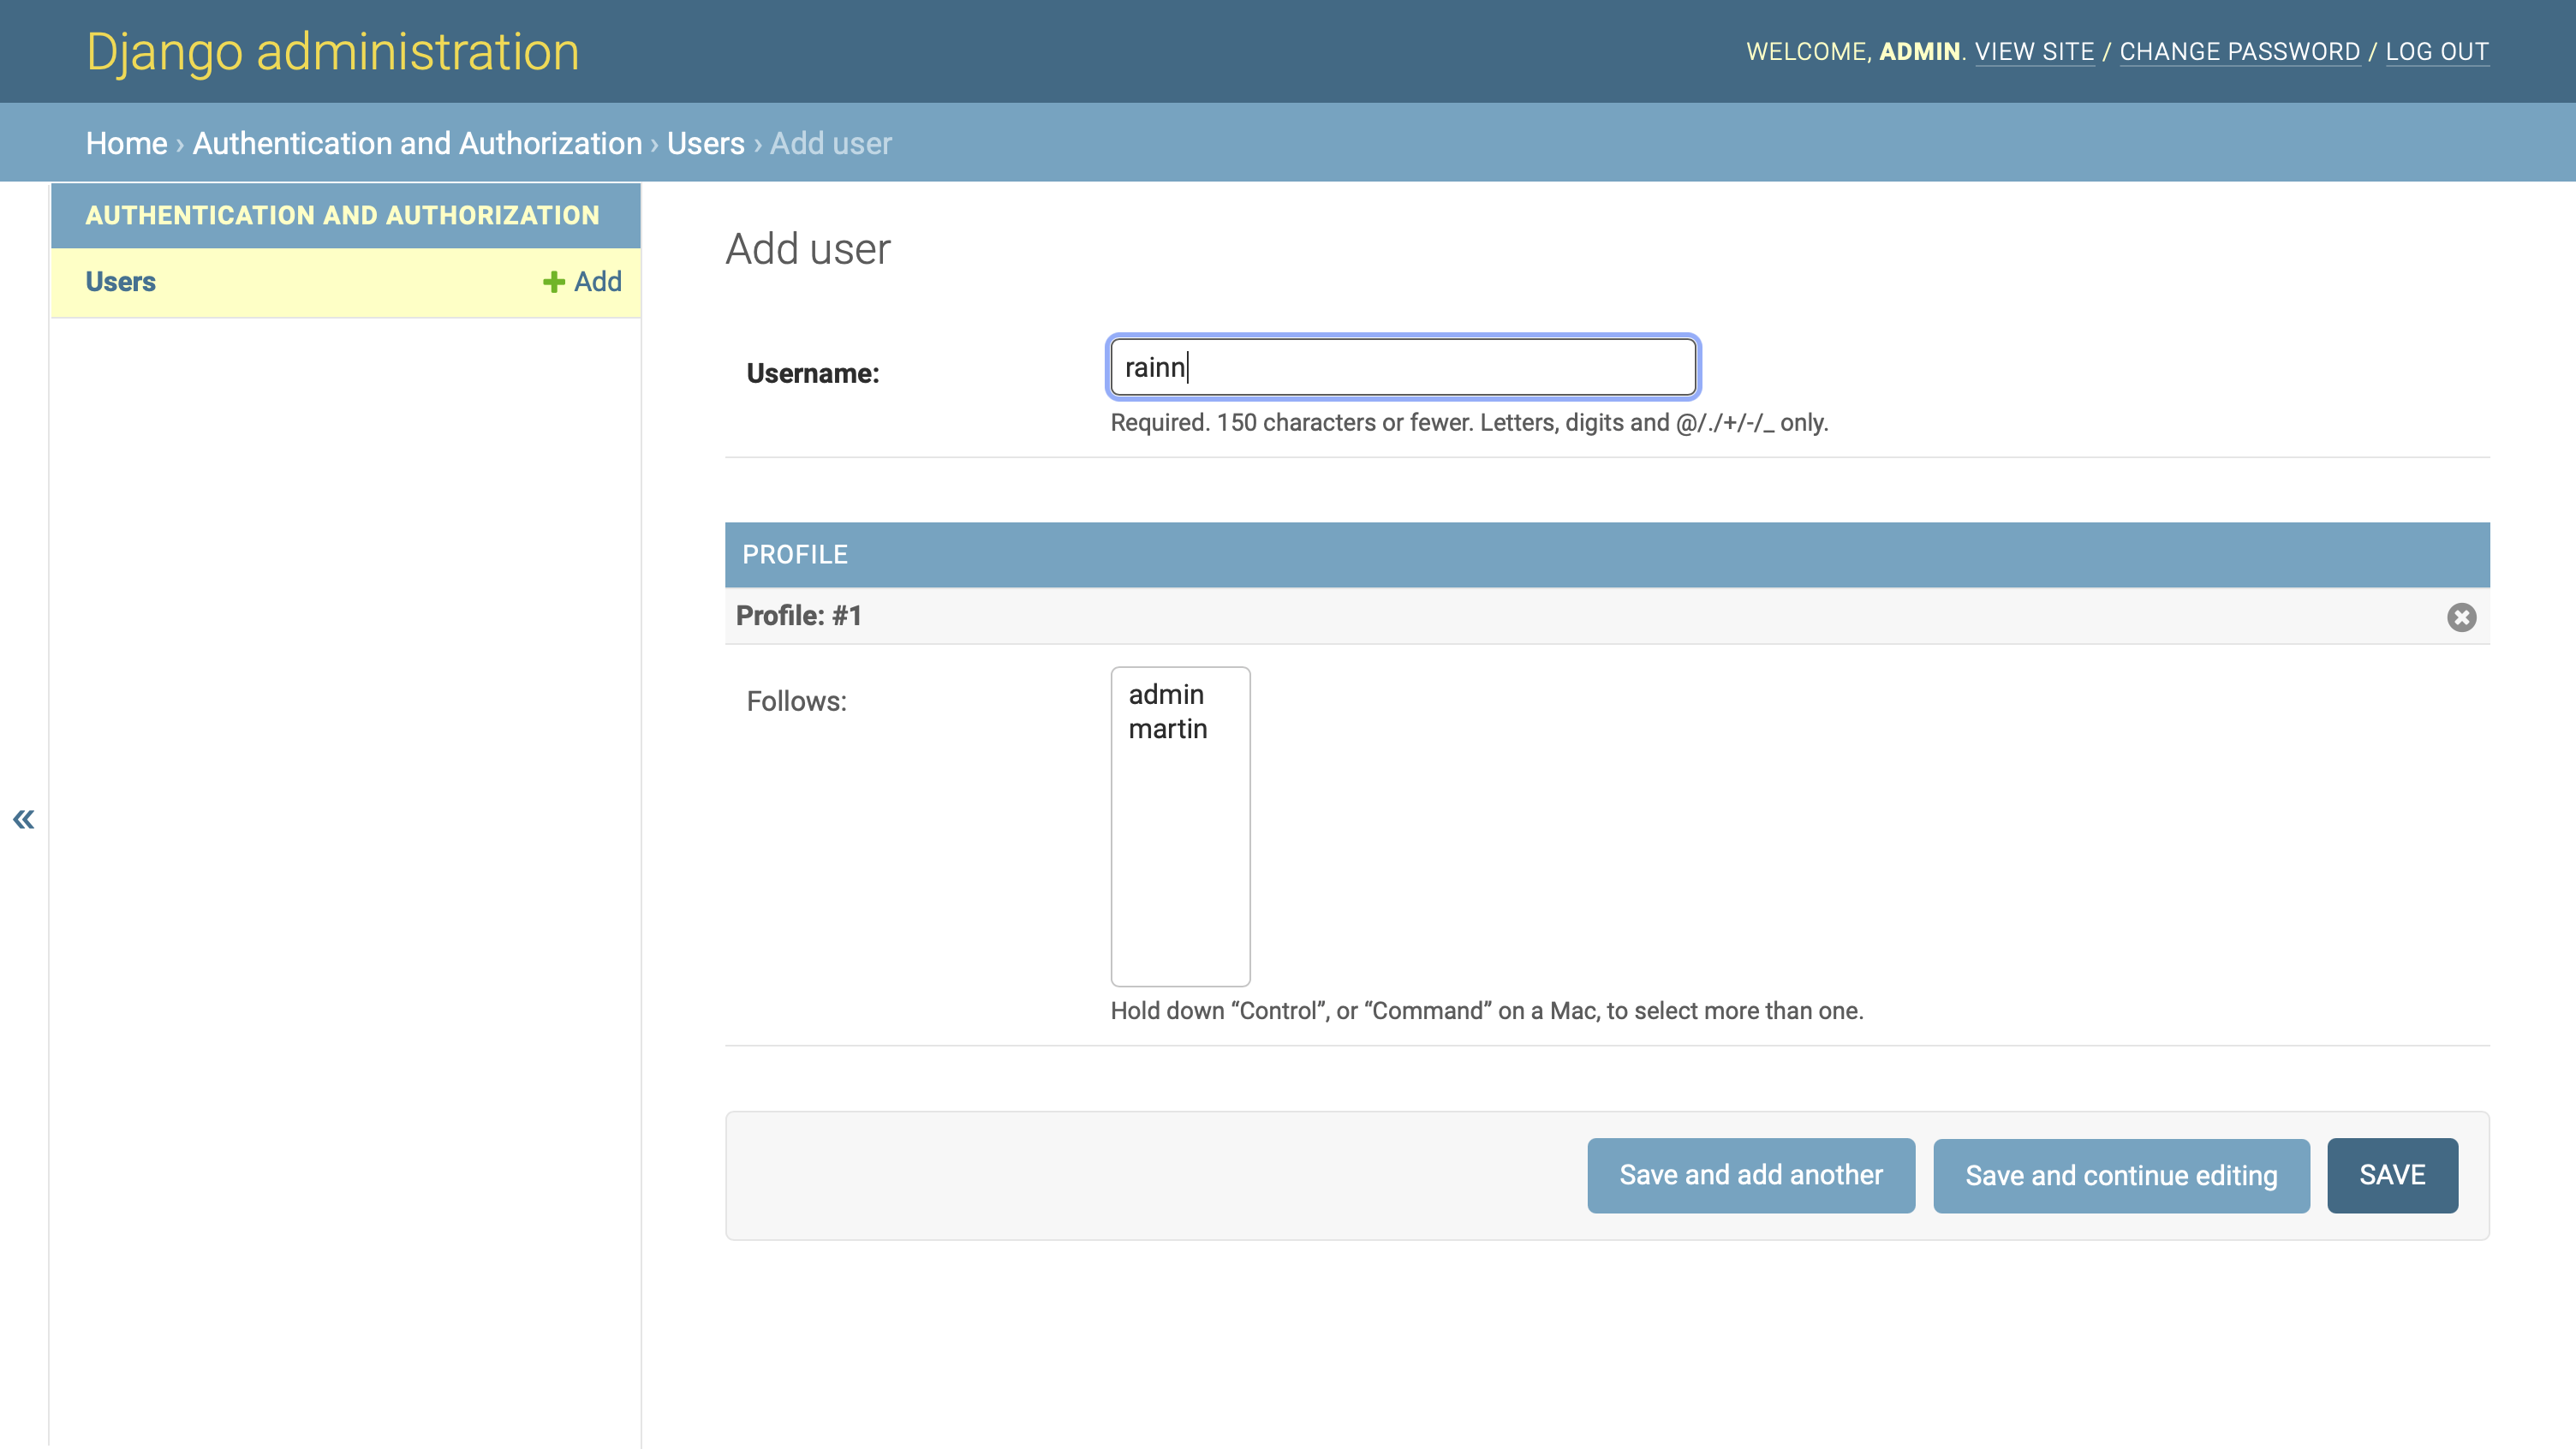
Head back to your admin interface and create a new user through the provided form. All you have to do is provide a username and click on save. For example, you could add another user called rainn:
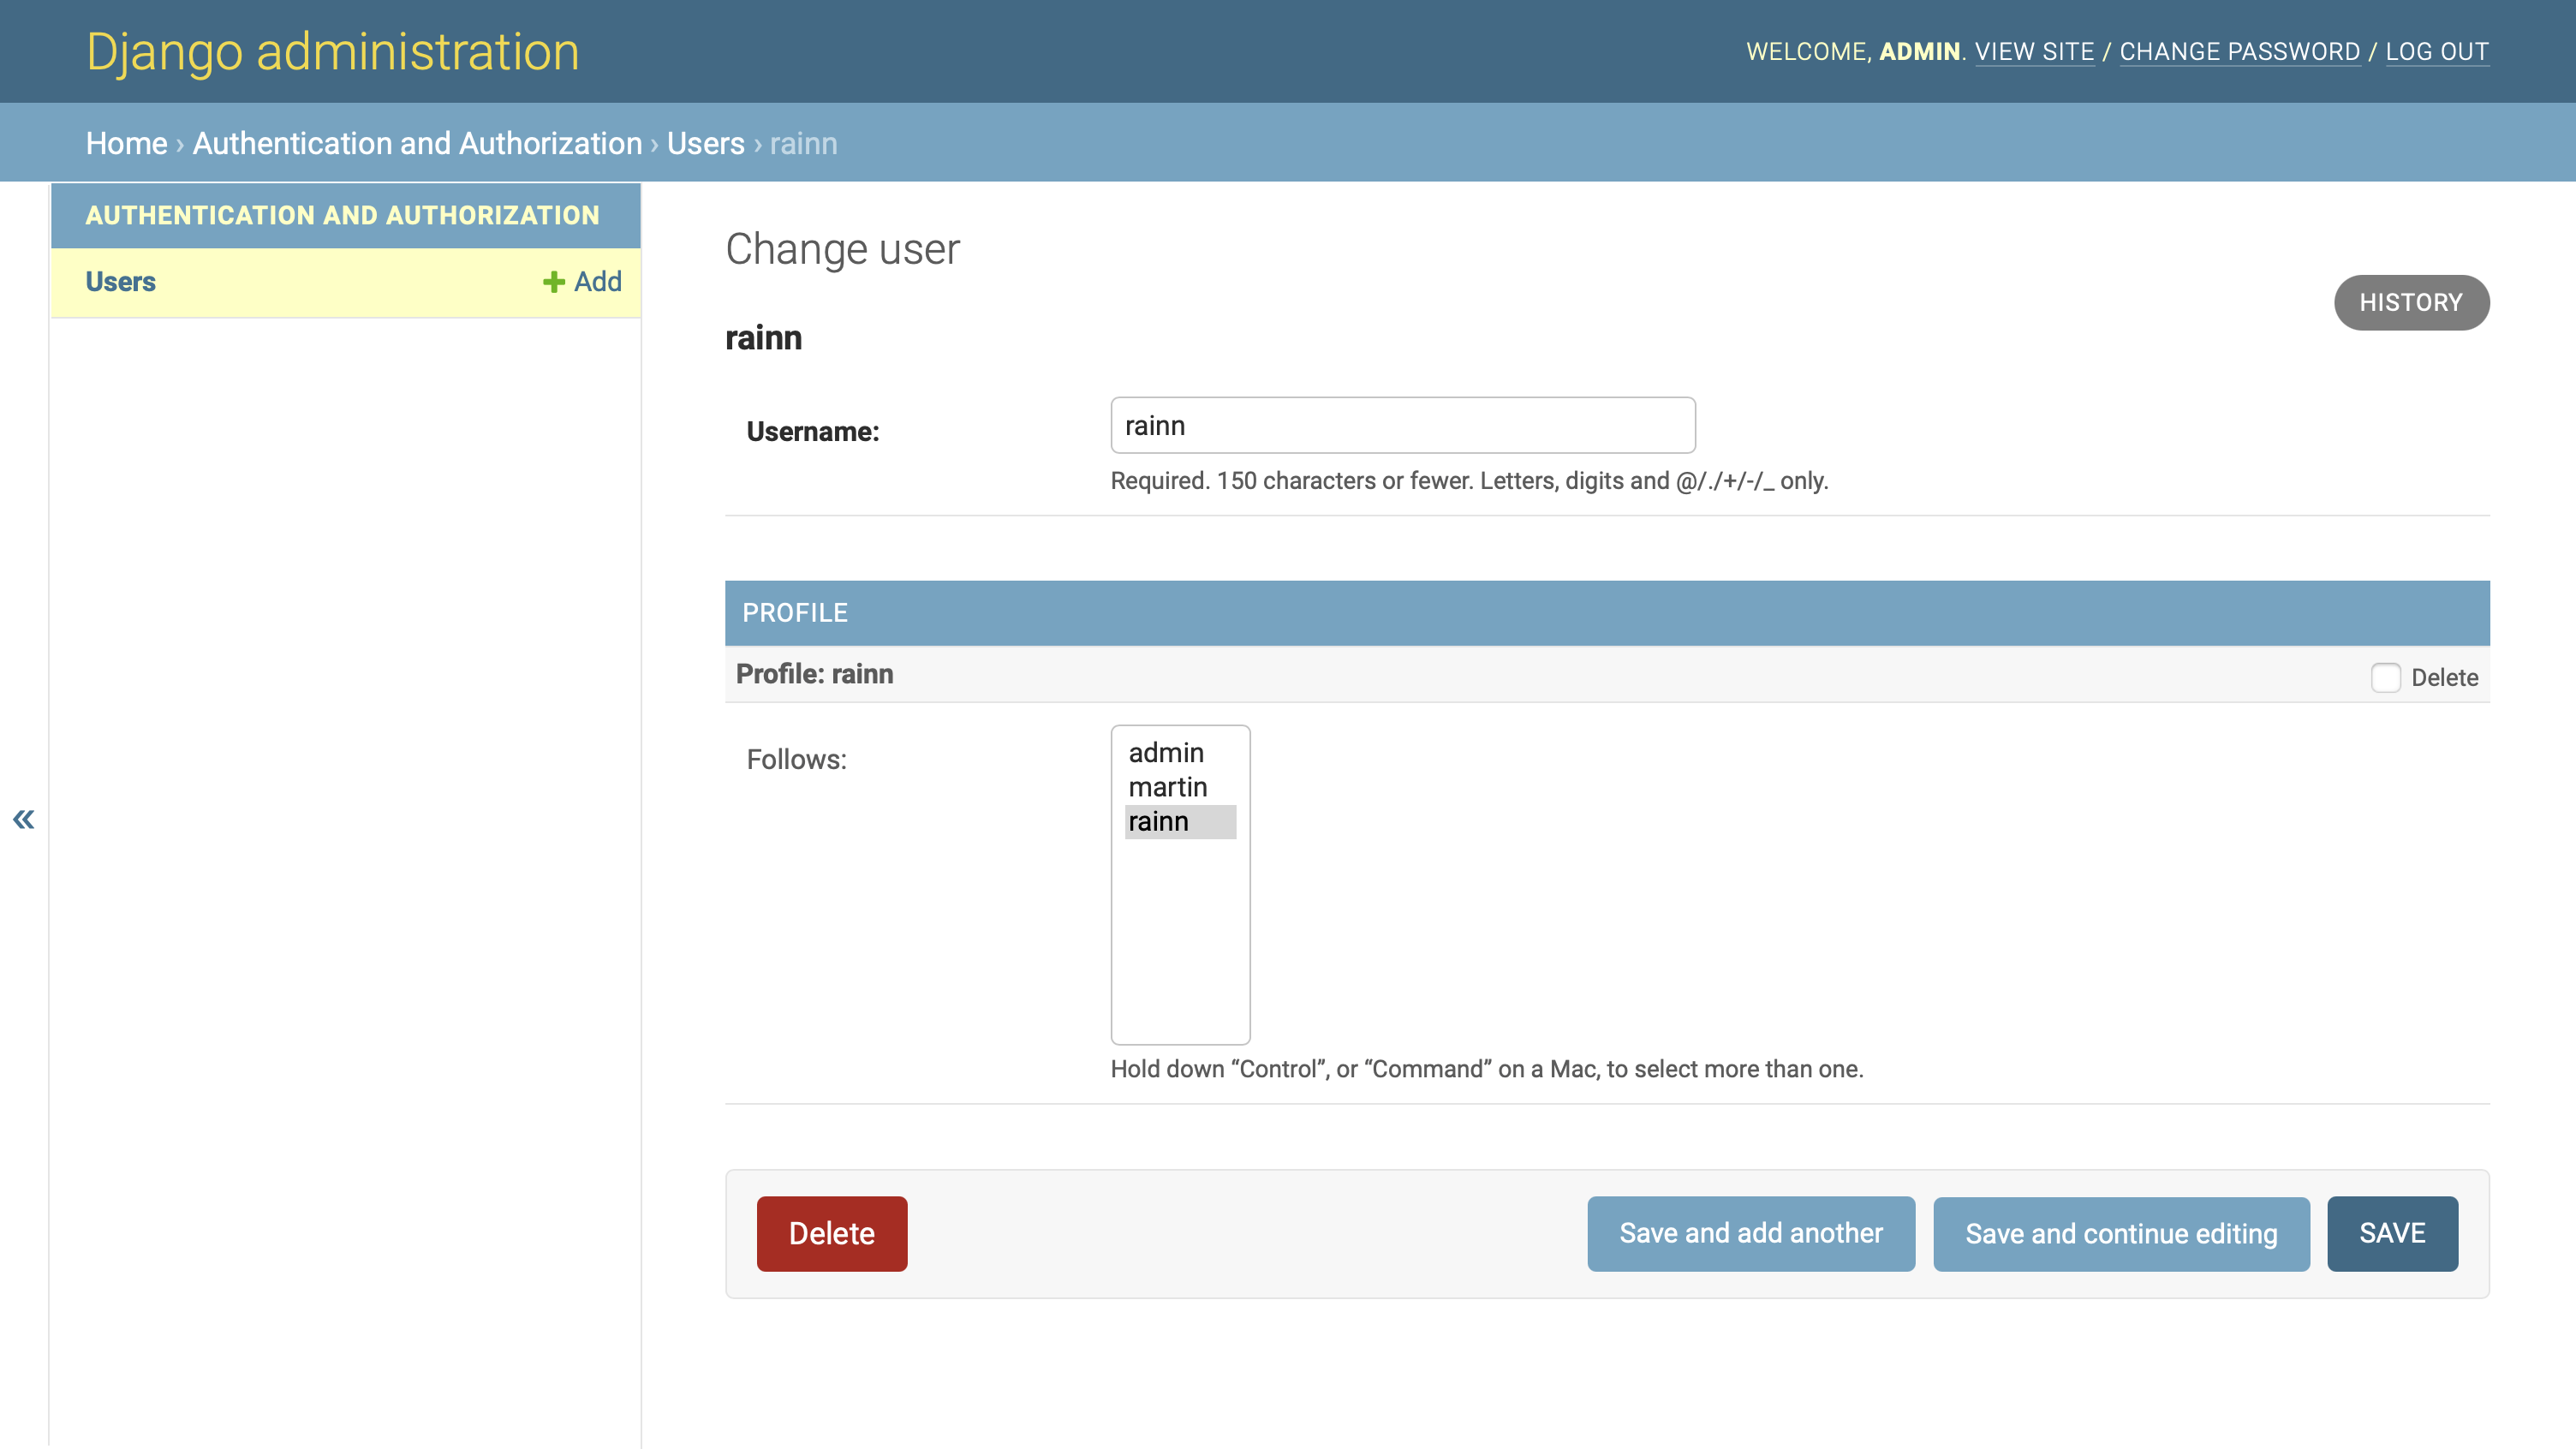
When you inspect the user’s Change page, you’ll see that Django automatically created a profile for the new user and added that profile to the list of profiles they follow:
You can see that a user follows their own profile because their profile name in the Follows list has a gray background.
You can now create new users through your Django admin interface, and they’ll automatically receive an associated profile as well. Django will also set up their profile to follow itself, which will make it possible to display their own dweets next to other people’s dweets on their dashboard.
You can change which profiles a user follows by selecting or unselecting the profile names in the Follows list and clicking on SAVE. To select multiple profiles or unselect a specific profile, you need to hold Ctrl on Windows and Linux, or Cmd on macOS, while clicking on the profile name.
But there’s not much to see here yet. Up to now, you’ve only been lurking in the Django admin. Maybe you’re starting to get tired of the pre-built pages that Django provides and itching to write some Django templates to see how you can display these model relationships in the user-facing interface of your app.
That’s what you’ll work on in the second part of this tutorial series! You’ll start building the front end of your web app, and you’ll learn how to make it look good using the CSS framework Bulma.
Conclusion
Congratulations! At this point, you’ve completed the first part of this tutorial series on building a basic social network with Django.
In the first part of this tutorial series, you learned how to:
- Implement one-to-one and many-to-many relationships between Django models
- Extend the Django user model with a custom
Profilemodel - Customize the Django admin interface
You’ve also gained additional practice in setting up a Django project and the tasks associated with doing so. You’ve practiced reading Django error messages and finding solutions based on the information they give you.
You can download the code for the first part of this project by clicking the link below and going to the source_code_final/ folder:
Prerequisite – Python Basics
Ever wondered how the most popular social networking site Facebook works? How we are connected with friends using just Facebook? So, Facebook and other social networking sites work on a methodology called social networks. Social networking is used in mostly all social media sites such as Facebook, Instagram, and LinkedIn, etc. It has a significant effect on marketers to engage customers. Social networks use graphs for creating a network. Their nodes are people and edges are their connection between each other. Two nodes with edges connected are friends. Now let’s see an example for understanding what is social networks.
A social network is a collection of individuals (or “nodes”) and the relationships (or “edges”) between them. Social network analysis is the process of analyzing these networks to understand patterns of interaction and communication among individuals.
NetworkX is a popular Python library for working with graphs and networks. It provides a wide range of graph algorithms and functions for creating, manipulating, and analyzing networks.
The network of 50 students in a class
The network of 50 people
The most important python library used in social networking is Networkx.
NetworkX
NetworkX is a graph package that is used to create and modify different types of graphs. It provides a rapid development environment for collaborative, multidisciplinary projects.
Installation:
pip install networkx
After starting python, we have to import networkx module:
import networkx as nx
Basic inbuilt graph types are:
- Graph: This type of graph stores nodes and edges and edges are un-directed. It can have self-loops but cannot have parallel edges.
- Di-Graph: This type of graph is the base class for directed graphs. It can have nodes and edges and edges are directed in nature. It can have self-loops but parallel edges are not allowed in Di-Graph.
- Multi-Graph: This type of graph is an undirected graph class that can store multi or parallel edges. It can have self-loops as well. Multi-edges are multiple edges between 2 nodes.
- Multi-DiGraph: This type of graph is a directed graph class that can store multi edges. It can have self-loops as well. Multi-edges are multiple edges between 2 nodes.
Example of Graph creation :
Python3
import networkx as nx
G = nx.Graph()
G.add_edge(1, 2)
G.add_edge(2, 3, weight=0.9)
Drawing of graph:
Drawing can be done using Matplotlib.pyplot library.
Python3
import matplotlib.pyplot as plt
import networkx as nx
G = nx.cubical_graph()
plt.subplot(122)
nx.draw(G, pos = nx.circular_layout(G),
node_color = 'r',
edge_color = 'b')
Output:
Circular Graph
Graph Edge Removal:
To remove an edge from the graph, use the remove_edge() method of graph object.
Syntax: G.remove_edge(u, v)
Parameters:
- u: first node
- v: second node
Return: None
Graph Node Removal:
To remove a node from the graph, use the remove_node() method of graph object.
Syntax: G.remove_node(u)
Parameter: Node to remove
Return: None
Show the Adjacent vertices:
Python3
import netwokx as nx
G = nx.Graph()
G.add_edge('1', '2')
G.add_edge('2', '3')
print(G.adj)
Output:
{'1': {'2': {}}, '2': {'1': {}, '3': {}}, '3': {'2': {}}}
Advantages and Disadvantages :
Advantages of using NetworkX for social network analysis include:
- A wide range of built-in algorithms: NetworkX provides a wide range of algorithms for analyzing and manipulating graphs, which makes it a powerful tool for social network analysis.
- Easy to use: NetworkX has a simple and intuitive API, which makes it easy to use even for beginners.
- Flexibility: NetworkX is built on top of the popular Python programming language, which means that it can be easily integrated with other Python libraries, such as NumPy and Matplotlib, making it a flexible tool for data analysis.
- Support for large graphs: NetworkX is built for handling large scale network analysis and visualization, it can handle large graphs with millions of nodes and edges.
Disadvantages of using NetworkX for social network analysis include:
- Limited visualization capabilities: While NetworkX provides basic visualization capabilities, it is not as advanced as other libraries such as Gephi, which is more specialized in graph visualization.
- Limited scalability: NetworkX is not designed to handle extremely large scale graph analysis, for that other libraries such as igraph, boost.python and SNAP can be used.
- Limited support for directed and weighted edges: NetworkX is primarily designed for undirected, unweighted graphs, although it does support directed and weighted edges.
Reference :
“Python NetworkX: A Practical Overview” by Shai Vaingast is a good reference book for learning NetworkX and its application in social network analysis. The book covers the basics of NetworkX and its use in solving real-world problems such as community detection, centrality measures, and graph visualization.
Are you interested in creating an exciting social media platform? Interestingly, it is also possible by using the Python Django framework.
In this blog, we will present before you a step-wise guide for using the Python Django framework to build up a social media platform. While creating, we will not take the help of any frontend framework. Since the primary focus of this brief guide will be to learn Django, we will exclusively be focusing on it only.
What to expect from social networking platforms?
Before starting your social networking application development project, it is essential to figure out what you want from the social media platform you want to create using Python Django framework. For example, given below are the following things that you expect the users of the social media platform to do:
- Upload and post images of their choice, along with tags and descriptions. These posts can be edited, updated and deleted any time the profile user wants.
- Decline and accept friend requests that are received from other users.
- Look into others’ profiles and send them friend requests or cancel the requests if sent by mistake.
- Unfriend existing friends.
- Search for users by typing their username.
- Search for posts based on tags.
- Discover and recommend new people to other users based on mutual connections.
Prerequisites of the process
To conduct this tutorial series comfortably, you should be adept with the following concepts:
- Know the fundamentals of Django to set up a project
- Using program-oriented programming in Python
- Customizing and using the Django interface
- Writing and being able to read HTML codes with class attributes
- Managing routing and redirects, viewing functions, templates, migrations, and models in Django
Steps of the project
To create a social media platform using the Python Django framework, there are three steps that one needs to follow. They are mentioned below:
Step 1: Set up the base project
Step 2: Extend the Django user model
Step 3: Implement a post-save hook
Now, let us focus on the activities in each of these three steps individually.
Step 1: Set up the base project
By the time you start working on the first step, you already know what you want from the social media platform. Also, you understand the mechanism of the database relationships that you want to implement here. At the end of this stage, your Django project will be set up with the Django admin interface edited, thereby allowing minimal and focused user creation.
Under the first step, you will have to go through the following
- Create a virtual environment to install Django.
Begin by developing and establishing a new project root folder. In this folder, you will store all the files. After working with the initial codes, you can push it to the parent folder where the project will be developed, and a virtual environment will be created and activated. Now, install Django from the PPI or Python packaging index.
- Build a Django app and project.
After the installation process is completed, you can create a new Django project under the name of ‘social.’ Now, build a new Django app in the name of ‘dwitter’ to match along with the entire project. By adding the name of your app to the list of installed apps, Django will become aware of those things that you want to include in your app.
- Produce customized Django admin interface.
Now, use the Django built-in admin interface to handle the management of the app and the user creation. Add some customization processes to ensure that the admin interface focuses on the essentials of the app. Before you set your foot into the customization process, do not forget to check the app’s default state.
- Create users from your app.
The formula that you need to follow in this step is as follows:
Navigate to home → authentication and authorization → users → add a user
Now, the admin portal has been reduced to a state where it can swiftly create additional test users for your social networking system.
Step 2: Extend the Django user model
At this point, you will have to create a model that can retain back the users’ information. For this, you will need to rely on the built-in Django user model to gather well-tested implementation.
- Create a profile model
Here, you will create a focused new model in the name of ‘profile’ that will help you keep track and monitor the added information you want to gather about each user.
Display profile information within the user admin page to record the user’s connections with the other profiles. Here, your primary focus should be on the profile model. So, you need to set it up to record who is following the profile and who the profile user is following.
Step 3: Implement a post-save hook
Now, you have the profile along with the users ready at hand. Here, you have to associate them through the admin interface. By the end of this step, you will have connected them all so that when someone creates a new user, the new profile will automatically be created.
- Coordinate users and profiles within a signal
Here, you will automatically associate a new profile with a user when the user is created. This is made possible with the help of Django signals. When you implement the Django documentation, you might have to make minor changes in the app configuration.
- Add functionality through error-driven development
Getting the code right for the first time is not possible for all developers. Hence it is recommended to hire a Senior Python Django Developer or Team for building a robust social networking platform. Techcronus has proven experience in building social networking and community apps as well as backend with features similar to Instagram, Facebook and TikTok.
CTA: Browse Techcronus portfolio here
Conclusion
This is how you can create a social media platform using the Python Django framework. However, before you get started with the process, make sure you revise your coding lessons thoroughly. The whole tutorial is majorly based on coding. So, if you are good at programming languages, then using the Django framework will not take much time.
- Главная >
- Видео канал >
- Создание социальной сети с помощью Python
Для создания социальной сети мы будем использовать веб-фреймворк aiohttp. Для хранения данных будем использовать базу MongoDB ( NoSQL база данных). Для подключения к базе — PyMongo(библиотека), для запросов к базе данных — Motor(библиотека).
План вебинара:
- Создание модели юзера. Создадим класс для работы с данными юзера — ФИО, никнейм, почта, аватар и т.д.
- Регистрация. Валидация данных и создания юзера.
- Логин. Для логина и работы с сессией будем использовать aiohttp-session.
- Аватар юзера. Юзер сможет добавить свой аватар, для этого будем использовать функции фреймворка aiohttp для работы с файлами.
- Пост на своей странице. Создание модели поста, сохранение поста.
- Добавления друга. Поиск и добавление юзера в друзья.
- Личное сообщение другу. Отправление личного сообщения юзеру.
Для участия в вебинаре обязательна регистрация. На email, который Вы укажете в регистрационной форме, 20 сентября будет отправлено письмо-приглашение со ссылкой на трансляцию.
Регистрация через
✖
или E-mail
Получите курс бесплатно
✖
Вы выбрали курс для изучения
«»
Чтобы получить доступ к курсу, зарегистрируйтесь на сайте.
Спасибо за регистрацию
✖
Перейдите на почту и подтвердите Ваш аккаунт,
чтобы получить доступ ко всем
бесплатным урокам и вебинарам на сайте ITVDN.com
Спасибо за регистрацию
✖
Ваш аккаунт успешно подтвержден.
Начать обучение вы можете через Личный кабинет
пользователя или непосредственно на странице курса.
Подтверждение аккаунта
На Ваш номер телефона было отправлено смс с кодом активации аккаунта. Пожалуйста, введите код в поле ввода.
Отправить код еще раз
Изменить номер телефона
ПОДТВЕРДИТЬ ПОЧТУ
На Ваш email было отправлено письмо с кодом активации аккаунта. Пожалуйста, введите код в поле ввода.
Отправить код еще раз
Изменить email
social-network — очередная реализация социальной сети на python
При создании, учитывал возможность использовать в проектах с высокой нагрузкой
Для запуска нужно:
- Django 4.1.7 — работа с БД
- Channels 4.0.0 — websocket
- Channels-redis 4.0.0 — django channels, используют Redis в качестве резервного хранилища
- Daphne 4.0.0 — ASGI сервер протоколов Django
- Gunicorn — python WSGI HTTP сервер для UNIX
- PostgreSQL 15.2 — основное хранилище
- Redis 7.0.8 — дополнительное хранилище
Пуск:
установка нужных компонентов
Redis
sudo add-apt-repository ppa:redislabs/redis
sudo apt-get update
sudo apt-get install redis

/etc/init.d/redis-server restart
Виртуальная среда для работы с Django 3
python3.9 -m venv <myenvname>
source <myenvname>/bin/activate
pip install --upgrade pip
pip install -r requirements.txt
синхронизация с postgresql
./manage.py makemigrations
./manage.py migrate auth
./manage.py migrate --run-syncdb
./manage.py createsuperuser
быстрый пуск
python manage.py runserver 192.168.1.50:8888
python manage.py runworker nnapp
gunicorn & daphne, исправить порт в javascript client
gunicorn app.wsgi:application --bind 192.168.1.50:8888 & daphne app.asgi:application --bind 0.0.0.0 --port 8889
Генирация пользователей и контента
простой пример взаимодействия web
python3 simple_api_client.py
простой пример генирации данных локально
./manage.py shell < gen_content.py
Дополнительно
очистить redis
из базы данных в json
./manage.py dumpdata > data_dump.json
работа с postgresql
sudo -u postgres psql postgres
du+
l+
DROP DATABASE com;
DROP USER sadko;
CREATE USER sadko WITH PASSWORD '1qaz';
ALTER ROLE sadko WITH CREATEDB CREATEROLE SUPERUSER;
CREATE DATABASE com;
grant all privileges on database com to sadko;
q
простые команды celery
python -m celery -A app worker
celery flower
celery flower --broker=redis://localhost:6379/0 --broker_api=redis://localhost:6379/0
Пример работы:
Нужно сделать
- aioredis 2
- выполнения ресурсоемких задач в очереди
- улучшить страницу пользователя
- инструменты для обучения ChatGPT
- подключить natural-motion
- инструменты генирации изображения
- стартовая страница для незарегестрированных пользователей
- исправить работу history state клиентской части
- оптимизация для поисковых ботов
- загрузка файлов
- CKEditor 5
- полнотекстовый поиск


