Вечер в хату чуваки и тянки!
1. Предисловие
Сегодня будем писать простенький скрипт на Питоне, который будет проводить спам атаку в сторону нашей жертвы.
Механизм работы кода прост, он пишет выбранное нами слово и нажимая ‘Enter’ отправляет его нашей жертве.
Инструкция написана так, чтобы даже ребенок понимал каждый шаг, так что особых знаний тут не надо, кроме умения пользоваться мышкой и клавиатурой.
2. Подготовка
Сначала создадим папку и там же два блокнота, один с них сохраняем, дав название «script.py», второй называем, как «text.txt».
В первый файл будем писать наш код, в второй файл вставим текст на ваш выбор (ТОЛЬКО НА ЛАТИНИЦЕ).
3. Приступаем
Импортируем модули для автоматизации и заморозки сценария:
Python:
import time # Модуль для работы с временем.
import pyautogui # Модуль для управления мышью и клавиатурой, точнее главный модуль в нашем программном коде.
Модуль «Time» нужен нам для того, чтобы мы успели активировать поле ввода, прежде чем скрипт начнет спамить.
Теперь создаем первую функцию, роль которой «стрелять» одним сообщением N-ое количество раз:
Python:
def SendMessage():
    time.sleep(2) # Замораживает скрипт на 2 секунды, чтобы мы успели активировать поле ввода.
    message = "U ARE UGLY" # Сообщение которое мы хотим отправлять пишем в кавычках.
    iterations = 1000 # 1000 раз отправляет данное сообщение.

    for i in range(iterations):
        pass

    while iterations > 0:
        iterations -= 1

        pyautogui.typewrite(message.strip()) # Пишет слово/текст написанный в переменной "message"
        pyautogui.press('enter') # и нажимая Enter, отправляет его нашей "жертве".
    print("Вся обойма попала в нашу жертву!")
Затем создаем вторую функцию, которая уже отправляет текст вписанный в наш блокнот:
Python:
def SendText():
    time.sleep(2)
    with open('text.txt') as f: # Открывает блокнот с названием text.txt (документ с содержанием того, что мы хотим отправлять).
        lines = f.readlines()
    for line in lines:
        pyautogui.typewrite(line.strip()) # В этой функции оно будет писать текст с каждой строки
        pyautogui.typewrite('enter') # и так же отправлять его "жертве".
    print("Дело сделано, осталось успокоить нашу жертву ^_^")
Подходим уже к концу, осталось лишь добавить «панель управления»:
Python:
print('~'*50)
print("[1] ===> Стрелять одним сообщением указанным в переменной ")
print("[2] ===> Отправлять строки из блокнота ")
print('~'*50)
option = input("[Выбирай функцию]===> ")

if option == "1":
    SendMessage()
elif option == "2":
    SendText()
else:
    print('Выбирай функция 1 или 2!')
4. Заканчиваем
Осталось лишь найти текст песни/стих или что-то там еще на английском языке и вставить его в наш «text.txt».
Для тех кому лень найти:
They say, oh my god, I see the way you shine
Take your hands, my dear, and place them both in mine
You know you stopped me dead while I was passing by
And now I beg to see you dance just one more time
Ooh I see you, see you, see you every time
And, oh my, I, I, I like your style
You, you make me, make me, make me wanna cry
And now I beg to see you dance just one more time
So they say
Dance for me
Dance for me
Dance for me oh oh oh
I’ve never seen anybody do the things you do before
They say
Move for me
Move for me
Move for me ay ay ay
And when you’re done, I’ll make you do it all again
I said, oh my god, I see you walking by
Take my hands, my dear, and look me in my eyes
Just like a monkey I’ve been dancing my whole life
But you just beg to see me dance just one more time
Ooh I see you, see you, see you every time
And, oh my, I, I, I,
I like your style
You, you make me, make me, make me wanna cry
And now I beg to see you dance just one more time
So they say
Dance for me
Dance for me
Dance for me oh oh oh
I’ve never seen anybody do the things you do before
They say
Move for me
Move for me
Move for me ay ay ay
And when you’re done I’ll make you do it all again
They say
Dance for me
Dance for me
Dance for me oh oh oh
I’ve never seen anybody do the things you do before
They say
Move for me
Move for me
Move for me ay ay ay
And when you’re done I’ll make you do it all again
They say
Dance for me
Dance for me
Dance for me oh oh oh
I’ve never seen anybody do the things you do before
They say
Move for me
Move for me
Move for me ay ay ay
And when you’re done I’ll make you do it all again
They say
Dance for me
Dance for me
Dance for me oh oh oh
I’ve never seen anybody do the things you do before
They say
Move for me
Move for me
Move for me ay ay ay
And when you’re done I’ll make you do it all again
All again
По неизвестным мне причинам, скрипт НЕ пишет слова или текст на кириллице, только на латинском.
Чтобы остановить работу нашей машины, нажмите на командую строку и выполните комбинацию Ctrl + C, либо просто закройте командую строку.
Какой-то серьезной опасности или важной опции данный скриптик не выполняет, больше предназначен для забавы.
Идею написания такого я взял у одного иностранца которого именно уже не помню, а сам выполняемый файл был написан мной, так что эта статья её первоисточник
Также приложил видео с обзором работы скрипта:
Это моя первая статья и в Python’e я лишь новичок, так что строго не судите.
«Цветная» версия скриптика:
Python:
from termcolor import colored
import subprocess
import time
import pyautogui
subprocess.call('', shell=True)

def SendMessage():
    time.sleep(2)
    # The message you want to send
    message = "U ARE UGLY"
    # How many times do i send a message?
    iterations = 5

    for i in range(iterations):
        pass

    while iterations > 0:
        iterations -= 1

        pyautogui.typewrite(message.strip())
        pyautogui.press('enter')

    print('Done, high five')
def SendScript():
    time.sleep(2)
    with open('script.txt') as f:
        lines = f.readlines()
    for line in lines:
        pyautogui.typewrite(line.strip())
        pyautogui.press('enter')

    print('It was hard, but we did it, high five.')

print(colored('~'*50, 'red'))
print(colored('Welcome bro (O V O)/', 'green'))
print(colored("Let's make fun of someone?", 'green'))
print(colored('~'*50, 'red'))


print(colored("t[1] ===> Resend the same message (─__─)", 'magenta' ))
print(colored("t[2] ===> Send titles from the script (v _ v)/", 'magenta'))

print(colored('~'*50, 'red'))
print('n')
option = input(colored('[Choose an option]==> ', 'cyan'))

if option == "1":
    SendMessage()
elif option == "2":
    SendScript()
else:
print(colored('Choose a function! ¯_(-_-)_/¯', 'red'))Improve Article
Save Article
Improve Article
Save Article
PyAutoGUI is a Python module that helps us automate the key presses and mouse clicks programmatically. In this article we will learn to develop a spam bot using PyAutoGUI.
Spamming – Refers to sending unsolicited messages to large number of systems over the internet.
This mini-project can be used for many real-life applications like:
- Remind your friends or relatives to do a particular task after every particular time interval
- Can be used for advertisement purpose
In this article we will show the working of spam bot on telegram, but the code can also work for WhatsApp, Instagram etc. i.e. anywhere we find a text field it will work the same way.
Approach
- Import module
- Add delay of 2 second in the execution of the program
- Create mechanism to generate text messages. typewrite() function of pyautogui helps to write the text and sleep function helps us specify the particular time interval (in seconds) after which the next instruction has to be executed. datetime.datetime.now() function helps the user keep a track of when the message was sent.
Syntax:
typewriter(“<message>”)
- Execute code
Follow these simple steps to develop a spam bot using python:
Example:
Python3
import pyautogui, time, datetime
time.sleep(2)
while True:
print(datetime.datetime.now())
pyautogui.typewrite("Reminder: Drink water!")
pyautogui.press("enter")
time.sleep(31)
print(datetime.datetime.now())
pyautogui.typewrite("Reminder: Take medicine!")
pyautogui.press("enter")
time.sleep(31)
print(datetime.datetime.now())
pyautogui.typewrite("Reminder: Take the dog for a walk!")
pyautogui.press("enter")
time.sleep(31)
print(datetime.datetime.now())
pyautogui.typewrite("Reminder: Drink water!")
pyautogui.press("enter")
time.sleep(31)
print(datetime.datetime.now())
pyautogui.typewrite("Reminder: Drink water!")
pyautogui.press("enter")
time.sleep(31)
Output:

Date and time at which the message was sent
Simple Spam Bot
A Simple and easy way to be the most hated person between your friends, All you have to do is spam the group chat
using this bot until you get kicked…
Please don’t bully me if my readme file does not look that professional, it’s my first time writing a readme.
NOTE
This is the beta version of this project, Do not expect it to be polished/fully featured/not buggy, I’m trying to fix as much bugs as I can and I’ll be trying to add more features.
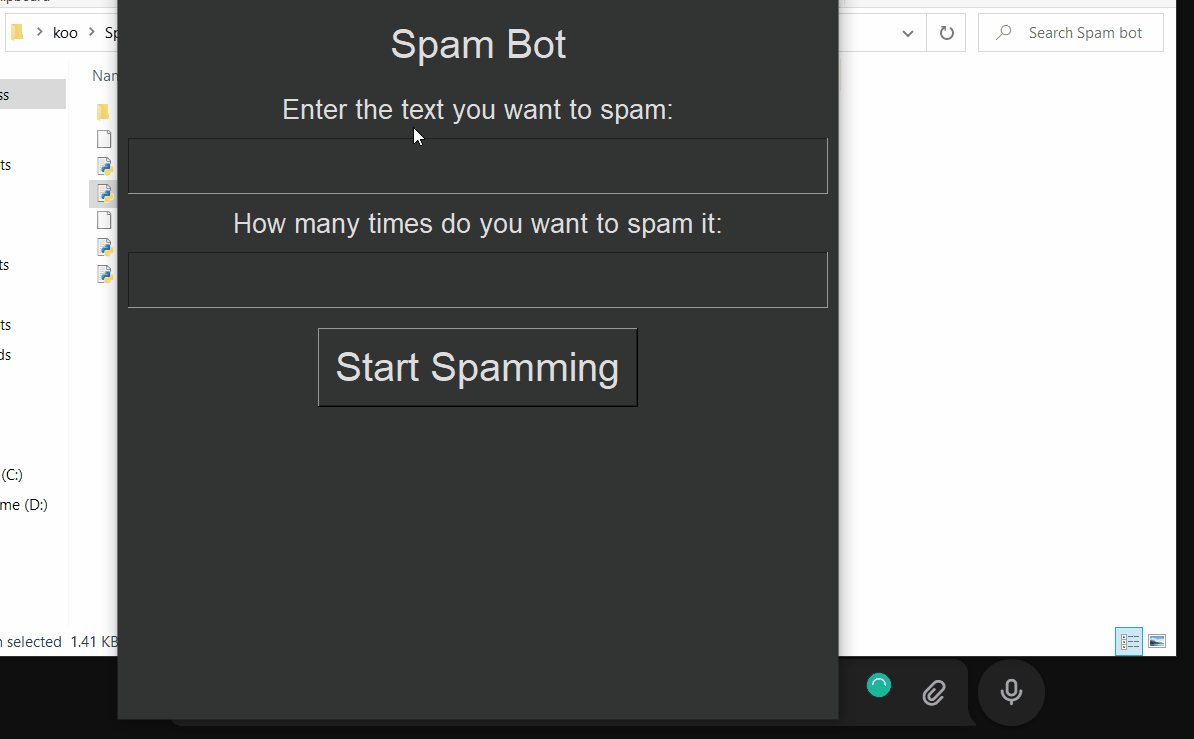
How it works
Basically, the bot takes the text you entered in the first input and takes the number you entered in the second input and uses it
to know how many times you want to type the text you entered, and then it types it for you. Simple as that!
Installation
First, you need to install Python and make sure it’s added to PATH,
Then open the Command Prompt and type this command:
That’s it. you’re done!
How to use
-
Text Spam mode:
This mode will spam the text you entered the amount of times you want
- Open
main.pyfile - Type whatever you want to spam
- Enter how many times do you want to spam
- press the
Start Spammingbutton - Quickly switch to the window that you want to spam in and click on the input you want to type messages in
- Open
-
Infinite Spam mode:
This mode will spam the text you entered and it will never stop until you stop yourself it or close the terminal
- Open
main.pyfile - Type whatever you want to spam
- press the
Start Spammingbutton - Quickly switch to the window that you want to spam in and click on the input you want to type messages in
- Open
-
File Spam mode:
This mode will spam the content of any text file you want
- Open
main.pyfile - Click
Select File - Navigate to the file you want to spam it’s content and select it
- press the
Start Spammingbutton - Quickly switch to the window that you want to spam in and click on the input you want to type messages in
- Open
NOTE: this gif is showing the spambot with 0.2 message delay, it can type faster if the message delay is 0 which you can change in the settings
ANOTHER NOTE: this gif is showing the first alpha version of the spambot not the latest version

Jul 11, 2021
2 min read
A Simple and easy way to be the most hated person between your friends, All you have to do is spam the group chat using this bot until you get kicked…
NOTES
This is the first ALpha version of this project, Do not expect it to be polished/fully featured/not buggy, this is Really buggy and really unstable, But I’m trying to fix as much bugs as I can and I’ll be trying to add more features
- There is a 5 seconds delay after you press the start button before the bot starts working so you gotta be quick, There is also a 0.2 seconds delay between every message I’ll make the delays changeable in later versions, the only way to change them at the moment is to open the code yourself and change them
- If you opened another window (or the input you were spamming was not pressed) the spamming will stop, basically the bot works by typing the text you entered over and over again really quickly, so you’ll have to watch the bot until it finishes spamming (or close the bot)
- There is a bug that makes the window of the spam bot not responding when it starts spamming which will make it really hard to close, but you can close the terminal thats running the bot (the other window that runs when you opened the bot)
Installation
First, you need to install Python and make sure it’s added to PATH Then open the Command prompt and type this command:
pip install pyautogui
How to use
- Open
Main.pyfile - Type whatever you want to spam
- Enter how many times do you want to spam
- press the
Start Spammingbutton - Quickly switch to the window that you want to spam in and click on the input
- Wait until the bot finishes spamming
GitHub
https://github.com/Kareem-dev/Simple-Spam-Bot

John was the first writer to have joined pythonawesome.com. He has since then inculcated very effective writing and reviewing culture at pythonawesome which rivals have found impossible to imitate.
Previous Post
A bot that can play music on Telegram Group and Channel Voice Chats
Next Post
Notion API Database Python Implementation
Привет всем! Чем только в жизни не приходится заниматься — в том числе — и вещью, которая называется: массовая рассылка писем с помощью Python. Для этой работы в случае отсутствия Python есть несколько интересных программных продуктов, но сегодня мы познакомимся с более интересным решением и узнаем, как выглядит массовая рассылка писем с помощью Python.
В принципе, основы по отправке электронного письма с помощью Pyhton я рассматривал в этой записи. Фактически, от создания спам-машины нас отделяет работа со списком получателей, и адресами, с которых мы будем производить отправку писем (уверен, вы понимаете, что отправлять, например, миллион электронных писем с одного ящика — не эффективно, и обречено на провал). А значит, наша задача будет выглядеть следующим образом:
1. Обрабатываем список адресов, которые нужны для рассылки (конечно, можно поставить свой smtp-сервер, и работать через него, но это — другая история 😉 )
2. Обрабатываем список адресов, на которые будем производить рассылку
3. И — сама рассылка.
Я решил немного скорректировать задачу, и программа, представленная ниже будет состоять из трех частей:
1. Функция, отвечающая за генерацию адресов для рассылки (все адреса генерируются случайным образом, аналогично генерируются пароли к ним, и все это сохраняется в Excel-файл)
2. Функция, отвечающая за создание списка адресов — получателей. Адреса генерируются аналогично с пунктом выше, только без паролей, и сохраняются в текстовый файл.
3. Функция, которая будет производить рассылку. Учитывая, что описанная задача представляет собой чисто умозрительный пример — вы сможете адаптировать код под собственные нужды 😉
-
''' -
Спам-машина :) Адреса для рассылки хранятся в Excel-файле в колонках: -
А - адрес почты -
В - пароль доступа к ней -
-
Адреса получателей - в текстовом файле. -
Алгоритм работы: -
1. Получаем из Excel-файла связку: логин-пароль -
2. Берем адрес из списка отправителей, и отправляем письмо на него. После отправки адрес получателя удаляется из списка -
-
''' -
-
import openpyxl -
import random
-
import re
-
import smtplib
-
from email.mime.text import MIMEText
-
from email.header import Header
-
-
#start_line = 1 -
max_mail = int(input('Сколько адресов нужно: '))
-
-
def create_sender_list():
-
start_line = 1
-
wb = openpyxl.Workbook()
-
column_a = 'A'
-
column_b = 'B'
-
while start_line <= max_mail:
-
sheets_list = wb.sheetnames # Получаем список всех листов в файле
-
sheet_active = wb[sheets_list[0]] # Начинаем работать с самым первым
-
mail_server_list = ['gmail.com', 'yandex.ru', 'outlook.com', 'mail.ru']
-
random_value = random.randrange(1, 10) #Генерируем случайное число от 1 до 10
-
random_mail = random.sample('abcdefghijklmnopqrstuvwxyz0123456789', random_value) #Генерируем случайный адрес из набора символов
-
random_mail = ''.join(random_mail)
-
random_mail_server = mail_server_list[random.randrange(0, len(mail_server_list))] #Выбираем случайный почтовый сервер
-
random_mail = random_mail + '@' + random_mail_server #Создаем итоговый адрес
-
start_line = start_line + 1
-
start_line = str(start_line)
-
sheet_active[column_a + start_line] = random_mail
-
start_line = int(start_line)
-
-
#Генерируем пароли к почте -
random_value = random.randrange(8, 12) #Генерируем длину пароля (от 8 до 12 символов)
-
password_for_mail = random.sample('abcdefghijklmnopqrstuvwxyzABCDEFGHIJKLMNOPQRSTUVWXYZ0123456789!@#$%^&*', random_value) #Генерируем сам пароль с использованием символов в скобках
-
password_for_mail = ''.join(password_for_mail)
-
-
#А теперь пишем все в файл -
start_line = str(start_line)
-
sheet_active[column_b + start_line] = password_for_mail
-
start_line = int(start_line)
-
print(random_mail, ':', password_for_mail, ' - создан')
-
-
wb.save('sender_base.xlsx')
-
print('База почтовых адресов для отправки создана.n')
-
-
def create_recipient_list():
-
start_line = 1
-
while start_line <= max_mail * 3:
-
random_value = random.randrange(1, 10)
-
random_mail = random.sample('abcdefghijklmnopqrstuvwxyz0123456789', random_value)
-
random_mail = ''.join(random_mail)
-
random_mail = random_mail + '@gmail.com'
-
with open('recipient_list.txt', 'a', encoding='utf8') as f:
-
f.write(random_mail + 'n')
-
start_line = start_line + 1
-
print('База получателей создана :)')
-
-
def spam():
-
print('Начинаем работу... n')
-
global recipient_list -
-
recipient_list = []
-
with open('recipient_list.txt', 'r', encoding='utf8') as f:
-
for mail in f:
-
mail = mail.replace('[', '').replace(''', '').replace(']', '').replace('n', '')
-
-
recipient_list.append(mail)
-
print(mail)
-
-
#Начинаем работать с файлом адресов для отправки -
path = 'sender_base.xlsx' # Какой файл адресов для рассылки читаем?
-
workbook = openpyxl.load_workbook(path) # Собственно - читаем сам файл
-
sheets_list = workbook.sheetnames # Получаем список всех листов в книге
-
global data_from_row, sheet, column_count, random_column, mail_adress_recipient, column_a, column_b, work_column_a, work_column_b, mail_server #Делаем глобальные переменные (уточнить)
-
sheet = workbook[sheets_list[0]] # Делаем активным самый первый лист в книге
-
column_count = sheet.max_row
-
print(column_count)
-
random_column = random.randrange(2, column_count) #получаем случайную строку
-
random_column = str(random_column)
-
-
column_a = 'A'
-
column_b = 'B'
-
-
work_column_a = column_a + random_column -
#work_column_a = str(work_column_a) -
-
work_column_b = column_b + random_column -
#work_column_b = str(work_column_b) -
-
#Определяем почтовый сервер -
print(work_column_a)
-
-
data_from_row = sheet[work_column_a].value
-
-
regxp = '(@w+.w+)'
-
mail_server = re.findall(regxp, data_from_row)
-
print('Почтовый сервер:', mail_server)
-
mail_server = str(mail_server)
-
mail_server = mail_server.replace('[', '').replace(']', '').replace(''','')
-
print('Определили почтовый сервер:', mail_server)
-
-
#А теперь начинаем рассылать со случайной строкой с учетом почтового сервера: -
if mail_server == '@gmail.com':
-
print('Работаем через Gmail')
-
mailsender = smtplib.SMTP('smtp.gmail.com', 587)
-
mailsender.starttls()
-
mailsender.login(work_column_a, work_column_b)
-
mail_subject = 'Тема сообщения'
-
mail_body = 'Текст сообщения'
-
msg = MIMEText(mail_body, 'plain', 'utf-8')
-
msg['Subject'] = Header(mail_subject, 'utf-8')
-
mailsender.sendmail(work_column_a, mail, msg.as_string())
-
mailsender.quit()
-
print('Сообщение на адрес', mail, 'отправлено')
-
-
elif mail_server == '@yandex.ru':
-
print('Работаем через Yandex')
-
mailsender = smtplib.SMTP('smtp.yandex.ru', 587)
-
mailsender.starttls()
-
mailsender.login(work_column_a, work_column_b)
-
mail_subject = 'Тема сообщения'
-
mail_body = 'Текст сообщения'
-
msg = MIMEText(mail_body, 'plain', 'utf-8')
-
msg['Subject'] = Header(mail_subject, 'utf-8')
-
mailsender.sendmail(work_column_a, mail, msg.as_string())
-
mailsender.quit()
-
print('Сообщение на адрес', mail, 'отправлено')
-
-
elif mail_server == '@mail.ru':
-
print('Работаем через Mail.ru')
-
mailsender = smtplib.SMTP('smtp.mail.ru', 587)
-
mailsender.starttls()
-
mailsender.login(work_column_a, work_column_b)
-
mail_subject = 'Тема сообщения'
-
mail_body = 'Текст сообщения'
-
msg = MIMEText(mail_body, 'plain', 'utf-8')
-
msg['Subject'] = Header(mail_subject, 'utf-8')
-
mailsender.sendmail(work_column_a, mail, msg.as_string())
-
mailsender.quit()
-
print('Сообщение на адрес', mail, 'отправлено')
-
-
elif mail_server == '@outlook.com':
-
print('Работаем с Outlook.com')
-
mailsender = smtplib.SMTP('smtp.outlook.com', 587)
-
mailsender.starttls()
-
mailsender.login(work_column_a, work_column_b)
-
mail_subject = 'Тема сообщения'
-
mail_body = 'Текст сообщения'
-
msg = MIMEText(mail_body, 'plain', 'utf-8')
-
msg['Subject'] = Header(mail_subject, 'utf-8')
-
mailsender.sendmail(work_column_a, mail, msg.as_string())
-
mailsender.quit()
-
print('Сообщение на адрес', mail, 'отправлено')
-
-
def work():
-
create_sender_list() #Создаем список адресов с которых будем отправлять
-
create_recipient_list() #Создаем список адресов на которые будем отправлять
-
spam() #Работаем
-
-
work()
Как всегда — полный код программы доступен на Git 🙂 С вопросами — добро пожаловать на почту, или в Telegram 🙂
Важно: в связи с неоднократно повторенным вопросом — почему программа генерирует почтовые адреса, а они не рабочие уточняю (писал это выше, но все же) — программа генерирует темповые (фейковые) адреса, которые нужны для примера, не более. Сама же функция, отвечающая за рассылку полностью рабочая. Что бы программа работала просто в режиме рассылки писем — закомментируйте следующий кусок:

-
#1
Я знаю, что тем по написанию SMS BOMB`еров было
дохуя
, но я решил написать, это самый простой смс бомбер, он работает и на андроиде и на пк.
Что же нам понадобится?
- Импортировать библиотеки.
- Узнать номер телефона.
- Сделать проверку номера телефона.
- Сделать запрос.
1. Импортируем библиотеки:
import requests # Загружаем библиотеку requests
import time # Загружаем библиотеку time
2) Узнаём номер телефона:
print("Привет, это урок по написанию SMS BOMBERnnНомер телефона, должен начинатся так: +7 или +380nn") #Выводим в консоль текст.

phone = input("Номер: ") #Номер мобильного телефона на который хотите направить спам.
3)Делаем проверку номера телефона:
if (phone[0:2] == "+7" and len(phone[1:]) == 11) or (phone[0:4] == "+380" and len(phone[1:]) == 12): #Делаем проверку, сколько цифр и правильно ли в начале.
  #Сюда пункт 4
else:
    print("Номер телефона набран не правильно, повторите попытку")
4) Делаем запрос в бесконечном цикле.
while True: # Делаем бескоенчный цикл.
    cl = requests.session()
    cl.get('https://b.utair.ru/api/v1/login/')
    rSL = requests.post('https://b.utair.ru/api/v1/login/', headers = {"Content-Type":"application/json", "Referer":"https://www.utair.ru/", "Sec-Fetch-Mode":"cors", "User-Agent":"Mozilla/5.0 (Windows NT 10.0; Win64; x64) AppleWebKit/537.36 (KHTML, like Gecko) Chrome/77.0.3865.120 Safari/537.36 OPR/64.0.3417.92 (Edition Yx 02)"}, json={"login":phone[1:]}) # Отпраялем запрос.
    if rSL.status_code == 200: # Делаем проверку на результат.
      print("Сообщение от сервиса utAir отправлено.") # Если результат выполнен
    else: # Если проверка не пройдена
      print("Сообщение от сервиса utAir не отправлено.")
    time.sleep(5) # Задержка
Пункт №4, добавляем между if и else.
Дальше может быть расскажу где и как доставать ссылки(чтобы смс приходило), как сделать бомбер для Telegram, и т.д.
Напишите если надо.
Сам бомбер оставлю во вложениях.
-
bomb.py
1.7 KB
· Просмотры: 7,489
Последнее редактирование: 13 Янв 2022
-
#2
Дальше может быть расскажу где и как доставать ссылки(чтобы смс приходило), как сделать бомбер для Telegramm, и т.д.
Да надо и пункт 4 выкладывай)))
Интересный бомбер просто скажу как человек который делал бомбер
-
#3
будет хорошо если для тг научишь делать смс бомбера
-
#4
import time # Загружаем библиотеку time
чет не находит дядя
-
#6
будет хорошо если для тг научишь делать смс бомбера
Мб позже.

-
#7
Эта библиотека вместе с питоном уже идет
-
#8
Это не библиотеки блять
Хахаха
Последнее редактирование: 18 Апр 2020
-
#9
Эта библиотека вместе с питоном уже идет
Спасибо

-
#10
Здраствуйте, а отключить как ни будь vожно будет? (и будет ли тратятся деньги на телефоне жертвы деньги?)
-
#11
Здраствуйте, а отключить как ни будь vожно будет? (и будет ли тратятся деньги на телефоне жертвы деньги?)
отключение закрытием бомбера. деньги не тратятся
-
#12
отключение закрытием бомбера. деньги не тратяся
Я вот хочу кинуть себе на номер для теста. Как его потом отключить?
-
#13
Я вот хочу кинуть себе на номер для теста. Как его потом отключить?
Закрываешь, придет остаток сообщений и все
-
#14
Сообщение от сервиса utAir не отправлено.
что делать?
-
#15
Сообщение от сервиса utAir не отправлено.
Этот сайт добавил капчу, уже ничего не сделать с ним.


In this article, we will guide you to create an Automated bot or Whatsapp Spam Bot Using Python Selenium. We will use tkinter and selenium for creating our whatsapp spam bot.
SELENIUM:
“Selenium automates browsers. That’s it! What you do with that power is entirely up to you. Primarily it is for automating web applications for testing purposes but is certainly not limited to just that” — from selenium website.
We can use selenium in many languages like Java and Python. Here, we will use selenium to Automate and repeat WhatsApp messages Using Python.
To know more about Selenium installation and setup check both the links below:
link 1
link 2
TKINTER:
What is Tkinter? it is used library provides Python users with a simple way to create GUI elements using the widgets found in the Tk toolkit. Tk widgets can be used to construct buttons, menus, data fields, etc. in a Python application.
“Simply Tkinter pops windows which make the code user friendly”.
SETTING ENVIRONMENT:


While installing python make sure the check boxes shown above are ticked. If not while reinstalling go to advanced installation settings and tick the check box. It will be useful if you are dealing with python IDLE. Its advisable to use PyCharm.

If you are dealing with pycharm IDE. You may frequently encounter a error while dealing with tkinter projects on PyCharm . To rectify the error it follow the steps below. If you are perfect with your environment you can skip this step and check the program.
As shown above first open PyCharm IDE > Settings > Project settings > Project interpreter > Add packages > Install Future Package.
PROGRAM:
First import all the necessary packages
Coming to Tkinter code:
Creating tkinter window and adding title and header description to it.
INPUT:
OUTPUT:
Now lets add fields to the tkinter window. we can also use input variable and selenium code instead of tkinter window.But using tkinter makes it userfriendly.
INPUT:
OUTPUT:
Coming to selenium code:
Just locating the Xpath of contact name / contact number makes the code much easy.
selenium code makes to pop up the webwhatsapp on your browser scan the qr code and enter whats app.
INPUT:
OUTPUT:
Wait for a while and see the magic. check the complete code below hope you like this stay tuned for more 🙂 .
import time
import tkinter as tk
from tkinter import *
from selenium import webdriver
from selenium.webdriver.common.keys import Keys

def startBombing():
    victim=str(name.get())
    msg=str(message.get())
    num=msgCount.get()
    driver=webdriver.Chrome('enter you path here example of a path : [C:/Users/91728/Desktop/pythonProject/chromedriver.exe] ')
    driver.get("https://web.whatsapp.com/")

    time.sleep(15)
    user=driver.find_element_by_xpath('//span[@title = "'+victim+'"]')
    user.click()

    msg_box=driver.find_element_by_xpath('//*[@id="main"]/footer/div[1]/div[2]/div/div[2]')
    for i in range(num):
        msg_box.send_keys(msg)
        msg_box.send_keys(Keys.ENTER)


#GUI
root=tk.Tk()
root.title("Whatsapp Bombing")
root.geometry("500x500")
root.resizable(height=False,width=False)

headingLabel=Label(root,text="Wait for 15 - 30 sec to start BOOM!",font=('Helvetics',12,'bold'))
headingLabel.place(relx=.5,y=15,anchor='center')

# victim name label
Label(root,text="Enter Name/No.").place(x=120,y=80)
name=StringVar()
nameBox=Entry(root,textvariable=name).place(x=220,y=80)
#  Msg label
Label(root,text="Enter Message").place(x=120,y=150)
message=StringVar()
msgBox=Entry(root,textvariable=message).place(x=220,y=150)

Label(root,text="No Of Message").place(x=120,y=220)
msgCount=IntVar()
countBox=Entry(root,textvariable=msgCount).place(x=220,y=220)
tk.Button(root,text="Start Bombing",command=startBombing).place(relx=.5,y=300,anchor="center")
root.mainloop()
Feel free to comment below. Thank you for spending your valuable time on this.
Keep learning
Also Read:
YouTube Video Downloader Application Using Python
Python Web scraping using Python Selenium
Automate Facebook Login Using Python Selenium
Shutdown Computer with Voice in Python
Jarvis and Google Assistant || Voice Assistant Using Python
Crack Any Password Using Python
Get WiFi Passwords With Python
