Время на прочтение
2 мин
Количество просмотров 155K
Версии, которые стоят у автора
Версия Python: 3.8.2
Версия discord.py: 1.3.3
Приветствую, хабровчане и другие пользователи интернета. Сегодня я начну цикл статей, посвящённых созданию Discord-бота с помощью библиотеки discord.py. Мы рассмотрим создание как и примитивного бота, как и «продвинутого» бота с модулями. В этой статье мы сделаем стандартную команду и ещё одну небольшую команду. Начнём!
Создание бота и получение токена
Для того, чтобы добавить бота на сервер нужно создать свое приложение и во вкладке General Information скопировать Client ID.
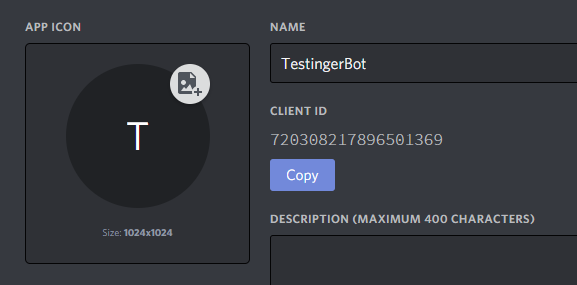
Здесь заменяем CLID на ранее скопированный Client ID.
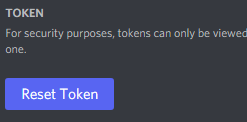
https://discordapp.com/oauth2/authorize?&client_id=CLID&scope=bot&permissions=8Во вкладке Bot создаём бота и копируем токен.
Написание кода
Устанавливаем саму библиотеку.
pip install discordСоздаём файл config.py (так удобнее), и создаём там словарь.
settings = {
    'token': 'Ваш токен',
    'bot': 'Имя бота',
    'id': Client ID бота, без кавычек,
    'prefix': 'Префикс бота'
}
Создаём main-файл, название может быть любое.
Импортируем библиотеки и наш файл конфига:
import discord
from discord.ext import commands
from config import settings
Создаём «тело» бота, название может быть любое:
bot = commands.Bot(command_prefix = settings['prefix']) # Так как мы указали префикс в settings, обращаемся к словарю с ключом prefix.Начинаем писать основной код.
@bot.command() # Не передаём аргумент pass_context, так как он был нужен в старых версиях.
async def hello(ctx): # Создаём функцию и передаём аргумент ctx.
    author = ctx.message.author # Объявляем переменную author и записываем туда информацию об авторе.

    await ctx.send(f'Hello, {author.mention}!') # Выводим сообщение с упоминанием автора, обращаясь к переменной author.
В конце запускаем бота с помощью:
bot.run(settings['token']) # Обращаемся к словарю settings с ключом token, для получения токенаПолный код
import discord
from discord.ext import commands
from config import settings

bot = commands.Bot(command_prefix = settings['prefix'])

@bot.command() # Не передаём аргумент pass_context, так как он был нужен в старых версиях.
async def hello(ctx): # Создаём функцию и передаём аргумент ctx.
    author = ctx.message.author # Объявляем переменную author и записываем туда информацию об авторе.
    await ctx.send(f'Hello, {author.mention}!') # Выводим сообщение с упоминанием автора, обращаясь к переменной author.

bot.run(settings['token']) # Обращаемся к словарю settings с ключом token, для получения токена
Должно получится так:
Бонусный туториал!
Сделаем вывод случайных картинок с лисами
Для этого импортируем еще пару библиотек:
import json
import requests
Приступим к написанию команды.
@bot.command()
async def fox(ctx):
    response = requests.get('https://some-random-api.ml/img/fox') # Get-запрос
    json_data = json.loads(response.text) # Извлекаем JSON

    embed = discord.Embed(color = 0xff9900, title = 'Random Fox') # Создание Embed'a
    embed.set_image(url = json_data['link']) # Устанавливаем картинку Embed'a
    await ctx.send(embed = embed) # Отправляем Embed
Должно получится так:

Конец
На этом 1 часть закончена. Скоро будет опубликована 2 часть.
Всем привет, сегодня мы напишем Discord-бота на Python и discord.py + бонусом посмотрим на примеры ботов. Приступим 🙂
Перед работой
Перед тем, как начать, вам нужны:
- Python 3;
- discord.py;
- Discord-аккаунт и свой сервер.
Для установки discord.py воспользуйтесь пакетным менеджером:
pip3 install discord.pyСоздаём нашего бота
Перейдите на Developer Portal и нажмите на New application.
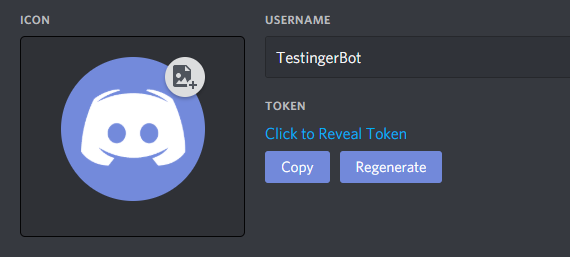
Вы создали своё приложение, на странице приложение перейдите в Bot >> Add Bot и создайте своего Discord-бота.
Сохраните токен бота! Дальше он нам понадобится!
Если всё прошло успешно, поздравляю, половина дела сделана 😀
Добавление бота на сервер
Теперь можно добавить бота на сервер.
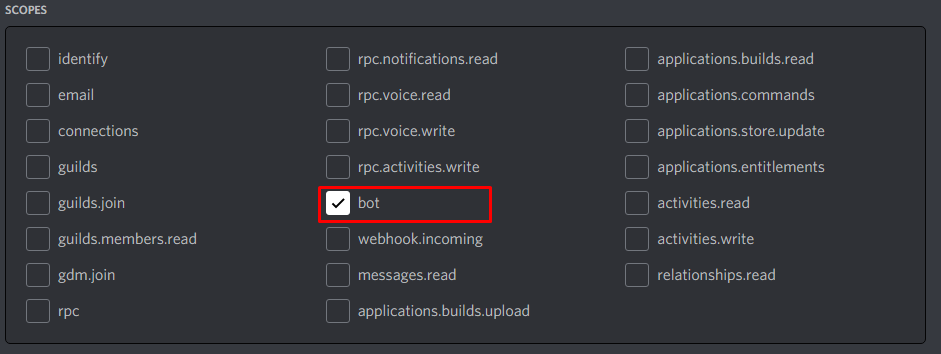
Перейдите в OAuth2 >> URL Generator, в Scopes выбираем Bot и ниже — права бота, копируем сгенерированный URL. Вставляем в браузер, и добавляем на наш сервер.
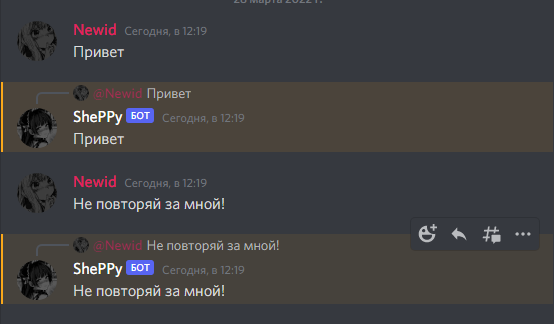
Эхо-бот
Напишем традиционного эхо-бота, и разберём каждую строчку кода.
Код:
import discord
from discord.ext import commands

config = {
    'token': 'your-token',
    'prefix': 'prefix',
}

bot = commands.Bot(command_prefix=config['prefix'])

@bot.event
async def on_message(ctx):
    if ctx.author != bot.user:
        await ctx.reply(ctx.content)

bot.run(config['token'])
Пример работы:
Разбор:
import discord
from discord.ext import commands
Нужные нам импорты.
config = {
    'token': 'your-token',
    'prefix': 'prefix',
}
Вспомогательный словарь config в котором храним токен и префикс команд (далее расскажу зачем нужен префикс команд).
bot = commands.Bot(command_prefix=config['prefix'])Создаём нашего бота, в аргументе передаём префикс.
@bot.eventДекоратор, предназначенный для обработки событий, подробнее здесь.
async def on_message(ctx):Создаём асинхронную функцию, с параметром ctx, представляет из себя сообщение.
if ctx.author != bot.user:Проверка, не является ли автор сообщения нашим Discord-ботом. Дело в том, что если бот отправит сообщение, это будет новым событием, и тогда получается цикл.
await ctx.reply(ctx.content)Отвечаем на сообщение (ctx.reply), в аргументы передаём сообщение (ctx.content).
bot.run(config['token'])Запускаем нашего бота, в аргументы передаём токен бота.
Надеюсь вы разобрались с кодом, и мы можем переходить далее.
Обработка команд
Перед тем, как обрабатывать команды, нам пригодится наш префикс.
Рассмотрим код:
import random
import discord
from discord.ext import commands

config = {
    'token': 'your-token',
    'prefix': '$',
}

bot = commands.Bot(command_prefix=config['prefix'])

@bot.command()
async def rand(ctx, *arg):
    await ctx.reply(random.randint(0, 100))

bot.run(config['token'])
Результат работы:

Разбор:
@bot.command()Декоратор обработки команд
async def rand(ctx, *arg):Асинхронная функция rand
await ctx.reply(random.randint(0, 100))Отвечаем на сообщение, в аргументы передаём случайное число от 0 до 100
Бонус
Проверка роли:
import random
import discord
from discord.ext import commands

config = {
    'token': 'your-token',
    'prefix': '$',
}

bot = commands.Bot(command_prefix=config['prefix'])

@bot.command()
@commands.has_role("Хозяин")
async def rand(ctx, *arg):
    await ctx.reply(random.randint(0, 100))

bot.run(config['token'])
Выгнать пользователя
import discord
from discord.ext import commands

config = {
    'token': 'your-token',
    'prefix': '$',
}

bot = commands.Bot(command_prefix=config['prefix'])

@bot.command()
async def kick(ctx, user : discord.User(), *arg, reason='Причина не указана'):
    await bot.kick(user)
    await ctx.send('Пользователь {user.name} был изгнан по причине "{reason}"')

bot.run(config['token'])Руководство по использованию библиотеки discord-py
Здесь вы можете почитать об основах, которые необходимо понимать, чтобы грамотно работать с библиотекой и не задавать вопросов, касающихся самых базовых вещей
Вероятнее всего у вас уже имеется созданный бот, поэтому инструкция по его созданию будет пропущена (но, возмжно появится позже).
Прежде чем начать…
Прежде чем приступать к работе с ботом, я сразу рекомендую зайти на страницу вашего бота и включить намерения (intents, подробнее). Для этого зайдите в раздел приложений и выберите вашего бота. Затем, слева, на вкладке "Bot"

Включите параметры PRESENCE INTENT и SERVER MEMBERS INTENT
После этого выдайте намерения в коде при инициализации бота
Намерения нужны для работы с некоторыми событиями, объектами пользователей серверов (участник/member) и др. Они вам точно понадобятся, поэтому лучше включить их сразу, чтобы потом не спрашивать, почему вам не удается получить данные о пользователе сервера или чего-либо еще.
Начало работы с ботом и discord-py
Бот, которого вы создали на странице приложений, является аккаунтом дискорда, который по сути является таким же пользовательским аккаунтом, как и ваш, но с атрибутом bot и некоторыми ограничениями. Чтобы бот начал что-то делать, нужно создать его в коде и прописать логику.
Для начала рассмотрим виды ботов, которые предоставляет библиотека:
discord.Client— фактически, самый базовый бот, на котором основаны другие. Умеет обрабатывать события по типу получения сообщенийon_message(), установки реакцииon_raw_reaction_add()и другие.discord.ext.commands.Bot— тот жеdiscord.Client, только умеет находить в сообщениях и обрабатывать отдельные команды, которые начинаются с какого-либо префикса, например!testdiscord.ext.commands.Cog— про этого бота ничего сказать не могу, так как ни разу не использовал. Насколько мне известно, он нужен в тех случаях, когда вы планируете задать боту кучу разных комманд, событий и организовать все это в один отдельный класс.
В общем-то, выбор бота зависит напрямую от цели использования. Если вам нужен простой бот, который будет читать чат, фильтровать мат и т.п., считывать реакции, выдавать роли при входе нового пользователя и т.д., то вам хватит базового бота discord.Client.
Если помимо того, что я написал выше, вы хотите добавить еще и обработку команд по типу !ban <@User>, !play <Ссылка на видео с YouTube>, !погода и т.п., то использовать надо именно discord.ext.commands.Bot.
Пишем код
Теперь, когда вы определились с ботом можно наконец-то приступить к написанию кода.
Для начала подключим библиотеку.
На данном этапе я настоятельно рекомендую ознакомиться с руководством по использованию документации, так как на эту самую документацию я буду ссылаться очень часто и без ее использования вы вряд ли напишете что-то самостоятельно и будете постоянно спрашивать как реализовать ту или иную функцию.
В случае, если вы хотите использовать discord.ext.commands.Bot, я бы сразу отдельно подключил еще и этот пакет
from discord.ext import commands
Инициализация бота
Теперь создадим объект бота, который будет обрабатывать события и команды:
Из документации видим, что единственным обязательным аргументом при создании экземпляра класса является command_prefix.
Он принимает строку (str), по которой бот будет определять, то что сообщение является командой и обрабатывать его нужно именно как команду.
Помимо этого, выдадим боту намерения (intents), инструкция по настройке которых была в начале.
В качестве префикса команды укажем !, намерения нужно выдавать именно те, которые вы будете использовать, но на первое время можно выдать все, то есть discord.Intents.all()
Если у вас discord.ext.commands.Bot:
bot = commands.Bot(command_prefix='!', intents=discord.Intents.all())
Если у вас discord.Client, то префикс указывать не нужно (класс не принимает такого аргумента):
bot = discord.Client(intents=discord.Intents.all())
Основные обработчики событий
Теперь у нас есть объект bot, для которого нужно написать логику взаимодействия.
В качестве обработчиков событий используются асинхронные (async) функции (def), помеченные декоратором @bot.event, где bot — название объекта вашего бота. Функция должна иметь название, строго как в документации — иначе событие просто не будет обработано.
Если коротко, то все, что делает декоратор @bot.event — это помещает написанную вами функцию в другую функцию из библиотеки discord, которая, в свою очередь, передает вашей функции какие-либо параметры. Поэтому, если не пометить функцию декоратором, discord не обратит на нее внимание и она не будет вызвана.
async def on_ready()
Первым делом, нужно удостовериться, что бот успешно запустился и готов к работе. В списке событий находим событие on_ready(), которое вызывается один раз при запуске кода и обозначает то, что бот загрузился и готов к работе.
Здесь нужно отметить, что в этой функции не следует размещать фрагменты кода, которые должны будут выполняться в дальнейшем, так как функция будет вызвана только один раз.
Поэтому в этой функции можно разместить какое-либо сообщение, о том, что бот запущен и, если есть работа с данными из файлов, то самое время их подгрузить. В общем, выполнить все единоразовые процедуры.
Выглядеть это будет вот так:
@bot.event
async def on_ready():
  # сам по себе объект bot (discord.ext.commands.Bot) не содержит имени бота
  # зато содержит объект пользователя, которым он является
  # а вот объект пользователя уже хранит в себе имя
  print(f'{bot.user.name} запустился и готов к работе!')
async def on_message(message)
Добавим обработчик сообщений, чтобы получать вызов функции каждый раз, когда bot получает сообщение в ЛС или на сервере.
В списке событий находим событие on_message(message), которое принимает обязательный аргумент message. Этот аргумент имеет тип discord.Message из которого вы можете получить текст сообщения, а также объекты автора сообщения, сервер, канал, вложения, реакции, упоминания, ссылку на сообщение и много чего еще
@bot.event
async def on_message(message):
  print(f'Получено сообщение! Текст: {message.content}, Сервер: {message.guild}')
Здесь вы можете прописать любую логику взаимодействия. Хоть даже удалять все только что переданные обработчиком сообщения (главное чтобы у бота были на то права).
Самое главное — задать функции аргумент, который будет принимать объект сообщения. Вы можете назвать его как хотите, например даже так: async def on_message(собщение), главное чтобы он был.
Если аргумент не указать, то при вызове события нового сообщения, discord-py отправит в функцию on_message() аргумент, содержащий объект сообщения, но получит ошибку о том, что указанная функция не принимает аргументов и ничего работать не будет. Это равноценно созданию функции, которая должна считать сумму 2 переданных в виде аргументов числа, но при этом она не принимает их.
Другие события
По аналогии с примерами, приведенными выше, можно создать обработчик любого другого события, предствленного в discord-py. Главное, чтобы совпадало название и принимаемые аргументы.
Примеры других часто используемых событий:
on_raw_reaction_add(payload), on_raw_reaction_remove(payload) — события добавления и удаления реакции с сообщения, соответствено. Из объекта payload вы можете получить сервер, сообщения и прочую инфу
on_member_join(member), on_member_remove(member) — события подключения и выхода участника с сервера, в качестве аргумента принимает объект участника из которого можно получить всю информацию о пользователе.
Остальное вы можете найти в списке событий.
Запуск бота
У вас уже есть объект бота и, вероятно, обработчики событий. Теперь бота нужно запустить.
При помощи токена, который нужно скопировать на странице бота, в разделе приложений вы можете авторизоваться в аккаунте бота.
Для этого у объекта bot нужно вызвать функцию run():
TOKEN = '' # здесь ваш токен
bot.run(TOKEN)
Особенности
Данная строка должна всегда находиться в самом низу кода. После ее выполнения бот будет запущен и весь код, который находится ниже этой строки будет выполнен только после завершения работы бота.
Бот будет выполнять работу до дех пор, пока вы не завершите выполнение кода. Это означает, что если вы закроете консольное окно программы, то бот перестанет работать и обрабатывать какие-либо события.
Чтобы бот работал без вашего участия, его можно поставить на хостинг — тогда он будет постоянно запущен на удаленном сервере, а не на вашем устройстве. Например, можно использовать бесплатный (уже не бесплатный) хостинг Heroku. В интернете есть куча разных туториалов по настройке. Возможно, когда-нибудь здесь появится ссылка на мой 
В итоге должен получиться примерно такой код, посмотреть который можно здесь.
Данный бот выводит сообщение при успешном запуске, а также подробную информацию о каждом полученном сообщении.
Для этого примера достаточно было бы простого бота discord.Client, так как он обрабатывает только события. Но я наперед прописал в коде бота discord.ext.commands.Bot, так как дальше в этот код мы будем добавлять обработку команд.
Обработка отдельных команд
Данный раздел содержит информацию об устаревших в дискорде prefix-командах (!command / >command / $command и т.п.). На данный момент актуально создавать именно slash-команды (/command), которые интегрируются в дискорд и позволяют более комфортно разделять аргументы и добавлять к ним описание.
Так или иначе, руководство по slash-командам подразумевает знание материала по работе с prefix-командами. Поэтому прежде чем переходить к slash-командам, я рекомендую ознакомиться с материалом ниже.
Почитать про slash-команды можно здесь.
Напоминаю, что для работы с командами, в качестве бота нужно использовать объект discord.ext.commands.Bot, а не discord.Client! Не забудьте также про префикс
-
Команды бота, как и обработчики событий, являются асинхронными функциями (
async def). -
Чтобы
discord-pyобнаружил команду в коде, функцию нужно пометить декоратором@bot.command(), гдеbot— название объекта вашего бота.Скобки в декораторе
@bot.command()обязательны, в отличии от@bot.event, так как дектораторdiscord.ext.commands.Command()принимает необязательные аргументы. Без скобок декоратор корректно работать не будет. *Подробнее про декораторы можно почитать выше -
В отличии от обработчиков событий, функцию можно назвать как захочется — название функции станет названием команды.
-
Любая функция, являющаяся командой, должна принимать обязательный аргумент
ctx(можно назвать как угодно). Аргумент является контекстом (discord.ext.commands.Context) выполнения команды, из которого можно получить сервер, автора, сообщение, канал и др. информацию. При вызове команды, Контекст в функцию передает библиотекаdiscord-py.
Перед созданием первой команды
Для начала, если у вас в коде есть обработчик событий on_message(), его нужно немного доработать.
Из документации видим, что у объекта пользователя (discord.User) есть свойство bot, имеющее тип bool. Значит, если свойство имеет значение True — пользователь является ботом, иначе — не является)
Допишем условие, чтобы сообщения от любых ботов (включая нашего) игнорировались. Это часто делается для того, чтобы другие боты не могли спамить вызовами команд, обработка которых сначала проходит через on_message(), ведь любая команда в дискорде по сути является просто сообщением.
Для этого, кстати, в on_message() нужно добавить еще одну строку await bot.process_commands(message), которую можно найти в списке методов объекта discord.ext.commands.Bot. Метод принимает в качестве аргумента сообщение с типом discord.Message и нужен для того, чтобы проверять, являестя ли сообщение командой.
Многие, забыв добавить эту строку, потом не понимают, почему их бот игнорирует команды (подробный разбор проблемы)
@bot.event
async def on_message(message):
  if message.author.bot:
    return
  await bot.process_commands(message)
Ключевое слово return завершает выполнение функции, то есть код, который идет дальше, так или иначе не будет выполнен.
Создание первой команды
Создадим команду с названием test, при вызове которой бот будет отвечать в чат «Успешный тест!»:
@bot.command()
async def test(ctx):
  # список свойств и методов контекста можно найти в документации по запросу context
  await ctx.send('Успешный тест!')
Результат:

Все работает!
Реализацию такой команды можно было бы сделать через обычного бота discord.Client прямо в on_message(), проверяя, наличие префикса и конкретного названия команды. Однако при большом количестве команд запихивать все в одну функцию не очень хорошо, да и не удобно разделять аргументы, про которые, кстати, можно почитать далее.
*Почитать подробнее, почему не стоит делать команды через on_message() можно здесь
Сложные команды
Несколько названий
Для создания нескольких названий одной команды можно передать в декоратор @bot.command() аргумент aliases, принимающий список (list) или кортеж (tuple) с названиями команды. При этом самого названия функции там быть не должно.
@bot.command(aliases=['test', 'тест', 'тестовая_команда', 'test_command'])
async def test_(ctx):
  pass
Работа с аргументами команды
Предположим, вам нужно при вызове функции принять от пользователя число, значение типа bool и участника сервера discord.Member

Чтобы принять эти параматры, нужно указать их в качестве аргументов функции, которая используется в качестве команды:
@bot.command()
async def get_values(ctx, number, boolean, member):
    ...
Поскольку Python — язык с динамической типизацией, по умолчанию все полученные значения принимают строковый тип str, так как фактически были получены из строки (str), содержащей текст сообщения.
Тогда
numberбудет равно'16'booleanбудет равно'True'memberбудет равно'<@!239863351063144451>'
То есть из number нельзя будет вычесть число, boolean == True примет значение False, а member просто примет строку, содержащую форму упоминания пользователя.
Вместо того, чтобы вручную выполнять приведение типов (number = int(number), boolean = bool(boolean) и т.д.), можно сразу же явно указать тип аргумента функции:
@bot.command()
async def get_values(ctx, number: int, boolean: bool, member: discord.Member):
    ...
И вот теперь уже все будет работать корректно. Помимо discord.Member можно указать любой другой тип библиотеки discord-py.
Из объекта member, например, можно получить id (member.id), ссылку на аватар (member.avatar_url) и другую информацию, которую можно найти в документации по объекту discord.Member.
Получить весь текст как один аргумент
В случае, когда вам в качестве аргумента нужен весь текст команды, можно использовать оператор *:

@bot.command()
async def get_text(ctx, *, text):
    ...
text будет иметь тип str и значение 'это тестовый текст для проверки функции'
Если сделать так:
@bot.command()
async def get_text(ctx, *text):
    ...
text будет иметь тип tuple и значение ('это', 'тестовый', 'текст', 'для, 'проверки', 'функции')
Также можно сначала получить несколько отдельных слов, а уже потом оставшийся текст:
@bot.command()
async def get_text(ctx, first_word, second_word, *, other_text):
    ...
first_wordбудет иметь типstrи значение'это'second_wordбудет иметь типstrи значение'тестовый'other_textбудет иметь типstrи значение'текст для проверки функции'
Итог
Если смешать все команды из базового руководства в один код, то должно получиться что-то такое.
Данной информации должно хватить для понимания базовых вещей, таких как работа с документацией, создание prefix-команд, работа с обработчиками событий и т.д.
Другие материалы
- Slash-команды
- Фоновые задачи (Tasks)
- UI-Элементы (Кнопки, выпадающие списки и дилоговые окна)
Watch Now This tutorial has a related video course created by the Real Python team. Watch it together with the written tutorial to deepen your understanding: Creating a Discord Bot in Python
In a world where video games are so important to so many people, communication and community around games are vital. Discord offers both of those and more in one well-designed package. In this tutorial, you’ll learn how to make a Discord bot in Python so that you can make the most of this fantastic platform.
By the end of this article you’ll learn:
- What Discord is and why it’s so valuable
- How to make a Discord bot through the Developer Portal
- How to create Discord connections
- How to handle events
- How to accept commands and validate assumptions
- How to interact with various Discord APIs
You’ll begin by learning what Discord is and why it’s valuable.
What Is Discord?
Discord is a voice and text communication platform for gamers.
Players, streamers, and developers use Discord to discuss games, answer questions, chat while they play, and much more. It even has a game store, complete with critical reviews and a subscription service. It is nearly a one-stop shop for gaming communities.
While there are many things you can build using Discord’s APIs, this tutorial will focus on a particular learning outcome: how to make a Discord bot in Python.
What Is a Bot?
Discord is growing in popularity. As such, automated processes, such as banning inappropriate users and reacting to user requests are vital for a community to thrive and grow.
Automated programs that look and act like users and automatically respond to events and commands on Discord are called bot users. Discord bot users (or just bots) have nearly unlimited applications.
For example, let’s say you’re managing a new Discord guild and a user joins for the very first time. Excited, you may personally reach out to that user and welcome them to your community. You might also tell them about your channels or ask them to introduce themselves.
The user feels welcomed and enjoys the discussions that happen in your guild and they, in turn, invite friends.
Over time, your community grows so big that it’s no longer feasible to personally reach out to each new member, but you still want to send them something to recognize them as a new member of the guild.
With a bot, it’s possible to automatically react to the new member joining your guild. You can even customize its behavior based on context and control how it interacts with each new user.
This is great, but it’s only one small example of how a bot can be useful. There are so many opportunities for you to be creative with bots, once you know how to make them.
There are two key steps when you’re creating a bot:
- Create the bot user on Discord and register it with a guild.
- Write code that uses Discord’s APIs and implements your bot’s behaviors.
In the next section, you’ll learn how to make a Discord bot in Discord’s Developer Portal.
How to Make a Discord Bot in the Developer Portal
Before you can dive into any Python code to handle events and create exciting automations, you need to first create a few Discord components:
- An account
- An application
- A bot
- A guild
You’ll learn more about each piece in the following sections.
Once you’ve created all of these components, you’ll tie them together by registering your bot with your guild.
You can get started by heading to Discord’s Developer Portal.
Creating a Discord Account
The first thing you’ll see is a landing page where you’ll need to either login, if you have an existing account, or create a new account:
If you need to create a new account, then click on the Register button below Login and enter your account information.
Once you’re finished, you’ll be redirected to the Developer Portal home page, where you’ll create your application.
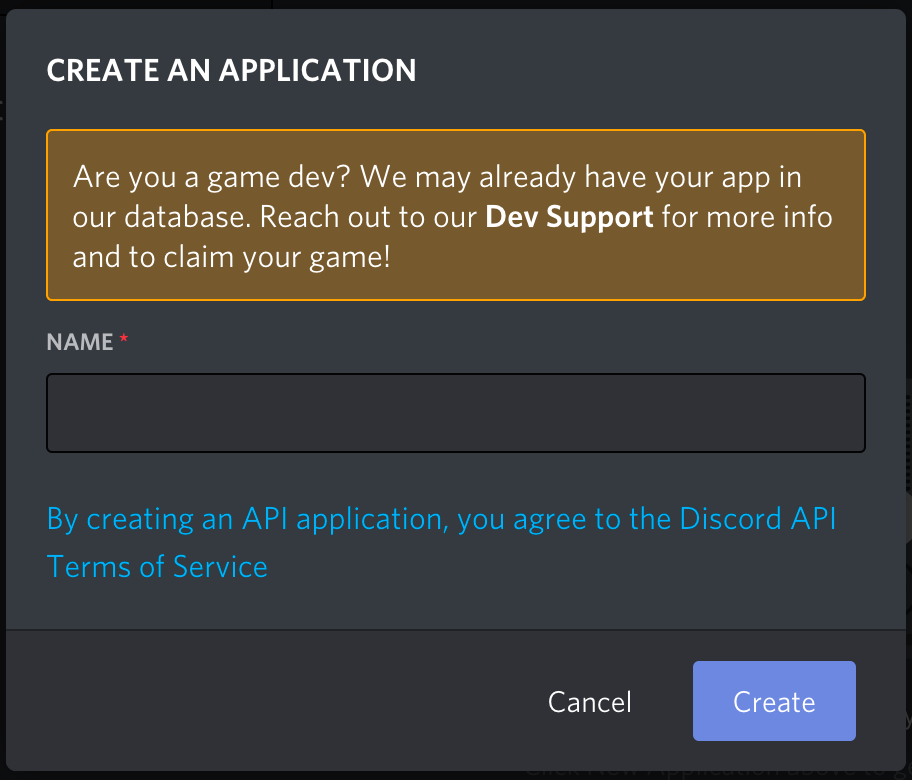
Creating an Application
An application allows you to interact with Discord’s APIs by providing authentication tokens, designating permissions, and so on.
To create a new application, select New Application:
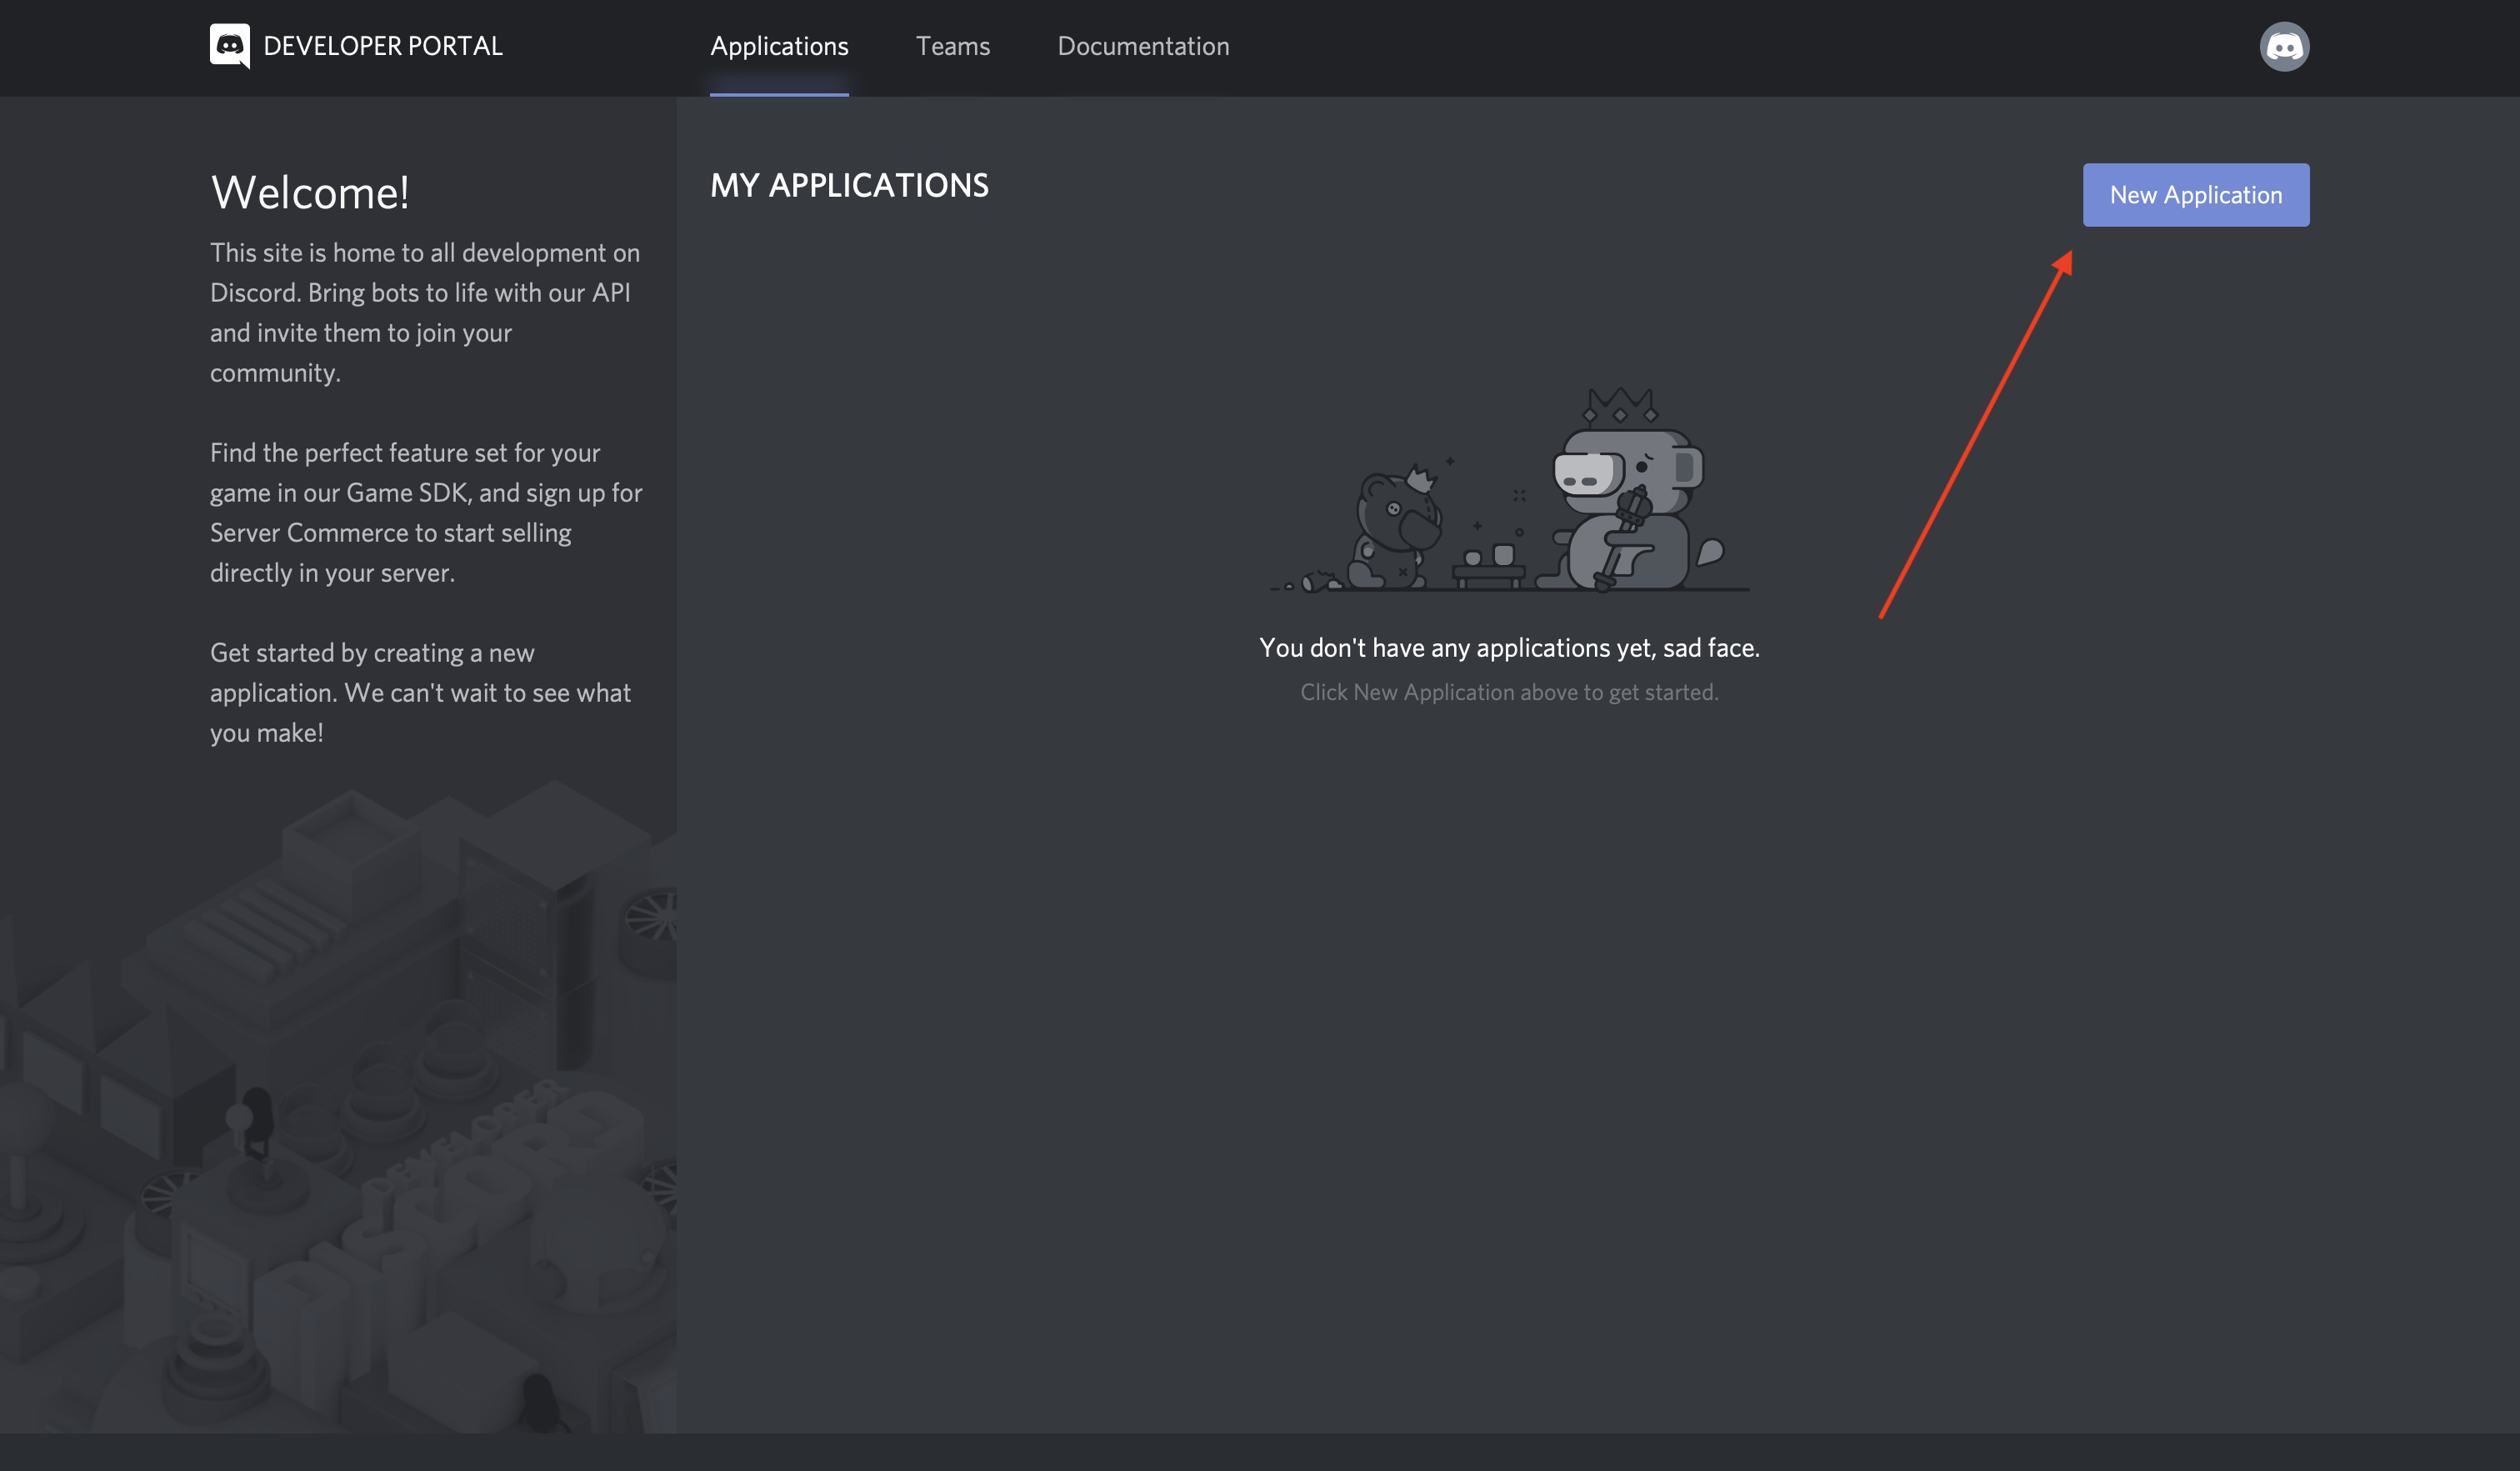
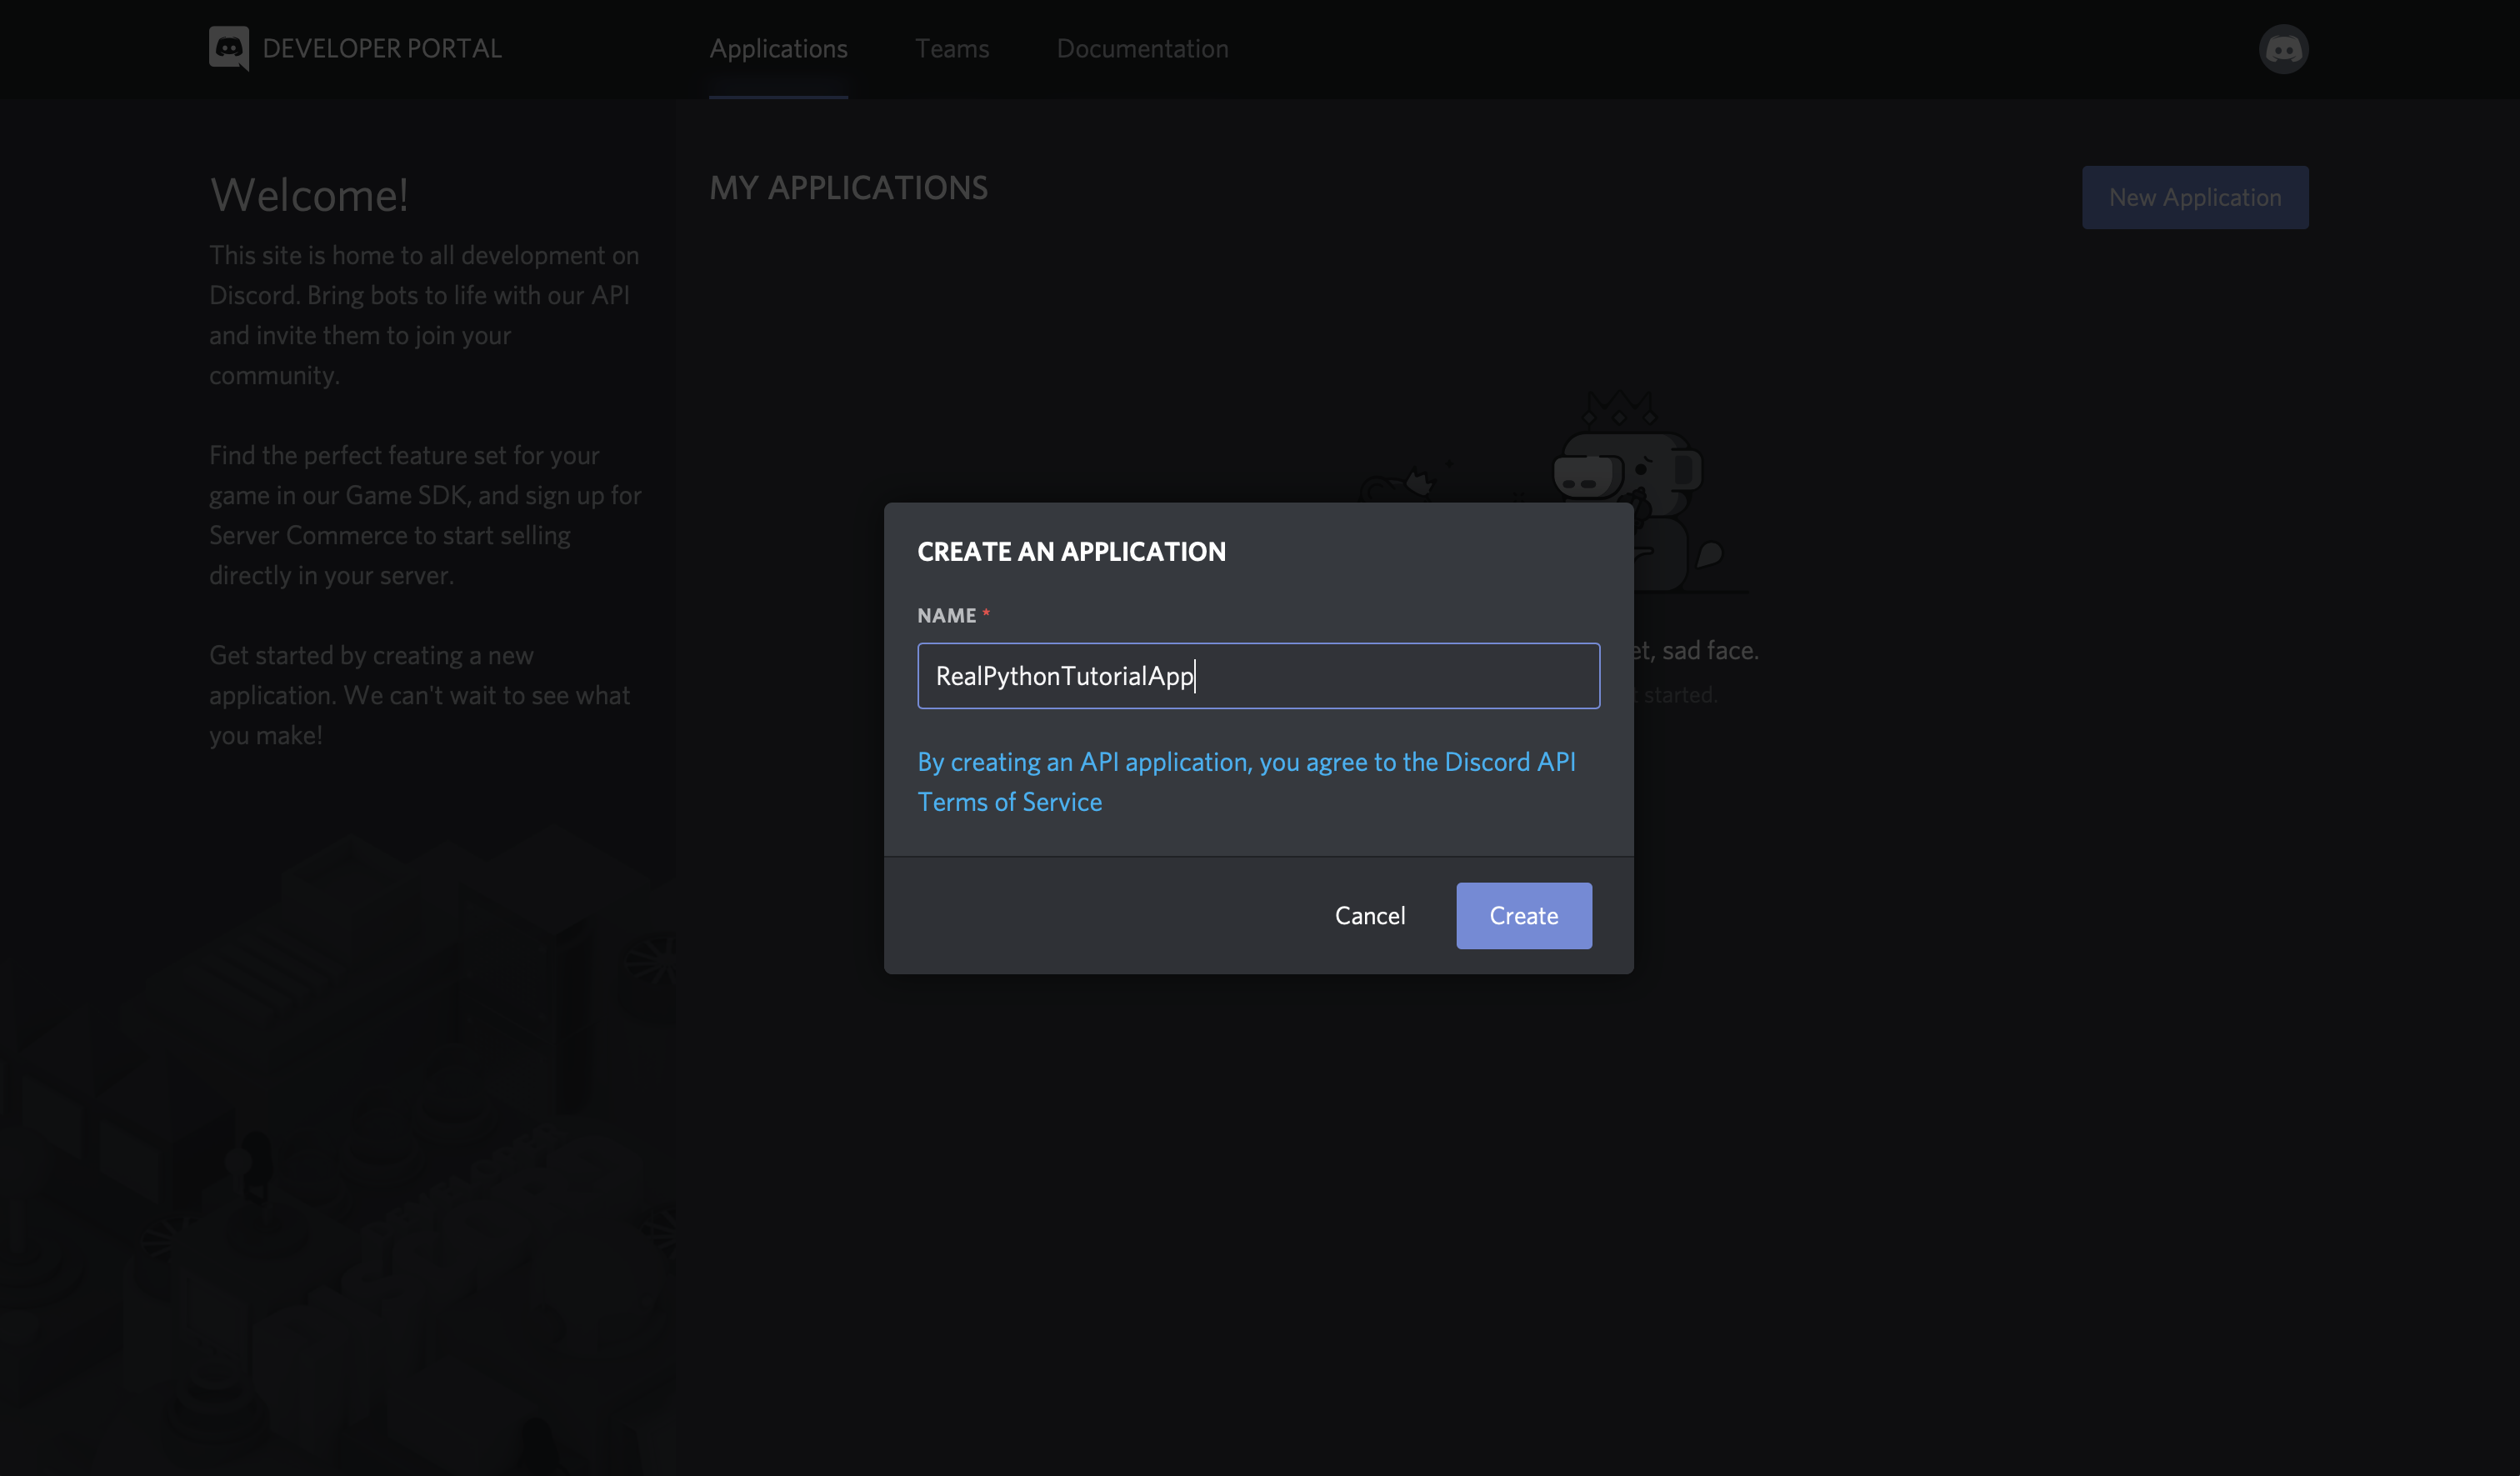
Next, you’ll be prompted to name your application. Select a name and click Create:
Congratulations! You made a Discord application. On the resulting screen, you can see information about your application:
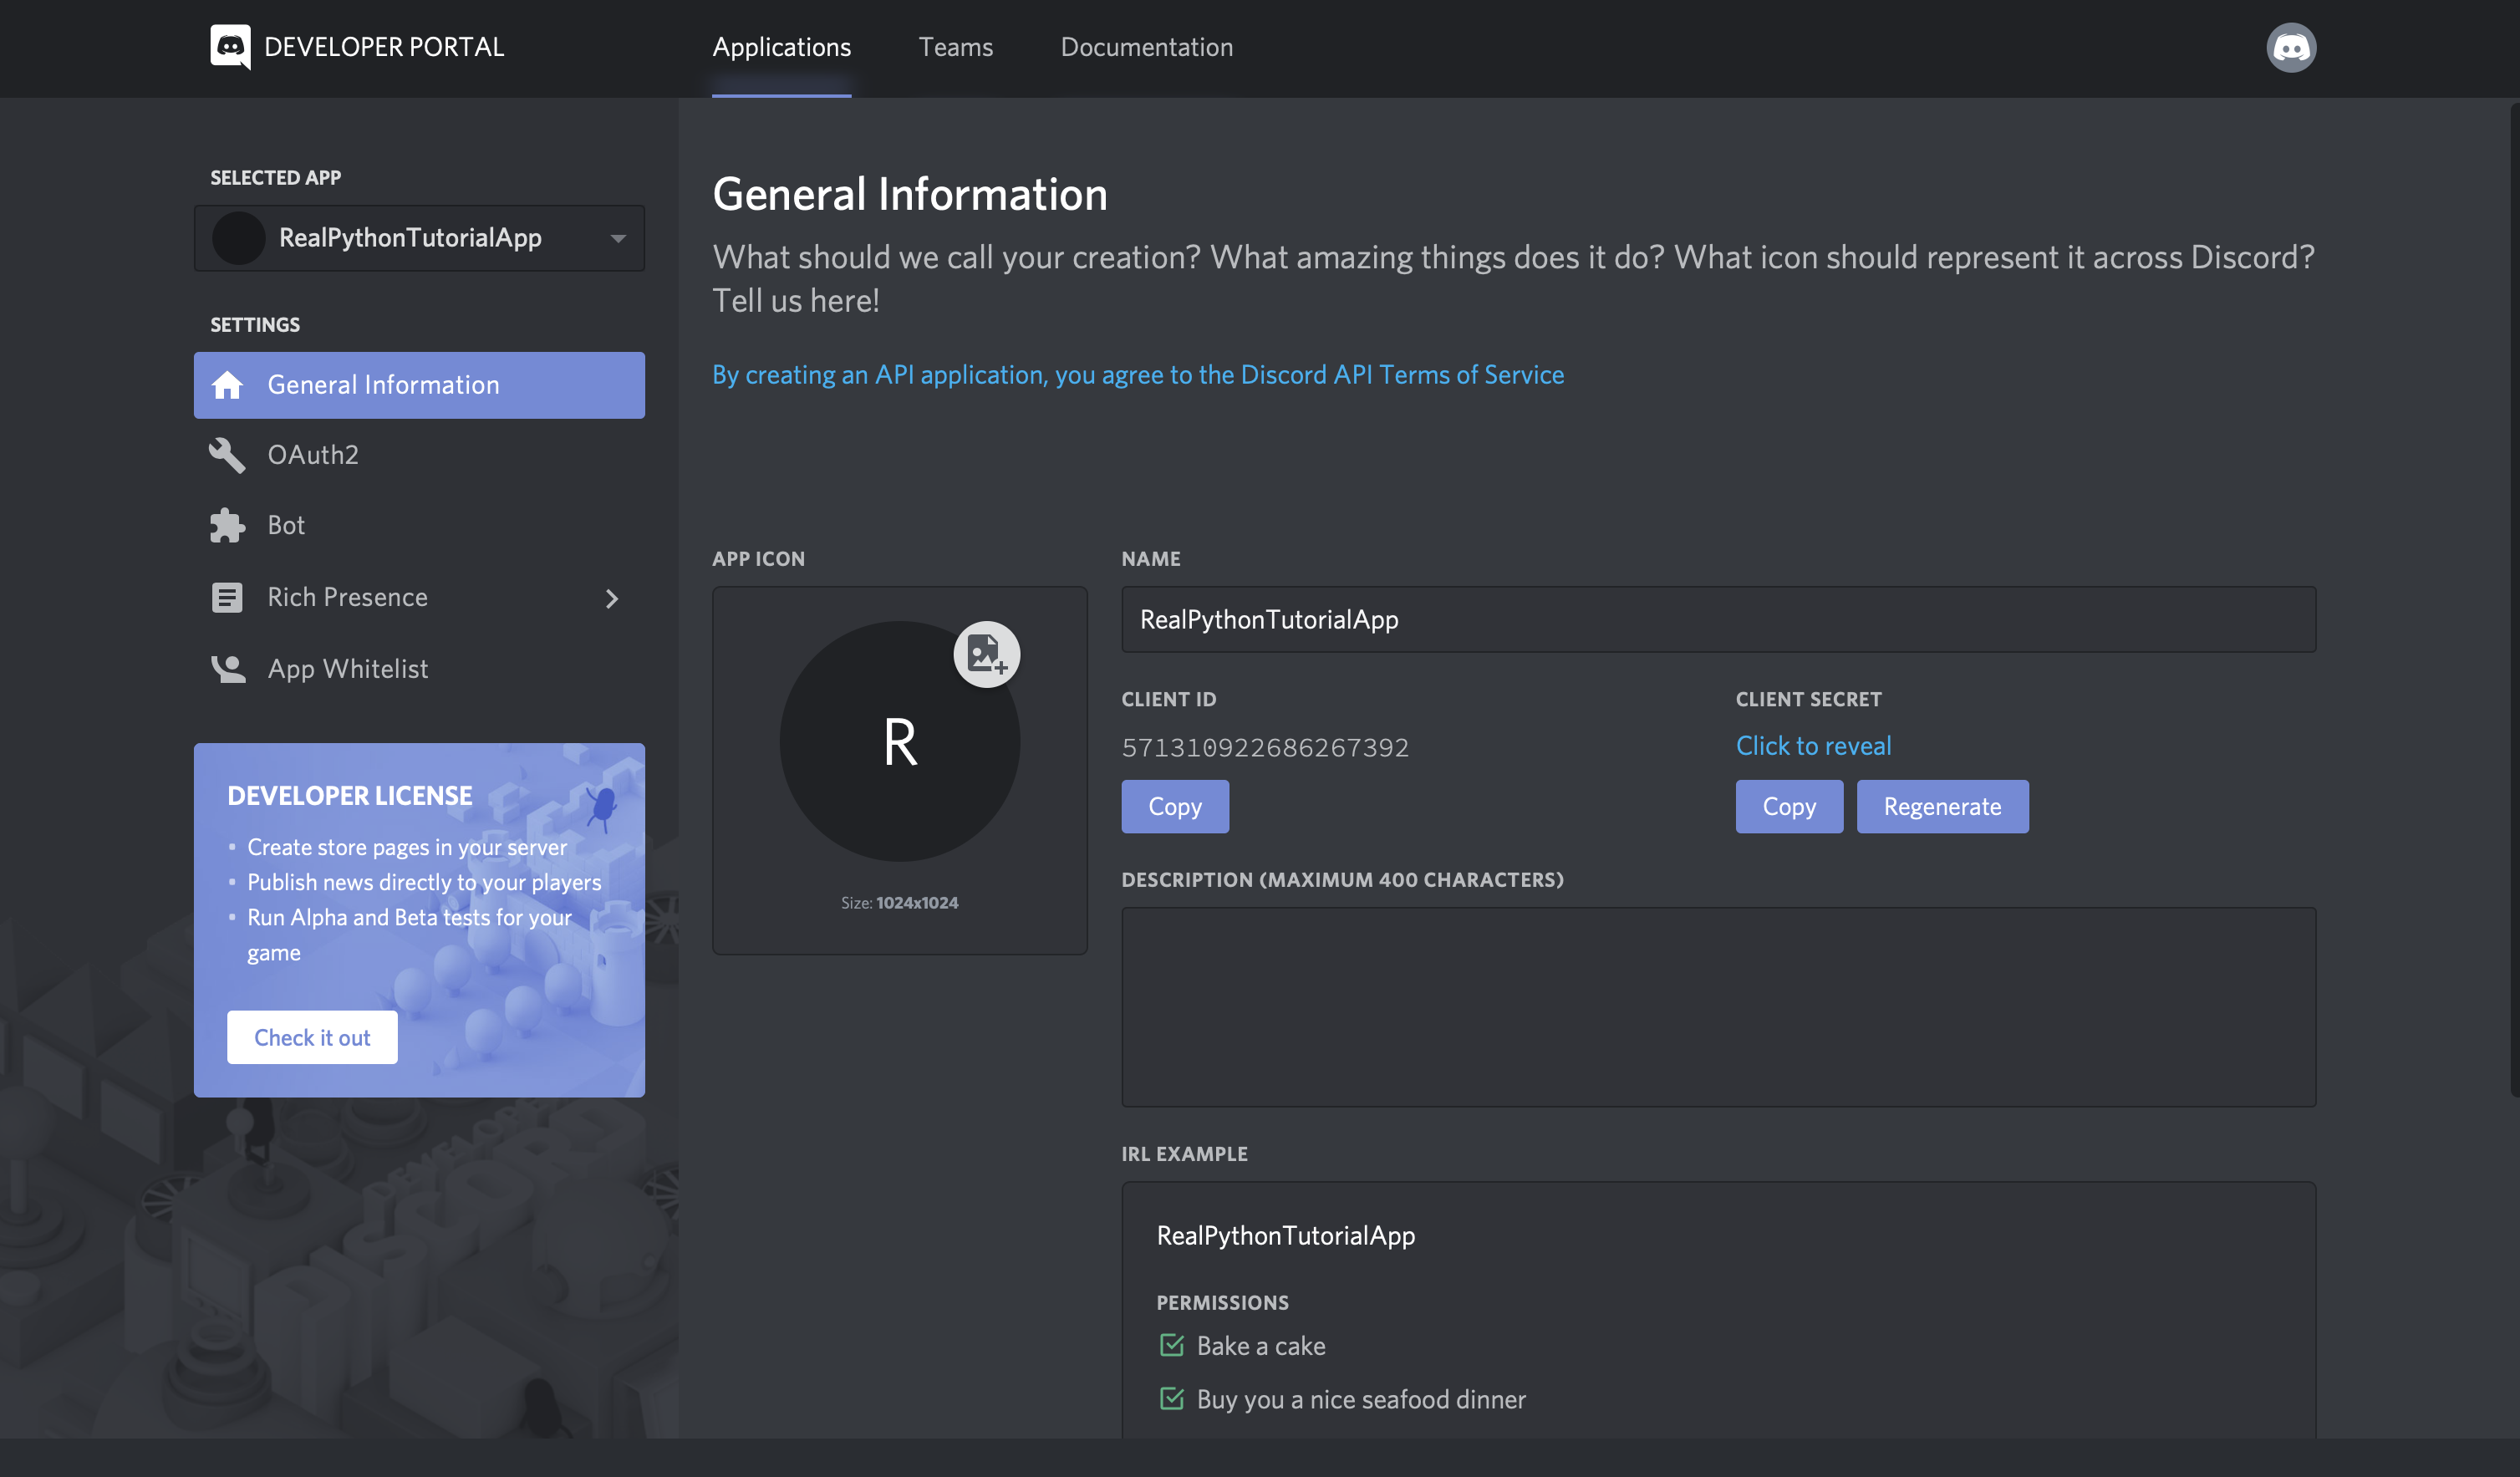
Keep in mind that any program that interacts with Discord APIs requires a Discord application, not just bots. Bot-related APIs are only a subset of Discord’s total interface.
However, since this tutorial is about how to make a Discord bot, navigate to the Bot tab on the left-hand navigation list.
Creating a Bot
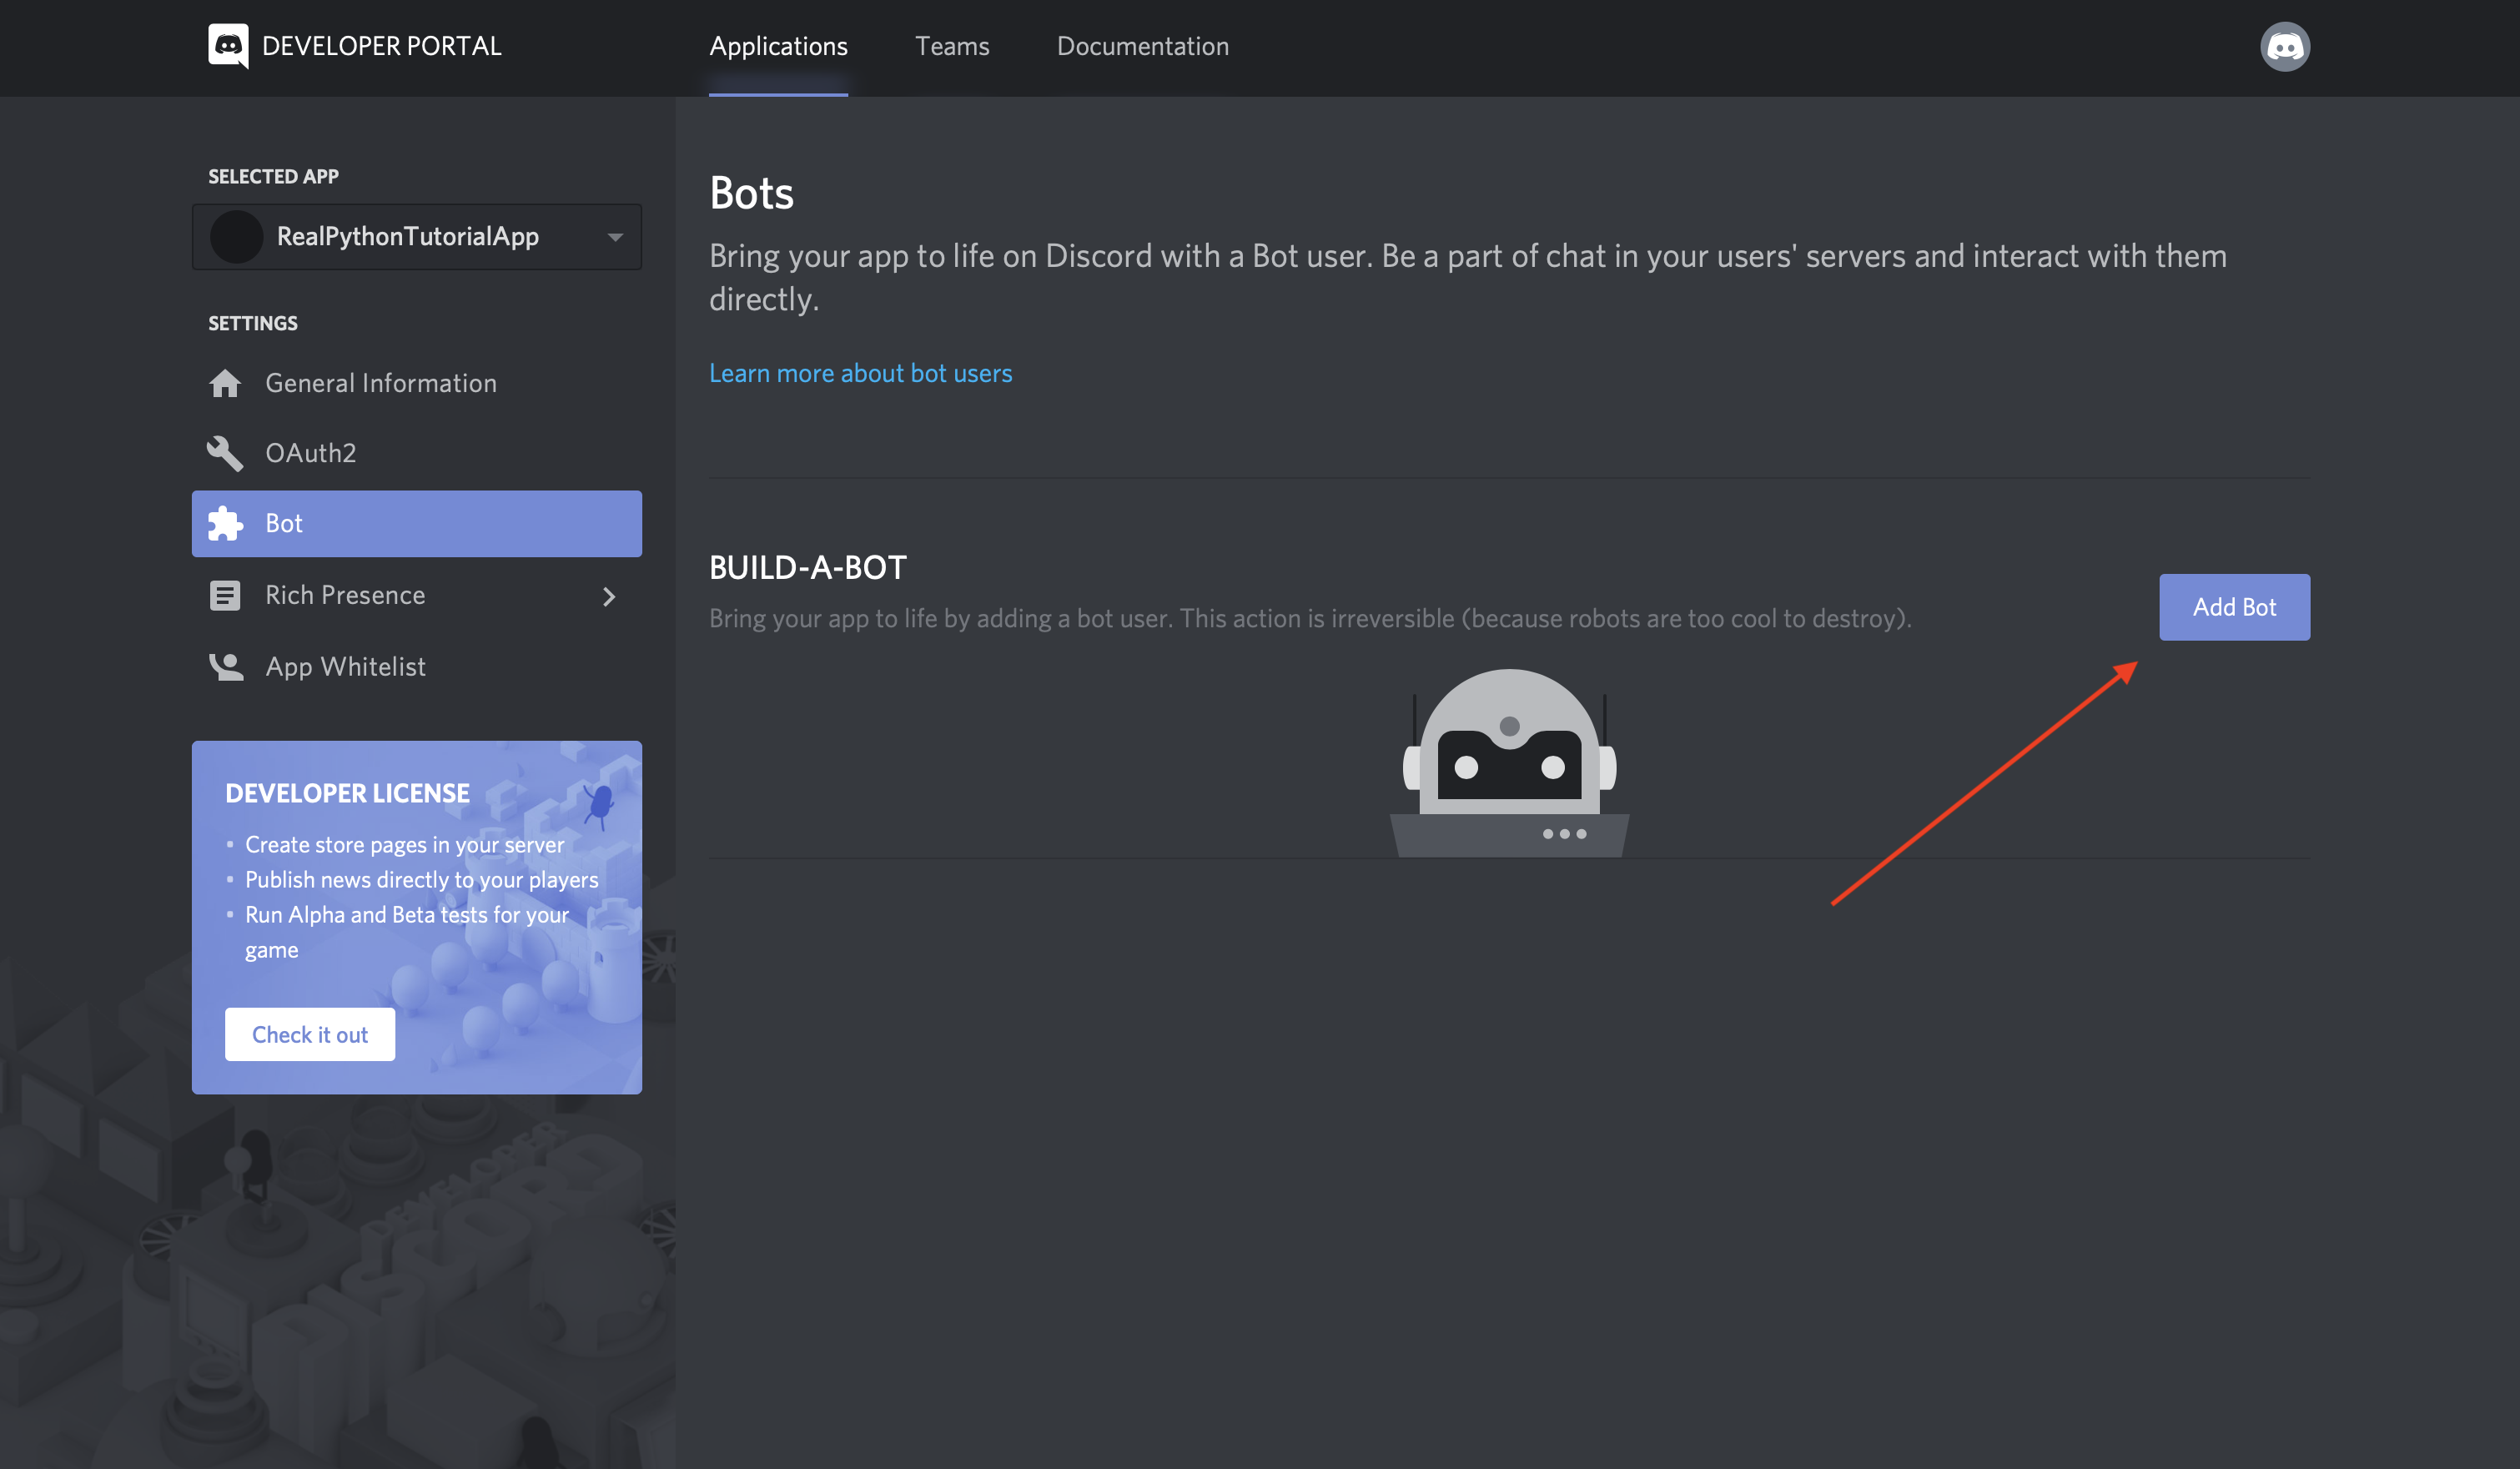
As you learned in the previous sections, a bot user is one that listens to and automatically reacts to certain events and commands on Discord.
For your code to actually be manifested on Discord, you’ll need to create a bot user. To do so, select Add Bot:
Once you confirm that you want to add the bot to your application, you’ll see the new bot user in the portal:
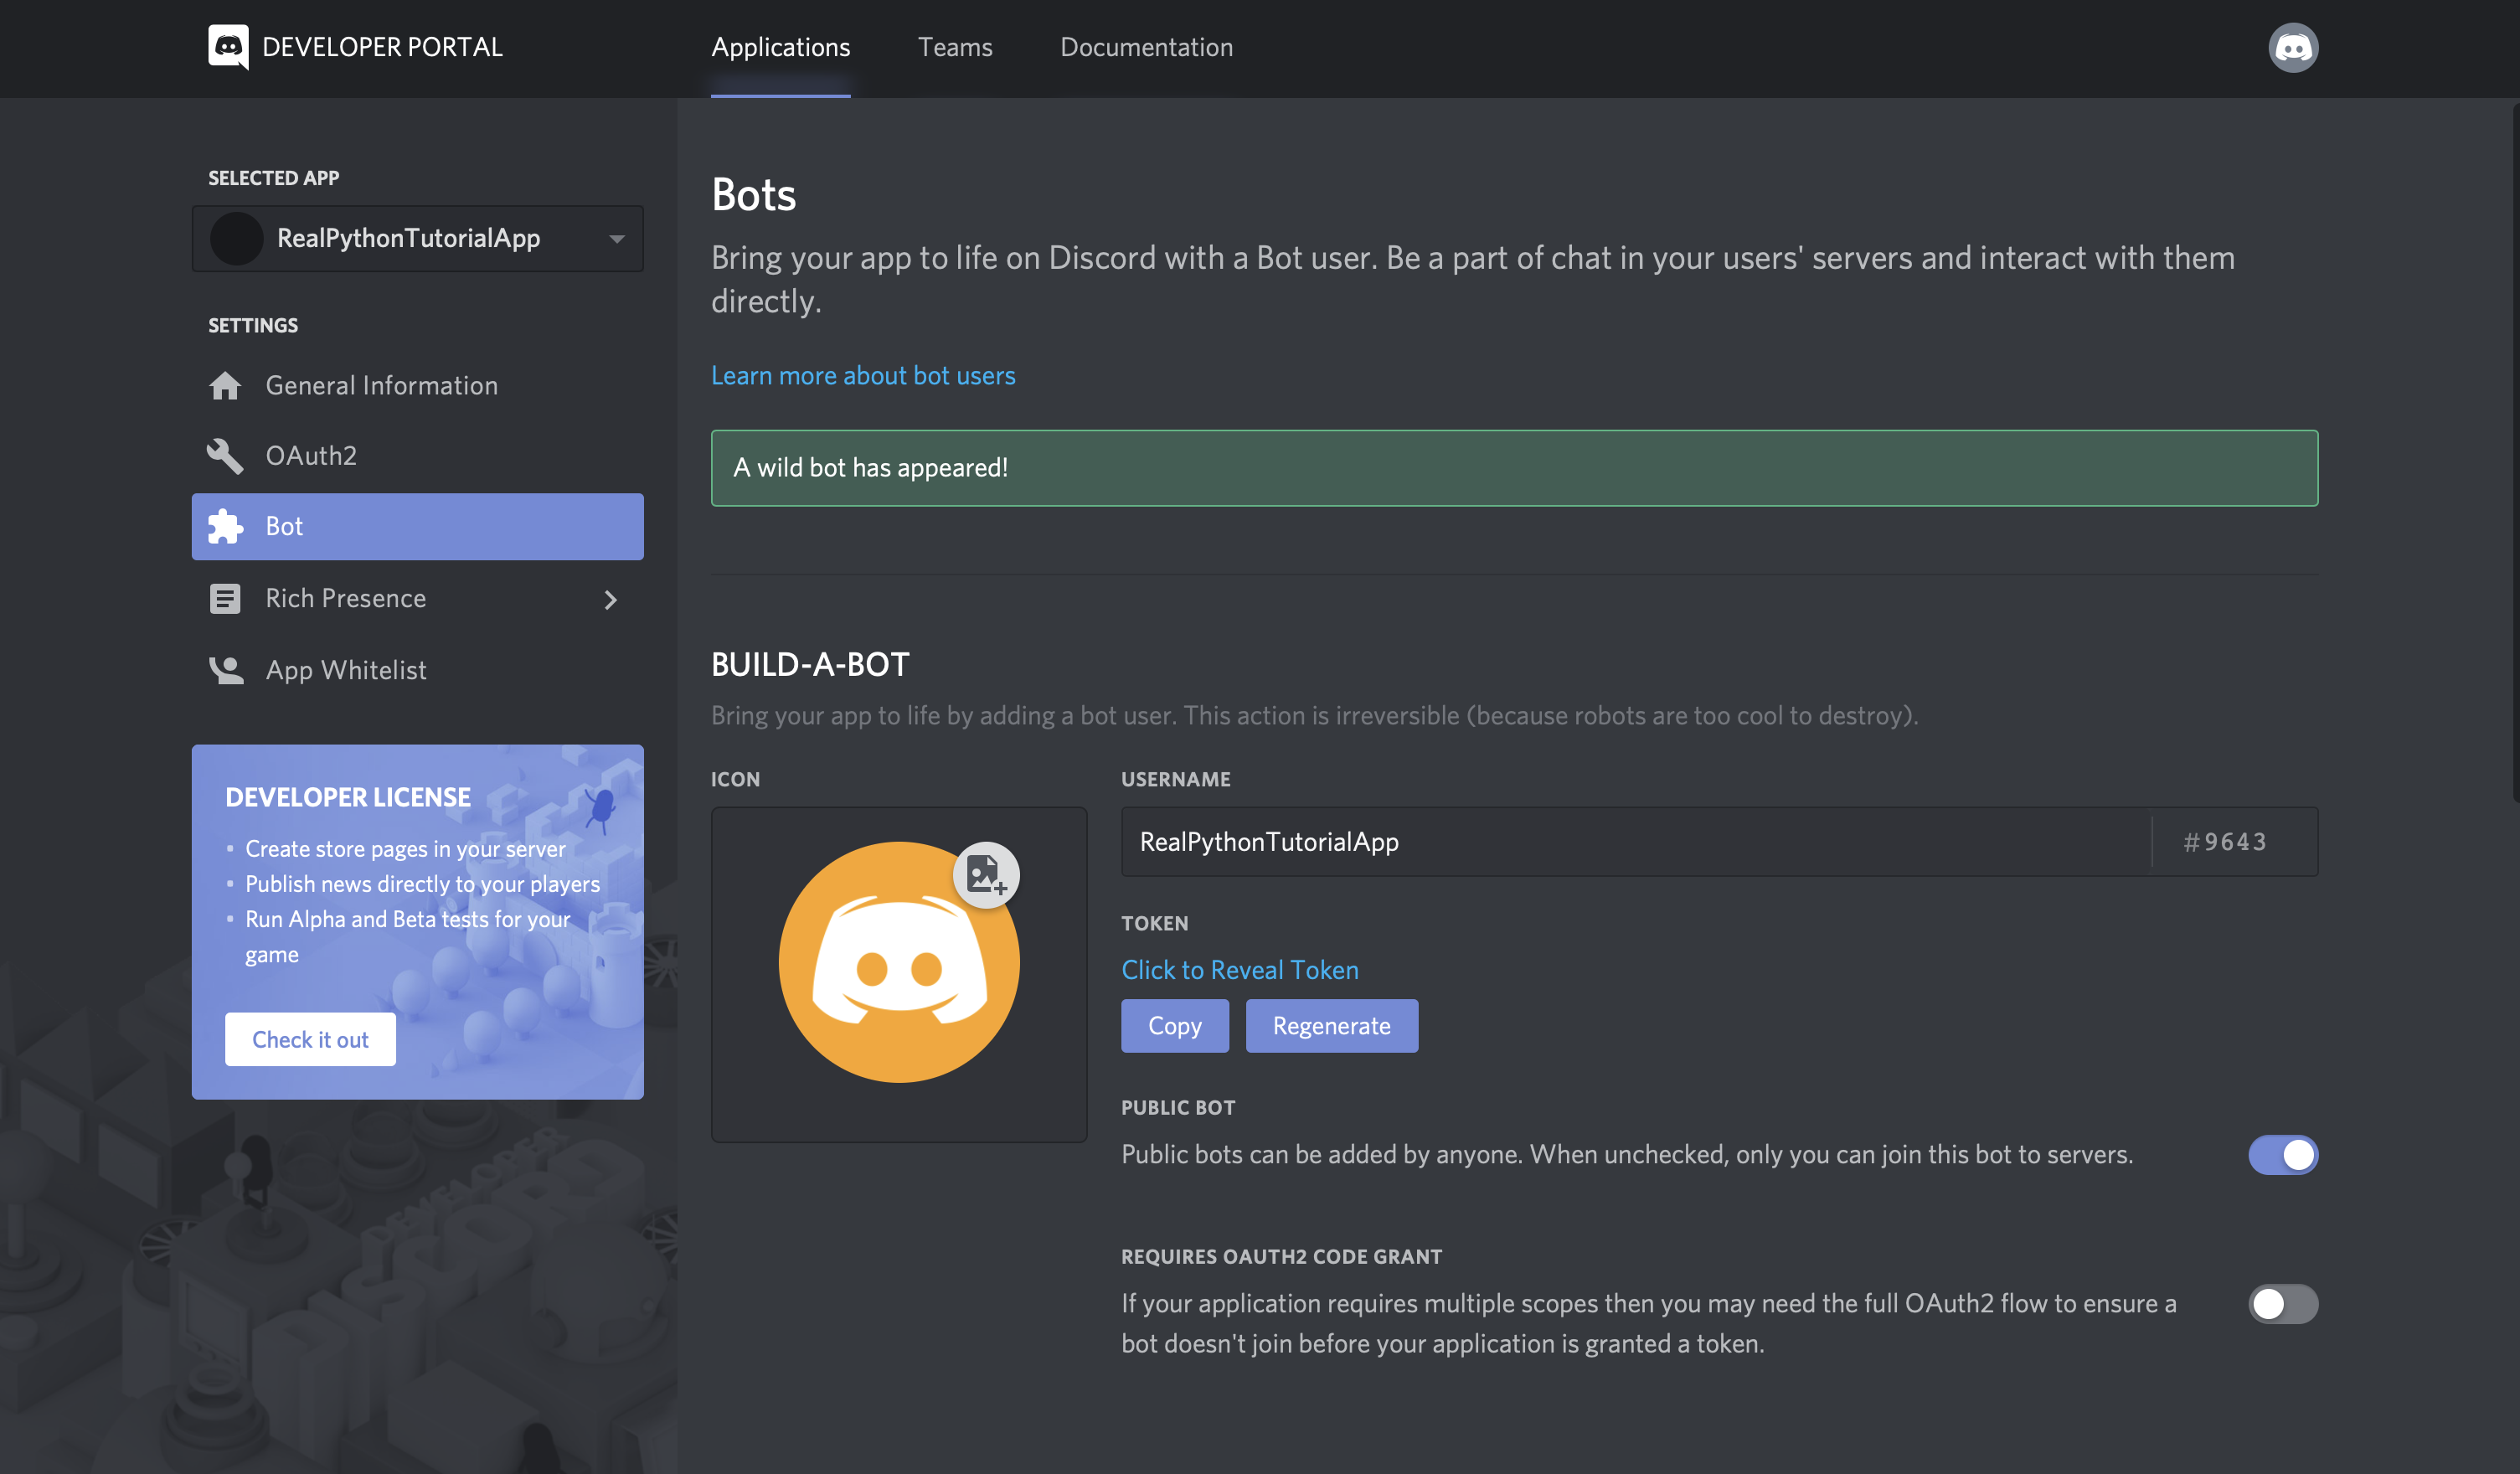
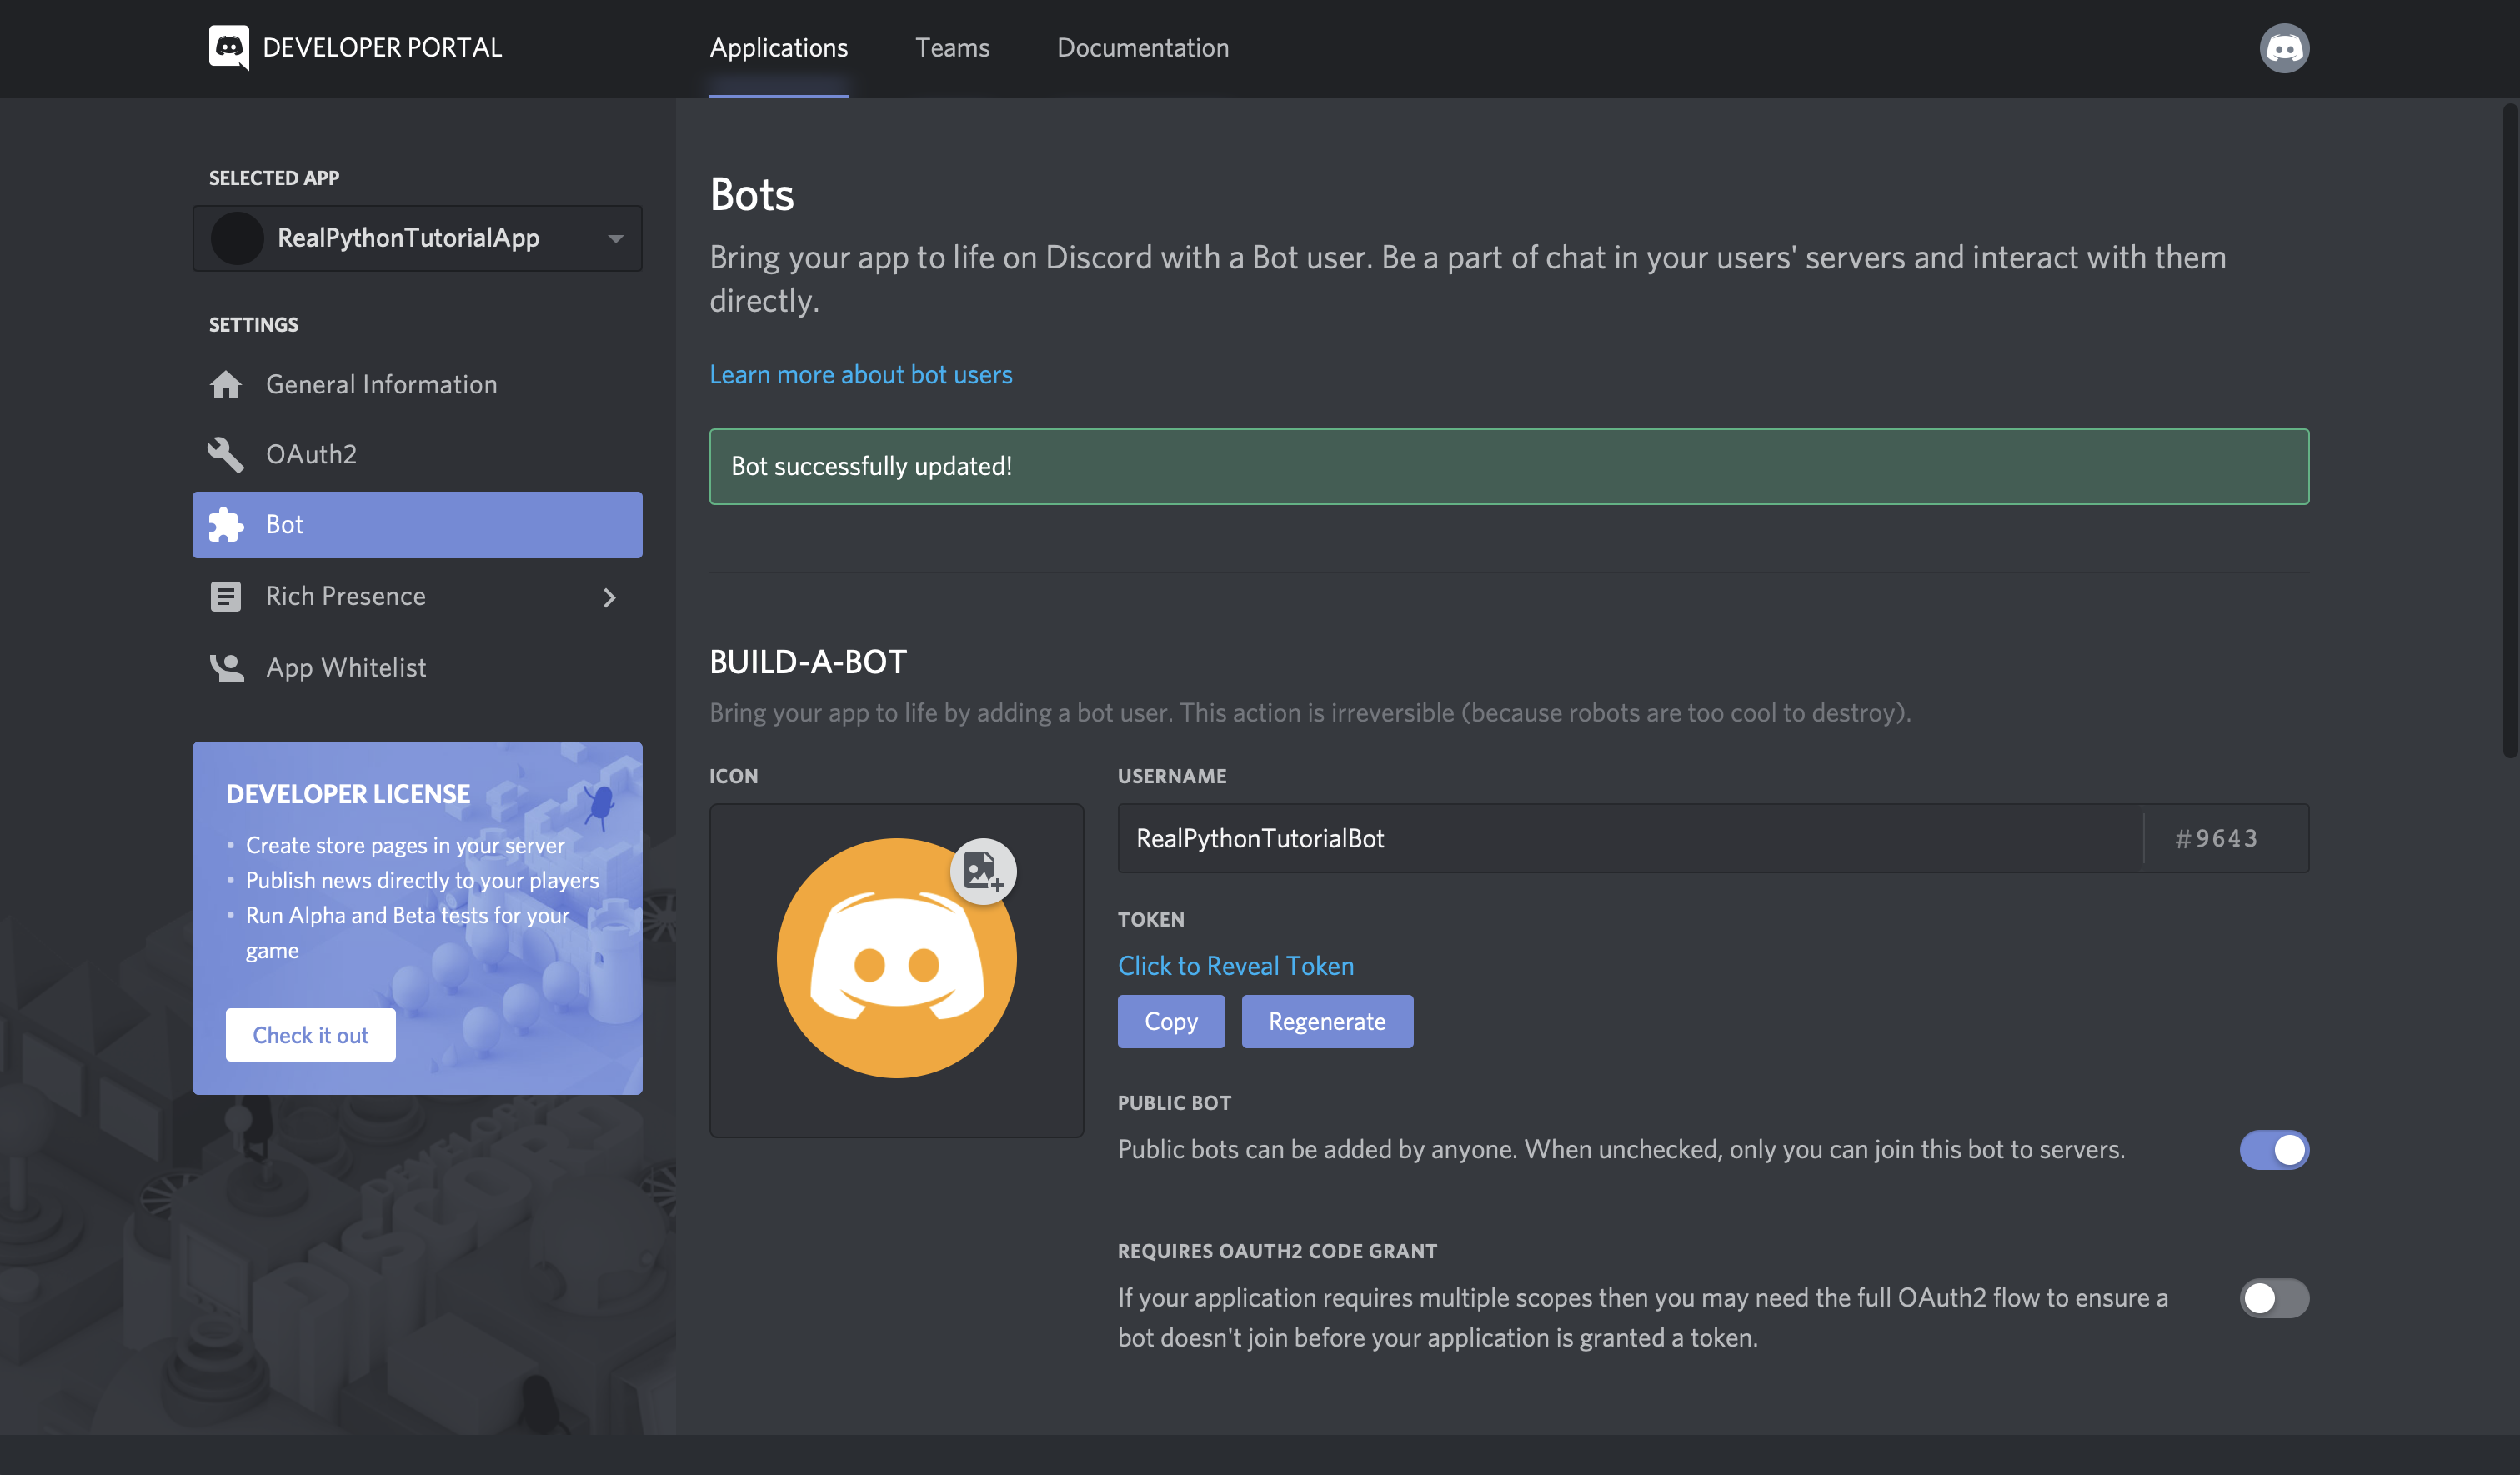
Notice that, by default, your bot user will inherit the name of your application. Instead, update the username to something more bot-like, such as RealPythonTutorialBot, and Save Changes:
Now, the bot’s all set and ready to go, but to where?
A bot user is not useful if it’s not interacting with other users. Next, you’ll create a guild so that your bot can interact with other users.
Creating a Guild
A guild (or a server, as it is often called in Discord’s user interface) is a specific group of channels where users congregate to chat.
For example, say you want to create a space where users can come together and talk about your latest game. You’d start by creating a guild. Then, in your guild, you could have multiple channels, such as:
- General Discussion: A channel for users to talk about whatever they want
- Spoilers, Beware: A channel for users who have finished your game to talk about all the end game reveals
- Announcements: A channel for you to announce game updates and for users to discuss them
Once you’ve created your guild, you’d invite other users to populate it.
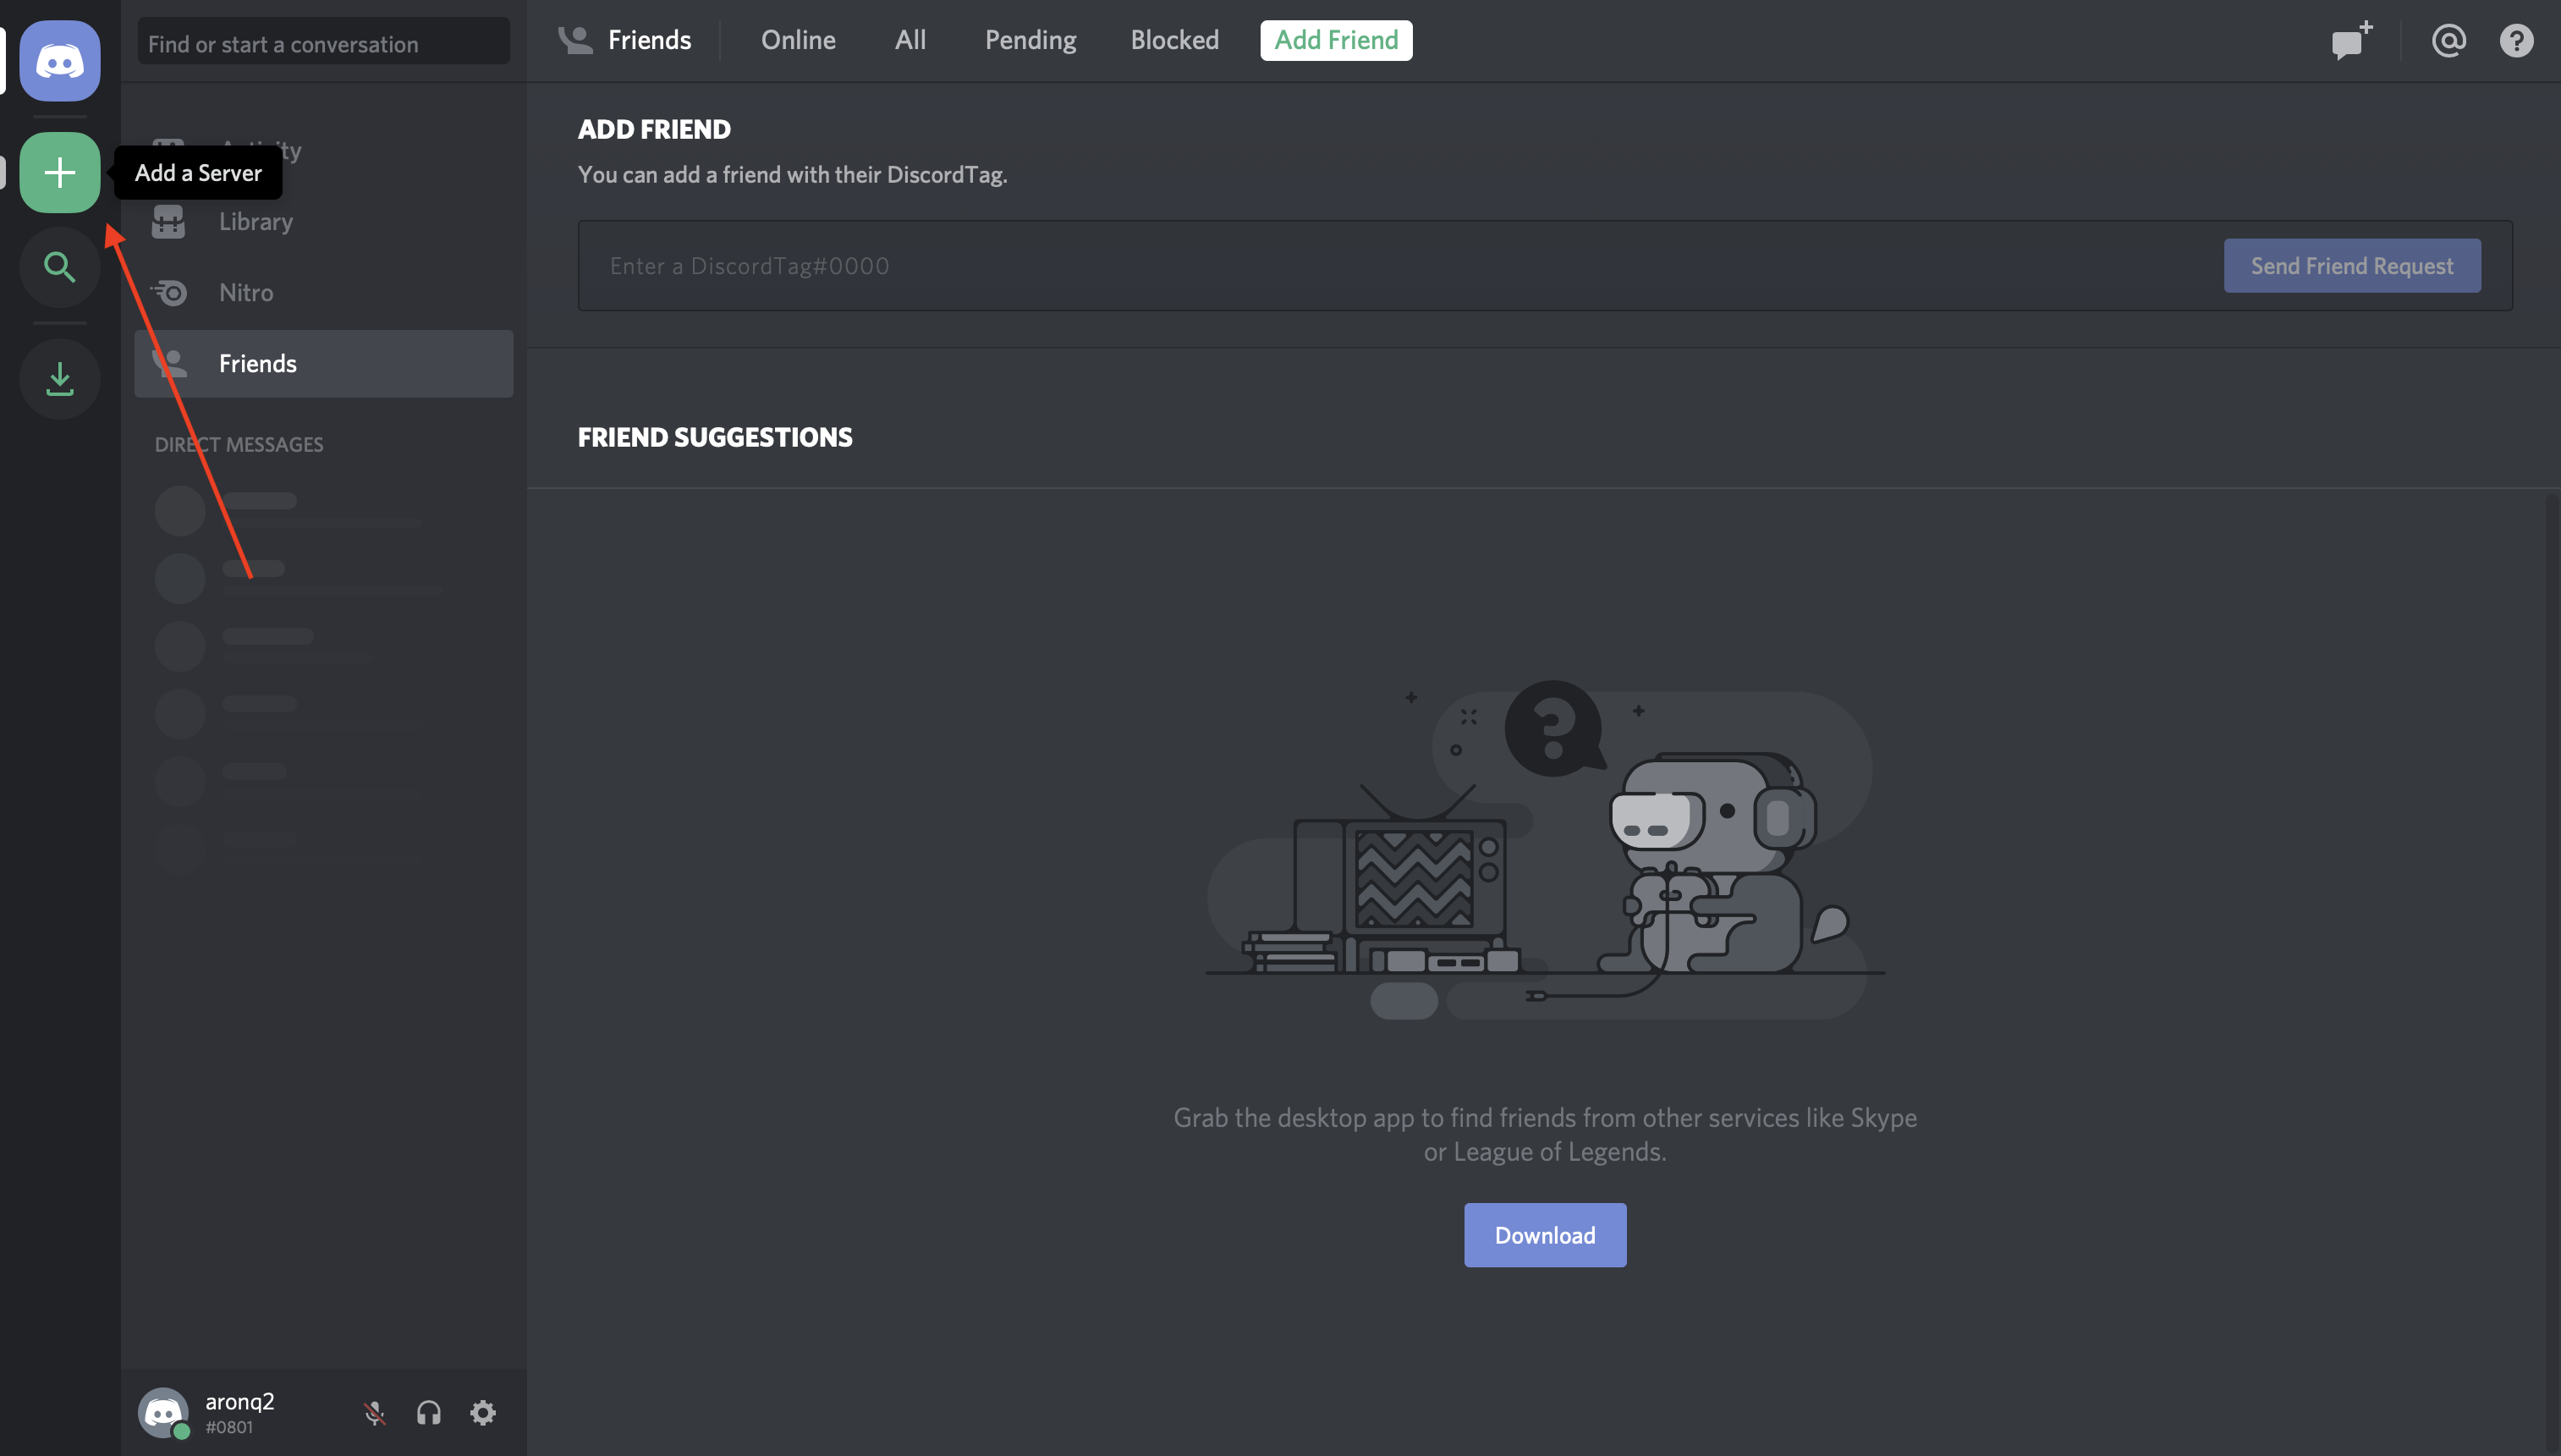
So, to create a guild, head to your Discord home page:
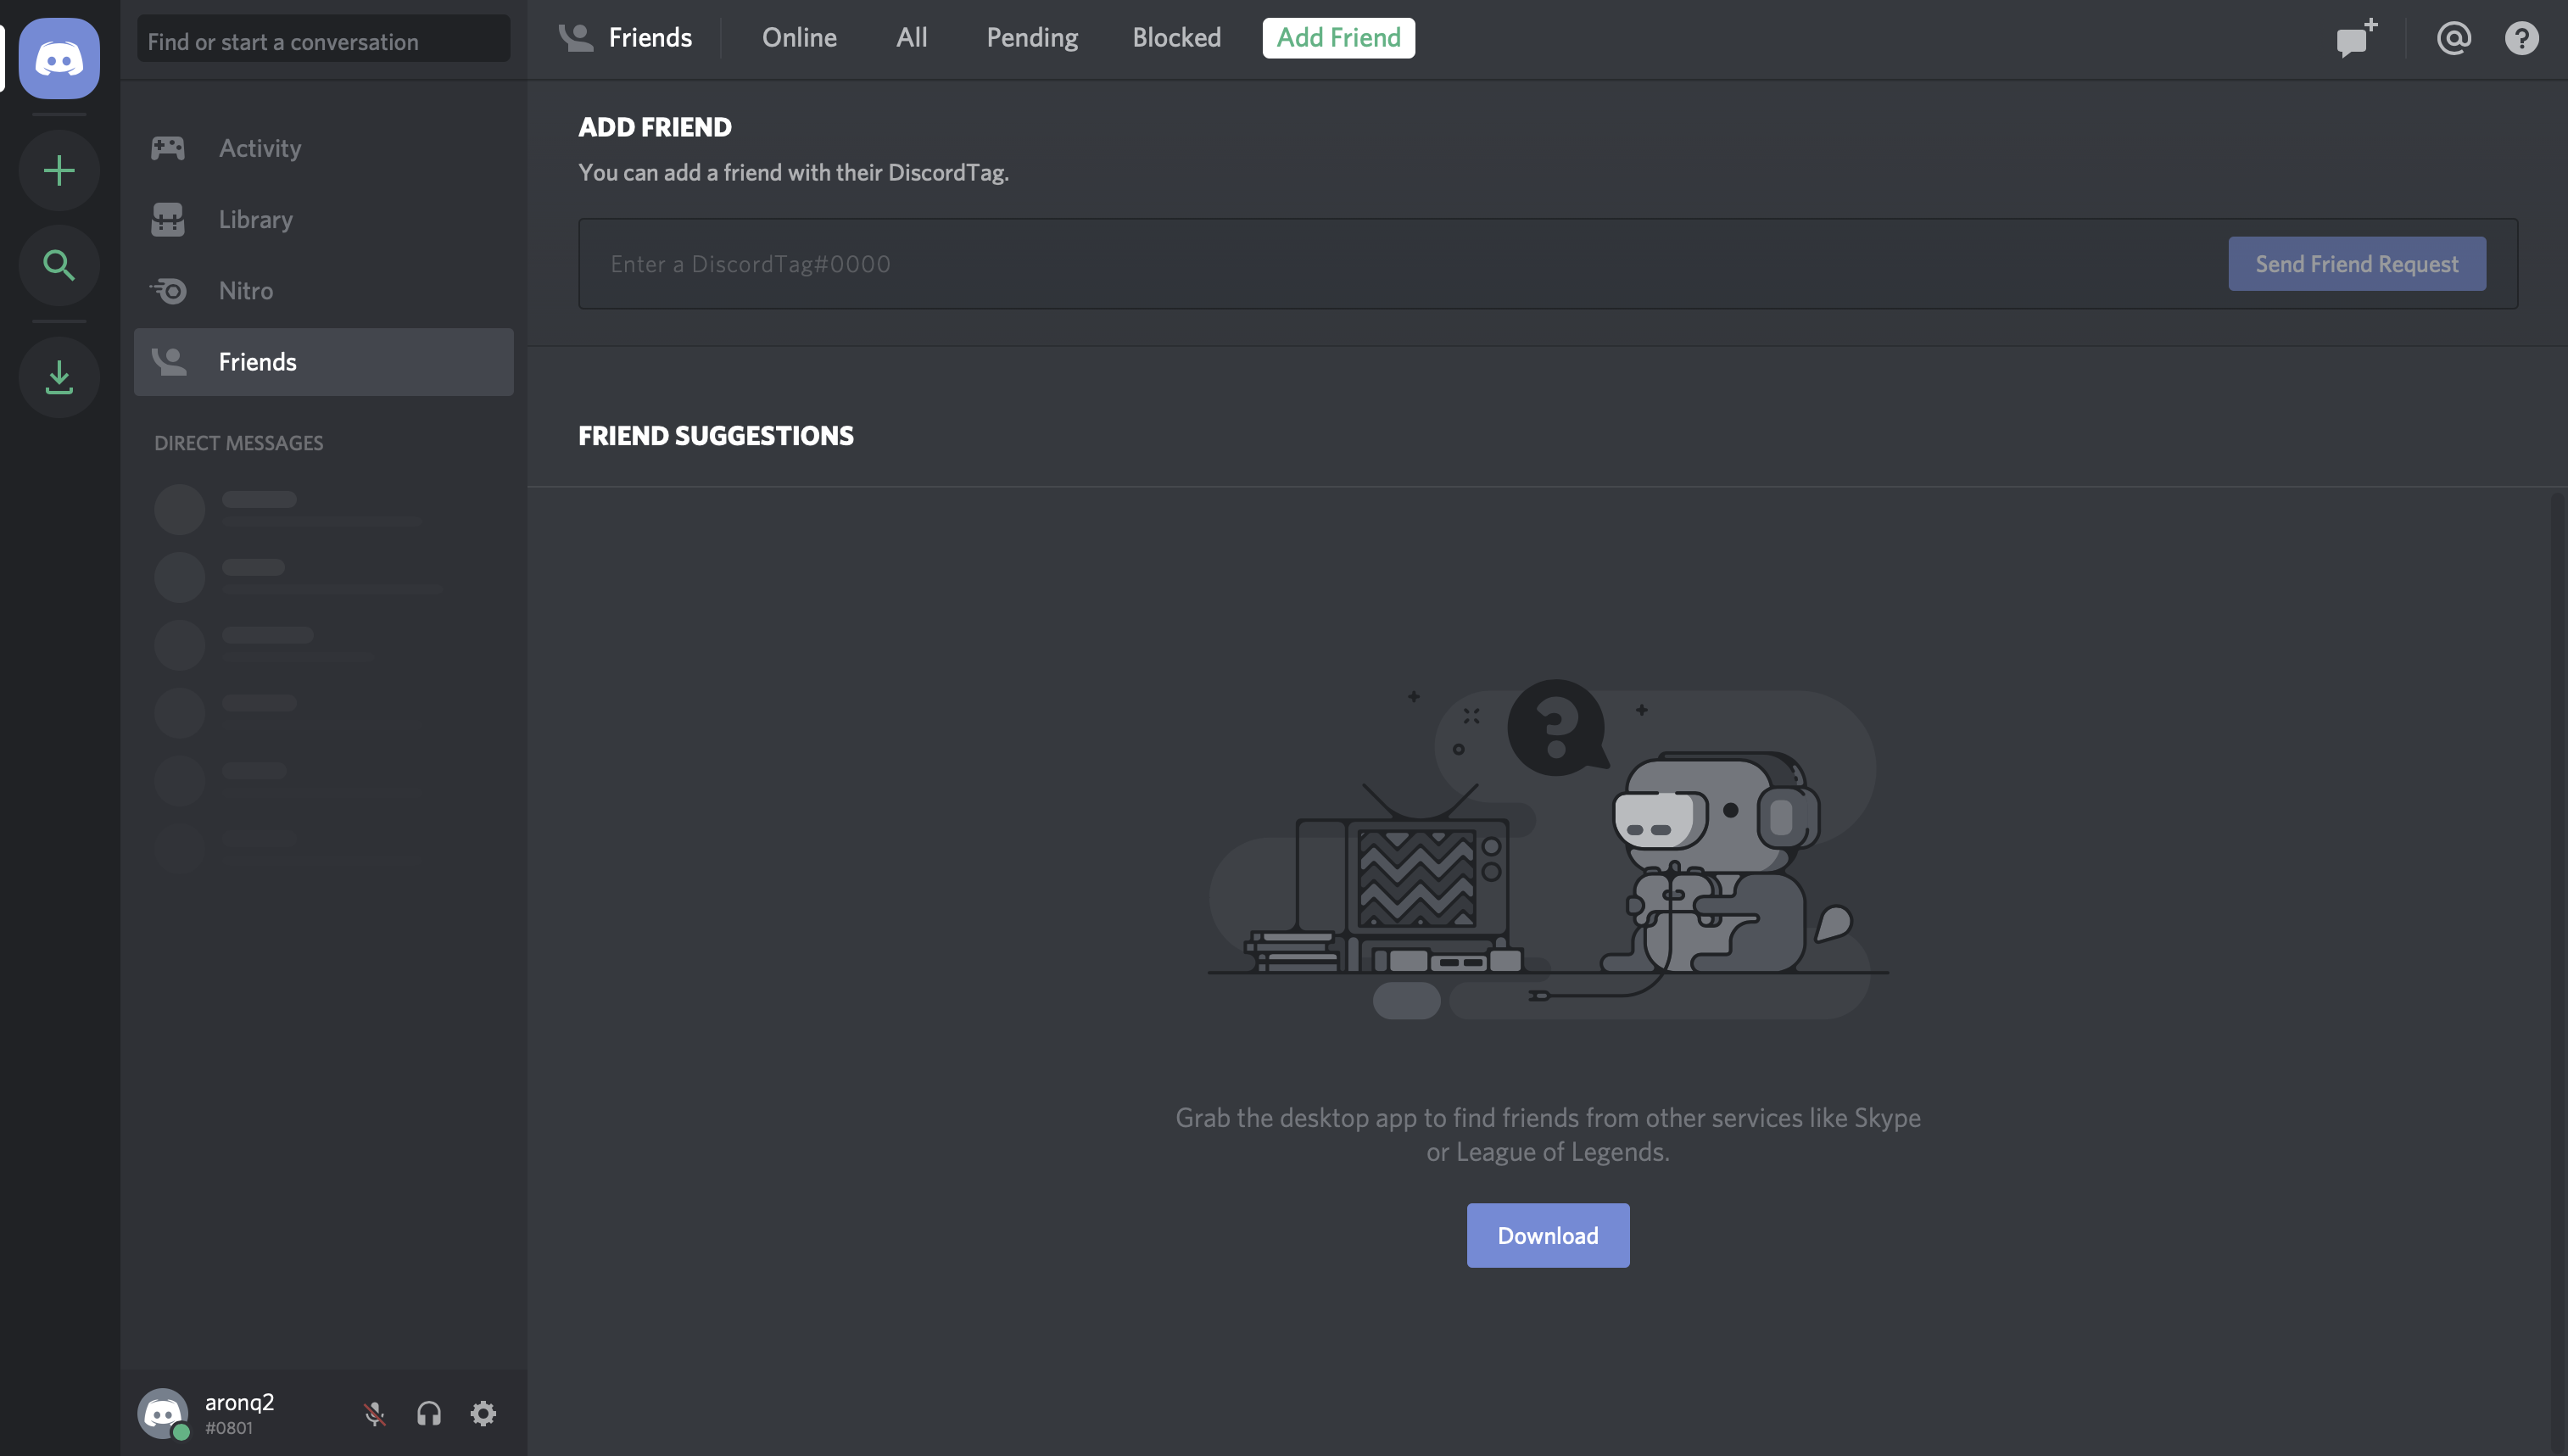
From this home page, you can view and add friends, direct messages, and guilds. From here, select the + icon on the left-hand side of the web page to Add a Server:
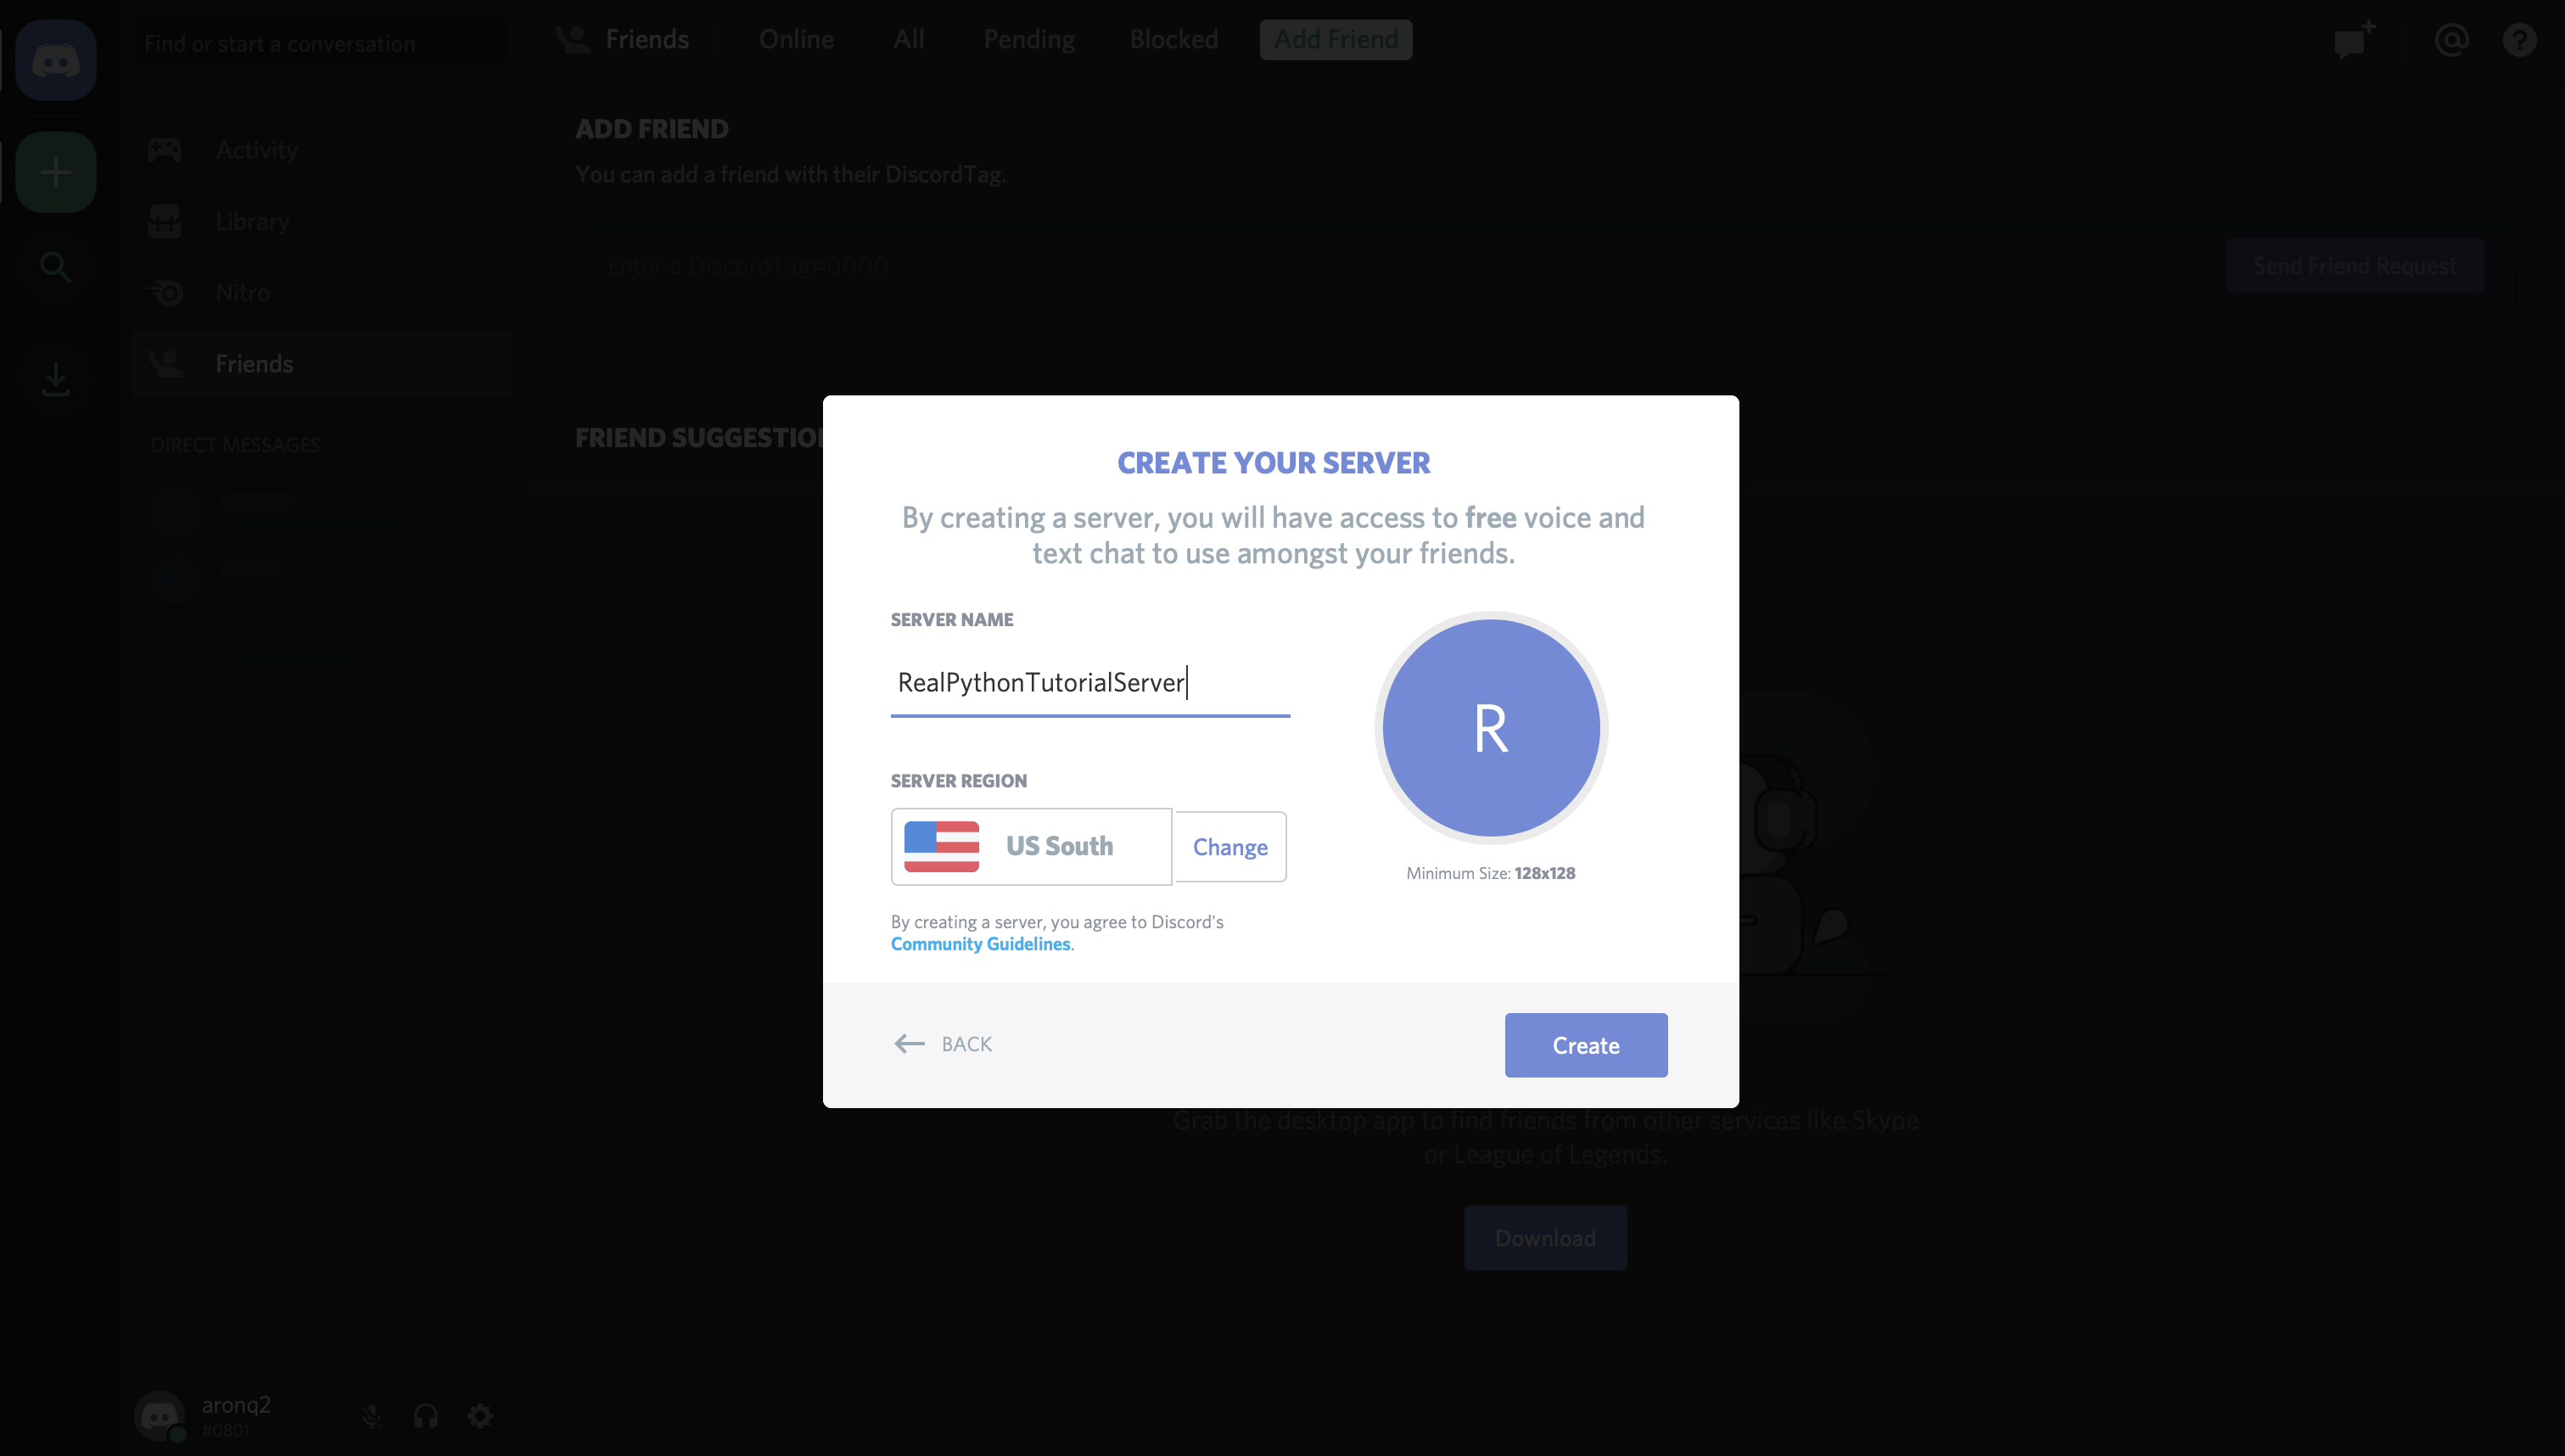
This will present two options, Create a server and Join a Server. In this case, select Create a server and enter a name for your guild:
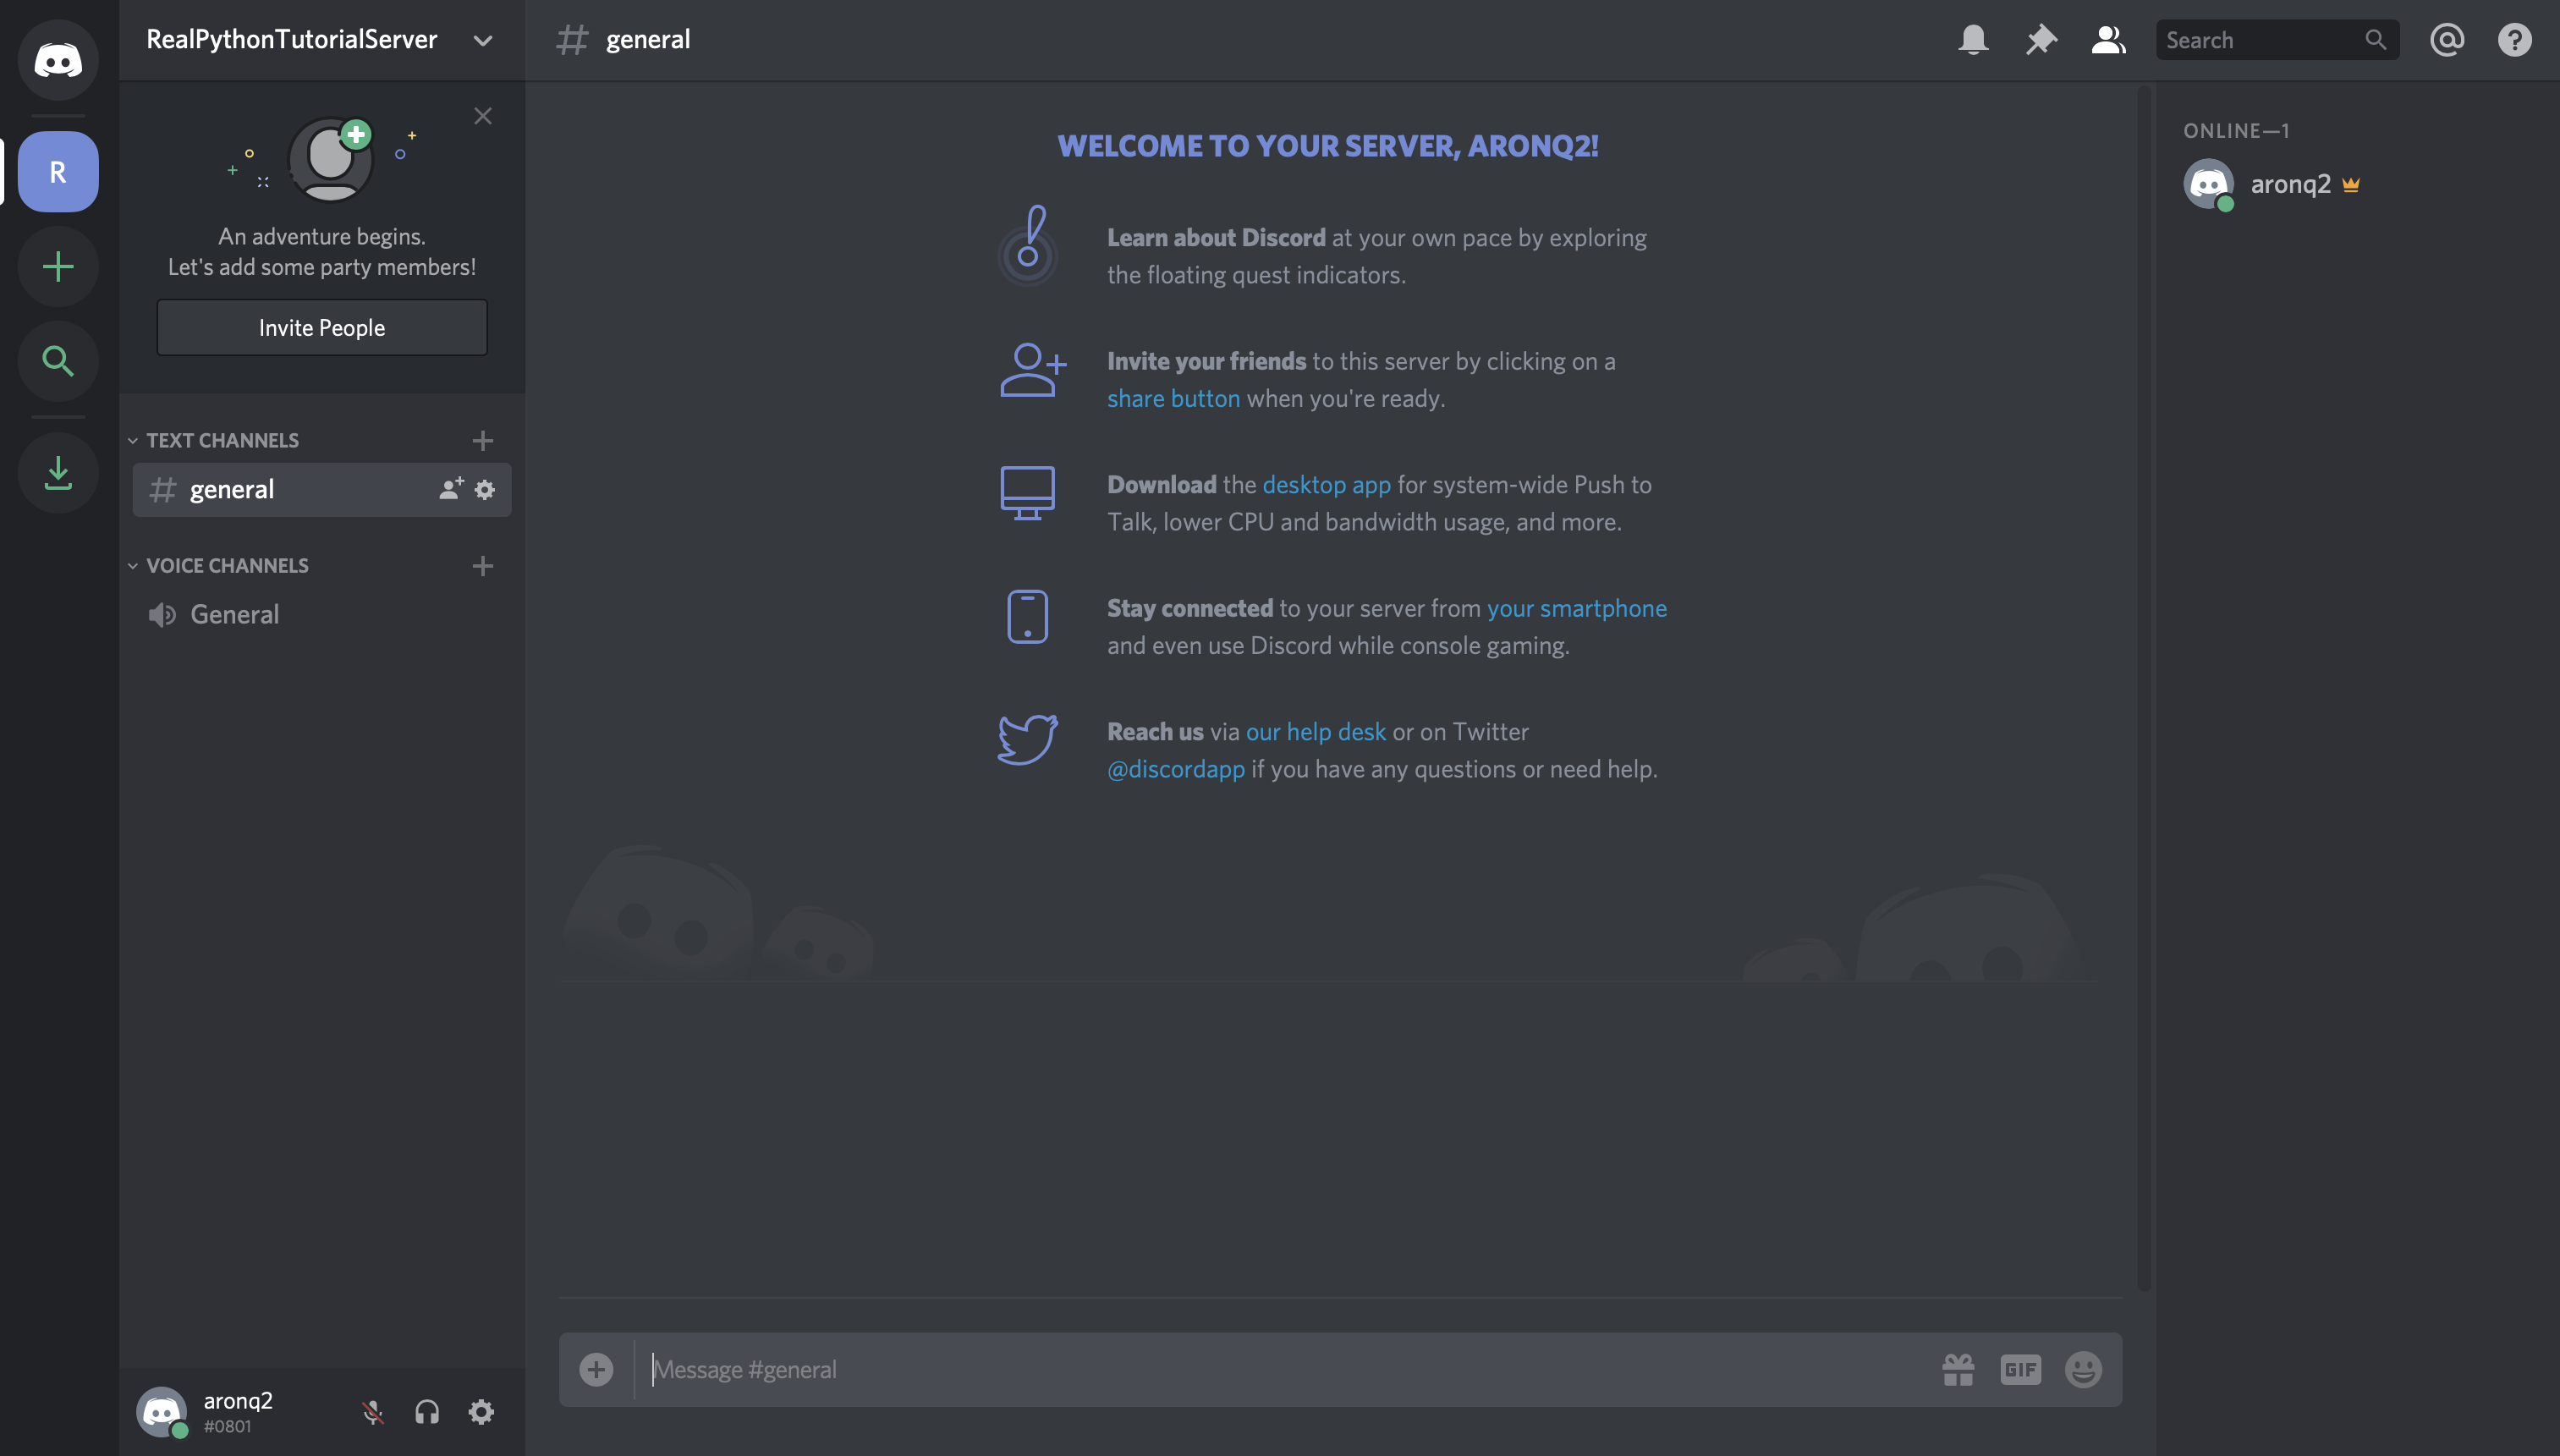
Once you’ve finished creating your guild, you’ll be able to see the users on the right-hand side and the channels on the left:
The final step on Discord is to register your bot with your new guild.
Adding a Bot to a Guild
A bot can’t accept invites like a normal user can. Instead, you’ll add your bot using the OAuth2 protocol.
To do so, head back to the Developer Portal and select the OAuth2 page from the left-hand navigation:
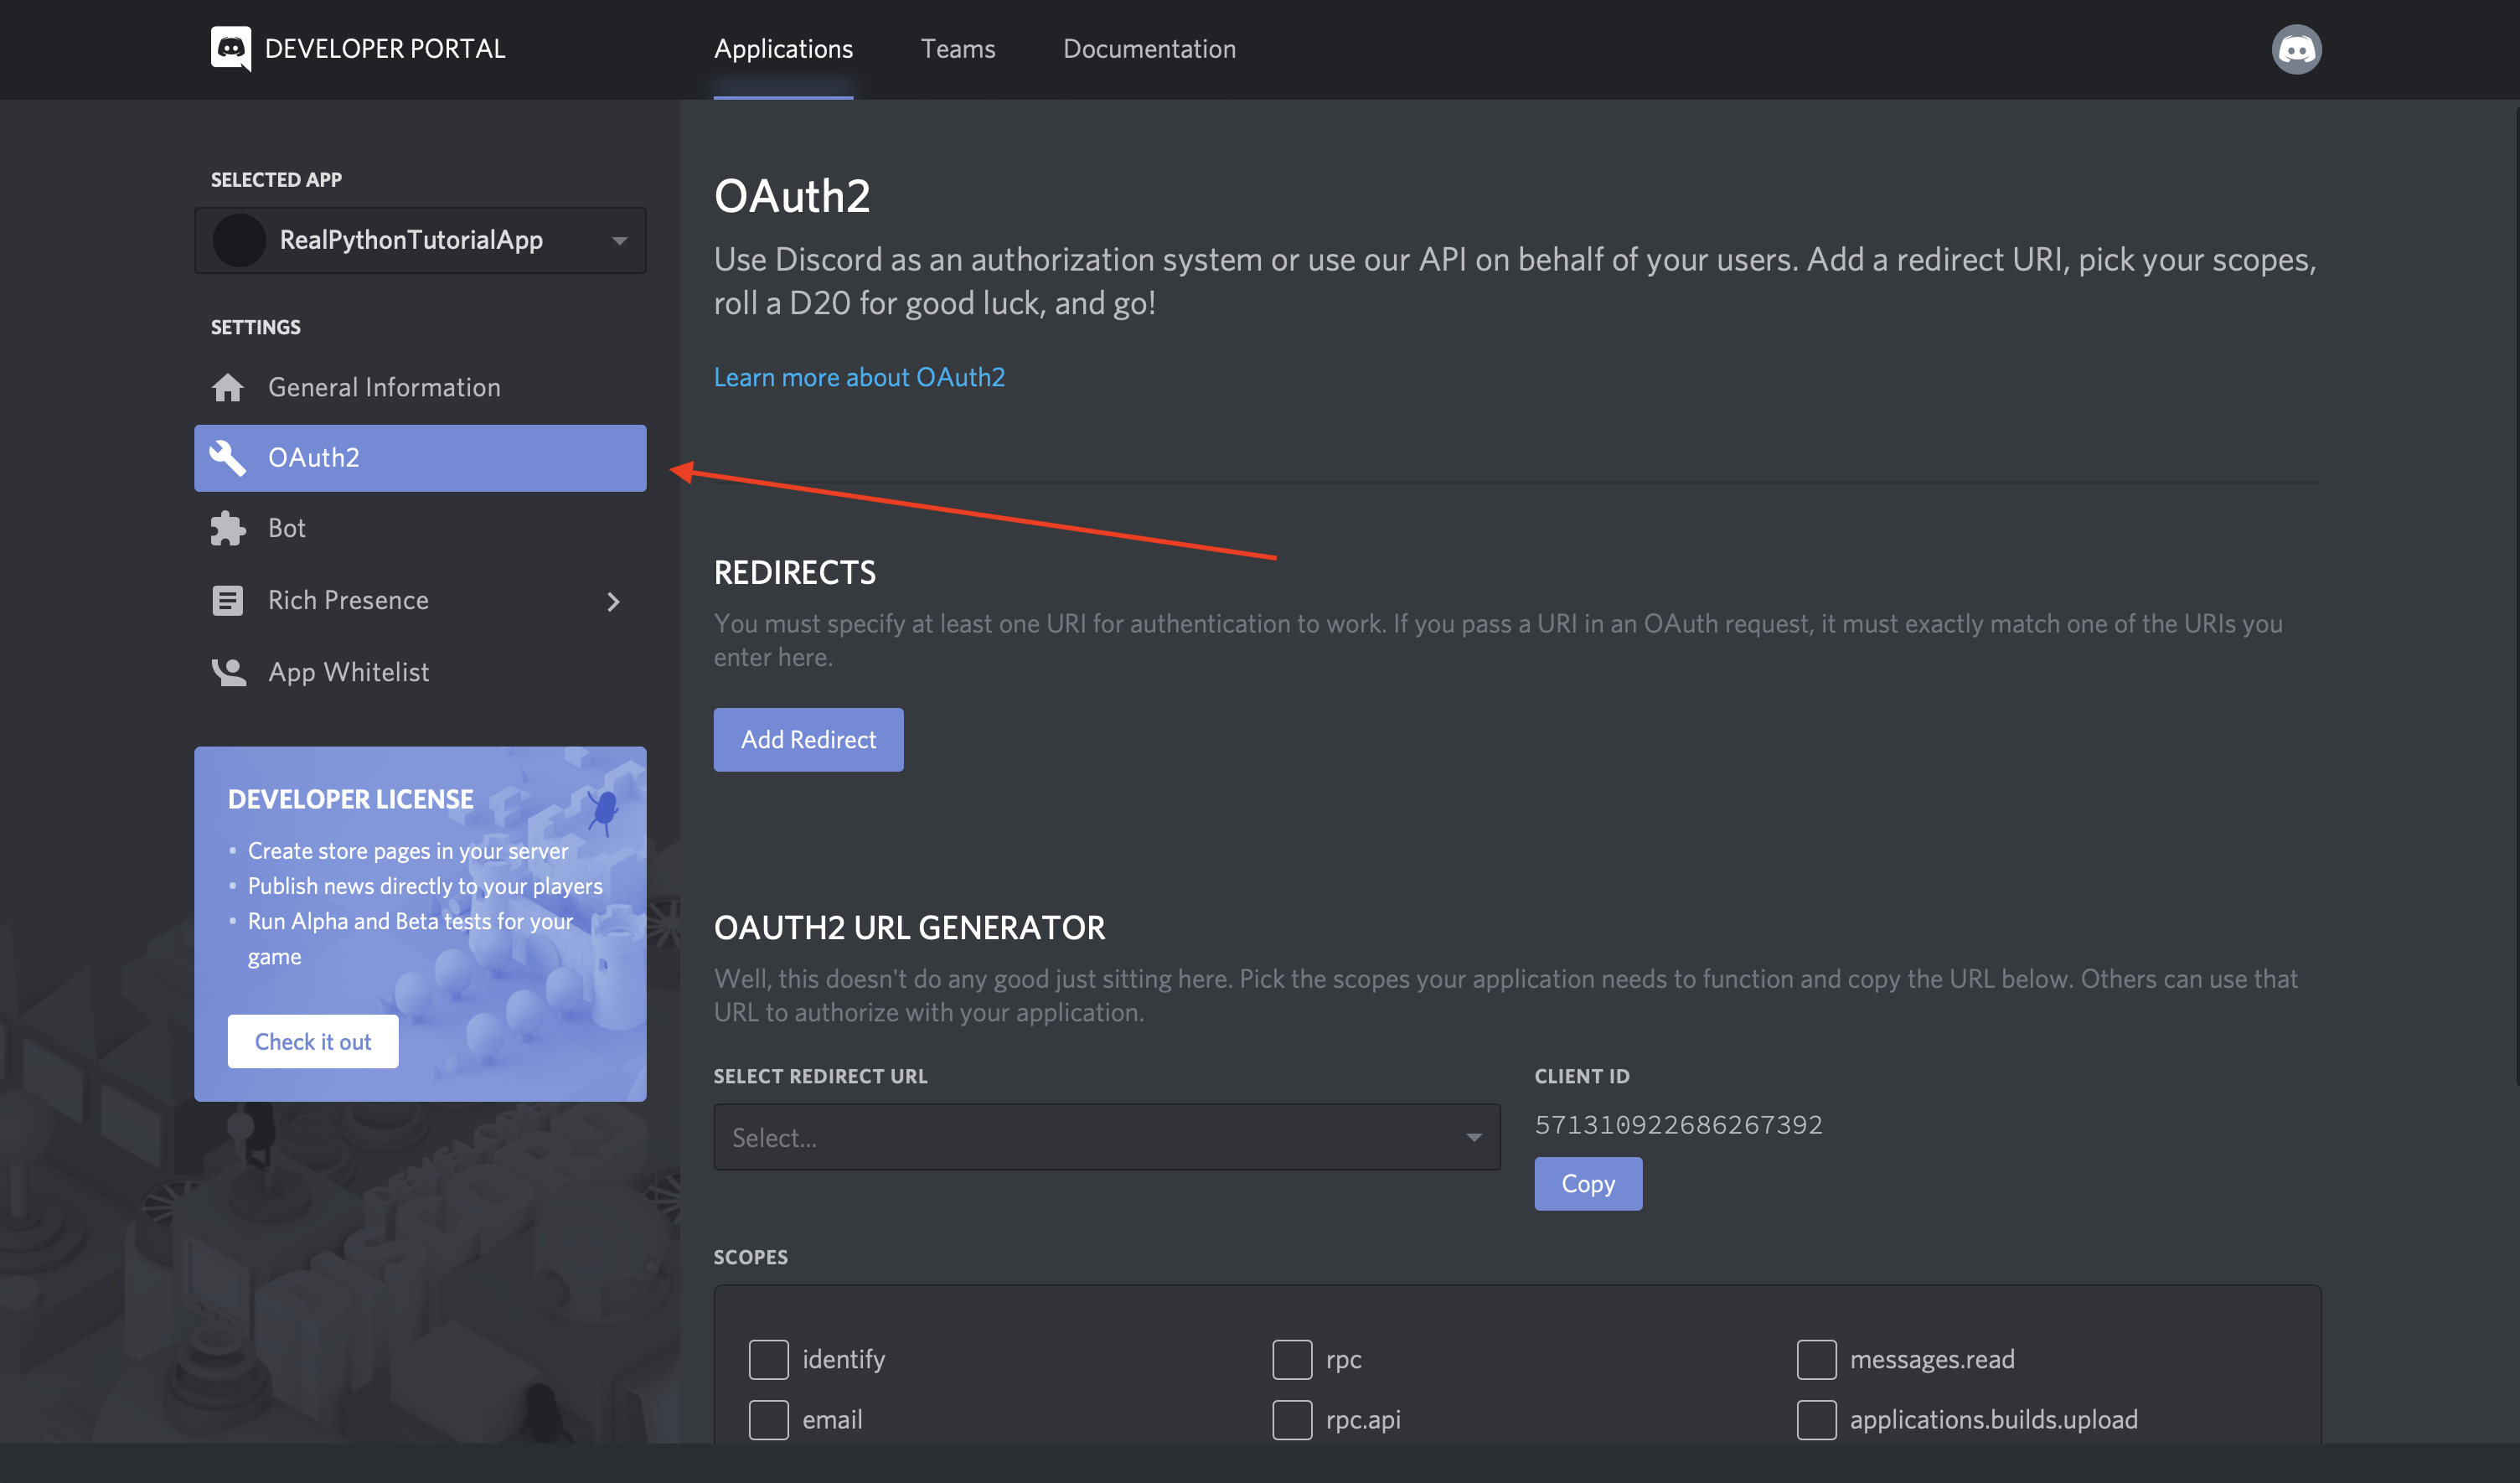
From this window, you’ll see the OAuth2 URL Generator.
This tool generates an authorization URL that hits Discord’s OAuth2 API and authorizes API access using your application’s credentials.
In this case, you’ll want to grant your application’s bot user access to Discord APIs using your application’s OAuth2 credentials.
To do this, scroll down and select bot from the SCOPES options and Administrator from BOT PERMISSIONS:
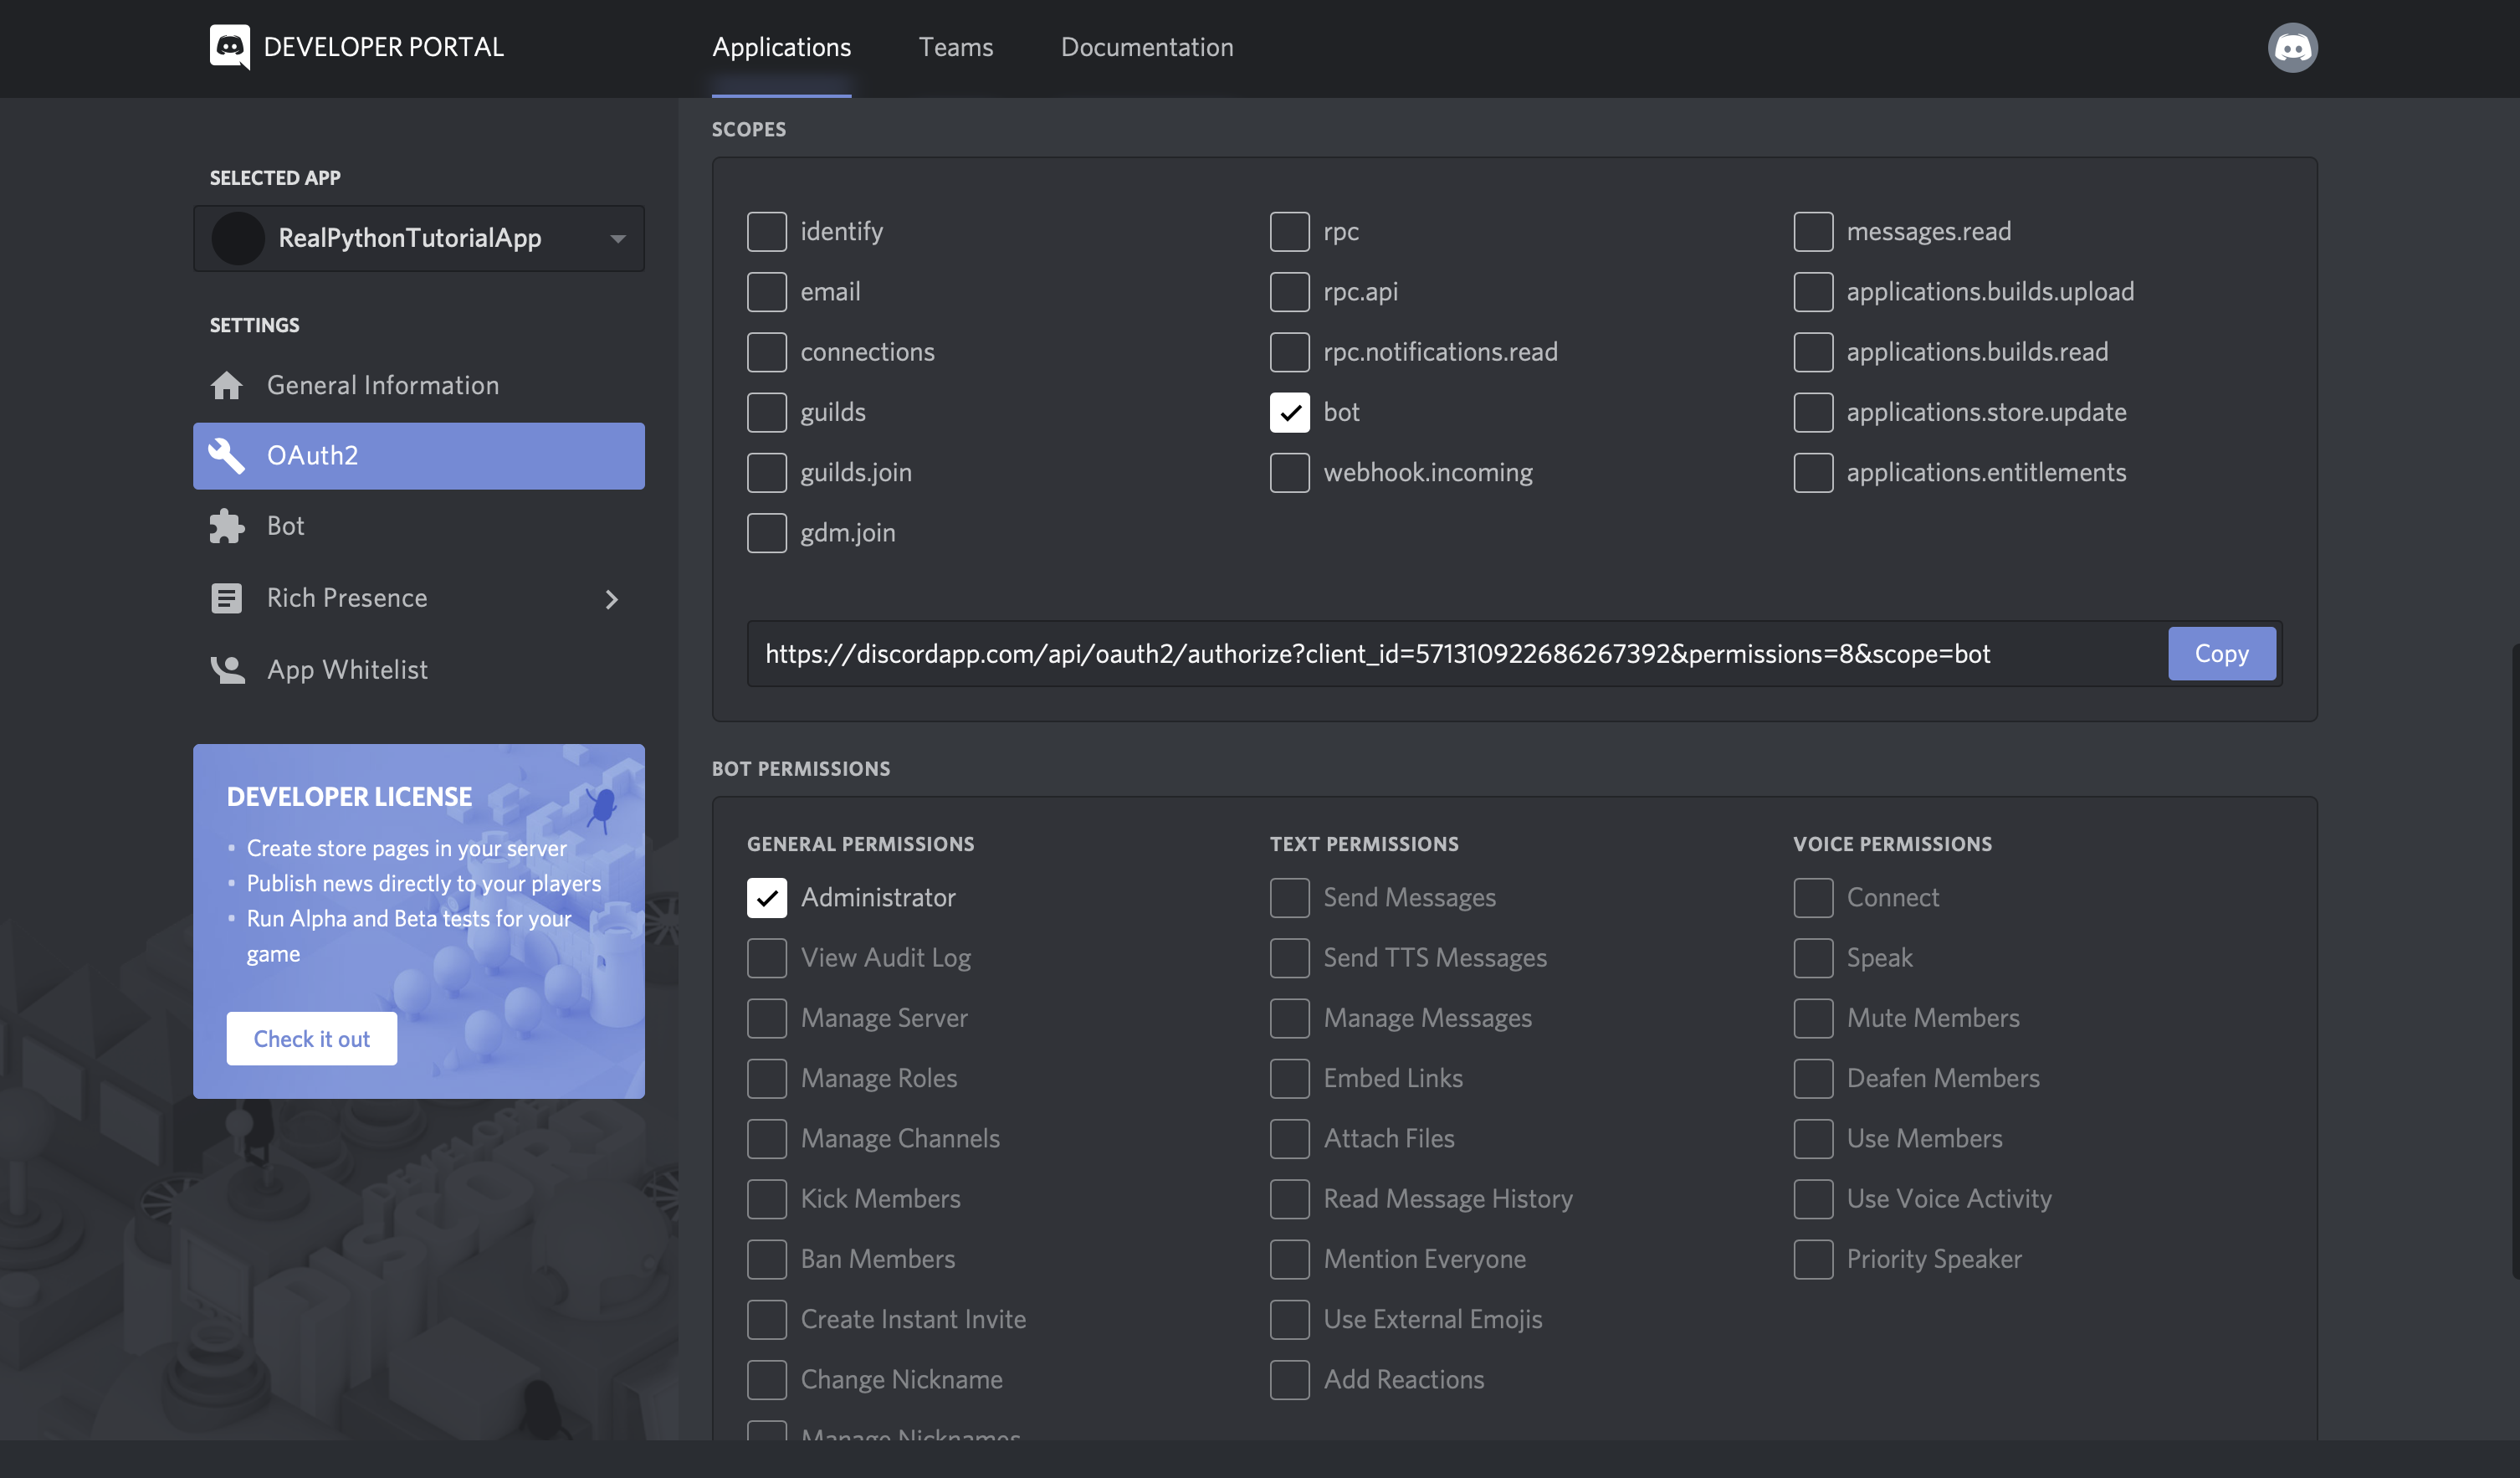
Now, Discord has generated your application’s authorization URL with the selected scope and permissions.
Select Copy beside the URL that was generated for you, paste it into your browser, and select your guild from the dropdown options:
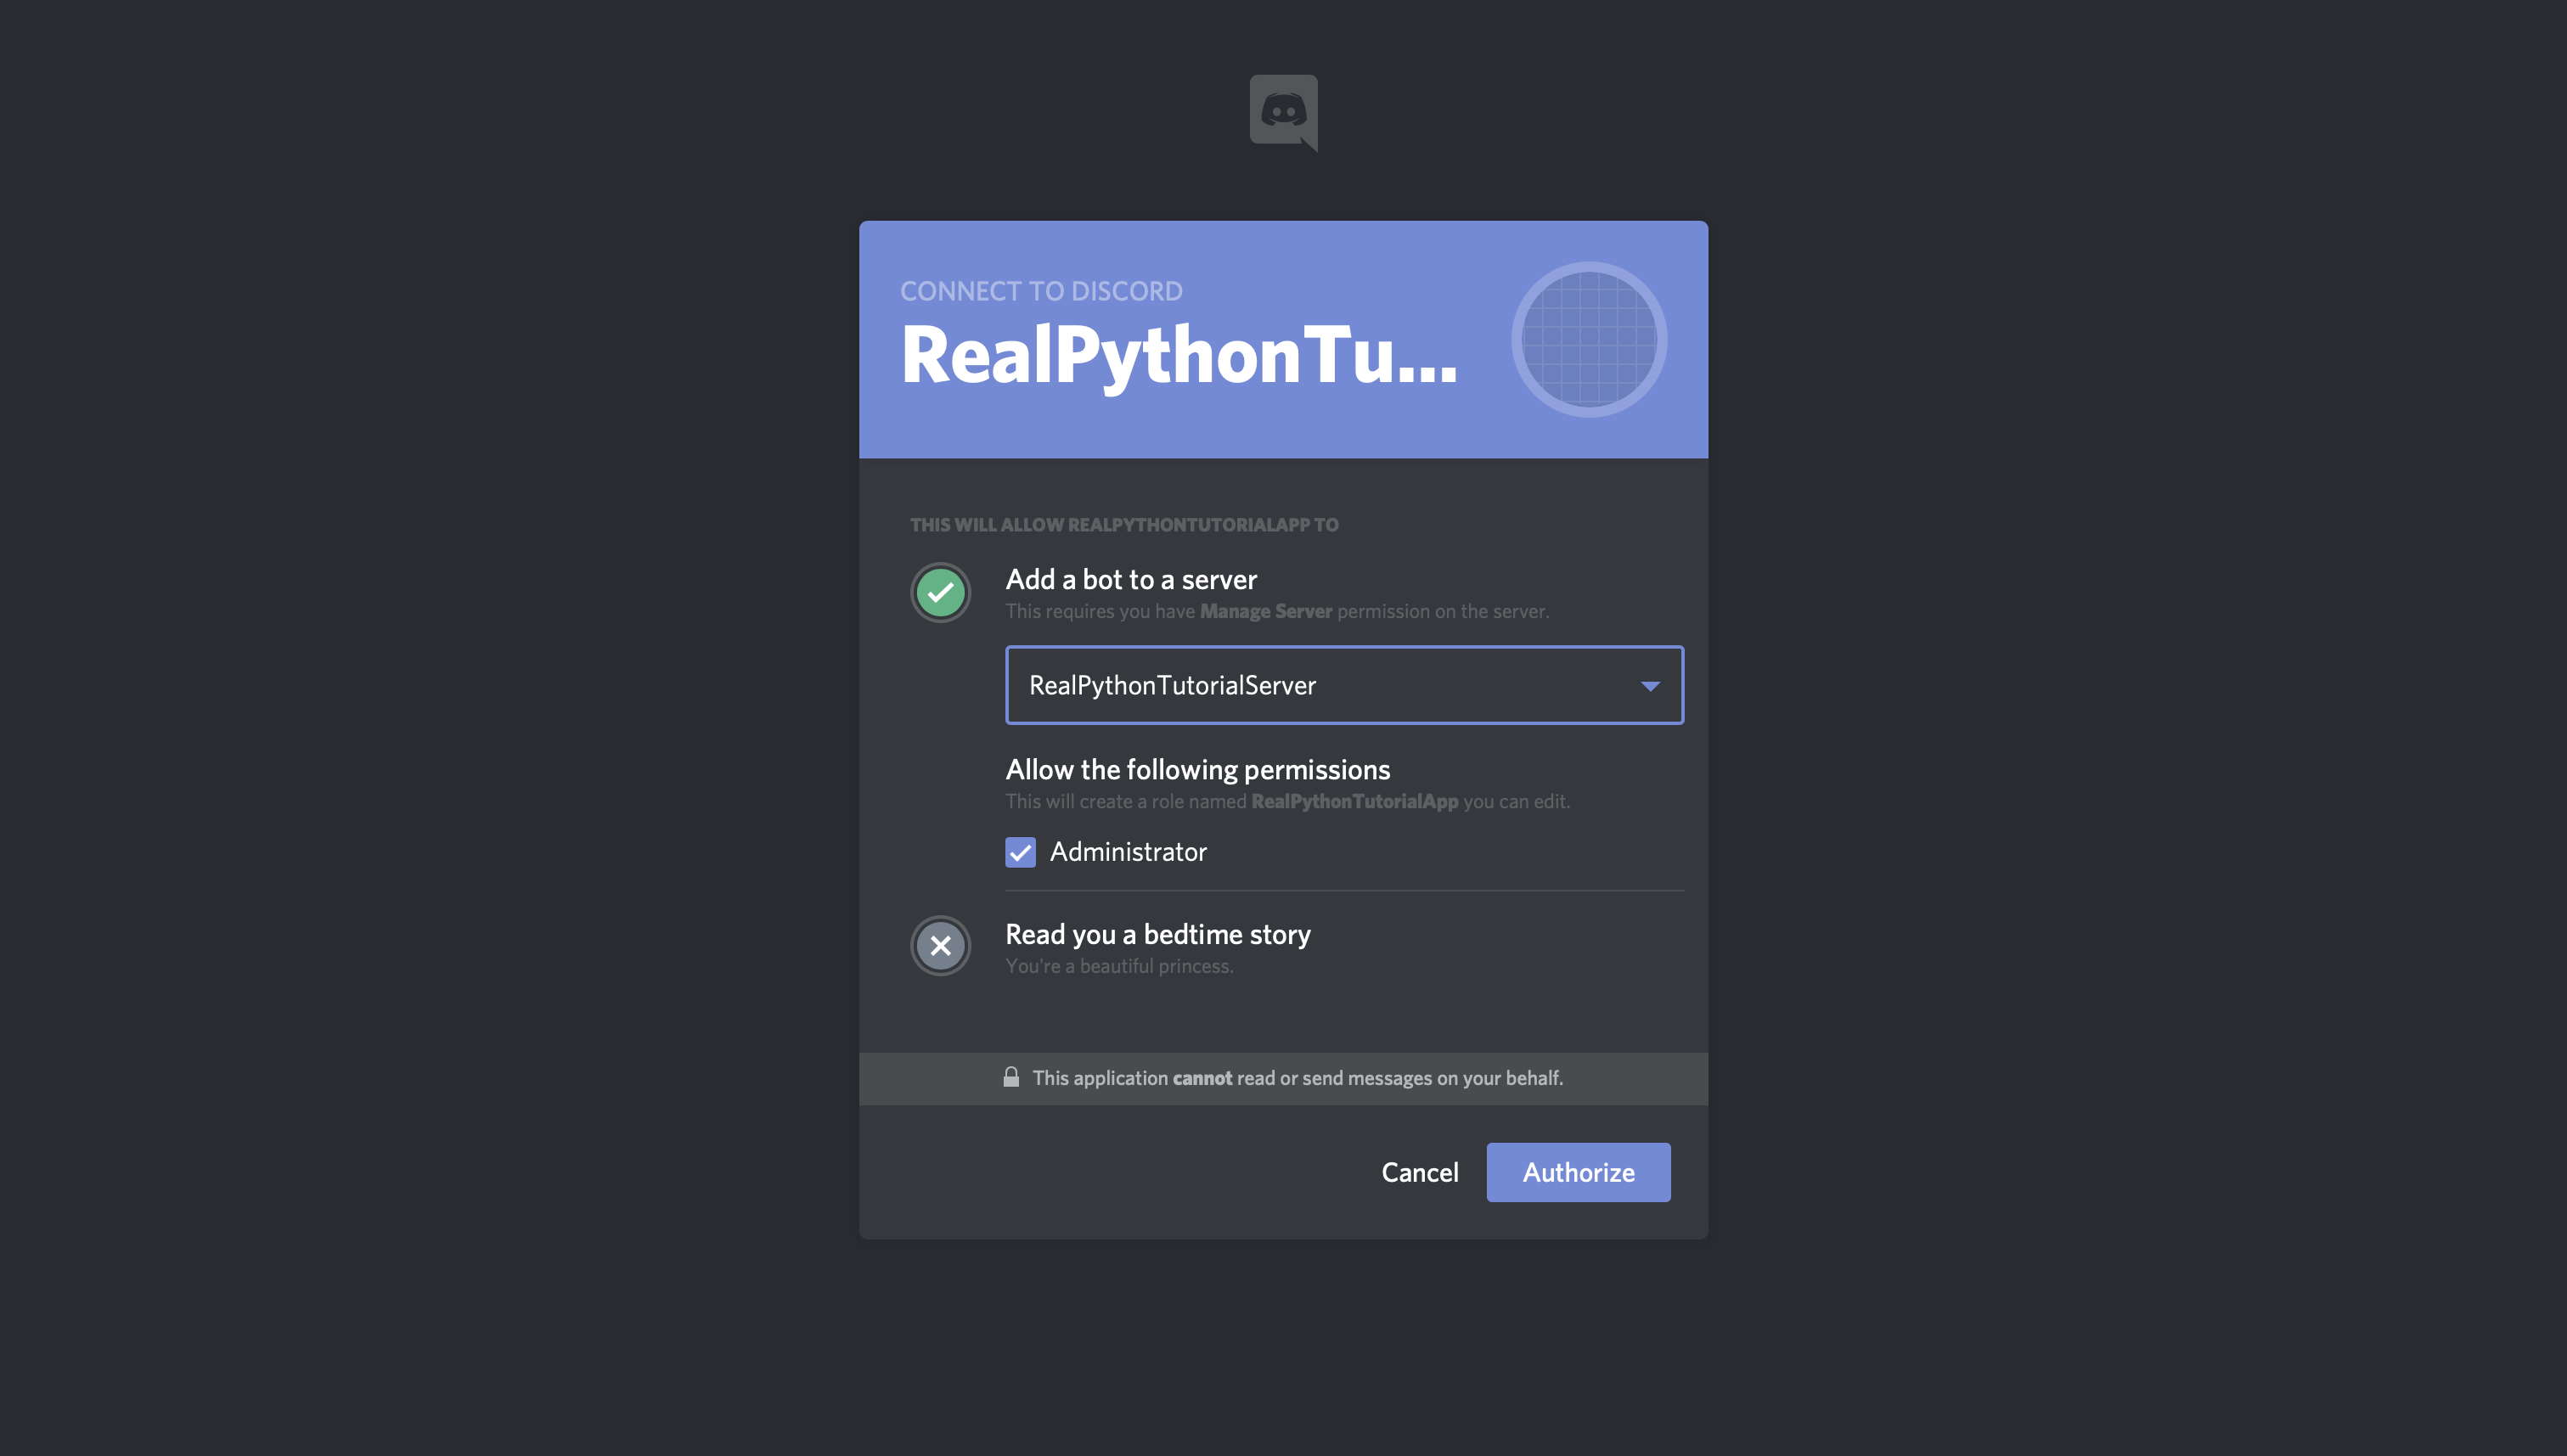
Click Authorize, and you’re done!
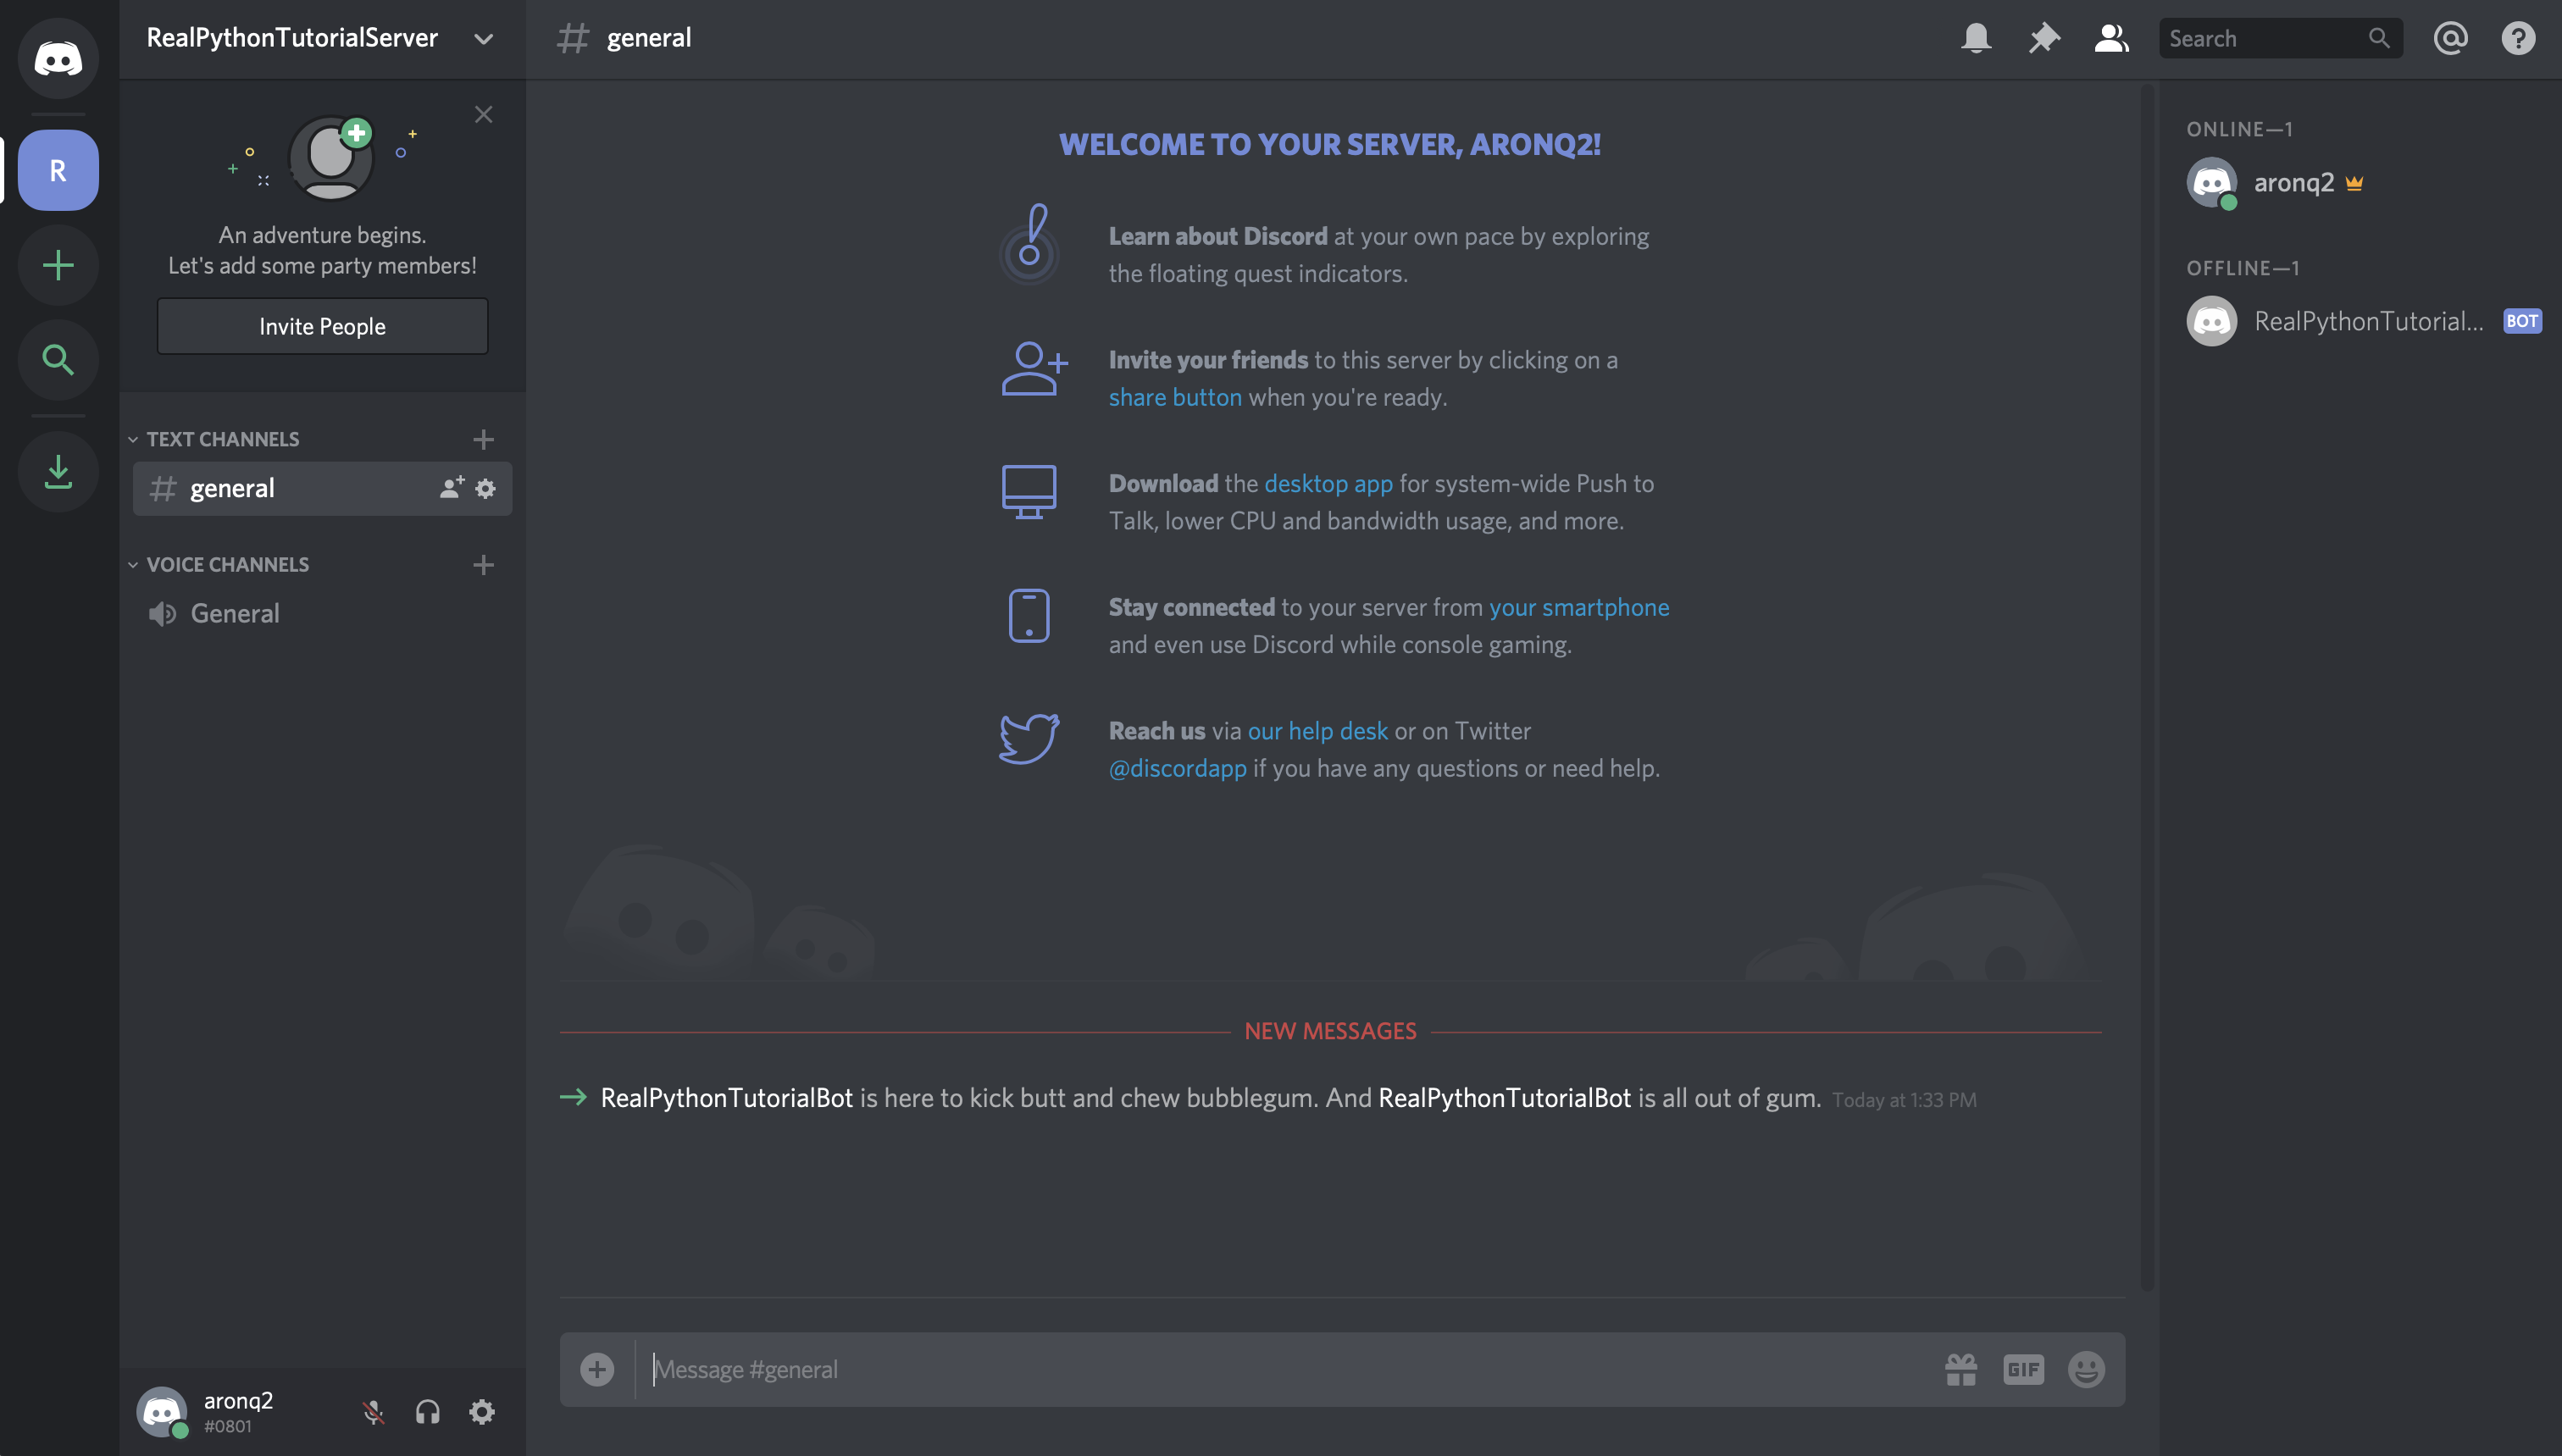
If you go back to your guild, then you’ll see that the bot has been added:
In summary, you’ve created:
- An application that your bot will use to authenticate with Discord’s APIs
- A bot user that you’ll use to interact with other users and events in your guild
- A guild in which your user account and your bot user will be active
- A Discord account with which you created everything else and that you’ll use to interact with your bot
Now, you know how to make a Discord bot using the Developer Portal. Next comes the fun stuff: implementing your bot in Python!
How to Make a Discord Bot in Python
Since you’re learning how to make a Discord bot with Python, you’ll be using discord.py.
discord.py is a Python library that exhaustively implements Discord’s APIs in an efficient and Pythonic way. This includes utilizing Python’s implementation of Async IO.
Begin by installing discord.py with pip:
$ pip install -U discord.py
Now that you’ve installed discord.py, you’ll use it to create your first connection to Discord!
Creating a Discord Connection
The first step in implementing your bot user is to create a connection to Discord. With discord.py, you do this by creating an instance of Client:
# bot.py
import os

import discord
from dotenv import load_dotenv

load_dotenv()
TOKEN = os.getenv('DISCORD_TOKEN')

client = discord.Client()

@client.event
async def on_ready():
    print(f'{client.user} has connected to Discord!')

client.run(TOKEN)
A Client is an object that represents a connection to Discord. A Client handles events, tracks state, and generally interacts with Discord APIs.
Here, you’ve created a Client and implemented its on_ready() event handler, which handles the event when the Client has established a connection to Discord and it has finished preparing the data that Discord has sent, such as login state, guild and channel data, and more.
In other words, on_ready() will be called (and your message will be printed) once client is ready for further action. You’ll learn more about event handlers later in this article.
When you’re working with secrets such as your Discord token, it’s good practice to read it into your program from an environment variable. Using environment variables helps you:
- Avoid putting the secrets into source control
- Use different variables for development and production environments without changing your code
While you could export DISCORD_TOKEN={your-bot-token}, an easier solution is to save a .env file on all machines that will be running this code. This is not only easier, since you won’t have to export your token every time you clear your shell, but it also protects you from storing your secrets in your shell’s history.
Create a file named .env in the same directory as bot.py:
# .env
DISCORD_TOKEN={your-bot-token}
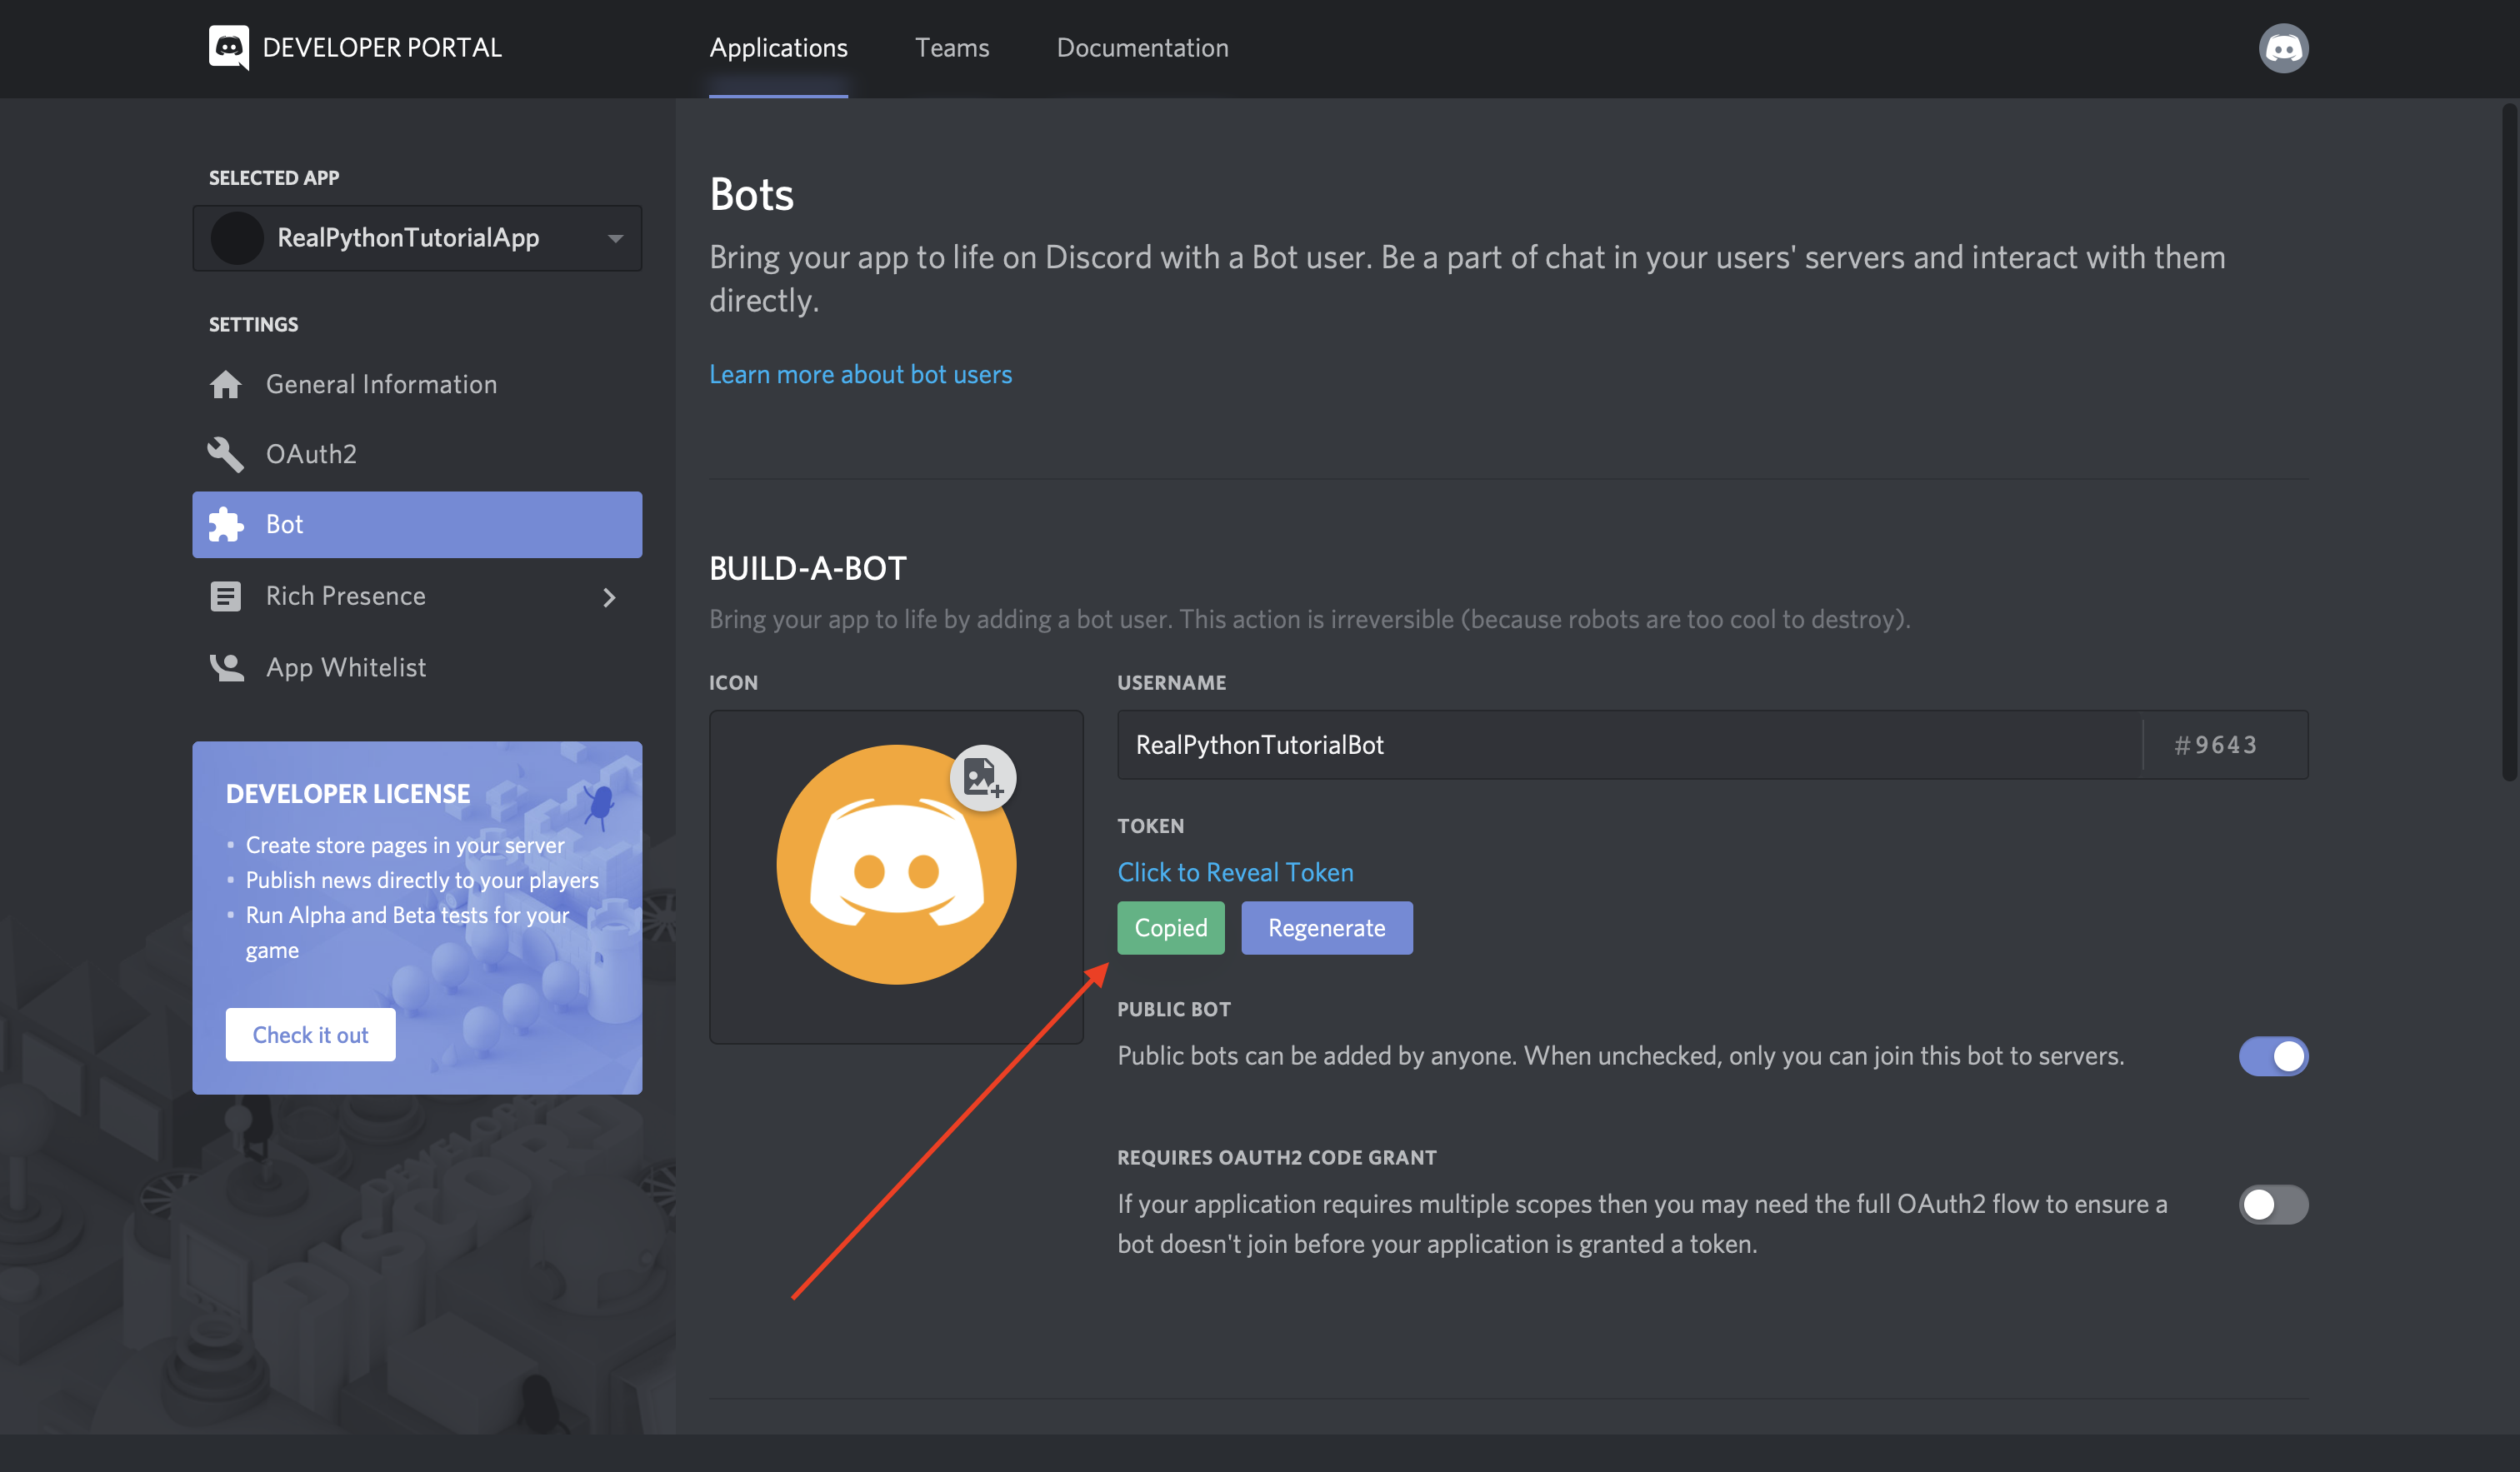
You’ll need to replace {your-bot-token} with your bot’s token, which you can get by going back to the Bot page on the Developer Portal and clicking Copy under the TOKEN section:
Looking back at the bot.py code, you’ll notice a library called dotenv. This library is handy for working with .env files. load_dotenv() loads environment variables from a .env file into your shell’s environment variables so that you can use them in your code.
Install dotenv with pip:
$ pip install -U python-dotenv
Finally, client.run() runs your Client using your bot’s token.
Now that you’ve set up both bot.py and .env, you can run your code:
$ python bot.py
RealPythonTutorialBot#9643 has connected to Discord!
Great! Your Client has connected to Discord using your bot’s token. In the next section, you’ll build on this Client by interacting with more Discord APIs.
Interacting With Discord APIs
Using a Client, you have access to a wide range of Discord APIs.
For example, let’s say you wanted to write the name and identifier of the guild that you registered your bot user with to the console.
First, you’ll need to add a new environment variable:
# .env
DISCORD_TOKEN={your-bot-token}
DISCORD_GUILD={your-guild-name}
Don’t forget that you’ll need to replace the two placeholders with actual values:
{your-bot-token}{your-guild-name}
Remember that Discord calls on_ready(), which you used before, once the Client has made the connection and prepared the data. So, you can rely on the guild data being available inside on_ready():
# bot.py
import os

import discord
from dotenv import load_dotenv

load_dotenv()
TOKEN = os.getenv('DISCORD_TOKEN')
GUILD = os.getenv('DISCORD_GUILD')

client = discord.Client()

@client.event
async def on_ready():
    for guild in client.guilds:
        if guild.name == GUILD:
            break

    print(
        f'{client.user} is connected to the following guild:n'
        f'{guild.name}(id: {guild.id})'
    )

client.run(TOKEN)
Here, you looped through the guild data that Discord has sent client, namely client.guilds. Then, you found the guild with the matching name and printed a formatted string to stdout.
Run the program to see the results:
$ python bot.py
RealPythonTutorialBot#9643 is connected to the following guild:
RealPythonTutorialServer(id: 571759877328732195)
Great! You can see the name of your bot, the name of your server, and the server’s identification number.
Another interesting bit of data you can pull from a guild is the list of users who are members of the guild:
# bot.py
import os

import discord
from dotenv import load_dotenv

load_dotenv()
TOKEN = os.getenv('DISCORD_TOKEN')
GUILD = os.getenv('DISCORD_GUILD')

client = discord.Client()

@client.event
async def on_ready():
    for guild in client.guilds:
        if guild.name == GUILD:
            break

    print(
        f'{client.user} is connected to the following guild:n'
        f'{guild.name}(id: {guild.id})n'
    )

    members = 'n - '.join([member.name for member in guild.members])
    print(f'Guild Members:n - {members}')

client.run(TOKEN)
By looping through guild.members, you pulled the names of all of the members of the guild and printed them with a formatted string.
When you run the program, you should see at least the name of the account you created the guild with and the name of the bot user itself:
$ python bot.py
RealPythonTutorialBot#9643 is connected to the following guild:
RealPythonTutorialServer(id: 571759877328732195)

Guild Members:
 - aronq2
 - RealPythonTutorialBot
These examples barely scratch the surface of the APIs available on Discord, be sure to check out their documentation to see all that they have to offer.
Next, you’ll learn about some utility functions and how they can simplify these examples.
Using Utility Functions
Let’s take another look at the example from the last section where you printed the name and identifier of the bot’s guild:
# bot.py
import os

import discord
from dotenv import load_dotenv

load_dotenv()
TOKEN = os.getenv('DISCORD_TOKEN')
GUILD = os.getenv('DISCORD_GUILD')

client = discord.Client()

@client.event
async def on_ready():
    for guild in client.guilds:
        if guild.name == GUILD:
            break

    print(
        f'{client.user} is connected to the following guild:n'
        f'{guild.name}(id: {guild.id})'
    )

client.run(TOKEN)
You could clean up this code by using some of the utility functions available in discord.py.
discord.utils.find() is one utility that can improve the simplicity and readability of this code by replacing the for loop with an intuitive, abstracted function:
# bot.py
import os

import discord
from dotenv import load_dotenv

load_dotenv()
TOKEN = os.getenv('DISCORD_TOKEN')
GUILD = os.getenv('DISCORD_GUILD')

client = discord.Client()

@client.event
async def on_ready():
    guild = discord.utils.find(lambda g: g.name == GUILD, client.guilds)
    print(
        f'{client.user} is connected to the following guild:n'
        f'{guild.name}(id: {guild.id})'
    )

client.run(TOKEN)
find() takes a function, called a predicate, which identifies some characteristic of the element in the iterable that you’re looking for. Here, you used a particular type of anonymous function, called a lambda, as the predicate.
In this case, you’re trying to find the guild with the same name as the one you stored in the DISCORD_GUILD environment variable. Once find() locates an element in the iterable that satisfies the predicate, it will return the element. This is essentially equivalent to the break statement in the previous example, but cleaner.
discord.py has even abstracted this concept one step further with the get() utility:
# bot.py
import os

import discord
from dotenv import load_dotenv

load_dotenv()
TOKEN = os.getenv('DISCORD_TOKEN')
GUILD = os.getenv('DISCORD_GUILD')

client = discord.Client()

@client.event
async def on_ready():
    guild = discord.utils.get(client.guilds, name=GUILD)
    print(
        f'{client.user} is connected to the following guild:n'
        f'{guild.name}(id: {guild.id})'
    )

client.run(TOKEN)
get() takes the iterable and some keyword arguments. The keyword arguments represent attributes of the elements in the iterable that must all be satisfied for get() to return the element.
In this example, you’ve identified name=GUILD as the attribute that must be satisfied.
Now that you’ve learned the basics of interacting with APIs, you’ll dive a little deeper into the function that you’ve been using to access them: on_ready().
Responding to Events
You already learned that on_ready() is an event. In fact, you might have noticed that it is identified as such in the code by the client.event decorator.
But what is an event?
An event is something that happens on Discord that you can use to trigger a reaction in your code. Your code will listen for and then respond to events.
Using the example you’ve seen already, the on_ready() event handler handles the event that the Client has made a connection to Discord and prepared its response data.
So, when Discord fires an event, discord.py will route the event data to the corresponding event handler on your connected Client.
There are two ways in discord.py to implement an event handler:
- Using the
client.eventdecorator - Creating a subclass of
Clientand overriding its handler methods
You already saw the implementation using the decorator. Next, take a look at how to subclass Client:
# bot.py
import os

import discord
from dotenv import load_dotenv

load_dotenv()
TOKEN = os.getenv('DISCORD_TOKEN')

class CustomClient(discord.Client):
    async def on_ready(self):
        print(f'{self.user} has connected to Discord!')

client = CustomClient()
client.run(TOKEN)
Here, just like before, you’ve created a client variable and called .run() with your Discord token. The actual Client is different, however. Instead of using the normal base class, client is an instance of CustomClient, which has an overridden on_ready() function.
There is no difference between the two implementation styles of events, but this tutorial will primarily use the decorator version because it looks similar to how you implement Bot commands, which is a topic you’ll cover in a bit.
Now that you’ve learned how to create an event handler, let’s walk through some different examples of handlers you can create.
Welcoming New Members
Previously, you saw the example of responding to the event where a member joins a guild. In that example, your bot user could send them a message, welcoming them to your Discord community.
Now, you’ll implement that behavior in your Client, using event handlers, and verify its behavior in Discord:
# bot.py
import os

import discord
from dotenv import load_dotenv

load_dotenv()
TOKEN = os.getenv('DISCORD_TOKEN')

client = discord.Client()

@client.event
async def on_ready():
    print(f'{client.user.name} has connected to Discord!')

@client.event
async def on_member_join(member):
    await member.create_dm()
    await member.dm_channel.send(
        f'Hi {member.name}, welcome to my Discord server!'
    )

client.run(TOKEN)
Like before, you handled the on_ready() event by printing the bot user’s name in a formatted string. New, however, is the implementation of the on_member_join() event handler.
on_member_join(), as its name suggests, handles the event of a new member joining a guild.
In this example, you used member.create_dm() to create a direct message channel. Then, you used that channel to .send() a direct message to that new member.
Now, let’s test out your bot’s new behavior.
First, run your new version of bot.py and wait for the on_ready() event to fire, logging your message to stdout:
$ python bot.py
RealPythonTutorialBot has connected to Discord!
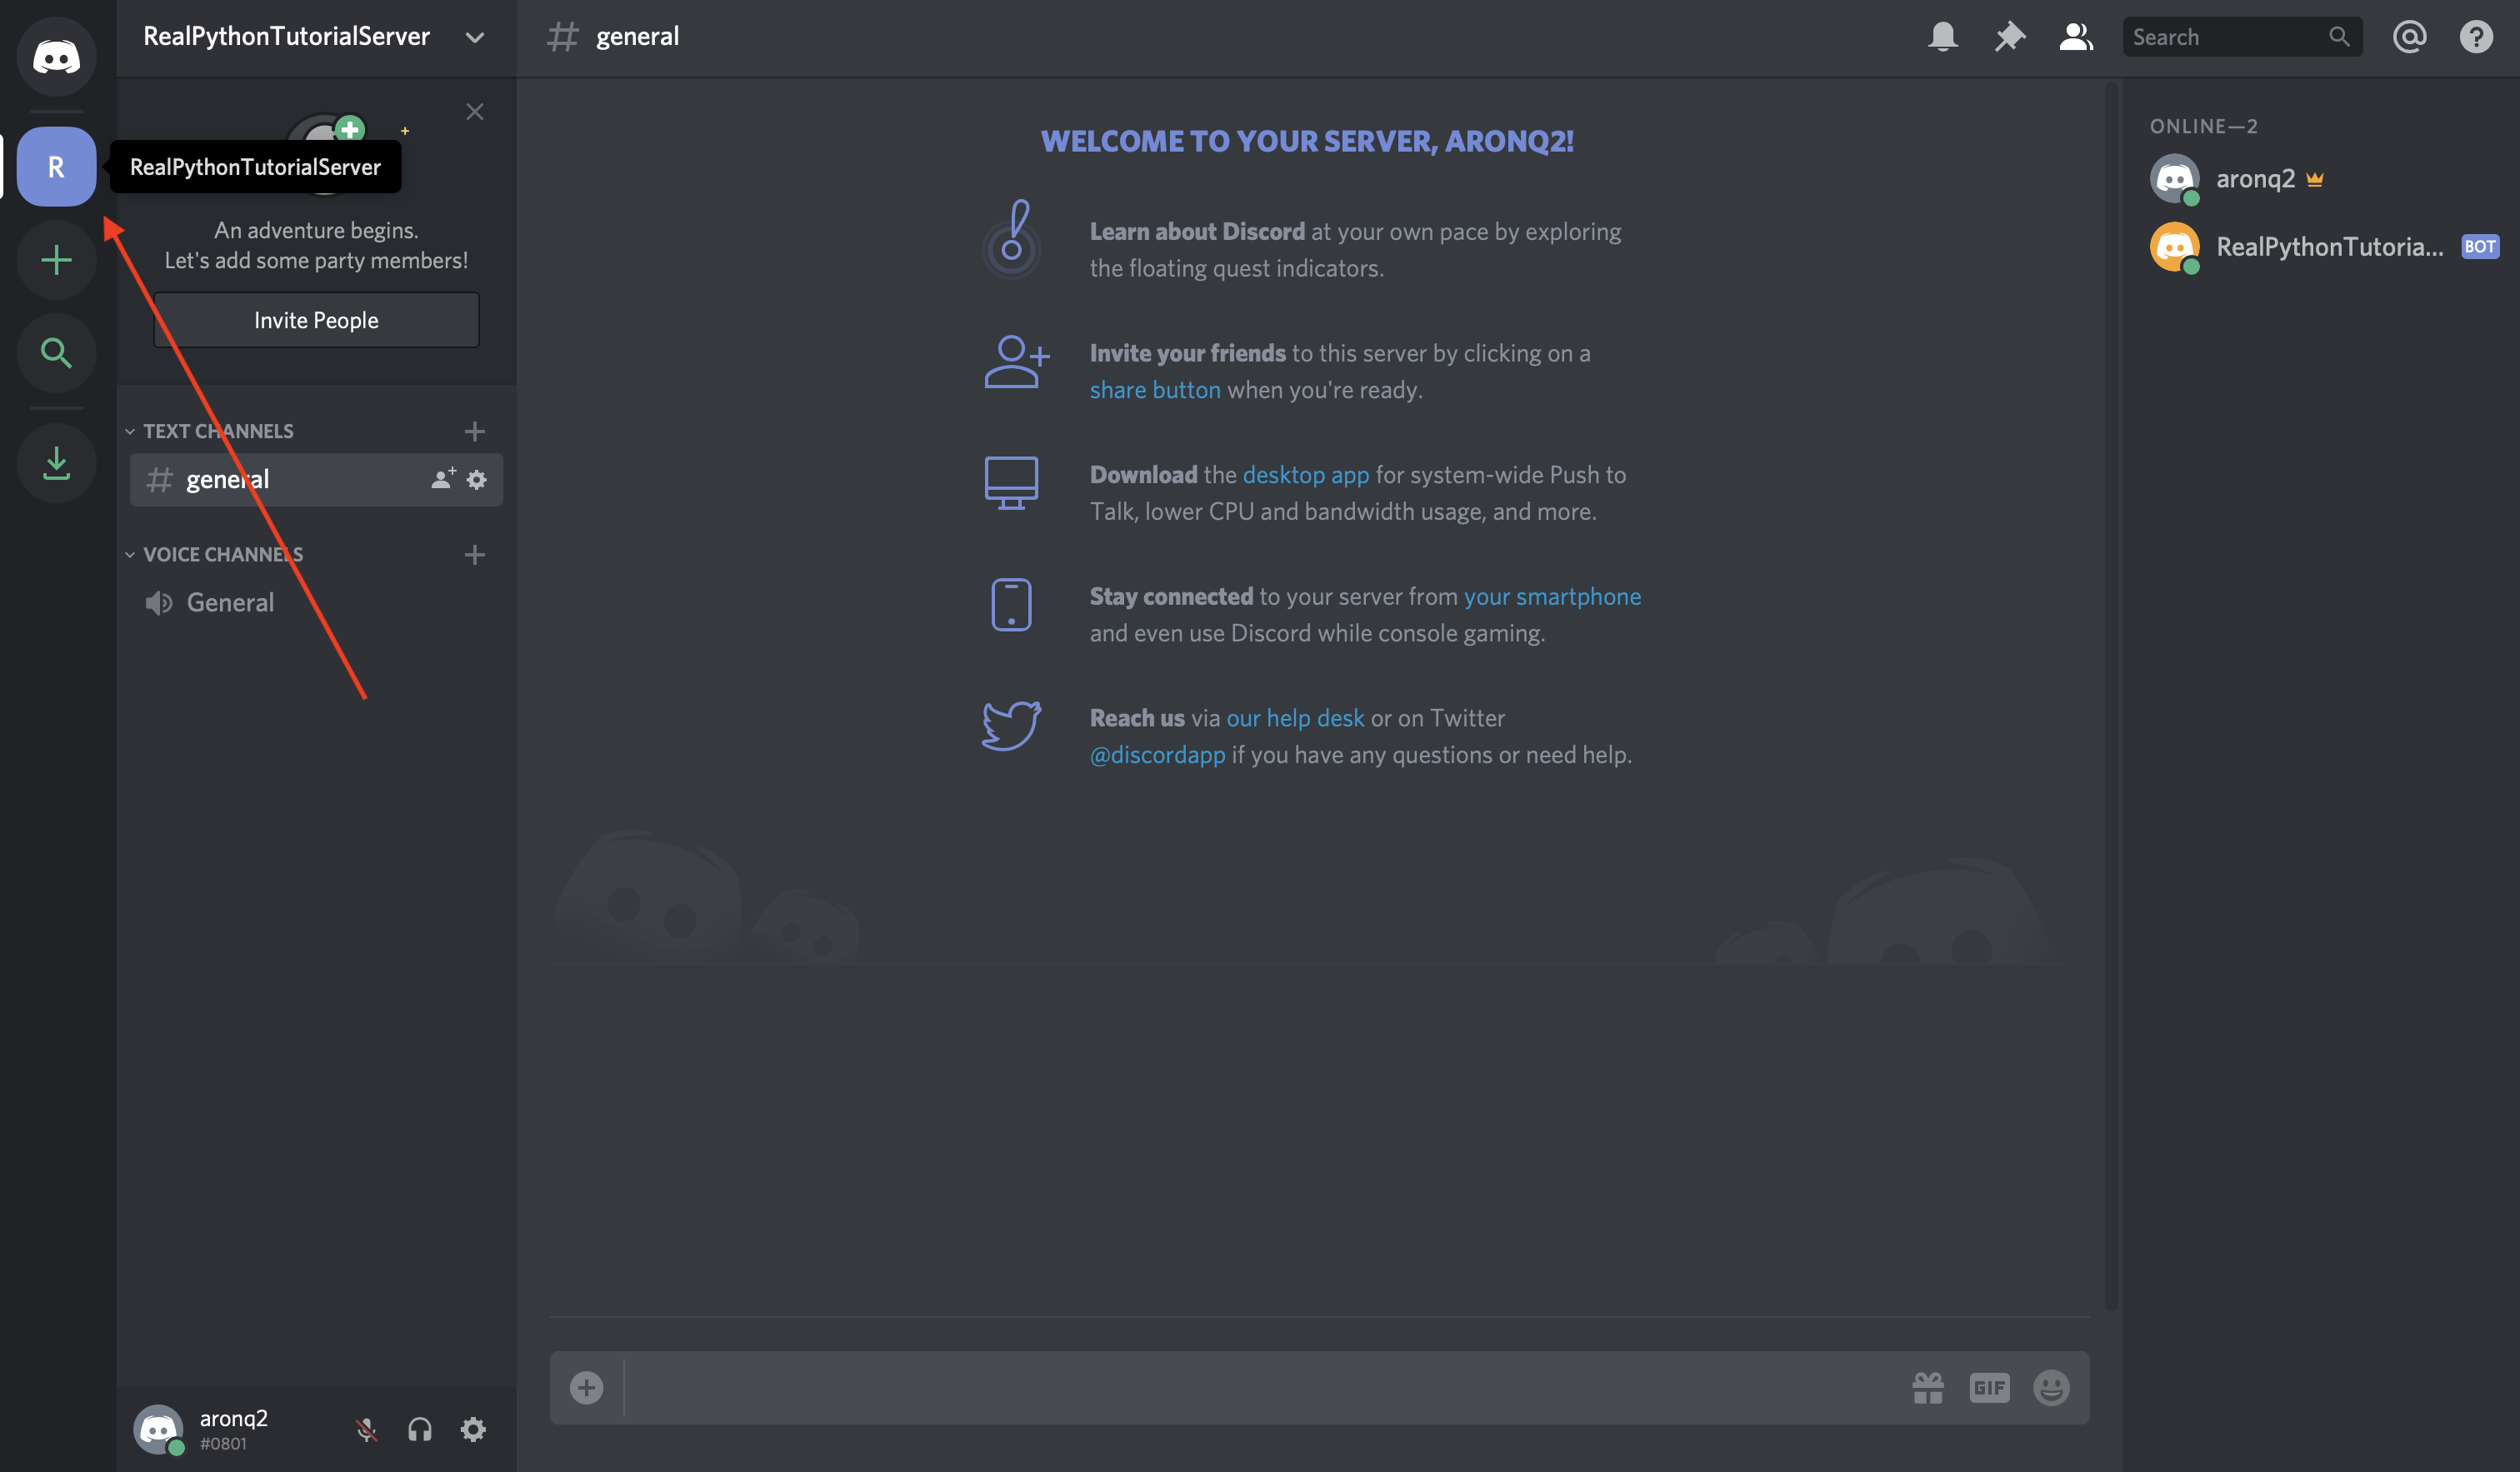
Now, head over to Discord, log in, and navigate to your guild by selecting it from the left-hand side of the screen:
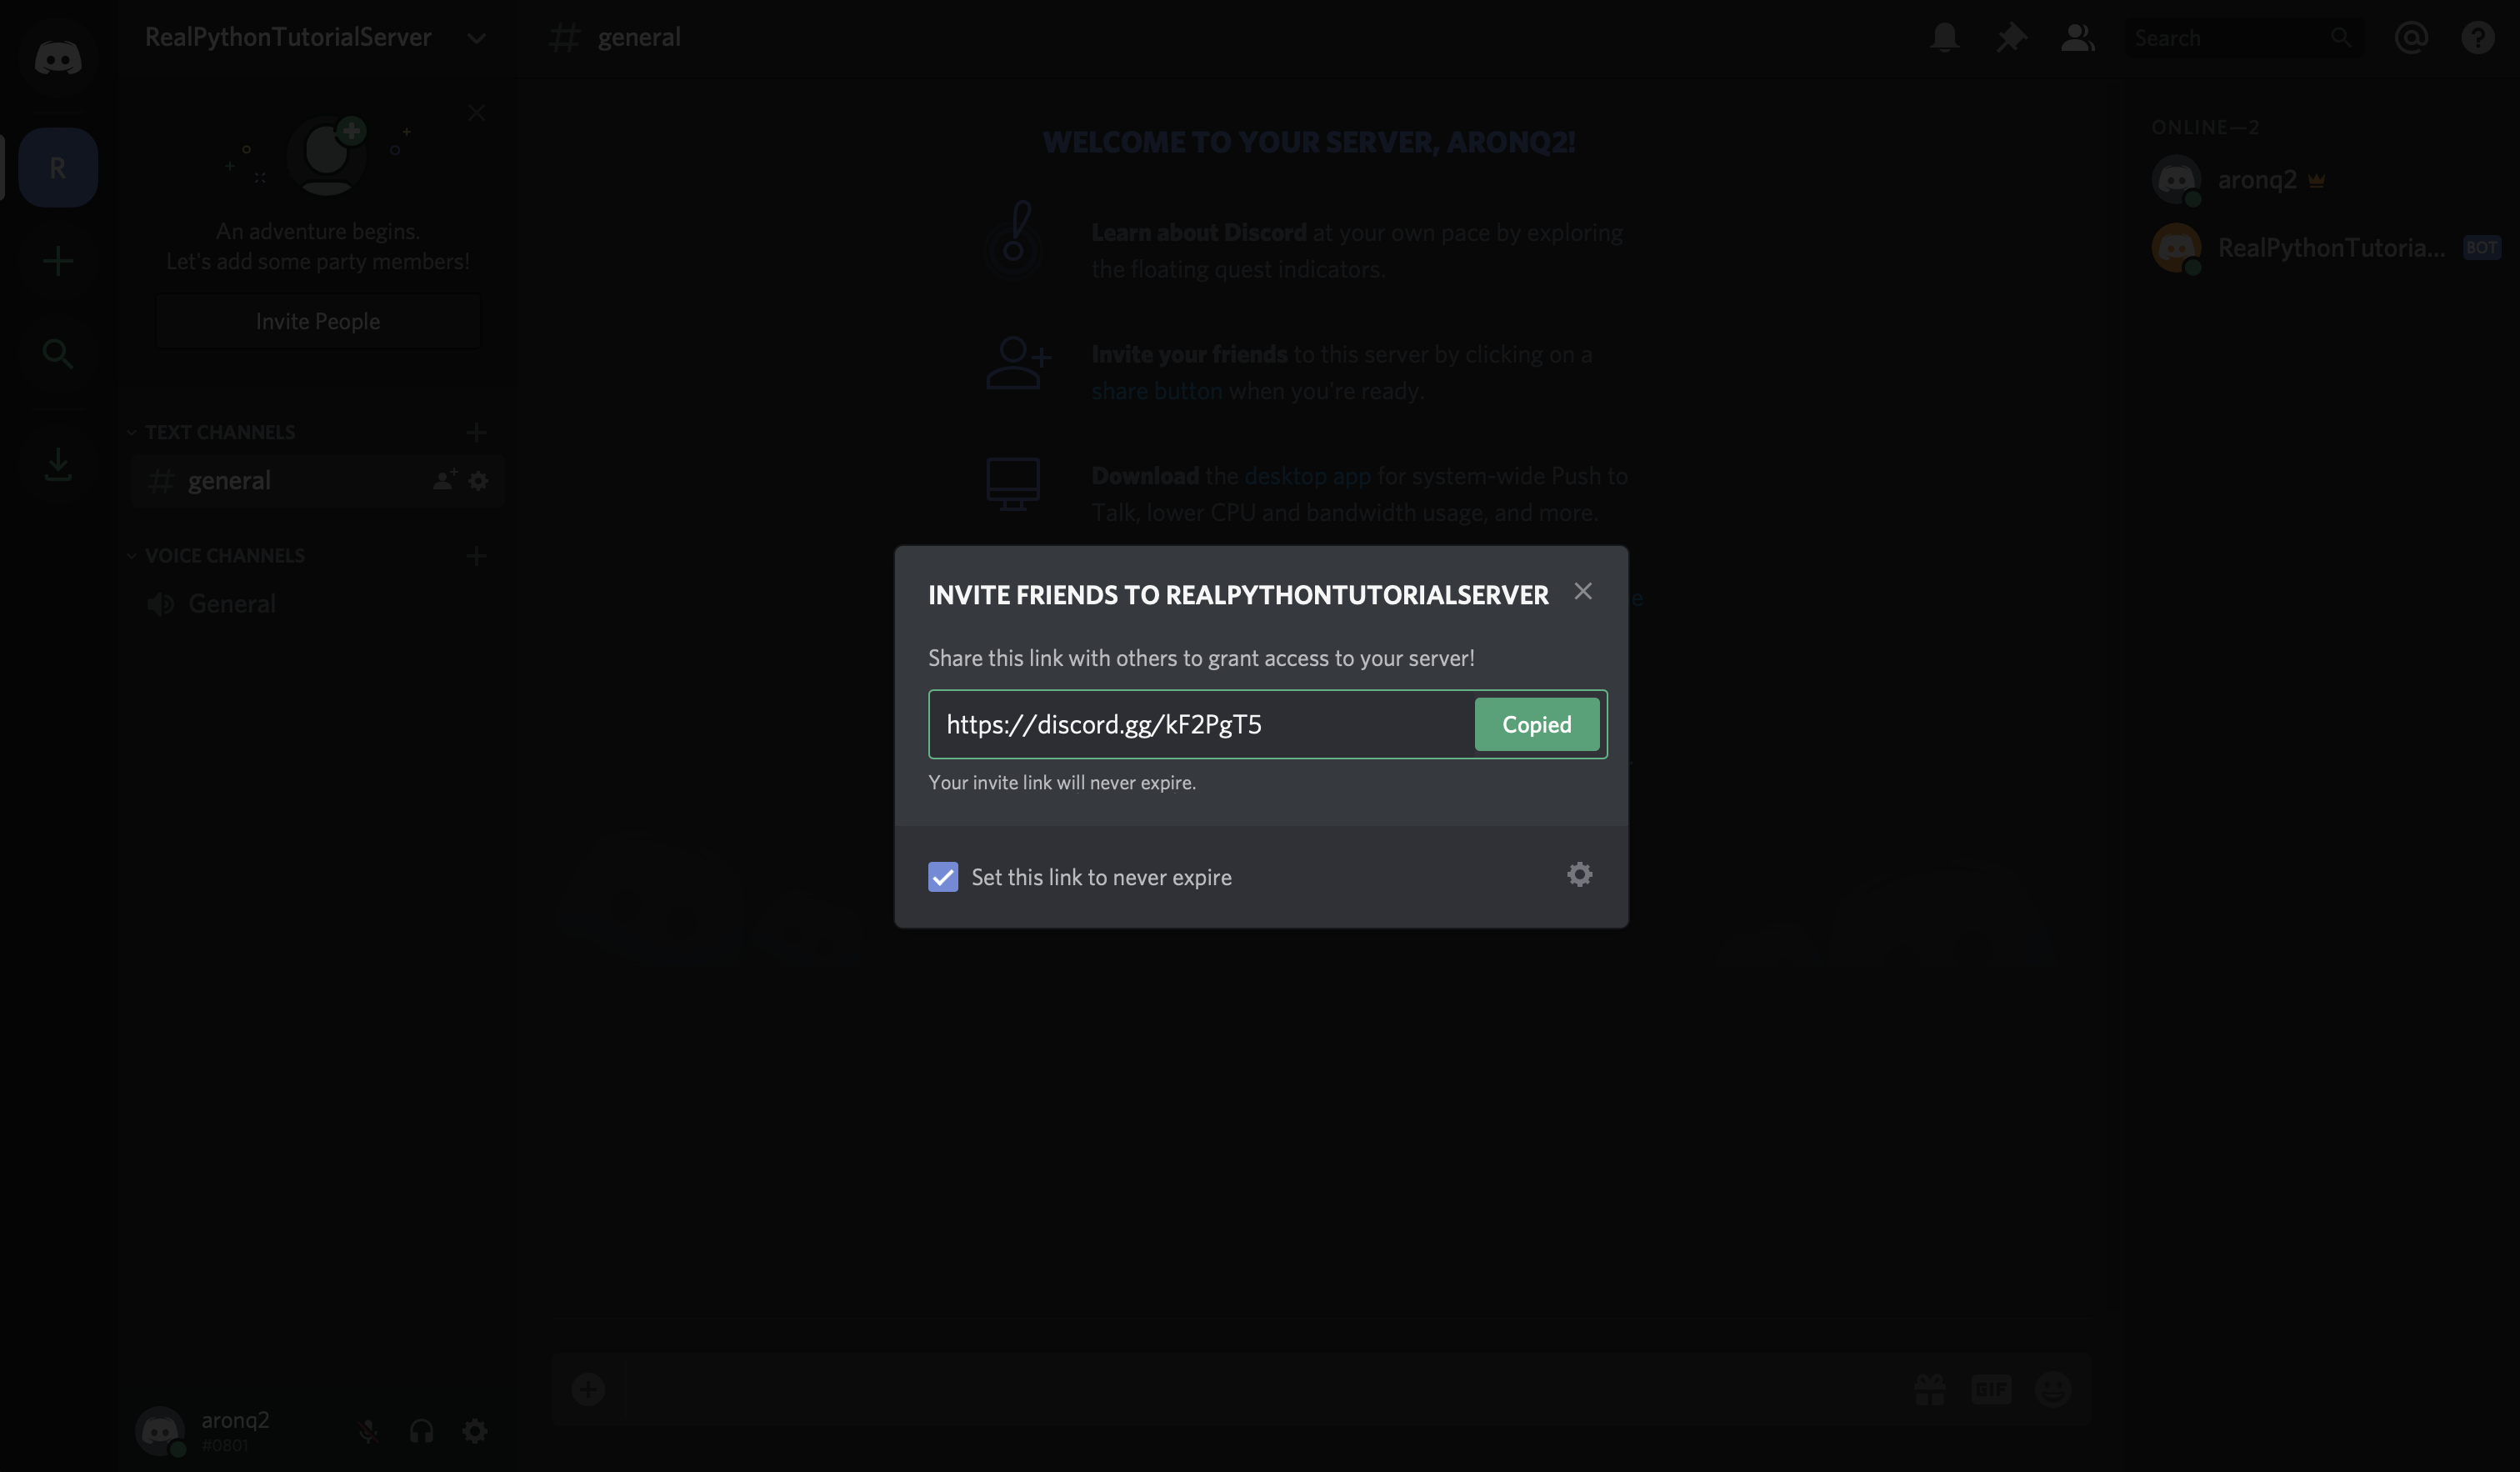
Select Invite People just beside the guild list where you selected your guild. Check the box that says Set this link to never expire and copy the link:
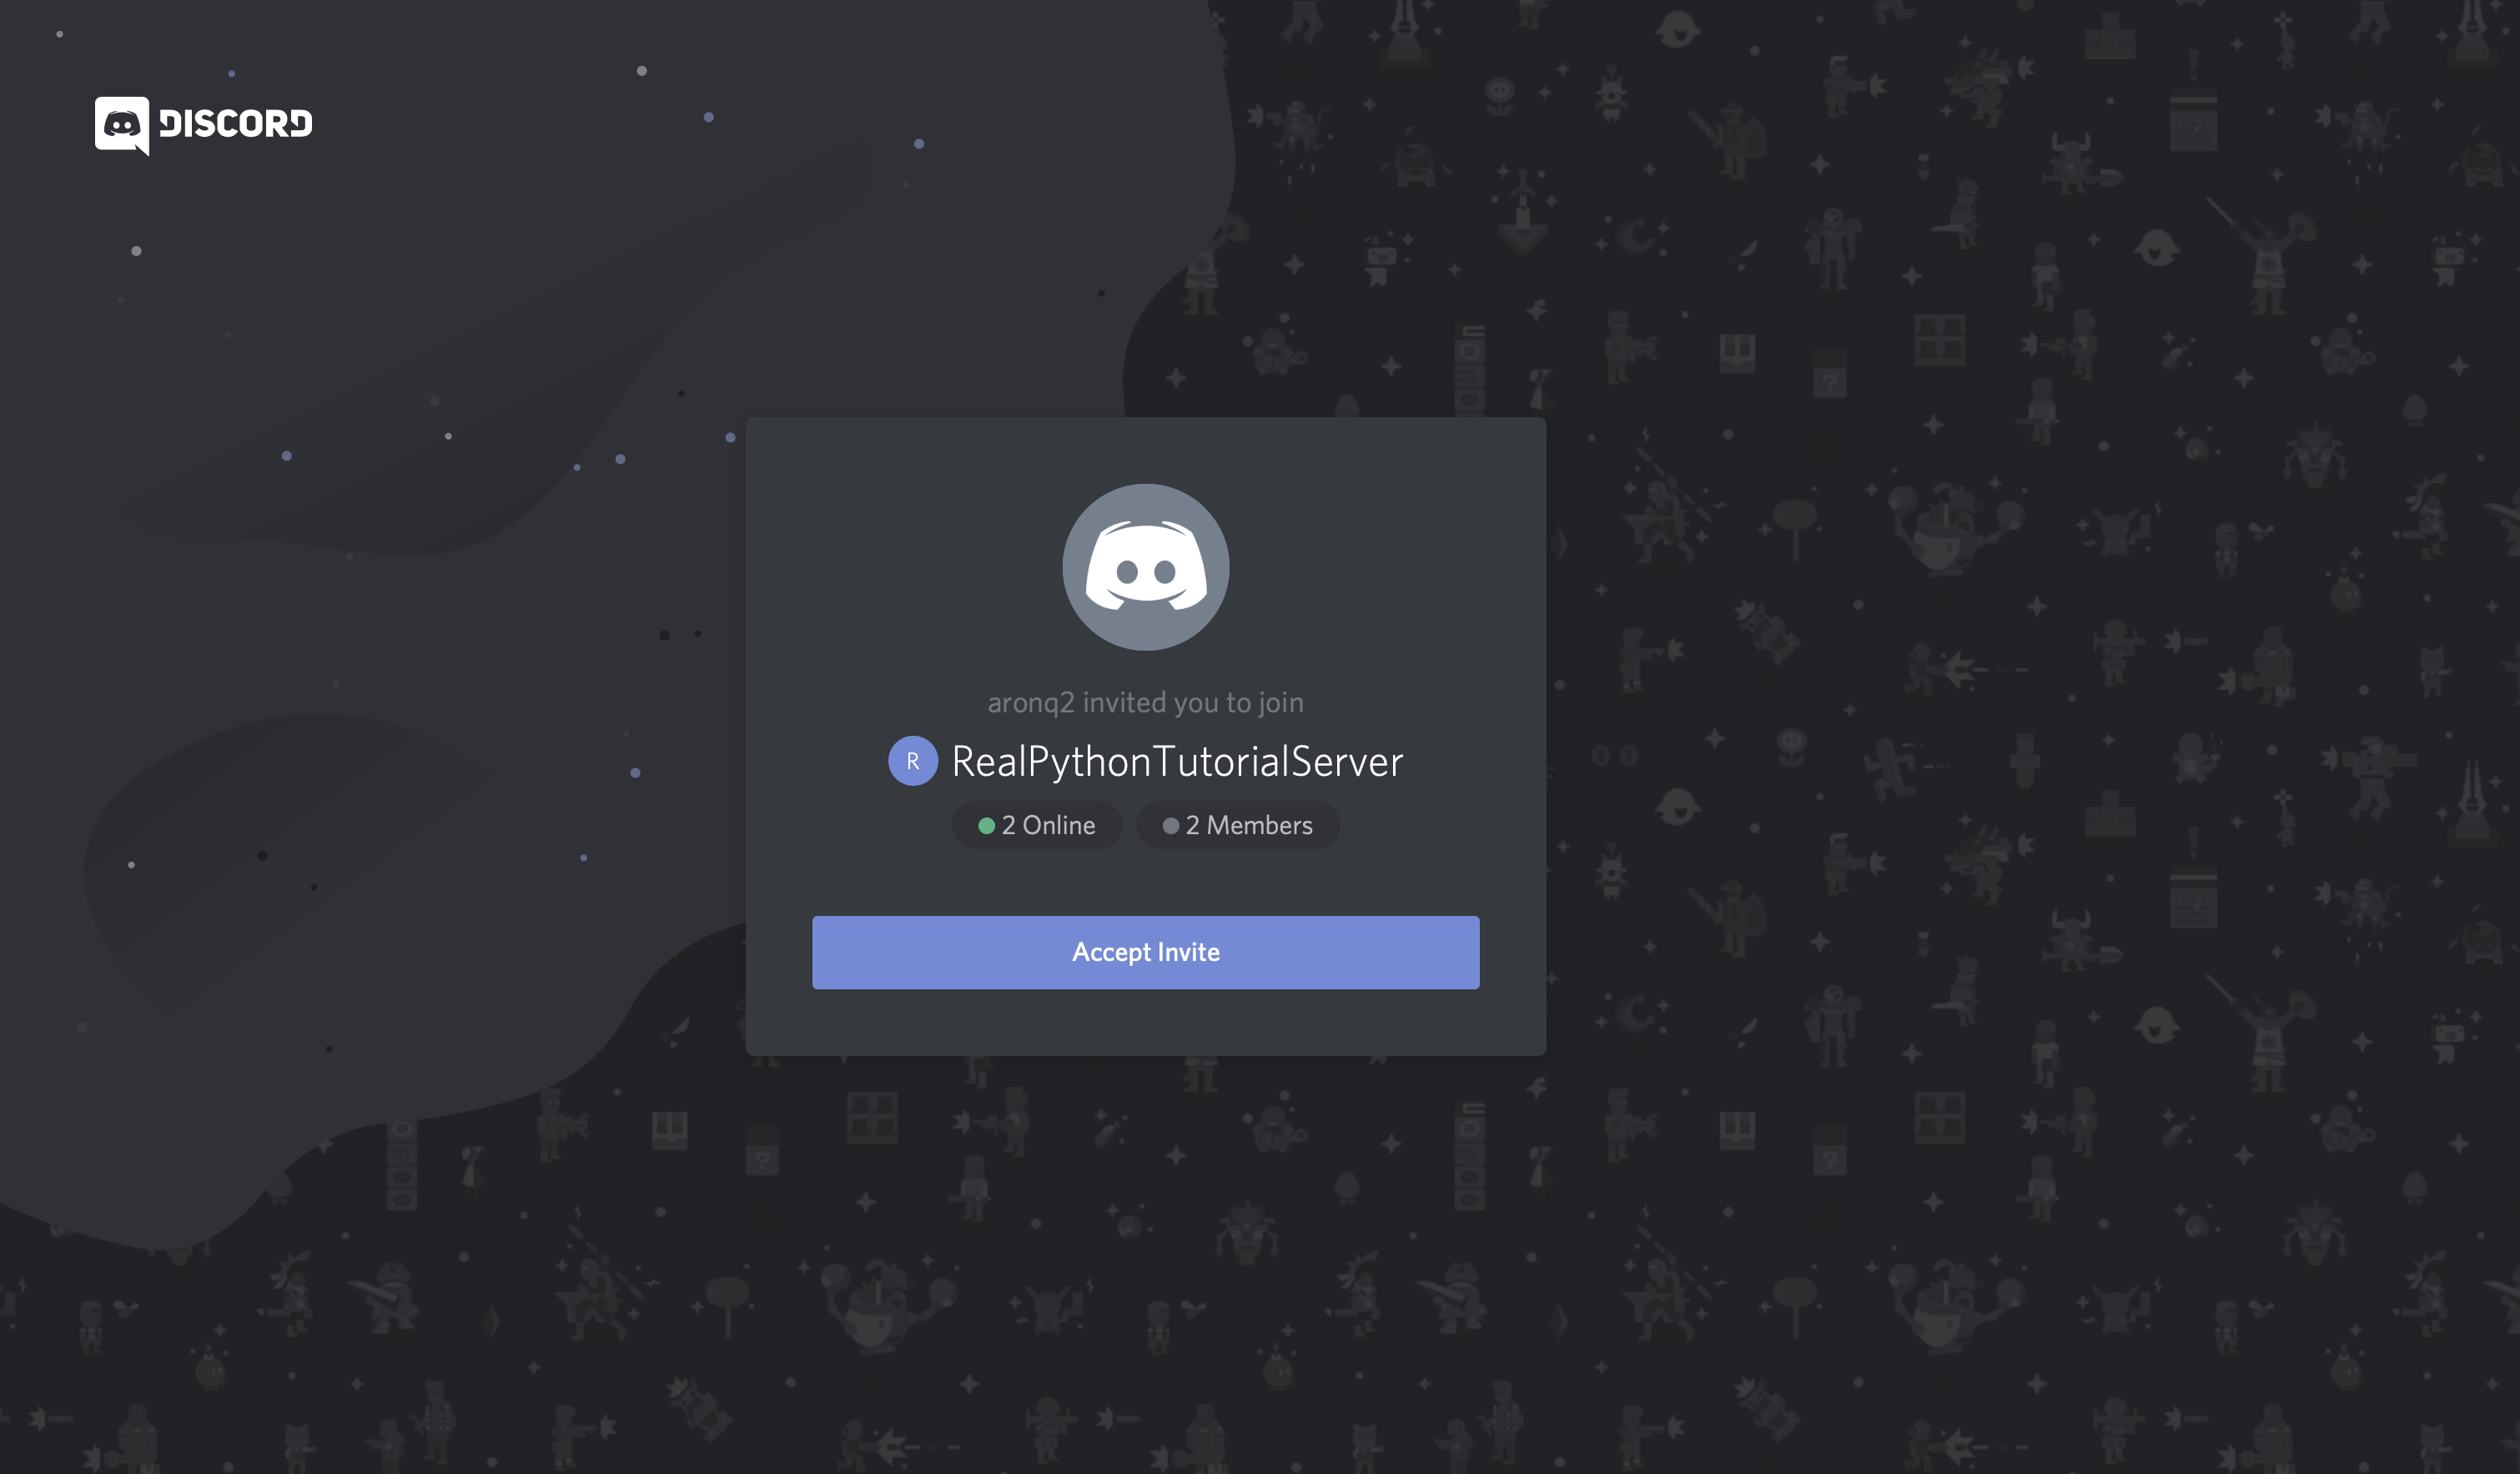
Now, with the invite link copied, create a new account and join the guild using your invite link:
First, you’ll see that Discord introduced you to the guild by default with an automated message. More importantly though, notice the badge on the left-hand side of the screen that notifies you of a new message:
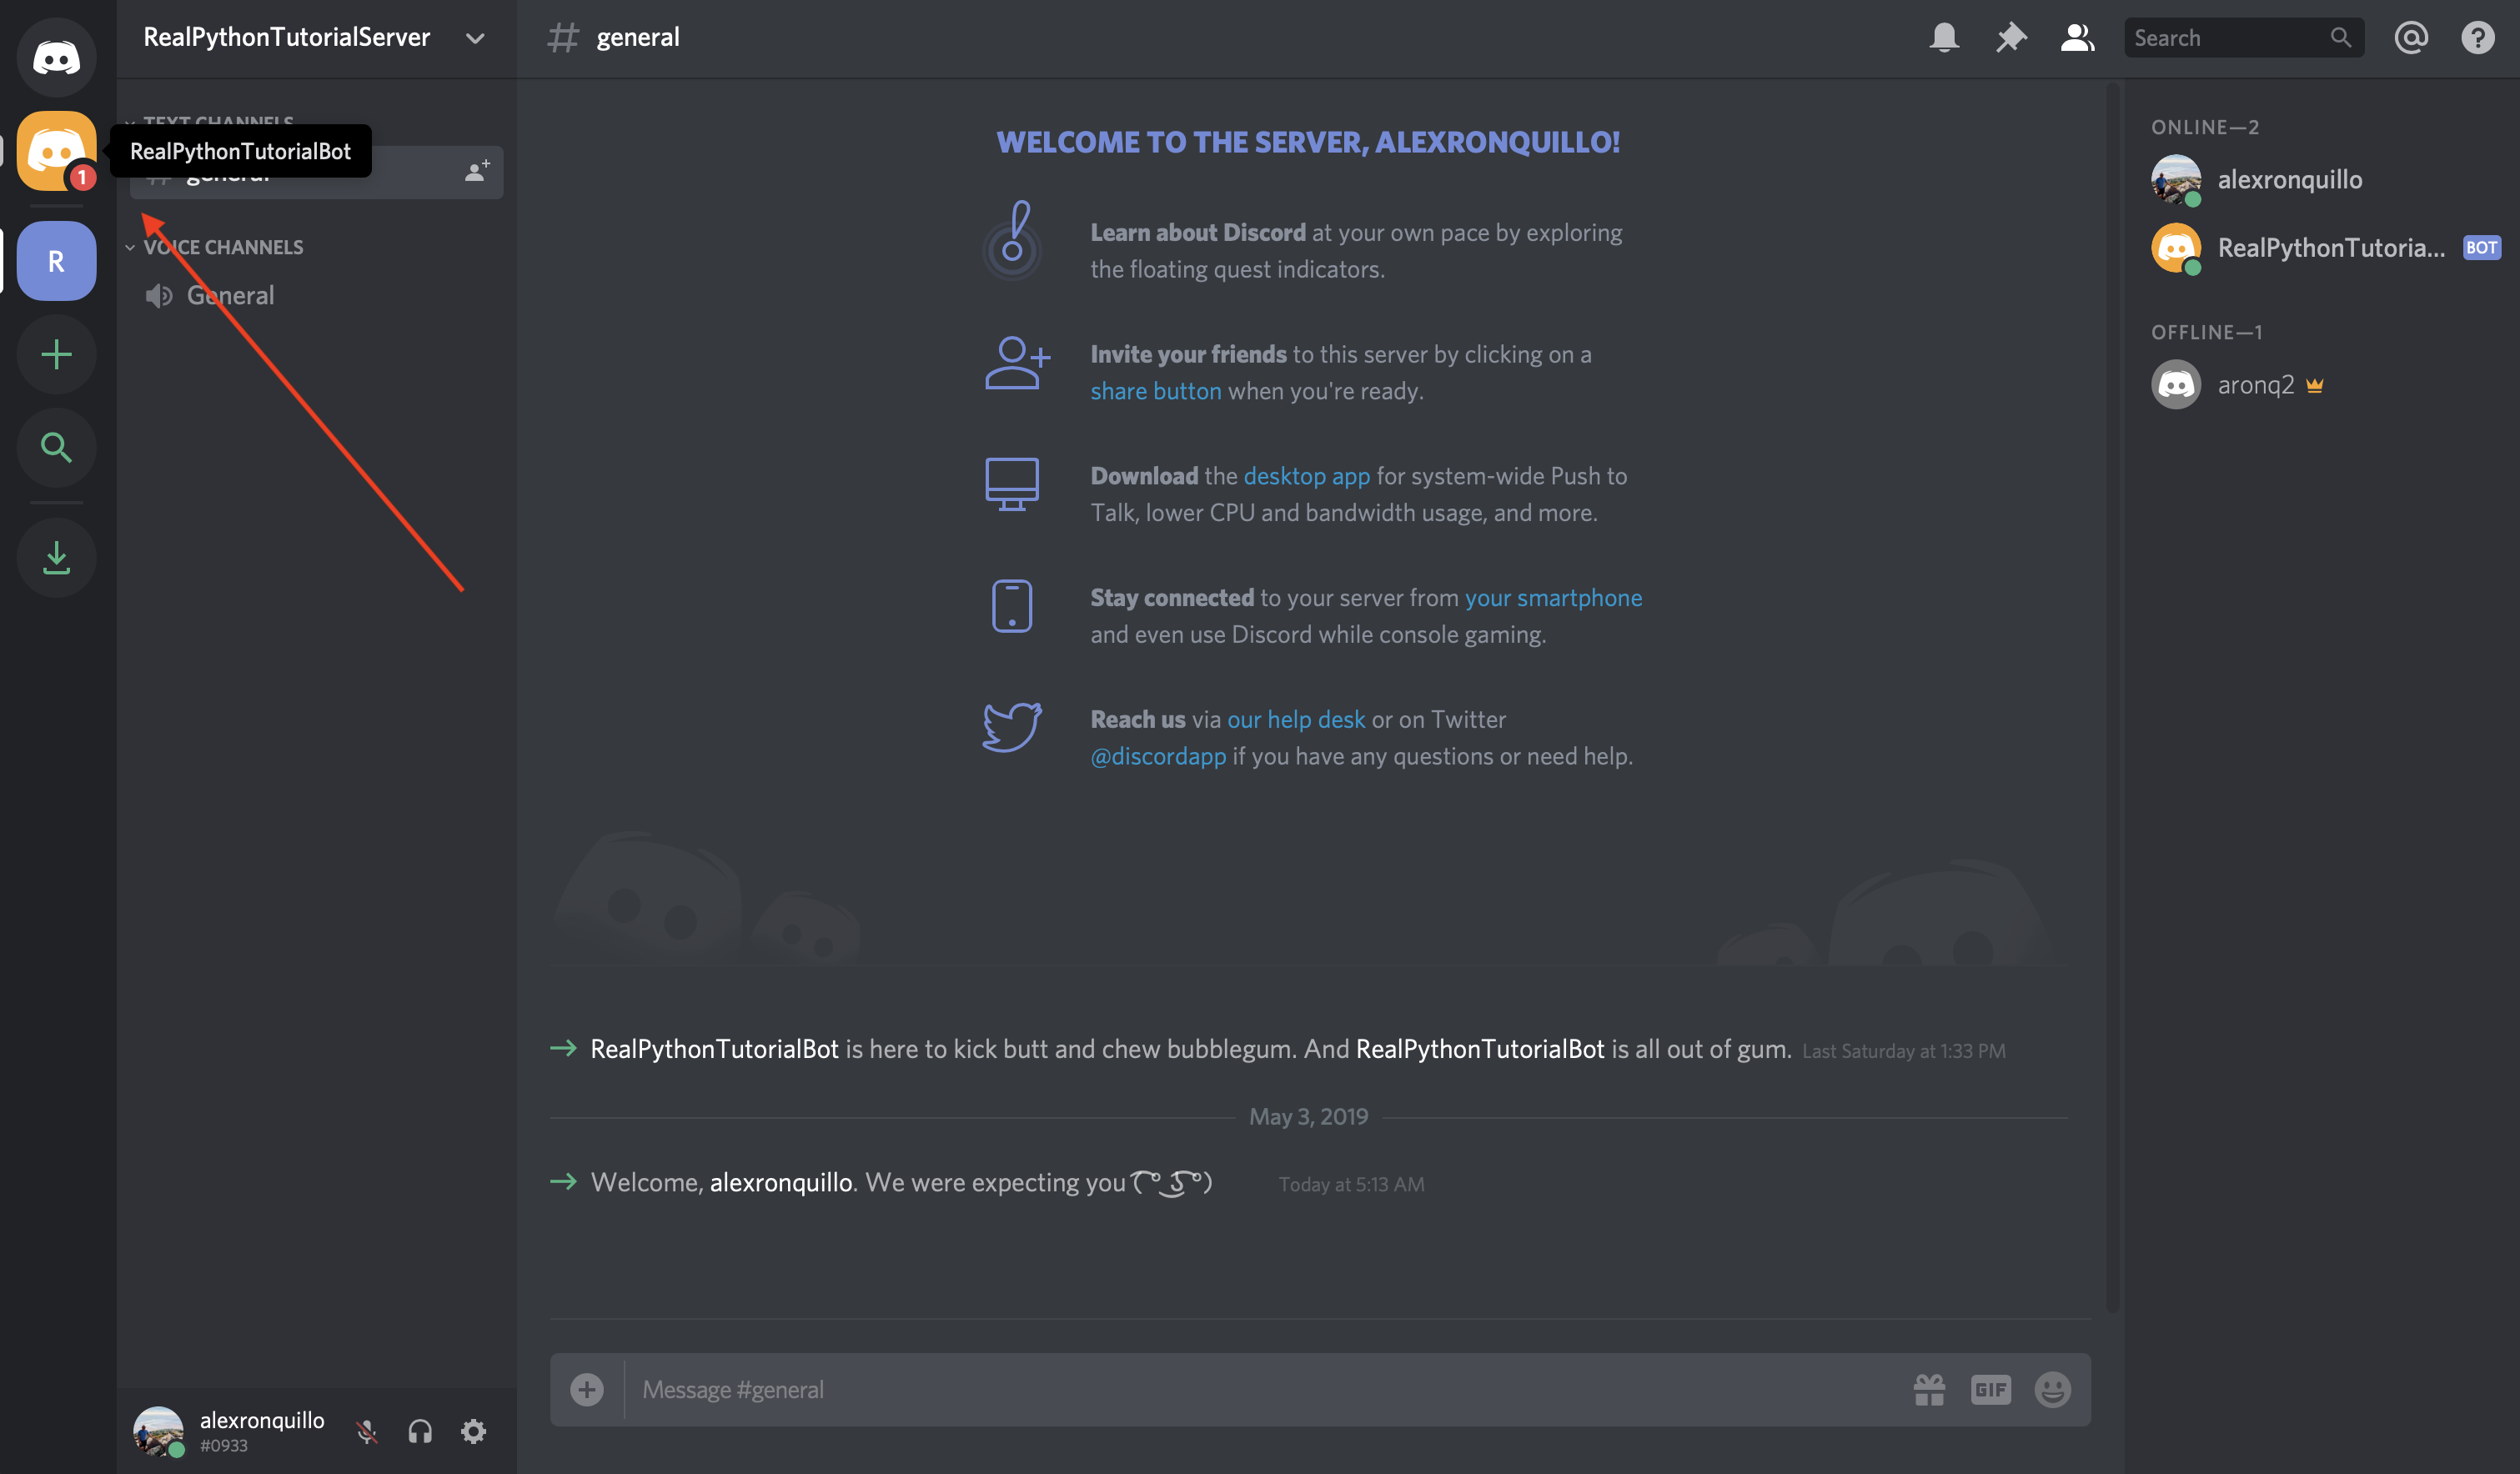
When you select it, you’ll see a private message from your bot user:
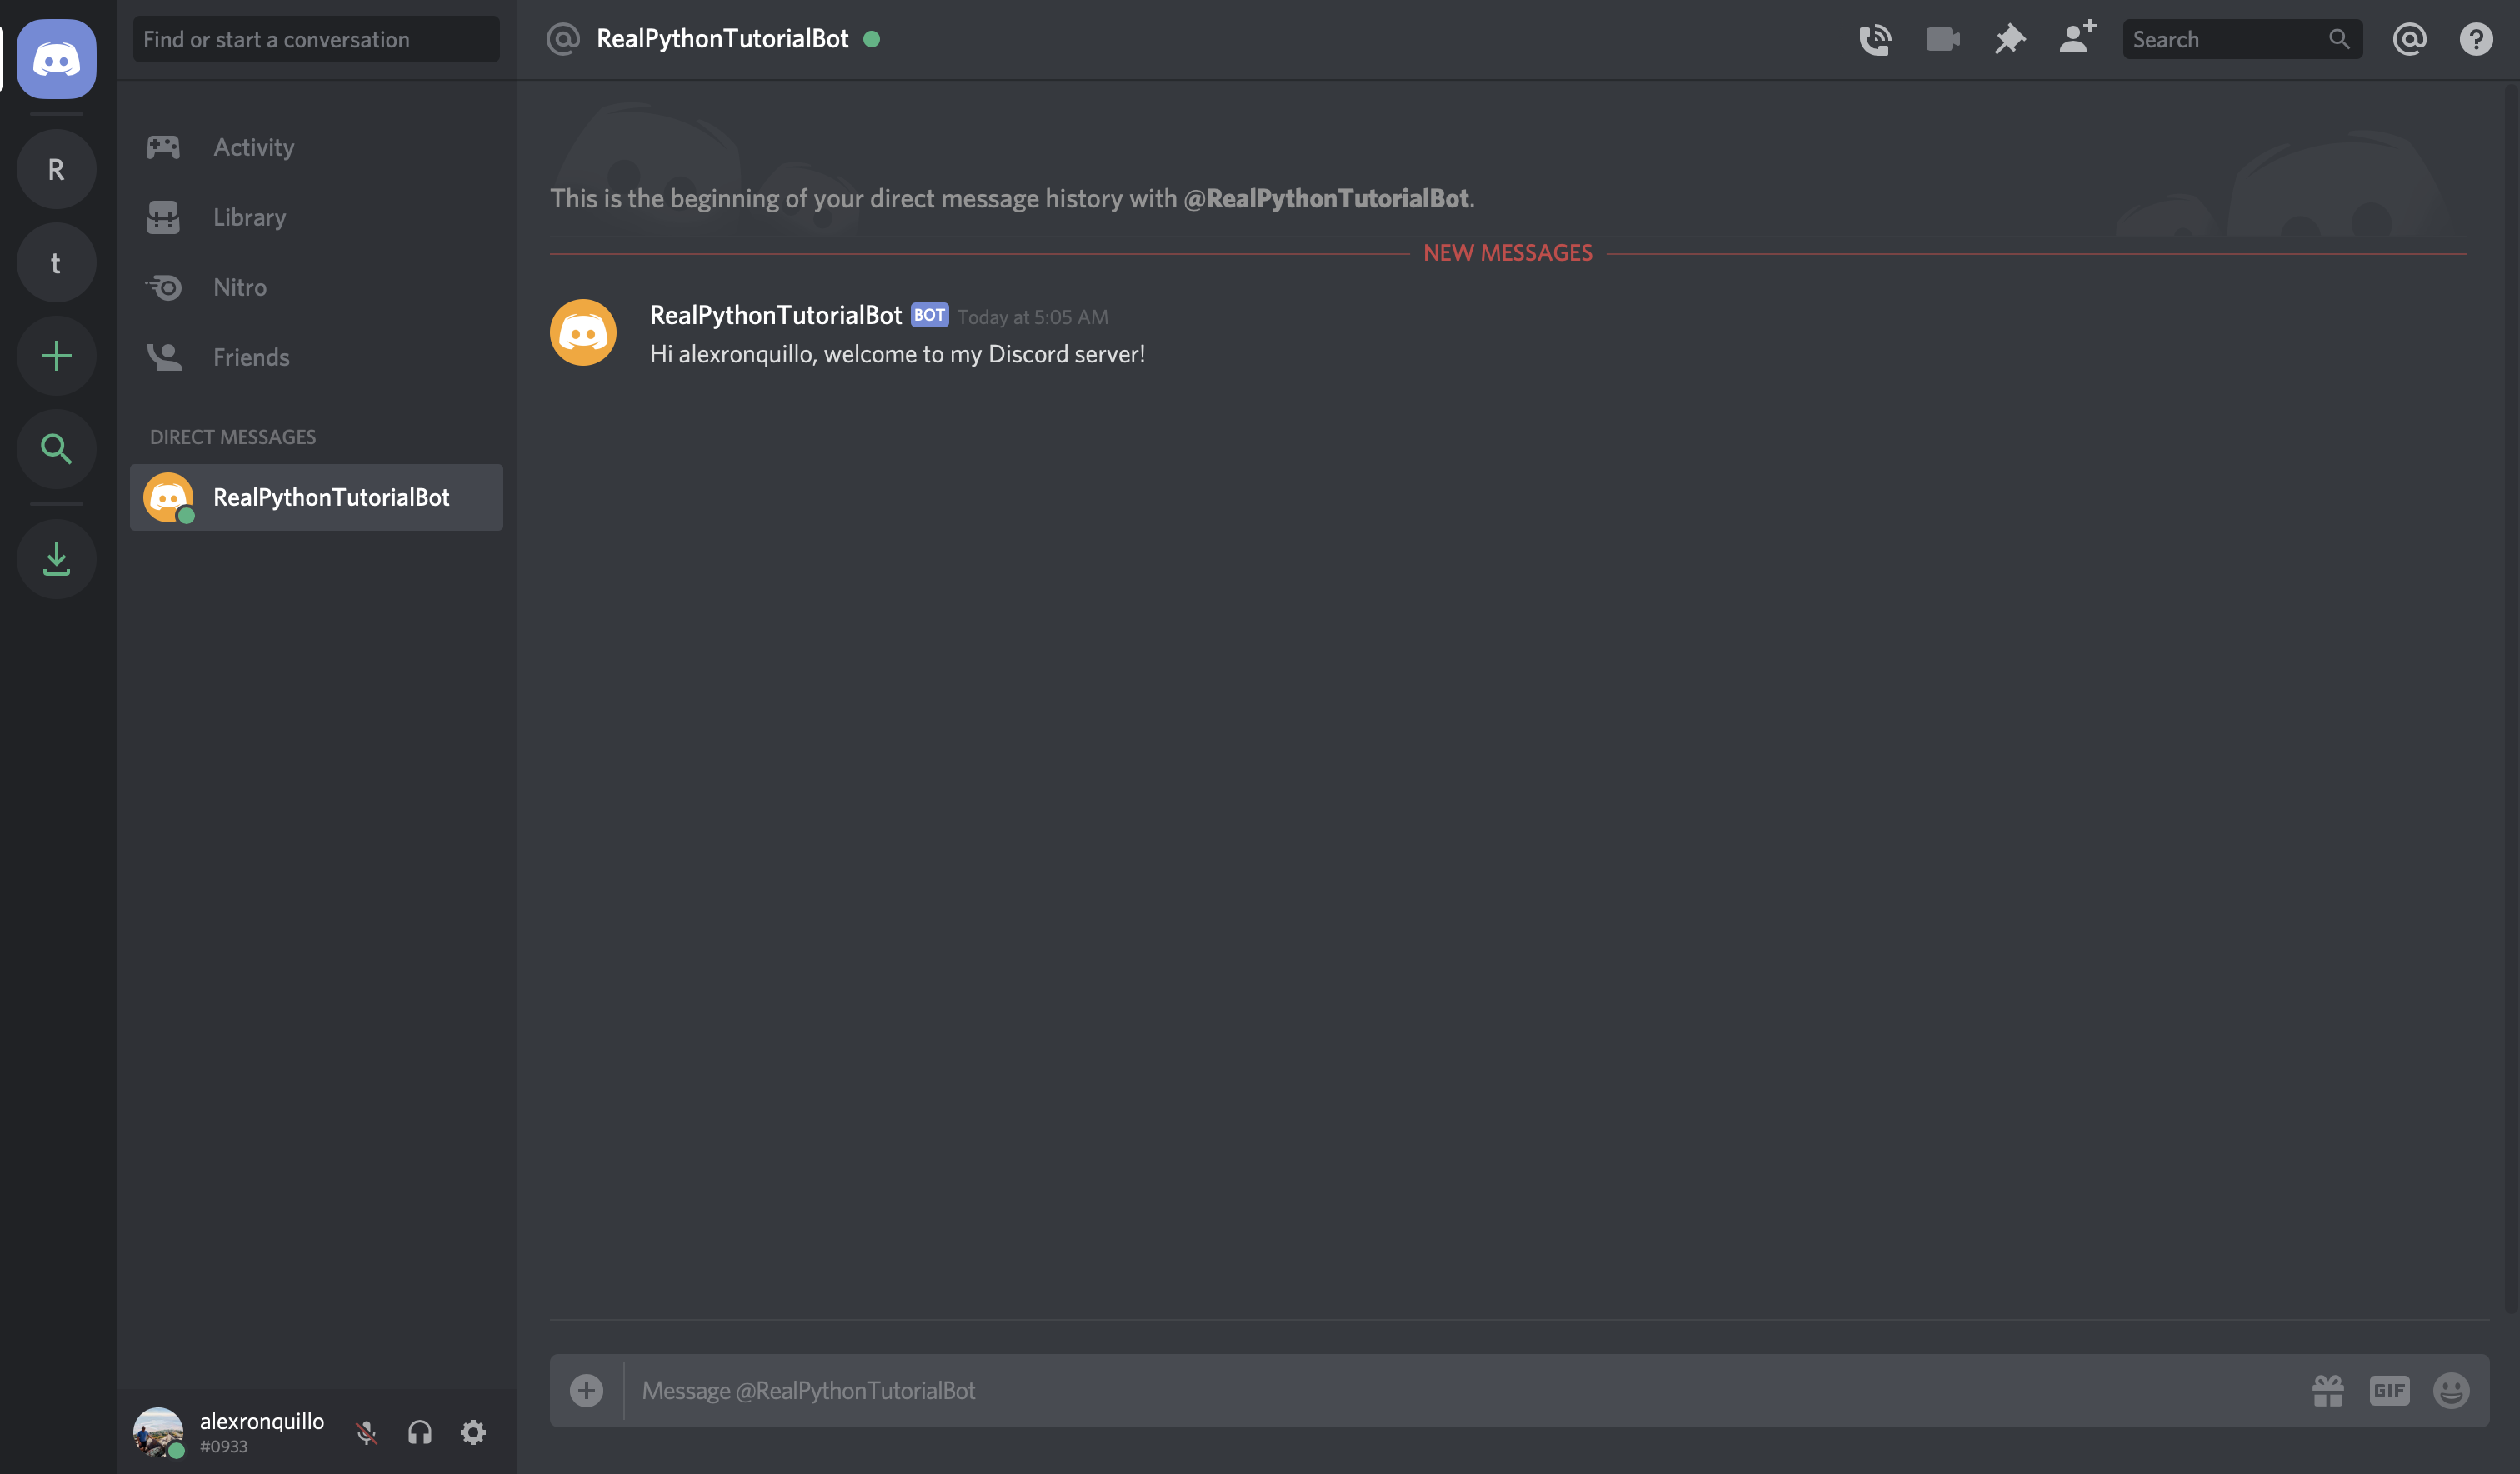
Perfect! Your bot user is now interacting with other users with minimal code.
Next, you’ll learn how to respond to specific user messages in the chat.
Responding to Messages
Let’s add on to the previous functionality of your bot by handling the on_message() event.
on_message() occurs when a message is posted in a channel that your bot has access to. In this example, you’ll respond to the message '99!' with a one-liner from the television show Brooklyn Nine-Nine:
@client.event
async def on_message(message):
    if message.author == client.user:
        return

    brooklyn_99_quotes = [
        'I'm the human form of the 💯 emoji.',
        'Bingpot!',
        (
            'Cool. Cool cool cool cool cool cool cool, '
            'no doubt no doubt no doubt no doubt.'
        ),
    ]

    if message.content == '99!':
        response = random.choice(brooklyn_99_quotes)
        await message.channel.send(response)
The bulk of this event handler looks at the message.content, checks to see if it’s equal to '99!', and responds by sending a random quote to the message’s channel if it is.
The other piece is an important one:
if message.author == client.user:
    return
Because a Client can’t tell the difference between a bot user and a normal user account, your on_message() handler should protect against a potentially recursive case where the bot sends a message that it might, itself, handle.
To illustrate, let’s say you want your bot to listen for users telling each other 'Happy Birthday'. You could implement your on_message() handler like this:
@client.event
async def on_message(message):
    if 'happy birthday' in message.content.lower():
        await message.channel.send('Happy Birthday! 🎈🎉')
Aside from the potentially spammy nature of this event handler, it also has a devastating side effect. The message that the bot responds with contains the same message it’s going to handle!
So, if one person in the channel tells another “Happy Birthday,” then the bot will also chime in… again… and again… and again:

That’s why it’s important to compare the message.author to the client.user (your bot user), and ignore any of its own messages.
So, let’s fix bot.py:
# bot.py
import os
import random

import discord
from dotenv import load_dotenv

load_dotenv()
TOKEN = os.getenv('DISCORD_TOKEN')

client = discord.Client()

@client.event
async def on_ready():
    print(f'{client.user.name} has connected to Discord!')

@client.event
async def on_member_join(member):
    await member.create_dm()
    await member.dm_channel.send(
        f'Hi {member.name}, welcome to my Discord server!'
    )

@client.event
async def on_message(message):
    if message.author == client.user:
        return

    brooklyn_99_quotes = [
        'I'm the human form of the 💯 emoji.',
        'Bingpot!',
        (
            'Cool. Cool cool cool cool cool cool cool, '
            'no doubt no doubt no doubt no doubt.'
        ),
    ]

    if message.content == '99!':
        response = random.choice(brooklyn_99_quotes)
        await message.channel.send(response)

client.run(TOKEN)
Don’t forget to import random at the top of the module, since the on_message() handler utilizes random.choice().
Run the program:
$ python bot.py
RealPythonTutorialBot has connected to Discord!
Finally, head over to Discord to test it out:

Great! Now that you’ve seen a few different ways to handle some common Discord events, you’ll learn how to deal with errors that event handlers may raise.
Handling Exceptions
As you’ve seen already, discord.py is an event-driven system. This focus on events extends even to exceptions. When one event handler raises an Exception, Discord calls on_error().
The default behavior of on_error() is to write the error message and stack trace to stderr. To test this, add a special message handler to on_message():
# bot.py
import os
import random

import discord
from dotenv import load_dotenv

load_dotenv()
TOKEN = os.getenv('DISCORD_TOKEN')

client = discord.Client()

@client.event
async def on_ready():
    print(f'{client.user.name} has connected to Discord!')

@client.event
async def on_member_join(member):
    await member.create_dm()
    await member.dm_channel.send(
        f'Hi {member.name}, welcome to my Discord server!'
    )

@client.event
async def on_message(message):
    if message.author == client.user:
        return

    brooklyn_99_quotes = [
        'I'm the human form of the 💯 emoji.',
        'Bingpot!',
        (
            'Cool. Cool cool cool cool cool cool cool, '
            'no doubt no doubt no doubt no doubt.'
        ),
    ]

    if message.content == '99!':
        response = random.choice(brooklyn_99_quotes)
        await message.channel.send(response)
    elif message.content == 'raise-exception':
        raise discord.DiscordException

client.run(TOKEN)
The new raise-exception message handler allows you to raise a DiscordException on command.
Run the program and type raise-exception into the Discord channel:
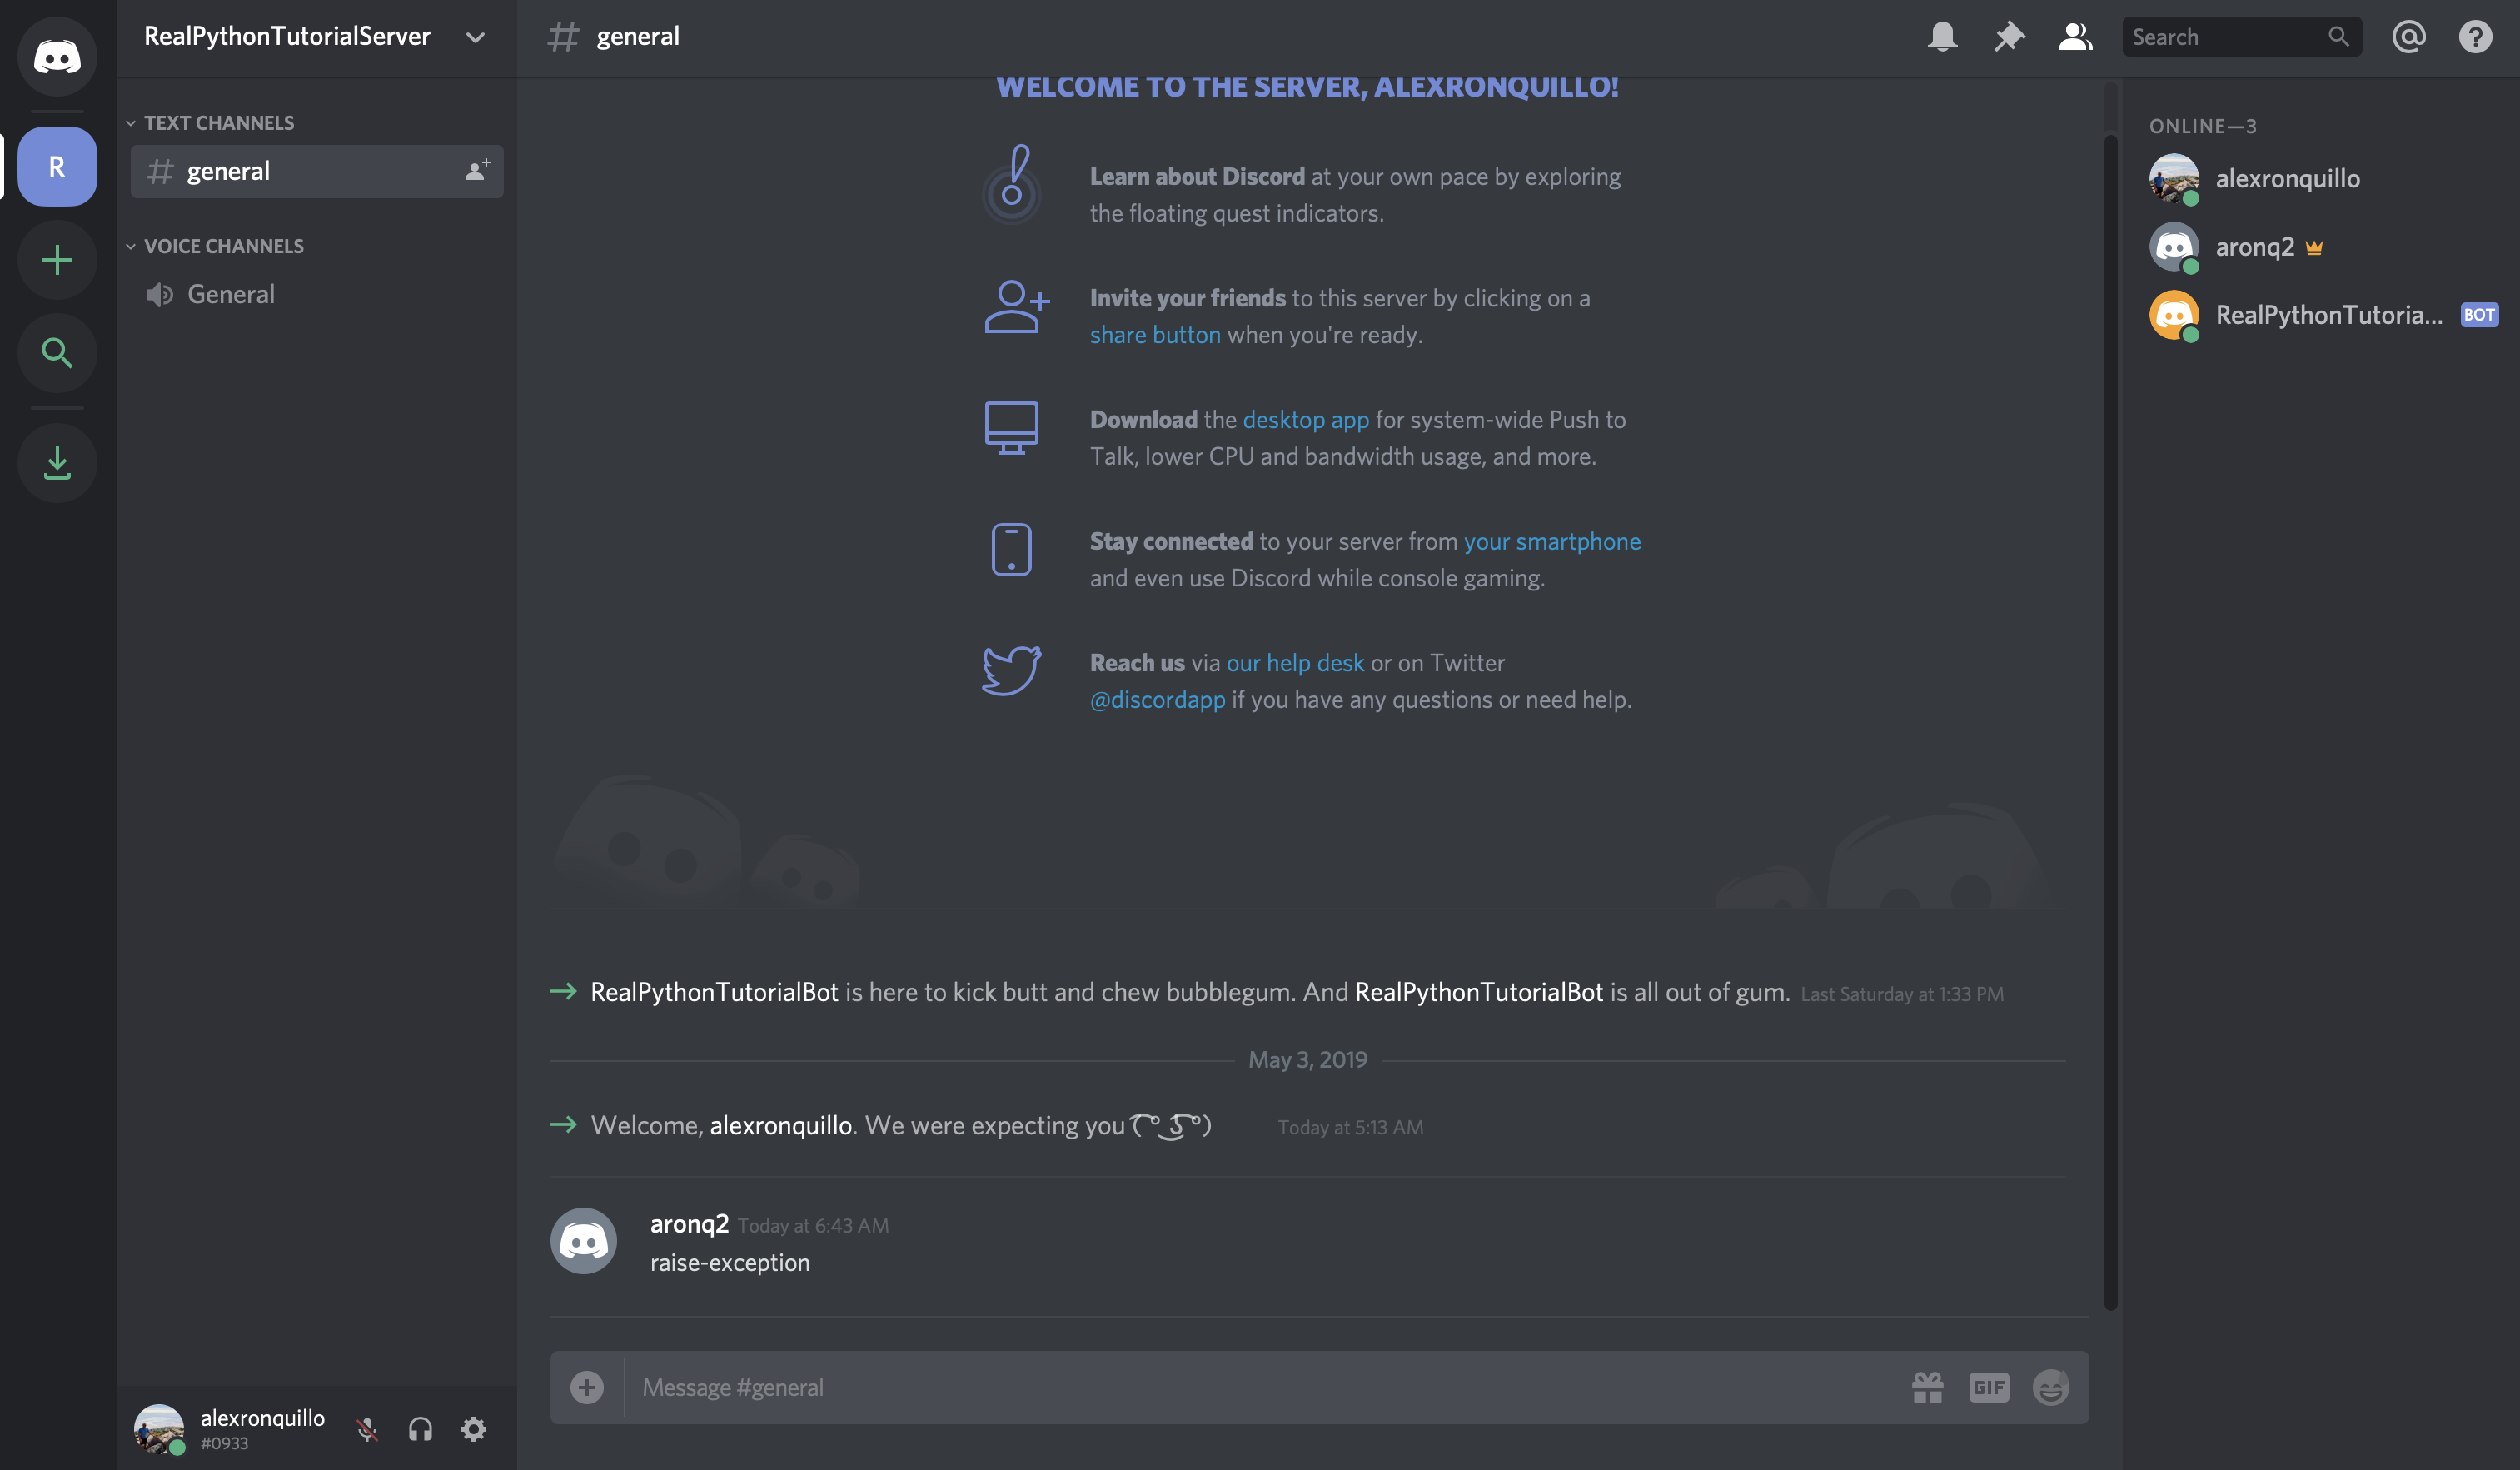
You should now see the Exception that was raised by your on_message() handler in the console:
$ python bot.py
RealPythonTutorialBot has connected to Discord!
Ignoring exception in on_message
Traceback (most recent call last):
  File "/Users/alex.ronquillo/.pyenv/versions/discord-venv/lib/python3.7/site-packages/discord/client.py", line 255, in _run_event
    await coro(*args, **kwargs)
  File "bot.py", line 42, in on_message
    raise discord.DiscordException
discord.errors.DiscordException
The exception was caught by the default error handler, so the output contains the message Ignoring exception in on_message. Let’s fix that by handling that particular error. To do so, you’ll catch the DiscordException and write it to a file instead.
The on_error() event handler takes the event as the first argument. In this case, we expect the event to be 'on_message'. It also accepts *args and **kwargs as flexible, positional and keyword arguments passed to the original event handler.
So, since on_message() takes a single argument, message, we expect args[0] to be the message that the user sent in the Discord channel:
@client.event
async def on_error(event, *args, **kwargs):
    with open('err.log', 'a') as f:
        if event == 'on_message':
            f.write(f'Unhandled message: {args[0]}n')
        else:
            raise
If the Exception originated in the on_message() event handler, you .write() a formatted string to the file err.log. If another event raises an Exception, then we simply want our handler to re-raise the exception to invoke the default behavior.
Run bot.py and send the raise-exception message again to view the output in err.log:
$ cat err.log
Unhandled message: <Message id=573845548923224084 pinned=False author=<Member id=543612676807327754 name='alexronquillo' discriminator='0933' bot=False nick=None guild=<Guild id=571759877328732195 name='RealPythonTutorialServer' chunked=True>>>
Instead of only a stack trace, you have a more informative error, showing the message that caused on_message() to raise the DiscordException, saved to a file for longer persistence.
Now that you have some experience handling different events and interacting with Discord APIs, you’ll learn about a subclass of Client called Bot, which implements some handy, bot-specific functionality.
Connecting a Bot
A Bot is a subclass of Client that adds a little bit of extra functionality that is useful when you’re creating bot users. For example, a Bot can handle events and commands, invoke validation checks, and more.
Before you get into the features specific to Bot, convert bot.py to use a Bot instead of a Client:
# bot.py
import os
import random
from dotenv import load_dotenv

# 1
from discord.ext import commands

load_dotenv()
TOKEN = os.getenv('DISCORD_TOKEN')

# 2
bot = commands.Bot(command_prefix='!')

@bot.event
async def on_ready():
    print(f'{bot.user.name} has connected to Discord!')

bot.run(TOKEN)
As you can see, Bot can handle events the same way that Client does. However, notice the differences between Client and Bot:
Botis imported from thediscord.ext.commandsmodule.- The
Botinitializer requires acommand_prefix, which you’ll learn more about in the next section.
The extensions library, ext, offers several interesting components to help you create a Discord Bot. One such component is the Command.
Using Bot Commands
In general terms, a command is an order that a user gives to a bot so that it will do something. Commands are different from events because they are:
- Arbitrarily defined
- Directly called by the user
- Flexible, in terms of their interface
In technical terms, a Command is an object that wraps a function that is invoked by a text command in Discord. The text command must start with the command_prefix, defined by the Bot object.
Let’s take a look at an old event to better understand what this looks like:
# bot.py
import os
import random

import discord
from dotenv import load_dotenv

load_dotenv()
TOKEN = os.getenv('DISCORD_TOKEN')

client = discord.Client()

@client.event
async def on_message(message):
    if message.author == client.user:
        return

    brooklyn_99_quotes = [
        'I'm the human form of the 💯 emoji.',
        'Bingpot!',
        (
            'Cool. Cool cool cool cool cool cool cool, '
            'no doubt no doubt no doubt no doubt.'
        ),
    ]

    if message.content == '99!':
        response = random.choice(brooklyn_99_quotes)
        await message.channel.send(response)

client.run(TOKEN)
Here, you created an on_message() event handler, which receives the message string and compares it to a pre-defined option: '99!'.
Using a Command, you can convert this example to be more specific:
# bot.py
import os
import random

from discord.ext import commands
from dotenv import load_dotenv

load_dotenv()
TOKEN = os.getenv('DISCORD_TOKEN')

bot = commands.Bot(command_prefix='!')

@bot.command(name='99')
async def nine_nine(ctx):
    brooklyn_99_quotes = [
        'I'm the human form of the 💯 emoji.',
        'Bingpot!',
        (
            'Cool. Cool cool cool cool cool cool cool, '
            'no doubt no doubt no doubt no doubt.'
        ),
    ]

    response = random.choice(brooklyn_99_quotes)
    await ctx.send(response)

bot.run(TOKEN)
There are several important characteristics to understand about using Command:
-
Instead of using
bot.eventlike before, you usebot.command(), passing the invocation command (name) as its argument. -
The function will now only be called when
!99is mentioned in chat. This is different than theon_message()event, which was executed any time a user sent a message, regardless of the content. -
The command must be prefixed with the exclamation point (
!) because that’s thecommand_prefixthat you defined in the initializer for yourBot. -
Any
Commandfunction (technically called acallback) must accept at least one parameter, calledctx, which is theContextsurrounding the invokedCommand.
A Context holds data such as the channel and guild that the user called the Command from.
Run the program:
With your bot running, you can now head to Discord to try out your new command:
From the user’s point of view, the practical difference is that the prefix helps formalize the command, rather than simply reacting to a particular on_message() event.
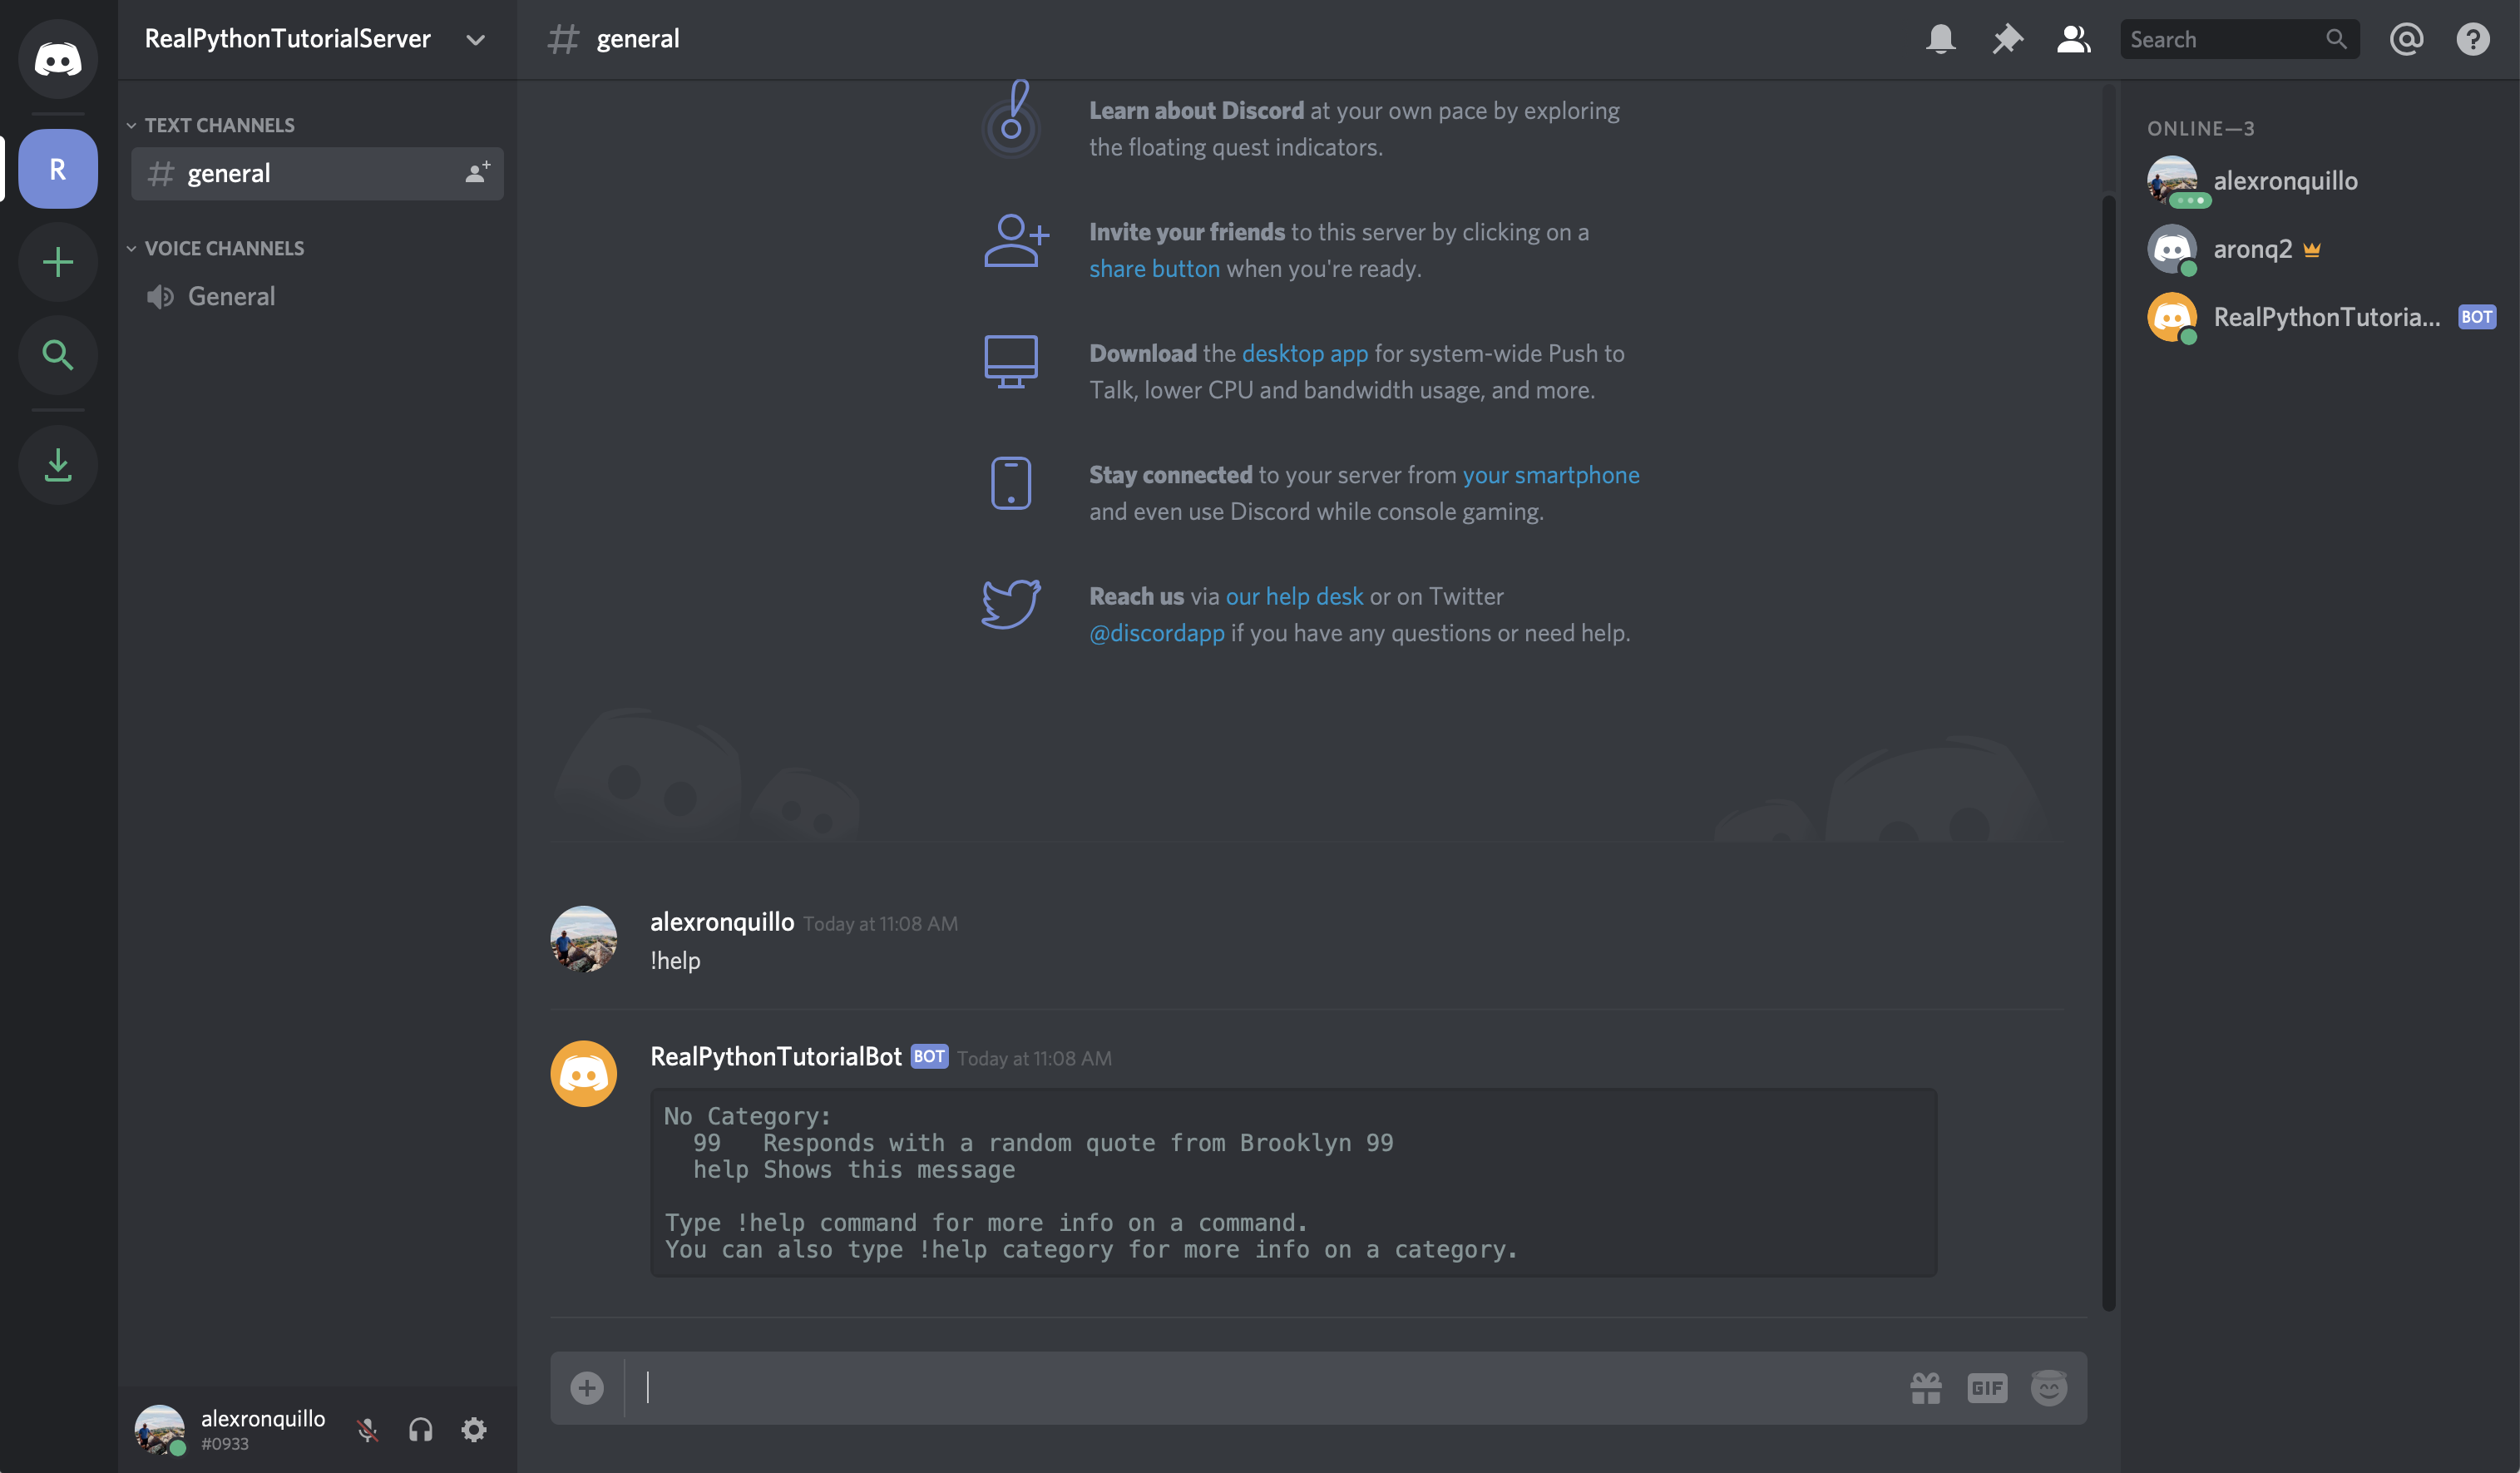
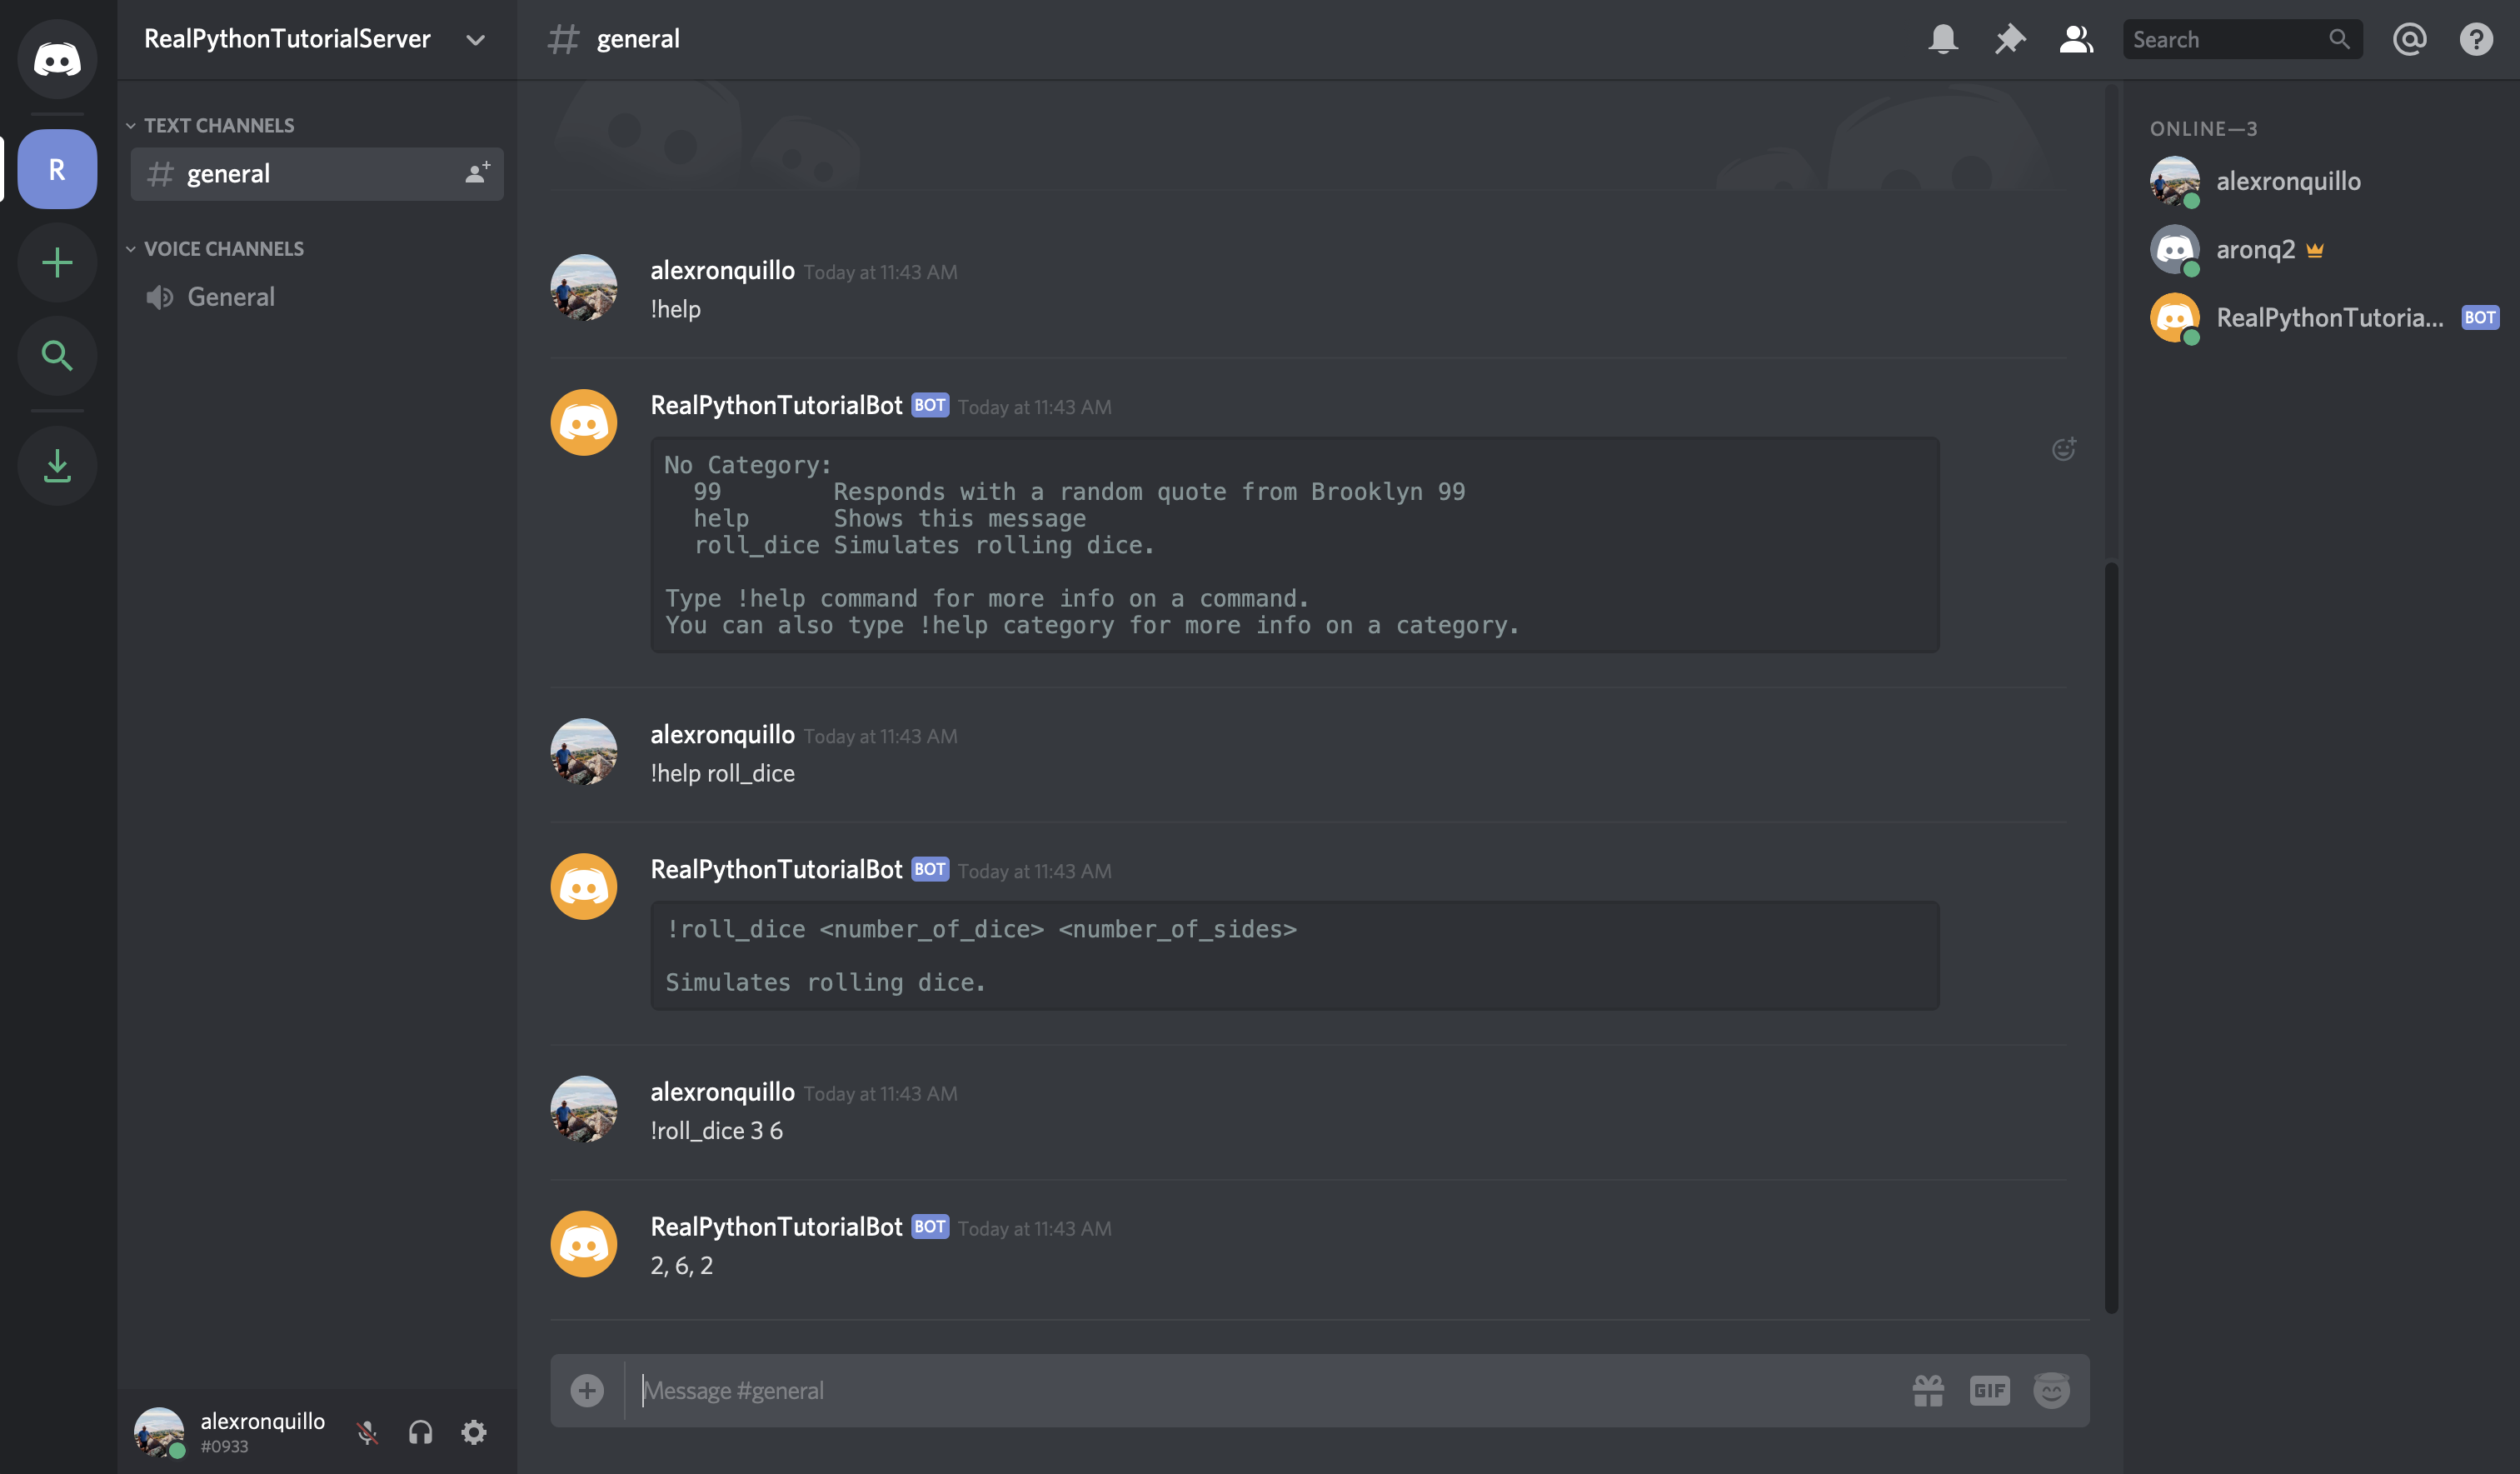
This comes with other great benefits as well. For example, you can invoke the !help command to see all the commands that your Bot handles:
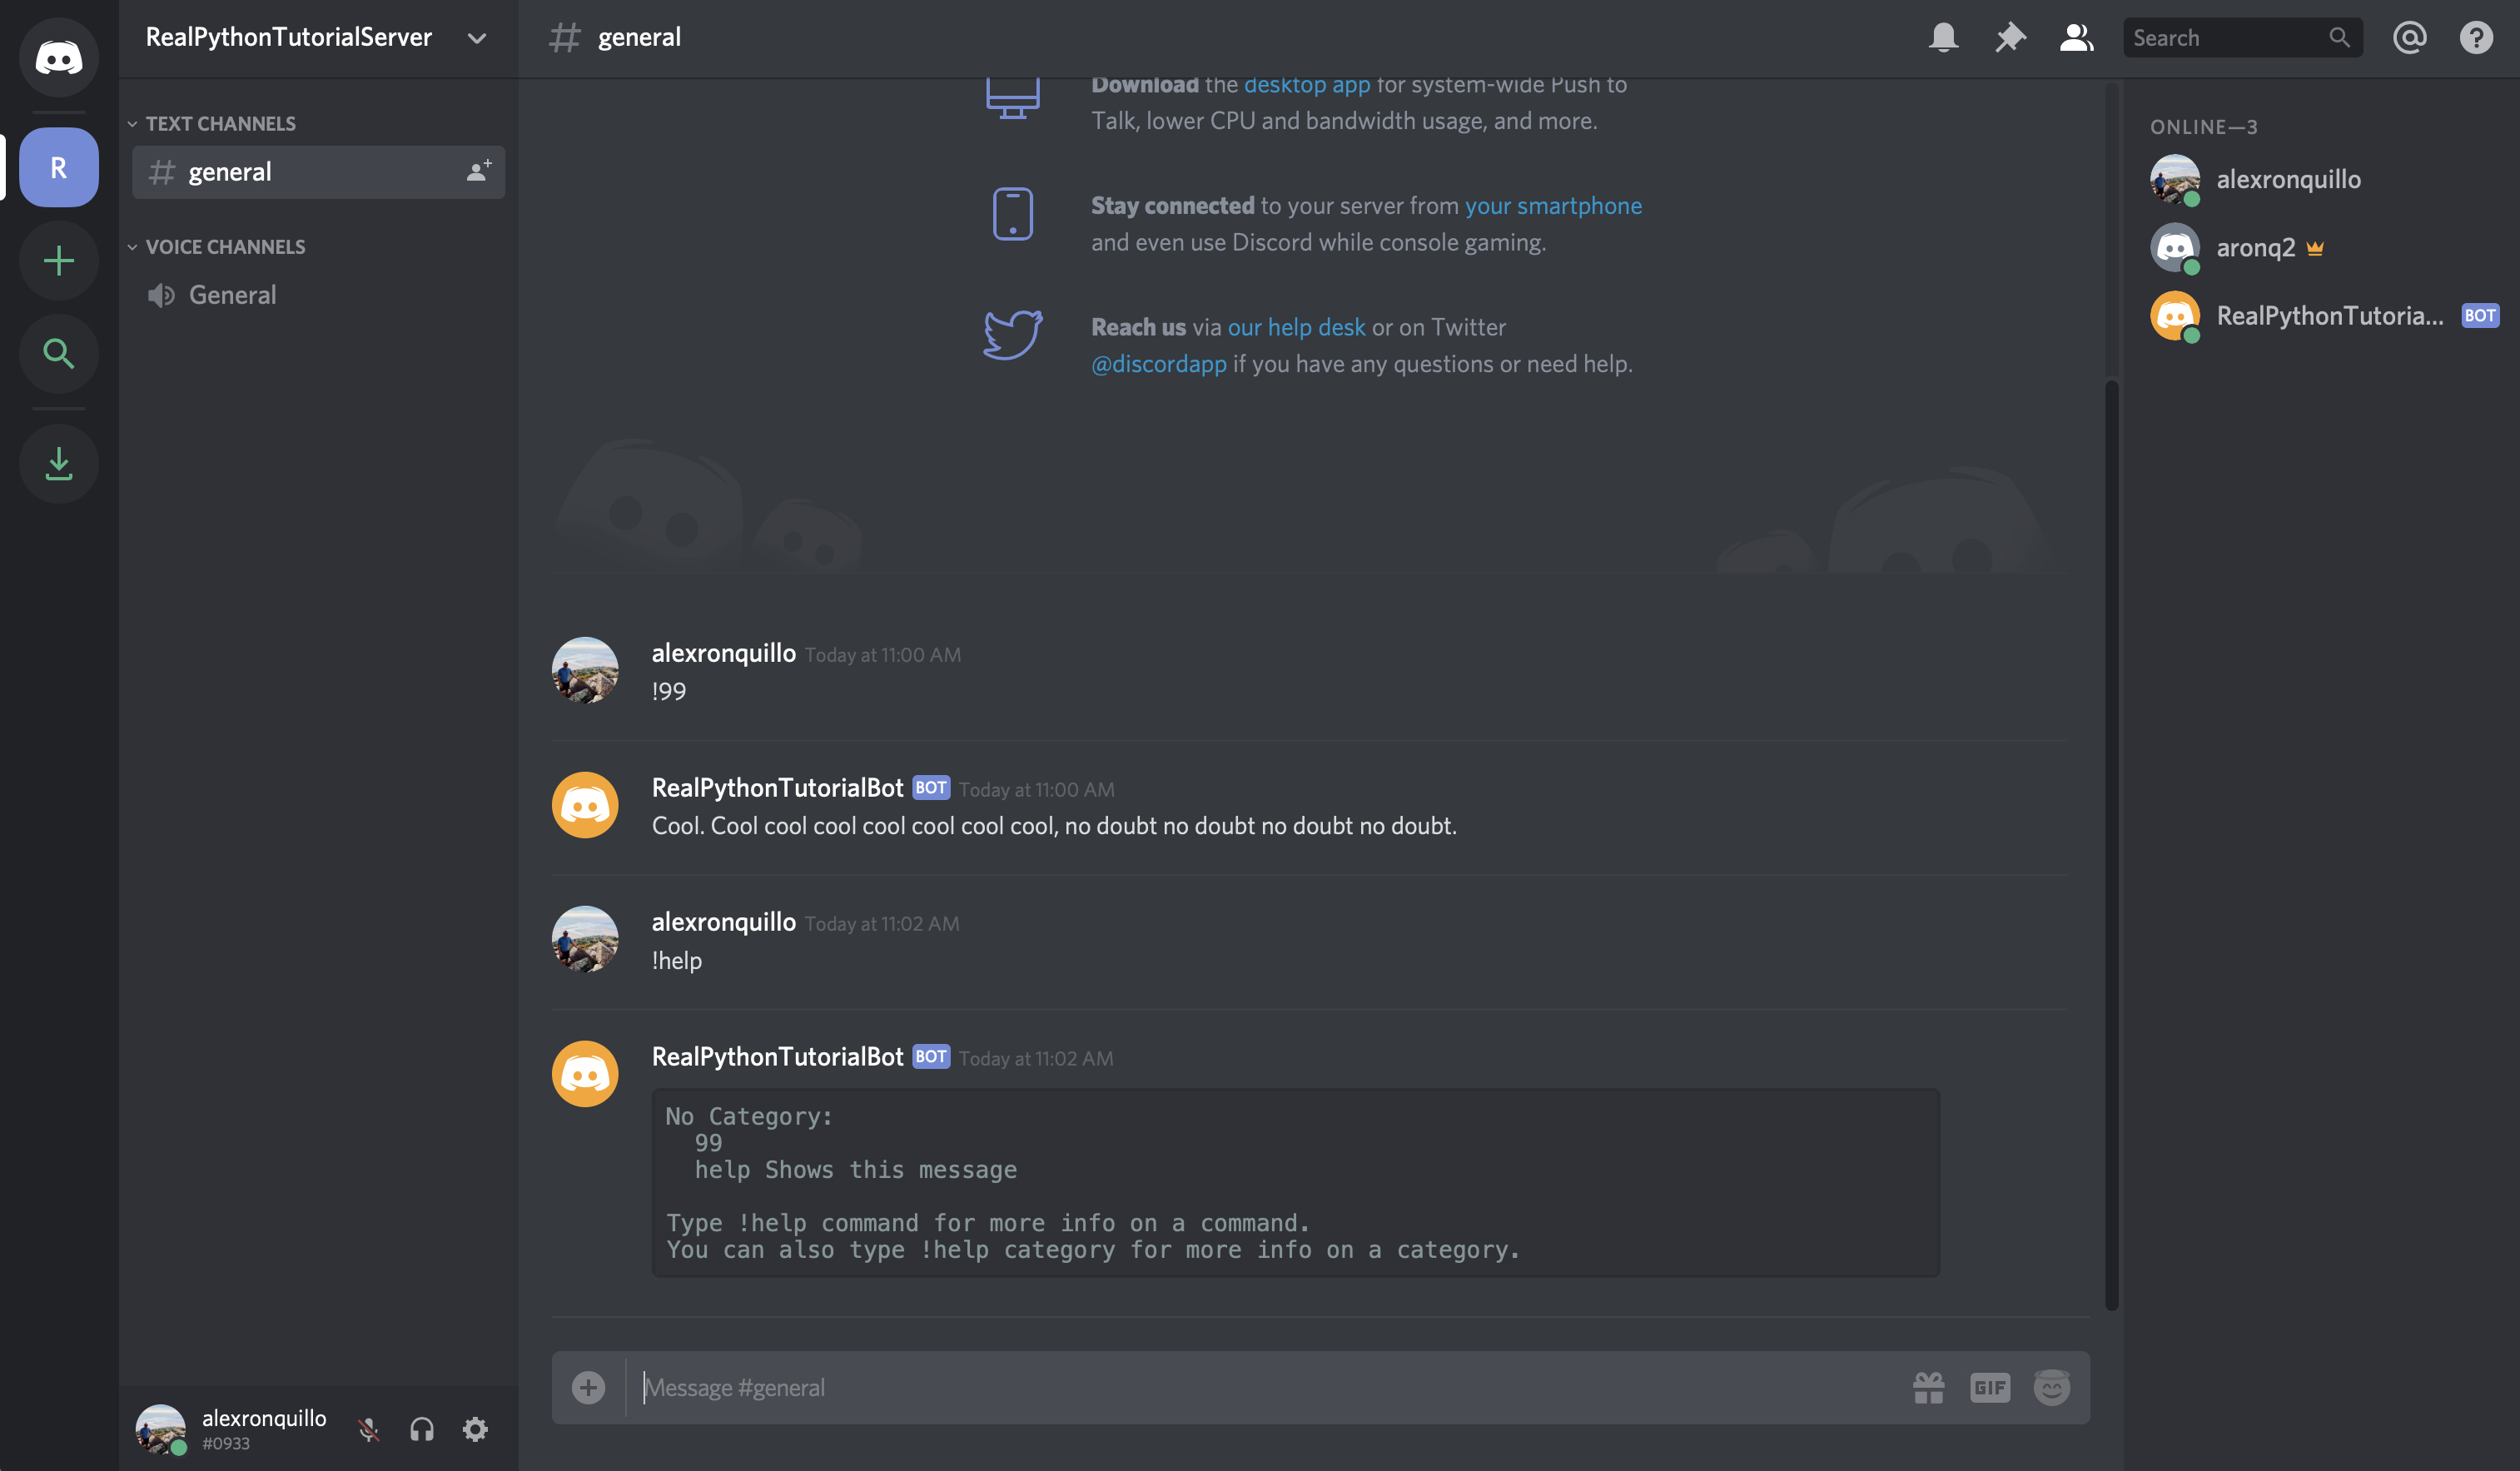
If you want to add a description to your command so that the help message is more informative, simply pass a help description to the .command() decorator:
# bot.py
import os
import random

from discord.ext import commands
from dotenv import load_dotenv

load_dotenv()
TOKEN = os.getenv('DISCORD_TOKEN')

bot = commands.Bot(command_prefix='!')

@bot.command(name='99', help='Responds with a random quote from Brooklyn 99')
async def nine_nine(ctx):
    brooklyn_99_quotes = [
        'I'm the human form of the 💯 emoji.',
        'Bingpot!',
        (
            'Cool. Cool cool cool cool cool cool cool, '
            'no doubt no doubt no doubt no doubt.'
        ),
    ]

    response = random.choice(brooklyn_99_quotes)
    await ctx.send(response)

bot.run(TOKEN)
Now, when the user invokes the !help command, your bot will present a description of your command:
Keep in mind that all of this functionality exists only for the Bot subclass, not the Client superclass.
Command has another useful functionality: the ability to use a Converter to change the types of its arguments.
Converting Parameters Automatically
Another benefit of using commands is the ability to convert parameters.
Sometimes, you require a parameter to be a certain type, but arguments to a Command function are, by default, strings. A Converter lets you convert those parameters to the type that you expect.
For example, if you want to build a Command for your bot user to simulate rolling some dice (knowing what you’ve learned so far), you might define it like this:
@bot.command(name='roll_dice', help='Simulates rolling dice.')
async def roll(ctx, number_of_dice, number_of_sides):
    dice = [
        str(random.choice(range(1, number_of_sides + 1)))
        for _ in range(number_of_dice)
    ]
    await ctx.send(', '.join(dice))
You defined roll to take two parameters:
- The number of dice to roll
- The number of sides per die
Then, you decorated it with .command() so that you can invoke it with the !roll_dice command. Finally, you .send() the results in a message back to the channel.
While this looks correct, it isn’t. Unfortunately, if you run bot.py, and invoke the !roll_dice command in your Discord channel, you’ll see the following error:
$ python bot.py
Ignoring exception in command roll_dice:
Traceback (most recent call last):
  File "/Users/alex.ronquillo/.pyenv/versions/discord-venv/lib/python3.7/site-packages/discord/ext/commands/core.py", line 63, in wrapped
    ret = await coro(*args, **kwargs)
  File "bot.py", line 40, in roll
    for _ in range(number_of_dice)
TypeError: 'str' object cannot be interpreted as an integer

The above exception was the direct cause of the following exception:

Traceback (most recent call last):
  File "/Users/alex.ronquillo/.pyenv/versions/discord-venv/lib/python3.7/site-packages/discord/ext/commands/bot.py", line 860, in invoke
    await ctx.command.invoke(ctx)
  File "/Users/alex.ronquillo/.pyenv/versions/discord-venv/lib/python3.7/site-packages/discord/ext/commands/core.py", line 698, in invoke
    await injected(*ctx.args, **ctx.kwargs)
  File "/Users/alex.ronquillo/.pyenv/versions/discord-venv/lib/python3.7/site-packages/discord/ext/commands/core.py", line 72, in wrapped
    raise CommandInvokeError(exc) from exc
discord.ext.commands.errors.CommandInvokeError: Command raised an exception: TypeError: 'str' object cannot be interpreted as an integer
In other words, range() can’t accept a str as an argument. Instead, it must be an int. While you could cast each value to an int, there is a better way: you can use a Converter .
In discord.py, a Converter is defined using Python 3’s function annotations:
@bot.command(name='roll_dice', help='Simulates rolling dice.')
async def roll(ctx, number_of_dice: int, number_of_sides: int):
    dice = [
        str(random.choice(range(1, number_of_sides + 1)))
        for _ in range(number_of_dice)
    ]
    await ctx.send(', '.join(dice))
You added : int annotations to the two parameters that you expect to be of type int. Try the command again:
With that little change, your command works! The difference is that you’re now converting the command arguments to int, which makes them compatible with your function’s logic.
Next, you’ll learn about the Check object and how it can improve your commands.
Checking Command Predicates
A Check is a predicate that is evaluated before a Command is executed to ensure that the Context surrounding the Command invocation is valid.
In an earlier example, you did something similar to verify that the user who sent a message that the bot handles was not the bot user, itself:
if message.author == client.user:
    return
The commands extension provides a cleaner and more usable mechanism for performing this kind of check, namely using Check objects.
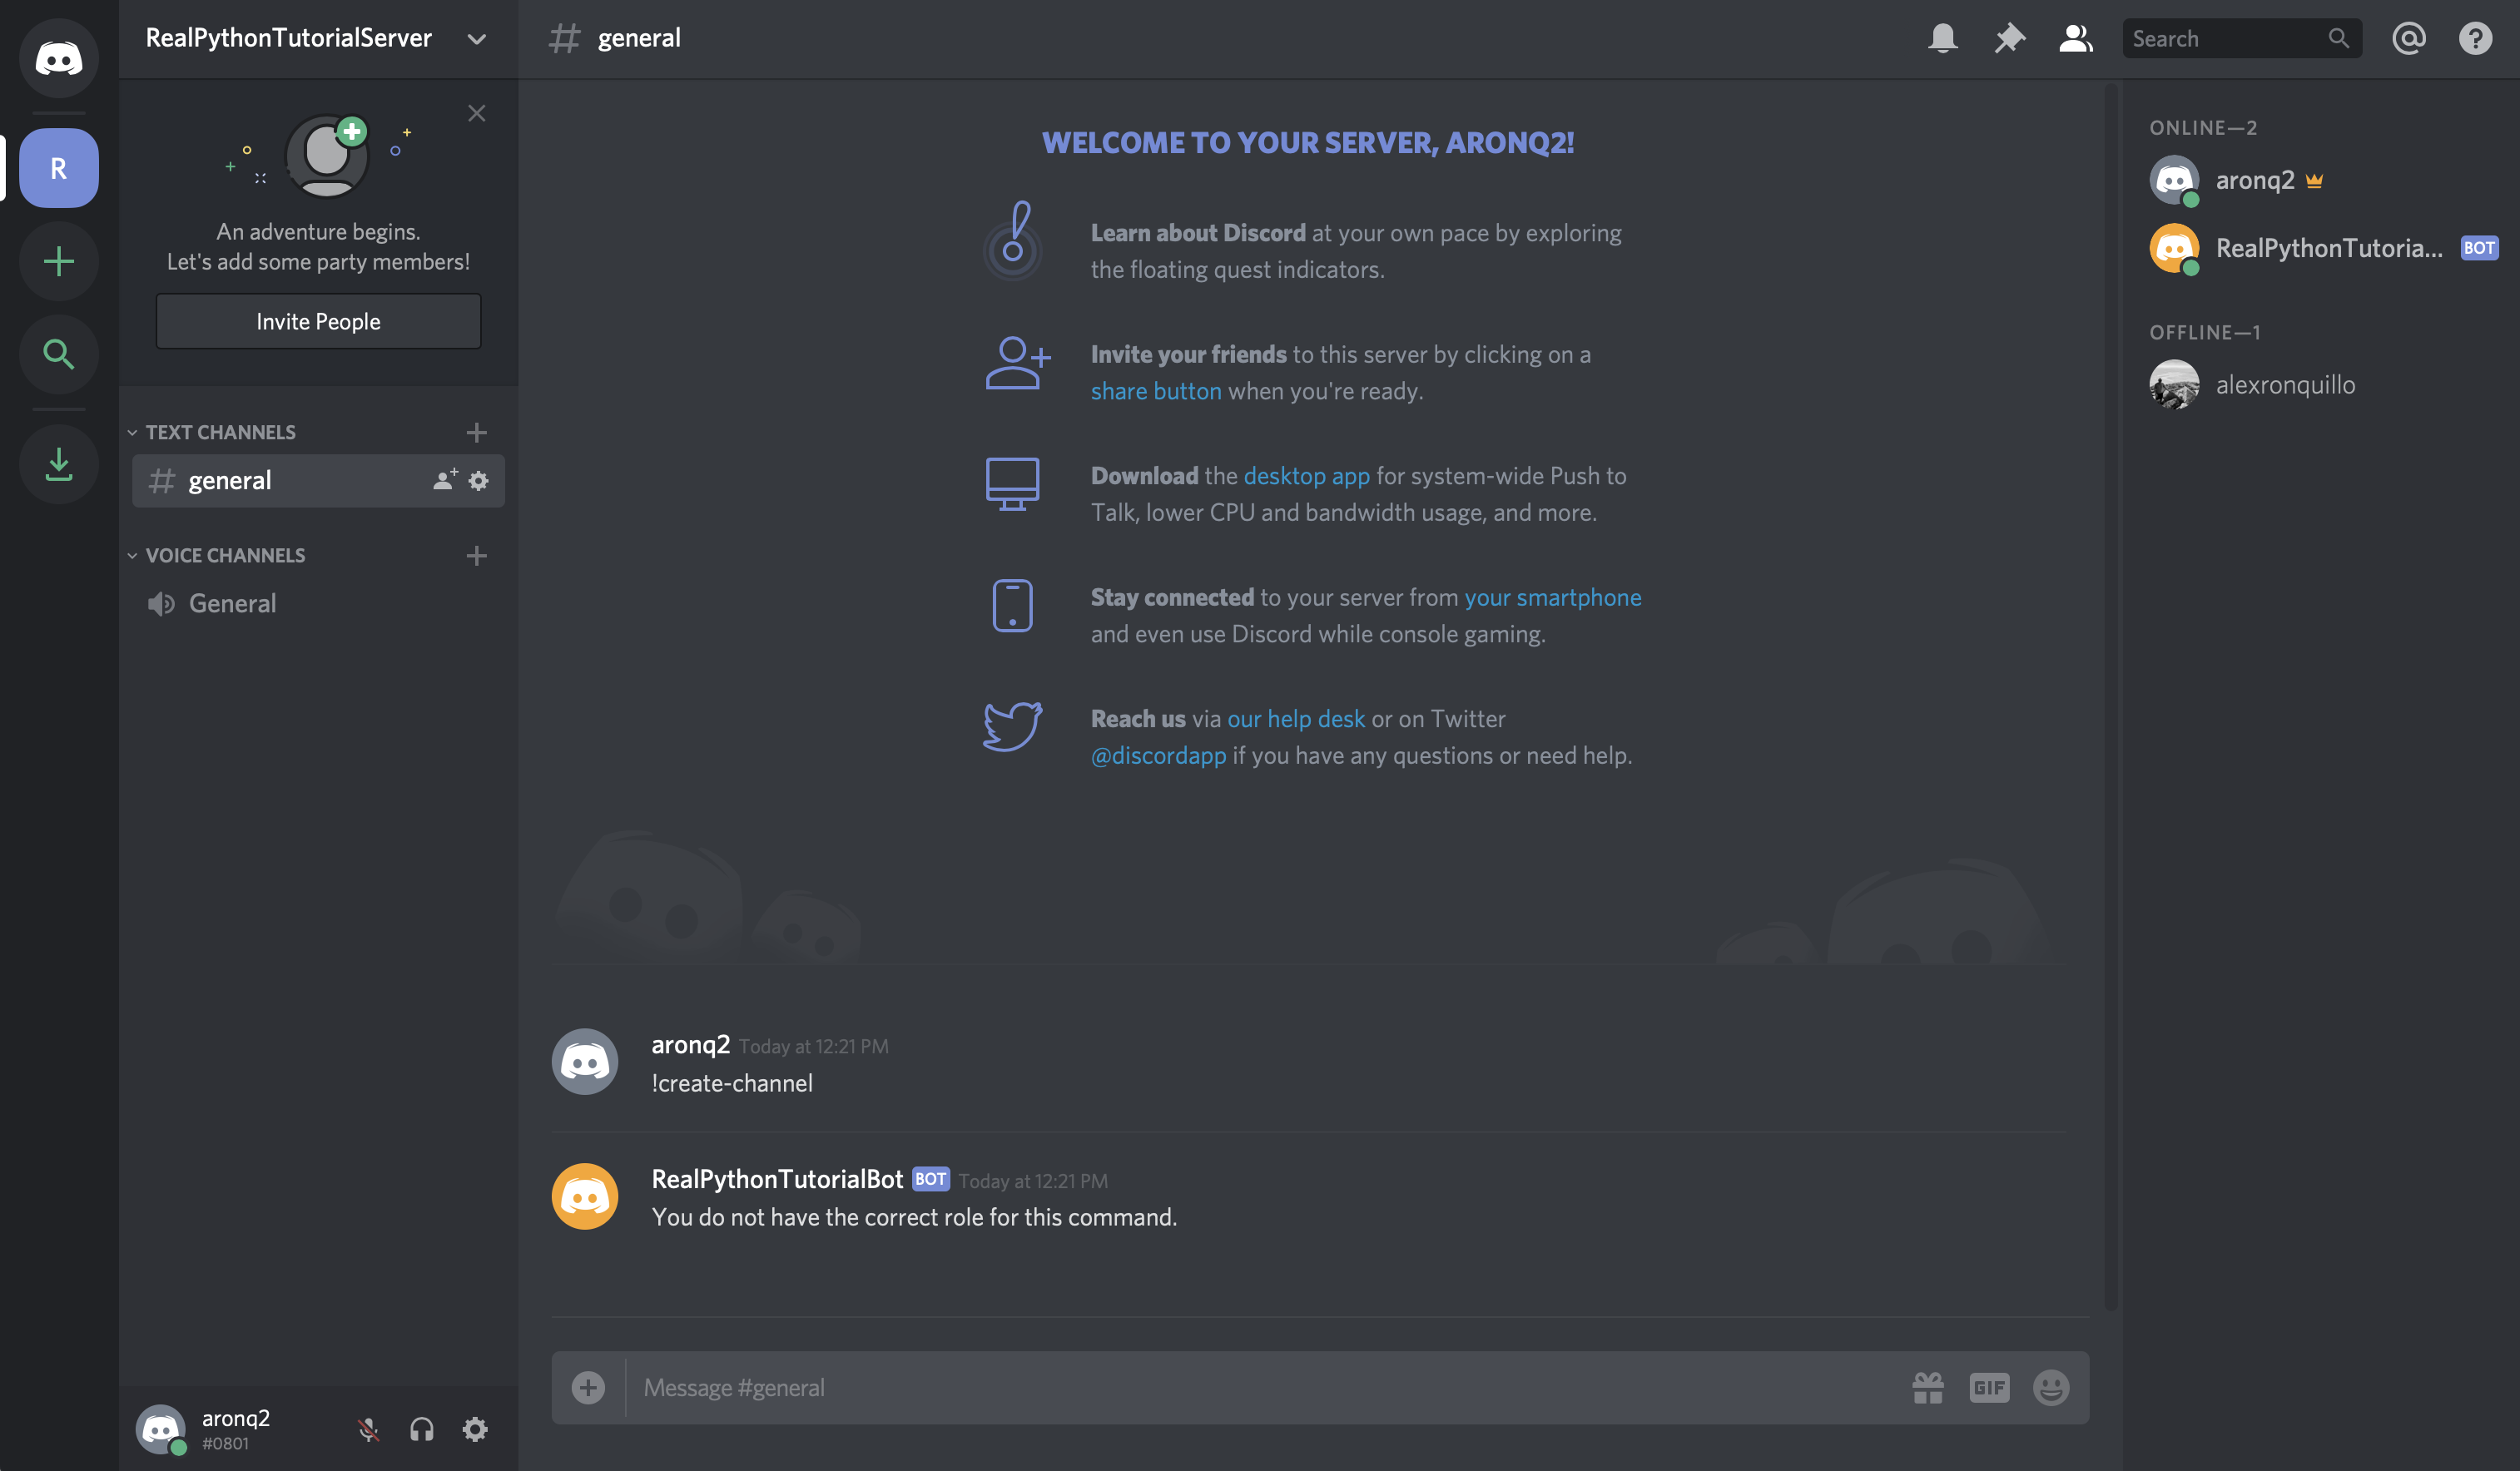
To demonstrate how this works, assume you want to support a command !create-channel <channel_name> that creates a new channel. However, you only want to allow administrators the ability to create new channels with this command.
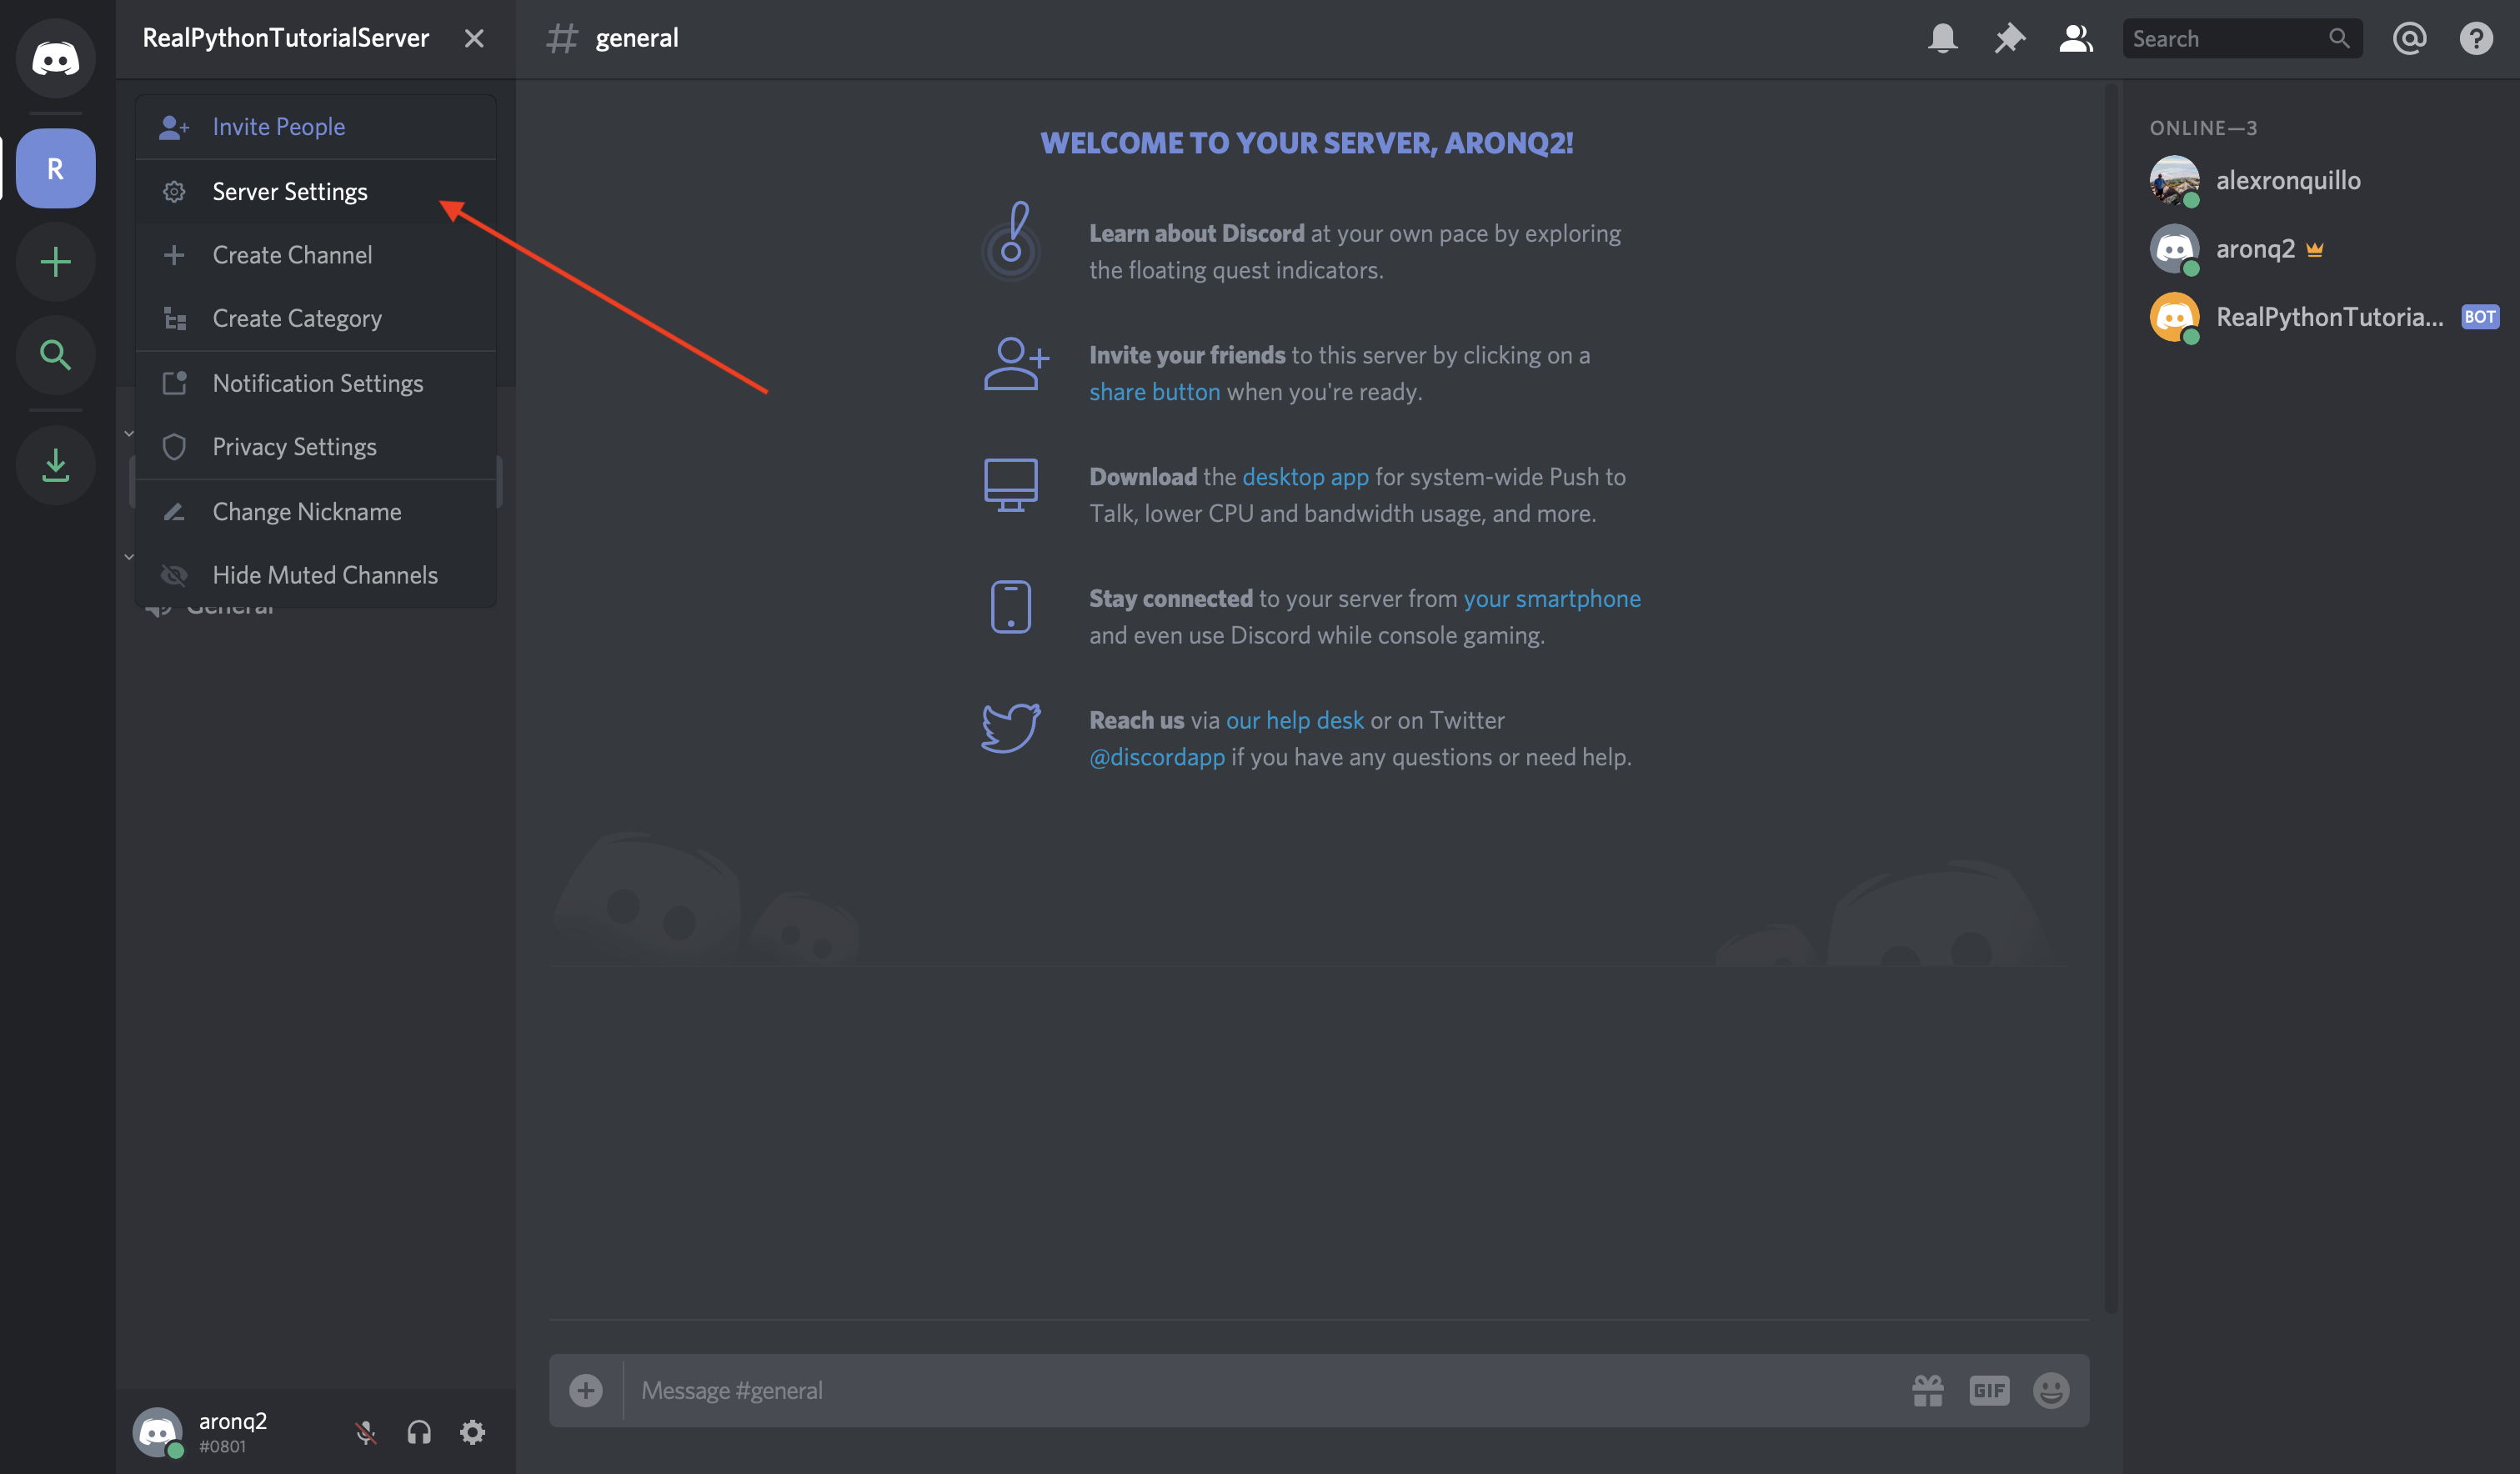
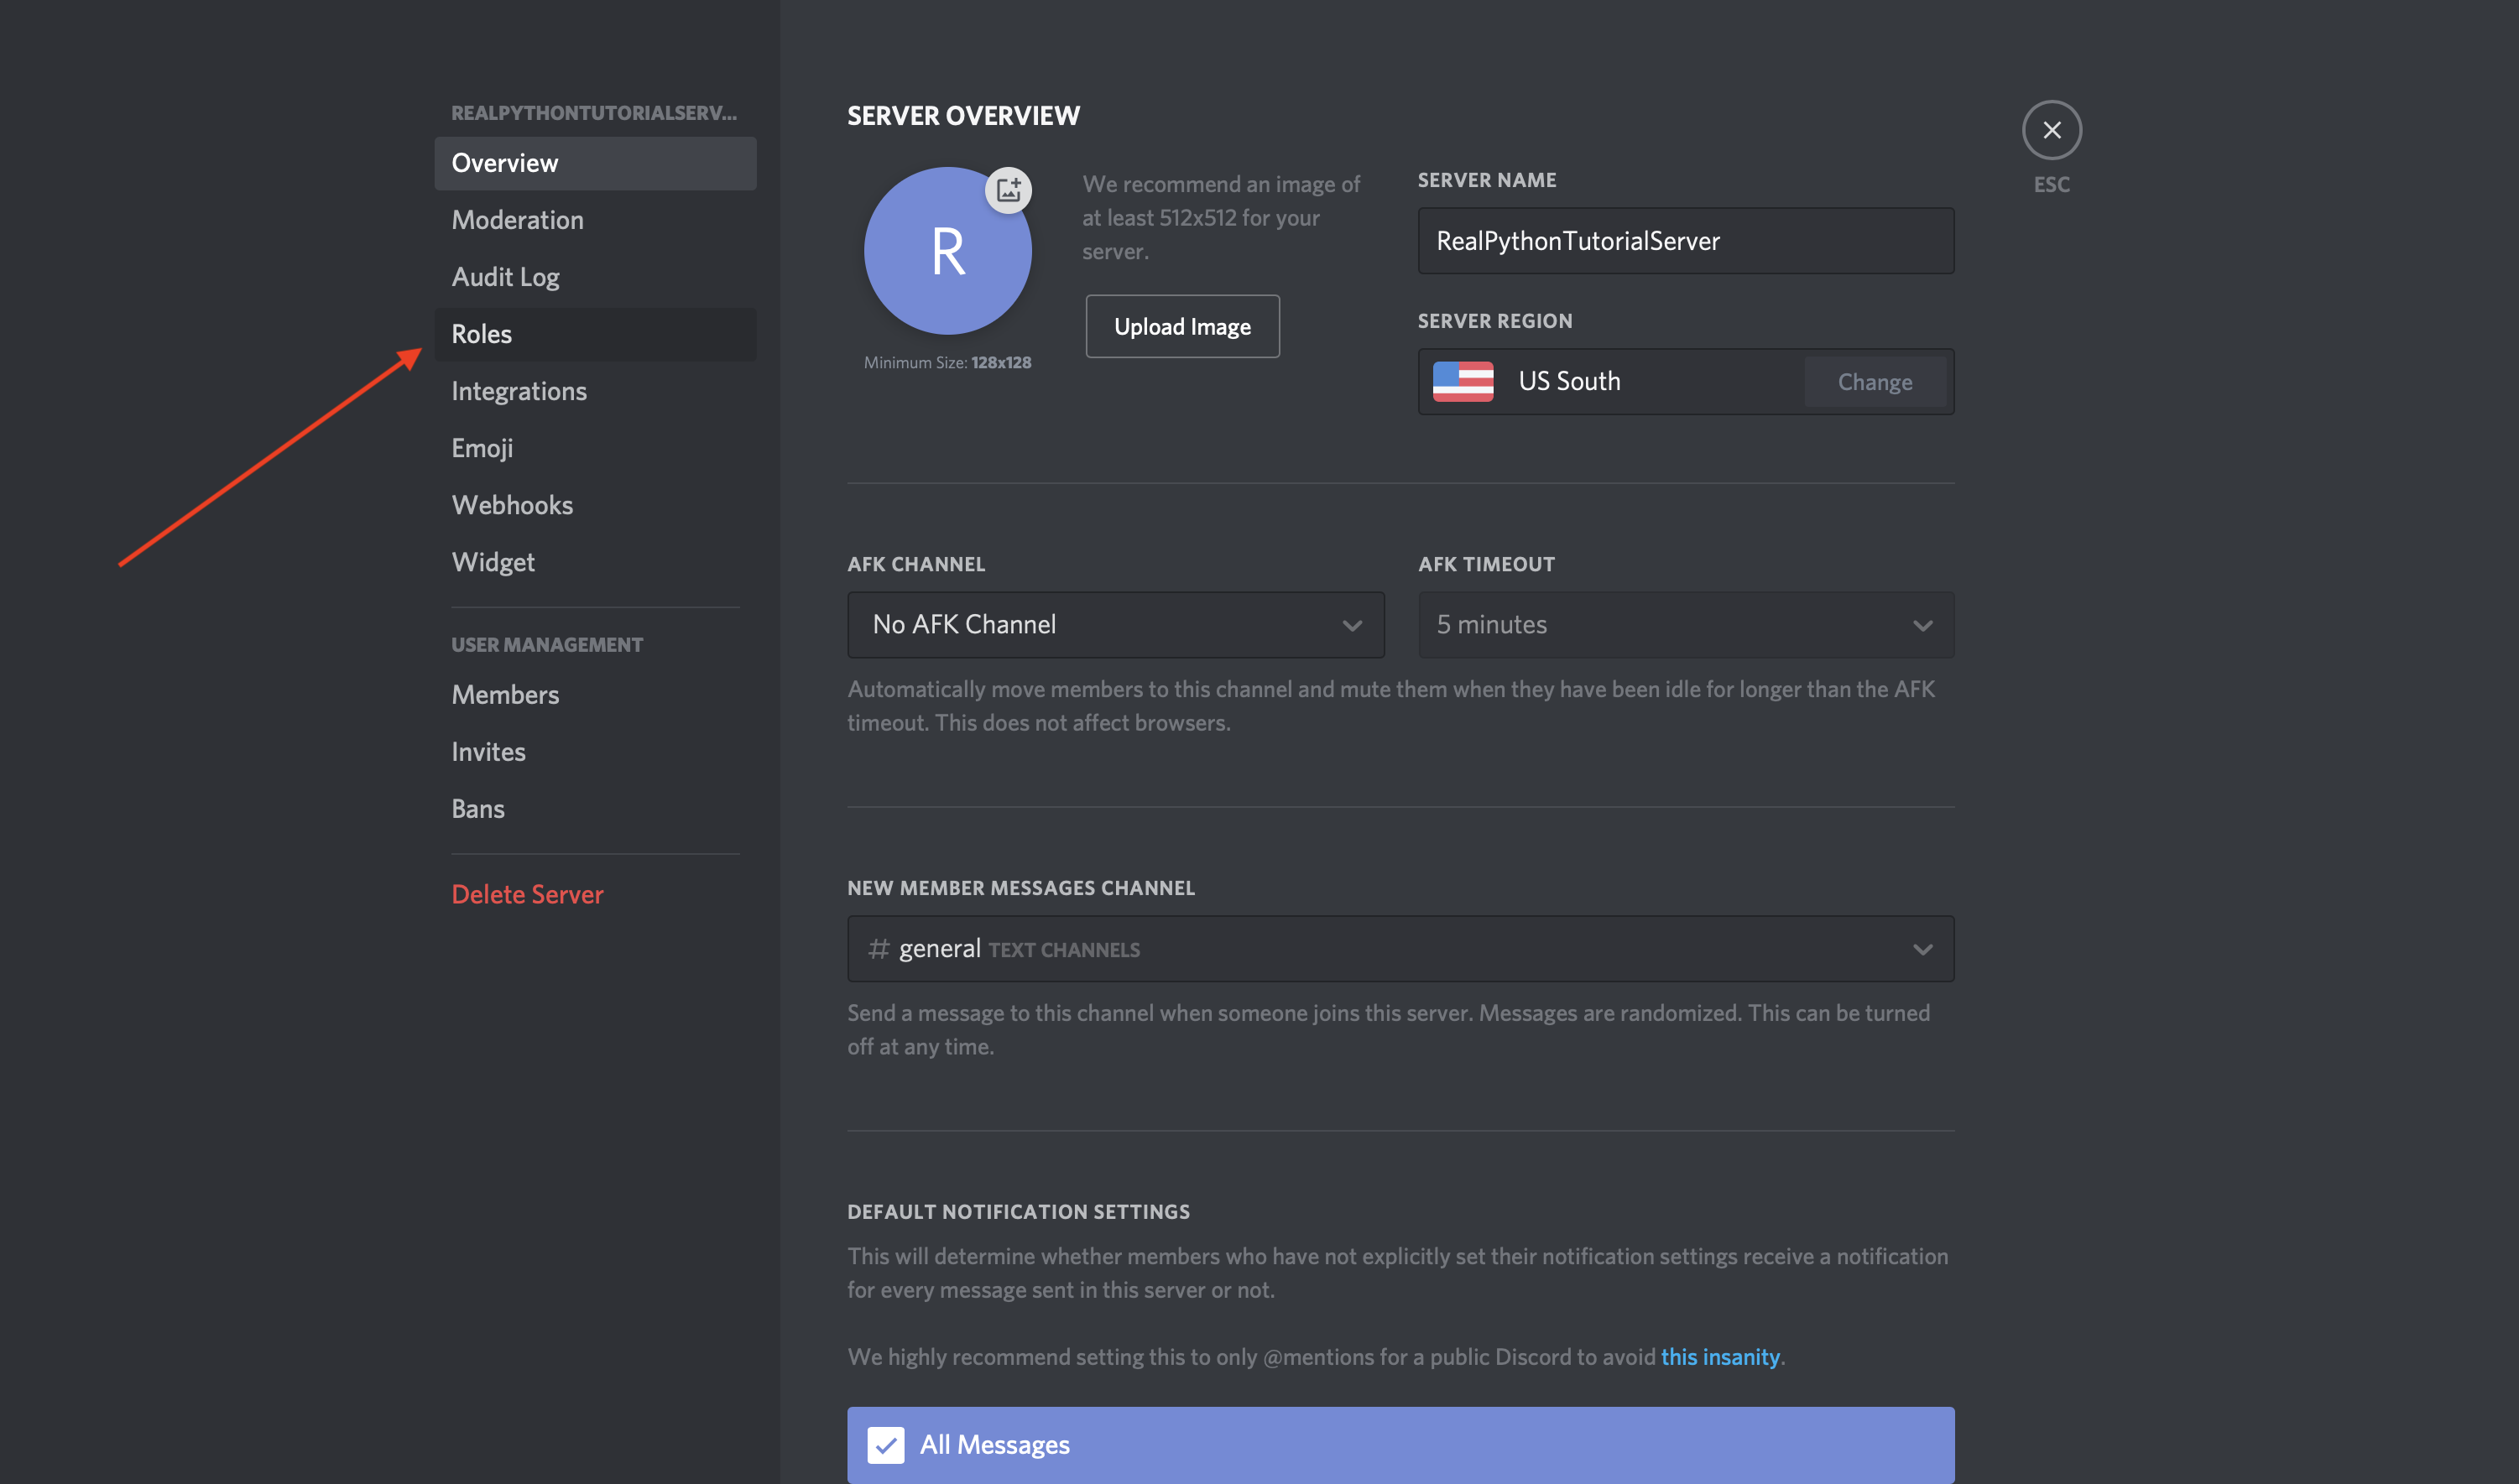
First, you’ll need to create a new member role in the admin. Go into the Discord guild and select the {Server Name} → Server Settings menu:
Then, select Roles from the left-hand navigation list:
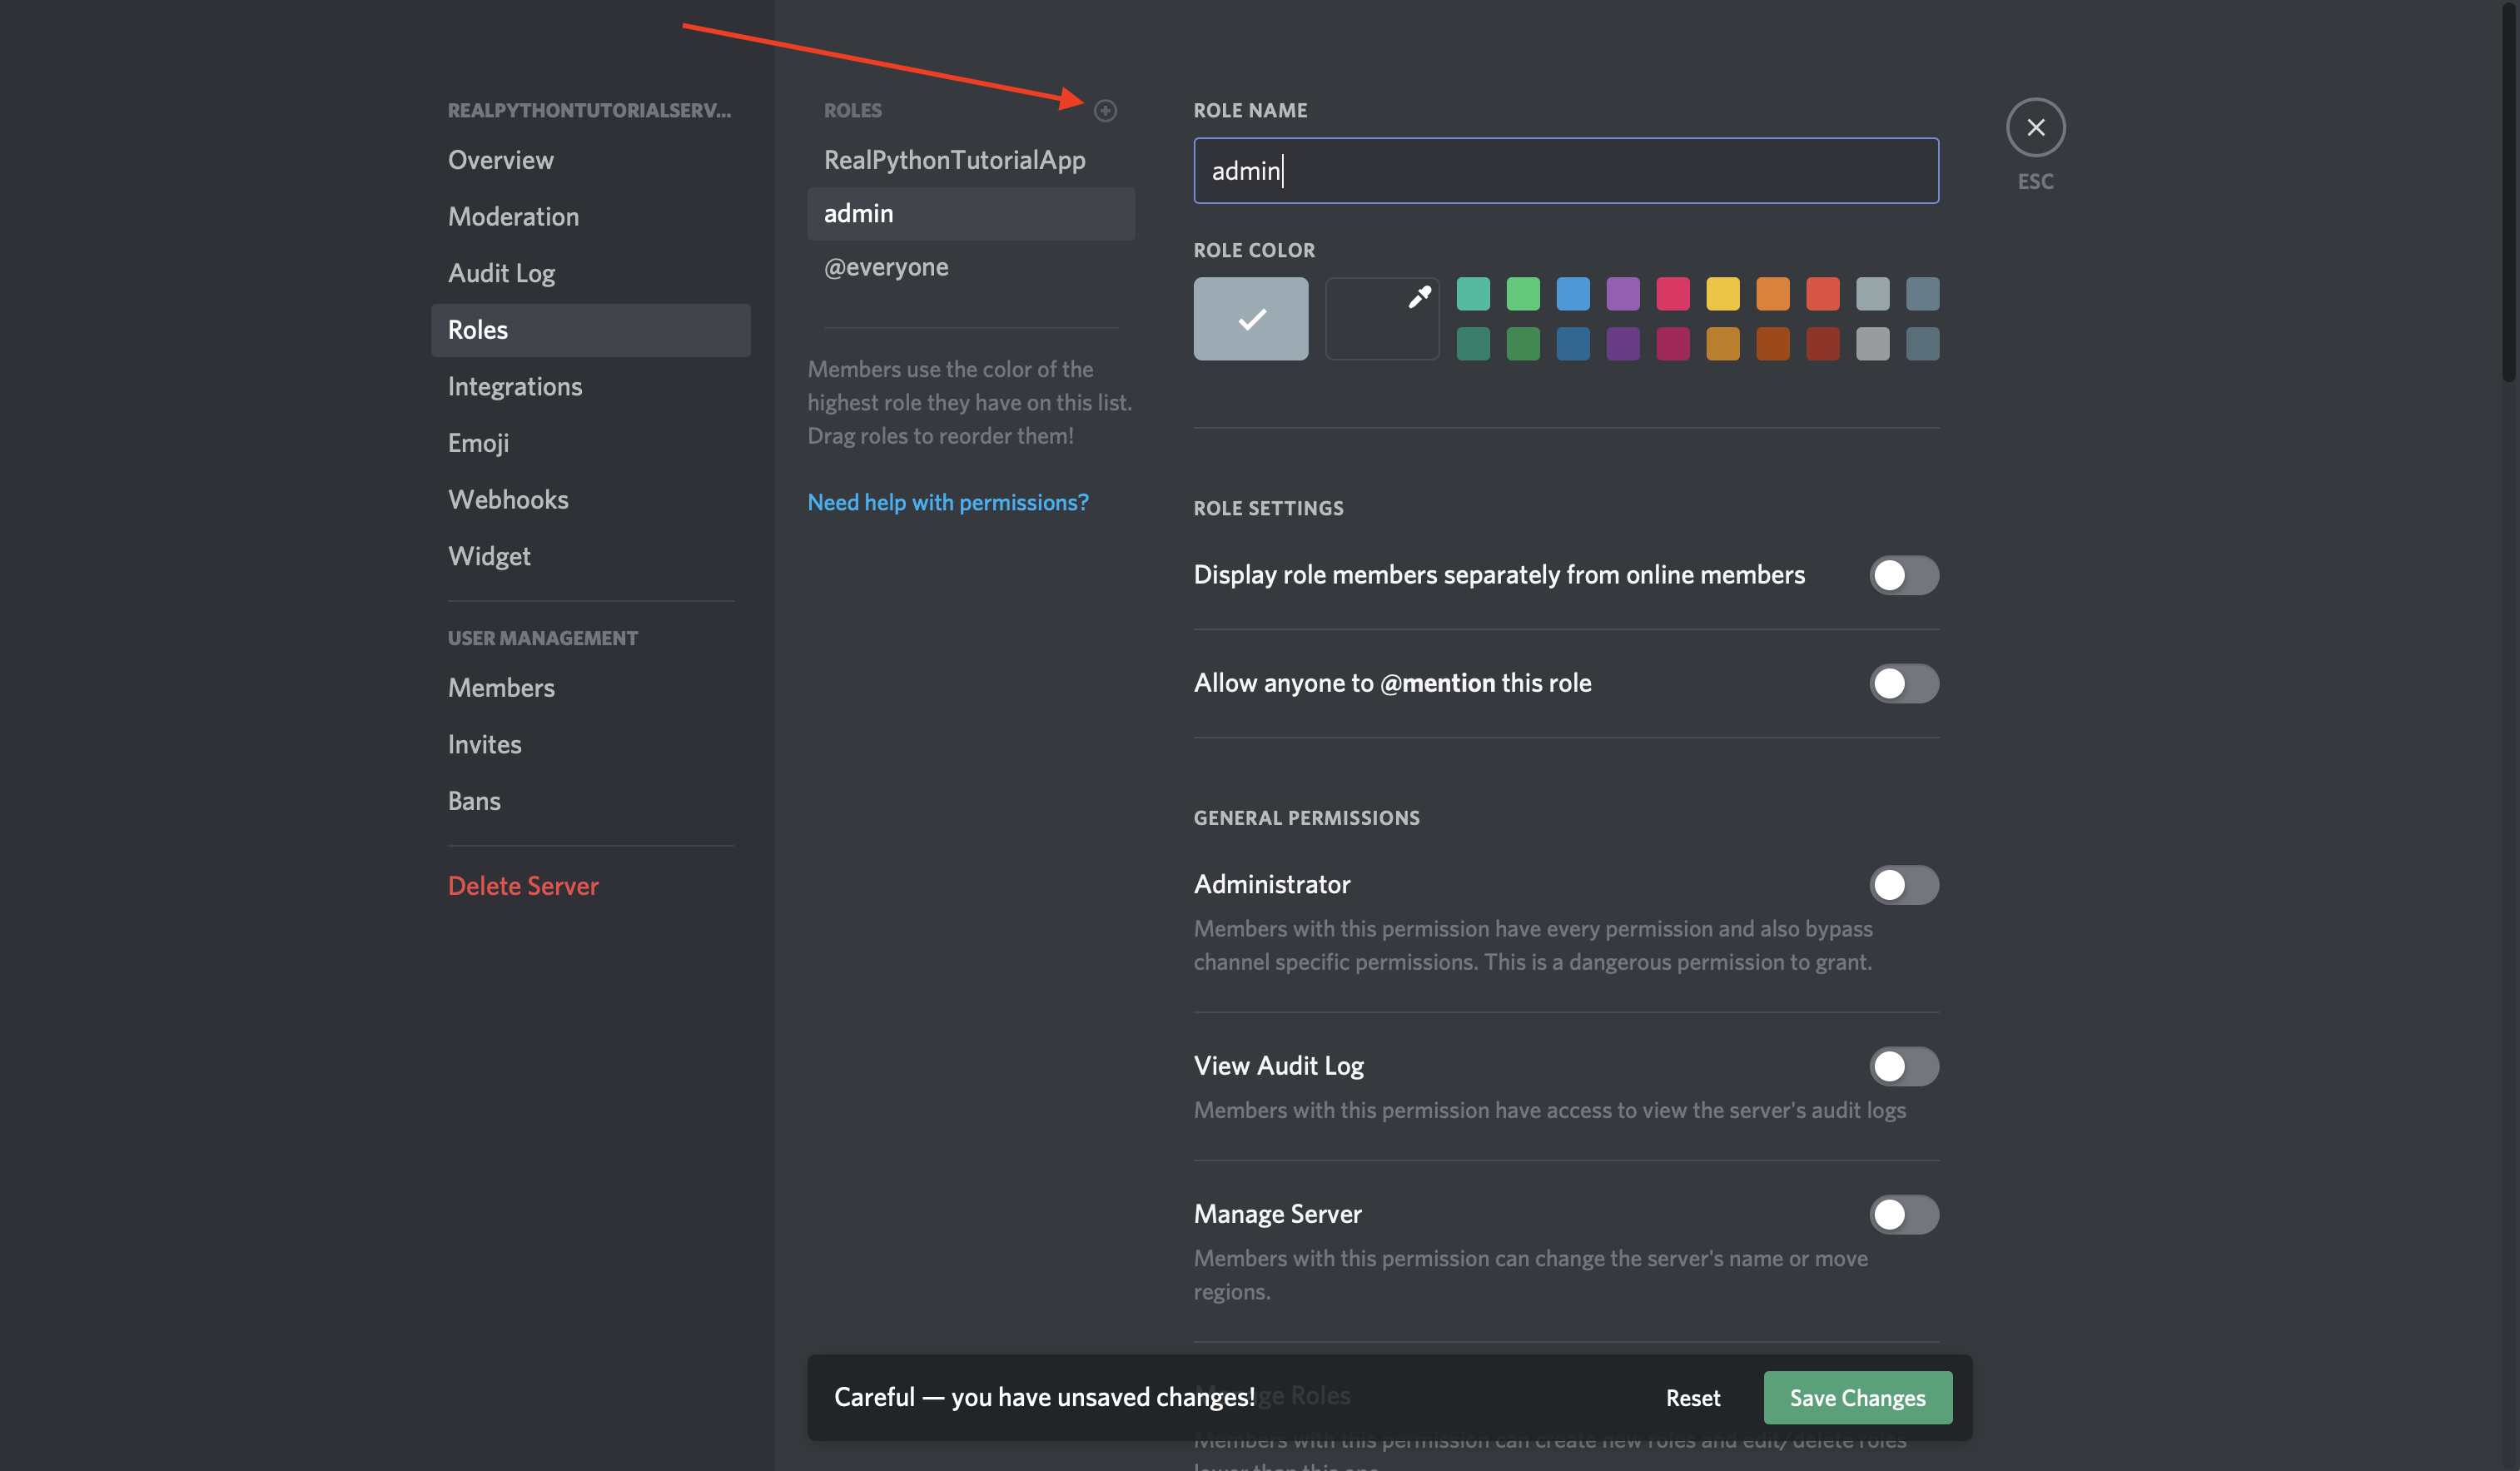
Finally select the + sign next to ROLES and enter the name admin and select Save Changes:
Now, you’ve created an admin role that you can assign to particular users. Next, you’ll update bot.py to Check the user’s role before allowing them to initiate the command:
# bot.py
import os

import discord
from discord.ext import commands
from dotenv import load_dotenv

load_dotenv()
TOKEN = os.getenv('DISCORD_TOKEN')

bot = commands.Bot(command_prefix='!')

@bot.command(name='create-channel')
@commands.has_role('admin')
async def create_channel(ctx, channel_name='real-python'):
    guild = ctx.guild
    existing_channel = discord.utils.get(guild.channels, name=channel_name)
    if not existing_channel:
        print(f'Creating a new channel: {channel_name}')
        await guild.create_text_channel(channel_name)

bot.run(TOKEN)
In bot.py, you have a new Command function, called create_channel() which takes an optional channel_name and creates that channel. create_channel() is also decorated with a Check called has_role().
You also use discord.utils.get() to ensure that you don’t create a channel with the same name as an existing channel.
If you run this program as it is and type !create-channel into your Discord channel, then you’ll see the following error message:
$ python bot.py
Ignoring exception in command create-channel:
Traceback (most recent call last):
  File "/Users/alex.ronquillo/.pyenv/versions/discord-venv/lib/python3.7/site-packages/discord/ext/commands/bot.py", line 860, in invoke
    await ctx.command.invoke(ctx)
  File "/Users/alex.ronquillo/.pyenv/versions/discord-venv/lib/python3.7/site-packages/discord/ext/commands/core.py", line 691, in invoke
    await self.prepare(ctx)
  File "/Users/alex.ronquillo/.pyenv/versions/discord-venv/lib/python3.7/site-packages/discord/ext/commands/core.py", line 648, in prepare
    await self._verify_checks(ctx)
  File "/Users/alex.ronquillo/.pyenv/versions/discord-venv/lib/python3.7/site-packages/discord/ext/commands/core.py", line 598, in _verify_checks
    raise CheckFailure('The check functions for command {0.qualified_name} failed.'.format(self))
discord.ext.commands.errors.CheckFailure: The check functions for command create-channel failed.
This CheckFailure says that has_role('admin') failed. Unfortunately, this error only prints to stdout. It would be better to report this to the user in the channel. To do so, add the following event:
@bot.event
async def on_command_error(ctx, error):
    if isinstance(error, commands.errors.CheckFailure):
        await ctx.send('You do not have the correct role for this command.')
This event handles an error event from the command and sends an informative error message back to the original Context of the invoked Command.
Try it all again, and you should see an error in the Discord channel:
Great! Now, to resolve the issue, you’ll need to give yourself the admin role:
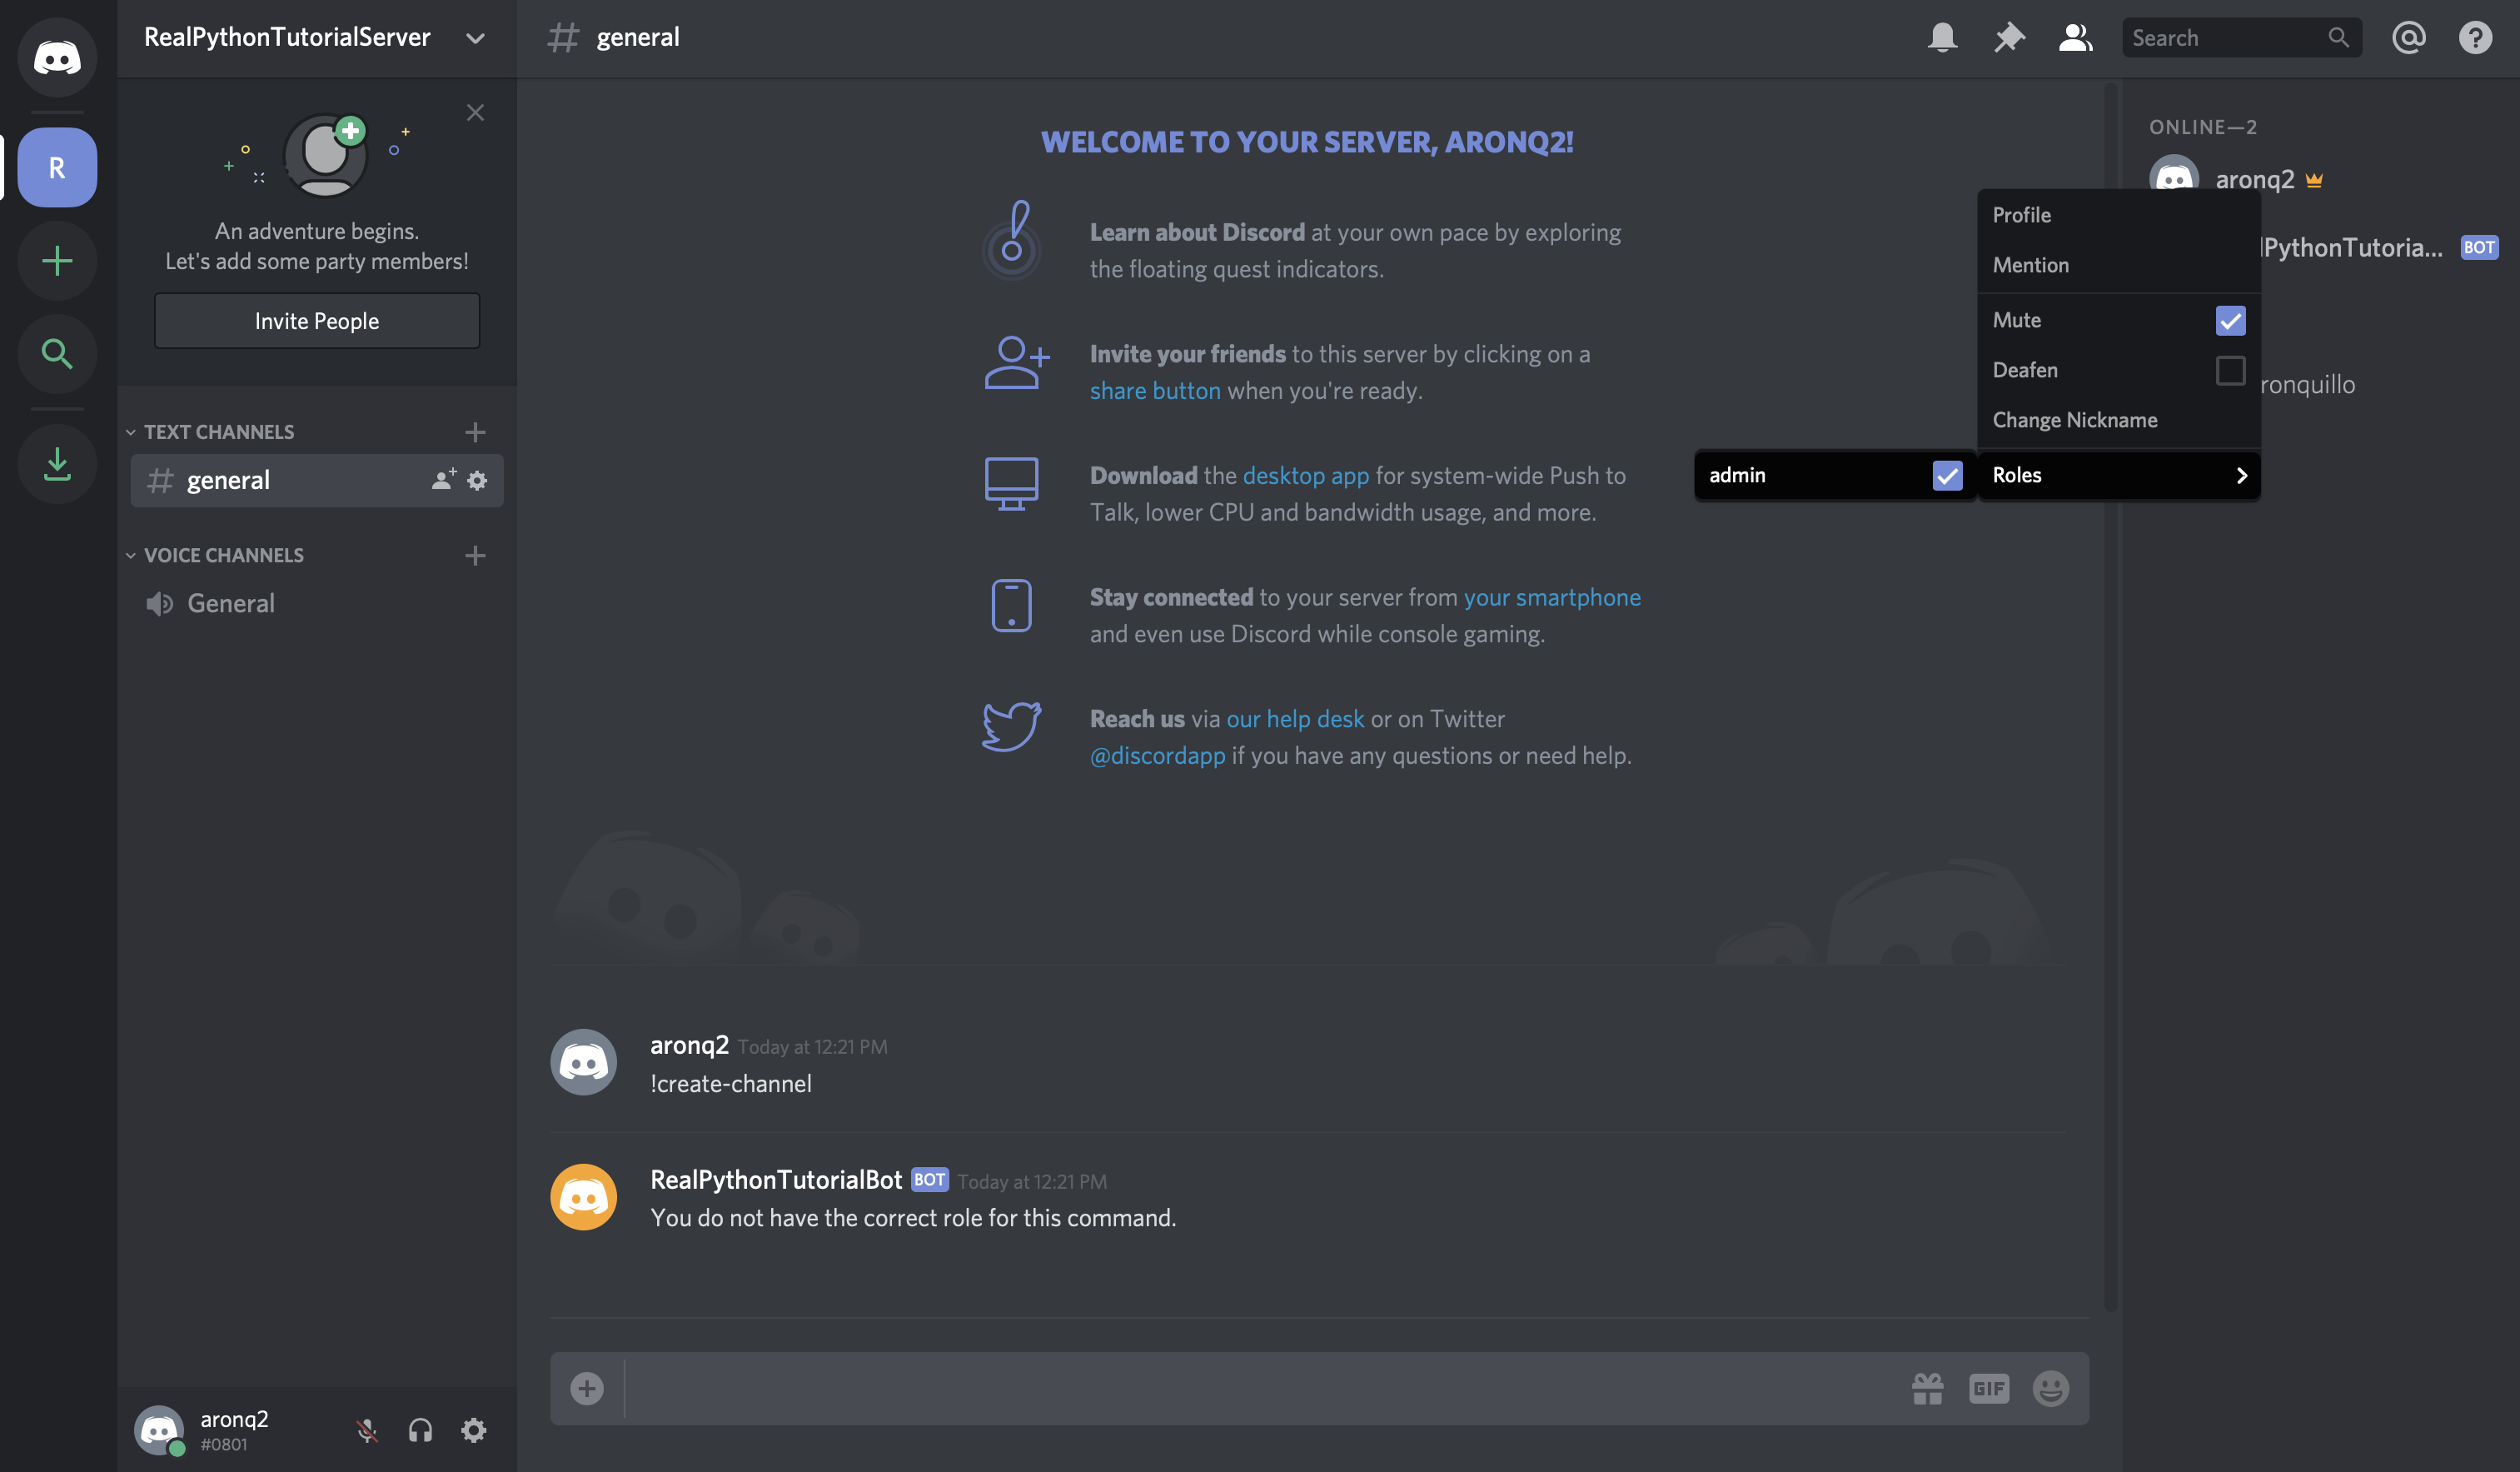
With the admin role, your user will pass the Check and will be able to create channels using the command.
When you type !create-channel again, you’ll successfully create the channel real-python:
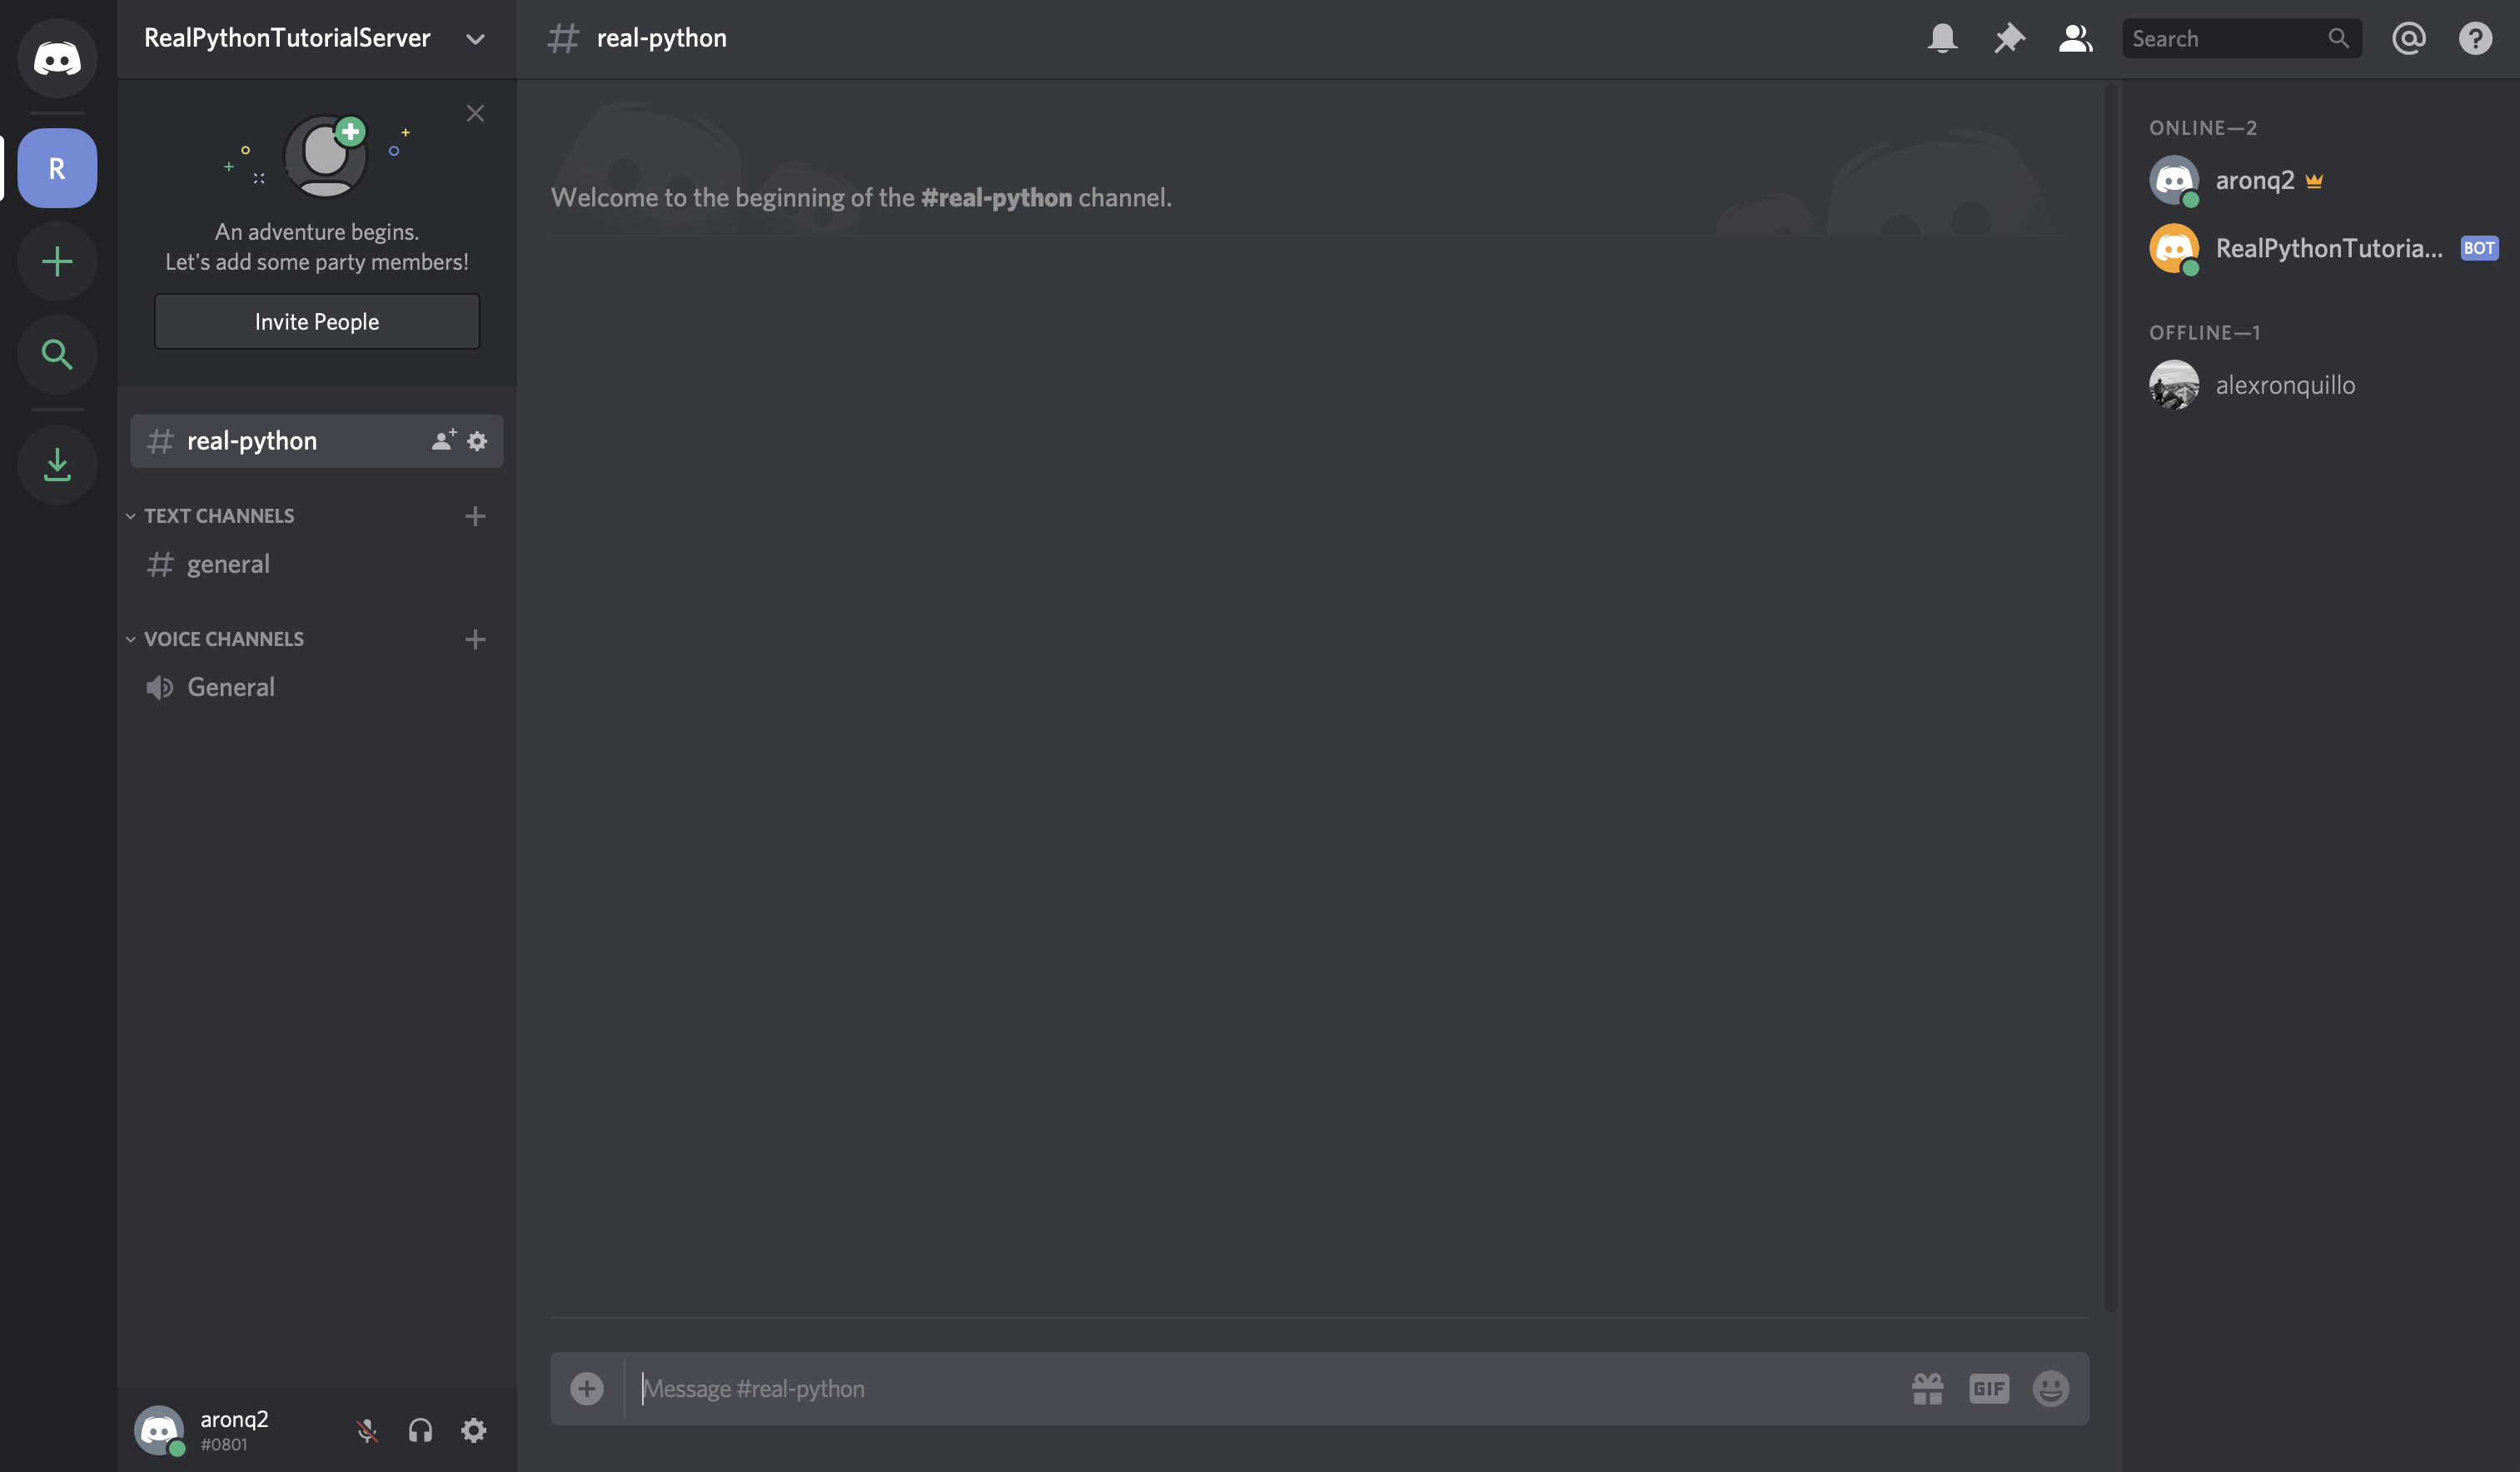
Also, note that you can pass the optional channel_name argument to name the channel to whatever you want!
With this last example, you combined a Command, an event, a Check, and even the get() utility to create a useful Discord bot!
Conclusion
Congratulations! Now, you’ve learned how to make a Discord bot in Python. You’re able to build bots for interacting with users in guilds that you create or even bots that other users can invite to interact with their communities. Your bots will be able to respond to messages and commands and numerous other events.
In this tutorial, you learned the basics of creating your own Discord bot. You now know:
- What Discord is
- Why
discord.pyis so valuable - How to make a Discord bot in the Developer Portal
- How to create a Discord connection in Python
- How to handle events
- How to create a
Botconnection - How to use bot commands, checks, and converters
To read more about the powerful discord.py library and take your bots to the next level, read through their extensive documentation. Also, now that you’re familiar with Discord APIs in general, you have a better foundation for building other types of Discord applications.
You can also explore the possibilities of ChatterBot, Tweepy, InstaPy, and Alexa Skills to learn more about how you can make bots for different platforms using Python.
Watch Now This tutorial has a related video course created by the Real Python team. Watch it together with the written tutorial to deepen your understanding: Creating a Discord Bot in Python
Из этого туториала Вы узнаете, как полностью создать собственного бота Discord в облаке.
Вам не нужно ничего устанавливать на свой компьютер, и вам не нужно ничего платить за размещение своего бота.
Мы будем использовать целый ряд инструментов, в том числе Discord API, библиотеки Python, и платформы облачных вычислений под названием Repl.it.
Как создать учетную запись Discord Bot
Чтобы работать с библиотекой Python и API Discord, мы должны сначала создать учетную запись Discord Bot.
Вот шаг к созданию учетной записи Discord Bot.
1. Убедитесь, что вы вошли на сайт Discord.
2. Перейдите на страницу приложения.
3. Щелкните кнопку «Новое приложение».

4. Дайте приложению имя и нажмите «Создать».
5. Перейдите на вкладку «Бот» и нажмите «Добавить бота». Вам нужно будет подтвердить действие, нажав «Yes, do it!»
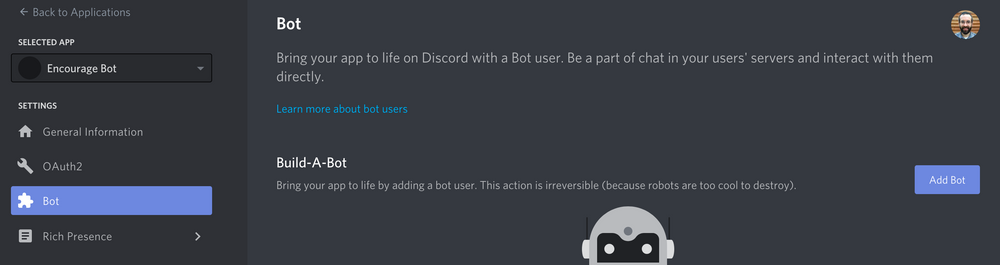
Оставьте настройки по умолчанию для Public Bot и Require OAuth2 Code Grant.
Ваш бот создан. Следующим шагом будет копирование токена.
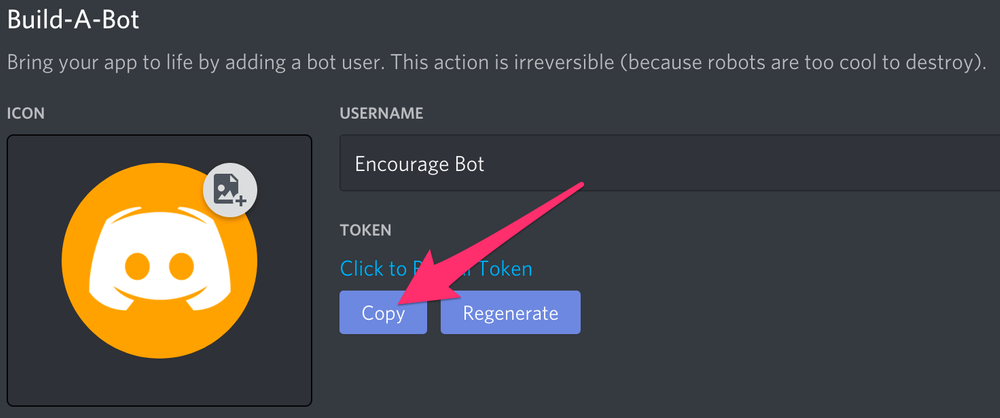
Этот токен является паролем вашего бота, поэтому не сообщайте его никому. Это может позволить кому-то войти в ваш бот и делать разные плохие вещи.
Вы можете регенерировать токен, если он случайно станет доступен.
Как пригласить вашего бота присоединиться к серверу
Теперь вам нужно подключить своего пользователя-бота к серверу. Для этого вы должны создать для него URL-адрес приглашения.
Перейдите на вкладку «OAuth2». Затем выберите «бот» в разделе «scopes».
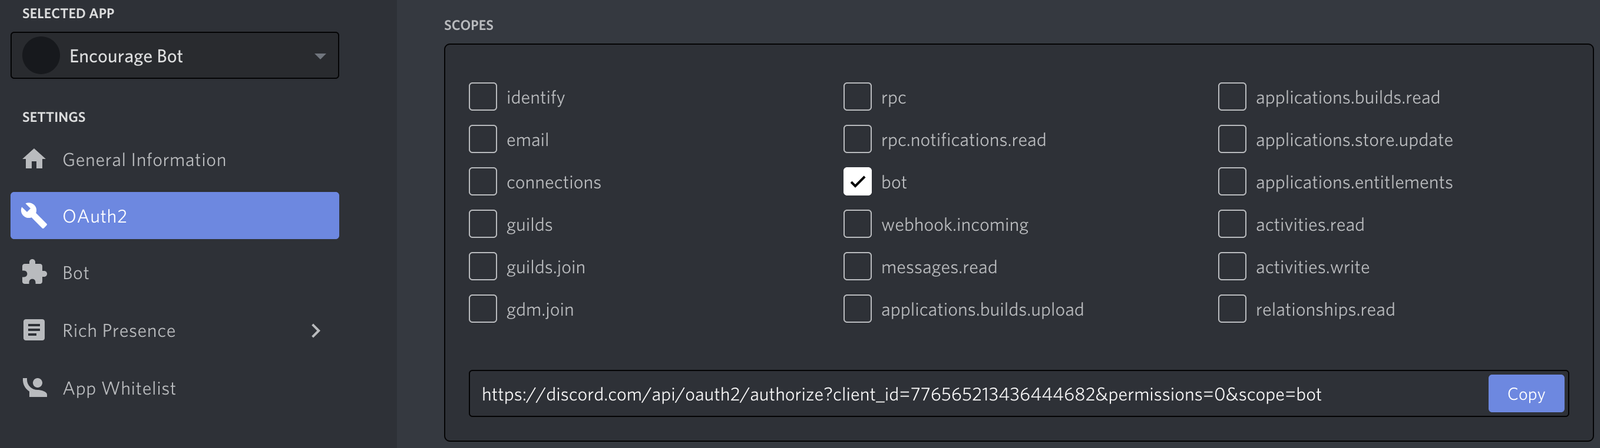
Теперь выберите нужные разрешения для бота. Наш бот будет в основном использовать текстовые сообщения, поэтому нам не нужно много разрешений. Вам может потребоваться больше, в зависимости от того, что вы хотите, чтобы ваш бот делал. Будьте осторожны с разрешением «Администратор».
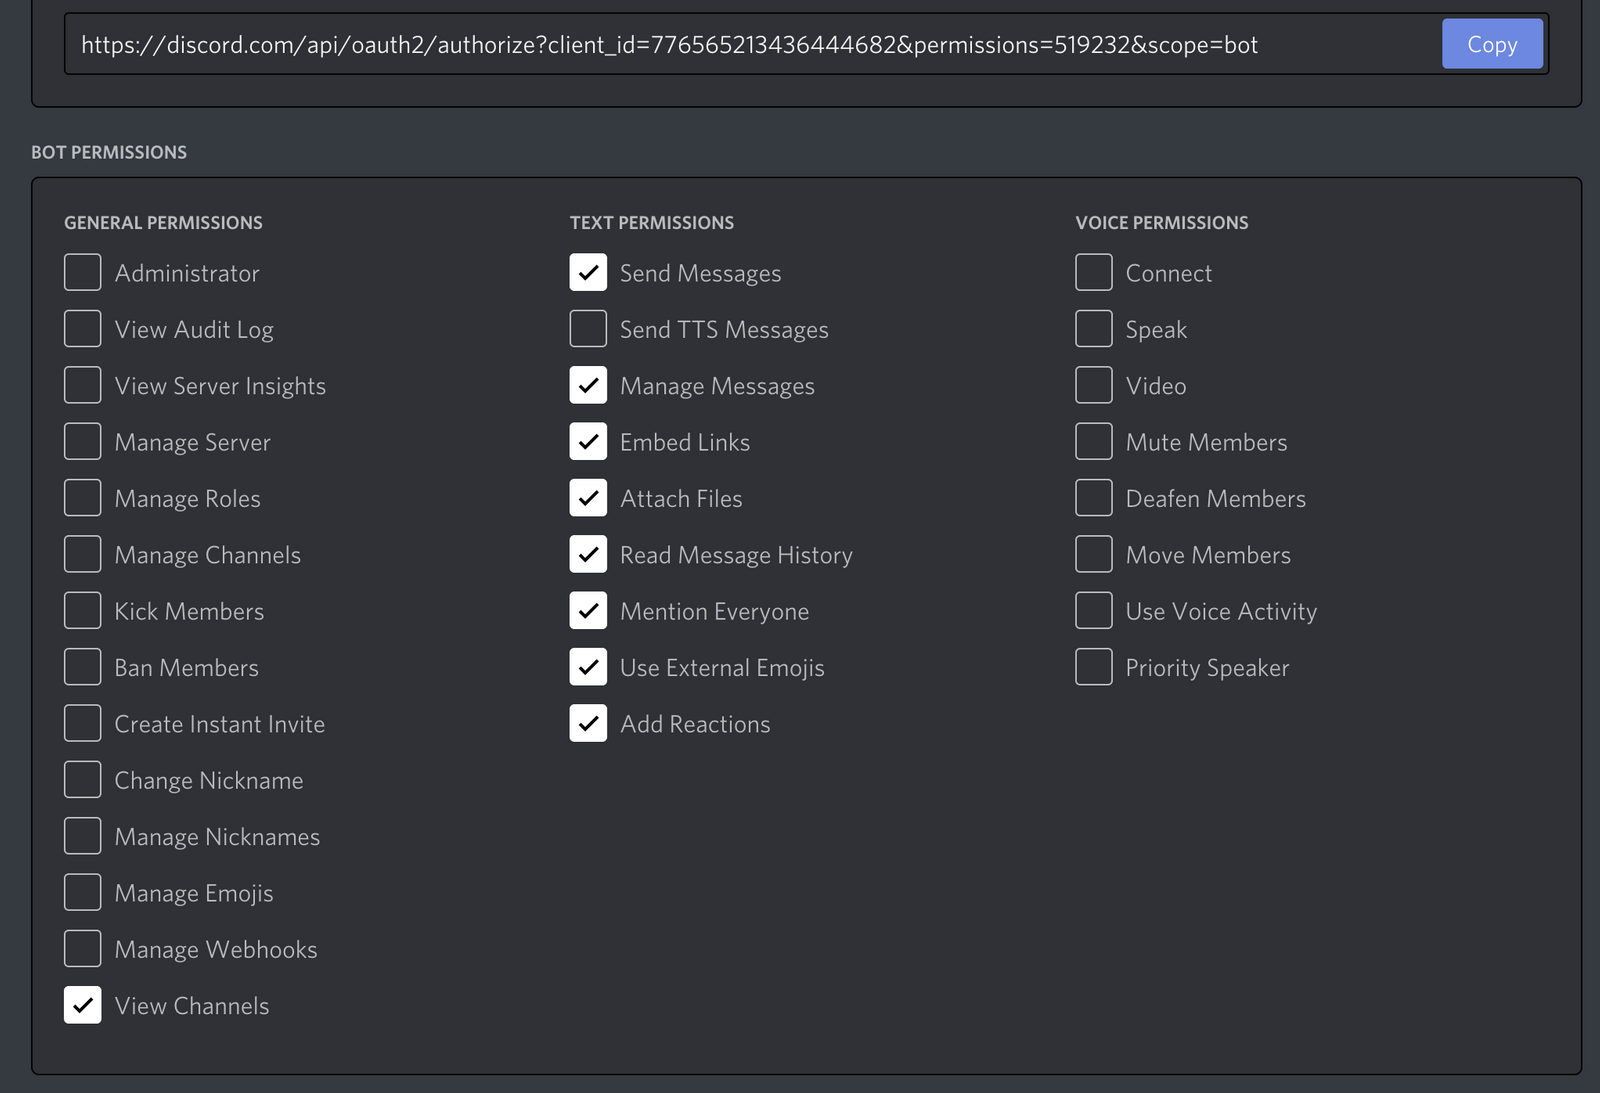
После выбора соответствующих разрешений нажмите кнопку «Copy» над разрешениями. Это скопирует URL-адрес, который можно использовать для добавления бота на сервер.
Вставьте URL-адрес в свой браузер, выберите сервер, на который будет приглашен бот, и нажмите «Авторизовать».
Чтобы добавить бота, вашей учетной записи необходимы разрешения «Управление сервером».
Теперь, когда вы создали пользователя-бота, мы начнем писать код Python для бота.
Как написать код для базового бота Discord с помощью библиотеки discord.py
Мы будем использовать библиотеку Python discord.py, чтобы написать код для бота. discord.py — это оболочка API для Discord, которая упрощает создание бота Discord на Python.
Как создать реплику и установить disocrd.py
Вы можете разработать бота на своем локальном компьютере с помощью любого редактора кода. Однако в этом уроке мы будем использовать Repl.it, потому что это упростит всем пользователям следовать его указаниям. Repl.it — это онлайн-среда IDE, которую вы можете использовать в своем веб-браузере.
Создайте новый Repl и выберите «Python» в качестве языка.
Чтобы использовать библиотеку discord.py, просто напишите import discord вверху main.py. Repl.it автоматически установит эту зависимость, когда вы нажмете кнопку «Run».
Если вы предпочитаете кодировать бота локально, вы можете использовать эту команду в MacOS для установки discord.py:
python3 -m pip install -U discord.pyВозможно, вам придется использовать pip3 вместо pip.
Если вы используете Windows, вы должны вместо этого использовать следующую строку:
py -3 -m pip install -U discord.pyКак настроить события Discord для вашего бота
discord.py вращается вокруг концепции событий. Событие — это то, что вы слушаете, а затем реагируете. Например, когда происходит сообщение, вы получаете событие об этом, на которое можете ответить.
Сделаем бота, который отвечает на конкретное сообщение. Этот простой код бота вместе с объяснением кода взят из документации discord.py. Позже мы добавим в бота дополнительные функции.
Добавьте этот код в main.py. (Вы можете назвать файл как-нибудь иначе, только не discord.py.) Я вскоре объясню, что делает весь этот код.
import discord
import os
client = discord.Client()
@client.event
async def on_ready():
print('We have logged in as {0.user}'.format(client))
@client.event
async def on_message(message):
if message.author == client.user:
return
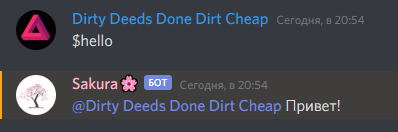
if message.content.startswith('$hello'):
await message.channel.send('Hello!')
client.run(os.getenv('TOKEN'))
Когда вы создали своего пользователя-бота в Discord, вы скопировали токен. Теперь мы собираемся создать файл .env для хранения токена. Если вы запускаете свой код локально, вам не нужен файл .env. Просто замените os.getenv('TOKEN') токеном.
.env файлы используются для объявления переменных среды. На Repl.it большинство создаваемых вами файлов видны всем, но .env файлы видны только вам. Другие люди, просматривающие публичный ответ, не смогут увидеть содержимое файла .env.
Поэтому, если вы разрабатываете на Repl.it, включайте в файл .env только личную информацию, такую как токены или ключи.
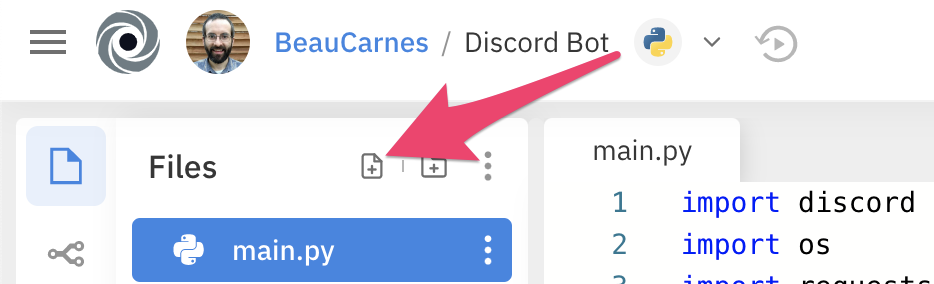
Нажмите кнопку «Добавить файл» и создайте файл с именем .env.
Внутри файла добавьте следующую строку, включая ваш фактический токен, который вы скопировали ранее:
Теперь давайте рассмотрим, что делает каждая строка в коде вашего бота Discord.
- Первая строка импортирует библиотеку discord.py.
- Вторая строка импортирует библиотеку os, но она используется только для получения переменной
TOKENиз файла.env. Если вы не используете.envфайл, эта строка вам не нужна. - Затем мы создаем экземпляр
Client. Это связь с Discord. - Декоратор
@client.event()используется для регистрации события. Это асинхронная библиотека, поэтому все делается с помощью обратных вызовов. Обратный вызов — это функция, которая вызывается, когда происходит что-то еще. В этом коде событиеon_ready()вызывается, когда бот готов к использованию. Затем, когда бот получает сообщение, вызывается событиеon_message(). - Триггер событий каждый раз вызывает
on_message(), когда принимается сообщение, но мы не хотим, что-то делать, если сообщение от самих себя. Поэтому, еслиMessage.authorэто то же самое, что иClient.user, просто делаем return. - Затем мы проверяем
Message.content, начинается ли с'$hello'. Если да, то бот отвечает'Hello!'в канал, в котором он использовался. - Теперь, когда бот настроен, последняя строка запускает бот с токеном входа. Он получает токен из файла
.env.
У нас есть код для бота, поэтому теперь нам просто нужно его запустить.
Как запустить бота
Теперь нажмите кнопку запуска вверху, чтобы запустить своего бота в repl.it.
Если вы пишете бота локально, вы можете использовать эти команды в терминале для запуска бота:
В Windows:
В других системах:
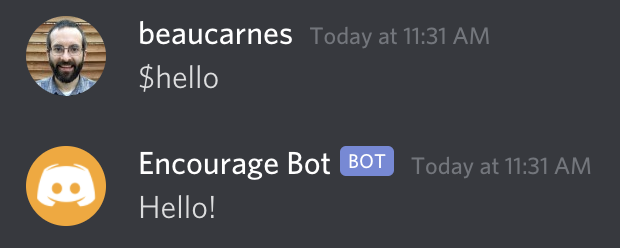
Теперь перейдите в свою комнату в Discord и введите «$hello». Ваш бот должен ответить «Hello!».
Как улучшить бота
Теперь, когда у нас есть базовый бот, мы его улучшим. Не зря он называется «Encourage Bot».
Этот бот будет отвечать сообщением ‘Hello!’ всякий раз, когда кто-то отправляет сообщение, содержащее грустное или удручающее слово.
Любой желающий сможет добавить ободряющие сообщения для использования бота, а отправленные пользователем сообщения будут храниться в базе данных Repl.it.
Бот также вернет случайную вдохновляющую цитату из API, когда кто-то наберет в чате сообщение «$inspire».
Мы начнем с добавления функции «$inspire».
Как добавить в бота вдохновляющие цитаты
Мы будем получать вдохновляющие цитаты из API под названием zenquotes.io. Нам нужно импортировать еще пару модулей Python, добавить функцию get_quote() и обновить код нашего бота, чтобы вызвать функцию.
Вот обновленный код. После кода я объясню новые части.
import discord
import os
import requests
import json

client = discord.Client()

def get_quote():
  response = requests.get("https://zenquotes.io/api/random")
  json_data = json.loads(response.text)
  quote = json_data[0]['q'] + " -" + json_data[0]['a']
  return(quote)

@client.event
async def on_ready():
  print('We have logged in as {0.user}'.format(client))

@client.event
async def on_message(message):
  if message.author == client.user:
    return

  if message.content.startswith('$inspire'):
    quote = get_quote()
    await message.channel.send(quote)

client.run(os.getenv('TOKEN'))
Теперь нам нужно импортировать модуль requests. Этот модуль позволяет нашему коду делать HTTP-запрос для получения данных из API. API возвращает JSON, и модуль json упрощает работу с возвращенными данными.
Функция get_quote() очень проста. Во-первых, она использует модуль запросов для запроса данных из URL-адреса API. API возвращает случайную вдохновляющую цитату. Эту функцию можно легко переписать для получения котировок из другого API, если текущий перестанет работать.
Затем внутри функции мы используем json.loads() для преобразования ответа API в JSON. Методом проб и ошибок я понял, как перевести цитату из JSON в нужный строковый формат. Цитата возвращается из функции в виде строки.
Последняя часть кода обновляется ближе к концу. Ранее он искал сообщение, которое начиналось с «$hello». Теперь он ищет «$inspire». Вместо того, чтобы возвращать «Hello!», Он получает цитату quote = get_quote() и возвращает цитату.
На этом этапе вы можете запустить свой код и попробовать его.
Как добавить в бота обнадеживающие сообщения
Теперь мы реализуем функцию, при которой бот отвечает обнадеживающими сообщениями, когда пользователь отправляет сообщение с грустным словом.
Как добавить грустные слова в бота
Для начала нам нужно создать список Python, содержащий грустные слова, на которые будет отвечать бот.
Добавьте следующую строку после создания переменной client:
sad_words = ["sad", "depressed", "unhappy", "angry", "miserable"]Не стесняйтесь добавлять в список больше слов.
Как добавить в бота обнадеживающие сообщения
Теперь мы добавим список ободряющих сообщений, которыми бот ответит.
Добавьте следующий список после созданного вами списка sad_words:
starter_encouragements = [
  "Cheer up!",
  "Hang in there.",
  "You are a great person / bot!"
]
Как и раньше, не стесняйтесь добавлять в список другие фразы по вашему выбору. Сейчас я использую всего три элемента, потому что позже мы добавим возможность пользователям добавлять больше ободряющих фраз для использования ботом.
Как отвечать на сообщения
Теперь нам нужно обновить нашего бота, чтобы он использовал два созданных нами списка. Во-первых, импортируйте модуль random, потому что бот будет случайным образом выбирать сообщения из списка. Добавьте следующую строку в операторы импорта в верхней части кода:
Теперь мы обновим функцию on_message(), чтобы проверять все сообщения, чтобы увидеть, содержат ли они слово из списка sad_words. Если будет найдено грустное слово, бот отправит случайное сообщение из списка.
Вот обновленный код:
async def on_message(message):
  if message.author == client.user:
    return

  msg = message.content

  if msg.startswith('$inspire'):
    quote = get_quote()
    await message.channel.send(quote)

  if any(word in msg for word in sad_words):
    await message.channel.send(random.choice(starter_encouragements))
Это хорошее время для тестирования бота. Теперь вы знаете достаточно, чтобы создать собственного бота.
Приветик всем! 👋
С вами я, Данил. Сегодня, мы с вами создадим своего собственного бота на языке программирования Python. Если кто не знает, что такое Python, почитать можно по ссылке:
Что ж, если вы все готовы, то начинаем! 🤟
Во первых, импортируем библиотеку которая называется Discord (Discord.py).
Для этого напишем вот такой простенький скрипт:
import discord
from discord.ext import commands
Как вы видите, тут не чего сложного.
Давайте припишем вот такую маленькую часть кода, напишем первую команду, и запустим бота:
bot = commands.Bot(command_prefix=»!»)
@bot.command()
async def say(ctx, arg):
ctx.send(arg)
Дальше, мы должны добыть токен для запуска бота.
Для этого переходим на этот сайт:
Там нажимаем кнопку New Application.
Потом мы должны будем вписать название бота. По желанию вы также можете поставить ему аватарку и описание.
Дальше нажимаем пункт «Bot». Там нажимаем «Add bot». Потом соглашаемся на всё, и бот почти готов
У вас откроется такое окно:
После нажимаете кнопку «Copy». Таким способом вы копируете свой токен.
Что ж, вернёмся к скрипту. Осталось дописать одну строку и всё готово:
bot.run(«токен с сайта»)
Ну и наконец-то. Финальный этап. Возвращаемся к Developer Portal, и выбираем пункт OAuth2. После, нажимаем на кнопку URL-generator. Там выдаём боту право «bot», ну а после все его права на сервере.(Это: send messages). Потом копируем ссылку, которую он нам выдал, и вставляем её в браузер. В моём случае это Яндекс.
Там выбераем сервак и выставляем все права доступа.
В итоге он зайдёт на сервер. 🎉
Дальше запустим скрипт и увидим то, что наш бот прекрасно печатает слова на команду !say.
Поздравляю, вы написали своего первого бота на Python! 🎁
Ну что ж, я думаю, все разобрались. Если что-то не понятно — гуглите! Если вам это понравилось, фаловьтесь на мои соц-сети:
Twitter —
Discord —
Ну что, удачи! Всем пока! 😉
В данной статье мы создадим Discord бот, используя при этом только Python.
Discord — это, фактически, универсальная платформа голосового и текстового общения для геймеров.
Игроки, стримеры, студенты и разработчики используют Discord, чтобы обсуждать игры, отвечать на вопросы, общаться в чате во время игры в хорошем качестве, в том числе с членами своей команды. В нем даже есть игровой магазин с критическими отзывами и возможностью подписки. По сути, это центр игровых сообществ.
Хотя есть много вещей, которые вы можете создать с помощью API Discord, в этом руководстве мы остановимся на создании бота на Python.
Необходимые приготовления
Чтобы создать Discord бот, вам понадобится:
- Аккаунт в Discord и собственный сервер
- Python
- Устойчивое интернет-соединение во время всего процесса.
Что такое боты?
Бот (сокращение от «робот») — это программа, которая выполняет автоматические, повторяющиеся и заранее определенные задачи. Боты обычно имитируют человеческое поведение или подменяют его. Поскольку все их действия автоматизированы, они работают намного быстрее, чем обычные пользователи.
Боты очень часто используются для ответов на типовые вопросы, возникающие в различных сообществах. Они действуют как своего рода представители человека для выполнения различных функций. Основной особенностью такого бота является то, что он устраняет необходимость вручную отвечать каждому участнику и полностью автоматизирует данный процесс.
Для чего нужны чат-боты
Автоматизация ответов на основные вопросы
В любой области деятельности всегда есть вопросы, которые пользователи задают чаще всего. И на эти вопросы каждый раз надо давать одни и те же ответы. Лучшее решение в таком случае — чат-бот.
Ускорение рабочих процессов
Чат-боты, в отличии от людей, никогда не устают. Все люди могут работать только ограниченный период времени, в то время как у ботов таких ограничений нет. Использование чат-ботов в бизнесе хорошо дополняет работу людей, повышает производительность труда и сокращает человеческий труд.
Экономия денег и времени
При правильном использовании дружелюбного чат-бота привлечение клиентов происходит с минимальными затратами и максимальной эффективностью.
[python_ad_block]
Пишем код для чат-бота
Сперва убедитесь, что на вашем компьютере установлен Python. Если его еще нет, то загрузите его с официального сайта.
Среду программирования можно использовать любую, какая вам больше нравится. Например, PyCharm, VS Code или Sublime.
Теперь идите на сайт Discord и откройте на нем Developer’s Section (раздел разработчика).
Теперь выберите опцию New application (новое приложение) в правом верхнем углу страницы и дайте вашему новому приложению имя. Как видите, можно даже добавить изображение к аватару вашего бота. Мы можем сделать это позже. Сейчас пойдем в раздел Bot (на странице слева) и выберем опцию Add bot (добавить бота).
Сделав это, перейдите в категорию OAuth2 и в секции scope выберите опцию bot. Далее идите в секцию Permissions и настройте разрешения по вашему выбору.
Затем откройте ссылку под секцией scope в новом окне и выберите сервер, на котором вы желаете видеть ваш бот.
После этого установим библиотеку discord.
Для этого введем следующую команду:
pip install discord
Вот официальный сайт, где есть вся необходимая информация по данной библиотеке. Здесь же мы только заметим, что эта библиотека поддерживает API acync/await.
После установки этой библиотеки откройте ваш редактор кода и создайте файл bot.py.
Основная задача нашего тестового бота будет состоять в том, чтобы давать ответ всем пользователям на их сообщение «Hello». Но вы, конечно, можете его настроить в соответствии с вашими потребностями.
Для начала импортируем необходимые библиотеки:
import discord from discord.ext import commands
Создадим переменную Client:
client = commands.Bot( command_prefix=" / " )
Обратите внимание, что вы можете выбрать любой префикс (например «>«, «.» и тому подобное).
Также имейте ввиду, что если вы хотите вызывать своего бота, ваша вызывающая команда должна иметь префикс, сохраненный в атрибуте command_prefix.
Например, в нашем случае, чтобы вызвать бота, нужно написать /hello, а не просто hello.
Напишем следующий код для определения статуса бота:
@client.event
async def on_ready( ):
           print("Bot is ready")
Это сообщение будет отображаться всякий раз, когда вы размещаете своего бота в сети. Вы также можете проверить статус бота из самого Discord.
Это сообщение подтверждает, что наш бот готов к использованию на сервере.
Теперь, когда бот готов к работе, мы можем ответить пользователям на их приветствие hello:
@client.event
async def hello( ):
          await ctx.send("Hi")
Эта функция задает условие, при котором, когда пользователь набирает /hello, бот отвечает hi.
Для запуска бота нам понадобится токен. Он находится в разделе Bot на сайте Discord. Мы заходили туда при создании бота.
client.run(" Token ")
Замените слово Token на ваш код. Сам токен находится рядом с аватором бота. Если вдруг его там нет, нажмите на надпись Click to Reveal Token. Это должно сработать.
Теперь настало время запустить нашего бота!
Откройте CMD и наберите следующую команду:
bot.py
Если так не выходит, то наберите вот это:
python bot.py
Если вы правильно выполнили все предыдущие шаги, то должны увидеть сообщение Bot is ready.
Теперь перейдем на наш сервер и введем тестовый запрос, который в нашем случае был /hello. Мы увидим, что наш бот отвечает нам Hi.
Точно таким же образом пишем бот для приветствия новых участников:
import os

import discord
from dotenv import load_dotenv

load_dotenv()
TOKEN = os.getenv('DISCORD_TOKEN')

client = discord.Client()

@client.event
async def on_ready():
    print(f'{client.user.name} has joined Discord!')

@client.event
async def on_member_join(member):
    await member.create_dm()
    await member.dm_channel.send(
        f'Hello {member.name}!! Welcome to Our Discord Server!'
    )

client.run(TOKEN)
Возможные проблемы при создании бота
Все может быть не так просто, как это кажется на первый взгляд. Вы обязательно должны помнить о проблемах, с которыми можете столкнуться при создании бота. Некоторые из них мы перечислили ниже:
- Различные способы отправки текстовых сообщений. У всех людей есть свой стиль написания текстовых сообщений (короткие предложения, длинные предложения, несколько коротких предложений в разных сообщениях и так далее). Так что понять пользователя может быть непростой задачей.
- Пользовательские эмоции. Все мы люди, и всем нам свойственны эмоции. Наше поведение контролируется эмоциями. Мы чувствуем себя по-разному в разные моменты времени. И, кроме того, настроение постоянно меняется, и это отражается на сообщениях.
- Создание креативного и интерактивного пользовательского интерфейса (UI): Промежуток времени, за который можно привлечь внимание пользователя, очень невелик. Здесь в игру вступает диалоговый интерфейс. Его задача состоит в привлечении пользователей. То, как бот реагирует на сообщение пользователя, должно привлекать его внимание. Чем эффективнее мы это делаем, тем больше шансов, что бот снова будет востребован. Поэтому следует уделять особое внимание написанию ответов на запросы пользователей.
Заключение
Мы рассмотрели, как создать Discord бот на Python. Разумеется, это был простейший бот. Но вы, конечно же, можете написать свой собственный код и добавить множество различных функций, например OCR.
Спасибо за внимание и хорошего дня!
Перевод статьи «Build Your First Discord Bot Using Python».