Список клавиш и кнопок мыши/джойстика
Мышь (работает только с Windows NT/2000/XP)
LButton — левая кнопка мыши
RButton — правая кнопка мыши
MButton — средняя кнопка мыши (или колесо)
WheelDown — поворот колеса мыши «вниз»
WheelUp — поворот колеса мыши «вверх»
Поддерживается только Windows 2000/XP:
XButton1 — четвертая кнопка мыши, боковая
XButton2 — пятая кнопка мыши, боковая
Клавиатура
Примечание: названия буквенных и цифровых клавиш точно такие же, как и сами символы этих клавиш. То есть, клавиша «b» записывается как b, а клавиша «5» как 5.
Space — пробел
Tab
Enter (или Return)
Escape (или Esc)
Backspace (или BS)
Delete (или Del)
Insert (или Ins)
Home
End
PgUp
PgDn
Up
Down
Left
Right
ScrollLock
CapsLock
NumLock
NumpadDiv — слэш «/»
NumpadMult — звездочка «*»
NumpadAdd — плюс «+»
NumpadSub — минус «-«
NumpadEnter — клавиша «Numpad-Enter»
Следующие названия клавиш используются, когда Numlock выключен:
NumpadDel
NumpadIns
NumpadClear — та же кнопка, что и Numpad5 на клавиатуре
NumpadUp
NumpadDown
NumpadLeft
NumpadRight
NumpadHome
NumpadEnd
NumpadPgUp
NumpadPgDn
Эти названия клавиш используются при включенном Numlock’e:
Numpad0
Numpad1
Numpad2
Numpad3
Numpad4
Numpad5
Numpad6
Numpad7
Numpad8
Numpad9
NumpadDot — «Numpad-точка»
С F1 по F24 — двенадцать или более функциональных клавиш, на большинстве клавиатур представлены в самом верхнем ряду.
AppsKey — клавиша, вызывающая контекстное меню файла/программы, как при правом клике мышкой.
LWin — левая клавиша «Windows»
RWin — правая клавиша «Windows»
Control (или Ctrl)
Alt
Shift
Примечание: в большинстве случаев работа со следующими шестью клавишами не поддерживается под Windows 95/98/Me. Используйте в этом случае вариант их записи, приведенный выше, вместо следующего:
LControl (или LCtrl) — левый «Сontrol»
RControl (или RCtrl) — правый «Сontrol»
LShift
RShift
LAlt — левый «Alt»
RAlt — правый «Alt». Примечание: если на вашей клавиатуре вместо клавиши RAlt сделана клавиша AltGr, вы можете использовать следующую запись данной клавиши: <^>! Также заметим, что клавишу AltGr можно записать как сочетание клавиш «LControl & RAlt::».
PrintScreen
CtrlBreak
Pause
Break
Help — довольно редкая клавиша, присутствует далеко не на всех клавиатурах. И работает совсем не как F1.
Sleep — предупреждаем, что клавиша «Sleep» на некоторых клавиатурах не работает под этой записью.
Клавиши расширенных функций Мультимедийных и Интернет-клавиатур:
Browser_Back
Browser_Forward
Browser_Refresh
Browser_Stop
Browser_Search
Browser_Favorites
Browser_Home
Volume_Mute
Volume_Down
Volume_Up
Media_Next
Media_Prev
Media_Stop
Media_Play_Pause
Launch_Mail
Launch_Media
Launch_App1
Launch_App2
Запись вида SCnnn, где nnn — это сканкод клавиши, позволяет нам работать с остальными клавишами, не упоминавшимися выше. Подробнее об этом — см. ниже.
Возможна запись VKnn, где nn является шестнадцатиричным виртуальным кодом клавиши. Несмотря на то, что этот редко используемый метод поддерживается всеми версиями программы, только с версии 1.0.38.02 и выше для некоторых типов горячих клавиш реализовано предотвращение отслеживания их функцией «keyboard hook» (обработчик клавиатурных прерываний). Например, следующая комбинация клавиш не использует обработчик клавиатурных прерываний (keyboard hook), и как следствие может быть запущена нажатием как клавиши Home, так и NumpadHome:
^VK24::MsgBox Вы нажали Home или NumpadHome`, удерживая клавишу Control.
Джойстик
Joy1 — Joy32: кнопки джойстика. Для удобства определения номеров кнопок вашего джойстика был создан специальный тест-скрипт (см. ссылку в оригинале статьи). Обратите внимание, что такие префиксы, как ^ (control) и + (shift) здесь не поддерживаются (тем не менее, команда GetKeyState может использоваться). Также обратите внимание, что нажатия клавиш джойстика всегда обращены напрямую в активное окно, поддерживающее приём таких сигналов.
Несмотря на то, что следующие управляющие элементы джойстика не могут использоваться как горячие клавиши, их можно использовать при помощи команды GetKeyState:
JoyX, JoyY, и JoyZ: где X (горизонтальная), Y (вертикальная), и Z (высота/глубина) — оси координат джойстика.
JoyR: руль джойстика или 4-ая ось джойстика.
JoyU и JoyV: 5-ая и 6-ая оси джойстика.
JoyPOV: the point-of-view (hat) control (POV control, «шляпка» или «переключатель видов»; например, вид глазами игрока).
JoyName: название джойстика.
JoyButtons: количество кнопок, поддерживаемых джойстиком (не всегда точное).
JoyAxes: количество направлений, поддерживаемых джойстиком.
JoyInfo: генерирует строку, состоящую из нуля или более знаков, иллюстрирующих возможности джойстика: Z (имеется Z направление), R (имеется R направление), U (имеется U направление), V (имеется V направление), P (имеется POV control), D (POV control имеет ограниченное количество дискретных/промежуточных настроек), C (POV control передает непрерывные/точные данные). Пример строки: ZRUVPD.
Несколько джойстиков: если вы используете несколько джойстиков одновременно, то для более точной адресации команды используйте при записи номер джойстика перед именем клавиши джойстика. Например запись 2joy1 будет обозначать первую кнопку второго джойстика.
Примечание: если у вас возникли проблемы с определением скриптами вашего джойстика, вы можете попробовать изменить номер джойстика с 1 на что-нибудь другое, даже несмотря на то, что к компьютеру у вас подключен всего один. Неизвестно, по каким мистическим причинам, но иногда это вместе с использованием нашего тестового скрипта даёт положительный результат.
Использование джойстика как мыши: специальный скрипт превращает ваш джойстик в мышь (см. ссылку в оригинале статьи).
Дистанционные пульты управления
Получение сигналов от дистанционных пультов управления с помощью специального клиентского скрипта WinLIRC — см. ссылку в оригинале статьи.
Специальные клавиши
Если ваши клавиатура или мышь имеют клавиши, не перечисленные выше, вы всё равно имеете возможность использовать их в качестве горячих клавиш, используя следующий метод (необходимы Windows NT/2000/XP или выше):
1. Вначале убедитесь, что у вас проинсталлирован обработчик клавиатурных прерываний (keyboard hook) — #InstallKeybdHook.
2. Запускаем этот скрипт, и затем двойным кликом по его иконке в системном трее открываем его главное окно.
3. Затем нажимаем ту самую клавишу, которую пытаемся определить.
4. Далее открываем меню окошка скрипта «View — Key history and script info» и прокручиваем записи до самого низа.
5. Где-то внизу этого лога должны быть записи по нажатию-отпусканию нашей искомой клавиши. Сам лог обновляется нажатием клавиши F5. Примечание: если после нажатия искомой клавиши никаких записей в логе не появилось, значит такая клавиша не распознаётся данной программой. В этом случае вы не можете использовать данную клавишу как горячую, т.к. либо драйвер вашей клавиатуры, либо сама её «железная» составляющая даёт сигнал слишком низкого уровня, недоступного для AutoHotkey. В случае со «злобными» драйверами, вы можете попробовать либо перенастроить сами «родные» драйвера, либо заменить их на другие, более дружественые, например такие, как дефолтные клавиатурные драйвера Windows.
6. Если ваша клавиша успешно определилась, обратите внимание на трехзначное шестнадцатеричное число во второй колонке лога (например, 159).
7. Теперь, чтобы использовать данную клавишу как горячую, следуйте данному примеру:
SC159:: ; Замените 159 на индекс вашей клавиши.
MsgBox, Вы нажали клавишу %A_ThisHotKey%
Return
Как альтернативный способ или в добавление к описанному выше: для переназначения какой-либо клавиши в нашу «искомую» клавишу, используйте запись вида #c::Send {vkFFsc159}. Замените 159 на индекс вашей клавиши, определённый вышеописанным методом. При необходимости замените буквы FF на те, что отображены в первой колонке лога «View-Key history» (код вашей виртуальной клавиши).
© Dmitrij_Medvedev
На чтение 3 мин Просмотров 2.3к. Опубликовано 26.01.2023
AutoHotkey — сценарный язык программирования, который существенно упрощает процесс PR отыгровок посредством автоматического ввода в игровой чат ряда подготовленных фраз.
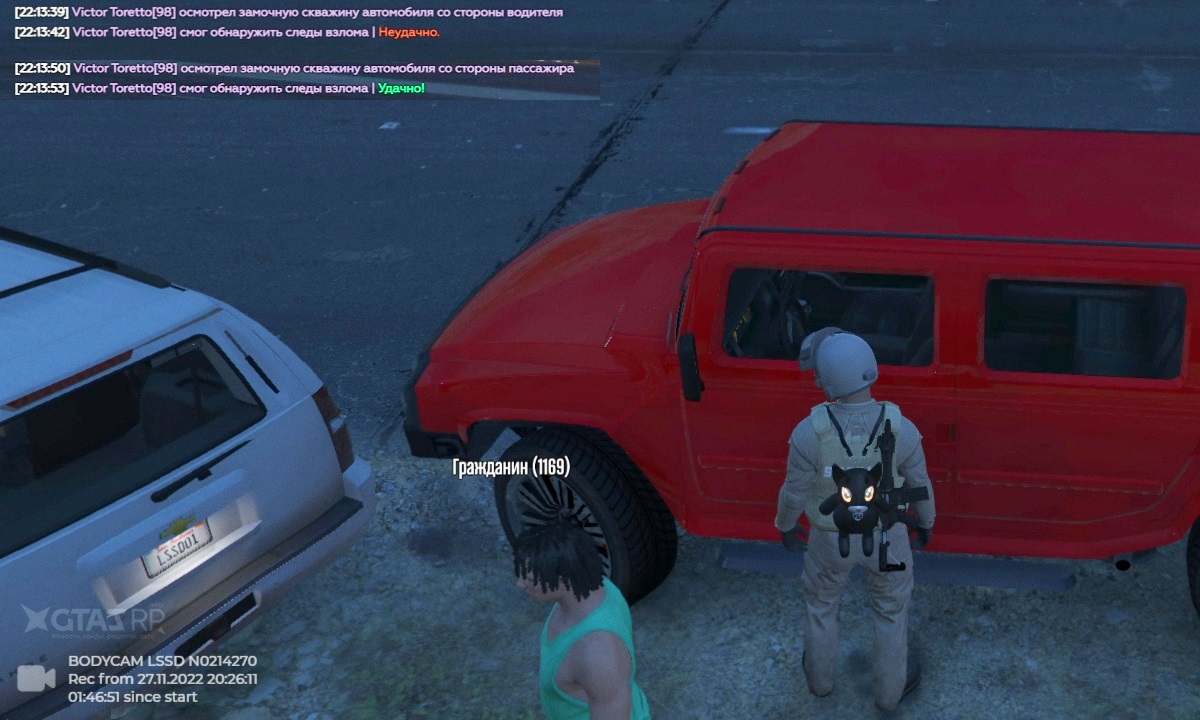
AHK по большей части нужен тем игрокам, которые работают в силовых структурах (таких как LSPD, FIB и др.), ведь именно там высокая концентрация коммуникативных действий, где при нажатии нескольких клавиш вы в считанные секунды можете воспроизводить объемные отыгровки с использованием /do, /me, /try и т.д. (например, при проверке гос. сотрудником угнанной машины на предмет взлома).
В crime фракциях отыгровки понадобятся при ограблении гражданских или похитках
Содержание
- Установка языка
- Создание файла
- Написание отыгровок
- Работа скрипта
Установка языка
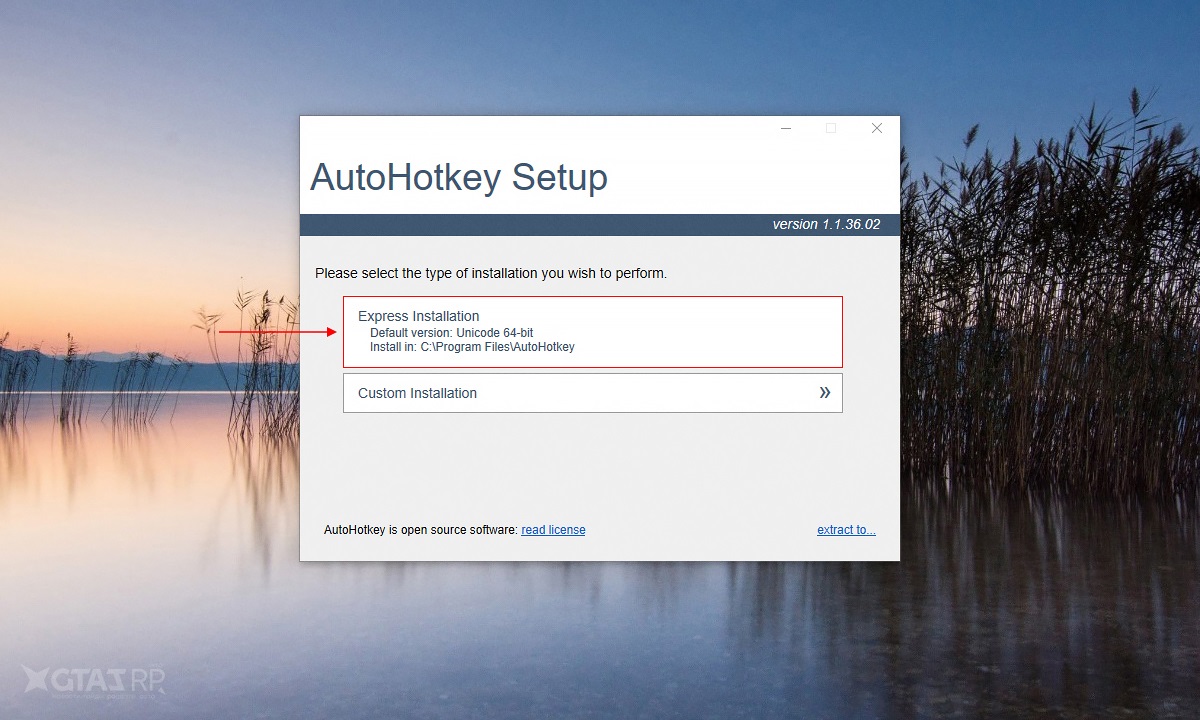
Установка AHK не занимает много времени и не требует специальных знаний, нужно лишь скачать файл с официального сайта и установить языковой пакет на свой компьютер.
Ссылка на скачивание с оф. сайта (v1.1): www.autohotkey.com

Создание файла
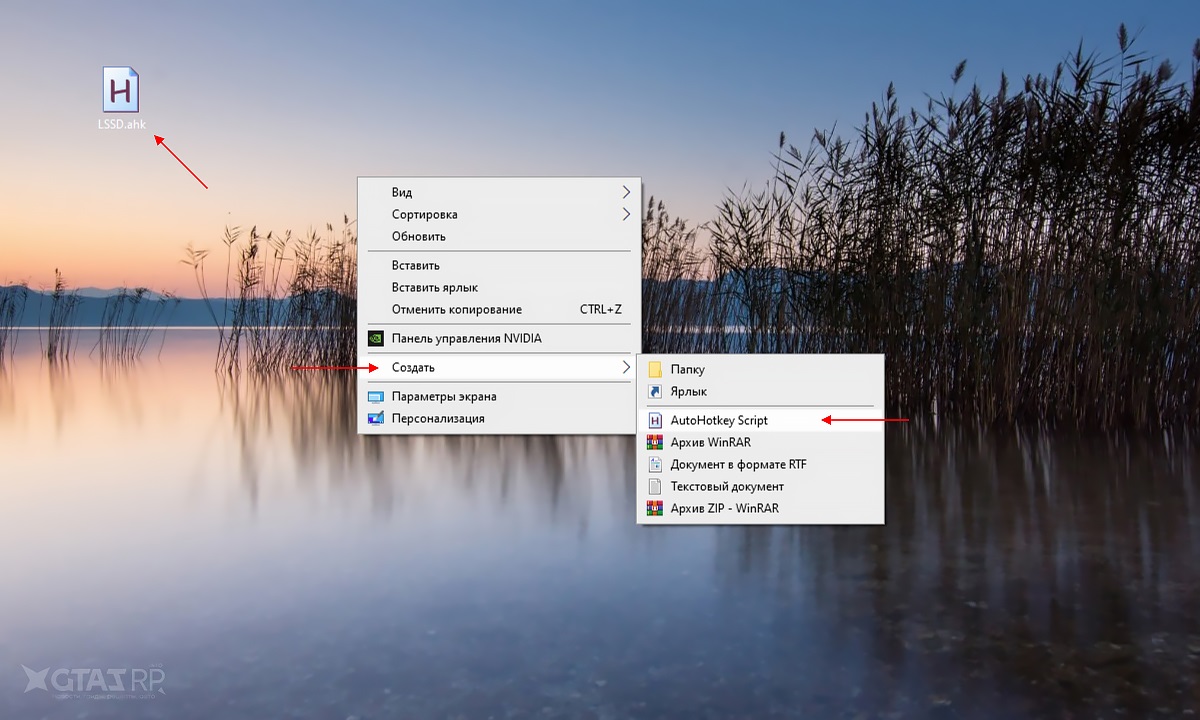
Установив AutoHotkey, открываем контекстное меню нажатием правой кнопки мыши на рабочем столе, создаем файл скрипта, выбрав пункт «Создать › AutoHotkey Script», и открываем его любым доступным редактором (например, Блокнот).
Написание отыгровок
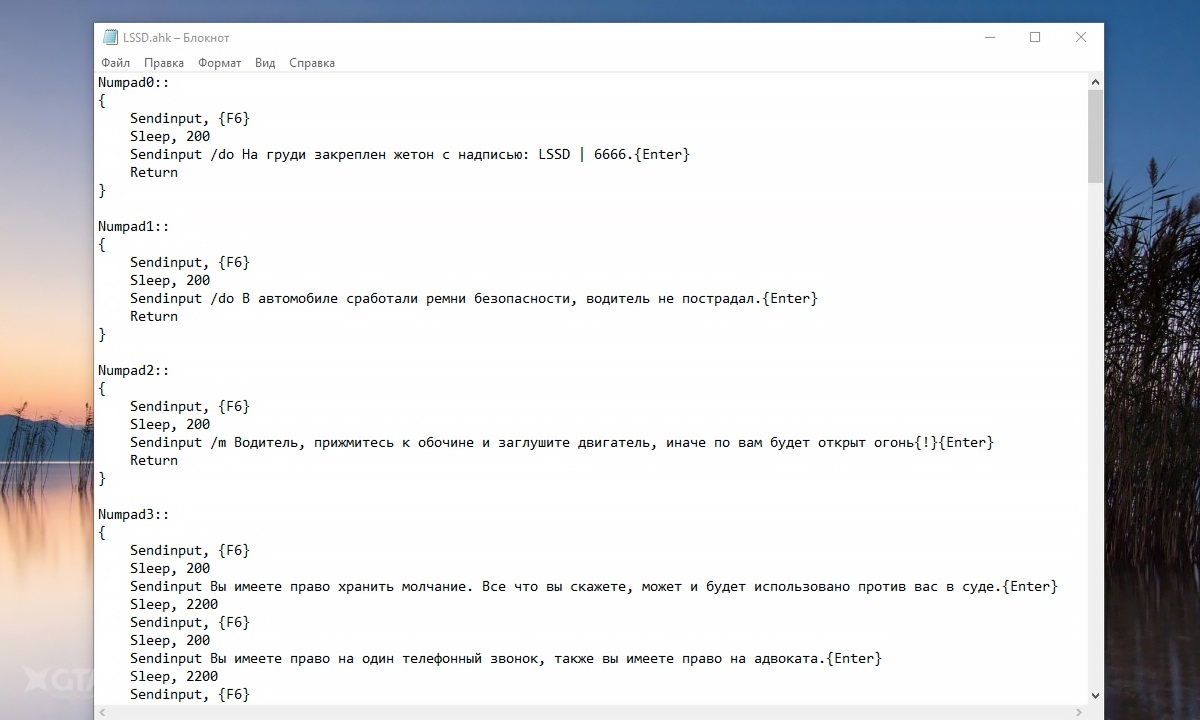
Разберем принцип написания кода на примере простой отыгровки.
Numpad7::
{
Sendinput, {F6}
Sleep, 200
Sendinput /do Ключ-карта находится на поясе.{Enter}
Sleep, 2200
Sendinput, {F6}
Sleep, 200
Sendinput /me снял ключ-карту с пояса, открыл КПЗ и провел туда задержанного{Enter}
Sleep, 2200
Sendinput, {F6}
Sleep, 200
Sendinput /me закрыл КПЗ и повесил ключ-карту на пояс{Enter}
Return
}
Numpad7:: — клавиша (7 на цифровом блоке клавиатуры), по нажатию которой будет воспроизводиться сценарий в синих скобках.
Сокращение клавиш: # — Win, ! — Alt, ^ — Ctrl, + — Shift (например, !6:: — среагирует на нажатие сочетания клавиш Alt+6)
Sendinput, {F6} — нажимает клавишу F6, которая открывает форму ввода в игровой чат.
Sleep, 200 — ожидание/задержка в ms после открытия формы ввода в чат.
Sleep, 2200 — ожидание/задержка в ms после отправки текста/отыгровки в игровой чат.
Sleep необходимо указывать между каждым действием, например, нажали F6 — подождали, ввели текст в поле и отправили в чат — подождали
Если код будет сбоить, можете увеличить задержку на 10-20%
Sendinput … {Enter} — вводит в поле заданный текст/отыгровку и нажимает клавишу Enter.
При необходимости ввести символ # ! ^ +, заключите его в фигурные скобки — {!}
Return — оператор, который возвращает результат воспроизведения/выполнения функции (перед Return не нужно указывать Sleep).
Скачать файл с примерами отыгровок: TEST_AHK.rar (Google Диск)
Работа скрипта
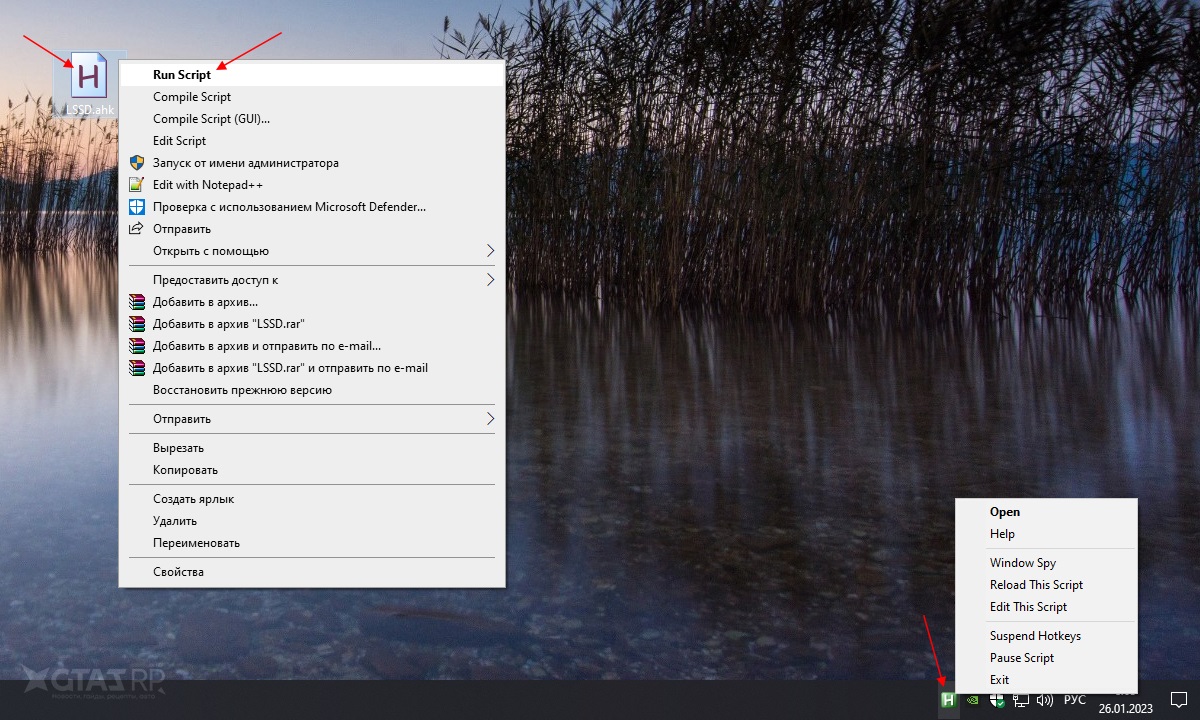
Наполнив файл нужными отыгровками, сохраняем его и запускаем, кликнув на значок правой кнопкой мыши и выбрав пункт «Run Script». Если вы все сделали правильно, то на панели задач появится зеленая иконка с буквой «H». Теперь, находясь в игре, при каждом нажатии ранее заданных клавиш будут проигрываться относящиеся к ним сценарии.
Выбрав «Exit» в контекстном меню на иконке в трее, вы завершите работу скрипта
![]()
Download Article
![]()
Download Article
- Installing AutoHotkey
- Creating a Script
- Creating a Hotkey
- Creating a Hotstring
- Launching Apps or Websites
|
|
|
|
This wikiHow teaches you how to use AutoHotkey on a Windows computer. AutoHotkey is a free Windows scripting language that allows you to program different actions with various keyboard shortcuts. The following steps will show you how to install AutoHotkey as well as program a few basic scripts to enter text, run programs, and open websites using simple keyboard shortcuts.
-

1
Go to https://autohotkey.com in a web browser. Using your preferred web browser, go to official AutoHotkey website.
-
2
Click Download. It’s the green button in the center of the page.
Advertisement
-
3
Click Download AutoHotkey Installer. It’s the blue button at the top of the page. This will start the download of the AutoHotkey installer.
-
4
Run the installation file. Double-click the installation file you just downloaded to start the installer.
- By default, all your downloaded files can be found in your Downloads folder.
-
5
Click Express Installation. It’s the first option in the AutoHotkey Setup wizard. This will install AutoHotkey on your computer with the default configuration.
- When it’s finished installing you can click «Run AutoHotkey» to launch some of the documentation about AutoHotkey.


Advertisement
-
1
Right-click your desktop. When you right-click on any blank part of your desktop, this opens a drop-down menu.
-
2
Hover the mouse over New. When you place the mouse cursor over «New» you will see a list of programs you can create a new file for.
-
3
Click AutoHotkey Script. This will create a new AutoHotkey script on your desktop. It will have an image of a white page with a red «H» on it.
-
4
Rename the AutoHotkey file. By default, the new document will be named «NewAutoHotkeyScript.ahk» and it will be highlighted, allowing you type a new name for your script.
- Be sure not to erase the file extension of «.ahk» at the end. Your file must end with the «.ahk» file extension or else it won’t work with AutoHotkey.
-
5
Right-click your new script. This will open a drop-down menu with additional options for the file.
-
6
Click Edit Script. It’s the third option from the top. This will launch the AutoHotkey script in Notepad. This is where you will write the programming to create your first AutoHotkey script.
- There is some code and text already inserted into the first few lines of every new AHK script, you can ignore this and leave it alone for now.


Advertisement
-
1
On a new line, type the code for the keyboard shortcut you want to assign. For example, if you want to assign a command that does something when you press the key combination of Ctrl+E, you would type ^e. Each lowercase letter represents its own key, while special keys have their own symbols:
- + = ⇧ Shift
- ^ = Ctrl
- ! = Alt
- # = ⊞ Win (Windows key)
- Click here for a complete list of key commands.
-
2
Type two colons after the keys you assigned. Any key or key combination you typed needs to be followed by ::. So in our example, the first line of our code would look like:
-
3
Press ↵ Enter to go to the next line and press Tab ↹ to indent. You’ll type the command for what will happen with then hotkey is pressed on the line below the two colons. You can indent the line by pressing «Tab» or by typing several spaces
- You don’t have to indent the command line but it will keep your code organized and easy to read if you have errors later.
-
4
Type Send, and then type a message. The Send command will automatically type a message when a Hotkey is triggered. Anything you type after the comma will be typed automatically when you press the assigned Hotkey. For our example, if you wanted to include the message «wikiHow is awesome!» your code would look like:
- Special characters, like the exclamation mark, must be enclosed in braces { } so it isn’t confused with the symbol for the «Alt» key.
^e::
    Send, wikiHow is awesome{!}
-
5
Press ↵ Enter to go the next line and type Return. The Return command denotes the end of a command and stops the code from going to the lines below.[1]
Your finished code should look like:^e:: Send, wikiHow is awesome{!} Return
-
6
Save your script. Click «File» in the menu bar at the top of Notepad and click «Save» in the drop-down menu. This will save the code you’ve added to the script file.
- You can close Notepad once your work has been saved.
-
7
Run the script. Double-click the script file on your desktop to run the script. You’ll see a green AutoHotkey icon appear in your system tray on the bottom-right of your screen. This indicates that an AutoHotkey script is active.
-
8
Test your Hotkey. Open a new word processing app or any app you can type text and press your Hotkey combo. In our example, if you press Ctrl+E you’ll see the text «wikiHow is awesome!» instantly appear.


Advertisement
-
1
Open your script or create a new one. You can open the script you were working on earlier and add a new command to it or create a new script from scratch.
- Right-click the script and select «Edit Script» to edit the previous script.
- Right-click the desktop and go to «New,» then select «Auto Hotkey Script.»
-
2
Go to a new line and type two colons. A Hotstring command starts with :: at the beginning.
- A Hotstring can take a word or phrase you type and replace it with a different word or phrase.
-
3
Type the letters, word, or phrase you want to replace. For example, you can create a Hotstring so that every time you type the acronym «btw» it would automatically change it to «By the way,» so you didn’t have to type it all out. In that example, so far your code would look like:
-
4
Type two more colons again. This will separate the end of the message you want to replace from the words or you want to replace it with. Using our example, the code would look like:
-
5
Type the message you want to replace it with. The message you type after the second pair of colons will automatically replace the first message in between the two sets of colons. In our example, the code would look like:
- Hotstrings don’t need a «Return» command and the end because they are self-contained on one line of a script
-
6
Save and run the script to test it out. Just like before, save your work by clicking «File» and «Save»—then double-click the script to run it. Then open any app or program you can type in to test it out. When you type the letters «btw» onto any page, it should immediately be replaced with «By the way,» in the text field.


Advertisement
-
1
Open your script or create a new one. You can open the script you were working on earlier and add a new command to it or create a new script from scratch.
- Right-click the script and select «Edit Script» to edit the previous script.
- Right-click the desktop and go to «New,» then select «Auto Hotkey Script.»
-
2
On a new line, type the code for the Hotkeys you want to assign. For example, if you wanted to open the wikiHow website whenever you pressed they keys Wind+W, you would type the code #w because «#» is the symbol for the Windows key and «w» is the code for the W key. In that example, the code would look like:
- Click here for a complete list of key symbols if you want to use a different key combination for your Hotkey.
-
3
Type the two colons, then go to the next line and indent. Immediately after typing the code for the keyboard shortcut, type two colons :: and then press ↵ Enter to go to the next line. Indent the line using several spaces or the Tab ↹ key.
- You don’t have to indent the command line but it will keep your code organized and easy to read if you have errors later.
-
4
Type Run,. The Run command can be used to launch any program, application or website. Type Run, with the comma at the end and Auto Hotkey will look for the name or location of any program or website listed after the comma. In our example, the code so far would look like:
-
5
Type the full location of any program on your computer or type any website’s full URL. For example, if you wanted your Hotkey to launch Internet Explorer, you would type C:Program Filesinternet exploreriexplore.exe after the Run command. In our example, since we want to launch the wikiHow website, our code would look like:
#w::
    Run, https://wikihow.com
-
6
Press ↵ Enter to go the next line and type Return. The Return command denotes the end of a command and stops the code from going to the lines below. In our example. your finished code should look like:
#w::
    Run, https://wikihow.com
Return
-
7
Save and run the script to test it out. Just like before, save your work by clicking «File» and «Save»—then double-click the script to run it. If you followed our example, whenever you press the key combination of ⊞ Win+W, the wikiHow website will open in your default browser!


Advertisement
Ask a Question
200 characters left
Include your email address to get a message when this question is answered.
Submit
Advertisement
Thanks for submitting a tip for review!
References
About This Article
Article SummaryX
1. Install AutoHotkey from https://www.autohotkey.com.
2. Right-click the desktop and click New.
3. Click AutoHotkey Script.
4. Right-click the script icon and select Edit Script.
5. Enter the code for the keyboard shortcut followed by two colons.
6. Press Enter.
7. Type «Send» followed by the word(s) or command.
8. Press Enter.
9. Type «Return» and save the file.
10. Double-click the script to run it.
Did this summary help you?
Thanks to all authors for creating a page that has been read 51,050 times.
Is this article up to date?
![]()
Download Article
![]()
Download Article
- Installing AutoHotkey
- Creating a Script
- Creating a Hotkey
- Creating a Hotstring
- Launching Apps or Websites
|
|
|
|
This wikiHow teaches you how to use AutoHotkey on a Windows computer. AutoHotkey is a free Windows scripting language that allows you to program different actions with various keyboard shortcuts. The following steps will show you how to install AutoHotkey as well as program a few basic scripts to enter text, run programs, and open websites using simple keyboard shortcuts.
-
1
Go to https://autohotkey.com in a web browser. Using your preferred web browser, go to official AutoHotkey website.
-
2
Click Download. It’s the green button in the center of the page.
Advertisement
-
3
Click Download AutoHotkey Installer. It’s the blue button at the top of the page. This will start the download of the AutoHotkey installer.
-
4
Run the installation file. Double-click the installation file you just downloaded to start the installer.
- By default, all your downloaded files can be found in your Downloads folder.
-
5
Click Express Installation. It’s the first option in the AutoHotkey Setup wizard. This will install AutoHotkey on your computer with the default configuration.
- When it’s finished installing you can click «Run AutoHotkey» to launch some of the documentation about AutoHotkey.
Advertisement
-
1
Right-click your desktop. When you right-click on any blank part of your desktop, this opens a drop-down menu.
-
2
Hover the mouse over New. When you place the mouse cursor over «New» you will see a list of programs you can create a new file for.
-
3
Click AutoHotkey Script. This will create a new AutoHotkey script on your desktop. It will have an image of a white page with a red «H» on it.
-
4
Rename the AutoHotkey file. By default, the new document will be named «NewAutoHotkeyScript.ahk» and it will be highlighted, allowing you type a new name for your script.
- Be sure not to erase the file extension of «.ahk» at the end. Your file must end with the «.ahk» file extension or else it won’t work with AutoHotkey.
-
5
Right-click your new script. This will open a drop-down menu with additional options for the file.
-
6
Click Edit Script. It’s the third option from the top. This will launch the AutoHotkey script in Notepad. This is where you will write the programming to create your first AutoHotkey script.
- There is some code and text already inserted into the first few lines of every new AHK script, you can ignore this and leave it alone for now.
Advertisement
-
1
On a new line, type the code for the keyboard shortcut you want to assign. For example, if you want to assign a command that does something when you press the key combination of Ctrl+E, you would type ^e. Each lowercase letter represents its own key, while special keys have their own symbols:
- + = ⇧ Shift
- ^ = Ctrl
- ! = Alt
- # = ⊞ Win (Windows key)
- Click here for a complete list of key commands.
-
2
Type two colons after the keys you assigned. Any key or key combination you typed needs to be followed by ::. So in our example, the first line of our code would look like:
-
3
Press ↵ Enter to go to the next line and press Tab ↹ to indent. You’ll type the command for what will happen with then hotkey is pressed on the line below the two colons. You can indent the line by pressing «Tab» or by typing several spaces
- You don’t have to indent the command line but it will keep your code organized and easy to read if you have errors later.
-
4
Type Send, and then type a message. The Send command will automatically type a message when a Hotkey is triggered. Anything you type after the comma will be typed automatically when you press the assigned Hotkey. For our example, if you wanted to include the message «wikiHow is awesome!» your code would look like:
- Special characters, like the exclamation mark, must be enclosed in braces { } so it isn’t confused with the symbol for the «Alt» key.
^e::
    Send, wikiHow is awesome{!}
-
5
Press ↵ Enter to go the next line and type Return. The Return command denotes the end of a command and stops the code from going to the lines below.[1]
Your finished code should look like:^e:: Send, wikiHow is awesome{!} Return
-
6
Save your script. Click «File» in the menu bar at the top of Notepad and click «Save» in the drop-down menu. This will save the code you’ve added to the script file.
- You can close Notepad once your work has been saved.
-
7
Run the script. Double-click the script file on your desktop to run the script. You’ll see a green AutoHotkey icon appear in your system tray on the bottom-right of your screen. This indicates that an AutoHotkey script is active.
-
8
Test your Hotkey. Open a new word processing app or any app you can type text and press your Hotkey combo. In our example, if you press Ctrl+E you’ll see the text «wikiHow is awesome!» instantly appear.
Advertisement
-
1
Open your script or create a new one. You can open the script you were working on earlier and add a new command to it or create a new script from scratch.
- Right-click the script and select «Edit Script» to edit the previous script.
- Right-click the desktop and go to «New,» then select «Auto Hotkey Script.»
-
2
Go to a new line and type two colons. A Hotstring command starts with :: at the beginning.
- A Hotstring can take a word or phrase you type and replace it with a different word or phrase.
-
3
Type the letters, word, or phrase you want to replace. For example, you can create a Hotstring so that every time you type the acronym «btw» it would automatically change it to «By the way,» so you didn’t have to type it all out. In that example, so far your code would look like:
-
4
Type two more colons again. This will separate the end of the message you want to replace from the words or you want to replace it with. Using our example, the code would look like:
-
5
Type the message you want to replace it with. The message you type after the second pair of colons will automatically replace the first message in between the two sets of colons. In our example, the code would look like:
- Hotstrings don’t need a «Return» command and the end because they are self-contained on one line of a script
-
6
Save and run the script to test it out. Just like before, save your work by clicking «File» and «Save»—then double-click the script to run it. Then open any app or program you can type in to test it out. When you type the letters «btw» onto any page, it should immediately be replaced with «By the way,» in the text field.
Advertisement
-
1
Open your script or create a new one. You can open the script you were working on earlier and add a new command to it or create a new script from scratch.
- Right-click the script and select «Edit Script» to edit the previous script.
- Right-click the desktop and go to «New,» then select «Auto Hotkey Script.»
-
2
On a new line, type the code for the Hotkeys you want to assign. For example, if you wanted to open the wikiHow website whenever you pressed they keys Wind+W, you would type the code #w because «#» is the symbol for the Windows key and «w» is the code for the W key. In that example, the code would look like:
- Click here for a complete list of key symbols if you want to use a different key combination for your Hotkey.
-
3
Type the two colons, then go to the next line and indent. Immediately after typing the code for the keyboard shortcut, type two colons :: and then press ↵ Enter to go to the next line. Indent the line using several spaces or the Tab ↹ key.
- You don’t have to indent the command line but it will keep your code organized and easy to read if you have errors later.
-
4
Type Run,. The Run command can be used to launch any program, application or website. Type Run, with the comma at the end and Auto Hotkey will look for the name or location of any program or website listed after the comma. In our example, the code so far would look like:
-
5
Type the full location of any program on your computer or type any website’s full URL. For example, if you wanted your Hotkey to launch Internet Explorer, you would type C:Program Filesinternet exploreriexplore.exe after the Run command. In our example, since we want to launch the wikiHow website, our code would look like:
#w::
    Run, https://wikihow.com
-
6
Press ↵ Enter to go the next line and type Return. The Return command denotes the end of a command and stops the code from going to the lines below. In our example. your finished code should look like:
#w::
    Run, https://wikihow.com
Return
-
7
Save and run the script to test it out. Just like before, save your work by clicking «File» and «Save»—then double-click the script to run it. If you followed our example, whenever you press the key combination of ⊞ Win+W, the wikiHow website will open in your default browser!
Advertisement
Ask a Question
200 characters left
Include your email address to get a message when this question is answered.
Submit
Advertisement
Thanks for submitting a tip for review!
References
About This Article
Article SummaryX
1. Install AutoHotkey from https://www.autohotkey.com.
2. Right-click the desktop and click New.
3. Click AutoHotkey Script.
4. Right-click the script icon and select Edit Script.
5. Enter the code for the keyboard shortcut followed by two colons.
6. Press Enter.
7. Type «Send» followed by the word(s) or command.
8. Press Enter.
9. Type «Return» and save the file.
10. Double-click the script to run it.
Did this summary help you?
Thanks to all authors for creating a page that has been read 51,050 times.
Is this article up to date?
Очень полезная программа быстрого набора предложений для SAMP, MTA, GTA для РП отыгровки
![]()
Содержание
- Что такое ахк биндер?
- Установка ahk биндера
- Как создать ahk файл — Бинд?
- Пример бинда
- Компиляция скрипта
- Запускаем откомпилированный файл
- Проверка работы скрипта
Что такое ахк биндер?
AutoHotKey — это программа предназначена для быстрого набора предложений. Самый простой пример например Вам необходимо поздороваться в игре с 1000 человек в течение дня. Чтобы каждый раз не писать одно и тоже пишется скрипт, который при нажатии всего на одну клавишу пишет необходимый текст целиком.
Установка ahk биндера
Ниже будет показано на скриншотах пошаговая установка программы, процесс установки не сложен, если вы знаете английский язык, если же не знаете следуйте указаниям.
1. Шаг. Выбираем пункт Modify
![]()
2. Шаг. Выбираем разрядность вашего windows
3. Шаг. Путь куда устанавливать программу
4. Шаг. Ставим необходимые галки.
5. Шаг. Установка завершена. Выходим с установщика.
Как создать ahk файл — Бинд?
АХК- файл это файл с действиями для РП отыгровки, которые необходимо выполнять нажатие на клавиши.
Для начала необходимо создать на рабочем столе( именно на рабочем столе файл) autoHotKey Script
После того как файл будет создан, его необходимо открыть на редактирование. Сделать это можно нажав на файл правой кнопкой мыши и выбрав пункт Edit Script
Пример бинда
И так файл у вас создан, открыт на редактирование. Настало время для примера. Вставляем в открый файл текст указанный ниже.
F3::
Send {h down}
Send {h up}
Send {e down}
Send {e up}
Send {l down}
Send {l up}
Send {l down}
Send {l up}
Send {o down}
Send {o up}
Return
Компиляция скрипта
Сохраняем файл и закрываем его. Далее щёлкаем правой мышкой по файлу. И выбираем Compile Script
Запускаем откомпилированный файл
После того как вы нажмёте compile Script, на рабочем столе появится файл с похожим названием и зёлёным значком.
Вам необходимо будет снова нажать правой кнопкой мыши уже по этому файлу и выбрать Запустить от имени Администратора
Проверка работы скрипта
После того как вы выполнили все указанные пункты выше, в треи у вас появиться запущенный скрипт. Создаём текстовый документ и нажимаем клавишу F3, в результате в блокноте должен появиться текст hello. Если у вас что-то не получилось значит вы что-то сделали не так. Повторите последовательность действий заново.
Примеры биндов для РП Бокс будут в других статьях.