
Все разделы

Нужна помощь?
Краткое обучение (начать здесь)
Оказавшись на этой странице, вероятно, вы собираетесь начать осваивать язык автоматизации Autohotkey.
В этой статье описана установка программы, ее базовые возможности и примеры кода. Наберитесь терпения, запасайтесь чаем и приступаем 
Все интересующие вопросы вы можете задать в нашей группе Вконтакте.
Autohotkey в играх
Обратите внимание, что макросы запрещены во многих играх. За использование Autohotkey ваш аккаунт может быть забанен!
Кроме этого, многие современные игры имеют активный античит, препятствующий программной эмуляции нажатий. Это значит, что нажатия, воспроизводимые скриптом могут игнорироваться.
Мы не содействуем читерству, и если античит блокирует работу Autohotkey в определенной игре- не будем помогать вам обойти защиту!
Стоит так же учитывать, что Autohotkey разработан для взаимодействия со средой Explorer’a и его окон. Такие команды как PixelSearch, PixelGetColor и ImageSearch вероятнее всего не будут работать в полноэкранных 3D приложениях.
Чаще всего Autohotkey воспринимает окна с отрисовкой 3D как черный квадрат (цвет 0x000000). Иногда проблема решается переводом игры в оконный режим, но корректная работа все равно не гарантируется и единого решения НЕТ.
Установка Autohotkey и редактора Notepad++
Перед началом работы неплохо бы скачать Autohotkey с оффициального сайта.
После запуска инсталятора выбираем Unicode версию программы, иначе получим иероглифы вместо русских букв. Лучше выбрать разрядность, соответствующую вашей ОС. Но стоит помнить что скрипты, скомпилированные x64 версией не запустятся на 32-разрядных ОС.
Для редактирования скриптов можно использовать любой текстовый редактор, включая «Блокнот». Но для удобства работы с кодом лучше использовать Notepad++, который так же скачиваем с оффициального сайта и устанавливаем.
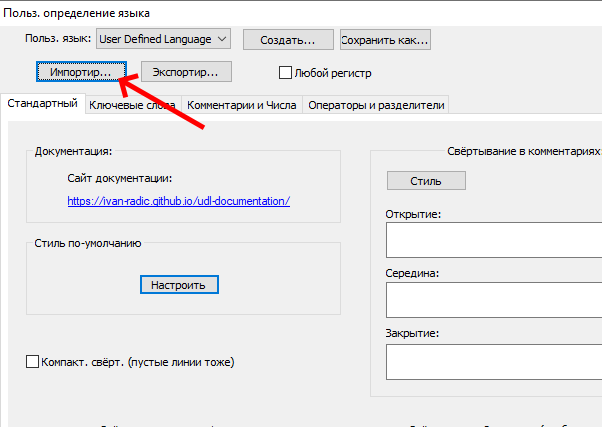
После установки вам понадобится файл подсветки синтаксиса Autohotkey userDefineLang_AHK.xml. Сохраняем его в любое удобное место.
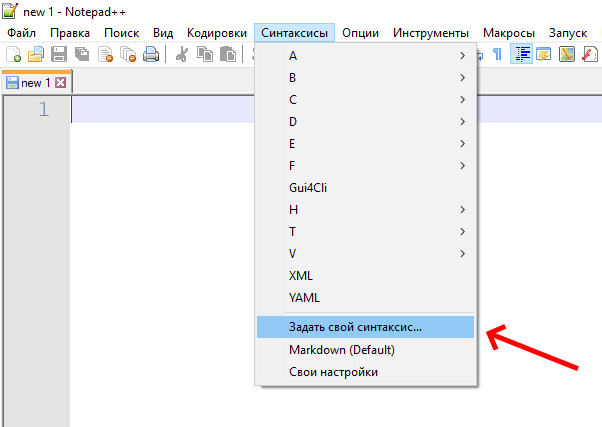
Теперь запускаем Notepad++, в меню «Синтксисы» выбираем «Задать свой синтаксис…». В открывшемся окне жмем «Импортировать» и выбираем скачанный файл.
После перезапуска программы в меню «Синтаксисы» появится Autohotkey, а файлы с расширением .ahk будут сразу открываться с подсветкой синтаксиса.
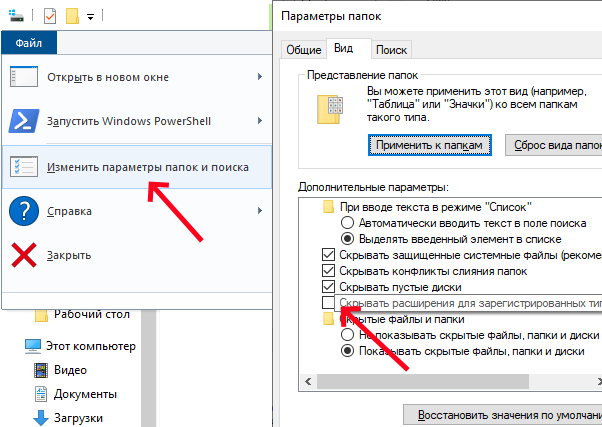
Рекомендую сразу включить отображение расширений файлов в системе. Для этого откройте любое окно проводника, в верхнем меню «Файл» выберите пункт «Параметры папок и поиска». В открывшемся окне во вкладке «Вид» снимите галочку «Скрывать расширения для зарегистрированных типов файлов».

Создание первого скрипта
После того, как среда Autohotkey и текстовый редактор установлены, можно приступать к созданию первого скрипта.
Скрипты являются обычными текстовыми файлами, имеющими расширение .ahk. Запускаются как любое приложение, двойным кликом мыши.
Чтобы отредактировать скрипт, нажмите на нем ПКМ > Открыть с помощью > Notepad++.
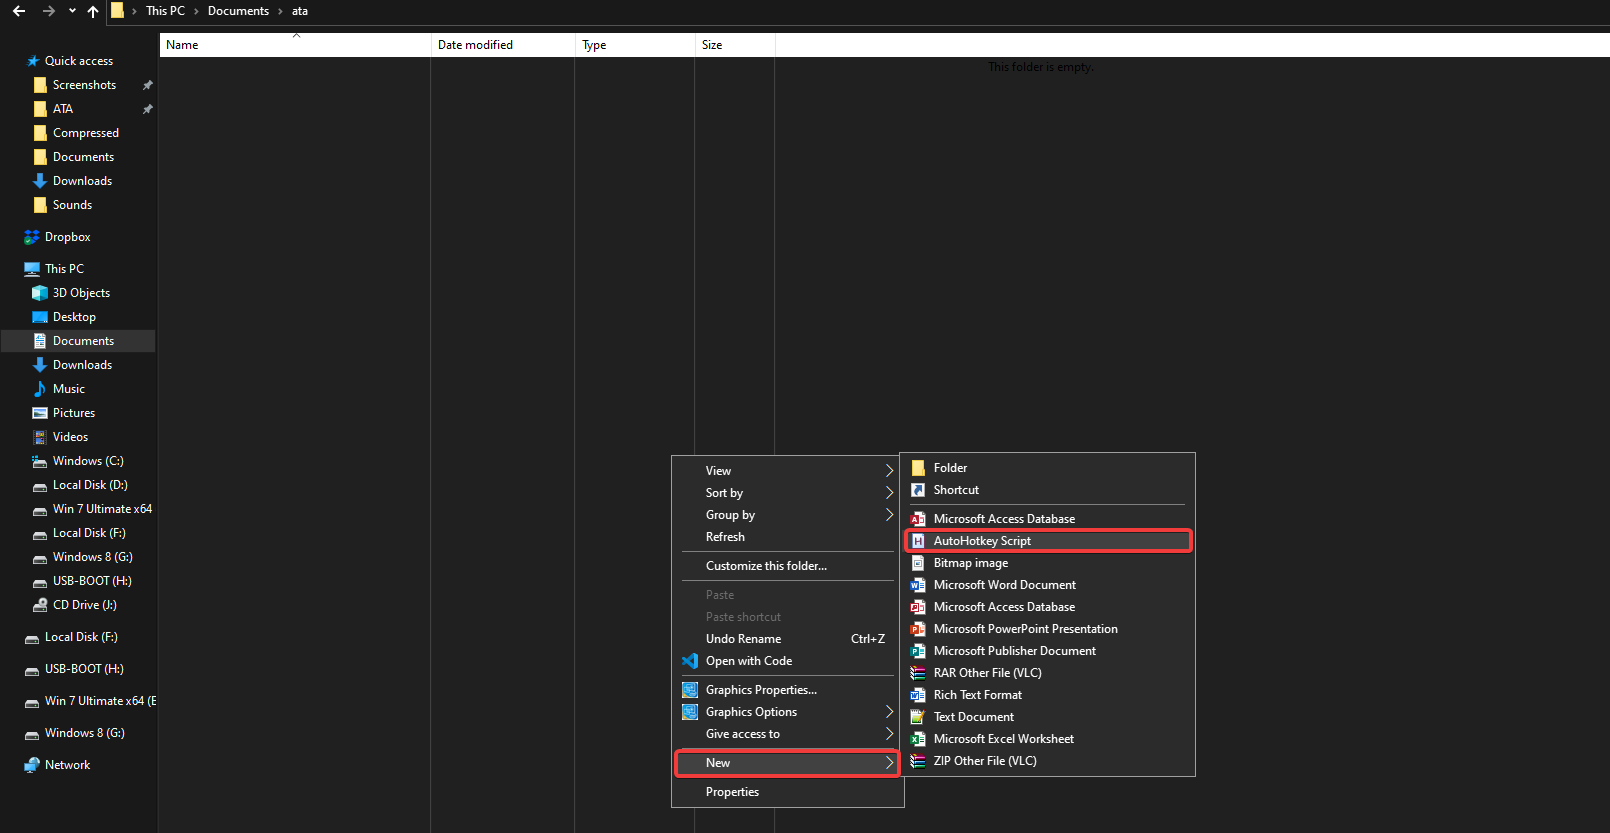
Вы можете создать обычный текстовый документ и переименовать его, изменив расширение с «.txt» на «.ahk», или сразу создать пустой скрипт, нажав ПКМ / Создать > / AutoHotkey Script. Не забудьте установить Notepad++ в качестве редактора по умолчанию для .ahk файлов.
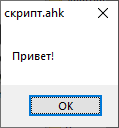
Создайте скрипт со следующим кодом и запустите его. Если вы увидели окно с приветствием- все установлено правильно и можно продолжать.
MsgBox, Привет!
Порядок исполнения команд
Обратите внимание! Данный пункт крайне важен для понимания работы программы.
В момент запуска скрипта, команды начинают выполняться по очереди сверху вниз. Выполнение новой команды не будет начато до тех пор, пока не окончена предыдущая.
Так интерпретатор будет последовательно исполнять код, пока не встретит Return. Эта команда прерывает текущий поток. С его помощью обозначаются пределы макрокоманды, а так же возвращаются значения из функций.
MsgBox, Эта команда выполнится
Return
MsgBox, А эта нет, ведь поток был прерван
Если по мере выполнения кода встречается цикл- он выполняется до тех пор, пока истинно его условие, или он не будет разорван командой Break. Как выглядят циклы мы разберем чуть ниже, не торопитесь
Комментарии в коде и отладка
Когда нужно оставить в коде строчку с пояснением- на помощь приходит комментарий, по умолчанию он отделяется точкой с запятой. Вся строка после ; игнорируется интерпретатором. Обратите внимание, что в Autohotkey нет многострочных комментариев! Каждая строка экранируется отдельно.
MsgBox, Тест ;А это комментарий в коде, он обычно поясняет происходящее
Для отладки кода (проверки условий, просмотра значений переменных и т.д.) проще всего использовать команды MsgBox и ToolTip. Первая выводит информацию в виде окна и ждет подтверждения, вторая показывает всплывающую подсказку и не прерывает выполнение кода.
Горячие клавиши
Основным назначением Autohotkey является назначение горячих клавиш. Они представляют собой сочетания клавиш и кнопок мыши, при нажатии которых выполняется заданная последовательность команд (макрокоманда, она же- макрос).
Запись горячей клавиши может иметь однострочный и многострочный вид, в зависимости от необходимого количества команд.
^1::MsgBox, вы нажали Ctrl+1 ;Однострочная запись
;Многострочная запись
^2::
MsgBox, Вы нажали Ctrl+2
Sleep, 3000
MsgBox, И дождались появления второго окна через 3 сек.
Return
Перед двоеточием указывается клавиша или сочетание клавиш, вызывающие действие. Больше о горячих клавишах можно узнать здесь. Так же, наверняка, вам пригодится список клавиш и кнопок мыши.
Строки автозамены
Строки автозамены имеют тот же принцип, что и горячие клавиши, но заменяют не сочетание клавиш, а фрагмент строки. Чаще всего используются для развертывания аббревиатур.
;При вводе «кхл», развернет сокращение
::кхл::Континентальная хоккейная лига
;Поддерживает многострочную запись и вызов любых команд
::ихний::
MsgBox, вы допустили ужасную грамматическую ошибку. Ваш компьютер будет выключен.
Shutdown, 1
Return
Все возможности строк автозамены, такие как чувствительность к регистру, замена части слова, задержка нажатий- ищите в соответствующей Статье.
Эмуляция нажатий
Для эмуляции нажатий и ввода текста используется команда Send.
Она имеет несколько вариаций: Send, SendPlay, SendInput и SendRaw. Подробно про их отличия можно прочитать по ссылке выше.
;Ввод строки по нажатию 1
1::Send, Здравствуйте, чем могу вам помочь?{Enter}Текст с новой строки
;Обратите внимание на !, без скобок он равносилен нажатию Alt
2::Send, Благодарим за визит{!}
;Выполнит комбинацию Ctrl+Shift+Esc, запустив диспетчер задач
3::Send, ^+{Esc}
;Зажмет Alt и несколько раз нажмет Tab, переключая окна
4::
Send, {Alt down}
Loop, 5
{
Send, {Tab}
Sleep, 500
}
Send, {Alt up}
Return
Переменные и выражения
Для хранения и обработки информации служат переменные. Во вступительном гайде мы рассмотрим лишь три основных вида: логический, числовой и текстовый. Переменные в Autohotkey динамически изменяют свой тип в зависимости от последнего присвоенного значения.
Имя переменной не должно превышать 254 знаков, может состоять из букв, цифр и знаков # _ @ $ ? [ ]. Вопреки традициям других языков, в хоткее имена переменных могут начинаться с цифр и даже содержать кириллицу.
Логический (булевый) тип предназначен для хранения 1 или 0 (true или false). Чаше всего используется в условиях, где есть всего два варианта выбора, а так же в функциях, для обозначения успешности или провала операции.
bool_val := true
;Здесь мы при нажатии 1 инвертируем значение переменной
1::
MsgBox, bool_val содержал значение %bool_val%
bool_val := !bool_val
Return
Числовой тип, как не сложно догадаться, применяется для операций с числами. Поддерживается большинство арифметических операций, а так же десятичные дроби.
numeric_val := 0
;Здесь мы при нажатии 1 добавляем 10 к значению переменной
1::
MsgBox, numeric_val содержал значение %numeric_val%
numeric_val := numeric_val + 10
Return
Строковый тип хранит отдельные символы или фрагменты текста. Работа со строками немного отличается от цифровых и булевых переменных- для них есть целый ряд специальных строковых функций.
string:=»Валера»
string.=» — гений кодинга»
StringReplace, string, string, ни
string := SubStr(string, 1, 12)
MsgBox, %string%
Логическое ветвление
Наверняка вы уже задумались, как выполнять действие только при соблюдении конкретного условия? На помощь приходит ветвление с логическими операторами if и else.
Так же существуют и другие команды, представляющие собой условие.
Пожалуй, самым простым применением условия является назначение двух чередующихся действий на одну и ту же горячую клавишу. В этом примере введена переменная, которая принимает противоположное значение при каждом новом вызове ГК.
ckeck := false
^1::
if(ckeck)
MsgBox, Сейчас условие верно!
else
MsgBox, Условие не верно
ckeck := !ckeck
Return
Еще одним примером может служить определение времени суток:
if(A_Hour < 6)
state = ночь
else if(A_Hour < 10)
state = утро
else if(A_Hour < 17)
state = день
else
state = вечер
MsgBox, Сейчас %state%`, %A_Hour% часов
Блок кода {}
Блок кода обозначается фигурными скобками и объединяет несколько комад или функций.
Он нужен чтобы указать интерпретатору, что несколько команд нужно выполнить вместе.
Чаще всего блок {} используется для группировки команд внутри условий или циклов.
;Здесь MsgBox и Send будут выполнены только если MyVar равна 5
if(MyVar == 5)
{
MsgBox, MyVar равна 5!
Send, Абсолютно равна
}
;А здесь скобок нет и Send будет выполнен в любом случае
if(MyVar == 5)
MsgBox, MyVar равна 5!
Send, Абсолютно равна
Циклы
Для повторения определенного участка кода несколько раз используются циклы. В Autohotkey их несколько видов, самым простым из которых является Loop.
;Пять повторений одного участка кода
^1::
Loop, 5
MsgBox, Это %A_Index% интерация цикла из 5
return
;Отображение тултипа пока нажата ЛКМ
~LButton::
while(GetKeyState(«LButton»))
{
ToolTip, А теперь отпустите ЛКМ
Sleep, 100
}
ToolTip
return
Запуск программ, открытие ссылок
Для запуска EXE приложений, открытия окон проводника или браузера используется команда Run.
;Запуск программы
Run, %A_ProgramFiles%Some_ProgramProgram.exe
;Открытие веб страницы
Run, https://ahk-wiki.ru
Команды и функции
В Autohotkey есть две основных структуры: команды и функции.
Обе предназначены для выполнения какого-либо действия, но отличаются способом записи.
У многих команд есть функция-двойник, выполняющая ту же операцию.
В отличае от функций, команды нельзя комбинировать или использовать одну команду как аргумент другой.
Команды не используют скобки вокруг параметров, вы можете легко отличить их от функций:
;Пример команды
Command, параметр1, параметр2, параметр3
;Пример функции
Function(параметр1, параметр2, параметр3)
Обратите внимание, что:
;Внутри функций можно производить вычисления:
SubStr(37 * 12, 1, 2)
;Переменные в функции передаются без знаков %%:
SubStr(A_Now, 7, 2)
;Результат выполнения одной функции может быть параметром другой:
SubStr(A_AhkPath, InStr(A_AhkPath, «AutoHotkey»))
;Текст в функциях должен быть обернут в кавычки:
SubStr(«I’m scripting, awesome!», 16)
;Функции могут возвращать результат
;Здесь MyVar будет присвоен результат выполнения функции
MyVar := SubStr(«I’m scripting, awesome!», 16)
Заключение
В этой статье приведены самые базовые возможности программы. Полный список функций можно найти на Главной странице справочника.
Рекомендуем последовательно пройти по описанию всех команд для примерного понимания их назначения перед тем, как начинать писать свой первый скрипт
Перед тем, как приступить к написанию кода, необходимо составить алгоритм. Распишите по шагам, что должна делать ваша программа. Так будет гораздо проще искать команды, необходимые для выполнения каждого из шагов.
![]()
Download Article
![]()
Download Article
- Installing AutoHotkey
- Creating a Script
- Creating a Hotkey
- Creating a Hotstring
- Launching Apps or Websites
|
|
|
|
This wikiHow teaches you how to use AutoHotkey on a Windows computer. AutoHotkey is a free Windows scripting language that allows you to program different actions with various keyboard shortcuts. The following steps will show you how to install AutoHotkey as well as program a few basic scripts to enter text, run programs, and open websites using simple keyboard shortcuts.
-

1
Go to https://autohotkey.com in a web browser. Using your preferred web browser, go to official AutoHotkey website.
-
2
Click Download. It’s the green button in the center of the page.
Advertisement
-
3
Click Download AutoHotkey Installer. It’s the blue button at the top of the page. This will start the download of the AutoHotkey installer.
-
4
Run the installation file. Double-click the installation file you just downloaded to start the installer.
- By default, all your downloaded files can be found in your Downloads folder.
-
5
Click Express Installation. It’s the first option in the AutoHotkey Setup wizard. This will install AutoHotkey on your computer with the default configuration.
- When it’s finished installing you can click «Run AutoHotkey» to launch some of the documentation about AutoHotkey.


Advertisement
-
1
Right-click your desktop. When you right-click on any blank part of your desktop, this opens a drop-down menu.
-
2
Hover the mouse over New. When you place the mouse cursor over «New» you will see a list of programs you can create a new file for.
-
3
Click AutoHotkey Script. This will create a new AutoHotkey script on your desktop. It will have an image of a white page with a red «H» on it.
-
4
Rename the AutoHotkey file. By default, the new document will be named «NewAutoHotkeyScript.ahk» and it will be highlighted, allowing you type a new name for your script.
- Be sure not to erase the file extension of «.ahk» at the end. Your file must end with the «.ahk» file extension or else it won’t work with AutoHotkey.
-
5
Right-click your new script. This will open a drop-down menu with additional options for the file.
-
6
Click Edit Script. It’s the third option from the top. This will launch the AutoHotkey script in Notepad. This is where you will write the programming to create your first AutoHotkey script.
- There is some code and text already inserted into the first few lines of every new AHK script, you can ignore this and leave it alone for now.


Advertisement
-
1
On a new line, type the code for the keyboard shortcut you want to assign. For example, if you want to assign a command that does something when you press the key combination of Ctrl+E, you would type ^e. Each lowercase letter represents its own key, while special keys have their own symbols:
- + = ⇧ Shift
- ^ = Ctrl
- ! = Alt
- # = ⊞ Win (Windows key)
- Click here for a complete list of key commands.
-
2
Type two colons after the keys you assigned. Any key or key combination you typed needs to be followed by ::. So in our example, the first line of our code would look like:
-
3
Press ↵ Enter to go to the next line and press Tab ↹ to indent. You’ll type the command for what will happen with then hotkey is pressed on the line below the two colons. You can indent the line by pressing «Tab» or by typing several spaces
- You don’t have to indent the command line but it will keep your code organized and easy to read if you have errors later.
-
4
Type Send, and then type a message. The Send command will automatically type a message when a Hotkey is triggered. Anything you type after the comma will be typed automatically when you press the assigned Hotkey. For our example, if you wanted to include the message «wikiHow is awesome!» your code would look like:
- Special characters, like the exclamation mark, must be enclosed in braces { } so it isn’t confused with the symbol for the «Alt» key.
^e::
    Send, wikiHow is awesome{!}
-
5
Press ↵ Enter to go the next line and type Return. The Return command denotes the end of a command and stops the code from going to the lines below.[1]
Your finished code should look like:^e:: Send, wikiHow is awesome{!} Return
-
6
Save your script. Click «File» in the menu bar at the top of Notepad and click «Save» in the drop-down menu. This will save the code you’ve added to the script file.
- You can close Notepad once your work has been saved.
-
7
Run the script. Double-click the script file on your desktop to run the script. You’ll see a green AutoHotkey icon appear in your system tray on the bottom-right of your screen. This indicates that an AutoHotkey script is active.
-
8
Test your Hotkey. Open a new word processing app or any app you can type text and press your Hotkey combo. In our example, if you press Ctrl+E you’ll see the text «wikiHow is awesome!» instantly appear.


Advertisement
-
1
Open your script or create a new one. You can open the script you were working on earlier and add a new command to it or create a new script from scratch.
- Right-click the script and select «Edit Script» to edit the previous script.
- Right-click the desktop and go to «New,» then select «Auto Hotkey Script.»
-
2
Go to a new line and type two colons. A Hotstring command starts with :: at the beginning.
- A Hotstring can take a word or phrase you type and replace it with a different word or phrase.
-
3
Type the letters, word, or phrase you want to replace. For example, you can create a Hotstring so that every time you type the acronym «btw» it would automatically change it to «By the way,» so you didn’t have to type it all out. In that example, so far your code would look like:
-
4
Type two more colons again. This will separate the end of the message you want to replace from the words or you want to replace it with. Using our example, the code would look like:
-
5
Type the message you want to replace it with. The message you type after the second pair of colons will automatically replace the first message in between the two sets of colons. In our example, the code would look like:
- Hotstrings don’t need a «Return» command and the end because they are self-contained on one line of a script
-
6
Save and run the script to test it out. Just like before, save your work by clicking «File» and «Save»—then double-click the script to run it. Then open any app or program you can type in to test it out. When you type the letters «btw» onto any page, it should immediately be replaced with «By the way,» in the text field.


Advertisement
-
1
Open your script or create a new one. You can open the script you were working on earlier and add a new command to it or create a new script from scratch.
- Right-click the script and select «Edit Script» to edit the previous script.
- Right-click the desktop and go to «New,» then select «Auto Hotkey Script.»
-
2
On a new line, type the code for the Hotkeys you want to assign. For example, if you wanted to open the wikiHow website whenever you pressed they keys Wind+W, you would type the code #w because «#» is the symbol for the Windows key and «w» is the code for the W key. In that example, the code would look like:
- Click here for a complete list of key symbols if you want to use a different key combination for your Hotkey.
-
3
Type the two colons, then go to the next line and indent. Immediately after typing the code for the keyboard shortcut, type two colons :: and then press ↵ Enter to go to the next line. Indent the line using several spaces or the Tab ↹ key.
- You don’t have to indent the command line but it will keep your code organized and easy to read if you have errors later.
-
4
Type Run,. The Run command can be used to launch any program, application or website. Type Run, with the comma at the end and Auto Hotkey will look for the name or location of any program or website listed after the comma. In our example, the code so far would look like:
-
5
Type the full location of any program on your computer or type any website’s full URL. For example, if you wanted your Hotkey to launch Internet Explorer, you would type C:Program Filesinternet exploreriexplore.exe after the Run command. In our example, since we want to launch the wikiHow website, our code would look like:
#w::
    Run, https://wikihow.com
-
6
Press ↵ Enter to go the next line and type Return. The Return command denotes the end of a command and stops the code from going to the lines below. In our example. your finished code should look like:
#w::
    Run, https://wikihow.com
Return
-
7
Save and run the script to test it out. Just like before, save your work by clicking «File» and «Save»—then double-click the script to run it. If you followed our example, whenever you press the key combination of ⊞ Win+W, the wikiHow website will open in your default browser!


Advertisement
Ask a Question
200 characters left
Include your email address to get a message when this question is answered.
Submit
Advertisement
Thanks for submitting a tip for review!
References
About This Article
Article SummaryX
1. Install AutoHotkey from https://www.autohotkey.com.
2. Right-click the desktop and click New.
3. Click AutoHotkey Script.
4. Right-click the script icon and select Edit Script.
5. Enter the code for the keyboard shortcut followed by two colons.
6. Press Enter.
7. Type «Send» followed by the word(s) or command.
8. Press Enter.
9. Type «Return» and save the file.
10. Double-click the script to run it.
Did this summary help you?
Thanks to all authors for creating a page that has been read 51,050 times.
Is this article up to date?
Going through the same tasks manually in your daily routine can be tiring, especially if you have other tasks on your plate. Why not automate those repetitive tasks? AutoHotkey (AHK) is a powerful and customizable way to automate your daily tasks.
In this ultimate guide, you’ll master the basics of creating and running scripts with AutoHotkey. You’ll also go through some advanced topics like hotkeys and variables, so you can eventually create AHK scripts for yourself.
Ready? Dive right in, and automate your workflow!
Prerequisites
This tutorial will be a hands-on demonstration. If you’d like to follow along, be sure you have the following.
- A Windows 10 computer.
- AutoHotkey installed on your computer.
What is AutoHotkey?
Before you dive deeper into this tutorial, what is AutoHotkey anyway? AutoHotkey is a free scripting language for Windows that allows you to automate tasks by creating scripts. These scripts can do anything from remapping keys on your keyboard to creating complex macros.
AutoHotkey was created in 2003 by Chris Mallett, and the language has continued to grow and evolve over the years. The AHK community is active and friendly, and there are many online resources to help you get started.
A wide range of people uses AutoHotkey, from gamers to software developers to power users:
- Gamers who want to create custom macros to improve their gameplay.
- Software developers who want to automate tasks or create custom shortcuts.
- System administrators who want to speed up their workflow.
One thing to note is that AutoHotkey is a portable application. You can combine the AutoHotkey executable with your scripts and create a self-contained portable application that you can run on any computer.
You can put the application on a flash drive and take it wherever you go. A portable version can be handy if you plan to use AutoHotkey on multiple computers without having to install the application on each one.
Is AutoHotkey Safe?
AutoHotkey is a safe language to use and is not known to cause any harm to your computer. But it’s worth noting that some anti-virus programs may mistakenly identify AHK scripts as viruses or malware.
Why some anti-virus programs identify AHK scripts as a virus is beyond the scope of this tutorial. But if your anti-virus blocks your AutoHotkey scripts, add your scripts to the list of approved programs or exceptions in your anti-virus software.
You can also report false positives to the anti-virus software vendor so that they can correct the issue.
Creating Your First AHK Script
Now enough with the introduction and dive into creating your first AHK script. You’ll start with a basic script that prints the words “Hello World.”
This script is a good starting point for beginners as it helps you familiarize yourself with the basics of the AHK language.
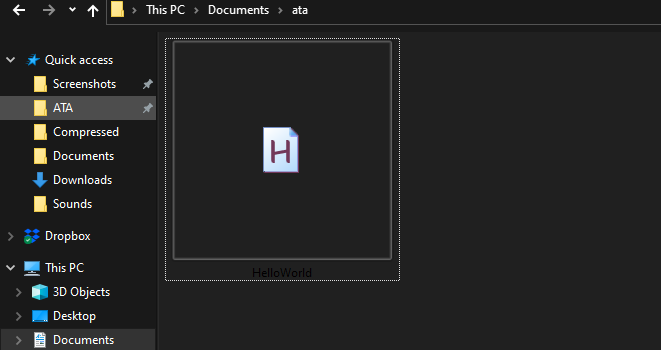
1. Create a project folder on your Desktop, and give it a name. But in this tutorial, the folder is named /ATA.
2. Open File Explorer, and navigate to your Desktop.
Right click in a space inside the folder and select New —> AutoHotkey Script. Provide a name for your script, such as HelloWorld.ahk.
You should now have a new AHK script file named HelloWorld.ahk, as shown below.
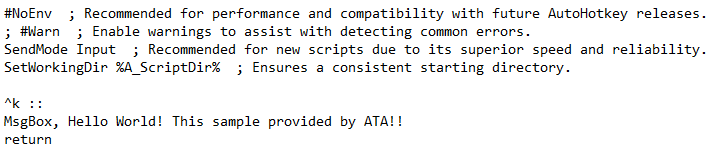
3. Next, open the HelloWorld.ahk file in your favorite text editor, and you’ll see the file contains the basic skeleton of an AutoHotkey script like the one below.
Throughout this tutorial, you’ll be working on only one script (HelloWorld.ahk). Be sure not to remove the code below (basic skeleton of the AutoHotkey) each time you modify the script.

4. Populate the code below at the bottom of the HelloWorld.ahk file’s content. Be sure to save the changes and close the file.
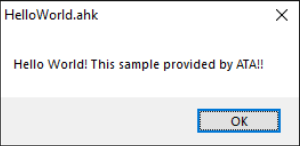
This code below simply opens a message dialog box (MsgBox) when you press the Ctrl+K keys (^k::) on your keyboard. The message box displays the message saying Hello World! This sample provided by ATA!!.
^k::

MsgBox, Hello World! This sample provided by ATA!!

Return
You can select any key combination you want, but it’s best to choose a key combination that isn’t already used to prevent conflicts. For example, Alt+Tab is a bad choice because Windows already uses this key shortcut to cycle through open applications.
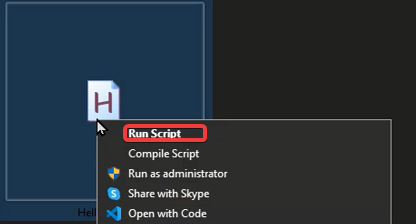
5. Now, right-click on the file and select Run Script from the context menu to run the script.
Don’t change the default app for opening or running your AHK scripts when you’re editing the scripts, like Notepad. Or else, you won’t see the Run Script option in the context menu.
You’ll see the AutoHotkey icon with the H letter on top of a green square in your system tray, as shown below. This icon confirms that your code is correct and is running.
6. Press the Ctrl+K hotkey on your keyboard, and you’ll see the same message box pop-up, as shown below.
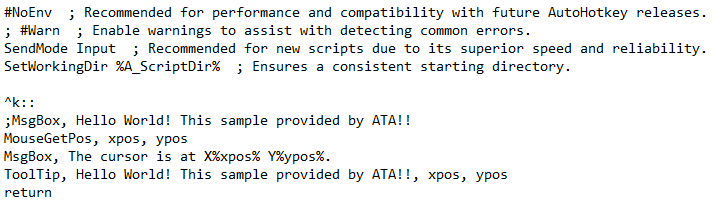
7. Next, replace the code you added in the HelloWorld.ahk file with the code below, save the changes and close the file.
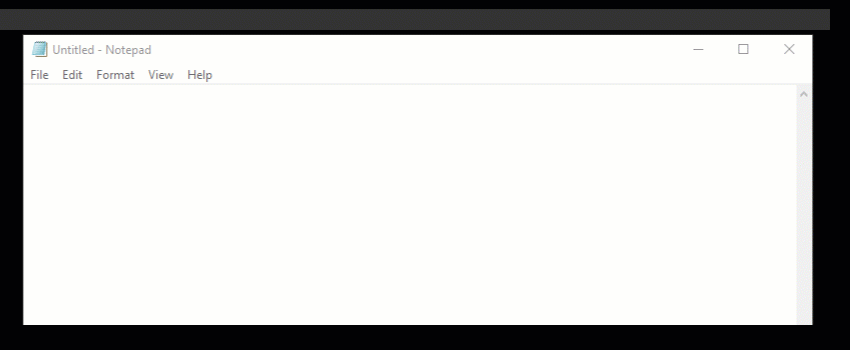
The code below captures (MouseGetPos) and prints the mouse cursor’s position (xpos, ypos) to a message box. At the same time, the code displays a ToolTip containing the text Hello World! This sample provided by ATA!! next to the mouse cursor.
^K::

MouseGetPos, xpos, ypos

MsgBox, The cursor is at X%xpos% Y%ypos%.

ToolTip, Hello World! This sample provided by ATA!!, xpos, ypos

Return
ToolTip lets you display a message next to the mouse cursor to provide additional information for the end-user on a GUI.
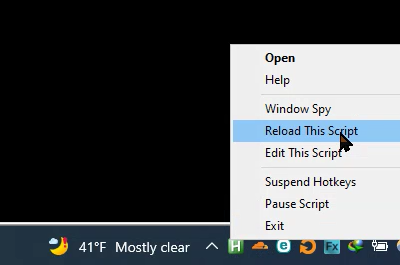
8. Now, right-click on the AutoHotkey icon at the system tray and select Reload This Script for the changes to take effect.
Note this step as it’s always essential to run an updated version of your scripts.
9. Finally, press the Ctrl+K hotkey to run the script.
You’ll see the cursor’s location displayed on the screen and the tooltip message beside the mouse cursor, as shown below.
Adding Comments in AHK Scripts
You’ve just created your first AHK script, but as you may have noticed, the codes can be confusing without comments. Luckily, AutoHotkey lets you add comments to leave notes and instructions for yourself or others who may be working on the same script.
Comments don’t affect your program – the interpreter simply ignores them. But AHK code comments are handy if you’re sharing your code with someone else or plan to come back to it later and need a reminder of what it does.
A code comment in AHK starts with a semicolon (;) and continues to the end of the line. You can place a code comment above or at the end of the line of command/function, as shown below.
When you place the comment at the end of the command, be sure to put a space before writing the semicolon. Or else, AutoHotkey will consider the comment as part of the command or function, leading to an error.
; A comment placed above a line of command/function
MsgBox, Hello, world!

MsgBox "Hello, world!" ; A comment placed at the end of a line of command/function.
To see how to add descriptive code comments in your AHK scripts:
1. Edit your HelloWorld file and replace your code with the one below, including comment lines, save the changes, and close the file.
; Adding Code Comments above the line of command/function

; Sets the Ctrl+K Hotkey. The ^ symbol represents the Ctrl key.
^K::

; Type Hello to the active window, like Notepad.

Send Hello {enter}

; Wait one second before continuing with the script

Sleep 1000

; Adding Code Comments at the end of the line of command/function

Send Holla {enter} ; Types Hello to the active window.

Sleep 1000 ; Waits one second before continuing.

Send Bonjour ; Sends the bonjour text to the active window.

Return ; Stop the script.
2. Reload the script to apply all changes you made to the HelloWorld.ahk script.
3. Finally, press the Ctrl+K keys to execute the code to test your code comments. You’ll see that the script prints one word per second, each in a new line, as shown below.
This output confirms that the interpreter ignores the comment lines in your script and your code comments syntax is correct.
Disabling a Code Block
When scripting in AHK, there are times you’ll want to disable a code block temporarily. For instance, you have a long sequence of code. But you only want to test a particular section of code without having to run the entire script.
Putting the semicolon (;) in each line is tedious. But luckily, there’s a better way! You can use the /**/ comment style to comment out a code block. This comment style tells the interpreter to completely ignore the code between the /* and */ characters.
1. Edit your HelloWorld.ahk file, and add the /**/ characters accordingly, as shown below, to comment out the code block. Save the changes and close the file.
; Sets Ctrl+K hotkey
^K::

Sleep 2000 ; Waits two seconds before continuing

; This code block is disabled/commented-out
/* Send Hello {enter}
Sleep 1000

Send Holla {enter}

Sleep 1000
*/

Send Bonjour ; Sends the Bonjour text to the active window.

; Stop the script
Return
2. Reload the HelloWorld.ahk script to apply the changes.
3. Finally, press the Ctrl+K keys to execute the script and test your commented-out code block.
This time, your script types only Bonjour, as shown below. Notice the interpreter entirely ignored the commented-out code block.
Pausing the Script with the Sleep Command
Commands are the most critical part of the AutoHotKey language. Different commands allow you to perform various tasks, such as manipulating text, running applications, and interacting with the user.
For example, user input is required before the script continues. The Sleep command will do the trick. As the name suggests, the Sleep command causes your script to wait a certain milliseconds before continuing.
The syntax for the Sleep command is as follows. Replace timer with the number of milliseconds of wait time you prefer.
The
timervalue can be 1 to 2147483647 milliseconds (about 24 days).
1. Open your HelloWorld.ahk script on a text editor, replace the code you previously added with the following lines. Save the changes and close the file.
The code below opens the command prompt when you press Ctrl+K and waits three seconds before displaying a message box that says, “Your command-line tool is ready!”.
You use the Sleep command to add a three-second delay before running the MsgBox command. Doing so ensures that the command prompt is truly open before displaying the message.
; Sets Ctrl+K hotkey
^K::

; Run command prompt
run, cmd.exe

; Sets a sleep timer of three second
Sleep 3000

; Displays a message on the command prompt
MsgBox, Your command-line tool is ready!

; Stops the script
return 
2. Reload the script to apply the changes you made to the HelloWorld.ahk file.
3. Finally, press the Ctrl+K keys to run the script. The command prompt opens, and a message box is displayed after a three-second delay, as shown below.

Randomizing a Value with the Random Command
Suppose your office has ten conference rooms, and you want to randomly choose one of the conference rooms to hold your meeting. If so, adding the Random command in your script is what you need. The Random command generates a random number in a specified range of numbers.
The syntax for the Random command is as follows where:
OutputVar– the variable to store the random number.Min– the lowest number you want the random number to be.Max– the highest number you want the random number to be.
Random, OutputVar, Min, Max
To demonstrate how the Random command works:
1. Replace the code you’ve added so far in the HelloWorld.ahk file with the following lines, save the changes and close the file.
This code chooses a random number between 1 and 10, stores the result in the rand variable, and displays the room number in a message box.
; Sets Ctrl+K hotkey
^K::

; Randomizes a number from 1-10 and store the result to rand variable
Random, rand, 1, 10

; Prints a message with the randomized number in a message box
MsgBox,  Room %rand% is chosen for the meeting.

; Stops the script
return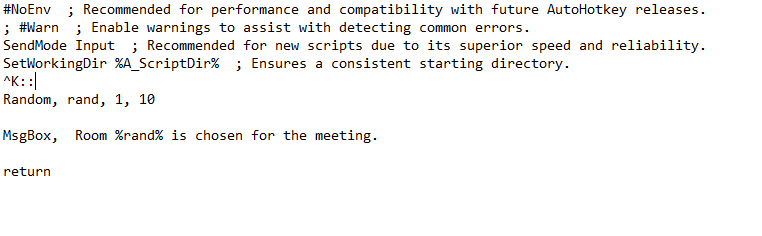
2. Reload the script to apply the changes.
3. Lastly, press Ctrl+K to run the HelloWorld.ahk script. You’ll see a message box displaying the room number that was randomly chosen, as shown below.
Close the message box and run the script multiple times to see room number changes each time.

Locating a Pixel with the PixelSearch Command
The PixelSearch command is like Google Image search on steroids. PixelSearch locates a pixel or group of pixels in a region of the screen or an image and returns the coordinates of the found pixel(s).
Gamers can use the PixelSearch command to help with in-game photo hunting tasks or create an aiming bot to improve accuracy exactly to every pixel.
Below is the syntax for the PixelSearch command, where:
OutputVarXandOutputVarYvariables – Store the coordinates of the found pixel(s).X1,Y1– The upper-left coordinates of the region or image you want to search.X2,Y2– The lower-right coordinates of the region or image you want to search.ColorID– The color of the pixel(s) you want to find, which can be a hex value (e.g., FF0000) or an RGB value (e.g., 255,0,0).Variation– The tolerance of the search, the number of pixels that can be off from the target color for the pixel(s) to be considered a match. The value can be from 0 to 255. For example, a variation value of “2” is provided with a ColorID of 0x444444. ThePixelSearchcommand will search for all pixels with a color value range of 0x424242 to 0x464646. This option can be helpful when the target color is not an exact match for the pixel(s) you are searching for.
The Mode argument can be one of the following:
Fast– Searches for the target color in the least amount of time.RGB– Searches for the target color using RGB values.
PixelSearch, OutputVarX, OutputVarY, X1, Y1, X2, Y2, ColorID, Variation, Mode
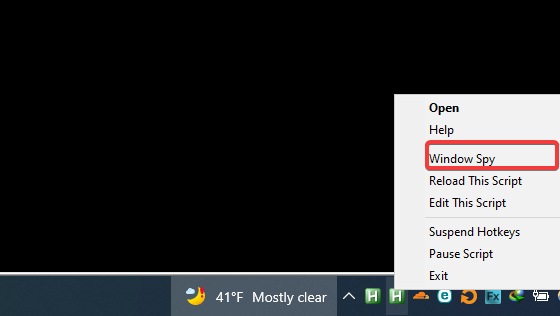
You must have the ColorID of the pixel(s) you want to find before running the PixelSearch command. Window Spy is a tool that allows you to get the RGB values of any pixel on the screen.
1. Right click on the AutoHotkey icon and select Window Spy from the context menu to open Window Spy.
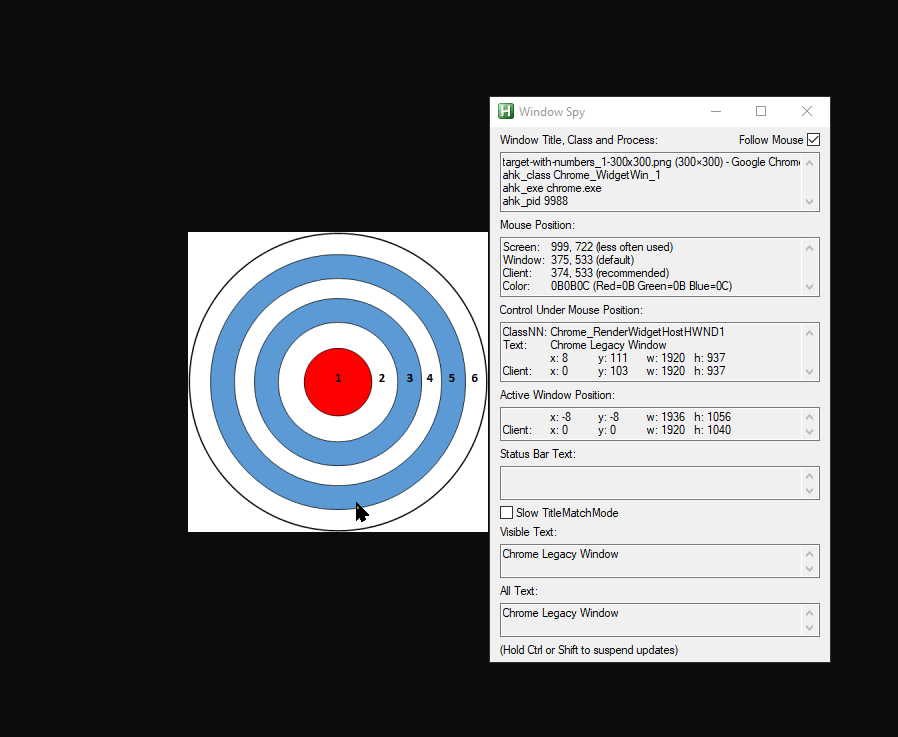
2. Navigate to the pixel’s location you want to get the RGB values. This tutorial uses a bullseye image.
The RGB values for the pixel will be displayed automatically in the Window Spy window, as shown below. Copy the values as you’ll need to put them in your AHK script in the following step.
3. Replace the code you added in the HelloWorld.ahk file with the code below, save the changes and close the file. Be sure to replace the placeholders in the PixelSearch command with the values of the target pixel you noted in step two.
This code will search the whole screen for the specified color (in this case, AA0000 or red) and send a mouse click to that location. In gaming, this code would send a shoot command to the target pixel if it’s found.
; Sets Ctrl+K hotkey
^K::

; Locate a specified pixel
PixelSearch, Px, Py, 0, 0, @DesktopWidth, @DesktopHeigh, AA0000, 3, Fast

if ErrorLevel ; If the pixel is not found, print an error message

  MsgBox, That color was not found in the specified region.

else ; If the pixel is found, send a mouse click on the specified pixel location

  Send click(%Px%. %Py%)

	; Waits for two seconds, then print a message

  Sleep 2000

  MsgBox, Your enemy has been destroyed!

; Stops the script
Return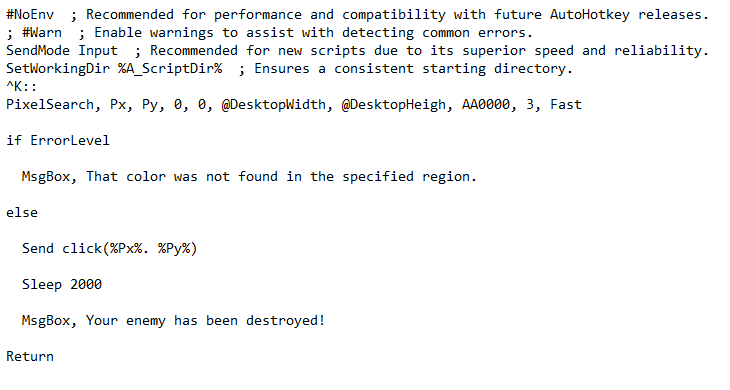
4. Now, reload the HelloWorld.ahk script to apply the changes.
5. Lastly, press Ctrl+K to run the script. You’ll see mouse cursor points to the specified pixel’s location and a message saying Your enemy has been destroyed!, as shown below.

Creating an Input Dialog Box with the InputBox Command
The most basic form of user input in AutoHotkey is the InputBox command. The InputBox command displays a simple dialog box on the screen and waits for the user‘s input.
You encounter the InputBox command all the time in everyday life. For example, your web browser probably uses another form of an input box, asking for your username and password.
The syntax of the InputBox command is below, where:
OutputVar– Stores the user’s input.Title– Sets the text in the title bar of the input dialog box.Prompt– Sets the message in the input dialog box.HIDE– Tells the script whether or not to hide the input area of the dialog box. If this parameter is set to True, the input is hidden, and the user will only see the masked text.WidthandHeight– Specify the size of the dialog box in pixels.XandY– Specify the location where the input dialog box should appear on the screen.Locale– Specifies the locale to use in displaying the dialog box. This parameter is optional and can be omitted if you don’t want to use it.Timeout– Specifies the amount of time (in seconds) that the input box will stay open. The input dialog box automatically closes past the specified time.Default– Specifies the default value displayed in the input field of the dialog box that the users can change.
InputBox, OutputVar, Title, Prompt, HIDE, Width, Height, X, Y, Locale, Timeout, Default
To create an input dialog box with a hotkey:
1. Replace the code in your HelloWorld.ahk file with the following lines, save the changes and close the file.
The code below displays a simple input dialog box that asks the user for their name that will be stored in the UserName variable.
; Sets Ctrl+K hotkey
^K::

; Creates an input box dialog
InputBox, UserName, Your Name, Please enter your name., , 640, 480

if ErrorLevel
; Prints a message if there's an error
  MsgBox, Opps, something went wrong!

else
; Prints a message with the username stored in the UserName variable
  MsgBox, Your name is "%UserName%!"

; Stops the script
Return
2. Reload the same HelloWorld.ahk script to apply the changes.
3. Finally, press the Ctrl+K keys to run the script. You’ll see an input dialog box that looks like the one below.
When you input your name and click OK, as shown below, you’ll get a message box showing a message with the name you entered. But if there is a problem with the user input, for example, if you enter an incorrect value, you’ll get a message saying Something is wrong!.

Sending Key Strokes with the Send Command
Have you ever felt tired of doing simple repetitive tasks? Like filling out forms or typing the same text many times over. If yes, the Send command is your friend.
The Send command sends simulated keystrokes to an active window. This command can be useful for automating tasks like filling out forms or typing text.
The syntax for the Send command is as follows, where keys is the keystrokes you want to send.
The Send command can also send special keys like the Windows key or the Alt key.
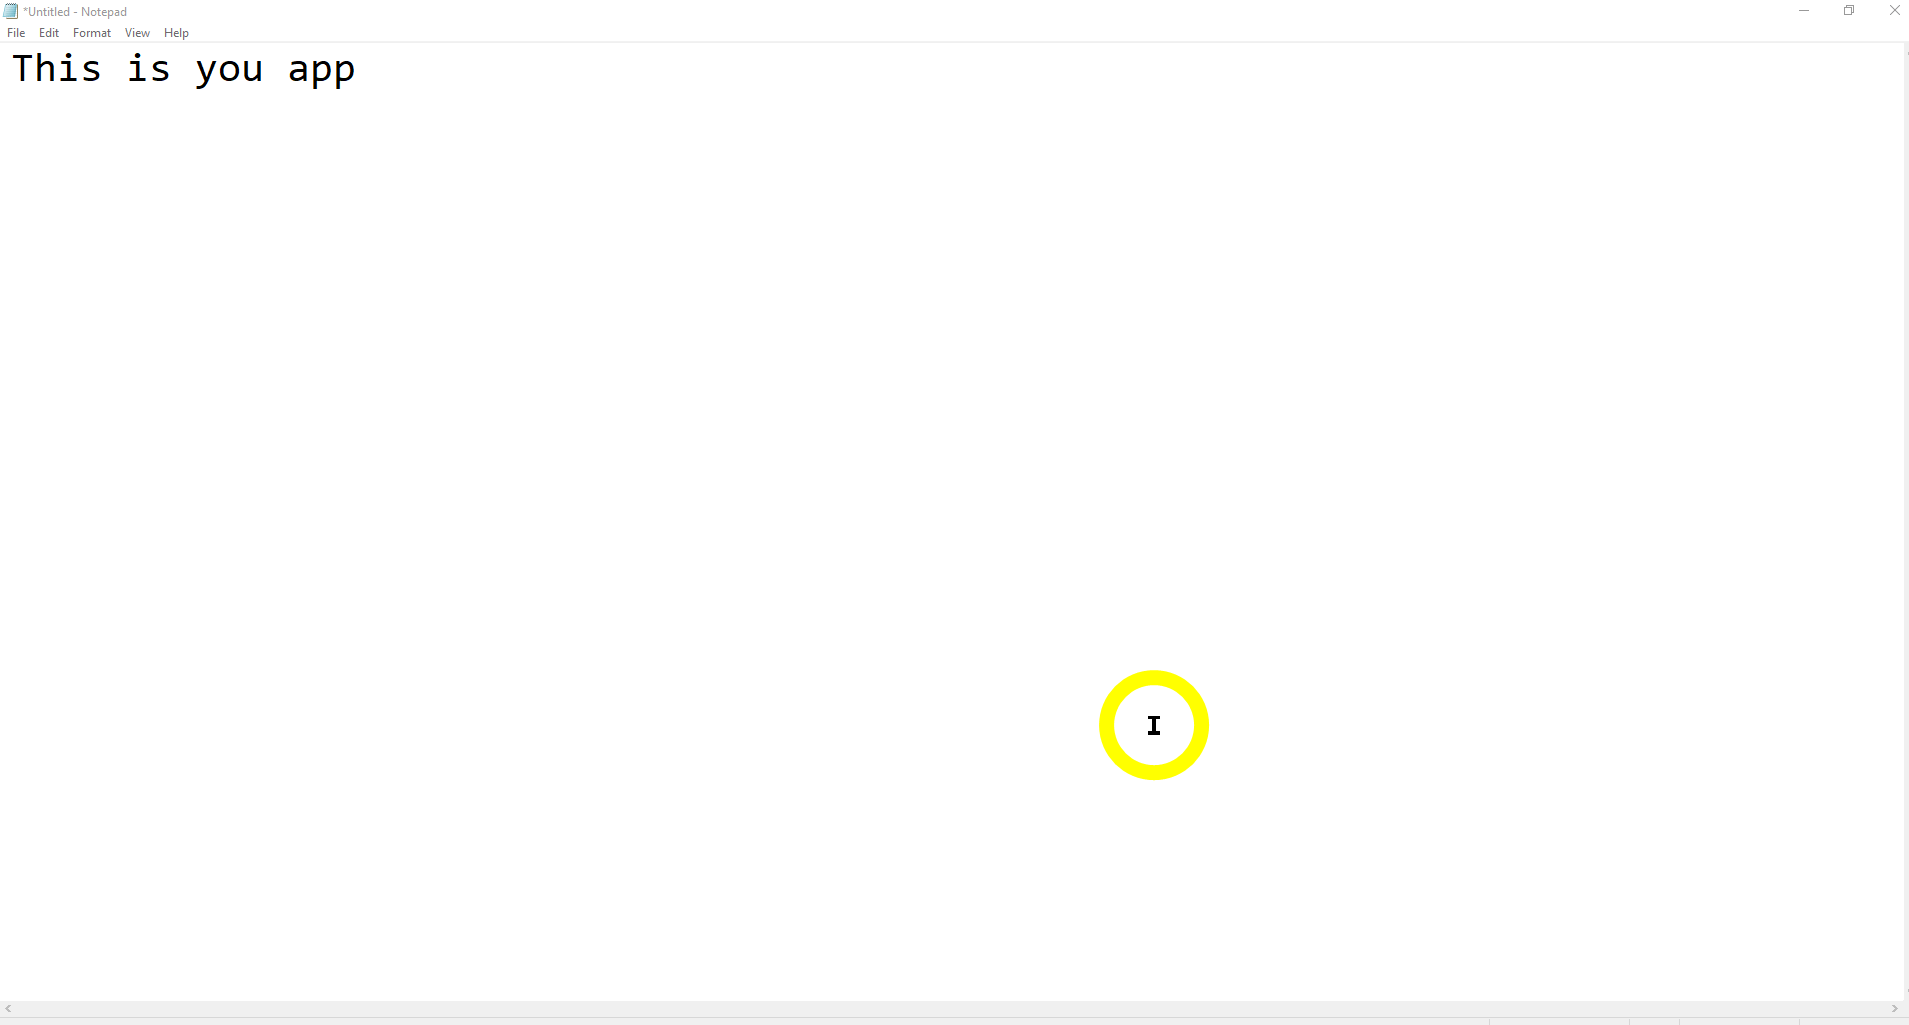
1. Replace your code in the HelloWorld.ahk file with the following lines, save the changes and close the file.
The code below sends the Sincerely, text, an ENTER {enter} keystroke, and the ATA text in sequence.
^K::
Send Sincerely, {enter} ATA
Return
2. Reload the HelloWorld.ahk script to apply the changes.
3. Finally, open your text editor and press Ctrl+K to run the script to see the Send command in action.
Automating Mouse Clicks and Keystrokes
You may be wondering how you can automate keystrokes using AHK. Automating keystrokes can speed up your work, saving you some time to complete tasks.
Suppose you need to click your app at a random position on the screen to keep your app active. Typically, you need to move your mouse to the desired location and click. But with AHK, you can automate this process by programing a keystroke sequence to perform the task for you.
1. Edit your HelloWorld script, replace the code with the following lines, save the changes and close the file. This code sends automated spam keystrokes (left-clicks) to your app at a random position on the screen.
; Sets Ctrl+K hotkey
^K::

; Runs your script for 1 million iterations
Loop 1000000
{
; Generates a random number between 869 and 1049, which determines the x-coordinate of the mouse click.
; You can change this number to adjust the position of the mouse click
Random, RandomX, 869, 1049

; Generates a random number between 135 and 241, which determines the y-coordinate
; of the mouse click.
; You can change this number to adjust the mouse click position.
Random, RandomY, 135, 241

; Sends a left-click to your app at the randomly generated x and y-coordinates.
MouseClick, Left, %RandomX%, %RandomY%
; To send keystrokes instead, write the Send command followed by the keys to send.
; For example: Send {enter}

; Pauses the script for 2000 milliseconds (two seconds) before continuing
; to the next loop iteration. You can change this value to something slower,
; making your clicks look more human-like.
Sleep 2000
}

; Stops the script
Return

; Sets hotkeys to pause this script. The + symbol before the ^K hotkey stands for
; the Shift key on your keyboard. To resume the script, press this hotkey again.
; By pausing the script, you can test the keystrokes sent to your app.
; Doing so helps you ensure the script is working properly.
+^K::Pause
2. Reload the script to apply the changes.
3. Lastly, press Ctrl+K on your keyboard to run the script.
As you see below, your script sends spam left-clicks to your app at a random position on the screen every two seconds. To stop the script, press the Shift+Ctrl+K keys.
In this example, when a left-click is sent, a red circle appears at the position of the mouse click.
Creating an AHK GUI
In computing, a graphical user interface (GUI) allows users to interact with electronic devices graphically (usually using images rather than text commands). A GUI can be created for almost any program or computing device.
There are many reasons to use a GUI. One reason is to make a user-friendly interface for a program or device easier. A GUI also makes it easier to see what’s happening on the screen, which can be helpful when troubleshooting a problem.
The AHK GUI consists of several elements you can use to create and modify scripts. And the syntax for creating a GUI is below, where Value1, Value2, and Value3 parameters are dependent upon the SubCommand.
Gui, SubCommand, Value1, Value2, Value3
In this tutorial, you’ll use the Add SubCommand to add controls to the GUI window, and the syntax for the Add SubCommand is below, where:
Text– Adds a static control (labels).Edit– Adds an edit control (text field) where users can input data.Button– Adds a pushbutton control (button) to the GUI. Upon clicking, the button sends an event to the script.
Gui, Add, ControlType, Options, Text
1. Replace the code in your HelloWorld.ahk file with the code below, save the changes and close the file.
The following code creates a new GUI window with two input fields that ask for the user’s first and last name. The GUI window includes a button that, when clicked, displays a message box with the contents of the input fields.
Once the message box closes, the GUI window automatically closes, so the user can enter a new first and last name when they rerun the script.
; Sets the Ctrl+K hotkey
^K::

; Adds a static text control named "First name"
Gui, Add, Text,, First name:

; Adds another static text control named "Last name"
Gui, Add, Text,, Last name:

; Adds an edit control (text field) named "First name."
; The v option tells the control to store its input in the variable FirstName.
; The ym option starts a new column of controls.
Gui, Add, Edit, vFirstName ym

; Adds another edit control (text field) named "LastName" that
; stores its input in the LastName variable.
Gui, Add, Edit, vLastName

; Adds a pushbutton control named OK
; when pressed, runs the label ButtonOK.
Gui, Add, Button, default, OK

; Shows the GUI window with the title "Simple Input Example".
Gui, Show,, Simple Input Example

; Ends auto-execute section
Return

; Closes the GUI window.
GuiClose:
ButtonOK:

; Displays a message box with the contents of the FirstName and LastName variables.
Gui, Submit
MsgBox You entered "%FirstName% %LastName%".

; Exits the script
ExitApp
2. Reload the HelloWorld.ahk script to apply the new code.
3. Finally, press the Ctrl+K hotkey to test the GUI. If the code works, you’ll see a window appear that looks like the one below.
Type in your first and last name, and click the OK button. A message box appears containing the texts you entered in the input fields.

You can customize the script to fit your needs for your GUI. For example, you’re saving the user’s input to a text file instead of displaying it in a message box.
Conclusion
AutoHotkey is a powerful tool that can help automate your work and improve productivity. And in this guide, you’ve learned how to create custom hotkeys and scripts, sending automated keystrokes and mouse clicks. You’ve also touched on creating an interactive GUI with AHK scripts for the users.
At this point, you should be familiar with the basics of AutoHotkey to help you improve your productivity.
Why not create custom scripts to automate daily tasks without the tedious manual process? Be creative and experiment with different scripts to see what works best for you! Perhaps add more input fields, or make your GUI window larger or smaller?
Если вы знакомы со многими сочетаниями клавиш в Windows и все еще чувствуете, что вам нужно больше, пора перейти к расширенному инструменту, который позволяет создавать собственные сценарии.
AutoHotkey (AHK) — это ответ на ваши потребности в настройке. Эта программа позволяет переназначать клавиши, создавать собственные ярлыки, запускать макросы для автоматизации повторяющихся задач и многое другое.
Давайте рассмотрим некоторые полезные сценарии AutoHotkey, чтобы вы начали, а также основы программного обеспечения, чтобы вы могли создавать свои собственные.
Прежде чем вы сможете использовать классные скрипты AHK или создавать свои собственные, вам необходимо установить AutoHotkey в вашей системе.
Посещение Домашняя страница AutoHotkeyнажмите Скачать, и выберите Скачать текущую версию схватить это. Запустите диалоговое окно быстрой установки, и вы готовы начать использовать сценарии AutoHotkey.
Как создать новые скрипты AutoHotkey
Программа, которую вы только что установили, выполняет скрипты AHK, но ничего не будет делать, пока у вас действительно не будет запущен скрипт.
Чтобы создать новый сценарий AutoHotkey, щелкните правой кнопкой мыши в любом месте рабочего стола (или в другом удобном месте) и выберите Создать> Скрипт AutoHotkey. Назовите это как-нибудь, что имеет смысл. Затем щелкните правой кнопкой мыши новый файл и выберите Редактировать скриптили откройте файл в любом текстовом редакторе, чтобы начать работу с ним.
Обратите внимание, что вы также можете открыть текстовый редактор, ввести скрипт AutoHotkey и сохранить его как файл, оканчивающийся на .ahk для достижения того же результата. Просто убедитесь, что у него правильное расширение файла!
Кстати, неплохо было бы обновить текстовый редактор с базового Блокнота. Блокнот ++ и Код Visual Studio оба отличные бесплатные варианты.
Теперь, когда у вас есть программное обеспечение для запуска сценариев AutoHotkey, вы можете загружать сценарии, написанные другими, чтобы воспользоваться ими, не выполняя никакой работы самостоятельно. Чтобы сохранить один, просто загрузите его как .ahk файл и сохраните его, где хотите.
Чтобы запустить сценарий, просто дважды щелкните его, и он вступит в силу. Однако вы, вероятно, захотите, чтобы некоторые из этих сценариев запускались сразу после загрузки компьютера, чтобы вам не приходилось каждый раз запускать их вручную.
Для этого скопируйте и вставьте .ahk файлы в папку автозагрузки. Вы можете легко добраться туда, набрав оболочка: запуск в меню Пуск. В противном случае перейдите в следующее место:
C:Users[USERNAME]AppDataRoamingMicrosoftWindowsStart MenuProgramsStartup
Это загружает ваши сценарии AutoHotkey после входа в систему.
Лучшие сценарии AutoHotkey, которые стоит попробовать
Вот некоторые из наиболее полезных сценариев AutoHotkey, которые вы можете загрузить и сразу же использовать для улучшения Windows. Еще больше примеров скриптов AutoHotkey, в том числе гораздо более сложных, чем эти, можно найти в Витрина скриптов AutoHotkey.
1. Автозамена
Даже с точностью настольной клавиатуры вы все равно будете ошибаться при наборе текста. И хотя это старый сценарий AHK, опечатки не выходят из моды.
Он содержит тысячи распространенных орфографических ошибок — когда вы делаете ошибку, он мгновенно заменяет вашу ошибку правильным словом. Он даже позволяет вам добавлять свои собственные слова, которые мы обсудим позже.
Скачать: Скрипт автозамены
2. Отключить клавиши блокировки
Три клавиши Lock — Num Lock, Caps Lock и Scroll Lock — не так часто используются в современных вычислениях. Вы, вероятно, используете цифровую клавиатуру только для цифр, случайно нажимаете Caps Lock и даже не заботитесь о Scroll Lock.
Если вы редко используете эти модификаторы, попробуйте установить для них значение по умолчанию с помощью этого скрипта:
; Set Lock keys permanently
SetNumlockState, AlwaysOn
SetCapsLockState, AlwaysOff
SetScrollLockState, AlwaysOff
return
Предполагается, что вы хотите, чтобы Num Lock всегда был включен. Если вы предпочитаете его выключить, просто измените эту строку (или удалите ее полностью и измените только Caps Lock и Scroll Lock).
3. Переназначьте Caps Lock
После того, как вы использовали приведенный выше сценарий для отключения Caps Lock, имеет смысл дать этой клавише другое назначение.
Использование этого короткого скрипта превратит Caps Lock в другую клавишу Shift, но вы можете изменить ее на все, что захотите (возможно, другую клавишу Windows, если на вашей клавиатуре есть только одна из них):
; Turn Caps Lock into a Shift key
Capslock::Shift
return
4. Быстрый просмотр или скрытие скрытых файлов.
Важно знать, как иногда просматривать скрытые файлы и папки в Windows. Если вам нужен доступ к скрытым папкам только время от времени, и вы не хотите, чтобы они обычно загромождали ваше представление, это полезный сценарий.
Этот сценарий просто заставляет вас нажать Ctrl + F2 с открытым проводником для переключения отображения скрытых файлов или папок. Вот и все! Вам просто нужно скопировать код из связанной публикации на форуме в скрипт:
  ^F2::GoSub,CheckActiveWindow
  CheckActiveWindow:
    ID := WinExist("A")
    WinGetClass,Class, ahk_id %ID%
    WClasses := "CabinetWClass ExploreWClass"
    IfInString, WClasses, %Class%
      GoSub, Toggle_HiddenFiles_Display
  Return  Toggle_HiddenFiles_Display:
    RootKey = HKEY_CURRENT_USER
    SubKey  = SoftwareMicrosoftWindowsCurrentVersionExplorerAdvanced    RegRead, HiddenFiles_Status, % RootKey, % SubKey, Hidden    if HiddenFiles_Status = 2
        RegWrite, REG_DWORD, % RootKey, % SubKey, Hidden, 1
    else
        RegWrite, REG_DWORD, % RootKey, % SubKey, Hidden, 2
    PostMessage, 0x111, 41504,,, ahk_id %ID%
  Return
Посещение: Переключить скрипт скрытых файлов
5. Быстрое отображение или скрытие известных расширений файлов
Этот похож на предыдущий, поскольку он также работает с проводником. По соображениям безопасности разумно всегда показывать расширения файлов. Это упрощает обнаружение мошеннических EXE-файлов, маскирующихся под PDF или аналогичные файлы. Это также удобно, когда вам нужно иметь дело с ассоциациями файлов Windows 10.
Приведенный ниже скрипт позволит вам переключать отображение расширений для известных типов файлов с Победа + Y.
Скачать: Переключить скрипт известных расширений файлов
6. Вставьте специальные символы.
Помимо нескольких специальных символов на клавиатуре (например, @ и *), есть еще десятки, которые не так удобны для доступа. Один из самых быстрых способов ввода иностранных символов и других необычных символов — использование AutoHotkey.
С помощью всего лишь строчки кода AHK вы можете быстро вставить эти специальные символы и избавиться от необходимости запоминать коды ALT или копировать и вставлять их из онлайн-списка.
Используйте приведенный ниже шаблон для создания наиболее полезных для вас ярлыков. Символы слева от двух двоеточий — это то, что вы нажимаете, чтобы активировать ярлык, а символ внутри скобок — это то, что вставляет ярлык.
Так, например, если вы хотите нажать Alt + Q чтобы вставить значок товарного знака, вы должны создать сценарий со следующим:
!q::SendInput {™}
Для справки символы для клавиш следующие. Вы можете узнать больше о горячих клавишах на Страница руководства AutoHotkey:
- ^ для Ctrl
- ! для Alt
- # для Выиграть
- + для сдвиг
7. Запустите быстрый поиск в Google.
Если вы активно ищите в Google, этот удобный ярлык позволит вам выполнить поиск любого скопированного текста на вашем компьютере.
Он запустит ваш браузер по умолчанию и выполнит поиск в Google любого фрагмента текста, выделенного вами при нажатии Ctrl + Shift + C. Это удобно, чтобы постоянно сокращать количество операций копирования и вставки!
^+c::
{
 Send, ^c
 Sleep 50
 Run, https://www.google.com/search?q=%clipboard%
 Return
}
8. Используйте цифровую клавиатуру как мышь.
Хотя при необходимости вы можете перемещаться по Windows без мыши, наличие этого сценария означает, что вам не нужно запоминать сочетания клавиш для этого. Этот аккуратный скрипт AutoHotkey использует вашу цифровую клавиатуру в качестве мыши, обеспечивая большую точность и способ обойти ваш компьютер в случае отказа оборудования.
Посмотрите информацию в верхней части скрипта, чтобы узнать, как его использовать.
Скачать: Использование клавиатуры Numpad в качестве сценария мыши
9. Запустите любое приложение.
Меню «Пуск» позволяет легко открыть любую программу, установленную на вашем компьютере, за считанные секунды. Но для наиболее часто используемых программ вам может потребоваться еще более быстрый способ их запуска.
Скрипт для открытия приложения прост; вот один для запуска Firefox при нажатии Win + F. При необходимости измените его для предпочитаемого сочетания клавиш и приложения.
#f::Run Firefox
10. Самодельные клавиши регулировки громкости.
На большинстве клавиатур есть клавиши для легкого изменения громкости, смены музыкальной дорожки и т. Д. Но если у вас их нет, вы можете использовать AutoHotkey, чтобы придумать свои собственные кнопки громкости.
Вот один пример, в котором используется Shift + плюс и Shift + минус (клавиши на цифровой клавиатуре) для увеличения и уменьшения громкости. Также можно попасть в малоиспользуемые Перерыв клавиша для отключения звука.
Как и в случае с другими скриптами, не стесняйтесь настраивать кнопки по своему вкусу.
+NumpadAdd:: Send {Volume_Up}
+NumpadSub:: Send {Volume_Down}
break::Send {Volume_Mute}
return
Написание собственных сценариев
Если вы чувствуете себя уверенно, почему бы в следующий раз не попробовать создать свои собственные скрипты AutoHotkey? Если вы только начинаете работать с AHK, вы, вероятно, извлечете наибольшую пользу из расширения текста.
По сути, расширение текста позволяет набирать небольшой фрагмент текста, который автоматически расширяется до чего-то более длинного. Если вы отправляете одно и то же электронное письмо несколько раз в день или постоянно вводите свой адрес электронной почты при входе на веб-сайты, настройка расширения текста сделает вас более продуктивным.
Если вы скачали скрипт автозамены из # 1 выше, внизу есть место для добавления любых собственных фраз, что является идеальным местом для добавления однострочного расширения. Если вы не используете этот сценарий, просто создайте новый сценарий для записей расширения.
Это просто: введите два двоеточия и текст горячей клавиши. После еще двух двоеточий введите фразу, до которой нужно расширить ярлык. Итак, если вы хотите, чтобы ввод «@@» автоматически разворачивался до вашего адреса электронной почты, сценарий был бы таким:
::@@::youremail@domain.com
Возможностей здесь много. Вы можете сделать горячую клавишу Ctrl + Alt + C выплюнуть шаблонное электронное письмо, которое вы набираете несколько раз в день, или любое количество других задач, относящихся к вашей работе:
^!c::
Send Hello,{enter}This is a canned email.
return
После того, как вы настроили расширение текста, вы можете начать переназначение клавиш, если вы обнаружите, что некоторые из них бесполезны в их текущем состоянии.
Вы хотите, чтобы кнопка Insert была, например, ярлыком для Copy? Вы можете изменить это следующим образом:
Insert::^c
Проверять, выписываться учебники AutoHotkey для получения дополнительной информации. Для более подробного ознакомления с AHK у нас есть руководство по AutoHotkey для начинающих, которое вы также можете проверить.
[youtube https://www.youtube.com/watch?v=lxLNtBYjkjU&w=560&h=315]
Сила AutoHotkey
Самое замечательное в AutoHotkey — это то, что он полностью настраивается под ваши нужды. Если вам просто нужна автокоррекция и несколько простых фрагментов расширения текста, вы можете легко это настроить. Если вы хотите углубиться в множество настраиваемых элементов управления и сложных ярлыков, вы можете написать любые скрипты, которые вам нравятся.
С этими великолепными скриптами AutoHotkey вам не понадобится опыт программирования, чтобы начать работу. Для аналогичного инструмента вам также следует изучить основы пакетных файлов Windows.