PYTHON SCRIPTS
Создайте свой собственный браузер Chrome с Python PyQt5
Как создать простой веб-браузер на Python?
В этом пошаговом руководстве по программированию на Python я покажу вам, как создать простой браузер с использованием платформы PyQt5. Браузер позволит нам открыть URL-адрес в окне, похожем на Chrome.
Python — это объектно-ориентированный язык программирования. Библиотека Qt, написанная на C ++, используется для разработки собственных графических приложений для настольных ПК и создает кроссплатформенный код, поэтому это хороший инструмент для разработки многоплатформенных приложений. Мы можем легко создать наш собственный веб-браузер на Python с помощью библиотеки PyQT5, и версия Python 3 хорошо подойдет для этого руководства, хотя Python 2.7 все еще используется во многих организациях, а также в моей среде.
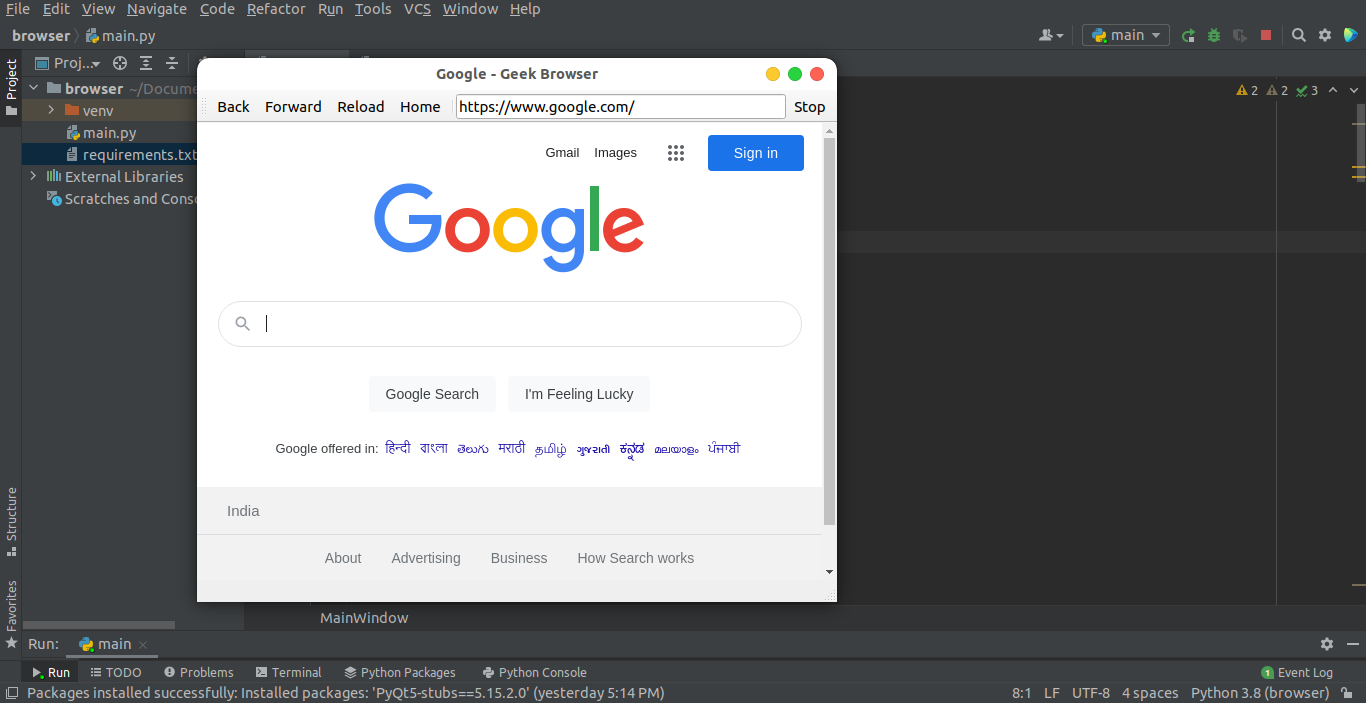
Демо
PyQt5
Qt — это набор кроссплатформенных библиотек C ++, реализующих высокоуровневые API для доступа ко многим аспектам современных настольных и мобильных систем. К ним относятся службы определения местоположения и позиционирования, мультимедиа, NFC и Bluetooth, веб-браузер на основе Chromium, а также традиционная разработка пользовательского интерфейса.
PyQt5 — это полный набор привязок Python для Qt v5. Он реализован в виде более чем 35 модулей расширения и позволяет использовать Python в качестве языка разработки приложений, альтернативного C ++, на всех поддерживаемых платформах, включая iOS и Android.
PyQt5 также может быть встроен в приложения на основе C ++, чтобы пользователи этих приложений могли настраивать или улучшать функциональность этих приложений. «источник»
Установка пакета
Https://carbon.now.sh/?bg=rgba%252874%252C144%252C226%252C1%2529&t=seti&wt=none&l=auto&ds=false&dsyoff=20px&dsblur=68px&wc=true&wa=true&hl=ru&fl=ru&fl=ru&fl=ru&hl=ru&hl=ru&hl=ru&hl=ru&fl=1 Fira + Code & fs = 18px & lh = 132% 2525 & si = false & es = 2x & wm = false & code = pip% 252520install% 252520PyQt5% 25250Apip% 252520install% 252520PyQtWebEngine
Я создал файл `requirements.txt` для установки необходимых пакетов с помощью pip.
PyQt5==5.15.4
PyQt5-Qt5==5.15.2
PyQt5-sip==12.9.0
PyQt5-stubs==5.15.2.0
PyQtWebEngine==5.15.4
PyQtWebEngine-Qt5==5.15.2
Установите требования из файла requirements.txt
pip install -r requirements.txt
Создать веб-браузер
Чтобы создать веб-браузер, выполните следующие действия.
Импортировать пакеты
from PyQt5.QtCore import *
from PyQt5.QtWidgets import *
from PyQt5.QtWebEngineWidgets import *
import sys
Создать главные окна
class MainWindow(QMainWindow):

    # constructor
    def __init__(self, *args, **kwargs):
        super(MainWindow, self).__init__(*args, **kwargs)

        # creating a QWebEngineView
        self.browser = QWebEngineView()

        # setting default browser url as google
        self.browser.setUrl(QUrl("http://google.com"))

        # adding action when url get changed
        self.browser.urlChanged.connect(self.update_urlbar)

        # adding action when loading is finished
        self.browser.loadFinished.connect(self.update_title)

        # set this browser as central widget or main window
        self.setCentralWidget(self.browser)

        # creating a status bar object
        self.status = QStatusBar()

        # adding status bar to the main window
        self.setStatusBar(self.status)
Создать приложение PyQt
# creating a pyQt5 application
app = QApplication(sys.argv)

# setting name to the application
app.setApplicationName("Chrome Web Browser")

# creating a main window object
window = MainWindow()
Запустить приложение
# loop
app.exec_()
Я предоставил правильные комментарии внутри части кодирования, она автоматически все объяснит.
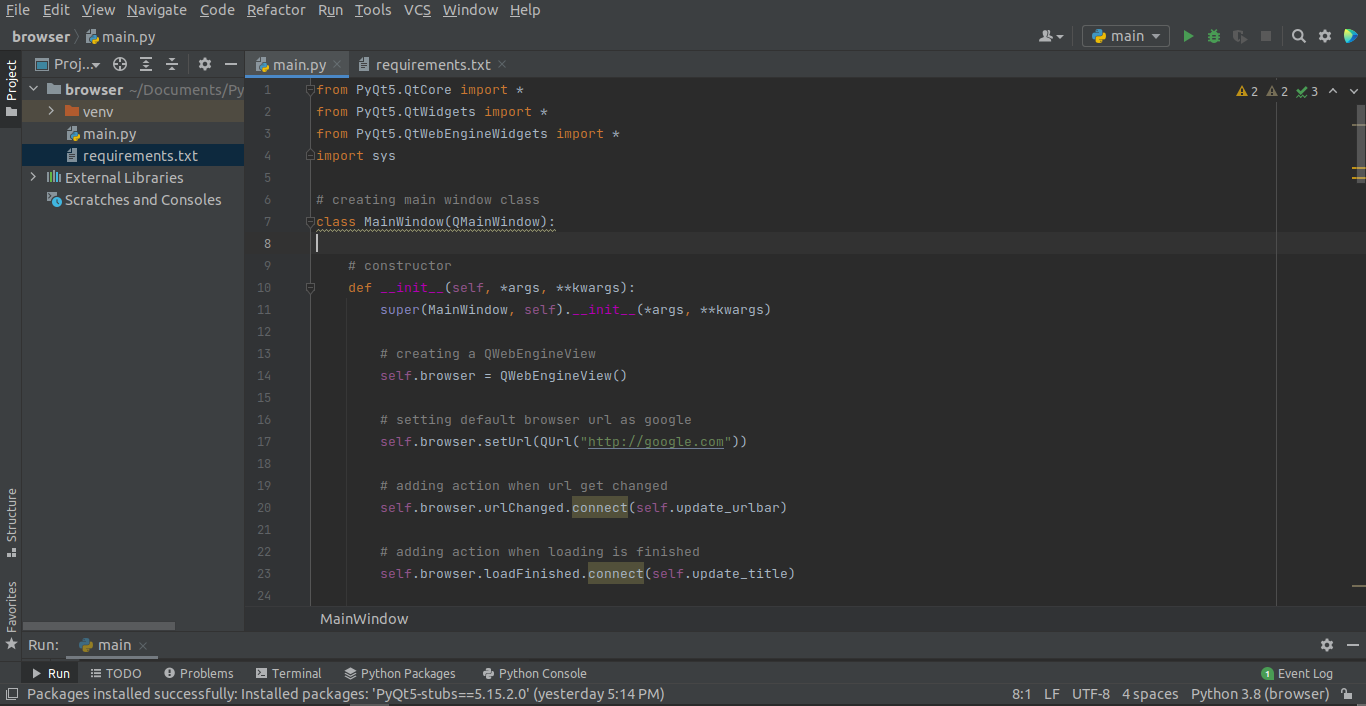
Вот файл main.py
Запустите приложение
Чтобы запустить приложение, откройте терминал внутри корневого каталога вашего проекта и запустите —
python3 main.py
Это запустит веб-браузер.
Заключение
Я рассмотрел все основные вещи, необходимые для создания веб-браузера с использованием библиотеки Python и PyQt5. Я надеюсь, что это поможет вам создавать потрясающие проекты. Вы можете добавить в него новые функции и прислать мне ответ. Пожалуйста, хлопайте в ладоши и подписывайтесь на меня, чтобы прочитать больше подобных статей. Эта статья была навеяна этим.
Спасибо за чтение!
Больше контента на plainenglish.io
from PyQt5.QtCore import *
from PyQt5.QtWidgets import *
from PyQt5.QtGui import *
from PyQt5.QtWebEngineWidgets import *
from PyQt5.QtPrintSupport import *
import os
import sys
class MainWindow(QMainWindow):
def __init__(self, *args, **kwargs):
super(MainWindow, self).__init__(*args, **kwargs)
self.browser = QWebEngineView()
self.browser.urlChanged.connect(self.update_urlbar)
self.browser.loadFinished.connect(self.update_title)
self.setCentralWidget(self.browser)
self.status = QStatusBar()
self.setStatusBar(self.status)
navtb = QToolBar("Navigation")
self.addToolBar(navtb)
back_btn = QAction("Back", self)
back_btn.setStatusTip("Back to previous page")
back_btn.triggered.connect(self.browser.back)
navtb.addAction(back_btn)
next_btn = QAction("Forward", self)
next_btn.setStatusTip("Forward to next page")
next_btn.triggered.connect(self.browser.forward)
navtb.addAction(next_btn)
reload_btn = QAction("Reload", self)
reload_btn.setStatusTip("Reload page")
reload_btn.triggered.connect(self.browser.reload)
navtb.addAction(reload_btn)
home_btn = QAction("Home", self)
home_btn.setStatusTip("Go home")
home_btn.triggered.connect(self.navigate_home)
navtb.addAction(home_btn)
navtb.addSeparator()
self.urlbar = QLineEdit()
self.urlbar.returnPressed.connect(self.navigate_to_url)
navtb.addWidget(self.urlbar)
stop_btn = QAction("Stop", self)
stop_btn.setStatusTip("Stop loading current page")
stop_btn.triggered.connect(self.browser.stop)
navtb.addAction(stop_btn)
self.show()
def update_title(self):
title = self.browser.page().title()
self.setWindowTitle("% s - Geek Browser" % title)
def navigate_home(self):
def navigate_to_url(self):
q = QUrl(self.urlbar.text())
if q.scheme() == "":
q.setScheme("http")
self.browser.setUrl(q)
def update_urlbar(self, q):
self.urlbar.setText(q.toString())
self.urlbar.setCursorPosition(0)
app = QApplication(sys.argv)
app.setApplicationName("Geek Browser")
window = MainWindow()
app.exec_()
 Python browser with PyQt4
In this tutorial we will build a webbrowser with Python. We will use the PyQT library which has a web component. In this tutorial you will learn how to link all the components together. We will use the default rendering engine and not roll one in this tutorial.
If you have not done our pyqt4 beginner tutorial, you could try it. If python-kde4 cannot be found update your repository to find it. The Ubuntu or Debian install guide .
Related course:
- Create GUI Apps with PyQt5
PyQt installation
Install the required qt4 packages:
sudo pip install python-qt4
sudo apt-get install qt4-designer
sudo apt-get install pyqt4-dev-tools
sudo apt-get install python-kde4
Creating the GUI with PyQT
Start qt4-designer from your applications menu. The QT Designer application will appear:
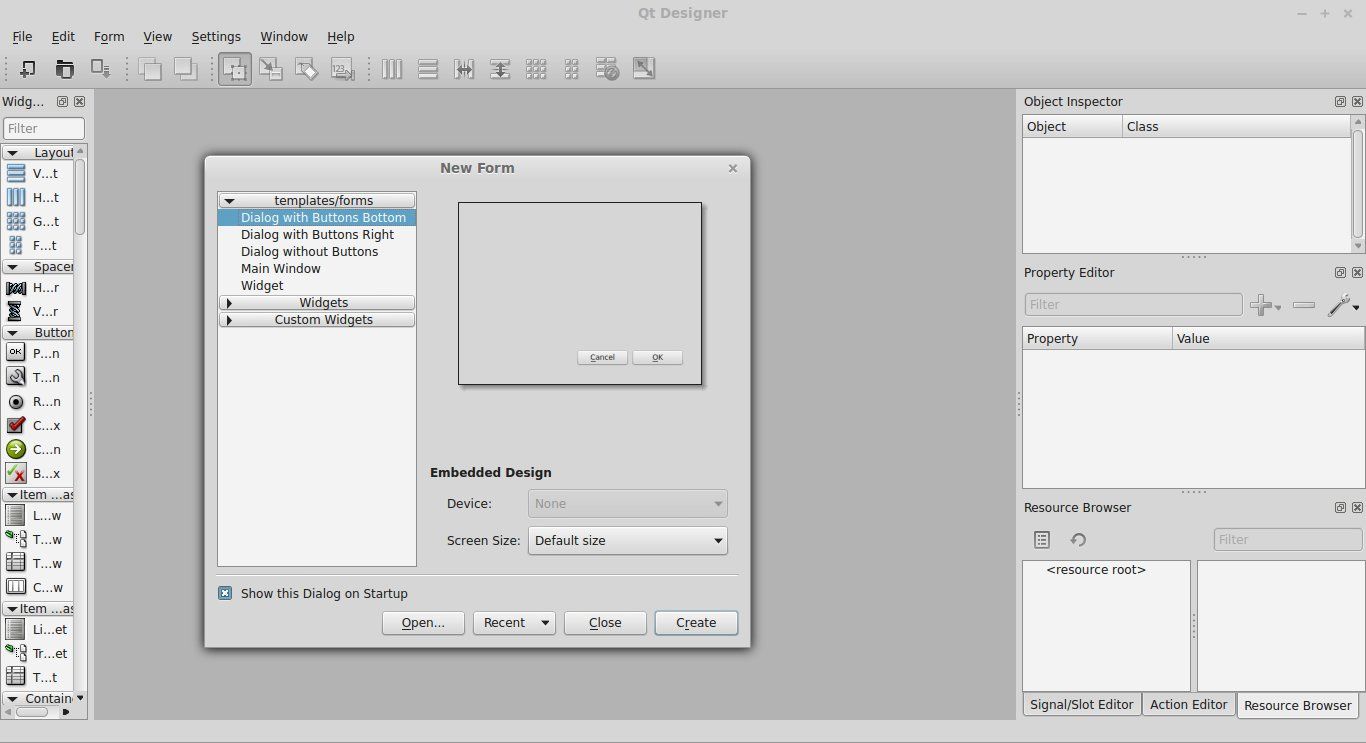 QT_Designer
Select Main Window and press Create. We now have our designer window open. Drag a KWebView component on the window. If you have a QtWebView (qtwebkit) in the component list. use that instead. We also add an Line Edit on top. Press File > Save As > browser.ui. Run the command:
pyuic4 browser.ui > browser.py
This will generate a Python file. Remove the line “from kwebview import KWebView” from the bottom of the browser.py file. Change KWebView to QtWebView. We want to use QtWebView instead. If you are lazy to change that, take the browser.py file from below.
QWebView exploration
Create a file called run.py with this contents:
import sys
from browser import BrowserDialog
from PyQt4 import QtCore, QtGui
from PyQt4.QtCore import QUrl
from PyQt4.QtWebKit import QWebView

class MyBrowser(QtGui.QDialog):
def __init__(self, parent=None):
QtGui.QWidget.__init__(self, parent)
QWebView.__init__(self)
self.ui = BrowserDialog()
self.ui.setupUi(self)
self.ui.lineEdit.returnPressed.connect(self.loadURL)

def loadURL(self):
url = self.ui.lineEdit.text()
self.ui.qwebview.load(QUrl(url))
self.show()


if __name__ == "__main__":
app = QtGui.QApplication(sys.argv)
myapp = MyBrowser()
myapp.ui.qwebview.load(QUrl('http://www.pythonspot.com'))
myapp.show()
sys.exit(app.exec_())
This code will use the UI as defined in browser.py and add logic to it. The lines
 self.ui.lineEdit.returnPressed.connect(self.loadURL)

def loadURL(self):
url = self.ui.lineEdit.text()
self.ui.qwebview.load(QUrl(url))
self.show()
The first line defines the callback or event. If a person presses enter (returnPressed), it will call the function loadURL. It makes sure that once you press enter, the page is loaded with that function. If you did everything correctly, you should be able to run the browser with the command:
python run.py
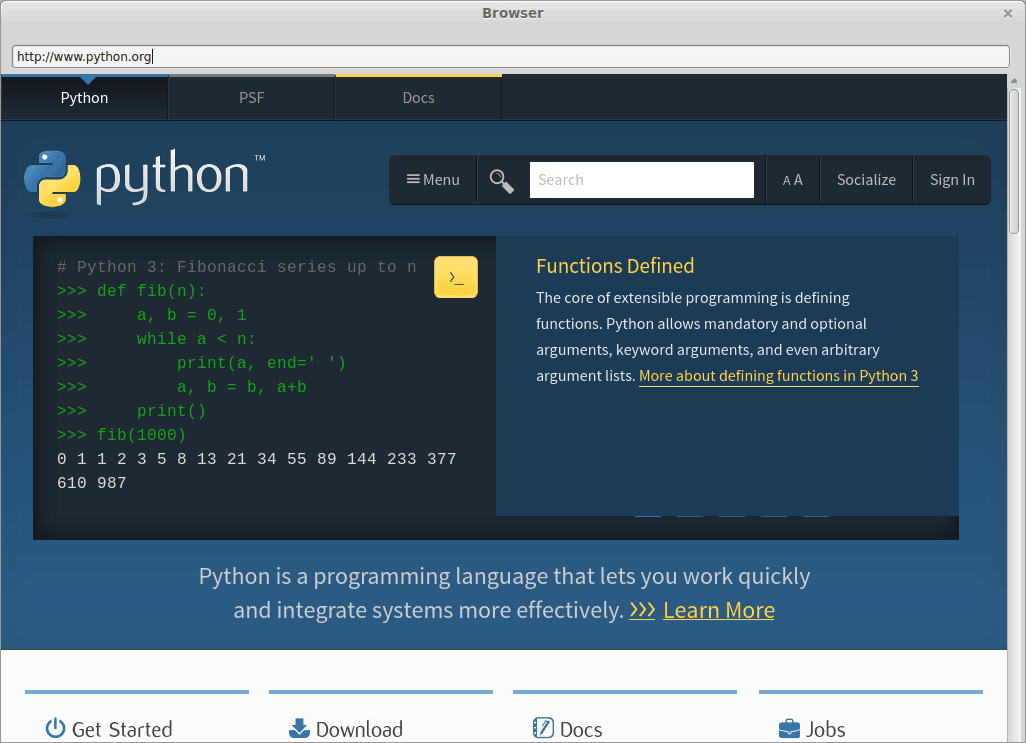
Please make sure you type the full url, e.g. : https://pythonspot.com including the http:// part. Your browser should now start:
<caption id=”attachment_295” align=”alignnone” width=”1026”] Python browser
If your code does not run, please use the codes below (or look at the differences and change whats wrong):
browser.py
import sys
from PyQt4 import QtCore, QtGui
from PyQt4.QtGui import QApplication
from PyQt4.QtCore import QUrl
from PyQt4.QtWebKit import QWebView

try:
_fromUtf8 = QtCore.QString.fromUtf8
except AttributeError:
def _fromUtf8(s):
return s

try:
_encoding = QtGui.QApplication.UnicodeUTF8
def _translate(context, text, disambig):
return QtGui.QApplication.translate(context, text, disambig, _encoding)
except AttributeError:
def _translate(context, text, disambig):
return QtGui.QApplication.translate(context, text, disambig)

class BrowserDialog(object):
def setupUi(self, Dialog):
Dialog.setObjectName(_fromUtf8("Dialog"))
Dialog.resize(1024, 768)
self.qwebview = QWebView(Dialog)
self.qwebview.setGeometry(QtCore.QRect(0, 50, 1020, 711))
self.qwebview.setObjectName(_fromUtf8("kwebview"))
self.lineEdit = QtGui.QLineEdit(Dialog)
self.lineEdit.setGeometry(QtCore.QRect(10, 20, 1000, 25))
self.lineEdit.setObjectName(_fromUtf8("lineEdit"))

self.retranslateUi(Dialog)
QtCore.QMetaObject.connectSlotsByName(Dialog)

def retranslateUi(self, Dialog):
Dialog.setWindowTitle(_translate("Browser", "Browser", None))
run.py
import sys
from browser import BrowserDialog
from PyQt4 import QtCore, QtGui
from PyQt4.QtCore import QUrl
from PyQt4.QtWebKit import QWebView

class MyBrowser(QtGui.QDialog):
def __init__(self, parent=None):
QtGui.QWidget.__init__(self, parent)
QWebView.__init__(self)
self.ui = BrowserDialog()
self.ui.setupUi(self)
self.ui.lineEdit.returnPressed.connect(self.loadURL)

def loadURL(self):
url = self.ui.lineEdit.text()
self.ui.qwebview.load(QUrl(url))
self.show()


if __name__ == "__main__":
app = QtGui.QApplication(sys.argv)
myapp = MyBrowser()
myapp.ui.qwebview.load(QUrl('http://www.pythonspot.com'))
myapp.show()
sys.exit(app.exec_())
Download PyQT Code (Bulk Collection)
Hey there! In this tutorial, we will be learning to create a simple browser in Python using PyQt5 in PyCharm.
Qt is a set of cross-platform C++ libraries that implement high-level APIs for accessing various aspects of modern desktop and mobile systems such as location and positioning services, Bluetooth connectivity, etc.
PyQt5 is a comprehensive set of Python bindings for Qt v5, that enables Python to be used as an alternative application development language to C++ on all supported platforms including iOS and Android.
Implementation
- Firstly, open PyCharm and create a project titled Browser. Then open the terminal and type the below-listed commands to install the respective libraries.
pip install PyQt5
pip install PyQtWebEngine
- Then, within the main.py file in this project, type the below-specified code. Refer to the code’s comments regarding various functionalities supported by the browser and their implementations.
# Import necessary libraries
from PyQt5.QtWidgets import *
from PyQt5.QtCore import *
from PyQt5.QtWebEngineWidgets import *
import sys


# Create a main window class
class MainWindow(QMainWindow):
    # Constructor of this class
    def __init__(self):
        super(MainWindow, self).__init__()
        # To provide a widget for viewing and editing web documents:
        self.browser = QWebEngineView()
        # To set default browser homepage as google homepage:
        self.browser.setUrl(QUrl("http://www.google.com"))
        # To set browser as central widget of main window:
        self.setCentralWidget(self.browser)
        # To open browser in a maximized window:
        self.showMaximized()

        # To create a navigation bar:
        navbar = QToolBar()
        navbar.adjustSize()
        # To add the navigation bar to the browser:
        self.addToolBar(navbar)

        # To add back button within navigation bar:
        back_btn = QAction('⮜', self)
        back_btn.triggered.connect(self.browser.back)
        navbar.addAction(back_btn)

        # To add forward button within navigation bar:
        forward_btn = QAction('⮞', self)
        forward_btn.triggered.connect(self.browser.forward)
        navbar.addAction(forward_btn)

        # To add reload button within navigation bar:
        reload_btn = QAction('⟳', self)
        reload_btn.triggered.connect(self.browser.reload)
        navbar.addAction(reload_btn)

        # To add URL bar within navigation bar:
        self.url_bar = QLineEdit()
        self.url_bar.returnPressed.connect(self.open_url)
        navbar.addWidget(self.url_bar)
        self.browser.urlChanged.connect(self.update_url)

    # To navigate to desired URL specified within URL bar:
    def open_url(self):
        url = self.url_bar.text()
        self.browser.setUrl(QUrl(url))

    # To update the URL bar contents when navigated from one page to another:
    def update_url(self, q):
        self.url_bar.setText(q.toString())


# To call constructor of the C++ class QApplication:
# Here, sys.argv is used to initialize the QT application
app = QApplication(sys.argv)
# To specify name of the browser:
QApplication.setApplicationName("My_Explorer")
# To create an object of MainWindow class defined above:
window = MainWindow()
# To run the main event loop and wait until exit() is called:
app.exec()
To access the arrowhead and reload symbols used in the above code, click here.
Output
In the video below, you can see the output of our project that we have just built:
You can see our browser is ready.
Also read, Implement Browser Automation using Selenium with Python
In this tutorial we’ll create simple web browser using Python PyQt framework.
As you may know PyQt is a set of Python bindings for Qt framework,
and Qt (pronounced cute) is C++ framework used to create
GUI-s. To be strict you can use Qt to develop programs without GUI too,
but developing user interfaces is probably most common thing people do with
this framework. Main benefit of Qt is that it allows you to create GUI-s
that are cross platform, your apps can run on various devices using
native capabilities of each platform without changing your codebase.
Qt comes with a port of webkit, which means that you can create webkit-based
browser in PyQt.
Our browser will do following things:
- load urls entered by user into input box
- show all requests performed while rendering the page
- allow you to execute custom JavaScript in page context
Hello Webkit
Let’s start with simplest possible use case of PyQt Webkit: loading some url,
opening window and rendering page in this window.
This is trivial to do, and requires around 13 lines of code (with imports
and whitespace):
import sys

from PyQt4.QtWebKit import QWebView
from PyQt4.QtGui import QApplication
from PyQt4.QtCore import QUrl

app = QApplication(sys.argv)

browser = QWebView()
browser.load(QUrl(sys.argv[1]))
browser.show()

app.exec_()
If you pass url to script from command line it should load this url and show
rendered page in window.
At this point you maybe have something looking like command line browser, which
is already better than python-requests or even Lynx because it renders JavaScript.
But it’s not much better than Lynx because you can only pass urls from command line when you invoke it. We
definitely need some way of passing urls to load to our browser.
Add address bar
To do this we’ll just add input box at the top of the window, user will type url
into text box, browser will load this url. We will use QLineEdit widget for
input box. Since we will have two elements (text input and browser frame), we’ll
need to add some grid layout to our app.
import sys

from PyQt4.QtGui import QApplication
from PyQt4.QtCore import QUrl
from PyQt4.QtWebKit import QWebView
from PyQt4.QtGui import QGridLayout, QLineEdit, QWidget


class UrlInput(QLineEdit):
    def __init__(self, browser):
        super(UrlInput, self).__init__()
        self.browser = browser
        # add event listener on "enter" pressed
        self.returnPressed.connect(self._return_pressed)

    def _return_pressed(self):
        url = QUrl(self.text())
        # load url into browser frame
        browser.load(url)

if __name__ == "__main__":
    app = QApplication(sys.argv)

    # create grid layout
    grid = QGridLayout()
    browser = QWebView()
    url_input = UrlInput(browser)
    # url_input at row 1 column 0 of our grid
    grid.addWidget(url_input, 1, 0)
    # browser frame at row 2 column 0 of our grid
    grid.addWidget(browser, 2, 0)

    # main app window
    main_frame = QWidget()
    main_frame.setLayout(grid)
    main_frame.show()

    # close app when user closes window
    sys.exit(app.exec_())
At this point you have bare-bones browser that shows some resembrance to
Google Chrome and it uses same rendering engine. You can enter url into input box and
your app will load url into browser frame and render all HTML and JavaScript.
Add dev tools
Of course the most interesting and important part of every browser are its
dev tools. Every browser worth its name should have its developer console.
Our Python browser should have some developer tools too.
Let’s add something similar to Chrome “network” tab in dev tools.
We will simply keep track of all requests performed by browser engine while rendering
page. Requests will be shown in table below main browser frame, for simplicity
we will only log url, status code and content type of responses.
Do do this we will need to create a table first, we’ll use QTableWidget for that,
header will contain field names, it will auto-resize each time
new row is added to table.
class RequestsTable(QTableWidget):
    header = ["url", "status", "content-type"]

    def __init__(self):
        super(RequestsTable, self).__init__()
        self.setColumnCount(3)
        self.setHorizontalHeaderLabels(self.header)
        header = self.horizontalHeader()
        header.setStretchLastSection(True)
        header.setResizeMode(QHeaderView.ResizeToContents)

    def update(self, data):
        last_row = self.rowCount()
        next_row = last_row + 1
        self.setRowCount(next_row)
        for col, dat in enumerate(data, 0):
            if not dat:
                continue
            self.setItem(last_row, col, QTableWidgetItem(dat))
To keep track of all requests we’ll need to get bit deeper into PyQt internals.
Turns out that Qt exposes NetworkAccessManager class as an API allowing you
to perform and monitor requests performed by application. We will need to
subclass NetworkAccessManager, add event listeners we need, and tell our
webkit view to use this manager to perform its requests.
First let’s create our network access manager:
class Manager(QNetworkAccessManager):
    def __init__(self, table):
        QNetworkAccessManager.__init__(self)
        # add event listener on "load finished" event
        self.finished.connect(self._finished)
        self.table = table

    def _finished(self, reply):
        """Update table with headers, status code and url.
        """
        headers = reply.rawHeaderPairs()
        headers = {str(k):str(v) for k,v in headers}
        content_type = headers.get("Content-Type")
        url = reply.url().toString()
        # getting status is bit of a pain
        status = reply.attribute(QNetworkRequest.HttpStatusCodeAttribute)
        status, ok = status.toInt()
        self.table.update([url, str(status), content_type])
I have to say that some things in Qt are not as easy and quick as they should be.
Note how awkward it is to get status code from response. You have to use response
method .attribute() and pass reference to class property of request. This returns
QVariant not int and when you convert to int it returns tuple.
Now finally we have a table and a network access manager. We just need to wire all this
together.
if __name__ == "__main__":
    app = QApplication(sys.argv)

    grid = QGridLayout()
    browser = QWebView()
    url_input = UrlInput(browser)
    requests_table = RequestsTable()

    manager = Manager(requests_table)
    # to tell browser to use network access manager
    # you need to create instance of QWebPage
    page = QWebPage()
    page.setNetworkAccessManager(manager)
    browser.setPage(page)

    grid.addWidget(url_input, 1, 0)
    grid.addWidget(browser, 2, 0)
    grid.addWidget(requests_table, 3, 0)

    main_frame = QWidget()
    main_frame.setLayout(grid)
    main_frame.show()

    sys.exit(app.exec_())
Now fire up your browser, enter url into input box and enjoy the view
of all requests filling up table below webframe.
If you have some spare time you could add lots of new functionality here:
- add filters by content-type
- add sorting to table
- add timings
- highlight requests with errors (e.g. show them in red)
- show more info about each request — all headers, response content, method
- add option to replay requests and load them into browser frame, e.g.
user clicks on request in table and this url is loaded into browser.
This is long TODO list and it would be probably interesting learning
exercise to do all these things, but describing all of them would probably
require to write quite a long book.
Add way to evaluate custom JavaScript
Finally let’s add one last feature to our experimental browser —
ability to execute custom JavaScipt in page context.
After everything we’ve done earlier this one comes rather easily,
we just add another QLineEdit widget, connect it to web page object,
and call evaluateJavaScript method of page frame.
class JavaScriptEvaluator(QLineEdit):
    def __init__(self, page):
        super(JavaScriptEvaluator, self).__init__()
        self.page = page
        self.returnPressed.connect(self._return_pressed)

    def _return_pressed(self):
        frame = self.page.currentFrame()
        result = frame.evaluateJavaScript(self.text())
then we instantiate it in our main clause and voila our dev tools are ready.
if __name__ == "__main__":
    # ...
    # ...
    page = QWebPage()
    # ...
    js_eval = JavaScriptEvaluator(page)

    grid.addWidget(url_input, 1, 0)
    grid.addWidget(browser, 2, 0)
    grid.addWidget(requests_table, 3, 0)
    grid.addWidget(js_eval, 4, 0)
Now the only thing missing is ability to execute Python in page context. You could probably
develop your browser and add support for Python along JavaScript so that devs writing
apps targeting your browser could.
Moving back and forth, other page actions
Since we already connected our browser to QWebPage object we can also add other
actions important for end users. Qt web page object supports lots of different
actions and you can add them all to your app.
For now let’s just add support for “back”, “forward” and “reload”. You could
add those actions to our GUI by adding buttons, but it will be easier to just
add another text input box.
class ActionInputBox(QLineEdit):
    def __init__(self, page):
        super(ActionInputBox, self).__init__()
        self.page = page
        self.returnPressed.connect(self._return_pressed)

    def _return_pressed(self):
        frame = self.page.currentFrame()
        action_string = str(self.text()).lower()
        if action_string == "b":
            self.page.triggerAction(QWebPage.Back)
        elif action_string == "f":
            self.page.triggerAction(QWebPage.Forward)
        elif action_string == "s":
            self.page.triggerAction(QWebPage.Stop)
just as before you also need to create instance of ActionInputBox, pass reference
to page object and add it to our GUI grid.
Full result should look somewhat like this:
For reference here’s code for final result
So far we’ve learned the basics of building Python GUI applications with Qt. In this tutorial we’ll take
what we’ve learned and apply it to creating a custom web browser — Mozzerella Ashbadger — in Python.
Mozzerella Ashbadger is the latest revolution in web browsing! Go back and forward! Save files! Get help! (you’ll need it). Any similarity to other browsers is entirely coincidental.
QtWebEngineWidgets is not included in the main PyQt5 repository. If you see errors when running this relating to this module, you can install it using pip install PyQtWebEngine
The full source code for MooseAche is available in the 15 minute apps repository. You can download/clone to get a working copy,
then install requirements using:
python
pip3 install -r requirements.txt
You can then run MooseAche with:
Read on for a walkthrough of how the code works.
The core of our browser is the QWebView which we import from PyQt5. QtWebEngineWidgets. This provides a complete browser window, which handles the rendering of the downloaded pages.
Below is the bare-minimum of code required to use web browser widget in PyQt.
python3
from PyQt5.QtCore import *
from PyQt5.QtWidgets import *
from PyQt5.QtGui import *
from PyQt5.QtWebEngineWidgets import *

import sys

class MainWindow(QMainWindow):

    def __init__(self, *args, **kwargs):
        super(MainWindow,self).__init__(*args, **kwargs)

        self.browser = QWebEngineView()
        self.browser.setUrl(QUrl("http://www.google.com"))

        self.setCentralWidget(self.browser)

        self.show()

app = QApplication(sys.argv)
window = MainWindow()

app.exec_()
If you click around a bit you’ll discover that the browser behaves as expected — links work correctly, and you can interact with the pages. However, you’ll also notice things you take for granted are missing — like an URL bar, controls or any sort of interface whatsoever. This makes it a little tricky to use.
In the next part we’ll extend this basic skeleton of a browser and add some navigation controls.
Over 10,000 developers have bought Create GUI Applications with Python & Qt!
[[ discount.discount_pc ]]% OFF for
the next [[ discount.duration ]]
[[discount.description ]]
with the code [[ discount.coupon_code ]]
Purchasing Power Parity
Developers in [[ country ]] get [[ discount.discount_pc ]]% OFF on all books & courses
with code [[ discount.coupon_code ]]