На чтение 20 мин Просмотров 1.7к. Опубликовано 08.07.2021
В этой статье мы собираемся создать программное обеспечение для управления задачами на Python. Это программное обеспечение будет очень полезно для тех, кто не хочет обременять себя тем, какую задачу они выполнили, а с какой остались. Как программист, мы должны помнить, какие соревнования проходят, на какие курсы мы записываемся, за каким плейлистом YouTube следим и так далее. Это программное обеспечение будет вести учет всех таких деталей в безопасном режиме, чтобы только вы имели доступ к вашим данным.
Инструменты и технологии, использованные в проекте:
- Этот проект будет очень удобным для новичков.
- Работа этого программного обеспечения полностью основана на протоколе POP (процедурно-ориентированное программирование). Требуются базовые знания о функциях Python.
- Модуль DateTime в Python.
Требуемый набор навыков для создания проекта:
- Python
- Visual Studio Code или любой другой редактор кода.
Содержание
- Пошаговая реализация
- Шаг 1.Создайте папку с именем «Диспетчер задач». Откройте его в своем любимом редакторе кода.
- Шаг 2.Создайте файл Python с именем task_manager.py.
- Шаг 3:Теперь мы готовы написать код нашего программного обеспечения.
- Шаг 4:Теперь мы создадим функцию user_information
- Шаг 5:После того, как текстовый файл будет создан функцией user_information.
- Шаг 6: На этом шаге мы позаботимся о том, чтобы после входа пользователя в систему мы могли попросить его / ее войти в свою учетную запись.
- Шаг 7: Давайте выполним четыре важные функции, упомянутые в блоке «вход».
- Шаг 8: Давайте закодируем блок данных представления.
- Шаг 9: Чтобы закодировать информационный блок задачи, нам нужно помнить об основных концепциях обработки текста в Python.
- Шаг 10: Обновление статуса задачи происходит в аналогичной концепции обработки текста в Python.
- Шаг 11: Теперь у нас осталась функция просмотра обновлений задач.
- Шаг 12: Основная функция.
Пошаговая реализация
Выполните следующие шаги, чтобы реализовать персонализированный диспетчер задач с использованием Python:
Шаг 1.Создайте папку с именем «Диспетчер задач». Откройте его в своем любимом редакторе кода.
Шаг 2.Создайте файл Python с именем task_manager.py.
Шаг 3:Теперь мы готовы написать код нашего программного обеспечения.
Первоначально мы начнем с создания нашей функции регистрации. Функция регистрации будет принимать имя пользователя, под которым пользователь собирается создать свою учетную запись, и запрашивать пароль для этой учетной записи. Приведенный ниже код проясняет ситуацию.
defsignup():
("Please enter the username by which you
wanna access your account")
username=input("please enter here: ")
password=input("Enter a password: ")
Шаг 4:Теперь мы создадим функцию user_information
Которая будет брать данные из функции регистрации и создавать текстовый файл для сохранения данных пользователя. Приведенный ниже код покажет, как все будет происходить.
defuser_information(ussnm, pssd):
name=input("enter your name please: ")
address=input("your adress")
age=input("Your age please")
ussnm_=ussnm+" task.txt"
f=open(ussnm_,'a')
f.write(pssd)
f.write("nName: ")
f.write(name)
f.write('n')
f.write("Adress :")
f.write(address)
f.write('n')
f.write("Age :")
f.write(age)
f.write('n')
f.close()
defsignup():
("Please enter the username by which you
wanna access your account")
username=input("please enter here: ")
password=input("Enter a password: ")
user_information(username, password)
Шаг 5:После того, как текстовый файл будет создан функцией user_information.
Пора закодировать нашу функцию входа в систему. Функция входа в систему будет принимать имя пользователя и запрашивать связанный с ним пароль. Как только пользователь вводит пароль, функция проверяет, совпадает ли пароль, сохраненный в текстовом файле, с введенным. Код может объяснить более точно,
deflogin():
("Please enter your username ")
user_nm=input("Enter here: ")
pssd_wr=(input("enterr the password"))+'n'
try:
usernm=user_nm+" task.txt"
f_=open(usernm,'r')
k=f_.readlines(0)[0]
f_.close()
ifpssd_wr==k:
(
"1--to view your data n2--To add task n3--Update
task status n4--View task status")
a=input()
else:
("SIR YOUR PASSWORD OR USERNAME IS WRONG , Plz enter Again")
login()
exceptException as e:
(e)
login()
Шаг 6: На этом шаге мы позаботимся о том, чтобы после входа пользователя в систему мы могли попросить его / ее войти в свою учетную запись.
Это можно сделать, вызвав функцию входа в систему в конце функции входа. Следовательно, функция входа будет выглядеть так:
Python3
defsignup():
("Please enter the username by which you wanna access your account")
username=input("please enter here: ")
password=input("Enter a password: ")
user_information(username, password)
("Sir please proceed towards log in")
login()
Шаг 7: Давайте выполним четыре важные функции, упомянутые в блоке «вход».
А именно, функция для просмотра данных, функция для добавления задачи к данным, функция для обновления статуса задачи и функция для просмотра статуса задачи. На этом этапе мы собираемся завершить функцию входа в систему, выполнив часть if-else после ввода запроса пользователя, то есть ввода в переменную a. См. Код ниже:
Python3
deflogin():
("Please enter your username ")
user_nm=input("Enter here: ")
pssd_wr=(input("enterr the password"))+'n'
try:
usernm=user_nm+" task.txt"
f_=open(usernm,'r')
k=f_.readlines(0)[0]
f_.close()
ifpssd_wr==k:
(
"1--to view your data n2--To add task n3--Update
task n4--VIEW TASK STATUS")
a=input()
ifa=='1':
view_data(usernm)
elifa=='2':
task_information(usernm)
elifa=='3':
task_update(user_nm)
elifa=='4':
task_update_viewer(user_nm)
else:
("Wrong input ! ")
else:
("SIR YOUR PASSWORD OR USERNAME IS WRONG")
login()
exceptException as e:
(e)
login()
defview_data(username):
pass
deftask_information(username):
pass
deftask_update(username):
pass
deftask_update_viewer(username):
pass
Как видите, команда pass используется, чтобы позволить нам записать имя функции и аргумент без тела функции, а также предотвратить появление сообщения об ошибке в редакторе кода.
Шаг 8: Давайте закодируем блок данных представления.
defview_data(username):
ff=open(username,'r')
(ff.read())
ff.close()
Шаг 9: Чтобы закодировать информационный блок задачи, нам нужно помнить об основных концепциях обработки текста в Python.
Мы спросим пользователя, сколько задач он / она хочет добавить, и, по его желанию, мы повторим цикл столько раз и попросим его ввести свою задачу и цель, по которой он хочет завершить задачу.
deftask_information(username):
("Sir enter n.o of task you want to ADD")
j=int(input())
f1=open(username,'a')
foriinrange(1, j+1):
task=input("enter the task")
target=input("enter the target")
pp="TASK "+str(i)+' :'
="TARGET "+str(i)+" :"
f1.write(pp)
f1.write(task)
f1.write('n')
f1.write(qq)
f1.write(target)
f1.write('n')
("Do u want to stop press space bar otherwise enter")
s=input()
ifs==' ':
break
f1.close()
Обратите внимание, что мы добавили сообщение о том, что если пользователь захочет прекратить добавление задачи раньше того количества раз, которое он хотел, то у него будет шанс. Это делает программу очень удобной для пользователя.
Шаг 10: Обновление статуса задачи происходит в аналогичной концепции обработки текста в Python.
Что мы будем делать, так это сохранить номер задачи, номер которой завершен, которая выполняется, а какая еще не запущена, с отметкой даты и времени с ними. Эта часть текстового файла будет выглядеть так:
2021-06-01 14:44:02.851506
COMPLETED TASK
1,3,4
ONGOING TASK
2
NOT YET STARTED
5
deftask_update(username):
username=username+" TASK.txt"
("Please enter the tasks which are completed ")
task_completed=input()
("Enter task which are still not started by you")
task_not_started=input()
("Enter task which you are doing")
task_ongoing=input()
fw=open(username,'a')
DT=str(datetime.datetime.now())
fw.write(DT)
fw.write("n")
fw.write("COMPLETED TASK n")
fw.write(task_completed)
fw.write("n")
fw.write("ONGOING TASK n")
fw.write(task_ongoing)
fw.write("n")
fw.write("NOT YET STARTEDn")
fw.write(task_not_started)
fw.write("n")
Шаг 11: Теперь у нас осталась функция просмотра обновлений задач.
Эта функция так же проста, как функция view_data.
deftask_update_viewer(username):
ussnm=username+" TASK.txt"
o=open(ussnm,'r')
(o.read())
o.close()
На этом программа завершается. Но прежде чем мы закончим, самая важная задача, которая все еще остается. Это кодирование основной функции и управление потоком команд программы из самой основной функции.
Шаг 12: Основная функция.
if__name__=='__main__':
("WELCOME TO ANURAG`S TASK MANAGER")
("sir are you new to this software")
a=int(input("Type 1 if new otherwise press 0 ::"))
ifa==1:
signup()
elifa==0:
login()
else:
("You have provided wrong input !")
Это знаменует конец кода. Вы должны попытаться внести соответствующие изменения в этот код, чтобы программа стала более красивой.
Исходный код:
importdatetime
defuser_information(ussnm, pssd):
name=input("enter your name please: ")
address=input("your adress")
age=input("Your age please")
ussnm_=ussnm+" task.txt"
f=open(ussnm_,'a')
f.write(pssd)
f.write("nName: ")
f.write(name)
f.write('n')
f.write("Adress :")
f.write(address)
f.write('n')
f.write("Age :")
f.write(age)
f.write('n')
f.close()
defsignup():
("Please enter the username by which you wanna access your account")
username=input("please enter here: ")
password=input("Enter a password: ")
user_information(username, password)
("Sir please proceed towards log in")
login()
deflogin():
("Please enter your username ")
user_nm=input("Enter here: ")
pssd_wr=(input("enterr the password"))+'n'
try:
usernm=user_nm+" task.txt"
f_=open(usernm,'r')
k=f_.readlines(0)[0]
f_.close()
ifpssd_wr==k:
(
"1--to view your data n2--To add task n3--Update
task n4--VIEW TASK STATUS")
a=input()
ifa=='1':
view_data(usernm)
elifa=='2':
task_information(usernm)
elifa=='3':
task_update(user_nm)
elifa=='4':
task_update_viewer(user_nm)
else:
("Wrong input ! bhai dekh kr input dal")
else:
("SIR YOUR PASSWORD OR USERNAME IS WRONG")
login()
exceptException as e:
(e)
login()
defview_data(username):
ff=open(username,'r')
(ff.read())
ff.close()
deftask_information(username):
("Sir enter n.o of task you want to ADD")
j=int(input())
f1=open(username,'a')
foriinrange(1, j+1):
task=input("enter the task")
target=input("enter the target")
pp="TASK "+str(i)+' :'
="TARGET "+str(i)+" :"
f1.write(pp)
f1.write(task)
f1.write('n')
f1.write(qq)
f1.write(target)
f1.write('n')
("Do u want to stop press space bar otherwise enter")
s=input()
ifs==' ':
break
f1.close()
deftask_update(username):
username=username+" TASK.txt"
("Please enter the tasks which are completed ")
task_completed=input()
("Enter task which are still not started by you")
task_not_started=input()
("Enter task which you are doing")
task_ongoing=input()
fw=open(username,'a')
DT=str(datetime.datetime.now())
fw.write(DT)
fw.write("n")
fw.write("COMPLETED TASK n")
fw.write(task_completed)
fw.write("n")
fw.write("ONGOING TASK n")
fw.write(task_ongoing)
fw.write("n")
fw.write("NOT YET STARTEDn")
fw.write(task_not_started)
fw.write("n")
deftask_update_viewer(username):
ussnm=username+" TASK.txt"
o=open(ussnm,'r')
(o.read())
o.close()
if__name__=='__main__':
("WELCOME TO ANURAG`S TASK MANAGER")
("sir are you new to this software")
a=int(input("Type 1 if new otherwise press 0 ::"))
ifa==1:
signup()
elifa==0:
login()
else:
("You have provided wrong input !")
Применение проекта в реальной жизни
- Это очень помогает учащемуся вести учет своей задачи или домашнего задания и крайнего срока их выполнения.
- Это очень помогает учащимся помнить о том, чему учиться, и о ресурсах.
1 / 1 / 0
Регистрация: 09.06.2013
Сообщений: 35
03.11.2013, 18:46
[ТС]
13
ну вот так маленько продолжил
| C++ | ||
|
вот я правильно воспользовался GetProcessTimes?т.е теперь мне необходимо взять ftUser и поделить на ftKernel и домножить на 100 чтобы получить загрузку процесса но перед этим «перевести» время?
Добавлено через 3 часа 21 минуту
вот подправил еще свой код,и вроде как мне кажется получилось получить загруженность цп…но не могли бы вы как знатоки оценить верность данного кода
| C++ | ||
|
0
- Download source — 263.7 KB
Introduction
All people who are working on any version of the Windows operating system know about Task Manager. They might be using it very frequently to start, end or manage processes. Task Manager has been around for a long time and is commonly used in our daily work. However, it is still lacking some features which might be useful in certain situations. So, I designed this application to provide features which are not present in the built-in Windows Task Manager. This application was created in VS.NET 2003 using C# and Windows Forms.
In this article, I will first explain some features present in the application, and then I will discuss its design and coding.
Task Manager features
This application…
- Displays all processes running in your system
- Allows you to add and remove any process (task) on your local machine
- Highlights current executing processes
- Enables connection to any machine and displays its process list
- Allows you to set or get the priority of any process running on your local machine
- Enables monitoring of .NET CLR managed memory
Creating the application
First, create a new Windows Application in VS.NET 2003 using C# and name it CustomizedTaskManager. Then design the main start-up form as shown below:
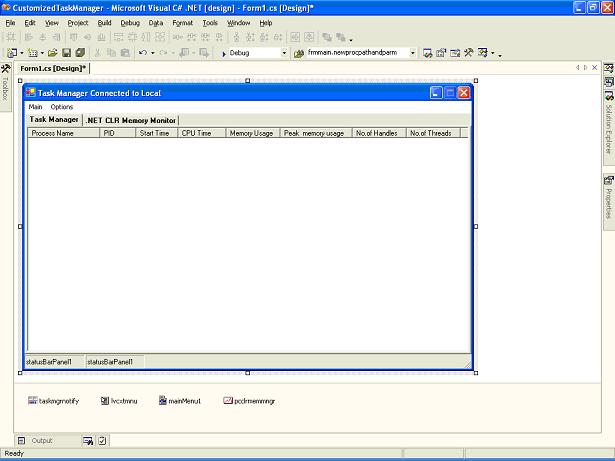
I placed a tab control with two tab pages. One is used to display Task Manager and the other to display CLR memory statistics. Then I placed a ListView control on first tab page where all processes and their details are displayed. I added columns like «process name,» «process id,» etc. to the ListView. Then I added MainMenu to provide following options:
- To popup «Connect to remote machine» dialog
- To popup «Create new task window»
- To control highlighting of currently executing processes
- To end a selected process
- To exit the application
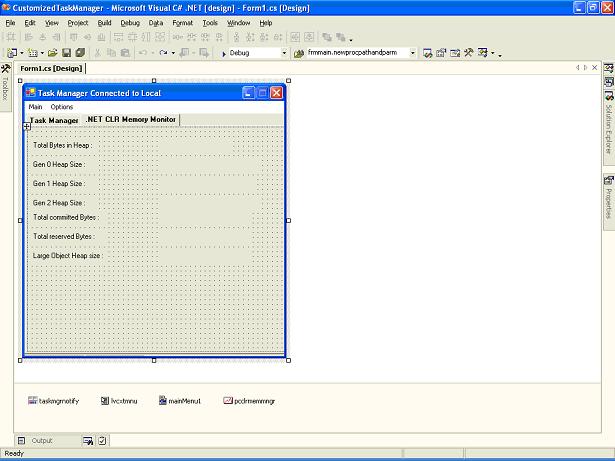
Add a performance counter component from toolbox and set its CategoryName as .NET CLR Memory and its instanceName as aspnet_wp. You can keep instanceName as the first 15 characters in any .NET-managed application’s name. Add appropriate labels to tabpage2 as shown in the figure:
Then add another form, naming it frmnewprcdetails, and design it as shown:

To minimize coding, I am using this form both to display dialog for connecting to a remote machine and to add new task functionality. These are the namespaces I used in Form1:
System.Diagnostics
System.Threading
Initially, I thought of displaying all processes in ListView and updating their details every second using the Threading.Timer object. However, if we update like that for every second by clearing all ListView items and reloading with new details, it will produce a flicker on the form for every reload. So, in order to avoid that problem, I used a hash table. The logic is outlined in the following section.
Design logic
Task functionality
All processes are loaded when the form loads. I’ve created a timer object with a one second interval to call LoadAllProcesses(). In this method, first I am storing all currently running process’ details in a hash table using Process.GetProcesses(machinename). Then I am comparing the hash table contents with each item present in ListView and if its process ID matches in both the hash table and ListView then we will update its details (i.e. processor time, number of threads) and set the ListView item’s color to red if its processor time or memory usage is changed.
If any new process is created, then the count of the ListView and HashTable items will not be equal. Based on this condition, I am adding an item to the ListView control from the hash table’s contents whose process ID is not present in the ListView control.
If any process has ended, then I am removing that item from ListView by using the ended process’ ID. We can get the ended process’ ID by finding the items that are present in ListView but not in the current process list (hash table).
In this way, it will update all process details in the ListView control every second without any flicker. In order to create a new task, I am getting the user-selected task’s path via the frmnewprcdetails form. We will create that process by calling Process.Start(taskname,arguments).
Then I am providing functionality to end selected processes by calling Process.GetProcessById(selectedprocessid,machinename).Kill().
Remote connection
In order to load a remote machine’s process list, you must have administrative rights or equivalent on that remote machine. I am providing a remote machine’s process load by setting mcname to the selected machine’s IP address from the «Connect to remote machine» dialog. After getting the IP address, I am reloading ListView with the remote machine’s process list.
Priority
We can get and set the priority of any running process from the context menu control. In the context menu, Set Priority will first make a check mark on the correct MenuItem based on its priority. After the context menu pops up, we can change its priority by clicking the appropriate MenuItem. In the status bar, I am displaying the total count of processes and threads in each panel.
Memory
In tabpage2 I am displaying CLR memory details such as heap size. Some applications won’t run fast if their objects are not garbage-collected properly. This will help us to see the total heap size and what the share percentage is between Gen 0, Gen 1, and Gen 2 objects. This will help us to know whether our application is running slow because of insufficient CLR memory. This will also help us make the decision of whether or not to call Garbage Collector explicitly in our application code.
Options
I’ve added the features «Always on top» and «Hide when minimized» to the Options menu. I’ve also added NotifyIcon to show/hide Task Manager.
The final output will look something like this:

Conclusion
We can still enhance this application by providing more performance counters for processors, ASP.NET applications, good UIs, etc. Please see the article download for further reference. I hope this code will be useful to all.
History
- May 9, 2007 — Original version posted
This member has not yet provided a Biography. Assume it’s interesting and varied, and probably something to do with programming.
- Download source — 263.7 KB
Introduction
All people who are working on any version of the Windows operating system know about Task Manager. They might be using it very frequently to start, end or manage processes. Task Manager has been around for a long time and is commonly used in our daily work. However, it is still lacking some features which might be useful in certain situations. So, I designed this application to provide features which are not present in the built-in Windows Task Manager. This application was created in VS.NET 2003 using C# and Windows Forms.
In this article, I will first explain some features present in the application, and then I will discuss its design and coding.
Task Manager features
This application…
- Displays all processes running in your system
- Allows you to add and remove any process (task) on your local machine
- Highlights current executing processes
- Enables connection to any machine and displays its process list
- Allows you to set or get the priority of any process running on your local machine
- Enables monitoring of .NET CLR managed memory
Creating the application
First, create a new Windows Application in VS.NET 2003 using C# and name it CustomizedTaskManager. Then design the main start-up form as shown below:
I placed a tab control with two tab pages. One is used to display Task Manager and the other to display CLR memory statistics. Then I placed a ListView control on first tab page where all processes and their details are displayed. I added columns like «process name,» «process id,» etc. to the ListView. Then I added MainMenu to provide following options:
- To popup «Connect to remote machine» dialog
- To popup «Create new task window»
- To control highlighting of currently executing processes
- To end a selected process
- To exit the application
Add a performance counter component from toolbox and set its CategoryName as .NET CLR Memory and its instanceName as aspnet_wp. You can keep instanceName as the first 15 characters in any .NET-managed application’s name. Add appropriate labels to tabpage2 as shown in the figure:
Then add another form, naming it frmnewprcdetails, and design it as shown:
To minimize coding, I am using this form both to display dialog for connecting to a remote machine and to add new task functionality. These are the namespaces I used in Form1:
System.Diagnostics
System.Threading
Initially, I thought of displaying all processes in ListView and updating their details every second using the Threading.Timer object. However, if we update like that for every second by clearing all ListView items and reloading with new details, it will produce a flicker on the form for every reload. So, in order to avoid that problem, I used a hash table. The logic is outlined in the following section.
Design logic
Task functionality
All processes are loaded when the form loads. I’ve created a timer object with a one second interval to call LoadAllProcesses(). In this method, first I am storing all currently running process’ details in a hash table using Process.GetProcesses(machinename). Then I am comparing the hash table contents with each item present in ListView and if its process ID matches in both the hash table and ListView then we will update its details (i.e. processor time, number of threads) and set the ListView item’s color to red if its processor time or memory usage is changed.
If any new process is created, then the count of the ListView and HashTable items will not be equal. Based on this condition, I am adding an item to the ListView control from the hash table’s contents whose process ID is not present in the ListView control.
If any process has ended, then I am removing that item from ListView by using the ended process’ ID. We can get the ended process’ ID by finding the items that are present in ListView but not in the current process list (hash table).
In this way, it will update all process details in the ListView control every second without any flicker. In order to create a new task, I am getting the user-selected task’s path via the frmnewprcdetails form. We will create that process by calling Process.Start(taskname,arguments).
Then I am providing functionality to end selected processes by calling Process.GetProcessById(selectedprocessid,machinename).Kill().
Remote connection
In order to load a remote machine’s process list, you must have administrative rights or equivalent on that remote machine. I am providing a remote machine’s process load by setting mcname to the selected machine’s IP address from the «Connect to remote machine» dialog. After getting the IP address, I am reloading ListView with the remote machine’s process list.
Priority
We can get and set the priority of any running process from the context menu control. In the context menu, Set Priority will first make a check mark on the correct MenuItem based on its priority. After the context menu pops up, we can change its priority by clicking the appropriate MenuItem. In the status bar, I am displaying the total count of processes and threads in each panel.
Memory
In tabpage2 I am displaying CLR memory details such as heap size. Some applications won’t run fast if their objects are not garbage-collected properly. This will help us to see the total heap size and what the share percentage is between Gen 0, Gen 1, and Gen 2 objects. This will help us to know whether our application is running slow because of insufficient CLR memory. This will also help us make the decision of whether or not to call Garbage Collector explicitly in our application code.
Options
I’ve added the features «Always on top» and «Hide when minimized» to the Options menu. I’ve also added NotifyIcon to show/hide Task Manager.
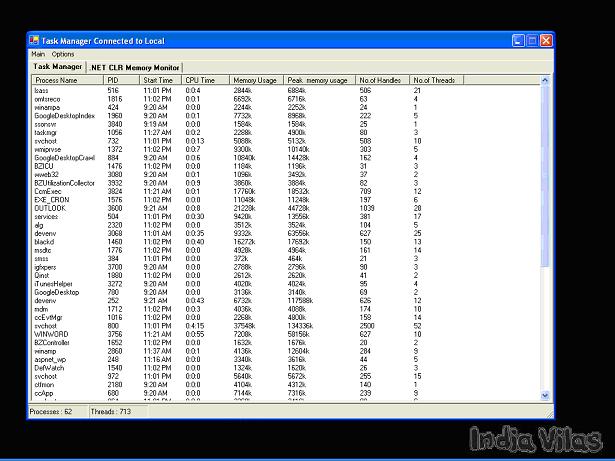
The final output will look something like this:
Conclusion
We can still enhance this application by providing more performance counters for processors, ASP.NET applications, good UIs, etc. Please see the article download for further reference. I hope this code will be useful to all.
History
- May 9, 2007 — Original version posted
This member has not yet provided a Biography. Assume it’s interesting and varied, and probably something to do with programming.
Только недавно делал такое, правда в контексте поиска процесса с заданным именем файла. Имеется некоторая проблема — код написан на C++17.
#include <functional>
#include <iostream>
#include <windows.h>
#include <psapi.h>

using PIDVector=vector<DWORD>;
using HMODULEVector=vector<HMODULE>;
template<typename T> bool autoFill(T& vec,std::function<WINBOOL(typename T::value_type*, DWORD, DWORD*)> filler)
{
    //вычисляем размер одного элемента массива
    constexpr auto itmSize=sizeof(typename T::value_type);
    while(true)
    {
        DWORD cnt;
        const auto status=filler(vec.data(), vec.size()*itmSize, &cnt);
        if(!status)
        {
            //в случае ошибки, выходим
            return false;
        }

        //нам приходит размер данных в байтах, а нужно - в штуках
        const auto nItems=cnt/itmSize;

        if(nItems>=vec.size())
        {
            //если буфер мал - увеличить
            vec.resize( nItems + 1024);
        }
        else
        {
            vec.resize( nItems );
            return true;
        }
    }
}

void findProcess()
{
    const auto fName=procName.toUpper();

    PIDVector pids(1024);
    //вызываем заполнялку первый раз, в качестве функции-заполнителя выступает EnumProcesses
    if(!autoFill<PIDVector>(pids, &EnumProcesses))
    {
        return;
    }

    wcout << pids.size() << L" processes found";


    for(const auto& i:pids)
    {
        const auto cur=OpenProcess(PROCESS_QUERY_INFORMATION | PROCESS_VM_READ,FALSE,i);

        if(!cur)
        {
            lout.fail();
            continue;
        }


        wstring name;
        //второй раз сложнее - GetProcessImageFileNameW работает по тому же шаблону, что и EnumProcesses, но аргументы принимает иначе
        //справляемся с этим, затолкав ее в адаптер из функтора
        autoFill(name,[cur](wchar_t* str,DWORD size,DWORD* needed)
                         {
                             *needed=GetProcessImageFileNameW(cur,str,size/sizeof(wchar_t))*sizeof(wchar_t);

                             return TRUE;
                         }
                );
        wcout << name;
    }
    return;
}
Магия с шаблоном тут сделана потому, что нужно дважды делать вызов функции с одинаковым паттерном
- вызывать
- проверить, что функции хватило буфера
- если нехватило, повторить
Чтобы не писать два раза идентичный по форме код, я сочинил шаблон.
Мне нужно сделать диспетчер задач: Вывод процессов, убиение процессов, открыть новый процесс.
Какие функции нужны???
Зарание благодарен.
10 ответов
51K
02 декабря 2009 года
![]()
Crypt1c
5 / / 09.09.2009
Я новичёк. А как можно сделать чтобы процессы выводились в ListView?
Если можно то поподробнее.
288
03 декабря 2009 года

nikitozz
1.2K / / 09.03.2007
Код:
foreach (Process process in Process.GetProcesses())
{
listView1.Items.Add(process.ProcessName);
}
51K
04 декабря 2009 года
![]()
Crypt1c
5 / / 09.09.2009
Большое спасибо! Может у кого есть исходник диспетчера на C#?
5
04 декабря 2009 года

hardcase
4.5K / / 09.08.2005
Большое спасибо! Может у кого есть исходник диспетчера на C#?
Ты уж определись, готовый исходник тебе или «алгоритм» работы. 
1
04 декабря 2009 года

kot_
7.3K / / 20.01.2000
И хороооооооошо подумай с ответом. 
51K
04 декабря 2009 года
![]()
Crypt1c
5 / / 09.09.2009
Я спрашивал может есть у кого исходник, зачем мне делать то ,что давно уже сделано?
1
04 декабря 2009 года
kot_
7.3K / / 20.01.2000
Я же сказал. Хорошо подумай. И прости правила прежде чем что либо писать.
7
27 августа 2013 года

@pixo $oft
3.4K / / 20.09.2006
…а потом, только ради того, чтоб разместить тут ссылку на свой бложек, зарегистрировался на этом форуме. Шедеврально!
Впрочем, я этому уже не удивляюсь, видя подобное не в первый раз.