Предыстория
Для очередного проекта возникла необходимость написать простенький софтверный драйвер под Windows, но так как опыта в написании драйверов у меня примерно столько же, сколько и в балете, я начал исследовать данную тему. В таких делах я предпочитаю начинать с основ, ибо если кидаться сразу на сложные вещи, то можно упустить многие базовые понятия и приёмы, что в дальнейшем только усложнит жизнь.
После 20 минут поисков по сети я наткнулся на Github Павла Иосифовича (zodiacon — Overview). Личность легендарная в своих кругах, достаточно посмотреть на его репозиторий, публикации и выступления на именитых конференциях. Помимо этого, Павел является автором/соавтором нескольких книг: «Windows Internals» (книга, имеющаяся у меня на полке, которая принесла немало пользы), и «Windows Kernel Programming» 2019 года выпуска (бегло пролистав 11 Глав или 390 страниц, я понял – это то, что нужно!).
Кстати, книгу вы можете купить прямо на сайте Павла
Ссылка скрыта от гостей
Книгу я приобрёл в бумажной версии, чтобы хоть и немного, но поддержать автора. Безупречное качество, несмотря на то, что она издается в мягком переплете. Хорошие плотные листы формата А4 и качественная краска. (книга без проблем пережила вылитую на нее кружку горячего кофе).
Пока я сидел на балконе и читал четвёртую главу книги, в голову пришла мысль: а почему бы не сделать ряд статей на тему «Программирования драйвера под Windows», так сказать, совместить полезное, с еще более полезным.
И вот я здесь, пишу предысторию.
Как я вижу этот цикл статей и что от него ожидать:
Это будут статьи, которые будут базироваться на вышеупомянутой книге, своеобразный вольный и сокращенный перевод, с дополнениями и примечаниями.
Базовые понятия о внутреннем устройстве Windows (Windows Internals)
Для того, чтобы начать разрабатывать Драйвер под Windows, то есть работать на уровне с ядром ОС, необходимо базовое понимание того, как эта ОС утроена. Так как я хочу сосредоточиться на написании драйвера, а не на теории об операционных системах, подробно описывать понятия я не буду, чтобы не растягивать статью, вместо этого прикреплю ссылки для самостоятельного изучения.
Следовательно, нам стоит ознакомиться с такими базовыми понятиями как:
Ссылка скрыта от гостей
Процесс – это объект, который управляет запущенной инстанцией программы.
Ссылка скрыта от гостей
Технология, позволяющая создавать закрытые пространства памяти для процессов. В своем роде — это песочница.
Ссылка скрыта от гостей
Это сущность, которая содержится внутри процесса и использует для работы ресурсы, выделенные процессом — такие, как виртуальная память. По сути, как раз таки потоки и запускают код.
Ссылка скрыта от гостей
В своем роде это прокладка, которая позволяет программе отправлять запросы в Ядро операционной системы, для выполнения нужных ей операций.
Ссылка скрыта от гостей
Это сложно описать словами коротко, проще один раз увидеть картинку.
В упрощённом виде это выглядит так:

Ссылка скрыта от гостей
Дескрипторы и объекты необходимы для регулирования доступа к системным ресурсам.
Объект — это структура данных, представляющая системный ресурс, например файл, поток или графическое изображение.
Дескриптор – это некая абстракция, которая позволяет скрыть реальный адрес памяти от Программы в пользовательском режиме.
Для более глубокого понимания Операционных систем могу посоветовать следующие материалы:
Книги:
- Таненбаум, Бос: Современные операционные системы
- Windows Internals 7th edition (Part 1)
Видео:
Настройка рабочего пространства
Для разработки драйвера, как и любого другого софта необходима подходящая среда.
Так как мы работаем в операционной системе Windows, её средствами мы и будем пользоваться.
Что нам понадобится:
1. Visual Studio 2017 и старше.
(Community Version хватает с головой) Также во вкладке „Individual components” необходимо установить
Код:
MSVC v142 - VS 2019 C++ ARM build tools (Latest)
MSVC v142 - VS 2019 C++ ARM Spectre-mitigated libs (Latest)
MSVC v142 - VS 2019 C++ ARM64 build tools (Latest)
MSVC v142 - VS 2019 C++ ARM64 Spectre-mitigated libs (Latest)
MSVC v142 - VS 2019 C++ ARM64EC build tools (Latest - experimental)
MSVC v142 - VS 2019 C++ ARM64EC Spectre-mitigated libs (Latest - experimental)
MSVC v142 - VS 2019 C++ x64/x86 build tools (Latest)
MSVC v142 - VS 2019 C++ x64/x86 Spectre-mitigated libs (Latest)
и далее по списку.
2. Windows 10/11 SDK (последней версии)
Ссылка скрыта от гостей

Тут все просто. Качаем iso файл, монтируем и запускаем установщик.
3. Windows 10/11 Driver Kit (WDK)
Ссылка скрыта от гостей

В конце установки вам будет предложено установить расширение для Visual Studio. Обязательно установите его!

После закрытия окна установки WDK появится установщик Расширения VisualStudio

4. Sysinternals Suite
Ссылка скрыта от гостей
Скачайте и распакуйте в удобное для вас место. Это набор полезных утилит, которые пригодятся для исследования Windows, дебага драйвера и прочего.

5. Виртуальная Машина с Windows для тестов.
Выбор ПО для виртуализации на ваше усмотрение. Я буду использовать «VMware Workstation 16 pro».
Написанные драйверы лучше тестировать именно в виртуальной машине, так как Ядро — ошибок не прощает, и вы будете часто улетать в синий экран смерти.
После того, как все было установлено, пора запускать Visual Studio и начинать писать драйвер.
Создание проекта
Запускаем Visual Studio и создаем новый проект. Создадим пустой проект „Empty WDM Driver“

Называем его как душе угодно.
И вот он, наш свеженький чистенький проект для нашего первого драйвера.

Теперь необходимо создать cpp файл, в котором мы будем писать сам драйвер.


Вот и все. Настройку системы и среды мы закончили.

Первый драйвер
Сначала импортируем ntddk.h эта одна из базовых библиотек для работы с ядром. Больше информации
Ссылка скрыта от гостей
. Как и у любой программы, у драйвера должна быть точка входа DriverEntry, как функция Main в обычной программе. Готовый прототип этой функции выглядит так
C++:
#include <ntddk.h>
NTSTATUS DriverEntry(_In_ PDRIVER_OBJECT DriverObject, _In_ PUNICODE_STRING RegistryPath) {
/*
    In_ это часть SAL(Source Code Ananotation Language) Аннотации не видимы для компилятора,
    но содержат метаданные которые, улучшают анализ и чтение кода.
*/
    return STATUS_SUCCESS;
}
Если мы попробуем собрать наш проект, то получим следующие ошибки и предупреждения.

В данном случае пункт 1 является следствием пунктов 2 и 3. Дело в том, что по дефолту в Visual Studio некоторые “предупреждения” расцениваются как ошибки.
Чтобы решить эту проблему есть 2 пути.
- Отключить эту фичу в Visual Studio, что делать не рекомендуется. Так как сообщения об ошибках могут быть полезны и сэкономят вам время и нервы в дальнейшем.
- Более правильный и классический метод это использовать макросы в c++. Как видно из сообщения с кодом C4100 объекты RegistryPath и DriverObject не упомянуты в теле функции. Подробнее
Ссылка скрыта от гостей
.
Для того, чтобы избавиться от предупреждений, и заставить наш код работать, стоит поместить объекты в макрос UNREFERENCED_PARAMETER(ObjectName)
C++:
include <ntddk.h>

NTSTATUS DriverEntry(_In_ PDRIVER_OBJECT DriverObject, _In_ PUNICODE_STRING RegistryPath) {
    UNREFERENCED_PARAMETER(DriverObject);
    UNREFERENCED_PARAMETER(RegistryPath);
    return STATUS_SUCCESS;
}
Теперь, если пересобрать проект, то мы увидим, что ошибка С220 и предупреждение C4100 пропали, но к ним на смену пришли LNK2019 и LNK1120. Однако это уже не ошибки компиляции — это ошибки линкера. А кто говорил что будет легко?
О том, что такое линкер можно почитать
Ссылка скрыта от гостей
.
Дело в том, что наша функция не представлена в стандартном линкере С++ и вообще она девушка капризная и хочет Си-линкер. Удовлетворим желание дамы и дадим ей то, чего она хочет.
Делается это просто. Перед функцией надо добавить extern "C" так наш линкер будет понимать, что эта функция должна линковаться С-линкером.
Собираем проект заново и вуаля — Драйвер собрался.

Что на данный момент умеет наш драйвер? Сейчас это по сути пустышка, которая после загрузки, в случае успеха, вернет нам сообщения об удачном запуске. Давайте заставим его нас поприветствовать и проверим его работоспособность. Выводить сообщения мы будем при помощи функции KdPrint(()); да именно в двойных кавычках.
Итоговый код драйвера будет выглядеть так:
C++:
#include <ntddk.h>

//Указываем линкеру, что DriverEntry должна линковаться С-линкером
extern "C"
NTSTATUS DriverEntry(_In_ PDRIVER_OBJECT DriverObject, _In_ PUNICODE_STRING RegistryPath)
{
    //Убираем варнинг C4100 и связанную с ним ошибку C220
    UNREFERENCED_PARAMETER(DriverObject);
    UNREFERENCED_PARAMETER(RegistryPath);
    //Выводим сообщение
    KdPrint(("Hi Codeby, this is our first driver! Yuhu!n"));

    return STATUS_SUCCESS;
}
Собираем или пересобираем драйвер.

Важно! Сборка драйвера должна происходить в режиме Debug!!!

После чего в папке нашего проекта мы сможем найти результаты нашего труда. Вы только посмотрите на него, какой маленький и хорошенький.

Но что делать дальше? Как проверить его работоспособность?
Для этого нам и понадобится наша виртуальная машина с Windows, но перед запуском на ней драйвера, нам придется проделать пару манипуляций. Дело в том, что в Windows есть встроенная защита, и если драйвер не подписан «нужной» подписью ака сертификатом, то драйвер просто не загрузится.
Дальнейшие действия нужно проделать в Windows на виртуальной машине.
Чтобы отключить эту проверку подписи, а точенее перевести Windows в тестовый режим, запустите cmd.exe от имени администратора и введите следующую команду bcdedit /set testsigning on.

Перезагрузите виртуальную машину.
Если все прошло удачно, в правом нижнем углу вы увидите следующую надпись (2 нижнее строчки могут отличиться в зависимости от версии Windows)

Возвращаемся в папку с драйвером и копируем его в виртуальную машину. Теперь нам надо создать службу для запуска драйвер. Открываем консоль от имени администратора и вводим следующую команду:
sc create Name type= kernel binPaht= PATH_TO_DRIVER
в моем случае это выглядит так:

Также проверить успешность создания можно через реестр.

В той же консоли мы можем попробовать запустить нашу службу.
sc start CodebyDriver

Отлично, драйвер запустился и мы даже не улетели в синьку, а это всегда приятно. Теперь давайте проверим, выводится ли сообщение от драйвера.
Для этого нам необходимо провести подготовительные работы.
Создадим новый ключ в реестре и назовем его Debug Print Filter.

В качестве значения задаем DWORD с именем DEFAULT и определяем данные для значения как 8.

Перезагружаем виртуальную машину.
После перезапуска запускаем DebugView данный инструмент находится в архиве Sysinternals, который мы ранее скачали. Ее можно смело скопировать в виртуальную машину.
Запускаем DebugView от имени Администратора и ставим галочку “Capture Kerner”

Capture Win32 и Capture Global Win32 можно снять, если летит много сообщений.
Затем запускаем консоль от имени администратора и запускаем службу загрузки драйвера.

Все отработало отлично, и мы видим приветствие от нашего драйвера!
На этой приятной ноте первая статья из цикла заканчивается. В дальнейших статьях мы добавим функционала нашему драйверу, научим его выгружаться и получать данные.
Спасибо за чтение!
P.S: Я сам только начал изучать тему работы с драйверами. Так что если у вас есть предложения или правки по технической части статьи, прошу отписать в комментарии, чтобы я мог внести изменения в статью.
P.P.S: Как вы могли заметить, писать мы будем преимущественно на С++, посему могу посоветовать отличный канал с уроками по С++ — The Cherno.
- Download source files — 10.4 Kb
This tutorial will attempt to describe how to write a simple device driver for Windows NT. There are various resources and tutorials on the internet for writing device drivers, however, they are somewhat scarce as compared to writing a “hello world” GUI program for Windows. This makes the search for information on starting to write device drivers a bit harder. You may think that if there’s already one tutorial, why do you need more? The answer is that more information is always better especially when you are first beginning to understand a concept. It is always good to see information from different perspectives. People write differently and describe certain pieces of information in a different light depending on how familiar they are with a certain aspect or how they think it should be explained. This being the case, I would recommend anyone who wants to write device drivers not to stop here or somewhere else. Always find a variety of samples and code snippets and research the differences. Sometimes there are bugs and things omitted. Sometimes there are things that are being done that aren’t necessary, and sometimes there’s information incorrect or just incomplete.
This tutorial will describe how to create a simple device driver, dynamically load and unload it, and finally talk to it from user mode.
Creating a Simple Device Driver
What is a subsystem?
I need to define a starting ground before we begin to explain how to write a device driver. The starting point for this article will be the compiler. The compiler and linker generate a binary in a format that the Operating System understands. In Windows, this format is “PE” for “Portable Executable” format. In this format, there is an idea called a subsystem. A subsystem, along with other options specified in the PE header information, describes how to load an executable which also includes the entry point into the binary.
Many people use the VC++ IDE to simply create a project with some default pre-set options for the compiler’s (and linker) command line. This is why a lot of people may not be familiar with this concept even though they are most likely already using it if they have ever written Windows applications. Have you ever written a console application? Have you ever written a GUI application for Windows? These are different subsystems in Windows. Both of these will generate a PE binary with the appropriate subsystem information. This is also why a console application uses “main” where a WINDOWS application uses “WinMain”. When you choose these projects, VC++ simply creates a project with /SUBSYSTEM:CONSOLE or /SUBSYSTEM:WINDOWS. If you accidentally choose the wrong project, you can simply change this in the linker options menu rather than needing to create a new project.
There’s a point to all of this? A driver is simply linked using a different subsystem called “NATIVE”. MSDN Subsystem compiler options.
The Driver’s “main”
After the compiler is setup with the appropriate options, it’s probably good to start thinking about the entry point to a driver. The first section lied a little bit about the subsystem. “NATIVE” can also be used to run user-mode applications which define an entry point called “NtProcessStartup”. This is the “default” type of executable that is made when specifying “NATIVE” in the same way “WinMain” and “main” are found when the linker is creating an application. You can override the default entry point with your own, simply by using the “-entry:<functionname>” linker option. If we know we want this to be a driver, we simply need to write an entry point whose parameter list and return type matches that of a driver. The system will then load the driver when we install it and tell the system that it is a driver.
The name we use can be anything. We can call it BufferFly() if we want. The most common practice used by driver developers and Microsoft is using the name “DriverEntry” as its initial entry point. This means we add “-entry:DriverEntry” to the linker’s command line options. If you are using the DDK, this is done for you when you specify “DRIVER” as the type of executable to build. The DDK contains an environment that has pre-set options in the common make file directory which makes it simpler to create an application as it specifies the default options. The actual driver developer can then override these settings in the make file or simply use them as a connivance. This is essentially how “DriverEntry” became the somewhat “official” name for driver entry points.
Remember, DLLs actually are also compiled specifying “WINDOWS” as the subsystem, but they also have an additional switch called /DLL. There is a switch which can also be used for drivers: /DRIVER:WDM (which also sets NATIVE behind the scenes) as well as a /DRIVER:UP which means this driver cannot be loaded on a multi-processor system.
The linker builds the final binary, and based on what the options are in the PE header and how the binary is attempting to be loaded (run as an EXE through the loader, loaded by LoadLibrary, or attempting to be loaded as a driver) will define how the loading system behaves. The loading system attempts to perform some level of verification, that the image being loaded is indeed supposed to be loaded in this manner, for example. There is even, in some cases, startup code added to the binary that executes before your entry point is reached (WinMainCRTStartup calling WinMain, for example, to initialize the CRT). Your job is to simply write the application based on how you want it to be loaded and then set the correct options in the linker so it knows how to properly create the binary. There are various resources on the details of the PE format which you should be able to find if you are interested in further investigation into this area.
The options we will set for the linker will end up being the following:
/SUBSYSTEM:NATIVE /DRIVER:WDM –entry:DriverEntry
Before creating the “DriverEntry”
There are some things we need to go over before we simply sit down and write the “DriverEntry”. I know that a lot of people simply want to jump right into writing the driver and seeing it work. This is generally the case in most programming scenarios as you usually just take the code, change it around, compile it, and test it out. If you remember back to when you were first learning Windows development, it was probably the same way. Your application probably didn’t work right away, probably crashed, or just disappeared. This was a lot of fun and you probably learned a lot, but you know that with a driver, the adventure is a little different. Not knowing what to do can end up in blue screening the system, and if your driver is loaded on boot and executes that code, you now have a problem. Hopefully, you can boot in safe mode or restore to a previous hardware configuration. That being the case, we have a few things to go over before you write the driver in order to help educate you on what you are doing before you actually do it.
The first rule of thumb is do not just take a driver and compile it with some of your changes. If you do not understand how the driver is working or how to program correctly in the environment, you are likely to cause problems. Drivers can corrupt the integrity of the whole system, they can have bugs that don’t always occur but in some rare circumstances. Application programs can have the same type of bugs in behavior but not in root cause. As an example, there are times when you cannot access memory that is pagable. If you know how Virtual Memory works, you know that the Operating System will remove pages from memory to pull in pages that are needed, and this is how more applications can run than would have been physically possible given the memory limitations of the machine. There are places, however, when pages cannot be read into memory from disk. At these times, those “drivers” who work with memory can only access memory that cannot be paged out.
Where am I going with this? Well, if you allow a driver which runs under these constraints to access memory that is “pagable”, it may not crash as the Operating System usually tries to keep all pages in memory as long as possible. If you close an application that was running, it may still be in memory, for example! This is why a bug like this may go undetected (unless you try doing things like driver verifier) and eventually may trap. When it does, if you do not understand the basic concepts like this, you would be lost as to what the problem is and how to fix it.
There are a lot of concepts behind everything that will be described in this document. On IRQL alone, there is a twenty page document you can find on MSDN. There’s an equally large document on IRP. I will not attempt to duplicate this information nor point out every single little detail. What I will attempt to do is give a basic summary and point you in the direction of where to find more information. It’s important to at least know that these concepts exist and understand some basic idea behind them, before writing the driver.
What is IRQL?
The IRQL is known as the “Interrupt ReQuest Level”. The processor will be executing code in a thread at a particular IRQL. The IRQL of the processor essentially helps determine how that thread is allowed to be interrupted. The thread can only be interrupted by code which needs to run at a higher IRQL on the same processor. Interrupts requiring the same IRQL or lower are masked off so only interrupts requiring a higher IRQL are available for processing. In a multi-processor system, each processor operates independently at its own IRQL.
There are four IRQL levels which you generally will be dealing with, which are “Passive”, “APC”, “Dispatch” and “DIRQL”. Kernel APIs documented in MSDN generally have a note which specifies the IRQL level at which you need to be running in order to use the API. The higher the IRQL you go, the less APIs that are available for use. The documentation on MSDN defines what IRQL the processor will be running at when the particular entry point of the driver is called. “DriverEntry”, for example, will be called at PASSIVE_LEVEL.
PASSIVE_LEVEL
This is the lowest IRQL. No interrupts are masked off and this is the level in which a thread executing in user mode is running. Pagable memory is accessible.
APC_LEVEL
In a processor running at this level, only APC level interrupts are masked. This is the level in which Asynchronous Procedure Calls occur. Pagable memory is still accessible. When an APC occurs, the processor is raised to APC level. This, in turn, also disables other APCs from occurring. A driver can manually raise its IRQL to APC (or any other level) in order to perform some synchronization with APCs, for example, since APCs can’t be invoked if you are already at APC level. There are some APIs which can’t be called at APC level due to the fact that APCs are disabled, which, in turn, may disable some I/O Completion APCs.
DISPATCH_LEVEL
The processor running at this level has DPC level interrupts and lower masked off. Pagable memory cannot be accessed, so all memory being accessed must be non-paged. If you are running at Dispatch Level, the APIs that you can use greatly decrease since you can only deal with non-paged memory.
<A name=OLE_LINK4>DIRQL </A>(Device IRQL)
Generally, higher level drivers do not deal with IRQLs at this level, but all interrupts at this level or less are masked off and do not occur. This is actually a range of IRQLs, and this is a method to determine which devices have priority over other devices.
In this driver, we will basically only be working at PASSIVE_LEVEL, so we won’t have to worry about the gotchas. However, it is necessary for you to be aware of what IRQL is, if you intend to continue writing device drivers.
For more information on IRQLs and thread scheduling, refer to the following documentation, and another good source of information is here.
What is an IRP?
The “IRP” is called the “I/O Request Packet”, and it is passed down from driver to driver in the driver stack. This is a data structure that allows drivers to communicate with each other and to request work to be done by the driver. The I/O manager or another driver may create an IRP and pass it down to your driver. The IRP includes information about the operation that is being requested.
A description of the IRP data structure can be found here.
The description and usage of an IRP can go from simple to complex very easily, so we will only be describing, in general, what an IRP will mean to you. There is an article on MSDN which describes in a lot more detail (about twenty pages) of what exactly an IRP is and how to handle them. That article can be found here.
The IRP will also contain a list of “sub-requests” also known as the “IRP Stack Location”. Each driver in the device stack will generally have its own “sub request” of how to interpret the IRP. This data structure is the “IO_STACK_LOCATION” and is described on MSDN.
To create an analogy of the IRP and IO_STACK_LOCATION, perhaps you have three people who do different jobs such as carpentry, plumbing and welding. If they were going to build a house, they could have a common overall design and perhaps a common set of tools like their tool box. This includes things like power drills, etc. All of these common tools and overall design of building a house would be the IRP. Each of them has an individual piece they need to work on to make this happen, for example, the plumber needs the plans on where to put the pipe, how much pipe he has, etc. These could be interpreted as the IO_STACK_LOCATION as his specific job is to do the piping. The carpenter could be building the framework for the house and the details of that would be in his IO_STACK_LOCATION. So, while the entire IRP is a request to build a house, each person in the stack of people has their own job as defined by the IO_STACK_LOCATION to make this happen. Once everyone has completed their job, they then complete the IRP.
The device driver we will be building will not be that complex and will basically be the only driver in the stack.
Things to Avoid
There are a lot of pitfalls that you will need to avoid but they are mostly unrelated to our simple driver. To be more informed, however, here is a list of items called “things to avoid” when it comes to driver development.
Create the DriverEntry routine
There is so much to explain, however, I think it’s time we simply started to develop the driver and explain as we go. It is hard to digest theory or even how code is supposed to work, without actually doing anything. You need some hands on experience so you can bring these ideas out of space and into reality.
The prototype for the DriverEntry is the following.
NTSTATUS DriverEntry(PDRIVER_OBJECT pDriverObject, PUNICODE_STRING pRegistryPath);
The DRIVER_OBJECT is a data structure used to represent this driver. The DriverEntry routine will use it to populate it with other entry points to the driver for handling specific I/O requests. This object also has a pointer to a DEVICE_OBJECT which is a data structure which represents a particular device. A single driver may actually advertise itself as handling multiple devices, and as such, the DRIVER_OBJECT maintains a linked list pointer to all the devices this particular driver services request for. We will simply be creating one device.
The “Registry Path” is a string which points to the location in the registry where the information for the driver was stored. The driver can use this location to store driver specific information.
The next part is to actually put things in the DriverEntry routine. The first thing we will do is create the device. You may be wondering how we are going to create a device and what type of device we should create. This is generally because a driver is usually associated with hardware but this is not the case. There are a variety of different types of drivers which operate at different levels, not all drivers work or interface directly with hardware. Generally, you maintain a stack of drivers each with a specific job to do. The highest level driver is the one that communicates with user mode, and the lowest level drivers generally just talk to other drivers and hardware. There are network drivers, display drivers, file system drivers, etc., and each has their own stack of drivers. Each place in the stack breaks up a request into a more generic or simpler request for the lower level driver to service. The highest level drivers are the ones which communicate themselves to user mode, and unless they are a special device with a particular framework (like display drivers), they can behave generally the same as other drivers just as they implement different types of operations.
As an example, take the hard disk drive. The driver which communicates to user mode does not talk directly to hardware. The high level driver simply manages the file system itself and where to put things. It then communicates where it wants to read or write from the disk to the lower level driver which may or may not talk directly to hardware. There may be another layer which then communicates that request to the actual hardware driver which then physically reads or writes a particular sector off a disk and then returns it to the higher level. The highest level may interpret them as file data, but the lowest level driver may simply be stupid and only manage requests as far as when to read a sector based off where the read/write head is located on the disk. It could then determine what sector read requests to service, however, it has no idea what the data is and does not interpret it.
Let’s take a look at the first part of our “DriverEntry”.
NTSTATUS DriverEntry(PDRIVER_OBJECT  pDriverObject, PUNICODE_STRING  pRegistryPath)
{
    NTSTATUS NtStatus = STATUS_SUCCESS;
    UINT uiIndex = 0;
    PDEVICE_OBJECT pDeviceObject = NULL;
    UNICODE_STRING usDriverName, usDosDeviceName;

    DbgPrint("DriverEntry Called rn");

    RtlInitUnicodeString(&usDriverName, L"\Device\Example");
    RtlInitUnicodeString(&usDosDeviceName, L"\DosDevices\Example");

    NtStatus = IoCreateDevice(pDriverObject, 0,
                              &usDriverName,
                              FILE_DEVICE_UNKNOWN,
                              FILE_DEVICE_SECURE_OPEN,
                              FALSE, &pDeviceObject);
The first thing you will notice is the DbgPrint function. This works just like “printf” and it prints messages out to the debugger or debug output window. You can get a tool called “DBGVIEW” from www.sysinternals.com and all of the information in those messages will be displayed.
You will then notice that we use a function called “RtlInitUnicodeString” which basically initializes a UNICODE_STRING data structure. This data structure contains basically three entries. The first is the size of the current Unicode string, the second is the maximum size that the Unicode string can be, and the third is a pointer to the Unicode string. This is used to describe a Unicode string and used commonly in drivers. The one thing to remember with UNICODE_STRING is that they are not required to be NULL terminated since there is a size parameter in the structure! This causes problems for people new to driver development as they assume a UNICODE_STRING is NULL terminated, and they blue-screen the driver. Most Unicode strings passing into your driver will not be NULL terminated, so this is something you need to be aware of.
Devices have names just like anything else. They are generally named Device<somename> and this is the string we were creating to pass into IoCreateDevice. The second string, “DosDevicesExample”, we will get into later as it’s not used in the driver yet. To the IoCreateDevice, we pass in the driver object, a pointer to the Unicode string we want to call the driver, and we pass in a type of driver “UNKNOWN” as it’s not associated with any particular type of device, and we also pass in a pointer to receive the newly created device object. The parameters are explained in more detail at “IoCreateDevice”.
The second parameter we passed 0, and it says to specify the number of bytes to create for the device extension. This is basically a data structure that the driver writer can define which is unique to that device. This is how you can extend the information being passed into a device and create device contexts, etc. in which to store instance data. We will not be using this for this example.
Now that we have successfully created our DeviceExample device driver, we need to setup the Driver Object to call into our driver when certain requests are made. These requests are called IRP Major requests. There are also Minor requests which are sub-requests of these and can be found in the stack location of the IRP.
The following code populates certain requests:
for(uiIndex = 0; uiIndex < IRP_MJ_MAXIMUM_FUNCTION; uiIndex++)
     pDriverObject->MajorFunction[uiIndex] = Example_UnSupportedFunction;

pDriverObject->MajorFunction[IRP_MJ_CLOSE]             = Example_Close;
pDriverObject->MajorFunction[IRP_MJ_CREATE]            = Example_Create;
pDriverObject->MajorFunction[IRP_MJ_DEVICE_CONTROL]    = Example_IoControl;
pDriverObject->MajorFunction[IRP_MJ_READ]              = Example_Read;
pDriverObject->MajorFunction[IRP_MJ_WRITE]             = USE_WRITE_FUNCTION;
We populate the Create, Close, IoControl, Read and Write. What do these refer to? When communicating with the user-mode application, certain APIs call directly to the driver and pass in parameters!
CreateFile->IRP_MJ_CREATECloseHandle->IRP_MJ_CLEANUP & IRP_MJ_CLOSEWriteFile->IRP_MJ_WRITEReadFile->IRP_MJ_READDeviceIoControl->IRP_MJ_DEVICE_CONTROL
To explain, one difference is IRP_MJ_CLOSE is not called in the context of the process which created the handle. If you need to perform process related clean up, then you need to handle IRP_MJ_CLEANUP as well.
So as you can see, when a user mode application uses these functions, it calls into your driver. You may be wondering why the user mode API says “file” when it doesn’t really mean “file”. That is true, these APIs can talk to any device which exposes itself to user mode, they are not only for accessing files. In the last piece of this article, we will be writing a user mode application to talk to our driver and it will simply do CreateFile, WriteFile, CloseHandle. That’s how simple it is. USE_WRITE_FUNCTION is a constant I will explain later.
The next piece of code is pretty simple, it’s the driver unload function.
pDriverObject->DriverUnload = Example_Unload;
You can technically omit this function but if you want to unload your driver dynamically, then it must be specified. If you do not specify this function once your driver is loaded, the system will not allow it to be unloaded.
The code after this is actually using the DEVICE_OBJECT, not the DRIVER_OBJECT. These two data structures may get a little confusing since they both start with “D” and end with “_OBJECT”, so it’s easy to confuse which one we’re using.
pDeviceObject->Flags |= IO_TYPE;
pDeviceObject->Flags &= (~DO_DEVICE_INITIALIZING);
We are simply setting the flags. “IO_TYPE” is actually a constant which defines the type of I/O we want to do (I defined it in example.h). I will explain this in the section on handling user-mode write requests.
The “DO_DEVICE_INITIALIZING” tells the I/O Manager that the device is being initialized and not to send any I/O requests to the driver. For devices created in the context of the “DriverEntry”, this is not needed since the I/O Manager will clear this flag once the “DriverEntry” is done. However, if you create a device in any function outside of the DriverEntry, you need to manually clear this flag for any device you create with IoCreateDevice. This flag is actually set by the IoCreateDevice function. We cleared it here just for fun even though we weren’t required to.
The last piece of our driver is using both of the Unicode strings we defined above. “DeviceExample” and “DosDevicesExample”.
IoCreateSymbolicLink(&usDosDeviceName, &usDriverName);
“IoCreateSymbolicLink” does just that, it creates a “Symbolic Link” in the object manager. To view the object manager, you may download my tool “QuickView”, or go to www.sysinternals.com and download “WINOBJ”. A Symbolic Link simply maps a “DOS Device Name” to an “NT Device Name”. In this example, “Example” is our DOS Device Name and “DeviceExample” is our NT Device Name.
To put this into perspective, different vendors have different drivers and each driver is required to have its own name. You cannot have two drivers with the same NT Device name. Say, you have a memory stick which can display itself to the system as a new drive letter which is any available drive letter such as E:. If you remove this memory stick and say you map a network drive to E:. Application can talk to E: the same way, they do not care if E: is a CD ROM, Floppy Disk, memory stick or network drive. How is this possible? Well, the driver needs to be able to interpret the requests and either handle them within themselves such as the case of a network redirector or pass them down to the appropriate hardware driver. This is done through symbolic links. E: is a symbolic link. The network mapped drive may map E: to DeviceNetworkRedirector and the memory stick may map E: to DeviceFujiMemoryStick, for example.
This is how applications can be written using a commonly defined name which can be abstracted to point to any device driver which would be able to handle requests. There are no rules here, we could actually map DeviceExample to E:. We can do whatever we wish to do, but in the end, however, the application attempts to use the device as how the device driver needs to respond and act. This means supporting IOCTLs commonly used by those devices as applications will try to use them. COM1, COM2, etc. are all examples of this. COM1 is a DOS name which is mapped to an NT Device name of a driver which handles serial requests. This doesn’t even need to be a real physical serial port!
So we have defined “Example” as a DOS Device which points to “DeviceExample”. In the “communicating with usermode” portion, we will learn more about how to use this mapping.
Create the Unload Routine
The next piece of code we will look at is the unload routine. This is required in order to be able to unload the device driver dynamically. This section will be a bit smaller as there is not much to explain.
VOID Example_Unload(PDRIVER_OBJECT  DriverObject)
{

    UNICODE_STRING usDosDeviceName;

    DbgPrint("Example_Unload Called rn");

    RtlInitUnicodeString(&usDosDeviceName, L"\DosDevices\Example");
    IoDeleteSymbolicLink(&usDosDeviceName);

    IoDeleteDevice(DriverObject->DeviceObject);
}
You can do whatever you wish in your unload routine. This unload routine is very simple, it just deletes the symbolic link we created and then deletes the only device that we created which was DeviceExample.
Creating the IRP_MJ_WRITE
The rest of the functions should be self explanatory as they don’t do anything. This is why I am only choosing to explain the “Write” routine. If this article is liked, I may write a second tutorial on implementing the IO Control function.
If you have used WriteFile and ReadFile, you know that you simply pass a buffer of data to write data to a device or read data from a device. These parameters are sent to the device in the IRP as we explained previously. There is more to the story though as there are actually three different methods that the I/O Manager will use to marshal this data before giving the IRP to the driver. That also means that how the data is marshaled is how the driver’s Read and Write functions need to interpret the data.
The three methods are “Direct I/O”, “Buffered I/O” and “Neither”.
#ifdef __USE_DIRECT__
#define IO_TYPE DO_DIRECT_IO
#define USE_WRITE_FUNCTION  Example_WriteDirectIO
#endif

#ifdef __USE_BUFFERED__
#define IO_TYPE DO_BUFFERED_IO
#define USE_WRITE_FUNCTION  Example_WriteBufferedIO
#endif

#ifndef IO_TYPE
#define IO_TYPE 0
#define USE_WRITE_FUNCTION  Example_WriteNeither
#endif
The code was written so if you define “__USE_DIRECT__” in the header, then IO_TYPE is now DO_DIRECT_IO and USE_WRITE_FUNCTION is now Example_WriteDirectIO. If you define “__USE_BUFFERED__” in the header, then IO_TYPE is now DO_BUFFERED_IO and USE_WRITE_FUNCTION is now Example_WriteBufferedIO. If you don’t define __USE_DIRECT__ or __USE_BUFFERED__, then IO_TYPE is defined as 0 (neither) and the write function is Example_WriteNeither.
We will now go over each type of I/O.
Direct I/O
The first thing I will do is simply show you the code for handling direct I/O.
NTSTATUS Example_WriteDirectIO(PDEVICE_OBJECT DeviceObject, PIRP Irp)
{
    NTSTATUS NtStatus = STATUS_SUCCESS;
    PIO_STACK_LOCATION pIoStackIrp = NULL;
    PCHAR pWriteDataBuffer;

    DbgPrint("Example_WriteDirectIO Called rn");


    pIoStackIrp = IoGetCurrentIrpStackLocation(Irp);

    if(pIoStackIrp)
    {
        pWriteDataBuffer =
          MmGetSystemAddressForMdlSafe(Irp->MdlAddress, NormalPagePriority);

        if(pWriteDataBuffer)
        {

           if(Example_IsStringTerminated(pWriteDataBuffer,
              pIoStackIrp->Parameters.Write.Length))
           {
                DbgPrint(pWriteDataBuffer);
           }
        }
    }

    return NtStatus;
}
The entry point simply provides the device object for the device for which this request is being sent for. If you recall, a single driver can create multiple devices even though we have only created one. The other parameter is as was mentioned before which is an IRP!
The first thing we do is call “IoGetCurrentIrpStackLocation”, and this simply provides us with our IO_STACK_LOCATION. In our example, the only parameter we need from this is the length of the buffer provided to the driver, which is at Parameters.Write.Length.
The way buffered I/O works is that it provides you with a “MdlAddress” which is a “Memory Descriptor List”. This is a description of the user mode addresses and how they map to physical addresses. The function we call then is “MmGetSystemAddressForMdlSafe” and we use the Irp->MdlAddress to do this. This operation will then give us a system virtual address which we can then use to read the memory.
The reasoning behind this is that some drivers do not always process a user mode request in the context of the thread or even the process in which it was issued. If you process a request in a different thread which is running in another process context, you would not be able to read user mode memory across process boundaries. You should know this already, as you run two applications they can’t just read/write to each other without Operating System support.
So, this simply maps the physical pages used by the user mode process into system memory. We can then use the returned address to access the buffer passed down from user mode.
This method is generally used for larger buffers since it does not require memory to be copied. The user mode buffers are locked in memory until the IRP is completed which is the downside of using direct I/O. This is the only downfall and is why it’s generally more useful for larger buffers.
Buffered I/O
The first thing I will do is simply show you the code for handling buffered I/O.
NTSTATUS Example_WriteBufferedIO(PDEVICE_OBJECT DeviceObject, PIRP Irp)
{
    NTSTATUS NtStatus = STATUS_SUCCESS;
    PIO_STACK_LOCATION pIoStackIrp = NULL;
    PCHAR pWriteDataBuffer;

    DbgPrint("Example_WriteBufferedIO Called rn");


    pIoStackIrp = IoGetCurrentIrpStackLocation(Irp);

    if(pIoStackIrp)
    {
        pWriteDataBuffer = (PCHAR)Irp->AssociatedIrp.SystemBuffer;

        if(pWriteDataBuffer)
        {

           if(Example_IsStringTerminated(pWriteDataBuffer,
                   pIoStackIrp->Parameters.Write.Length))
           {
                DbgPrint(pWriteDataBuffer);
           }
        }
    }

    return NtStatus;
}
As mentioned above, the idea is to pass data down to the driver that can be accessed from any context such as another thread in another process. The other reason would be to map the memory to be non-paged so the driver can also read it at raised IRQL levels.
The reason you may need to access memory outside the current process context is that some drivers create threads in the SYSTEM process. They then defer work to this process either asynchronously or synchronously. A driver at a higher level than your driver may do this or your driver itself may do it.
The downfall of using “Buffered I/O” is that it allocates non-paged memory and performs a copy. This is now overhead in processing every read and write into the driver. This is one of the reasons this is best used on smaller buffers. The whole user mode page doesn’t need to be locked in memory as with Direct I/O, which is the plus side of this. The other problem with using this for larger buffers is that since it allocates non-paged memory, it would need to allocate a large block of sequential non-paged memory.
Neither Buffered nor Direct
The first thing I will do is show you the code for handling neither Buffered nor Direct I/O.
NTSTATUS Example_WriteNeither(PDEVICE_OBJECT DeviceObject, PIRP Irp)
{
    NTSTATUS NtStatus = STATUS_SUCCESS;
    PIO_STACK_LOCATION pIoStackIrp = NULL;
    PCHAR pWriteDataBuffer;

    DbgPrint("Example_WriteNeither Called rn");


    pIoStackIrp = IoGetCurrentIrpStackLocation(Irp);

    if(pIoStackIrp)
    {

        __try {

                ProbeForRead(Irp->UserBuffer,
                  pIoStackIrp->Parameters.Write.Length,
                  TYPE_ALIGNMENT(char));
                pWriteDataBuffer = Irp->UserBuffer;

                if(pWriteDataBuffer)
                {

                   if(Example_IsStringTerminated(pWriteDataBuffer,
                          pIoStackIrp->Parameters.Write.Length))
                   {
                        DbgPrint(pWriteDataBuffer);
                   }
                }

        } __except( EXCEPTION_EXECUTE_HANDLER ) {

              NtStatus = GetExceptionCode();
        }

    }

    return NtStatus;
}
In this method, the driver accesses the user mode address directly. The I/O manager does not copy the data, it does not lock the user mode pages in memory, it simply gives the driver the user mode address buffer.
The upside of this is that no data is copied, no memory is allocated, and no pages are locked into memory. The downside of this is that you must process this request in the context of the calling thread so you will be able to access the user mode address space of the correct process. The other downside of this is that the process itself can attempt to change access to the pages, free the memory, etc., on another thread. This is why you generally want to use “ProbeForRead” and “ProbeForWrite” functions and surround all the code in an exception handler. There’s no guarantee that at any time the pages could be invalid, you can simply attempt to make sure they are, before you attempt to read or write. This buffer is stored at Irp->UserBuffer.
What’s this #pragma stuff?
These directives you see simply let the linker know what segment to put the code and what options to set on the pages. The “DriverEntry”, for example, is set as “INIT” which is a discardable page. This is because you only need that function during initialization.
Homework!
Your homework is to create the Read routines for each type of I/O processing. You can use the Write routines as reference to figure out what you need to do.
Dynamically Loading and Unloading the Driver
A lot of tutorials will go and explain the registry, however, I have chosen not to at this time. There is a simple user mode API that you can use to load and unload the driver without having to do anything else. This is what we will use for now.
int _cdecl main(void)
{
    HANDLE hSCManager;
    HANDLE hService;
    SERVICE_STATUS ss;

    hSCManager = OpenSCManager(NULL, NULL, SC_MANAGER_CREATE_SERVICE);

    printf("Load Drivern");

    if(hSCManager)
    {
        printf("Create Servicen");

        hService = CreateService(hSCManager, "Example",
                                 "Example Driver",
                                  SERVICE_START | DELETE | SERVICE_STOP,
                                  SERVICE_KERNEL_DRIVER,
                                  SERVICE_DEMAND_START,
                                  SERVICE_ERROR_IGNORE,
                                  "C:\example.sys",
                                  NULL, NULL, NULL, NULL, NULL);

        if(!hService)
        {
            hService = OpenService(hSCManager, "Example",
                       SERVICE_START | DELETE | SERVICE_STOP);
        }

        if(hService)
        {
            printf("Start Servicen");

            StartService(hService, 0, NULL);
            printf("Press Enter to close servicern");
            getchar();
            ControlService(hService, SERVICE_CONTROL_STOP, &ss);

            DeleteService(hService);

            CloseServiceHandle(hService);

        }

        CloseServiceHandle(hSCManager);
    }

    return 0;
}
This code will load the driver and start it. We load the driver with “SERVICE_DEMAND_START” which means this driver must be physically started. It will not start automatically on boot, that way we can test it, and if we blue-screen, we can fix the issue without having to boot to safe mode.
This program will simply pause. You can then run the application that talks to the service, in another window. The code above should be pretty easy to understand that you need to copy the driver to C:example.sys in order to use it. If the service fails to create, it knows it has already been created and opens it. We then start the service and pause. Once you press Enter, we stop the service, delete it from the list of services, and exit. This is very simple code and you can modify it to serve your purposes.
Communicating to the Device Driver
The following is the code that communicates to the driver.
int _cdecl main(void)
{
    HANDLE hFile;
    DWORD dwReturn;

    hFile = CreateFile("\\.\Example",
            GENERIC_READ | GENERIC_WRITE, 0, NULL,
            OPEN_EXISTING, 0, NULL);

    if(hFile)
    {
        WriteFile(hFile, "Hello from user mode!",
                  sizeof("Hello from user mode!"), &dwReturn, NULL);
        CloseHandle(hFile);
    }

    return 0;
}
This is probably simpler than you thought. If you compile the driver three times using the three different methods of I/O, the message sent down from user mode should be printed in DBGVIEW. As you notice, you simply need to open the DOS Device Name using \.<DosName>. You could even open Device<Nt Device Name> using the same method. You will then create a handle to the device and you can call WriteFile, ReadFile, CloseHandle, DeviceIoControl! If you want to experiment, simply perform actions and use DbgPrint to show what code is being executed in your driver.
Conclusion
This article showed a simple example of how to create a driver, install it, and access it via a simple user mode application. You may use the associated source files to change and experiment. If you wish to write drivers, it’s best to read up on many of the basic concepts of drivers, especially, some of the ones linked to in this tutorial.
Урок 3. Сборка и запуск драйвера
Еще один, особый, вид программ – драйверы. В отличие от остальных – выполняются в особом режиме, где они имеют ряд возможностей, недоступных для обычных приложений Windows. Однако это осложняется тем, что в этом режиме практически отсутствуют средства для взаимодействия с пользователем. Для тестирования драйвера можно пользоваться функцией DbgPrint, выдающей отладочные сообщения отладчику. Но отладчика может не оказаться и этих сообщений никто в таком случае не увидит. Для обычного же взаимодействия с пользователем драйвер должен полагаться на прикладные приложения, обмениваясь с ними запросами ввода/вывода.
Сообщения, выдаваемые отладчику, проще всего увидеть при помощи программы DebugView, которую нужно запустить перед сеансом проверки.
Создание проекта будем вести следующим образом. Создаем папку DrvHello, где будем разрабатывать приложение-драйвер. Внутри нее создаем такие файлы:
• makefile
#
# DO NOT EDIT THIS FILE!!!  Edit .sources. if you want to add a new source
# file to this component.  This file merely indirects to the real make file
# that is shared by all the driver components of the Windows NT DDK
#

!INCLUDE $(NTMAKEENV)makefile.def
Над текстом этого файла не следует задумываться, он просто должен присутствовать в таком вот неизменном виде. Хотя в чужих проектах этого файла может и не быть, либо он будет работать другим образом. В общем, если он есть и содержит это содержимое – то все в порядке, если нет – необходимы дополнительные исследования.
• sources
TARGETNAME=drvhello
TARGETTYPE=DRIVER
TARGETPATH=obj
SOURCES=main.c
Задает параметры сборки. Здесь в параметре SOURCES необходимо перечислить через пробел все файлы с исходным кодом, которые нужно будет скомпилировать.
• main.c – это наш файл с исходным кодом. Может носить любое имя, их может быть много, а может быть очень много. Главное, не забыть их все перечислить в файле sources
#include "ntddk.h"

#pragma code_seg("INIT")
NTSTATUS DriverEntry(IN PDRIVER_OBJECT DriverObject,
    IN PUNICODE_STRING RegistryPath)
{
    DbgPrint("Hello, world!");			// Выдача отладочного сообщения
    return STATUS_DEVICE_CONFIGURATION_ERROR;	// Выдача ошибки заставит систему сразу же выгрузить драйвер
}
#pragma code_seg()
Основная функция у нас здесь носит название DriverEntry. Запускаться она будет при попытке загрузки драйвера. А чтобы сделать такую попытку – нужна программа-загрузчик, которую напишем чуть поздней.
Откомпилируем драйвер. Чтобы мы могли что-то увидеть в отладчике, драйвер должен быть собран в отладочном режиме. Напомню, что отладочный режим у программистов драйверов называется checked, а финальный — free (прикладные программисты так не заморачиваются и называют их debug и release соответственно). В этом режиме программный код не оптимизируется и исполняемый файл содержит много избыточной информации, совершенно не нужной для работы, но очень полезной при изучении того, что будет делать этот код.
Для сборки открываем меню Start, затем Programs/Windows Driver Kits/WDK <номер версии>/Build Environment/Windows Server 2003 (или Windows XP)/ x86 Checked Build Environment. Щелкаем и попадаем в консольное окно. Если FAR был добавлен в PATH, то можно набрать far и перейти в директорию проекта обычным способом, иначе туда придется добираться используя команду cd (и может быть смену диска). Когда добрались до папки DrvHello (там где лежат три файла, которые были созданы выше) – набираем команду nmake. Если сборка прошла без ошибок, то будет созданы директории objchk_wnet_x86/i386, а в ней уже можно обнаружить файл drvhello.sys. Это и есть наш собранный драйвер.
Теперь вернемся к загрузчику. Это у нас будет консольное приложение (см. главу 1). Имя я ему дал DrvHelloloader и разместил, как всегда, в c:Projects. Имя файла с исходным кодом такое же – main.c, содержимое:
#include <windows.h>
#include <shlwapi.h>
#pragma comment(lib, "shlwapi.lib")

void main(int argc, char* argv[])
{
	char serviceName[] = "drvhello";
	char driverBinary[MAX_PATH] = "";
	SC_HANDLE hSc;
	SC_HANDLE hService;

	// Чтобы запустить драйвер, потребуется полный путь к нему
	// Предполагаем, что он лежит в той же папке, что и экзешник
	strcpy(driverBinary, argv[0]);			// argv[0] - здесь будет имя экзешника с полным путем
	PathRemoveFileSpec(driverBinary);		// Выкидываем имя экзешника, остается только путь к папке
	strcat(driverBinary, "\drvhello.sys");	// Добавляем имя драйвера.
					// Бэкслэш в строках Си надо удваивать, из-за его специального значения.

	hSc = OpenSCManager(NULL, NULL, SC_MANAGER_ALL_ACCESS);	// Открываем SCM (Service Control Management)
								// Это такая штука, которая позволяет запускать драйверы
								// из пользовательского режима
	CreateService(hSc, serviceName, serviceName,
		SERVICE_ALL_ACCESS, SERVICE_KERNEL_DRIVER, SERVICE_DEMAND_START, SERVICE_ERROR_NORMAL,
		driverBinary, NULL, NULL, NULL, NULL, NULL);				// Загрузка в 3 этапа - создаем службу
	hService = OpenService(hSc, serviceName, SERVICE_ALL_ACCESS);	// Открываем ее
	StartService(hService, 0, NULL);	// И запускаем. Вообще-то было бы неплохо
						// еще и закрыть ее... Как нибудь потом.
}
Выбираем в меню cтудии – Build/Rebuild Solution. Произойдет пересборка проекта без запуска. В принципе, можно и запустить. Находим экзешник в папке проекта, докидываем в ту же папку drvhello.sys. Далее запускаем DebugView, включаем галочку Capture/Capture Kernel, как показано на рисунке:
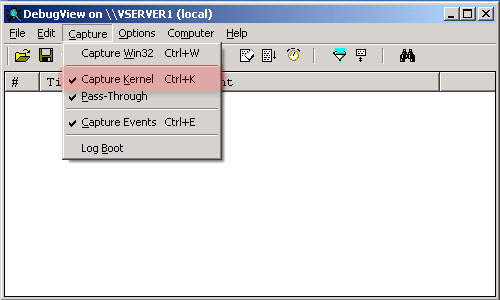
Рис. 3.1 – Настройка DebugView
Теперь запускаем программу. Если все прошло успешно – видим следующую картину:
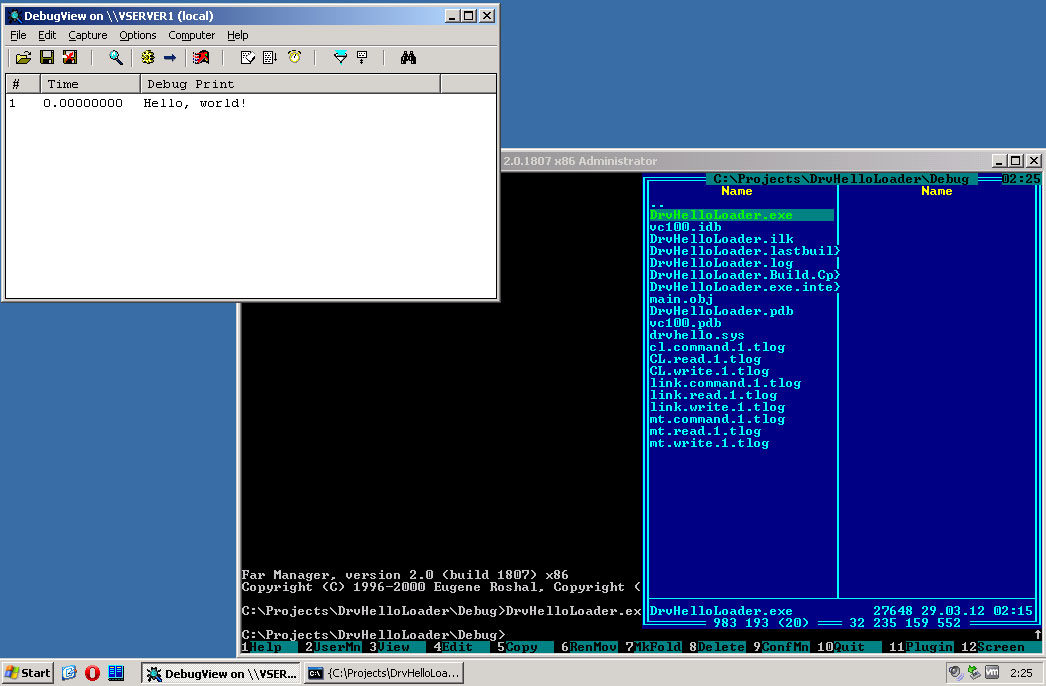
Рис. 3.2 – Проверка драйвера
Вот такой простой код позволяет уже очень много – работать на уровне ядра. Но следует помнить, что если допустить ошибку в прикладной программе – упадет она одна; если в драйвере – вся система. К примеру, если в код драйвера перед DbgPrint добавить строку:
int a = *((int *)0);
которая делает попытку прочесть содержимое памяти по нулевому адресу – то картинка будет уже иной:
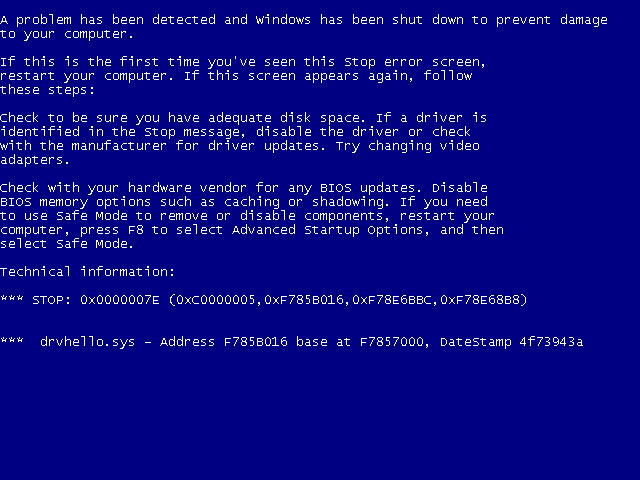
Рис. 3.3 – Попытка чтения из нулевого адреса
Если бы это был не драйвер, а просто программа пользовательского режима, то при выполнении этого кода она бы просто закрылась, выдав ошибку:
Рис. 3.4 – Та же ошибка в программе пользовательского режима
В один прекрасный день меня попросили написать Драйвер. На тот день мои познания в C/C++ ограничивались программой Hellow Word, и поэтому на вопрос: «Напишешь?» я самоуверенно ответил: «Конечно». На следующий день я узнал, что на свете существуют MSDN и DDK. Вскоре я понял, что не все Windows одинаковые, оказалось, что мой драйвер должен работать под Win2000/NT. У меня ушло больше месяца на то, чтобы скомпилировать и запустить свой первый Драйвер. По правде сказать, это был не совсем мой Драйвер, а точнее — это был genport из NTDDK. Но радовался я так, как будто минимум написал свою ОС.
Недавно мне пришлось опять вернуться к Драйверу. И вот вчера я, наконец-то, сдал работающий драйвер и решил написать эту небольшую статью, для того, чтобы как-то систематизировать то, что я узнал, и, чтобы когда мне снова придется взяться за драйвер, было от чего отталкиваться.
Люди, знающие что такое IOCTL, DEVICE_EXTENSION, MajorFunction и DriverEntry не найдут здесь ничего нового. Эта статья для тех, кто, возможно, никогда не слышал слово ДДК, и кто до сего дня никогда не заглядывал в исходники драйверов. И еще, я буду довольно-таки подробно описывать многие, даже очевидные вещи, поэтому напомню о том, что данная статья рассчитана на людей с очень малым опытом программирования, какой был у меня, когда я занялся написанием драйверов.
Первое, с чем сталкивается программист, решивший заняться драйверами, это почти полное отсутствие русскоязычной литературы по данной теме. За год поисков мне удалось найти всего три книги на русском, в которых хотя бы немного говорится о драйверах:
————————
1. Свен Шрайбер «Недокументированные возможности Windows 2000». Издательство «Питер» 2002 год.
Здесь очень хорошо описан механизм динамической загрузки драйвера.
——————
2. П. И. Рудаков, К. Г. Финогенов «Язык ассемблера: уроки программирования» Диалог МИФИ 2001 год.
Очень полезная книга для того, что бы понять, как писать драйвера без всякий Wizard-ов.
——————————
3. Светлана Сорокина, Андрей Тихонов, Андрей Щербаков «Программирование драйверов и систем безопасности». Издательство «БХВ-Петербург» 2002 год.
Здесь хорошо описывается многоуровневая модель драйверов.
Я ни в коей мере не претендую как на полноту освещения темы написания драйверов, так и на 100% правильность и достоверность того, что здесь написано (но все приведенные здесь исходники проверены и являются работоспособными). Буду благодарен всем, приславшим мне (01_artem@mail.ru) или высказавшим в форуме свои замечания.
Итак, я обращаюсь к человеку, решившему написать Драйвер уровня ядра под Win2000/NT. Надеюсь, эти заметки помогут сэкономить кучу времени и сил.
Прежде всего, я бы не рекомендовал (исходя из собственного опыта) пользоваться различными библиотеками (типа NuMega и всякими другими визардами). В основном из-за того, что даже для написания простейшего драйвера необходимо хотя бы поверхностное представление о том, как он функционирует. И самый простой способ получить представление об этом — написать драйвер самому. Мне, например, не хватило терпения разобраться с NuMega, и даже оболочки функций динамической загрузки/выгрузки драйвера, предложенные Свен Шрайбером в своей книге, я предпочел переписать.
Итак, начнем. Для начала надо установить на компьютер Visul C++ 6.0, MSDN и NTDDK установку проводить желательно именно в этом порядке. Лично я пользуюсь редактором UltraEdit для работы с текстами драйверов, но, в принципе, исходный код драйвера можно набирать в любом текстовом редакторе, хоть в NotePad.
Создадим папку, в которой мы будем работать с драйвером (пусть это будет C:myDriver). В этой папке создадим 5 файлов:
1. myDrv.c
2. myDrv.h
3. myDrv.rc
4. MAKEFILE
5. SOURCES
Начнем с последнего файла. В SOURCES скопируйте следующее:
TARGETNAME=myDrv
TARGETPATH=obj
TARGETTYPE=DRIVER
SOURCES=myDrv.c MyDrv.rc
В MAKEFILE скопируйте следующее:
!INCLUDE $(NTMAKEENV)makefile.def
В myDrv.rc скопируйте следующее:
#include <windows.h>
#include <ntverp.h>
#define VER_FILETYPE VFT_DRV
#define VER_FILESUBTYPE VFT2_DRV_SYSTEM
#define VER_FILEDESCRIPTION_STR «Generic Port I/O»
#define VER_INTERNALNAME_STR «myDrv.sys»
#include «common.ver»
А вот так должен выглядеть myDrv.h:
#define FIRST_IOCTL_INDEX 0x800
#define FILE_DEVICE_myDRV 0x00008000
#define TEST_SMTH CTL_CODE(FILE_DEVICE_myDRV,
FIRST_IOCTL_INDEX + 101,
METHOD_BUFFERED,
FILE_ANY_ACCESS)
Теперь обратимся к тексту самого драйвера myDrv.c:
#include «ntddk.h»
#include «myDrv.h»
#include «parallel.h»
#define NT_DEVICE_NAME L»\Device\myDrv»
#define DOS_DEVICE_NAME L»\DosDevices\myDrv»
//структура расширения устройства
typedef struct _DEVICE_EXTENSION
{
PDRIVER_OBJECT DriverObject;
PDEVICE_OBJECT DeviceObject;
PFILE_OBJECT FileObject;
HANDLE Handle;
} DEVICE_EXTENSION, *PDEVICE_EXTENSION;
//прототипы функций
NTSTATUS
DriverDeviceControl(IN PDEVICE_OBJECT DeviceObject,
IN PIRP Irp);
VOID
DriverUnload(IN PDRIVER_OBJECT DriverObject);
NTSTATUS
DriverOpen(IN PDEVICE_OBJECT DeviceObject,
IN PIRP Irp);
NTSTATUS
DriverClose(IN PDEVICE_OBJECT DeviceObject,
IN PIRP Irp);
/////////////////////////////////////////////////////////////////////////////////реализация функций
NTSTATUS
DriverEntry(IN PDRIVER_OBJECT DriverObject,
IN PUNICODE_STRING RegistryPath)
{
PDEVICE_OBJECT deviceObject;
UNICODE_STRING deviceNameUnicodeString;
UNICODE_STRING deviceLinkUnicodeString;
PDEVICE_EXTENSION extension;
NTSTATUS ntStatus;
RtlInitUnicodeString(&deviceNameUnicodeString, NT_DEVICE_NAME);
ntStatus = IoCreateDevice(DriverObject,
sizeof (DEVICE_EXTENSION),
&deviceNameUnicodeString,
FILE_DEVICE_UNKNOWN,
0,
FALSE,
&deviceObject);
if (!NT_SUCCESS(ntStatus)) return ntStatus;
DriverObject->MajorFunction[IRP_MJ_DEVICE_CONTROL] = DriverDeviceControl;
DriverObject->DriverUnload = DriverUnload;
DriverObject->MajorFunction[IRP_MJ_CREATE] = DriverOpen;
DriverObject->MajorFunction[IRP_MJ_CLOSE] = DriverClose;
extension = (PDEVICE_EXTENSION) deviceObject->DeviceExtension;
extension->DeviceObject = deviceObject;
extension->DriverObject = DriverObject;
// Create counted string version of our Win32 device name.
RtlInitUnicodeString(&deviceLinkUnicodeString, DOS_DEVICE_NAME);
// Create a link from our device name to a name in the Win32 namespace.
ntStatus = IoCreateSymbolicLink(&deviceLinkUnicodeString, &deviceNameUnicodeString);
if (!NT_SUCCESS(ntStatus))
{
IoDeleteDevice(deviceObject);
return ntStatus;
}
return STATUS_SUCCESS;
}
//———————————————————————————————-
VOID
DriverUnload(IN PDRIVER_OBJECT DriverObject)
{
UNICODE_STRING deviceLinkUnicodeString;
PDEVICE_EXTENSION extension;
PIRP pNewIrp = NULL;
ULONG m_size;
NTSTATUS ntStatus;
extension = DriverObject->DeviceObject->DeviceExtension;
// Create counted string version of our Win32 device name.
RtlInitUnicodeString(&deviceLinkUnicodeString, DOS_DEVICE_NAME);
// Delete the link from our device name to a name in the Win32 namespace.
IoDeleteSymbolicLink(&deviceLinkUnicodeString);
// Finally delete our device object
IoDeleteDevice(DriverObject->DeviceObject);
}
//————————————————————————————————
NTSTATUS
DriverOpen(IN PDEVICE_OBJECT DeviceObject,
IN PIRP Irp)
{
Irp->IoStatus.Status = STATUS_SUCCESS;
Irp->IoStatus.Information = 0;
IoCompleteRequest(Irp, IO_NO_INCREMENT);
return STATUS_SUCCESS;
}
//————————————————————————————————
NTSTATUS
DriverClose(IN PDEVICE_OBJECT DeviceObject,
IN PIRP Irp)
{
Irp->IoStatus.Status = STATUS_SUCCESS;
Irp->IoStatus.Information = 0;
IoCompleteRequest(Irp, IO_NO_INCREMENT);
return STATUS_SUCCESS;
}
//————————————————————————————————
NTSTATUS
DriverDeviceControl(IN PDEVICE_OBJECT DeviceObject,
IN PIRP Irp)
{
NTSTATUS ntStatus;
PIO_STACK_LOCATION irpStack;
PDEVICE_EXTENSION extension;
PULONG ioBuffer;
ULONG ioControlCode;
ULONG port = 0;
Irp->IoStatus.Status = STATUS_SUCCESS;
Irp->IoStatus.Information = 0;
irpStack = IoGetCurrentIrpStackLocation(Irp);
extension = DeviceObject->DeviceExtension;
ioBuffer = Irp->AssociatedIrp.SystemBuffer;
ioControlCode = irpStack->Parameters.DeviceIoControl.IoControlCode;
switch (ioControlCode)
{
case TEST_SMTH:
ioBuffer[0] =(ULONG)DriverEntry;//В буфер обмена адрес функции DriverEntry
Irp->IoStatus.Information = 4;
break;
default:
Irp->IoStatus.Status = STATUS_INVALID_PARAMETER;
break;
}
ntStatus = Irp->IoStatus.Status;
IoCompleteRequest(Irp, IO_NO_INCREMENT);
return ntStatus;
}
Немного поясню содержимое файла myDrv.c. Итак, по порядку:
#define NT_DEVICE_NAME L»DevicemyDrv»
#define DOS_DEVICE_NAME L»DosDevicesmyDrv»- Эти строки служат для задания символических имен текстовыми строками с именами объекта устройства, который будет создан нашим драйвером.
Далее приведены прототипы используемых функций. Этим функциям можно дать произвольные имена, НО их сигнатура (состав параметров с типом возвращаемого значения) жестко заданы системой. [2]:Программная часть драйвера начинается с обязательной функции с именем DriverEntry(), которая автоматически вызывается системой на этапе загрузки драйвера. Эта функция должна содержать все действия по его инициализации. В качестве первого параметра наша функция получает указатель на объект драйвера типа PDRIVER_OBJECT.
При загрузке драйвера системы создается объект драйвера (driver object), олицетворяющий образ драйвера в памяти. С другой стороны, объект драйвера представляет собой структуру, содержащую необходимые для функционирования драйвера данные и адреса функций. В процессе инициализации драйвера (в DriverEntry()) создаются один или несколько объектов устройств (device object), олицетворяющие те устройства, с которыми будет работать драйвер. Этот самый device object необходим для правильного функционирования драйвера и создается (как и в нашем случае) даже тогда, когда драйвер не имеет отношения к какому-либо реальному устройству.
Далее, в первых строках DriverEntry мы определяем используемые в ней данные, в т.ч. указатель на device object, и две символьные строки UNICODE_STRING с именами устройств. Системные программы взаимодействуют с объектом устройства, созданным драйвером, посредством указателя на него. Однако для прикладных программ объект устройства представляется одним из файловых объектов, и обращение к нему осуществляется по имени (в приложении мы будем использовать функцию CreateFile()).
Надо иметь в виду, что объект устройства должен иметь два имени, одно — в пространстве имен NT, другое — в пространстве имен Win32. Эти имена должны представлять собой структуры UNICODE_STRING. Имена объектов устройств составляются по определенным правилам. NT-имя предваряется префиксом Device, а Win32-имя — префиксом ?? (или DosDevice). При указании имен в Си-программе знак обратной косой черты удваивается. Для того, чтобы указанное в программе драйвера имя можно было использовать в приложении для открытия устройства, следует создать символическую связь между обоими заданными именами устройств. Для этого используем функцию IoCreateSymbolicLink(). Следующая обязательная операция — создание объекта устройства — осуществляется вызовом функции IoCreateDevice(). Первый параметр этой функции — это указатель на объект драйвера, поступающий в DriverEntry(). Второй параметр определяет размер расширения устройства — структуры, которая служит для передачи данных между функциями драйвера (состав этой структуры произволен и полностью определяется разработчиком). Третий параметр — созданное ранее NT-имя устройства. Далее идут: тип устройства (FILE_DEVICE_UNKNOWN), специальные характеристики (0), FALSE означает, что у нас однопоточное устройство. Наконец, последний параметр является выходным — через него функция возвращает указатель на созданный объект устройства.
Далее необходимо занести в объект драйвера адреса основных функций, включенных программистом в текст драйвера. Массив MajorFunction является одним из элементов структурной переменной. В этот массив мы и заносим адреса основных функций (т.е. функций, которые вызываются системой автоматически в ответ на определенные действия приложения или устройства). Завершается функция оператором return с указанием кода успешного завершения.
Функция DriverUnload() вызывается при выгрузке драйвера. Здесь мы должны выполнить действия по удалению объекта устройства, созданного в DriverEntry().
Функции DriverOpen и DriverClose в нашем случае ничего не делают и возвращают просто STATUSS_SUCCESS. Кстати, все эти функции тоже могут иметь произвольные имена, но передаваемые им параметры строго фиксированы.
[2]:Вот мы и добрались до самой содержательной, с точки зрения прикладного программирования, функции DriverDeviceControl(). Эта функция вызывается каждый раз, когда драйверу приходит IRP-пакет с каким либо IOCTL_ кодом. Грубо говоря, IRP-пакет — это структура, передавая указатель на которую, приложение может общаться с драйвером (как, впрочем, и драйвер может общаться с другим драйвером). Более подробное описание того, что такое IRP-пакет, можно найти здесь http://www.lcard.ru/~gorinov/texts/irp99.html.
IRP-пакет содержит так называемый системный буфер, служащий для обмена информацией (переменная SystemBuffer). Таким образом, нам надо получить доступ к IRP-пакету, а через него к SystemBuffer. Для этого объявляем переменную irpStack типа указателя на стековую область ввода-вывода PIO_STACK_LOCATION, и, кроме того, переменная ioBuffer, в которую будет помещен адрес системного буфера обмена. В нашем случае тип этой переменной — PULONG, в действительности тип передаваемых данных может быть каким угодно. С помощью функции IoGetCurrentIrpStackLocation() в переменную irpStack помещается адрес стековой области ввода-вывода, а в переменную ioBuffer заносится адрес системного буфера из структуры IRP. Системный буфер входит в объединение (union) с именем AssociatedIrp, поэтому мы используем конструкцию Irp->AssociatedIrp.SystemBuffer. Конструкция switch-case анализирует содержимое ячейки IoControlCode и в зависимости от значения кода выполняет те или иные действия. В нашей программе только один код действия TEST_SMTH. Засылка в буфер обмена адреса функции DriverEntry() осуществляется через указатель на этот буфер. В переменную Irp->IoStatus.Information заносим количество (4) пересылаемых байт. Для завершения IRP-пакета вызываем IoCompleteRequest().
Итак, драйвер мы написали. Теперь надо его скомпилировать. Т.к. процесс компиляции идет из командной строки, то для этой цели гораздо удобнее пользоваться bat-файлом. Создадим небольшой bat-файл с именем, допустим, Crt.bat и со следующим содержанием:
%SystemRoot%system32cmd.exe /c «cd C:NTDDKbin&&setenv.bat C:NTDDK&&cd c:myDriver &&build -ceZ»
pause
NTDDK у меня установлено в корень С:, если у Вас по-другому, то вместо C:NTDDKbin и C:NTDDK пропишите полные пути к соответствующим папкам.
Итак, теперь запустим наш Crt.bat. После окончания компиляции в папке C:myDriverobjfrei386 находим готовый драйвер myDrv.sys. Наш драйвер пока умеет только лишь загружаться/выгружаться и по специальному запросу посылает приложению адрес одной из своих процедур.
Теперь займемся написанием приложения, работающего с нашим драйвером. Еще раз напоминаю, что мы работаем под Win2000. Эта ОС позволяет реализовать динамическую загрузку/выгрузку драйвера.
Точнее, динамическую загрузку/выгрузку служб (service), но т.к. в Win2000 в качестве службы можно рассматривать и драйвер, я буду использовать оба эти термина, подразумевая, в данной статье, наш драйвер.
Для загрузки и выгрузки драйверов используется диспетчер управления службами SC Manager (Service Control Manager). Прежде чем вы сможете работать с интерфейсом SC, вы должны получить дескриптор диспетчера служб. Для этого необходимо обратиться к функции OpenSCManager(). Дескриптор диспетчера служб необходимо использовать при обращении к функциям CreateServise() и OpenService(). Дескрипторы, возвращаемые этими функциями, необходимо использовать при обращении к вызовам, имеющим отношение к конкретной службе. К подобным вызовам относятся функции ControlService(), DeleteService() и StartService(). Для освобождения дескрипторов обоих типов используется вызов CloseServiceHandle().
Загрузка и запуск службы подразумевает выполнение следующих действий:
- Обращение к функции OpenSCManager() для получения дескриптора диспетчера
- Обращение к CreateServise() для того, чтобы добавить службу в систему. Если такой сервис уже существует, то CreateServise() выдаст ошибку с кодом 1073 (код ошибки можно прочитать GetLastError()) Данная ошибка означает, что сервис уже существует и надо вместо CreateServise() использовать OpenService().
- Обращение к StartService() для того, чтобы перевести службу в состояние функционирования.
- Если служба запустилась успешно, то можно вызвать CreateFile() для получения дескриптора, который мы будем использовать уже непосредственно при обращении к драйверу.
- И по окончании работы не забудьте дважды обратиться к CloseServiceHandle() для того, чтобы освободить дескрипторы диспетчера и службы.
Если на каком-то шаге этой последовательности возникла ошибка, нужно выполнить действия, обратные тем, которые вы успели выполнить до ошибки. Надо помнить о том, что при обращении к функциям, подобным CreateServise(), необходимо указывать полное имя исполняемого файла службы (в нашем случае полный путь и имя myDrv.sys).
Посмотрим на исходный текст простого консольного приложения, написанного на Visual C++ 6.0:
#include <conio.h>
#include «LoadDRV.h»
#include <string.h>
#include <stdio.h>
void main()
{
LPTSTR m_name = new char[20];
strcpy(m_name, «myDrv.sys»);
if (drvLoad(m_name)) TestSmth();
drvUnLoad(m_name);
delete m_name;
}
//——————————————————————————
//создаем и посылаем драйверу IRP-запрос
int TestSmth(void)//0x800 + 101
{
int test = 0;
DWORD ReturetLength = 0;
DeviceIoControl(hDevice, IOCTL_TEST_SMTH, NULL, 0,
&test, 4, &ReturetLength, NULL);
printf(«TestSmth= %in»,test);
return test;
}
///**************Функции динамической загрузки************************
bool drvLoad(char* name)
{
printf (name);
hSCManager=NULL;
hService=NULL;
bool status;
status=FALSE;
if(OpenManager())
{
if(drvCreateService(name))
{
if(drvStartService(name))
{
status=TRUE;
printf(«n Driver is now load…n»);
}
}
}
hDevice = CreateFile («//./myDrv», GENERIC_READ,
FILE_SHARE_READ | FILE_SHARE_WRITE,
NULL, OPEN_EXISTING,
FILE_ATTRIBUTE_NORMAL, NULL);
return status;
}
//———————————————————————
bool OpenManager()
{
bool status;
status=FALSE;
if(hSCManager!=NULL)
{
CloseServiceHandle (hSCManager);
hSCManager=NULL;
}
hSCManager=OpenSCManager (NULL,NULL,SC_MANAGER_ALL_ACCESS);
if (hSCManager == NULL)
{
error(_OpenSCManager);
} else status=TRUE;
return status;
}
//———————————————————————
bool drvCreateService(PCHAR pDrvName)
{
LPTSTR lpBuffer;
lpBuffer = new char[256];
bool status = FALSE;
LPTSTR awPath; // путь к драйверу с именем pDrvName
// формируем путь к pDrvName, драйвер должен лежать рядом с exe-шником
GetCurrentDirectory(256, lpBuffer);
strcat(lpBuffer,»»);
strcat(lpBuffer,pDrvName);
awPath = lpBuffer;
hService = CreateService(hSCManager,pDrvName,pDrvName,SERVICE_ALL_ACCESS, SERVICE_KERNEL_DRIVER,SERVICE_DEMAND_START,SERVICE_ERROR_NORMAL,awPath,NULL,NULL,NULL,NULL,NULL);
if(!hService)
{
error(_CreateService);
status = drvOpenService(pDrvName);//Пытаемся открыть службу
}
else status=TRUE;
delete lpBuffer;
return status;
}
//———————————————————————
bool drvOpenService(PCHAR name)
{
bool status;
status=FALSE;
if(hService!=NULL) CloseService();
hService=OpenService(hSCManager,name,SERVICE_ALL_ACCESS);
if (!hService) error(_OpenService);
else status=TRUE;
return status;
}
//———————————————————————
bool drvStartService(PCHAR name)
{
bool status;
status=FALSE;
if(!StartService(hService,0,NULL))
{
error(_StartService);
printf(«Deleting service…»);
drvDeleteService(name)
}
else status=TRUE;
return status;
}
//———————————————————————
bool drvDeleteService(PCHAR name)
{
bool status;
status=FALSE;
CloseService();
if(!DeleteService(hService)) error(_DeleteService);
else status=TRUE;
return status;
}
//——————————————————————-
void CloseService()
{
CloseServiceHandle (hService);
hService=NULL;
}
//——————————————————————-
int drvUnLoad(PCHAR name)
{
int status;
status=FALSE;
if (hDevice!=INVALID_HANDLE_VALUE)
{
if(!CloseHandle(hDevice)) error(_CloseHandle);
hDevice=INVALID_HANDLE_VALUE;
}
if (hService)
{
status = ControlService(hService,SERVICE_CONTROL_STOP,&ServiceStatus);
if(!status) error(_SERVICE_CONTROL_STOP);
status = DeleteService(hService);
if(!status) error(_DeleteService);
status = CloseServiceHandle(hService);
if(!status) error(_CloseServiceHandle);
}
if(!CloseServiceHandle(hSCManager)) error(_CloseServiceHandle);
if (status) printf(«Driver Unload… SUCCESSn»);
return status;
}
//———————————————————————
void error(error_index erIndex)
{
DWORD err;
err=GetLastError();
switch(erIndex)
{
case _OpenSCManager:
printf(«OpenSCManager failed with Error=%in»,err);
break;
case _GetFullPathName:
printf(«GetFullPathName failed with Error=%in»,err);
break;
case _CreateService:
switch (err)
{
case 1073:
printf(«The specified service already exists.n»);
printf(«opening this service…»);
break;
default:
printf(«CreateService failed with Error=%in»,err);
}
break;
case _OpenService:
printf(«OpenService failed with Error=%in»,err);
break;
case _StartService:
printf(«StartService failed with Error=%in»,err);
break;
case _DeleteService:
printf(«DeleteService failed with Error=%in»,err);
break;
case _SERVICE_CONTROL_STOP:
printf(«SERVICE_CONTROL_STOP failed with Error=%in»,err);
break;
case _CreateFile:
printf(«CreateFile failed with Error=%in»,err);
break;
case _CloseHandle:
printf(«CloseHandle failed with Error=%in»,err);
break;
case _CloseServiceHandle:
printf(«CloseServiceHandle failed with Error=%in»,err);
break;
}
}
И содержимое h-файла этого приложения:
#define FIRST_IOCTL_INDEX 0x800
#define FILE_DEVICE_myDrv 0x00008000
#define TEST_SMTH CTL_CODE(FILE_DEVICE_myDrv,
0x800 + 101,
METHOD_BUFFERED,
FILE_ANY_ACCESS)
Это приложение загружает драйвер, файл которого лежит в одной папке, что и exe-файл данного приложения.
Посмотрим на исходный текст:
В main() мы создаем переменную с именем драйвера (myDrv.sys) и передаем это имя в функцию динамической загрузки драйвера drvLoad(), которая выполняет все необходимые действия по работе с менеджером служб, и в конце вызывает CreateFile(), которая возвращает дескриптор, нужный для работы с драйвером как файловым объектом. Этот дескриптор, в частности, используется при вызове функции DeviceIoControl.
Если драйвер загружен успешно, то вызываем функцию TestSmth(), внутри которой мы создаем и посылаем драйверу IRP-пакет (с помощью вызова DeviceIoControl()). Приняв этот пакет, наш драйвер возвращает адрес своей процедуры DriverEntry. После этого выгружаем драйвер. Все.
Итак, мы написали простейший (дальше некуда) драйвер и приложение, работающее с ним. В этой статье я активно цитировал материалы из книги П. И. Рудаков, К. Г. Финогенов, по возможности делая ссылки на нее в виде: [2].
Через некоторое время напишу о том, как на базе этого драйвера написать драйвер-фильтр для LPT-порта.
Артем.