In this article, we are going to learn how to create your own programming language using SLY(Sly Lex Yacc) and Python. Before we dig deeper into this topic, it is to be noted that this is not a beginner’s tutorial and you need to have some knowledge of the prerequisites given below.
Prerequisites
- Rough knowledge about compiler design.
- Basic understanding of lexical analysis, parsing and other compiler design aspects.
- Understanding of regular expressions.
- Familiarity with Python programming language.
Getting Started
Install SLY for Python. SLY is a lexing and parsing tool which makes our process much easier.
pip install sly
Building a Lexer
The first phase of a compiler is to convert all the character streams(the high level program that is written) to token streams. This is done by a process called lexical analysis. However, this process is simplified by using SLY
First let’s import all the necessary modules.
Python3
Now let’s build a class BasicLexer which extends the Lexer class from SLY. Let’s make a compiler that makes simple arithmetic operations. Thus we will need some basic tokens such as NAME, NUMBER, STRING. In any programming language, there will be space between two characters. Thus we create an ignore literal. Then we also create the basic literals like ‘=’, ‘+’ etc., NAME tokens are basically names of variables, which can be defined by the regular expression [a-zA-Z_][a-zA-Z0-9_]*. STRING tokens are string values and are bounded by quotation marks(” “). This can be defined by the regular expression ”.*?”.
Whenever we find digit/s, we should allocate it to the token NUMBER and the number must be stored as an integer. We are doing a basic programmable script, so let’s just make it with integers, however, feel free to extend the same for decimals, long etc., We can also make comments. Whenever we find “//”, we ignore whatever that comes next in that line. We do the same thing with new line character. Thus, we have build a basic lexer that converts the character stream to token stream.
Python3
class BasicLexer(Lexer):
tokens = { NAME, NUMBER, STRING }
ignore = 't '
literals = { '=', '+', '-', '/',
'*', '(', ')', ',', ';'}
NAME = r'[a-zA-Z_][a-zA-Z0-9_]*'
STRING = r'".*?"'
@_(r'd+')
def NUMBER(self, t):
t.value = int(t.value)
return t
@_(r'//.*')
def COMMENT(self, t):
pass
@_(r'n+')
def newline(self, t):
self.lineno = t.value.count('n')
Building a Parser
First let’s import all the necessary modules.
Python3
Now let’s build a class BasicParser which extends the Lexer class. The token stream from the BasicLexer is passed to a variable tokens. The precedence is defined, which is the same for most programming languages. Most of the parsing written in the program below is very simple. When there is nothing, the statement passes nothing. Essentially you can press enter on your keyboard(without typing in anything) and go to the next line. Next, your language should comprehend assignments using the “=”. This is handled in line 18 of the program below. The same thing can be done when assigned to a string.
Python3
class BasicParser(Parser):
tokens = BasicLexer.tokens
precedence = (
('left', '+', '-'),
('left', '*', '/'),
('right', 'UMINUS'),
)
def __init__(self):
self.env = { }
@_('')
def statement(self, p):
pass
@_('var_assign')
def statement(self, p):
return p.var_assign
@_('NAME "=" expr')
def var_assign(self, p):
return ('var_assign', p.NAME, p.expr)
@_('NAME "=" STRING')
def var_assign(self, p):
return ('var_assign', p.NAME, p.STRING)
@_('expr')
def statement(self, p):
return (p.expr)
@_('expr "+" expr')
def expr(self, p):
return ('add', p.expr0, p.expr1)
@_('expr "-" expr')
def expr(self, p):
return ('sub', p.expr0, p.expr1)
@_('expr "*" expr')
def expr(self, p):
return ('mul', p.expr0, p.expr1)
@_('expr "/" expr')
def expr(self, p):
return ('div', p.expr0, p.expr1)
@_('"-" expr %prec UMINUS')
def expr(self, p):
return p.expr
@_('NAME')
def expr(self, p):
return ('var', p.NAME)
@_('NUMBER')
def expr(self, p):
return ('num', p.NUMBER)
The parser should also parse in arithmetic operations, this can be done by expressions. Let’s say you want something like shown below. Here all of them are made into token stream line-by-line and parsed line-by-line. Therefore, according to the program above, a = 10 resembles line 22. Same for b =20. a + b resembles line 34, which returns a parse tree (‘add’, (‘var’, ‘a’), (‘var’, ‘b’)).
GFG Language > a = 10
GFG Language > b = 20
GFG Language > a + b
30
Now we have converted the token streams to a parse tree. Next step is to interpret it.
Execution
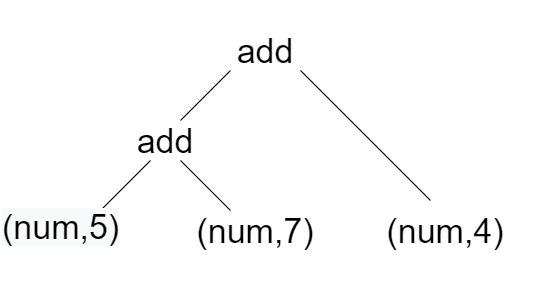
Interpreting is a simple procedure. The basic idea is to take the tree and walk through it to and evaluate arithmetic operations hierarchically. This process is recursively called over and over again till the entire tree is evaluated and the answer is retrieved. Let’s say, for example, 5 + 7 + 4. This character stream is first tokenized to token stream in a lexer. The token stream is then parsed to form a parse tree. The parse tree essentially returns (‘add’, (‘add’, (‘num’, 5), (‘num’, 7)), (‘num’, 4)). (see image below)
The interpreter is going to add 5 and 7 first and then recursively call walkTree and add 4 to the result of addition of 5 and 7. Thus, we are going to get 16. The below code does the same process.
Python3
class BasicExecute:
def __init__(self, tree, env):
self.env = env
result = self.walkTree(tree)
if result is not None and isinstance(result, int):
print(result)
if isinstance(result, str) and result[0] == '"':
print(result)
def walkTree(self, node):
if isinstance(node, int):
return node
if isinstance(node, str):
return node
if node is None:
return None
if node[0] == 'program':
if node[1] == None:
self.walkTree(node[2])
else:
self.walkTree(node[1])
self.walkTree(node[2])
if node[0] == 'num':
return node[1]
if node[0] == 'str':
return node[1]
if node[0] == 'add':
return self.walkTree(node[1]) + self.walkTree(node[2])
elif node[0] == 'sub':
return self.walkTree(node[1]) - self.walkTree(node[2])
elif node[0] == 'mul':
return self.walkTree(node[1]) * self.walkTree(node[2])
elif node[0] == 'div':
return self.walkTree(node[1]) / self.walkTree(node[2])
if node[0] == 'var_assign':
self.env[node[1]] = self.walkTree(node[2])
return node[1]
if node[0] == 'var':
try:
return self.env[node[1]]
except LookupError:
print("Undefined variable '"+node[1]+"' found!")
return 0
Displaying the Output
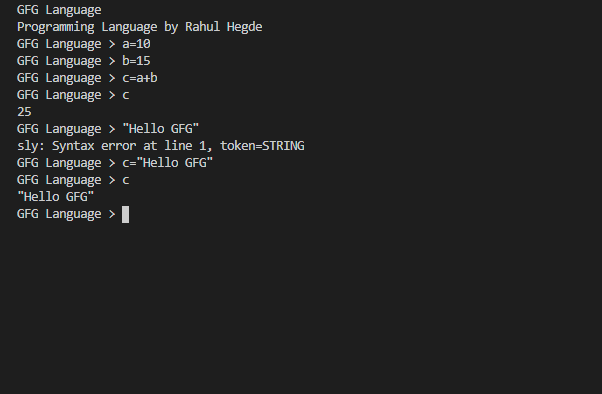
To display the output from the interpreter, we should write some codes. The code should first call the lexer, then the parser and then the interpreter and finally retrieves the output. The output in then displayed on to the shell.
Python3
if __name__ == '__main__':
lexer = BasicLexer()
parser = BasicParser()
print('GFG Language')
env = {}
while True:
try:
text = input('GFG Language > ')
except EOFError:
break
if text:
tree = parser.parse(lexer.tokenize(text))
BasicExecute(tree, env)
It is necessary to know that we haven’t handled any errors. So SLY is going to show it’s error messages whenever you do something that is not specified by the rules you have written.
Execute the program you have written using,
python you_program_name.py
Footnotes
The interpreter that we built is very basic. This, of course, can be extended to do a lot more. Loops and conditionals can be added. Modular or object oriented design features can be implemented. Module integration, method definitions, parameters to methods are some of the features that can be extended on to the same.
In this article, we are going to learn how to create your own programming language using SLY(Sly Lex Yacc) and Python. Before we dig deeper into this topic, it is to be noted that this is not a beginner’s tutorial and you need to have some knowledge of the prerequisites given below.
Prerequisites
- Rough knowledge about compiler design.
- Basic understanding of lexical analysis, parsing and other compiler design aspects.
- Understanding of regular expressions.
- Familiarity with Python programming language.
Getting Started
Install SLY for Python. SLY is a lexing and parsing tool which makes our process much easier.
pip install sly
Building a Lexer
The first phase of a compiler is to convert all the character streams(the high level program that is written) to token streams. This is done by a process called lexical analysis. However, this process is simplified by using SLY
First let’s import all the necessary modules.
Python3
Now let’s build a class BasicLexer which extends the Lexer class from SLY. Let’s make a compiler that makes simple arithmetic operations. Thus we will need some basic tokens such as NAME, NUMBER, STRING. In any programming language, there will be space between two characters. Thus we create an ignore literal. Then we also create the basic literals like ‘=’, ‘+’ etc., NAME tokens are basically names of variables, which can be defined by the regular expression [a-zA-Z_][a-zA-Z0-9_]*. STRING tokens are string values and are bounded by quotation marks(” “). This can be defined by the regular expression ”.*?”.
Whenever we find digit/s, we should allocate it to the token NUMBER and the number must be stored as an integer. We are doing a basic programmable script, so let’s just make it with integers, however, feel free to extend the same for decimals, long etc., We can also make comments. Whenever we find “//”, we ignore whatever that comes next in that line. We do the same thing with new line character. Thus, we have build a basic lexer that converts the character stream to token stream.
Python3
class BasicLexer(Lexer):
tokens = { NAME, NUMBER, STRING }
ignore = 't '
literals = { '=', '+', '-', '/',
'*', '(', ')', ',', ';'}
NAME = r'[a-zA-Z_][a-zA-Z0-9_]*'
STRING = r'".*?"'
@_(r'd+')
def NUMBER(self, t):
t.value = int(t.value)
return t
@_(r'//.*')
def COMMENT(self, t):
pass
@_(r'n+')
def newline(self, t):
self.lineno = t.value.count('n')
Building a Parser
First let’s import all the necessary modules.
Python3
Now let’s build a class BasicParser which extends the Lexer class. The token stream from the BasicLexer is passed to a variable tokens. The precedence is defined, which is the same for most programming languages. Most of the parsing written in the program below is very simple. When there is nothing, the statement passes nothing. Essentially you can press enter on your keyboard(without typing in anything) and go to the next line. Next, your language should comprehend assignments using the “=”. This is handled in line 18 of the program below. The same thing can be done when assigned to a string.
Python3
class BasicParser(Parser):
tokens = BasicLexer.tokens
precedence = (
('left', '+', '-'),
('left', '*', '/'),
('right', 'UMINUS'),
)
def __init__(self):
self.env = { }
@_('')
def statement(self, p):
pass
@_('var_assign')
def statement(self, p):
return p.var_assign
@_('NAME "=" expr')
def var_assign(self, p):
return ('var_assign', p.NAME, p.expr)
@_('NAME "=" STRING')
def var_assign(self, p):
return ('var_assign', p.NAME, p.STRING)
@_('expr')
def statement(self, p):
return (p.expr)
@_('expr "+" expr')
def expr(self, p):
return ('add', p.expr0, p.expr1)
@_('expr "-" expr')
def expr(self, p):
return ('sub', p.expr0, p.expr1)
@_('expr "*" expr')
def expr(self, p):
return ('mul', p.expr0, p.expr1)
@_('expr "/" expr')
def expr(self, p):
return ('div', p.expr0, p.expr1)
@_('"-" expr %prec UMINUS')
def expr(self, p):
return p.expr
@_('NAME')
def expr(self, p):
return ('var', p.NAME)
@_('NUMBER')
def expr(self, p):
return ('num', p.NUMBER)
The parser should also parse in arithmetic operations, this can be done by expressions. Let’s say you want something like shown below. Here all of them are made into token stream line-by-line and parsed line-by-line. Therefore, according to the program above, a = 10 resembles line 22. Same for b =20. a + b resembles line 34, which returns a parse tree (‘add’, (‘var’, ‘a’), (‘var’, ‘b’)).
GFG Language > a = 10
GFG Language > b = 20
GFG Language > a + b
30
Now we have converted the token streams to a parse tree. Next step is to interpret it.
Execution
Interpreting is a simple procedure. The basic idea is to take the tree and walk through it to and evaluate arithmetic operations hierarchically. This process is recursively called over and over again till the entire tree is evaluated and the answer is retrieved. Let’s say, for example, 5 + 7 + 4. This character stream is first tokenized to token stream in a lexer. The token stream is then parsed to form a parse tree. The parse tree essentially returns (‘add’, (‘add’, (‘num’, 5), (‘num’, 7)), (‘num’, 4)). (see image below)
The interpreter is going to add 5 and 7 first and then recursively call walkTree and add 4 to the result of addition of 5 and 7. Thus, we are going to get 16. The below code does the same process.
Python3
class BasicExecute:
def __init__(self, tree, env):
self.env = env
result = self.walkTree(tree)
if result is not None and isinstance(result, int):
print(result)
if isinstance(result, str) and result[0] == '"':
print(result)
def walkTree(self, node):
if isinstance(node, int):
return node
if isinstance(node, str):
return node
if node is None:
return None
if node[0] == 'program':
if node[1] == None:
self.walkTree(node[2])
else:
self.walkTree(node[1])
self.walkTree(node[2])
if node[0] == 'num':
return node[1]
if node[0] == 'str':
return node[1]
if node[0] == 'add':
return self.walkTree(node[1]) + self.walkTree(node[2])
elif node[0] == 'sub':
return self.walkTree(node[1]) - self.walkTree(node[2])
elif node[0] == 'mul':
return self.walkTree(node[1]) * self.walkTree(node[2])
elif node[0] == 'div':
return self.walkTree(node[1]) / self.walkTree(node[2])
if node[0] == 'var_assign':
self.env[node[1]] = self.walkTree(node[2])
return node[1]
if node[0] == 'var':
try:
return self.env[node[1]]
except LookupError:
print("Undefined variable '"+node[1]+"' found!")
return 0
Displaying the Output
To display the output from the interpreter, we should write some codes. The code should first call the lexer, then the parser and then the interpreter and finally retrieves the output. The output in then displayed on to the shell.
Python3
if __name__ == '__main__':
lexer = BasicLexer()
parser = BasicParser()
print('GFG Language')
env = {}
while True:
try:
text = input('GFG Language > ')
except EOFError:
break
if text:
tree = parser.parse(lexer.tokenize(text))
BasicExecute(tree, env)
It is necessary to know that we haven’t handled any errors. So SLY is going to show it’s error messages whenever you do something that is not specified by the rules you have written.
Execute the program you have written using,
python you_program_name.py
Footnotes
The interpreter that we built is very basic. This, of course, can be extended to do a lot more. Loops and conditionals can be added. Modular or object oriented design features can be implemented. Module integration, method definitions, parameters to methods are some of the features that can be extended on to the same.
A BASIC Interpreter — Program like it’s 1979!
Introduction
A simple interactive BASIC interpreter written in Python 3. It is based heavily on material in the excellent book Writing Interpreters
and Compilers for the Raspberry Pi Using Python by Anthony J. Dos Reis. However, I have had to adapt the Python interpreter presented
in the book, both to work with the BASIC programming language and to produce an interactive command line interface. The interpreter
therefore adopts the key techniques for interpreter and compiler writing, the use of a lexical analysis stage followed by a recursive descent parser
which implements the context free grammar representing the target programming language.
The interpreter is a homage to the home computers of the early 1980s, and when executed, presents an interactive prompt (‘>’)
typical of such a home computer. Commands to run, list, save and load BASIC programs can be entered at the prompt as well as
program statements themselves.
The BASIC dialect that has been implemented is slightly simplified, and naturally avoids machine specific instructions,
such as those concerned with sound and graphics for example.
There is reasonably comprehensive error checking. Syntax errors will be picked up and reported on by the
lexical analyser as statements are entered. Runtime errors will highlight the cause and the line number of
the offending statement.
The interpreter can be invoked as follows:
Although this started of as a personal project, it has been enhanced considerably by some other Github users. You can see them in the list of contributors! It’s very much a group endeavour now.
Operators
A limited range of arithmetic expressions are provided. Addition and subtraction have the lowest precedence,
but this can be changed with parentheses.
- + — Addition
- — — Subtraction
- * — Multiplication
- / — Division
- MOD (or %) — Modulo
> 10 PRINT 2 * 3
> 20 PRINT 20 / 10
> 30 PRINT 10 + 10
> 40 PRINT 10 - 10
> 50 PRINT 15 MOD 10
> RUN
6
2.0
20
0
5
>
Additional numerical operations may be performed using numeric functions (see below).
Not also that ‘+’ does extra duty as a string concatenation operator, while ‘*’ can be used to repeat strings.
Commands
Programs may be listed using the LIST command:
> LIST
10 LET I = 10
20 PRINT I
>
The list command can take arguments to refine the line selection listed
LIST 50 Lists only line 50.
LIST 50-100 Lists lines 50 through 100 inclusive.
LIST 50 100 Also Lists lines 50 through 100 inclusive, almost any delimiter
works here.
LIST -100 Lists from the start of the program through line 100 inclusive.
LIST 50- Lists from line 50 to the end of the program.
A program is executed using the RUN command:
A program may be saved to disk using the SAVE command. Note that the full path must be specified within double quotes:
> SAVE "C:pathtomyfile"
Program written to file
>
The program may be re-loaded from disk using the LOAD command, again specifying the full path using double quotes:
> LOAD "C:pathtomyfile"
Program read from file
>
When loading or saving, the .bas extension is assumed if not provided. If you are loading a simple name (alpha/numbers only) and in the working dir, quotes can be omitted:
will load regression.bas from the current working directory.
Individual program statements may be deleted by entering their line number only:
> 10 PRINT "Hello"
> 20 PRINT "Goodbye"
> LIST
10 PRINT "Hello"
20 PRINT "Goodbye"
> 10
> LIST
20 PRINT "Goodbye"
>
The program may be erased entirely from memory using the NEW command:
> 10 LET I = 10
> LIST
10 LET I = 10
> NEW
> LIST
>
Finally, it is possible to terminate the interpreter by issuing the EXIT command:
On occasion, it might be necessary to force termination of a program and return to the
interpreter, for example, because it is caught in an infinite loop. This can be achieved by
using Ctrl-C to force the program to stop:
> 10 PRINT "Hello"
> 20 GOTO 10
> RUN
"Hello"
"Hello"
"Hello"
...
...
<Ctrl-C>
Program terminated
> LIST
10 PRINT "Hello"
20 GOTO 10
>
Programming language constructs
Statement structure
As per usual in old school BASIC, all program statements must be prefixed with a line number which indicates the order in which the
statements may be executed. There is no renumber command to allow all line numbers to be modified. A statement may be modified or
replaced by re-entering a statement with the same line number:
> 10 LET I = 10
> LIST
10 LET I = 10
> 10 LET I = 200
> LIST
10 LET I = 200
>
Multiple statements may appear on one line separated by a colon:
NOTE: Currently inline loops are NOT supported
10 FOR I = 1 to 10: PRINT I: NEXT
will need to be decomposed to individual lines.
Variables
Variable types follow the typical BASIC convention. Simple variables may contain either strings
or numbers (the latter may be integers or floating point numbers). Likewise array variables may contain arrays
of either strings or numbers, but they cannot be mixed in the same array.
Note that all keywords and variable names are case insensitive (and will be converted to upper case internally by the lexical analyser).
String literals will retain their case however. There is no inherent limit on the length of variable names or string literals,
this will be dictated by the limitations of Python. The range of numeric values is also dependent upon the underlying
Python implementation.
Note that variable names may only consist of alphanumeric characters and underscores. However, they
must all begin with an alphabetic character. For example:
- MY_VAR
- MY_VAR6$
- VAR77(0, 0)
are all valid variable names, whereas:
- 5_VAR
- _VAR$
- 66$
are all invalid.
Numeric variables have no suffix, whereas string variables are always suffixed by ‘$’. Note that ‘I’ and ‘I$’ are
considered to be separate variables. Note that string literals must always be enclosed within double quotes (not single quotes).
Using no quotes will result in a syntax error.
Array variables are defined using the DIM statement, which explicitly lists how
many dimensions the array has, and the sizes of those dimensions:
> REM DEFINE A THREE DIMENSIONAL NUMERIC ARRAY
> 10 DIM A(3, 3, 3)
Note that the index of each dimension always starts at zero, but for
compatibility with some basic dialects the bounds of each dimension will be
expanded by one to enable element access including the len. So in the above example,
valid index values for array A will be 0, 1, 2 or 3
for each dimension. Arrays may have a maximum of three dimensions. Numeric arrays will
be initialised with each element set to zero, while string arrays will be initialised
with each element set to the empty string «».
As for simple variables, a string array has its name suffixed by a ‘$’ character, while a numeric array does not carry
a suffix. An attempt to assign a string value to a numeric array or vice versa will generate an error.
Array variables
with the same name but different dimensionality are treated as the same. For example,
using a DIM statement to define I(5) and then a second DIM statement to define I(5, 5) will
result in the second definition (the two dimensional array) overwriting the first definition (the one dimensional array).
Array values may be used within any expression, such as in a PRINT statement for string values, or in any numerical
expression for number values. However, you must be specific about which array element you are referencing, using the
correct number of in-range indexes. If that particular array value has not yet been assigned, then an error
message will be printed.
> 10 DIM MYARRAY(2, 2, 2)
> 20 LET MYARRAY(0, 1, 0) = 56
> 30 PRINT MYARRAY(0, 1, 0)
> RUN
56
> 30 PRINT MYARRAY(0, 0, 0)
> RUN
Empty array value returned in line 30
>
As in all implementations of BASIC, there is no garbage collection (not surprising since all variables
have global scope)!
Program constants
Constants may be defined through the use of the DATA statement. They may consist of numeric or string values
and are declared in a comma separated list:
> 10 DATA 56, "Hello", 78
These values can then later be assigned to variables using the READ statement. Note that the type of the value
(string or numeric) must match the type of the variable, otherwise an error message will be triggered. Therefore,
attention should be paid to the relative ordering of constants and variables. Once the constants on a DATA
statement are used by a READ statement, the next READ
statement will move to the DATA statement with the next higher line number, if there are no more DATA
statements before the end of the program an error will be displayed. This is to ensure that the program is not left
in a state where a variable has not been assigned a value, but nevertheless an attempt to use that variable is
made later on in the program.
Normally each DATA statement is consumed sequently by READ statements however, the RESTORE statement can
be used to override this order and set the line number of the DATA statement that will be used by the next
READ statement. If the line-number used in a RESTORE statement does not refer to a DATA statement an
error will be displayed.
The constants defined in the DATA statement may be consumed using several READ statements or several DATA
statements may be consumed by a single READ statement.:
> 10 DATA 56, "Hello", 78
> 20 READ FIRSTNUM, S$
> 30 PRINT FIRSTNUM, " ", S$
> 40 READ SECONDNUM
> 50 PRINT SECONDNUM
> 60 DATA "Another "
> 70 DATA "Line "
> 80 DATA "of "
> 90 DATA "Data"
> 100 RESTORE 10
> 110 READ FIRSTNUM, S$, SECONDNUM, A$, B$, C$, D$
> 120 PRINT S$," ",A$,B$,C$,D$
> RUN
56 Hello
78
Hello Another Line of Data
>
It is a limitation of this BASIC dialect that it is not possible to assign constants directly to array variables
within a READ statement, only simple variables.
Comments
The REM statement is used to indicate a comment, and occupies an entire statement. It has no effect on execution:
> 10 REM THIS IS A COMMENT
Stopping a program
The STOP statement may be used to cease program execution. The command END has the same effect.
> 10 PRINT "one"
> 20 STOP
> 30 PRINT "two"
> RUN
one
>
A program will automatically cease execution when it reaches the final statement, so a STOP may not be necessary. However
a STOP will be required if subroutines have been defined at the end of the program, otherwise execution will continue
through to those subroutines without a corresponding subroutine call. This will cause an error when the RETURN
statement is processed and the interpreter attempts to return control back to the caller.
Assignment
Assignment may be made to numeric simple variables (which can contain either integers or floating point numbers) and string simple variables
(string variables are distinguished by their dollar suffix). The interpreter will enforce this division between the two types:
> 10 LET I = 10
> 20 LET I$ = "Hello"
The LET keyword is also optional:
Array variables may also have values assigned to them. The indexes can be derived from numeric
expressions:
> 10 DIM NUMS(3, 3)
> 20 DIM STRS$(3, 3)
> 30 LET INDEX = 0
> 40 LET NUMS(INDEX, INDEX) = 55
> 50 LET STRS$(INDEX, INDEX) = "hello"
Attempts to assign the wrong type (number or string) to a numeric or string array, attempts to assign a value to an array by specifying the wrong number
of dimensions, and attempts to assign to an array using an out of range index, will all result in an error.
Printing to standard output
The PRINT statement is used to print to the screen (or to a file, see File I/O below):
> 10 PRINT 2 * 4
> RUN
8
> 10 PRINT "Hello"
> RUN
Hello
>
Multiple items may be printed by providing a semicolon separated list. The items in the list will be printed immediately after one
another, so spaces must be inserted if these are required:
> 10 PRINT 345; " hello "; 678
> RUN
345 hello 678
>
A blank line may be printed by using the PRINT statement without arguments:
> 10 PRINT "Here is a blank line:"
> 20 PRINT
> 30 PRINT "There it was"
> RUN
Here is a blank line:

There it was
>
A print statement terminated by a semicolon will not include a CR/LF.
Unconditional branching
Like it or loath it, the GOTO statement is an integral part of BASIC, and is used to transfer control to the statement with the specified line number:
> 10 PRINT "Hello"
> 20 GOTO 10
> RUN
Hello
Hello
Hello
...
Subroutine calls
The GOSUB statement is used to generate a subroutine call. Control is passed back to the program at the
next statement after the call by a RETURN statement at the end of the subroutine:
> 10 GOSUB 100
> 20 PRINT "This happens after the subroutine"
> 30 STOP
> 100 REM HERE IS THE SUBROUTINE
> 110 PRINT "This happens in the subroutine"
> 120 RETURN
> RUN
This happens in the subroutine
This happens after the subroutine
>
Note that without use of the STOP statement, execution will run past the last statement
of the main program (line 30) and will re-execute the subroutine again (at line 100).
Subroutines may be nested, that is, a subroutine call may be made within another subroutine.
A subroutine may also be called using the ON-GOSUB statement (see Conditional branching
below).
Loops
Bounded loops are achieved through the use of FOR-NEXT statements. The loop is controlled by a numeric
loop variable that is incremented or decremented from a start value to an end value. The loop terminates when
the loop variable reaches the end value. The loop variable must also be specified in the NEXT
statement at the end of the loop.
> 10 FOR I = 1 TO 3
> 20 PRINT "hello"
> 30 NEXT I
> RUN
hello
hello
hello
>
Loops may be nested within one another.
The STEP statement allows the loop variable to be incremented or decremented by
a specified amount. For example, to count down from 5 in steps of -1:
> 10 FOR I = 5 TO 1 STEP -1
> 20 PRINT I
> 30 NEXT I
> RUN
5
4
3
2
1
>
Note that the start value, end value and step value need not be integers, but can be floating
point numbers as well. If the loop variable was previously assigned in the program, its value will
be replaced by the start value, it will not be evaluated.
After the completion of the loop, the loop variable value will be the end value + step value (unless
the loop is exited using a GOTO statement).
Conditionals
Conditionals are implemented using the IF-THEN-ELSE statement. The expression is evaluated and the appropriate
statements executed depending upon the result of the evaluation. If a positive integer is supplied as
the THEN or the ELSE statement, a branch will be performed to the indicated line number.
Note that the ELSE clause is optional and may be omitted. In this case, the THEN branch is taken if the
expression evaluates to true, otherwise the next statement is executed.
Conditional branching example:
> 10 REM PRINT THE GREATEST NUMBER
> 20 LET I = 10
> 30 LET J = 20
> 40 IF I > J THEN 50 ELSE 70
> 50 PRINT I
> 60 GOTO 80
> 70 PRINT J
> 80 REM FINISHED
> RUN
20
>
The following code segment is equivalent to the segment above:
> 10 REM PRINT THE GREATEST NUMBER
> 20 LET I = 10
> 30 LET J = 20
> 40 IF I > J THEN PRINT I ELSE PRINT J
> 80 REM FINISHED
> RUN
20
>
A THEN or ELSE can be supplied multiple statements if they are separated by a colon «:«.
> 10 REM PRINT THE GREATEST NUMBER
> 20 LET I = 10
> 30 LET J = 20
> 40 IF I > J THEN LET L = I:PRINT I ELSE LET L = J:PRINT J
> 50 PRINT L
> 80 REM FINISHED
> RUN
20
20
>
Note that should an IF-THEN-ELSE stmt be used in a THEN code block or multiple IF-THEN-ELSE statements
are used in either a single THEN or ELSE code block, the block grouping is ambiguous and logical processing
may not function as expected. There is no ambiguity when single IF-THEN-ELSE statements are placed within ELSE
blocks.
Ambiguous:
> 100 IF I > J THEN IF J >= 100 THEN PRINT "I > 100" else PRINT "Not clear which **IF** this belongs to"
Not Ambiguous:
> 100 IF I < J THEN PRINT "I is less than J" ELSE IF J > 100 THEN PRINT "I > 100" ELSE PRINT "J <= 100"
Allowable relational operators are:
- ‘=’ (equal, note that in BASIC the same operator is used for assignment)
- ‘<‘ (less than)
- ‘>’ (greater than)
- ‘<=’ (less than or equal)
- ‘>=’ (greater than or equal)
- ‘<>’ / ‘!=’ (not equal)
The logical operators AND and OR are also provided to allow you to join two or more expressions. The NOT operator can also be given before an expression.
= and <> can also be considered logical operators. However, unlike AND or OR they can’t be used to join more than two expressions.
| Inputs | AND | OR | = | <> / != | |
|---|---|---|---|---|---|
| FALSE | FALSE | FALSE | FALSE | TRUE | FALSE |
| TRUE | FALSE | FALSE | TRUE | FALSE | TRUE |
| TRUE | TRUE | TRUE | TRUE | TRUE | FALSE |
| Input | NOT |
|---|---|
| TRUE | FALSE |
| FALSE | TRUE |
Example:
> 10 a = 10
> 20 b = 20
> 30 IF NOT a > b AND b = 20 OR a >= 5 THEN 60
> 40 PRINT "Test failed!"
> 50 STOP
> 60 PRINT "Test passed!"
> RUN
Test passed!
Expressions can be inside brackets to change the order of evaluation. Compare the output when line 30 is changed:
> 30 IF NOT a > b AND (b = 20 OR a >= 5) THEN 60
> RUN
Test failed!
ON GOTO, ON GOSUB
The ON GOTO|GOSUB expr line1,line2,… statement will call a subroutine or branch to a line number in the list of line numbers corresponding to the ordinal
value of the evaluated expr. The first line number corresponds with an expr value of 1. expr must evaluate to an integer value.
If expr evaluates to less than 1 or greater than the number of provided line numbers execution continues on the next
statement without making a subroutine call or branch:
> 20 LET J = 2
> 30 ON J GOSUB 100,200,300
> 40 STOP
> 100 REM THE 1ST SUBROUTINE
> 110 PRINT "J is ONE"
> 120 RETURN
> 200 REM THE 2ND SUBROUTINE
> 210 PRINT "J is TWO"
> 220 RETURN
> 300 REM THE 3RD SUBROUTINE
> 310 PRINT "J is THREE"
> 320 RETURN
> RUN
J is TWO
>
It is also possible to call a subroutine depending upon the result of a conditional expression using the IFF function (see Ternary Functions below). In
the example below, if the expression evaluates to true, IFF returns a 1 and the subroutine is called, otherwise IFF returns a 0 and execution
continues to the next statement without making the call:
> 10 LET I = 10
> 20 LET J = 5
> 30 ON IFF (I > J, 1, 0) GOSUB 100
> 40 STOP
> 100 REM THE SUBROUTINE
> 110 PRINT "I is greater than J"
> 120 RETURN
> RUN
I is greater than J
>
Ternary Functions
As an alternative to branching, Ternary functions are provided.
- IFF(x, y, z) — Evaluates x and returns y if true, otherwise returns z. y and z are expected to be numeric.
- IF$(x, y$, z$) — As above, but y$ and z$ are expected to be strings.
> 10 LET I = 10
> 20 LET J = 5
> 30 PRINT IF$(I > J, "I is greater than J", "I is not greater than J")
> 40 K = IFF(I > J, 20, 30)
> 50 PRINT K
> RUN
I is greater than J
20
User input
The INPUT statement is used to solicit input from the user (or read input from a file, see File I/O below):
> 10 INPUT A
> 20 PRINT A
> RUN
? 22
22
>
The default input prompt of ‘? ‘ may be changed by inserting a prompt string, which must be terminated
by a semicolon, thus:
> 10 INPUT "Input a number - "; A
> 20 PRINT A
> RUN
Input a number - 22
22
>
Multiple items may be input by supplying a comma separated list. Input variables will be assigned
to as many input values as supplied at run time. If there are more input values supplied than input
variables, excess commas will be left in place. Conversely, if not enough input values are
supplied, an error message will be printed and the user will be asked to re-input the values again.
Further, numeric input values must be valid numbers (integers or floating point).
> 10 INPUT "Num, Str, Num: ": A, B$, C
> 20 PRINT A, B$, C
> RUN
Num, Str, Num: 22, hello!, 33
22 hello!33
>
A mismatch between the input value and input variable type will trigger an error, and the user will be asked
to re-input the values again.
It is a limitation of this BASIC dialect that it is not possible to assign constants directly to array variables
within an INPUT statement, only simple variables.
File Input/Output
Data can be read from or written to files using the OPEN, FSEEK, INPUT, PRINT and CLOSE statements.
When a file is opened using the syntax OPEN «filename» FOR INPUT|OUTPUT|APPEND AS #filenum [ELSE linenum] a
file number (#filenum) is assigned to the file, which if specified as the first argument of an INPUT or PRINT
statement, will direct the input or output to the file.
If there is an error opening a file and the optional ELSE option has been specified, program control
will branch to the specified line number, if the ELSE has not been provided an error message will be displayed.
If a file is opened for OUTPUT which does not exist, the file will be created, if the file does exist, its contents will
be erased and any new PRINT output will replace it. If a file is opened for APPEND an error will occur if the file
doesn’t exist (or the ELSE branch will occur if specified). If the file does exist, any PRINT statements will add to the end
of the file.
If an input prompt is specified on an INPUT statement being used for file I/O (i.e. #filenum is specified) an error
will be displayed.
The FSEEK #filenum,filepos statement will position the file pointer for the next INPUT statement.
The CLOSE #filenum statement will close the file.
> 10 OPEN "FILE.TXT" FOR OUTPUT AS #1
> 20 PRINT #1,"0123456789Hello World!"
> 30 CLOSE #1
> 40 OPEN "FILE.TXT" FOR INPUT AS #2
> 50 FSEEK #2,10
> 60 INPUT #2,A$
> 70 PRINT A$
> RUN
Hello World!
>
Numeric functions
Selected numeric functions are provided, and may be used with any numeric expression. For example,
the square root function, SQR, can be applied expressions consisting of both literals and variables:
> 10 LET I = 6
> 20 PRINT SQR(I - 2)
> RUN
2.0
>
Allowable numeric functions are:
-
ABS(x) — Calculates the absolute value of x
-
ATN(x) — Calculates the arctangent of x
-
COS(x) — Calculates the cosine of x, where x is an angle in radians
-
EXP(x) — Calculates the exponential of x, e^x where e=2.718281828
-
INT(x) — Rounds down numbers to the lowest whole integer less than or equal to x
-
LOG(x) — Calculates the natural logarithm of x
-
MAX(x, y[, z]…) — Returns the highest value from a list of expressions
-
MIN(x, y[, z]…) — Returns the lowest value from a list of expressions
> 10 PRINT MAX(-2, 0, 1.5, 4)
> 20 PRINT MIN(-2, 0, 1.5, 4)
> RUN
> 4
> -2
-
PI — Returns the value of pi.
-
POW(x, y) — Calculates x to the power y
-
RND(mode) — Psuedorandom number generator. The behavior is different depending on the value passed. If the value is positive, the result will be a new random value between 0 and 1 (including 0 but not 1). If the value is negative, it will be rounded down to the nearest integer and used to reseed the random number generator. Pseudorandom sequences can be repeated by reseeding with the same number.Generates a pseudo random number N, where 0 <= N < 1. Can be
reset using the RANDOMIZE instruction with an optional seed value: e.g.
> 10 RANDOMIZE 100
> 20 PRINT RND(1)
> RUN
0.1456692551041303
>
Random integers can be generated by combining RND and INT: e.g.
> 10 PRINT INT(RND(1) * 6) + 1
> RUN
3
> RUN
6
>
Seeds may not produce the same result on another platform.
-
RNDINT(lo, hi) — Generates a pseudo random integer N, where lo <= N <= hi. Uses the same seed as above.
-
ROUND(x) — Rounds number to the nearest integer.
-
SIN(x) — Calculates the sine of x, where x is an angle in radians
-
SQR(x) — Calculates the square root of x
-
TAN(x) — Calculates the tangent of x, where x is an angle in radians
String functions
Some functions are provided to help you manipulate strings. Functions that return a string
have a ‘$’ suffix like string variables.
NOTE For compatibility with older basic dialetcs, all string indexes are 1 based.
The functions are:
-
ASC(x$) — Returns the character code for x$. x$ is expected to be a single character.
Note that despite the name, this function can return codes outside the ASCII range. -
CHR$(x) — Returns the character specified by character code x.
-
INSTR(x$, y$[, start[, end]]) — Returns position of y$ inside x$, optionally start searching
at position start and end at end. Returns 0 if no match found. -
LEN(x$) — Returns the length of x$.
-
LOWER$(x$) — Returns a lower-case version of x$.
-
MID$(x$, y[, z]) — Returns part of x$ starting at position y. If z is provided, that number of characters is returned, if omitted the entire rest of the string is returned
-
LEFT$(x$, y) — Returns the left most y characters from string x$. If y * exceeds the length of x$, the entire string will be returned.
-
RIGHT$(x$, y) — Returns the right most y characters from string x$. If y * exceeds the length of x$, the entire string will be returned.
-
STR$(x) — Returns a string representation of numeric value x.
-
UPPER$(x$) — Returns an upper-case version of x$
-
VAL(x$) — Attempts to convert x$ to a numeric value. If x$ is not numeric, returns 0.
-
TAB(x) — When included in a PRINT statement print-list, specifies the position x on the line where the next text will be printed. If the specified position x is less than the current print position a newline is printed and the print location is set to the specified column. If the TAB function is used anywhere other than on a PRINT statement, it will return a string containing x spaces with no CR/LF
Examples for ASC, CHR$ and STR$
> 10 I = 65
> 20 J$ = CHR$(I) + " - " + STR$(I)
> 30 PRINT J$
> 40 PRINT ASC("Z")
RUN
A - 65
90
Strings may also be concatenated using the ‘+’ operator:
> 10 PRINT "Hello" + " there"
> RUN
Hello there
Strings may be repeated using the ‘*’ operator:
> 10 PRINT "Hello " * 5
> RUN
Hello Hello Hello Hello Hello
Example programs
A number of example BASIC programs have been supplied in the repository, in the examples directory:
-
regression.bas — A program to exercise the key programming language constructs
in such a way as to allow verification that the interpreter is functioning correctly. -
factorial.bas — A simple BASIC program to take a number, N, as input from the user and
calculate the corresponding factorial N!. -
rock_scissors_paper.bas — A BASIC implementation of the rock-paper-scissors game.
-
PyBStartrek.bas — A port of the 1971 Star Trek text based strategy game.
-
adventure-fast.bas — A port of a 1979 text based Microsoft Adventure game.
-
bagels.bas — A guessing game, which made its first appearance in the book ‘BASIC Computer Games’ in 1978.
-
eliza.bas — A port of the early chatbot, posing as a therapist, originally created by Joseph Weizenbaum in 1964. This BASIC version can trace its lineage back to an implementation originally developed by Jeff Shrager in 1973.
-
oregon.bas — A port (of a port by the looks of it) of The Oregon Trail. This is a text based adventure game, originally developed by Don Rawitsch, Bill Heinemann, and Paul Dillenberger in 1971. This could still be a bit buggy, the listing I found wasn’t the greatest.
-
life.bas — An implementation of Conway’s Game of Life. This version is a port of the BASIC program which appeared in ‘BASIC Computer Games’ in 1978.
Informal grammar definition
ABS(numerical-expression) — Calculates the absolute value of the result of numerical-expression
ASC(string-expression) — Returns the character code of the result of string-expression.
ATN(numerical-expression) — Calculates the arctangent value of the result of numerical-expression
CHR$(numerical-expression) — Returns the character specified by character code of the result of numerical-expression.
CLOSE #filenum — Closes an open file
COS(numerical-expression) — Calculates the cosine value of the result of numerical-expression
DATA(expression-list) — Defines a list of string or numerical values
DIM array-variable(dimensions) — Defines a new array variable
EXIT — Exits the interpreter
EXP(numerical-expression) — Calculates the exponential value of the result of numerical-expression
FOR loop-variable = start-value TO end-value [STEP increment] — Bounded loop
FSEEK #filenum,filepos — Positions the file input pointer to the specified location within the open file, the next INPUT #filenum
will read starting at file position filepos
GOSUB line-number — Subroutine call
GOTO line-number — Unconditional branch
IF expression THEN line-number|basic-statement(s) [ELSE line-number|basic-statement(s)] — Conditional
IFF(expression, numeric-expression, numeric-expression) — Evaluates expression and returns the value of the result of the first numeric-expression if true, or the second if false.
IF$(expression, string-expression, string-expression) — Evaluates expression and returns the value of the result of the first string-expression if true, or the second if false.
INPUT [#filenum,|input-prompt;] simple-variable-list — Processes user or file input presented as a comma separated list
INSTR(hackstack-string-expression, needle-string-expression[, start-numeric-expression[, end-numeric-expression]]) — Returns position of first needle-string-expression inside first hackstack-string-expression, optionally start searching at position given by start-numeric-expression and optionally ending at position given by end-numeric-expression. Returns -1 if no match found.
LEFT$(string-expression, char-count) — Takes the result of string-expression and returns the left-most char-count characters. If char-count exceeds string length the entire string is returned.
LEN(string-expression) — Returns the length of the result of string-expression
[LET] variable = numeric-expression | string-expression — Assigns a value to a simple variable or array variable
LIST — Lists the program
LOAD filename — Loads a program from disk
LOWER$(string-expression) — Returns a lower-case version of the result of string-expression.
LOG(numerical-expression) — Calculates the natural logarithm value of the result of numerical-expression
NEW — Clears the program from memory
NEXT loop-variable — See FOR statement
MAX(expression-list) — Returns the highest value in expression-list
MID$(string-expression, start-position[, end-position]) — Takes the result of string-expression and returns part of it, starting at position start-position, and ending at end-position. end-position can
be omitted to get the rest of the string. If start-position or end-position are negative, the position is counted backwards from the end of the string.
MIN(expression-list) — Returns the lowest value in expression-list
ON expression GOSUB|GOTO line-number1,line-number2,… — Conditional subroutine call|branch — Program flow will be transferred either through a GOSUB subroutine call or a GOTO branch to the line number in the list of line numbers corresponding to the ordinal value of the evaluated expr. The first line number corresponds with an expr value of 1. expr must evaluate to an integer value.
OPEN «filename» FOR INPUT|OUTPUT|APPEND AS #filenum [ELSE linenum] — Opens the specified file. Program control is transferred to linenum if an error occurs otherwise continues
on the next line.
PI — Returns the value of pi
POW(base, exponent) — Calculates the result of raising the base to the power of the exponent
PRINT [#filenum,]print-list — Prints a semicolon separated list of literals or variables to the screen or to a file. Included CR/LF by default, but this can be suppressed by ending the statement with a semicolon.
RANDOMIZE [numeric-expression] — Resets random number generator to an unpredictable sequence. With
optional seed (numeric expression), the sequence is predictable.
READ simple-variable-list — Reads a set of constants into the list of variables.
REM comment — Internal program documentation
RETURN — Return from a subroutine
RESTORE line-number — sets the line number that the next READ will start loading constants from. line-number must refer to a DATA statement
RIGHT$(string-expression, char-count) — Takes the result of string-expression and returns the right-most char-count characters. If char-count exceeds string length, the entire string is returned.
RND(mode) — For mode values >= 0 generates a pseudo random number N, where 0 <= N < 1. For values < 0 reseeds the PRNG
RNDINT(lo-numerical-expression, hi-numerical-expression) — Generates a pseudo random integer N, where lo-numerical-expression <= N <= hi-numerical-expression
ROUND(numerical-expression) — Rounds numerical-expression to the nearest integer
RUN — Runs the program
SAVE filename — Saves a program to disk
SIN(numerical-expression) — Calculates the sine value of the result of numerical-expression
SQR(numerical-expression) — Calculates the square root of the expression
STOP — Terminates a program
STR$(numerical-expression) — Returns a string representation of the result of numerical-expression
TAN(numerical-expression) — Calculates the tangent value of the result of numerical-expression
UPPER$(string-expression) — Returns an upper-case version of the result of string-expression
VAL(string-expression) — Attempts to convert the result of string-expression to a numeric value. If it is not numeric, returns 0.
Architecture
The interpreter is implemented using the following Python classes:
-
basictoken.py — This implements the tokens that are produced by the lexical analyser. The class mostly defines token categories
and provides a simple token pretty printing method. -
lexer.py — This class implements the lexical analyser. Lexical analysis is performed on one statement at a time, as each statement is
entered into the interpreter. -
basicparser.py — This class implements a parser for individual BASIC statements. This is somewhat inefficient in that statements,
for example those in a loop, must be re-parsed every time they are executed. However, such a model allows us to develop an
interactive interpreter where statements can be gradually added to the program between runs.
Since the parser is oriented to the processing of individual statements, it uses a
signalling mechanism (using FlowSignal objects) to its caller indicate when program level actions are required, such as recording the return address
following a subroutine jump. However, the parser does maintain a symbol table (implemented as a dictionary) in order to record
the value of variables as they are assigned. -
program.py — This class implements an actual basic program, which is represented as a dictionary. Dictionary keys are
statement line numbers and the corresponding value is the list of tokens that make up the statement with that line number.
Statements are executed by calling the parser to parse one statement at a time. This class
maintains a program counter, an indication of which line number should be executed next. The program counter is incremented to the next line
number in sequence, unless executed a statement has resulted in a branch. The parser indicates this by signalling to the program object that
calls it using a FlowSignal object. -
interpreter.py — This class provides the interface to the user. It allows the user to both input program statements and to execute
the resulting program. It also allows the user to run commands, for example to save and load programs, or to list them. -
flowsignal.py — Implements a FlowSignal object that allows the parser to signal a change in control flow. For example, as
the result of a jump defined in the statement just parsed (GOTO, conditional branch evaluation), a loop decision,
a subroutine call, or program termination. This paradigm of using the parser to simply parse individual statements, the Program
object to make control flow decisions and to track execution, and a signalling mechanism to allow the parser to signal
control flow changes to the Program object, is used consistently throughout the implementation.
Open issues
- It is not possible to renumber a program. This would require considerable extra functionality.
- Negative values are printed with a space (e.g. ‘- 5’) in program listings because of tokenization. This does not affect functionality.
- Decimal values less than one must be expressed with a leading zero (i.e. 0.34 rather than .34)
- User input values cannot be directly assigned to array variables in an INPUT or READ statement
- Strings representing numbers (e.g. «10») can actually be assigned to numeric variables in INPUT and READ statements without an
error, Python will silently convert them to integers.
License
PyBasic is made available under the GNU General Public License, version 3.0 or later (GPL-3.0-or-later).
Из песочницы, Компиляторы, Python
Рекомендация: подборка платных и бесплатных курсов Python — https://katalog-kursov.ru/

Пишем свой «Язык программирования» на Python3
1. Лексер
В этой статье мы сделаем, так сказать python2, создание переменных, вывод их в консоль
Если вам зайдёт, то сделаю 2 часть поста 

Для начала, определимся с названием языка — к примеру «xnn»
Теперь создадим файл xnn.py и запишем туда основной код:
import sys #Импортируем библиотеку sys
import os #Импортируем библиотеку os

dir = os.path.abspath(os.curdir) #Узнаём откуда запущен компилятор
p = str(dir) + '\' + str(sys.argv[1]) #sys.argv[1] - определяем 1 аргумент
print(p) # Выводим ддиректорию + файл
modules = ['if', 'else', 'while', 'for', '=', '==', '{', '}', '[', ']', '(', ')', '//'] #Создаём все зарезервированные слова
var = [] #Создаём список для лексера
vars_ = {} #Создаём список для переменных

with open(p, 'r', encoding="UTF-8") as f: #Отрываем файл из аргумента
        for ex in f.read().split(): #Распределяем все слова
            var.append(ex) #Записываем все слова в список var
    print(var) # $ Выводим список $
Что мы делаем:
- Импортируем библиотеки os и sys
- С помощью os определяем откуда запущен компилятор, (в будущем раскажу зачем)
- Создаём путь к файлу + берём сам файл из аргумента — получаем его через sys.argv
- Дальше выводим сам путь, с файлом (в будущем это надо будет удалить)
- Создаём все зарезервированные слова — пока, нам это не надо, но в будещем понядобиться дял вывода ошибок
- Создаём списки для лексера и переменных
- Создаём сам лексер, для этого открываем файл, в режиме чтения, обязательно в
encoding=«UTF-8»
если этого не сделать, то вместо русских букв, будут иероглифы!
- С помощью for ex in read().split() распределяем весь текст на слова и помещаем каждое слово отдельно в ex
- Дальше записываем каждое слово в список var
- И выведим сам список — в будущем нужно будет удалить вывод :/
Создание файла .xnn
Теперь создадим сам файл который будем парсить, а также изменим способ открытия

Откроем его и запишем туда:
pr = Привет
rprint pr
2. Создание Компилятора
Теперь создадим компилятор!
Для этого дополним наш файл кодом, чтобы получилось вот так:
import sys #Импортируем библиотеку sys
import os #Импортируем библиотеку os

dir = os.path.abspath(os.curdir) #Узнаём откуда запущен компилятор
p = str(dir) + '\' + str(sys.argv[1]) #sys.argv[1] - определяем 1 аргумент
print(p) # Выводим ддиректорию + файл
modules = ['if', 'else', 'while', 'for', '=', '==', '{', '}', '[', ']', '(', ')', '//'] #Создаём все зарезервированные слова
var = [] #Создаём список для лексера
vars_ = {} #Создаём список для переменных
try:
    with open(p, 'r', encoding="UTF-8") as f: #Отрываем файл из аргумента
        for ex in f.read().split(): #Распределяем все слова
            var.append(ex) #Записываем все слова в список var
    print(var) # $ Выводим список $
    a = -1 #Устанавливаем значение на каком сейчас var
    for i in var: #Перебираем все значения
        a = a + 1 #Добавляем что это значение просмотренно
        if i == '=': #Если находим совпадение с "="
            vars_[var[a-1]] = var[a+1] #в список vars_ добавляем занчение до и после "="
        if i == 'rprint':
            let = var[a+1]
            for key, value in vars_.items():
                if key == let:
                    print(value)
except FileNotFoundError:
    print('Error! Файл не найден!')
Что мы делаем?
Мы перебираем все значения в var и при нахождении того или инного зарезервировонного слова, делаем определённые действия
Присваивание переменных
При совпадении i с «=» добавляем в список
vars_
значение, до «=» как key, а после «=», как value — таким образом образуя переменную
Вывод переменных
При совпадении i с «rprint» ищем в списке
vars_
совпадение для этой переменной, которое получаем через нашего друга, списка
var
После нахождение выводим значение переменной
Работа в действии
Для того чтобы скомпилировать файл, вводим данные команды в cmd:
cd path/to/files
python xnn.py prog.xnn
На выход получаем:
C:UsersHoopengoDesktopxnnprog.xnn
['pr', '=', 'Привет', 'rprint', 'pr']
Привет
3. Компиляция в .exe
Создадим копию папки с файлами и отредактируем файл xnn.py
import sys #Импортируем библиотеку sys
import os #Импортируем библиотеку os

dir = os.path.abspath(os.curdir) #Узнаём откуда запущен компилятор
p = str(dir) + '\' + str(sys.argv[1]) #sys.argv[1] - определяем 1 аргумент
modules = ['if', 'else', 'while', 'for', '=', '==', '{', '}', '[', ']', '(', ')', '//'] #Создаём все зарезервированные слова
var = [] #Создаём список для лексера
vars_ = {} #Создаём список для переменных
try:
    with open(p, 'r', encoding="UTF-8") as f: #Отрываем файл из аргумента
        for ex in f.read().split(): #Распределяем все слова
            var.append(ex) #Записываем все слова в список var
    a = -1 #Устанавливаем значение на каком сейчас var
    for i in var: #Перебираем все значения
        a = a + 1 #Добавляем что это значение просмотренно
        if i == '=': #Если находим совпадение с "="
            vars_[var[a-1]] = var[a+1] #в список vars_ добавляем занчение до и после "="
        if i == 'rprint':
            let = var[a+1]
            for key, value in vars_.items():
                if key == let:
                    print(value)
except FileNotFoundError:
    print('Error! Файл не найден!')
Установим auto-py-to-exe
Полная информация по установке есть по этой ссылке
Введём в консоль:
auto-py-to-exe
pip install auto-py-to-exe
auto-py-to-exe
Запустится браузер. Выбираем там путь к файлу и One File
Мои Предустоновка

4. Создание установщика
В копированной папке создадим файл bat.py:
import os

with open('path\xnn.exe', 'r', encoding='UTF-8') as f:
	lean = f.read()

	directory_folder = r"C:\Windows\System32\xnn.exe"
	folder_path = os.path.dirname(directory_folder) # Путь к папке с файлом

	if not os.path.exists(folder_path): #Если пути не существует создаем его
	    os.makedirs(folder_path)

	with open(directory_folder, 'w', encoding='UTF-8') as file: # Открываем фаил и пишем
	    file.write(lean)
После этого компилируем его в .exe и бросаем в туже директорию, должно получится так:

5. Установка
Теперь установим
Для этого отроем файл bat.exe, после чего произведотся установка
Перезапустим консоль и введём:
cd path/to/file
xnn prog.xnn
И получим:
Привет
Если пишет что «xnn не является внутренней командой», то самостоятельно добавьте файл xnn.exe в папку «C:WindowsSystem32».
Предлагаем вашему вниманию серию статей, опубликованную в блоге Руслана Спивака. В ней автор подробно описывает процесс разработки базового интерпретатора. Серия пополняется, и в этой подборке вы найдете первые части руководства.
Примеры кода приведены на Python, однако подробные пояснения позволят читателю использовать для реализации любой другой удобный язык. В качестве интерпретируемого языка выбран Pascal, однако и здесь вы не будете ограничены — можно обратиться к любому другому языку, с семантикой которого вы хорошо знакомы.
Если вы не знаете, как работает компилятор, то вы не знаете, как работает компьютер. И если вы не уверены на 100%, что знаете, как работает компилятор, то вы не знаете, как он работает. — Стив Йиг
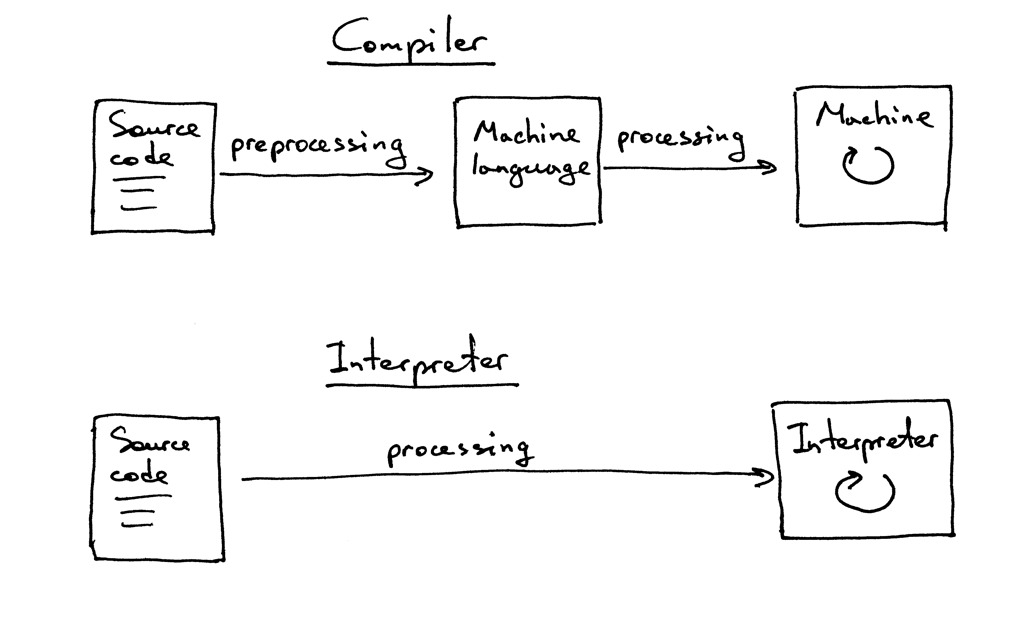
Небольшой ликбез перед прочтением. Компилятор — программа, которая переводит (транслирует) исходный код на языке программирования (высокого уровня) на язык, «более понятный компьютеру» (низкоуровневый). При этом программа сначала полностью транслируется, а затем выполняется. Интерпретатор — такой же транслятор, но выполняющий инструкции «на лету» (пооператорно, построчно), то есть без предварительной компиляции всего кода.
Различие между компилятором и интерпретатором
Почему вам нужно создать свой интерпретатор:
- Написать компилятор — значит задействовать и/или развить сразу несколько различных технических навыков. Причем навыков, которые окажутся полезными в программировании вообще, а не только при написании трансляторов.
- Вы станете чуть ближе к разгадке тайны, как же все-таки работают компьютеры. Компиляторы и интепретаторы — это магия. И нужно чувствовать себя комфортно при работе с этой магией.
- Вы сможете создать собственный язык программирования, восполняющий видимые вам недостатки существующих. А это, во-первых, сейчас модно, а во-вторых, при достаточном везении вы обретете мировую известность.
- Да ну и чем вам еще сейчас можно заняться? (Кстати, мы уже предлагали вам несколько вариантов на зимние каникулы и лето.)
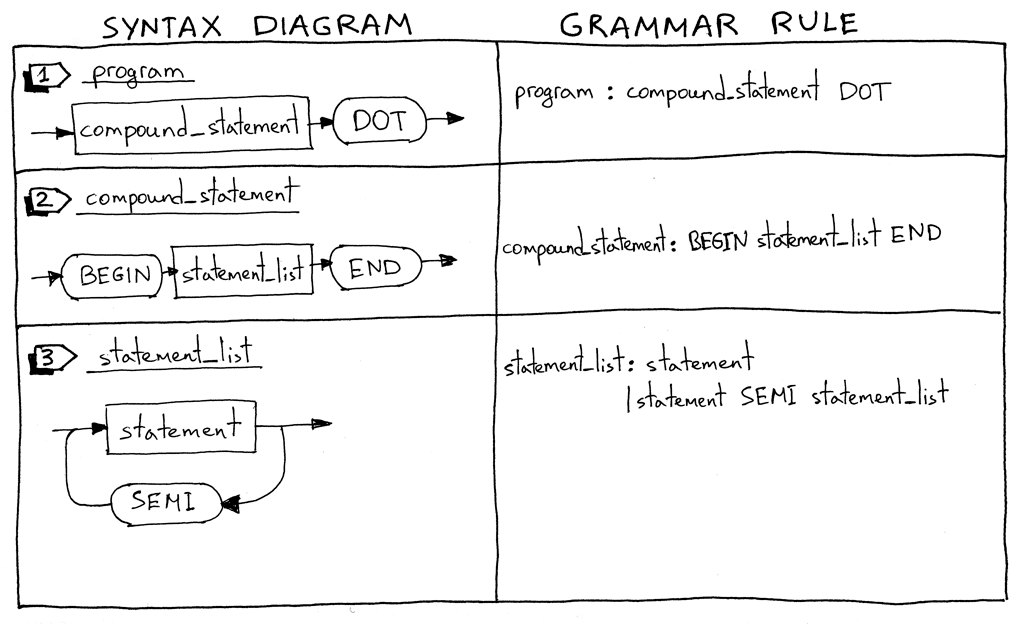
Что приятно, статьи подробно иллюстрируются. Создается впечатление, что автор перед вами ведет настоящую лекцию. Вот, например, одна из синтаксических диаграмм:
В конце каждой части руководства дается несколько задач для самостоятельной реализации и список полезных книг для более полного изучения вопроса. Итак, теперь приступайте к чтению:
Часть 1. Основные понятия, разбиение на токены и сложение однозначных чисел.
Часть 2. Обработка пробельных символов, многозначные числа.
Часть 3. Синтаксические диаграммы, одиночные умножение и деление.
Часть 4. Множественные умножения и деления, форма Бэкуса-Наура.
Часть 5. Калькулятор с произвольным числом операций, ассоциативность и порядок выполнения операторов.
Часть 6. Заканчиваем калькулятор: произвольный уровень вложенности.
Часть 7. Базовые используемые структуры данных. Также рекомендуем эту серию статей.
Часть 8. Унарные операторы.
Часть 9. Объявление программы, составные операторы, присваивание, таблицы символов и обработка переменных.
Часть 10. Продолжение предыдущей части руководства. Обработка комментариев.
Серия продолжит пополняться, а пока можете обратиться к одному из пособий, которые рекомендует автор в конце каждой части.
Оригинал: A Python Interpreter Written in Python
Автор: Allison Kaptur
Дата публикации: July 12, 2016
Перевод: Н.Ромоданов
Дата перевода: февраль 2017 г.
Creative Commons
Перевод был сделан в соответствие с лицензией Creative Commons. С русским вариантом
лицензии можно ознакомиться здесь.
Эллисон – инженер в компании Dropbox, где она помогает поддерживать одну из крупнейших в мире сетей с клиентскими программами, написанными на языке Python. Перед тем, как оказаться в Dropbox, она была посредником в Recurse Center, центре переобучения в Нью-Йорке. На конференциях PyCon North America она рассказывает о внутреннем устройстве интерпретатора языка Python и ей нравятся всякие странные ошибки. Ее блоги размещены на akaptur.com.
Введение
Byterun является интерпретатором языка Python, реализованным на языке Python. Хотя я участвовала в разработке ByteRun, я была удивлена и обрадована, когда обнаружила, что основная структура интерпретатора языка Python достаточно просто соответствует ограничению в 500 строк. В этой главе мы рассмотрим эту структуру интерпретатора и расскажем о ней достаточно подробно с тем, чтобы вы могли изучать ее дальше. Цель главы не в том, чтобы объяснить все, что известно об интерпретаторах – подобно многим другим интересным темам в программировании и информатике, для глубокого понимания этой темы могут потребоваться годы обучения.
Интерпретатор Byterun был написан Недом Батчелдером (Ned Batchelder) и мной на основе работы Пола Шварца (Paul Swartz). Структура этого интерпретатора похожа на структуру первой реализации языка Python — CPython, поэтому понимание интерпретатора Byterun поможет вам разобраться с интерпретаторами в целом и с интерпретатором CPython в частности. Если вы не знаете, каким интерпретатором языка Python вы пользуетесь, то это, вероятно, интерпретатор CPython. Несмотря на свои небольшие размеры, интерпретатор Byterun может запускать самые простые программы на языке Python [1].
Интерпретатор языка Python
Прежде чем мы начнем, давайте сузим понятие того, что мы будем подразумевать под понятием «интерпретатором языка Python». Понятие «интерпретатор» при обсуждении языка Python может использоваться в различных смыслах. Иногда понятие интерпретатор относится к Python REPL, интерактивной командной строке и приглашению, которое вы получите, когда в командной строке наберете команду python. Иногда, когда говорят о выполнении кода на языке Python от самого начала до конца, понятие «интерпретатор языка Python» будет более или менее взаимозаменяемо с понятием «язык Python». В этой главе, понятие «интерпретатор» имеет более узкое значение: это последний шаг в процессе выполнения программы на языке Python.
Перед тем как интерпретатор примет на себя эстафету, необходимо выполнить три других действия: лексический анализ, синтаксический анализ и компиляция. Вместе эти шаги преобразуют исходный код, написанный программистом, из текстовых строк в структурированные объекты кода, содержащий инструкции, которые может понять интерпретатор. Работа интерпретатора заключается в том, что он должен брать эти объекты кода и следовать указанным в них инструкциям.
Вы удивитесь, узнав, что компиляция вообще является одним из шагов в выполнении кода на языке Python. Язык Python часто называют «интерпретируемым» языком точно таким, как язык Ruby или язык Perl, в отличие от таких «компилируемых» языков, как C или Rust. Тем не менее, эта терминология не столь точна, как это может показаться. В наиболее известных интерпретируемых языках, в том числе и в языке Python, действительно, есть стадия компиляции. Причина того, что язык Python называется «интерпретируемым», в том, что на шаге компиляции делается меньше работы (а интерпретатор выполняет больше работы), чем в компилируемом языке. Далее в этой главе будет рассказано о том, компилятор языка Python имеет гораздо меньше информации о поведении программы, чем компилятор языка С.
Интерпретатор языка Python, написанный на языке Python
Byterun является интерпретатором языка Python, который написан на самом языке Python. Это может показаться странным, но это не более странно, чем писать компилятор языка С на языке С. На самом деле широко используемый компилятор gcc для языка С написан на самом языке C. Вы можете написать интерпретатор языка Python практически на любом языке программирования.
Написание интерпретатора языка Python на самом языке Python обладает как преимуществами, так и недостатками. Самым большим недостатком будет скорость выполнения программы: выполнение кода с помощью интерпретатора Byterun происходит гораздо медленнее, чем его выполнение с помощью интерпретатора CPython, который написан на языке C и тщательно оптимизирован. Но интерпретатор Byterun был разработан первоначально как учебное упражнение, так что для нас скорость не так важна. Самым большим преимуществом использования языка Python является то, что гораздо проще реализовывать лишь интерпретатор, а не весь остальной контекст времени выполнения, в частности, реализовывать систему объектов. Например, в случае, когда необходимо создать класс, интерпретатор Byterun может воспользоваться «реальным» языком Python. Еще одним преимуществом является то, что интерпретатор Byterun понять проще, отчасти потому, что он написан на языке высокого уровня (Python!), который, как многие считают, читается легче. Мы также убрали из интерпретатора Byterun всю оптимизацию периода интерпретации, отдав предпочтение ясности и простоты над скоростью.
Перейти к следующей части статьи.
Если вам понравилась статья, поделитесь ею с друзьями:
Сегодня мы напишем интерпретатор ещё одного эзотерического языка программирования, под названием hq9+.
До этого я уже писал интерпретатор brainfuck, поэтому эзотерические языки уже не так нам страшны.
Итак, что же из себя представляет язык hq9+ ?
Это всего лишь 4 команды:
- H — выводит «Hello, world!».
- Q — выводит текст исполняемой программы.
- 9 — выводит текст песни «99 Bottles of Beer».
- + — увеличивает никому не нужный счётчик.
Зная это, мы можем написать свой интерпретатор hq9+.
Ввод мы будем осуществлять из файла, вывод на консоль. Для простоты, любые другие символы мы будем просто игнорировать.
f = open(input('Enter file name: '))
s = f.read()
f.close()
И, собственно, сам интерпретатор:
template = '''{} bottles of beer on the wall.
Take one down and pass it around, {} bottles of beer on the wall.'''
count = 0  # Никому не нужный счётчик

for i in s.upper():  # Игнорируем регистр
    if i == 'H':
        print('Hello, world!')  # Выводим 'Hello, world!'
    elif i == 'Q':
        print(s)  # Выводим саму программу
    elif i == '9':
        for i in range(99, 1, -1):
            print(template.format(i, i-1))  # Выводим текст песни
        print('1 bottle of beer on the wall.nTake one down and pass it around, no more bottles of beer on the wall.')
        print('No more bottles of beer on the wall.nGo to the store and buy some more, 99 bottles of beer on the wall.')
    elif i == '+':
        count += 1
Самое «сложное» здесь — вывод текста песни «99 Bottles of Beer». Можно было запихнуть весь текст, но тогда файл получился бы довольно объёмный. Поэтому вместо этого я использую форматирование строк, и вывожу песню с помощью цикла.
У меня на этом всё, и в конце — онлайн-интерпретатор hq9+.
Введите программу на hq9+
Для вставки кода на Python в комментарий заключайте его в теги <pre><code class=»python3″>Ваш код</code></pre>