Время на прочтение
2 мин
Количество просмотров 37K
Народ, это моя первая статья, так что задолбите меня критикой, дабы повысить качество следующих статей.


Вступление
Ну, начнем как и везде с определений, берите тетрадь и ручку сейчас начнется нудятина. Чтобы мы cмогли написать свой сервер, нужно для начала понимать как он вообще работает, ловите определение:
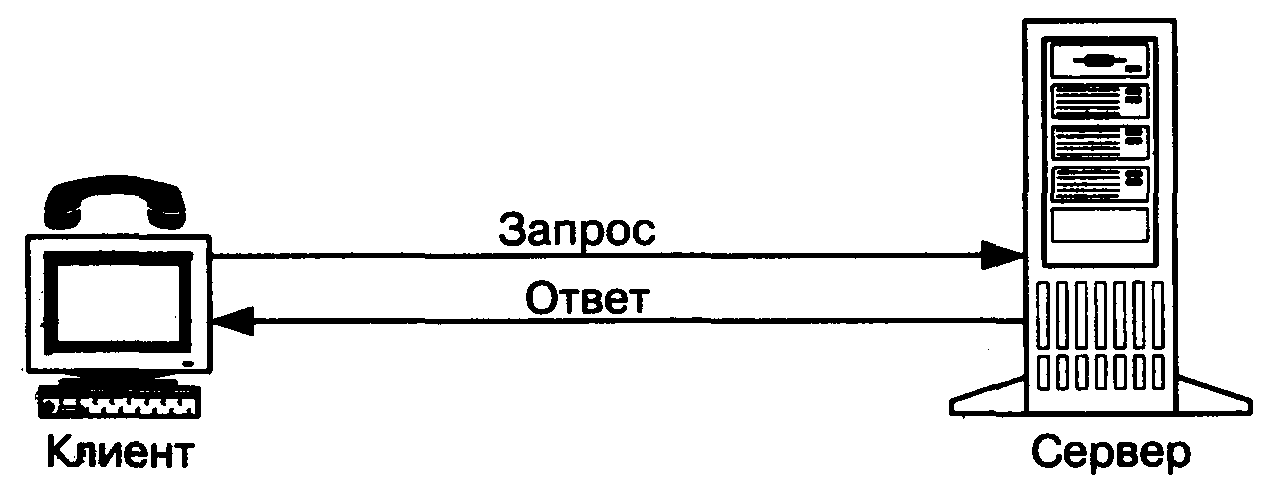
Сервер – это программное обеспечение, которое ожидает запросов клиентов и обслуживает или обрабатывает их соответственно.
Если объяснять это своими словами, представьте фургон с хот-догами(сервер), проголодавшись, вы(клиент) подходите и говорите повару, что вы хотите заказать(запрос), после чего повар обрабатывает, что вы ему сказали и начинает готовить, в конечном итоге вы получаете свой хот-дог(результат) и сытый радуетесь жизни. Для наглядности посмотри схему.
Околопрактика
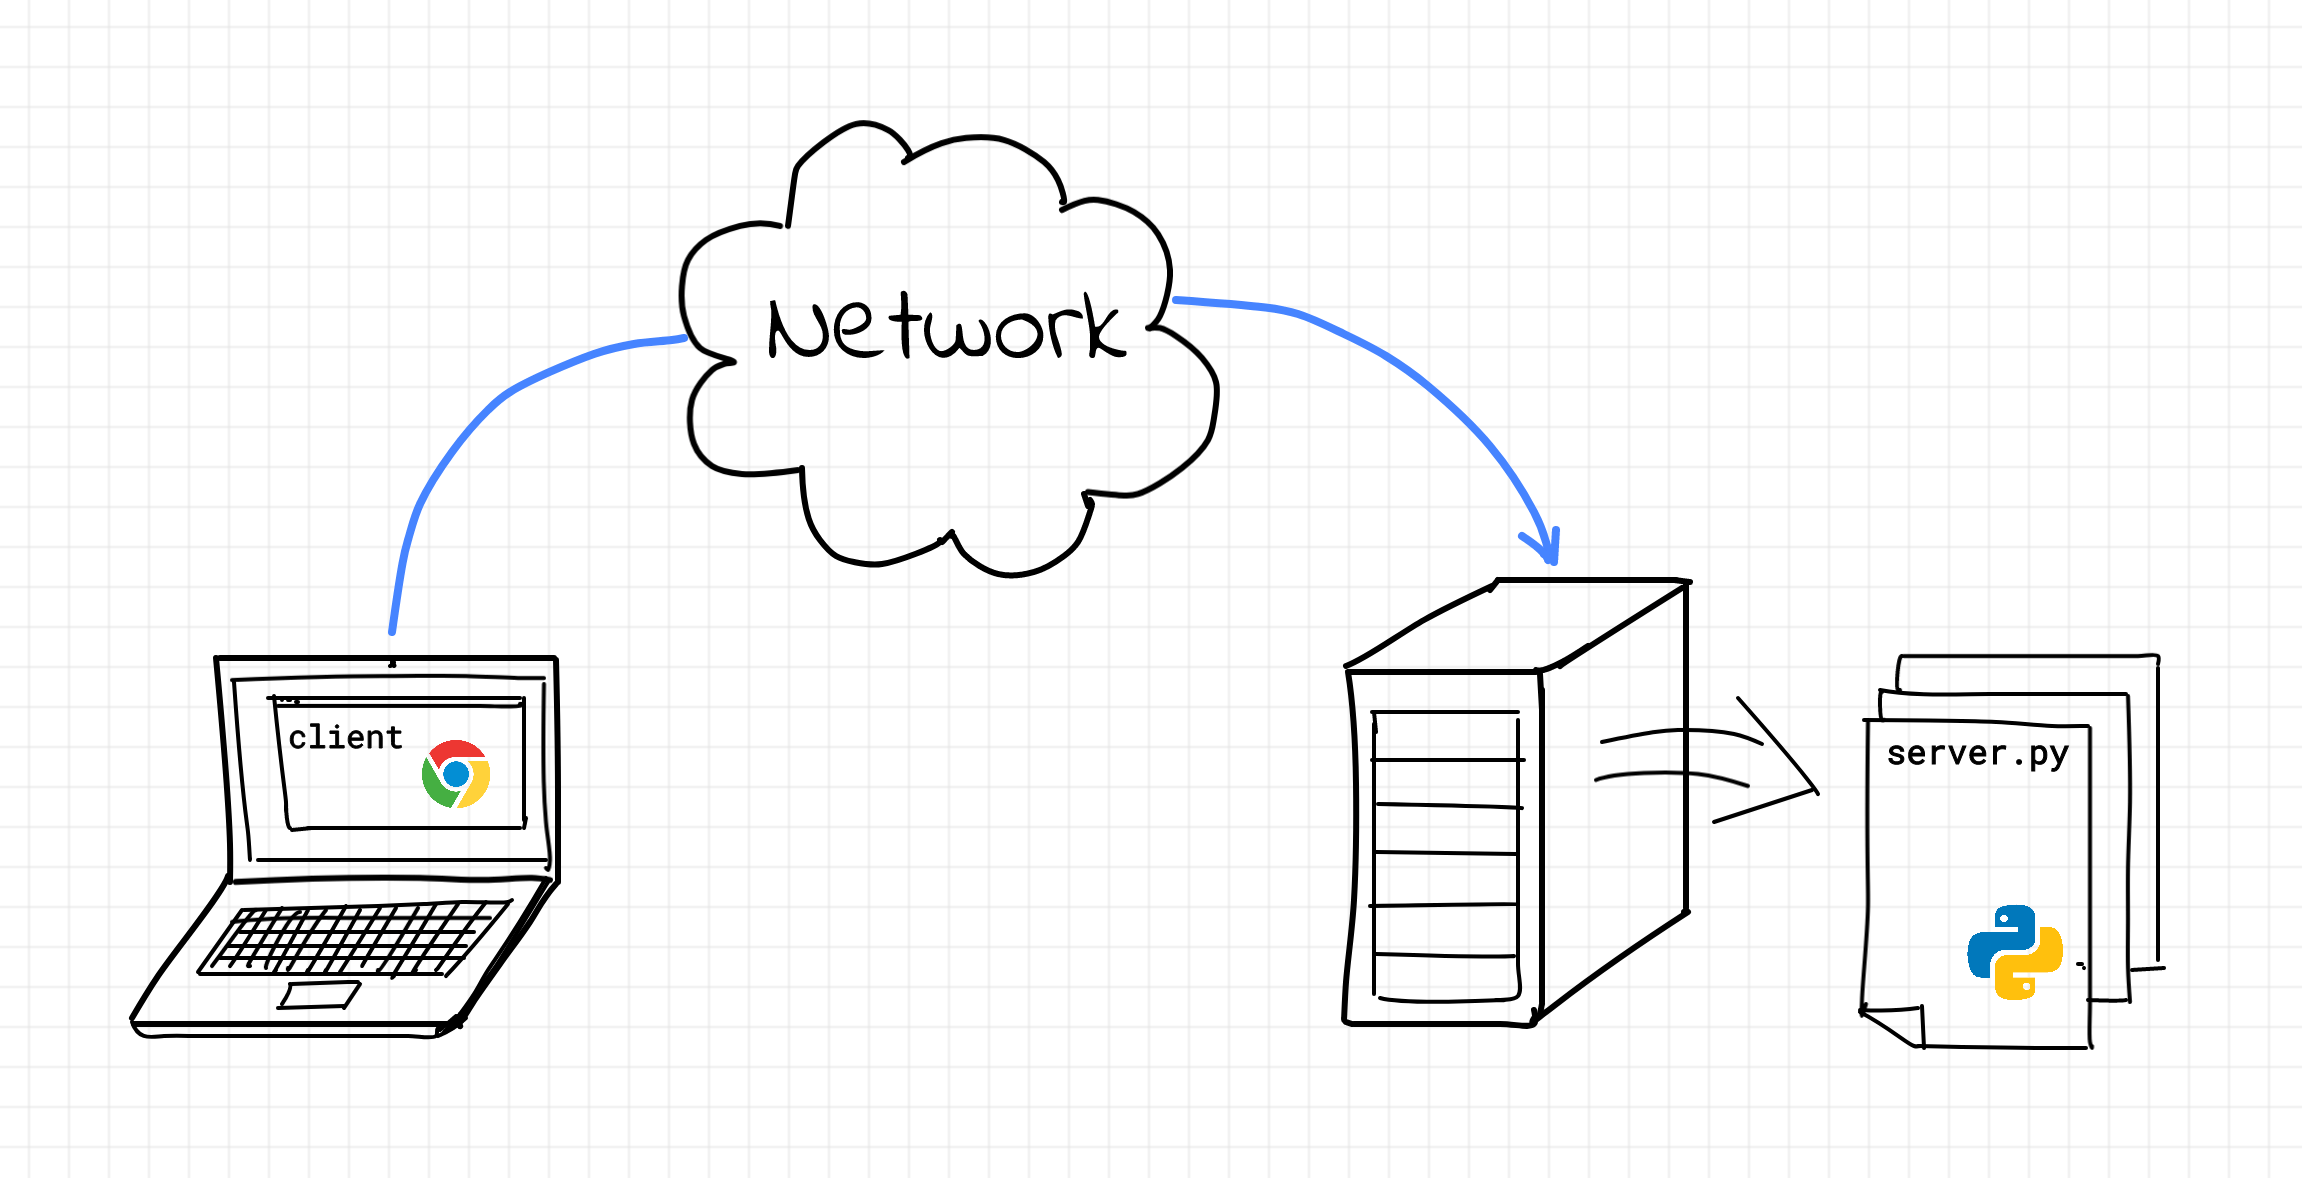
Для написания сервера мы будем использовать Python и модуль Socket.
Socket позволяет нам общаться с сервером с помощью сокетов. Весь код я постараюсь пояснять, дабы ты мой дорогой читатель все понял. В конце статьи будет готовый код.
Создайте два файла в одной директории:
-
socket_server.py
-
socket_client.py
Практика
Пишем код для серверной части, так что открывайте файл socket_server.py.
Начнем с импорта модуля и создания TCP-сокета:
import socketДалее весь код будет с комментариями:
s.bind(('localhost', 3030)) # Привязываем серверный сокет к localhost и 3030 порту.
s.listen(1) # Начинаем прослушивать входящие соединения
conn, addr = s.accept() # Метод который принимает входящее соединение.
Добавим вечный цикл, который будет считывать данные с клиентской части, и отправлять их обратно.
while True: # Создаем вечный цикл.
	data = conn.recv(1024) # Получаем данные из сокета.
	if not data:
		break
	conn.sendall(data) # Отправляем данные в сокет.
	print(data.decode('utf-8')) # Выводим информацию на печать.
conn.close()
Переходим к клиентской части, весь код теперь пишем в файле socket_client.py.
Начало у клиентской части такое-же как и у серверной.
import socket
s = socket.socket(socket.AF_INET, socket.SOCK_STREAM)
Далее подключимся к нашему серверу и отправим сообщение «Hello. Habr!».
s.connect(('localhost', 3030)) # Подключаемся к нашему серверу.
s.sendall('Hello, Habr!'.encode('utf-8')) # Отправляем фразу.
data = s.recv(1024) #Получаем данные из сокета.
s.close()
Результат:

Заключение
Вот мы с вами и написали свой первый сервер, рад был стараться для вас, ниже будет готовый код.
socket_server.py:
import socket
s = socket.socket(socket.AF_INET, socket.SOCK_STREAM)

s.bind(('localhost', 3030)) # Привязываем серверный сокет к localhost и 3030 порту.
s.listen(1) # Начинаем прослушивать входящие соединения.
conn, addr = s.accept() # Метод который принимает входящее соединение.

while True:
	data = conn.recv(1024) # Получаем данные из сокета.
	if not data:
		break
	conn.sendall(data) # Отправляем данные в сокет.
	print(data.decode('utf-8'))
conn.close()
socket_client.py:
import socket
s = socket.socket(socket.AF_INET, socket.SOCK_STREAM)

s.connect(('localhost', 3030)) # Подключаемся к нашему серверу.
s.sendall('Hello, Habr!'.encode('utf-8')) # Отправляем фразу.
data = s.recv(1024) #Получаем данные из сокета.
s.close()Оглавление
- Что определяет хорошего разработчика ПО?
- Что же такое веб-сервер?
- Как общаться с клиентами по сети
- Простейший TCP сервер
- Простейший TCP клиент
- Заключение
- Cсылки по теме
Лирическое отступление: что определяет хорошего разработчика?

Разработка ПО — это инженерная дисциплина. Если вы хотите стать действительно профессиональным разработчиком, то необходимо в себе развивать качества инженера, а именно: системный подход к решению задач и аналитический склад ума. Для вас должно перестать существовать слово магия. Вы должны точно знать как и почему работают системы, с которыми вы взаимодействуете (между прочим, полезное качество, которое находит применение и за пределами IT).
К сожалениею (или к счастью, ибо благоприятно складывается на уровне доходов тех, кто осознал), существует огромное множество людей, которые пишут код без должного понимания важности этих принципов. Да, такие горе-программисты могут создавать работающие до поры до времени системы, собирая их из найденных в Интернете кусочков кода, даже не удосужившись прочитать, как они реализованы. Но как только возникает первая нестандартная проблема, решение которой не удается найти на StackOverflow, вышеупомянутые персонажи превращаются в беспомощных жертв кажущейся простоты современной разработки ПО.
Для того, чтобы не оказаться одним из таких бедолаг, необходимо постоянно инвестировать свое время в получение фундаментальных знаний из области Computer Science. В частности, для прикладных разработчиков в большинстве случаев таким фундаментом является операционная система, в которой выполняются созданные ими программы.
Веб-фреймворки и контейнеры приложений рождаются и умирают, а инструменты, которыми они пользуются, и принципы, на которых они основаны, остаются неизменными уже десятки лет. Это означает, что вложение времени в изучение базовых понятий и принципов намного выгоднее в долгосрочной перспективе. Сегодня мы рассмотрим одну из основных для веб-разработчика концепций — сокеты. А в качестве прикладного аспекта, мы разберемся, что же такое на самом деле веб-сервер и начнем писать свой.
Что такое веб-сервер?
Начнем с того, что четко ответим на вопрос, что же такое веб-сервер?
В первую очередь — это сервер. А сервер — это процесс (да, это не железка), обслуживающий клиентов. Сервер — фактически обычная программа, запущенная в операционной системе. Веб-сервер, как и большинство программ, получает данные на вход, преобразовывает их в соответствии с бизнес-требованиями и осуществляет вывод данных. Данные на вход и выход передаются по сети с использованием протокола HTTP. Входные данные — это запросы клиентов (в основном веб-браузеров и мобильных приложений). Выходные данные — это зачастую HTML-код подготовленных веб-страниц.
На данном этапе логичными будут следующие вопросы: что такое HTTP и как передавать данные по сети? HTTP — это простой текстовый (т.е. данные могут быть прочитаны человеком) протокол передачи информации в сети Интернет. Протокол — это не страшное слово, а всего лишь набор соглашений между двумя и более сторонами о правилах и формате передачи данных. Его рассмотрение мы вынесем в отдельную тему, а далее попробуем понять, как можно осуществлять передачу данных по сети.
Как компьютеры взаимодействуют по сети
В Unix-подобных системах принят очень удобный подход для работы с различными устройствами ввода/вывода — рассматривать их как файлы. Реальные файлы на диске, мышки, принтеры, модемы и т.п. являются файлами. Т.е. их можно открыть, прочитать данные, записать данные и закрыть.
При открытии файла операционной системой создается т.н. файловый дескриптор. Это некоторый целочисленный идентификатор, однозначно определяющий файл в текущем процессе. Для того, чтобы прочитать или записать данные в файл, необходимо в соответсвующую функцию (например, read() или write()) передать этот дескриптор, чтобы четко указать, с каким файлом мы собираемся взаимодействовать.
int fd = open("/path/to/my/file", ...);

char buffer[1024];
read(fd, buffer, 1024);
write(fd, "some data", 10);

close(fd);
Очевидно, что т.к. общение компьютеров по сети — это также про ввод/вывод, то и оно должно быть организовано как работа с файлами. Для этого используется специальный тип файлов, т.н. сокеты.
Сокет — это некоторая абстракция операционной системы, представляющая собой интерфейс обмена данными между процессами. В частности и по сети. Сокет можно открыть, можно записать в него данные и прочитать данные из него.
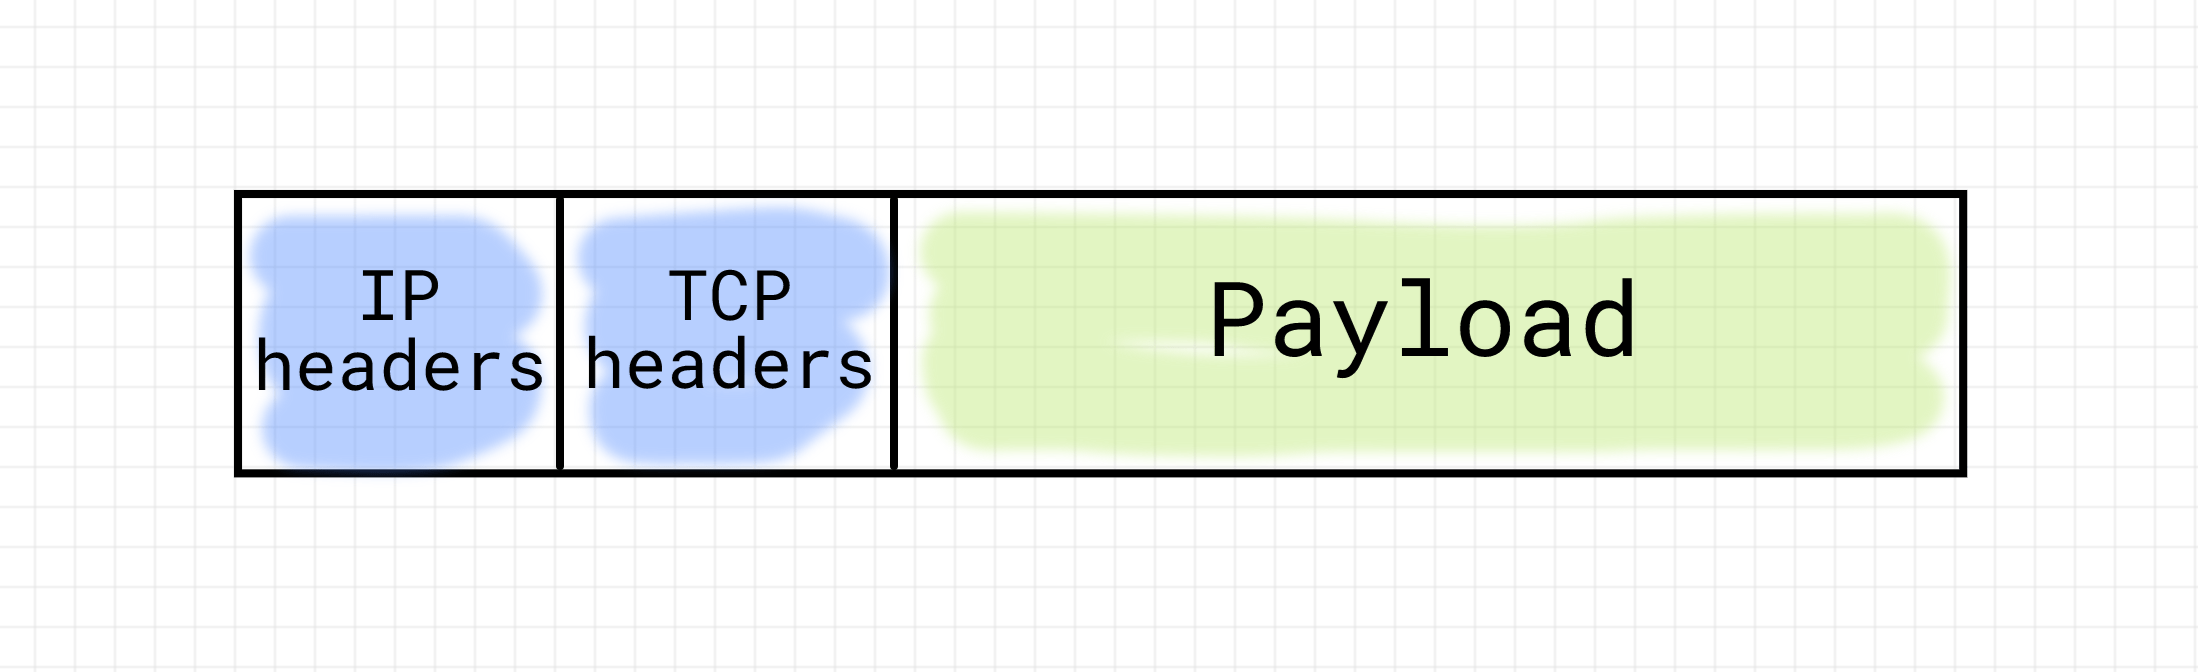
Т.к. видов межпроцессных взаимодействий с помощью сокетов множество, то и сокеты могут иметь различные конфигурации: сокет характеризуется семейством протоколов (IPv4 или IPv6 для сетевого и UNIX для локального взаимодействия), типом передачи данных (потоковая или датаграммная) и протоколом (TCP, UDP и т.п.).
Далее будет рассматриваться исключительно клиент-серверное взаимодействие по сети с использованием сокетов и стека протоколов TCP/IP.
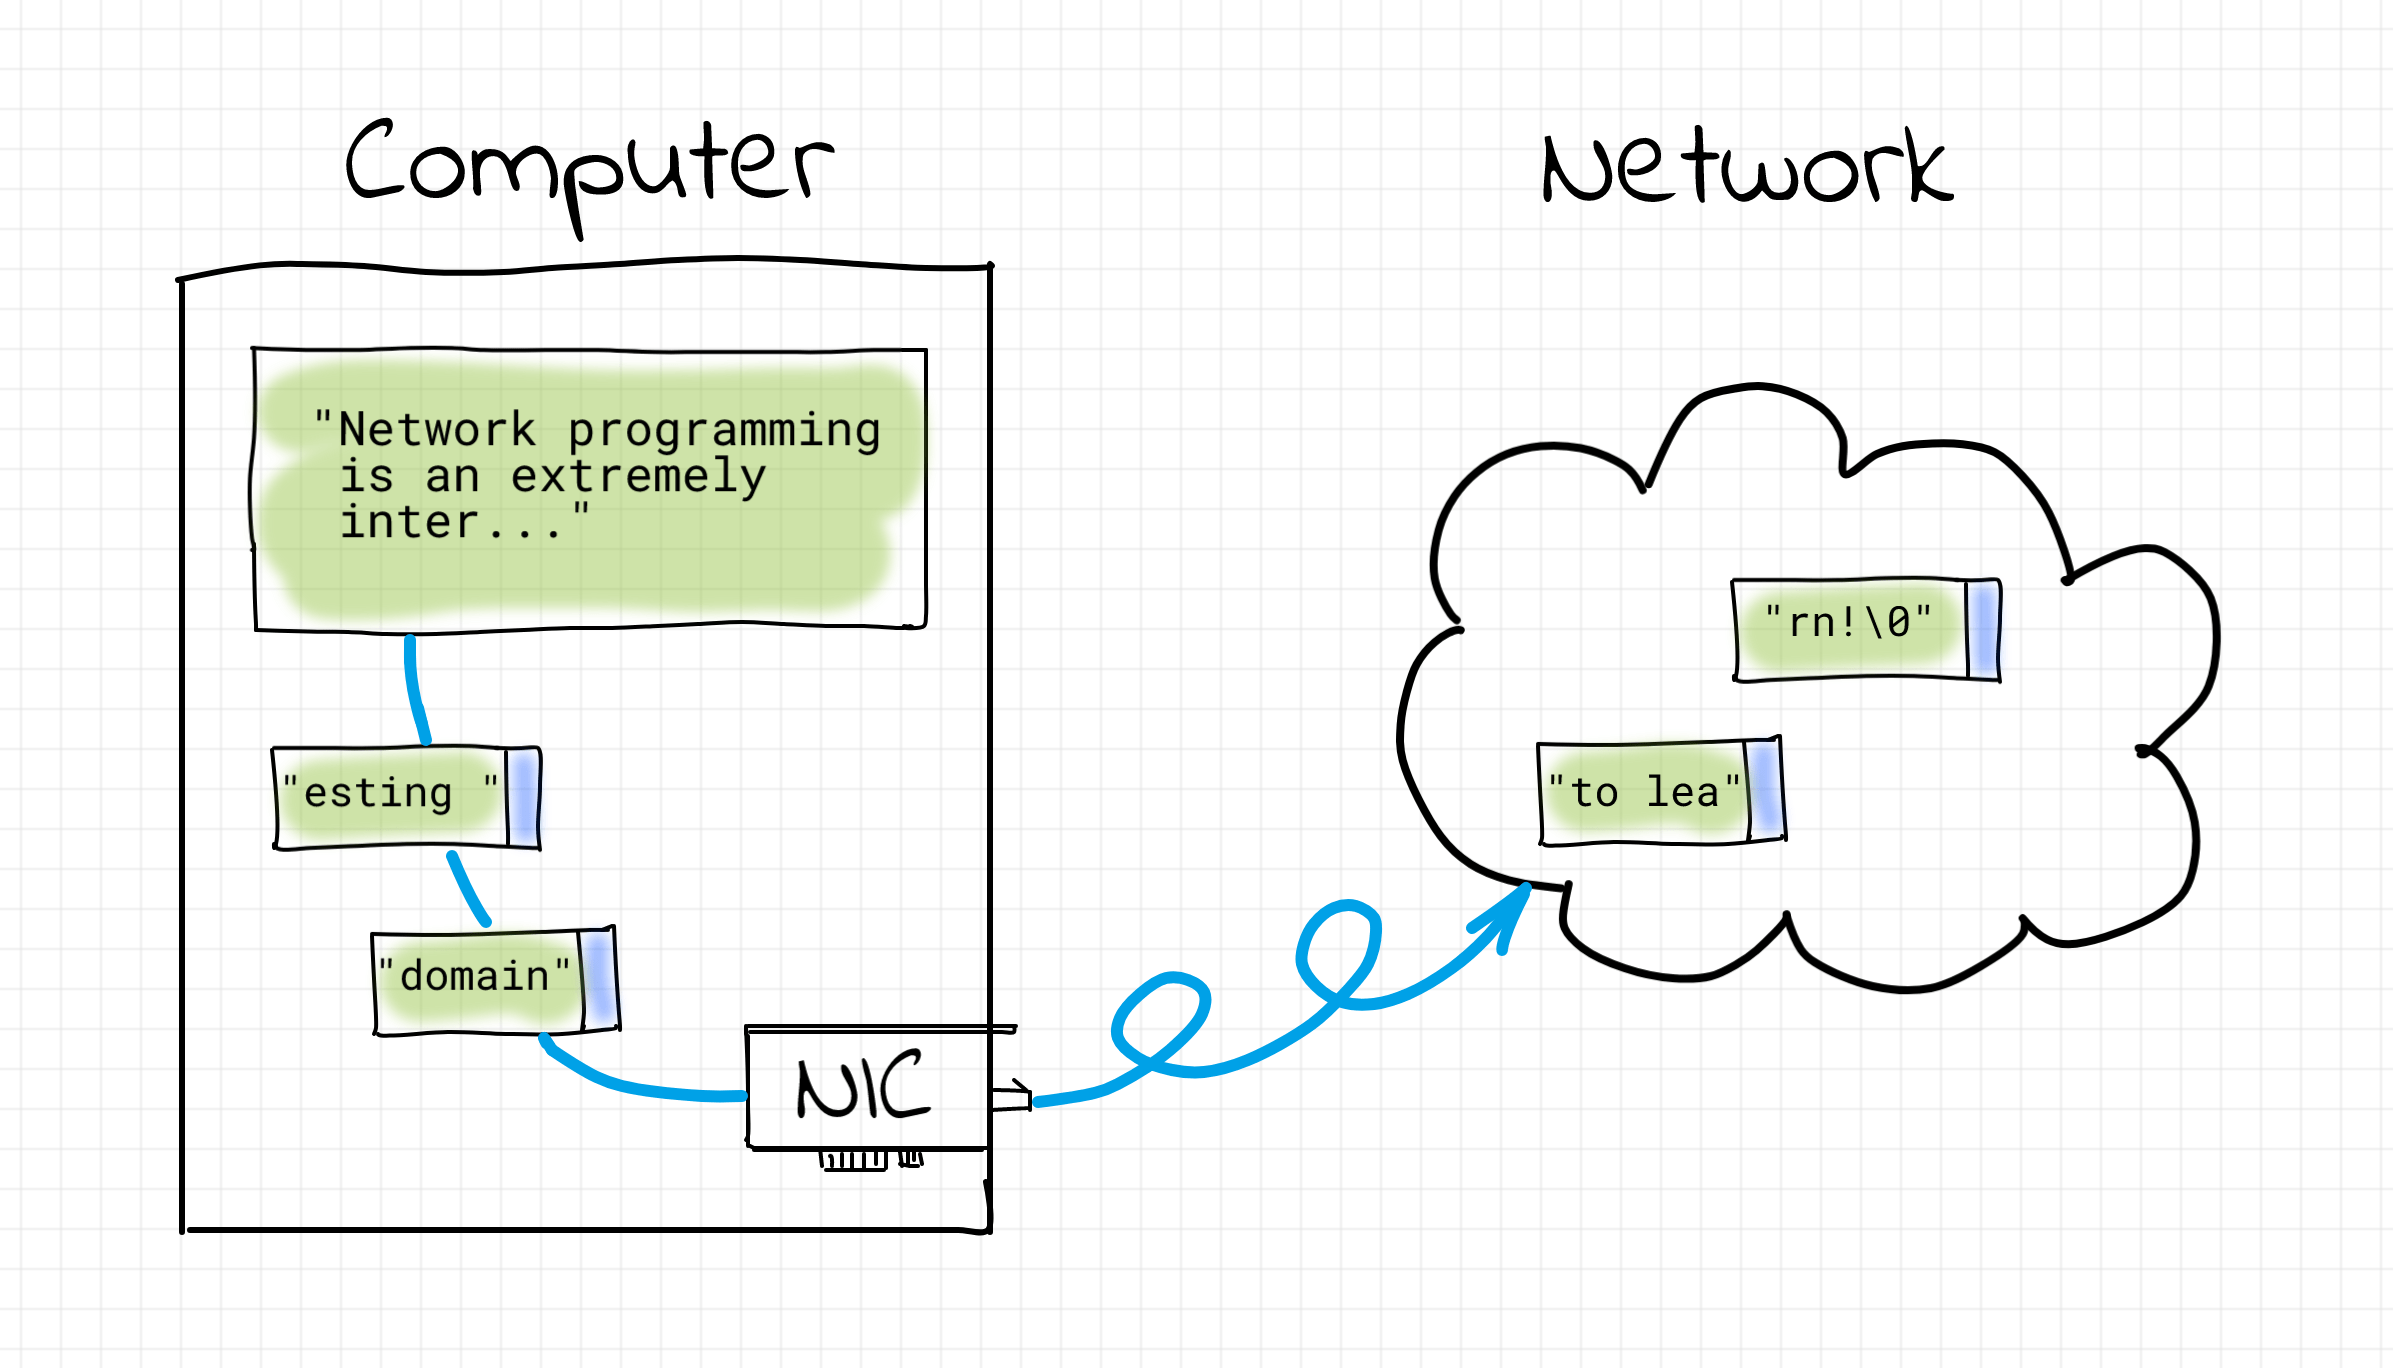
Предположим, что наша прикладная программа хочет передать строку «Hello World» по сети, и соответствующий сокет уже открыт. Программа осуществляет запись этой строки в сокет с использованием функции write() или send(). Как эти данные будут переданы по сети?
Т.к. в общем случае размер передаваемых программой данных не ограничен, а за один раз сетевой адаптер (NIC) может передать фиксировнный объем информации, данные необходимо разбить на фрагменты, не превышающие этот объем. Такие фрагменты называются пакетами. Каждому пакету добавляется некоторая служебная информация, в частности содержащая адреса получателя и отправителя, и они начинают свой путь по сети.
Адрес компьютера в сети — это т.н. IP-адрес. IP (Internet Protocol) — протокол, который позволил объединить множество разнородных сетей по всеми миру в одну общую сеть, которая называется Интернет. И произошло это благодаря тому, что каждому компьютеру в сети был назначен собственный адрес.
В силу особенности маршрутизации пакетов в сети, различные пакеты одной и той же логической порции данных могут следовать от отправителя к получателю разными маршрутами. Разные маршруты могут иметь различную сетевую задержку, следовательно, пакеты могут быть доставлены получателю не в том порядке, в котором они были отправлены. Более того, содержимое пакетов может быть повреждено в процессе передачи.
Вообще говоря, требование получать пакеты в том же порядке, в котором они были отправлены, не всегда является обязательным (например, при передаче потокового видео). Но, когда мы загружаем веб-страницу в браузере, мы ожидаем, что буквы на ней будут расположены ровно в том же порядке, в котором их нам отправил веб-сервер. Именно поэтому HTTP протокол работает поверх надеждного протокола передачи данных TCP, который будет рассмотрен ниже.
Чтобы организовать доставку пакетов в порядке их передачи, необходимо добавить в служебную информацию каждого пакета его номер в цепочке пакетов и на принимающей стороне делать сборку пакетов не в порядке их поступления, а в порядке, определенном этими номерами. Чтобы избежать доставки поврежденных пакетов, необходимо в каждый пакет добавить контрольную сумму и пакеты с неправильной контрольной суммой отбрасывать, ожидая, что они будут отправлены повторно.
Этим занимается специальный протокол потоковой передачи данных — TCP.
TCP — (Transmission Control Protocol — протокол управления передачей) — один из основных протоколов передачи данных в Интернете. Используется для надежной передачи данных с подтверждением доставки и сохранением порядка пакетов.
В силу того, что передачей данных по сети по протоколу TCP на одном и том же компьютере может заниматься одновременно несколько программ, для каждого из таких сеансов передачи данных необходимо поддерживать свою последовательность пакетов. Для этого TCP вводит понятие соединения. Соединение — это просто логическое соглашение между принимающей и передающей сторонами о начальных и текущих значениях номеров пакетов и состоянии передачи. Соединение необходимо установить (обменявшись несколькими служебными пакетами), поддерживать (периодически передавать данные, чтобы не наступил таймаут), а затем закрыть (снова обменявшись несколькими служебными пакетами).
Итак, IP определяет адрес компьютера в сети. Но, в силу наличия TCP соединений, пакеты могут принадлежать различным соединениям на одной и той же машине. Для того, чтобы различать соединения, вводится понятие TCP-порт. Это всего лишь пара чисел (одно для отправителя, а другое для получателя) в служебной информации пакета, определяющая, в рамках какого соединения должен рассматриваться пакет. Т.е. адрес соединения на этой машине.
Простейший TCP сервер
Теперь перейдем к практике. Попробуем создать свой собственный TCP-сервер. Для этого нам понадобится модуль socket из стандартной библиотеки Python.
Основная проблема при работе с сокетами у новичков связана с наличием обязательного магического ритуала подготовки сокетов к работе. Но имея за плечами теоретические знания, изложенные выше, кажущаяся магия превращается в осмысленные действия. Также необходимо отметить, что в случае с TCP работа с сокетами на сервере и на клиенте различается. Сервер занимается ожиданием подключений клиентов. Т.е. его IP адрес и TCP порт известны потенциальным клиентам заранее. Клиент может подключиться к серверу, т.е. выступает активной стороной. Сервер же ничего не знает об адресе клиента до момента подключения и не может выступать инициатором соединения. После того, как сервер принимает входящее соединения клиента, на стороне сервера создается еще один сокет, который является симметричным сокету клиента.
Итак, создаем серверный сокет:
# python3

import socket

serv_sock = socket.socket(socket.AF_INET,      # задамем семейство протоколов 'Интернет' (INET)
                          socket.SOCK_STREAM,  # задаем тип передачи данных 'потоковый' (TCP)
                          proto=0)             # выбираем протокол 'по умолчанию' для TCP, т.е. IP
print(type(serv_sock))                         # <class 'socket.socket'>
А где же обещанные int fd = open("/path/to/my/socket")? Дело в том, что системный вызов open() не позволяет передать все необходимые для инициализации сокета параметры, поэтому для сокетов был введен специальный одноименный системный вызов socket(). Python же является объектно-ориентированным языком, в нем вместо функций принято использовать классы и их методы. Код модуля socket является ОО-оберткой вокрут набора системных вызовов для работе с сокетами. Его можно представить себе, как:
class socket:  # Да, да, имя класса с маленькой буквы :(
    def __init__(self, sock_familty, sock_type, proto):
      self._fd = system_socket(sock_family, sock_type, proto)

    def write(self, data):
        # на самом деле вместо write используется send, но об этом ниже
        system_write(self._fd, data)

    def fileno(self):
        return self._fd
Т.е. доступ к целочисленному файловому дескриптору можно получить с помощью:
print(serv_sock.fileno()) # 3 или другой int
Так мы работаем с серверным сокетом, а в общем случае на серверной машине может быть несколько сетевых адаптеров, нам необходимо привязать созданный сокет к одному из них:
serv_sock.bind(('127.0.0.1', 53210)) # чтобы привязать сразу ко всем, можно использовать ''
Вызов bind() заставляет нас указать не только IP адрес, но и порт, на котором сервер будет ожидать (слушать) подключения клиентов.
Далее необходимо явно перевести сокет в состояние ожидания подключения, сообщив об этом операционной системе:
backlog = 10  # Размер очереди входящих подключений, т.н. backlog
serv_sock.listen(backlog)
После этого вызова операционная система готова принимать подключения от клиентов на этом сокете, хотя наш сервер (т.е. программа) — еще нет. Что же это означает и что такое backlog?
Как мы уже выяснили, взаимодействие по сети происходит с помощью отправки пакетов, а TCP требует установления соединения, т.е. обмена между клиентом и сервером несколькими служебными пакетами, не содержащими реальных бизнес-данных. Каждое TCP соединение обладает состоянием. Упростив, их можно представить себе так:
СОЕДИНЕНИЕ УСТАНАВЛИВАЕТСЯ -> УСТАНОВЛЕНО -> СОЕДИНЕНИЕ ЗАКРЫВАЕТСЯ
Таким образом, параметр backlog определяет размер очереди для установленных, но еще не обработанных программой соединений. Пока количество подключенных клиентов меньше, чем этот параметр, операционная система будет автоматически принимать входящие соединения на серверный сокет и помещать их в очередь. Как только количество установленных соединений в очереди достигнет значения backlog, новые соединения приниматься не будут. В зависимости от реализации (GNU Linux/BSD), OC может явно отклонять новые подключения или просто их игнорировать, давая возможность им дождаться освобождения места в очереди.
Теперь необходимо получить соединение из этой очереди:
client_sock, client_addr = serv_sock.accept()
В отличие от неблокирующего вызова listen(), который сразу после перевода сокета в слушающее состояние, возвращает управление нашему коду, вызов accept() является блокирующим. Это означает, что он не возвращает управление нашему коду до тех пор, пока в очереди установленных соединений не появится хотя бы одно подключение.
На этом этапе на стороне сервера мы имеем два сокета. Первый, serv_sock, находится в состоянии LISTEN, т.е. принимает входящие соединения. Второй, client_sock, находится в состоянии ESTABLISHED, т.е. готов к приему и передаче данных. Более того, client_sock на стороне сервера и клиенсткий сокет в программе клиента являются одинаковыми и равноправными участниками сетевого взаимодействия, т.н. peer’ы. Они оба могут как принимать и отправлять данные, так и закрыть соединение с помощью вызова close(). При этом они никак не влияют на состояние слушающего сокета.
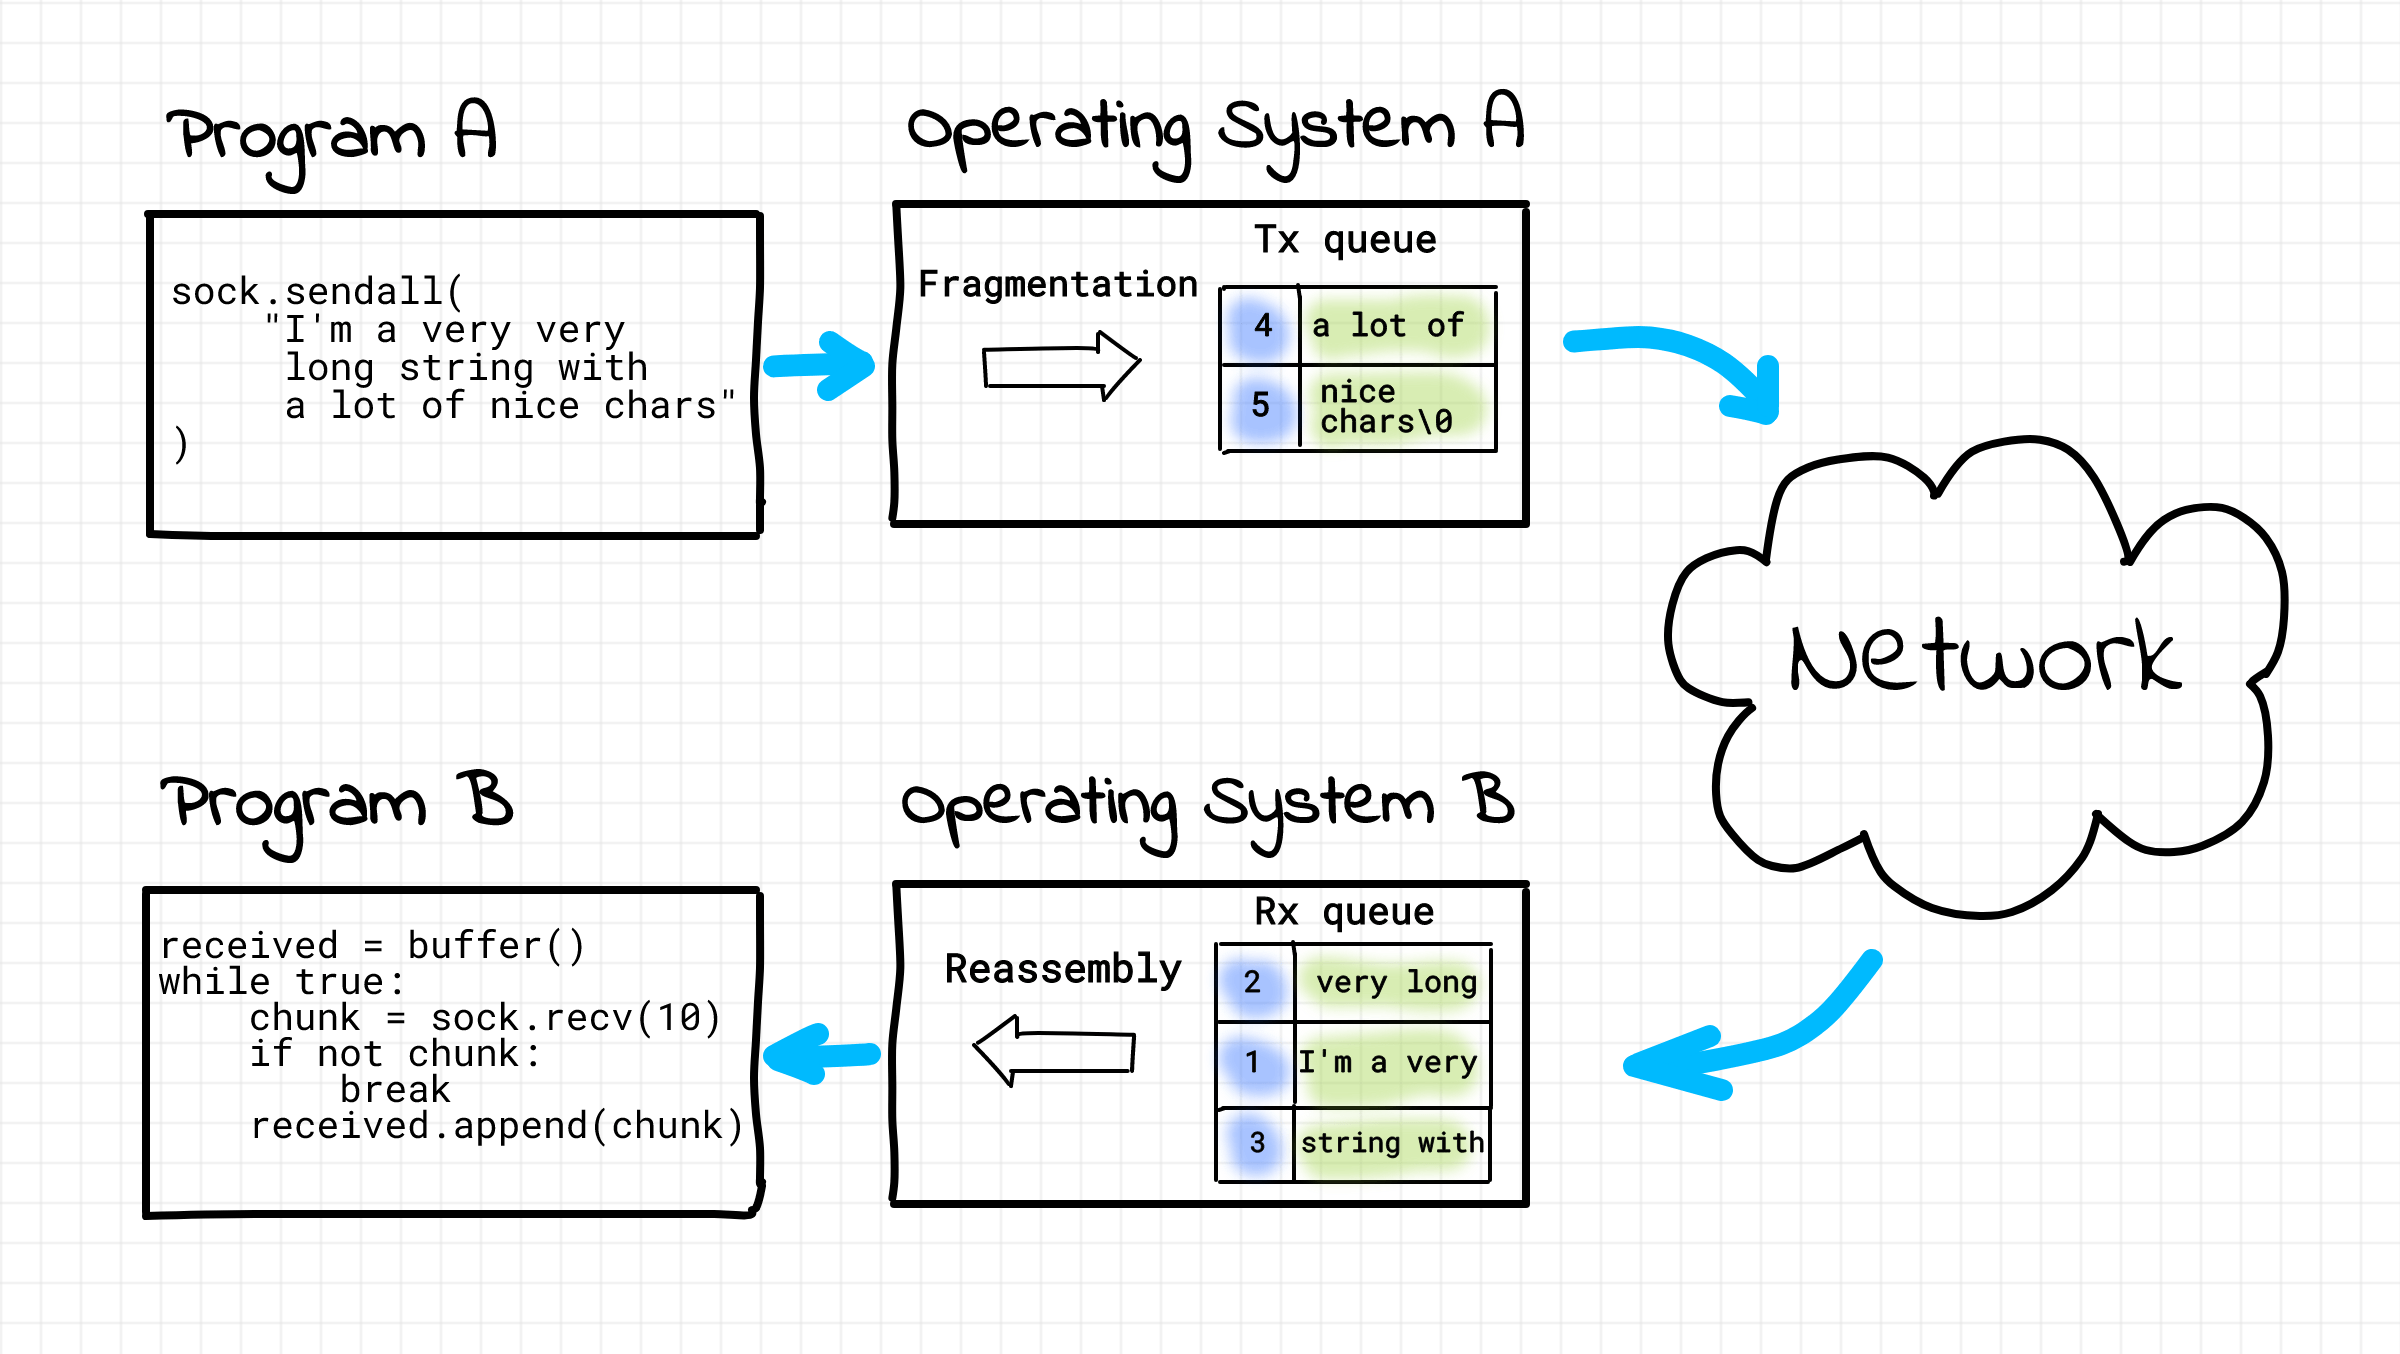
Пример чтения и записи данных в клиентский сокет:
while True:
    data = client_sock.recv(1024)
    if not data:
        break
    client_sock.sendall(data)
И опять же справедливый вопрос — где обещанные read() и write()? На самом деле с сокетом можно работать и с помощью этих двух функций, но в общем случае сигнатуры read() и write() не позволяют передать все возможные параметры чтения/записи. Так, например, вызов send() с нулевыми флагами равносилен вызову write().
Немного коснемся вопроса адресации. Каждый TCP сокет определяется двумя парами чисел: (локальный IP адрес, локальный порт) и (удаленный IP адрес, удаленный порт). Рассмотрим, какие адреса на данный момент у наших сокетов:
serv_sock:
  laddr (ip=<server_ip>, port=53210)
  raddr (ip=0.0.0.0, port=*)  # т.е. любой

client_sock:
  laddr (ip=<client_ip>, port=51573)  # случайный порт, назначенный системой
  raddr (ip=<server_ip>, port=53210)  # адрес слушающего сокета на сервере
Полный код сервера выглядит так:
# python3

import socket

serv_sock = socket.socket(socket.AF_INET, socket.SOCK_STREAM, proto=0)
serv_sock.bind(('', 53210))
serv_sock.listen(10)

while True:
    # Бесконечно обрабатываем входящие подключения
    client_sock, client_addr = serv_sock.accept()
    print('Connected by', client_addr)

    while True:
        # Пока клиент не отключился, читаем передаваемые
        # им данные и отправляем их обратно
        data = client_sock.recv(1024)
        if not data:
            # Клиент отключился
            break
        client_sock.sendall(data)

    client_sock.close()
Подключиться к этому серверу можно с использованием консольной утилиты telnet, предназначенной для текстового обмена информацией поверх протокола TCP:
telnet 127.0.0.1 53210
> Trying 192.168.0.1...
> Connected to 192.168.0.1.
> Escape character is '^]'.
> Hello
> Hello
Простейший TCP клиент
На клиентской стороне работа с сокетами выглядит намного проще. Здесь сокет будет только один и его задача только лишь подключиться к заранее известному IP-адресу и порту сервера, сделав вызов connect().
# python3

import socket

client_sock = socket.socket(socket.AF_INET, socket.SOCK_STREAM)
client_sock.connect(('127.0.0.1', 53210))
client_sock.sendall(b'Hello, world')
data = client_sock.recv(1024)
client_sock.close()
print('Received', repr(data))
Заключение
Запоминать что-то без понимания, как это работает — злое зло не самый разумный подход для разработчика. Работа с сокетами тому отличный пример. На первый взгляд может показаться, что уложить в голове последовательность приготовления клиентских и серверных сокетов к работе практически не возможно. Это происходит из-за того, что не сразу понятен смысл производимых манипуляций. Однако, понимая, как осуществляется сетевое взаимодействие, API сокетов сразу становится прозрачным и легко оседает в подкорке. А с точки зрения полезности полученных знаний, я считаю. что понимание принципов сетевого взаимодействия жизненно важно для разработки и отладки действительно сложных веб-проектов.
Другие статьи из серии:
- Пишем свой веб-сервер на Python: процессы, потоки и асинхронный I/O
- Пишем свой веб-сервер на Python: протокол HTTP
- Пишем свой веб-сервер на Python: стандарт WSGI
- Пишем свой веб-сервер на Python: фреймворк Flask
Ссылки по теме
Справочная информация:
- Сокеты
- Веб-сервер
- Протокол
- Файловый дескриптор
- Межпроцессное взаимодействие
- Пакет
- IP
- TCP
- Порт
- Модуль
socket
Литература
- Beej’s Guide to Network Programming — отличные основы
- UNIX Network Programming — продвинутый уровень
Мой вебинар на данную тему можно посмотреть на сайте GeekBrains.Ru.
Содержание
- Предисловие
- Простой сервер
- Конфигурируемый сервер
- Передача файлов и параметров
- Передеча параметров в GET запросе
- Передача параметров в POST запросе
- Сохраняем переданный файл
- WSGI
- Заставляем Python выполнить код на PHP
- ИТОГИ
Предисловие
Когда-то давно, читая вопросы ребят, работающих с Django пришел к мысли о том, что большинство вопросов вызваны непониманием механизма общения браузера и сервера. Поэтому я решил написать статью, в которой попытаюсь пролить свет и объяснить как все происходит. В данной статье будет частично рассмотрен протокол http.
Простой сервер
Для того, чтобы понять как все происходит, я создам свой собственный веб-сервер, на котором и буду объяснять процесс общения.
Итак, приступим.
Создаем сервер:
#!-*-coding: utf8-*-
'''
Простой веб-сервер
'''

import socket
import select

HOST = ''  # Символическое имя. По умолчанию localhost
PORT = 8080  # Указываем непривилированный порт

if __name__ == "__main__":
    with socket.socket(socket.AF_INET, socket.SOCK_STREAM) as sock:
        print('Socket created')

        # Связываем сокет с локальным хостом и портом
        sock.bind((HOST, PORT))

        print('Привязка сокета')

        # Слушаем сокет
        sock.listen(10)
        print('Слушаем сокет')

        inputs = [sock]
        outputs = [sock]
        num = 0
        # Теперь можем общаться с клиентами
        while True:
            # Ждем подключения клиентов
            reads, writes, excepts = select.select(inputs, outputs, inputs)
            for conn in reads:
                _conn, client_addr = conn.accept()
                with _conn as client_conn:
                    ip_addr, client_port = client_addr
                    print(f'Подключение с {ip_addr}:{client_port}')
                    data = client_conn.recv(1024)
                    print(data)
                    answermsg = (
                        'HTTP/1.1 200 OKnn'
                        '<html>'
                        '    <head>'
                        '        <title>Test done!!!</title>'
                        '    </head>'
                        '    <body>'
                        '        <b>'
                        f'            <i>ok {num}</i>'
                        '        </b>'
                        '    </body>'
                        '</html>'
                    )
                    client_conn.send(bytes(answermsg, 'utf-8'))
                    num += 1
Как вы видите, я использую модуль socket. Поэтому настоятельно рекомендую вам ознакомиться с этим модулем, так как здесь я буду объяснять лишь используемые мною свойства и методы модуля. В коде мы указываем, что сервер будет работать на localhost и 8080м порте (веб). Теперь, если мы запустим наш сервер и в браузере введем адрес localhost, то в консоли (или командной строке в Windows) увидим запрос, посланный браузером серверу. Здесь вы можете прочитать про заголовки запроса и ответа в http . Я в данной статье буду использовать лишь некоторые заголовки. А здесь список Content-Type/MIME type.
Запускаем наш скрипт (сервер)
После запуска скрипта в консоли увидим сообщения о том, что сервер запустился.
Теперь осталось открывать браузер и перейти на localhost. Как только мы напечатаем в адресной строке и нажмем «Ввод», то браузер инициализирует соединение и передаст некоторую информацию. Что это за информация мы увидим чуть позже. В консоль мы выведем всю информацию, которую передаст нам браузер.
Теперь давайте разберемся, что же это за информация и как ее обрабатывать. В консоли мы видим, что к серверу подключились с ip-адреса 127.0.0.1:39494. А вот ниже уже идут строки данных, полученные от браузера. Разбираемся что это за информация. Согласно спецификации http , первой строкой в запросе идет так называемая стартовая строка и формат ее такой:
где:
- Метод — тип запроса, одно слово заглавными буквами. Список методов для версии 1.1 представлен в спецификации.
- URI определяет путь к запрашиваемому документу.
- Версия — пара разделённых точкой цифр. Например: 1.0.
Все 3 параметра разделены между собой одним пробелом.
Далее идет блок заголовков. Спецификация http регламентирует обязательно одну пустую строку после всех заголовков и перед началом тела самого сообщения.
Все заголовки разделяются на четыре основных группы:
- General Headers («Основные заголовки») — могут включаться в любое сообщение клиента и сервера
- Request Headers («Заголовки запроса») — используются только в запросах клиента;
- Response Headers («Заголовки ответа») — только для ответов от сервера;
- Entity Headers («Заголовки сущности») — сопровождают каждую сущность сообщения.
В стартовой строке мы видим, что браузер сообщает о методе GET (имена всех методов пишутся ПРОПИСНЫМИ БУКВАМИ). Обратился браузер к ресурсу по адресу / и версия HTTP = 1.1. Далее смотрим на общие заголовки. Название заголовка и его значение разделены символами «: «. Первым заголовком идет Host. Так как мы обращались к localhost, то здесь мы и видим наш адрес. Если когда-то ранее браузер уже обращался к ресурсу localhost (возможно запускали тестовый веб-сервер, на котором разрабатывали сайт) и сервер передал браузеру куки, то браузер передаст серверу уже имеющиеся куки, что мы и видим на скрине выше по наличию заголовка Cookie. Благодаря этому имеют место быть атаки на куки у пользователей. Так как в запросе мы больше ничего не передаем, то тело запроса осталось пустым. Чуть позже я покажу что будет, если передать нашему серверу файл или какие-то другие данные из формы в html странице.
После того, как сервер получил и обработал запрос от браузера, сервер должен отправить браузеру ответ. Ответ так же начинается со стартовой строки.
Стартовая строка ответа сервера имеет следующий формат:
HTTP/Версия КодСостояния Пояснение
где:
- Версия — пара разделённых точкой цифр, как в запросе;
- Код состояния (англ. Status Code) — три цифры. По коду состояния определяется дальнейшее содержимое сообщения и поведение клиента;
- Пояснение (англ. Reason Phrase) — текстовое короткое пояснение к коду ответа для пользователя. Никак не влияет на сообщение и является необязательным.
Я воспользуюсь таким соглашением. Например, стартовая строка ответа сервера на предыдущий запрос может выглядеть так:
После стартовой строки должны идти заголовки ответа. Но сейчас никаких заголовков я передавать не буду. Я лишь ограничусь только стартовой строкой, в которой указываю версию, код ответа (200) и пояснение (ОК). После этого я делаю одну пустую строку (она обязательна), иначе не будет работать. Ну а дальше уже я передаю простенькую html страницу (переменная answermsg). Если сделали все правильно, то вы увидите в браузере слово ok, выделенное жирным шрифтом и курсивом.
Но сейчас сервер получился не очень гибким. А точнее даже вообще не гибким. Если я захочу изменить страницу, то мне придется лезть в код и менять его. Поэтому сейчас я переделаю свой сервер так, чтобы я мог использовать конфигурационные файлы, в которых смогу указать пути, указать файлы и, может быть, что-нибудь еще.
Конфигурируемый сервер
Сейчас я покажу простой пример того, как можно сделать наш сервер конфигурируемым. Для этого я воспользуюсь модулем configparser. Для этого я создам простенький файл конфигурации:
Файл конфигаруции: conf/localhost.conf
[localhost]
Directory: ./sites
Первой строкой здесь будет являться хост, запрос для которого мы должны обработать. А во второй строке я указываю директорию, в которой лежит файл index.html.
Теперь код сервера выглядит так:
'''
Конфигурируемый веб-сервер
'''

import socket
import select
import configparser

from pathlib import Path
HOST = ''  # Символическое имя. По умолчанию localhost
PORT = 8080  # Указываем непривилированный порт

if __name__ == '__main__':
    with socket.socket(socket.AF_INET, socket.SOCK_STREAM) as sock:
        print('Socket created')

        # Связываем сокет с локальным хостом и портом
        sock.bind((HOST, PORT))

        print('Привязка сокета')

        # Слушаем сокет
        sock.listen(10)
        print('Слушаем сокет')

        inputs = [sock]
        outputs = [sock]

        base_dir = Path(__file__).parent
        root_dir = base_dir.parent

        config = configparser.ConfigParser()
        config.read(
            root_dir.absolute() / Path('conf') / Path('localhost.conf')
        )

        # Теперь можем общаться с клиентами
        while True:
            # Ждем подключения клиентов
            reads, writes, excepts = select.select(inputs, outputs, inputs)
            for conn in reads:
                _conn, client_addr = conn.accept()
                with _conn as client_conn:
                    ip_addr, client_port = client_addr
                    print(f'Подключение с {ip_addr}:{client_port}')
                    data = client_conn.recv(1024)
                    data = data.decode('utf-8')
                    print(data)
                    answer = ''
                    data_list = data.split('rn')
                    header_line, *other_lines = data_list
                    headers = {}
                    headers['method'], headers['uri'], headers['version'] = (
                        header_line.split()
                    )
                    version = headers['version']
                    for header in other_lines:
                        if header and ':' in header:
                            header_name, header_value = map(
                                lambda x: x.strip(),
                                header.split(':', maxsplit=1)
                            )
                            headers[header_name] = header_value
                    if 'Host' in headers.keys():
                        host = headers['Host']
                        directory = Path(config.get(
                            host.split(':')[0], 'Directory'
                        ))
                        status_code = 404
                        message = 'Not Found'
                        answer_body = ''
                        if headers['uri'] in ['/', '/index', '/index.html']:
                            path = Path('index.html')
                        else:
                            path = Path().joinpath(
                                *headers['uri'].split('/')[1:]
                            )

                        file_path = base_dir / directory / path
                        if file_path.exists():
                            status_code = 200
                            message = 'OK'
                            answer_body = file_path.read_text()

                        answer_headers = (
                            f'{version} {status_code} {message}nnn'
                        )
                        answer = answer_headers + answer_body
                    client_conn.send(bytes(answer, 'utf-8'))
Здесь я на всякий случай проверяю наличие заголовка Host в запросе. Если такой есть, то читаю к какому хосту направлен запрос. Далее я смотрю по какому uri идет обращение. Если uri обращен к главной странице сайта, то как правило uri будет равен «/», либо будет содержать ключевое слово /index[.html|.php]. Если обращение идет к главной странице сайта, то стоит проверить существование файла index[.html|.php] в корневой директории сайта. Если такой сайт есть, тогда надо отдать страницу. Если обращение идет к какой-то конкретной странице, тогда, если файл страницы существует, отдаем эту страницу. Если файлов страниц не существует, мы должны выдать ошибку с кодом 404 и пояснением «Not Found». Такой статус у меня сделан по-умолчанию.
В папку sites я положил два файла:
Теперь, если запустить сервер и сделать запрос к localhost, то увидим в браузере страницу с содержанием из файла index.html.
Если сделать запрос к localhost/test, то увидим страницу с содержанием из файла test.
Передача файлов и параметров
Теперь у нас есть сервер, который мы можем конфигурировать. В примере выше я не стал рассматривать вариант с несколькими конфигурационными файлами, как это сделано, например, в Apache2. Но здесь не сложно изменить код. Такой сервер уже можно назвать рабочим, но данный сервер пока еще не умеет работать с переданными в запросе параметрами.
Передеча параметров в GET запросе
Чтобы добавить параметры к GET запросу, нужно в конце URL-адреса поставить знак «?» и после него начинать задавать их по следующему правилу:
имя_параметра1=значение_параметра1&имя_параметра2=значение_параметра2&...
Разделителем между параметрами служит знак «&».
Если запустим текущий вариант сервера и обратиться по адресу localhost/test?te=15, то получим ошибку 404, так как файла с названием «test?te=15» не существует. Необходимо отделить название файла и параметры.
Я мог бы указать в коде и другой код ответа, но я придерживаюсь соглашения, чтобы любой браузер правильно понимал ответ.
Пара слов о шаблоне для кода 404. Как видно из примера, шаблон страницы ответа тоже нужно создавать.
Теперь у меня получился вот такой код:
#!-*-coding: utf8-*-
'''
Конфигурируемый веб-сервер с параметрами
'''

import socket
import select
import configparser
from pathlib import Path
HOST = ''  # Символическое имя. По умолчанию localhost
PORT = 8080  # Указываем непривилированный порт

if __name__ == '__main__':
    with socket.socket(socket.AF_INET, socket.SOCK_STREAM) as sock:
        print('Socket created')

        # Связываем сокет с локальным хостом и портом
        sock.bind((HOST, PORT))

        print('Привязка сокета')

        # Слушаем сокет
        sock.listen(10)
        print('Слушаем сокет')

        inputs = [sock]
        outputs = [sock]

        base_dir = Path(__file__).parent
        root_dir = base_dir.parent

        config = configparser.ConfigParser()
        config.read(
            root_dir.absolute() / Path('conf') / Path('localhost.conf')
        )

        # Теперь можем общаться с клиентами
        while True:
            # Ждем подключения клиентов
            reads, writes, excepts = select.select(inputs, outputs, inputs)
            for conn in reads:
                _conn, client_addr = conn.accept()
                with _conn as client_conn:
                    ip_addr, client_port = client_addr
                    print(f'Подключение с {ip_addr}:{client_port}')
                    data = client_conn.recv(1024)
                    data = data.decode('utf-8')
                    print(data)
                    answer = ''
                    data_list = data.split('rn')
                    header_line, *other_lines = data_list
                    headers = {}
                    headers['method'], headers['uri'], headers['version'] = (
                        header_line.split()
                    )
                    version = headers['version']
                    for header in other_lines:
                        if header and ':' in header:
                            header_name, header_value = map(
                                lambda x: x.strip(),
                                header.split(':', maxsplit=1)
                            )
                            headers[header_name] = header_value
                    if 'Host' in headers.keys():
                        host = headers['Host']
                        directory = Path(config.get(
                            host.split(':')[0], 'Directory'
                        ))
                        status_code = 404
                        message = 'Not Found'
                        answer_body = ''
                        if '?' in headers['uri']:
                            uri_file, uri_params = headers['uri'].split('?')
                        else:
                            uri_file, uri_params = headers['uri'], ''
                        if uri_file in ['/', '/index', '/index.html']:
                            path = Path('index.html')
                        else:
                            path = Path().joinpath(*uri_file.split('/')[1:])
                        file_path = base_dir / directory / path
                        if file_path.exists():
                            status_code = 200
                            message = 'OK'
                            answer_body = file_path.read_text().format(
                                data=uri_params.replace('&', 'n')
                            )
                        answer_headers = (
                            f'{version} {status_code} {message}n{headers}nn'
                        )
                        answer = answer_headers + answer_body
                    client_conn.send(bytes(answer, 'utf-8'))
В папке sites у меня лежит файл test, в который я вставил вот такой код:
<html>
    <head>
        <meta charset="utf-8">
        <title>Тестовая страница</title>
    </head>
    <body>
        {data}
    </body>
</html>
Поэтому в коде сервера я указал answer_body.format(data=uri_params.replace("&", "n")).
Таким образом я лишь просто вывожу переданные параметры.
Теперь, если запустить сервер и обратиться по адресу localhost/test с передачей различных параметров в запросе, эти параметры с их значениями будут выведены на странице в браузере.
Передача параметров в POST запросе
Теперь осталось разобраться с тем, как происходит передача параметров в POST-запросе. Для этого в sites/index.html я создам форму, которая будет передавать POST-запрос к странице /test:
<html>
<head>
    <meta charset="utf8">
    <title>New page</title>
</head>
<body>
    <b>
        <i>Это новая страница сайта</i>
    </b>
    <p>Заполните форму ниже</p>
    <form method="post" action="test">
        <input name="fullname">
        <input name="email" type="email">
        <button type="submit">Отправить</button>
    </form>
</body>
</html>
Сохраняем переданный файл
И вот здесь-то после нажатия на кнопку «Отправить» сервер у меня завершил процесс с ошибкой. Как оказалось, все дело в том, что параметры POST запроса передаются не в стартовой строке запроса, как в GET, а в теле сообщения запроса. Поэтому нужно переписать код так, чтобы обрабатывать текст сообщений запроса:
#!-*-coding: utf8-*-
'''
Конфигурируемый веб-сервер с сохранением файлов
'''

import socket
import select
import configparser
from pathlib import Path
HOST = ''  # Символическое имя. По умолчанию localhost
PORT = 8080  # Указываем непривилированный порт

if __name__ == '__main__':
    with socket.socket(socket.AF_INET, socket.SOCK_STREAM) as sock:
        print('Socket created')

        # Связываем сокет с локальным хостом и портом
        sock.bind((HOST, PORT))

        print('Привязка сокета')

        # Слушаем сокет
        sock.listen(10)
        print('Слушаем сокет')

        inputs = [sock]
        outputs = [sock]

        base_dir = Path(__file__).parent
        root_dir = base_dir.parent

        config = configparser.ConfigParser()
        config.read(
            root_dir.absolute() / Path('conf') / Path('localhost.conf')
        )

        # Теперь можем общаться с клиентами
        while True:
            # Ждем подключения клиентов
            reads, writes, excepts = select.select(inputs, outputs, inputs)
            for conn in reads:
                _conn, client_addr = conn.accept()
                with _conn as client_conn:
                    ip_addr, client_port = client_addr
                    print(f'Подключение с {ip_addr}:{client_port}')
                    data = client_conn.recv(1024)
                    data = data.decode('utf-8')
                    print(data)
                    answer = ''
                    data_list = data.split('rn')
                    header_line, *other_lines = data_list
                    headers = {}
                    headers['method'], headers['uri'], headers['version'] = (
                        header_line.split()
                    )
                    version = headers['version']
                    msg_body = ''
                    for header in other_lines:
                        if header:
                            if ':' in header:
                                header_name, header_value = map(
                                    lambda x: x.strip(),
                                    header.split(':', maxsplit=1)
                                )
                                headers[header_name] = header_value
                                if (
                                    header_name == 'Content-Type'
                                    and 'boundary=' in header_value
                                ):
                                    boundary = (
                                        header_value.split('boundary=')[1]
                                    )
                                    boundary_data = data.split(boundary)[1:]
                                    for body_data in boundary_data:
                                        if 'filename' in body_data:
                                            data_file = (
                                                body_data.split('rnrn')[1]
                                            )
                                            filename = Path('test.txt')
                                            data_file_path = (
                                                base_dir / Path('upload') /
                                                filename
                                            )
                                            data_file_path.parent.mkdir(
                                                parents=True, exist_ok=True
                                            )
                                            data_file_path.write_bytes(
                                                data_file
                                            )
                            else:
                                msg_body += header + 'rn'
                    if 'Host' in headers.keys():
                        host = headers['Host']
                        directory = Path(config.get(host, 'Directory'))
                        status_code = 404
                        message = 'Not Found'
                        answer_body = ''
                        if '?' in headers['uri']:
                            uri_file, uri_params = headers['uri'].split('?')
                        else:
                            uri_file, uri_params = headers['uri'], msg_body
                        if uri_file in ['/', '/index', '/index.html']:
                            path = Path('index.html')
                        else:
                            path = Path().joinpath(*uri_file.split('/')[1:])
                        file_path = base_dir / directory / path
                        if file_path.exists():
                            status_code = 200
                            message = 'OK'
                            answer_body = file_path.read_text().format(
                                data=uri_params.replace('&', 'n')
                            )
                        answer_headers = (
                            f'{version} {status_code} {message}n{headers}nn'
                        )
                        answer = answer_headers + answer_body
                    client_conn.send(bytes(answer, 'utf-8'))
Обратите внимание, что названия передаваемых параметров есть ни что иное, как значение атрибута name тега <input>. Если не указать значение атрибута name, то в запрос данное поле не будет передано. Поэтому считайте, что этот атрибут обязательный, хотя на самом деле в html атрибуты не являются обязательными.
Теперь все в порядке. Процесс не завершается с ошибкой после нажатия на кнопку «Отправить» на клиенте. Вместо этого браузер переходит на страницу test и показывает параметры, которые мы передали в запросе POST.
Но теперь я хочу передать на сервер файл. Первое, что приходит на ум — это использовать поле типа file в форме:
<html>
<head>
    <meta charset="utf8">
    <title>New page</title>
</head>
<body>
    <b>
        <i>Это новая страница сайта</i>
    </b>
    <p>Заполните форму ниже</p>
    <form method="post" action="test">
        <input name="fullname">
        <input name="email" type="email">
        <input name="myfile" type="file">
        <button type="submit">Отправить</button>
    </form>
</body>
</html>
Теперь на странице test мы увидим название файла. НО… Это ведь не сам файл, а лишь его наименование. Как сделать так, чтобы передать содержимое указанного файла??? Ответ на этот вопрос здесь. Перепишем код страницы:
<html>
<head>
    <meta charset="utf8">
    <title>New page</title>
</head>
<body>
    <b>
        <i>Это новая страница сайта</i>
    </b>
    <p>Заполните форму ниже</p>
    <form method="post" action="test" enctype="multipart/form-data">
        <input name="fullname">
        <input name="email" type="email">
        <input name="myfile" type="file">
        <button type="submit">Отправить</button>
    </form>
</body>
</html>
Теперь вроде все в порядке. Но после запуска первое с чем я сталкиваюсь — это с размером передаваемого файла. В коде циклически читается 1024 байт, но файл, который я передаю, занимает порядка 10 кБ. В коде не происходит склейки новой порции данных со старыми при чтении данных. Исправляю:
#!-*-coding: utf8-*-
'''
Конфигурируемый веб-сервер с post-запросом
'''

import socket
import select
import configparser
from pathlib import Path
HOST = ''  # Символическое имя. По умолчанию localhost
PORT = 8080  # Указываем непривилированный порт

if __name__ == "__main__":
    with socket.socket(socket.AF_INET, socket.SOCK_STREAM) as sock:
        print('Socket created')

        # Связываем сокет с локальным хостом и портом
        sock.bind((HOST, PORT))

        print('Привязка сокета')

        # Слушаем сокет
        sock.listen(10)
        print('Слушаем сокет')

        inputs = [sock]
        outputs = [sock]

        base_dir = Path(__file__).parent
        root_dir = base_dir.parent

        config = configparser.ConfigParser()
        config.read(
            root_dir.absolute() / Path('conf') / Path('localhost.conf')
        )

        # Теперь можем общаться с клиентами
        while True:
            # Ждем подключения клиентов
            reads, writes, excepts = select.select(inputs, outputs, inputs)
            for conn in reads:
                _conn, client_addr = conn.accept()
                with _conn as client_conn:
                    ip_addr, client_port = client_addr
                    print(f'Подключение с {ip_addr}:{client_port}')
                    data = client_conn.recv(1024)
                    data = data.decode('utf-8')
                    print(data)
                    answer = ''
                    data_list = data.split("rn")
                    header_line, *other_lines = data_list
                    headers = {}
                    headers["method"], headers["uri"], headers["version"] = (
                        header_line.split()
                    )
                    version = headers['version']
                    msg_body = ""
                    for header in other_lines:
                        if header:
                            if ":" in header:
                                header_name, header_value = map(
                                    lambda x: x.strip(),
                                    header.split(':', maxsplit=1)
                                )
                                headers[header_name] = header_value
                            else:
                                msg_body += header + "rn"
                    if "Host" in headers.keys():
                        host = headers["Host"]
                        directory = Path(config.get(host, "Directory"))
                        status_code = 404
                        message = "Not Found"
                        answer_body = ""
                        if "?" in headers["uri"]:
                            uri_file, uri_params = headers["uri"].split("?")
                        else:
                            uri_file, uri_params = headers["uri"], msg_body
                        if uri_file in ["/", "/index", "/index.html"]:
                            path = Path('index.html')
                        else:
                            path = Path().joinpath(*uri_file.split("/")[1:])
                        file_path = base_dir / directory / path
                        if file_path.exists():
                            status_code = 200
                            message = "OK"
                            answer_body = file_path.read_text().format(
                                data=uri_params.replace('&', 'n')
                            )
                        answer_headers = (
                            f"{version} {status_code} {message}n{headers}nn"
                        )
                        answer = answer_headers + answer_body
                    client_conn.send(bytes(answer, 'utf-8'))
Теперь можно увидеть, что после добавления атрибута enctype=»multipart/form-data» содержимое запроса изменилось и можно увидеть передаваемые байты файла с его названием.
Теперь в заголовке Content-Type помимо типа еще есть параметр boundary, который переводится как «граница». Эта граница между параметрами в теле сообщений. С помощью значения этого параметра я буду разделять передаваемые параметры и их значения. Я не стал усложнять код, поэтому у меня получился вот такой результат:
#!-*-coding: utf8-*-
'''
Конфигурируемый веб-сервер с post-запросом
'''

import socket
import select
import configparser
from pathlib import Path
HOST = ''  # Символическое имя. По умолчанию localhost
PORT = 8080  # Указываем непривилированный порт

if __name__ == "__main__":
    with socket.socket(socket.AF_INET, socket.SOCK_STREAM) as sock:
        print('Socket created')

        # Связываем сокет с локальным хостом и портом
        sock.bind((HOST, PORT))

        print('Привязка сокета')

        # Слушаем сокет
        sock.listen(10)
        print('Слушаем сокет')

        inputs = [sock]
        outputs = [sock]

        base_dir = Path(__file__).parent
        root_dir = base_dir.parent

        config = configparser.ConfigParser()
        config.read(
            root_dir.absolute() / Path('conf') / Path('localhost.conf')
        )

        # Теперь можем общаться с клиентами
        while True:
            # Ждем подключения клиентов
            reads, writes, excepts = select.select(inputs, outputs, inputs)
            for conn in reads:
                _conn, client_addr = conn.accept()
                with _conn as client_conn:
                    ip_addr, client_port = client_addr
                    print(f'Подключение с {ip_addr}:{client_port}')
                    data = client_conn.recv(1024)
                    data = data.decode('utf-8')
                    print(data)
                    answer = ''
                    data_list = data.split("rn")
                    header_line, *other_lines = data_list
                    headers = {}
                    headers["method"], headers["uri"], headers["version"] = (
                        header_line.split()
                    )
                    version = headers['version']
                    msg_body = ""
                    for header in other_lines:
                        if header:
                            if ":" in header:
                                header_name, header_value = map(
                                    lambda x: x.strip(),
                                    header.split(':', maxsplit=1)
                                )
                                headers[header_name] = header_value
                            else:
                                msg_body += header + "rn"
                    if "Host" in headers.keys():
                        host = headers["Host"]
                        directory = Path(config.get(host, "Directory"))
                        status_code = 404
                        message = "Not Found"
                        answer_body = ""
                        if "?" in headers["uri"]:
                            uri_file, uri_params = headers["uri"].split("?")
                        else:
                            uri_file, uri_params = headers["uri"], msg_body
                        if uri_file in ["/", "/index", "/index.html"]:
                            path = Path('index.html')
                        else:
                            path = Path().joinpath(*uri_file.split("/")[1:])
                        file_path = base_dir / directory / path
                        if file_path.exists():
                            status_code = 200
                            message = "OK"
                            answer_body = file_path.read_text().format(
                                data=uri_params.replace('&', 'n')
                            )
                        answer_headers = (
                            f"{version} {status_code} {message}n{headers}nn"
                        )
                        answer = answer_headers + answer_body
                    client_conn.send(bytes(answer, 'utf-8'))
После запуска сервера и передачи текстового файла в папке со скриптом сервера у меня появился файл test.txt с содержимым передаваемого файла. Думаю теперь многим станет ясно, что очень важно правильно прочитать и обработать входящие данные от браузера.
Я не буду здесь рассматривать способ скачивания файлов с сервера и его методы докачки. Об этом можно прочитать тут.
WSGI
Но сервер еще до сих пор не является гибким и если нужно что-то добавить на сайт, то скорее всего придется переделывать код самого сервера. Чтобы избежать этого существует стандарт WSGI.
WSGI — стандарт обмена данными между веб-сервером (backend) и веб-приложением (frontend). Под это определение попадают многие вещи, тот же самый CGI. Так что поясню.
- Во-первых, WSGI — Python-специфичный стандарт, его описывают PEP 333 и PEP 3333.
- Во-вторых, он уже принят (статус Final).
По стандарту, WSGI-приложение должно удовлетворять следующим требованиям:
- должно быть вызываемым (callable) объектом (обычно это функция или метод)
- принимать два параметра:
- словарь переменных окружения (environ)[2]
- обработчик запроса (start_response)[3]
- вызывать обработчик запроса с кодом HTTP-ответа и HTTP-заголовками
- возвращать итерируемый объект с телом ответа
Значит сейчас я создам простенькое приложение, которое будет удовлетворять всем выше изложенным требованиям. У меня оно выглядит так:
def start_response(status_message, list_of_headers):
    print(status_message)
    print(list_of_headers)


def simplest_wsgi_app(environ, start_response):
    start_response('200 OK', [('Content-Type', 'text/plain')])
    yield 'Hello, world!'
В данном случае я создал функцию-приложение с названием simplest_wsgi_app и обработчик запроса start_response. Как видно из кода я ничего не обрабатываю в обработчике запроса, так как это лишь тестовый пример, чтобы показать как работает WSGI. Теперь это приложение нужно импортировать в сервер и при запросе от клиента выполнить данное приложение.
У меня получился вот такой код сервера с WSGI:
#!-*-coding: utf8-*-
'''
Простой веб-сервер с wsgi
'''

import socket
import select

from wsgi.application import simplest_wsgi_app, start_response

HOST = ''  # Символическое имя. По умолчанию localhost
PORT = 8080  # Указываем непривилированный порт

if __name__ == "__main__":
    with socket.socket(socket.AF_INET, socket.SOCK_STREAM) as sock:
        print('Socket created')

        # Связываем сокет с локальным хостом и портом
        sock.bind((HOST, PORT))

        print('Привязка сокета')

        # Слушаем сокет
        sock.listen(10)
        print('Слушаем сокет')
        # Теперь можем общаться с клиентами
        while True:
            # Ждем подключения клиентов
            conn, addr = sock.accept()
            print('Подключение с ' + addr[0] + ':' + str(addr[1]))
            ready, _, _ = select.select([conn], [], [], 1)
            if ready:
                data = conn.recv(1024)
                print(data)
                while True:
                    ready, _, _ = select.select([conn], [], [], 2)
                    if ready:
                        data += conn.recv(1024)
                    else:
                        break
                print(data)
                data_list = data.split("rn")
                headers = {}
                headers["method"], headers["uri"], headers["version"] = (
                    data_list[0].split()
                )
                version = headers["version"]
                msg_body = ""
                for header in data_list[1:]:
                    if header != "":
                        if ": " in header:
                            header_name, header_value = header.split(": ")
                            headers[header_name] = header_value
                            if (
                                header_name == "Content-Type"
                                and "boundary=" in header_value
                            ):
                                boundary = header_value.split("boundary=")[1]
                                boundary_data = data.split(boundary)[1:]
                                for body_data in boundary_data:
                                    if "filename" in body_data:
                                        data_file = (
                                            body_data.split("rnrn")[1]
                                        )
                                        filename = "test.txt"
                                        with open(filename, "wb") as in_file:
                                            in_file.write(data_file)
                        else:
                            msg_body += header + "rn"
                if "Host" in headers.keys():
                    status_code = 404
                    message = "Not Found"
                    answer_body = ""
                    env = {"host": "localhost"}
                    for ans in simplest_wsgi_app(env, start_response):
                        answer_body += ans
                    answer_headers = (
                        f"{version} {status_code} {message}n{headers}nn"
                    )
                    answer = answer_headers + answer_body
                    conn.send(answer)
                    conn.close()
                else:
                    conn.close()
Я вызываю созданное приложение и полученное значение сохраняю в тело ответа сервера. Полученный ответ ниже отдается браузеру.
Заставляем Python выполнить код на PHP
А для тех, кто все же хочет на своем сервере запускать скрипты php отвечу, что да, такое возможно. Решение взято отсюда.
У меня получился вот такой код:
#!-*-coding: utf8-*-
'''
Простой веб-сервер с запуском php-кода
'''

import socket
import select
import configparser
import os
from pathlib import Path
HOST = ''  # Символическое имя. По умолчанию localhost
PORT = 8080  # Указываем непривилированный порт

if __name__ == "__main__":
    with socket.socket(socket.AF_INET, socket.SOCK_STREAM) as sock:
        print('Socket created')

        # Связываем сокет с локальным хостом и портом
        sock.bind((HOST, PORT))

        print('Привязка сокета')

        # Слушаем сокет
        sock.listen(10)
        print('Слушаем сокет')

        inputs = [sock]
        outputs = [sock]

        base_dir = Path(__file__).parent
        root_dir = base_dir.parent

        config = configparser.ConfigParser()
        config.read(
            root_dir.absolute() / Path('conf') / Path('localhost.conf')
        )

        # Теперь можем общаться с клиентами
        while True:
            # Ждем подключения клиентов
            conn, addr = sock.accept()
            print('Подключение с ' + addr[0] + ':' + str(addr[1]))
            ready, _, _ = select.select([conn], [], [], 1)
            if ready:
                data = conn.recv(1024)
                print(data)
                while True:
                    ready, _, _ = select.select([conn], [], [], 2)
                    if ready:
                        data += conn.recv(1024)
                    else:
                        break
                print(data)
                data_list = data.split("rn")
                headers = {}
                headers["method"], headers["uri"], headers["version"] = (
                    data_list[0].split()
                )
                version = headers['version']
                msg_body = ""
                for header in data_list[1:]:
                    if header != "":
                        if ": " in header:
                            header_name, header_value = header.split(": ")
                            headers[header_name] = header_value
                            if (
                                header_name == "Content-Type"
                                and "boundary=" in header_value
                            ):
                                boundary = header_value.split("boundary=")[1]
                                boundary_data = data.split(boundary)[1:]
                                for body_data in boundary_data:
                                    if "filename" in body_data:
                                        data_file = (
                                            body_data.split("rnrn")[1]
                                        )
                                        filename = "test.txt"
                                        with open(filename, "wb") as in_file:
                                            in_file.write(data_file)
                        else:
                            msg_body += header + "rn"
                if "Host" in headers.keys():
                    host = headers["Host"]
                    directory = Path(config.get(
                        host, "Directory"
                    ))
                    status_code = 404
                    message = "Not Found"
                    answer_body = ""
                    if "?" in headers["uri"]:
                        uri_file, uri_params = headers["uri"].split("?")
                    else:
                        uri_file, uri_params = headers["uri"], msg_body
                    if uri_file in ["/", "/index", "/index.html"]:
                        path = Path('index.html')
                    else:
                        path = os.path.join(*uri_file.split("/")[1:])
                    file_path = base_dir / directory / path
                    if file_path.exists():
                        status_code = 200
                        message = "OK"
                        if not file_path.endswith(".php"):
                            answer_body = file_path.read_text().format(
                                data=uri_params.replace("&", "n")
                            )
                        else:
                            answer_body = os.popen(f'php {file_path}').read()
                    answer_headers = (
                        f"{version} {status_code} {message}n{headers}nn"
                    )
                    answer = answer_headers + answer_body
                    conn.send(answer)
                    conn.close()
                else:
                    conn.close()
Если сейчас обратиться по адресу localhost/test.php, то будет выполнен скрипт test.php. У меня test.php выведет информацию о php:
ИТОГИ
Теперь я надеюсь всем стало ясно следующее:
- Когда мы в браузере печатаем адрес ресурса, тогда веб-браузер, будучи программой, соединяется с сервером и передает ему некоторые сведения: стартовую строку, заголовки и тело сообщения. Эту всю информацию веб сервер парсит, анализирует и выдает клиенту результат обработки запроса.
- Передача параметров для GET и POST запросов отличается.
- Передача файлов от клиента на сервер и от сервера на клиент тоже имеет свои нюансы. Можно организовывать «докачку» файла.
- Можно создавать на питоне свое собственное приложение и это приложение будет вызываться при каждом обращении к веб-серверу. Эту возможность нам дает стандарт WSGI. Есть еще и CGI.
- В свою очередь браузер должен правильно составить тело сообщения, стартовую строку и блок заголовков. Но в данной статье процесс работы браузера я не рассматривал.
- При формировании ответа мы можем использовать шаблоны страниц, заменяя в них определенные теги. Именно так сделано в Django. Подстановочные теги в ходе обработки заменяются на необходимую информацию.
- Страницы для ответов с любым кодом состояния, будь то 404 или 500, необходимо создавать. Именно благодаря этому в Django мы можем создавать свою страницу, указывая серверу, какой шаблон использовать для ответа.
Ссылка на проект
Table of Contents
Python remains one of the best programming languages to learn in 2022, with applications in back-end web development, machine learning, scientific modelling, system operations, and several enterprise-specific software. It is generally considered one of the more approachable programming languages, with dynamically typed, English-like syntax and many libraries.
That accessibility extends to creating a Python web server, which you can do in only a few lines of code. Like our other Python tutorials, you’ll find that some of the most fundamental operations are carried out in a matter of minutes.
We’ll show you how to create your own Python web server for local testing. The whole process takes only a few minutes and a few lines of code.
But first, let’s go over what a web server is.
What is a Web Server? [Definition]
In the infrastructure of the internet, the server is one part of the client-server model. When a client browser visits a web page, it makes an HTTP request to the server containing the files needed to operate a website. The server listens to the client’s request, processes it, and responds with the required files to present the web page. This content could be HTML (the text and media you see on a website) and JSON (applications).
You might have encountered a few server error codes in your time browsing the internet — “file not found” or 404 being a more popular one. In these cases, the server has trouble accessing certain files. With a 404 error, the particular file is missing.
There are more nuances to web servers, including classification into static and dynamic web servers. For example, static web servers only return files as they are, with no extra processing. Dynamic web servers introduce databases and application servers, which you can proceed to once you’ve got the hang of static servers.
Having said all that, we should get into how you create a web server. We’ll assume you’re running the latest version of Python. There are resources for you to learn how to run a python script, among other useful lessons.
How Do You Create a Simple Python Web Server?
Launching a Python web server is quick and straightforward, and it’ll only take a few minutes for you to get up and to run. All it takes is one line of code to get the simplest of local servers running on your computer.
By local testing, your system becomes the server to the client that is your browser, and the files are stored locally on your system. The module you’ll be using to create a web server is Python’s http server. There is one caveat to this: it can only be used as a static file server. You’ll need a Python web framework, like Django, to run dynamic web servers.
Let’s get to the code, which looks like this follows:
python -m http.server
Type this into the terminal or command prompt, depending on your system, and you should see a “server started” message and a “server stopped” when you close the server.
And there you have it — your first Python webserver! Admittedly, it’s a simple one, doing nothing more than opening up a web server on your system’s default port of 8000. The port can also be changed by specifying the port number at the end of the line, like this:
python -m http.server 8080
A simple web server like the one you’ve just created is all well and good. It’s far more interesting and educational, however, to create a custom web server. After all, the best way to learn python is through a hands-on approach — code, debug, fix, rinse and repeat.
Recommend Python Course
Complete Python Bootcamp From Zero to Hero in Python
Creating a Custom Web Server Using Python
A custom web server allows you to do more than a built-in web server. The code you’re about to see will teach you a lot about some important functions and processes. Don’t be put off by the length of the code — there are only a handful of key concepts at play here. You don’t have to manually type all of this out to test it yourself — but note the significance of those concepts.
from http.server import HTTPServer, BaseHTTPRequestHandler #Python’s built-in library
import time
hostName = "localhost"
serverPort = 8080 #You can choose any available port; by default, it is 8000
Class MyServer(BaseHTTPRequestHandler):
 def do_GET(self): //the do_GET method is inherited from BaseHTTPRequestHandler
   self.send_response(200)
              self.send_header("Content-type", "text/html")
              self.end_headers()
             self.wfile.write(bytes("<html><head><title>https://testserver.com</title></head>", "utf-8"))
             self.wfile.write(bytes("<p>Request: %s</p>" % self.path, "utf-8"))
             self.wfile.write(bytes("<body>", "utf-8"))
               self.wfile.write(bytes("<p>This is an example web server.</p>", "utf-8"))
             self.wfile.write(bytes("</body></html>", "utf-8"))
if __name__ == "__main__":
  webServer = HTTPServer((hostName, serverPort), MyServer)
             print("Server started http://%s:%s" % (hostName, serverPort))  #Server starts
try:
          webServer.serve_forever()
except KeyboardInterrupt:
pass
webServer.server_close()  #Executes when you hit a keyboard interrupt, closing the server
    print("Server stopped.")
Before we jump into the critical parts, let’s quickly go over a few things. If you’ve done your HTML homework, then you’ll see some familiar terms in the code. The class MyServer writes to the output stream (wfile) that’s sent as a response to the client using “self.wfile.write()”. What we’re doing here is writing an elementary HTML page on the fly.
We’ll address some of the more important executions going on here, namely:
- The module http.server
- The classes HTTPServer and BaseHTTPRequestHandler, derived from the library http.server
- The do_GET method
The HTTP server is a standard module in the Python library that has the classes used in client-server communication. Those two classes are HTTPServer and BaseHTTPRequestHandler. The latter accesses the server through the former. HTTPServer stores the server address as instance variables, while BaseHTTPRequestHandler calls methods to handle the requests.
To sum up, the code starts at the main function. Next, the class MyServer is called, and the BaseHTTPRequestHandler calls the do_GET() method to meet requests. When you interrupt the program, the server closes.
If you did this correctly, you should see messages like this:
Why would you want to use a custom web server? It lets you use more methods, like do_HEAD() and do_POST(), offering additional functionality. In any case, you can see that creating a custom web server is also fairly straightforward.
Conclusion
It doesn’t take much to get your web server going using Python. It’s the fundamental idea that you should absorb. Creating your server is a small but significant step forward on your path to creating full-stack applications.
Try the code yourself, and perhaps even search for Python projects incorporating server implementation. There are many projects available that make use of this concept, so it’s good to know how to implement it in a larger context.
If you’re looking for more such lessons, head over to our Python tutorials page, there’s a lot of information on everything from the best resources to lessons that focus on a specific concept.
And if you’re looking to build your own website, we found some great discounts on NameCheap for domain names and web hosting.
People are also reading:
- Best Python Books
- Best Python Compilers
- Best Python Interpreters
- Best way to learn python
- Python Conditional Statements
- What is PyCharm?
- Python for Data Science
- Python vs PHP
- Python vs Java
Человек — это звучит гордо, а выглядит отвратительно (Куклы).
 Веб-серверы есть везде.
Черт возьми, вы взаимодействуете с одним прямо сейчас!
Независимо от того, какой вы разработчик программного обеспечения, в какой-то момент вашей карьеры вам придется взаимодействовать с веб-серверами. Может быть, вы создаете сервер API для бэкэнда. Или, может быть, вы просто настраиваете веб-сервер для своего сайта.
В этой статье мы расскажем, как создать самый простой http веб-сервер на Python.
Но поскольку мы хотим убедиться, что вы понимаете, что мы создаем, мы сначала дадим обзор о том, что такое веб-серверы и как они работают.
Если вы уже знаете, как работают веб-серверы, вы можете сразу перейти к этому разделу.
- Что такое HTTP-сервер?
- Адрес сокета TCP
- Создайте простой файл HTTP
- Создать HTTP веб-сервер
Что такое HTTP-сервер?
Веб-сервер HTTP — это не что иное, как процесс, который выполняется на вашем компьютере и выполняет ровно две вещи:
1- Прослушивает входящие HTTP-запросы на определенный адрес сокета TCP (IP-адрес и номер порта, о которых мы расскажем позже)
2- Обрабатывает этот запрос и отправляет ответ обратно пользователю.
Но что на самом деле происходит под капотом?
На самом деле много чего происходит, и мы могли бы посвятить целую статью, чтобы объяснить магию, как это произошло.
Но для простоты мы отвлечемся от некоторых деталей и расскажем об этом на очень высоком уровне.
На высоком уровне, когда вы набираете www.yandex.ru в своем браузере, ваш браузер создаст сетевое сообщение, называемое HTTP-запросом.
Этот запрос будет распространяться на компьютер yandex, на котором работает веб-сервер. Этот веб-сервер перехватит ваш запрос и обработает его, отвечая HTML-кодом домашней страницы yandex.
Наконец, ваш браузер отображает этот HTML на экране, и это то, что вы видите на своем экране.
Каждое взаимодействие с домашней страницей yandex после этого (например, когда вы нажимаете на ссылку) инициирует новый запрос и ответ точно так же, как первый.
Повторим еще раз: на машине, которая получает запрос http, работает программный процесс, называемый веб-сервером. Этот веб-сервер отвечает за перехват этих запросов и их обработку соответствующим образом.
Хорошо, теперь, когда вы знаете, что такое веб-сервер и какова его функция, вам может быть интересно, как запрос в первую очередь достигает машины yandex?
Хороший вопрос!
Позвольте нам объяснить, как, но опять же … на высоком уровне.
Адрес сокета TCP
Любое http-сообщение (будь то запрос или ответ) должно знать, как добраться до места назначения.
Чтобы достичь места назначения, каждое http-сообщение содержит адрес, называемый адресом TCP назначения.
И каждый TCP-адрес состоит из IP-адреса и номера порта.
Мы знаем, что все эти аббревиатуры (TCP, IP и т. д.) могут быть ошеломляющими, если ваши сетевые знания не сильны.
Так где же этот адрес, когда все, что вы сделали, и набрали www.yandex.ru в вашем браузере?
Ну, это доменное имя преобразуется в IP-адрес через большую распределенную базу данных, называемую DNS.
Хотите проверить, что это за IP-адрес?
Легко! Зайдите в свой терминал и сделайте следующее:
$ host yandex.ru
Yandex.ru has address 77.88.55.66
Yandex.ru has address 5.255.255.70
Yandex.ru has address 77.88.55.70
Yandex.ru has address 5.255.255.60
Yandex.ru has IPv6 address 2a02:6b8:a::a
Yandex.ru mail is handled by 10 mx.Yandex.ru.
Как видите, как DNS переведет yandex.ru на любой из указанных выше адресов.
Один только IP-адрес позволит HTTP-сообщению поступить на нужный компьютер, но вам все равно нужен номер порта, чтобы HTTP-запрос поступил именно на веб-сервер.
Другими словами, веб-сервер — это обычное сетевое приложение, которое прослушивает определенный порт.
И HTTP-запрос ДОЛЖЕН быть адресован этому порту.
Так где же номер порта при вводе www.yandex.ru ?
По умолчанию номер порта равен 80 для http и 443 для https, поэтому даже если вы не указали номер порта явно, он все еще там.
И если веб-сервер прослушивает номер порта не по умолчанию (ни 80, ни 443), вы должны явно указать номер порта следующим образом:
www.yandex.ru:445
К настоящему времени у вас должна быть вся необходимая информация для создания http-сервера на Python.
Так что без дальнейших церемоний, давайте начнем.
Создайте простой файл HTML
Вот что мы хотим сделать.
Мы хотим создать простой http-сервер, который обслуживает статическую HTML-страницу.
Давайте создадим нашу HTML-страницу.
<html>
    <head>
        <title>Python-это потрясающе!</title>
    </head>
    <body>
        <h1>yandex</h1>
        <p>Поздравляю! Сервер HTTP работает!</p>
    </body>
</html>
Теперь сохраните этот файл как index.html.
Теперь, для обслуживания веб-страницы, следующим шагом является создание веб-сервера, который будет обслуживать эту HTML-страницу.
Создать HTTP веб-сервер
Чтобы создать веб-сервер в Python 3, вам нужно импортировать два модуля: http.server и socketserver
Обратите внимание, что в Python 2 был модуль с именем SimpleHTTPServer. Этот модуль был объединен с http.server в Python 3
Давайте посмотрим на код для создания http-сервера
import http.server
import socketserver

PORT = 8080
Handler = http.server.SimpleHTTPRequestHandler

with socketserver.TCPServer(("", PORT), Handler) as httpd:
    print("serving at port", PORT)
    httpd.serve_forever()
Просто так у нас есть функциональный http-сервер.
Теперь давайте разберем этот код построчно.
Во-первых, как мы упоминали ранее, веб-сервер — это процесс, который прослушивает входящие запросы на определенный TCP-адрес.
И, как вы уже знаете, TCP-адрес идентифицируется по IP-адресу и номеру порта.
Во-вторых, веб-сервер также должен знать, как обрабатывать входящие запросы.
Эти входящие запросы обрабатываются специальными обработчиками. Вы можете думать о веб-сервере как о диспетчере, поступает запрос, http-сервер проверяет запрос и отправляет его назначенному обработчику.
Конечно, эти обработчики могут делать все что угодно.
Но что вы думаете, какой самый основной обработчик?
Ну, это будет обработчик, который просто обслуживает статический файл.
Другими словами, когда мы заходим на yandex.ru, веб-сервер на другом конце отправляет обратно статический HTML-файл.
Это на самом деле то, что мы пытаемся сделать.
И это, и есть то, что является http.server.SimpleHTTPRequestHandler : простой обработчик HTTP-запросов, который обслуживает файлы из текущего каталога и любых его подкаталогов.
Класс socketserver.TCPServer
Теперь поговорим о классе socketserver.TCPServer.
Экземпляр TCPServer описывает сервер, который использует протокол TCP для отправки и получения сообщений (http — это протокол прикладного уровня поверх TCP).
Чтобы создать экземпляр TCP-сервера, нам нужны две вещи:
- TCP-адрес (IP-адрес и номер порта)
- Обработчик
socketserver.TCPServer(("", PORT), Handler)
Как видите, TCP-адрес передается в виде кортежа (IP-адрес, номер порта)
Передача пустой строки в качестве IP-адреса означает, что сервер будет прослушивать любой сетевой интерфейс (все доступные IP-адреса).
А поскольку PORT хранит значение 8080, сервер будет прослушивать входящие запросы на этот порт.
Для обработчика мы передаем простой обработчик, о котором мы говорили ранее.
Handler = http.server.SimpleHTTPRequestHandler
Ну, а как насчет serve_forever?
serve_forever — это метод в экземпляре TCPServer, который запускает сервер и начинает прослушивать и отвечать на входящие запросы.
Круто, давайте сохраним этот файл как server.py в том же каталоге, что и index.html, потому что по умолчанию SimpleHTTPRequestHandler будет искать файл с именем index.html в текущем каталоге.
В этом каталоге запустите веб-сервер:
$ python server.py
serving at port 8080
Благодаря этому теперь у вас есть HTTP-сервер, который прослушивает любой интерфейс на порте 8080 и ожидает входящие HTTP-запросы.
Пришло время для забавных вещей!
Откройте браузер и введите localhost:8080 в адресной строке.
Потрясающие! Похоже, все работает нормально.
Но что такое localhost ?
localhost — это имя хоста, которое означает этот компьютер. Он используется для доступа к сетевым службам, работающим на хосте, через петлевой сетевой интерфейс.
А поскольку веб-сервер прослушивает любой интерфейс, он также прослушивает интерфейс обратной связи.
Вы хотите знать, какой IP-адрес соответствует localhost?
Введите следующее:
$ host localhost
localhost has address 127.0.0.1
localhost has IPv6 address ::1
Host localhost not found: 3(NXDOMAIN)
Фактически вы можете полностью заменить localhost на 127.0.0.1 в вашем браузере, и вы все равно получите тот же результат.
Одно последнее слово
На самом деле вы можете запустить веб-сервер с python, даже не создавая никаких скриптов.
Просто зайдите в свой терминал и сделайте следующее (но убедитесь, что вы на Python 3)
python -m http.server 8080
По умолчанию этот сервер будет прослушивать все интерфейсы и порт 8080.
Если вы хотите прослушать определенный интерфейс, сделайте следующее:
python -m http.server 8080 --bind 127.0.0.1
Также начиная с Python 3.7, вы можете использовать флаг –directory для обслуживания файлов из каталога, который не обязательно является текущим каталогом.
Таким образом, теперь возникает вопрос: зачем вам когда-либо писать сценарий, когда вы можете просто вызывать сервер из терминала?
Хорошо, помните, что вы используете SimpleHTTPRequestHandler. Если вы хотите создать свои собственные обработчики (что вы, вероятно, захотите), то вы не сможете сделать это из терминала.
Если вы нашли ошибку, пожалуйста, выделите фрагмент текста и нажмите Ctrl+Enter.
Загрузка…
HTTP & Web Servers
<– back to Mobile Web Specialist Nanodegree homepage
Resource Links
Python Docs
- The Python Tutorial
- BaseHTTPRequestHandler
- Executing modules as scripts
- urllib.parse
- url-quoting
- Requrests Quickstart
Utilities
- Let’s Encrypt is a great site to learn about HTTPS in a hands-on way, by creating your own HTTPS certificates and installing them on your site.
- HTTP Spy is a neat little Chrome extension that will show you the headers and request information for every request your browser makes.
Setup
Welcome to our course on HTTP and Web Servers! In this course, you’ll learn how web servers work. You’ll write web services in Python, and you’ll also write code that accesses services out on the web.
This course isn’t about installing Apache on a Linux server, or uploading HTML files to the cloud. It’s about how the protocol itself works. The examples you’ll build in this course are meant to illustrate the low-level behaviors that higher-level web frameworks and services are built out of.
Getting Started
You’ll be using the command line a lot in this course. A lot of the instructions in this course will ask you to run commands on the terminal on your computer. You can use any common terminal program —
- On Windows 10, you can use the bash shell in Windows Subsystem for Linux.
- On earlier versions of Windows, you can use the Git Bash terminal program from Git.
- On Mac OS, you can use the built-in Terminal program, or another such as iTerm.
- On Linux, you can use any common terminal program such as gnome-terminal or xterm.
Python 3
This course will not use a VM (virtual machine). Instead, you will be running code directly on your computer. This means you will need to have Python installed on your computer. The code in this course is built for Python 3, and will not all work in Python 2.
- Windows and Mac: Install it from python.org: https://www.python.org/downloads/
- Mac (with Homebrew): In the terminal, run
brew install python3 - Debian/Ubuntu/Mint: In the terminal, run
sudo apt-get install python3
Open a terminal and check whether you have Python installed:
$ python --version
Python 2.7.12

$ python3 --version
Python 3.5.2
Depending on your system, the Python 3 command may be called
pythonorpython3. Take a moment to check! Due to changes in the language, the examples in this course will not work in Python 2.In the screenshot above, the
pythoncommand runs Python 2.7.12, while the python3 command runs Python 3.5.2. In that situation, we’d want to usepython3for this course.
Interactive Python
You should be familiar with the Python interactive interpreter. When you see code examples with the >>> prompt in this course, those are things you can try out in Python on your own computer. For instance:
>>> from urllib.parse import urlparse
>>> urlparse("https://classroom.udacity.com/courses/ud303").path
'/courses/ud303'
Git
You will need to have the git version control software installed. If you don’t have it already, you can download it from https://git-scm.com/downloads.
$ git --version
git version 2.18.0
You’ll be using Git to download course materials from the Github repository https://github.com/udacity/course-ud303. (You don’t need to do this yet.) You’ll also use it as part of an exercise on deploying a server to a hosting provider.
Nmap
You’ll also need to install ncat, which is part of the Nmap network testing toolkit. We’ll be using ncat to investigate how web servers and browsers talk to each other.
- Windows: Download and run https://nmap.org/dist/nmap-7.30-setup.exe
- Mac (with Homebrew): In the terminal, run brew install nmap
- Mac (without Homebrew): Download and install https://nmap.org/dist/nmap-7.30.dmg
- Debian/Ubuntu/Mint: In the terminal, run sudo apt-get install nmap
To check whether ncat is installed and working, open up two terminals. In one of them, run ncat -l 9999 then in the other, ncat localhost 9999.
Then type something into each terminal and press Enter. You should see the message on the opposite terminal:
I’ve got two terminals open on my computer. I run
ncatas a server in the terminal on the left. Ncat dash little L 9999. Now it’s listening on port 9999.On the right, I run
ncatas a client, and tell it to connect to localhost port 9999. They’re connected now, but they’re not saying anything yet. Let’s change that.On the server side, I type in a message. “Hello from server”, and you see it shows up on the client side.
Now I send a message from the client to the server. And sure enough, it shows up over on the server side.
This shows that each end of the connections can send data to the other.
Now, none of this is happening over HTTP. This is at the network layer below HTTP, called TCP. But we can use this to experiment with HTTP servers, which we’ll do later in this lesson.
For now, I’ll have the server say goodbye, and then I’ll shut the client down by typing control-c. You should try this out yourself to make sure
ncatis installed and working right on your computer.
What’s going on here? Well, one of the ncat programs is acting as a very simple network server, and the other is acting as a client.
Note: If you get an error such as “Address already in use”, this means that another program on your computer is using port 9999. You can pick another port number and use it. Make sure to use the same port number on the server and client sides.
To exit the ncat program, type Control-C in the terminal. If you exit the server side first, the client should automatically exit. This happens because the server ends the connection when it shuts down.
You’ll be learning much more about the interaction between clients and servers throughout this course.
6. Requests & Responses
6.1 Introduction
This is a course about HTTP and web servers.

HTTP, the Hypertext Transfer Protocol, is the language that web browsers and web servers speak to each other. Every time you open a web page, or download a file,or watch a video like this one, it’s HTTP that makes it possible.
In this course, you’ll take a look at how all that takes place.
- In lesson one, you’ll explore the building blocks of HTTP.
- In lesson two, you’ll write web server and client programs from the ground up and handle user input from HTML forms.
- In lesson three, you’ll learn about web server hosting, cookies, and many other more practical aspects of building web services.
This course is a bridge. It’s going to connect your knowledge of basic web technologies, like HTML, with your experience writing code in Python.
With that foundation, you can go on to learn and build many more awesome things.
6.2 First Web Server
An HTTP transaction always involves a client and a server. You’re using an HTTP client right now, your web browser.
Your browser sends HTTP requests to web servers, and servers send responses back to your browser.
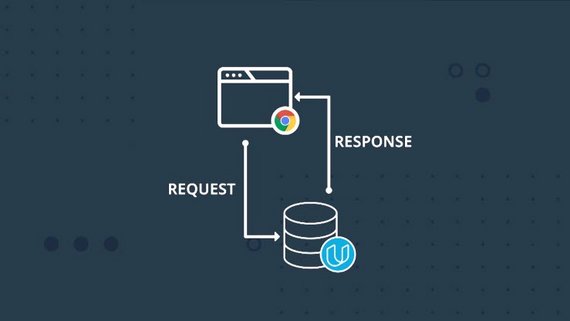
Displaying a simple web page can involve dozens of requests — for the HTML page itself, for images or other media, and for additional data that the page needs.
HTTP was originally created to serve hypertext documents, but today is used for much more. As a user of the web, you’re using HTTP all the time.
A lot of smartphone apps use HTTP under the hood to send requests and receive data. Web browsers are just the most common — and complicated — user interface for web technology. But browsers are not the only web client around. HTTP is powerful and widely supported in software, so it’s a common choice for programs that need to talk to each other across the network, even if they don’t look anything like a web browser.
Exercise: Running your first web server
So what about the other end, the web server? Well, it turns out that a web server can actually be a lot simpler than a browser. Browsers have all this user interface and animation and graphics stuff going on. A server just needs to do one thing: handle incoming requests.
The Python http.server module can run a built-in web server on your computer. It’s not a web app you’d publish to the world; it’s a demonstration of Python’s HTTP abilities. We’ll be referring to this as the demo server in this lesson.
So, let’s get started with the demo web server.
Open up a terminal; cd to a directory that has some files in it — maybe a directory containing some text files, HTML files, or images — then run python3 -m http.server 9000 in your terminal.
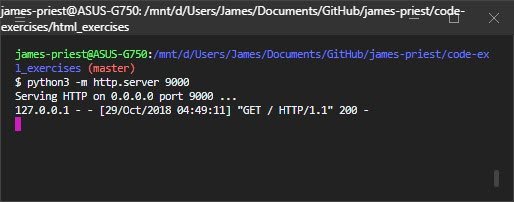
When you start up the demo server, it will print a message telling you that it’s serving HTTP. Leave it running, and leave the terminal open. Now try accessing http://localhost:9000/ from your browser. You should see something like this, although the file names you see will be different from mine:
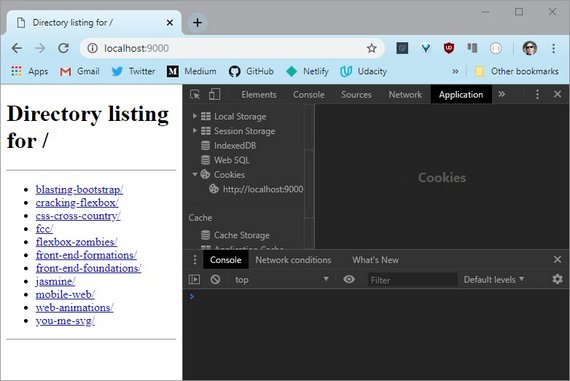
And that’s the Python demo web server, running on your own computer. It serves up files on your local disk so you can look at them in your browser.
This may not seem like much of a big deal — after all, if you just wanted to access files on your local computer in your browser, you could use file:// URIs. But the demo server is actually a web server. If you have another computer on the same local network, you could use it to access files served up by this server.
When you put localhost:9000 in your browser, your browser sends an HTTP request to the Python program you’re running. That program responds with a piece of data, which your browser presents to you. In this case, it’s showing you a directory listing as a piece of HTML. Use your browser’s developer tools to look at the HTML that it sends.
Note: If you have a file called index.html in that directory, you’ll see the contents of that file in your browser instead of the directory listing. Move that file somewhere else and reload the page, and you will see the directory listing like the one above.
6.2 Question 1
What happens if you make up a web address that doesn’t correspond to a file you actually have, like http://localhost:9000/NotExistyFile?
6.2 Answer 1
The browser gives an error response with a 404 error code, and the server keeps running.
404 is the HTTP status code for “Not Found”. On Highway 101, not far from the Udacity office in Mountain View, there’s a sign that tells the distance to Los Angeles. As it happens, it’s 404 miles from Mountain View to Los Angeles, so the sign says Los Angeles 404. And so, every web programmer in Silicon Valley has probably heard the “Los Angeles Not Found” joke at least once.
What’s a server anyway
A server is just a program that accepts connections from other programs on the network.
When you start a server program, it waits for clients to connect to it — like the demo server waiting for your web browser to ask it for a page. Then when a connection comes in, the server runs a piece of code — like calling a function — to handle each incoming connection. A connection in this sense is like a phone call: it’s a channel through which the client and server can talk to each other. Web clients send requests over these connections, and servers send responses back.
Take a look in the terminal where you ran the demo server. You’ll see a server log with an entry for each request your browser sent:

Hey wow, what is all this stuff? There are some dates and times in there, but what’s GET / HTTP/1.1, or for that matter 127.0.0.1? And what’s that 200 doing over there?
How do these things relate to the web address you put into your browser? Let’s take a look at that next.
6.3 Parts of a URI
A web address is also called a URI for Uniform Resource Identifier. You’ve seen plenty of these before. From a web user’s view, a URI is a piece of text that you put into your web browser that tells it what page to go to. From a web developer’s view, it’s a little bit more complicated.
You’ve probably also seen the term URL or Uniform Resource Locator. These are pretty close to the same thing; specifically, a URL is a URI for a resource on the network. Since URI is slightly more precise, we’ll use that term in this course. But don’t worry too much about the distinction.
A URI is a name for a resource — such as this lesson page, or a Wikipedia article, or a data source like the Google Maps API. URIs are made out of several different parts, each of which has its own syntax. Many of these parts are optional, which is why URIs for different services look so different from one another.
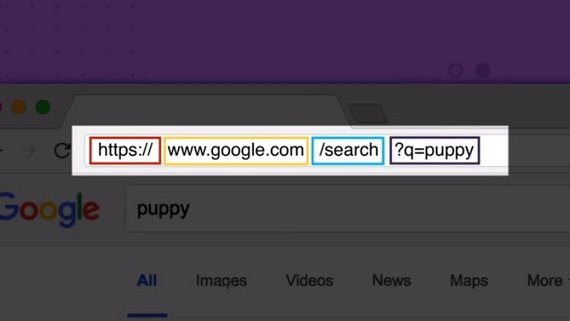
Here is an example of a URI: https://en.wikipedia.org/wiki/Fish
This URI has three visible parts, separated by a little bit of punctuation:
httpsis the scheme;en.wikipedia.orgis the hostname;- and
/wiki/Fishis the path.
Different URIs can have different parts; we’ll see more below.
Scheme
The first part of a URI is the scheme, which tells the client how to go about accessing the resource. Some URI schemes you’ve seen before include http, https, and file. File URIs tell the client to access a file on the local filesystem. HTTP and HTTPS URIs point to resources served by a web server.
HTTP and HTTPS URIs look almost the same. The difference is that when a client goes to access a resource with an HTTPS URI, it will use an encrypted connection to do it. Encrypted Web connections were originally used to protect passwords and credit-card transactions, but today many sites use them to help protect users’ privacy. We’ll look more into HTTPS near the end of this course.
There are many other URI schemes out there, though. You can take a look at [the official list](http://www.iana.org/assignments/uri-schemes/uri-schemes.xhtml!
6.3 Question 1
Which of these are real URI schemes actually used on the Web?
- mailto
- data
- magnet
- postal
Hostname
In an HTTP URI, the next thing that appears after the scheme is a hostname — something like www.udacity.com or localhost. This tells the client which server to connect to.
You’ll often see web addresses written as just a hostname in print. But in the HTML code of a web page, you can’t write <a href="www.google.com">this</a> and get a working link to Google. A hostname can only appear after a URI scheme that supports it, such as http or https. In these URIs, there will always be a :// between the scheme and hostname.
We’ll see more about hostnames later on in the lesson. By the way, not every URI has a hostname. For instance, a mailto URI just has an email address: mailto:spam@example.net is a well-formed mailto URI. This also reveals a bit more about the punctuation in URIs: the : goes after the scheme, but the // goes before the hostname. Mailto links don’t have a hostname part, so they don’t have a //.
Path
In an HTTP URI (and many others), the next thing that appears is the path, which identifies a particular resource on a server. A server can have many resources on it — such as different web pages, videos, or APIs. The path tells the server which resource the client is looking for.
On the demo server, the paths you see will correspond to files on your filesystem. But that’s just the demo server. In the real world, URI paths don’t necessarily equate to specific filenames. For instance, if you do a Google search, you’ll see a URI path such as /search?q=ponies. This doesn’t mean that there’s literally a file on a server at Google with a filename of search?q=ponies. The server interprets the path to figure out what resource to send. In the case of a search query, it sends back a search result page that maybe never existed before.
When you write a URI without a path, such as http://udacity.com, the browser fills in the default path, which is written with a single slash. That’s why http://udacity.com is the same as http://udacity.com/ (with a slash on the end).
The path written with just a single slash is also called the root. When you look at the root URI of the demo server — http://localhost:8000/ — you’re not looking at the root of your computer’s whole filesystem. It’s just the root of the resources served by the web server. The demo server won’t let a web browser access files outside the directory that it’s running in.
6.3 Question 2
Here is a URI: http://example.net/google.com/ponies
What is the hostname in this URI?
- www.example.net
- example.net
- google.com
- /google.com/ponies
Relative URI references
Take a look at the HTML source for the demo server’s root page. Find one of the <a> tags that links to a file. In mine, I have a file called cliffsofinsanity.png, so there’s an <a> tag that looks like this:
<a href="cliffsofinsanity.png">cliffsofinsanity.png</a>
URIs like this one don’t have a scheme, or a hostname — just a path. This is a relative URI reference. It’s “relative” to the context in which it appears — specifically, the page it’s on. This URI doesn’t include the hostname or port of the server it’s on, but the browser can figure that out from context. If you click on one of those links, the browser knows from context that it needs to fetch it from the same server that it got the original page from.
Other URI parts
There are many other parts that can occur in a URI. Consider the difference between these two Wikipedia URIs:
- https://en.wikipedia.org/wiki/Oxygen
- https://en.wikipedia.org/wiki/Oxygen#Discovery
If you follow these links in your browser, it will fetch the same page from Wikipedia’s web server. But the second one displays the page scrolled to the section about the discovery of oxygen. The part of the URI after the # sign is called a fragment. The browser doesn’t even send it to the web server. It lets a link point to a specific named part of a resource; in HTML pages it links to an element by id.
In contrast, consider this Google Search URI:
- https://www.google.com/search?q=fish
The ?q=fish is a query part of the URI. This does get sent to the server.
There are a few other possible parts of a URI. For way more detail than you need for this course, take a look at this Wikipedia article:
- https://en.wikipedia.org/wiki/Uniform_Resource_Identifier#Generic_syntax
(Hey, look, it’s another fragment ID!)
6.4 Hostnames and Ports
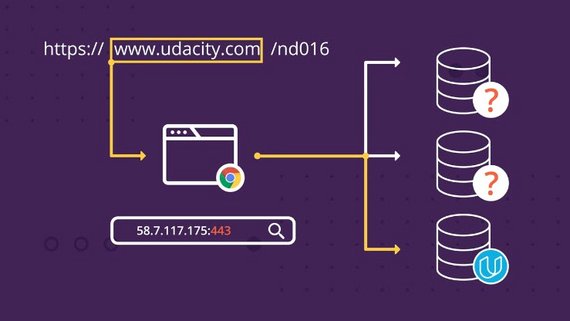
Hostnames
A full HTTP or HTTPS URI includes the hostname of the web server, like www.udacity.com or www.un.int or www.cheeseboardcollective.coop (my favorite pizza place in the world, in Berkeley CA). A hostname in a URI can also be an IP address: for instance, if you put http://216.58.194.174/ in your browser, you’ll end up at Google.
Why is it called a hostname? In network terminology, a host is a computer on the network; one that could host services.
The Internet tells computers apart by their IP addresses; every piece of network traffic on the Internet is labeled with the IP addresses of the sending and receiving computers. In order to connect to a web server such as www.udacity.com, a client needs to translate the hostname into an IP address. Your operating system’s network configuration uses the Domain Name Service (DNS) — a set of servers maintained by Internet Service Providers (ISPs) and other network users — to look up hostnames and get back IP addresses.
In the terminal, you can use the host program to look up hostnames in DNS:
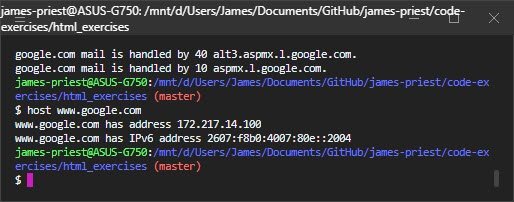
Some systems don’t have the host command, but do have a similar command called nslookup. This command also displays the IP address for the hostname you give it; but it also shows the IP address of the DNS server that’s giving it the answer:
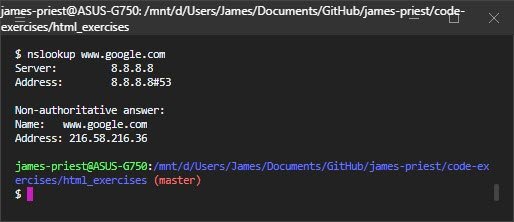
6.4 Question 1
Use the host or nslookup command to find the IPv4 address for the name localhost. What is it?
- 1.2.3.4
- 127.0.0.1
- 0.0.0.0
- ::1
IP addresses come in two different varieties: the older IPv4 and the newer IPv6. When you see an address like 127.0.0.1 or 216.58.194.164, those are IPv4 addresses. IPv6 addresses are much longer, such as 2607:f8b0:4005:804::2004, although they can also be abbreviated.
Localhost
The IPv4 address 127.0.0.1 and the IPv6 address ::1 are special addresses that mean “this computer itself” — for when a client (like your browser) is accessing a server on your own computer. The hostname localhost refers to these special addresses.
When you run the demo server, it prints a message saying that it’s listening on 0.0.0.0. This is not a regular IP address. Instead, it’s a special code for “every IPv4 address on this computer”. That includes the localhost address, but it also includes your computer’s regular IP address.
6.4 Question 2
Use host or nslookup command to find the IPv4 addresses of en.wikipedia.org and ja.wikipedia.org — the servers the Wikipedia in English and Japanese.
Are these sites on the same IP address?
- Yes, they are on the same IP address
- No, they are on different IP addresses.
As of October 2016, these sites were on the same IP address, but the Wikimedia Foundation can move their servers around sometimes — so you might have gotten a different answer.
A single web server can have lots of different web sites running on it, each with their own hostname. When a client asks the server for a resource, it has to specify what hostname it intends to be talking to. We’ll see more about this later, in the section on HTTP headers.
Ports
When you told your browser to connect to the demo server, you gave it the URI http://localhost:9000/. This URI has a port number of 9000. But most of the web addresses you see in the wild don’t have a port number on them. This is because the client usually figures out the port number from the URI scheme.
For instance, HTTP URIs imply a port number of 80, whereas HTTPS URIs imply a port number of 443. Your Python demo web server is running on port 9000. Since this isn’t the default port, you have to write the port number in URIs for it.
What’s a port number, anyway? To get into that, we need to talk about how the Internet works. All of the network traffic that computers send and receive — everything from web requests, to login sessions, to file sharing — is split up into messages called packets. Each packet has the IP addresses of the computer that sent it, and the computer that receives it. And (with the exception of some low-level packets, such as ping) it also has the port number for the sender and recipient. IP addresses distinguish computers; port numbers distinguish programs on those computers.
We say that a server “listens on” a port, such as 80 or 8000. “Listening” means that when the server starts up, it tells its operating system that it wants to receive connections from clients on a particular port number. When a client (such as a web browser) “connects to” that port and sends a request, the operating system knows to forward that request to the server that’s listening on that port.
Why do we use port 9000 instead of 80 for the demo server? For historical reasons, operating systems only allow the administrator (or root) account to listen on ports below 1024. This is fine for production web servers, but it’s not convenient for learning.
6.4 Question 3
Which of the URIs below refers to the same resource as https://en.wikipedia.org/wiki/Fish?
http://en.wikipedia.org/wiki/Fishhttps://en.wikipedia.org:443/wiki/Fishhttp://en.wikipedia.org:80/wiki/Fishhttp://en.wikipedia.org:8000/wiki/Fish
6.5 HTTP GET Requests
HTTP GET requests
Take a look back at the server logs on your terminal, where the demo server is running. When you request a page from the demo server, an entry appears in the logs with a message like this:
127.0.0.1 - - [29/Oct/2018 06:23:35] "GET /images/bg1.jpg HTTP/1.1" 200 -
Take a look at the part right after the date and time. Here, it says "GET /images/bg1.jpg HTTP/1.1". This is the text of the request line that the browser sent to the server. This log entry is the server telling you that it received a request that said, literally, GET /images/bg1.jpg HTTP/1.1.
This request has three parts.
The word GET is the method or HTTP verb being used; this says what kind of request is being made. GET is the verb that clients use when they want a server to send a resource, such as a web page or image. Later, we’ll see other verbs that are used when a client wants to do other things, such as submit a form or make changes to a resource.
/bg1.jpg is the path of the resource being requested. Notice that the client does not send the whole URI of the resource here. It doesn’t say https://localhost:9000/images/bg1.jpg. It just sends the path.
Finally, HTTP/1.1 is the protocol of the request. Over the years, there have been several changes to the way HTTP works. Clients have to tell servers which dialect of HTTP they’re speaking. HTTP/1.1 is the most common version today.
Exercise: Send a request by hand
You can use ncat to connect to the demo server and send it an HTTP request by hand. (Make sure the demo server is still running!)
Terminal 1
$ python3 -m http.server 9000
Serving HTTP on 0.0.0.0 port 9000 ...
Terminal 2
Try it out:
Use ncat 127.0.0.1 9000 to connect your terminal to the demo server.
Then type these two lines:
GET / HTTP/1.1
Host: localhost
After the second line, press Enter twice. As soon as you do, the response from the server will be displayed on your terminal. Depending on the size of your terminal, and the number of files the web server sees, you will probably need to scroll up to see the beginning of the response!
6.5 Question
Which of these things do you see in the server’s response?
- A line end with
200 OK - The date and time.
- A Python error message
- A piece of HTML
- A message that says
Ncat: connection refused
If your server works like mine, you’ll see a status line that says HTTP/1.0 200 OK, then several lines of headers including the date as well as some other information, and a piece of HTML code. These parts make up the HTTP response that the server sends.
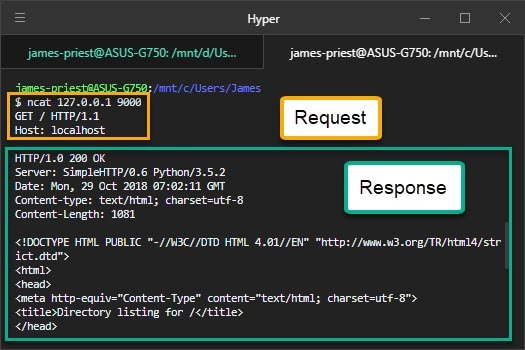
On the next page, we’ll look at the parts of the HTTP response in detail.
6.6 HTTP Responses
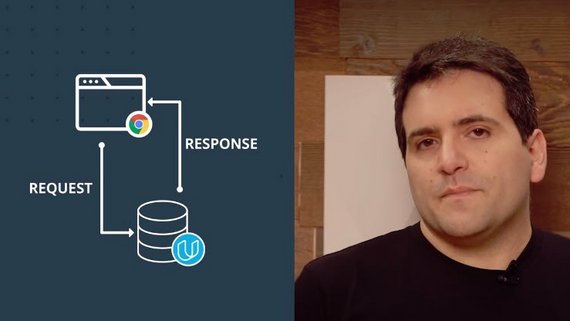
HTTP responses
Take another look at what you got back from the web server in the previous exercise.
After you typed Host: localhost and pressed Enter twice, the server sent back a lot of text. This is an HTTP response. One of these exchanges — a request and response — is happening every time your browser asks a server for a page, an image, or anything else.
Here’s another one to try. Use ncat to connect to google.com port 80, and send a request for the path / on the host google.com:
GET / HTTP/1.1
Host: google.com
Make sure to send
Host: google.comexactly … don’t slip awwwin there. These are actually different hostnames, and we want to take a look at the difference between them. And press Enter twice!
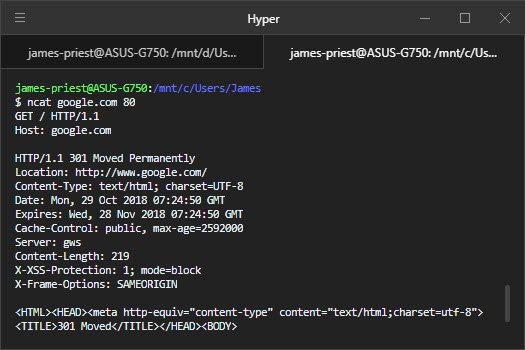
The HTTP response is made up of three parts: the status line, some headers, and a response body.
The status line is the first line of text that the server sends back. The headers are the other lines up until the first blank line. The response body is the rest — in this case, it’s a piece of HTML.
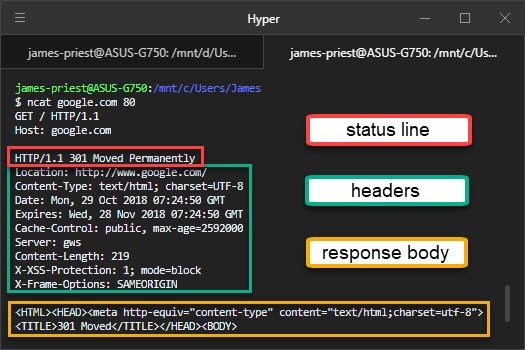
Status line
In the response you got from your demo server, the status line said HTTP/1.0 200 OK. In the one from Google, it says HTTP/1.1 301 Moved Permanently. The status line tells the client whether the server understood the request, whether the server has the resource the client asked for, and how to proceed next. It also tells the client which dialect of HTTP the server is speaking.
The numbers 200 and 301 here are HTTP status codes. There are dozens of different status codes. The first digit of the status code indicates the general success of the request. As a shorthand, web developers describe all of the codes starting with 2 as “2xx” codes, for instance — the x’s mean “any digit”.
- 1xx — Informational. The request is in progress or there’s another step to take.
- 2xx — Success! The request succeeded. The server is sending the data the client asked for.
- 3xx — Redirection. The server is telling the client a different URI it should redirect to. The headers will usually contain a Location header with the updated URI. Different codes tell the client whether a redirect is permanent or temporary.
- 4xx — Client error. The server didn’t understand the client’s request, or can’t or won’t fill it. Different codes tell the client whether it was a bad URI, a permissions problem, or another sort of error.
- 5xx — Server error. Something went wrong on the server side.
You can find out much more about HTTP status codes in this Wikipedia article or in the specification for HTTP.
6.6 Question 1
Look back at the reponse Google sent, specifically the status line and the first header line:
HTTP/1.1 301 Moved Permanently
Location: http://www.google.com/
What do you think Google’s server wants the client to do?
- Go to http://www.google.com/ instead of http://google.com/.
- Show the user an error message saying they got the wrong web address.
- Go away forever and never come back
The server sent a 301 status code, which is a kind of redirection. It’s telling the client that if it wants to get the Google home page, the client needs to use the URI http://www.google.com/.
The server response here is an example of good user interface on the Web. Google wants browsers to use www.google.com instead of google.com. But instead of showing the user an error message, they send a redirect. Browsers will automatically follow the redirect and end up on the right site.
An HTTP response can include many headers. Each header is a line that starts with a keyword, such as Location or Content-Type, followed by a colon and a value. Headers are a sort of metadata for the response. They aren’t displayed by browsers or other clients; instead, they tell the client various information about the response.
Many, many features of the Web are implemented using headers. For instance, cookies are a Web feature that lets servers store data on the browser, for instance to keep a user logged in. To set a cookie, the server sends the Set-Cookie header. The browser will then send the cookie data back in a Cookie header on subsequent requests. You’ll see more about cookies later in this course.
For the next quiz, take a look at the Content-Type header sent by the Google server and the demo server. Both servers send the exact same value:
Content-Type: text/html; charset=utf-8
What do you think this means?
6.6 Question 2
What does the Content-Type header sent by the two servers mean? Content-Type: text/html; charset=utf-8
- The server did not understand the client’s request. The server only understands text that is written in the languages HTML or UTF-8
- To get the right web page, the client should connect to the server named charset=utf8 and request an HTML document.
- The server is telling the client that the response body is an HTML document written in UTF-8 text.
A Content-type header indicates the kind of data that the server is sending. It includes a general category of content as well as the specific format. For instance, a PNG image file will come with the Content-type image/png. If the content is text (including HTML), the server will also tell what encoding it’s written in. UTF-8 is a very common choice here, and it’s the default for Python text anyway.
Very often, the headers will contain more metadata about the response body. For instance, both the demo server and Google also send a Content-Length header, which tells the client how long (in bytes) the response body will be. If the server sends this, then the client can reuse the connection to send another request after it’s read the first response. Browsers use this so they can fetch multiple pieces of data (such as images on a web page) without having to reconnect to the server.
Response body
The headers end with a blank line. Everything after that blank line is part of the response body. If the request was successful (a 200 OK status, for instance), this is a copy of whatever resource the client asked for — such as a web page, image, or other piece of data.
But in the case of an error, the response body is where the error message goes! If you request a page that doesn’t exist, and you get a 404 Not Found error, the actual error message shows up in the response body.
Exercise: Be a web server!
Use ncat -l 9999 to listen on port 9999. Connect to it with your web browser at http://localhost:9999/. What do you see in your terminal?
- A Pythin error message that starts with “NameError”
- A JavaScript error message that starts with “Uncaught SyntaxError”
- An HTTP request that starts with “GET / HTTP1.1”.
- Nothing; it just sits there
You should see an HTTP request that starts with GET. This is your browser talking!
Keep that terminal open!
Next, send an HTTP response to your browser by typing it into the terminal, right under where you see the headers the browser sent to you:
HTTP/1.1 307 Temporary Redirect
Location: https://www.eff.org/
At the end, press Enter twice to send a blank line to mark the end of headers.
6.6 Question 4
What happens in your browser after sending it the response described above?
- it crashes.
- It requests five more web pages from you.
- It opens the web page of the Electronic Frontier Foundation (EFF),
- It doesn’t do anything; it just sits there.
By sending a 307 redirect code, you told your browser to go to a different URL, specifically the one in the Location header. And sure enough, that’s the EFF.
Do it again! Run ncat -l 9999 to play a server, and get your browser to access it. But this time, instead of sending a 307 redirect, send a 200 OK with a piece of text in it:
HTTP/1.1 200 OK
Content-type: text/plain
Content-length: 50

Hello, browser! I am a real HTTP server, honestly!
(Remember the blank line between headers and body!)
6.6 Question 5
What happens in your browser after you send it the HTTP response with 200 OK?
- It catches you in the act of pretending to be a server, and displays a warning that humans are not allowed to be HTTP servers.
- It displays the message that you typed in plain text
- It turns into a tofu elephant and lies away in a passing breeze.
You aren’t just pretending to be a web server; you have actually sent a valid HTTP response to the browser.
6.7 Conclusion
Now I’ve been working with servers since the late’90s, and every time I find myself talking to a server by hand like that, I feel like I’m getting away with something sneaky.
It actually turns out you can do something similar with email servers to send fake email. Don’t be evil though.
But seriously, there’s only so much you can learn about web servers and clients by pretending to be one by hand.
In the next lesson, you’ll write code to do that for you. And as it turns out, a piece of code that pretends to be a web server, well, it is a web server. Sneaky.
Congratulations!
You have demonstrated your ability to play the part of an HTTP client or server by hand. You can carry out conversations in HTTP with all manner of interesting clients and servers.
Fortunately, Python makes it much easier than this when building real web applications. Rather than sending and answering HTTP requests by hand, in the next lesson, you’ll be writing Python code to do it for you.
Downloadable exercises
In the next two lessons, you’ll be doing several exercises involving running Python server code on your own computer. To get ready for these exercises, you’ll need to download the starter code. To do this, open your terminal and run these commands:
git clone https://github.com/udacity/course-ud303
cd course-ud303
git remote remove origin
This will put your shell into a directory called course-ud303 containing the downloadable exercises. Take a look around at the subdirectories here. For each exercise, you’ll be using one of them.
6.7 Question 1
To get ready for Lesson 2, download the exercise material and take a look around the exercises
git clone https://github.com/udacity/course-ud303cd course-ud303git remote remove origin- I looked around in the subdirectories of
course-ud303
7. The Web from Python
7.1 Python’s http.server
In the last lesson, you used the built-in demo web server from the Python http.server module. But the demo server is just that — a demonstration of the module’s abilities. Just serving static files out of a directory is hardly the only thing you can do with HTTP. In this lesson, you’ll build a few different web services using http.server, and learn more about HTTP at the same time. You’ll also use another module, requests, to write code that acts as an HTTP client.
These modules are written in object-oriented Python. You should already be familiar with creating class instances, defining subclasses, and defining methods on classes. If you need a refresher on the Python syntax for these object-oriented actions, you might want to browse the Python tutorial on classes or take another look at the sections on classes in our Programming Foundations with Python course.
In the exercises in this lesson, you’ll be writing code that runs on your own computer. You’ll need the starter code that you downloaded at the end of the last lesson, which should be in a directory called course-ud303. And you’ll need your favorite text editor to work on these exercises.
Servers and handlers
Web servers using http.server are made of two parts: the HTTPServer class, and a request handler class. The first part, the HTTPServer class, is built in to the module and is the same for every web service. It knows how to listen on a port and accept HTTP requests from clients. Whenever it receives a request, it hands that request off to the second part — a request handler — which is different for every web service.
Here’s what your Python code will need to do in order to run a web service:
- Import
http.server, or at least the pieces of it that you need. - Create a subclass of
http.server.BaseHTTPRequestHandler. This is your handler class. - Define a method on the handler class for each HTTP verb you want to handle. (The only HTTP verb you’ve seen yet in this course is
GET, but that will be changing soon.)- The method for GET requests has to be called
do_GET. - Inside the method, call built-in methods of the handler class to read the HTTP request and write the response.
- The method for GET requests has to be called
- Create an instance of
http.server.HTTPServer, giving it your handler class and server information — particularly, the port number. - Call the
HTTPServerinstance’sserve_forevermethod.
Once you call the HTTPServer instance’s serve_forever method, the server does that — it runs forever, until stopped. Just as in the last lesson, if you have a Python server running and you want to stop it, type Ctrl-C into the terminal where it’s running. (You may need to type it two or three times.)
Exercise: The hello server
Let’s take a quick tour of an example! In your terminal, go to the course-ud303 directory you downloaded earlier. Under the Lesson-2 subdirectory, you’ll find a subdirectory called 0_HelloServer. Inside, there’s a Python program called HelloServer.py. Open it up in your text editor and take a look around. Then run it in your terminal with python3 HelloServer.py. It won’t print anything in the terminal … until you access it at http://localhost:8000/ in your browser.
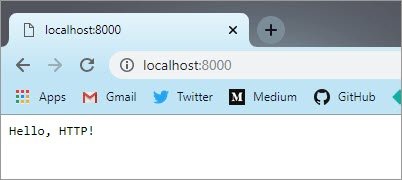
HelloServer.py
#!/usr/bin/env python3
#
# The *hello server* is an HTTP server that responds to a GET request by
# sending back a friendly greeting.  Run this program in your terminal and
# access the server at http://localhost:8000 in your browser.

from http.server import HTTPServer, BaseHTTPRequestHandler

class HelloHandler(BaseHTTPRequestHandler):
    def do_GET(self):
        # First, send a 200 OK response.
        self.send_response(200)

        # Then send headers.
        self.send_header('Content-type', 'text/plain; charset=utf-8')
        self.end_headers()

        # Now, write the response body.
        self.wfile.write("Hello, HTTP!n".encode())

if __name__ == '__main__':
    server_address = ('', 8000)  # Serve on all addresses, port 8000.
    httpd = HTTPServer(server_address, HelloHandler)
    httpd.serve_forever()
A tour of the hello server
Open up HelloServer.py in your text editor. Let’s take a look at each part of this code, line by line.
from http.server import HTTPServer, BaseHTTPRequestHandler
The http.server module has a lot of parts in it. For now, this program only needs these two. I’m using the from syntax of import so that I don’t have to type http.server over and over in my code.
class HelloHandler(BaseHTTPRequestHandler):
  def do_GET(self):
This is the handler class. It inherits from the BaseHTTPRequestHandler parent class, which is defined in http.server. I’ve defined one method, do_GET, which handles HTTP GET requests. When the web server receives a GET request, it will call this method to respond to it.
As you saw in the previous lesson, there are three things the server needs to send in an HTTP response:
- a status code
- some headers
- and the response body
The handler parent class has methods for doing each of these things. Inside do_GET, I just call them in order.
    # First, send a 200 OK response.
    self.send_response(200)
The first thing the server needs to do is send a 200 OK status code; and the send_response method does this. I don’t have to tell it that 200 means OK; the parent class already knows that.
    # Then send headers.
    self.send_header('Content-type', 'text/plain; charset=utf-8')
    self.end_headers()
The next thing the server needs to do is send HTTP headers. The parent class supplies the send_header and end_headers methods for doing this. For now, I’m just having the server send a single header line — the Content-type header telling the client that the response body will be in UTF-8 plain text.
    # Now, write the response body.
    self.wfile.write("Hello, HTTP!n".encode())
The last part of the do_GET method writes the response body.
The parent class gives us a variable called self.wfile, which is used to send the response. The name wfile stands for writable file. Python, like many other programming languages, makes an analogy between network connections and open files: they’re things you can read and write data to. Some file objects are read-only; some are write-only; and some are read/write.
self.wfile represents the connection from the server to the client; and it is write-only; hence the name. Any binary data written to it with its write method gets sent to the client as part of the response. Here, I’m writing a friendly hello message.
What’s going on with .encode() though? We’ll get to that in a moment. Let’s look at the rest of the code first.
if __name__ == '__main__':
  server_address = ('', 8000)  # Serve on all addresses, port 8000.
  httpd = HTTPServer(server_address, HelloHandler)
  httpd.serve_forever()
This code will run when we run this module as a Python program, rather than importing it. The HTTPServer constructor needs to know what address and port to listen on; it takes these as a tuple that I’m calling server_address. I also give it the HelloHandler class, which it will use to handle each incoming client request.
At the very end of the file, I call serve_forever on the HTTPServer, telling it to start handling HTTP requests. And that starts the web server running.
HelloServer.py
#!/usr/bin/env python3
#
# The *hello server* is an HTTP server that responds to a GET request by
# sending back a friendly greeting.  Run this program in your terminal and
# access the server at http://localhost:8000 in your browser.

from http.server import HTTPServer, BaseHTTPRequestHandler


class HelloHandler(BaseHTTPRequestHandler):
    def do_GET(self):
        # First, send a 200 OK response.
        self.send_response(200)

        # Then send headers.
        self.send_header('Content-type', 'text/plain; charset=utf-8')
        self.end_headers()

        # Now, write the response body.
        self.wfile.write("Hello, HTTP!n".encode())

if __name__ == '__main__':
    server_address = ('', 8000)  # Serve on all addresses, port 8000.
    httpd = HTTPServer(server_address, HelloHandler)
    httpd.serve_forever()
End of the tour
That’s all that’s involved in writing a basic HTTP server in Python. But the hello server isn’t very interesting. It doesn’t even do as much as the demo server. No matter what query you send it, all it has to say is hello. (Try it: http://localhost:8000/goodbye)
In the rest of this lesson, we’ll build servers that do much more than say hello.
7.2 What about .encode()
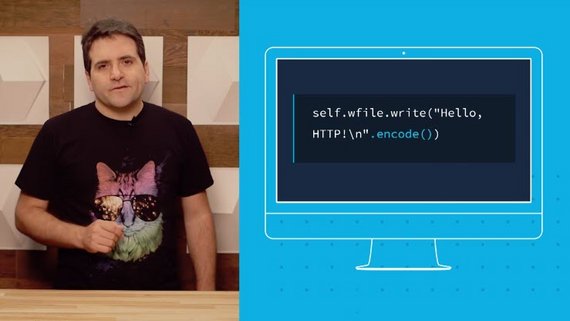
In the last exercise you saw this bit of code in the hello server:
self.wfile.write("Hello, HTTP!n".encode())
I mentioned that I’d explain the .encode() part later. Well, here goes!
The short version
An HTTP response could contain any kind of data, not only text. And so the self.wfile.write method in the handler class expects to be given a bytes object — a piece of arbitrary binary data — which it writes over the network in the HTTP response body.
If you want to send a string over the HTTP connection, you have to encode the string into a bytes object. The encode method on strings translates the string into a bytes object, which is suitable for sending over the network. There is, similarly, a decode method for turning bytes objects into strings.
That’s all you need to know about text encodings in order to do this course. However, if you want to learn even more, read on …
The long version
Text strings look simple, but they are actually kind of complicated underneath. There are a lot of different ways that computers can represent text in memory and on the network.
Older software — including older versions of Python — tended to assume that each character takes up only one byte of memory. That works fine for some human languages, like English and Russian, but it doesn’t work at all for other human languages, like Chinese; and it really doesn’t work if you want to handle text from multiple languages in the same program.
These words all mean cat:
gato قط 猫 گربه кіт बिल्ली ねこ
The Web is international, so browsers and servers need to support all languages. This means that the old one-byte assumption is completely thrown out. But when programs use the network, they need to know how long a piece of data is in terms of bytes. That has to be figured out unambiguously at some point in time. The way Python does this is by making us encode strings into bytes objects when we want to send them over a binary channel (such as an HTTP connection).
This Japanese word for cat is two characters long. But when it’s encoded in binary, it’s six bytes long:
>>> len('ねこ')
2
>>> len('ねこ'.encode())
6
The most common encoding these days is called UTF-8. It is supported by all major and minor browsers and operating systems, and it supports characters for almost all the world’s languages. In UTF-8, a single character may be represented as anywhere from one to four bytes, depending on language.
English text with no accent marks still takes up one byte per character:
>>> len('cat')
3
>>> len('cat'.encode())
3
UTF-8 is the default encoding in Python. When you call the encode method on a string without passing it another encoding, it assumes you mean UTF-8. This is the right thing to do, so that’s what the code in this course does.
For even more detail …
The Python Unicode HOWTO is a definitive guide to the history of string encodings in Python.
Okay, now let’s get back to writing web servers!
7.3 The echo server
The hello server doesn’t do anything with the query you send it. It just always sends back the same piece of text. Let’s modify it into a server that sends back whatever request path you send it, like an echo. For instance, if you access the page http://localhost:8000/bears, you will see “bears” in your browser. We’ll call this the echo server.
In order to echo back the request, the server needs to be able to look at the request information. That’s something that http.server lets your code do. But to find out how, let’s take a look in the documentation.
7.3 Question 1
Take a look at the Python documentation for the BaseHTTPRequestHandler parent class. What’s the name of the instance variable that contains the request path?
- url
- request
- requestline
- path
path is the right answer. Which means that in do_GET, you’ll need to access self.path to get the request path.
Exercise: Turn HelloHandler into EchoHandler
Change directory to course-ud303/Lesson-2/1_EchoServer. Here, you’ll find a file called EchoServer.py. However, the code in that file is just a copy of the hello server code! For this exercise, modify this code so that it echoes back the request path that it receives. For instance, if you access http://localhost:8000/puppies, you should see the word “puppies” in your browser.
While you’re at it, rename it from HelloHandler to EchoHandler, to better describe what we’ll have it do now. When you’re done, run EchoServer.py and test it out with some different request paths.
What didn’t get echoed
Once you have EchoServer.py running on your machine, try these three test URIs:
- http://localhost:8000/bears
- http://localhost:8000/spiders_from_mars#stardust
- http://localhost:8000/giant-squid?color=green
Then take a look at this quiz:
7.3 Question 2
Which of these silly words did not show up in the server’s response when you tried the URIs above?
- bears
- stardust
- green
How did you build the echo server
The only difference in the code between EchoHandler and HelloHandler is what they write in the response body. The hello server always writes the same message, while the echo server takes its message from the request path. Here’s how I did it — a one-line change at the end of do_GET:
self.wfile.write(self.path[1:].encode())
What I’m doing here is taking the path (for instance "/bears"), using a string slice to remove the first character (which is always a slash), and then encoding the resulting string into bytes, then writing that to the HTTP response body.
You could also do it in several lines of code:
message = self.path[1:]  # Extract 'bears' from '/bears', for instance
message_bytes = message.encode()  # Make bytes from the string
self.wfile.write(message_bytes)  # Send it over the network
Make sure to keep EchoServer.py around! We’ll use it later in the course to look at queries.
7.3 Question 3
The echo server wants to listen on the same port that the hello server does: port 8000. What happens if you try to start EchoServer.py while HelloServer.py is still running or vice versa?
- The new server exists with an
OSErrorexception. - The old server exits with an
OSErrorexception. - The new server is assigned to listen on port 8001 instead of 8000.
- Nothing unusual happens; they coexist just fine.
- Your computer gets 423,827 viruses.
The new server exits. Under normal conditions, only one program on your computer can listen on a particular port at the same time. If you want to have both servers running, you have to change the port number from 8000 to something else.
Note: Windows 10 has a different behavior from all other operating systems (including earlier Windows versions) when two processes try to listen on the same port.
Instead of exiting with an error, the new server will stop and wait for the old server to exit. If you are using Windows 10, be on the lookout for this behavior in your network servers!
EchoServer.py
#!/usr/bin/env python3
#
# The *echo server* is an HTTP server that responds to a GET request by
# sending the query path back to the client.  For instance, if you go to
# the URI "http://localhost:8000/Balloon", the echo server will respond
# with the text "Balloon" in the HTTP response body.
#
# Instructions:
#
# The starter code for this exercise is the code from the hello server.
# Your assignment is to change this code into the echo server:
#
#   1. Change the name of the handler from HelloHandler to EchoHandler.
#   2. Change the response body from "Hello, HTTP!" to the query path.
#
# When you're done, run it in your terminal.  Try it out from your browser,
# then run the "test.py" script to check your work.

from http.server import HTTPServer, BaseHTTPRequestHandler


class EchoHandler(BaseHTTPRequestHandler):
    def do_GET(self):
        # First, send a 200 OK response.
        self.send_response(200)

        # Then send headers.
        self.send_header('Content-type', 'text/plain; charset=utf-8')
        self.end_headers()

        # Now, write the response body.
        self.wfile.write(self.path[1:].encode())

if __name__ == '__main__':
    server_address = ('', 8000)  # Serve on all addresses, port 8000.
    httpd = HTTPServer(server_address, EchoHandler)
    httpd.serve_forever()
7.4 Queries & quoting
Unpacking query parameters
When you take a look at a URI for a major web service, you’ll often see several query parameters, which are a sort of variable assignment that occurs after a ? in the URI. For instance, here’s a Google Image Search URI:
https://www.google.com/search?q=gray+squirrel&tbm=isch
This will be sent to the web server as this HTTP request:
GET /search?q=gray+squirrel&tbm=isch HTTP/1.1
Host: www.google.com
The query part of the URI is the part after the ? mark. Conventionally, query parameters are written as key=value and separated by & signs. So the above URI has two query parameters, q and tbm, with the values gray+squirrel and isch.
(isch stands for Image Search. I’m not sure what tbm means.)
There is a Python library called urllib.parse that knows how to unpack query parameters and other parts of an HTTP URL. (The library doesn’t work on all URIs, only on some URLs.) Take a look at the urllib.parse documentation here. Check out the urlparse and parse_qs functions specifically. Then try out this demonstration in your Python interpreter:
>>> from urllib.parse import urlparse, parse_qs, parse_qsl
>>> address = 'https://www.google.com/search?q=gray+squirrel&tbm=isch'
>>> parts = urlparse(address)
>>> print(parts)
ParseResult(scheme='https', netloc='www.google.com', path='/search',
  params='', query='q=gray+squirrel&tbm=isch', fragment='')
>>> print(parts.query)
q=gray+squirrel&tbm=isch
>>> query = parse_qs(parts.query)
>>> query
{'q': ['gray squirrel'], 'tbm': ['isch']}
>>> parse_qsl(parts.query)
[('q', 'gray squirrel'), ('tbm', 'isch')]
>>>
7.4 Question 1
What does parse_qs('texture=fuzzy&animal=gray+squirrel') return?
- The list
['texture', 'fuzzy', 'animal', 'gray+squirrel'] - The dictionary
{'texture': 'fuzzy', 'animal', 'gray squirrel'} - The dictionary
{'texture': ['fuzzy'], 'animal': ['gray squirrel']}
URL quoting
Did you notice that 'gray+squirrel' in the query string became 'gray squirrel' in the output of parse_qs? HTTP URLs aren’t allowed to contain spaces or certain other characters. So if you want to send these characters in an HTTP request, they have to be translated into a “URL-safe” or “URL-quoted” format.
“Quoting” in this sense doesn’t have to do with quotation marks, the kind you find around Python strings. It means translating a string into a form that doesn’t have any special characters in it, but in a way that can be reversed (unquoted) later.
(And if that isn’t confusing enough, it’s sometimes also referred to as URL-encoding or URL-escaping).
One of the features of the URL-quoted format is that spaces are sometimes translated into plus signs. Other special characters are translated into hexadecimal codes that begin with the percent sign.
Take a look at the documentation for urllib.parse.quote and related functions. Later in the course when you want to construct a URI in your code, you’ll need to use appropriate quoting. More generally, whenever you’re working on a web application and you find spaces or percent-signs in places you don’t expect them to be, it means that something needs to be quoted or unquoted.
7.5 HTML and forms
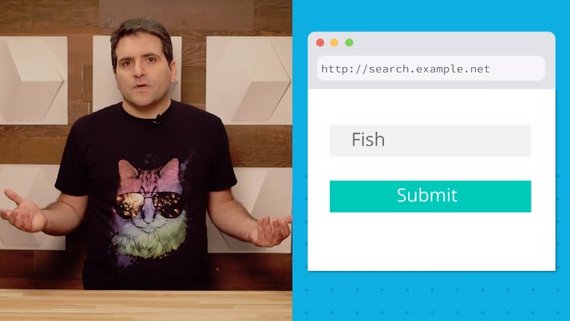
Exercise: HTML and forms
Most of the time, query parameters don’t get into a URL by the user typing them out into the browser. Query parameters often come from a user submitting an HTML form. So dust off your HTML knowledge and let’s take a look at a form that gets submitted to a server.
If you need a refresher on HTML forms, take a look at the MDN introduction (gentle) or the W3C standard reference (more advanced).
Here’s a piece of HTML that contains a form:
<!DOCTYPE html>
<title>Login Page</title>
<form action="http://localhost:8000/" method="GET">
<label>Username:
  <input type="text" name="username">
</label>
<br>
<label>Password:
  <input type="password" name="pw">
</label>
<br>
<button type=submit>Log in!</button>
This HTML is also in the exercises directory, under Lesson-2/2_HTMLForms/LoginPage.html. Open it up in your browser.
Before pressing the submit button, start up the echo server again on port 8000 so you can see the results of submitting the form.
7.5 Question 1
What happens when you fill out the form and submit it?
- Nothing; the browser just sits there.
- You see the username and password you entered in the output from the echo server
- Your browser logs into your favorite web site and deletes all your favorite things.
The form inputs, with the names username and pw, become query parameters to the echo server.
Exercise: Form up for action
Let’s do another example! This HTML form has a pull-down menu with four options.
<!DOCTYPE html>
<title>Search wizardry!</title>
<form action="http://www.google.com/search" method=GET>
  <label>Search term:
    <input type="text" name="q">
  </label>
  <br>
  <label>Corpus:
    <select name="tbm">
      <option selected value="">Regular</option>
      <option value="isch">Images</option>
      <option value="bks">Books</option>
      <option value="nws">News</option>
    </select>
  </label>
  <br>
  <button type="submit">Go go!</button>
</form>
This form is in the HTML file SearchPage.html in the same directory. Open it up in your browser.
This form tells your browser to submit it to Google Search. The inputs in the form supply the q and tbm query parameters. (And if Google ever changes the way their search query parameters work, this example is going to be totally broken.)
7.5 Question 2
Using these two different forms as examples, can you tell what data in the form tells the browser which server to submit the form to?
- The URI in the form
actionattribute. - The text in the
submitbutton. - The browser looks up the form’s
titlein the DNS.
Yes. The form action is the URI to which the form fields will be submitted.
7.6 GET and POST
In the last lesson, I mentioned that GET is only one of many HTTP verbs, or methods.
When a browser submits a form via GET, it puts all of the form fields into the URI that it sends to the server. These are sent as a query, in the request path — just like search engines do. They’re all jammed together into a single line. Since they’re in the URI, the user can bookmark the resulting page, reload it, and so forth.
This is fine for search engine queries, but it’s not quite what we would want for (say) a form that adds an item to your shopping cart on an e-commerce site, or posts a new message on a comments board. GET methods are good for search forms and other actions that are intended to look something up or ask the server for a copy of some resource. But GET is not recommended for actions that are intended to alter or create a resource. For this sort of action, HTTP has a different verb, POST.
Idempotence
Vocabulary word of the day: idempotent. An action is idempotent if doing it twice (or more) produces the same result as doing it once. “Show me the search results for ‘polar bear’” is an idempotent action, because doing it a second time just shows you the same results. “Add a polar bear to my shopping cart” is not, because if you do it twice, you end up with two polar bears.
POST requests are not idempotent. If you’ve ever seen a warning from your browser asking you if you really mean to resubmit a form, what it’s really asking is if you want to do a non-idempotent action a second time.
(Important note if you’re ever asked about this in a job interview: idempotent is pronounced like “eye-dem-poe-tent”, or rhyming with “Hide ‘em, Joe Tent” — not like “id impotent”.)
7.6 Question 1
Here’s a list of several (non-HTTP) actions. Makr the ones that are idempotent.
- Adding zero to a numeric variable. (In Python,
x += 0.) - Adding five to a numeric variable. (In Python,
x += 5.) - Setting a variable to the value 5. (In Python,
x = 5.) - Looking up an entry in a dictionary. (In Python,
h = words["hello"].)
Adding zero to a number is idempotent, since you can add zero as many times as you want and the original number is unchanged. Adding five to a number is not idempotent, because if you do it twice you’ll have added ten. Setting a variable to the value 5 is idempotent: doing it twice is the same as doing it once. Looking up an entry in a dictionary doesn’t alter anything, so it’s idempotent.
Exercise: Be a server and receive a POST request
Here’s a piece of HTML with a form in it that is submitted via POST:
<!DOCTYPE html>
<title>Testing POST requests</title>
<form action="http://localhost:9999/" method="POST">
  <label>Magic input:
    <input type="text" name="magic" value="mystery">
  </label>
  <br>
  <label>Secret input:
     <input type="text" name="secret" value="spooky">
  </label>
  <br>
  <button type="submit">Do a thing!</button>
</form>
This form is in your exercises directory as Lesson-2/2_HTMLForms/PostForm.html. Open it up in your browser. You should see a form. Don’t submit that form just yet. First, open up a terminal and use ncat -l 9999 to listen on port 9999. Then type some words into the form fields in your browser, and submit the form. You should see an HTTP request in your terminal. Take a careful look at this request!
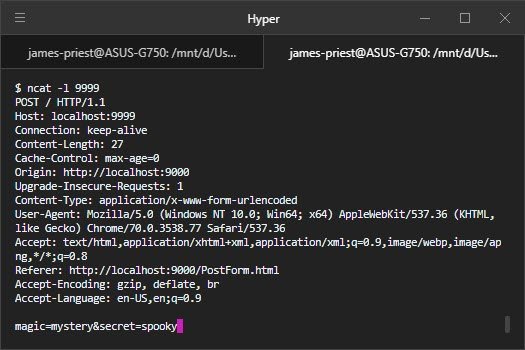
7.6 Question 2
What’s different about this HTTP request from ones you’ve seen before?
- The request line says “POST” instead of “GET”.
- The form data is not in the URI path of the request.
- The form data is somewhere else in the request.
- The for data is written backwards.
The first three are true! Try changing POST to GET in the form and restarting ncat, and see how this affects the request you see when you submit the form.
When a browser submits a form as a POST request, it doesn’t encode the form data in the URI path, the way it does with a GET request. Instead, it sends the form data in the request body, underneath the headers. The request also includes Content-Type and Content-Length headers, which we’ve previously only seen on HTTP responses.
By the way, the names of HTTP headers are case-insensitive. So there’s no difference between writing
Content-Lengthorcontent-lengthor evenConTent-LeNgTh… except, of course, that humans will read your code and be confused by that last one.
7.7 A server for POST
One approach that I like to use when designing a new piece of code is to imagine that it already exists, and think through the ways that a user would use it. Coming up with these narratives is a useful tool to plan out what the code will need to do.
In the next few exercises, you’ll be building a messageboard server. When a user goes to the main page in their browser, it’ll display a form for writing messages, as well as a list of the previously written messages. Submitting the form will send a request to the server, which stores the submitted message and then re-displays the main page.
In order to test your messageboard server, you’ll need to install the requests module, which is a Python module for making HTTP requests. We’ll see much more about this module later in this lesson. For now, just run pip3 install requests in your terminal to install it.
7.7 Question 1
Which HTTP method do you think this server will need to use?
- Only GET
- Only POST
- GET for submitting messages, and POST for viewing them
- GET for viewing messages, and POST for submitting them
We’ll be using a GET request to display the messageboard’s existing contents, and POST to update the contents by creating new messages. Creating new messages is not idempotent — we don’t want duplicates.
Why don’t we want to use GET for submitting the form? Imagine if a user did this. They write a message and press the submit button … and the message text shows up in their URL bar. If they press reload, it sends the message again. If they bookmark that URL and go back to it, it sends the message again. This doesn’t seem like such a great experience. So we’ll use POST for message submission, and GET to display the main page.
POST handlers read the request body
Previously you’ve written handler classes that have just a single method, do_GET. But a handler class can have do_POST as well, to support GET and POST requests. This is exactly how the messageboard server will work. When a GET request comes in, the server will send the HTML form and current messages. When a POST request comes in with a new message, the server will store the message in a list, and then return all the messages it’s seen so far.
The code for a do_POST method will need to do some pretty different things from a do_GET method. When we’re handling a GET request, all the user data in the request is in the URI path. But in a POST request, it’s in the request body. Inside do_POST, our code can read the request body by calling the self.rfile.read method. self.rfile is a file object, like the self.wfile we saw earlier — but rfile is for reading the request, rather than writing the response.
However, self.rfile.read needs to be told how many bytes to read … in other words, how long the request body is.
7.7 Question 2
How do you think our code can tell how much data is in the request body of a POST request from a web browser?
- The browser always sends exactly 1024 bytes.
- Our code should read repeatedly until it gets an empty string.
- The browser sends the length of the request body in the
Content-Lengthheader. - The first two bytes of the request body encode the length of the request body.
If there’s a request body at all, the browser will send the length of the request body in the Content-Length header.
The handler class gives us access to the HTTP headers as the instance variable self.headers, which is an object that acts a lot like a Python dictionary. The keys of this dictionary are the header names, but they’re case-insensitive: it doesn’t matter if you look up 'content-length' or 'Content-Length'. The values in this dictionary are strings: if the request body is 140 bytes long, the value of the Content-length entry will be the string "140". We need to call self.rfile.read(140) to read 140 bytes; so once we read the header, we’ll need to convert it to an integer.
But in an HTTP request, it’s also possible that the body will be empty, in which case the browser might not send a Content-length header at all. This means we have to be a little careful when accessing the headers from the self.headers object. If we do self.headers['content-length'] and there’s no such header, our code will crash with a KeyError. Instead we’ll use the .get dictionary method to get the header value safely.
So here’s a little bit of code that can go in the do_POST handler to find the length of the request body and read it:
length = int(self.headers.get('Content-length', 0))
data = self.rfile.read(length).decode()
Once you read the message body, you can use urllib.parse.parse_qs to extract the POST parameters from it.
With that, you can now build a do_POST method!
Exercise: Messageboard, Part One
The first step to building the messageboard server is to build a server that accepts a POST request and just echoes it back to the browser. The starter code for this exercise is in Lesson-2/3_MessageboardPartOne.
There are several steps involved in doing this, so here’s a checklist —
Messageboard Part One
- Find the length of the POST request data.
- Read the correct amount of request data.
- Extract the “message” field from the request data
- Run the
MessageboardPartOne.pyserver. - Run the
MessageboardPartOne.htmlfile in your browser and submit it. - Run the test script
test.pywith the server running.
Solution, Part One
You can see my version of the solution to the Messageboard Part One exercise in the 3_MessageboardPartOne/solution subdirectory. As before, there are lots of variations on how you can do this exercise; if the tests in test.py pass, then you’ve got a good server!
#!/usr/bin/env python3
#
# Step one in building the messageboard server:
# An echo server for POST requests.
#
# Instructions:
#
# This server should accept a POST request and return the value of the
# "message" field in that request.
#
# You'll need to add three things to the do_POST method to make it work:
#
# 1. Find the length of the request data.
# 2. Read the correct amount of request data.
# 3. Extract the "message" field from the request data.
#
# When you're done, run this server and test it from your browser using the
# Messageboard.html form.  Then run the test.py script to check it.

from http.server import HTTPServer, BaseHTTPRequestHandler
from urllib.parse import parse_qs


class MessageHandler(BaseHTTPRequestHandler):
    def do_POST(self):
        # 1. How long was the message? (Use the Content-Length header.)
        length = int(self.headers.get('Content-length', 0))

        # 2. Read the correct amount of data from the request.
        data = self.rfile.read(length).decode()

        # 3. Extract the "message" field from the request data.
        message = parse_qs(data)["message"][0]

        # Send the "message" field back as the response.
        self.send_response(200)
        self.send_header('Content-type', 'text/plain; charset=utf-8')
        self.end_headers()
        self.wfile.write(message.encode())

if __name__ == '__main__':
    server_address = ('', 8000)
    httpd = HTTPServer(server_address, MessageHandler)
    httpd.serve_forever()
Exercise: Messageboard, Part Two
So far, this server only handles POST requests. To submit the form to it, you have to load up the form in your browser as a separate HTML file. It would be much more useful if the server could serve the form itself.
This is pretty straightforward to do. You can add the form in a variable as a Python string (in triple quotes), and then write a do_GET method that sends the form.
You can choose to start from where you left off in the previous exercise; or if you like, you can start from the code in the 4_MessageboardPartTwo directory.
When you’re done, you should have a server that you can access in your browser at http://localhost:8000/. Going there should display the form. Submitting the form should get the message echoed back. That’s most of the way to a messageboard server … let’s keep going!
Messageboard, Part Two
- Add a string variable that contains the HTML form from
Messageboard.html - Add a
do_GETmethod that returns the form. - Run the server and test it in your browser at http://localhost:8000.
- Run the tests in
test.pywith the server running.
Solution, Part Two
You can see my version of the solution to the Messageboard Part Two exercise in the 4_MessageboardPartTwo/solution subdirectory.
#!/usr/bin/env python3
#
# Step two in building the messageboard server:
# A server that handles both GET and POST requests.
#
# Instructions:
#
# 1. Add a string variable that contains the form from Messageboard.html.
# 2. Add a do_GET method that returns the form.
#
# You don't need to change the do_POST method in this exercise!
#
# To test your code, run this server and access it at http://localhost:8000/
# in your browser.  You should see the form.  Then put a message into the
# form and submit it.  You should then see the message echoed back to you.

from http.server import HTTPServer, BaseHTTPRequestHandler
from urllib.parse import parse_qs

form = '''<!DOCTYPE html>
  <title>Message Board</title>
  <form method="POST" action="http://localhost:8000/">
    <textarea name="message"></textarea>
    <br>
    <button type="submit">Post it!</button>
  </form>
'''


class MessageHandler(BaseHTTPRequestHandler):
    def do_POST(self):
        # How long was the message?
        length = int(self.headers.get('Content-length', 0))

        # Read the correct amount of data from the request.
        data = self.rfile.read(length).decode()

        # Extract the "message" field from the request data.
        message = parse_qs(data)["message"][0]

        # Send the "message" field back as the response.
        self.send_response(200)
        self.send_header('Content-type', 'text/plain; charset=utf-8')
        self.end_headers()
        self.wfile.write(message.encode())

    def do_GET(self):
        # First, send a 200 OK response.
        self.send_response(200)

        # Then send headers.
        self.send_header('Content-type', 'text/html; charset=utf-8')
        self.end_headers()

        # Encode & send the form
        self.wfile.write(form.encode())

if __name__ == '__main__':
    server_address = ('', 8000)
    httpd = HTTPServer(server_address, MessageHandler)
    httpd.serve_forever()
On the next page, you’ll get into part three. But first, once you have your server up and running, try testing it out with some silly queries in this quiz:
7.7 Question 3
Bring your messageboard server up and send it some requests from your browser with different URI paths, like http://localhost:8000/bears or http://localhost:8000/udacity-rocks/my-foxes.
Does it do anything different based on the URI path?
- Yes, it does.
- No, it doesn’t
This particular server doesn’t look at the URI path at all. Any GET request will get the form. Any POST request will save a message.
7.8 Post-Redirect-Get
There’s a very common design pattern for interactive HTTP applications and APIs, called the PRG or Post-Redirect-Get pattern. A client POSTs to a server to create or update a resource; on success, the server replies not with a 200 OK but with a 303 redirect. The redirect causes the client to GET the created or updated resource.
This is just one of many, many ways to architect a web application, but it’s one that makes good use of HTTP methods to accomplish specific goals. For instance, wiki sites such as Wikipedia often use Post-Redirect-Get when you edit a page.
For the messageboard server, Post-Redirect-Get means:
- You go to http://localhost:8000/ in your browser. Your browser sends a GET request to the server, which replies with a
200 OKand a piece of HTML. You see a form for posting comments, and a list of the existing comments. (But at the beginning, there are no comments posted yet.) - You write a comment in the form and submit it. Your browser sends it via
POSTto the server. - The server updates the list of comments, adding your comment to the list. Then it replies with a
303redirect, setting theLocation: /header to tell the browser to request the main page viaGET. - The redirect response causes your browser to go back to the same page you started with, sending a
GETrequest, which replies with a200 OKand a piece of HTML…
One big advantage of Post-Redirect-Get is that as a user, every page you actually see is the result of a GET request, which means you can bookmark it, reload it, and so forth — without ever accidentally resubmitting a form.
Exercise: Messageboard, Part Three
Update the messageboard server to a full Post-Redirect-Get pattern, as described above. You’ll need both do_GET and do_POST handlers; the do_POST handler should reply with a 303 redirect with no response body.
The starter code for this exercise is in the 5_MessageboardPartThree directory. I’ve added the logic that actually stores the messages into a list; all you need to do is implement the HTTP steps described above.
When you’re done, test it in your browser and with the test.py script, as before.
Messageboard, Part Three
- In the
do_POSTmethod, send a 303 redirect back to the root page (/). - In the
do_GETmethod, assemble the response data together out of the form template and the stored messages. - Run the server and test it in your browser.
- Run the tests in
test.pywith the server running.
Solution, part three
You can see my version of the solution to the Messageboard Part Three exercise in the 5_MessageboardPartThree/solution subdirectory. Your code might not look the same as mine; stylistic variations are normal! But if the tests in test.py pass, you’ve got a good server.
MessageboardPartThree.py
#!/usr/bin/env python3
#
# Step two in building the messageboard server.
#
# Instructions:
# 1. In the do_POST method, send a 303 redirect back to the / page.
# 2. In the do_GET method, put the response together and send it.
from http.server import HTTPServer, BaseHTTPRequestHandler
from urllib.parse import parse_qs
memory = []
form = '''<!DOCTYPE html>
<title>Message Board</title>
<form method="POST">
<textarea name="message" id="message"></textarea>
<br>
<button type="submit">Post it!</button>
</form>
<pre>
{}
</pre>
<script>
window.onload = () => document.querySelector("#message").focus();
</script>
'''
class MessageHandler(BaseHTTPRequestHandler):
def do_POST(self):
# How long was the message?
length = int(self.headers.get('Content-length', 0))
# Read the correct amount of data from the request.
data = self.rfile.read(length).decode()
# Extract the "message" field from the request data.
message = parse_qs(data)["message"][0]
# Escape HTML tags in the message so users can't break world+dog.
message = message.replace("<", "<")
# Store it in memory.
memory.append(message)
# 1. Send a 303 redirect back to the root page.
self.send_response(303)
self.send_header('Location', '/')
self.end_headers()
def do_GET(self):
# First, send a 200 OK response.
self.send_response(200)
# Then send headers.
self.send_header('Content-type', 'text/html; charset=utf-8')
self.end_headers()
# 2. Put the response together out of the form and the stored messages.
msg = form.format("n".join(memory))
# 3. Send the response.
self.wfile.write(msg.encode())
if __name__ == '__main__':
server_address = ('', 8000)
httpd = HTTPServer(server_address, MessageHandler)
httpd.serve_forever()
7.9 Making requests
Now let’s turn from writing web servers to writing web clients. The requests library is a Python library for sending requests to web servers and interpreting the responses. It’s not included in the Python standard library, though; you’ll need to install it. In your terminal, run pip3 install requests to fetch and install the requests library.
Then take a look at the quickstart documentation for requests and try it out.
7.9 Question 1
Assuming you’ve still got your messageboard werver running on port 8000, how yould you send a GET request to it using the requests library?
requests.fetch("http://localhost/", port=8000)requests.get("http://localhost:8000/")requests.transmit("GET", "localhost:8000", "/")
The requests function for performing GET requests is requests.get, and it takes the URI as an argument.
Response objects
When you send a request, you get back a Response object. Try it in your Python interpreter:
>>> import requests
>>> a = requests.get('http://www.udacity.com')
>>> a
<Response [200]>
>>> type(a)
<class 'requests.models.Response'>
7.9 Question 2
Use the documentation for the requests module to answer this question!
If you have a response object called r, how can you get the reponse body — for instance, the HTML that the server sent?
r.textr.content- Both of the above, but they’re different.
Both, but they’re different. r.content is a bytes object representing the literal binary data that the server sent. r.text is the same data but interpreted as a str object, a Unicode string.
Handling errors
Try fetching some different URIs with the requests module in your Python interpreter. More specifically, try some that don’t work. Try some sites that don’t exist, like http://bad.example.com/, but also try some pages that don’t exist on sites that do, like http://google.com/ThisDoesNotExist.
What do you notice about the responses that you get back?
uri = "http://bad.example.com/"
r = requests.get(uri)
7.9 Question 3
Using the requests module, try making GET requests to nonexistent site or pages, e.g. http://bad.example.com or http://google.com/NotExisty. Mark all of the statements that are true.
- Accessing a nonexistent site raises a Python exception.
- Accessing a nonexistent site gives you a object
rwherer.status_codeis an error code. - Accessing a nonexistent page on a real site raises a Python exception.
- Accessing a nonexistent page on a real site gives you an object
rwherer.status_codeis an error code.
The first and last answers are correct, according to the way that HTTP is designed to work.
If the requests.get call can reach an HTTP server at all, it will give you a Response object. If the request failed, the Response object has a status_code data member — either 200, or 404, or some other code.
But if it wasn’t able to get to an HTTP server, for instance because the site doesn’t exist, then requests.get will raise an exception.
However: Some Internet service providers will try to redirect browsers to an advertising site if you try to access a site that doesn’t exist. This is called DNS hijacking, and it’s nonstandard behavior, but some do it anyway. If your ISP hijacks DNS, you won’t get exceptions when you try to access nonexistent sites. Standards-compliant DNS services such as Google Public DNS don’t hijack.
7.10 Using a JSON API
As a web developer, you will deal with data in a lot of different formats, especially when your code calls out to APIs provided by other developers. It’s not uncommon for a large software system to have parts that deal with a dozen or more different data formats. Fortunately, usually someone else has already written libraries to help you read and write these formats.
JSON is a data format based on the syntax of JavaScript, often used for web-based APIs. There are a lot of services that let you send HTTP queries and get back structured data in JSON format. You can read more about the JSON format at http://www.json.org/.
Python has a built-in json module; and as it happens, the requests module makes use of it. A Response object has a .json method; if the response data is JSON, you can call this method to translate the JSON data into a Python dictionary.
Try it out! Here, I’m using it to access the Star Wars API, a classic JSON demonstration that contains information about characters and settings in the Star Wars movies:
>>> a = requests.get('http://swapi.co/api/people/1/')
>>> a.json()['name']
'Luke Skywalker'
7.10 QUIZ QUESTION
What happens if you call r.json() on a Response that isn’t made of JSON data, such as the Udacity main page?
- It returns an empty dictionary
- It raises an exception defined in Python’s json library
- It raises AttributeError; the method is only defined on valid JSON responses
- It returns a dictionary containing a string which is the response data.
Specifically, it raises a json.decoder.JSONDecodeError exception. If you want to catch this exception with a try block, you’ll need to import it from the json module.
There’s a great example of an API on the site http://uinames.com/, a service that makes up fake names and user account information. You can find the full API documentation under the little menu at the top right.
For this exercise, all you’ll need is this URI and a couple of query parameters:
http://uinames.com/api/
The query parameters to use are ext, which gives you a record with more fields, and region, which lets you specify which country you want your imaginary person to come from. For instance, to have the API invent a person from Italy:
http://uinames.com/api?ext®ion=Italy
(It’s not perfect. For instance, currently it makes up North American phone numbers for everyone, regardless of where they live.)
Exercise: Use JSON with UINames.com
The starter code for this exercise is in the Lesson-2/6_UsingJSON directory, with the filename UINames.py. In this exercise, use the JSON methods described above to decode the response from the uinames.com site.
Use JSON with UINames.com
- Decode the JSON data returned by the
GETrequest. - Print out the JSON data fields in the specified format
- Test your code by running
UINames.py - Run the test script in
test.py
UINames.py
#!/usr/bin/env python3
#
# Client for the UINames.com service.
#
# 1. Decode the JSON data returned by the UINames.com API.
# 2. Print the fields in the specified format.
#
# Example output:
# My name is Tyler Hudson and the PIN on my card is 4840.
import requests
def SampleRecord():
r = requests.get("http://uinames.com/api?ext®ion=United%20States",
timeout=2.0)
# 1. Add a line of code here to decode JSON from the response.
json = r.json()
return "My name is {} {} and the PIN on my card is {}.".format(
# 2. Add the correct fields from the JSON data structure.
json['name'],
json['surname'],
json['credit_card']['pin']
)
if __name__ == '__main__':
print(SampleRecord())
7.11 The bookmark server
You’re almost to the end of this lesson. One more exercise to go.
In this one you’ll write a piece of code that both accepts requests as a web server and makes requests as a web client.
This will put together a bunch of things that you’ve learned this lesson. It’s a server that serves up an HTML form via a GET request then accepts that form submission by a POST request.
It checks web addresses using the request module to make sure they work and it uses the Post-Redirect-Get design.
Exercise: The bookmark server
You’re almost to the end of this lesson! One more server to write…
You’ve probably seen URL-shortening services such as TinyURL or Google’s goo.gl, this service will be turning down support by Google Starting March 30, 2018.
They let you create short URI paths like https://tinyurl.com/jye5r6l that redirect to a longer URI on another site. It’s easier to put a short URI into an email, text message, or tweet. In this exercise, you’ll be writing a service similar to this.
Like the messageboard server, this bookmark server will keep all of its data in memory. This means that it’ll be reset if you restart it.
Your server needs to do three things, depending on what kind of request it receives:
- On a GET request to the / path, it displays an HTML form with two fields. One field is where you put the long URI you want to shorten. The other is where you put the short name you want to use for it. Submitting this form sends a POST to the server.
- On a POST request, the server looks for the two form fields in the request body. If it has those, it first checks the URI with
requests.getto make sure that it actually exists (returns a 200).- If the URI exists, the server stores a dictionary entry mapping the short name to the long URI, and returns an HTML page with a link to the short version.
- If the URI doesn’t actually exist, the server returns a 404 error page saying so.
- If either of the two form fields is missing, the server returns a 400 error page saying so.
- On a GET request to an existing short URI, it looks up the corresponding long URI and serves a redirect to it.
The starter code for this exercise is in the 7_BookmarkServer directory. I’ve given you a skeleton of the server; your job is to fill out the details!
The bookmark server
- Write the
checkURIfunction. This function should take a URI as an argument, and returnTrueif that URI could be successfully fetched, andFalseif it can’t - Write the code inside
do_GETthat sends a 303 redirect to a known name. - Write the code inside
do_POSTthat sends a 400 error if the form fields are not present in the POST - Write the code inside
do_POSTthat sends a 303 redirect to the form after saving a newly submitted URI. - Write the code inside
do_POSTthat sends a 404 error if a URI is not successfully checked (i.e. if CheckURI returnsFalse)
BookmarkServer.py
#!/usr/bin/env python3
#
# A *bookmark server* or URI shortener.

import http.server
import requests
from urllib.parse import unquote, parse_qs

memory = {}

form = '''<!DOCTYPE html>
<title>Bookmark Server</title>
<form method="POST">
    <label>Long URI:
        <input name="longuri">
    </label>
    <br>
    <label>Short name:
        <input name="shortname">
    </label>
    <br>
    <button type="submit">Save it!</button>
</form>
<p>URIs I know about:
<pre>
{}
</pre>
'''


def CheckURI(uri, timeout=5):
    '''Check whether this URI is reachable, i.e. does it return a 200 OK?

    This function returns True if a GET request to uri returns a 200 OK, and
    False if that GET request returns any other response, or doesn't return
    (i.e. times out).
    '''
    try:
        r = requests.get(uri, timeout=timeout)
        # If the GET request returns, was it a 200 OK?
        return r.status_code == 200
    except requests.RequestException:
        # If the GET request raised an exception, it's not OK.
        return False


class Shortener(http.server.BaseHTTPRequestHandler):
    def do_GET(self):
        # A GET request will either be for / (the root path) or for /some-name.
        # Strip off the / and we have either empty string or a name.
        name = unquote(self.path[1:])

        if name:
            if name in memory:
                # We know that name! Send a redirect to it.
                self.send_response(303)
                self.send_header('Location', memory[name])
                self.end_headers()
            else:
                # We don't know that name! Send a 404 error.
                self.send_response(404)
                self.send_header('Content-type', 'text/plain; charset=utf-8')
                self.end_headers()
                self.wfile.write("I don't know '{}'.".format(name).encode())
        else:
            # Root path. Send the form.
            self.send_response(200)
            self.send_header('Content-type', 'text/html')
            self.end_headers()
            # List the known associations in the form.
            known = "n".join("{} : {}".format(key, memory[key])
                              for key in sorted(memory.keys()))
            self.wfile.write(form.format(known).encode())

    def do_POST(self):
        # Decode the form data.
        length = int(self.headers.get('Content-length', 0))
        body = self.rfile.read(length).decode()
        params = parse_qs(body)

        # Check that the user submitted the form fields.
        if "longuri" not in params or "shortname" not in params:
            self.send_response(400)
            self.send_header('Content-type', 'text/plain; charset=utf-8')
            self.end_headers()
            self.wfile.write("Missing form fields!".encode())
            return

        longuri = params["longuri"][0]
        shortname = params["shortname"][0]

        if CheckURI(longuri):
            # This URI is good!  Remember it under the specified name.
            memory[shortname] = longuri

            # Serve a redirect to the form.
            self.send_response(303)
            self.send_header('Location', '/')
            self.end_headers()
        else:
            # Didn't successfully fetch the long URI.
            self.send_response(404)
            self.send_header('Content-type', 'text/plain; charset=utf-8')
            self.end_headers()
            self.wfile.write(
                "Couldn't fetch URI '{}'. Sorry!".format(longuri).encode())

if __name__ == '__main__':
    server_address = ('', 8000)
    httpd = http.server.HTTPServer(server_address, Shortener)
    httpd.serve_forever()
7.12 Conclusion
You know it took me several tries to get the URI shortening server right for that
last exercise. And even though it looks pretty bare-bones when you see it from the browser, there’s a lot of things going on in there.
There’s different response codes. There’s a couple of headers. There’s parsing the post body.
All in all, my version turned out to be about a hundred lines of code. If you got
that code working too you should feel proud of yourself.
Go get a cookie. Oh hey, speaking of cookies, web cookies are one of the many things we’re going to be talking about in the next lesson.
You did it
In this lesson, you’ve built up your knowledge of HTTP by building servers and clients that speak it. You’ve built Python programs that act as web servers, web clients, and both at once. That’s pretty awesome!
The next lesson will be a tour of some more advanced HTTP features that are essential to the modern web: cookies, encryption, and more.
8. Real World HTTP
8.1 Deploy to Heroku
Localhost. We’ve been seeing a lot of that lately. Far too much, I’m afraid.
As a web developer, you don’t just want to put your server up on your own localhost where only you can use it. You want to run that server on the real web where other people can see it, and interact with it
In this lesson, you’ll start out by deploying the server from last lesson onto a web hosting service, where you can show it off to your friends and colleagues.
Then, we’ll be talking about some other real world aspects of HTTP and web services, like cookies and encryption.
Can I just host my web service at home
Maybe! Plenty of people do, but not everyone can. It’s a common hobbyist activity, but not something that people would usually do for a job.
There’s nothing fundamentally special about the computers that run web servers. They’re just computers running an operating system such as Linux, Mac OS, or Windows (usually Linux). Their connection to the Internet is a little different from a typical home or mobile Internet connection, though. A server usually needs to have a stable (static) IP address so that clients can find it and connect to it. Most home and mobile systems don’t assign your computer a static IP address.
Also, most home Internet routers don’t allow incoming connections by default. You would need to reconfigure your router to allow it. This is totally possible, but way beyond the scope of this course (and I don’t know what kind of router you have).
Lastly, if you run a web service at home, your computer has to be always on.
So, for the next exercise in this course, you’ll be deploying one of your existing web services to Heroku, a commercial service that will host it on the web where it will be publicly accessible.
Steps to deployment
Here’s an overview of the steps you’ll need to complete. We’ll be going over each one in more detail.
- Check your server code into a new local Git repository.
- Sign up for a free Heroku account.
- Download the Heroku command-line interface (CLI).
- Authenticate the Heroku CLI with your account:
heroku login - Create configuration files
Procfile,requirements.txt, andruntime.txtand check them into your Git repository. - Modify your server to listen on a configurable port.
- Create your Heroku app:
heroku create your-app-name - Push your code to Heroku with Git:
git push heroku master
Check in your code
Heroku (and many other web hosting services) works closely with Git: you can deploy a particular version of your code to Heroku by pushing it with the git push command. So in order to deploy your code, it first needs to be checked into a local Git repository.
This Git repository should be separate from the one created when you downloaded the exercise code (the course-ud303 directory). Create a new directory outside of that directory and copy the bookmark server code (the file BookmarkServer.py from last lesson) into it. Then set this new directory up as a Git repository:
git initgit add BookmarkServer.pygit commit -m "Checking in my bookmark server!"
For a refresher on using Git, take a look at our Git course.
Sign up for a free Heroku account
First, visit this link and follow the instructions to sign up for a free Heroku account:
https://signup.heroku.com/dc
Make sure to write down your username and password!
Install the Heroku CLI and authenticate
You’ll need the Heroku command-line interface (CLI) tool to set up and configure your app. Download and install it now. Once you have it installed, the heroku command will be available in your shell.
From the command line, use heroku login to authenticate to Heroku. It will prompt you for your username and password; use the ones that you just set up when you created your account. This command will save your authentication information in a hidden file (.netrc) so you will not need to ender your password again on the same computer.
Create configuration files
There are a few configuration files that Heroku requires for deployment, to tell its servers how to run your application. For the case of the bookmark server, I’ll just give you the required content for these files. These are just plain text files and can be created in your favorite text editor.
runtime.txt tells Heroku what version of Python you want to run. Check the currently supported runtimes in the Heroku documentation; this will change over time! As of early 2017, the currently supported version of Python 3 is python-3.6.0; so this file just needs to contain the text python-3.6.0.
requirements.txt is used by Heroku (through pip) to install dependencies of your application that aren’t in the Python standard library. The bookmark server has one of these: the requests module. We’d like a recent version of that, so this file can contain the text requests>=2.12. This will install version 2.12 or a later version, if one has been released.
Procfile is used by Heroku to specify the command line for running your application. It can support running multiple servers, but in this case we’re only going to run a web server. Check the Heroku documentation about process types for more details. If your bookmark server is in BookmarkServer.py, then the contents of Procfile should be web: python BookmarkServer.py.
Create each of these files in the same directory as your code, and commit them all to your Git repository.
$ cat runtime.txt
python-3.6.0
$ cat requirements.txt
requests>=2.112
$ cat Procfile
web: python BookmarkServer.py
Listen on a configurable port
There’s one small change that you have to make to your server code to make it run on Heroku. The bookmark server from Lesson 2 listens on port 8000. But Heroku runs many users’ processes on the same computer, and multiple processes can’t (normally) listen on the same port. So Heroku needs to be able to tell your server what port to listen on.
The way it does this is through an environment variable — a configuration variable that is passed to your server from the program that starts it, usually the shell. Python code can access environment variables in the os.environ dictionary. The names of environment variables are usually capitalized; and the environment variable we need here is called, unsurprisingly, PORT.
The port your server listens on is configured when it creates the HTTPServer instance, near the bottom of the server code. We can make it work with or without the PORT environment variable, like so:
if __name__ == '__main__':
    port = int(os.environ.get('PORT', 8000))   # Use PORT if it's there.
    server_address = ('', port)
    httpd = http.server.HTTPServer(server_address, Shortener)
    httpd.serve_forever()
To access os.environ, you will also need to import os at the top of the file.
Make these changes to your server code, run the server locally to test that it still works, then commit it to your Git repository:
git add BookmarkServer.py
git commit -m "Use PORT from environment."
Create and push your app
Before you can put your service on the web, you have to give it a name. You can call it whatever you want, as long as the name is not already taken by another user! Your app’s name will appear in the URI of your deployed service. For instance, if you name your app silly-pony, it will appear on the web at https://silly-pony.herokuapp.com/.
Use heroku create <your-app-name> to tell Heroku about your app and give it a name. Again, you can choose any name you like, but it will have to be unique — the service will tell you if you’re choosing a name that someone else has already claimed.
Finally, use git push heroku master to deploy your app!
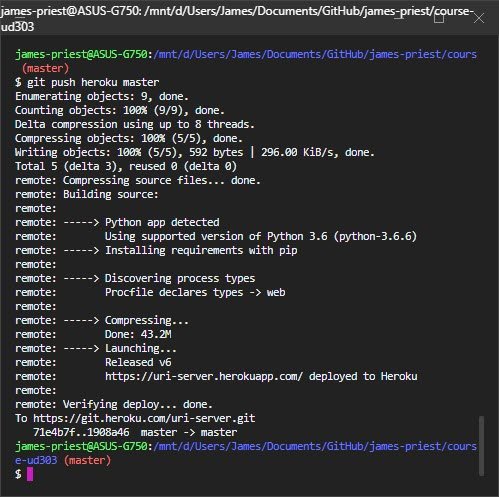
If all goes well, your app will now be accessible on the web! The URI appears in the output from the git command.
Accessing server logs
If your app doesn’t work quite right as deployed, one resource that can be very helpful is the server log. You can view this by typing
You can also view them from the Heroku dashboard.
Take a look at https://dashboard.heroku.com/apps/uri-server/logs, except replace “uri-server” with your own app’s name.
Deploying your service
- I’ve committed my server code to a Git repository.
- I’ve signed up for a Heroku account and installed the CLI.
- I’ve added a
runtime.txt. - I’ve added a
requirements.txtwithrequests. - I’ve added a
Profilewith thewebprocess defined. - I’ve changed my server code to listen on a port defined by the environment.
- I’ve committed these changes to my Git repository.
- I’ve logged into Heroku from the command line and pushed my app.
- I’ve tested it and it works!
8.2 Multi-threaded Model
Now that you’ve deployed that server, try using the deployed version. No more localhost– now you have a version that you can send around all your friends so they can post really weird things in it.
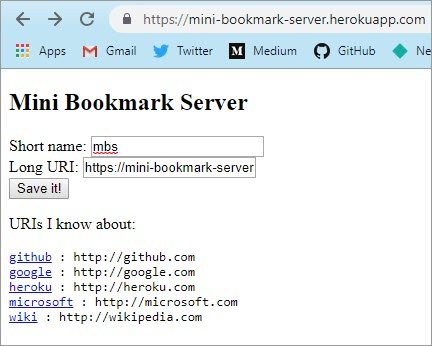
But let’s take a look at one limitation this version has and how to work around it.
Handling more requests
Try creating a link in it where the target URI is the bookmark server’s own URI. What happens when you try to do that?
When I do this, the app gives me an error, saying it can’t fetch that web page. That’s weird! The server is right there; it should be able to reach itself! What do you think is going on here?
8.2 Question 1
Why can’t the bookmark server fetch a page from itself?
- It needs to use the name
localhostto do that, not it’s public web address. http.servercan only handle one request at a time.- The hosting service is blocking the app’s request as spam.
- Web sites are not allowed to link to themselves; it would create an infinite loop.
The basic, built-in http.server.HTTPServer class can only handle a single request at once. The bookmark server tries to fetch every URI that we give it, while it’s in the middle of handling the form submission.
It’s like an old-school telephone that can only have one call at once. Because it can only handle one request at a time, it can’t “pick up” the second request until it’s done with the first … but in order to answer the first request, it needs the response from the second.
Concurrency
Being able to handle two ongoing tasks at the same time is called concurrency, and the basic http.server.HTTPServer doesn’t have it. It’s pretty straightforward to plug concurrency support into an HTTPServer, though. The Python standard library supports doing this by adding a mixin to the «HTTPServer` class. A mixin is a sort of helper class, one that adds extra behavior the original class did not have. To do this, you’ll need to add this code to your bookmark server:
import threading
from socketserver import ThreadingMixIn

class ThreadHTTPServer(ThreadingMixIn, http.server.HTTPServer):
    "This is an HTTPServer that supports thread-based concurrency."
Then look at the bottom of your bookmark server code, where it creates an HTTPServer. Have it create a ThreadHTTPServer instead:
if __name__ == '__main__':
    port = int(os.environ.get('PORT', 8000))
    server_address = ('', port)
    httpd = ThreadHTTPServer(server_address, Shortener)
    httpd.serve_forever()
Commit this change to your Git repository, and push it to Heroku. Now when you test it out, you should be able to add an entry that points to the service itself.
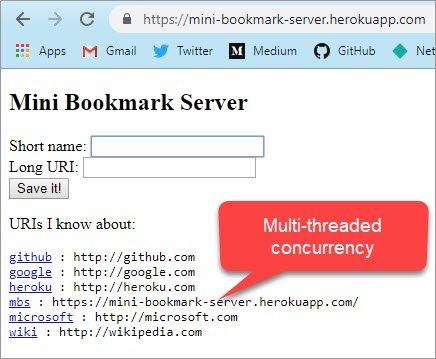
8.2 Question 2
Try posting an entry to your bookmark server that points to the server itself now. Did it work? If so, the server is now able to handle a second incoming request while processing another request.
- Yes, it worked!
- Not quite.
8.3 Apache & Nginx
If you look up most popular web server using your favorite search engine, you’re not going to see Python’s http.server on the list. You’ll see programs like Apache, NGINX, and Microsoft IIS.

These specialized web server programs handle a large number of requests very quickly. Let’s take a look at what these do, and how they relate to the rest of the web service picture.
Static content and more
The Web was originally designed to serve documents, not to deliver applications. Even today, a large amount of the data presented on any web site is static content — images, HTML files, videos, downloadable files, and other media stored on disk.
Specialized web server programs — like Apache, Nginx, or IIS — can serve static content from disk storage very quickly and efficiently. They can also provide access control, allowing only authenticated users to download particular static content.
Routing and load balancing
Some web applications have several different server components, each running as a separate process. One thing a specialized web server can do is dispatch requests to the particular backend servers that need to handle each request. There are a lot of names for this, including request routing and reverse proxying.
Some web applications need to do a lot of work on the server side for each request, and need many servers to handle the load. Splitting requests up among several servers is called load balancing.
Load balancing also helps handle conditions where one server becomes unavailable, allowing other servers to pick up the slack. A reverse proxy can health check the backend servers, only sending requests to the ones that are currently up and running. This also makes it possible to do updates to the backend servers without having an outage.
Concurrent users
Handling a large number of network connections at once turns out to be complicated — even more so than plugging concurrency support into your Python web service.
As you may have noticed in your own use of the web, it takes time for a server to respond to a request. The server has to receive and parse the request, come up with the data that it needs to respond, and transmit the response back to the client. The network itself is not instantaneous; it takes time for data to travel from the client to the server.
In addition, a browser is totally allowed to open up multiple connections to the same server, for instance to request resources such as images, or to perform API queries.
All of this means that if a server is handling many requests per second, there will be many requests in progress at once — literally, at any instant in time. We sometimes refer to these as in-flight requests, meaning that the request has “taken off” from the client, but the response has not “landed” again back at the client. A web service can’t just handle one request at a time and then go on to the next one; it has to be able to handle many at once.
8.3 Question 1
In Spetember 2016, the English Wikipedia received about 250 million page views per day. That’s an average of about 2,900 page views every second. Let’s imagine that an average page view involves three HTTP queries (the page HTML itself and two images), and the each HTTP query takes 0.1 seconds (or 100 milliseconds) to serve.
About how many requests are in flight at any instant?
- Less than 100
- Between 100 and 1,000
- Between 1,000 and 9,000
- Over 9,000
If each page view involves three queries, then there are about 8,700 queries per second. Each one takes 0.1 seconds, so about 870 are going to be in-flight at any instant. So “between 100 and 1,000” is the right answer here.
Caching
Imagine a web service that does a lot of complicated processing for each request — something like calculating the best route for a trip between two cities on a map. Pretty often, users make the same request repeatedly: imagine if you load up that map, and then you reload the page — or if someone else loads the same map. It’s useful if the service can avoid recalculating something it just figured out a second ago. It’s also useful if the service can avoid re-sending a large object (such as an image) if it doesn’t have to.
One way that web services avoid this is by making use of a cache, a temporary storage for resources that are likely to be reused. Web systems can perform caching in a number of places — but all of them are under control of the server that serves up a particular resource. That server can set HTTP headers indicating that a particular resource is not intended to change quickly, and can safely be cached.
There are a few places that caching usually can happen. Every user’s browser maintains a browser cache of cacheable resources — such as images from recently-viewed web pages. The browser can also be configured to pass requests through a web proxy, which can perform caching on behalf of many users. Finally, a web site can use a reverse proxy to cache results so they don’t need to be recomputed by a slower application server or database.
All HTTP caching is supposed to be governed by cache control headers set by the server. You can read a lot more about them in this article by Google engineer Ilya Grigorik.
Capacity
Why serve static requests out of cache (or a static web server) rather than out of your application server? Python code is totally capable of sending images or video via HTTP, after all. The reason is that — all else being equal — handling a request faster provides a better user experience, but also makes it possible for your service to support more requests.
If your web service becomes popular, you don’t want it to bog down under the strain of more traffic. So it helps to handle different kinds of request with software that can perform that function quickly and efficiently.
8.3 Question 2
Imagine that you have a service that is handling 6,000 requests per second. One-third of its requests are for the site’s CSS file, which doesn’t change very often. So browsers shouldn’t need to fetch it every time they load the site. If you tell the browser to cache the CSS, 1% of visitors will need to fetch it. After this change, about how many requests will the service be getting?
- About 60 requests per second.
- About 420 requests per second.
- About 4,020 requests per second.
- About 6,060 requests per second.
2,000 requests per second are the CSS file, so the other 4,000 requests are other things. Those 4,000 will be unaffected by this change.
The 2,000 CSS requests will be reduced by 99%, to 20 requests.
This means that after the caching improvement, the service will be getting 4,020 requests per second.
8.4 Cookies
Earlier in this course, you saw quite a lot about HTTP headers. There are a couple of particular headers that are especially important for web applications– the Set-Cookie and Cookie headers.
These headers are used to store and transmit cookies. Now an HTTP cookie isn’t a tasty snack. It’s a piece of data that a web server asks a browser to store and send back.
Cookies are immensely important to many web applications. They make it possible to
- stay logged in to a website
- or to associate multiple queries into a single session
- they’re also used to track users for advertising purposes.
Let’s take a look at how cookies work.
Cookies
Cookies are a way that a server can ask a browser to retain a piece of information, and send it back to the server when the browser makes subsequent requests. Every cookie has a name and a value, much like a variable in your code; it also has rules that specify when the cookie should be sent back.
What are cookies for? A few different things. If the server sends each client a unique cookie value, it can use these to tell clients apart. This can be used to implement higher-level concepts on top of HTTP requests and responses — things like sessions and login. Cookies are used by analytics and advertising systems to track user activity from site to site. Cookies are also sometimes used to store user preferences for a site.
How cookies happen
The first time the client makes a request to the server, the server sends back the response with a Set-Cookie header. This header contains three things: a cookie name, a value, and some attributes. Every subsequent time the browser makes a request to the server, it will send that cookie back to the server. The server can update cookies, or ask the browser to expire them.
Seeing cookies in your browser
Browsers don’t make it easy to find cookies that have been set, because removing or altering cookies can affect the expected behavior of web services you use. However, it is possible to inspect cookies from sites you use in every major browser. Do some research on your own to find out how to view the cookies that your browser is storing.
Here’s a cookie that I found in my Chrome browser, from a web site I visited:
What are all these pieces of data in my cookie? There are eight different fields there!
By the way, if you try to research “cookie fields” with a web search, you may get a lot of results from the Mrs. Fields cookie company. Try “HTTP cookie fields” for more relevant results.
The first two, the cookie’s name and content, are also called its key and value. They’re analogous to a dictionary key and value in Python — or a variable’s name and value for that matter. They will both be sent back to the server. There are some syntactic rules for which characters are allowed in a cookie name; for instance, they can’t have spaces in them. The value of the cookie is where the “real data” of the cookie goes — for instance, a unique token representing a logged-in user’s session.
The next two fields, Domain and Path, describe the scope of the cookie — that is to say, which queries will include it. By default, the domain of a cookie is the hostname from the URI of the response that set the cookie. But a server can also set a cookie on a broader domain, within limits. For instance, a response from www.udacity.com can set a cookie for udacity.com, but not for com.
The fields that Chrome describes as “Send for” and “Accessible to script” are internally called Secure and HttpOnly, and they are boolean flags (true or false values). The internal names are a little bit misleading. If the Secure flag is set, then the cookie will only be sent over HTTPS (encrypted) connections, not plain HTTP. If the HttpOnly flag is set, then the cookie will not be accessible to JavaScript code running on the page.
Finally, the last two fields deal with the lifetime of the cookie — how long it should last. The creation time is just the time of the response that set the cookie. The expiration time is when the server wants the browser to stop saving the cookie. There are two different ways a server can set this: it can set an Expires field with a specific date and time, or a Max-Age field with a number of seconds. If no expiration field is set, then a cookie is expired when the browser closes.
Using cookies in Python
To set a cookie from a Python HTTP server, all you need to do is set the Set-Cookie header on an HTTP response. Similarly, to read a cookie in an incoming request, you read the Cookie header. However, the format of these headers is a little bit tricky; I don’t recommend formatting them by hand. Python’s http.cookies module provides handy utilities for doing so.
To create a cookie on a Python server, use the SimpleCookie class. This class is based on a dictionary, but has some special behavior once you create a key within it:
from http.cookies import SimpleCookie, CookieError

out_cookie = SimpleCookie()
out_cookie["bearname"] = "Smokey Bear"
out_cookie["bearname"]["max-age"] = 600
out_cookie["bearname"]["httponly"] = True
Then you can send the cookie as a header from your request handler:
self.send_header("Set-Cookie", out_cookie["bearname"].OutputString())
To read incoming cookies, create a SimpleCookie from the Cookie header:
in_cookie = SimpleCookie(self.headers["Cookie"])
in_data = in_cookie["bearname"].value
Be aware that a request might not have a cookie on it, in which case accessing the Cookie header will raise a KeyError exception; or the cookie might not be valid, in which case the SimpleCookie constructor will raise http.cookies.CookieError.
Important safety tip: Even though browsers make it difficult for users to modify cookies, it’s possible for a user to modify a cookie value. Higher-level web toolkits, such as Flask (in Python) or Rails (in Ruby) will cryptographically sign your cookies so that they won’t be accepted if they are modified. Quite often, high-security web applications use a cookie just to store a session ID, which is a key to a server-side database containing user information.
Another important safety tip: If you’re displaying the cookie data as HTML, you need to be careful to escape any HTML special characters that might be in it. An easy way to do this in Python is to use the
html.escapefunction, from the built-inhtmlmodule!
For a lot more information on cookie handling in Python, see the documentation for the http.cookies module.
Exercise: A server that remembers you
In this exercise, you’ll build a server that asks for your name, and then stores your name in a cookie on your browser. You’ll be able to see that cookie in your browser’s cookie data. Then when you visit the server again, it’ll already know your name.
The starter code for this exercise is in Lesson-3/2_CookieServer.
- In the
doPOSTmethod, set the cookie fields: it’s value, domain (localhost) and max-age. - In the
do_GETmethod, extract and decode the returned cookie value. - Run the cookie serverand test it in your browser at http://localhost:8000
- Run the
test.pyscript to test the running server. - Inspect your browser’s cookies for the
localhostdomain and find the cookie your your server created!
Many web frameworks use cookies “under the hood” without you having to explicitly set them like this. But by doing it this way first, you’ll know what’s going on inside your applications.
How it looks on my browser
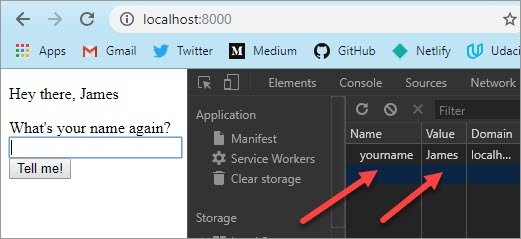
DNS domains and cookie security
Back in Lesson 1, you used the host or nslookup command to look up the IP addresses of a few different web services, such as Wikipedia and your own localhost. But domain names play a few other roles in HTTP besides just being easier to remember than IP addresses. A DNS domain links a particular hostname to a computer’s IP address. But it also indicates that the owner of that domain intends for that computer to be treated as part of that domain.
Imagine what a bad guy could do if they could convince your browser that their server evilbox was part of (say) Facebook, and get you to request a Facebook URL from evilbox instead of from Facebook’s real servers. Your browser would send your facebook.com cookies to evilbox along with that request. But these cookies are what prove your identity to Facebook … so then the bad guy could use those cookies to access your Facebook account and send spam messages to all your friends.
In the immortal words of Dr. Egon Spengler: It would be bad.
This is just one reason that DNS is essential to web security. If a bad guy can take control of your site’s DNS domain, they can send all your web traffic to their evil server … and if the bad guy can fool users’ browsers into sending that traffic their way, they can steal the users’ cookies and reuse them to break into those users’ accounts on your site.
8.5 HTTPS for security
As a web user, you’ve probably heard of HTTPS, the encrypted version of HTTP. Whenever you see that little green lock upin your browser or an HTTPS URI, you’re looking at an encrypted website.
For a user, HTTPS does two really important things. It protects your data from eavesdroppers on the network, and it also checks the authenticity of the site you’re talking to. For a web developer, HTTPS lets you offer those assurances to your users.
Originally, HTTPS was used to protect credit card information, passwords, and other high-security information. But as web security and privacy got more and more important, a lot of major sites started using it on every connection.
Today, sites like Google, Facebook, and Wikipedia–and Udacity–default to HTTPS for every connection.
Now earlier in this lesson, you deployed a service on the web in a way that already makes use of HTTPS. We can use that to test it out and see how it works.
What HTTPS does for you
When a browser and a server speak HTTPS, they’re just speaking HTTP, but over an encrypted connection. The encryption follows a standard protocol called Transport Layer Security, or TLS for short. TLS provides some important guarantees for web security:
- It keeps the connection private by encrypting everything sent over it. Only the server and browser should be able to read what’s being sent.
- It lets the browser authenticate the server. For instance, when a user accesses https://www.udacity.com/, they can be sure that the response they’re seeing is really from Udacity’s servers and not from an impostor.
- It helps protect the integrity of the data sent over that connection — checking that it has not been (accidentally or deliberately) modified or replaced.
Note: TLS is also very often referred to by the older name SSL (Secure Sockets Layer). Technically, SSL is an older version of the encryption protocol. This course will talk about TLS because that’s the current standard.
8.5 Question 1
Here are a few different malicious things that an attacker could do to normal HTTP traffic. Each of the three guarantees (privacy, authenticity, and integrity) helps defend agains one of them. Match them up!
| Attack | Defense |
|---|---|
| You’re reading your email in a coffee shop, and the shop owner can read your email off of their Wi-Fi network you’re using. | Privacy Authenticity Integrity |
| You think you’re loggin into Facebook, but actually you’re sending your FB password to a server in the coffee shop’s back room | Privacy Authenticity Integrity |
| The coffe shop owner doesn’t like cat pics, so they replace all the cat pics on the web page you’re looking at with pics of celery. | Privacy Authenticity Integrity |
Inspecting TLS on your service
If you deployed a web service on Heroku earlier in this lesson, then HTTPS should already be set up. The URI that Heroku assigned to your app was something like https://yourappname.herokuapp.com/.
From there, you can use your browser to see more information about the HTTPS setup for this site. However, the specifics of where to find this information will depend on your browser. You can experiment to find it, or you can check the documentation: Chrome, Firefox, Safari.
Note: In some browser documentation you’ll see references to SSL certificates. These are the same as TLS certificates. Remember, SSL is just the older version of the encryption standard.
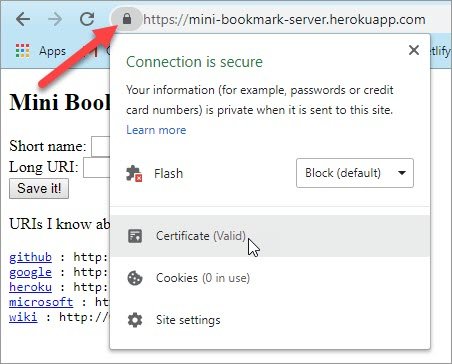
Click the lock icon to view details of the HTTPS connection.

Viewing TLS certificate details for the herokuapp.com certificate.
What does it mean?
Well, there are a lot of locks in these pictures. Those are how the browser indicates to the user that their connection is being protected by TLS. However, these dialogs also show a little about the server’s TLS setup.
Keys and certificates
The server-side configuration for TLS includes two important pieces of data: a private key and a public certificate. The private key is secret; it’s held on the server and never leaves there. The certificate is sent to every browser that connects to that server via TLS. These two pieces of data are mathematically related to each other in a way that makes the encryption of TLS possible.
The server’s certificate is issued by an organization called a certificate authority (CA). The certificate authority’s job is to make sure that the server really is who it says it is — for instance, that a certificate issued in the name of Heroku is actually being used by the Heroku organization and not by someone else.
The role of a certificate authority is kind of like getting a document notarized. A notary public checks your ID and witnesses you sign a document, and puts their stamp on it to indicate that they did so.
8.5 Question 2
Take a look at the TLS certificate presented for your deployed app, or the screenshots above from my version of it. What organization was this server certificate issued to? Who issued it?
- It was issued to Heroku, and the issuer is SHA2 High Assurance.
- It was issued to DigiCert, and the issuer is the state of California.
- It was issued to Heroku, and the issuer is the state of California.
- It was issued to Heroku, and the issuer is DigiCert.
- It was issued to
localhost, and the issuer is port 8000.
DigiCert, Inc. is the issuer, or certificate authority, that issued this TLS certificate. Heroku, Inc. is the organization to which it was issued.
How does TLS assure privacy?
The data in the TLS certificate and the server’s private key are mathematically related to each other through a system called public-key cryptography. The details of how this works are way beyond the scope of this course. The important part is that the two endpoints (the browser and server) can securely agree on a shared secret which allows them to scramble the data sent between them so that only the other endpoint — and not any eavesdropper — can unscramble it.
How does TLS assure authentication?
A server certificate indicates that an encryption key belongs to a particular organization responsible for that service. It’s the job of a certificate authority to make sure that they don’t issue a cert for (say) udacity.com to someone other than the company who actually runs that domain.
But the cert also contains metadata that says what DNS domain the certificate is good for. The cert in the picture above is only good for sites in the .herokuapp.com domain. When the browser connects to a particular server, if the TLS domain metadata doesn’t match the DNS domain, the browser will reject the certificate and put up a big scary warning to tell the user that something fishy is going on.
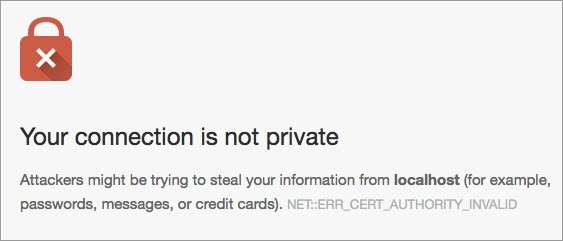
A big scary warning that Chrome displays if a TLS certificate is not valid.
How does TLS assure integrity?
Every request and response sent over a TLS connection is sent with a message authentication code (MAC) that the other end of the connection can verify to make sure that the message hasn’t been altered or damaged in transit.
8.5 Question 3
Suppose that an attacker were able to trick your browser into sending your udacity.com requests to the attacker’s server instead of Udacity’s real servers. What could the attacker do with that evil ability?
- Steal your udacity.com cookies, use them to log into the real site as you, and post terrible span to the discussion forums.
- Make this course appear with terrible images in it instead of nice friendly ones.
- Send fake email through your Gmail account or post spam to your friends on Facebook.
- Cause your computer to explode.
If your browser believes the attacker’s server is udacity.com, it will send your udacity.com authentication cookies to the attacker’s server. They can then put those cookies in their own web client and masquerade as you when talking to the real site. Also, if your browser is fetching content from the attacker’s server, the attacker can put whatever they want in that content. They could even forward most of the content from the real server.
However, compromising Udacity’s site would not allow an attacker to break into your Gmail or Facebook accounts, and fortunately it wouldn’t let the attacker blow up your computer either.
8.5 Question 4
When your browser talks to your deployed service over HTTPS, there are still some ways that an attacker could spy on the communication. Mark the cases that HTTPS does not protect against.
- A malicious program on your computer taking a screenshot of your browser.
- An attacker monitoring the WiFi network in the coffee shop you’re in when you deploy your app.
- Your Internet service provider tying to read the contents of your connection as it passes through their network.
- An attacker guessing your Heroku password and replacing your service with a malicious one.
- An attacker who had broken into Heroku’s servers themselves
HTTPS only protects your data in transit. It doesn’t protect it from an attacker who has taken over your computer, or the computer that’s running your service. So items 1, 4, and 5 are not things that HTTPS can help with.
8.6 Beyond GET and POST
API’s are a huge part of the modern web. A lot of web applications make use of a server side part that exposes an API and the client side part that sends queries to that API.
But not every API call make sense as a GET or a POST query. The GET method is really for requesting a copy of a resource. And POST is for things that act more or less like form submission.
But there are a bunch of other methods in HTTP. Let’s see what those are.
All of the other methods
The different HTTP methods each stand for different actions that a client might need to perform upon a server-hosted resource. Unlike GET and POST, their usage isn’t built into the normal operation of web browsers; following a link is always going to be a GET request, and the default action for submitting an HTML form will always be a GET or POST request.
However, other methods are available for web APIs to use, for instance from client code in JavaScript. If you want to use other methods in your own full-stack applications, you’ll have to write both server-side code to accept them, and client-side JavaScript code to make use of them.
PUT for creating resources
The HTTP PUT method can be used for creating a new resources. The client sends the URI path that it wants to create, and a piece of data in the request body. A server could implement PUT in a number of different ways — such as storing a file on disk, or adding records to a database. A server should respond to a PUT request with a 201 Created status code, if the PUT action completed successfully. After a successful PUT, a GET request to the same URI should return the newly created resource.
8.6 Question 1
PUT can be used for actions such as uploading a file to a web site. However, it’s not the most common way to do file uploads. PUT has to be done in application code (e.g.JavaScript), whereas with another method it’s pssible to do uploads with just HTML on the client side. What method do you think this describes?
GETPOSTUPLOAD
Most file uploads are done via POST requests. For examples, see this article at MDN.
DELETE for, well, deleting things
The destructive counterpart to PUT is DELETE, for removing a resource from the server. After a DELETE has happened successfully, further GET requests for that resource will yield 404 Not Found … unless, of course, a new resource is later created with the same name!
8.6 Question 2
What’s something that we would almost always want the client to do before allowing it to delete resouces in your application?
- Create a new resouce to replace it
- Establish a doubly encrypted protocal tunnel
- Log in, or otherwise authenticate
Most applications that involve creating and deleting resources on the server are going to require authentication, to make sure that the client is actually someone we want to trust with that power.
PATCH for making changes
The PATCH method is a relatively new addition to HTTP. It expresses the idea of patching a resource, or changing it in some well-defined way. (If you’ve used Git, you can think of patching as what applying a Git commit does to the files in a repository.)
However, just as HTTP doesn’t specify what format a resource has to be in, it also doesn’t specify in what format a patch can be in: how it should represent the changes that are intended to be applied. That’s up to the application to decide. An application could send diffs over HTTP PATCH requests, for instance. One standardized format for PATCH requests is the JSON Patch format, which expresses changes to a piece of JSON data. A different one is JSON Merge Patch.
HEAD, OPTIONS, TRACE for debugging
There are a number of additional methods that HTTP supports for various sorts of debugging and examining servers.
HEADworks just like GET, except the server doesn’t return any content — just headers.OPTIONScan be used to find out what features the server supports.TRACEechoes back what the server received from the client — but is often disabled for security reasons.
8.6 Question 3
If HTTP method are the “verbs” in the protocol, what are the “objects” (in the grammatical sense)?
- URIs (e.g. https://en.wikipedia.org/wiki/Transport_Layer_Security)
- Servers (e.g. en.wikipedia.org)
- Status codes (e.g.200 OK)
- URI schemes (e.g. https)
- Authenticated users, content-types, and network latency
An HTTP method asks the server to do something to a resource, which is named by a URI.
Great responsibility
HTTP can’t prevent a service from using methods to mean something different from what they’re intended to mean, but this can have some surprising effects. For instance, you could create a service that used a GET request to delete content. However, web clients don’t expect GET requests to have side-effects like that. In one famous case from 2006, an organization put up a web site where “edit” and “delete” actions happened through GET requests, and the result was that the next search-engine web crawler to come along deleted the whole site.
The standard tells all
For much more about HTTP methods, consult the HTTP standards documents.
8.7 HTTP/1.1 vs HTTP/2
HTTP has been around for almost 30 years now and it’s seen some pretty big changes.
The first version of HTTP didn’t even have a version number on it, but it was later called version 0.9. It was really simple. It only supported GET Requests, it expected all responses to be in HTML, and it didn’t even have any headers.
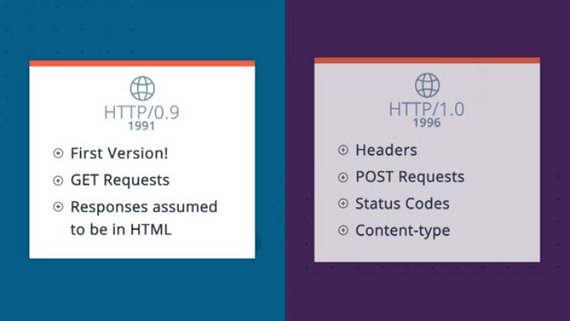
HTTP 1.0 came out in 1996. It added Headers, Post Requests for forms, Status Codes, and Content Types. A lot of features were then added by browser and server developers without immediately getting standardized. That’s where Cookies came from.
HTTP 1.1 followed in 1999, and was significantly revised in 2007, including a lot of those changes. It added improved Caching, a whole bunch of features to make Requests more efficient, and the ability to host multiple websites on the same serverand IP address by using the Host Header.
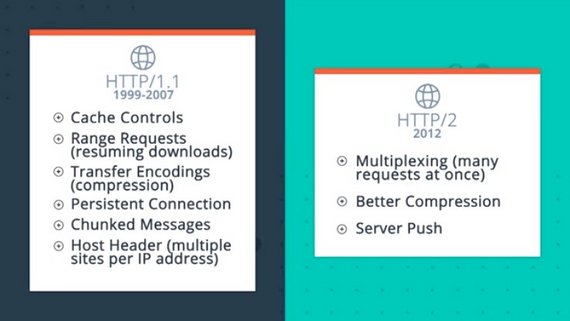
As of the end of 2016, HTTP 1.1 is what 90% of the web is using. But there’s a whole new version now too.
HTTP 2 was designed to make HTTP much more efficient, especially for busy services that involve large numbers of Requests. HTTP 1.1 isn’t going away, but let’s take a look at what the new one does.
HTTP/2
The new version of HTTP is called HTTP/2. It’s based on earlier protocol work done at Google, under the name SPDY (pronounced “speedy”).
Unfortunately, we can’t show you very much about HTTP/2 in Python, because the libraries for it are not very mature yet (as of early 2017). We’ll still take a look at the motivations for the changes that HTTP/2 brings, though.
Some other languages are a little bit more up to the minute; one of the best demonstrations of HTTP/2’s advantages is in the Gophertiles demo from the makers of the Go programming language. In order to see the effects, you’ll need to be using a browser that supports HTTP/2. Check CanIUse.com to check that your browser does!
This demo lets you load the same web page over HTTP/1.1 and HTTP/2. It also lets you add extra latency (delay) to each request, simulating what happens when you access a server that’s far away or when you’re on a slow network. The latency options are zero (no extra latency), 30 milliseconds, 200 milliseconds, and one second. Try it out!
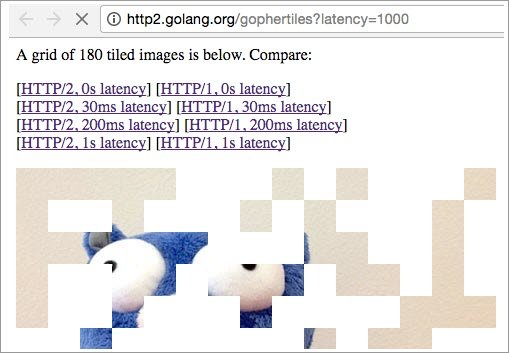
A partly -loaded Gophertiles demo, using HTTP/1 with a server latency of 1 second.
8.7 Question
In the Gophertiles demo, try the HTTP/2 and HTTP/1 links with 1 second of latency. What do you notice about the time it takes to load all the images?
- HTTP/1 loads much more quickly than HTTP/2
- They’re about the same.
- HTTP/2 loads much more quickly than HTTP/1.
HTTP/2 should load much faster than HTTP/1, if your browser is using it!
Other HTTP/2 demos
You don’t have to take the Go folks’ word for it, either; there’s http://www.http2demo.io/ too, and also https://http2.akamai.com/demo. Each of these demos works similarly to the Gophertiles demo, and will show you much the same effects. The HTTP/2 one is (on average) a whole lot faster, especially with high latency.
But why is it faster? To answer that, we first need to look at some browser behavior in HTTP/1.1.
Exercise: Multiple connections
Since the early days of HTTP, browsers have kept open multiple connections to a server. This lets the browser fetch several resources (such as images, scripts, etc.) in parallel, with less waiting. However, the browser only opens up a small number of connections to each server. And in HTTP/1.1, each connection can only request a single resource at a time.
As an exercise, take a look at the server in Lesson-3/3_Parallelometer. Try running this server on your computer and accessing it at http://localhost:8000 to see parallel requests happening. The code here is based on the threading server that you’ve seen earlier in this lesson.
Depending on your browser, you may see different numbers, but most likely the biggest one you’ll see is 6. Common browsers such as Chrome, Firefox, and Safari open up as many as six connections to the same server. And under HTTP/1.1, only one request can effectively be in flight per connection, which means that they can only have up to six requests in flight with that server at a time.
Multiplexing
But if you’re requesting hundreds of different tiny files from the server — as in this demo or the Gophertiles demo — it’s kind of limiting to only be able to fetch six at a time. This is particularly true when the latency (delay) between the server and browser gets high. The browser can’t start fetching the seventh image until it’s fully loaded the first six. The greater the latency, the worse this affects the user experience.
HTTP/2 changes this around by multiplexing requests and responses over a single connection. The browser can send several requests all at once, and the server can send responses as quickly as it can get to them. There’s no limit on how many can be in flight at once.
And that’s why the Gophertiles demo loads much more quickly over HTTP/2 than over HTTP/1.
Server push
When you load a web page, your browser first fetches the HTML, and then it goes back and fetches other resources such as stylesheets or images. But if the server already knows that you will want these other resources, why should it wait for your browser to ask for them in a separate request? HTTP/2 has a feature called server push which allows the server to say, effectively, “If you’re asking for index.html, I know you’re going to ask for style.css too, so I’m going to send it along as well.”
Encryption
The HTTP/2 protocol was being designed around the same time that web engineers were getting even more interested in encrypting all traffic on the web for privacy reasons. Early drafts of HTTP/2 proposed that encryption should be required for sites to use the new protocol. This ended up being removed from the official standard … but most of the browsers did it anyway! Chrome, Firefox, and other browsers will only attempt HTTP/2 with a site that is using TLS encryption.
Many more features
Now you have a sense of where HTTP development has been going in the past few years. You can read much more about HTTP/2 in the HTTP/2 FAQ.
8.8 Learning Resources
Congratulations. You’ve reached the end this course. You’ve learned a lot in the past few lessons, and you’ve done a lot.
You’ve built code that interacts with the web in a bunch of ways–
- as a server
- as a client
- both at once
But you’ve also built up your own knowledge of the protocols that the web is built out of. I hope that will serve you well in the rest of your education as a web developer. Go build things.
Resources
Here are some handy resources for learning more about HTTP:
- Mozilla Developer Network’s HTTP index page contains a variety of tutorial and reference materials on every aspect of HTTP.
- The standards documents for HTTP/1.1 start at RFC 7230. The language of Internet standards tends to be a little difficult, but these are the official description of how it’s supposed to work.
- The standards documents for HTTP/2 are at https://http2.github.io/.
- Let’s Encrypt is a great site to learn about HTTPS in a hands-on way, by creating your own HTTPS certificates and installing them on your site.
- HTTP Spy is a neat little Chrome extension that will show you the headers and request information for every request your browser makes.