Итак, вы вдохновились ретро-электроникой и мечтаете написать трек в стиле синтвейв. Из этого материала вы узнаете, что такое синтвейв, как звучат инструменты в жанре, какие подходы к аранжировке используются и какие плагины применяются для написания треков.
Ностальгия по 1980-м не проходит уже несколько лет: кинематографисты возвращаются к стилистике эпохи со стабильной регулярностью, музыканты вдохновляются творчеством того времени. Во главе музыкальной ностальгии уже более 20 лет стоит синтвейв — музыкальный жанр, появившийся как дань уважения поп-музыке 1980-х, но со временем сформировавшийся в самостоятельное направление с собственными характерными чертами.
Этот гайд — попытка собрать воедино всю имеющуюся полезную информацию для тех, кто хочет писать синтвейв. Если вы знаете какие-либо важные информационные ресурсы, или вам есть, чем дополнить этот материал, напишите об этом в комментариях. Вместе мы сделаем этот материал лучше.
Что такое синтвейв
Синтвейв (или ретровейв, англ. synthwave, retrowave) — жанр электронной музыки, вдохновлённый музыкой 1980-х годов — стилем нью вейв, а также саундтреками к фильмам, играм и телешоу того времени. Иногда синтвейв также называют фьючасинт (англ. Futuresynth) или аутран (англ. Outrun, по названию видеоигры).
Музыка в стиле синтвейв преимущественно инструментальная, основанная на звучании аналоговых синтезаторов. Задача продюсера — воссоздать атмосферу популярной культуры 1980-х, а также достичь схожего с саундтреками фильмов и игр в жанре научной фантастики звучания.
Для достижения нужного звука используются характерные для того времени инструменты и методики обработки: активное использование арпеджиаторов, драм-машин, реверберации, применение гейта на ударных. Несмотря на это жанр также полагается и на особенности современной электроники: так, например, на передний план выводятся инструменты ритм-секции (ударных и баса), задающие общий тон композиции.
Источники вдохновения и заметные представители жанра
Вдохновением для жанра послужило творчество Джона Карпентера (режиссер, снявший «Нечто», «Побег из Лос-Анджелеса» и «Хэллоуин», еще и неплохой композитор), Вангелиса, Джорджо Мородера и группы Tangerine Dream. Пионерами синтвейва считаются французские электронные музыканты Давид Грелье (College), Венсан Пьер Клод Белорже (Kavinsky), электронный дуэт Justice, которые одними из первых стали писать музыку, вдохновленную работой композиторов 1980-х годов.
Изначально жанр ассоциировался с французской электронной сценой — синтвейв относили к разновидности французского хауса. Ситуация изменилась в 2011 году после выхода фильма «Драйв» с Райаном Гослингом, активно использующим ретро-стилистику в музыкальном оформлении. Написанный Kavinsky саундтрек сделал синтвейв по-настоящему популярным, что привело к быстрому развитию жанра, появлению новых исполнителей и росту числа поклонников.
Среди самых заметных представителей сцены можно выделить Perturbator, Carpenter Brut, Droid Bishop, Scandroid, дуэты Electric Youth, Power Glove, Dance With The Dead, FutureCop! и Timecop1983, а также такие группы как The Midnight и Gunship. Помимо этого элементы синтвейва встречаются в творчестве Daft Punk и ряда других исполнителей.
Несмотря на большое количество имён, каждый исполнитель по-своему интерпретирует ретро-звучание 1980-х годов. Для синтвейв-музыкантов характерно смешение «старой» музыки с элементами современности. Так, например, Dance With The Dead совмещает синтвейв с элементами рока и метала:
Carpenter Brut соединяют ретро с элементами дабстепа, драм-н-бейса и хард-рока:
В свою очередь коллективы The Midnight и Gunship исполняют смесь синтвейва и синти-попа, которая на выходе напоминает о лёгкой поп-музыке 1980-х:
Характерные элементы жанра
При первом знакомстве жанр кажется сложным — обилие различных синтезаторов, масса обработок, большое количество эффектов. Написание первой синтвейв-композиции может затянуться на долгое время, которое уйдет на поиски полезной информации в Интернете. Тем не менее не всё так страшно: синтвейв легче, чем кажется, но сложнее, чем слышится.
Общая структура и звучание
Синтвейв использует простую структуру треков и зачастую следует распространенному сценарию: вступление, куплет, припев, куплет, припев, проигрыш, припев, концовка (см. Анатомия аранжировки: типовая структура песни в популярной и электронной музыке). Темп композиций средний, чаще всего в районе 90-110 ударов в минуту.
Характерная черта партий инструментов — простота. Синтвейв полагается на ровные ритмические рисунки без каких-либо излишеств. Основные длительности нот — 1/4, 1/8, 1/16. Особенно это касается баса, задающего динамику всей композиции.
В музыкальной индустрии 1980-х активно применялся процессор Aural Exciter, который добавлял трекам эффекта присутствия и насыщал их высокими частотами. Его применение связано с распространением компакт-дисков, позволявших выпускать музыку в более высоком качестве.
Музыкальные лейблы активно осваивали новый формат и перегоняли записанное на пленку на CD-диски. Из-за не идеального исходного звучания пленки в оцифрованном сигнале наблюдался переизбыток высоких частот и замыленность середины. У инструментов также избирательно появлялся легкий налет дисторшна и прочих искажений.
Вся эта ситуация наложила отпечаток на восприятие музыки того времени. Звучание синтвейва отличается плотными низкими частотами, лёгкой размытостью и мягкостью середины, блеском и яркостью в верху. Низкие частоты держат основу треков, средние — создают несколько мутный и насыщенный аккомпанемент, верхние — как бы сияют над остальным миксом.
Для миксов характерен узкий динамический диапазон из-за большого количества эффектов (той же компрессии на мастер-канале). Итоговое звучание зачастую расширяется посредством дополнительных плагинов и обработок (например, iZotope).

Реверберация
Отличительная черта синтвейва — активное использование реверберации. Пространственный эффект используется повсеместно, через него пропускается практически любой звук и инструмент.
В 1980-х годах самыми популярными ревербераторами были Lexicon 224s и AMS. Сегодня достичь схожего эффекта реверберации довольно сложно, поэтому музыканты и продюсеры полагаются на комбинации обработок с различающимися настройками для каждого инструмента или группы инструментов.
Предпочтение лучше отдавать длительным реверберациям с активными откликами. Если реверберация не подходит инструменту, лучше использовать сатурированный дилэй или связку или эхо, дилэя и сатурации, применяемую последовательно.
Ударные
Партии ударных прямолинейны: ровные бочка и рабочий на 4/4 с хай-хэтом на слабую долю такта (4 удара в такте) или на каждую долю (8-16 ударов в такте). Звучание нарочито электронное. Смена ритма — исключение, а не правило. Такой подход к ударным имитирует работу драм-машины.
Разнообразие партиям придают сбивки по томам в конце квадратов. Иногда партия хай-хэта разбавляется более комплексными рисунками шейкера, хлопков в ладоши (также электронных, с изрядной долей дилэя), тарелок, колокольчиков и чаймсов (чаще) или колотушки (реже).
Ударные обильно обрабатываются реверберацией. Каждый секция элементов драм-машины полагается на отдельный ревербератор с собственными настройками. Часто вместе с обработкой отдельных элементов реверберацией дополнительно обрабатывается весь трек ударных.
Общая картина звучания ритма характеризуется объёмными пространственными эффектами типа «Hall». Обилие реверберации предполагает строгий контроль за её поведением в миксе: ничем не сдержанный эффект с лёгкостью превращает звучание драм-машины в кашу. Хвосты звуков обрабатываются гейтом, который вовремя пресекает их распространение, сажает барабаны обратно в микс и разделяет звуки между собой.
Во избежание проблем реверберацию активно подавляют гейтом. Ограничитель настраивают таким образом, чтобы он отсекал эффект спустя несколько миллисекунд после удара драм-машины. Время и порог срабатывания напрямую зависит от темпа композиции: чем быстрее песня, тем более активный гейт нужен ударным.
Бочка (кик)
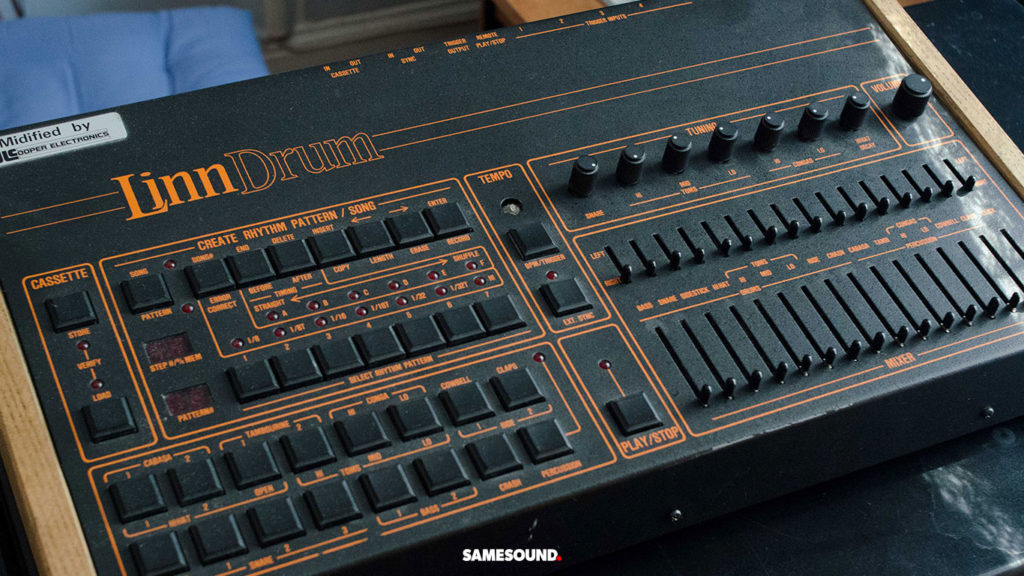
Бочка играет практически постоянно, на каждую долю такта (четвертыми длительностями). Большой популярностью пользуются сэмплы драм-машин Roland TR-707 и LinnDrum.
Посредством компрессии и эквализации бочке придают упругое и плотное звучание. Часто продюсеры отрезают или понижают частоты ниже 60 Гц, чтобы сделать звук чище, устранить в нем гул и глухость.
Рабочий барабан (снейр)
Снейр держит ровный ритм, играя на вторую и четвертую доли такта.
В звучании барабана, если речь идет о сэмплах, должно быть много тела в районе среднего низа. При работе с живыми ударными лучше использовать два микрофона: один над снейром (топ), второй — под ним (боттом). Звучание нижнего микрофона должно преобладать в миксе.
Обработка снейра подразумевает подрезку эквалайзером средних частот и компрессию для большей плотности звука. К барабану применяют короткую реверберацию (Small Room) с ранними отражениями. Иногда сигнал снейра отправляют на ещё один реверебератор с более длинным эффектом (Big Room) и гейтом.
Гитары
Гитары в синтвейве отличаются простотой прогрессий и следуют за басом. Фразы часто строятся на ровной игре восьмыми длительностями, тянучими соло/лид-отрезками (в духе мелодики глэм-рока) и рисунками на основе арпеджио.
Звучание гитар плоское, хрупкое и тонкое, с малым количеством низа, активной компрессией и применением дилэя и хоруса. Чтобы добиться подобного звука, стоит отрезать у гитар эквалайзером всё, что находится ниже 120 Гц или даже 300-400 Гц, в зависимости от смысловой нагрузки партии.
Лид и соло-партии отличаются плотным дисторшном/овердрайвом, с большим количеством компрессии и реверберации.
Синтезаторы
Ритмические партии синтезаторов — простые. В большинстве случаев используются повторяющиеся через всю песню арпеджио с небольшими изменениями нот (см. Пишем Synthwave: создание арпеджио). Чаще всего синтезаторы обыгрывают ноты басовой линии, при этом длительность нот редко превышает 1/8.
Лид-партии — тянучие. Главное правило: меньше нот, больше длительность.
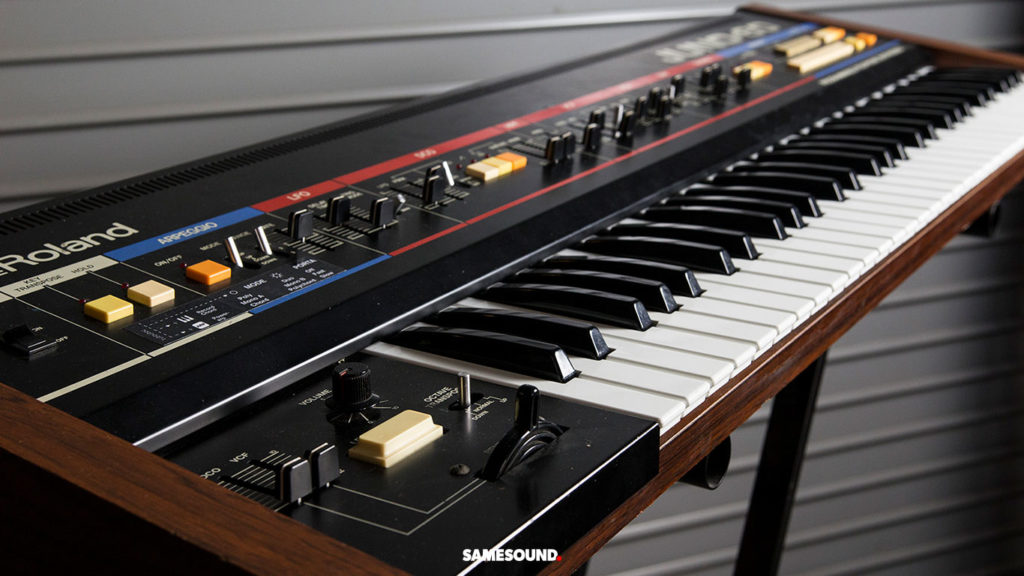
Для написания партий чаще всего применяют реальные синтезаторы Moog Minimoog, Roland Jupiter-8, Roland Juno-60, KORG Polysix и Yamaha DX7 наравне с их эмуляциями. Звук должен быть подчеркнуто электронным, несколько странным, с активным использованием детюнинга нот. При этом звучание инструментов должно быть несколько пространственным, воздушным и кремовым.
Среди других характерных элементов — игра с настройками модуляции низкочастотных осцилляторов (LFO), использование хоруса и реверберации.
Пэды
Пэды, пэды, пэды. Кремовые и сладко звучащие подложки присутствовали в электронной музыке 1980-х повсеместно. Для создания подложек применяли синтезаторы Oberheim.
Пэды следуют за басом и арпедижио. Если бас играет Ля, а синтезаторы обыгрывают аккорд Ля-минор, то пэды также держат тот же Ля-минор.
Звук пэдов дополнительно обрабатывается хорусом или стереохорусом для достижения большего объема. Иногда музыканты заменяют хорус на очень короткий дилэй, но такие ситуации редкость.
Бас
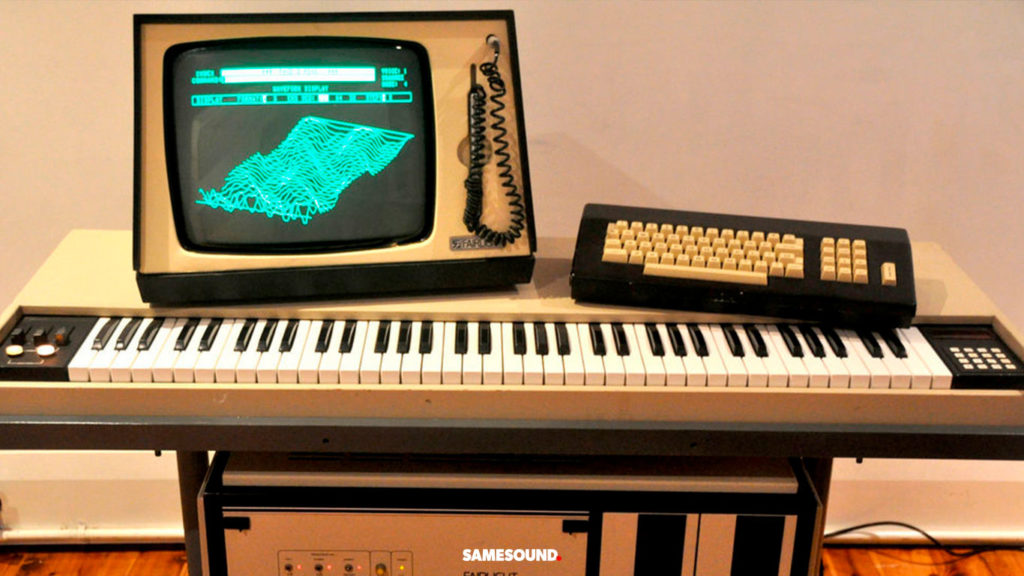
Плотный и простой бас — второй по важности составляющий элемент композиций в синтвейве. В музыке 1980-х годов за бас отвечали сэмплеры и синтезаторы — Yamaha DX, Roland D50, EMU, Fairlight CMI, Moog Minimoog, Moog Taurus. Ближе к концу десятилетия роль баса взяли на себя различные FM-синтезаторы.
Для написания басовых линий музыканты полагались на арпеджиаторы, настроенные на повторение одной ноты. Из-за этого басовые линии отличаются простотой и прямолинейностью, отсутствием сложных переходов.
Для общего разнообразия арпеджиатор настраивался таким образом, чтобы чередовать одну и ту же ноту в разных октавах (например, Ля первой октавы иЛя второй октавы).
Для эмуляции аналогового звучания баса можно воспользоваться виртуальными синтезаторами с несколькими синтезаторами. Один осциллятор должен генерировать пульсообразную форму звуковой волны. Посредством ADSR-огибающей осциллятор нужно обработать фильтром с моментальной атакой и очень коротким (быстрым) временем спада. Такое решение сделает звучание нот отрывистым.
Звук первого осциллятора нужно дополнительно модулировать вторым осциллятором с другой формой звуковой волны. К примеру, подойдёт квадратная форма волны, которая придаст общему звуку большей плотности и тяжести.

Вокал
Первоначально вокал в синтвейве был скорее исключением, чем правилом. Тем не менее в последнее время различные исполнители всё чаще дополняют аранжировки вокальной партией.
Вокальные партии — простые, тянучие, без излишеств, большого количества слов и резких забегов к высоким нотам. Хорошими примерами подхода к вокалу служит творчество уже упомянутых Gunship, а также Scandroid.
Голос в песнях звучит аккуратно, несколько интимно. Мелодии — приставучие, часто следующие за основной мелодической темой композиции или одной из партий синтезаторов.
Что касается эффектов, то здесь также не обходится без реверберации, создающей воздушное ощущение от голоса. На концах фраз иногда накладывается дилэй. Не редко применение вокодера, дисторшена и прочих эффектов искажения.
Плагины и инструменты для написания синтвейва
Из-за высокой стоимости оригинальных аналоговых синтезаторов для написания синтвейва музыканты и продюсеры полагаются на плагины. Недостатка в плагинах нет — на рынке без лишнего труда можно найти как бесплатные, так и платные качественные разработки.
Для написания синтвейва потребуются эмуляции аналоговых инструментов или цифровых синтезаторов, имитирующих звучание классических устройств.
Бесплатные плагины для синтвейва
Ichiro Toda Synth1. Качественная цифровая копия синтезатора Clavia Nord Lead 2 Red Synth. Несмотря на бесплатность, Synth1 отличается отличным саундом и богатством возможностей для генерации звука.
Siegfried Kullmann SQ8L. Эмуляция аналогового синтезатора Ensoniq SQ-80. Пресеты этого плагина просто-таки кричат о своем ретро-прошлом. Тем, кому встроенных пресетов окажется недостаточно, стоит скачать дополнительный архив из нескольких тысяч заготовок в винтажном стиле.
Baby Audio Magic Switch. Бесплатный плагин хоруса, имитирующий эффект прямиком из 1980-х. Незаменим, когда звуку нужно придать лёгкое несовершенство музыки той эпохи.
Martin Lüder PG8X. Качественный синтезатор, эмулирующий звучание Roland JX-8P. Существует в виде VST-плагина для PC и Mac. Разработка AU-версии синтезатора, к сожалению, прекращена.
TAL U-No-62. Бесплатный полифонический виртуальный аналоговый синтезатор с осцилляторами и фильтрами, копирующими работу Roland Juno-60, а также рядом других возможностей. Инструмент существует в виде VST/AU-плагина для PC и Mac, но пользователи Logic Pro X могут проходить мимо — AU-плагин поддерживает только 32-битные хосты и не видится Лоджиком.

TAL BassLine. Нетребовательный к ресурсам компьютера виртуальный аналоговый басовый синтезатор, созданный с оглядкой на Roland TB-303. Звучание не самое универсальное, но на первое время его точно может хватить. Из минусов — инструмент больше не поддерживается разработчиком, обновления не выходят. При этом сам плагин работает в Windows с 64-битными хостами, а в macOS X — только с 32-битными.
Digital Suburban Dexed. Мультиплатформенный синтезатор, очень точно воспроизводящий звучание Yamaha DX7. Плагин может считывать пресеты от реального DX7 или создавать заготовки для него.
SampleScience Single Cycle Audio Single Drum Elements. VST/AU-эмуляция классической драм-машины Yamaha RX5, которая также часто использовалась в музыке 1980-х.
u-he TyrellN6. Компактный синтезатор, взявший за основу звучание и особенности различных моделей синтезаторов 1980-х годов. Подойдет для создания лид-партий, басовых линий.
Платные плагины и инструменты для синтвейва
Синтезаторы в составе Arturia V Collection. В составе пакета плагинов есть качественные виртуальные эмуляции легендарных ретро-синтезаторов Roland Jupiter-8, Moog Minimoog, Sequential Circuits Prophet-5, Fairlight CMI, Yamaha DX7. Самое интересное в этих инструментах то, что они повторяют все особенности генерации звукового сигнала оригинальных устройств, а не полагаются на сэмплы. Стоимость всего набора V Collection — 499 €, стоимость инструментов по отдельности — 149 €. Есть версия как для PC, так и для Mac.
u-he Diva. Виртуальный аналоговый синтезатор с очень выраженным винтажным звучанием. За качественный звук придется заплатить прожорливостью Дивы, которая очень требовательна к ресурсам процессора компьютера (об этом предупреждают сами разработчики). Стоимость синтезатора — 179 €, существует в версиях для PC и Mac.

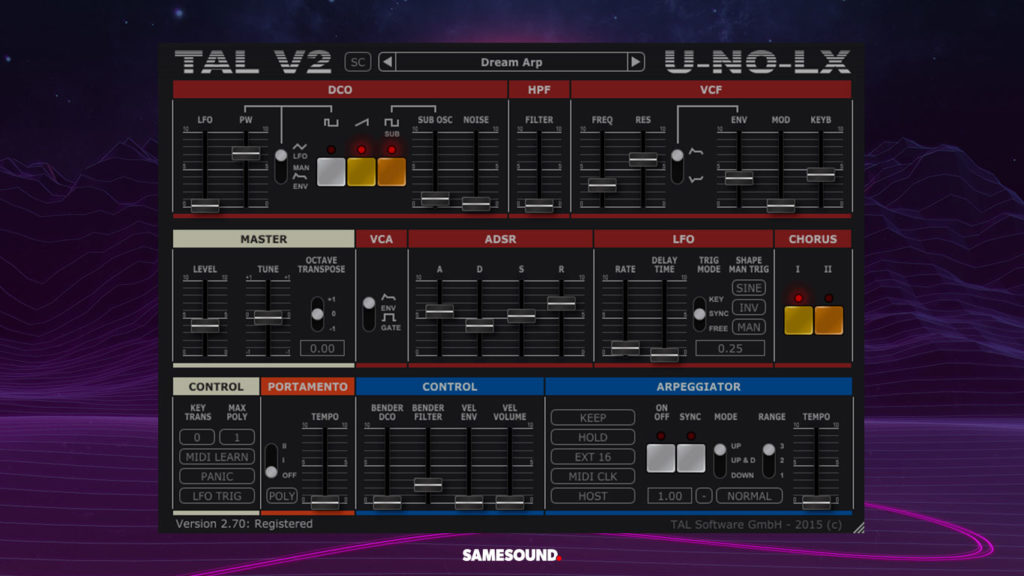
TAL U-No-LX V2. Один из основных инструментов любого синтвейв-продюсера. U-No-LX V2 — это очень точная эмуляция синтезатора Roland Juno-60, более продвинутая версия бесплатного TAL U-No-62. Множество фильтров от оригинального Juno-60, арпеджиатор с несколькими режимами работы, генераторы огибающих и другие возможности позволяют писать синтвейв только с помощью этого плагина. Существует в VST/AU-версиях для PC и Mac, стоимость — $70.
Arturia Spark VDM. Драм-машина от Arturia с большим количеством качественных пресетов, эмулирующих звучание множества популярных драм-машин. Основана на реальной драм-машине Arturia Spark. Есть сэмплы Roland TR-606 и TR-808, уже не раз упомянутой LinnDrum. Стоимость — 99 €, есть версии для PC и Mac.
Aly James Lab VProm 2.0. Эмуляция драм-машины LinnDrum для PC и Mac, точно повторяющая звучание оригинального инструмента, использовавшегося в 1980-х повсеместно. Стоимость — 40 €.
Baby Audio SuperVHS. Очень крутая обработка для создания винтажных эффектов, описать которую можно как «весь звук 1980-х в одном плагине». Умеет генерировать шумы, неточности и тепло плёнки, создавать неидеальную реверберацию, расширять и состаривать сигнал в духе 8-битных сэмплеров. В общем, придать звуку старомодный вайб с ним очень легко. Существует в виде VST/AU-плагина, стоит $49.
Native Instruments Analog Dreams. Библиотека сэмплов винтажных инструментов и синтезаторов. Более 100 пресетов, жирные аналоговые басы и сочные лиды, яркие клавишные и густые пэды. По своим возможностям разработка Native Instruments проще многих других виртуальных инструментов, однако суть библиотеки в другом — предоставить музыкантам срез саунда 1980 годов. Работает с NI Kontakt 6 и выше, стоимость — $49.
sonicprojects OP-X Pro II. VST/AU-клон синтезатора Oberheim OB-X с 2500 пресетов для любого вида электронной музыки. Разработчики в точности воссоздали все схемы оригинального синтезатора, поэтому звучание плагина идентично настоящему OB-X. Стоимость — $179, но на сайте часто появляются скидки, с помощью которых плагин можно купить за полцены.
KORG Legacy Collection. Переиздание классических инструментов KORG в виде VST/AU-плагинов для PC и Mac. Среди самых полезных инструментов для синтвейв-продюсеров окажутся эмуляции KORG Polysix, активно применявшегося в басовых линиях музыки 1980-х, а также эмуляция синтезатора KORG M1. Качество инструментов выше всяких похвал. Набор из всех плагинов обойдется в $249, KORG Polysix и KORG M1 — $49,99.
Reveal Sound Spire. Программный полифонический синтезатор с мощным нетребовательным к ресурсам движком и простым интерфейсом, сочетающий лучшие черты аналоговых и цифровых синтезаторов. С помощью синтезатора можно генерировать качественные кремовые пэды, плотные басовые линии, яркие лиды. Распространяется в виде VST/AU-инструмента, стоимость — $189.
LennarDigital Sylenth1. Производительный виртуальный аналоговый синтезатор для PC и Mac. Качественное звучание, множество настроек, большая коллекция пресетов для разных стилей. Стоимость — €139 за неограниченную лицензию или €9,95/мес. До третьей версии синтезатор распространялся только в виде 32-битного инструмента и имел ряд проблем с современными хостами (тем же Logic Pro X), но начиная с версии Sylenth1 v3 синтезатор распространяется в виде 64-битного плагина и работает с любыми DAW.
Xfer Serum. Универсальный таблично-волновой синтезатор, который подойдет для создания электронной музыки в любом стиле, в том числе и в стиле синтвейв. Гибкие настройки, возможность подгрузки собственных сэмплов и создания своих таблиц, а также большая коллекция встроенных пресетов. В Интернете можно найти огромное количество пресетов от сторонних разработчиков для написания синтвейва. Стоимость — $189, есть версия для PC и Mac.
Сэмплы и звуковые эффекты для синтвейва
По мере популяризации жанра различные компании стали выпускать сэмпл-паки, наборы пресетов и звуковых эффектов для написания синтвейва. Подборки звуков для любителей 1980-х найдутся в каталогах Sample Magic, Big Fish Audio, Loopmasters, LANDR Samples, а также в портфолио отдельных студий — Apex Audio, Elemental Sound, Carma Studio и других (к слову, чекните нашу подборку самых сочных и интересных сэмпл-паков в стиле синтвейв).
В архивах с пресетами и сэмплами иногда включают полезный дополнительный контент. Так, например, в некоторых паках можно найти проекты для FL Studio или Ableton Live, заготовки для сэмплеров Logic Sampler, Logic EXS24, Native Instruments Kontakt и другие бонусы.
В поиске жанровых сэмпл-паков также стоит посетить британский магазин The Patch Bay, специализирующийся только на пресетах и сэмплах в стиле синтвейв. В каталоге представлено большое количество паков от известных синтвейв-музыкантов и продюсеров для всех популярных синтезаторов, которые мы перечисляли выше.
Что и кого посмотреть, чтобы понять, как делать синтвейв
- Хорошие ролики о создании синтвейва выкладывает Найджел Силва на своем канале The Encounter. Отдельный плейлист «How To Make Outrun in FL Studio» Найджел посвятил производству ретро-электроники в FL Studio.
- Для начинающих адептов синтвейва также полезным окажется серия роликов «The Fundamentals of Synthesizer Programming» от Moog, рассказывающая о принципах программирования и работы синтезаторов.
- Не лишним окажется трехчасовой фильм «Intro To Synthesis» от канала matrixsynth, повествующий о субтрактивном синтезе, создании пресетов и собственных звуков.
- Cинтвейв-продюсер Стэ Ингхэм, выступающий под псевдонимом Retro Thunder, ведет на YouTube канал, посвященный всем аспектам создания синтвейва. В роликах Ингхэм рассказывает о методиках работы, принципах написания партий, а также разбирает особенности звучания других синтвейв-исполнителей.
The future was better then.
This one little phrase sums up the synthwave genre pretty well. Or, another way of thinking about it is that synthwave is the futuristic genre from the past.
In this guide, I’m going to cover absolutely everything you could want to know about synthwave!
In the first half, I’ll cover more general questions about synthwave, and in the second half, I’ll get practical and dive into how you can create rad synthwave music yourself.
What Is synthwave?
Synthwave is an electronic music microgenre that combines the classic synth sounds from 1980s science fiction, fantasy, and horror film soundtracks with modern production techniques and quality.
Synthwave is not merely ’80s music recreated. Synthwave is actually a distinctly modern music genre that began in the mid 2000s, inspired mainly by the pop culture and soundtracks of the 1980s and 1990s.
Thus, synthwave is a mix of iconic 80s sounds blended together with modern production quality.
Influences for early synthwave music include:
- John Carpenter
- Vangelis (Blade Runner)
- Tangerine Dream
- The film Drive
Most common sounds & instruments in synthwave

You can get away with a lot of different instruments in synthwave, but there are a few staples that form the foundation of any synthwave song.
These are:
- Analog synthesizers (physical or modeled)
- Vintage drum machines
- Electric guitar (optional)
- Vocoded vocals (optional)
Synthwave is also known for using 80s production techniques, especially when it comes to drums (gated reverb), the addition of saturation, and the copious use of reverb in general.
Common Synths Used in Synthwave
Here is a list of the common synths used in synthwave music, along with links to digitally modeled software versions (which are much less expensive and more readily available)
- Minomoog, Moog Voyager
- Oberheim OB-X, OB-Xa
- Roland Jupiter-8, Jupiter-6, Jupiter-4
- Sequential circuits Prophet-5, Prophet-10
- ARP 2600
- Roland TB-303
- PPG Wave 2.3
- Moog Taurus I, II, 3
- Alesis Andromeda
- Oberheim SEM
- Yamaha SY99
- Roland Juno-60
- Memorymoog
- Korg Mono/Poly, Polysix

Get 44 Legendary Analog-Modeled Synths In ONE Piece of Software
22 powerful Synths recreating the sound of 44 legendary hardware synthesizers and string machines, 80GB of content, 2,600 instrument presets, over 120,000 high-quality samples. Syntronik Deluxe is far more than just a plain virtual instrument. It’s an awesome, synthtastic, mind-blowing collection thats captures unique characters and sounds from the entire history of analog and digital synthesizers in a single collection.
This is THE TOOL for Creating Synthwave Music
Common Drum Machines Used in Synthwave
You can use real drum kits, or kits modeled after real drums from the 80s for your synthwave drums, or you can use the sounds from iconic drum machines such as:
- Linn LM-1 or Lin 9000
- E-mu Drumulator
- Roland TR-909 or TR-808
What do you need to make synthwave music?
There is actually very little you need to make synthwave music yourself.
Here are a few necessities:
- A digital audio workstation (DAW)
- Headphones
- MIDI keyboard
That’s really all you need to get started.
What Is The Best DAW For Synthwave?
You can create synthwave music with any DAW, but some have more synthwave sounds built-in than others.
For example, Logic Pro X is an outstanding DAW for synthwave, as it has a lot of analog synth sounds built-in, and even includes a Linn drum kit.
Logic Pro X is also the DAW of choice for The Midnight, one of the most popular synthwave artists, and Arcade High.
However, if you don’t have a Mac computer, some other DAWs that are popular with synthwave producers are Ableton and FL Studio.
Timecop1983, for example, uses FL Studio.
How to get started making synthwave
Getting started with creating synthwave is pretty simple since it uses a lot of simple sounds and production elements.
The first place to start is to decide which microgenre of synthwave music you want to create.
Listen To Synthwave
Listen to a lot of synthwave music and pay attention to what songs and styles stand out to you.
Microgenres of synthwave include:
- Popwave/Dreamwave (My genre)
- Darksynth
- Outrun
- Cyberpunk Synthwave (Cybersynth)
- Cinematic Synthwave
- Spacewave
Just Start Writing
Once you have a reference for what style of synthwave music you want to make, it’s time to just start writing.
If you’re stuck on how to start, then check out my video below for 9 different ways to quickly get started writing a song.
Choose your tempo and key
One of the first places to start is to simply pick your tempo and key.
Most synthwave Songs are between 80 and 140 BPM.
If you want a dreamier and slower song, shoot for between 80-120 BPM, but if you want something more upbeat, feel free to make your track between 128-168 BPM.
Now, when it comes to key, you can pick anything you want. But if you want to know what are some common keys among popular synthwave songs…
Most synthwave songs are written in the keys of A Minor and B Flat Major.
Synthwave music can be composed in any key. If you want to go for a bright, happy, and cheerful synthwave sound, then use major keys. If you want a more melancholy and sad sound, use minor keys.
If you want to examine the tempos and keys of specific synthwave songs, then feel free to check out my articles below where I examine 50 different synthwave songs.
Creating Synthwave Drums
Alright, now it’s time to actually lay down some tracks!
Drum Selection
Drum Selection is probably the most key element to creating synthwave drums.
A lot of synthwave songs utilize the sounds from 80s drum machines which have a very unique character to them.
Refer back to the drum machines I mentioned above if your DAW doesn’t have any built-in synthwave drum sounds, or you can just download some free samples by clicking below.
Free Synthwave Sample Pack
Just click the button below to download 126 synthwave drum and FX samples
These samples will give you a great starting place, but you can also hear that they were made years ago, and need a lot of processing to get up to snuff with modern productions and synthwave.
If you want to learn more about how to mix synthwave drums, or even how you can get your hands on 10 mix-ready synthwave drum kits…
Then check out my article here on how to create synthwave drums.
Drum Placement
You are of course free to use whatever drum placements you want with synthwave, but one of the most common drum patterns in synthwave is simply a four-on-the-floor kick (or a kick hitting on the 1 and the 3), with the snare hitting on the 2 and 4 beats of a measure.
![]()
From there, you can then fill in the pattern with hihats. Hihats can be placed in a quarter note, eight note, or sixteenth note grid, depending on how fast you want the groove to feel.

Creating Synthwave Bass

Creating the bass might be one of the easiest parts of constructing a synthwave song.
1. Choose a Saw or Square wave

Optionally, you could also add a second oscillator and drop the pitch by an octave.
2. Enable a low-pass filter and attach it to an envelope.

You can also try adjusting the decay time and resonance to taste.
Otherwise, adding a chorus effect and saturation will work wonders as well.
From there, it’s very common for the bass to just hit on every 8th or 16th note.

Creating Synthwave Chords
Here is a simple 5 step system for creating synthwave chords:
-
1
Pick a basic waveform shape, such as a saw
-
2
Add multiple voices and detune them slightly
-
3
Consider slightly increasing the envelope’s sustain and release time
-
4
Add a low-pass filter and attach it to another envelope
-
5
Increase the filter resonance and fine-tune all parameters
Use Suspended Chords

Try moving the middle note (3rd) up or down in the scale to create a suspended chord. This will help you create that «dreamy» synthwave feeling.
Use A Lot Of The Same Notes

Also try and keep a lot of the same notes in each chord so no individual chord is too different from the rest.
You can do this simply moving notes around, or by inverting a note (dropping up or down an octave) to get it to match other notes in your chord progression.
For a complete video tutorial on how to make synthwave chords, check out my article here.
Creating Synthwave arpeggios
Another common staple in synthwave music is the use of arpeggios.
An arpeggio is simple the notes of a chord played in succession, either ascending or descending.
You can easily create a synthwave «arp» by simply picking a few of the notes that commonly appear across several chords in your chord progression, and then making an ascending or descending sequence of notes.
However, to spice things up, a common pattern you can follow is this:
-
1
Bars 1 & 2: Repeat the pattern
-
2
Bar 3: Move the top notes in the arp pattern up the scale
-
3
Bar 4: Move the top notes even higher, and then change up the pattern completely at the end.
Here is an example of Timecop1983 following this pattern:

Creating Synthwave Leads
You can use just about any basic synth waveform for your lead sound, but it’s common to use a square or a sawtooth wave.
However, you can find tons of great synthwave leads inside of free plugins.
Where the challenge lies is actually creating a good melody from the lead.
If you’re stuck, try one of these three common melody patterns:
Common Lead Line Structures
ABAC
Alternating different sections with a repeating section.
ABAB
Two different sections which take turns.
AAAB
A lead that is mostly the same all the way through until the end.
Creating Synthwave Vocals
There is a lot of room for creativity with vocals in synthwave, as you’ll find a lot of different styles, from vocals buried in the background and obscured by reverb, to vocals that more resemble clear pop vocals.
With that in mind, here are some things you can try:
Lots of vocal reverb and delay
To create synthwave vocals, you can treat your vocals with longer digital reverbs and digital delay, which were staples of the 80s.
A couple of plugins I really like for this are waves H-Delay and Hybrid Reverb.
ADT & Chorus
Double tracking or artificial double tracking (ADT) and chorus effects were also popular in the 80s, and therefore, work well with synthwave.
So try creating two or three takes for your vocals, and panning one left, one right, and the other down the center.
Synthwave mixing & processing hacks
Once you’ve got your song written, it’s possible things are sounding a little…well, cheap.
And this makes sense since we’ve been using a lot of simple sounds.
The mixing and processing side of things can really help you take your track to the next level.
Saturation and bitcrushing
First, add some saturation and bitcrushing to tone your sounds.
Saturation is really what can help you get rid of that «cheap» sound and make your production sound more «expensive» for lack of a better term.
What saturation is really doing is adding subtle distortion to color your sound.
Bitcrushing is a bit more extreme, and can be used to create some cool effects, or used subtly to help different elements, such as your snare, cut through the mix.
The pitchbend wheel is your friend
Also, consider using more pitchbend effects, as this is popular in synthwave.
So if you have a midi controller, then consider the pitchbend wheel your friend.
Spoken Word
Spoken word is also common in synthwave, so consider adding some of that in.
«Mitch Murder», with «Summer of Heat», opens with a simple weather report.
(This also might be my all time favorite synthwave song)
Whereas «Mental Minority» as a fantastic spoken word taken from the book 1984, which fits great with often apocalyptic/dystopian feel of synthwave music.
Finish More Tracks, Faster
Obviously, there are a LOT of different ways of creating synthwave music, and this article is just scratching the surface.
So get out there, experiment, and create more music.
Speaking of which, if you want help finishing more of your tracks, faster, so you can start releasing new music more regularly…
Then be sure to grab my rapid song-finishing checklist below.
This will give you simple checklist which will walk you through the process of mixing, mastering, and knowing that your song is finished and ready to be released.

Create Better Songs, Faster
Click below to download my free song-finishing checklist to help you create radio-ready songs without taking months to complete them.
I hope you got value from this post on how to make synthwave, if so, feel free to share.
And let me know in the comments below…
What are your biggest questions when it comes to creating synthwave music?
Synthwave is the new trend, and a lot of pop artists are incorporating this music into their songs.
This genre was created in the 80s and used all kinds of Synths and the famous percussion of that time which used reverb in the kick/Snare.
The tempo of the songs from this genre was between 80 and 140BPM, however, you can find faster Synthwave tracks nowadays.
In the 80s this type of music was used in films and arcade videogames but recently Synthwave came back with TV series like “Stranger Thing” or movies like “Tron”, which have made this genre popular again.
To make a basic Synthave song you can follow this steps:
- Choose a key for a song and make a Chord Progression, the most common for Synthwave music is A minor and Bb major.
- Make a melody from the Chord progression and also other melodies and patterns for all of the instruments/Synth.
- Divide the song into sections following the popular structure: intro, verse, chorus/drop, verse, chorus/drop, bridge, chorus/chorus.
- Now you can start with the Percussion or the Synths
- For the Synths, you should have a bassline, an Arp, a Key/Organ, a Pad, and risers.
- In the bassline use two notes at the end of each beat to follow the percussion, which is very characteristic of Synthwave music.
- The sound from the Synth should sound like Analog Synths, so you could add always some release on your sounds to give that feeling.
- For the percussion use acoustic vintage kick/snare following a drum pattern from synth-pop or new wave 80s music.
Structure

Synthwave is used for films, games as background and to give more emotion to the story of the game or the film, but also as regular music.
I will only talk about the structure of Synthwave used in full songs or regular music, which has the same structure as all contemporary music.
This structure follows this pattern: Intro (4Bar), First Verse(16Bar), Pre-Chorus(4Bar), Chorus(8Bar), Second Verse(16Bar), Pre-Chorus(4Bar), Chorus(8Bar), Bridge(4Bar), Chorus(8Bar), End.
Before making the structure you have to choose a key for the song, and once you have the key you can make a chord progression.
After you make the chord progression you can make the different melodies for the different parts of the song, like intro, verses, pre-chorus, chorus, bridge.
And also the different patterns for the bassline, Plucks, Synths, and other accompaniment of the melodies.
You could start also from melody, and make the chords from that melody, but usually is easier the other way around.
Key
The most popular keys for Synthwave music are A minor and Bb Major, but there is Synthwave music in all minor and major keys.
In Synthwave music the key is not something that defines the genre, so you can use any key you want.
Major keys are more bright and happy while minor keys tend to be more emotional and sometimes sad.
You can select a major or minor scale in the piano roll and place it in any note you want to get the key of your song.
In Fl Studio, go to Stamp inside the piano roll, which is the symbol to the right of the magnet.
You can Select any chord and Scale from there.

Chord Progression
The difference between the chord progression in common pop or other popular genres is that in pop the chord progression in the verses sometimes is different from the one in the chorus.
In Synthwave however to maintain the “Dreamy” feeling, the chords used in the verses are always the same used in the chorus.
The chord progression used in a lot of Synthwave songs is similar to the I-V-vi-IV, or variations from those chord progressions.
You could use with those chords a progression that is just I-V, or V-IV-vi.
What is sometimes more unique of Synthwave songs, is the use of sus chords as well as 7th chords.
After you finish making the Chord Progression, you could change any of the triad chords you have for a 7th or Sus Chord.
If you use Fl Studio just go to Stamp to select the Chords.
Try to have the Key/Scale in other channels or place it where you are drawing the notes, so you make sure every note is in the key.

Melody and Patterns
Chorus/Drop

Now that you have the chord progression, you can start making the chorus melody, and the verse melody.
If you are making a more electronic music Synthwave, you can use your chorus-melody afterward with a lead sound in a Drop.
You could also make a chorus melody for a chorus and a similar melody from that chorus-melody for the drop.
Verse
Once you have the melody for the chorus, you can make the melody for the verses.
Usually, the notes from the melody on the verses are in a lower range to make a contrast with the chorus.
Bridge

In the bridge, the chord progression changes a little bit, but you can keep it simple just by raising a part of the verse or the chorus keeping the pattern in the scale.
This will give some tension in the song, and it will make it less repetitive.
Bassline

For the Bassline, you can use the bass note or lowest note from your chords, which usually is the root note from that chord.
Using the bass note always work, but you can try as well using any other note from the chord to see if it sound good.
In Synthwave the bass notes are always made of two notes with a 1/8Bar length, at the end of each beat(1/4bar).
Arpeggios/Plucked

Arpeggios are really common in Synthwave music, they are played all the time, which makes everything more “Hypnotizing”, but also more connected.
Arps are just notes that follow a Chord or a Scale in ascending or descending notes.
You can make really simple Arps that goes up and down each bar or each half-bar, or get inspired by artist like Einaudi or Debussy, who used a lot of Arps in their compositions.
The length of the notes in the Arps will depend on the tempo of the song.
For fast song use longer notes and a bar long Arp with no repetition, and for slower tempos, shorter notes and half bar long Arp repeated one time.
You could make as well an Arp from octaves that repeat itself all the time without following the Chords.
Synth-Buzzy/Keys-Organ/Brass

You can add Keys or a Synth-Buzzy/Organ type of sound that follows the chords, or that just plays the chords from time to time, but also sometimes play single notes.
Try experimenting while you hear the rest of the melodies, so it fits not just with the chords, but with the vibe.
These chords should be placed in the mid-range(C3-C5), so it adds something but doesn’t take space from the lead sound or from the vocals.
Pads

Pads should follow the chords from the Chord Progression as well.
This type of sound is made to fill empty spaces, and for that reason, you should use long notes in the Pad unless it has a long release, in which case you can have shorter notes at the begging of each chord.
Sound Design

You can use any Synth you want to make the Synth sounds used in Synthwave.
The easier one to use and install are Virtual Synths, like Spire, Sylenth 1, or Serum.
However, if you want to go for the pure retro feeling you can use Analog Synths.
Analog Synths can be expensive and in general, they don’t have as many options as virtual synths and are harder to get into.
Still, if you want to have a real Synth you can check these Analog Synths from Roland.
There are also virtual versions from old Analog synths, which sound very similar to the real thing.
An example of this is the Yamaha CS-80 version from Arturia.
You can use a combination of both virtual and analog Synths.
Once you choose a Synth you have two options to get the sounds. You can make the sound from scratch or buy banks of presets.
If you haven’t worked with Synths before, you should use presets, and if you want to make your own sound, you can tweak the parameters of a preset you like.
Here are some preset banks for Serum, Spire, and Sylenth 1:
- Free Serum Preset Bank.
- Spire Preset Bank.
- Sylenth 1 Preset Bank.
Synths

Pads
The pad should sound soft and slow.
You can make Pads just by having a slow attack, but you can also make Pads using an LFO or a cutoff filter with a low pass.
If you don’t want to start from scratch just scroll until you find a preset you like and tweak the parameters, like adding release.
Another thing that will give you more control over the Pad is the automation of the parameters, like the cutoff filter.
But if you just want to make a Pad that sounds retro, add some release and some detune.

Plucks/Arps
There are sounds called Arps which will play an arpeggio when you play one note or one chord.
They are easy to use and really helpful if you don’t have a good idea for an arp.
But the problem with Arps is that they are very limiting if you don’t know how to change the notes of that ARP in the Synth.
With a pluck sound, you will have to place each note of an Arp that you have to draw.
Have the pluck sound with some release to give it the retro Synthwave feeling.
To make it more Plucky/Snappy give it a faster attack and lower the decay.

Organ/Buzz chords
The organ sound is great from Analog Synths like the Korg M1, but try to mix it with a saw or something buzzy to give a more Synth type of feeling.
The more buzzy soundwave is the saw wave, so if you are starting from scratch you can start from there.
You can also get more buzzines applying some distortion and using LFO with a very fast rate like 1/32.
Be sure to have poly and more than 4 voices, to be able to play chords.
And also have the sustain all the way up so it plays until you release a key.

Bassline
For the bassline, you can use a growl type of bass or the classic Moog Bass.
To get the best results you can use more than one layer for the bass, so you have a richer sound.
You can have as the first layer a Growl bass to give it buzziness and crunchiness and as a second layer a clean sine bass to make it more bassy.

Lead
For the lead, you can use a saw type of lead, with detune and a lot of release and the sustain all the way up.
But you can use a Synth brass as well or any other Synth sound, the only important thing is that it has a lot of presence.

Percussion

For the percussion, you can buy Synthwave packages that come with all the samples you need to make Synthwave, like Kicks, Snare, Drum loops, and Fx.
There are also Free Sample Libraries you can download after registering or giving your email on a site, like this Free Synthwave Sample Pack.
It’s also good to have a big sample library with sounds that a Synthwave package may lack, like sweeps, percussion, ambiance Fx, or Cymbals.
One of the biggest sample libraries with samples you can use for all types of music is the Sounds of KSHMR Vol. 3.
If you don’t find a sound that you like you can buy a plan on Splice to download from thousands of samples people upload.
Kick
The kick should have a vintage sound like it’s from an old drum kit.
You can place the kick on each beat or each two-beat to leave the snare alone, and maybe some change after 8 or 16 Bar.
But you can also follow more elaborate Kick/Drum patterns, like the one from “Take on me” from A-Ha.

Snare
You can use a 70s disco snare or a more 80s Synth-pop one, but the important thing is that you add reverb.
The built-in plugin on your DAW can work for the reverb but is easier to go through preset on a paid plugin like Valhalla or Redline Reverb.
You can adjust the amount of reverb by changing the Mix(DRY/WET). A more wet mix will mean more amount of reverb.
The snare should play each second beat, but you can change this pattern at the end of 8 or 16 bar like the kick.

Hi-hats

You can use any Hi-hat you want, it doesn’t have to sound retro, as it’s not a central part of the percussion.
Place the each Hi-hat half-beat as you don’t need complex patterns for the Hi-hats like in Trap music.
Crash

The Crash should only be at the beginning or end of a section, for example at the beginning of the verse, or from the verse to the chorus.
In the Crash, you can add some delay, so the echo from the delay repeats each beat.
To make this effect just use the built-in delay on your DAW and use a delay time of 1/4, give it some feedback and rise the cut to half.
Fx
Finally add some Sweeps and Risers.
Sweeps

Sweeps help to connect each part of the track with the next one.
Place a 2 bar long sweep-up, 2 bars before the beginning of the verse, and place a sweep-down of the same length after the sweep up.
After the sweep-down place again another sweep-up and repeat this for the rest of the song.
In most silent parts, like at the beginning or in a bridge with little instrumentation, you don’t have to use them.
Risers

There are Risers that you can just drag but you can also make yours from a Synth.
To make a Riser from a Synth you can place a chord and use a cutoff filter with a low-pass, automate that cutoff filter.
Next, rise 12 semitones the range of the pitch-bend, and automate the pitch bend, and you have a simple Riser.
You can also use an LFO and change the rates, so the Riser it’s rhythmical.
Another way of making a more complex Riser is by using Synths with short notes in combination with Synths playing chords.
Ever wanted to know how to make synthwave? In this tutorial, I’m going to show you how to make synthwave in FL Studio using all stock plugins and drums.
We’ll be going over sound selection for drums and synths, and talking a bit about some other characteristics that make up the genre. Even if you’re not really into making synthwave I think this tutorial will be pretty helpful for you.
To make things easier, I created a drum kit of a few retro stock FL Studio sounds. In case you don’t feel like sifting through a bunch of drum samples, I included a download link to the drum kit in the description of the video.
Video link: https://youtu.be/5sAiOXMzWbU
Synthwave AKA retrowave is a genre of electronic music that has been growing in popularity over the past few years. The genre is heavily influenced by video game and movie soundtracks from the 80’s. Retrofuturism is a big part of the music and artwork (depicting an idea of the future from the point of view of the past). The art plays a big role in the overall sound and vibe of synthwave.
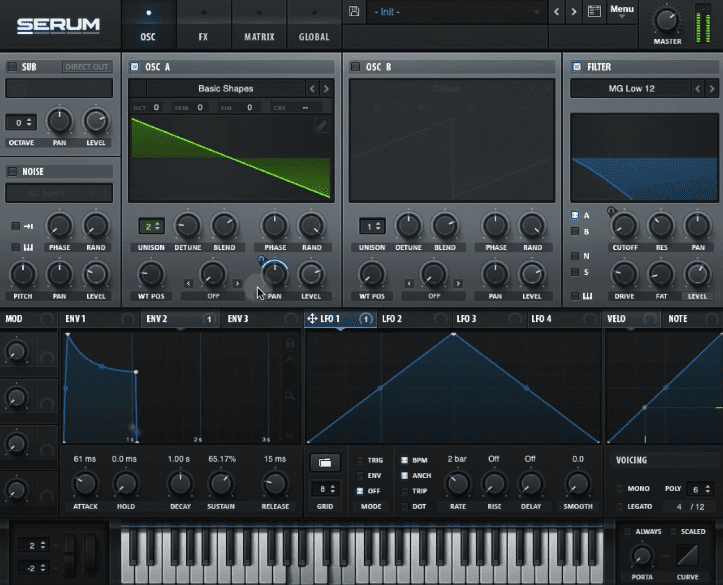
In this synthwave sound design tutorial, we’ll discover how to create a synthwave sound from scratch using Serum Xfer Wavetable Synth. A well-rounded producer can synthesize a sound in minutes giving him or her the ability to create compelling synthwave sounds while sounding unique. Although most producers shy away from using presets, many have spent years crafting their sound-sculpting skills hoping to create a soundscape that is uniquely theirs. In this synthwave tutorial, we will synthesize a synthwave sound in Serum Xfer Wavetable Synth that you can use for a variety of synthwave music.
- Select the appropriate waveforms
- Thicken your sound be adding unison
- Increase your sounds polyphony
- Choose the Low-pass filter and adjust it’s cutoff
- Adjust the filter’s resonance
- Apply an envelope to the synth filter cutoff
- Adjust the envelopes ADSR
- Add audio effects to your sound
- Use an LFO to effect the panning of your sound
- Apply an additional LFO to detune your synthwave sound to taste
Choose Your Waveforms
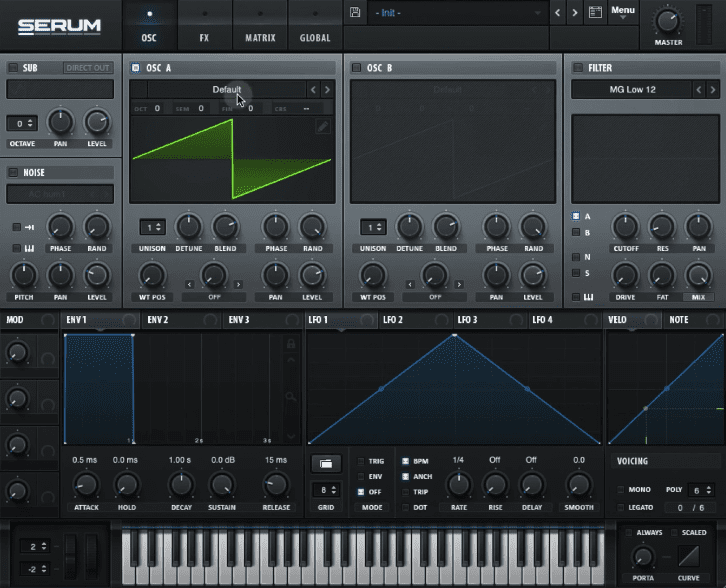
Which waveforms are best for synthwave music? The answer to this question depends on what type of preset you want to create. For instance, most bass patches use a combination of sine and square waveforms. For example, the sine and square waveforms are ideal for bass presets as they are rich with low frequency information. As a result, bass patches that use these waveforms sound grounded and have a solid bottom end. In this sound design tutorial, we’ll make a polyphonic synth stab preset so we’ll use on a sawtooth waveform.
Add Unison For a Bigger Sound
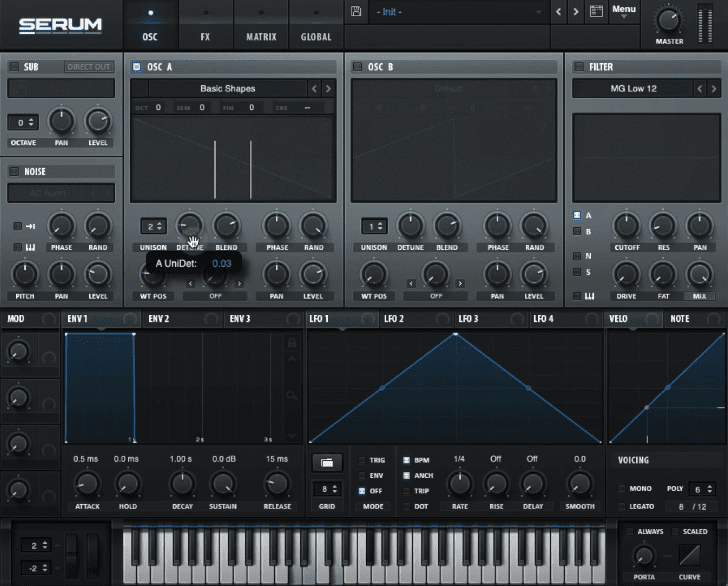
Next, we’ll increase the unison of oscillator A to 2. Not only does this detune our sawtooth waveform, it helps add width and overall thickness to our sound. Don’t overdo this step as a little detuning goes a long way. In this tutorial we’ll set oscillator A’s unison control to a value of 0.03 which should be more than enough.
Understanding The Basics of Synthesizers
The most basic synthesizer consists of an oscillator, filter and an amp. Like most synthesizers on the market, they come equipped with a variety of additional modules such as noise generators, additional filters, envelopes and LFO (Low frequency oscillator)
Choose A Filter Type

The next step is to route oscillator A to our filter by clicking on the filter modules A button . For this example, we will use a low pass filter with a slope of 12 dB per octave. This slope allows for additional high frequency material to pass through. Conversely, slopes with higher values (24, 48) offer a much darker sound so be sure to choose accordingly.
Understanding Serum’s Filter Modules
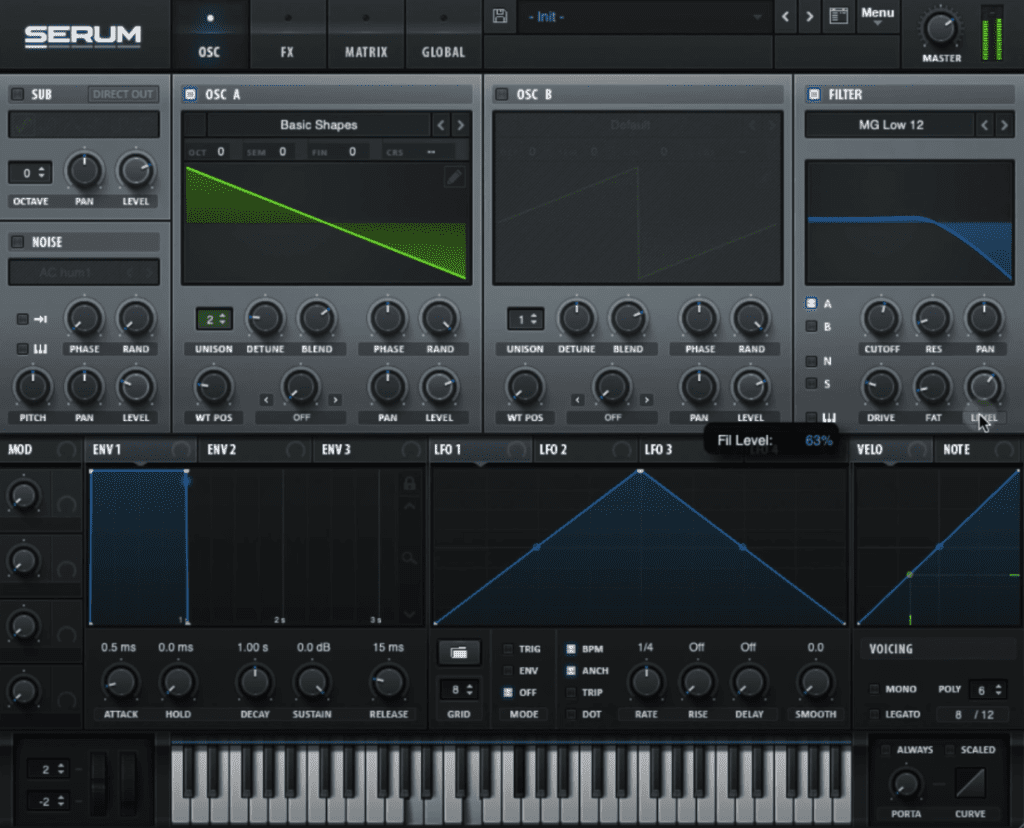
Next, we’ll add more thickness to our sound by increasing the drive and fatness knobs to our signal. Serum’s filter module boasts a drive and fat control so be sure to crank these up to taste. Be careful however, as this will saturate and boost the output volume of our signal potentially causing audio clipping as our sound exits the plugin. To avoid unwanted clipping, click and toggle the filter’s mix knob so it displays the wording labeled level – then reduce the output level of the outgoing signal.
How to Use Xfer Serum Envelopes ADSR
Envelopes play a critical role in sound design. For instance, they help shape our sound through time. By and large, envelopes are made up of components that allow us to manipulate how a sound responds when it is being played. Envelopes consist of stages known as ADSR, attack, decay, sustain and release.
- Attack
- Decay
- Sustain
- Release
Attack: The attack stage determines the time it takes for a sound to reach its loudest volume.
Decay: The decay stage determines the time it takes for the sound to move from the attack stage to the sustain stage.
Sustain: The sustain stage sets the level/volume of a sound when a note or key is being held or played.
Release: The release sets the time it takes for the sound to reach inaudible levels once a key has been released.
It’s important to understand that not all envelopes will be assigned to a synthesizers amp. For instance, an envelope can be applied to any synthesizer’s parameter. By default, Xfer Serum’s Env 1 control is set to the synth’s amp (volume). This means that the ENV 1, attack, decay, sustain and release will play a role in shaping the volume of our sound.
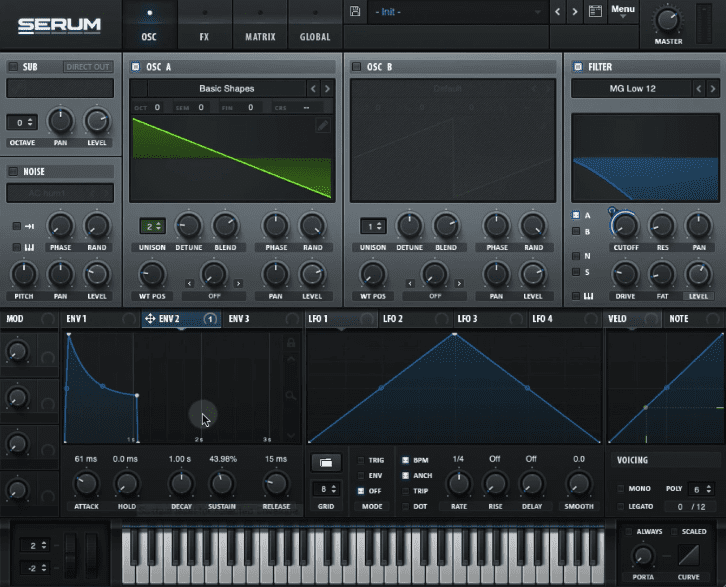
Since ENV 1 is linked to our volume control, we’ll turn to ENV 2 and apply it to our filter’s cutoff. Next we can set the the tracking so the filter is set to unidirectional – to do so, hold OPTION + SHIFT and click on the horseshoe button to toggle from unidirectional to bidirectional. Next, it’s time to adjust ENV 2, ADSR.
Now that ENV 2 is linked to the filter’s cutoff, increasing the ATTACK causes the filter to open gradually. The decay determines how long it takes to go from attack stage to sustain stage of our sound. Moreover, the sustain will determine the brightness of our sound. Finally, the release determines the length of time it takes for our sound to return to the initial attack phase right after we let go of a key.
As a side note, it’s important to know that the attack, decay and release operate in the time domain and are expressed in ms (milliseconds). Alternatively, the sustain control sets the level and determines the brightness of our filter while a key is being held.

Applying Xfer Serum Filter Resonance
One of the key components with synthwave sound design is a filter’s resonance. This is especially important when the filter type is set to a low pass filter. For instance, the resonance adds a bump to the filter cutoff point that is used to accentuate a particular frequency. This is often used in bass patch sound design to highlight the sound’s initial attack transient. In the context of our synth stab however, it will add a point to our stab to help define our overall sound.
How to Use Xfer Serum LFOs
Unlike Serum’s main oscillators, LFOs (low frequency oscillators) are used to manipulate a synthesizer’s parameter. Unlike an envelope, LFOs are active at all times and are repetitive. In this synth stab tutorial, we will apply our LFO 1 to Oscillator A’s, pan pot. This will cause oscillator A to shift from left to right within the stereo field as set by the LFO’s rate. Again, be sure to set the pan pots tracking to bidirectional and set the LFO’s rate to 2 bars for a subtle panning movement.
How to Add White Noise To A Synthwave Sound
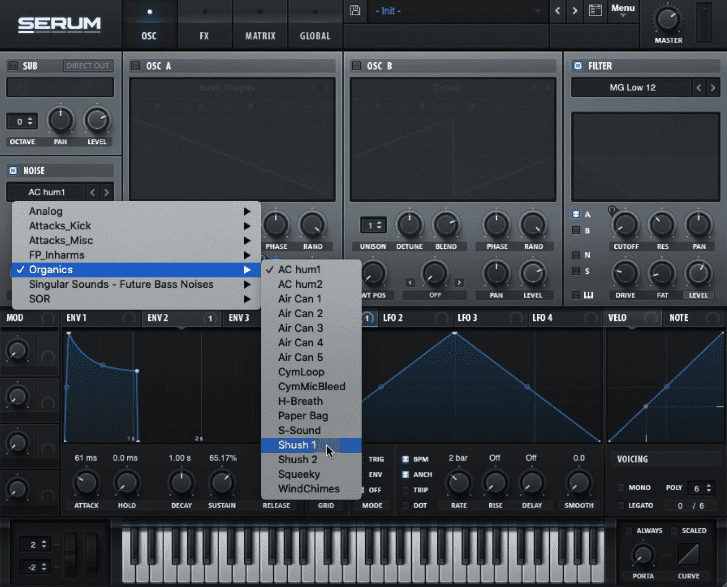
We can now consider adding white noise to our signal. Although most producers strive to reduce the amount of noise in their recordings, white noise can add grit and texture to any sound. In this next step, we’ll select the Shush 1 noise generator and route it to our filter. This white noise provides a clicking sound that is layered with our initial oscillator A sawtooth waveform. By and large, the human ear can detect the direction of incoming higher frequencies (white noise) thus our listener will be able to accurately pinpoint the location of our synth stabs in relation to our stereo field.
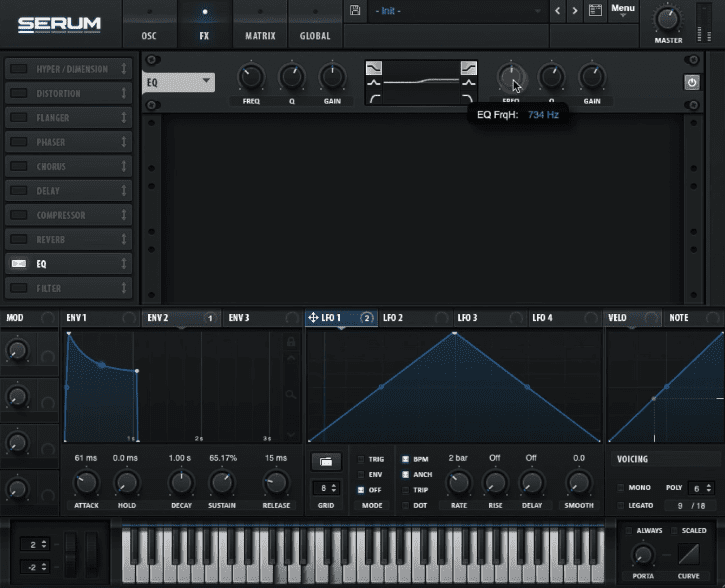
How to Add Audio Effects To Synthwave Sounds
It’s time to add some audio effects to our sound. The first effect in our chain is a shelving EQ. Be sure to add 4 dB’s of gain as of 770 Hz. This will brighten our overall sound.
How to Add Reverb To Synthwave Sounds
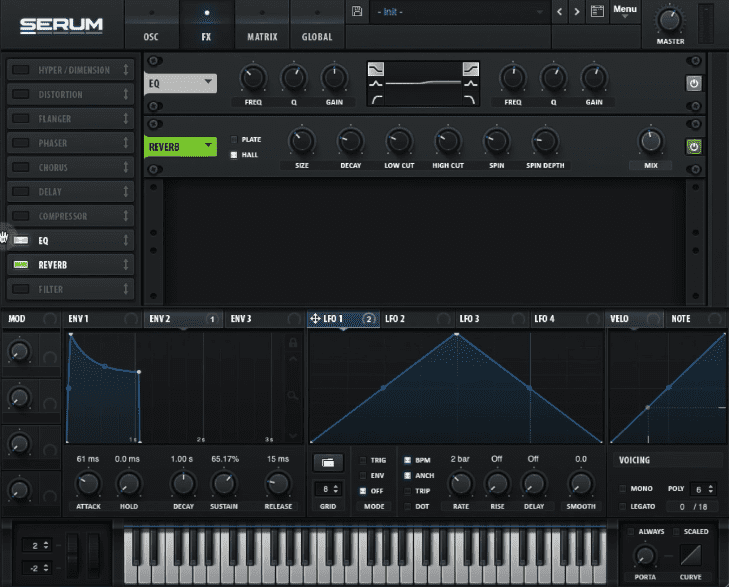
Add a reverb to the chain and place it after the EQ. Adjust the mix knob to taste and reduce the amount of higher frequencies in the reverb by reducing the high cut knob. Increase the reverbs mix knob so that it’s wet then adjust the reverb’s size, decay and dampness. Once these parameters have been set, reduce the mix knob to an appropriate level.
How to Add Delay To Synthwave Sounds
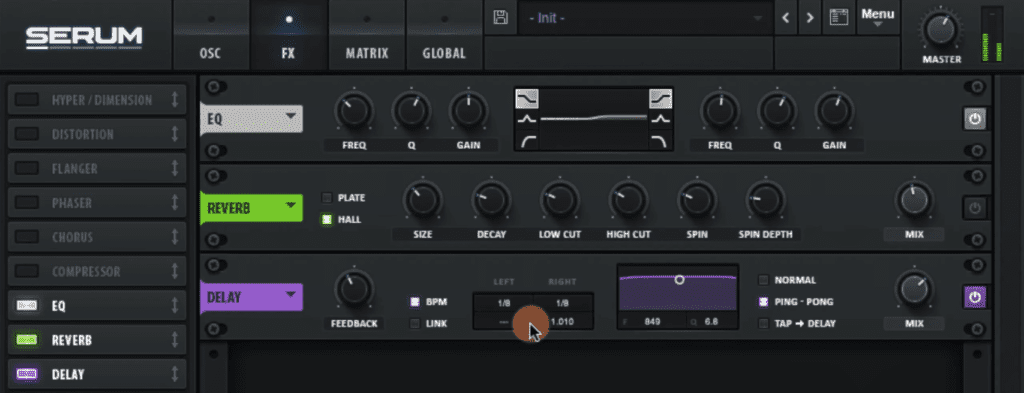
Next in our effects chain is the delay module. Be sure to add the delay after the EQ and reverb audio effects. Set the delay time to 1/8/ notes on left and right channel. Adjust the delay time by increasing the right channel delay’s time by few milliseconds. Set the delay module to ping pong delay and adjust the delay filters bandpass to reduce the extreme low and high frequencies.
How to Add Chorus To Synthwave Sounds
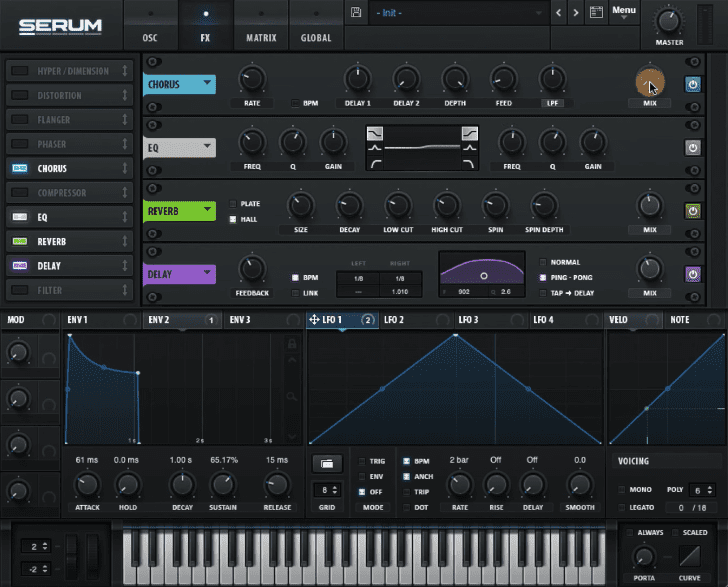
Finally we can add a chorus to the top of our audio effect chain and be sure to set the mix knob to 0. We will eventually assign this to Ableton Live’s macro control.
Detuning our Sound
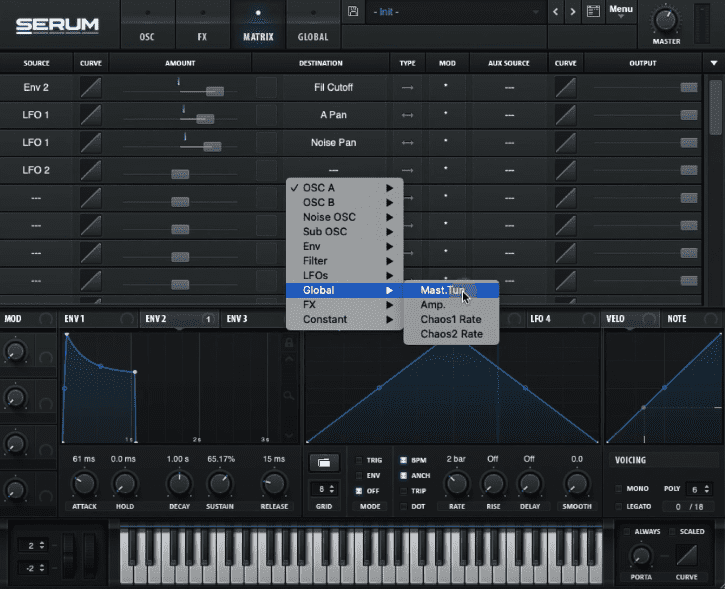
The next step is to detune our sound. For this, we will use LFO 2 to control the master tuning of our sound. To do this, we will turn to Serum’s matrix pane and select LFO 2 in the source column. From there be sure to link it to the Master Tuning parameter in the destination column. Finally be sure to set the type to bidirectional.
The key to effectively detuning a sound is to use a small amount. For instance, we can apply a small amount of detuning to the LFO 2 (value of 3) and adjust the output (dry/wet mix knob) to a value of 5.
Getting Fancy With Our Synth Stabs
Next we can use Live’s macro control to map ENV 2 decay and sustain. In addition we can use the Chorus’ dry/wet knon and link to to Live’s macro control. We can automate these controls throughout our arrangement to add contrast, interest and variety to our sequence.
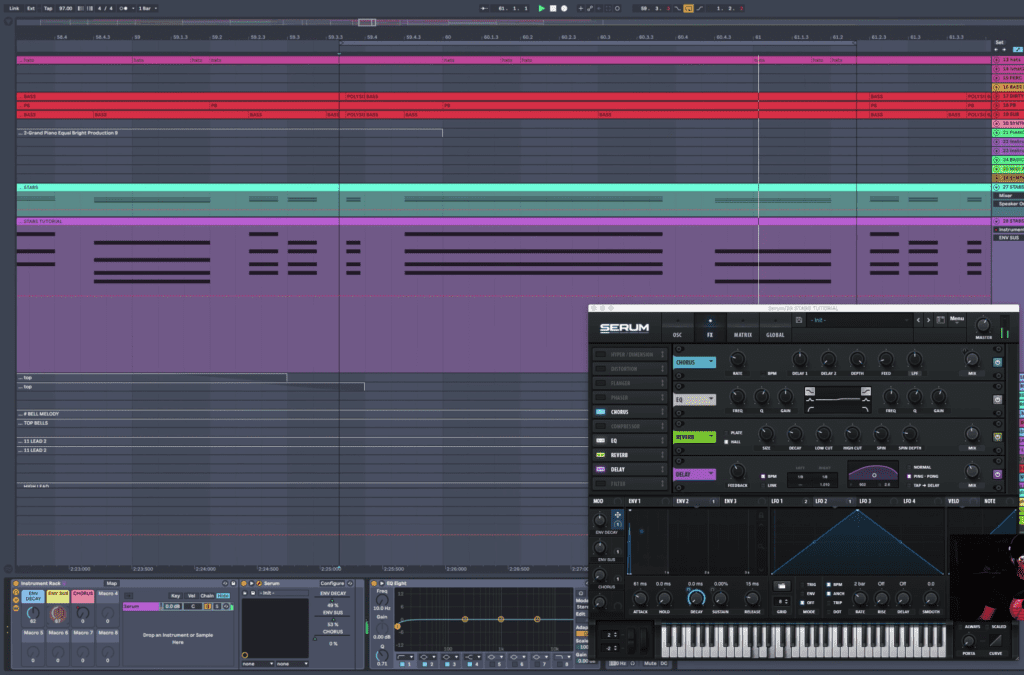
How To Add Automation To Your Synthwave Track
Turn to Live’s arrangement and be sure to automate the chorus dry/wet control. Be sure to apply the chorus effect during sustained chords as this will add a dream-like quality to our sound.
Conclusion
Sound design can be an enriching experience and in time, anyone can learn how to program virtually any hardware or vst synthesizer. The secret to programming compelling synthwave presets is to learn the basics and understand how each component relates to one another.
How to Make Synthwave Melodies In Ableton – Tips and Tutorial
How to learn sound design
На Disgusting Men новый музыкальный live-проект: мы разбираемся в устройстве жанра ретровейв, попутно сочиняя собственный смэш-хит.
На нашем Twitch-канале идут трансляции, посвященные заранее определенному этапу работы. В ходе стримов мы закрываем некую часть задач, отвечаем на вопросы зрителей о теории, практике и железе, обсуждаем артистов разных жанров и читаем критику.
На этой странице будут опубликованы результаты нашей работы с комментариями о том, что и зачем мы использовали.
PreyCover
Об участниках:
Илья Оранж — композитор и саунд-продюсер в студии Pixonic, соавтор проекта Naukograd;
Петр Сальников — ведущий подкаста «Отвратительные мужики», вокалист в Solar Deity.
Руслан Эльдорадович — гитарист в Solar Deity.
Часть 1. Собрана фонограмма
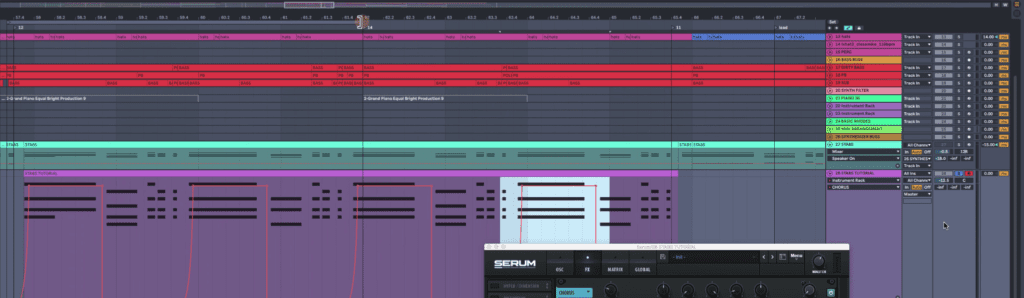
<span data-mce-type=»bookmark» style=»display: inline-block; width: 0px; overflow: hidden; line-height: 0;» class=»mce_SELRES_start»></span>
В ходе дебютного эфира мы представили зрителям суть происходящего, описали перспективы и соорудили основную аранжировку, на которую в дальнейшем будет нанизываться все остальное. Рассказываем об истоках жанра ретровейв, ключевых артистах, приемах, которые используются в этой музыке, на ходу иллюстрируя все это живой работой.
Что мы использовали:
Оборудование:
- Macbook Pro Mid 2016;
- Миди-клавиатура M-Audio Oxygen49;
- FM-синтезатор Korg Volca FM;
- Звуковая карта Tascam US-2×2.
Софт:
- DAW Ableton Live + plugins;
- Wavetable-синтезатор Serum;
- Жирный синтезатор для EDM Spire;
- Эмуляторы синтезаторов из 80-х Roland Cloud D-50 — и Roland Cloud Juno-106;
- Старый VA-синтезатор Albino.
Часть 2. Записан черновой вокал, готово рабочее сведение
На втором стриме мы слушаем черновой вокал, раскидываем партии по дорожкам и панораме. Накладываем базовые эффекты, чтобы приблизить фактуру голоса к электронной фактуре фонограммы. Экспериментируем с дополнительными элементами аранжировки, рассказываем о работе, проделанной за кадром.
Что мы использовали:
Оборудование:
- Macbook Pro Mid 2014;
- Звуковая карта Presonus Audiobox 44VSL;
- Микрофон AKG P5 Perception Live;
- Macbook Pro Mid 2016;
- Миди-клавиатура M-Audio Axiom Air32.
Софт — тот же, что и в прошлый раз, а также Garageband для записи вокала.
Часть 3. Запись гитар
В ходе третьего эфира мы подвели итоги конкурса гитарных соло, а также записали свою версию партии электрогитары в наш ретровейв-шлягер. Было непросто: мы, как подобает, совершенно не готовились, сочиняли все на ходу и искали решения, которых еще не было среди тех работ, которые прислали нам зрители.
Для записи гитары мы использовали:
• Macbook Pro Mid 2016;
• Звуковая карта Tascam US-2×2;
• Гитару Gibson Classic Goldtop;
• Предусилитель AMT SS-11;
• Овердрайв Fulltone Plim Soul;
• Октавер T-Rex Octavius;
• Дилей TC Electronic Flashback X4.
После того, как мы закончим со всем этим, трек выйдет в iTunes, Google Play, Spotify и других сервисах. Больше хитов от Disgusting Men — в Soundcloud.
У аналоговых синтезаторов достаточно высокая стоимость, поэтому для написания синтвейва музыканты и продюсеры полагаются на плагины. Недостатка в плагинах нет — на рынке без лишнего труда можно найти как бесплатные, так и платные качественные разработки.
Для написания синтвейва потребуются эмуляции аналоговых инструментов или цифровых синтезаторов, имитирующих звучание классических устройств.
Бесплатные плагины для синтвейва
TAL BassLine. Нетребовательный к ресурсам компьютера виртуальный аналоговый басовый синтезатор, созданный с оглядкой на Roland TB-303. Звучание не самое универсальное, но на первое время его точно может хватить. Из минусов — инструмент больше не поддерживается разработчиком, обновления не выходят. При этом сам плагин работает в Windows с 64-битными хостами, а в macOS X — только с 32-битными.
Digital Suburban Dexed. Мультиплатформенный синтезатор, очень точно воспроизводящий звучание Yamaha DX7. Плагин может считывать пресеты от реального DX7 или создавать заготовки для него.
SampleScience Single Cycle Audio Single Drum Elements. VST/AU-эмуляция классической драм-машины Yamaha RX5, которая также часто использовалась в музыке 1980-х.
u-he TyrellN6. Компактный синтезатор, взявший за основу звучание и особенности различных моделей синтезаторов 1980-х годов. Подойдет для создания лид-партий, басовых линий.
Ichiro Toda Synth1. Качественная цифровая копия синтезатора Clavia Nord Lead 2 Red Synth. Несмотря на бесплатность, Synth1 отличается отличным саундом и богатством возможностей для генерации звука.
Siegfried Kullmann SQ8L. Эмуляция аналогового синтезатора Ensoniq SQ-80. Пресеты этого плагина просто-таки кричат о своем ретро-прошлом. Тем, кому встроенных пресетов окажется недостаточно, стоит скачать дополнительный архив из нескольких тысяч заготовок в винтажном стиле.
Baby Audio Magic Switch. Бесплатный плагин хоруса, имитирующий эффект прямиком из 1980-х. Незаменим, когда звуку нужно придать лёгкое несовершенство музыки той эпохи.
Martin Lüder PG8X. Качественный синтезатор, эмулирующий звучание Roland JX-8P. Существует в виде VST-плагина для PC и Mac. Разработка AU-версии синтезатора, к сожалению, прекращена.
TAL U-No-62. Бесплатный полифонический виртуальный аналоговый синтезатор с осцилляторами и фильтрами, копирующими работу Roland Juno-60, а также рядом других возможностей. Инструмент существует в виде VST/AU-плагина для PC и Mac, но пользователи Logic Pro X могут проходить мимо — AU-плагин поддерживает только 32-битные хосты и не видится Лоджиком.
Платные плагины и инструменты для синтвейва
KORG Legacy Collection. Переиздание классических инструментов KORG в виде VST/AU-плагинов для PC и Mac. Среди самых полезных инструментов для синтвейв-продюсеров окажутся эмуляции KORG Polysix, активно применявшегося в басовых линиях музыки 1980-х, а также эмуляция синтезатора KORG M1. Качество инструментов выше всяких похвал. Набор из всех плагинов обойдется в $249, KORG Polysix и KORG M1 — $49,99.
Reveal Sound Spire. Программный полифонический синтезатор с мощным нетребовательным к ресурсам движком и простым интерфейсом, сочетающий лучшие черты аналоговых и цифровых синтезаторов. С помощью синтезатора можно генерировать качественные кремовые пэды, плотные басовые линии, яркие лиды. Распространяется в виде VST/AU-инструмента, стоимость — $189.
LennarDigital Sylenth1. Производительный виртуальный аналоговый синтезатор для PC и Mac. Качественное звучание, множество настроек, большая коллекция пресетов для разных стилей. Стоимость — €139 за неограниченную лицензию или €9,95/мес. До третьей версии синтезатор распространялся только в виде 32-битного инструмента и имел ряд проблем с современными хостами (тем же Logic Pro X), но начиная с версии Sylenth1 v3 синтезатор распространяется в виде 64-битного плагина и работает с любыми DAW.
Xfer Serum. Универсальный таблично-волновой синтезатор, который подойдет для создания электронной музыки в любом стиле, в том числе и в стиле синтвейв. Гибкие настройки, возможность подгрузки собственных сэмплов и создания своих таблиц, а также большая коллекция встроенных пресетов. В Интернете можно найти огромное количество пресетов от сторонних разработчиков для написания синтвейва. Стоимость — $189, есть версия для PC и Mac.
u-he Diva. Виртуальный аналоговый синтезатор с очень выраженным винтажным звучанием. За качественный звук придется заплатить прожорливостью Дивы, которая очень требовательна к ресурсам процессора компьютера (об этом предупреждают сами разработчики). Стоимость синтезатора — 179 €, существует в версиях для PC и Mac.
TAL U-No-LX V2. Один из основных инструментов любого синтвейв-продюсера. U-No-LX V2 — это очень точная эмуляция синтезатора Roland Juno-60, более продвинутая версия бесплатного TAL U-No-62. Множество фильтров от оригинального Juno-60, арпеджиатор с несколькими режимами работы, генераторы огибающих и другие возможности позволяют писать синтвейв только с помощью этого плагина. Существует в VST/AU-версиях для PC и Mac, стоимость — $70.
Arturia Spark VDM. Драм-машина от Arturia с большим количеством качественных пресетов, эмулирующих звучание множества популярных драм-машин. Основана на реальной драм-машине Arturia Spark. Есть сэмплы Roland TR-606 и TR-808, уже не раз упомянутой LinnDrum. Стоимость — 99 €, есть версии для PC и Mac.
Aly James Lab VProm 2.0. Эмуляция драм-машины LinnDrum для PC и Mac, точно повторяющая звучание оригинального инструмента, использовавшегося в 1980-х повсеместно. Стоимость — 40 €.
Baby Audio SuperVHS. Очень крутая обработка для создания винтажных эффектов, описать которую можно как «весь звук 1980-х в одном плагине». Умеет генерировать шумы, неточности и тепло плёнки, создавать неидеальную реверберацию, расширять и состаривать сигнал в духе 8-битных сэмплеров. В общем, придать звуку старомодный вайб с ним очень легко. Существует в виде VST/AU-плагина, стоит $49.
Native Instruments Analog Dreams. Библиотека сэмплов винтажных инструментов и синтезаторов. Более 100 пресетов, жирные аналоговые басы и сочные лиды, яркие клавишные и густые пэды. По своим возможностям разработка Native Instruments проще многих других виртуальных инструментов, однако суть библиотеки в другом — предоставить музыкантам срез саунда 1980 годов. Работает с NI Kontakt 6 и выше, стоимость — $49.
sonicprojects OP-X Pro II. VST/AU-клон синтезатора Oberheim OB-X с 2500 пресетов для любого вида электронной музыки. Разработчики в точности воссоздали все схемы оригинального синтезатора, поэтому звучание плагина идентично настоящему OB-X. Стоимость — $179, но на сайте часто появляются скидки, с помощью которых плагин можно купить за полцены.
Сэмплы и звуковые эффекты для синтвейва
По мере популяризации жанра различные компании стали выпускать сэмпл-паки, наборы пресетов и звуковых эффектов для написания синтвейва. Подборки звуков для любителей 1980-х найдутся в каталогах Sample Magic, Big Fish Audio, Loopmasters, LANDR Samples, а также в портфолио отдельных студий — Apex Audio, Elemental Sound, Carma Studio и других (к слову, посмотрите нашу группу по бесплатным плагинам и семплам).
В архивах с пресетами и сэмплами иногда включают полезный дополнительный контент. Так, например, в некоторых паках можно найти проекты для FL Studio или Ableton Live, заготовки для сэмплеров Logic Sampler, Logic EXS24, Native Instruments Kontakt и другие бонусы.
В поиске жанровых сэмпл-паков также стоит посетить британский магазин The Patch Bay, специализирующийся только на пресетах и сэмплах в стиле синтвейв. В каталоге представлено большое количество паков от известных синтвейв-музыкантов и продюсеров для всех популярных синтезаторов, которые мы перечисляли выше.