Время на прочтение
6 мин
Количество просмотров 41K
На Хабре уже достаточно статей о том, как разработать «hello world»-виджет для устройств на базе Android. Еще больше об этом можно почитать в сети, в том числе и на сайте Google для разработчиков, StackOverflow и других ресурсах. Казалось бы, все подробно разжевано, есть сотни примеров — зачем же писать очередную статью, когда вокруг и так достаточно информации?
Однако, когда мы начали разработку виджета, нам пришлось потратить несколько недель на то, чтобы разобраться с нюансами и реализовать проект так, как мы задумали его изначально.
Надеемся, наш опыт поможет сэкономить время на реализацию вашего виджета.
Подготовка
Для разработки была выбрана Android Stuido.Продукт еще очень сырой, не все разработчики готовы на него перейти, но отличная работа Preview и широкие возможности системы сборки Gradle берут верх над всеми недочетами. Поэтому мы рискнули попробовать, и, как оказалось, не зря.
Для тестирования, помимо непосредственной отладки на тестовом смартфоне, мы также использовали программные эмуляторы. Стандартным пользоваться достаточно проблематично, были рассмотрены различные высокопроизводительные эмуляторы Android-x86, AndroVM, Genymotion, Manymo и другие. В итоге мы выбрали Genymotion — он подкупил своей простотой установки и скоростью работы Android-x86, подробная инструкция по настройке и установке — необходим для тестирования на устройствах с Android 4.0 и ниже.
Данные эмуляторы отлично работают под различными ОС: Linux, Mac, Windows, у разработчиков бывают разные предпочтения, а переубеждать их неправильно, так что кроссплатформенные инструменты выручают.
Также эти программы помогают при автоматизированном тестировании: тесты написаны с использованием Android Instrumentation Framework, JUnit, Robotium. Подробнее об этом в следующей статье, которую мы опубликуем в ближайшее время 
Проектирование
Итак, мы хотим, чтобы пользователь видел поисковую форму, кнопку голосовых запросов, а при увеличении доступного размера виджета — анонсы актуальных новостей.
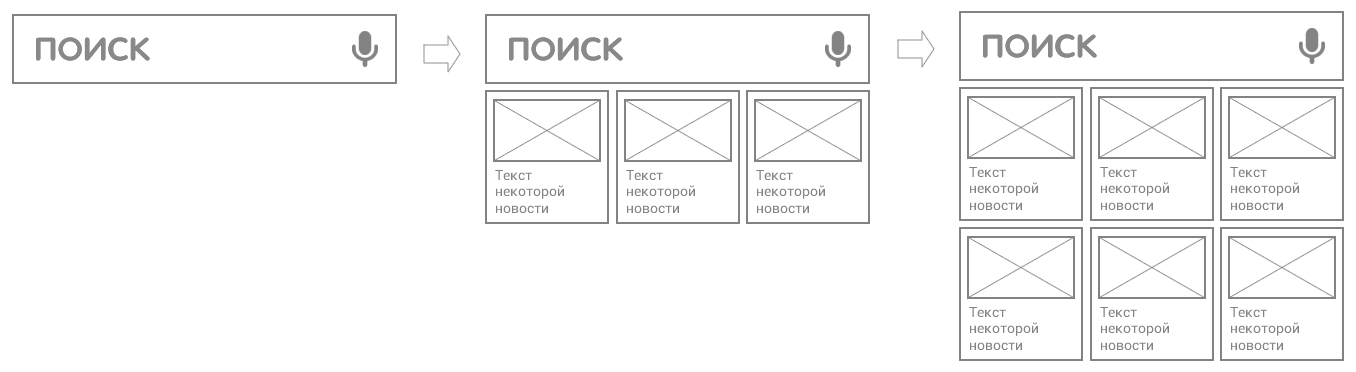
По данным Google Play, в мире зарегистрировано около 4500 видов различных устройств с поддержкой Android.
Помимо разрешения экрана, эти устройства могут различаться диагоналями и плотностью точек на единицу площади (ppi). К счастью, задачу можно упростить и для определения размеров элементов виджета использовать аппаратно-независимые пиксели — dp. Большинство смартфонов используют сетку 4×4, для 7-дюймовых планшетов сетка может быть 6×6, да еще и сам размер ячейки зависит от лаунчера и версий API Android. В таблице мы привели получившиеся размеры в dp для различных устройств:
| Samsung GT-i9000 | Nexus 4 | Samsung Tab | Nexus 7 | |
|---|---|---|---|---|
| 1 x 1 | 64 x 58 | 64 x 58 | 74 x 74 | 80 x 71 |
| 2 x 2 | 144 x 132 | 152 x 132 | 148 x 148 | 176 x 159 |
| 4 x 3 | 304 x 206 | 328 x 206 | 296 x 222 | 368 x 247 |
Можно отталкиваться от формул:
для API младше 14 размер = (74 x количество ячеек) — 2
для последних версий размер = (70 x количество ячеек) — 30
Если во время тестирования вы сталкиваетесь с проблемами на каком-то конкретном устройстве, например при смене ориентации экрана, то проще добавить отдельный layout или указать нужный размер в dimens.xml, чем пытаться подогнать параметры. Еще на этапе проектирования обратите внимание на повторно используемые элементы, чтобы при разработке вынести их в отдельные layout, а для вставки в необходимое место используйте Include. В нашем приложении данную технологию использовали для новостей, и для реализации тени у некоторых элементов home_news_row.xml:
<?xml version="1.0" encoding="utf-8"?>
<LinearLayout xmlns:android="http://schemas.android.com/apk/res/android"
    android:id="@+id/news_row"
    android:layout_width="match_parent"
    android:layout_height="match_parent">
    <include
        android:id="@+id/news_item1"
        layout="@layout/home_news_item"/>
    <include
        android:id="@+id/news_item2"
        layout="@layout/home_news_item"/>
</LinearLayout>
home_news_item.xml:
<?xml version="1.0" encoding="utf-8"?>
<LinearLayout xmlns:android="http://schemas.android.com/apk/res/android"
    android:orientation="horizontal"
    android:layout_width="match_parent"
    android:layout_height="match_parent">
    <ImageView
        android:id="@+id/news_img"
        android:scaleType="centerCrop"
        android:layout_weight="1"/>
    <TextView
        android:id="@+id/news_text"
        android:layout_width="match_parent"
        android:layout_height="match_parent"
        android:textSize="13sp"/>
</LinearLayout>
Реализация
Данные для виджета мы получаем с сервера в JSON — все достаточно просто и подробно описано в документации. Если у виджета установлен минимальный размер (поисковая строка и иконка голосового запроса), то анонсы актуальных новостей мы не запрашиваем, а при увеличении виджета сначала проверяем, есть ли закэшированные актуальные новости, после чего берем имеющиеся данные, тем самым экономя трафик и батарейку.
Проанализировав текущее распространение версий Android мы выяснили, что версия 2.2 все еще актуальна и ее необходимо поддерживать. К сожалению, поддержка изменения размеров виджета доступна только с версии 3.0, поэтому для более старых версий сделаем статичную версию развернутого виджета. Доля устройств версий 3.x на текущий момент несущественна, и мы решили реагировать на изменение размера виджета начиная с Android 4.1 c помощью метода onAppWidgetOptionsChanged. Но не все с ним гладко: он не срабатывает в некоторых модифицированных прошивках. Пришлось искать альтернативное решение, и оно нашлось: мы использовали событие com.sec.android.widgetapp.APPWIDGET_RESIZE в методе onReceive():
public void onReceive(Context context, Intent intent) {
        if (intent.getAction().contentEquals("com.sec.android.widgetapp.APPWIDGET_RESIZE")) {
            handleResize(context, intent);
        }

        super.onReceive(context, intent);
    }

    private void handleResize(Context context, Intent intent) {
        AppWidgetManager appWidgetManager = AppWidgetManager.getInstance(context);
        Bundle newOptions = getOptions(context, intent);
        int appWidgetId = intent.getIntExtra("widgetId", 0);

        if (!newOptions.isEmpty()) {
            onAppWidgetOptionsChanged(context, appWidgetManager, appWidgetId, newOptions);
        }
    }

    public Bundle getOptions(Context context, Intent intent) {
        Bundle newOptions = new Bundle();

        int appWidgetId = intent.getIntExtra("widgetId", 0);
        int widgetSpanX = intent.getIntExtra("widgetspanx", 0);
        int widgetSpanY = intent.getIntExtra("widgetspany", 0);

        if(appWidgetId > 0 && widgetSpanX > 0 && widgetSpanY > 0) {
            newOptions.putInt(AppWidgetManager.OPTION_APPWIDGET_MIN_HEIGHT, widgetSpanY * 74);
            newOptions.putInt(AppWidgetManager.OPTION_APPWIDGET_MIN_WIDTH, widgetSpanX * 74);
        }
        return newOptions;
    }

    @Override
    public void onAppWidgetOptionsChanged(Context context, AppWidgetManager appWidgetManager, int appWidgetId, Bundle newOptions) {
	Log.d("height", newOptions.getInt(AppWidgetManager.OPTION_APPWIDGET_MIN_HEIGHT));
	Log.d("width", newOptions.getInt(AppWidgetManager.OPTION_APPWIDGET_MIN_WIDTH));
}
При установке виджета на домашний экран, пользователь может выбрать в настройках цвет и прозрачность. В данной реализации нет нечего сложного, но есть один нюанс: уровень прозрачности необходимо добавить к выбранному цвету. Например, вот так это реализовано у нас:
int color = Color.parseColor(“#FFFFFF”);
int transparent =150;
color = Color.argb(transparent, Color.red(color), Color.green(color), Color.blue(color));
Полученный цвет с уровнем прозрачности применяется к элементу виджета. В нашем случае мы просто устанавливаем setBackgroundColor() у LinearLayout.
Также бывают ситуации, когда в альбомном режиме размер ячейки виджета получается меньше, чем в портретном, в связи с чем текст заданной длины уже не помещается. Можно попробовать уменьшить размер текста, но на устройствах с низким разрешением он становится нечитаемым. В связи с этим при смене ориентации мы просто уменьшаем в layout альбомного режима количество выводимых строк text.setMaxLines(2), а размер шрифта оставляем прежним:
android:maxLines="3"
android:ellipsize="end"
Последнее свойство добавляет в конце строки многоточие.
Для того, чтобы наш виджет было легче найти в списке установленных, нужен последний штрих: подготовка картинок-превью, или previewImage. Можно попытаться воспроизвести итоговый виджет в графическом редакторе, мы же воспользовались приложением Widget Preview.
Вот что получилось в итоге:
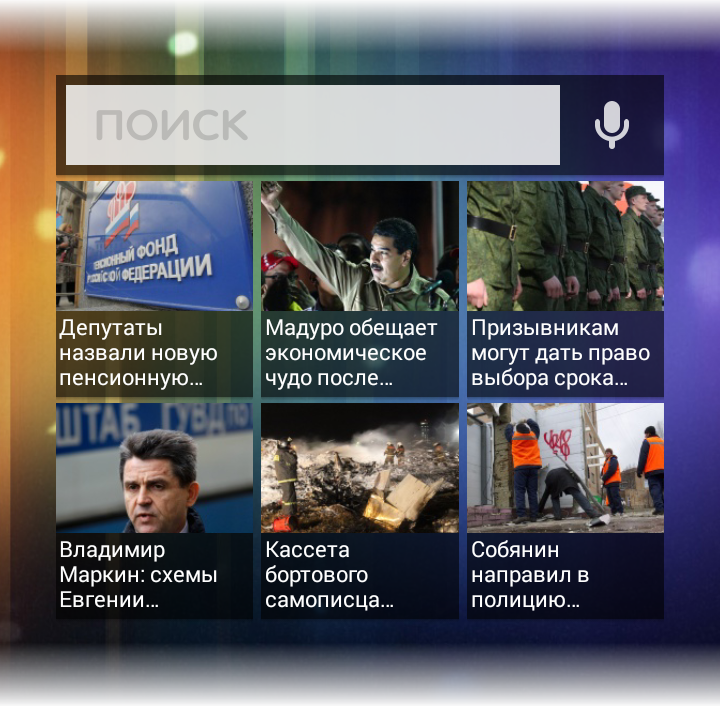
Скачать итоговое приложение можно тут.
Спасибо за внимание!
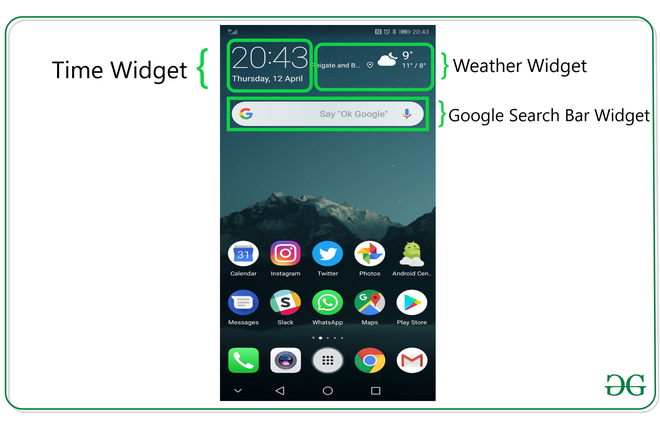
Widgets are the micro-version of the application that consists of some functionality of the application that is displayed only on the Home Screens or the Lock Screen. For example, we see Weather, Time, Google Search Bars on the Home Screen, and FaceLock, FingerprintLock on the Lock Screen, which are some of the Widgets available on the device. Widgets come along with the Application when you install it or download it from the Web. Generally, phones come with a manufacturing configuration but such elements can be adjusted by a user later in time. In this article, we demonstrate how one can implement a basic widget for an Android App.
Steps for Creating a Basic Widget
Step 1: Create a New Project
To create a new project in Android Studio please refer to How to Create/Start a New Project in Android Studio. We are implementing it for both Java and Kotlin languages.
Step 2: Add the App Widget to the Project
Right-Click on the app, move the cursor to new, find the “Widget” option at the end, select it.

Specify the required properties for the widget such as min. width and height, config file and preferred language, etc, and proceed. Files are automatically generated.

Step 3: Install and Run the Code
- Install and Run the code on Android Virtual Device (AVD) or a personal device.
- Open the widget section of the phone, lookup for a widget with the Application name, select it, bring it to the home screen.
- Try changing the dimensions and we are done!
Output: Run On Emulator
What extra files are generated in this process?
During this selecting and deploying process, a few extra files are generated and minor changes are made to existing files as well. No programming is required for generating a basic widget and is only required if an application is to be embedded inside the widget, as discussed in the later parts of the article. Let us now explain the newly generated files the changes make to the existing ones, one by one.
1. NewAppWidget.kt
Where it’s generated?

Kotlin
import android.appwidget.AppWidgetManager
import android.appwidget.AppWidgetProvider
import android.content.Context
import android.widget.RemoteViews
class NewAppWidget : AppWidgetProvider() {
override fun onUpdate(
context: Context,
appWidgetManager: AppWidgetManager,
appWidgetIds: IntArray
) {
for (appWidgetId in appWidgetIds) {
updateAppWidget(context, appWidgetManager, appWidgetId)
}
}
override fun onEnabled(context: Context) {
}
override fun onDisabled(context: Context) {
}
}
internal fun updateAppWidget(
context: Context,
appWidgetManager: AppWidgetManager,
appWidgetId: Int
) {
val widgetText = context.getString(R.string.appwidget_text)
val views = RemoteViews(context.packageName, R.layout.new_app_widget)
views.setTextViewText(R.id.appwidget_text, widgetText)
appWidgetManager.updateAppWidget(appWidgetId, views)
}
Java
import android.appwidget.AppWidgetManager;
import android.appwidget.AppWidgetProvider;
import android.content.Context;
import android.widget.RemoteViews;
class NewAppWidget extends AppWidgetProvider {
@Override
public void onUpdate(Context context, AppWidgetManager appWidgetManager, int[] appWidgetIds)
{
for (int appWidgetId : appWidgetIds) {updateAppWidget(context, appWidgetManager, appWidgetId);
}
}
@Override public void onEnabled(Context context)
{
super.onEnabled(context);
}
@Override public void onDisabled(Context context)
{
super.onDisabled(context);
}
private void
updateAppWidget(Context context, AppWidgetManager appWidgetManager, int appWidgetId)
{
String widgetText = context.getString(R.string.appwidget_text);
RemoteViews views = new RemoteViews(context.getPackageName(), R.layout.new_app_widget);
views.setTextViewText(R.id.appwidget_text, widgetText);
appWidgetManager.updateAppWidget(appWidgetId, views);
}
}
2. new_app_widget.xml
Where it’s generated?

XML
<RelativeLayout
android:layout_width="match_parent"
android:layout_height="match_parent"
android:background="#09C"
android:padding="@dimen/widget_margin">
<TextView
android:id="@+id/appwidget_text"
android:layout_width="wrap_content"
android:layout_height="wrap_content"
android:layout_centerHorizontal="true"
android:layout_centerVertical="true"
android:layout_margin="8dp"
android:background="#09C"
android:contentDescription="@string/appwidget_text"
android:text="@string/appwidget_text"
android:textColor="#ffffff"
android:textSize="24sp"
android:textStyle="bold|italic" />
</RelativeLayout>
3. dimens.xml
Where it’s generated?

XML
<?xml version="1.0" encoding="utf-8"?>
<resources>
<dimen name="widget_margin">8dp</dimen>
</resources>
4. new_app_widget_info.xml
Where it’s generated?

XML
<?xml version="1.0" encoding="utf-8"?>
<appwidget-provider
android:initialKeyguardLayout="@layout/new_app_widget"
android:initialLayout="@layout/new_app_widget"
android:minWidth="40dp"
android:minHeight="40dp"
android:previewImage="@drawable/example_appwidget_preview"
android:resizeMode="horizontal|vertical"
android:updatePeriodMillis="86400000"
android:widgetCategory="home_screen">
</appwidget-provider>
5. Changes made to AndroidManifest.xml file
XML
<?xml version="1.0" encoding="utf-8"?>
package="org.geeksforgeeks.widget_basic">
<application
android:allowBackup="true"
android:icon="@mipmap/ic_launcher"
android:label="@string/app_name"
android:roundIcon="@mipmap/ic_launcher_round"
android:supportsRtl="true"
android:theme="@style/AppTheme">
<receiver android:name=".NewAppWidget">
<intent-filter>
<action android:name="android.appwidget.action.APPWIDGET_UPDATE" />
</intent-filter>
<meta-data
android:name="android.appwidget.provider"
android:resource="@xml/new_app_widget_info" />
</receiver>
<activity android:name=".MainActivity">
<intent-filter>
<action android:name="android.intent.action.MAIN" />
<category android:name="android.intent.category.LAUNCHER" />
</intent-filter>
</activity>
</application>
</manifest>
Is Programming Still Required? If so, which part of the code is to be changed? (In Continuation)
Yes, Programming is still a requirement for creating widgets. Changes are made inside the NewAppWidget.kt which is a Kotlin class and its counterpart new_app_widget.xml file that displays the widget. Functionalities can be declared inside the update app widget function for the application operations and new_app_widget.xml for adding multiple elements to the widget’s display. Since both the files are linked internally, altering one of them brings changes to another.
Regarding implementing multiple Widgets
There are no restrictions on the number of widgets that an app can have, however, it is advised to have a minimum number of widgets as possible as widgets are dynamically changing elements. There are update callbacks (refer to new_app_widget_info.xml file ), updatePeriodMillis is a parameter referring to which the application keeps updating the widget, meaning, the application thread to update the widget keeps running in the background, acquiring some part of the limited RAM.
Widgets are the micro-version of the application that consists of some functionality of the application that is displayed only on the Home Screens or the Lock Screen. For example, we see Weather, Time, Google Search Bars on the Home Screen, and FaceLock, FingerprintLock on the Lock Screen, which are some of the Widgets available on the device. Widgets come along with the Application when you install it or download it from the Web. Generally, phones come with a manufacturing configuration but such elements can be adjusted by a user later in time. In this article, we demonstrate how one can implement a basic widget for an Android App.
Steps for Creating a Basic Widget
Step 1: Create a New Project
To create a new project in Android Studio please refer to How to Create/Start a New Project in Android Studio. We are implementing it for both Java and Kotlin languages.
Step 2: Add the App Widget to the Project
Right-Click on the app, move the cursor to new, find the “Widget” option at the end, select it.
Specify the required properties for the widget such as min. width and height, config file and preferred language, etc, and proceed. Files are automatically generated.
Step 3: Install and Run the Code
- Install and Run the code on Android Virtual Device (AVD) or a personal device.
- Open the widget section of the phone, lookup for a widget with the Application name, select it, bring it to the home screen.
- Try changing the dimensions and we are done!
Output: Run On Emulator
What extra files are generated in this process?
During this selecting and deploying process, a few extra files are generated and minor changes are made to existing files as well. No programming is required for generating a basic widget and is only required if an application is to be embedded inside the widget, as discussed in the later parts of the article. Let us now explain the newly generated files the changes make to the existing ones, one by one.
1. NewAppWidget.kt
Where it’s generated?
Kotlin
import android.appwidget.AppWidgetManager
import android.appwidget.AppWidgetProvider
import android.content.Context
import android.widget.RemoteViews
class NewAppWidget : AppWidgetProvider() {
override fun onUpdate(
context: Context,
appWidgetManager: AppWidgetManager,
appWidgetIds: IntArray
) {
for (appWidgetId in appWidgetIds) {
updateAppWidget(context, appWidgetManager, appWidgetId)
}
}
override fun onEnabled(context: Context) {
}
override fun onDisabled(context: Context) {
}
}
internal fun updateAppWidget(
context: Context,
appWidgetManager: AppWidgetManager,
appWidgetId: Int
) {
val widgetText = context.getString(R.string.appwidget_text)
val views = RemoteViews(context.packageName, R.layout.new_app_widget)
views.setTextViewText(R.id.appwidget_text, widgetText)
appWidgetManager.updateAppWidget(appWidgetId, views)
}
Java
import android.appwidget.AppWidgetManager;
import android.appwidget.AppWidgetProvider;
import android.content.Context;
import android.widget.RemoteViews;
class NewAppWidget extends AppWidgetProvider {
@Override
public void onUpdate(Context context, AppWidgetManager appWidgetManager, int[] appWidgetIds)
{
for (int appWidgetId : appWidgetIds) {updateAppWidget(context, appWidgetManager, appWidgetId);
}
}
@Override public void onEnabled(Context context)
{
super.onEnabled(context);
}
@Override public void onDisabled(Context context)
{
super.onDisabled(context);
}
private void
updateAppWidget(Context context, AppWidgetManager appWidgetManager, int appWidgetId)
{
String widgetText = context.getString(R.string.appwidget_text);
RemoteViews views = new RemoteViews(context.getPackageName(), R.layout.new_app_widget);
views.setTextViewText(R.id.appwidget_text, widgetText);
appWidgetManager.updateAppWidget(appWidgetId, views);
}
}
2. new_app_widget.xml
Where it’s generated?
XML
<RelativeLayout
android:layout_width="match_parent"
android:layout_height="match_parent"
android:background="#09C"
android:padding="@dimen/widget_margin">
<TextView
android:id="@+id/appwidget_text"
android:layout_width="wrap_content"
android:layout_height="wrap_content"
android:layout_centerHorizontal="true"
android:layout_centerVertical="true"
android:layout_margin="8dp"
android:background="#09C"
android:contentDescription="@string/appwidget_text"
android:text="@string/appwidget_text"
android:textColor="#ffffff"
android:textSize="24sp"
android:textStyle="bold|italic" />
</RelativeLayout>
3. dimens.xml
Where it’s generated?
XML
<?xml version="1.0" encoding="utf-8"?>
<resources>
<dimen name="widget_margin">8dp</dimen>
</resources>
4. new_app_widget_info.xml
Where it’s generated?
XML
<?xml version="1.0" encoding="utf-8"?>
<appwidget-provider
android:initialKeyguardLayout="@layout/new_app_widget"
android:initialLayout="@layout/new_app_widget"
android:minWidth="40dp"
android:minHeight="40dp"
android:previewImage="@drawable/example_appwidget_preview"
android:resizeMode="horizontal|vertical"
android:updatePeriodMillis="86400000"
android:widgetCategory="home_screen">
</appwidget-provider>
5. Changes made to AndroidManifest.xml file
XML
<?xml version="1.0" encoding="utf-8"?>
package="org.geeksforgeeks.widget_basic">
<application
android:allowBackup="true"
android:icon="@mipmap/ic_launcher"
android:label="@string/app_name"
android:roundIcon="@mipmap/ic_launcher_round"
android:supportsRtl="true"
android:theme="@style/AppTheme">
<receiver android:name=".NewAppWidget">
<intent-filter>
<action android:name="android.appwidget.action.APPWIDGET_UPDATE" />
</intent-filter>
<meta-data
android:name="android.appwidget.provider"
android:resource="@xml/new_app_widget_info" />
</receiver>
<activity android:name=".MainActivity">
<intent-filter>
<action android:name="android.intent.action.MAIN" />
<category android:name="android.intent.category.LAUNCHER" />
</intent-filter>
</activity>
</application>
</manifest>
Is Programming Still Required? If so, which part of the code is to be changed? (In Continuation)
Yes, Programming is still a requirement for creating widgets. Changes are made inside the NewAppWidget.kt which is a Kotlin class and its counterpart new_app_widget.xml file that displays the widget. Functionalities can be declared inside the update app widget function for the application operations and new_app_widget.xml for adding multiple elements to the widget’s display. Since both the files are linked internally, altering one of them brings changes to another.
Regarding implementing multiple Widgets
There are no restrictions on the number of widgets that an app can have, however, it is advised to have a minimum number of widgets as possible as widgets are dynamically changing elements. There are update callbacks (refer to new_app_widget_info.xml file ), updatePeriodMillis is a parameter referring to which the application keeps updating the widget, meaning, the application thread to update the widget keeps running in the background, acquiring some part of the limited RAM.
This page explains recommended practices for creating a more advanced widget for
a better user experience.
Updating widget content can be computationally expensive. To save battery
consumption, optimize the update type, frequency, and timing.
Types of widget updates
There are three ways to update a widget: a full update, a partial update, and,
in the case of a collection widget, a data refresh. Each has different
computational costs and ramifications.
The following describes each update type and provides code snippets for each.
-
Full update: call
AppWidgetManager.updateAppWidget(int,

android.widget.RemoteViews)
to fully update the widget. This replaces the previously provided
RemoteViewswith a new
RemoteViews. This is the most computationally expensive update.Kotlin
val appWidgetManager = AppWidgetManager.getInstance(context)
val remoteViews = RemoteViews(context.getPackageName(), R.layout.widgetlayout).also {
setTextViewText(R.id.textview_widget_layout1, "Updated text1")
setTextViewText(R.id.textview_widget_layout2, "Updated text2")
}
appWidgetManager.updateAppWidget(appWidgetId, remoteViews)
Java
AppWidgetManager appWidgetManager = AppWidgetManager.getInstance(context);
RemoteViews remoteViews = new RemoteViews(context.getPackageName(), R.layout.widgetlayout);
remoteViews.setTextViewText(R.id.textview_widget_layout1, "Updated text1");
remoteViews.setTextViewText(R.id.textview_widget_layout2, "Updated text2");
appWidgetManager.updateAppWidget(appWidgetId, remoteViews);
-
Partial update: call
AppWidgetManager.partiallyUpdateAppWidget
to update parts of the widget. This merges the newRemoteViewswith the
previously providedRemoteViews. This method is ignored if a widget
doesn’t receive at least one full update throughupdateAppWidget(int[],.
RemoteViews)Kotlin
val appWidgetManager = AppWidgetManager.getInstance(context)
val remoteViews = RemoteViews(context.getPackageName(), R.layout.widgetlayout).also {
setTextViewText(R.id.textview_widget_layout, "Updated text")
}
appWidgetManager.partiallyUpdateAppWidget(appWidgetId, remoteViews)
Java
AppWidgetManager appWidgetManager = AppWidgetManager.getInstance(context);
RemoteViews remoteViews = new RemoteViews(context.getPackageName(), R.layout.widgetlayout);
remoteViews.setTextViewText(R.id.textview_widget_layout, "Updated text");
appWidgetManager.partiallyUpdateAppWidget(appWidgetId, remoteViews);
-
Collection data refresh: call
AppWidgetManager.notifyAppWidgetViewDataChanged
to invalidate the data of a collection view in your widget. This triggers
RemoteViewsFactory.onDataSetChanged.
In the interim, the old data is displayed in the widget. You can safely
perform expensive tasks synchronously with this method.Kotlin
val appWidgetManager = AppWidgetManager.getInstance(context)
appWidgetManager.notifyAppWidgetViewDataChanged(appWidgetId, R.id.widget_listview)
Java
AppWidgetManager appWidgetManager = AppWidgetManager.getInstance(context);
appWidgetManager.notifyAppWidgetViewDataChanged(appWidgetId, R.id.widget_listview);
You can call these methods from anywhere in your app, as long as the app has the
same UID as the corresponding
AppWidgetProvider class.
Determine how often to update a widget
Widgets are updated periodically depending on the value provided for the
updatePeriodMillis
attribute. The widget can update in response to user interaction, broadcast
updates, or both.
Update periodically
You can control the frequency of the periodic update by specifying a value for
AppWidgetProviderInfo.updatePeriodMillis in the appwidget-provider XML. Each
update triggers the AppWidgetProvider.onUpdate() method, which is where you
can place the code to update the widget. However, consider the alternatives for
broadcast receiver updates described in a
following section if your widget needs to load data asynchronously or takes more
than 10 seconds to update, because after 10 seconds, the system considers a
BroadcastReceiver to be non-responsive.
updatePeriodMillis doesn’t support values of less than 30 minutes. However, if
you want to disable periodic updates, you can specify 0.
You can let users adjust the frequency of updates in a configuration. For
example, they might want a stock ticker to update every 15 minutes or only four
times a day. In this case, set the updatePeriodMillis to 0 and use
WorkManager instead.
Update in response to a user interaction
Here are some recommended ways to update the widget based on user interaction:
-
From an activity of the app: directly call
AppWidgetManager.updateAppWidgetin response to a user interaction, such
as a user’s tap. -
From remote interactions, such as a notification or an app widget:
construct aPendingIntent, then update the widget from the invoked
Activity,Broadcast, orService. You can choose your own priority. For
example, if you select aBroadcastfor thePendingIntent, you can choose
a foreground broadcast to give the
BroadcastReceiverpriority.
Update in response to a broadcast event
An example of a broadcast event that requires a widget to update is when the
user takes a photo. In this case, you want to update the widget when a new photo
is detected.
You can schedule a job with JobScheduler and specify a broadcast as the
trigger using the
JobInfo.Builder.addTriggerContentUri
method.
You can also register a BroadcastReceiver for the broadcast—for example,
listening for
ACTION_LOCALE_CHANGED.
However, because this consumes device resources, use this with care and listen
only to the specific broadcast. With the introduction of broadcast
limitations in Android
7.0 (API level 24) and Android 8.0 (API level 26), apps can’t register implicit
broadcasts in their manifests, with certain
exceptions.
Considerations when updating a widget from a BroadcastReceiver
If the widget is updated from a BroadcastReceiver, including
AppWidgetProvider, be aware of the following considerations regarding the
duration and priority of a widget update.
Duration of the update
As a rule, the system lets broadcast receivers, which usually run in the app’s
main thread, run for up to 10 seconds before considering them non-responsive and
triggering an Application Not
Responding (ANR) error. If it takes longer to
update the widget, consider the following alternatives:
-
Schedule a task using
WorkManager. -
Give the receiver more time with the
goAsyncmethod.
This lets receivers execute for 30 seconds.
See Security considerations and best
practices for more
information.
Priority of the update
By default, broadcasts—including those made using
AppWidgetProvider.onUpdate—run as background processes. This means
overloaded system resources can cause a delay in the invocation of the broadcast
receiver. To prioritize the broadcast, make it a foreground process.
For example, add the
Intent.FLAG_RECEIVER_FOREGROUND
flag to the Intent passed to the PendingIntent.getBroadcast when the user
taps on a certain part of the widget.
Build accurate previews that include dynamic items

This section explains the recommended approach for displaying multiple items in
a widget preview for a widget with a collection
view—that is, a widget that uses a
ListView, GridView, or StackView.
If your widget uses one of these views, creating a scalable preview by directly
providing the actual widget
layout degrades the
experience when the widget preview displays no items. This occurs because
collection view data is set dynamically at runtime, and it looks similar to the
image shown in figure 1.
To make previews of widgets with collection views display properly in the widget
picker, we recommend maintaining a separate layout file designated for only the
preview. This separate layout file includes the actual widget layout and a
placeholder collection view with fake items. For example, you can mimic a
ListView by providing a placeholder LinearLayout with several fake list
items.
To illustrate an example for a ListView, start with a separate layout file:
// res/layout/widget_preview.xml

<LinearLayout xmlns:android="http://schemas.android.com/apk/res/android"
   android:layout_width="match_parent"
   android:layout_height="wrap_content"
   android:background="@drawable/widget_background"
   android:orientation="vertical">

    // Include the actual widget layout that contains ListView.
    <include
        layout="@layout/widget_view"
        android:layout_width="match_parent"
        android:layout_height="wrap_content" />

    // The number of fake items you include depends on the values you provide
    // for minHeight or targetCellHeight in the AppWidgetProviderInfo
    // definition.

    <TextView android:text="@string/fake_item1"
        android:layout_width="match_parent"
        android:layout_height="wrap_content"
        android:layout_marginVertical="?attr/appWidgetInternalPadding" />

    <TextView android:text="@string/fake_item2"
        android:layout_width="match_parent"
        android:layout_height="wrap_content"
        android:layout_marginVertical="?attr/appWidgetInternalPadding" />

</LinearLayout>
Specify the preview layout file when providing the previewLayout attribute of
the AppWidgetProviderInfo metadata. You still specify the actual widget layout
for the initialLayout attribute and use the actual widget layout when
constructing a RemoteViews at runtime.
<appwidget-provider
    previewLayout="@layout/widget_previe"
    initialLayout="@layout/widget_view" />
Complex list items
The example in the previous section provides fake list items, because the list
items are TextView objects. It can be
more complex to provide fake items if the items are complex layouts.
Consider a list item that is defined in widget_list_item.xml and consists of
two TextView objects:
<LinearLayout  xmlns:android="http://schemas.android.com/apk/res/android"
        android:layout_width="match_parent"
        android:layout_height="wrap_content">

    <TextView android:id="@id/title"
        android:layout_width="match_parent"
        android:layout_height="wrap_content"
        android:text="@string/fake_title" />

    <TextView android:id="@id/content"
        android:layout_width="match_parent"
        android:layout_height="wrap_content"
        android:text="@string/fake_content" />
</LinearLayout>
To provide fake list items, you can include the layout multiple times, but this
causes each list item to be identical. To provide unique list items, follow
these steps:
-
Create a set of attributes for the text values:
<resources> <attr name="widgetTitle" format="string" /> <attr name="widgetContent" format="string" /> </resources> -
Use these attributes to set the text:
<LinearLayout xmlns:android="http://schemas.android.com/apk/res/android" android:layout_width="match_parent" android:layout_height="wrap_content"> <TextView android:id="@id/title" android:layout_width="match_parent" android:layout_height="wrap_content" android:text="?widgetTitle" /> <TextView android:id="@id/content" android:layout_width="match_parent" android:layout_height="wrap_content" android:text="?widgetContent" /> </LinearLayout> -
Create as many styles as required for the preview. Redefine the values in
each style:<resources> <style name="Theme.Widget.ListItem"> <item name="widgetTitle"></item> <item name="widgetContent"></item> </style> <style name="Theme.Widget.ListItem.Preview1"> <item name="widgetTitle">Fake Title 1</item> <item name="widgetContent">Fake content 1</item> </style> <style name="Theme.Widget.ListItem.Preview2"> <item name="widgetTitle">Fake title 2</item> <item name="widgetContent">Fake content 2</item> </style> </resources> -
Apply the styles on the fake items in the preview layout:
<LinearLayout xmlns:android="http://schemas.android.com/apk/res/android"
   android:layout_width="match_parent"
   android:layout_height="wrap_content" ...>

    <include layout="@layout/widget_view" ... />

    <include layout="@layout/widget_list_item"
        android:theme="@style/Theme.Widget.ListItem.Preview1" />

    <include layout="@layout/widget_list_item"
        android:theme="@style/Theme.Widget.ListItem.Preview2" />

</LinearLayout>
В этом уроке:
— создаем простой виджет
— разбираемся в его Lifecycle
Добрались таки и до этой долгожданной темы. Вообще, интересно было бы глянуть статистику, какое количество из всех существующих приложений содержит в себе виджеты. Подозреваю, что не чаще, чем одно из десяти. Возможно, ближайшие несколько уроков эту статистику изменят )
Для понимания темы виджетов желательно знать, что такое BroadcastReceiver. Я о нем упоминал в Уроках 96 и 100. Это просто слушатель, который регистрируется в системе, ловит с помощью настроенного Intent Filter сообщения (Intent) и выполняет какой-либо код. Почему-то не сделал я отдельного урока по нему. Но, думаю, еще сделаю. Есть там свои интересные особенности, о которых можно поговорить.
Думаю, нет особой необходимости подробно объяснять, что такое виджеты. Все их видели на своих девайсах. Это что-то типа мини-приложений расположенных на рабочем столе (Home). Они позволяют просмотреть какую-либо информацию из основных приложений, либо повлиять на поведение этих приложений. В качестве примера можно привести – прогноз погоды, текущее время, баланс какого-либо счета, список сообщений в различных мессенджерах, управление состоянием WiFi/3G/GPS/Bluetooth, яркость экрана и т.д. и т.п. В этом уроке сделаем простейший виджет, который отобразит статичный текст.
Чтобы создать простейший виджет нам понадобятся три детали:
1) Layout-файл.
В нем мы формируем внешний вид виджета. Все аналогично layout-файлам для Activity и фрагментов, только набор доступных компонентов здесь ограничен следующим списком:
FrameLayout
LinearLayout
RelativeLayout
GridLayout
AnalogClock
Button
Chronometer
ImageButton
ImageView
ProgressBar
TextView
ViewFlipper
ListView
GridView
StackView
AdapterViewFlipper
2) XML-файл c метаданными
В нем задаются различные характеристики виджета. Мы пока что укажем следующие параметры:
— layout-файл (из п.1.), чтобы виджет знал, как он будет выглядеть
— размер виджета, чтобы виджет знал, сколько места он должен занять на экране
— интервал обновления, чтобы система знала, как часто ей надо будет обновлять виджет
3) Класс, наследующий AppWidgetProvider. В этом классе нам надо будет реализовать Lifecycle методы виджета.
Давайте создадим три этих детали. Activity нам не понадобится, поэтому не забудьте убрать галку Create Activity в визарде создания нового проекта
Создадим проект без Activity:
Project name: P1171_SimpleWidget
Build Target: Android 2.3.3
Application name: SimpleWidget
Package name: ru.startandroid.develop.p1171simplewidget
Добавим строки в strings.xml:
<string name="widget_name">My first widget</string>
<string name="widget_text">Text in widget</string>
Создаем layout-файл widget.xml:
<?xml version="1.0" encoding="utf-8"?>
<RelativeLayout
	xmlns:android="http://schemas.android.com/apk/res/android"
	android:layout_width="match_parent"
	android:layout_height="match_parent"
	android:orientation="vertical">
	<TextView
		android:id="@+id/tv"
		android:layout_width="match_parent"
		android:layout_height="match_parent"
		android:background="#6600ff00"
		android:gravity="center"
		android:text="@string/widget_text"
		android:textColor="#000"
		android:textSize="18sp">
	</TextView>
</RelativeLayout>
RelativeLayout, а внутри зеленый TextView с текстом по центру. Т.е. виджет просто будет показывать текст на зеленом фоне.
Создаем файл метаданных res/xml/widget_metadata.xml:
<appwidget-provider
	xmlns:android="http://schemas.android.com/apk/res/android"
	android:initialLayout="@layout/widget"
	android:minHeight="40dp"
	android:minWidth="110dp"
	android:updatePeriodMillis="2400000">
</appwidget-provider>
В атрибуте initialLayout указываем layout-файл для виджета.
Атрибуты minHeight и minWidth содержат минимальные размеры виджета по высоте и ширине.
Есть определенный алгоритм расчета этих цифр. Как вы наверняка замечали, при размещении виджета, экран делится на ячейки, и виджет занимает одну или несколько из этих ячеек по ширине и высоте. Чтобы конвертнуть ячейки в dp, используется формула 70 * n – 30, где n – это количество ячеек. Т.е. если мы, например, хотим, чтобы наш виджет занимал 2 ячейки в ширину и 1 в высоту, мы высчитываем ширину = 70 * 2 – 30 = 110 и высоту = 70 * 1 – 30 = 40. Эти полученные значения и будем использовать в атрибутах minWidth и minHeight.
Атрибут updatePeriodMillis содержит количество миллисекунд. Это интервал обновления виджета. Насколько я понял хелп, указать мы тут можем хоть 5 секунд, но чаще, чем раз в 30 минут (1 800 000) виджет обновляться все равно не будет — это системное ограничение. Давайте пока что поставим интервал 40 минут (2 400 000). В следующих уроках мы разберемся, как самим обновлять виджет с необходимым интервалом.
Осталось создать класс, наследующий AppWidgetProvider.
package ru.startandroid.develop.p1171simplewidget;

import java.util.Arrays;

import android.appwidget.AppWidgetManager;
import android.appwidget.AppWidgetProvider;
import android.content.Context;
import android.util.Log;

public class MyWidget extends AppWidgetProvider {

  final String LOG_TAG = "myLogs";

  @Override
  public void onEnabled(Context context) {
    super.onEnabled(context);
    Log.d(LOG_TAG, "onEnabled");
  }

  @Override
  public void onUpdate(Context context, AppWidgetManager appWidgetManager,
      int[] appWidgetIds) {
    super.onUpdate(context, appWidgetManager, appWidgetIds);
    Log.d(LOG_TAG, "onUpdate " + Arrays.toString(appWidgetIds));
  }

  @Override
  public void onDeleted(Context context, int[] appWidgetIds) {
    super.onDeleted(context, appWidgetIds);
    Log.d(LOG_TAG, "onDeleted " + Arrays.toString(appWidgetIds));
  }

  @Override
  public void onDisabled(Context context) {
    super.onDisabled(context);
    Log.d(LOG_TAG, "onDisabled");
  }

}
onEnabled вызывается системой при создании первого экземпляра виджета (мы ведь можем добавить в Home несколько экземпляров одного и того же виджета).
onUpdate вызывается при обновлении виджета. На вход, кроме контекста, метод получает объект AppWidgetManager и список ID экземпляров виджетов, которые обновляются. Именно этот метод обычно содержит код, который обновляет содержимое виджета. Для этого нам нужен будет AppWidgetManager, который мы получаем на вход.
onDeleted вызывается при удалении каждого экземпляра виджета. На вход, кроме контекста, метод получает список ID экземпляров виджетов, которые удаляются.
onDisabled вызывается при удалении последнего экземпляра виджета.
Во всех методах выводим в лог одноименный текст и список ID для onUpdate и onDeleted.
Повторюсь — в onUpdate мы, по идее, должны накодить какое-то обновление виджета. Т.е. если наш виджет отображает, например, текущее время, то при очередном обновлении (вызове onUpdate) надо получать текущее время и передавать эту инфу в виджет для отображения. В этом уроке мы пока не будем с этим возиться.
Осталось немного подрисовать манифест. Добавьте туда ваш класс как Receiver
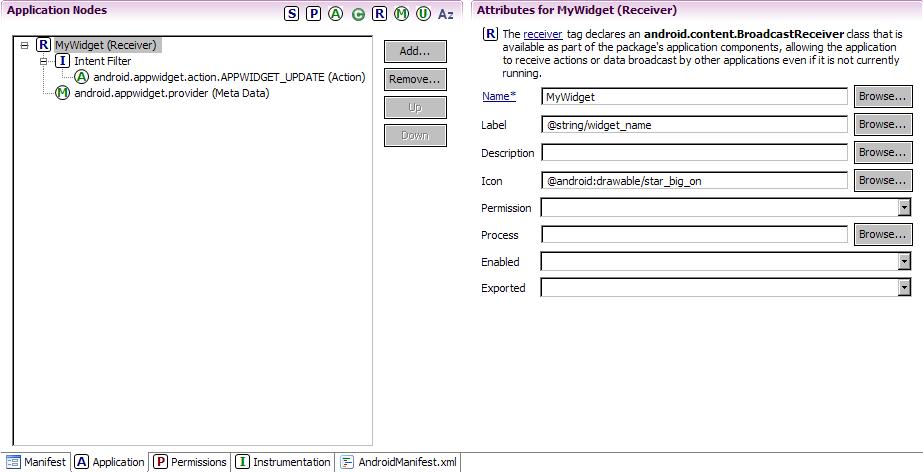
— укажите для него свои label и icon. Этот текст и эту иконку вы увидите в списке выбираемых виджетов, когда будете добавлять виджет на экран.
— настройте для него фильтр с action = android.appwidget.action.APPWIDGET_UPDATE
— добавьте метаданные с именем android.appwidget.provider и указанием файла метаданных xml/widget_metadata.xml в качестве ресурса
После этого секция receiver в манифесте должна получиться примерно такая:
<receiver
	android:name="MyWidget"
	android:icon="@android:drawable/star_big_on"
	android:label="@string/widget_name">
	<intent-filter>
		<action
			android:name="android.appwidget.action.APPWIDGET_UPDATE">
		</action>
	</intent-filter>
	<meta-data
		android:name="android.appwidget.provider"
		android:resource="@xml/widget_metadata">
	</meta-data>
</receiver>
Виджет готов. Все сохраняем и запускаем. Никаких Activity, разумеется, не всплывет. В консоли должен появиться текст:
P1171_SimpleWidgetbinP1171_SimpleWidget.apk installed on device
Done!
Открываем диалог создания виджета и видим в списке наш виджет с иконкой и текстом, которые мы указывали в манифесте для receiver.
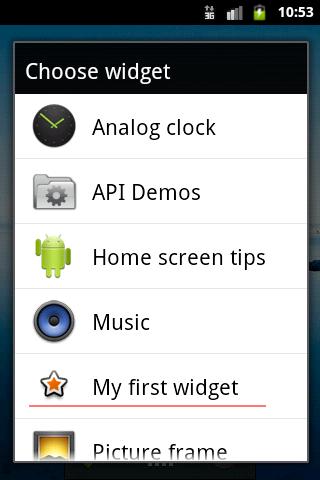
Выбираем его и добавляем на экран.
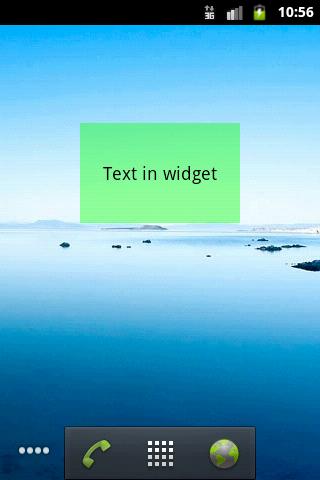
Виджет появился, смотрим логи.
onEnabled
onUpdate [8]
Сработал onEnabled, т.к. мы добавили первый экземпляр виджета. И сразу после добавления, сработал метод onUpdate для этого экземпляра. Видим, что ему назначен ID = 8. (У вас, скорее всего, будет другой ID). Т.е. система добавила экземпляр виджета на экран и вызвала метод обновления с указанием ID экземпляра.
Добавим еще один экземпляр
Смотрим лог
onUpdate [9]
onEnabled не сработал, т.к. добавляемый экземпляр виджета уже не первый. onUpdate же снова отработал для нового добавленного экземпляра и получил на вход ID = 9.
Теперь давайте удалим с экрана два этих экземпляра виджета. Сначала второй. В логах увидим:
onDeleted [9]
Сработал onDeleted и получил на вход ID удаляемого экземпляра виджета.
Удаляем первый экземпляр. В логах:
onDeleted [8]
onDisabled
Снова сработал onDeleted — нас оповестили, что экземпляр виджета с ID=8 был удален. И сработал onDisabled, т.е. был удален последний экземпляр виджета, больше работающих экземпляров не осталось.
Наш виджет обновляется (получает вызов метода onUpdate) раз в 40 минут. Если кому не лень, добавьте снова пару виджетов на экран и подождите. Когда они снова обновятся, в логах это отразится.
Так создается и работает простой виджет. Пока остановимся на этом, чтобы уложились в голове схема создания виджета и его lifecycle-методы. Из интересного хотелось бы еще отметить пару вещей.
BroadcastReceiver
Класс AppWidgetProvider является расширением класса BroadcastReceiver (в манифесте мы его и прописали как Receiver). Он просто получает от системы сообщение в onReceive, определяет по значениям из Intent, какое именно событие произошло (добавление, удаление или обновление виджета), и вызывает соответствующий метод (onEnabled, onUpdate и пр.).
В манифесте мы для нашего Receiver-класса настроили фильтр с action, который ловит события update. Каким же образом этот Receiver ловит остальные события (например, удаление)? Хелп пишет об этом так:
The <intent-filter> element must include an <action> element with the android:name attribute. This attribute specifies that the AppWidgetProvider accepts the ACTION_APPWIDGET_UPDATE broadcast. This is the only broadcast that you must explicitly declare. The AppWidgetManager automatically sends all other App Widget broadcasts to the AppWidgetProvider as necessary.
Т.е. ACTION_APPWIDGET_UPDATE – это единственный action, который необходимо прописать явно. Остальные события AppWidgetManager каким-то образом сам доставит до нашего AppWidgetProvider-наследника.
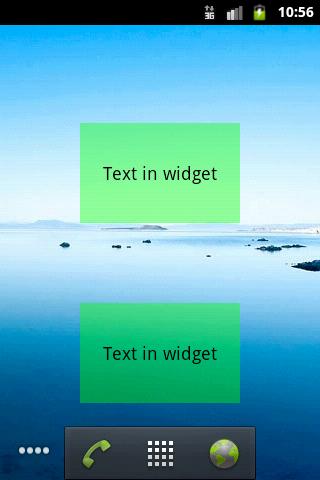
Отступы
Если мы расположим рядом несколько экземпляров виджета, увидим следующую картину
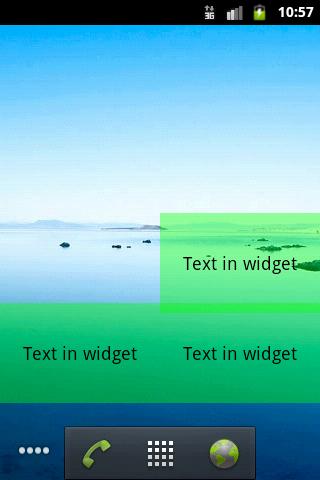
Не очень приятное зрелище. Надо бы сделать отступ.
Добавим android:padding=»8dp» к RelativeLayout в нашем layout-файле

Сохраняем, запускаем.
Виджеты на экране поменялись автоматически и теперь выглядят более пристойно.
Кстати, для них сработал onUpdate, смотрите логи. В метод был передан массив ID всех работающих экземпляров виджета.
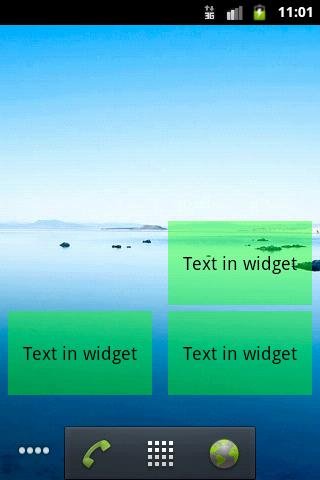
В Android 4.0 (API Level 14) и выше этот недостаток с отступами был устранен, и вручную делать отступы больше не надо. Давайте проверим. Уберите ранее добавленный в RelativeLayout отступ. И укажите в манифесте android:targetSdkVersion версию 14 (или выше), чтобы система знала, что можно использовать стандартные возможности, а не режим совместимости.
Все сохраняем, запускаем наш виджет на эмуляторе с 4.1. Добавим три экземпляра.
Система сама делает отступы между виджетами.
Получается для версий, ниже 4 надо делать отступ в layout, а для старших версий не надо. Хелп дает подсказку, как сделать так, чтобы ваш виджет корректно работал на всех версиях. Для этого используются квалификаторы версий.
В layout для RelativeLayuot указываете:
android:padding=»@dimen/widget_margin»
И создаете два файла.
res/values/dimens.xml с записью:
<dimen name="widget_margin">8dp</dimen>
и res/values-v14/dimens.xml с записью:
<dimen name="widget_margin">0dp</dimen>
В манифесте android:targetSdkVersion должен быть 14 или выше.
Таким образом, на старых версиях (без системного отступа) отступ будет 8dp, а на новых – 0dp и останется только системный отступ.
На следующем уроке:
— настраиваем виджет при размещении
— работаем с view-компонентами виджета при обновлении
Присоединяйтесь к нам в Telegram:
— в канале StartAndroid публикуются ссылки на новые статьи с сайта startandroid.ru и интересные материалы с хабра, medium.com и т.п.
— в чатах решаем возникающие вопросы и проблемы по различным темам: Android, Compose, Kotlin, RxJava, Dagger, Тестирование, Performance
— ну и если просто хочется поговорить с коллегами по разработке, то есть чат Флудильня
Overview
This guide covers how to create an app Widget.
A widget is a small gadget or control of your android application placed on the home screen. Widgets can be very handy as they allow you to put your favourite applications on your home screen in order to quickly access them. You have probably seen some common widgets, such as music widget, weather widget, clock widget e.t.c
Widgets could be of many types such as information widgets, collection widgets, control widgets and hybrid widgets. Android provides us a complete framework to develop our own widgets.
Basics
To create an App Widget, you need the following:
-
AppWidgetProviderInfoobject
Describes the metadata for an App Widget, such as the App Widget’s layout, update frequency, and the AppWidgetProvider class. This should be defined in XML. -
AppWidgetProviderclass implementation
Defines the basic methods that allow you to programmatically interface with the App Widget, based on broadcast events. Through it, you will receive broadcasts when the App Widget is updated, enabled, disabled and deleted. -
View layout
Defines the initial layout for the App Widget, defined in XML.
Declaring an App Widget in the Manifest
First, declare the AppWidgetProvider class in your application’s AndroidManifest.xml file. For example:
<receiver android:name="ExampleAppWidgetProvider" >
    <intent-filter>
        <action android:name="android.appwidget.action.APPWIDGET_UPDATE" />
    </intent-filter>
    <meta-data android:name="android.appwidget.provider"
               android:resource="@xml/example_appwidget_info" />
</receiver>
Widget — XML file
In order to create an application widget, the first thing you need is the AppWidgetProviderInfo object, which you will define in a separate widget XML file. In order to do that, right-click on your project and create a new folder called XML. Now right-click on the newly created folder and create a new XML file. The resource type of the XML file should be set to AppWidgetProvider. In the XML file, define some properties which are as follows −
<appwidget-provider
   xmlns:android="http://schemas.android.com/apk/res/android"
   android:minWidth="146dp"
   android:updatePeriodMillis="0"
   android:minHeight="146dp"
   android:initialLayout="@layout/activity_main">
</appwidget-provider>
Widget — Layout file
Now you have to define the layout of your widget in your default XML file. You can drag components to generate auto XML.
Widget — Java file
After defining the layout, now create a new JAVA file or use an existing one, and extend it with the AppWidgetProvider class and override its update method as follows.
PendingIntent pending = PendingIntent.getActivity(context, 0, intent, 0);
RemoteViews views = new RemoteViews(context.getPackageName(), R.layout.activity_main);
In the end, you have to call an update method updateAppWidget() of the AppWidgetManager class. Its syntax is −
appWidgetManager.updateAppWidget(currentWidgetId,views);
A part from the updateAppWidget method, there are other methods defined in this class to manipulate widgets. They are as follows −
| Sr.No | Method & Description |
|---|---|
| 1 |
onDeleted(Context context, int[] appWidgetIds) This is called when an instance of AppWidgetProvider is deleted. |
| 2 |
onDisabled(Context context) This is called when the last instance of AppWidgetProvider is deleted |
| 3 |
onEnabled(Context context) This is called when an instance of AppWidgetProvider is created. |
| 4 |
onReceive(Context context, Intent intent) It is used to dispatch calls to the various methods of the class |
Example
Following is the content of the modified MainActivity.java.
import android.app.PendingIntent;
import android.appwidget.AppWidgetManager;
import android.appwidget.AppWidgetProvider;
import android.content.Context;
import android.content.Intent;
import android.net.Uri;
import android.widget.RemoteViews;
import android.widget.Toast;

public class MainActivity extends AppWidgetProvider{
   public void onUpdate(Context context, AppWidgetManager appWidgetManager,int[] appWidgetIds) {
      for(int i=0; i<appWidgetIds.length; i++){
         int currentWidgetId = appWidgetIds[i];
         String url = "http://www.tutorialspoint.com";

         Intent intent = new Intent(Intent.ACTION_VIEW);
         intent.addFlags(Intent.FLAG_ACTIVITY_NEW_TASK);
         intent.setData(Uri.parse(url));

         PendingIntent pending = PendingIntent.getActivity(context, 0,intent, 0);
         RemoteViews views = new RemoteViews(context.getPackageName(),R.layout.activity_main);

         views.setOnClickPendingIntent(R.id.button, pending);
         appWidgetManager.updateAppWidget(currentWidgetId,views);
         Toast.makeText(context, "widget added", Toast.LENGTH_SHORT).show();
      }
   }
}
Following is the modified content of the xml res/layout/activity_main.xml.
<?xml version="1.0" encoding="utf-8"?>
<RelativeLayout xmlns:android="http://schemas.android.com/apk/res/android"
   xmlns:tools="http://schemas.android.com/tools" android:layout_width="match_parent"
   android:layout_height="match_parent" android:paddingLeft="@dimen/activity_horizontal_margin"
   android:paddingRight="@dimen/activity_horizontal_margin"
   android:paddingTop="@dimen/activity_vertical_margin"
   android:paddingBottom="@dimen/activity_vertical_margin"
   tools:context=".MainActivity"
   android:transitionGroup="true">

   <TextView
      android:layout_width="wrap_content"
      android:layout_height="wrap_content"
      android:text="Tutorials point"
      android:id="@+id/textView"
      android:layout_centerHorizontal="true"
      android:textColor="#ff3412ff"
      android:textSize="35dp" />

   <Button
      android:layout_width="wrap_content"
      android:layout_height="wrap_content"
      android:text="Widget"
      android:id="@+id/button"
      android:layout_centerHorizontal="true"
      android:layout_marginTop="61dp"
      android:layout_below="@+id/textView" />

</RelativeLayout>
Following is the content of the res/xml/mywidget.xml.
<?xml version="1.0" encoding="utf-8"?>
<appwidget-provider
   xmlns:android="http://schemas.android.com/apk/res/android"
   android:minWidth="146dp"
   android:updatePeriodMillis="0"
   android:minHeight="146dp"
   android:initialLayout="@layout/activity_main">
</appwidget-provider>
Following is the content of the res/values/string.xml.
<resources>
   <string name="app_name">My Application</string>
</resources>
Following is the content of the AndroidManifest.xml file.
<?xml version="1.0" encoding="utf-8"?>
<manifest xmlns:android="http://schemas.android.com/apk/res/android"
   package="com.example.sairamkrishna.myapplication" >

   <application
      android:allowBackup="true"
      android:icon="@mipmap/ic_launcher"
      android:label="@string/app_name"
      android:theme="@style/AppTheme" >
      <receiver android:name=".MainActivity">

      <intent-filter>
         <action android:name="android.appwidget.action.APPWIDGET_UPDATE"></action>
      </intent-filter>

      <meta-data android:name="android.appwidget.provider"
         android:resource="@xml/mywidget"></meta-data>

      </receiver>

   </application>
</manifest>
NOTE:- By just changing the URL in the java file, your widget will open your desired website in the browser.
Reference
- https://www.tutorialspoint.com/android/android_widgets.htm
- https://developer.android.com/guide/topics/appwidgets/index.html
Since Android 1.5, application widgets have enabled users to get information, control apps, and perform crucial tasks, all from the comfort of their homescreens.
In this two-part series, I’ll be showing you how to provide a better user experience by adding an application widget to your Android projects.
By the end of the series, you’ll have created a widget that:
- Displays multiple sets of data.
- Performs a unique action when the user interacts with a specific
Viewwithin that widget’s layout. - Updates automatically whenever a set period of time has elapsed.
- Updates with new data in response to user interaction.
In this first post, we’ll be using Android Studio’s built-in tools to quickly and easily generate all the files required to deliver any Android application widget. We’ll then expand on this foundation to create a widget that retrieves and displays data and responds to onClick events.
What Are Application Widgets?
An application widget is a lightweight, miniature app that typically falls into one of the following categories:
- Information widget. A non-scrollable widget that displays important information, such as a weather or clock widget.
-
Collection widgets. A scrollable widget that displays a series of related elements, such as a gallery of photos or articles from the same publication. Collection widgets are typically backed by a data source, such as an
Arrayor database. A collection widget must include either aListView,GridView,StackView, or anAdapterViewFlipper. - Control widgets. A widget that acts as a remote control for your application, allowing the user to trigger frequently used functions without necessarily having to launch your application. Applications that play music often provide a widget that lets the user play, pause, and skip tracks directly from their homescreen.
- Hybrid widgets. Why restrict yourself to one category, when you can cherry-pick elements from multiple categories? Just be aware that mixing and matching can lead to a confusing user experience, so for the best results you should design your widget with a single category in mind and then add elements from other categories as required. For example, if you wanted to create a widget that displays today’s weather forecast but also allows users to view the forecast for different days and locations, then you should create an information widget and then add the necessary control elements afterwards.
In addition to the above functionality, most widgets respond to onClick events by launching their associated application, similar to an application shortcut, but they can also provide direct access to specific content within that application.
Application widgets must be placed inside an App Widget Host, most commonly the stock Android homescreen, although there are some third-party App Widget Hosts, such as the popular Nova Launcher and Apex Launcher.
Throughout this series, I’ll be talking about widgets as something you place on the homescreen, but if you have a vague recollection of being able to place widgets on the lockscreen, then this wasn’t just some kind of wonderful dream! Between API levels 17 and 20, it was possible to place widgets on the homescreen or the lockscreen.
Since lockscreen widgets were deprecated in API level 21, in this series we’ll be creating a widget for the homescreen only.
Why Should I Create an Application Widget?
There are several reasons why you should consider adding an application widget to your latest Android project.
Easy Access to Important Information and Features
Widgets allow the user to view your app’s most important information, directly from their homescreen. For example, if you’ve developed a calendar app then you might create a widget that displays details about the user’s next appointment. This is far more convenient than forcing the user to launch your app and potentially navigate multiple screens, just to retrieve the same information.
If you develop a control widget (or a hybrid widget with control elements) then the user can also complete tasks directly from their homescreen. Continuing with our calendar example, your widget might allow the user to create, edit and cancel appointments, potentially without even having to launch your app. This has the potential to remove multiple navigation steps from some of your app’s most important tasks, which can only have a positive impact on the user experience!
Direct Access to All of Your App’s Most Important Screens
Tapping a widget typically takes the user to the top level of the associated application, similar to an application shortcut. However, unlike app shortcuts, widgets can link to specific areas within the associated application. For example, tapping a widget’s New email received notification might launch the application with the new message already selected, while tapping Create new email might take them directly to your app’s ComposeEmail Activity.
By embedding multiple links in your widget’s layout, you can provide convenient, one-tap access to all of your app’s most important Activities.
Create a Loyal, Engaged User Base
As the whole Pokemon Go explosion and subsequent drop-off proved, getting a ton of people to download your app doesn’t automatically guarantee a loyal user base who will still be using your app days, weeks, or even months down the line.
Mobile users are a pretty fickle bunch, and with the memory available on your typical Android smartphone or tablet increasing all the time, it’s easy to lose track of the apps you’ve installed on your device. Chances are, if you pick up your Android smartphone or tablet now and swipe through the app drawer then you’ll discover at least one application that you’ve completely forgotten about.
By creating a widget that showcases all of your app’s most valuable information and features, you ensure that each time the user glances at their homescreen they’re reminded not only that your app exists, but also that it has some great content.
Adding an App Widget to Your Project
Even the most basic widget requires multiple classes and resources, but when you create a widget using Android Studio’s built-in tools, all of these files are generated for you. Since there’s no point in making Android development any harder than it needs to be, we’ll be using these tools to get a head-start on building our widget.
An application widget must always be tied to an underlying app, so create a new Android project with the settings of your choice.
Once Android Studio has built your project, select File > New > Widget > AppWidget from the Android Studio toolbar. This launches a Configure Component menu where you can define some of your widget’s initial settings.


Most of these options are pretty self-explanatory, but there are a few that are worth exploring in more detail.
Resizable (API 12+)
If a widget is resizable, then the user can increase or decrease the number of “cells” it occupies on their homescreen, by long-pressing the widget and then dragging the blue handles that appear around its outline.
Wherever possible, you should give your widget the ability to resize horizontally and vertically, as this will help your widget adapt to a range of screen configurations and homescreen setups. If a user has a seriously cluttered homescreen, then it may be impossible for your widget to even fit onto that homescreen, unless your widget is resizable.
If you do want to create a non-resizable widget, then open the Resizable dropdown menu and select either Only horizontally, Only vertically, or Not resizable.
Minimum Width and Height
The minimum width and height specifies the number of cells your widget will initially occupy when it’s placed on the homescreen.
For resizable widgets, this is the smallest the user can size your widget, so you can use these values to prevent users from shrinking your widget to the point where it becomes unusable.
If your widget isn’t resizable, then the minimum width and height values are your widget’s permanent width and height.
To increase a widget’s chances of fitting comfortably across a range of homescreens, it’s recommended that you never use anything larger than 4 by 4 for the minimum width and height values.
While the exact width and height of a homescreen “cell” vary between devices, you can get a rough estimate of how many DPIs (dots per inch) your widget will occupy using the following formula:
1 |
70 × number of cells -30 |
For example, if your widget is 2 x 3 cells:
1 |
70 x 2 - 30 = 110 |
2 |
70 x 3 - 30 = 180 |
This widget will occupy around 110 x 180 DPIs on the user’s homescreen. If these values don’t align with the dimensions of a particular device’s cells, then Android will automatically round your widget to the nearest cell size.
Review all the options in this menu and make any desired changes (I’m sticking with the defaults) and then click Finish.
Android Studio will now generate all the files and resources required to deliver a basic application widget. This widget isn’t exactly exciting (it’s basically just a blue block with the word Example written across it) but it is a functional widget that you can test on your device.
To test the widget:
- Install your project on a physical Android device or AVD (Android Virtual Device).
- Launch Android’s Widget Picker by pressing any empty space on the homescreen, and then tapping the word Widget that appears towards the bottom of the screen.
- Swipe through the Widget Picker until you spot the blue Example widget.
- Press down on this widget to drop it onto your homescreen.
- Enter resize mode by pressing the widget until a set of blue handles appear, and then drag these handles to increase or decrease the number of cells that this widget occupies.


Exploring the Application Widget Files
This widget might not do all that much, but it includes all the classes and resources that we’ll be working on throughout the rest of this series, so let’s take a look at these files and the role they play in delivering an application widget.
NewAppWidget.java
The widget provider is a convenience class containing the methods used to programmatically interface with a widget via broadcast events. Under the hood, a widget is essentially just a BroadcastReceiver that can respond to various actions, such as the user placing a new widget instance on their homescreen.
Most notably, the app widget provider is where you’ll define your widget’s lifecycle methods, which either get called for every instance of the widget or for specific instances only.
Although we tend to think of a widget as a single entity that the user places on their homescreen once, there’s nothing to prevent them from creating multiple instances of the same widget. Maybe your widget is customisable, to the point where different instances can have significantly different functionality, or maybe the user just loves your widget so much that they want to plaster it all over their homescreen!
Let’s take a look at the different lifecycle methods that you can implement in the widget provider class:
The onReceive Event
Android calls the onReceive() method on the registered BroadcastReceiver whenever the specified event occurs.
You typically won’t need to implement this method manually, as the AppWidgetProvider class automatically filters all widget broadcasts and delegates operations to the appropriate methods.
The onEnabled Event
The onEnabled() lifecycle method is called in response to ACTION_APPWIDGET_ENABLED, which is broadcast when the user adds the first instance of your widget to their homescreen. If the user creates two instances of your widget, then onEnabled() is called for the first instance, but not for the second.
This lifecycle method is where you perform any setup that only needs to occur once for all widget instances, such as creating a database or setting up a service.
Note that if the user deletes all instances of your widget from their device and then creates a new instance, then this is classed as the first instance, and consequently the onEnabled() method will be called once again.
The onAppWidgetOptionsChanged Event
This lifecycle method is called in response to ACTION_APPWIDGET_OPTIONS_CHANGED, which is broadcast when a widget instance is created and every time that widget is resized. You can use this method to reveal or hide content based on how the user sizes your widget, although this callback is only supported in Android 4.1 and higher.
The onUpdate Event
The onUpdate() lifecycle method is called every time:
- The update interval has elapsed.
- The user performs an action that triggers the
onUpdate()method. - The user places a new instance of the widget on their homescreen (unless your widget contains a configuration Activity, which we’ll be covering in part two).
The onUpdate() lifecycle method is also called in response to ACTION_APPWIDGET_RESTORED, which is broadcast whenever a widget is restored from backup.
For most projects, the onUpdate() method will contain the bulk of the widget provider code, especially since it’s also where you register your widget’s event handlers.
The onDeleted Event
The onDeleted() method is called every time an instance of your widget is deleted from the App Widget Host, which triggers the system’s ACTION_APPWIDGET_DELETED broadcast.
The onDisabled Event
This method is called in response to the ACTION_APPWIDGET_DISABLED broadcast, which is sent when the last instance of your widget is removed from the App Widget Host. For example, if the user created three instances of your widget, then the onDisabled() method would only be called when the user removes the third and final instance from their homescreen.
The onDisabled() lifecycle method is where you should clean up any resources you created in onEnabled(), so if you set up a database in onEnabled() then you’ll delete it in onDisabled().
The onRestored Event
The onRestored() method is called in response to ACTION_APPWIDGET_RESTORED, which is broadcast whenever an instance of an application widget is restored from backup. If you want to maintain any persistent data, then you’ll need to override this method and remap the previous AppWidgetIds to the new values, for example:
1 |
public void onRestored(Context context, int[] oldWidgetIds, |
2 |
int[] newWidgetIds) { |
3 |
}
|
4 |
}
|
If you open the NewAppWidget.java file that Android Studio generated automatically, then you’ll see that it already contains implementations for some of these widget lifecycle methods:
1 |
import android.appwidget.AppWidgetManager; |
2 |
import android.appwidget.AppWidgetProvider; |
3 |
import android.content.Context; |
4 |
import android.widget.RemoteViews; |
5 |
|
6 |
//All widgets extend the AppWidgetProvider class//
|
7 |
|
8 |
public class NewAppWidget extends AppWidgetProvider { |
9 |
|
10 |
static void updateAppWidget(Context context, AppWidgetManager appWidgetManager, |
11 |
int appWidgetId) { |
12 |
|
13 |
CharSequence widgetText = context.getString(R.string.appwidget_text); |
14 |
|
15 |
//Load the layout resource file into a RemoteViews object//
|
16 |
|
17 |
RemoteViews views = new RemoteViews(context.getPackageName(), R.layout.new_app_widget); |
18 |
views.setTextViewText(R.id.appwidget_text, widgetText); |
19 |
|
20 |
//Tell the AppWidgetManager about the updated RemoteViews object//
|
21 |
|
22 |
appWidgetManager.updateAppWidget(appWidgetId, views); |
23 |
}
|
24 |
|
25 |
//Define the onUpdate lifecycle method//
|
26 |
|
27 |
@Override
|
28 |
public void onUpdate(Context context, AppWidgetManager appWidgetManager, int[] appWidgetIds) { |
29 |
|
30 |
//appWidgetIds is an array of IDs that identifies every instance of your widget, so this
|
31 |
//particular onUpdate() method will update all instances of our application widget//
|
32 |
|
33 |
for (int appWidgetId : appWidgetIds) { |
34 |
updateAppWidget(context, appWidgetManager, appWidgetId); |
35 |
}
|
36 |
}
|
37 |
|
38 |
@Override
|
39 |
|
40 |
//Define the onEnabled lifecycle method//
|
41 |
|
42 |
public void onEnabled(Context context) { |
43 |
|
44 |
//To do//
|
45 |
}
|
46 |
|
47 |
@Override
|
48 |
|
49 |
//Define the onDisabled method//
|
50 |
|
51 |
public void onDisabled(Context context) { |
52 |
|
53 |
//To do//
|
54 |
|
55 |
}
|
56 |
}
|
The Widget Layout File
The res/layout/new_app_widget.xml file defines our widget’s layout, which is currently just a blue background with the word Example written across it.
The major difference between creating a layout for an Activity and creating a layout for a widget is that widget layouts must be based on RemoteViews, as this allows Android to display the layout in a process outside of your application (i.e. on the user’s homescreen).
RemoteViews don’t support every kind of layout or View, so when building a widget layout, you’re limited to the following types:
AnalogClockButtonChromometerFrameLayoutGridLayoutImageButtonImageViewLinearLayoutProgressBarRelativeLayoutTextViewViewStub
If you’re creating a collection widget, then you can also use the following types when your application is installed on Android 3.0 and higher:
AdapterViewFlipperGridViewListViewStackViewViewFlipper
Subclasses and descendants of the above Views and classes are not supported.
Clicks and Swipes
To ensure users don’t accidentally interact with a widget while they’re navigating around their homescreen, widgets respond to onClick events only.
The exception is when the user removes a widget by dragging it towards their homescreen’s Uninstall action, as in this situation your widget will respond to the vertical swipe gesture. However, since this interaction is managed by the Android system, you don’t need to worry about implementing vertical swipe support in your application.
The Widget Info File
The res/xml/new_app_widget_info.xml file (also known as the AppWidgetProviderInfo file) defines a number of widget properties, including many of the settings you selected in Android Studio’s Configure Component menu, such as your widget’s minimum dimensions and whether it can be placed on the lockscreen.
The configuration file also specifies how frequently your widget requests new information from the App Widget update service. Deciding on this frequency requires you to strike a tricky balance: longer update intervals will help conserve the device’s battery, but place your intervals too far apart and your widget may display noticeably out-of-date information.
You should also be aware that the system will wake a sleeping device in order retrieve new information, so although updating your widget once every half an hour may not sound excessive, it could result in your widget waking the device once every 30 minutes, which is going to affect battery consumption.
If you open your project’s new_app_widget_info.xml file, then you’ll see that it already defines a number of widget properties, including the update interval.
1 |
<?xml version="1.0" encoding="utf-8"?>
|
2 |
<appwidget-provider xmlns:android="https://schemas.android.com/apk/res/android" |
3 |
|
4 |
//The layout your widget should use when it’s placed on the lockscreen on supported devices// |
5 |
|
6 |
android:initialKeyguardLayout="@layout/new_app_widget" |
7 |
|
8 |
//The layout your widget should use when it’s placed on the homescreen// |
9 |
|
10 |
android:initialLayout="@layout/new_app_widget" |
11 |
|
12 |
//The minimum space your widget consumes, which is also its initial size// |
13 |
|
14 |
android:minHeight="40dp" |
15 |
android:minWidth="40dp" |
16 |
|
17 |
//The drawable that represents your widget in the Widget Picker// |
18 |
|
19 |
android:previewImage="@drawable/example_appwidget_preview" |
20 |
|
21 |
//Whether the widget can be resized horizontally, vertically, or along both axes, on Android 3.1 and higher// |
22 |
|
23 |
android:resizeMode="horizontal|vertical" |
24 |
|
25 |
//How frequently your widget should request new information from the app widget provider// |
26 |
|
27 |
android:updatePeriodMillis="86400000" |
28 |
|
29 |
//Whether the widget can be placed on the homescreen, lockscreen (“keyguard”) or both.// |
30 |
//On Android 5.0 and higher, home_screen is the only valid option// |
31 |
|
32 |
android:widgetCategory="home_screen"></appwidget-provider> |
If you do give your users the option of placing your widget on the lockscreen, then bear in mind that the widget’s contents will be visible to anyone who so much as glances at the lockscreen. If your “default” layout contains any personal or potentially sensitive information, then you should provide an alternative layout for your widget to use when it’s placed on the lockscreen.
The res/values/dimens.xml File
Widgets don’t look their best when they’re pressed against one another, or when they extend to the very edge of the homescreen.
Whenever your widget is displayed on Android 4.0 or higher, the Android operating system automatically inserts some padding between the widget frame and the bounding box.


If your app winds up on a device that’s running anything earlier than Android 4.0, then your widget needs to supply this padding itself.
When you create a widget using the File > New > Widget > AppWidget menu, Android Studio generates two dimens.xml files that guarantee your widget always has the correct padding, regardless of the version of Android it’s installed on.
You’ll find both of these files in your project’s res folder:
res/values/dimens.xml
This file defines the 8dpi of padding that your widget needs to provide whenever it’s installed on API level 13 or earlier.
1 |
<dimen name="widget_margin">8dp</dimen> |
res/values-v14/dimens.xml
Since Android 4.0 and higher automatically applies padding to every widget, any padding that your widget provides will be in addition to this default padding.
To ensure your widget aligns with any app icons or other widgets that the user has placed on their homescreen, this dimens.xml file specifies that your widget should provide no additional margins for Android 4.0 and higher:
1 |
<dimen name="widget_margin">0dp</dimen> |
This default margin helps to visually balance the homescreen, so you should avoid modifying it—you don’t want your widget to be the odd one out, after all!
Your widget’s layout already references this dimension value (android:padding="@dimen/widget_margin") so be careful not to change this line while working on your widget’s layout.
Although these dimens.xml files are the easiest way of ensuring your widget always has the correct padding, if this technique isn’t suitable for your particular project, then one alternative is to create multiple nine-patch backgrounds with different margins for API level 14 and higher, and API level 13 and lower. You can create nine-patches using Android Studio’s Draw 9-patch tool, or with a dedicated graphics editing program such as Adobe Photoshop.
The Project Manifest
In your project’s AndroidManifest.xml file, you need to register your widget as a BroadcastReceiver and specify the widget provider and the AppWidgetProviderInfo file that this widget should use.
If you open the manifest, you’ll see that Android Studio has already added all this information for you.
1 |
//The widget’s AppWidgetProvider; in this instance that’s NewAppWidget.java// |
2 |
|
3 |
<receiver android:name=".NewAppWidget"> |
4 |
<intent-filter>
|
5 |
|
6 |
//An intent filter for the android.appwidget.action.APPWIDGET_UPDATE action// |
7 |
|
8 |
<action android:name="android.appwidget.action.APPWIDGET_UPDATE" /> |
9 |
</intent-filter>
|
10 |
|
11 |
<meta-data
|
12 |
android:name="android.appwidget.provider" |
13 |
|
14 |
//The widget’s AppWidgetProviderInfo object// |
15 |
|
16 |
android:resource="@xml/new_app_widget_info" /> |
17 |
|
18 |
</receiver>
|
19 |
</application>
|
Widget Picker Resource
The res/drawable/example_appwidget_preview.png file is the drawable resource that represents your widget in the Widget Picker.
To encourage users to select your widget from all the available options, this drawable should show your widget, properly configured on a homescreen and displaying lots of useful content.
When you create a widget using the File > New > Widget > AppWidget menu, Android Studio generates a preview drawable automatically (example_appwidget_preview.png).
In part two, I’ll be showing you how to quickly and easily replace this stock drawable, by using Android Studio’s built-in tools to generate your own preview image.
Building Your Layout
Now we have an overview of how these files come together to create an application widget, let’s expand on this foundation and create a widget that does more than just display the word Example on a blue background!
We’ll be adding the following functionality to our widget:
- A
TextViewthat displays an Application Widget ID label. - A
TextViewthat retrieves and displays the ID for this particular widget instance. - A
TextViewthat responds toonClickevents by launching the user’s default browser and loading a URL.
While we could simply drag three TextViews from the Android Studio palette and drop them onto the canvas, if your widget looks good then users will be more likely to place it on their homescreen, so let’s create some resources that’ll give our widget extra visual appeal.
Create the Widget’s Background
I’m going to create a rectangle with rounded corners, a gradient background, and a border, which I’ll be using as the background for my widget:
- Control-click your project’s drawable folder and select New > Drawable resource file.
- Name this file widget_background and click OK.
- Enter the following code:
1 |
<?xml version="1.0" encoding="UTF-8"?>
|
2 |
http://schemas.android.com/apk/res/android" |
3 |
android:shape="rectangle"> |
4 |
|
5 |
<stroke
|
6 |
android:width="1dp" |
7 |
android:color="#ffffff" /> |
8 |
|
9 |
<gradient
|
10 |
android:angle="225" |
11 |
android:endColor="#00FFFFFF" |
12 |
android:startColor="#DD000000" /> |
13 |
|
14 |
<corners
|
15 |
android:topRightRadius="10dp" |
16 |
android:topLeftRadius="10dp" |
17 |
android:bottomRightRadius="10dp" |
18 |
android:bottomLeftRadius="10dp" /> |
19 |
</shape>
|
2. Create the TextView Background
Next, create a shape to use as the background for our TextViews:
- Control-click your project’s drawable folder and select New > Drawable resource file.
- Name this file tvbackground and then click OK.
- Enter the following code:
1 |
<?xml version="1.0" encoding="utf-8"?>
|
2 |
http://schemas.android.com/apk/res/android" |
3 |
android:shape="rectangle" > |
4 |
|
5 |
<stroke
|
6 |
android:width="1dp" |
7 |
android:color="#000000" /> |
8 |
|
9 |
<solid android:color="#FFFFFFFF" /> |
10 |
|
11 |
<corners
|
12 |
android:topRightRadius="15dp" |
13 |
android:topLeftRadius="15dp" |
14 |
android:bottomRightRadius="15dp" |
15 |
android:bottomLeftRadius="15dp" /> |
16 |
</shape>
|
3. Create Some Styles
I’m also going to use the following styles:
-
widget_text. A bold effect that I’ll apply to the widget’s text. -
widget_views. The various margins and padding that I’ll apply to myTextViews.
Open your project’s styles.xml file and add the following:
1 |
<style name="widget_views" parent="@android:style/Widget"> |
2 |
<item name="android:padding">8dp</item> |
3 |
<item name="android:layout_marginTop">12dp</item> |
4 |
<item name="android:layout_marginLeft">12dp</item> |
5 |
<item name="android:layout_marginRight">12dp</item> |
6 |
<item name="android:textStyle">bold</item> |
7 |
</style>
|
8 |
|
9 |
<style name="widget_text" parent="@android:style/Widget"> |
10 |
<item name="android:textStyle">bold</item> |
11 |
</style>
|
4. Build Your Layout!
Now that all our resources are in place, we can create our widget’s layout. Open the new_app_widget.xml file and add the following:
1 |
<LinearLayout xmlns:android="http://schemas.android.com/apk/res/android" |
2 |
android:layout_width="match_parent" |
3 |
android:layout_height="match_parent" |
4 |
android:padding="@dimen/widget_margin" |
5 |
android:background="@drawable/widget_background" |
6 |
android:orientation="vertical" > |
7 |
|
8 |
<LinearLayout
|
9 |
android:background="@drawable/tvbackground" |
10 |
style="@style/widget_views" |
11 |
android:layout_width="match_parent" |
12 |
android:layout_height="wrap_content" |
13 |
android:orientation="horizontal"> |
14 |
|
15 |
<TextView
|
16 |
android:id="@+id/id_label" |
17 |
android:layout_width="wrap_content" |
18 |
android:layout_height="wrap_content" |
19 |
android:text="@string/widget_id" |
20 |
style="@style/widget_text" /> |
21 |
|
22 |
<TextView
|
23 |
android:id="@+id/id_value" |
24 |
android:layout_width="wrap_content" |
25 |
android:layout_height="wrap_content" |
26 |
android:text="." |
27 |
style="@style/widget_text" /> |
28 |
</LinearLayout>
|
29 |
|
30 |
<TextView
|
31 |
android:id="@+id/launch_url" |
32 |
style="@style/widget_views" |
33 |
android:layout_width="wrap_content" |
34 |
android:layout_height="wrap_content" |
35 |
android:text="@string/URL" |
36 |
android:background="@drawable/tvbackground"/> |
37 |
</LinearLayout>
|
Finally, open the strings.xml file and define the string resources that we referenced in our layout:
1 |
<resources>
|
2 |
<string name="app_name">Widget</string> |
3 |
<string name="widget_id">App Widget IDu0020</string> |
4 |
<string name="URL">Tap to launch URL</string> |
5 |
</resources>
|
Android Studio’s Design tab helps you work more efficiently, by previewing how your layout will render across a range of devices. Switching to the Design tab is far easier than running your project on an Android device every single time you make a change to your layout.
Frustratingly, Android Studio doesn’t supply a dedicated widget skin, so by default your widget’s layout is rendered just like a regular Activity, which doesn’t provide the best insight into how your widget will look on the user’s homescreen.
One potential workaround is to render your layout using the Android Wear (Square) skin, which is comparable to the size and shape of an Android application widget:
- Make sure Android Studio’s Device tab is selected.
- Open the Device dropdown.
- Select 280 x 280, hdpi (Square) from the dropdown menu.


Create the Widget Functionality
Now that our widget looks the part, it’s time to give it some functionality:
- Retrieve and display data. Every instance of a widget is assigned an ID when it’s added to the App Widget Host. This ID persists across the widget’s lifecycle and will be completely unique to that widget instance, even if the user adds multiple instances of the same widget to their homescreen.
- Add an action. We’ll create an
OnClickListenerthat launches the user’s default browser and loads a URL.
Open the widget provider file (NewAppWidget.java) and delete the line that retrieves the appwidget_text string resource:
1 |
static void updateAppWidget(Context context, AppWidgetManager appWidgetManager, |
2 |
int appWidgetId) { |
3 |
|
4 |
//Delete the following line//
|
5 |
|
6 |
CharSequence widgetText = context.getString(R.string.appwidget_text); |
7 |
RemoteViews views = new RemoteViews(context.getPackageName(), R.layout.new_app_widget); |
8 |
views.setTextViewText(R.id.appwidget_text, widgetText); |
9 |
|
10 |
appWidgetManager.updateAppWidget(appWidgetId, views); |
11 |
|
12 |
}
|
In the updateAppWidget block, we now need to update the R.id.id_value placeholder with the widget’s unique ID:
1 |
RemoteViews views = new RemoteViews(context.getPackageName(), R.layout.new_app_widget); |
2 |
views.setTextViewText(R.id.id_value, String.valueOf(appWidgetId)); |
We also need to create an Intent object containing the URL that should load whenever the user interacts with this TextView.
1 |
Intent intent = new Intent(Intent.ACTION_VIEW, Uri.parse("https://code.tutsplus.com/")); |
2 |
PendingIntent pendingIntent = PendingIntent.getActivity(context, 0, intent, 0); |
3 |
|
4 |
//Attach an OnClickListener to our “launch_url” button, using setOnClickPendingIntent//
|
5 |
|
6 |
views.setOnClickPendingIntent(R.id.launch_url, pendingIntent); |
Here’s the complete widget provider file:
1 |
import android.appwidget.AppWidgetManager; |
2 |
import android.appwidget.AppWidgetProvider; |
3 |
import android.content.Context; |
4 |
import android.widget.RemoteViews; |
5 |
import android.app.PendingIntent; |
6 |
import android.content.Intent; |
7 |
import android.net.Uri; |
8 |
|
9 |
public class NewAppWidget extends AppWidgetProvider { |
10 |
|
11 |
static void updateAppWidget(Context context, |
12 |
|
13 |
AppWidgetManager appWidgetManager, |
14 |
|
15 |
int appWidgetId) { |
16 |
|
17 |
//Instantiate the RemoteViews object//
|
18 |
|
19 |
RemoteViews views = new RemoteViews(context.getPackageName(), R.layout.new_app_widget); |
20 |
|
21 |
//Update your app’s text, using the setTextViewText method of the RemoteViews class//
|
22 |
|
23 |
views.setTextViewText(R.id.id_value, String.valueOf(appWidgetId)); |
24 |
|
25 |
//Register the OnClickListener//
|
26 |
|
27 |
Intent intent = new Intent(Intent.ACTION_VIEW, Uri.parse("https://code.tutsplus.com/")); |
28 |
PendingIntent pendingIntent = PendingIntent.getActivity(context, 0, intent, 0); |
29 |
views.setOnClickPendingIntent(R.id.launch_url, pendingIntent); |
30 |
appWidgetManager.updateAppWidget(appWidgetId, views); |
31 |
|
32 |
}
|
33 |
|
34 |
@Override
|
35 |
public void onUpdate(Context context, AppWidgetManager appWidgetManager, int[] appWidgetIds) { |
36 |
|
37 |
//Update all instances of this widget//
|
38 |
|
39 |
for (int appWidgetId : appWidgetIds) { |
40 |
updateAppWidget(context, appWidgetManager, appWidgetId); |
41 |
}
|
42 |
}
|
43 |
}
|
Testing the Widget
It’s time to put this widget to the test!
- Install the updated project on your Android device.
- To ensure you’re seeing the latest version of this widget, remove any existing widget instances from your homescreen.
- Press any empty section of the homescreen, and then select your widget from the Widget Picker.
- Reposition and resize the widget as desired.


-
Check that the widget responds to user input events, by selecting the Tap to launch URL
TextView. The application widget should respond by launching your default browser and loading a URL.
If you’ve been following along with this tutorial, then at this point you have a fully functioning widget that demonstrates many of the core concepts of Android application widgets. You can also download the finished project from our GitHub repo.
Conclusion
In this post we examined all the files required to deliver an Android application widget, before building a widget that retrieves and displays some unique data and responds to user input events.
Currently, there’s one major piece of functionality still missing from our widget: it never displays any new information! In the next post, we’ll give this widget the ability to retrieve and display new data automatically, based on a set schedule, and in direct response to user input events.
In the meantime, check out some of our other great posts about Android app development here on Envato Tuts+!
Did you find this post useful?

Jessica Thornsby is a technical writer based in Sheffield. She writes about Android, Eclipse, Java, and all things open source. She is the co-author of iWork: The Missing Manual, and the author of Android UI Design.