IP-туннель (VPN) с tun-интерфейсом на Python
Данный код был написан в рамках трансляции
(https://www.youtube.com/watch?v=tgXV1h_YMu4).
Тестирование
Для тестирования используются Linux network namespaces и простой HTTP-сервер,
чтобы убедиться, что туннель работает.
Подготовка
Команда sudo ./test/prepare создаст network namespaces и мост между ними.
Запуск туннеля и HTTP-сервера
Каждую из этих команд нужно запустить в отдельном окне терминала
и не прерывать.
sudo ./test/tunnel_serversudo ./test/tunnel_clientsudo ./test/http_server
Тестирование
Выполнение команды sudo ./test/curl должно вывести на экран сообщение
Hello, World!. Это означает, что HTTP-запросы передаются по нашему туннелю.
Завершение
Завершите каждый из процессов, висящих в открытых окнах терминала, с помощью
сочетания клавиш Ctrl+C (иногда может потребоваться несколько нажатий).
Затем выполните команду sudo ./test/cleanup для удаления namespace’ов.

Today with the increase in digital technology online privacy has become a question; every ISPs and intelligence organization is looking to collect and exploit your data. There are good and bad reasons but privacy is your right. With strict laws, various VPN companies have to hand over their logs etc when requested by law enforcement agencies around the world. This tutorial on how to create a VPN in Python using a free Python VPN library will allow you to be self-sufficient knowing only you have access to it and the technology behind is truly open source.
In past years the popularity of VPNs has increased as it is a good way to keep your data safe, keeping all the thefts away from getting hands-on sensitive data but still if you don’t have much faith in VPN companies or don’t want to pay the monthly recurring fee then don’t worry as you can make your own VPN.
Why did we choose Python to create a VPN
To develop your very own VPN it is not necessary to be a developer but you need to have some technical prowess, but the question is whether the results are worth the trouble well follow through and know the prominent benefits:
VPNs which are homemade shift the traffic from ISP or VPN provider to cloud service but services such as Linode, Hetzner, or Digital Ocean allow you to boot up a new server each time you connect.
For those who do not know Nanode from Linode costs around $5 to get 1 GB RAM and 1 Core VPN Server. If you are more of a light user then you can get one year free with Amazon AWS or Azure with credits. When compared this is cheaper than commercial VPNs.
If you intend to use multiple servers then each location is charged separately plus the price can shoot up quickly. In such a case these cheap VPN services will save a lot of money.
Should you create your own VPN Client
It is a “Yes” only because you don’t want to rely on other third-party VPN providers such as SurfShark, PIA, TunnelBear and Nord VPN.
What cloud services do is collect data from the time you register. Depending on the company you need to give your full name, address, email ID, company name, phone number and other information.
Moreover, cookies and other tracking technologies are used by all. This also allows them to get your IP address, ISP, type of browser, OS, date or time, stamps and much more; this is then used to mount a successful attack against you by all the malicious actors if your cloud providers get in the hand of the security theft.
Now, the cloud services work with third-party advisors in order to serve you targeted ads. Their advertising partners can also set their very own cookies, pixel tags and other similar trackers. Another less talked about benefit is that you can visit blocked websites such as EZTV in countries where it is blocked.
If we talk about privacy then making your own VPN shall look more like using a VPN service. There are many guides that say that you do not need to trust any VPN companies but what is that need to trust these cloud service providers? Well, in our opinion there is no difference in privacy levels whether you opt to buy VPN or make your own.
How To Build Your Own VPN Client For Free Using Python
There are a few prerequisites that you may or may not need in order to choose which Python library or configuration you want.
One way to keep your data safe and secure while surfing the net is through VPNs. They shall allow you to create a secure connection to a remote server so you get access to the internet as like you were located on that server.
Step 1: Choosing the correct Python VPN library

VPNs are of different kinds in which each comes with unique features. To write one in Python you shall need to do some research and find which library suits you, the most popular ones are:
- PyVPN
This has been designed especially for writing VPNs in Python. You shall get all the necessary functions which are needed to create a functioning VPN and is easy to use as well.
2. OpenVPN Client (Open Source)
This one shall provide you with all the necessary features which are needed to create a functional VPN. It is easy to use. Although it might be more complex than PyVPN all depending upon your needs.
3. Alternative: Cisco IOS SSL VPN
This got developed by Cisco and has been designed primarily to create SSL or TLS-secured VPN tunnels between cisco devices in a network. Well, it is somehow complex and needs advanced knowledge of networking concepts in order to use it more effective. It is an alternative if you need a full network-level VPN that you can run from your router.
Other Python libraries you may like:
- The Best Python Malware Analysis Libraries for Researchers.
- Best Python Libraries Used for Artificial Intelligence and Data Science Purposes.
Step 2: Installing Python VPN library

In Python if you need to write VPN then first you need to install the library. For this create VPN object, it shall carry all the required information to create and manage the connection.
After this you need to create an instance of VPN class. This class needs the following two arguments:
- Server or IP address.
- Port number e.g. 1122.
An optional argument can also be passed which specifies certain VPN parameters like whether it should use encryption or not e.g. IPSec.
Step 3: Configure your Python VPN Client
For this you first need to create VPN object and then configure it by using the correct settings. To do this you need to create VPN object and call its constructor with the parameters mentioned below:
- VPN name, in our case would be Ninja-VPN.
- IP address of the server would be 192.168.1.243
- Server Port like 1122.
- Encryption type you want to use like IPSec or IKEv2.
- Password for the user account which shall be used to connect to the VPN.
- Done.
Step 4: Connect your Python VPN to your chosen designated VPN server
At this point you need to make a connection with the VPN server. For this opent the terminal window type the following command:
[email protected]:~# Python –m 192.168.1.243 –p 1122
This shall open the VPN server on port 1122; once done enter VPN credentials and hit “enter” on the terminal screen. It can take anywhere between 30 to 60 seconds for the connection to complete.
Step 5: Make sure your VPN connection is working
In the last steps you did was configured a VPN connection on your system. At this point you need to test it by connecting with the VPN server. For this you need to open the terminal window and type the command mentioned below:
[email protected]:~# Ip addr show eth0 tunnel1
After this, you need to use the ifconfig command to configure your system to use the VPN server’s IP address. Type the command mentioned below:
In the end, use the ping tool to test that your system is able to reach the VPN server; just remember if it’s on a different VLAN ping may not always work.
Once it has been connected you can normally start browsing the internet however you want!
Create your own Python VPN Server (Simplest Method)
This is intended for users who have very little or no networking or knowledge of servers. You can use the Python-VPN program also known as (pvpn) to do all the heavy lifting for you.
You are not required to do any configuration, setup networking, or fiddle with ports.
To create your own Python VPN server, run the below commands after downloading the above program:
[email protected]:~# install pvpn
Now, you need to setup a password for security:
[email protected]:~# pvpn -p
Next, you need to open the port depending on if you want to use OpenVPN or WireGuard:
[email protected]:~# pvpn -wg
Finally, now connect to your server IP and port.
Other useful software and projects you can make using Python:
- How To Create Your Own Torrenting Software in Python.
- Build a Text-to-speech Project in Python with pyttsx3.
- How To Create a Python-powered HTTP Server.
Final Words
This tutorial covered different Python VPN libraries and which ones you can use to build your own VPN Client and Server with Python. VPNs can get very complex due to the nature of their protocols and connectivity of the client hence why we have kept it very simple in the above tutorial for beginners and absolute newbies when it comes to this topic.
Do let us know which Python library you went for and how it worked out in the end.
Прокси‑сервер — это приложение, которое действует как посредник запросов между клиентом, который хочет скрыть свой родной IP‑адрес, и сервером назначения, с которого клиент запрашивает определенную услугу (HTTP, SSL и т. д.).
При использовании прокси‑сервера на пути прямого подключения к серверу назначения стоит прокси‑сервер, куда и направляется запрос всего, что хотите получить, где он анализируется, передаётся серверу назначения, далее выполняется, а результат выполнения сервером назначения возвращается клиенту по схеме взятой из Википедии и показанной ниже:

Что-бы избежать блокировки своего IP‑адреса веб‑сервером назначения при парсинге частенько приходится используют несколько прокси. Ещё у прокси‑серверов есть ряд других достоинств, в том числе обход фильтров и цензуры, скрытие своего реального IP‑адреса и т. д., и т. п.
Здесь вы узнаете, как использовать Python для прокси‑подключения с помощью библиотеки request, кроме того, я буду использовать библиотеку stem, которая является библиотекой контроллера Python для Tor. Установим их из своего терминала (в Windows cmd):
pip3 install bs4 requests stem
Использование бесплатных прокси
Во-первых, есть несколько веб‑сайтов, которые предлагают список бесплатных прокси. Вот вам функция для автоматического получения подобного списка:
import requests
import random
from bs4 import BeautifulSoup as bs

def get_free_proxies():
    url = "https://free-proxy-list.net/"
    # получаем ответ HTTP и создаем объект soup
    soup = bs(requests.get(url).content, "html.parser")
    proxies = []
    for row in soup.find("table", attrs={"id": "proxylisttable"}).find_all("tr")[1:]:
        tds = row.find_all("td")
        try:
            ip = tds[0].text.strip()
            port = tds[1].text.strip()
            host = f"{ip}:{port}"
            proxies.append(host)
        except IndexError:
            continue
    return proxies

free_proxies = get_free_proxies()

print(f'Обнаружено бесплатных прокси - {len(free_proxies)}:')
for i in range(len(free_proxies)):
    print(f"{i+1}) {free_proxies[i]}")
Получилось вот это:
Обнаружено бесплатных прокси - 300:
1) 218.253.39.60:80
2) 5.252.161.48:8080
3) 151.232.72.14:80

˙ ˙ ˙

298) 87.236.212.97:8080
299) 36.90.164.90:8181
300) 103.227.255.43:80
>>>
Однако, когда вы попытаетесь использовать сервера из списка, большинства из них вылетит по тайм-ауту. На самом деле, подобные списки недолговечны и большинство полученных прокси перестанут работать ещё до того, как вы дочитаете эту статью (поэтому, в реальной жизни приходится применять указанную выше функцию каждый раз, когда понадобятся новые прокси-серверы).
Следующая функция принимает список прокси и создает сеанс запросов, который случайным образом выбирает один из переданных прокси:
def get_session(proxies):
    # создать HTTP‑сеанс
    session = requests.Session()
    # выбираем один случайный прокси
    proxy = random.choice(proxies)
    session.proxies = {"http": proxy, "https": proxy}
    return session
Проверим отправив запрос на веб‑сайт, который возвращает наш IP‑адрес:
for i in range(5):
    s = get_session(proxies)
    try:
        print("Страница запроса с IP:", s.get("http://icanhazip.com", timeout=1.5).text.strip())
    except Exception as e:
        continue
Вот мой результат:
Страница запроса с IP: 45.64.134.198
Страница запроса с IP: 141.0.70.211
Страница запроса с IP: 94.250.248.230
Страница запроса с IP: 46.173.219.2
Страница запроса с IP: 201.55.164.177
Как видите, это некоторые IP‑адреса рабочих прокси-серверов, а не наш реальный IP‑адрес (попробуйте посетить этот веб‑сайт в своем браузере, и вы увидите свой реальный IP‑адрес).
Бесплатные прокси, как правило, умирают очень быстро, в основном за дни или даже за часы, и часто умирают до того, как закончится наш проект. Чтобы предотвратить такую ситуацию для крупномасштабных проектов по извлечению данных, нужно использовать прокси премиум-класса. Существует множество провайдеров, которые меняют IP‑адреса за вас. Одно из хорошо известных решений — Crawlera. Мы поговорим об этом подробнее в последнем разделе этой статьи.
Использование Tor в качестве прокси
Для смены IP‑адресов можно использовать сеть Tor:
import requests
from stem.control import Controller
from stem import Signal

def get_tor_session():
    # инициализировать сеанс запросов
    session = requests.Session()
    # установка прокси для http и https на localhost: 9050
    # для этого требуется запущенная служба Tor на вашем компьютере и прослушивание порта 9050 (по умолчанию)
    session.proxies = {"http": "socks5://localhost:9050", "https": "socks5://localhost:9050"}
    return session

def renew_connection():
    with Controller.from_port(port=9051) as c:
        c.authenticate()
        # отправить сигнал NEWNYM для установления нового чистого соединения через сеть Tor
        c.signal(Signal.NEWNYM)

if __name__ == "__main__":
    s = get_tor_session()
    ip = s.get("http://icanhazip.com").text
    print("IP:", ip)
    renew_connection()
    s = get_tor_session()
    ip = s.get("http://icanhazip.com").text
    print("IP:", ip)
Примечание. Приведенный выше код должен работать только в том случае, если на вашем компьютере установлен Tor (перейдите по этой ссылке и правильно его установить) и правильно настроен (ControlPort 9051 включен, см. Этот ответ о переполнении стека для получения дополнительных сведений).
Таким образом, будет создан сеанс с IP‑адресом Tor и сделан HTTP‑запрос. Затем обновим соединение, отправив сигнал NEWNYM (который сообщает Tor установить новое чистое соединение), чтобы изменить IP‑адрес и сделать еще один запрос, вот результат:
IP: 185.220.101.49

IP: 109.70.100.21
Великолепно! Однако, когда вы попробуете парсить в сети Tor, то скоро поймете, что в подавляющем большинстве случаев скорость оставляет желать лучшего. Поэтому перейдем к более продуктивному методу.
Использование Crawlera
Crawlera от Scrapinghub позволяет сканировать быстро и надежно, сервис по‑умному управляет подключением прокси‑серверов в одном сеансе и, если вас забанят, то он это автоматически обнаружит и изменит за вас IP‑адрес.
Crawlera — это интеллектуальная прокси‑сеть, специально разработанная для парсинга и сканирования веб‑страниц. Его задача ясна: облегчить жизнь парсера, помогает получать успешные запросы и извлекать данные в любом масштабе с любого веб‑сайта с помощью любого инструмента для парсинга.

Благодаря простому API запрос, который делается при парсинге, будет перенаправляться через пул высококачественных прокси. При необходимости он автоматически создаёт задержки между запросами и удаляет/добавляет IP‑адреса для решения различных проблем сканирования.
Вот как можно использовать Crawlera с библиотекой requests в Python:
import requests

url = "http://icanhazip.com"
proxy_host = "proxy.crawlera.com"
proxy_port = "8010"
proxy_auth = "<APIKEY>:"
proxies = {
       "https": f"https://{proxy_auth}@{proxy_host}:{proxy_port}/",
       "http": f"http://{proxy_auth}@{proxy_host}:{proxy_port}/"
}

r = requests.get(url, proxies=proxies, verify=False)
После регистрации вы получите ключ API, котором подставите в качестве значения для proxy_auth.
Итак, вот что происходит с Crawlera:
- Вы отправляете HTTP‑запрос, используя API единой конечной точки.
- Он автоматически выбирает, подменяет, ограничивает и заносит в черный список IP‑адреса для получения целевых данных.
- Он обрабатывает заголовки запросов и поддерживает сеансы. В результате ваш запрос для конечной точки всегда будет успешным.
Заключение
Существует несколько типов прокси, включая бесплатные прокси, анонимные прокси, элитные прокси. Если ваша цель использования прокси — не дать веб‑сайтам блокировать ваши парсеры, то элитные прокси — оптимальный выбор, для веб‑сайта вы станете похожи на обычного пользователя, который вообще не знает, что такое прокси.
Более того, дополнительная анти-мера очистки — это использование ротационных пользовательских агентов, в которых вы каждый раз отправляете изменяющийся поддельный заголовок, говоря, что вы обычный браузер.
Наконец, Crawlera экономит ваше время и энергию, автоматически управляя прокси-серверами, а также предоставляет 14-дневную бесплатную пробную версию, так что вы можете просто попробовать ее без какого-либо риска. Если вам нужно прокси-решение, то настоятельно рекомендую вам попробовать Crawlera.
Рекомендую для полного понимания вопроса: Как с помощью в Python извлечь все ссылки на веб‑сайты.
По мотивам How to Use Proxies to Rotate IP Addresses in Python

Время на прочтение
2 мин
Количество просмотров 60K
Если Вы предпочитаете простые и красивые решения, или Вам нравится всё, что попадает под категорию It Just Works, то эта статья для Вас. Для запуска шифрованного подключения достаточно иметь на своем компьютере SSH-клиент, установить sshuttle (об этом чуть позже) и приобрести VPS с любым тарифным планом в интересующей Вас стране. На удалённой VPS-машине в большинстве случаев абсолютно ничего настраивать не нужно (достаточно, чтобы были установлены пакеты python и сервер SSH).

На своем компьютере установим sshuttle:
- либо с помощью
pip install sshuttle - либо с помощью копирования исходников с github
git clone https://github.com/sshuttle/sshuttle.git && python setup.py install - пользователи debian могут это сделать так:
apt-get install sshuttle
Далее нужно выполнить простую команду:
sudo sshuttle -r username@sshserver 0.0.0.0/0где username — логин на удаленном виртуальном сервере, sshserver — его IP-адрес или доменное имя, параметр 0.0.0.0/0 означает, что мы собираемся добавить в нашу таблицу маршрутизации правило, благодаря которому весь исходящий трафик будет отправляться на удалённый сервер, за исключением DNS-запросов. Разработчик намеренно не включает по умолчанию этот функционал для DNS, потому что у некоторых пользователей для выхода в интернет должны использоваться провайдерские серверы разрешения имен. Если мы можем пользоваться любыми DNS-серверами, то и запросы к ним можем “завернуть” в наш шифрованный SSH-туннель:
sshuttle --dns -r username@sshserver 0.0.0.0/0
Помимо этого мы можем направлять в туннель наш исходящий трафик не полностью, а только для определенных IP-подсетей, указывая соответствующий параметр:
sshuttle -r username@sshserver 11.12.13.14/0Преимущества этого решения в следующем:
- у Вас нет необходимости иметь права администратора на удалённом сервере, используемом для выхода в интернет
- Вам не нужно создавать правила SSH для форварда каждого порта
Недостаток только один (если это можно назвать недостатком): sshuttle не поддерживает Windows, пользователям этой ОС можно сделать костыль в виде VM.
Are you looking for a way to protect your privacy? By learning how to code a VPN in Python, you can create a secure connection that protects your data from prying eyes. Do you know how to create a VPN that meets your specific needs?
Starting a VPN in Python can be a daunting task. With the right tips, however, it will be a breeze. Let’s look at how to set up the required libraries and create a simple VPN server to get up and running with a secure VPN connection.
What Is a VPN and What Does It Do?
Python is a popular programming language that can be used to create VPNs. Python has a wide range of applications, including:
- Web development;
- Scientific computing;
- Data analysis;
- System administration.
Furthermore, it is relatively easy to learn and use. It makes it an ideal choice for beginners who are looking to start creating their projects.
A VPN is software that allows you to encrypt your traffic and protect yourself from cyberattacks. According to statistics, there are about 142 million VPN users in the USA alone.
VPNs work by creating an encrypted tunnel between your computer and the VPN server. It means that all the data you send and receive is encrypted, meaning that anyone who tries to intercept it will be unable to read it.
It is significant because approximately 30,000 websites are hacked each day, and hackers can steal data from an average unprotected user in a matter of seconds. A VPN can protect you from identity theft, data theft, and other types of cyberattacks. By encrypting your traffic, a VPN can also help keep your online activities private.
In addition to protecting yourself online, a VPN can also help you stay safe when you travel. By connecting to a secure VPN server in a different country, you will be able to bypass local censorship and restrictions. It means that you will be able to access content that is normally unavailable in your current location.
What Is Needed to Create a VPN with Python?
To create a VPN, you will need the following:
- A computer with Internet access;
- An account with a VPN provider;
- A VPN library (such as VPNSocket or pyvpn). It will handle the actual encryption and tunneling of data;
- An SSH tunneling module (such as sshtunnel). It will allow you to create an encrypted connection between two remote machines;
- Working knowledge of Python to be able to achieve the goal;
- A basic understanding of networking concepts to set up your VPN.
How to Create VPN with Python
So, what should you do to create a VPN with Python? Here are the key steps:
1. Research and Select a Python Library That Suits the Purpose
VPNs are a great way to keep your data safe and secure when you are using the internet. They allow you to create a secure connection to a remote server so that you can access the internet as if you were located on that server.
There are many different types of VPNs, and each has its unique features. To write one in Python, you will need to research which library suits the purpose best. Here are some of the most popular Python VPN libraries:
- PyVPN. It is a popular library that was created specifically for writing VPNs in Python. It has all the necessary functions needed to create a functioning VPN, and it is easy to use overall;
- OpenVPN. It is another well-known Python VPN library that provides all the necessary features needed to create a functional VPN. It is also fairly easy to use, though it may be more complex than PyVPN depending on your needs;
- Cisco IOS SSL VPN. This library was developed by Cisco and is specifically designed for creating SSL/TLS-secured VPN tunnels between Cisco devices in a network. It is quite complex and requires advanced knowledge of networking concepts to use it effectively;
- PsychoPy. This library is specifically designed to create VPNs in Python. It has a few different advantages over other libraries, including being more user-friendly and providing greater flexibility.
2. Install the Library
To write a VPN in Python, you first need to install the library. You first need to
create a VPN object. It will contain all the necessary information to create and manage your VPN connection.
Next, you will need to create an instance of the VPN class. This class needs two arguments:
- The server address (or IP address);
- The port number on which the VPN should be active.
You can also pass in optional arguments that specify certain parameters of the VPN, like whether it should use encryption or not.
3. Set Up the Settings
To set up a VPN in Python, you will first need to create a VPN object and configure it using the correct settings. To do this, first create a VPN object and call its constructor with the following parameters:
- The name of your VPN (for example, «MyVPN»);
- Your server’s IP address (for example, «192.168.1.100»);
- Your server’s port (for example, «2347»);
- The type of encryption you want to use (for example, «aes256»);
- A password for the user account that will be used to connect to the VPN (for example, «mypassword»).
4. Connect to the VPN Server
In this step, you will need to connect to the VPN server. To do this, you will need to open a terminal window and type the following:
python -m vpn.server --port 443
It will open a connection to the VPN server on port 443. You can now enter your VPN credentials and press Enter.
5. Test the Connection
In the previous steps, you configured a VPN connection on your computer. Now it is time to test it by connecting to the VPN server. To do it, open a terminal window and type the following command:
ip addr show dev tun0
You will see something like this:
tun0: mtu 1500 qdisc pfifo_fast state UP group default qlen 1000
Next, use the ifconfig command to configure your computer to use the IP address of the VPN server. Type the following command:
ifconfig tun0 10.8.0.2 pointopoint 10.8.0.1 netmask 255.255.255.252
Finally, use our ping tool to test that your computer can reach the VPN server.
Once it is connected, you can start browsing the Internet normally.
Conclusion
Writing a VPN in Python is not an easy task. As long as you follow the right steps and keep track of your work, the result will be something amazing. If you have knowledge of data encryption and keys, then this job can be accomplished within no time.
Author

Odessa Powell
Odessa Powell has been copywriting and writing texts for business pages on social
networks since her student years. She worked as an editor for the popular writing
service Best Essays Education. Currently, her range of professional interests
includes the topics of self-development and motivation. In her free time, she enjoys
yoga and learning foreign languages.
You should be specific about what you want. A proxy is different from a VPN.
A proxy is easier to create in Python.
Here’s the code:
import socket
import select
import time
import sys

# Changing the buffer_size and delay, you can improve the speed and bandwidth.
# But when buffer get to high or delay go too down, you can broke things
buffer_size = 4096
delay = 0.0001
forward_to = ('smtp.zaz.ufsk.br', 25)

class Forward:
    def __init__(self):
        self.forward = socket.socket(socket.AF_INET, socket.SOCK_STREAM)

    def start(self, host, port):
        try:
            self.forward.connect((host, port))
            return self.forward
        except Exception, e:
            print e
            return False

class TheServer:
    input_list = []
    channel = {}

    def __init__(self, host, port):
        self.server = socket.socket(socket.AF_INET, socket.SOCK_STREAM)
        self.server.setsockopt(socket.SOL_SOCKET, socket.SO_REUSEADDR, 1)
        self.server.bind((host, port))
        self.server.listen(200)

    def main_loop(self):
        self.input_list.append(self.server)
        while 1:
            time.sleep(delay)
            ss = select.select
            inputready, outputready, exceptready = ss(self.input_list, [], [])
            for self.s in inputready:
                if self.s == self.server:
                    self.on_accept()
                    break

                self.data = self.s.recv(buffer_size)
                if len(self.data) == 0:
                    self.on_close()
                    break
                else:
                    self.on_recv()

    def on_accept(self):
        forward = Forward().start(forward_to[0], forward_to[1])
        clientsock, clientaddr = self.server.accept()
        if forward:
            print clientaddr, "has connected"
            self.input_list.append(clientsock)
            self.input_list.append(forward)
            self.channel[clientsock] = forward
            self.channel[forward] = clientsock
        else:
            print "Can't establish connection with remote server.",
            print "Closing connection with client side", clientaddr
            clientsock.close()

    def on_close(self):
        print self.s.getpeername(), "has disconnected"
        #remove objects from input_list
        self.input_list.remove(self.s)
        self.input_list.remove(self.channel[self.s])
        out = self.channel[self.s]
        # close the connection with client
        self.channel[out].close()  # equivalent to do self.s.close()
        # close the connection with remote server
        self.channel[self.s].close()
        # delete both objects from channel dict
        del self.channel[out]
        del self.channel[self.s]

    def on_recv(self):
        data = self.data
        # here we can parse and/or modify the data before send forward
        print data
        self.channel[self.s].send(data)

if __name__ == '__main__':
        server = TheServer('', 9090)
        try:
            server.main_loop()
        except KeyboardInterrupt:
            print "Ctrl C - Stopping server"
            sys.exit(1)
Hope you found it useful 
- What is a VPN
- Connect VPN Using Python
- Conclusion

In the world, security and privacy have become major concerns for people. In search of a solution, developers made VPNs.
What is a VPN
A Virtual Private Network, also known as VPN, is a software where it creates a private network to protect our online privacy. VPN gives us many benefits but protected privacy and data encryption are the main advantages for the users.
-
Protected Privacy
Since VPN creates a private network within the public network, what we do on the internet can’t be virtually traced. It hides our IP address, so third parties can’t track our activities.
Hiding the IP means the website we visit through a VPN sees the VPN server as the origin of the traffic.
So, VPN will mask the user’s IP address, and the IP of the VPN server will be visible. Most importantly, this process prevents exploitation of the user’s location and the traffic; therefore, the user’s privacy is protected.
-
Data Encryption
VPN also encrypts our online data. The VPN encrypts the data we send throughout the internet so that hackers and other third parties can’t retrieve them.
Even if they retrieve them, they will not be able to understand the content or decrypt the data.
Since we have a good understanding of what a VPN is now, let’s try to connect it. In this article, we discuss how to connect VPN using Python.
Connect VPN Using Python
This tutorial will use a free VPN service from VPNGate and OpenVPN software. VPNGate is a public VPN cloud service that we can use for free.
To use OpenVPN, we need to install it on our system. For Windows OS, you can manually download and install it.
For Linux or Ubuntu users, use the below command.
Install OpenVPN:
$ apt-get install openvpn easy-rsa
After installing it, we can build a Python script to connect to the VPN. When we run this script in the terminal, we have to provide a country as an argument.
The syntax is below.
Python3 <filename.py> <countryname>
When giving the country name, there are two options.
-
Long name of the country
$ python3 vpn.py Japan -
Short name of the country
$ python3 vpn.py JP
As the first step, we must import the following libraries to the script.
import requests, os, sys, tempfile, subprocess, base64, time, json
Sometimes a user may enter more than one country when running the script. To prevent that, we can use the below code chunk.
As the first step, we must import the libraries below to the script.
if len(sys.argv) != 2:
    print ('Enter one country at a time!')
    exit(1)
cntry = sys.argv[1]
Here in the first line, we check whether the total arguments are not equal to two. If it equals, we continue with the given country; otherwise, we put caution and exit.
Next, we can check whether the user has given the country’s long or short name. If the user enters one letter, we can throw an error message.
if len(cntry) > 2:
    j = 5
elif len(cntry) == 2:
    j = 6
else:
    print ('Cannot identify the country. Name is too short.')
    exit(1)
So now we can retrieve a list of available free VPN servers from the VPNGate website. Along with the list, we can get labels of the VPN servers, such as HostName, IP, Score, Ping, etc., and their values.
try:
    vpnServerListData = requests.get('http://www.vpngate.net/api/iphone/').text.replace('r','')
    freeServers = [line.split(',') for line in vpnServerListData.split('n')]
    serverLabels = freeServers[1]
    serverLabels[0] = serverLabels[0][1:]
    freeServers = [srvrs for srvrs in freeServers[2:] if len(srvrs) > 1]
except:
    print ("Something is wrong! Cannot load the VPN server's data")
    exit(1)
Then we need to retrieve the available servers and get the total number. Then we can display the number of available servers.
We can throw a message mentioning it and exit if no servers are available. To achieve this task, we can use the below code chunk.
availableServers = [srvrs for srvrs in freeServers if cntry.lower() in srvrs[j].lower()]
numOfServers = len(availableServers)
print ('We found ' + str(numOfServers) + ' servers for ' + cntry)
if numOfServers == 0:
    exit(1)
Now we should display how many servers support the OpenVPN tool. Since we use this tool to connect to VPN, it is essential to have supporting VPN servers, and then we can filter them out.
supporteServers = [srvrs for srvrs in availableServers if len(srvrs[-1]) > 0]
print ('There are ' + str(len(supporteServers)) + ' servers that support OpenVPN')
As we have filtered the supported servers, we need to choose the best server among them, with the lowest ping and the highest speed and score.
Then we can display its attributes (labels) using a for loop. And finally, the country can be displayed.
bestServer = sorted(supporteServers, key=lambda srvrs: float(srvrs[2].replace(',','.')), reverse=True)[0]
print ("n------------------Best server------------------")
labelPair = list(zip(serverLabels, bestServer))[:-1]
for (l, d) in labelPair[:4]:
    print (l + ': ' + d)
print (labelPair[4][0] + ': ' + str(float(labelPair[4][1]) / 10**6) + ' MBps')
print ("Country: " + labelPair[5][1])
Output:

Before launching the VPN, we should update the resolveconf with DNS settings. Also, they should be in string format.
By default, it comes in binary format. Using base64 decode, we can convert them into strings.
Then we can launch the VPN.
print ("nLaunching VPN...")
_, path = tempfile.mkstemp()
file = open(path, 'wb')
file.write(base64.b64decode(bestServer[-1]))
file.write(b'nscript-security 2nup /etc/openvpn/update-resolv-confndown /etc/openvpn/update-resolv-conf')
file.close()
vpnR = subprocess.Popen(['sudo', 'openvpn', '--config', path])
After we launch it, we can get the following output.
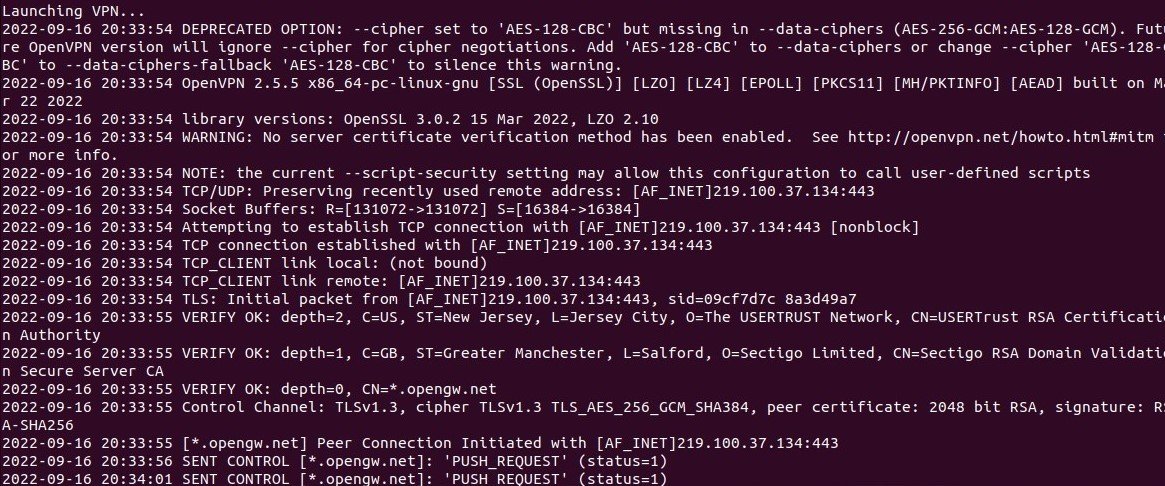
We have a successful connection if you get a message like Initialization Sequence Competed.

Now we have successfully connected to the VPN. Below you can see the VPNGate server information that we can see after a successful connection.
Also, we can set the time required to connect OpenVPN to the VPN server. Through the below code chunk, we can achieve it.
try:
     #time required to connect the openvpn to connect the vpn server
 time.sleep(60)
 start_time = time.time()
 nUrl = "http://bot.whatismyipaddress.com/"
 nRet = requests.get(nUrl)
 if nRet.status_code == 200:
  with open('resp', "wb") as txtFile:
   txtFile.write(nRet.text)
 print ('Time took to check Ip address  ',(time.time() - start_time))
 vpnR.kill()
To terminate the VPN connection, use Ctrl+C. Then, the connection will terminate, and the system will throw a message to notify the user.
except Exception as ex:
    try:
        vpnR.kill()
    except:
        pass
    while vpnR.poll() != 0:
        time.sleep(1)
    print ('nVPN has terminated')
Output:

Full code:
import requests, os, sys, tempfile, subprocess, base64, time, json

if len(sys.argv) != 2:
    print('Enter one country at a time!')
    exit(1)
cntry = sys.argv[1]

if len(cntry) > 2:
    j = 5
elif len(cntry) == 2:
    j = 6
else:
    print('Cannot identify the country. Name is too short.')
    exit(1)

try:
    vpnServerListData = requests.get('http://www.vpngate.net/api/iphone/').text.replace('r', '')
    freeServers = [line.split(',') for line in vpnServerListData.split('n')]
    serverLabels = freeServers[1]
    serverLabels[0] = serverLabels[0][1:]
    freeServers = [srvrs for srvrs in freeServers[2:] if len(srvrs) > 1]
except:
    print("Something is wrong! Cannot load the VPN server's data")
    exit(1)

    availableServers = [srvrs for srvrs in freeServers if cntry.lower() in srvrs[j].lower()]
    numOfServers = len(availableServers)
    print('We found ' + str(numOfServers) + ' servers for ' + cntry)
    if numOfServers == 0:
        exit(1)

    supporteServers = [srvrs for srvrs in availableServers if len(srvrs[-1]) > 0]
    print(str(len(supporteServers)) + ' of these servers support OpenVPN')

    bestServer = sorted(supporteServers, key=lambda srvrs: float(srvrs[2].replace(',', '.')), reverse=True)[0]
    print("n== Best server ==")
    labelPair = list(zip(serverLabels, bestServer))[:-1]
    for (l, d) in labelPair[:4]:
        print(l + ': ' + d)
    print(labelPair[4][0] + ': ' + str(float(labelPair[4][1]) / 10 ** 6) + ' MBps')
    print("Country: " + labelPair[5][1])

    print("nLaunching VPN...")
    _, path = tempfile.mkstemp()
    file = open(path, 'wb')
    file.write(base64.b64decode(bestServer[-1]))
    file.write(b'nscript-security 2nup /etc/openvpn/update-resolv-confndown /etc/openvpn/update-resolv-conf')
    file.close()
    vpnR = subprocess.Popen(['sudo', 'openvpn', '--config', path])

try:
    # time required to connect the openvpn to connect the vpn server
    time.sleep(60)
    timeS = time.time()
    nUrl = "http://bot.whatismyipaddress.com/"
    nRet = requests.get(nUrl)
    if nRet.status_code == 200:
        with open('resp', "wb") as txtFile:
            txtFile.write(nRet.text)
    print('Time took to check Ip address  ', (time.time() - timeS))
    vpnR.kill()

except Exception as ex:
    try:
        vpnR.kill()
    except:
        pass
    while vpnR.poll() != 0:
        time.sleep(1)
    print('nVPN has terminated')
Output (without terminating):
Conclusion
Throughout this article, we discussed what a VPN is and its benefits. Then we connect a free VPN service using Python.
There are other methods to reach our goal, but we can easily understand the basic concepts of connecting to a VPN through this method.