Прежде чем мы начнём программировать что-то полезное на Python, давайте закодим что-нибудь интересное. Например, свою игру, где нужно не дать шарику упасть, типа Арканоида. Вы, скорее всего, играли в детстве во что-то подобное, поэтому освоиться будет просто.
Логика игры
Есть игровое поле — простой прямоугольник с твёрдыми границами. Когда шарик касается стенки или потолка, он отскакивает в другую сторону. Если он упадёт на пол — вы проиграли. Чтобы этого не случилось, внизу вдоль пола летает платформа, а вы ей управляете с помощью стрелок. Ваша задача — подставлять платформу под шарик как можно дольше. За каждое удачное спасение шарика вы получаете одно очко.
Алгоритм
Чтобы реализовать такую логику игры, нужно предусмотреть такие сценарии поведения:
- игра начинается;
- шарик начинает двигаться;
- если нажаты стрелки влево или вправо — двигаем платформу;
- если шарик коснулся стенок, потолка или платформы — делаем отскок;
- если шарик коснулся платформы — увеличиваем счёт на единицу;
- если шарик упал на пол — выводим сообщение и заканчиваем игру.
Хитрость в том, что всё это происходит параллельно и независимо друг от друга. То есть пока шарик летает, мы вполне можем двигать платформу, а можем и оставить её на месте. И когда шарик отскакивает от стен, это тоже не мешает другим объектам двигаться и взаимодействовать между собой.
Получается, что нам нужно определить три класса — платформу, сам шарик и счёт, и определить, как они реагируют на действия друг друга. Поле нам самим определять не нужно — для этого есть уже готовая библиотека. А потом в этих классах мы пропишем методы — они как раз и будут отвечать за поведение наших объектов.
Весь кайф в том, что мы всё это задаём один раз, а потом объекты сами разбираются, как им реагировать друг на друга и что делать в разных ситуациях. Мы не прописываем жёстко весь алгоритм, а задаём правила игры — а для этого классы подходят просто идеально.
По коням, пишем на Python
Для этого проекта вам потребуется установить и запустить среду Python. Как это сделать — читайте в нашей статье.
Начало программы
Чтобы у нас появилась графика в игре, используем библиотеку Tkinter. Она входит в набор стандартных библиотек Python и позволяет рисовать простейшие объекты — линии, прямоугольники, круги и красить их в разные цвета. Такой простой Paint, только для Python.
Чтобы создать окно, где будет видна графика, используют класс Tk(). Он просто делает окно, но без содержимого. Чтобы появилось содержимое, создают холст — видимую часть окна. Именно на нём мы будем рисовать нашу игру. За холст отвечает класс Canvas(), поэтому нам нужно будет создать свой объект из этого класса и дальше уже работать с этим объектом.
Если мы принудительно не ограничим скорость платформы, то она будет перемещаться мгновенно, ведь компьютер считает очень быстро и моментально передвинет её к другому краю. Поэтому мы будем искусственно ограничивать время движения, а для этого нам понадобится модуль Time — он тоже стандартный.
Последнее, что нам глобально нужно, — задавать случайным образом начальное положение шарика и платформы, чтобы было интереснее играть. За это отвечает модуль Random — он помогает генерировать случайные числа и перемешивать данные.
Запишем всё это в виде кода на Python:
# подключаем графическую библиотеку
from tkinter import *
# подключаем модули, которые отвечают за время и случайные числа
import time
import random
# создаём новый объект — окно с игровым полем. В нашем случае переменная окна называется tk, и мы его сделали из класса Tk() — он есть в графической библиотеке
tk = Tk()
# делаем заголовок окна — Games с помощью свойства объекта title
tk.title('Game')
# запрещаем менять размеры окна, для этого используем свойство resizable
tk.resizable(0, 0)
# помещаем наше игровое окно выше остальных окон на компьютере, чтобы другие окна не могли его заслонить
tk.wm_attributes('-topmost', 1)
# создаём новый холст — 400 на 500 пикселей, где и будем рисовать игру
canvas = Canvas(tk, width=500, height=400, highlightthickness=0)
# говорим холсту, что у каждого видимого элемента будут свои отдельные координаты
canvas.pack()
# обновляем окно с холстом
tk.update()
Мы подключили все нужные библиотеки, сделали и настроили игровое поле. Теперь займёмся классами.
Шарик
Сначала проговорим словами, что нам нужно от шарика. Он должен уметь:
- задавать своё начальное положение и направление движение;
- понимать, когда он коснулся платформы;
- рисовать сам себя и понимать, когда нужно отрисовать себя в новом положении (например, после отскока от стены).
Этого достаточно, чтобы шарик жил своей жизнью и умел взаимодействовать с окружающей средой. При этом нужно не забыть о том, что каждый класс должен содержать конструктор — код, который отвечает за создание нового объекта. Без этого сделать шарик не получится. Запишем это на Python:
# Описываем класс Ball, который будет отвечать за шарик
class Ball:
    # конструктор — он вызывается в момент создания нового объекта на основе этого класса
    def __init__(self, canvas, paddle, score, color):
        # задаём параметры объекта, которые нам передают в скобках в момент создания
        self.canvas = canvas
        self.paddle = paddle
        self.score = score
        # цвет нужен был для того, чтобы мы им закрасили весь шарик
        # здесь появляется новое свойство id, в котором хранится внутреннее название шарика
        # а ещё командой create_oval мы создаём круг радиусом 15 пикселей и закрашиваем нужным цветом
        self.id = canvas.create_oval(10,10, 25, 25, fill=color)
        # помещаем шарик в точку с координатами 245,100
        self.canvas.move(self.id, 245, 100)
        # задаём список возможных направлений для старта
        starts = [-2, -1, 1, 2]
        # перемешиваем его
        random.shuffle(starts)
        # выбираем первый из перемешанного — это будет вектор движения шарика
        self.x = starts[0]
        # в самом начале он всегда падает вниз, поэтому уменьшаем значение по оси y
        self.y = -2
        # шарик узнаёт свою высоту и ширину
        self.canvas_height = self.canvas.winfo_height()
        self.canvas_width = self.canvas.winfo_width()
        # свойство, которое отвечает за то, достиг шарик дна или нет. Пока не достиг, значение будет False
        self.hit_bottom = False
    # обрабатываем касание платформы, для этого получаем 4 координаты шарика в переменной pos (левая верхняя и правая нижняя точки)
    def hit_paddle(self, pos):
        # получаем кординаты платформы через объект paddle (платформа)
        paddle_pos = self.canvas.coords(self.paddle.id)
        # если координаты касания совпадают с координатами платформы
        if pos[2] >= paddle_pos[0] and pos[0] <= paddle_pos[2]:
            if pos[3] >= paddle_pos[1] and pos[3] <= paddle_pos[3]:
                # увеличиваем счёт (обработчик этого события будет описан ниже)
                self.score.hit()
                # возвращаем метку о том, что мы успешно коснулись
                return True
        # возвращаем False — касания не было
        return False
    # обрабатываем отрисовку шарика
    def draw(self):
        # передвигаем шарик на заданные координаты x и y
        self.canvas.move(self.id, self.x, self.y)
        # запоминаем новые координаты шарика
        pos = self.canvas.coords(self.id)
        # если шарик падает сверху
        if pos[1] <= 0:
            # задаём падение на следующем шаге = 2
            self.y = 2
        # если шарик правым нижним углом коснулся дна
        if pos[3] >= self.canvas_height:
            # помечаем это в отдельной переменной
            self.hit_bottom = True
            # выводим сообщение и количество очков
            canvas.create_text(250, 120, text='Вы проиграли', font=('Courier', 30), fill='red')
        # если было касание платформы
        if self.hit_paddle(pos) == True:
            # отправляем шарик наверх
            self.y = -2
        # если коснулись левой стенки
        if pos[0] <= 0:
            # движемся вправо
            self.x = 2
        # если коснулись правой стенки
        if pos[2] >= self.canvas_width:
            # движемся влево
            self.x = -2
Платформа
Сделаем то же самое для платформы — сначала опишем её поведение словами, а потом переведём в код. Итак, вот что должна уметь платформа:
- двигаться влево или вправо в зависимости от нажатой стрелки;
- понимать, когда игра началась и можно двигаться.
А вот как это будет в виде кода:
#  Описываем класс Paddle, который отвечает за платформы
class Paddle:
    # конструктор
    def __init__(self, canvas, color):
        # canvas означает, что платформа будет нарисована на нашем изначальном холсте
        self.canvas = canvas
        # создаём прямоугольную платформу 10 на 100 пикселей, закрашиваем выбранным цветом и получаем её внутреннее имя
        self.id = canvas.create_rectangle(0, 0, 100, 10, fill=color)
        # задаём список возможных стартовых положений платформы
        start_1 = [40, 60, 90, 120, 150, 180, 200]
        # перемешиваем их
        random.shuffle(start_1)
        # выбираем первое из перемешанных
        self.starting_point_x = start_1[0]
        # перемещаем платформу в стартовое положение
        self.canvas.move(self.id, self.starting_point_x, 300)
        # пока платформа никуда не движется, поэтому изменений по оси х нет
        self.x = 0
        # платформа узнаёт свою ширину
        self.canvas_width = self.canvas.winfo_width()
        # задаём обработчик нажатий
        # если нажата стрелка вправо — выполняется метод turn_right()
        self.canvas.bind_all('<KeyPress-Right>', self.turn_right)
        # если стрелка влево — turn_left()
        self.canvas.bind_all('<KeyPress-Left>', self.turn_left)
        # пока игра не началась, поэтому ждём
        self.started = False
        # как только игрок нажмёт Enter — всё стартует
        self.canvas.bind_all('<KeyPress-Return>', self.start_game)
    # движемся вправо
    def turn_right(self, event):
        # будем смещаться правее на 2 пикселя по оси х
        self.x = 2
    # движемся влево
    def turn_left(self, event):
        # будем смещаться левее на 2 пикселя по оси х
        self.x = -2
    # игра начинается
    def start_game(self, event):
        # меняем значение переменной, которая отвечает за старт
        self.started = True
    # метод, который отвечает за движение платформы
    def draw(self):
        # сдвигаем нашу платформу на заданное количество пикселей
        self.canvas.move(self.id, self.x, 0)
        # получаем координаты холста
        pos = self.canvas.coords(self.id)
        # если мы упёрлись в левую границу
        if pos[0] <= 0:
            # останавливаемся
            self.x = 0
        # если упёрлись в правую границу
        elif pos[2] >= self.canvas_width:
            # останавливаемся
            self.x = 0
Счёт
Можно было не выделять счёт в отдельный класс и каждый раз обрабатывать вручную. Но здесь реально проще сделать класс, задать нужные методы, чтобы они сами потом разобрались, что и когда делать.
От счёта нам нужно только одно (кроме конструктора) — чтобы он правильно реагировал на касание платформы, увеличивал число очков и выводил их на экран:
#  Описываем класс Score, который отвечает за отображение счетов
class Score:
    # конструктор
    def __init__(self, canvas, color):
        # в самом начале счёт равен нулю
        self.score = 0
        # будем использовать наш холст
        self.canvas = canvas
        # создаём надпись, которая показывает текущий счёт, делаем его нужно цвета и запоминаем внутреннее имя этой надписи
        self.id = canvas.create_text(450, 10, text=self.score, font=('Courier', 15), fill=color)
    # обрабатываем касание платформы
    def hit(self):
        # увеличиваем счёт на единицу
        self.score += 1
        # пишем новое значение счёта
        self.canvas.itemconfig(self.id, text=self.score)
Игра
У нас всё готово для того, чтобы написать саму игру. Мы уже провели необходимую подготовку всех элементов, и нам остаётся только создать конкретные объекты шарика, платформы и счёта и сказать им, в каком порядке мы будем что делать.
Смысл игры в том, чтобы не уронить шарик. Пока этого не произошло — всё движется, но как только шарик упал — нужно показать сообщение о конце игры и остановить программу.
Посмотрите, как лаконично выглядит код непосредственно самой игры:
# создаём объект — зелёный счёт
score = Score(canvas, 'green')
# создаём объект — белую платформу
paddle = Paddle(canvas, 'White')
# создаём объект — красный шарик
ball = Ball(canvas, paddle, score, 'red')
# пока шарик не коснулся дна
while not ball.hit_bottom:
    # если игра началась и платформа может двигаться
    if paddle.started == True:
        # двигаем шарик
        ball.draw()
        # двигаем платформу
        paddle.draw()
    # обновляем наше игровое поле, чтобы всё, что нужно, закончило рисоваться
    tk.update_idletasks()
    # обновляем игровое поле, и смотрим за тем, чтобы всё, что должно было быть сделано — было сделано
    tk.update()
    # замираем на одну сотую секунды, чтобы движение элементов выглядело плавно
    time.sleep(0.01)
# если программа дошла досюда, значит, шарик коснулся дна. Ждём 3 секунды, пока игрок прочитает финальную надпись, и завершаем игру
time.sleep(3)
# подключаем графическую библиотеку
from tkinter import *
# подключаем модули, которые отвечают за время и случайные числа
import time
import random
# создаём новый объект — окно с игровым полем. В нашем случае переменная окна называется tk, и мы его сделали из класса Tk() — он есть в графической библиотеке
tk = Tk()
# делаем заголовок окна — Games с помощью свойства объекта title
tk.title('Game')
# запрещаем менять размеры окна, для этого используем свойство resizable
tk.resizable(0, 0)
# помещаем наше игровое окно выше остальных окон на компьютере, чтобы другие окна не могли его заслонить. Попробуйте 🙂
tk.wm_attributes('-topmost', 1)
# создаём новый холст — 400 на 500 пикселей, где и будем рисовать игру
canvas = Canvas(tk, width=500, height=400, highlightthickness=0)
# говорим холсту, что у каждого видимого элемента будут свои отдельные координаты
canvas.pack()
# обновляем окно с холстом
tk.update()
# Описываем класс Ball, который будет отвечать за шарик
class Ball:
    # конструктор — он вызывается в момент создания нового объекта на основе этого класса
    def __init__(self, canvas, paddle, score, color):
        # задаём параметры объекта, которые нам передают в скобках в момент создания
        self.canvas = canvas
        self.paddle = paddle
        self.score = score
        # цвет нужен был для того, чтобы мы им закрасили весь шарик
        # здесь появляется новое свойство id, в котором хранится внутреннее название шарика
        # а ещё командой create_oval мы создаём круг радиусом 15 пикселей и закрашиваем нужным цветом
        self.id = canvas.create_oval(10,10, 25, 25, fill=color)
        # помещаем шарик в точку с координатами 245,100
        self.canvas.move(self.id, 245, 100)
        # задаём список возможных направлений для старта
        starts = [-2, -1, 1, 2]
        # перемешиваем его
        random.shuffle(starts)
        # выбираем первый из перемешанного — это будет вектор движения шарика
        self.x = starts[0]
        # в самом начале он всегда падает вниз, поэтому уменьшаем значение по оси y
        self.y = -2
        # шарик узнаёт свою высоту и ширину
        self.canvas_height = self.canvas.winfo_height()
        self.canvas_width = self.canvas.winfo_width()
        # свойство, которое отвечает за то, достиг шарик дна или нет. Пока не достиг, значение будет False
        self.hit_bottom = False
    # обрабатываем касание платформы, для этого получаем 4 координаты шарика в переменной pos (левая верхняя и правая нижняя точки)
    def hit_paddle(self, pos):
        # получаем кординаты платформы через объект paddle (платформа)
        paddle_pos = self.canvas.coords(self.paddle.id)
        # если координаты касания совпадают с координатами платформы
        if pos[2] >= paddle_pos[0] and pos[0] <= paddle_pos[2]:
            if pos[3] >= paddle_pos[1] and pos[3] <= paddle_pos[3]:
                # увеличиваем счёт (обработчик этого события будет описан ниже)
                self.score.hit()
                # возвращаем метку о том, что мы успешно коснулись
                return True
        # возвращаем False — касания не было
        return False
    # метод, который отвечает за движение шарика
    def draw(self):
        # передвигаем шарик на заданный вектор x и y
        self.canvas.move(self.id, self.x, self.y)
        # запоминаем новые координаты шарика
        pos = self.canvas.coords(self.id)
        # если шарик падает сверху
        if pos[1] <= 0:
            # задаём падение на следующем шаге = 2
            self.y = 2
        # если шарик правым нижним углом коснулся дна
        if pos[3] >= self.canvas_height:
            # помечаем это в отдельной переменной
            self.hit_bottom = True
            # выводим сообщение и количество очков
            canvas.create_text(250, 120, text='Вы проиграли', font=('Courier', 30), fill='red')
        # если было касание платформы
        if self.hit_paddle(pos) == True:
            # отправляем шарик наверх
            self.y = -2
        # если коснулись левой стенки
        if pos[0] <= 0:
            # движемся вправо
            self.x = 2
        # если коснулись правой стенки
        if pos[2] >= self.canvas_width:
            # движемся влево
            self.x = -2
#  Описываем класс Paddle, который отвечает за платформы
class Paddle:
    # конструктор
    def __init__(self, canvas, color):
        # canvas означает, что платформа будет нарисована на нашем изначальном холсте
        self.canvas = canvas
        # создаём прямоугольную платформу 10 на 100 пикселей, закрашиваем выбранным цветом и получаем её внутреннее имя
        self.id = canvas.create_rectangle(0, 0, 100, 10, fill=color)
        # задаём список возможных стартовых положений платформы
        start_1 = [40, 60, 90, 120, 150, 180, 200]
        # перемешиваем их
        random.shuffle(start_1)
        # выбираем первое из перемешанных
        self.starting_point_x = start_1[0]
        # перемещаем платформу в стартовое положение
        self.canvas.move(self.id, self.starting_point_x, 300)
        # пока платформа никуда не движется, поэтому изменений по оси х нет
        self.x = 0
        # платформа узнаёт свою ширину
        self.canvas_width = self.canvas.winfo_width()
        # задаём обработчик нажатий
        # если нажата стрелка вправо — выполняется метод turn_right()
        self.canvas.bind_all('<KeyPress-Right>', self.turn_right)
        # если стрелка влево — turn_left()
        self.canvas.bind_all('<KeyPress-Left>', self.turn_left)
        # пока платформа не двигается, поэтому ждём
        self.started = False
        # как только игрок нажмёт Enter — всё стартует
        self.canvas.bind_all('<KeyPress-Return>', self.start_game)
    # движемся вправо
    def turn_right(self, event):
        # будем смещаться правее на 2 пикселя по оси х
        self.x = 2
    # движемся влево
    def turn_left(self, event):
        # будем смещаться левее на 2 пикселя по оси х
        self.x = -2
    # игра начинается
    def start_game(self, event):
        # меняем значение переменной, которая отвечает за старт движения платформы
        self.started = True
    # метод, который отвечает за движение платформы
    def draw(self):
        # сдвигаем нашу платформу на заданное количество пикселей
        self.canvas.move(self.id, self.x, 0)
        # получаем координаты холста
        pos = self.canvas.coords(self.id)
        # если мы упёрлись в левую границу
        if pos[0] <= 0:
            # останавливаемся
            self.x = 0
        # если упёрлись в правую границу
        elif pos[2] >= self.canvas_width:
            # останавливаемся
            self.x = 0
#  Описываем класс Score, который отвечает за отображение счетов
class Score:
    # конструктор
    def __init__(self, canvas, color):
        # в самом начале счёт равен нулю
        self.score = 0
        # будем использовать наш холст
        self.canvas = canvas
        # создаём надпись, которая показывает текущий счёт, делаем его нужно цвета и запоминаем внутреннее имя этой надписи
        self.id = canvas.create_text(450, 10, text=self.score, font=('Courier', 15), fill=color)
    # обрабатываем касание платформы
    def hit(self):
        # увеличиваем счёт на единицу
        self.score += 1
        # пишем новое значение счёта
        self.canvas.itemconfig(self.id, text=self.score)
# создаём объект — зелёный счёт
score = Score(canvas, 'green')
# создаём объект — белую платформу
paddle = Paddle(canvas, 'White')
# создаём объект — красный шарик
ball = Ball(canvas, paddle, score, 'red')
# пока шарик не коснулся дна
while not ball.hit_bottom:
    # если игра началась и платформа может двигаться
    if paddle.started == True:
        # двигаем шарик
        ball.draw()
        # двигаем платформу
        paddle.draw()
    # обновляем наше игровое поле, чтобы всё, что нужно, закончило рисоваться
    tk.update_idletasks()
    # обновляем игровое поле и смотрим за тем, чтобы всё, что должно было быть сделано — было сделано
    tk.update()
    # замираем на одну сотую секунды, чтобы движение элементов выглядело плавно
    time.sleep(0.01)
# если программа дошла досюда, значит, шарик коснулся дна. Ждём 3 секунды, пока игрок прочитает финальную надпись, и завершаем игру
time.sleep(3)
Что дальше
На основе этого кода вы можете сделать свою модификацию игры:
- добавить второй шарик;
- раскрасить элементы в другой цвет;
- поменять размеры шарика; поменять скорость платформы;
- сделать всё это сразу;
- поменять логику программы на свою.
This article is for anyone who is interested in game programming. I will take you through the basics of game programming. Here we are specifically focusing on the classic DOS games. I cover and give examples for: Determining Initial requirements, Developing an Interface, analyzing different elements of the game design in the program that we’re going to make, and developing logic for Gameplay.
- Download source code — 44.3 KB
Before we actually jump into game programming, we need to know something called event driven programming. Event driven programming refers to that style of programming wherein the user of the application is free to choose from several options rather than be confined to a predetermined sequence of interactions with the program. Game programming is one common example of event driven programming. A game is a closed, i.e., complete and self sufficient formal system that represents a subset of reality. A game is a perfect combination of actions-reactions or event-responses where every response is based on the most-recently occurred event.
Elements of Game Programming
In general, a computer game has five elements:
- Graphics
- Sound
- Interface
- Gameplay
- Story
Graphics
Graphics consists of any images that are displayed and any effects that are performed on them. This includes 3D objects, textures, 2D tiles, 2D full screen shots, Full Motion Video (FMV) and anything else that the player will see.
Sound
Sound consists of any music or sound effects that are played during the game. This includes starting music, CD music, MIDI or MOD tracks, Foley effects (environment sounds), and sound effects.
Interface
Sound consists of any music or sound effects that are played during the game. This includes starting music, CD music, MIDI or MOD tracks, Foley effects (environment sounds), and sound effects.
Gameplay
It encompasses how fun the game is, how immense it is, and the length of playability.
Story
The game’s story includes any background before the game starts, all information the player gains during the game or when they win and any information they learn about character in the game. A story is an element of a game. The difference between a story and a game is that a story represents the facts in an immutable (i.e., fixed) sequence, while a game represents a branching tree of sequences and allows the player to create his own story by making choice at each branch point.
Though graphics plays an important role in game programming, in this article we’re not going to emphasize upon graphics and sound element of a game. We shall be concentrating at elementary game programming through text based interfaces.
Game Design Sequence
Since game design requires one to explore one’s artistic abilities, it cannot be formulated in a step by step process. However, there are certain technical steps that one needs to follow in one way or another.
These are:
- Determining Initial requirements.
- Develop Interface.
- Develop Interface.
- Develop Logic for Scoring points.
We will look at each of these in detail.
Interface is another very important aspect of game programming. The interface is the mode of communication between the computer and the player. Like any human language, it is the funnel through which the programmer must squeeze the avalanche of thoughts, ideas and feelings that he/she seeks to share with the fellow player. Interface will dictate what can or cannot be done. Interface is composed of input and output. While developing interface, the programmer should develop the static display screens and dynamic display screen. Static display is the screen which remains unaffected by the player’s actions i.e., the input by the player. The dynamic display, on the other hand, is the screen which is governed by the player’s actions i.e., the input by the player.
Examples of some static display screens are:
Game selection screens
What options are available to the player on the game startup? This describes what options are on the menu, how and where it appears on what screen, how the player gets there, and how he gets out.
Game start screen
What does the screen looks like at the beginning of the game, what are the startup parameters, where are the characters, etc? What messages, if any are on screen, and where? Intro music? Etc.
Since the dynamic screen vary as per the input given by the player, their descriptions are too many to be listed here. Some examples:
Message Screens
While developing interfaces, you also need to work on screens in response to legal actions of the player, by intimating that he/she is on the right track. Also, you need to work on the screens required to warn the player in case he/she commits an illegal move or action.
End of game message
These screens include messages and responses to questions like: What happens when the player loses? What happens when the player wins? What happens when the player get the high score? Where does the player go when the game is over? How does he start a new game?
This step involves developing a proper logic for gameplay. This requires the game-programmer to answer many questions in the form of program-code. These questions include: How is game played? What are the controls? What is the Game Goal? How is the player going to achieve the game goal? etc. In other words, we must say that since game represents an event-driven situation, the game-programmer i.e., you must specify or program everything that includes:
- Determining Initial requirements
While writing a game program, after selecting the goal-of-game, one needs to determine its initial requirements. For instance, to write a game program for guessing a number, you need to decide about a way to generate the number, number of players involved, number of chances allowed to the player, a scoring methodology etc. Here we are not aiming at making you a professional game programmer, rather we are concentrating more at giving you an idea of writing simple or elementary game programs.
General Description of Game: The general description of a game involves the general overview of the game, how it works, what happens on each level, etc. It describes all parts of the game from the player’s perspective:
- What he’s supposed to know before he starts playing.
- What he sees.
- What he does.
- His intended reaction to what he sees and does.
- Develop Interface
- Develop Logic of Gameplay
- responses to the user/player’s action.
- responses to system events.
- rules of the game.
- if it’s a two player game (if the computer is a player), then the computer’s moves and actions.
- Develop Logic for Keeping Scores
Developing logic for the scoring purposes is a subset of developing logic for the game play. For this, you must first decide the scoring policy that you’re going to follow in your game. You’re going to decide the maximum number of chances allowed, the scoring mechanism, whether it is tied to time or not, etc. During this phase, the milestone events are worked out and accordingly scoring (positively or negatively) is carried out.
Milestone Events in a Game
Every once in a while, the player needs to be rewarded (or penalized) somehow for reaching that point in the game. Each of these places where something special happens is called a Milestone Event. There are a gauge to let the player know he’s on the right (or wrong) track, and will encourage (or discourage) him to keep going.
Now that we have discussed these different phases in game-development, let us not develop a simple tic-tac-toe game.
General Description of the game:
- It’s a two player game so the program takes the name of two players and assign O and X to the players.
- Players enter their move turn by turn, into the box they choose.
- Program needs to assure that no box is overwritten.
- If the player tries to enter his/her move into the box that’s already taken by the other player the the chance passes over to the other player.
- Program needs to run till a player wins, want to quit the game or until there are no moves left.
- After a player wins, program displays the message and will ask the player if he/she wants to play again.
Now let us analyze different elements of the game design in the program that we’re going to make.
It’s a two player game, so we need two variables to store their names and run a loop to ask for the player to enter their move turn by turn. So we need another variable to store the turn to see which player is to enter the move. Here are the variables:
char name[2][30]; int chance;
We need a function to handle the navigation to the boxes when the player presses arrow keys and hit the Enter button to enter his move in the box. We need another variable to track the current box the player is on at the movement. An array to store the values entered by the player. So here are the variables:
int box; char a[3][3]; int navigate(char a[3][3], int box, int player, int key);
Here in this function, char a[3][3] is the array that holds the moves. box is the box the player was on, and key is the key pressed.
Another variable is required to count the number of turns. There are nine boxes in total however the number of turns maybe more than nine because if the player tries to enter his move into a box that’s already taken, then the chance passes over to the other player.
int turns;
We need a function to put the move into the box chosen by the player and we need to make sure that we don’t overwrite the value in a box:
void putintobox(char a[3][3], char ch, int box);
Here a[3][3] is used to represent the boxes, ch is the character ‘O’ or ‘X’, and box is the box into which the value is to be entered. Now how would we know what character to put into the box? Well, this function is called by the navigate function mentioned above. So if the navigate function is called like this: box = navigate(a[3][3],3,0,ENTER);, then it means that player1(here player1-0, player2 is represented by 2) needs to enter into box 3. The putintobox function checks if the box is taken and enter the value in to the array that represents the boxes (a[3][3]), and calls another function showbox(char ch, int box) to show the character on screen in the specified box.
checkforwin checks if the player has won the game or not and boxesleft will check if all boxes are filled. We would need another variable to check if the player wants to quit the game so – int quit;.
In order to interact with the user, many messages are displayed. Also the player is told if he won the game or if it’s a draw. The program will also ask if the player wants to play again. So in our program, the messages would be:
The logic of this program is to run a while loop that runs till a player wins, or all the boxes are filled up but no one won the game or if the user wants to quit. Now while the loop is running, the variable chance that tracks whose chance is it to enter the move is updated. A function will check what was the key what pressed by the user (user can enter only up, down, left, right or enter key) and moves the cursor to the specified box and enter the character assigned to the player into the array and displays that on the screen. It also makes sure that no box is overwritten. It the user tries to overwrite the box, chance is passed on to the other player as a penalty to the player who entered the wrong move. At the end of the program, the user is asked if he/she wants to play the game again.
- Initial requirements
- Developing Interface
- Ask the name of the players.
- Display whose chance is it to enter the move.
- Display if a player wins or if it’s a draw.
- Display a message when the player wants to quit.
- Display a message asking if the player wants to play again.
- Developing logic for Gameplay
Here is the list of functions we would need:
void showframe(int posx, int posy)— This function will show the frame of the Tic Tac Toe on the specified position.void showbox(int ch, int box)— This function will show a specified character into the specified box.void putintobox(char a[3][3], char ch, int box)— This function is used to write the character into the array and will callshowbox(ch,box).void gotobox(int box)— This function will take the cursor into the specified box.int navigate(char a[3][3], int box, int player, int key)— This function will be used to track the box number the user is at while he is pressing the arrows keys on the keyboard. This will also get the box number in which the user wants to enter the character assigned to him/her.int checkforwin(char a[3][3])— Checks if the player wins.int boxesleft(char a[3][3])— To check how many boxes are left.
Details of the function: void showframe(int posx, int posy)
void showframe(int posx, int posy)
{

  int hr=196, vr=179;   int crossbr=197;      int x=posx, y=posy;
  int i,j;

  gotoxy(35,4); cprintf("TIC TAC TOE");
  gotoxy(35,5); for(i=0;i<11;i++) cprintf("%c",223);


  for(i=0;i<2;i++)
  {
    for(j=1;j<=11;j++)
     {
      gotoxy(x,y);
      printf("%c",hr);
      x++;p;    x++;
     }
    x=posx; y+=2;
  }
  x=posx+3; y=posy-1;

  for(i=0;i<2;i++)
  {

   for(j=1;j<=5;j++)
   {
      gotoxy(x,y);
      printf("%c",vr);
      y++;
   }
   x+=4;y=posy-1;
  }


  x=posx+3; y=posy;
  gotoxy(x,y);
  printf("%c",crossbr);

   x=posx+7; y=posy;
  gotoxy(x,y);
  printf("%c",crossbr);

  x=posx+3; y=posy+2;
  gotoxy(x,y);
  printf("%c",crossbr);

  x=posx+7; y=posy+2;
  gotoxy(x,y);
  printf("%c",crossbr);

}
void showbox(char ch, int box)
void showbox(char ch, int box)
{
   switch(box)
   {
     case 1 :	gotoxy(_x+1,_y-1); printf("%c",ch); break;      case 2 :	gotoxy(_x+5,_y-1); printf("%c",ch); break;      case 3 :	gotoxy(_x+9,_y-1); printf("%c",ch); break;      case 4 :	gotoxy(_x+1,_y+1); printf("%c",ch); break;      case 5 :	gotoxy(_x+5,_y+1); printf("%c",ch); break;      case 6 :	gotoxy(_x+9,_y+1); printf("%c",ch); break;      case 7 :	gotoxy(_x+1,_y+3); printf("%c",ch); break;      case 8 :	gotoxy(_x+5,_y+3); printf("%c",ch); break;      case 9 :	gotoxy(_x+9,_y+3); printf("%c",ch); break;    }
}
void putintobox(char a[3][3], char ch, int box)
void putintobox(char arr[3][3], char ch, int box)
{
  switch(box)
  {

    case 1 :	if(arr[0][0] != 'X' && arr[0][0]!= 'O')
                { arr[0][0] = ch;
		          showbox(ch,1);
		        }
		        break;

    case 2 :	if(arr[0][1] != 'X' && arr[0][1]!= 'O')
		        { arr[0][1] = ch;
		          showbox(ch,2);
		        }
		        break;

    case 3 :	if(arr[0][2] != 'X' && arr[0][2]!= 'O')
                { arr[0][2] = ch;
		          showbox(ch,3);
		        }
		        break;

    case 4 :	if(arr[1][0] != 'X' && arr[1][0]!= 'O')
		       { arr[1][0] = ch;
		         showbox(ch,4);
		       }
		        break;

    case 5 :	if(arr[1][1] != 'X' && arr[1][1]!= 'O')
		        { arr[1][1] = ch;
		         showbox(ch,5);
		        }
		        break;

    case 6 :	if(arr[1][2] != 'X' && arr[1][2]!= 'O')
		        { arr[1][2] = ch;
                  showbox(ch,6);
		        }
	        	break;

    case 7 :	if(arr[2][0] != 'X' && arr[2][0]!= 'O')
     		    { arr[2][0] = ch;
		          showbox(ch,7);
		        }
		        break;

    case 8 :	if(arr[2][1] != 'X' && arr[2][1]!= 'O')
		        { arr[2][1] = ch;
		          showbox(ch,8);
		        }
		        break;

    case 9 :	if(arr[2][2] != 'X' && arr[2][2]!= 'O')
		        { arr[2][2] = ch;
		          showbox(ch,9);
		        }
		        break;
   }}
void gotobox(int box)
void gotobox(int box)
{
  switch(box)
  {
    case 1 : gotoxy(_x+1,_y-1); break;
    case 2 : gotoxy(_x+5,_y-1); break;
    case 3 : gotoxy(_x+9,_y-1); break;
    case 4 : gotoxy(_x+1,_y+1); break;
    case 5 : gotoxy(_x+5,_y+1); break;     case 6 : gotoxy(_x+9,_y+1); break;     case 7 : gotoxy(_x+1,_y+3); break;     case 8 : gotoxy(_x+5,_y+3); break;     case 9 : gotoxy(_x+9,_y+3); break;

  }
}
int navigate(char a[3][3], int box, int player, int key)
int navigate(char arr[3][3], int box, int player, int key)
{
   switch(key)
   {
     case UPARROW    : if( (box!=1) || (box!=2) || (box!=3) )
		               { box-=3; if(box<1) box = 1; gotobox(box); }
	                   break;

     case DOWNARROW  : if( (box!=7) || (box!=8) || (box!=9) )
		               { box+=3; if(box>9) box = 9; gotobox(box); }
		               break;

     case LEFTARROW  : if( (box!=1) || (box!=4) || (box!=7) )
		               { box--;  if(box<1) box = 1; gotobox(box); }
		               break;

     case RIGHTARROW : if( (box!=3) || (box!=6) || (box!=9) )
		               { box++; if(box>9) box = 9; gotobox(box); }
		               break;

     case ENTER      : if(player == 0)
			            putintobox(arr,'O',box);
		               else if(player == 1)
			            putintobox(arr,'X',box);
		               break;
    }
 return box;
}
int checkforwin(char a[3][3])
int checkforwin(char arr[3][3])
{
  int w=0;


    if((arr[0][0] == arr[0][1]) && (arr[0][1] == arr[0][2])) w = 1;
  else if((arr[1][0] == arr[1][1]) && (arr[1][1] == arr[1][2])) w = 1;
  else if((arr[2][0] == arr[2][1]) && (arr[2][1] == arr[2][2])) w = 1;

    else if((arr[0][0] == arr[1][0]) && (arr[1][0] == arr[2][0])) w = 1;
  else if((arr[0][1] == arr[1][1]) && (arr[1][1] == arr[2][1])) w = 1;
  else if((arr[0][2] == arr[1][2]) && (arr[1][2] == arr[2][2])) w = 1;

    else if((arr[0][0] == arr[1][1]) && (arr[1][1] == arr[2][2])) w = 1;
  else if((arr[0][2] == arr[1][1]) && (arr[1][1] == arr[2][0])) w = 1;

  return w;
}
int boxesleft(char a[3][3])
int boxesleft(char a[3][3])
{
   int i,j,boxesleft=9;

   for(i=0;i<3;i++)
    { for(j=0;j<3;j++)
      { if((a[i][j] == 'X') ||(a[i][j] == 'O'))
          boxesleft--;
      }
    }

   return boxesleft;
}
Now we have all the functions in place, we move on to the third step that talks about Presentation.
We have actually taken care of presentation in some of the above written functions, haven’t we?
The ASCII character used in this program to display the vertical line is 179 and for horizontal line is 196. For a cross — 197. Check this website for more information about extended ASCII characters http://www.asciitable.com/.
You can even printout your ASCII table with a C program. Here is an example:
#include <stdio.h>

int main()
{
    FILE *fh;
    int  ch;

    fh = fopen("ascii.txt","r");

    for(i=0;i<256;i++)
     fprint(fh,"n%d - %c",i,i);

    fclose(fh);
    return 0;
}
Now we will talk about Exception Handling. Here in this program, we have kept it simple so nothing much to worry about here, however, we do take the name from the user. The array we use to store the name is of size 30. What if the user enters a string that is more than 30 in length? This would result in a buffer overflow. This may crash your program right away or produce unexpected results. To avoid this either we can write a function that would get a string from the stdin one by one and stops if Enter is pressed or if string is more than 30 OR we can use the inbuilt function known as fgets.
Finally, putting it all together:
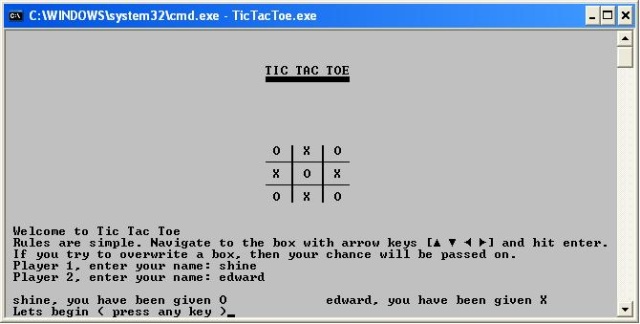
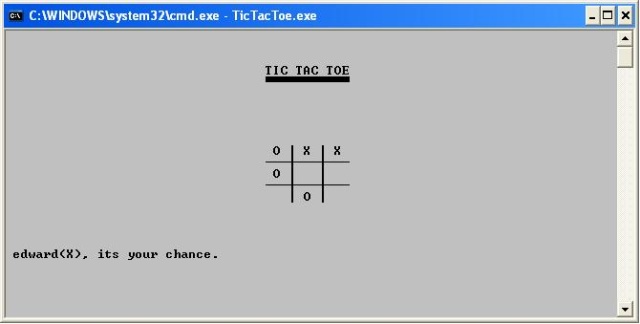
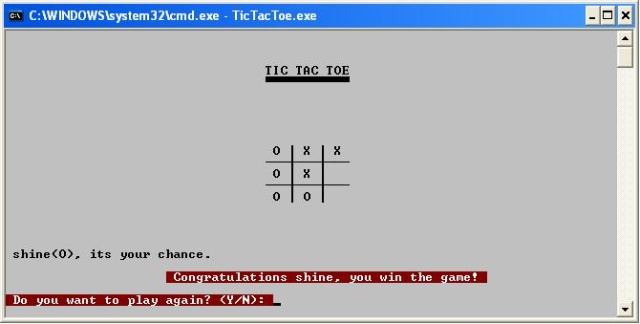
#include <stdio.h>
#include <conio.h>

int main()
{


    showframe(12,25);
    printf("nPlayer 1, enter your name:"); fgets(name[0], 30, stdin);
    printf("nPlayer 2, enter your name:"); fgets(name[1], 30, stdin);

    printf("n%s, you take 0",name[0]);
    printf("n%s, you take X",name[1]); getch();

    clrscr();

    do
    {
       while(!enter)
       {
         if(khbit())
          ch = getch();

           switch(ch)
           {
             case UPARROW : box = navigate(a[3][3], box, player, UPARROW);
             .
             .
             .
           }
       }
       if(quit) break;
              win = checkforwin(a);

     }while(!win)

    if(win)
    { .
      .
    }

    else if(quit)
    {    .
         .
    }

 return 0;
}
View the complete source code and executable to take a look at how the program works.
Here are some screenshots of the working executable for Tic Tac Toe:
This article was not a complete fully fledged article for game programming but I hope that you gain something out of it. If you have any questions, please feel free to email me at shine_hack@yahoo.com
Source code for this program can be obtained at: http://techstuff.x10.mx/articles/.
Happy programming!
Shine Jacob (Enot): shine_hack@yahoo.com
I love programming, learn about new technologies, algorithms, and problems solving using programming. I started off programming with C/C++. Though I learned PHP and web development but still stuck on C. Don’t know why but I kinda love it.
This article is for anyone who is interested in game programming. I will take you through the basics of game programming. Here we are specifically focusing on the classic DOS games. I cover and give examples for: Determining Initial requirements, Developing an Interface, analyzing different elements of the game design in the program that we’re going to make, and developing logic for Gameplay.
- Download source code — 44.3 KB
Before we actually jump into game programming, we need to know something called event driven programming. Event driven programming refers to that style of programming wherein the user of the application is free to choose from several options rather than be confined to a predetermined sequence of interactions with the program. Game programming is one common example of event driven programming. A game is a closed, i.e., complete and self sufficient formal system that represents a subset of reality. A game is a perfect combination of actions-reactions or event-responses where every response is based on the most-recently occurred event.
Elements of Game Programming
In general, a computer game has five elements:
- Graphics
- Sound
- Interface
- Gameplay
- Story
Graphics
Graphics consists of any images that are displayed and any effects that are performed on them. This includes 3D objects, textures, 2D tiles, 2D full screen shots, Full Motion Video (FMV) and anything else that the player will see.
Sound
Sound consists of any music or sound effects that are played during the game. This includes starting music, CD music, MIDI or MOD tracks, Foley effects (environment sounds), and sound effects.
Interface
Sound consists of any music or sound effects that are played during the game. This includes starting music, CD music, MIDI or MOD tracks, Foley effects (environment sounds), and sound effects.
Gameplay
It encompasses how fun the game is, how immense it is, and the length of playability.
Story
The game’s story includes any background before the game starts, all information the player gains during the game or when they win and any information they learn about character in the game. A story is an element of a game. The difference between a story and a game is that a story represents the facts in an immutable (i.e., fixed) sequence, while a game represents a branching tree of sequences and allows the player to create his own story by making choice at each branch point.
Though graphics plays an important role in game programming, in this article we’re not going to emphasize upon graphics and sound element of a game. We shall be concentrating at elementary game programming through text based interfaces.
Game Design Sequence
Since game design requires one to explore one’s artistic abilities, it cannot be formulated in a step by step process. However, there are certain technical steps that one needs to follow in one way or another.
These are:
- Determining Initial requirements.
- Develop Interface.
- Develop Interface.
- Develop Logic for Scoring points.
We will look at each of these in detail.
Interface is another very important aspect of game programming. The interface is the mode of communication between the computer and the player. Like any human language, it is the funnel through which the programmer must squeeze the avalanche of thoughts, ideas and feelings that he/she seeks to share with the fellow player. Interface will dictate what can or cannot be done. Interface is composed of input and output. While developing interface, the programmer should develop the static display screens and dynamic display screen. Static display is the screen which remains unaffected by the player’s actions i.e., the input by the player. The dynamic display, on the other hand, is the screen which is governed by the player’s actions i.e., the input by the player.
Examples of some static display screens are:
Game selection screens
What options are available to the player on the game startup? This describes what options are on the menu, how and where it appears on what screen, how the player gets there, and how he gets out.
Game start screen
What does the screen looks like at the beginning of the game, what are the startup parameters, where are the characters, etc? What messages, if any are on screen, and where? Intro music? Etc.
Since the dynamic screen vary as per the input given by the player, their descriptions are too many to be listed here. Some examples:
Message Screens
While developing interfaces, you also need to work on screens in response to legal actions of the player, by intimating that he/she is on the right track. Also, you need to work on the screens required to warn the player in case he/she commits an illegal move or action.
End of game message
These screens include messages and responses to questions like: What happens when the player loses? What happens when the player wins? What happens when the player get the high score? Where does the player go when the game is over? How does he start a new game?
This step involves developing a proper logic for gameplay. This requires the game-programmer to answer many questions in the form of program-code. These questions include: How is game played? What are the controls? What is the Game Goal? How is the player going to achieve the game goal? etc. In other words, we must say that since game represents an event-driven situation, the game-programmer i.e., you must specify or program everything that includes:
- Determining Initial requirements
While writing a game program, after selecting the goal-of-game, one needs to determine its initial requirements. For instance, to write a game program for guessing a number, you need to decide about a way to generate the number, number of players involved, number of chances allowed to the player, a scoring methodology etc. Here we are not aiming at making you a professional game programmer, rather we are concentrating more at giving you an idea of writing simple or elementary game programs.
General Description of Game: The general description of a game involves the general overview of the game, how it works, what happens on each level, etc. It describes all parts of the game from the player’s perspective:
- What he’s supposed to know before he starts playing.
- What he sees.
- What he does.
- His intended reaction to what he sees and does.
- Develop Interface
- Develop Logic of Gameplay
- responses to the user/player’s action.
- responses to system events.
- rules of the game.
- if it’s a two player game (if the computer is a player), then the computer’s moves and actions.
- Develop Logic for Keeping Scores
Developing logic for the scoring purposes is a subset of developing logic for the game play. For this, you must first decide the scoring policy that you’re going to follow in your game. You’re going to decide the maximum number of chances allowed, the scoring mechanism, whether it is tied to time or not, etc. During this phase, the milestone events are worked out and accordingly scoring (positively or negatively) is carried out.
Milestone Events in a Game
Every once in a while, the player needs to be rewarded (or penalized) somehow for reaching that point in the game. Each of these places where something special happens is called a Milestone Event. There are a gauge to let the player know he’s on the right (or wrong) track, and will encourage (or discourage) him to keep going.
Now that we have discussed these different phases in game-development, let us not develop a simple tic-tac-toe game.
General Description of the game:
- It’s a two player game so the program takes the name of two players and assign O and X to the players.
- Players enter their move turn by turn, into the box they choose.
- Program needs to assure that no box is overwritten.
- If the player tries to enter his/her move into the box that’s already taken by the other player the the chance passes over to the other player.
- Program needs to run till a player wins, want to quit the game or until there are no moves left.
- After a player wins, program displays the message and will ask the player if he/she wants to play again.
Now let us analyze different elements of the game design in the program that we’re going to make.
It’s a two player game, so we need two variables to store their names and run a loop to ask for the player to enter their move turn by turn. So we need another variable to store the turn to see which player is to enter the move. Here are the variables:
char name[2][30]; int chance;
We need a function to handle the navigation to the boxes when the player presses arrow keys and hit the Enter button to enter his move in the box. We need another variable to track the current box the player is on at the movement. An array to store the values entered by the player. So here are the variables:
int box; char a[3][3]; int navigate(char a[3][3], int box, int player, int key);
Here in this function, char a[3][3] is the array that holds the moves. box is the box the player was on, and key is the key pressed.
Another variable is required to count the number of turns. There are nine boxes in total however the number of turns maybe more than nine because if the player tries to enter his move into a box that’s already taken, then the chance passes over to the other player.
int turns;
We need a function to put the move into the box chosen by the player and we need to make sure that we don’t overwrite the value in a box:
void putintobox(char a[3][3], char ch, int box);
Here a[3][3] is used to represent the boxes, ch is the character ‘O’ or ‘X’, and box is the box into which the value is to be entered. Now how would we know what character to put into the box? Well, this function is called by the navigate function mentioned above. So if the navigate function is called like this: box = navigate(a[3][3],3,0,ENTER);, then it means that player1(here player1-0, player2 is represented by 2) needs to enter into box 3. The putintobox function checks if the box is taken and enter the value in to the array that represents the boxes (a[3][3]), and calls another function showbox(char ch, int box) to show the character on screen in the specified box.
checkforwin checks if the player has won the game or not and boxesleft will check if all boxes are filled. We would need another variable to check if the player wants to quit the game so – int quit;.
In order to interact with the user, many messages are displayed. Also the player is told if he won the game or if it’s a draw. The program will also ask if the player wants to play again. So in our program, the messages would be:
The logic of this program is to run a while loop that runs till a player wins, or all the boxes are filled up but no one won the game or if the user wants to quit. Now while the loop is running, the variable chance that tracks whose chance is it to enter the move is updated. A function will check what was the key what pressed by the user (user can enter only up, down, left, right or enter key) and moves the cursor to the specified box and enter the character assigned to the player into the array and displays that on the screen. It also makes sure that no box is overwritten. It the user tries to overwrite the box, chance is passed on to the other player as a penalty to the player who entered the wrong move. At the end of the program, the user is asked if he/she wants to play the game again.
- Initial requirements
- Developing Interface
- Ask the name of the players.
- Display whose chance is it to enter the move.
- Display if a player wins or if it’s a draw.
- Display a message when the player wants to quit.
- Display a message asking if the player wants to play again.
- Developing logic for Gameplay
Here is the list of functions we would need:
void showframe(int posx, int posy)— This function will show the frame of the Tic Tac Toe on the specified position.void showbox(int ch, int box)— This function will show a specified character into the specified box.void putintobox(char a[3][3], char ch, int box)— This function is used to write the character into the array and will callshowbox(ch,box).void gotobox(int box)— This function will take the cursor into the specified box.int navigate(char a[3][3], int box, int player, int key)— This function will be used to track the box number the user is at while he is pressing the arrows keys on the keyboard. This will also get the box number in which the user wants to enter the character assigned to him/her.int checkforwin(char a[3][3])— Checks if the player wins.int boxesleft(char a[3][3])— To check how many boxes are left.
Details of the function: void showframe(int posx, int posy)
void showframe(int posx, int posy)
{

  int hr=196, vr=179;   int crossbr=197;      int x=posx, y=posy;
  int i,j;

  gotoxy(35,4); cprintf("TIC TAC TOE");
  gotoxy(35,5); for(i=0;i<11;i++) cprintf("%c",223);


  for(i=0;i<2;i++)
  {
    for(j=1;j<=11;j++)
     {
      gotoxy(x,y);
      printf("%c",hr);
      x++;p;    x++;
     }
    x=posx; y+=2;
  }
  x=posx+3; y=posy-1;

  for(i=0;i<2;i++)
  {

   for(j=1;j<=5;j++)
   {
      gotoxy(x,y);
      printf("%c",vr);
      y++;
   }
   x+=4;y=posy-1;
  }


  x=posx+3; y=posy;
  gotoxy(x,y);
  printf("%c",crossbr);

   x=posx+7; y=posy;
  gotoxy(x,y);
  printf("%c",crossbr);

  x=posx+3; y=posy+2;
  gotoxy(x,y);
  printf("%c",crossbr);

  x=posx+7; y=posy+2;
  gotoxy(x,y);
  printf("%c",crossbr);

}
void showbox(char ch, int box)
void showbox(char ch, int box)
{
   switch(box)
   {
     case 1 :	gotoxy(_x+1,_y-1); printf("%c",ch); break;      case 2 :	gotoxy(_x+5,_y-1); printf("%c",ch); break;      case 3 :	gotoxy(_x+9,_y-1); printf("%c",ch); break;      case 4 :	gotoxy(_x+1,_y+1); printf("%c",ch); break;      case 5 :	gotoxy(_x+5,_y+1); printf("%c",ch); break;      case 6 :	gotoxy(_x+9,_y+1); printf("%c",ch); break;      case 7 :	gotoxy(_x+1,_y+3); printf("%c",ch); break;      case 8 :	gotoxy(_x+5,_y+3); printf("%c",ch); break;      case 9 :	gotoxy(_x+9,_y+3); printf("%c",ch); break;    }
}
void putintobox(char a[3][3], char ch, int box)
void putintobox(char arr[3][3], char ch, int box)
{
  switch(box)
  {

    case 1 :	if(arr[0][0] != 'X' && arr[0][0]!= 'O')
                { arr[0][0] = ch;
		          showbox(ch,1);
		        }
		        break;

    case 2 :	if(arr[0][1] != 'X' && arr[0][1]!= 'O')
		        { arr[0][1] = ch;
		          showbox(ch,2);
		        }
		        break;

    case 3 :	if(arr[0][2] != 'X' && arr[0][2]!= 'O')
                { arr[0][2] = ch;
		          showbox(ch,3);
		        }
		        break;

    case 4 :	if(arr[1][0] != 'X' && arr[1][0]!= 'O')
		       { arr[1][0] = ch;
		         showbox(ch,4);
		       }
		        break;

    case 5 :	if(arr[1][1] != 'X' && arr[1][1]!= 'O')
		        { arr[1][1] = ch;
		         showbox(ch,5);
		        }
		        break;

    case 6 :	if(arr[1][2] != 'X' && arr[1][2]!= 'O')
		        { arr[1][2] = ch;
                  showbox(ch,6);
		        }
	        	break;

    case 7 :	if(arr[2][0] != 'X' && arr[2][0]!= 'O')
     		    { arr[2][0] = ch;
		          showbox(ch,7);
		        }
		        break;

    case 8 :	if(arr[2][1] != 'X' && arr[2][1]!= 'O')
		        { arr[2][1] = ch;
		          showbox(ch,8);
		        }
		        break;

    case 9 :	if(arr[2][2] != 'X' && arr[2][2]!= 'O')
		        { arr[2][2] = ch;
		          showbox(ch,9);
		        }
		        break;
   }}
void gotobox(int box)
void gotobox(int box)
{
  switch(box)
  {
    case 1 : gotoxy(_x+1,_y-1); break;
    case 2 : gotoxy(_x+5,_y-1); break;
    case 3 : gotoxy(_x+9,_y-1); break;
    case 4 : gotoxy(_x+1,_y+1); break;
    case 5 : gotoxy(_x+5,_y+1); break;     case 6 : gotoxy(_x+9,_y+1); break;     case 7 : gotoxy(_x+1,_y+3); break;     case 8 : gotoxy(_x+5,_y+3); break;     case 9 : gotoxy(_x+9,_y+3); break;

  }
}
int navigate(char a[3][3], int box, int player, int key)
int navigate(char arr[3][3], int box, int player, int key)
{
   switch(key)
   {
     case UPARROW    : if( (box!=1) || (box!=2) || (box!=3) )
		               { box-=3; if(box<1) box = 1; gotobox(box); }
	                   break;

     case DOWNARROW  : if( (box!=7) || (box!=8) || (box!=9) )
		               { box+=3; if(box>9) box = 9; gotobox(box); }
		               break;

     case LEFTARROW  : if( (box!=1) || (box!=4) || (box!=7) )
		               { box--;  if(box<1) box = 1; gotobox(box); }
		               break;

     case RIGHTARROW : if( (box!=3) || (box!=6) || (box!=9) )
		               { box++; if(box>9) box = 9; gotobox(box); }
		               break;

     case ENTER      : if(player == 0)
			            putintobox(arr,'O',box);
		               else if(player == 1)
			            putintobox(arr,'X',box);
		               break;
    }
 return box;
}
int checkforwin(char a[3][3])
int checkforwin(char arr[3][3])
{
  int w=0;


    if((arr[0][0] == arr[0][1]) && (arr[0][1] == arr[0][2])) w = 1;
  else if((arr[1][0] == arr[1][1]) && (arr[1][1] == arr[1][2])) w = 1;
  else if((arr[2][0] == arr[2][1]) && (arr[2][1] == arr[2][2])) w = 1;

    else if((arr[0][0] == arr[1][0]) && (arr[1][0] == arr[2][0])) w = 1;
  else if((arr[0][1] == arr[1][1]) && (arr[1][1] == arr[2][1])) w = 1;
  else if((arr[0][2] == arr[1][2]) && (arr[1][2] == arr[2][2])) w = 1;

    else if((arr[0][0] == arr[1][1]) && (arr[1][1] == arr[2][2])) w = 1;
  else if((arr[0][2] == arr[1][1]) && (arr[1][1] == arr[2][0])) w = 1;

  return w;
}
int boxesleft(char a[3][3])
int boxesleft(char a[3][3])
{
   int i,j,boxesleft=9;

   for(i=0;i<3;i++)
    { for(j=0;j<3;j++)
      { if((a[i][j] == 'X') ||(a[i][j] == 'O'))
          boxesleft--;
      }
    }

   return boxesleft;
}
Now we have all the functions in place, we move on to the third step that talks about Presentation.
We have actually taken care of presentation in some of the above written functions, haven’t we?
The ASCII character used in this program to display the vertical line is 179 and for horizontal line is 196. For a cross — 197. Check this website for more information about extended ASCII characters http://www.asciitable.com/.
You can even printout your ASCII table with a C program. Here is an example:
#include <stdio.h>

int main()
{
    FILE *fh;
    int  ch;

    fh = fopen("ascii.txt","r");

    for(i=0;i<256;i++)
     fprint(fh,"n%d - %c",i,i);

    fclose(fh);
    return 0;
}
Now we will talk about Exception Handling. Here in this program, we have kept it simple so nothing much to worry about here, however, we do take the name from the user. The array we use to store the name is of size 30. What if the user enters a string that is more than 30 in length? This would result in a buffer overflow. This may crash your program right away or produce unexpected results. To avoid this either we can write a function that would get a string from the stdin one by one and stops if Enter is pressed or if string is more than 30 OR we can use the inbuilt function known as fgets.
Finally, putting it all together:
#include <stdio.h>
#include <conio.h>

int main()
{


    showframe(12,25);
    printf("nPlayer 1, enter your name:"); fgets(name[0], 30, stdin);
    printf("nPlayer 2, enter your name:"); fgets(name[1], 30, stdin);

    printf("n%s, you take 0",name[0]);
    printf("n%s, you take X",name[1]); getch();

    clrscr();

    do
    {
       while(!enter)
       {
         if(khbit())
          ch = getch();

           switch(ch)
           {
             case UPARROW : box = navigate(a[3][3], box, player, UPARROW);
             .
             .
             .
           }
       }
       if(quit) break;
              win = checkforwin(a);

     }while(!win)

    if(win)
    { .
      .
    }

    else if(quit)
    {    .
         .
    }

 return 0;
}
View the complete source code and executable to take a look at how the program works.
Here are some screenshots of the working executable for Tic Tac Toe:
This article was not a complete fully fledged article for game programming but I hope that you gain something out of it. If you have any questions, please feel free to email me at shine_hack@yahoo.com
Source code for this program can be obtained at: http://techstuff.x10.mx/articles/.
Happy programming!
Shine Jacob (Enot): shine_hack@yahoo.com
I love programming, learn about new technologies, algorithms, and problems solving using programming. I started off programming with C/C++. Though I learned PHP and web development but still stuck on C. Don’t know why but I kinda love it.
Сделать игру на Unity сможет даже начинающий кодер, который не знает С#. Большое количество обучающих материалов и активное комьюнити значительно облегчают первые этапы знакомства с движком и создание первого проекта. Вместе с ведущим разработчиком Unity Владимиром Филимоновым и преподавателем на курсе «Разработчик игр» разбираемся, почему писать код — не главное в геймдеве и какие базовые инструменты и ПО в играх нужно освоить, чтобы соорудить свою первую игру.
Unity — это и среда разработки, и игровой движок, с помощью которого создаются проекты для разных платформ: ПК, мобильных устройств, игровых консолей и интернет-платформ, — поэтому он называется кроссплатформенным. В Unity есть инструменты для создания объектов, их перемещения, работы с графикой, текстурами и звуком, поэтому сделать полноценную игру с его помощью можно даже в одиночку.
Наглядный пример игры, созданной на Unity, которая поддерживает разные устройства, — Genshin Impact, успешный мультиплатформенный проект китайской студии miHoYo Limited. Более популярной стала ее мобильная версия, но пользователи могут войти в аккаунт, например, с компьютера и продолжить играть с того же момента, на котором остановились в мобильной версии. Кроме Genshin Impact, на Unity созданы такие известные проекты, как Hearthstone, Outlast, Cuphead, Pokemon GO и многие другие.
В игровой индустрии существуют десятки разных движков. Одни разработаны под конкретную игру, на других можно делать игры конкретного жанра (шутеры от первого лица, платформеры, гонки), а есть универсальные, вроде Unity, которые открывают разработчикам больше возможностей. Уникальность Unity заключается в сочетании нескольких факторов. Кроме того, что этот движок позволяет создавать проекты под разные устройства и не ограничивает разработчика конкретным жанром, он:
- имеет практически неограниченный бесплатный функционал;
- не требует глубокого знания языков программирования для создания первых простых проектов;
- имеет многочисленное и активное сообщество, в котором можно найти ответ на любой вопрос, потому что среди такого большого количества людей кто-то обязательно уже сталкивался с вашей проблемой.
Посмотрите также: Как установить Unity
При создании собственного проекта важно помнить, что разработка кода — это примерно 20% игры; гораздо большее значение в ней имеют другие аспекты:
- Геймплей — это общее понятие взаимодействия игрока с игровым миром, которое определяет его действия (бежать вперед, преодолевать препятствия, стрелять по мишеням, обгонять других) и цели (прийти первым к финишу, выбить 10 из 10, победить врага в бою, собрать как можно больше монет). Геймплей напрямую связан с жанром игры, так как у каждого из них есть специфичный набор правил и механик.
- Игровые механики — конкретные элементы взаимодействия с игрой, которые входят в состав геймплея. Стрельба — это одна механика, сражение на мечах — другая, гонка — третья. Одна игра может сочетать в себе десятки таких механик.
- Сюжет — это развитие действия в игре; он одинаково важен и для масштабных AAA-проектов, и для небольших, но глубоких инди-игр. Сюжет должен затянуть игрока, рассказать ему историю, а также развивать персонажей, чтобы они не оставались однобокими и раскрывались для игрока с новых сторон.
- Персонажи — в них важны и дизайн, и характер. Удачно проработанный персонаж обладает узнаваемыми особенностями поведения, интересной историей, а еще для полного погружения он должен иметь что-то общее с игроком, что зацепит его и заставит сопереживать. На эту тему Unity разработали гайд «Пять типов привлекательных игровых персонажей», чтобы у новичков получалось сделать игрового персонажа правдоподобным.
- Дизайн уровней — это внешний вид игры, цветовые решения, общая стилистика объектов, фона, персонажей, предметов, которая создает определенное настроение. В помощь начинающим разработчикам Unity опубликовали в своем блоге «Советы по дизайну уровней вашей первой видеоигры».
- Баланс — это соотношение характеристик разных объектов, он тоже отвечает за увлеченность игрока. Например, если меч в игре может наносить объекту 3 единицы урона, а объект имеет всего 3 HP (hit points — величина, обозначающая максимальный урон), то его можно уничтожить с первого раза, и играть будет слишком легко. Если объект имеет 30 HP, то игроку придется нанести 10 ударов, чтобы его уничтожить. Такое уже подходит скорее для босса, например на первом или втором уровне. Разработчику важно грамотно распределить эти величины, чтобы игра была увлекательной и бросала игроку вызовы.
Перед созданием игры важно продумать все эти моменты и представить общую картину, а также найти референсы, на которые можно ориентироваться, продумать опорные точки сюжета и механики. Для создания игры именно на Unity также пригодится понимание некоторых базовых терминов, с которыми постоянно придется сталкиваться в процессе разработки:
- Ассет (Asset) — готовый компонент, который можно использовать для создания своих проектов. Это могут быть элемент интерфейса в игре, текстура, фигурка персонажа, шрифт или звук.
- Игровой объект (GameObject) — это любой ассет, который используется в игровой сцене. Например, изображение монетки, сам ее внешний вид — это ассет, а пять монет, которые должен подобрать персонаж в процессе прохождения уровня — это пять игровых объектов. Сам персонаж при этом тоже станет игровым объектом.
- Компоненты (Components) — часть игрового объекта, отвечающая за его поведение в процессе игры: перемещение или реакцию на определенные триггеры.
- Скрипт (Script) — код на C#, в котором прописаны конкретные условия работы компонента.
Установка Unity занимает 5–10 минут. Для этого нужно зайти на официальный сайт проекта и выбрать бесплатный тариф для физических лиц — Personal. Его будет достаточно для самостоятельного изучения Unity и создания первой игры. Еще один бесплатный тариф — студенческий, но он подойдет тем, кто зарегистрирован на GitHub и может подтвердить свой ученический статус.
После нажатия кнопки «Начать» откроется Unity Store. Для новых пользователей в нем есть вариант установки движка с обучающим руководством для начинающих. С помощью кнопки «Начните здесь» скачивается установщик UnityHubSetup.exe, который запускается как любой другой установщик: нужно просто открыть файл, принять условия пользовательского соглашения и нажать кнопку «Установить».
Русского языка в настройках нет, так что придется совершенствовать технический английский. Всего Unity занимает 11,3 Гб,поэтому перед установкой лучше проверить свободное место на диске и почистить его при необходимости.
Следующий шаг — создание Unity ID. Можно регистрироваться с помощью почты или использовать предложенные аккаунты, например Google или Apple. Важно поставить первые две галочки: согласие с условиями использования Unity и признание политики конфиденциальности. Третья галочка — это согласие на маркетинговые рассылки, ее ставить не обязательно.

После регистрации Unity предложит создать тестовый проект Microgame. На выбор предлагается пять шаблонов:
- LEGO Microgame;
- шутер от первого лица;
- картинг;
- платформер;
- пустой 3D-шаблон.
Можно выбрать любой из них и посмотреть, как работает создание игры в конкретном жанре. Обучающий материал пошагово демонстрирует назначение различных окон в интерфейсе и принцип работы с элементами игры: как заставить двигаться персонажей, поменять текстуру объекта или его форму. В обучении окно Scene, в котором происходит вся работа с элементами, уже заполнено различными объектами, но при создании проекта с нуля оно будет пустым.
После обучения можно перейти к созданию своей первой игры на Unity с помощью кнопки NEW в меню проектов.
Новому проекту присваивается имя, выбираются место хранения на диске и темплейт — то есть шаблон для разработки, внешний вид и функционал которого зависит от количества измерений в игре. Проще начинать с 2D-проектов, так как для этого формата создано больше готовых ассетов. Конечно, можно сразу начать делать 3D-игры, но в этом случае многие элементы и анимации придется самостоятельно создавать с нуля или выделять бюджет на то, чтобы делегировать эту часть работы другим специалистам.
В стандартном интерфейсе проекта шесть элементов рабочей области:
- Верхняя панель инструментов — в ней находятся стандартные вкладки File, Edit, Help, как во многих других интерфейсах, а также вкладки Assets, GameObject, Components и Window.
- Scene — окно сцены, в котором выстраивается игровое пространство (элементы игрового мира, текстуры, фигурки персонажей и прочее).
- Games — это окно игры, в котором можно посмотреть глазами пользователя, как будут двигаться элементы и работать игровые механики.
- Hierarchy — окно иерархии, в нем перечислен список всех элементов (GameObject), которые помещены в окно Scene.
- Project — это система папок, в которых хранятся ассеты по категориям (текстуры, шрифты, звуки и т.д.).
- Inspector — окно для изменения элементов игры, их размера, цвета, положения в пространстве и других характеристик.

Объекты на экран Scene можно добавить из Asset Store. Для этого на панели инструментов нужно кликнуть на вкладку Window –> General –> Asset Store.
В строке поиска можно по названиям найти нужные компоненты, например, сет Free Platform Game Assets.
Как и другие ассеты, он загружается с помощью кнопки Import.
Перед загрузкой появится список всех компонентов, которые содержит этот пакет; некоторые из них можно исключить. Если в списке есть персонажи, текстуры или другие элементы, которые вам не нужны, можно просто снять галочки, и пакет загрузится без них.
После установки все ассеты будут доступны в окне Project. Теперь можно комбинировать и перемещать эти объекты, менять их форму, причем сделать это можно с помощью мыши или горячих клавиш, не написав ни одной строчки кода. Например, из перечня платформ самых разных видов можно выбрать одну и мышкой перетащить ее в рабочую область.
Шаг 2. Перенести в область Scene

За поведение игровых объектов отвечают присоединенные к ним компоненты (Components). Базовый компонент любого объекта — Transform, он отвечает за положение элемента в окне Scene, возможность поворачивать и масштабировать его. К базовому компоненту можно добавить, например, Renderer, который меняет цвет, или RigidBody, который отвечает за массу и физику объекта. Но кроме базовых компонентов, объектам можно задавать особые условия, и для этого как раз используются скрипты.
Создать новый скрипт можно в окне Project, кликнув мышкой на Assets –> Create –> C# Script.
Двойным кликом мыши скрипт открывается в текстовом редакторе. Скрипты, как и все остальное в Unity, прописываются на С#, так что для создания сложных проектов разработчикам все же придется освоить этот язык программирования.
Базовые элементы скриптов — это:
- using — элемент в коде, который подключает библиотеки;
- public class — в этой строке обычно прописан класс MonoBehaviour, он содержит набор функций, необходимых для работы скрипта;
- void — те самые функции, с их помощью прописываются действия, происходящие в игре.
Рассмотрим, например, функцию start. Любое действие в ней произойдет только один раз, когда запустится игра. Пропишем здесь print (“Hi”).
И можно заметить, что в консоли это слово выводится один раз.
Функция update — повторяющаяся, ее можно использовать, например, для передвижения объекта. Для этого в скрипте задается переменная int i = 0, она выводится на экран с помощью функции print (i) и увеличивается на одну единицу за каждый шаг с помощью i++.
В консоли можно будет заметить, что апдейт действительно срабатывает каждый фрейм и объект, к которому применен этот скрипт, плавно движется.
Для понимания сути триггеров важно усвоить, что такое коллайдер (Collider). Это компонент, который присваивается объекту в пространстве игры, задает форму и делает его твердым, недоступным для прохождения сквозь него. Например, если мы разместим монетку в 2D-пространстве и захотим сделать так, чтобы она упала на платформу, то без использования компонента Collider ничего не получится — монетка пролетит сквозь платформу.
Поэтому обоим объектам необходимо присвоить компонент Box Collider 2D — это тонкая зеленая линия, которая обводит элементы по контуру, и за счет этой рамки они становятся твердыми, то есть один не может пройти сквозь другой.
Так объекты обязательно соприкоснутся и монета встанет на платформу.
Триггер (Trigger) — это пространство на карте, при попадании объекта в которое происходит действие; он тоже обводит объект или область в пространстве по краям. По сути, это тот же коллайдер, только триггер позволяет объектам проходить внутрь этой области. Представьте, что на ту же самую платформу вместе с коллайдером наброшен триггер, и при попадании персонажа внутрь триггерной области активируется телепорт — персонажа перебрасывает в другую точку карты.
Чтобы создать триггер, нужно накинуть тот же самый компонент коллайдера, но поставить галочку Is Trigger.

Триггеры распознают три варианта взаимодействия области на карте и объекта:
- OnTriggerEnter — объект зашел в зону;
- OnTriggerStay — объект находится в зоне;
- OnTriggerExit — объект покинул зону.
Освоить интерфейс Unity довольно легко, в интернете есть разные гайды на тему того, как сделать это действительно быстро. Например, видео «Я сделал игру на Unity за неделю» или обучающий мини-курс «Как создать RPG за час». Можно изучать геймдев самостоятельно или начать обучение на курсе — это ускорит процесс и даст более заметные результаты.
Для работы со скриптами и создания более сложных механик разработчикам в любом случае понадобится С#, так что к его изучению вы тоже рано или поздно придете. Но в отличие от Unity, по C# нет в свободном доступе такого большого количества актуальных и понятных гайдов, так что в целях экономии времени и сил лучше записаться на курс «Разработчик игр на Unity», где все знания упакованы в структурированные блоки и сбалансированы с практикой на тренажерах.