![]()
Download Article
![]()
Download Article
This wikiHow teaches you how to plan and develop an operating system if you don’t know how to code in C, or C++. Operating systems manage computer hardware and provide the resources that applications need to run. Writing an operating system from scratch requires a strong command of computer science, a programming language like C or C++, assembly, and code management practices.
-

1
Take some basic Computer Science courses. Unlike developing for the web, creating an operating system requires a strong understanding of algorithms, data structures, computer hardware, and resource management.[1]
People get degrees in this stuff, so don’t expect to write an entire operating system after reading an online tutorial! Harvard’s Intro to Computer Science course is available online through EDX at no cost. -
2
Advertisement
-
3
Learn an assembly language. Assembly languages are low-level languages designed to communicate with different processors. Since assembly is different for different processor types (e.g., x86 assembly Language for Intel, AMD, VIA, and other processors), you’ll need to learn the version for the type of processor you’re coding for.
-
This open-source book, if read in its entirety, can give you a solid enough understanding for building an operating system.[2]
- The Art of Assembly Language is a highly-recommended book about assembly available both on and offline.
- You should also do a lot of research on the type of processor(s) on which your operating system should run. The manuals for processor architecture can easily be found using a Google search («Intel Manuals,» «ARM manuals,» etc.).
-
This open-source book, if read in its entirety, can give you a solid enough understanding for building an operating system.[2]
-
4
Complete an operating system tutorial. OS tutorials will walk you through the process of creating a basic operating system. This gets you used to the process and helps you figure out if there are any pieces you’re missing. Once you’ve completed a tutorial or two, you’ll be well on your way to creating your very own operating system.
- Bare Bones is a tutorial that helps you write your first simple 32-bit kernel. After completing the tutorial, the next step is to use Meaty Skeleton to structure your own operating system.
- Linux from Scratch is an online book that walks you through creating your own Linux operating system.
- Operating systems from 0 to 1 is a free book about creating various operating systems from start to finish.
-
5
Figure out your operating system goals. What do you want your operating system to do? How should it look? Do you really need to write an entire operating system or are you just looking to create a certain look for your desktop? These are all things to consider before beginning to code.[3]
- Consider developing with a team of other programmers. Having a team of developers working on the project will cut the development time significantly.
- Add your project goals, plans, and questions to your public repository so it’s easy for others to help you.


Advertisement
-
1
Choose a development environment. This is the platform you’ll be using to code your new operating system. It’s a matter of personal preference, but most people either use Windows or a flavor of UNIX. If you’re using Windows, it’s a good idea to install a UNIX environment like Cygwin or MinGW. You’ll generally want to make sure whatever environment you’re using includes the following:
- GCC (the Gnu compiler). If you’re using Windows, you can install it in Cygwin or MinGW.
- Binutils is a collection of tools used for manipulating object files. Again, if you’re using Windows, you can install it in Cygwin.
- A good text editor. Vim and emacs are commonly used in UNIX environments. Windows users can use Notepad, or check out Notepad++ for a multi-tab upgrade.
- Perl and/or Python. One or both are recommended for string manipulation.
-
2
Set up your version control system. Writing an operating system means you’ll likely be creating hundreds (or thousands!) of lines of code. When you’re working on revisions, this can get confusing. Some options to check out are CVS, Mercurial, and Subversion.
-
3
-
4
Choose a kernel design. The kernel is the core of your operating system, providing an interface between the user and the computer hardware. There are monolithic kernels and micro kernels. Monolithic kernels implement all the services in the kernel, while microkernels have a small kernel combined with user daemons implementing services. In general, monolithic kernels are faster, but microkernels have better fault isolation and reliability.
-
5
Start small. Begin with small things such as displaying text and interrupts before moving on to things such as memory management and multitasking. You can also try making a simple 16-bit Operating System, instead of taking a big leap.
- You will not have a full system in two weeks. Start with an OS that boots, then move on to the cool stuff.
-
6
Test your new operating system with a virtual machine. Rather than rebooting your computer each time you make changes or having to transfer the files from your development computer to your test machine, use a virtual machine application. VMWare is a common option that works with both Windows and Linux, and so is Bochs. Check for potential deadlocks and other bugs and repair them as needed.
-
7
Release a «release candidate.» You can do this by uploading your tested code to your public repository. This will allow people to test your operating system and report back on any issues they run into.
-
8
Network with other operating system developers. There’s an entire community of operating system developers congregating on various forums, including /r/osdev on Reddit and the Software Engineering Stack Exchange. One you’ve gotten a grasp on developing a basic operating system, read existing posts to see what kind of things come up during the development process.


Advertisement
Add New Question
-
Question
Can I do this if I have no programming experience?

Only if you’re willing to learn a lot. You will require a full understanding of at least assembly code, and the motivation to learn more. Building your own OS is not a small task.
-
Question
What should be my first step?
Learn programming languages and concepts, and practice to become a very strong programmer.
-
Question
Which applications can I use to program my operating system?
That depends on the programming language you are using. It is recommended, however, to use an IDE, or Integrated Development Environment, to program your operating system, as IDEs have built-in tools and features to help make development easier. Not all IDEs support every language however, so you will want to specifically search for IDEs that support the language (or languages) you’re using.
See more answers
Ask a Question
200 characters left
Include your email address to get a message when this question is answered.
Submit
Advertisement
Video
-
After all development is done, decide if you want to release the code as open source, or proprietary.
-
To make an operating system able to handle multiple processors, your Memory Manager must have «locking» mechanisms in place to prevent multiple processors from accessing the same resource at the same time. The «locks» used for this will require the presence of a scheduler to make sure that only one processor accesses a critical resource at any given time and all the others are made to wait. Yet the scheduler depends on the presence of a Memory Manager. This is a case of a deadlocked dependency. There is no standard way to solve problems like this; as a programmer, you are expected to be skilled enough to figure out his own way of dealing with it.
-
Be sure to implement security features as your top priority if you ever want your system to be viable.
Show More Tips
Thanks for submitting a tip for review!
Advertisement
About This Article
Article SummaryX
1. Take some computer science courses.
2. Learn a high-level programming language at an advanced level.
3. Learn a low-level assembly language.
4. Complete an operating system tutorial.
5. Plan your operating system.
6. Create your programming environment.
7. Build and test.
8. Release a release candidate.
Did this summary help you?
Thanks to all authors for creating a page that has been read 1,559,260 times.
Is this article up to date?
![]()
Download Article
![]()
Download Article
This wikiHow teaches you how to plan and develop an operating system if you don’t know how to code in C, or C++. Operating systems manage computer hardware and provide the resources that applications need to run. Writing an operating system from scratch requires a strong command of computer science, a programming language like C or C++, assembly, and code management practices.
-
1
Take some basic Computer Science courses. Unlike developing for the web, creating an operating system requires a strong understanding of algorithms, data structures, computer hardware, and resource management.[1]
People get degrees in this stuff, so don’t expect to write an entire operating system after reading an online tutorial! Harvard’s Intro to Computer Science course is available online through EDX at no cost. -
2
Advertisement
-
3
Learn an assembly language. Assembly languages are low-level languages designed to communicate with different processors. Since assembly is different for different processor types (e.g., x86 assembly Language for Intel, AMD, VIA, and other processors), you’ll need to learn the version for the type of processor you’re coding for.
-
This open-source book, if read in its entirety, can give you a solid enough understanding for building an operating system.[2]
- The Art of Assembly Language is a highly-recommended book about assembly available both on and offline.
- You should also do a lot of research on the type of processor(s) on which your operating system should run. The manuals for processor architecture can easily be found using a Google search («Intel Manuals,» «ARM manuals,» etc.).
-
This open-source book, if read in its entirety, can give you a solid enough understanding for building an operating system.[2]
-
4
Complete an operating system tutorial. OS tutorials will walk you through the process of creating a basic operating system. This gets you used to the process and helps you figure out if there are any pieces you’re missing. Once you’ve completed a tutorial or two, you’ll be well on your way to creating your very own operating system.
- Bare Bones is a tutorial that helps you write your first simple 32-bit kernel. After completing the tutorial, the next step is to use Meaty Skeleton to structure your own operating system.
- Linux from Scratch is an online book that walks you through creating your own Linux operating system.
- Operating systems from 0 to 1 is a free book about creating various operating systems from start to finish.
-
5
Figure out your operating system goals. What do you want your operating system to do? How should it look? Do you really need to write an entire operating system or are you just looking to create a certain look for your desktop? These are all things to consider before beginning to code.[3]
- Consider developing with a team of other programmers. Having a team of developers working on the project will cut the development time significantly.
- Add your project goals, plans, and questions to your public repository so it’s easy for others to help you.
Advertisement
-
1
Choose a development environment. This is the platform you’ll be using to code your new operating system. It’s a matter of personal preference, but most people either use Windows or a flavor of UNIX. If you’re using Windows, it’s a good idea to install a UNIX environment like Cygwin or MinGW. You’ll generally want to make sure whatever environment you’re using includes the following:
- GCC (the Gnu compiler). If you’re using Windows, you can install it in Cygwin or MinGW.
- Binutils is a collection of tools used for manipulating object files. Again, if you’re using Windows, you can install it in Cygwin.
- A good text editor. Vim and emacs are commonly used in UNIX environments. Windows users can use Notepad, or check out Notepad++ for a multi-tab upgrade.
- Perl and/or Python. One or both are recommended for string manipulation.
-
2
Set up your version control system. Writing an operating system means you’ll likely be creating hundreds (or thousands!) of lines of code. When you’re working on revisions, this can get confusing. Some options to check out are CVS, Mercurial, and Subversion.
-
3
-
4
Choose a kernel design. The kernel is the core of your operating system, providing an interface between the user and the computer hardware. There are monolithic kernels and micro kernels. Monolithic kernels implement all the services in the kernel, while microkernels have a small kernel combined with user daemons implementing services. In general, monolithic kernels are faster, but microkernels have better fault isolation and reliability.
-
5
Start small. Begin with small things such as displaying text and interrupts before moving on to things such as memory management and multitasking. You can also try making a simple 16-bit Operating System, instead of taking a big leap.
- You will not have a full system in two weeks. Start with an OS that boots, then move on to the cool stuff.
-
6
Test your new operating system with a virtual machine. Rather than rebooting your computer each time you make changes or having to transfer the files from your development computer to your test machine, use a virtual machine application. VMWare is a common option that works with both Windows and Linux, and so is Bochs. Check for potential deadlocks and other bugs and repair them as needed.
-
7
Release a «release candidate.» You can do this by uploading your tested code to your public repository. This will allow people to test your operating system and report back on any issues they run into.
-
8
Network with other operating system developers. There’s an entire community of operating system developers congregating on various forums, including /r/osdev on Reddit and the Software Engineering Stack Exchange. One you’ve gotten a grasp on developing a basic operating system, read existing posts to see what kind of things come up during the development process.
Advertisement
Add New Question
-
Question
Can I do this if I have no programming experience?
Only if you’re willing to learn a lot. You will require a full understanding of at least assembly code, and the motivation to learn more. Building your own OS is not a small task.
-
Question
What should be my first step?
Learn programming languages and concepts, and practice to become a very strong programmer.
-
Question
Which applications can I use to program my operating system?
That depends on the programming language you are using. It is recommended, however, to use an IDE, or Integrated Development Environment, to program your operating system, as IDEs have built-in tools and features to help make development easier. Not all IDEs support every language however, so you will want to specifically search for IDEs that support the language (or languages) you’re using.
See more answers
Ask a Question
200 characters left
Include your email address to get a message when this question is answered.
Submit
Advertisement
Video
-
After all development is done, decide if you want to release the code as open source, or proprietary.
-
To make an operating system able to handle multiple processors, your Memory Manager must have «locking» mechanisms in place to prevent multiple processors from accessing the same resource at the same time. The «locks» used for this will require the presence of a scheduler to make sure that only one processor accesses a critical resource at any given time and all the others are made to wait. Yet the scheduler depends on the presence of a Memory Manager. This is a case of a deadlocked dependency. There is no standard way to solve problems like this; as a programmer, you are expected to be skilled enough to figure out his own way of dealing with it.
-
Be sure to implement security features as your top priority if you ever want your system to be viable.
Show More Tips
Thanks for submitting a tip for review!
Advertisement
About This Article
Article SummaryX
1. Take some computer science courses.
2. Learn a high-level programming language at an advanced level.
3. Learn a low-level assembly language.
4. Complete an operating system tutorial.
5. Plan your operating system.
6. Create your programming environment.
7. Build and test.
8. Release a release candidate.
Did this summary help you?
Thanks to all authors for creating a page that has been read 1,559,260 times.
Is this article up to date?
Пишем операционную систему. Часть 1. Загрузчик +34
Из песочницы, Системное программирование
Рекомендация: подборка платных и бесплатных курсов 3D max — https://katalog-kursov.ru/
Всем привет! Сегодня мы напишем загрузчик, который будет выводить «Hello World» и запустим его на VirtualBox. Писать будем на ассемблере FASM. Скачать его можно отсюда. Также нам понадобится собственно VirtualBox и UltraISO. Перед тем как писать код, разберемся как загружаются операционные системы.
Итак, когда мы нажимаем большую кнопку включения на нашем компьютере запускается система, которая есть на любом компьютере — BIOS (Basic Input/Output System или базовая система ввода/вывода). Задача BIOS это:
- Обнаружить все подключенные устройства и проверить их на работоспособность. За это отвечает программа POST (Power On Self Test, самотестирование при включении). Если жизненно необходимое железо не обнаружено, то системный динамик (если таковой имеется) пропищит что-то непонятное и дальше загрузка не пойдет.
- Предоставить операционной системе функции для работы с железом.
- Считать самый первый сектор загрузочного устройства в нулевой сегмент оперативной памяти по смещению 0x7C00h и передать туда управление. 1 сектор на диске равен 512 байтам. Поэтому, наш загрузчик не должен превышать 512 байт. BIOS определяет, что сектор загрузочный по наличию в последних двух его байтах значений 0x55 и 0xAA.
Теперь можно приступать к написанию кода. Запускаем файл FASMW.EXE, который находится в архиве с FASM-мом и вставляем туда следующий код:
org 7C00h

 start:
    cli              ;Запрещаем прерывания (чтобы ничего не отвлекало)
    xor ax, ax       ;Обнуляем регистр ax
    mov ds, ax       ;Настраиваем dataSegment на нулевой адрес
    mov es, ax       ;Настраиваем сегмент es на нулевой адрес
    mov ss, ax       ;Настраиваем StackSegment на нулевой адрес
    mov sp, 07C00h   ;Указываем на текущую вершину стека
    sti              ;Запрещаем прерывания

  ;Очищаем экран
  mov ax, 3
  int 10h

  mov ah, 2h
  mov dh, 0
  mov dl, 0
  xor bh, bh
  int 10h

  ;Печатаем строку
  mov ax, 1301h
  mov bp, message
  mov cx, 12
  mov bl, 02h
  int 10h

  jmp $

message db 'Hello World!',0

times 510 - ($ - $$) db 0 ;Заполнение оставшихся байт нулями до 510-го байта
db 0x55, 0xAA ;Загрузочная сигнатура
Этот код требует немного пояснений. Командой
org 7C00hмы говорим, что код нужно загружать в ОЗУ по адресу 0x7C00. В строках
  mov ax, 3
  int 10h
мы устанавливаем видео режим 80х25 (80 символов в строке и 25 строк) и тем самым очищаем экран.
  mov ah, 2h
  mov dh, 0
  mov dl, 0
  xor bh, bh
  int 10h
Здесь мы устанавливаем курсор. За это отвечает функция 2h прерывания 10h. В регистр dh мы помещаем координату курсора по Y, а в регистр dl — по X.
  mov ax, 1301h
  mov bp, message
  mov cx, 12
  mov bl, 02h
  int 10h
Печатаем строку. За это отвечает функция 13h прерывания 10h. В регистр bp мы помещаем саму строку, в регистр cx — число символов в строке, в регистр bl — атрибут, в нашем случае цвет, он будет зеленым. На цвет фона влияют первые 4 бита, на цвет текста — вторые 4 бита. Ниже представлена таблица цветов
0 - черный, 1 - синий, 2 - зеленый, 3 - желтый, 4 - красный, 5 - фиолетовый, 6 - коричневый, 7 - светло-серый, 8 - темно-серый, 9 - светло-синий, A - светло-зеленый, B - светло-желтый, C - светло-красный, D- светло-фиолетовый, E - светло-коричневый, F – Белый.В строке
jmp $Программа зависает.
Откомпилируем код нажатием клавиш Ctrl + F9 и сохраним полученный файл как boot.bin.
Запуск
Запускаем UltraISO и перетаскиваем наш бинарник в специальную область (отмечено красной стрелкой).
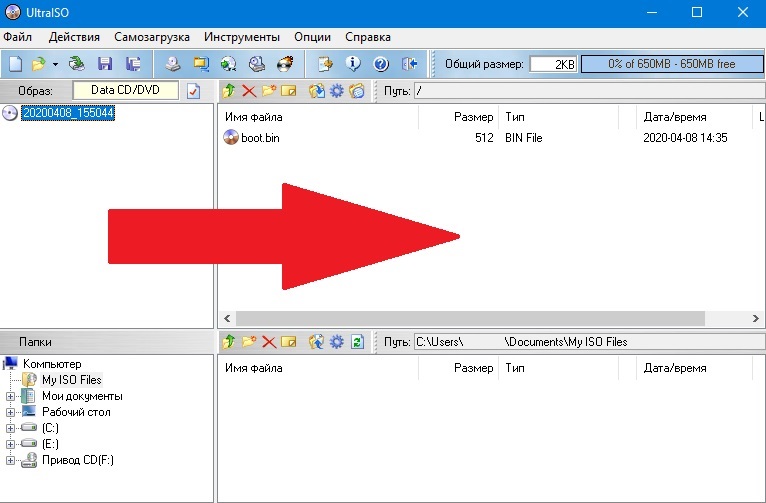
Далее кликаем правой кнопкой мыши по бинаринку и нажимаем кнопку примерно с такой надписью: «Установить загрузочным файлом». Далее сохраняем наш файл в формате ISO.
Открываем VIrtualBox и создаем новую виртуальную машину (если вы не знаете, как это делается, кликайте сюда). Итак, после того, как вы создали виртуальную машину, нажимаем «Настроить, выбираем пункт „Носители“, нажимаем на „Пусто“, там где „Привод“ есть значок оптического диска. Нажимаем на него и выбираем „Выбрать образ оптического диска“, ищем наш ISO файл, нажимаем „Открыть“. Сохраняем все настройки и запускаем виртуальную машину. На экране появляется наш „Hello World!“.

На этом первый выпуск подходит к концу. В следующей части мы научим наш загрузчик читать сектора диска и загрузим свое первое ядро!
![]()
Загрузить PDF
![]()
Загрузить PDF
Операционные системы, составленные из сотен тысяч строк кода, позволяют пользователям взаимодействовать с компьютерной техникой. Они обычно пишутся на языках программирования C, C++ и ассемблер.
Шаги
-
1
Для начала обучитесь программированию. Знание ассемблера необходимо; настоятельно рекомендуется также иметь понятие о других дополнительных языках программирования более низкого уровня, например, С.
-
2
Определитесь, на какое устройство вы хотите загрузить операционную систему. Это может быть CD-диск, DVD-диск, устройство флэш-памяти, жесткий диск или другой компьютер.
-
3
Решите, какой вы хотите видеть вашу операционную систему. Должна ли это быть полная версия ОС с графическим интерфейсом пользователя (GUI) или, может быть, что-нибудь более минималистичное? Вам необходимо знать, в каком направлении двигаться, еще перед началом процесса.
-
4
Уточните, какую платформу процессора будет поддерживать ваша операционная система. AI-32 и x86_64 являются двумя наиболее распространенными версиями для персональных компьютеров, так что их можно считать наилучшим выбором.
-
5
Определитесь, предпочитаете ли делать все самостоятельно с нуля, или же имеются ядра, на основе которых вы бы хотели надстроить систему. Linux с нуля – проект для тех, кто желает, к примеру, создать свой собственный дистрибутив Linux.
-
6
Выберите, собираетесь вы использовать свой собственный загрузчик или предварительно созданный унифицированный системный загрузчик Grand Unified Bootloader (GRUB). Поскольку кодирование своей собственной программы загрузки требует обширных знаний в области компьютерного обеспечения и BIOS, это может отодвинуть график программирования действующего ядра.
-
7
Примите решение по поводу языка программирования, который собираетесь использовать. Конечно, вполне возможно разработать ОС на таком языке, как Pascal или BASIC, но предпочтительнее писать на С или ассемблере. Ассемблер совершенно необходим, т. к. некоторые важные части операционной системы требуют знания именно этого языка. C++, с другой стороны, содержит ключевые слова, требуемые для запуска полной версии ОС.
- Чтобы собрать ОС с помощью кодов C или C++, вы, конечно, будете использовать то один компилятор, то другой. Это означает, что вы должны прочесть руководство/инструкции/документацию для выбранного компилятора C/C++, что поставляется в комплекте с программным обеспечением или доступно на веб-сайте дистрибьютора. Вам придется узнать множество сложных вещей о компиляторе, кроме того, для совершенствования C++ предстоит изучить его схему и ABI. Вы, как ожидается, поймете различные форматы исполнительных задач (ELF, PE, COFF, обычные бинарные и т.д.) и заметите, что собственный формат Windows, PE (.exe) защищен авторским правом.
-
8
Выберите интерфейс программирования приложений (API). Одной из подборок хорошего API является POSIX, так как она хорошо документирован. Все системы Unix имеют, по крайней мере, частичную поддержку POSIX, так что было бы тривиально пристраивать программы Unix на вашу операционную систему.
-
9
Определитесь с дизайном. Существуют монолитные ядра и микроядра. Монолитные ядра выполняют все службы в ядре, в то время как микроядра имеют маленькое ядро в сочетании с пользовательской реализацией сервисов. В общем, монолитные ядра быстрее, но микроядра имеют лучшую изоляцию и защиту от возможных неисправностей.
-
10
Рассмотрите вопрос о разработке и работе в команде. Таким образом, вам потребуется меньше времени на разрешение больших проблем, что позволит создать операционную систему лучшего качества за более короткие сроки.
-
11
Не стирайте ваш жесткий диск полностью. Помните, форматирование диска необратимо очистит все ваши данные! Используйте GRUB или другой менеджер для дублированной загрузки вашего компьютера с другой ОС, пока ваша версия не будет полностью готова функционально.
-
12
Начните с малого. Обратите внимание в первую очередь на мелочи, такие как отображение текста и прерывания, прежде чем переходить к сложным элементам, к примеру, к управлению памятью и многозадачности.
-
13
Сохраняйте резервную копию последней рабочей версии. Это дает определенное спокойствие в случае, если что-то пойдет абсолютно неправильно в текущей версии вашей ОС или последующих дополнениях. В случае поломки вашего компьютера и невозможности загрузки, как вы и сами понимаете, отличной возможностью станет наличие второй копии для работы, так что вы сможете устранить имеющиеся неисправности.
-
14
Протестируйте вашу новую операционную систему на виртуальной машине. Вместо перезагрузки компьютера каждый раз после внесения изменений или передачи файлов с рабочего компьютера тестовой машине вы можете использовать приложение для запуска ОС на виртуальной машине, в то время как ваша текущая ОС продолжает работать. Приложения VM включают в себя VMWare (которая также имеет сервер в свободном доступе), альтернативный открытый исходный код, Bochs, Microsoft Virtual PC (не совместим с Linux), а также XVM VirtualBox.
-
15
Выпустите релиз-версию. Это позволит пользователям рассказать вам о возможных недостатках в вашей операционной системе.
-
16
Операционная система также должна быть удобной для пользователя, так что не забудьте добавить полезные функции, которые станут неотъемлемой частью вашего дизайна.
Реклама


Советы
- Когда разработка будет закончена, подумайте, хотите ли вы представить код в свободном доступе либо же установить частные права на него.
- Обязательно сделайте функции безопасности вашим основным приоритетом, если хотите, чтобы ваша система была жизнеспособной.
- Не начинайте проект разработки операционной системы с целью обучения программированию. Если вы не знаете C, C++, Pascal или какие-нибудь другие подходящие языки и свойства, в том числе типы указателя, операции с битами низкого уровня, переключение битов, встроенный ассемблер и т.д., – значит, еще не готовы для создания ОС.
- Просматривайте такие порталы, как OSDev и OSDever, которые помогут вам улучшить собственную операционную систему. Обратите особое внимание на то, что по большинству вопросов сообщество OSDev.org предпочитает, чтобы вы самостоятельно обращались к содержанию сайта, а не присоединялись к форуму. Если вы все же решили примкнуть к рядам форумчан, для этого должны быть определенные предпосылки. Вы обязаны досконально знать C или C++ и язык x86 ассамблер. Вы также должны понимать общие и комплексные понятия в программировании, такие как Linked Lists, Queues и т.д. Сообщество OSDev в своих правилах прямо говорит о том, что никто не собирается нянчить новых программистов. Если вы пытаетесь разработать ОС, само собой разумеется, что вы «бог» в области программирования. От вас также требуется прочесть руководство по работе с процессором касательно его архитектуры, выбранной вами; например, x86 (Intel), ARM, MIPS, PPC и т.д. Такой справочник по структуре процессора можно легко найти с помощью поиска в Google («Intel Manuals», «ARM manuals» и т.д.). Не регистрируйтесь на форуме OSDev.org, чтобы задавать очевидные вопросы. Это просто приведет к ответам вроде «Read the f*** ing Manual». Для начала вы должны попробовать почитать Википедию, пособия для различных инструментов, которые собираетесь использовать.
- Проверьте наличие потенциальных мертвых точек и других ошибок. Недочеты, тупики и другие проблемы могут повлиять на проект вашей операционной системы.
- Если вы хотите способ попроще, представьте дистрибутивы Linux — типа Fedora Revisor, Custom Nimble X, Puppy Remaster, PCLinuxOS mklivecd или SUSE Studio и SUSE KIWI. Тем не менее, создаваемая ОС принадлежит компании, которая первой представила этот сервис (хотя у вас есть права на ее свободное распространение, изменение и запуск, как вам нравится, под GPL).
- Хорошим решением будет создание совершенно нового раздела для разрабатываемой операционной системы.
Реклама
Предупреждения
- Небрежное переписывание ОС на жесткий диск может повредить его полностью. Будьте осторожны
- У вас не получится полностью готовая система за две недели. Начните с загружаемой операционной системы, а затем переходите на более интересный материал.
- Если вы сделаете что-то опрометчивое, как, например, напишите беспорядочные байты в произвольных портах I/O, то уничтожите вашу ОС и можете (в теории) спалить ваше оборудование.
- Не ожидайте, что будет легко построить качественную операционную систему. Существует множество сложных взаимозависимостей. Например, для того, чтобы ОС была способна работать с несколькими процессорами, ваш диспетчер памяти должен иметь «блокирующие» механизмы для предотвращения доступа лишних процессоров в один и тот же ресурс одновременно. Используемые «блоки» предполагают наличие планировщика, чтобы убедиться, что только один процессор обращается к критическому ресурсу в любой момент времени, а все остальные находятся в режиме ожидания. Тем не менее, работа планировщика зависит от присутствия диспетчера памяти. Это пример зависимости от взаимоблокировки. Нет стандартного способа разрешить подобные проблемы; каждый создатель операционной системы, как ожидается, достаточно квалифицирован, чтобы найти свой собственный вариант их решения.
Реклама
Что вам понадобится
- Компьютер
- Процессор, на котором собираетесь строить
- Достаточная оперативная память (ОЗУ) для виртуальной машины
- Основная ОС (используется для разработки исходного кода ассемблера (и др.), а также сборки и упаковки на ранних стадиях работы; в конечном итоге ваша собственная ОС станет первичной)
- Редактор цветного кода Syntax (применяется при отсутствии Integrated Development Environment)
- Компилятор
- CD/DVD привод
Источники
- Справочник: Linux From Scratch
- Загрузчик: GRUB
- Приложения для виртуальной машины: Bochs, VM Ware, XM Virtual Box.
- Руководство по работе с процессором: Intel manuals
- Сайты по разработке ОС: OSDev, OSDever
Об этой статье
Эту страницу просматривали 75 231 раз.
Была ли эта статья полезной?
os-project
Пишем свою собственную операционную систему с нуля!
Идея написать ОС возникла у меня в процессе поиска идеи для сайд-проекта. Это исключительно хобби-проект, не рассчитанный на серьезность и достоверность, и хотя я пытался объяснить многие новые и неочевидные концепты, с которыми я столкнулся в процессе разработки, я мог что-то упустить, так как я сам только учусь — именно поэтому я настоятельно рекомендую пользоваться гуглом и любыми другими источниками информации когда вы познакомитесь с чем-то новым в гайде. Гуглите абсолютно всё. Я серьезно.
**Prerequisites: **Для комфортного прохождения гайда нужно уметь программировать на языке Си на базовом уровне (одно из обязательных требований: понимать принципы работы с указателями), иметь опыт разработки на высокоуровневых ЯП. С синтаксисом ассемблера можно ознакомиться по ссылке ниже, но все же рекомендую побольше почитать или посмотреть по нему туториалов.
Навигация по репозиторию
guide/ — гайд с последовательными уроками, теорией и задокументированным кодом
- Гайд разделен на главы, например
00-BOOT-SECTOR - Главы разделены на упражнения, например
ex00 - Упражнения содержат в себе код и теорию. Выглядят как
main.asm
src/ — исходный код ОС
Установка и запуск
- Установить эмулятор QEMU (подробнее: https://www.qemu.org/download/)
sudo apt install qemu-kvm qemu
- Собрать кросс-компилятор gcc для i386 архитектуры процессора. Удобнее использовать готовый отсюда: https://wiki.osdev.org/GCC_Cross-Compiler#Prebuilt_Toolchains. Для компьютеров на Linux с x86_64 архитектурой:
wget http://newos.org/toolchains/i386-elf-4.9.1-Linux-x86_64.tar.xz
mkdir /usr/local/i386elfgcc
tar -xf i386-elf-4.9.1-Linux-x86_64.tar.xz -C /usr/local/i386elfgcc --strip-components=1
export PATH=$PATH:/usr/local/i386elfgcc/bin
- Клонировать и собрать проект
git clone https://github.com/thedenisnikulin/os-project
cd os-project/src/build
make
- Запустить образ ОС с помощью эмулятора
qemu-system-i386 -fda os-image.bin
Справочник по синтаксису ассемблера NASM
https://www.opennet.ru/docs/RUS/nasm/nasm_ru3.html
Дополнительная информация
Ссылки на полезный материал которым я пользовался в качестве теории.
На русском языке:
- Серия статей о ядре Linux и его внутреннем устройстве: https://github.com/proninyaroslav/linux-insides-ru
- Статья «Давай напишем ядро!»: https://xakep.ru/2018/06/18/lets-write-a-kernel/
На английском языке:
- Небольшая книга по разработке собственной ОС (70 страниц): https://www.cs.bham.ac.uk/~exr/lectures/opsys/10_11/lectures/os-dev.pdf
- Общее введене в разработку операционных систем: https://wiki.osdev.org/Getting_Started
- Туториал по разработке ядра операционной системы для 32-bit x86 архитектуры. Первые шаги в создании собсвтенной ОС: https://wiki.osdev.org/Bare_Bones
- Продолжение предыдущего туториала: https://wiki.osdev.org/Meaty_Skeleton
- Про загрузку ОС (booting): https://wiki.osdev.org/Boot_Sequence
- Список туториалов по написанию ядра и модулей к ОС: https://wiki.osdev.org/Tutorials
- Внушительных размеров гайд по разработке ОС с нуля: http://www.brokenthorn.com/Resources/OSDevIndex.html
- Книга, описывающая ОС xv6 (не особо вникал, но должно быть что-то годное): https://github.com/mit-pdos/xv6-riscv-book, сама ОС: https://github.com/mit-pdos/xv6-public
- «Небольшая книга о разработке операционных систем» https://littleosbook.github.io/
- Операционная система от 0 до 1 (книга): https://github.com/tuhdo/os01
- ОС, написанная как пример для предыдущей книги: https://github.com/tuhdo/sample-os
- Интересная статья про программирование модулей для Линукса и про системное программирование https://jvns.ca/blog/2014/09/18/you-can-be-a-kernel-hacker/
- Еще одна статья от автора предыдущей https://jvns.ca/blog/2014/01/04/4-paths-to-being-a-kernel-hacker/
- Пример простого модуля к ядру линукса: https://github.com/jvns/kernel-module-fun/blob/master/hello.c
- Еще один туториал о том, как написать ОС с нуля: https://github.com/cfenollosa/os-tutorial
- Статья «Давайте напишем ядро»: https://arjunsreedharan.org/post/82710718100/kernels-101-lets-write-a-kernel
- Сабреддит по разработке ОС: https://www.reddit.com/r/osdev/
- Большой список идей для проектов для разных ЯП, включая C/C++: https://github.com/tuvtran/project-based-learning/blob/master/README.md
- Еще один список идей для проектов https://github.com/danistefanovic/build-your-own-x
- «Давайте напишем ядро с поддержкой ввода с клавиатуры и экрана»: https://arjunsreedharan.org/post/99370248137/kernel-201-lets-write-a-kernel-with-keyboard-and
Introduction: Make a Simple Operating System
Ever wanted to make an Operating System? Ever waned to know how command line operating systems work? Everything’s here!
So we’ll make a basic Operating System in C#, don’t worry, if you even know some basics of c++ or java, you’ll understand the code 
By end of this tutorial, you’ll be able to make your cool operating system!
So lets begin with some ind
Step 1: The Concept
So, how actually a OS works? I’ll explain from the level of a electric circuit.
Most of you know logic gates in electric circuits. when many logic gates are connected, i.e. billions of transistors are connected together inside a chip, they can store 0s and 1s. Each gate could store either 0 or 1.
Then the connected transistor forms a Micro-Controller or a Micro-Processor. Here we are going to program on the micro-processor which is in your computer.
Did you know that your computer can also run with a operating system!? Wonder how! Every chip in your computer can run individually without a microprocessor but then without OS, it can’t do multi tasking or run multiple threads together like in simple words, play a video in which one time music can play and one time graphics can play. But both can’t run together.
Because of an operating system, today you can listen to music while browsing the internet.
The OS works based on its kernel. The kernel stores all the library files and whenever we run a program, the program’s code calls header files from the kernel. In windows, kernel is ‘Win32’
Step 2: Materials and Prerequisite Knowledge
What will you need-
1) Microsoft Visual Studio 2012/2013/2010 (Any Edition)
Link: https://www.visualstudio.com/
2) COSMOS User Development Kit Milestone 4 (C# Open Source Managed Operating System)
Link: https://cosmos.codeplex.com/downloads/get/90082
3) Any Virtulization Software to run the OS. I’m using VMware Player.
Perquisite Knowledge-
Basics of C++, Java, .net would work
I just request to just browse some 5-10 basic online tutorials of c# so you can get a better understanding
Step 3: Introduction to COSMOS
Cosmos (C# Open Source Managed Operating System) is an operating system development kit which uses Visual Studio as its development environment. Despite C# in the name, any .NET based language can be used including VB.NET, Fortran, Delphi Prism, IronPython, F# and more. Cosmos itself and the kernel routines are primarily written in C#, and thus the Cosmos name. Besides that, NOSMOS (.NET Open Source Managed Operating System) sounds stupid.
Cosmos is not an operating system in the traditional sense, but instead it is an «Operating System Kit», or as I like to say «Operating System Legos». Cosmos lets you create operating systems just as Visual Studio and C# normally let you create applications. Most users can write and boot their own operating system in just a few minutes, all using Visual Studio. Milestone 5 includes new features such as an integrated project type in Visual Studio, and an integrated debugger. You can debug your operating system directly from Visual Studio using breakpoints. Cosmos is available in two distributions, the developer kit (dev kit), and the user kit. The dev kit is designed for users who want to work on Cosmos itself. The user kit is designed for those who are interested in building their own operating system and doing some Cosmos work. The dev kit might be thought of as the Cosmos SDK. Most users should start off with the user kit as it is not so overwhelming like the dev kit. This article focuses on the user kit.
Step 4: Writing Your First Operating System
So, first lets write a OS which can simply print some text on screen!
So first of all, install all of the software required that is mentioned in the previous step.
1) Open visual studio and navigate to File>New Project
2) In the new project dialog box, select COSMOS and then COSMOS Project in the templates box. Name the project and click OK!
3) Now you’ll see a file «program.cs» in the solution explorer. Click and load it.
4) You’ll see a whole lot of code in it, don’t be scared, we just need to edit code under «public static void Init()» block only
5) Now click on start button you see on visual studio toolbar or from Debug menu, click «start debugging»
6) You’ll see a COSMOS Builder window appear, without any modification, just boot click build
7) WOW! So that QEMU window appear? QEMU is actually a operating system emulator so you are seeing the code being executed. Now lets make some modifications and personalize the OS.
Step 5: Personalizing the OS
Now just make some simple changes in code,
under public static void Init(),
Change Console.WriteLine(«Welcome! You just booted C# code. Please edit Program.cs to fit your needs»); to Console.WriteLine(«Hello World! This is my first operating system»);
So, you’ve changed Welcome! You just booted C# code. Please edit Program.cs to fit your needs to Hello World! This is my first operating system.
We’ve just edited the text. Now lets compile the code and see the output. Perform the steps in previous step to compile the code.
Saw that! Text has changed! you can even put your name here. Congrats! you’ve won half the battle by understanding the basics. But how about a operating system that takes input from user and gives user a output? Just like command line operating systems or Linux terminal.
Step 6: Making a Command Line OS
So here we’ll make a command line operating system. As we saw the previous code, the code just writes some text on screen via Console.WriteLine() function. Now we will write a OS where the user gives the input and the computer processes it.
So, lets make a code which prints Hello User! Thanks for using this operating system! when we give hello as input to the computer.
In programming, there are different kinds of loops which most of you know like If loop which does the action if the conditions are met. So here will will use if loop and if the input of a user is hello, then it will print the line we mentioned above.
CODE:
string input;
input = Console.ReadLine();
if (input == «hello»)
{ Console.WriteLine(«Hello User! Thanks for using this operating system!»);
}
Here in this code, we made a string named input in which we read some data. The If loop checks that if the input matches the word hello, then it should print Hello User! Thanks for using this operating system!
Now lets go and execute this code!
You can now type into the operating system now! type hello
Excited? Saw the output?
You made your own command line OS. but how about adding many more features in this? Like if you type about, it tells you the info about the OS and if you type help it shows the list of commands? Lets do it in the next step.
Step 7: Adding More Features to Our OS
So, lets add more features like about which displays COSMOS OS 1.0 and help which displays
hello — Simple OS command
about — Know about OS
Similarly like the previous step, make 2 more if loops.
CODE:
string input;
input = Console.ReadLine();
if (input == «hello»)
{ Console.WriteLine(«Hello User! Thanks for using this operating system!»); }
if (input == «about»)
{ Console.WriteLine(«COSMOS OS 1.0 «);
}
if (input == «help»)
{
Console.WriteLine(«hello — Simple OS command»);
Console.WriteLine(«about — Know about OS «);
}
In this code as you see we’ve made 2 more if loops. Now execute the code and type about. Saw that, it displays COSMOS OS 1.0 and then close the window and re-execute the code and then type help. Saw that? This means everything is going good.
Now every OS has a option of shut down or power off. So lets add features like shutdown and restart.
Step 8: Adding Shutdown and Restart Features
Adding shutdown and restart feature is also extremely easy. In cosmos the code to shutdown is Cosmos.Sys.Deboot.ShutDown(); and to restart is Cosmos.Sys.Deboot.Reboot();
Now make IF loops which have input as shutdown and restart.
CODE:
string input;
input = Console.ReadLine();
if (input == «hello») { Console.WriteLine(«Hello User! Thanks for using this operating system!»); }
if (input == «about») { Console.WriteLine(«COSMOS OS 1.0 «);
}
if (input == «help») { Console.WriteLine(«hello — Simple OS command»); Console.WriteLine(«about — Know about OS «); }
if (input == «shutdown») { Cosmos.Sys.Deboot.ShutDown(); }
if (input == «restart») { Cosmos.Sys.Deboot.Reboot(); }
Now execute the code and type restart. Saw it xD! It restarted! Now type shutdown. Saw it, the window closed which means the OS shut down.
This may be the most exciting part when you made a OS which can shutdown and restart itself!
Now lets improve this OS by giving it final touches.
Step 9: Final Touches
In the final touches, we will use the switch case because it is much more simpler and better then IF statement. We will also make a command that when the user types a keyword which is not in list of our commands, it should show No such command
Just see the code once.
CODE:
while (true)
{
string command = Console.ReadLine();
switch (command) {
case «shutdown»: { Cosmos.Sys.Deboot.ShutDown();
break;
}
case «help»:
{
Console.WriteLine(«hello — Simple OS command»);
Console.WriteLine(«about — Know about OS «);
break;
}
case «about»:
{
Console.WriteLine(«COSMOS OS 1.0 «);
break;
}
case «reboot»: {
Cosmos.Sys.Deboot.Reboot();
break;
}
case «hello»: {
Console.WriteLine(«Hello User! Thanks for using this operating system!»);
break;
}
default: { Console.WriteLine(«No such command»);
command = null; break; } }
}
Ok, just copy the code into visual studio and execute the code. Note that we added the break;. This is used in switch case. Now have the fun with your OS!
Now try to type a wrong command like help me. this command was not defined so it shows No command found. This means now our OS won’t accept wrong commands. And try all commands. You may have noted that now you can type another command after previous as we are taking input in a constant loop.
Step 10: Running & Testing the OS
So i’m now going to test the OS we made. I’ll be using a Virtualization software to run the OS. I’ll be using VMware player which is free to download!
Ok, so create a virtual machine and open C:Users {Your Username} AppDataRoamingCosmos User Kit
Here you will find cosmos.iso file after you select build ISO in visual studio. Just boot this file in VMware and enjoy your operating system! (make it full screen)
Step 11: Thanks & About Me
I’m a 16 year old embedded developer, working with MIT Media Labs India Initiative. I work in various technologies like ARM, AVR, Arduino and Raspberry Pi.
You can find about me here: http://www.sarthaksethi.net/
Facebook: https://www.facebook.com/pages/Sarthak-Sethi/25272…
Youtube: https://www.youtube.com/channel/UCv7OszKtRFkJ_e0Af…
1 Person Made This Project!