1. Почему так сложно понять asyncio
Асинхронное программирование традиционно относят к темам для «продвинутых». Действительно, у новичков часто возникают сложности с практическим освоением асинхронности. В случае python на то есть весьма веские причины:
-
Асинхронность в python была стандартизирована сравнительно недавно. Библиотека
asyncioпоявилась впервые в версии 3.5 (то есть в 2015 году), хотя возможность костыльно писать асинхронные приложения и даже фреймворки, конечно, была и раньше. Соответственно у Лутца она не описана, а, как всем известно, «чего у Лутца нет, того и знать не надо». -
Рекомендуемый синтаксис асинхронных команд неоднократно менялся уже и после первого появления
asyncio. В сети бродит огромное количество статей и роликов, использующих архаичный код различной степени давности, только сбивающий новичков с толку. -
Официальная документация
asyncio(разумеется, исчерпывающая и прекрасно организованная) рассчитана скорее на создателей фреймворков, чем на разработчиков пользовательских приложений. Там столько всего — глаза разбегаются. А между тем: «Вам нужно знать всего около семи функций для использования asyncio» (c) Юрий Селиванов, автор PEP 492, в которой были добавлены инструкцииasyncиawait
На самом деле наша повседневная жизнь буквально наполнена асинхронностью.
Утром меня поднимает с кровати будильник в телефоне. Я когда-то давно поставил его на 8:30 и с тех пор он исправно выполняет свою работу. Чтобы понять когда вставать, мне не нужно таращиться на часы всю ночь напролет. Нет нужды и периодически на них посматривать (скажем, с интервалом в 5 минут). Да я вообще не думаю по ночам о времени, мой мозг занят более интересными задачами — просмотром снов, например. Асинхронная функция «подъем» находится в режиме ожидания. Как только произойдет событие «на часах 8:30», она сама даст о себе знать омерзительным Jingle Bells.
Иногда по выходным мы с собакой выезжаем на рыбалку. Добравшись до берега, я снаряжаю и забрасываю несколько донок с колокольчиками. И… Переключаюсь на другие задачи: разговариваю с собакой, любуюсь красотами природы, истребляю на себе комаров. Я не думаю о рыбе. Задачи «поймать рыбу удочкой N» находятся в режиме ожидания. Когда рыба будет готова к общению, одна из удочек сама даст о себе знать звонком колокольчика.
Будь я автором самого толстого в мире учебника по python, я бы рассказывал читателям про асинхронное программирование уже с первых страниц. Вот только написали «Hello, world!» и тут же приступили к созданию «Hello, asynchronous world!». А уже потом циклы, условия и все такое.
Но при написании этой статьи я все же облегчил себе задачу, предположив, что читатели уже знакомы с основами python и им не придется втолковывать что такое генераторы или менеджеры контекста. А если кто-то не знаком, тогда сейчас самое время ознакомиться.
Пара слов о терминологии
В настоящем руководстве я стараюсь придерживаться не академических, а сленговых терминов, принятых в русскоязычных командах, в которых мне довелось работать. То есть «корутина», а не «сопрограмма», «футура», а не «фьючерс» и т. д. При всем при том, я еще не столь низко пал, чтобы, скажем, задачу именовать «таской». Если в вашем проекте приняты другие названия, прошу отнестись с пониманием и не устраивать терминологический холивар.
Внимание! Все примеры отлажены в консольном python 3.10. Вероятно в ближайших последующих версиях также работать будут. Однако обратной совместимости со старыми версиями не гарантирую. Если у вас что-то пошло не так, попробуйте, установить 3.10 и/или не пользоваться Jupyter.
2. Первое асинхронное приложение
Предположим, у нас есть две функции в каждой из которых есть некая «быстрая» операция (например, арифметическое вычисление) и «медленная» операция ввода/вывода. Детали реализации медленной операции нам сейчас не важны. Будем моделировать ее функцией time.sleep(). Наша задача — выполнить обе задачи как можно быстрее.
Традиционное решение «в лоб»:
Пример 2.1
import time


def fun1(x):
    print(x**2)
    time.sleep(3)
    print('fun1 завершена')


def fun2(x):
    print(x**0.5)
    time.sleep(3)
    print('fun2 завершена')


def main():
    fun1(4)
    fun2(4)


print(time.strftime('%X'))

main()

print(time.strftime('%X'))
Никаких сюрпризов — fun2 честно ждет пока полностью отработает fun1 (и быстрая ее часть, и медленная) и только потом начинает выполнять свою работу. Весь процесс занимает 3 + 3 = 6 секунд. Строго говоря, чуть больше чем 6 за счет «быстрых» арифметических операций, но в выбранном масштабе разницу уловить невозможно.
Теперь попробуем сделать то же самое, но в асинхронном режиме. Пока просто запустите предложенный код, подробно мы его разберем чуть позже.
Пример 2.2
import asyncio
import time


async def fun1(x):
    print(x**2)
    await asyncio.sleep(3)
    print('fun1 завершена')


async def fun2(x):
    print(x**0.5)
    await asyncio.sleep(3)
    print('fun2 завершена')


async def main():
    task1 = asyncio.create_task(fun1(4))
    task2 = asyncio.create_task(fun2(4))

    await task1
    await task2


print(time.strftime('%X'))

asyncio.run(main())

print(time.strftime('%X'))
Сюрприз! Мгновенно выполнились быстрые части обеих функций и затем через 3 секунды (3, а не 6!) одновременно появились оба текстовых сообщения. Полное ощущение, что функции выполнились параллельно (на самом деле нет).
А можно аналогичным образом добавить еще одну функцию-соню? Пожалуйста — хоть сто! Общее время выполнения программы будет по-прежнему определяться самой «тормознутой» из них. Добро пожаловать в асинхронный мир!
Что изменилось в коде?
-
Перед определениями функций появился префикс
async. Он говорит интерпретатору, что функция должна выполняться асинхронно. -
Вместо привычного
time.sleepмы использовалиasyncio.sleep. Это «неблокирующий sleep». В рамках функции ведет себя так же, как традиционный, но не останавливает интерпретатор в целом. -
Перед вызовом асинхронных функций появился префикс
await. Он говорит интерпретатору примерно следующее: «я тут возможно немного потуплю, но ты меня не жди — пусть выполняется другой код, а когда у меня будет настроение продолжиться, я тебе маякну». -
На базе функций мы при помощи
asyncio.create_taskсоздали задачи (что это такое разберем позже) и запустили все это при помощиasyncio.run
Как это работает:
-
выполнилась быстрая часть функции
fun1 -
fun1сказала интерпретатору «иди дальше, я посплю 3 секунды» -
выполнилась быстрая часть функции
fun2 -
fun2сказала интерпретатору «иди дальше, я посплю 3 секунды» -
интерпретатору дальше делать нечего, поэтому он ждет пока ему маякнет первая проснувшаяся функция
-
на доли миллисекунды раньше проснулась
fun1(она ведь и уснула чуть раньше) и отрапортовала нам об успешном завершении -
то же самое сделала функция
fun2
Замените «посплю» на «пошлю запрос удаленному сервису и буду ждать ответа» и вы поймете как работает реальное асинхронное приложение.
Возможно в других руководствах вам встретится «старомодный» код типа:
Пример 2.3
import asyncio
import time


async def fun1(x):
    print(x**2)
    await asyncio.sleep(3)
    print('fun1 завершена')


async def fun2(x):
    print(x**0.5)
    await asyncio.sleep(3)
    print('fun2 завершена')


print(time.strftime('%X'))

loop = asyncio.get_event_loop()
task1 = loop.create_task(fun1(4))
task2 = loop.create_task(fun2(4))
loop.run_until_complete(asyncio.wait([task1, task2]))

print(time.strftime('%X'))
Результат тот же самый, но появилось упоминание о каком-то непонятном цикле событий (event loop) и вместо одной asyncio.runиспользуются аж три функции: asyncio.wait, asyncio.get_event_loop и asyncio.run_until_complete. Кроме того, если вы используете python версии 3.10+, в консоль прилетает раздражающее предупреждение DeprecationWarning: There is no current event loop, что само по себе наводит на мысль, что мы делаем что-то слегка не так.
Давайте пока руководствоваться Дзен питона: «Простое лучше, чем сложное», а цикл событий сам придет к нам… в свое время.
Пара слов о «медленных» операциях
Как правило, это все, что связано с вводом выводом: получение результата http-запроса, файловые операции, обращение к базе данных.
Однако следует четко понимать: для эффективного использования с asyncio любой медленный интерфейс должен поддерживать асинхронные функции. Иначе никакого выигрыша в производительности вы не получите. Попробуйте использовать в примере 2.2 time.sleep вместо asyncio.sleep и вы поймете о чем я.
Что касается http-запросов, то здесь есть великолепная библиотека aiohttp, честно реализующая асинхронный доступ к веб-серверу. С файловыми операциями сложнее. В Linux доступ к файловой системе по определению не асинхронный, поэтому, несмотря на наличие удобной библиотеки aiofiles, где-то в ее глубине всегда будет иметь место многопоточный «мостик» к низкоуровневым функциям ОС. С доступом к БД примерно то же самое. Вроде бы, последние версии SQLAlchemy поддерживают асинхронный доступ, но что-то мне подсказывает, что в основе там все тот же старый добрый Threadpool. С другой стороны, в веб-приложениях львиная доля задержек относится именно к сетевому общению, так что «не вполне асинхронный» доступ к локальным ресурсам обычно не является бутылочным горлышком.
Внимательные читатели меня поправили в комментах. В Linux, начиная с ядра 5.1, есть полноценный асинхронный интерфейс io_uring и это прекрасно. Кому интересны детали, рекомендую пройти вот сюда.
3. Асинхронные функции и корутины
Теперь давайте немного разберемся с типами. Вернемся к «неасинхронному» примеру 2.1, слегка модифицировав его:
Пример 3.1
import time


def fun1(x):
    print(x**2)
    time.sleep(3)
    print('fun1 завершена')


def fun2(x):
    print(x**0.5)
    time.sleep(3)
    print('fun2 завершена')


def main():
    fun1(4)
    fun2(4)


print(type(fun1))

print(type(fun1(4)))
Все вполне ожидаемо. Функция имеет тип <class 'function'>, а ее результат — <class 'NoneType'>
Теперь аналогичным образом исследуем «асинхронный» пример 2.2:
Пример 3.2
import asyncio
import time


async def fun1(x):
    print(x**2)
    await asyncio.sleep(3)
    print('fun1 завершена')


async def fun2(x):
    print(x**0.5)
    await asyncio.sleep(3)
    print('fun2 завершена')


async def main():
    task1 = asyncio.create_task(fun1(4))
    task2 = asyncio.create_task(fun2(4))

    await task1
    await task2


print(type(fun1))

print(type(fun1(4)))
Уже интереснее! Класс функции не изменился, но благодаря ключевому слову async она теперь возвращает не <class 'NoneType'>, а <class 'coroutine'>. Ничто превратилось в нечто! На сцену выходит новая сущность — корутина.
Что нам нужно знать о корутине? На начальном этапе немного. Помните как в python устроен генератор? Ну, это то, что функция начинает возвращать, если в нее добавить yield вместо return. Так вот, корутина — это разновидность генератора.
Корутина дает интерпретатору возможность возобновить базовую функцию, которая была приостановлена в месте размещения ключевого слова await.
И вот тут начинается терминологическая путаница, которая попила немало крови добрых разработчиков на собеседованиях. Сплошь и рядом корутиной называют саму функцию, содержащую await. Строго говоря, это неправильно. Корутина — это то, что возвращает функция с await. Чувствуете разницу между f и f()?
С генераторами, кстати, та же самая история. Генератором как-то повелось называть функцию, содержащую yield, хотя по правильному-то она «генераторная функция». А генератор — это именно тот объект, который генераторная функция возвращает.
Далее по тексту мы постараемся придерживаться правильной терминологии: асинхронная (или корутинная) функция — это f, а корутина — f(). Но если вы в разговоре назовете корутиной асинхронную функцию, беды большой не произойдет, вас поймут. «Не важно, какого цвета кошка, лишь бы она ловила мышей» (с) тов. Дэн Сяопин
4. Футуры и задачи
Продолжим исследовать нашу программу из примера 2.2. Помнится, на базе корутин мы там создали какие-то загадочные задачи:
Пример 4.1
import asyncio


async def fun1(x):
    print(x**2)
    await asyncio.sleep(3)
    print('fun1 завершена')


async def fun2(x):
    print(x**0.5)
    await asyncio.sleep(3)
    print('fun2 завершена')


async def main():
    task1 = asyncio.create_task(fun1(4))
    task2 = asyncio.create_task(fun2(4))

    print(type(task1))
    print(task1.__class__.__bases__)

    await task1
    await task2


asyncio.run(main())
Ага, значит задача (что бы это ни значило) имеет тип <class '_asyncio.Task'>. Привет, капитан Очевидность!
А кто ваша мама, ребята? А мама наша — анархия какая-то еще более загадочная футура (<class '_asyncio.Future'>).
В asyncio все шиворот-навыворот, поэтому сначала выясним что такое футура (которую мы видим впервые в жизни), а потом разберемся с ее дочкой задачей (с которой мы уже имели честь познакомиться в предыдущем разделе).
Футура (если совсем упрощенно) — это оболочка для некой асинхронной сущности, позволяющая выполнять ее «как бы одновременно» с другими асинхронными сущностями, переключаясь от одной сущности к другой в точках, обозначенных ключевым словом await
Кроме того футура имеет внутреннюю переменную «результат», которая доступна через .result() и устанавливается через .set_result(value). Пока ничего не надо делать с этим знанием, оно пригодится в дальнейшем.
У футуры на самом деле еще много чего есть внутри, но на данном этапе не будем слишком углубляться. Футуры в чистом виде используются в основном разработчиками фреймворков, нам же для разработки приложений приходится иметь дело с их дочками — задачами.
Задача — это частный случай футуры, предназначенный для оборачивания корутины.
Все трагически усложняется
Вернемся к примеру 2.2 и опишем его логику заново, используя теперь уже знакомые нам термины — корутины и задачи:
-
корутину асинхронной функции
fun1обернули задачейtask1 -
корутину асинхронной функции
fun2обернули задачейtask2 -
в асинхронной функции main обозначили точку переключения к задаче
task1 -
в асинхронной функции main обозначили точку переключения к задаче
task2 -
корутину асинхронной функции
mainпередали в функциюasyncio.run
Бр-р-р, ужас какой… Воистину: «Во многой мудрости много печали; и кто умножает познания, умножает скорбь» (Еккл. 1:18)
Все счастливо упрощается
А можно проще? Ведь понятие корутина нам необходимо, только чтобы отличать функцию от результата ее выполнения. Давайте попробуем временно забыть про них. Попробуем также перефразировать неуклюжие «точки переключения» и вот эти вот все «обернули-передали». Кроме того, поскольку asyncio.run — это единственная рекомендованная точка входа в приложение для python 3.8+, ее отдельное упоминание тоже совершенно излишне для понимания логики нашего приложения.
А теперь (барабанная дробь)… Мы вообще уберем из кода все упоминания об асинхронности. Я понимаю, что работать не будет, но все же давайте посмотрим что получится:
Пример 4.2 (не работающий)
def fun1(x):
    print(x**2)

    # запустили ожидание
    sleep(3)

    print('fun1 завершена')


def fun2(x):
    print(x**0.5)

    # запустили ожидание
    sleep(3)

    print('fun2 завершена')


def main():
    # создали конкурентную задачу из функции fun1
    task1 = create_task(fun1(4))

    # создали конкурентную задачу из функции fun2
    task2 = create_task(fun2(4))

    # запустили задачу task1
    task1

    # запустили task2
    task2


main()
Кощунство, скажете вы? Нет, я всего лишь честно выполняю рекомендацию великого и ужасного Гвидо ван Россума:
«Прищурьтесь и притворитесь, что ключевых слова async и await нет»
Звучит почти как: «Наденьте зеленые очки и притворитесь, что стекляшки — это изумруды»
Итак, в «прищуренной вселенной Гвидо»:
Задачи — это «ракеты-носители» для конкурентного запуска «боеголовок»-функций.
А если вообще без задач?
Как это? Ну вот так, ни в какие задачи ничего не заворачивать, а просто эвейтнуть в main() сами корутины. А что, имеем право!
Пробуем:
Пример 4.3 (неудачный)
import asyncio
import time


async def fun1(x):
    print(x**2)
    await asyncio.sleep(3)
    print('fun1 завершена')


async def fun2(x):
    print(x**0.5)
    await asyncio.sleep(3)
    print('fun2 завершена')


async def main():
    await fun1(4)
    await fun2(4)


print(time.strftime('%X'))

asyncio.run(main())

print(time.strftime('%X'))
Грусть-печаль… Снова 6 секунд как в давнем примере 1.1, ни разу не асинхронном. Боеголовка без ракеты взлетать отказалась.
Вывод:
В asyncio.run нужно передавать асинхронную функцию с эвейтами на задачи, а не на корутины. Иначе не взлетит. То есть работать-то будет, но сугубо последовательно, без всякой конкурентности.
Пара слов о конкурентности
С точки зрения разработчика и (особенно) пользователя конкурентное выполнение в асинхронных и многопоточных приложениях выглядит почти как параллельное. На самом деле никакого параллельного выполнения чего бы то ни было в питоне нет и быть не может. Кто не верит — погулите аббревиатуру GIL. Именно поэтому мы используем осторожное выражение «конкурентное выполнение задач» вместо «параллельное».
Нет, конечно, если очень хочется настоящего параллелизма, можно запустить несколько интерпретаторов python одновременно (библиотека multiprocessing фактически так и делает). Но без крайней нужды лучше такими вещами не заниматься, ибо издержки чаще всего будут непропорционально велики по сравнению с профитом.
А что есть «крайняя нужда»? Это приложения-числодробилки. В них подавляющая часть времени выполнения расходуется на операции процессора и обращения к памяти. Никакого ленивого ожидания ответа от медленной периферии, только жесткий математический хардкор. В этом случае вас, конечно, не спасет ни изящная асинхронность, ни неуклюжая мультипоточность. К счастью, такие негуманные приложения в практике веб-разработки встречаются нечасто.
5. Асинхронные менеджеры контекста и настоящее асинхронное приложение
Пришло время написать на asyncio не тупой перебор неблокирующих слипов, а что-то выполняющее действительно осмысленную работу. Но прежде чем приступить, разберемся с асинхронными менеджерами контекста.
Если вы умеете работать с обычными менеджерами контекста, то без труда освоите и асинхронные. Тут используется знакомая конструкция with, только с префиксом async, и те же самые контекстные методы, только с буквой a в начале.
Пример 5.1
import asyncio


# имитация  асинхронного соединения с некой периферией
async def get_conn(host, port):
    class Conn:
        async def put_data(self):
            print('Отправка данных...')
            await asyncio.sleep(2)
            print('Данные отправлены.')

        async def get_data(self):
            print('Получение данных...')
            await asyncio.sleep(2)
            print('Данные получены.')

        async def close(self):
            print('Завершение соединения...')
            await asyncio.sleep(2)
            print('Соединение завершено.')

    print('Устанавливаем соединение...')
    await asyncio.sleep(2)
    print('Соединение установлено.')
    return Conn()


class Connection:
    # этот конструктор будет выполнен в заголовке with
    def __init__(self, host, port):
        self.host = host
        self.port = port

    # этот метод будет неявно выполнен при входе в with
    async def __aenter__(self):
        self.conn = await get_conn(self.host, self.port)
        return self.conn

    # этот метод будет неявно выполнен при выходе из with
    async def __aexit__(self, exc_type, exc, tb):
        await self.conn.close()


async def main():
    async with Connection('localhost', 9001) as conn:
        send_task = asyncio.create_task(conn.put_data())
        receive_task = asyncio.create_task(conn.get_data())

        # операции отправки и получения данных выполняем конкурентно
        await send_task
        await receive_task


asyncio.run(main())
Создавать свои асинхронные менеджеры контекста разработчику приложений приходится нечасто, а вот использовать готовые из асинхронных библиотек — постоянно. Поэтому нам полезно знать, что находится у них внутри.
Теперь, зная как работают асинхронные менеджеры контекста, можно написать ну очень полезное приложение, которое узнает погоду в разных городах при помощи библиотеки aiohttp и API-сервиса openweathermap.org:
Пример 5.2
import asyncio
import time
import aiohttp


async def get_weather(city):
    async with aiohttp.ClientSession() as session:
        url = f'http://api.openweathermap.org/data/2.5/weather'
              f'?q={city}&APPID=2a4ff86f9aaa70041ec8e82db64abf56'

        async with session.get(url) as response:
            weather_json = await response.json()
            print(f'{city}: {weather_json["weather"][0]["main"]}')


async def main(cities_):
    tasks = []
    for city in cities_:
        tasks.append(asyncio.create_task(get_weather(city)))

    for task in tasks:
        await task


cities = ['Moscow', 'St. Petersburg', 'Rostov-on-Don', 'Kaliningrad', 'Vladivostok',
          'Minsk', 'Beijing', 'Delhi', 'Istanbul', 'Tokyo', 'London', 'New York']

print(time.strftime('%X'))

asyncio.run(main(cities))

print(time.strftime('%X'))
«И говорит по радио товарищ Левитан: в Москве погода ясная, а в Лондоне — туман!» (c) Е.Соев
Кстати, ключик к API дарю, пользуйтесь на здоровье.
Внимание! Если будет слишком много желающих потестить сервис с моим ключом, его могут временно заблокировать. В этом случае просто получите свой собственный, это быстро и бесплатно.
Опрос 12-ти городов на моем канале 100Mb занимает доли секунды.
Обратите внимание, мы использовали два вложенных менеджера контекста: для сессии и для функции get. Так требует документация aiohttp, не будем с ней спорить.
Давайте попробуем реализовать тот же самый функционал, используя классическую синхронную библиотеку requests и сравним скорость:
Пример 5.3
import time
import requests


def get_weather(city):
    url = f'http://api.openweathermap.org/data/2.5/weather'
          f'?q={city}&APPID=2a4ff86f9aaa70041ec8e82db64abf56'

    weather_json = requests.get(url).json()
    print(f'{city}: {weather_json["weather"][0]["main"]}')


def main(cities_):
    for city in cities_:
        get_weather(city)


cities = ['Moscow', 'St. Petersburg', 'Rostov-on-Don', 'Kaliningrad', 'Vladivostok',
          'Minsk', 'Beijing', 'Delhi', 'Istanbul', 'Tokyo', 'London', 'New York']

print(time.strftime('%X'))

main(cities)

print(time.strftime('%X'))
Работает превосходно, но… В среднем занимает 2-3 секунды, то есть раз в 10 больше чем в асинхронном примере. Что и требовалось доказать.
А может ли асинхронная функция не просто что-то делать внутри себя (например, запрашивать и выводить в консоль погоду), но и возвращать результат? Ту же погоду, например, чтобы дальнейшей обработкой занималась функция верхнего уровня main().
Нет ничего проще. Только в этом случае для группового запуска задач необходимо использовать уже не цикл с await, а функцию asyncio.gather
Давайте попробуем:
Пример 5.4
import asyncio
import time
import aiohttp


async def get_weather(city):
    async with aiohttp.ClientSession() as session:
        url = f'http://api.openweathermap.org/data/2.5/weather'
              f'?q={city}&APPID=2a4ff86f9aaa70041ec8e82db64abf56'

        async with session.get(url) as response:
            weather_json = await response.json()
            return f'{city}: {weather_json["weather"][0]["main"]}'


async def main(cities_):
    tasks = []
    for city in cities_:
        tasks.append(asyncio.create_task(get_weather(city)))

    results = await asyncio.gather(*tasks)

    for result in results:
        print(result)


cities = ['Moscow', 'St. Petersburg', 'Rostov-on-Don', 'Kaliningrad', 'Vladivostok',
          'Minsk', 'Beijing', 'Delhi', 'Istanbul', 'Tokyo', 'London', 'New York']

print(time.strftime('%X'))

asyncio.run(main(cities))

print(time.strftime('%X'))
Красиво получилось! Обратите внимание, мы использовали выражение со звездочкой *tasks для распаковки списка задач в аргументы функции asyncio.gather.
Пара слов о лишних сущностях
Кажется, я совершил невозможное. Настучал уже почти тысячу строк текста и ни разу не упомянул о цикле событий. Ну, почти ни разу. Один раз все-же упомянул: в примере 2.3 «как не надо делать». А между тем, в традиционных руководствах по asyncio этим самым циклом событий начинают душить несчастного читателя буквально с первой страницы. На самом деле цикл событий в наших программах присутствует, но он надежно скрыт от посторонних глаз высокоуровневыми конструкциями. До сих пор у нас не возникало в нем нужды, вот и я и не стал плодить лишних сущностей, руководствуясь принципом дорогого товарища Оккама.
Но вскоре жизнь заставит нас извлечь этот скелет из шкафа и рассмотреть его во всех подробностях.
Продолжение следует…
Асинхронное программирование — это особенность современных языков программирования, которая позволяет выполнять операции, не дожидаясь их завершения. Асинхронность — одна из важных причин популярности Node.js.
Представьте приложение для поиска по сети, которое открывает тысячу соединений. Можно открывать соединение, получать результат и переходить к следующему, двигаясь по очереди. Однако это значительно увеличивает задержку в работе программы. Ведь открытие соединение — операция, которая занимает время. И все это время последующие операции находятся в процессе ожидания.
А вот асинхронность предоставляет способ открытия тысячи соединений одновременно и переключения между ними. По сути, появляется возможность открыть соединение и переходить к следующему, ожидая ответа от первого. Так продолжается до тех пор, пока все не вернут результат.

На графике видно, что синхронный подход займет 45 секунд, в то время как при использовании асинхронности время выполнения можно сократить до 20 секунд.
Где асинхронность применяется в реальном мире?
Асинхронность больше всего подходит для таких сценариев:
- Программа выполняется слишком долго.
- Причина задержки — не вычисления, а ожидания ввода или вывода.
- Задачи, которые включают несколько одновременных операций ввода и вывода.
Это могут быть:
- Парсеры,
- Сетевые сервисы.
Разница в понятиях параллелизма, concurrency, поточности и асинхронности
Параллелизм — это выполнение нескольких операций за раз. Многопроцессорность — один из примеров. Отлично подходит для задач, нагружающих CPU.
Concurrency — более широкое понятие, которое описывает несколько задач, выполняющихся с перекрытием друг друга.
Поточность — поток — это отдельный поток выполнения. Один процесс может содержать несколько потоков, где каждый будет работать независимо. Отлично подходит для IO-операций.
Асинхронность — однопоточный, однопроцессорный дизайн, использующий многозадачность. Другими словами, асинхронность создает впечатление параллелизма, используя один поток в одном процессе.
Составляющие асинхронного программирования
Разберем различные составляющие асинхронного программирования подробно. Также используем код для наглядности.
Сопрограммы
Сопрограммы (coroutine) — это обобщенные формы подпрограмм. Они используются для кооперативных задач и ведут себя как генераторы Python.
Для определения сопрограммы асинхронная функция использует ключевое слово await. При его использовании сопрограмма передает поток управления обратно в цикл событий (также известный как event loop).
Для запуска сопрограммы нужно запланировать его в цикле событий. После этого такие сопрограммы оборачиваются в задачи (Tasks) как объекты Future.
Пример сопрограммы
В коде ниже функция async_func вызывается из основной функции. Нужно добавить ключевое слово await при вызове синхронной функции. Функция async_func не будет делать ничего без await.
import asyncio


async def async_func():
    print('Запуск ...')
    await asyncio.sleep(1)
    print('... Готово!')


async def main():
    async_func()  # этот код ничего не вернет
    await async_func()


asyncio.run(main())
Вывод:
Warning (from warnings module):
  File "AppDataLocalProgramsPythonPython38main.py", line 8
    async_func() # этот код ничего не вернет
RuntimeWarning: coroutine 'async_func' was never awaited
Запуск ...
... Готово!
Задачи (tasks)
Задачи используются для планирования параллельного выполнения сопрограмм.
При передаче сопрограммы в цикл событий для обработки можно получить объект Task, который предоставляет способ управления поведением сопрограммы извне цикла событий.
Пример задачи
В коде ниже создается create_task (встроенная функция библиотеки asyncio), после чего она запускается.
import asyncio


async def async_func():
    print('Запуск ...')
    await asyncio.sleep(1)
    print('... Готово!')


async def main():
    task = asyncio.create_task (async_func())
    await task

asyncio.run(main())
Вывод:
Запуск ...
... Готово!
Циклы событий
Этот механизм выполняет сопрограммы до тех пор, пока те не завершатся. Это можно представить как цикл while True, который отслеживает сопрограммы, узнавая, когда те находятся в режиме ожидания, чтобы в этот момент выполнить что-нибудь другое.
Он может разбудить спящую сопрограмму в тот момент, когда она ожидает своего времени, чтобы выполниться. В одно время может выполняться лишь один цикл событий в Python.
Пример цикла событий
Дальше создаются три задачи, которые добавляются в список. Они выполняются асинхронно с помощью get_event_loop, create_task и await библиотеки asyncio.
import asyncio


async def async_func(task_no):
    print(f'{task_no}: Запуск ...')
    await asyncio.sleep(1)
    print(f'{task_no}: ... Готово!')


async def main():
    taskA = loop.create_task (async_func('taskA'))
    taskB = loop.create_task(async_func('taskB'))
    taskC = loop.create_task(async_func('taskC'))
    await asyncio.wait([taskA,taskB,taskC])


if __name__ == "__main__":
    try:
        loop = asyncio.get_event_loop()
        loop.run_until_complete(main())
    except :
        pass
Вывод:
taskA: Запуск ...
taskB: Запуск ...
taskC: Запуск ...
taskA: ... Готово!
taskB: ... Готово!
taskC: ... Готово!
Future
Future — это специальный низкоуровневый объект, который представляет окончательный результат выполнения асинхронной операции.
Если этот объект подождать (await), то сопрограмма дождется, пока Future не будет выполнен в другом месте.
В следующих разделах посмотрим, на то, как Future используется.
Сравнение многопоточности и асинхронности
Прежде чем переходить к асинхронности попробуем проверить многопоточность на производительность и сравним результаты. Для этого теста будем получать данные по URL с разной частотой: 1, 10, 50, 100 и 500 раз соответственно. После этого сравним производительность обоих подходов.
Реализация
Многопоточность:
import requests
import time
from concurrent.futures import ProcessPoolExecutor


def fetch_url_data(pg_url):
    try:
        resp = requests.get(pg_url)
    except Exception as e:
        print(f"Возникла ошибка при получении данных из url: {pg_url}")
    else:
        return resp.content


def get_all_url_data(url_list):
    with ProcessPoolExecutor() as executor:
        resp = executor.map(fetch_url_data, url_list)
    return resp


if __name__=='__main__':
    url = "https://www.uefa.com/uefaeuro-2020/"
    for ntimes in [1,10,50,100,500]:
        start_time = time.time()
        responses = get_all_url_data([url] * ntimes)
        print(f'Получено {ntimes} результатов запроса за {time.time() - start_time} секунд')
Вывод:
Получено 1 результатов запроса за 0.9133939743041992 секунд
Получено 10 результатов запроса за 1.7160518169403076 секунд
Получено 50 результатов запроса за 3.842841625213623 секунд
Получено 100 результатов запроса за 7.662721633911133 секунд
Получено 500 результатов запроса за 32.575703620910645 секунд
ProcessPoolExecutor — это пакет Python, который реализовывает интерфейс Executor. fetch_url_data — функция для получения данных по URL с помощью библиотеки request. После получения get_all_url_data используется, чтобы замапить function_url_data на список URL.
Асинхронность:
import asyncio
import time
from aiohttp import ClientSession, ClientResponseError


async def fetch_url_data(session, url):
    try:
        async with session.get(url, timeout=60) as response:
            resp = await response.read()
    except Exception as e:
        print(e)
    else:
        return resp
    return


async def fetch_async(loop, r):
    url = "https://www.uefa.com/uefaeuro-2020/"
    tasks = []
    async with ClientSession() as session:
        for i in range(r):
            task = asyncio.ensure_future(fetch_url_data(session, url))
            tasks.append(task)
        responses = await asyncio.gather(*tasks)
    return responses


if __name__ == '__main__':
    for ntimes in [1, 10, 50, 100, 500]:
        start_time = time.time()
        loop = asyncio.get_event_loop()
        future = asyncio.ensure_future(fetch_async(loop, ntimes))
        # будет выполняться до тех пор, пока не завершится или не возникнет ошибка
        loop.run_until_complete(future)
        responses = future.result()
        print(f'Получено {ntimes} результатов запроса за {time.time() - start_time} секунд')
Вывод:
Получено 1 результатов запроса за 0.41477298736572266 секунд
Получено 10 результатов запроса за 0.46897053718566895 секунд
Получено 50 результатов запроса за 2.3057644367218018 секунд
Получено 100 результатов запроса за 4.6860511302948 секунд
Получено 500 результатов запроса за 18.013994455337524 секунд
Нужно использовать функцию get_event_loop для создания и добавления задач. Чтобы использовать более одного URL, нужно применить функцию ensure_future.
Функция fetch_async используется для добавления задачи в объект цикла событий, а fetch_url_data — для чтения данных URL с помощью пакета session. Метод future_result возвращает ответ всех задач.
Результаты
Как можно увидеть, асинхронное программирование на порядок эффективнее многопоточности для этой программы.
Выводы
Асинхронное программирование демонстрирует более высокие результаты в плане производительности, задействуя параллелизм, а не многопоточность. Его стоит использовать в тех программах, где этот параллелизм можно применить.
Слышали об асинхронном программировании в Python? Интересно познакомиться с его особенностями и практическими областями применения? Быть может, вам даже пришлось столкнуться с определенными проблемами во время написания многопоточных программ. В любом случае, если вы хотите получше познакомиться с темой, это правильное место.
Содержание статьи
- Особенности асинхронного программирования в Python
- Создания синхронного веб-сервера
- Иной подход к программированию в Python
- Программирование родительского элемента: не так уж просто!
- Использование асинхронных особенностей Python на практике
- Синхронное программирование Python
- Совместный параллелизм с блокирующими вызовами
- Кооперативный параллелизм с неблокирующими вызовами Python
- Синхронные (блокирующие) HTTP вызовы
- Асинхронные (неблокирующие) HTTP вызовы Python
Основные пункты данной статьи:
- Что такое синхронное программирование;
- Что такое асинхронное программирование;
- Когда требуется написание асинхронных программ;
- Как использовать асинхронные особенности Python.
Синхронная программа выполняется поэтапно. Даже при наличии условных операторов, циклов и вызовов функций, код можно рассматривать как процесс, где за раз выполняется один шаг. По завершении одного шага программа переходит к другому.
Вот два примера программ, которые работают синхронно:
- Программы для пакетной обработки обычно создаются синхронно. Вы получаете некие входные данные, обрабатываете их и создаете определенный вывод. Шаг следует за шагом до тех пор, пока программа не достигнет желаемого вывода. При написании кода важно только следить за этапами и их правильном порядком;
- Программы для командной строки является небольшими, быстрыми процессами, которые запускаются в терминале. Данные скрипты используются для создания или трансформирования чего-то, генерации отчета или создания списка данных. Все это может быть создано через серию шагов, которые выполняются последовательно до завершения окончания программы.
Асинхронная программа действует иначе. Код по-прежнему будет выполняться шаг за шагом.
Основная разница в том, что системе не обязательно ждать завершения одного этапа перед переходом к следующему.
Это значит, что программа перейдет к выполнению следующего этапа, когда предыдущий еще не завершен и все еще выполняется где-то параллельно. Это также значит, что программе известно, что нужно делать после окончания предыдущего этапа.
Зачем же писать код подобным образом? Далее будет дан подробный ответ на данный вопрос, а также предоставлены инструменты для элегантного решения интересных асинхронных задач.
Создания синхронного веб-сервера
Процесс создания веб-сервера в общем и целом схож с пакетной обработкой. Сервер получает определенные входные данные, обрабатывает их и создает вывод. Написанная таким образом синхронная программа создает рабочий веб-сервер.
Однако такой веб-сервер был бы просто ужасным.
Почему? В данном случае каждая единица работы (ввод, обработка, вывод) не является единственной целью. Настоящая цель заключается в быстром выполнении сотен или даже тысяч единиц работы. Это может продолжаться на протяжении длительного времени, и несколько рабочих единиц могут поступить одновременно.
Можно ли сделать синхронный веб-сервер лучше? Конечно можно попробовать оптимизировать этапы выполнения для наиболее быстрой работы. К сожалению, у этого подхода есть ограничения. Результатом может быть веб-сервер, который отвечает медленно, не справляется с работой или копит невыполненные задачи даже по завершении срока.
На заметку: Есть и другие ограничения, с которыми можно столкнуться при попытке оптимизировать указанный выше подход. В их число входит скорость сети, скорость I/O (ввод-вывода) файла, скорость запроса базы данных (MySQL, SQLite) и скорость других подсоединенных устройств. Общая особенность в том, что везде есть функции ввода-вывода. Все эти элементы работают на порядок медленнее, чем скорость обработки CPU.
В синхронной программе, если шаг выполнения запускает запрос к базе данных, тогда CPU практически не используется, пока не будет возвращен запрос к базе данных. Для пакетно-ориентированных программ большую часть времени это не является приоритетом. Обработка результатов этой операции ввода-вывода является целью. Часто это может занять больше времени, чем сама операция ввода-вывода. Любые усилия по оптимизации будут сосредоточены на обработке, а не на вводе-выводе.
Техники асинхронного программирования позволяют программам использовать преимущества относительно медленных процессов ввода-вывода, освобождая CPU для выполнения другой работы.
Иной подход к программированию в Python
В начале изучения асинхронного программирования вы можете столкнуться с многочисленными дискуссиями относительно важности блокирования и написания неблокирующего кода. У меня, например, было много сложностей при разборе данных концепций, как во время разбора документации, так и при обсуждении темы с другими программистами.
Что такое неблокирующий код? Возникает встречный вопрос — что такое блокирующий код? Помогут ли ответы на данные вопросы при создании лучшего веб-сервера? Если да, как это сделать? Будем выяснять!
Написание асинхронных программ требует несколько иного подхода к программированию. Новый взгляд на устоявшуюся в сознании тему может быть непривычным, но это интересное упражнение. Все оттого, что реальный мир сам по себе по большей части асинхронный, как и то, как мы с ним взаимодействуем.
Представьте следующее: вы родитель, что пытается совмещать сразу несколько задач. Вам нужно заняться подсчетом коммунальных услуг, стиркой и присмотреть за детьми. Вы делаете эти вещи параллельно, особенно не задумываясь о том, как именно. Давайте разберем все по полочкам:
- Подсчет коммунальных услуг является синхронной задачей. Шаг за шагом, пока все не оплачено. За данный процесс вы отвечаете полностью сами;
- Тем не менее, вы можете отвлечься от подсчетов и заняться стиркой. Можно высушить постиранное белье и загрузить в стиральную машинку новую партию;
- Работа со стиральной машинкой и сушкой является синхронной задачей, и основная часть работы приходится на то, что происходит после загрузки одежды. Машинка стирает сама, поэтому вы можете вернуться к подсчету коммунальных услуг. К данному моменту сушка и стирка стали асинхронными задачами. Сушилка и стиральная машинка теперь будут работать независимо от вас и друг от друга до тех пор, пока звуковой сигнал не сообщит о завершении процесса;
- Присмотр за детьми является другой асинхронной задачей. По большей части они могут играть самостоятельно. Возможно, кто-то захочет перекусить, или кому-то понадобится помощь, тогда вам нужно будет как-то отреагировать. Особенно это важно в случае, если ребенок поранится или заплачет. Дети являются долгоиграющей задачей с высшим приоритетом. Присмотр за ними намного важнее стирки и подсчета коммунальных платежей.
Данные примеры могут помочь представить концепты блокирующего и неблокирующего кода. Рассмотрим их, заменив примеры на термины программирования. В роли центрального процессора CPU будете выступать вы сами. Во время погружения одежды в стиральную машинку вы (CPU) заняты и заблокированы от других задач, к примеру, подсчета коммунальных услуг. Но ничего страшного, ведь самой стиркой вам заниматься не нужно.
С другой стороны, работающая стиральная машинка не блокируют вас от занятия другими задачами. Это асинхронная функция, так как вам не нужно ждать ее завершения. После запуска машинки вы можете заняться чем-то другим. Это называется переключением контекста, или context switch. Контекст того, что вы делаете изменился, но через некоторое время звуковой сигнал сообщит о завершении стирки.
Будучи людьми, в большинстве случаев мы так и действуем. Нам естественно постоянно переключаться от дела к делу, даже не задумываясь об этом. Разработчику важно суметь перевести поведение подобного рода на язык кода, который бы работал аналогичным образом.
Программирование родительского элемента: не так уж просто!
Если вы узнали себя (или своих родителей) в вышеуказанном примере, отлично! Вам будет проще разобраться в асинхронном программировании. Напомним, что вы можете переключать контекст, легко менять, выбирать новые задачи и завершать старые. Теперь попробуем воплотить данную манеру поведения в коде по отношению к виртуальным родителям.
Мысленный эксперимент #1: Синхронный родитель
Каким образом вы бы создали родительскую программу, что выполняла бы все вышеперечисленные задачи в синхронной манере? Так как присмотр за детьми является приоритетной задачей, возможно, ваша программа только этим и будет заниматься. Родитель будет присматривать за детьми, ожидая чего-то, что может потребовать его внимания. Однако ничего другого (вроде подсчета коммунальных услуг или стирки) на протяжении данного сценария сделано не будет.
Теперь вы можете назначать приоритеты задачам так, как вам хочется. Однако только одна задача может произойти в любой момент времени. Это результат синхронного, пошагового подхода. Как и синхронный веб-сервер, описанный выше, это может сработать, однако многим такая жизнь может показаться не очень удобной. Родитель не сможет ничем заняться, пока дети не уснут. Все другие задачи будут выполняться позже, до поздней ночи. От такой жизни многие с ума сойдут уже через несколько дней.
Мысленный эксперимент #2: Родитель опросник
При использовании опросника, или polling, можно изменить вещи подобным образом, чтобы многочисленные задачи были завершены. В данном подходе родитель периодически отрывается от текущей задачи и проверяет, не требуют ли другие задачи внимания.
Давайте сделаем интервал опросника примерно в пятнадцать минут. Теперь каждые пятнадцать минут родитель проверяет, не нужно ли заняться стиральной машиной, высушенной одеждой или детьми. Если нет, то родитель может вернуться к работе с подсчетом коммунальных услуг. Однако, если какое-либо из этих заданий требует внимания, родитель позаботится об этом, прежде чем вернуться к подсчетам. Этот цикл продолжается до следующего тайм-аута из цикла опросника.
Этот подход также работает, ведь внимание уделяется множеству задач. Однако у него есть несколько проблем:
- Родитель может потратить много времени, проверяя те вещи, на которых не нужно акцентировать внимания: Стиральная машинка еще не закончила работа, другая одежда все еще сушится, а детям потребуется уделить внимание только в том случае, если произойдет что-то непредвиденное;
- Родитель может пропустить завершение задач, которые требуют определенного внимания. К примеру, если стирка завершилась в начале интервала опросника, на это никто не будет обращать внимания целые пятнадцать минут! Кроме того, присмотр за детьми должен иметь наивысший приоритет. Столкнувшись с проблемой, ребенок вряд ли станет ждать родителей пятнадцать минут, ему потребуется внимание сразу же.
Можно решить эти проблемы, сократив интервал опросника, но теперь родитель (CPU) будет тратить больше времени на переключение контекста между задачами. Это происходит, когда вы начинаете достигать точки убывающей отдачи. Опять же, немногие смогут нормально так жить.
Мысленный эксперимент #3: Родитель потока
«Вот бы у меня был клон…» Если вы родитель, тогда мысли подобного рода у вас наверняка периодически возникают. Во время программирования виртуальных родителей это действительно можно сделать, используя потоки. Данный механизм позволяет одновременно запускать несколько секций программы. Каждая секция кода, запущенная независимо, называется потоком, и все потоки разделяют одно и то же пространство памяти.
Если вы рассматриваете каждую задачу как часть одной программы, можете разделить их и запустить в виде потоков. Другими словами, можно «клонировать» родителя, создав по одному экземпляру для каждой задачи: присмотр за детьми, работой стиральной машинки, сушилки и подсчет коммунальных услуг. Все эти «клоны» работают независимо.
Это звучит как довольно хорошее решение, но у него есть и некоторые сложности. Одной из них является тот факт, что вам придется указывать каждому родительскому экземпляру, что именно делать в программе. Это может привести к некоторым проблемам, поскольку все экземпляры программы используют одни и те же элементы.
К примеру, скажем, Родитель А следит за сушилкой. Увидев, что вещи высушились, Родитель А уберет их и развесит новые. В то же время Родитель В замечает, что стиральная машинка завершила работу, поэтому он начинает вытаскивать одежду. Однако Родителю В также нужно заняться сушилкой, чтобы развесить постиранное белье. Сейчас это невозможно, так как в данный момент сушилкой занимается Родитель А.
Через некоторое время Родитель А заканчивает собирать одежду. Теперь ему хочется заняться стиральной машинкой и переместить вещи на пустую сушилку. Это также невозможно, ведь у стиральной машинки сейчас Родитель В.
Сейчас эти два родителя находятся в состоянии взаимной блокировки, или deadlock. Они оба имеют контроль над своим собственным ресурсом, но также хотят контролировать другой ресурс. Им придется ждать вечно, пока другой родительский экземпляр не освободит контроль. Как программист, вы должны написать код, чтобы разрешить такую ситуацию.
На заметку: Многопоточные программы позволяют создавать несколько параллельных путей выполнения, которые совместно используют одно и то же пространство памяти. Это может быть как преимуществом, так и недостатком. Любая память, совместно используемая потоками, подчиняется одному или нескольким потокам, пытающимся одновременно использовать одну и ту же общую память. Это может привести к повреждению данных, чтению данных в поврежденном состоянии и просто к беспорядочным данным в целом.
В многопоточном программировании переключение контекста происходит под управлением системы, а не программиста. Система контролирует, когда переключать контексты и когда предоставлять потокам доступ к общим данным, тем самым изменяя контекст использования памяти. Все виды проблем подобного рода управляемы в многопоточном коде, однако их трудно разрешить и отладить без ошибок.
Вот еще одна проблема, которая может возникнуть из-за многопоточности. Предположим, что ребенок получил травму и нуждается в неотложной помощи. Родителю «С» было поручено присматривать за детьми, поэтому он сразу же забирает ребенка. При оказании неотложной помощи Родителю «C» необходимо выписать достаточно большой чек, чтобы покрыть расходы на посещение врача.
Тем временем Родитель «D» дома работает над подсчетом коммунальных платеже, следовательно, сейчас он отвечает за финансы. Он не знает о дополнительных расходах на врача, поэтому очень удивлен, что на оплату счетов средств не хватает.
Помните, что эти два родительских экземпляра работают в одной программе. Семейные финансы являются общим ресурсом, поэтому вам нужно найти способ, чтобы родитель, наблюдающий за ребенком, проинформировал родителя, который занимает подсчетом средств. В противном случае вам потребуется предоставить какой-то механизм блокировки, чтобы финансовый ресурс мог использовать только один родитель за раз, с обновлениями.
Использование асинхронных особенностей Python на практике
Попробуем воспользоваться некоторыми вышеуказанным подходами и превратим их в функционирующие программы Python.
Все примеры статьи были протестированы на Python 3.8. В файле requirements.txt указано, какие модули вам нужно установить, чтобы запустить все примеры.
|
aiohttp==3.6.2 async—timeout==3.0.1 attrs==19.3.0 certifi==2019.11.28 chardet==3.0.4 codetiming==1.1.0 idna==2.8 multidict==4.7.4 requests==2.22.0 urllib3==1.25.7 yarl==1.4.2 |
Сохраните как requirements.txt и выполните команду в терминале:
|
pip3 install —r requirements.txt |
Вам также потребуется установить виртуальную среду Python для запуска кода, чтобы не мешать системному Python.
Синхронное программирование Python
Первый пример представляет собой несколько ответвленный способ создания задачи для извлечения работы из очереди и последующей ее обработки. Очередь в Python является структурой данных FIFO (first in, first out — «первым пришел — первым ушел»). Она предоставляет методы для размещения элементов в очередь и их повторного вывода в том порядке, в котором они были поставлены.
В данном случае работа состоит в том, чтобы получить номер из очереди и рассчитать количество циклов до этого числа. Оно выводится на консоль, когда начинается цикл, и снова при общем выводе. Программа демонстрирует способ, при котором несколько синхронных задач обрабатывают работу в очереди.
Программа, названная example_1.py, полностью представлена ниже:
|
1 2 3 4 5 6 7 8 9 10 11 12 13 14 15 16 17 18 19 20 21 22 23 24 25 26 27 28 29 30 31 32 33 34 |
import queue def task(name, work_queue): if work_queue.empty(): print(f«Task {name} nothing to do») else: while not work_queue.empty(): count = work_queue.get() total = 0 print(f«Task {name} running») for x in range(count): total += 1 print(f«Task {name} total: {total}») def main(): «»» Это основная точка входа в программу «»» # Создание очереди работы work_queue = queue.Queue() # Помещение работы в очередь for work in [15, 10, 5, 2]: work_queue.put(work) # Создание нескольких синхронных задач tasks = [(task, «One», work_queue), (task, «Two», work_queue)] # Запуск задач for t, n, q in tasks: t(n, q) if __name__ == «__main__»: main() |
Рассмотрим важные строки программы:
- Строка 1 импортирует модуль
queue. Здесь программа хранит работу, которая должна быть выполнена задачами; - Строки с 3 по 13 определяют
task(). Данная функция извлекает работу из очередиwork_queueи обрабатывает ее до тех пор, пока больше не нужно ничего делать; - Строка 15 определяет функцию
main()для запуска задач программы; - Строка 20 создает
work_queue. Все задачи используют этот общий ресурс для извлечения работы; - Строки с 23 по 24 помещают работу в
work_queue. В данном случае это просто случайное количество значений для задач, которые нужно обработать; - Строка 27 создает список кортежей задач со значениями параметров, передаваемых задачами;
- Строки с 30 по 31 перебирают список кортежей задач, вызывая каждый из них и передавая ранее определенные значения параметров;
- Строка 34 вызывает
main()для запуска программы.
Задача в данной программе является просто функцией, что принимает строку и очередь в качестве параметров. При выполнении она ищет что-либо в очереди для обработки. Если есть над чем поработать, из очереди извлекаются значения, запускается цикл for для подсчета до этого значения и выводится итоговое значение в конце. Получение работы из очереди продолжается до тех пор, пока на не закончится.
Есть вопросы по Python?
На нашем форуме вы можете задать любой вопрос и получить ответ от всего нашего сообщества!
Telegram Чат & Канал
Вступите в наш дружный чат по Python и начните общение с единомышленниками! Станьте частью большого сообщества!
Паблик VK
Одно из самых больших сообществ по Python в социальной сети ВК. Видео уроки и книги для вас!
При запуске данной программы будет получен следующий вывод:
|
Task One running Task One total: 15 Task One running Task One total: 10 Task One running Task One total: 5 Task One running Task One total: 2 Task Two nothing to do |
Здесь показано, что всю работу выполняет Task One. Цикл while, в котором задействован Task One внутри task(), потребляет всю работу в очереди и обрабатывает ее. Когда этот цикл завершается, Task Two получает шанс на выполнение. Однако он обнаруживает, что очередь пуста, поэтому Task Two выводит оператор, который говорит, что ему нечего делать, и затем завершается. В коде нет ничего, что позволяло бы Task One и Task Two переключать контексты и работать вместе.
Простой кооперативный параллелизм в Python
Следующая версия программы позволяет двум задачам работать вместе. Добавление оператора yield означает, что цикл получит контроль в указанной точке, сохраняя при этом свой контекст. Таким образом, уступающая задача может быть возобновлена позже.
Оператор yield превращает task() в генератор. Функция генератора вызывается так же, как и любая другая функция в Python, но когда выполняется оператор yield, управление возвращается вызывающей функции. По сути, это переключение контекста, поскольку управление переходит от функции генератора к вызывающей стороне.
Интересная часть заключается в том, что функции генератора можно вернуть контроль, вызвав в генераторе next(). Получается переключение контекста обратно к функции генератора, что запускает выполнение со всеми переменными функции, которые были определены до того, как выход все еще остается неизменным.
Цикл while в main() использует данное преимущество при вызове next(t). Данный оператор перезапускает задачу с того места, где оно было ранее выполнено. Это значит, что у вас есть контроль во время переключения контекста: когда оператор yield выполняется в task().
Это форма совместной многозадачности. У программы контроль над своим текущим контекстом, и теперь можно запустить что-то еще. В таком случае цикл while в main() способен запускать два экземпляра task() в качестве функции генератора. Каждый экземпляр потребляет работу из одной и той же очереди. Это довольно умно, но для достижения тех же результатов, что и в первой программе, требуется потрудиться.
Программа example_2.py демонстрирует простой параллелизм и приведена ниже:
|
1 2 3 4 5 6 7 8 9 10 11 12 13 14 15 16 17 18 19 20 21 22 23 24 25 26 27 28 29 30 31 32 33 34 35 36 37 38 39 40 41 42 |
import queue def task(name, queue): while not queue.empty(): count = queue.get() total = 0 print(f«Task {name} running») for x in range(count): total += 1 yield print(f«Task {name} total: {total}») def main(): «»» Это основная точка входа в программу «»» # Создание очереди работы work_queue = queue.Queue() # Размещение работы в очереди for work in [15, 10, 5, 2]: work_queue.put(work) # Создание задач tasks = [task(«One», work_queue), task(«Two», work_queue)] # Запуск задач done = False while not done: for t in tasks: try: next(t) except StopIteration: tasks.remove(t) if len(tasks) == 0: done = True if __name__ == «__main__»: main() |
Рассмотрим, что именно происходит в коде выше:
- Строки с 3 по 11 определяют
task(), как и раньше. Кроме того, в Строке 10 добавляетсяyield, превращая функцию в генератор. В этом случае происходит переключение контекста и управление возвращается обратно в циклwhileвmain(); - Строка 25 создает список задач, но немного иначе, чем вы видели в предыдущем примере кода. В этом случае каждая задача вызывается с параметрами, указанными в переменной списка задач. Это необходимо для запуска функции генератора
task()в первый раз; - Строки с 31 по 36 являются модификациями цикла
whileвmain(), которые позволяют совместно выполнятьtask(). Управление возвращается к каждому экземпляруtask(), позволяя циклу продолжаться и запустить другую задачу; - Строка 32 возвращает контроль к
task()и продолжает выполнение после точки, где был вызванyield; - Строка 36 устанавливает переменную
done. Циклwhileзаканчивается, когда все задачи завершены и удалены изtasks.
При запуске вышеуказанной программы будет получен следующий вывод:
|
Task One running Task Two running Task Two total: 10 Task Two running Task One total: 15 Task One running Task Two total: 5 Task One total: 2 |
Здесь видно, что Task One и Task Two выполняются и потребляют работу из очереди. Именно это требуется, поскольку обе задачи обрабатывают работу, и каждая отвечает за два элемента в очереди. Это интересно, но опять же, для достижения этих результатов требуется немало усилий.
Хитрость заключается в использовании оператора
yield, который превращаетtask()в генератор и выполняет переключение контекста. Программа использует переключатель контекста для управления цикломwhileвmain(), позволяя двум экземплярам задачи выполняться совместно.
Обратите внимание на то, как Task Two выводит итоговую сумму первой. Может показаться, что задачи выполняются асинхронно. Тем не менее, это все еще синхронная программа. Она структурирована так, что две задачи могут передавать контексты вперед и обратно. Причина, по которой Task Two выводит итоговую сумму в первую очередь, состоит в том, что она считает только до 10, а Task One до 15. Task Two просто достигает своей первой итоговой суммы, поэтому она выводит выходные данные на консоль раньше Task One.
На заметку: В коде из примера выше используется модуль codetiming, что фиксирует и выводит время, нужное для выполнения фрагментов кода. Более подробно почитать о данном модуле можете в данной статье на сайте RealPython.
Этот модуль является частью Python Package Index. Он создан Geir Arne Hjelle, одним из авторов популярного сайта Real Python. Если занимаетесь написанием кода, который должен включать функции синхронизации, то обязательно стоит обратить внимание на модуль
codetiming.Для того чтобы модуль
codetimingбыл доступен, его требуется установить. Это можно сделать с помощью команды pip:pip install codetiming
Совместный параллелизм с блокирующими вызовами
Следующая версия программы такая же, как и предыдущая, за исключением добавления time.sleep(delay) в теле вашего цикла задач. Добавляется задержка, основанная на значении, полученном из рабочей очереди, к каждой итерации цикла задачи. Задержка имитирует эффект блокирующего вызова в вашей задачи.
Блокирующий вызов является кодом, который не дает CPU делать что-либо еще в течение некоторого периода времени. В вышеупомянутых мысленных экспериментах, если родитель не мог отвлечься от подсчета коммунальных услуг до завершения задачи, такой процесс был бы блокирующим вызовом.
В данном примереtime.sleep(delay) делает то же самое, потому что CPU не может ничего сделать, кроме ожидания истечения задержки.
Сперва установим нужные библиотеки:
Код:
|
1 2 3 4 5 6 7 8 9 10 11 12 13 14 15 16 17 18 19 20 21 22 23 24 25 26 27 28 29 30 31 32 33 34 35 36 37 38 39 40 41 42 43 |
import time import queue from codetiming import Timer def task(name, queue): timer = Timer(text=f«Task {name} elapsed time: {{:.1f}}») while not queue.empty(): delay = queue.get() print(f«Task {name} running») timer.start() time.sleep(delay) timer.stop() yield def main(): «»» Это основная точка входа в программу «»» # Создание очереди работы work_queue = queue.Queue() # Добавление работы в очередь for work in [15, 10, 5, 2]: work_queue.put(work) tasks = [task(«One», work_queue), task(«Two», work_queue)] # Запуск задач done = False with Timer(text=«nTotal elapsed time: {:.1f}»): while not done: for t in tasks: try: next(t) except StopIteration: tasks.remove(t) if len(tasks) == 0: done = True if __name__ == «__main__»: main() |
Изменения, что были сделаны в данном коде:
- Строка 1 импортирует модуль time, чтобы у программы был доступ к time.sleep();
- Строка 3 импортирует код Timer из модуля codetiming;
- Строка 6 создает экземпляр класса Timer, используемый для измерения времени, нужного для итерации каждой задачи цикла;
- Строка 10 запускает экземпляр timer;
- Строка 11 изменяет
task()для включенияtime.sleep(delay)для имитации задержки IO. Это заменяет циклfor, что отвечал за подсчет вexample_1.py; - Строка 12 останавливает экземпляр
timerи выводит, истекшее с момента вызоваtimer.start(), время; - Строка 30 создает менеджер контекста Timer, что выводит истекшее время с момента начала всего цикла.
При запуске программы будет получен следующий вывод:
|
Task One running Task One elapsed time: 15.0 Task Two running Task Two elapsed time: 10.0 Task One running Task One elapsed time: 5.0 Task Two running Task Two elapsed time: 2.0 Total elapsed time: 32.0 |
Как и ранее, Task On и Task Two запускаются, собирая работу из очереди обрабатывая ее. Однако даже при добавлении задержки видно, что кооперативный параллелизм ничего не привнес. Задержка останавливает обработку всей программы, а CPU просто ждет, чтобы задержка IO завершилась.
Именно под этим и подразумевается блокирующий код Python в документации по асинхронизации. Вы заметите, что время, необходимое для запуска всей программы, является просто совокупным временем всех задержек. Выполнение заданий таким способом нельзя считать успешным.
Кооперативный параллелизм с неблокирующими вызовами Python
Следующая версия программы подверглась небольшим изменениям. Здесь используются асинхронные особенности asyncio/await, появившиеся в Python 3.
Модули time и queue были заменены пакетом asyncio. Программа получает доступ к асинхронной дружественной (неблокирующей) функциональности сна и очереди. Изменение task() определяет ее как асинхронную, добавляя на строке 4 префикса async. В Python это является показателем того, что функция будет асинхронной.
Другим большим изменением является удаление операторов time.sleep(delay) и yield с их последующей заменой на замена их на await asyncio.sleep(delay). Создается неблокирующая задержка, которая выполнит переключение контекста обратно к вызывающей main().
Цикла while внутри main() больше не существует. Вместо task_array есть вызов await asyncio.gather(...). Это сообщает asyncio о двух вещах:
- Создание двух задач на основе
task()и их запуск; - Ожидание завершения обеих задач до перехода к дальнейшим действиям.
Последней строкой программы является asyncio.run(main()). Здесь создается цикл событий. Данный цикл запускает main(), что в свою очередь запускает два экземпляра task().
Цикл событий лежит в основе асинхронной системы Python. Он запускает весь код, включая main(). Когда код задачи выполняется, CPU занят выполнением работы. С приближением ключевого слова await происходит переключение контекста, и контроль возвращается обратно в цикл событий. Цикл событий просматривает все задачи, ожидающие события (в данном случае asyncio.sleep(delay, и передает управление задаче с событием, которое готово.
await asyncio.sleep(delay) является неблокирующим по отношению к CPU. Вместо ожидания истечения времени ожидания, CPU регистрирует событие сна в очереди задач цикла событий и выполняет переключение контекста, передавая контроль циклу событий. Цикл событий непрерывно ищет завершенные события и передает контроль задаче, ожидающей этого события. Таким образом CPU может оставаться занятым, если работа доступна, а цикл обработки событий отслеживает события, которые произойдут в будущем.
На заметку: Асинхронная программа запускается в одном потоке выполнения. Переключение контекста с одного раздела кода на другой, который может повлиять на данные, полностью под вашим контролем. Это значит, что вы можете разбить и завершить весь доступ к данным совместно используемой памяти, прежде чем переключать контекст. Это помогает решить проблему общей памяти, что присуща многопоточному коду.
Код example_4.py приведен ниже:
|
1 2 3 4 5 6 7 8 9 10 11 12 13 14 15 16 17 18 19 20 21 22 23 24 25 26 27 28 29 30 31 32 33 34 35 |
import asyncio from codetiming import Timer async def task(name, work_queue): timer = Timer(text=f«Task {name} elapsed time: {{:.1f}}») while not work_queue.empty(): delay = await work_queue.get() print(f«Task {name} running») timer.start() await asyncio.sleep(delay) timer.stop() async def main(): «»» Это главная точка входа для главной программы «»» # Создание очереди работы work_queue = asyncio.Queue() # Помещение работы в очередь for work in [15, 10, 5, 2]: await work_queue.put(work) # Запуск задач with Timer(text=«nTotal elapsed time: {:.1f}»): await asyncio.gather( asyncio.create_task(task(«One», work_queue)), asyncio.create_task(task(«Two», work_queue)), ) if __name__ == «__main__»: asyncio.run(main()) |
Вот отличия данной программы от example_3.py:
- Строка 1 импортирует
asyncioдля получения доступа к асинхронной функциональности Python. Это замена импортаtime; - Строка 2 импортирует класс
Timerиз модуляcodetiming; - Строка 4 добавляет ключевое слово
asyncперед определениемtask(). Это сообщает программе, чтоtaskможет выполняться асинхронно; - Строка 5 создается экземпляр
Timer, используемый для измерения времени, необходимого для каждой итерации цикла задач; - Строка 9 запускает экземпляр
timer; - Строка 10 заменяет
time.sleep(delay)неблокирующимasyncio.sleep(delay), что также возвращает контроль (или переключает контексты) обратно в цикл основного события; - Строка 11 останавливается экземпляр
timerи выводится истекшее время с момента вызоваtimer.start(); - Строка 18 создает неблокирующую асинхронную
work_queue; - Строки 21-22 помещают работу в
work_queueасинхронно с использованием ключевого словаawait; - Строка 25 создается менеджер контекста
Timer, который выводит истекшее время, затраченное на выполнение циклаwhile; - Строки 26-29 создают две задачи и собирают их вместе, поэтому программа будет ожидать завершения обеих задач;
- Строка 32 запускает программу асинхронно. Здесь также запускается внутренний цикл событий.
При анализе вывода программы обратите внимание на одновременный запуск Task One и Task Two, а затем ложный вызов IO:
|
Task One running Task Two running Task Two total elapsed time: 10.0 Task Two running Task One total elapsed time: 15.0 Task One running Task Two total elapsed time: 5.0 Task One total elapsed time: 2.0 Total elapsed time: 17.0 |
Это указывает на то, что await asyncio.sleep(delay) неблокирующая, и другая работа завершена.
В конце программы можно заметить, что общее время по сути в два раза меньше, чем при запуске example_3.py. Это преимущество программы, что использует асинхронные особенности. Каждая задача может одновременно запускать await asyncio.sleep(delay). Общее время выполнения программы теперь меньше, чем общее время частей. Нам удалось избавиться от синхронной модели.
Синхронные (блокирующие) HTTP вызовы
Следующая версия программы является как шагом вперед, так и отступлением назад. Программа выполняет некоторую работу с реальным I/O, отправляя HTTP запросы из списка с URL и получая содержимое страницы. Однако это происходит блокирующим (синхронным) образом.
Программа была изменена для импорта отличного модуля requests, чтобы сделать фактические HTTP-запросы. Кроме того, очередь теперь содержит список URL, а не номеров. Кроме того, task() больше не увеличивает счетчик. Вместо этого запросы получают содержимое URL из очереди и выводят потраченное на данное действие время.
Код example_5.py приведен ниже:
|
1 2 3 4 5 6 7 8 9 10 11 12 13 14 15 16 17 18 19 20 21 22 23 24 25 26 27 28 29 30 31 32 33 34 35 36 37 38 39 40 41 42 43 44 45 46 47 48 49 50 51 52 53 |
import queue import requests from codetiming import Timer def task(name, work_queue): timer = Timer(text=f«Task {name} elapsed time: {{:.1f}}») with requests.Session() as session: while not work_queue.empty(): url = work_queue.get() print(f«Task {name} getting URL: {url}») timer.start() session.get(url) timer.stop() yield def main(): «»» Это основная точка входа в программу «»» # Создание очереди работы work_queue = queue.Queue() # Помещение работы в очередь for url in [ «http://google.com», «http://yahoo.com», «http://linkedin.com», «http://apple.com», «http://microsoft.com», «http://facebook.com», «http://twitter.com», ]: work_queue.put(url) tasks = [task(«One», work_queue), task(«Two», work_queue)] # Запуск задачи done = False with Timer(text=«nTotal elapsed time: {:.1f}»): while not done: for t in tasks: try: next(t) except StopIteration: tasks.remove(t) if len(tasks) == 0: done = True if __name__ == «__main__»: main() |
Вот что происходит в данной программе:
- Строка 2 импортирует
requests, что предоставляет удобный способ совершать HTTP вызовы. - Строка 3 импортирует класс
Timerиз модуляcodetiming. - Строка 6 создается экземпляр
Timer, используемый для измерения времени, необходимого для каждой итерации цикла задач. - Строка 11 запускает экземпляр
timer - Строка 12 создает задержку, похожую на то, что в
example_3.py. Однако на этот раз вызываетсяsession.get(url), который возвращает содержимое URL, полученного изwork_queue. - Строка 13 останавливает экземпляр
timerи выводит истекшее время с момента вызоваtimer.start(). - Строки с 23 по 32 помещают список URL в
work_queue. - Строка 39 создается менеджер контекста
Timer, который выводит истекшее время, затраченное на выполнение всего циклаwhile.
При запуске этой программы вы увидите следующий вывод:
|
Task One getting URL: http://google.com Task One total elapsed time: 0.3 Task Two getting URL: http://yahoo.com Task Two total elapsed time: 0.8 Task One getting URL: http://linkedin.com Task One total elapsed time: 0.4 Task Two getting URL: http://apple.com Task Two total elapsed time: 0.3 Task One getting URL: http://microsoft.com Task One total elapsed time: 0.5 Task Two getting URL: http://facebook.com Task Two total elapsed time: 0.5 Task One getting URL: http://twitter.com Task One total elapsed time: 0.4 Total elapsed time: 3.2 |
Как и в более ранних версиях программы, yield превращает task() в генератор. Он также выполняет переключение контекста, позволяющее запустить другой экземпляр задачи.
Каждая задача получает URL из рабочей очереди, извлекает содержимое страницы и сообщает, сколько времени потребовалось для получения этого содержимого.
Как и раньше, yield позволяет обеим задачам работать совместно. Однако, поскольку эта программа работает синхронно, каждый вызов session.get() блокирует CPU, пока не будет получена страница. Обратите внимание на общее время, необходимое для запуска всей программы в конце. Это будет иметь смысл для следующего примера.
Асинхронные (неблокирующие) HTTP вызовы Python
Эта версия программы модифицирует предыдущую версию для использования асинхронных функций Python. Здесь импортируется модуль aiohttp, который является библиотекой для асинхронного выполнения HTTP запросов с использованием asyncio.
Задачи были изменены, чтобы удалить вызов yield, поскольку код для выполнения HTTP GET запроса больше не блокирующий. Он также выполняет переключение контекста обратно в цикл событий.
Программа example_6.py приведена ниже:
|
1 2 3 4 5 6 7 8 9 10 11 12 13 14 15 16 17 18 19 20 21 22 23 24 25 26 27 28 29 30 31 32 33 34 35 36 37 38 39 40 41 42 43 44 45 46 |
import asyncio import aiohttp from codetiming import Timer async def task(name, work_queue): timer = Timer(text=f«Task {name} elapsed time: {{:.1f}}») async with aiohttp.ClientSession() as session: while not work_queue.empty(): url = await work_queue.get() print(f«Task {name} getting URL: {url}») timer.start() async with session.get(url) as response: await response.text() timer.stop() async def main(): «»» Это основная точка входа в программу «»» # Создание очереди работы work_queue = asyncio.Queue() # Помещение работы в очередь for url in [ «http://google.com», «http://yahoo.com», «http://linkedin.com», «http://apple.com», «http://microsoft.com», «http://facebook.com», «http://twitter.com», ]: await work_queue.put(url) # Запуск задач with Timer(text=«nTotal elapsed time: {:.1f}»): await asyncio.gather( asyncio.create_task(task(«One», work_queue)), asyncio.create_task(task(«Two», work_queue)), ) if __name__ == «__main__»: asyncio.run(main()) |
В данной программе происходит следующее:
- Строка 2 импортирует библиотеку
aiohttp, которая обеспечивает асинхронный способ выполнения HTTP вызовов. - Строка 3 импортирует класс
Timerиз модуляcodetiming. - Строка 5 помечает
task()как асинхронную функцию. - Строка 6 создает экземпляр
Timer, используемый для измерения времени, необходимого для каждой итерации цикла задач. - Строка 7 создается менеджер контекста сессии
aiohttp. - Строка 8 создает менеджер контекста ответа
aiohttp. Он также выполняет HTTP вызовGETдля URL, взятого изwork_queue. - Строка 11 запускает экземпляр
timer - Строка 12 использует сеанс для асинхронного получения текста из URL.
- Строка 13 останавливает экземпляр
timerи выводит истекшее время с момента вызоваtimer.start(). - Строка 39 создает менеджер контекста
Timer, который выводит истекшее время, затраченное на выполнение всего циклаwhile.
При запуске программы вы увидите следующий вывод:
|
Task One getting URL: http://google.com Task Two getting URL: http://yahoo.com Task One total elapsed time: 0.3 Task One getting URL: http://linkedin.com Task One total elapsed time: 0.3 Task One getting URL: http://apple.com Task One total elapsed time: 0.3 Task One getting URL: http://microsoft.com Task Two total elapsed time: 0.9 Task Two getting URL: http://facebook.com Task Two total elapsed time: 0.4 Task Two getting URL: http://twitter.com Task One total elapsed time: 0.5 Task Two total elapsed time: 0.3 Total elapsed time: 1.7 |
Посмотрите на общее прошедшее время, а также на индивидуальное время, чтобы получить содержимое каждого URL. Вы увидите, что длительность составляет примерно половину совокупного времени всех HTTP GET запросов. Это связано с тем, что HTTP GET запросы выполняются асинхронно. Другими словами, вы эффективно используете преимущества CPU, позволяя ему делать несколько запросов одновременно.
Поскольку CPU очень быстрый, этот пример может создать столько же задач, сколько URL. В этом случае время выполнения программы будет соответствовать времени самого медленного поиска URL.
Заключение
В статье были предоставлены инструменты для начала работы с техниками асинхронного программирования. Использование асинхронных функций Python обеспечивает вас программным контролем во время переключения контекста. Теперь сложности, которые возникают в процессе многопоточного программирования, разрешить гораздо легче.
Асинхронное программирование является мощным инструментом, однако оно подойдет не для каждой программы. Например, если вы пишете программу, которая вычисляет число Пи с точностью до миллионных знаков после запятой, то асинхронный код не поможет. Такая программа связана с CPU, без большого количества I/O. Однако, если вы пытаетесь реализовать сервер или программу, которая выполняет IO (например, доступ к файлам или сети), использование асинхронных функций Python может иметь огромное преимущество.
Подведем итоги изученных тем:
- Что такое синхронное программирование
- Отличия асинхронных программ, их мощность и управляемость
- Случаи необходимости использования асинхронных программ
- Использование асинхронных особенностей Python
Теперь, получив все необходимые знания, вы сможете писать программы совершенно иного уровня!

Являюсь администратором нескольких порталов по обучению языков программирования Python, Golang и Kotlin. В составе небольшой команды единомышленников, мы занимаемся популяризацией языков программирования на русскоязычную аудиторию. Большая часть статей была адаптирована нами на русский язык и распространяется бесплатно.
E-mail: vasile.buldumac@ati.utm.md
Образование
Universitatea Tehnică a Moldovei (utm.md)
- 2014 — 2018 Технический Университет Молдовы, ИТ-Инженер. Тема дипломной работы «Автоматизация покупки и продажи криптовалюты используя технический анализ»
- 2018 — 2020 Технический Университет Молдовы, Магистр, Магистерская диссертация «Идентификация человека в киберпространстве по фотографии лица»
Асинхронное программирование на Python становится все более популярным. Для этих целей существует множество различных библиотек. Самая популярная из них — Asyncio, которая является стандартной библиотекой Python 3.4. Из этой статьи вы узнаете, что такое асинхронное программирование и чем отличаются различные библиотеки, реализующие асинхронность в Python.
По очереди
В каждой программе строки кода выполняются поочередно. Например, если у вас есть строка кода, которая запрашивает что-либо с сервера, то это означает, что ваша программа не делает ничего во время ожидания ответа. В некоторых случаях это допустимо, но во многих — нет. Одним из решений этой проблемы являются потоки (threads).
Потоки дают возможность вашей программе выполнять ряд задач одновременно. Конечно, у потоков есть ряд недостатков. Многопоточные программы являются более сложными и, как правило, более подвержены ошибкам. Они включают в себя такие проблемы: состояние гонки (race condition), взаимная (deadlock) и активная (livelock) блокировка, исчерпание ресурсов (resource starvation).
Переключение контекста
Хотя асинхронное программирование и позволяет обойти проблемные места потоков, оно было разработано для совершенно другой цели — для переключения контекста процессора. Когда у вас есть несколько потоков, каждое ядро процессора может запускать только один поток за раз. Для того, чтобы все потоки/процессы могли совместно использовать ресурсы, процессор очень часто переключает контекст. Чтобы упростить работу, процессор с произвольной периодичностью сохраняет всю контекстную информацию потока и переключается на другой поток.
Асинхронное программирование — это потоковая обработка программного обеспечения / пользовательского пространства, где приложение, а не процессор, управляет потоками и переключением контекста. В асинхронном программировании контекст переключается только в заданных точках переключения, а не с периодичностью, определенной CPU.
Эффективный секретарь
Теперь давайте рассмотрим эти понятия на примерах из жизни. Представьте секретаря, который настолько эффективен, что не тратит время впустую. У него есть пять заданий, которые он выполняет одновременно: отвечает на телефонные звонки, принимает посетителей, пытается забронировать билеты на самолет, контролирует графики встреч и заполняет документы. Теперь представьте, что такие задачи, как контроль графиков встреч, прием телефонных звонков и посетителей, повторяются не часто и распределены во времени. Таким образом, большую часть времени секретарь разговаривает по телефону с авиакомпанией, заполняя при этом документы. Это легко представить. Когда поступит телефонный звонок, он поставит разговор с авиакомпанией на паузу, ответит на звонок, а затем вернется к разговору с авиакомпанией. В любое время, когда новая задача потребует внимания секретаря, заполнение документов будет отложено, поскольку оно не критично. Секретарь, выполняющий несколько задач одновременно, переключает контекст в нужное ему время. Он асинхронный.
Потоки — это пять секретарей, у каждого из которых по одной задаче, но только одному из них разрешено работать в определенный момент времени. Для того, чтобы секретари работали в потоковом режиме, необходимо устройство, которое контролирует их работу, но ничего не понимает в самих задачах. Поскольку устройство не понимает характер задач, оно постоянно переключалось бы между пятью секретарями, даже если трое из них сидят, ничего не делая. Около 57% (чуть меньше, чем 3/5) переключения контекста были бы напрасны. Несмотря на то, что переключение контекста процессора является невероятно быстрым, оно все равно отнимает время и ресурсы процессора.
Зеленые потоки
Зеленые потоки (green threads) являются примитивным уровнем асинхронного программирования. Зеленый поток — это обычный поток, за исключением того, что переключения между потоками производятся в коде приложения, а не в процессоре. Gevent — известная Python-библиотека для использования зеленых потоков. Gevent — это зеленые потоки и сетевая библиотека неблокирующего ввода-вывода Eventlet. Gevent.monkey изменяет поведение стандартных библиотек Python таким образом, что они позволяют выполнять неблокирующие операции ввода-вывода. Вот пример использования Gevent для одновременного обращения к нескольким URL-адресам:
import gevent.monkey
from urllib.request import urlopen
gevent.monkey.patch_all()
urls = ['http://www.google.com', 'http://www.yandex.ru', 'http://www.python.org']

def print_head(url):
    print('Starting {}'.format(url))
    data = urlopen(url).read()
    print('{}: {} bytes: {}'.format(url, len(data), data))

jobs = [gevent.spawn(print_head, _url) for _url in urls]

gevent.wait(jobs)
Как видите, API-интерфейс Gevent выглядит так же, как и потоки. Однако за кадром он использует сопрограммы (coroutines), а не потоки, и запускает их в цикле событий (event loop) для постановки в очередь. Это значит, что вы получаете преимущества потоков, без понимания сопрограмм, но вы не избавляетесь от проблем, связанных с потоками. Gevent — хорошая библиотека, но только для тех, кто понимает, как работают потоки.
Давайте рассмотрим некоторые аспекты асинхронного программирования. Один из таких аспектов — это цикл событий. Цикл событий — это очередь событий/заданий и цикл, который вытягивает задания из очереди и запускает их. Эти задания называются сопрограммами. Они представляют собой небольшой набор команд, содержащих, помимо прочего, инструкции о том, какие события при необходимости нужно возвращать в очередь.
Функция обратного вызова (callback)
В Python много библиотек для асинхронного программирования, наиболее популярными являются Tornado, Asyncio и Gevent. Давайте посмотрим, как работает Tornado. Он использует стиль обратного вызова (callbacks) для асинхронного сетевого ввода-вывода. Обратный вызов — это функция, которая означает: «Как только это будет сделано, выполните эту функцию». Другими словами, вы звоните в службу поддержки и оставляете свой номер, чтобы они, когда будут доступны, перезвонили, вместо того, чтобы ждать их ответа.
Давайте посмотрим, как сделать то же самое, что и выше, используя Tornado:
import tornado.ioloop
from tornado.httpclient import AsyncHTTPClient
urls = ['http://www.google.com', 'http://www.yandex.ru', 'http://www.python.org']

def handle_response(response):
    if response.error:
        print("Error:", response.error)
    else:
        url = response.request.url
        data = response.body
        print('{}: {} bytes: {}'.format(url, len(data), data))

http_client = AsyncHTTPClient()
for url in urls:
    http_client.fetch(url, handle_response)

tornado.ioloop.IOLoop.instance().start()
Предпоследняя строка кода вызывает метод AsyncHTTPClient.fetch, который получает данные по URL-адресу неблокирующим способом. Этот метод выполняется и возвращается немедленно. Поскольку каждая следующая строка будет выполнена до того, как будет получен ответ по URL-адресу, невозможно получить объект, как результат выполнения метода. Решение этой проблемы заключается в том, что метод fetch вместо того, чтобы возвращать объект, вызывает функцию с результатом или обратный вызов. Обратный вызов в этом примере — handle_response.
В примере вы можете заметить, что первая строка функции handle_response проверяет наличие ошибки. Это необходимо, потому что невозможно обработать исключение. Если исключение было создано, то оно не будет отрабатываться в коде из-за цикла событий. Когда fetch выполняется, он запускает HTTP-запрос, а затем обрабатывает ответ в цикле событий. К тому моменту, когда возникнет ошибка, стек вызовов будет содержать только цикл событий и текущую функцию, при этом нигде в коде не сработает исключение. Таким образом, любые исключения, созданные в функции обратного вызова, прерывают цикл событий и останавливают выполнение программы. Поэтому все ошибки должны быть переданы как объекты, а не обработаны в виде исключений. Это означает, что если вы не проверили наличие ошибок, то они не будут обрабатываться.
Другая проблема с обратными вызовами заключается в том, что в асинхронном программировании единственный способ избегать блокировок — это обратный вызов. Это может привести к очень длинной цепочке: обратный вызов после обратного вызова после обратного вызова. Поскольку теряется доступ к стеку и переменным, вы в конечном итоге переносите большие объекты во все ваши обратные вызовы, но если вы используете сторонние API-интерфейсы, то не можете передать что-либо в обратный вызов, если он этого не может принять. Это также становится проблемой, потому что каждый обратный вызов действует как поток. Например, вы хотели бы вызвать три API-интерфейса и дождаться, пока все три вернут результат, чтобы его обобщить. В Gevent вы можете это сделать, но не с обратными вызовами. Вам придется немного поколдовать, сохраняя результат в глобальной переменной и проверяя в обратном вызове, является ли результат окончательным.
Сравнения
Если вы хотите предотвратить блокировку ввода-вывода, вы должны использовать либо потоки, либо асинхронность. В Python вы выбираете между зелеными потоками и асинхронным обратным вызовом. Вот некоторые из их особенностей:
Зеленые потоки
- потоки управляются на уровне приложений, а не аппаратно;
- включают в себя все проблемы потокового программирования.
Обратный вызов
- сопрограммы невидимы для программиста;
- обратные вызовы ограничивают использование исключений;
- обратные вызовы трудно отлаживаются.
Как решить эти проблемы?
Вплоть до Python 3.3 зеленые потоки и обратный вызов были оптимальными решениями. Чтобы превзойти эти решения, нужна поддержка на уровне языка. Python должен каким-то образом частично выполнить метод, прекратить выполнение, поддерживая при этом объекты стека и исключения. Если вы знакомы с концепциями Python, то понимаете, что я намекаю на генераторы. Генераторы позволяют функции возвращать список по одному элементу за раз, останавливая выполнение до того момента, когда следующий элемент будет запрошен. Проблема с генераторами заключается в том, что они полностью зависят от функции, вызывающей его. Другими словами, генератор не может вызвать генератор. По крайней мере так было до тех пор, пока в PEP 380 не добавили синтаксис yield from, который позволяет генератору получить результат другого генератора. Хоть асинхронность и не является главным назначением генераторов, они содержат весь функционал, чтобы быть достаточно полезными. Генераторы поддерживают стек и могут создавать исключения. Если бы вы написали цикл событий, в котором бы запускались генераторы, у вас получилась бы отличная асинхронная библиотека. Именно так и была создана библиотека Asyncio.
Все, что вам нужно сделать, это добавить декоратор @coroutine, а Asyncio добавит генератор в сопрограмму. Вот пример того, как обработать те же три URL-адреса, что и раньше:
import asyncio
import aiohttp

urls = ['http://www.google.com', 'http://www.yandex.ru', 'http://www.python.org']

@asyncio.coroutine
def call_url(url):
    print('Starting {}'.format(url))
    response = yield from aiohttp.get(url)
    data = yield from response.text()
    print('{}: {} bytes: {}'.format(url, len(data), data))
    return data

futures = [call_url(url) for url in urls]

loop = asyncio.get_event_loop()
loop.run_until_complete(asyncio.wait(futures))
Прим. перев. В примерах используется aiohttp версии 1.3.5. В последней версии библиотеки синтаксис другой.
Несколько особенностей, которые нужно отметить:
- ошибки корректно передаются в стек;
- можно вернуть объект, если необходимо;
- можно запустить все сопрограммы;
- нет обратных вызовов;
- строка 10 не выполнится до тех пор, пока строка 9 не будет полностью выполнена.
Единственная проблема заключается в том, что объект выглядит как генератор, и это может вызвать проблемы, если на самом деле это был генератор.
Async и Await
Библиотека Asyncio довольно мощная, поэтому Python решил сделать ее стандартной библиотекой. В синтаксис также добавили ключевое слово async. Ключевые слова предназначены для более четкого обозначения асинхронного кода. Поэтому теперь методы не путаются с генераторами. Ключевое слово async идет до def, чтобы показать, что метод является асинхронным. Ключевое слово await показывает, что вы ожидаете завершения сопрограммы. Вот тот же пример, но с ключевыми словами async/await:
import asyncio
import aiohttp

urls = ['http://www.google.com', 'http://www.yandex.ru', 'http://www.python.org']

async def call_url(url):
    print('Starting {}'.format(url))
    response = await aiohttp.get(url)
    data = await response.text()
    print('{}: {} bytes: {}'.format(url, len(data), data))
    return data

futures = [call_url(url) for url in urls]

loop = asyncio.get_event_loop()
loop.run_until_complete(asyncio.wait(futures))
Программа состоит из метода async. Во время выполнения он возвращает сопрограмму, которая затем находится в ожидании.
Заключение
В Python встроена отличная асинхронная библиотека. Давайте еще раз вспомним проблемы потоков и посмотрим, решены ли они теперь:
- процессорное переключение контекста: Asyncio является асинхронным и использует цикл событий. Он позволяет переключать контекст программно;
- состояние гонки: поскольку Asyncio запускает только одну сопрограмму и переключается только в точках, которые вы определяете, ваш код не подвержен проблеме гонки потоков;
- взаимная/активная блокировка: поскольку теперь нет гонки потоков, то не нужно беспокоиться о блокировках. Хотя взаимная блокировка все еще может возникнуть в ситуации, когда две сопрограммы вызывают друг друга, это настолько маловероятно, что вам придется постараться, чтобы такое случилось;
- исчерпание ресурсов: поскольку сопрограммы запускаются в одном потоке и не требуют дополнительной памяти, становится намного сложнее исчерпать ресурсы. Однако в Asyncio есть пул «исполнителей» (executors), который по сути является пулом потоков. Если запускать слишком много процессов в пуле исполнителей, вы все равно можете столкнуться с нехваткой ресурсов.
Несмотря на то, что Asyncio довольно хорош, у него есть и проблемы. Во-первых, Asyncio был добавлен в Python недавно. Есть некоторые недоработки, которые еще не исправлены. Во-вторых, когда вы используете асинхронность, это значит, что весь ваш код должен быть асинхронным. Это связано с тем, что выполнение асинхронных функций может занимать слишком много времени, тем самым блокируя цикл событий.
Существует несколько вариантов асинхронного программирования в Python. Вы можете использовать зеленые потоки, обратные вызовы или сопрограммы. Хотя вариантов много, лучший из них — Asyncio. Если используете Python 3.5, то вам лучше использовать эту библиотеку, так как она встроена в ядро python.
Перевод статьи «Asynchronous Python»
Async IO is a concurrent programming design that has received dedicated support in Python, evolving rapidly from Python 3.4 through 3.7, and probably beyond.
You may be thinking with dread, “Concurrency, parallelism, threading, multiprocessing. That’s a lot to grasp already. Where does async IO fit in?”
This tutorial is built to help you answer that question, giving you a firmer grasp of Python’s approach to async IO.
Here’s what you’ll cover:
-
Asynchronous IO (async IO): a language-agnostic paradigm (model) that has implementations across a host of programming languages
-
async/await: two new Python keywords that are used to define coroutines -
asyncio: the Python package that provides a foundation and API for running and managing coroutines
Coroutines (specialized generator functions) are the heart of async IO in Python, and we’ll dive into them later on.
Before you get started, you’ll need to make sure you’re set up to use asyncio and other libraries found in this tutorial.
Setting Up Your Environment
You’ll need Python 3.7 or above to follow this article in its entirety, as well as the aiohttp and aiofiles packages:
$ python3.7 -m venv ./py37async
$ source ./py37async/bin/activate  # Windows: .py37asyncScriptsactivate.bat
$ pip install --upgrade pip aiohttp aiofiles  # Optional: aiodns
For help with installing Python 3.7 and setting up a virtual environment, check out Python 3 Installation & Setup Guide or Virtual Environments Primer.
With that, let’s jump in.
The 10,000-Foot View of Async IO
Async IO is a bit lesser known than its tried-and-true cousins, multiprocessing and threading. This section will give you a fuller picture of what async IO is and how it fits into its surrounding landscape.
Where Does Async IO Fit In?
Concurrency and parallelism are expansive subjects that are not easy to wade into. While this article focuses on async IO and its implementation in Python, it’s worth taking a minute to compare async IO to its counterparts in order to have context about how async IO fits into the larger, sometimes dizzying puzzle.
Parallelism consists of performing multiple operations at the same time. Multiprocessing is a means to effect parallelism, and it entails spreading tasks over a computer’s central processing units (CPUs, or cores). Multiprocessing is well-suited for CPU-bound tasks: tightly bound for loops and mathematical computations usually fall into this category.
Concurrency is a slightly broader term than parallelism. It suggests that multiple tasks have the ability to run in an overlapping manner. (There’s a saying that concurrency does not imply parallelism.)
Threading is a concurrent execution model whereby multiple threads take turns executing tasks. One process can contain multiple threads. Python has a complicated relationship with threading thanks to its GIL, but that’s beyond the scope of this article.
What’s important to know about threading is that it’s better for IO-bound tasks. While a CPU-bound task is characterized by the computer’s cores continually working hard from start to finish, an IO-bound job is dominated by a lot of waiting on input/output to complete.
To recap the above, concurrency encompasses both multiprocessing (ideal for CPU-bound tasks) and threading (suited for IO-bound tasks). Multiprocessing is a form of parallelism, with parallelism being a specific type (subset) of concurrency. The Python standard library has offered longstanding support for both of these through its multiprocessing, threading, and concurrent.futures packages.
Now it’s time to bring a new member to the mix. Over the last few years, a separate design has been more comprehensively built into CPython: asynchronous IO, enabled through the standard library’s asyncio package and the new async and await language keywords. To be clear, async IO is not a newly invented concept, and it has existed or is being built into other languages and runtime environments, such as Go, C#, or Scala.
The asyncio package is billed by the Python documentation as a library to write concurrent code. However, async IO is not threading, nor is it multiprocessing. It is not built on top of either of these.
In fact, async IO is a single-threaded, single-process design: it uses cooperative multitasking, a term that you’ll flesh out by the end of this tutorial. It has been said in other words that async IO gives a feeling of concurrency despite using a single thread in a single process. Coroutines (a central feature of async IO) can be scheduled concurrently, but they are not inherently concurrent.
To reiterate, async IO is a style of concurrent programming, but it is not parallelism. It’s more closely aligned with threading than with multiprocessing but is very much distinct from both of these and is a standalone member in concurrency’s bag of tricks.
That leaves one more term. What does it mean for something to be asynchronous? This isn’t a rigorous definition, but for our purposes here, I can think of two properties:
- Asynchronous routines are able to “pause” while waiting on their ultimate result and let other routines run in the meantime.
- Asynchronous code, through the mechanism above, facilitates concurrent execution. To put it differently, asynchronous code gives the look and feel of concurrency.
Here’s a diagram to put it all together. The white terms represent concepts, and the green terms represent ways in which they are implemented or effected:

I’ll stop there on the comparisons between concurrent programming models. This tutorial is focused on the subcomponent that is async IO, how to use it, and the APIs that have sprung up around it. For a thorough exploration of threading versus multiprocessing versus async IO, pause here and check out Jim Anderson’s overview of concurrency in Python. Jim is way funnier than me and has sat in more meetings than me, to boot.
Async IO Explained
Async IO may at first seem counterintuitive and paradoxical. How does something that facilitates concurrent code use a single thread and a single CPU core? I’ve never been very good at conjuring up examples, so I’d like to paraphrase one from Miguel Grinberg’s 2017 PyCon talk, which explains everything quite beautifully:
Chess master Judit Polgár hosts a chess exhibition in which she plays multiple amateur players. She has two ways of conducting the exhibition: synchronously and asynchronously.
Assumptions:
- 24 opponents
- Judit makes each chess move in 5 seconds
- Opponents each take 55 seconds to make a move
- Games average 30 pair-moves (60 moves total)
Synchronous version: Judit plays one game at a time, never two at the same time, until the game is complete. Each game takes (55 + 5) * 30 == 1800 seconds, or 30 minutes. The entire exhibition takes 24 * 30 == 720 minutes, or 12 hours.
Asynchronous version: Judit moves from table to table, making one move at each table. She leaves the table and lets the opponent make their next move during the wait time. One move on all 24 games takes Judit 24 * 5 == 120 seconds, or 2 minutes. The entire exhibition is now cut down to 120 * 30 == 3600 seconds, or just 1 hour. (Source)
There is only one Judit Polgár, who has only two hands and makes only one move at a time by herself. But playing asynchronously cuts the exhibition time down from 12 hours to one. So, cooperative multitasking is a fancy way of saying that a program’s event loop (more on that later) communicates with multiple tasks to let each take turns running at the optimal time.
Async IO takes long waiting periods in which functions would otherwise be blocking and allows other functions to run during that downtime. (A function that blocks effectively forbids others from running from the time that it starts until the time that it returns.)
Async IO Is Not Easy
I’ve heard it said, “Use async IO when you can; use threading when you must.” The truth is that building durable multithreaded code can be hard and error-prone. Async IO avoids some of the potential speedbumps that you might otherwise encounter with a threaded design.
But that’s not to say that async IO in Python is easy. Be warned: when you venture a bit below the surface level, async programming can be difficult too! Python’s async model is built around concepts such as callbacks, events, transports, protocols, and futures—just the terminology can be intimidating. The fact that its API has been changing continually makes it no easier.
Luckily, asyncio has matured to a point where most of its features are no longer provisional, while its documentation has received a huge overhaul and some quality resources on the subject are starting to emerge as well.
The asyncio Package and async/await
Now that you have some background on async IO as a design, let’s explore Python’s implementation. Python’s asyncio package (introduced in Python 3.4) and its two keywords, async and await, serve different purposes but come together to help you declare, build, execute, and manage asynchronous code.
The async/await Syntax and Native Coroutines
At the heart of async IO are coroutines. A coroutine is a specialized version of a Python generator function. Let’s start with a baseline definition and then build off of it as you progress here: a coroutine is a function that can suspend its execution before reaching return, and it can indirectly pass control to another coroutine for some time.
Later, you’ll dive a lot deeper into how exactly the traditional generator is repurposed into a coroutine. For now, the easiest way to pick up how coroutines work is to start making some.
Let’s take the immersive approach and write some async IO code. This short program is the Hello World of async IO but goes a long way towards illustrating its core functionality:
#!/usr/bin/env python3
# countasync.py

import asyncio

async def count():
    print("One")
    await asyncio.sleep(1)
    print("Two")

async def main():
    await asyncio.gather(count(), count(), count())

if __name__ == "__main__":
    import time
    s = time.perf_counter()
    asyncio.run(main())
    elapsed = time.perf_counter() - s
    print(f"{__file__} executed in {elapsed:0.2f} seconds.")
When you execute this file, take note of what looks different than if you were to define the functions with just def and time.sleep():
$ python3 countasync.py
One
One
One
Two
Two
Two
countasync.py executed in 1.01 seconds.
The order of this output is the heart of async IO. Talking to each of the calls to count() is a single event loop, or coordinator. When each task reaches await asyncio.sleep(1), the function yells up to the event loop and gives control back to it, saying, “I’m going to be sleeping for 1 second. Go ahead and let something else meaningful be done in the meantime.”
Contrast this to the synchronous version:
#!/usr/bin/env python3
# countsync.py

import time

def count():
    print("One")
    time.sleep(1)
    print("Two")

def main():
    for _ in range(3):
        count()

if __name__ == "__main__":
    s = time.perf_counter()
    main()
    elapsed = time.perf_counter() - s
    print(f"{__file__} executed in {elapsed:0.2f} seconds.")
When executed, there is a slight but critical change in order and execution time:
$ python3 countsync.py
One
Two
One
Two
One
Two
countsync.py executed in 3.01 seconds.
While using time.sleep() and asyncio.sleep() may seem banal, they are used as stand-ins for any time-intensive processes that involve wait time. (The most mundane thing you can wait on is a sleep() call that does basically nothing.) That is, time.sleep() can represent any time-consuming blocking function call, while asyncio.sleep() is used to stand in for a non-blocking call (but one that also takes some time to complete).
As you’ll see in the next section, the benefit of awaiting something, including asyncio.sleep(), is that the surrounding function can temporarily cede control to another function that’s more readily able to do something immediately. In contrast, time.sleep() or any other blocking call is incompatible with asynchronous Python code, because it will stop everything in its tracks for the duration of the sleep time.
The Rules of Async IO
At this point, a more formal definition of async, await, and the coroutine functions that they create are in order. This section is a little dense, but getting a hold of async/await is instrumental, so come back to this if you need to:
-
The syntax
async defintroduces either a native coroutine or an asynchronous generator. The expressionsasync withandasync forare also valid, and you’ll see them later on. -
The keyword
awaitpasses function control back to the event loop. (It suspends the execution of the surrounding coroutine.) If Python encounters anawait f()expression in the scope ofg(), this is howawaittells the event loop, “Suspend execution ofg()until whatever I’m waiting on—the result off()—is returned. In the meantime, go let something else run.”
In code, that second bullet point looks roughly like this:
async def g():
    # Pause here and come back to g() when f() is ready
    r = await f()
    return r
There’s also a strict set of rules around when and how you can and cannot use async/await. These can be handy whether you are still picking up the syntax or already have exposure to using async/await:
-
A function that you introduce with
async defis a coroutine. It may useawait,return, oryield, but all of these are optional. Declaringasync def noop(): passis valid:-
Using
awaitand/orreturncreates a coroutine function. To call a coroutine function, you mustawaitit to get its results. -
It is less common (and only recently legal in Python) to use
yieldin anasync defblock. This creates an asynchronous generator, which you iterate over withasync for. Forget about async generators for the time being and focus on getting down the syntax for coroutine functions, which useawaitand/orreturn. -
Anything defined with
async defmay not useyield from, which will raise aSyntaxError.
-
-
Just like it’s a
SyntaxErrorto useyieldoutside of adeffunction, it is aSyntaxErrorto useawaitoutside of anasync defcoroutine. You can only useawaitin the body of coroutines.
Here are some terse examples meant to summarize the above few rules:
async def f(x):
    y = await z(x)  # OK - `await` and `return` allowed in coroutines
    return y

async def g(x):
    yield x  # OK - this is an async generator

async def m(x):
    yield from gen(x)  # No - SyntaxError

def m(x):
    y = await z(x)  # Still no - SyntaxError (no `async def` here)
    return y
Finally, when you use await f(), it’s required that f() be an object that is awaitable. Well, that’s not very helpful, is it? For now, just know that an awaitable object is either (1) another coroutine or (2) an object defining an .__await__() dunder method that returns an iterator. If you’re writing a program, for the large majority of purposes, you should only need to worry about case #1.
That brings us to one more technical distinction that you may see pop up: an older way of marking a function as a coroutine is to decorate a normal def function with @asyncio.coroutine. The result is a generator-based coroutine. This construction has been outdated since the async/await syntax was put in place in Python 3.5.
These two coroutines are essentially equivalent (both are awaitable), but the first is generator-based, while the second is a native coroutine:
import asyncio

@asyncio.coroutine
def py34_coro():
    """Generator-based coroutine, older syntax"""
    yield from stuff()

async def py35_coro():
    """Native coroutine, modern syntax"""
    await stuff()
If you’re writing any code yourself, prefer native coroutines for the sake of being explicit rather than implicit. Generator-based coroutines will be removed in Python 3.10.
Towards the latter half of this tutorial, we’ll touch on generator-based coroutines for explanation’s sake only. The reason that async/await were introduced is to make coroutines a standalone feature of Python that can be easily differentiated from a normal generator function, thus reducing ambiguity.
Don’t get bogged down in generator-based coroutines, which have been deliberately outdated by async/await. They have their own small set of rules (for instance, await cannot be used in a generator-based coroutine) that are largely irrelevant if you stick to the async/await syntax.
Without further ado, let’s take on a few more involved examples.
Here’s one example of how async IO cuts down on wait time: given a coroutine makerandom() that keeps producing random integers in the range [0, 10], until one of them exceeds a threshold, you want to let multiple calls of this coroutine not need to wait for each other to complete in succession. You can largely follow the patterns from the two scripts above, with slight changes:
#!/usr/bin/env python3
# rand.py

import asyncio
import random

# ANSI colors
c = (
    "33[0m",   # End of color
    "33[36m",  # Cyan
    "33[91m",  # Red
    "33[35m",  # Magenta
)

async def makerandom(idx: int, threshold: int = 6) -> int:
    print(c[idx + 1] + f"Initiated makerandom({idx}).")
    i = random.randint(0, 10)
    while i <= threshold:
        print(c[idx + 1] + f"makerandom({idx}) == {i} too low; retrying.")
        await asyncio.sleep(idx + 1)
        i = random.randint(0, 10)
    print(c[idx + 1] + f"---> Finished: makerandom({idx}) == {i}" + c[0])
    return i

async def main():
    res = await asyncio.gather(*(makerandom(i, 10 - i - 1) for i in range(3)))
    return res

if __name__ == "__main__":
    random.seed(444)
    r1, r2, r3 = asyncio.run(main())
    print()
    print(f"r1: {r1}, r2: {r2}, r3: {r3}")
The colorized output says a lot more than I can and gives you a sense for how this script is carried out:

This program uses one main coroutine, makerandom(), and runs it concurrently across 3 different inputs. Most programs will contain small, modular coroutines and one wrapper function that serves to chain each of the smaller coroutines together. main() is then used to gather tasks (futures) by mapping the central coroutine across some iterable or pool.
In this miniature example, the pool is range(3). In a fuller example presented later, it is a set of URLs that need to be requested, parsed, and processed concurrently, and main() encapsulates that entire routine for each URL.
While “making random integers” (which is CPU-bound more than anything) is maybe not the greatest choice as a candidate for asyncio, it’s the presence of asyncio.sleep() in the example that is designed to mimic an IO-bound process where there is uncertain wait time involved. For example, the asyncio.sleep() call might represent sending and receiving not-so-random integers between two clients in a message application.
Async IO Design Patterns
Async IO comes with its own set of possible script designs, which you’ll get introduced to in this section.
Chaining Coroutines
A key feature of coroutines is that they can be chained together. (Remember, a coroutine object is awaitable, so another coroutine can await it.) This allows you to break programs into smaller, manageable, recyclable coroutines:
#!/usr/bin/env python3
# chained.py

import asyncio
import random
import time

async def part1(n: int) -> str:
    i = random.randint(0, 10)
    print(f"part1({n}) sleeping for {i} seconds.")
    await asyncio.sleep(i)
    result = f"result{n}-1"
    print(f"Returning part1({n}) == {result}.")
    return result

async def part2(n: int, arg: str) -> str:
    i = random.randint(0, 10)
    print(f"part2{n, arg} sleeping for {i} seconds.")
    await asyncio.sleep(i)
    result = f"result{n}-2 derived from {arg}"
    print(f"Returning part2{n, arg} == {result}.")
    return result

async def chain(n: int) -> None:
    start = time.perf_counter()
    p1 = await part1(n)
    p2 = await part2(n, p1)
    end = time.perf_counter() - start
    print(f"-->Chained result{n} => {p2} (took {end:0.2f} seconds).")

async def main(*args):
    await asyncio.gather(*(chain(n) for n in args))

if __name__ == "__main__":
    import sys
    random.seed(444)
    args = [1, 2, 3] if len(sys.argv) == 1 else map(int, sys.argv[1:])
    start = time.perf_counter()
    asyncio.run(main(*args))
    end = time.perf_counter() - start
    print(f"Program finished in {end:0.2f} seconds.")
Pay careful attention to the output, where part1() sleeps for a variable amount of time, and part2() begins working with the results as they become available:
$ python3 chained.py 9 6 3
part1(9) sleeping for 4 seconds.
part1(6) sleeping for 4 seconds.
part1(3) sleeping for 0 seconds.
Returning part1(3) == result3-1.
part2(3, 'result3-1') sleeping for 4 seconds.
Returning part1(9) == result9-1.
part2(9, 'result9-1') sleeping for 7 seconds.
Returning part1(6) == result6-1.
part2(6, 'result6-1') sleeping for 4 seconds.
Returning part2(3, 'result3-1') == result3-2 derived from result3-1.
-->Chained result3 => result3-2 derived from result3-1 (took 4.00 seconds).
Returning part2(6, 'result6-1') == result6-2 derived from result6-1.
-->Chained result6 => result6-2 derived from result6-1 (took 8.01 seconds).
Returning part2(9, 'result9-1') == result9-2 derived from result9-1.
-->Chained result9 => result9-2 derived from result9-1 (took 11.01 seconds).
Program finished in 11.01 seconds.
In this setup, the runtime of main() will be equal to the maximum runtime of the tasks that it gathers together and schedules.
Using a Queue
The asyncio package provides queue classes that are designed to be similar to classes of the queue module. In our examples so far, we haven’t really had a need for a queue structure. In chained.py, each task (future) is composed of a set of coroutines that explicitly await each other and pass through a single input per chain.
There is an alternative structure that can also work with async IO: a number of producers, which are not associated with each other, add items to a queue. Each producer may add multiple items to the queue at staggered, random, unannounced times. A group of consumers pull items from the queue as they show up, greedily and without waiting for any other signal.
In this design, there is no chaining of any individual consumer to a producer. The consumers don’t know the number of producers, or even the cumulative number of items that will be added to the queue, in advance.
It takes an individual producer or consumer a variable amount of time to put and extract items from the queue, respectively. The queue serves as a throughput that can communicate with the producers and consumers without them talking to each other directly.
The synchronous version of this program would look pretty dismal: a group of blocking producers serially add items to the queue, one producer at a time. Only after all producers are done can the queue be processed, by one consumer at a time processing item-by-item. There is a ton of latency in this design. Items may sit idly in the queue rather than be picked up and processed immediately.
An asynchronous version, asyncq.py, is below. The challenging part of this workflow is that there needs to be a signal to the consumers that production is done. Otherwise, await q.get() will hang indefinitely, because the queue will have been fully processed, but consumers won’t have any idea that production is complete.
(Big thanks for some help from a StackOverflow user for helping to straighten out main(): the key is to await q.join(), which blocks until all items in the queue have been received and processed, and then to cancel the consumer tasks, which would otherwise hang up and wait endlessly for additional queue items to appear.)
Here is the full script:
#!/usr/bin/env python3
# asyncq.py

import asyncio
import itertools as it
import os
import random
import time

async def makeitem(size: int = 5) -> str:
    return os.urandom(size).hex()

async def randsleep(caller=None) -> None:
    i = random.randint(0, 10)
    if caller:
        print(f"{caller} sleeping for {i} seconds.")
    await asyncio.sleep(i)

async def produce(name: int, q: asyncio.Queue) -> None:
    n = random.randint(0, 10)
    for _ in it.repeat(None, n):  # Synchronous loop for each single producer
        await randsleep(caller=f"Producer {name}")
        i = await makeitem()
        t = time.perf_counter()
        await q.put((i, t))
        print(f"Producer {name} added <{i}> to queue.")

async def consume(name: int, q: asyncio.Queue) -> None:
    while True:
        await randsleep(caller=f"Consumer {name}")
        i, t = await q.get()
        now = time.perf_counter()
        print(f"Consumer {name} got element <{i}>"
              f" in {now-t:0.5f} seconds.")
        q.task_done()

async def main(nprod: int, ncon: int):
    q = asyncio.Queue()
    producers = [asyncio.create_task(produce(n, q)) for n in range(nprod)]
    consumers = [asyncio.create_task(consume(n, q)) for n in range(ncon)]
    await asyncio.gather(*producers)
    await q.join()  # Implicitly awaits consumers, too
    for c in consumers:
        c.cancel()

if __name__ == "__main__":
    import argparse
    random.seed(444)
    parser = argparse.ArgumentParser()
    parser.add_argument("-p", "--nprod", type=int, default=5)
    parser.add_argument("-c", "--ncon", type=int, default=10)
    ns = parser.parse_args()
    start = time.perf_counter()
    asyncio.run(main(**ns.__dict__))
    elapsed = time.perf_counter() - start
    print(f"Program completed in {elapsed:0.5f} seconds.")
The first few coroutines are helper functions that return a random string, a fractional-second performance counter, and a random integer. A producer puts anywhere from 1 to 5 items into the queue. Each item is a tuple of (i, t) where i is a random string and t is the time at which the producer attempts to put the tuple into the queue.
When a consumer pulls an item out, it simply calculates the elapsed time that the item sat in the queue using the timestamp that the item was put in with.
Keep in mind that asyncio.sleep() is used to mimic some other, more complex coroutine that would eat up time and block all other execution if it were a regular blocking function.
Here is a test run with two producers and five consumers:
$ python3 asyncq.py -p 2 -c 5
Producer 0 sleeping for 3 seconds.
Producer 1 sleeping for 3 seconds.
Consumer 0 sleeping for 4 seconds.
Consumer 1 sleeping for 3 seconds.
Consumer 2 sleeping for 3 seconds.
Consumer 3 sleeping for 5 seconds.
Consumer 4 sleeping for 4 seconds.
Producer 0 added <377b1e8f82> to queue.
Producer 0 sleeping for 5 seconds.
Producer 1 added <413b8802f8> to queue.
Consumer 1 got element <377b1e8f82> in 0.00013 seconds.
Consumer 1 sleeping for 3 seconds.
Consumer 2 got element <413b8802f8> in 0.00009 seconds.
Consumer 2 sleeping for 4 seconds.
Producer 0 added <06c055b3ab> to queue.
Producer 0 sleeping for 1 seconds.
Consumer 0 got element <06c055b3ab> in 0.00021 seconds.
Consumer 0 sleeping for 4 seconds.
Producer 0 added <17a8613276> to queue.
Consumer 4 got element <17a8613276> in 0.00022 seconds.
Consumer 4 sleeping for 5 seconds.
Program completed in 9.00954 seconds.
In this case, the items process in fractions of a second. A delay can be due to two reasons:
- Standard, largely unavoidable overhead
- Situations where all consumers are sleeping when an item appears in the queue
With regards to the second reason, luckily, it is perfectly normal to scale to hundreds or thousands of consumers. You should have no problem with python3 asyncq.py -p 5 -c 100. The point here is that, theoretically, you could have different users on different systems controlling the management of producers and consumers, with the queue serving as the central throughput.
So far, you’ve been thrown right into the fire and seen three related examples of asyncio calling coroutines defined with async and await. If you’re not completely following or just want to get deeper into the mechanics of how modern coroutines came to be in Python, you’ll start from square one with the next section.
Async IO’s Roots in Generators
Earlier, you saw an example of the old-style generator-based coroutines, which have been outdated by more explicit native coroutines. The example is worth re-showing with a small tweak:
import asyncio

@asyncio.coroutine
def py34_coro():
    """Generator-based coroutine"""
    # No need to build these yourself, but be aware of what they are
    s = yield from stuff()
    return s

async def py35_coro():
    """Native coroutine, modern syntax"""
    s = await stuff()
    return s

async def stuff():
    return 0x10, 0x20, 0x30
As an experiment, what happens if you call py34_coro() or py35_coro() on its own, without await, or without any calls to asyncio.run() or other asyncio “porcelain” functions? Calling a coroutine in isolation returns a coroutine object:
>>>
>>> py35_coro()
<coroutine object py35_coro at 0x10126dcc8>
This isn’t very interesting on its surface. The result of calling a coroutine on its own is an awaitable coroutine object.
Time for a quiz: what other feature of Python looks like this? (What feature of Python doesn’t actually “do much” when it’s called on its own?)
Hopefully you’re thinking of generators as an answer to this question, because coroutines are enhanced generators under the hood. The behavior is similar in this regard:
>>>
>>> def gen():
...     yield 0x10, 0x20, 0x30
...
>>> g = gen()
>>> g  # Nothing much happens - need to iterate with `.__next__()`
<generator object gen at 0x1012705e8>
>>> next(g)
(16, 32, 48)
Generator functions are, as it so happens, the foundation of async IO (regardless of whether you declare coroutines with async def rather than the older @asyncio.coroutine wrapper). Technically, await is more closely analogous to yield from than it is to yield. (But remember that yield from x() is just syntactic sugar to replace for i in x(): yield i.)
One critical feature of generators as it pertains to async IO is that they can effectively be stopped and restarted at will. For example, you can break out of iterating over a generator object and then resume iteration on the remaining values later. When a generator function reaches yield, it yields that value, but then it sits idle until it is told to yield its subsequent value.
This can be fleshed out through an example:
>>>
>>> from itertools import cycle
>>> def endless():
...     """Yields 9, 8, 7, 6, 9, 8, 7, 6, ... forever"""
...     yield from cycle((9, 8, 7, 6))

>>> e = endless()
>>> total = 0
>>> for i in e:
...     if total < 30:
...         print(i, end=" ")
...         total += i
...     else:
...         print()
...         # Pause execution. We can resume later.
...         break
9 8 7 6 9 8 7 6 9 8 7 6 9 8

>>> # Resume
>>> next(e), next(e), next(e)
(6, 9, 8)
The await keyword behaves similarly, marking a break point at which the coroutine suspends itself and lets other coroutines work. “Suspended,” in this case, means a coroutine that has temporarily ceded control but not totally exited or finished. Keep in mind that yield, and by extension yield from and await, mark a break point in a generator’s execution.
This is the fundamental difference between functions and generators. A function is all-or-nothing. Once it starts, it won’t stop until it hits a return, then pushes that value to the caller (the function that calls it). A generator, on the other hand, pauses each time it hits a yield and goes no further. Not only can it push this value to calling stack, but it can keep a hold of its local variables when you resume it by calling next() on it.
There’s a second and lesser-known feature of generators that also matters. You can send a value into a generator as well through its .send() method. This allows generators (and coroutines) to call (await) each other without blocking. I won’t get any further into the nuts and bolts of this feature, because it matters mainly for the implementation of coroutines behind the scenes, but you shouldn’t ever really need to use it directly yourself.
If you’re interested in exploring more, you can start at PEP 342, where coroutines were formally introduced. Brett Cannon’s How the Heck Does Async-Await Work in Python is also a good read, as is the PYMOTW writeup on asyncio. Lastly, there’s David Beazley’s Curious Course on Coroutines and Concurrency, which dives deep into the mechanism by which coroutines run.
Let’s try to condense all of the above articles into a few sentences: there is a particularly unconventional mechanism by which these coroutines actually get run. Their result is an attribute of the exception object that gets thrown when their .send() method is called. There’s some more wonky detail to all of this, but it probably won’t help you use this part of the language in practice, so let’s move on for now.
To tie things together, here are some key points on the topic of coroutines as generators:
-
Coroutines are repurposed generators that take advantage of the peculiarities of generator methods.
-
Old generator-based coroutines use
yield fromto wait for a coroutine result. Modern Python syntax in native coroutines simply replacesyield fromwithawaitas the means of waiting on a coroutine result. Theawaitis analogous toyield from, and it often helps to think of it as such. -
The use of
awaitis a signal that marks a break point. It lets a coroutine temporarily suspend execution and permits the program to come back to it later.
Other Features: async for and Async Generators + Comprehensions
Along with plain async/await, Python also enables async for to iterate over an asynchronous iterator. The purpose of an asynchronous iterator is for it to be able to call asynchronous code at each stage when it is iterated over.
A natural extension of this concept is an asynchronous generator. Recall that you can use await, return, or yield in a native coroutine. Using yield within a coroutine became possible in Python 3.6 (via PEP 525), which introduced asynchronous generators with the purpose of allowing await and yield to be used in the same coroutine function body:
>>>
>>> async def mygen(u: int = 10):
...     """Yield powers of 2."""
...     i = 0
...     while i < u:
...         yield 2 ** i
...         i += 1
...         await asyncio.sleep(0.1)
Last but not least, Python enables asynchronous comprehension with async for. Like its synchronous cousin, this is largely syntactic sugar:
>>>
>>> async def main():
...     # This does *not* introduce concurrent execution
...     # It is meant to show syntax only
...     g = [i async for i in mygen()]
...     f = [j async for j in mygen() if not (j // 3 % 5)]
...     return g, f
...
>>> g, f = asyncio.run(main())
>>> g
[1, 2, 4, 8, 16, 32, 64, 128, 256, 512]
>>> f
[1, 2, 16, 32, 256, 512]
This is a crucial distinction: neither asynchronous generators nor comprehensions make the iteration concurrent. All that they do is provide the look-and-feel of their synchronous counterparts, but with the ability for the loop in question to give up control to the event loop for some other coroutine to run.
In other words, asynchronous iterators and asynchronous generators are not designed to concurrently map some function over a sequence or iterator. They’re merely designed to let the enclosing coroutine allow other tasks to take their turn. The async for and async with statements are only needed to the extent that using plain for or with would “break” the nature of await in the coroutine. This distinction between asynchronicity and concurrency is a key one to grasp.
The Event Loop and asyncio.run()
You can think of an event loop as something like a while True loop that monitors coroutines, taking feedback on what’s idle, and looking around for things that can be executed in the meantime. It is able to wake up an idle coroutine when whatever that coroutine is waiting on becomes available.
Thus far, the entire management of the event loop has been implicitly handled by one function call:
asyncio.run(main()) # Python 3.7+
asyncio.run(), introduced in Python 3.7, is responsible for getting the event loop, running tasks until they are marked as complete, and then closing the event loop.
There’s a more long-winded way of managing the asyncio event loop, with get_event_loop(). The typical pattern looks like this:
loop = asyncio.get_event_loop()
try:
    loop.run_until_complete(main())
finally:
    loop.close()
You’ll probably see loop.get_event_loop() floating around in older examples, but unless you have a specific need to fine-tune control over the event loop management, asyncio.run() should be sufficient for most programs.
If you do need to interact with the event loop within a Python program, loop is a good-old-fashioned Python object that supports introspection with loop.is_running() and loop.is_closed(). You can manipulate it if you need to get more fine-tuned control, such as in scheduling a callback by passing the loop as an argument.
What is more crucial is understanding a bit beneath the surface about the mechanics of the event loop. Here are a few points worth stressing about the event loop.
#1: Coroutines don’t do much on their own until they are tied to the event loop.
You saw this point before in the explanation on generators, but it’s worth restating. If you have a main coroutine that awaits others, simply calling it in isolation has little effect:
>>>
>>> import asyncio

>>> async def main():
...     print("Hello ...")
...     await asyncio.sleep(1)
...     print("World!")

>>> routine = main()
>>> routine
<coroutine object main at 0x1027a6150>
Remember to use asyncio.run() to actually force execution by scheduling the main() coroutine (future object) for execution on the event loop:
>>>
>>> asyncio.run(routine)
Hello ...
World!
(Other coroutines can be executed with await. It is typical to wrap just main() in asyncio.run(), and chained coroutines with await will be called from there.)
#2: By default, an async IO event loop runs in a single thread and on a single CPU core. Usually, running one single-threaded event loop in one CPU core is more than sufficient. It is also possible to run event loops across multiple cores. Check out this talk by John Reese for more, and be warned that your laptop may spontaneously combust.
#3. Event loops are pluggable. That is, you could, if you really wanted, write your own event loop implementation and have it run tasks just the same. This is wonderfully demonstrated in the uvloop package, which is an implementation of the event loop in Cython.
That is what is meant by the term “pluggable event loop”: you can use any working implementation of an event loop, unrelated to the structure of the coroutines themselves. The asyncio package itself ships with two different event loop implementations, with the default being based on the selectors module. (The second implementation is built for Windows only.)
A Full Program: Asynchronous Requests
You’ve made it this far, and now it’s time for the fun and painless part. In this section, you’ll build a web-scraping URL collector, areq.py, using aiohttp, a blazingly fast async HTTP client/server framework. (We just need the client part.) Such a tool could be used to map connections between a cluster of sites, with the links forming a directed graph.
The high-level program structure will look like this:
-
Read a sequence of URLs from a local file,
urls.txt. -
Send GET requests for the URLs and decode the resulting content. If this fails, stop there for a URL.
-
Search for the URLs within
hreftags in the HTML of the responses. -
Write the results to
foundurls.txt. -
Do all of the above as asynchronously and concurrently as possible. (Use
aiohttpfor the requests, andaiofilesfor the file-appends. These are two primary examples of IO that are well-suited for the async IO model.)
Here are the contents of urls.txt. It’s not huge, and contains mostly highly trafficked sites:
$ cat urls.txt
https://regex101.com/
https://docs.python.org/3/this-url-will-404.html
https://www.nytimes.com/guides/
https://www.mediamatters.org/
https://1.1.1.1/
https://www.politico.com/tipsheets/morning-money
https://www.bloomberg.com/markets/economics
https://www.ietf.org/rfc/rfc2616.txt
The second URL in the list should return a 404 response, which you’ll need to handle gracefully. If you’re running an expanded version of this program, you’ll probably need to deal with much hairier problems than this, such a server disconnections and endless redirects.
The requests themselves should be made using a single session, to take advantage of reusage of the session’s internal connection pool.
Let’s take a look at the full program. We’ll walk through things step-by-step after:
#!/usr/bin/env python3
# areq.py

"""Asynchronously get links embedded in multiple pages' HMTL."""

import asyncio
import logging
import re
import sys
from typing import IO
import urllib.error
import urllib.parse

import aiofiles
import aiohttp
from aiohttp import ClientSession

logging.basicConfig(
    format="%(asctime)s %(levelname)s:%(name)s: %(message)s",
    level=logging.DEBUG,
    datefmt="%H:%M:%S",
    stream=sys.stderr,
)
logger = logging.getLogger("areq")
logging.getLogger("chardet.charsetprober").disabled = True

HREF_RE = re.compile(r'href="(.*?)"')

async def fetch_html(url: str, session: ClientSession, **kwargs) -> str:
    """GET request wrapper to fetch page HTML.

    kwargs are passed to `session.request()`.
    """

    resp = await session.request(method="GET", url=url, **kwargs)
    resp.raise_for_status()
    logger.info("Got response [%s] for URL: %s", resp.status, url)
    html = await resp.text()
    return html

async def parse(url: str, session: ClientSession, **kwargs) -> set:
    """Find HREFs in the HTML of `url`."""
    found = set()
    try:
        html = await fetch_html(url=url, session=session, **kwargs)
    except (
        aiohttp.ClientError,
        aiohttp.http_exceptions.HttpProcessingError,
    ) as e:
        logger.error(
            "aiohttp exception for %s [%s]: %s",
            url,
            getattr(e, "status", None),
            getattr(e, "message", None),
        )
        return found
    except Exception as e:
        logger.exception(
            "Non-aiohttp exception occured:  %s", getattr(e, "__dict__", {})
        )
        return found
    else:
        for link in HREF_RE.findall(html):
            try:
                abslink = urllib.parse.urljoin(url, link)
            except (urllib.error.URLError, ValueError):
                logger.exception("Error parsing URL: %s", link)
                pass
            else:
                found.add(abslink)
        logger.info("Found %d links for %s", len(found), url)
        return found

async def write_one(file: IO, url: str, **kwargs) -> None:
    """Write the found HREFs from `url` to `file`."""
    res = await parse(url=url, **kwargs)
    if not res:
        return None
    async with aiofiles.open(file, "a") as f:
        for p in res:
            await f.write(f"{url}t{p}n")
        logger.info("Wrote results for source URL: %s", url)

async def bulk_crawl_and_write(file: IO, urls: set, **kwargs) -> None:
    """Crawl & write concurrently to `file` for multiple `urls`."""
    async with ClientSession() as session:
        tasks = []
        for url in urls:
            tasks.append(
                write_one(file=file, url=url, session=session, **kwargs)
            )
        await asyncio.gather(*tasks)

if __name__ == "__main__":
    import pathlib
    import sys

    assert sys.version_info >= (3, 7), "Script requires Python 3.7+."
    here = pathlib.Path(__file__).parent

    with open(here.joinpath("urls.txt")) as infile:
        urls = set(map(str.strip, infile))

    outpath = here.joinpath("foundurls.txt")
    with open(outpath, "w") as outfile:
        outfile.write("source_urltparsed_urln")

    asyncio.run(bulk_crawl_and_write(file=outpath, urls=urls))
This script is longer than our initial toy programs, so let’s break it down.
The constant HREF_RE is a regular expression to extract what we’re ultimately searching for, href tags within HTML:
>>>
>>> HREF_RE.search('Go to <a href="https://realpython.com/">Real Python</a>')
<re.Match object; span=(15, 45), match='href="https://realpython.com/"'>
The coroutine fetch_html() is a wrapper around a GET request to make the request and decode the resulting page HTML. It makes the request, awaits the response, and raises right away in the case of a non-200 status:
resp = await session.request(method="GET", url=url, **kwargs)
resp.raise_for_status()
If the status is okay, fetch_html() returns the page HTML (a str). Notably, there is no exception handling done in this function. The logic is to propagate that exception to the caller and let it be handled there:
We await session.request() and resp.text() because they’re awaitable coroutines. The request/response cycle would otherwise be the long-tailed, time-hogging portion of the application, but with async IO, fetch_html() lets the event loop work on other readily available jobs such as parsing and writing URLs that have already been fetched.
Next in the chain of coroutines comes parse(), which waits on fetch_html() for a given URL, and then extracts all of the href tags from that page’s HTML, making sure that each is valid and formatting it as an absolute path.
Admittedly, the second portion of parse() is blocking, but it consists of a quick regex match and ensuring that the links discovered are made into absolute paths.
In this specific case, this synchronous code should be quick and inconspicuous. But just remember that any line within a given coroutine will block other coroutines unless that line uses yield, await, or return. If the parsing was a more intensive process, you might want to consider running this portion in its own process with loop.run_in_executor().
Next, the coroutine write() takes a file object and a single URL, and waits on parse() to return a set of the parsed URLs, writing each to the file asynchronously along with its source URL through use of aiofiles, a package for async file IO.
Lastly, bulk_crawl_and_write() serves as the main entry point into the script’s chain of coroutines. It uses a single session, and a task is created for each URL that is ultimately read from urls.txt.
Here are a few additional points that deserve mention:
-
The default
ClientSessionhas an adapter with a maximum of 100 open connections. To change that, pass an instance ofasyncio.connector.TCPConnectortoClientSession. You can also specify limits on a per-host basis. -
You can specify max timeouts for both the session as a whole and for individual requests.
-
This script also uses
async with, which works with an asynchronous context manager. I haven’t devoted a whole section to this concept because the transition from synchronous to asynchronous context managers is fairly straightforward. The latter has to define.__aenter__()and.__aexit__()rather than.__exit__()and.__enter__(). As you might expect,async withcan only be used inside a coroutine function declared withasync def.
If you’d like to explore a bit more, the companion files for this tutorial up at GitHub have comments and docstrings attached as well.
Here’s the execution in all of its glory, as areq.py gets, parses, and saves results for 9 URLs in under a second:
$ python3 areq.py
21:33:22 DEBUG:asyncio: Using selector: KqueueSelector
21:33:22 INFO:areq: Got response [200] for URL: https://www.mediamatters.org/
21:33:22 INFO:areq: Found 115 links for https://www.mediamatters.org/
21:33:22 INFO:areq: Got response [200] for URL: https://www.nytimes.com/guides/
21:33:22 INFO:areq: Got response [200] for URL: https://www.politico.com/tipsheets/morning-money
21:33:22 INFO:areq: Got response [200] for URL: https://www.ietf.org/rfc/rfc2616.txt
21:33:22 ERROR:areq: aiohttp exception for https://docs.python.org/3/this-url-will-404.html [404]: Not Found
21:33:22 INFO:areq: Found 120 links for https://www.nytimes.com/guides/
21:33:22 INFO:areq: Found 143 links for https://www.politico.com/tipsheets/morning-money
21:33:22 INFO:areq: Wrote results for source URL: https://www.mediamatters.org/
21:33:22 INFO:areq: Found 0 links for https://www.ietf.org/rfc/rfc2616.txt
21:33:22 INFO:areq: Got response [200] for URL: https://1.1.1.1/
21:33:22 INFO:areq: Wrote results for source URL: https://www.nytimes.com/guides/
21:33:22 INFO:areq: Wrote results for source URL: https://www.politico.com/tipsheets/morning-money
21:33:22 INFO:areq: Got response [200] for URL: https://www.bloomberg.com/markets/economics
21:33:22 INFO:areq: Found 3 links for https://www.bloomberg.com/markets/economics
21:33:22 INFO:areq: Wrote results for source URL: https://www.bloomberg.com/markets/economics
21:33:23 INFO:areq: Found 36 links for https://1.1.1.1/
21:33:23 INFO:areq: Got response [200] for URL: https://regex101.com/
21:33:23 INFO:areq: Found 23 links for https://regex101.com/
21:33:23 INFO:areq: Wrote results for source URL: https://regex101.com/
21:33:23 INFO:areq: Wrote results for source URL: https://1.1.1.1/
That’s not too shabby! As a sanity check, you can check the line-count on the output. In my case, it’s 626, though keep in mind this may fluctuate:
$ wc -l foundurls.txt
     626 foundurls.txt

$ head -n 3 foundurls.txt
source_url  parsed_url
https://www.bloomberg.com/markets/economics https://www.bloomberg.com/feedback
https://www.bloomberg.com/markets/economics https://www.bloomberg.com/notices/tos
Async IO in Context
Now that you’ve seen a healthy dose of code, let’s step back for a minute and consider when async IO is an ideal option and how you can make the comparison to arrive at that conclusion or otherwise choose a different model of concurrency.
When and Why Is Async IO the Right Choice?
This tutorial is no place for an extended treatise on async IO versus threading versus multiprocessing. However, it’s useful to have an idea of when async IO is probably the best candidate of the three.
The battle over async IO versus multiprocessing is not really a battle at all. In fact, they can be used in concert. If you have multiple, fairly uniform CPU-bound tasks (a great example is a grid search in libraries such as scikit-learn or keras), multiprocessing should be an obvious choice.
Simply putting async before every function is a bad idea if all of the functions use blocking calls. (This can actually slow down your code.) But as mentioned previously, there are places where async IO and multiprocessing can live in harmony.
The contest between async IO and threading is a little bit more direct. I mentioned in the introduction that “threading is hard.” The full story is that, even in cases where threading seems easy to implement, it can still lead to infamous impossible-to-trace bugs due to race conditions and memory usage, among other things.
Threading also tends to scale less elegantly than async IO, because threads are a system resource with a finite availability. Creating thousands of threads will fail on many machines, and I don’t recommend trying it in the first place. Creating thousands of async IO tasks is completely feasible.
Async IO shines when you have multiple IO-bound tasks where the tasks would otherwise be dominated by blocking IO-bound wait time, such as:
-
Network IO, whether your program is the server or the client side
-
Serverless designs, such as a peer-to-peer, multi-user network like a group chatroom
-
Read/write operations where you want to mimic a “fire-and-forget” style but worry less about holding a lock on whatever you’re reading and writing to
The biggest reason not to use it is that await only supports a specific set of objects that define a specific set of methods. If you want to do async read operations with a certain DBMS, you’ll need to find not just a Python wrapper for that DBMS, but one that supports the async/await syntax. Coroutines that contain synchronous calls block other coroutines and tasks from running.
For a shortlist of libraries that work with async/await, see the list at the end of this tutorial.
Async IO It Is, but Which One?
This tutorial focuses on async IO, the async/await syntax, and using asyncio for event-loop management and specifying tasks. asyncio certainly isn’t the only async IO library out there. This observation from Nathaniel J. Smith says a lot:
[In] a few years,
asynciomight find itself relegated to becoming one of those stdlib libraries that savvy developers avoid, likeurllib2.…
What I’m arguing, in effect, is that
asynciois a victim of its own success: when it was designed, it used the best approach possible; but since then, work inspired byasyncio– like the addition ofasync/await– has shifted the landscape so that we can do even better, and nowasynciois hamstrung by its earlier commitments. (Source)
To that end, a few big-name alternatives that do what asyncio does, albeit with different APIs and different approaches, are curio and trio. Personally, I think that if you’re building a moderately sized, straightforward program, just using asyncio is plenty sufficient and understandable, and lets you avoid adding yet another large dependency outside of Python’s standard library.
But by all means, check out curio and trio, and you might find that they get the same thing done in a way that’s more intuitive for you as the user. Many of the package-agnostic concepts presented here should permeate to alternative async IO packages as well.
Odds and Ends
In these next few sections, you’ll cover some miscellaneous parts of asyncio and async/await that haven’t fit neatly into the tutorial thus far, but are still important for building and understanding a full program.
Other Top-Level asyncio Functions
In addition to asyncio.run(), you’ve seen a few other package-level functions such as asyncio.create_task() and asyncio.gather().
You can use create_task() to schedule the execution of a coroutine object, followed by asyncio.run():
>>>
>>> import asyncio

>>> async def coro(seq) -> list:
...     """'IO' wait time is proportional to the max element."""
...     await asyncio.sleep(max(seq))
...     return list(reversed(seq))
...
>>> async def main():
...     # This is a bit redundant in the case of one task
...     # We could use `await coro([3, 2, 1])` on its own
...     t = asyncio.create_task(coro([3, 2, 1]))  # Python 3.7+
...     await t
...     print(f't: type {type(t)}')
...     print(f't done: {t.done()}')
...
>>> t = asyncio.run(main())
t: type <class '_asyncio.Task'>
t done: True
There’s a subtlety to this pattern: if you don’t await t within main(), it may finish before main() itself signals that it is complete. Because asyncio.run(main()) calls loop.run_until_complete(main()), the event loop is only concerned (without await t present) that main() is done, not that the tasks that get created within main() are done. Without await t, the loop’s other tasks will be cancelled, possibly before they are completed. If you need to get a list of currently pending tasks, you can use asyncio.Task.all_tasks().
Separately, there’s asyncio.gather(). While it doesn’t do anything tremendously special, gather() is meant to neatly put a collection of coroutines (futures) into a single future. As a result, it returns a single future object, and, if you await asyncio.gather() and specify multiple tasks or coroutines, you’re waiting for all of them to be completed. (This somewhat parallels queue.join() from our earlier example.) The result of gather() will be a list of the results across the inputs:
>>>
>>> import time
>>> async def main():
...     t = asyncio.create_task(coro([3, 2, 1]))
...     t2 = asyncio.create_task(coro([10, 5, 0]))  # Python 3.7+
...     print('Start:', time.strftime('%X'))
...     a = await asyncio.gather(t, t2)
...     print('End:', time.strftime('%X'))  # Should be 10 seconds
...     print(f'Both tasks done: {all((t.done(), t2.done()))}')
...     return a
...
>>> a = asyncio.run(main())
Start: 16:20:11
End: 16:20:21
Both tasks done: True
>>> a
[[1, 2, 3], [0, 5, 10]]
You probably noticed that gather() waits on the entire result set of the Futures or coroutines that you pass it. Alternatively, you can loop over asyncio.as_completed() to get tasks as they are completed, in the order of completion. The function returns an iterator that yields tasks as they finish. Below, the result of coro([3, 2, 1]) will be available before coro([10, 5, 0]) is complete, which is not the case with gather():
>>>
>>> async def main():
...     t = asyncio.create_task(coro([3, 2, 1]))
...     t2 = asyncio.create_task(coro([10, 5, 0]))
...     print('Start:', time.strftime('%X'))
...     for res in asyncio.as_completed((t, t2)):
...         compl = await res
...         print(f'res: {compl} completed at {time.strftime("%X")}')
...     print('End:', time.strftime('%X'))
...     print(f'Both tasks done: {all((t.done(), t2.done()))}')
...
>>> a = asyncio.run(main())
Start: 09:49:07
res: [1, 2, 3] completed at 09:49:10
res: [0, 5, 10] completed at 09:49:17
End: 09:49:17
Both tasks done: True
Lastly, you may also see asyncio.ensure_future(). You should rarely need it, because it’s a lower-level plumbing API and largely replaced by create_task(), which was introduced later.
The Precedence of await
While they behave somewhat similarly, the await keyword has significantly higher precedence than yield. This means that, because it is more tightly bound, there are a number of instances where you’d need parentheses in a yield from statement that are not required in an analogous await statement. For more information, see examples of await expressions from PEP 492.
Conclusion
You’re now equipped to use async/await and the libraries built off of it. Here’s a recap of what you’ve covered:
-
Asynchronous IO as a language-agnostic model and a way to effect concurrency by letting coroutines indirectly communicate with each other
-
The specifics of Python’s new
asyncandawaitkeywords, used to mark and define coroutines -
asyncio, the Python package that provides the API to run and manage coroutines
Resources
Python Version Specifics
Async IO in Python has evolved swiftly, and it can be hard to keep track of what came when. Here’s a list of Python minor-version changes and introductions related to asyncio:
-
3.3: The
yield fromexpression allows for generator delegation. -
3.4:
asynciowas introduced in the Python standard library with provisional API status. -
3.5:
asyncandawaitbecame a part of the Python grammar, used to signify and wait on coroutines. They were not yet reserved keywords. (You could still define functions or variables namedasyncandawait.) -
3.6: Asynchronous generators and asynchronous comprehensions were introduced. The API of
asynciowas declared stable rather than provisional. -
3.7:
asyncandawaitbecame reserved keywords. (They cannot be used as identifiers.) They are intended to replace theasyncio.coroutine()decorator.asyncio.run()was introduced to theasynciopackage, among a bunch of other features.
If you want to be safe (and be able to use asyncio.run()), go with Python 3.7 or above to get the full set of features.
Articles
Here’s a curated list of additional resources:
- Real Python: Speed up your Python Program with Concurrency
- Real Python: What is the Python Global Interpreter Lock?
- CPython: The
asynciopackage source - Python docs: Data model > Coroutines
- TalkPython: Async Techniques and Examples in Python
- Brett Cannon: How the Heck Does Async-Await Work in Python 3.5?
- PYMOTW:
asyncio - A. Jesse Jiryu Davis and Guido van Rossum: A Web Crawler With asyncio Coroutines
- Andy Pearce: The State of Python Coroutines:
yield from - Nathaniel J. Smith: Some Thoughts on Asynchronous API Design in a Post-
async/awaitWorld - Armin Ronacher: I don’t understand Python’s Asyncio
- Andy Balaam: series on
asyncio(4 posts) - Stack Overflow: Python
asyncio.semaphoreinasync—awaitfunction - Yeray Diaz:
- AsyncIO for the Working Python Developer
- Asyncio Coroutine Patterns: Beyond
await
A few Python What’s New sections explain the motivation behind language changes in more detail:
- What’s New in Python 3.3 (
yield fromand PEP 380) - What’s New in Python 3.6 (PEP 525 & 530)
From David Beazley:
- Generator: Tricks for Systems Programmers
- A Curious Course on Coroutines and Concurrency
- Generators: The Final Frontier
YouTube talks:
- John Reese — Thinking Outside the GIL with AsyncIO and Multiprocessing — PyCon 2018
- Keynote David Beazley — Topics of Interest (Python Asyncio)
- David Beazley — Python Concurrency From the Ground Up: LIVE! — PyCon 2015
- Raymond Hettinger, Keynote on Concurrency, PyBay 2017
- Thinking about Concurrency, Raymond Hettinger, Python core developer
- Miguel Grinberg Asynchronous Python for the Complete Beginner PyCon 2017
- Yury Selivanov asyncawait and asyncio in Python 3 6 and beyond PyCon 2017
- Fear and Awaiting in Async: A Savage Journey to the Heart of the Coroutine Dream
- What Is Async, How Does It Work, and When Should I Use It? (PyCon APAC 2014)
Libraries That Work With async/await
From aio-libs:
aiohttp: Asynchronous HTTP client/server frameworkaioredis: Async IO Redis supportaiopg: Async IO PostgreSQL supportaiomcache: Async IO memcached clientaiokafka: Async IO Kafka clientaiozmq: Async IO ZeroMQ supportaiojobs: Jobs scheduler for managing background tasksasync_lru: Simple LRU cache for async IO
From magicstack:
uvloop: Ultra fast async IO event loopasyncpg: (Also very fast) async IO PostgreSQL support
From other hosts:
trio: Friendlierasynciointended to showcase a radically simpler designaiofiles: Async file IOasks: Async requests-like http libraryasyncio-redis: Async IO Redis supportaioprocessing: Integratesmultiprocessingmodule withasyncioumongo: Async IO MongoDB clientunsync: Unsynchronizeasyncioaiostream: Likeitertools, but async
Asyncio allows us to use asynchronous programming with coroutine-based concurrency in Python.
Although asyncio has been available in Python for many years now, it remains one of the most interesting and yet one of the most frustrating areas of Python.
It is just plain hard to get started with asyncio for new developers.
This guide provides a detailed and comprehensive review of asyncio in Python, including how to define, create and run coroutines, what is asynchronous programming, what is non-blocking-io, concurrency primitives used with coroutines, common questions, and best practices.
This is a massive 29,000+ word guide. You may want to bookmark it so you can refer to it as you develop your concurrent programs.
Let’s dive in.
What is Asynchronous Programming
Asynchronous programming is a programming paradigm that does not block.
Instead, requests and function calls are issued and executed somehow in the background at some future time. This frees the caller to perform other activities and handle the results of issued calls at a later time when results are available or when the caller is interested.
Let’s get a handle on asynchronous programming before we dive into asyncio.
Asynchronous Tasks
Asynchronous means not at the same time, as opposed to synchronous or at the same time.
asynchronous: not simultaneous or concurrent in time
— Merriam-Webster Dictionary
When programming, asynchronous means that the action is requested, although not performed at the time of the request. It is performed later.
Asynchronous: Separate execution streams that can run concurrently in any order relative to each other are asynchronous.
— Page 265, The Art of Concurrency, 2009.
For example, we can make an asynchronous function call.
This will issue the request to make the function call and will not wait around for the call to complete. We can choose to check on the status or result of the function call later.
- Asynchronous Function Call: Request that a function is called at some time and in some manner, allowing the caller to resume and perform other activities.
The function call will happen somehow and at some time, in the background, and the program can perform other tasks or respond to other events.
This is key. We don’t have control over how or when the request is handled, only that we would like it handled while the program does other things.
Issuing an asynchronous function call often results in some handle on the request that the caller can use to check on the status of the call or get results. This is often called a future.
- Future: A handle on an asynchronous function call allowing the status of the call to be checked and results to be retrieved.
The combination of the asynchronous function call and future together is often referred to as an asynchronous task. This is because it is more elaborate than a function call, such as allowing the request to be canceled and more.
- Asynchronous Task: Used to refer to the aggregate of an asynchronous function call and resulting future.
Asynchronous Programming
Issuing asynchronous tasks and making asynchronous function calls is referred to as asynchronous programming.
So what is asynchronous programming? It means that a particular long-running task can be run in the background separate from the main application. Instead of blocking all other application code waiting for that long-running task to be completed, the system is free to do other work that is not dependent on that task. Then, once the long-running task is completed, we’ll be notified that it is done so we can process the result.
— Page 3, Python Concurrency with asyncio, 2022.
- Asynchronous Programming: The use of asynchronous techniques, such as issuing asynchronous tasks or function calls.
Asynchronous programming is primarily used with non-blocking I/O, such as reading and writing from socket connections with other processes or other systems.
In non-blocking mode, when we write bytes to a socket, we can just fire and forget the write or read, and our application can go on to perform other tasks.
— Page 18, Python Concurrency with asyncio, 2022.
Non-blocking I/O is a way of performing I/O where reads and writes are requested, although performed asynchronously. The caller does not need to wait for the operation to complete before returning.
The read and write operations are performed somehow (e.g. by the underlying operating system or systems built upon it), and the status of the action and/or data is retrieved by the caller later, once available, or when the caller is ready.
- Non-blocking I/O: Performing I/O operations via asynchronous requests and responses, rather than waiting for operations to complete.
As such, we can see how non-blocking I/O is related to asynchronous programming. In fact, we use non-blocking I/O via asynchronous programming, or non-blocking I/O is implemented via asynchronous programming.
The combination of non-blocking I/O with asynchronous programming is so common that it is commonly referred to by the shorthand of asynchronous I/O.
- Asynchronous I/O: A shorthand that refers to combining asynchronous programming with non-blocking I/O.
Next, let’s consider asynchronous programming support in Python.
Asynchronous Programming in Python
Broadly, asynchronous programming in Python refers to making requests and not blocking to wait for them to complete.
We can implement asynchronous programming in Python in various ways, although a few are most relevant for Python concurrency.
The first and obvious example is the asyncio module. This module directly offers an asynchronous programming environment using the async/await syntax and non-blocking I/O with sockets and subprocesses.
asyncio is short for asynchronous I/O. It is a Python library that allows us to run code using an asynchronous programming model. This lets us handle multiple I/O operations at once, while still allowing our application to remain responsive.
— Page 3, Python Concurrency with asyncio, 2022.
It is implemented using coroutines that run in an event loop that itself runs in a single thread.
- Asyncio: An asynchronous programming environment provided in Python via the asyncio module.
More broadly, Python offers threads and processes that can execute tasks asynchronously.
For example, one thread can start a second thread to execute a function call and resume other activities. The operating system will schedule and execute the second thread at some time and the first thread may or may not check on the status of the task, manually.
Threads are asynchronous, meaning that they may run at different speeds, and any thread can halt for an unpredictable duration at any time.
— Page 76, The Art of Multiprocessor Programming, 2020.
More concretely, Python provides executor-based thread pools and process pools in the ThreadPoolExecutor and ProcessPoolExeuctor classes.
These classes use the same interface and support asynchronous tasks via the submit() method that returns a Future object.
The concurrent.futures module provides a high-level interface for asynchronously executing callables. The asynchronous execution can be performed with threads, using ThreadPoolExecutor, or separate processes, using ProcessPoolExecutor.
— concurrent.futures — Launching parallel tasks
The multiprocessing module also provides pools of workers using processes and threads in the Pool and ThreadPool classes, forerunners to the ThreadPoolExecutor and ProcessPoolExeuctor classes.
The capabilities of these classes are described in terms of worker execution tasks asynchronously. They explicitly provide synchronous (blocking) and asynchronous (non-blocking) versions of each method for executing tasks.
For example, one may issue a one-off function call synchronously via the apply() method or asynchronously via the apply_async() method.
A process pool object which controls a pool of worker processes to which jobs can be submitted. It supports asynchronous results with timeouts and callbacks and has a parallel map implementation.
— multiprocessing — Process-based parallelism
There are other aspects of asynchronous programming in Python that are less strictly related to Python concurrency.
For example, Python processes receive or handle signals asynchronously. Signals are fundamentally asynchronous events sent from other processes.
This is primarily supported by the signal module.
Now that we know about asynchronous programming, let’s take a closer look at asyncio.
What is Asyncio
Broadly, asyncio refers to the ability to implement asynchronous programming in Python using coroutines.
Specifically, it refers to two elements:
- The addition of the “asyncio” module to the Python standard library in Python 3.4.
- The addition of async/await expressions to the Python language in Python 3.5.
Together, the module and changes to the language facilitate the development of Python programs that support coroutine-based concurrency, non-blocking I/O, and asynchronous programming.
Python 3.4 introduced the asyncio library, and Python 3.5 produced the async and await keywords to use it palatably. These new additions allow so-called asynchronous programming.
— Page vii, Using Asyncio in Python, 2020.
Let’s take a closer look at these two aspects of asyncio, starting with the changes to the language.
Changes to Python to add Support for Coroutines
The Python language was changed to accommodate asyncio with the addition of expressions and types.
More specifically, it was changed to support coroutines as first-class concepts. In turn, coroutines are the unit of concurrency used in asyncio programs.
A coroutine is a function that can be suspended and resumed.
coroutine: Coroutines are a more generalized form of subroutines. Subroutines are entered at one point and exited at another point. Coroutines can be entered, exited, and resumed at many different points.
— Python Glossary
A coroutine can be defined via the “async def” expression. It can take arguments and return a value, just like a function.
For example:
|
# define a coroutine async def custom_coro(): # … |
Calling a coroutine function will create a coroutine object, this is a new class. It does not execute the coroutine function.
|
... # create a coroutine object coro = custom_coro() |
A coroutine can execute another coroutine via the await expression.
This suspends the caller and schedules the target for execution.
|
... # suspend and schedule the target await custom_coro() |
An asynchronous iterator is an iterator that yields awaitables.
asynchronous iterator: An object that implements the __aiter__() and __anext__() methods. __anext__ must return an awaitable object. async for resolves the awaitables returned by an asynchronous iterator’s __anext__() method until it raises a StopAsyncIteration exception.
— Python Glossary
An asynchronous iterator can be traversed using the “async for” expression.
|
... # traverse an asynchronous iterator async for item in async_iterator: print(item) |
This does not execute the for-loop in parallel.
Instead, the calling coroutine that executes the for loop will suspend and internally await each awaitable yielded from the iterator.
An asynchronous context manager is a context manager that can await the enter and exit methods.
An asynchronous context manager is a context manager that is able to suspend execution in its enter and exit methods.
— Asynchronous Context Managers and “async with”
The “async with” expression is for creating and using asynchronous context managers.
The calling coroutine will suspend and await the context manager before entering the block for the context manager, and similarly when leaving the context manager block.
These are the sum of the major changes to Python language to support coroutines.
Next, let’s look at the asyncio module.
The asyncio Module
The “asyncio” module provides functions and objects for developing coroutine-based programs using the asynchronous programming paradigm.
Specifically, it supports non-blocking I/O with subprocesses (for executing commands) and with streams (for TCP socket programming).
asyncio is a library to write concurrent code using the async/await syntax.
— asyncio — Asynchronous I/O
Central to the asyncio module is the event loop.
This is the mechanism that runs a coroutine-based program and implements cooperative multitasking between coroutines.
The event loop is the core of every asyncio application. Event loops run asynchronous tasks and callbacks, perform network IO operations, and run subprocesses.
— Asyncio Event Loop
The module provides both a high-level and low-level API.
The high-level API is for us Python application developers. The low-level API is for framework developers, not us, in most cases.
Most use cases are satisfied using the high-level API that provides utilities for working with coroutines, streams, synchronization primitives, subprocesses, and queues for sharing data between coroutines.
The lower-level API provides the foundation for the high-level API and includes the internals of the event loop, transport protocols, policies, and more.
… there are low-level APIs for library and framework developers
— asyncio — Asynchronous I/O
Now that we know what asyncio is, broadly, and that it is for Asynchronous programming.
Next, let’s explore when we should consider using asyncio in our Python programs.
Confused by the asyncio module API?
Download my FREE PDF cheat sheet
When to Use Asyncio
Asyncio, broadly, is new, popular, much discussed, and exciting.
Nevertheless, there is a lot of confusion over when it should be adopted in a project.
When should we use asyncio in Python?
Reasons to Use Asyncio in Python
There are perhaps 3 top-level reasons to use asyncio in a Python project.
They are:
- Use asyncio in order to adopt coroutines in your program.
- Use asyncio in order to use the asynchronous programming paradigm.
- Use asyncio in order to use non-blocking I/O.
Reason 1: To Use Coroutines
We may choose to use asyncio because we want to use coroutines.
We may want to use coroutines because we can have many more concurrent coroutines in our program than concurrent threads.
Coroutines are another unit of concurrency, like threads and processes.
Thread-based concurrency is provided by the threading module and is supported by the underlying operating system. It is suited to blocking I/O tasks such reading and writing from files, sockets, and devices.
Process-based concurrency is provided by the multiprocessing module and is also supported by the underlying operating system, like threads. It is suited to CPU-bound tasks that do not require much inter-process communication, such as compute tasks.
Coroutines are an alternative that is provided by the Python language and runtime (standard interpreter) and further supported by the asyncio module. They are suited to non-blocking I/O with subprocesses and sockets, however, blocking I/O and CPU-bound tasks can be used in a simulated non-blocking manner using threads and processes under the covers.
This last point is subtle and key. Although we can choose to use coroutines for the capability for which they were introduced into Python, non-blocking, we may in fact use them with any tasks. Any program written with threads or processes can be rewritten or instead written using coroutines if we so desire.
Threads and processes achieve multitasking via the operating system that chooses which threads and processes should run, when, and for how long. The operating switches between threads and processes rapidly, suspending those that are not running and resuming those granted time to run. This is called preemptive multitasking.
Coroutines in Python provide an alternative type of multitasking called cooperating multitasking.
A coroutine is a subroutine (function) that can be suspended and resumed. It is suspended by the await expression and resumed once the await expression is resolved.
This allows coroutines to cooperate by design, choosing how and when to suspend their execution.
It is an alternate, interesting, and powerful approach to concurrency, different from thread-based and process-based concurrency.
This alone may make it a reason to adopt it for a project.
Another key aspect of coroutines is that they are lightweight.
They are more lightweight than threads. This means they are faster to start and use less memory. Essentially a coroutine is a special type of function, whereas a thread is represented by a Python object and is associated with a thread in the operating system with which the object must interact.
As such, we may have thousands of threads in a Python program, but we could easily have tens or hundreds of thousands of coroutines all in one thread.
We may choose coroutines for their scalability.
Reason 2: To Use Asynchronous Programming
We may choose to use asyncio because we want to use asynchronous programming in our program.
That is, we want to develop a Python program that uses the asynchronous programming paradigm.
Asynchronous means not at the same time, as opposed to synchronous or at the same time.
When programming, asynchronous means that the action is requested, although not performed at the time of the request. It is performed later.
Asynchronous programming often means going all in and designing the program around the concept of asynchronous function calls and tasks.
Although there are other ways to achieve elements of asynchronous programming, full asynchronous programming in Python requires the use of coroutines and the asyncio module.
It is a Python library that allows us to run code using an asynchronous programming model.
— Page 3, Python Concurrency with asyncio, 2022.
We may choose to use asyncio because we want to use the asynchronous programming module in our program, and that is a defensible reason.
To be crystal clear, this reason is independent of using non-blocking I/O. Asynchronous programming can be used independently of non-blocking I/O.
As we saw previously, coroutines can execute non-blocking I/O asynchronously, but the asyncio module also provides the facility for executing blocking I/O and CPU-bound tasks in an asynchronous manner, simulating non-blocking under the covers via threads and processes.
Reason 3: To Use Non-Blocking I/O
We may choose to use asyncio because we want or require non-blocking I/O in our program.
Input/Output or I/O for short means reading or writing from a resource.
Common examples include:
- Hard disk drives: Reading, writing, appending, renaming, deleting, etc. files.
- Peripherals: mouse, keyboard, screen, printer, serial, camera, etc.
- Internet: Downloading and uploading files, getting a webpage, querying RSS, etc.
- Database: Select, update, delete, etc. SQL queries.
- Email: Send mail, receive mail, query inbox, etc.
These operations are slow, compared to calculating things with the CPU.
The common way these operations are implemented in programs is to make the read or write request and then wait for the data to be sent or received.
As such, these operations are commonly referred to as blocking I/O tasks.
The operating system can see that the calling thread is blocked and will context switch to another thread that will make use of the CPU.
This means that the blocking call does not slow down the entire system. But it does halt or block the thread or program making the blocking call.
You can learn more about blocking calls in the tutorial:
- Thread Blocking Call in Python
Non-blocking I/O is an alternative to blocking I/O.
It requires support in the underlying operating system, just like blocking I/O, and all modern operating systems provide support for some form of non-blocking I/O.
Non-blocking I/O allows read and write calls to be made as asynchronous requests.
The operating system will handle the request and notify the calling program when the results are available.
- Non-blocking I/O: Performing I/O operations via asynchronous requests and responses, rather than waiting for operations to complete.
As such, we can see how non-blocking I/O is related to asynchronous programming. In fact, we use non-blocking I/O via asynchronous programming, or non-blocking I/O is implemented via asynchronous programming.
The combination of non-blocking I/O with asynchronous programming is so common that it is commonly referred to by the shorthand of asynchronous I/O.
- Asynchronous I/O: A shorthand that refers to combining asynchronous programming with non-blocking I/O.
The asyncio module in Python was added specifically to add support for non-blocking I/O with subprocesses (e.g. executing commands on the operating system) and with streams (e.g. TCP socket programming) to the Python standard library.
We could simulate non-blocking I/O using threads and the asynchronous programming capability provided by Python thread pools or thread pool executors.
The asyncio module provides first-class asynchronous programming for non-blocking I/O via coroutines, event loops, and objects to represent non-blocking subprocesses and streams.
We may choose to use asyncio because we want to use asynchronous I/O in our program, and that is a defensible reason.
Other Reasons to Use Asyncio
Ideally, we would choose a reason that is defended in the context of the requirements of the project.
Sometimes we have control over the function and non-functional requirements and other times not. In the cases we do, we may choose to use asyncio for one of the reasons listed above. In the cases we don’t, we may be led to choose asyncio in order to deliver a program that solves a specific problem.
Some other reasons we may use asyncio include:
- Use asyncio because someone else made the decision for you.
- Use asyncio because the project you have joined is already using it.
- Use asyncio because you want to learn more about it.
We don’t always have full control over the projects we work on.
It is common to start a new job, new role, or new project and be told by the line manager or lead architect of specific design and technology decisions.
Using asyncio may be one of these decisions.
We may use asyncio on a project because the project is already using it. You must use asyncio, rather than you choose to use asyncio.
A related example might be the case of a solution to a problem that uses asyncio that you wish to adopt.
For example:
- Perhaps you need to use a third-party API and the code examples use asyncio.
- Perhaps you need to integrate an existing open-source solution that uses asyncio.
- Perhaps you stumble across some code snippets that do what you need, yet they use asyncio.
For lack of alternate solutions, asyncio may be thrust upon you by your choice of solution.
Finally, we may choose asyncio for our Python project to learn more about.
You may scoff, “what about the requirements?”
You may choose to adopt asyncio just because you want to try it out and it can be a defensible reason.
Using asyncio in a project will make its workings concrete for you.
When to Not Use Asyncio
We have spent a lot of time on reasons why we should use asyncio.
It is probably a good idea to spend at least a moment on why we should not use it.
One reason to not use asyncio is that you cannot defend its use using one of the reasons above.
This is not foolproof. There may be other reasons to use it, not listed above.
But, if you pick a reason to use asyncio and the reason feels thin or full of holes for your specific case. Perhaps asyncio is not the right solution.
I think the major reason to not use asyncio is that it does not deliver the benefit that you think it does.
There are many misconceptions about Python concurrency, especially around asyncio.
For example:
- Asyncio will work around the global interpreter lock.
- Asyncio is faster than threads.
- Asyncio avoids the need for mutex locks and other synchronization primitives.
- Asyncio is easier to use than threads.
These are all false.
Only a single coroutine can run at a time by design, they cooperate to execute. This is just like threads under the GIL. In fact, the GIL is an orthogonal concern and probably irrelevant in most cases when using asyncio.
Any program you can write with asyncio, you can write with threads and it will probably be as fast or faster. It will also probably be simpler and easier to read and interpret by fellow developers.
Any concurrency failure mode you might expect with threads, you can encounter with coroutines. You must make coroutines safe from deadlocks and race conditions, just like threads.
Another reason to not use asyncio is that you don’t like asynchronous programming.
Asynchronous programming has been popular for some time now in a number of different programming communities, most notably the JavaScript community.
It is different from procedural, object-oriented, and functional programming, and some developers just don’t like it.
No problem. If you don’t like it, don’t use it. It’s a fair reason.
You can achieve the same effect in many ways, notably by sprinkling a few asynchronous calls in via thread or process executors as needed.
Now that we are familiar with when to use asyncio, let’s look at coroutines in more detail.
Free Python Asyncio Course
Download my asyncio API cheat sheet and as a bonus you will get FREE access to my 7-day email course on asyncio.
Discover how to use the Python asyncio module including how to define, create, and run new coroutines and how to use non-blocking I/O.
Learn more
Coroutines in Python
Python provides first-class coroutines with a “coroutine” type and new expressions like “async def” and “await“.
It provides the “asyncio” module for running coroutines and developing asynchronous programs.
In this section, we will take a much closer look at coroutines.
What is a Coroutine
A coroutine is a function that can be suspended and resumed.
It is often defined as a generalized subroutine.
A subroutine can be executed, starting at one point and finishing at another point. Whereas, a coroutine can be executed then suspended, and resumed many times before finally terminating.
Specifically, coroutines have control over when exactly they suspend their execution.
This may involve the use of a specific expression, such as an “await” expression in Python, like a yield expression in a Python generator.
A coroutine is a method that can be paused when we have a potentially long-running task and then resumed when that task is finished. In Python version 3.5, the language implemented first-class support for coroutines and asynchronous programming when the keywords async and await were explicitly added to the language.
— Page 3, Python Concurrency with asyncio, 2022.
A coroutine may suspend for many reasons, such as executing another coroutine, e.g. awaiting another task, or waiting for some external resources, such as a socket connection or process to return data.
Coroutines are used for concurrency.
Coroutines let you have a very large number of seemingly simultaneous functions in your Python programs.
— Page 267, Effective Python, 2019.
Many coroutines can be created and executed at the same time. They have control over when they will suspend and resume, allowing them to cooperate as to when concurrent tasks are executed.
This is called cooperative multitasking and is different from the multitasking typically used with threads called preemptive multitasking tasking.
… in order to run multiple applications concurrently, processes voluntarily yield control periodically or when idle or logically blocked. This type of multitasking is called cooperative because all programs must cooperate for the scheduling scheme to work.
— Cooperative multitasking, Wikipedia
Preemptive multitasking involves the operating system choosing what threads to suspend and resume and when to do so, as opposed to the tasks themselves deciding in the case of cooperative multitasking.
Now that we have some idea of what a coroutine is, let’s deepen this understanding by comparing them to other familiar programming constructs.
Coroutine vs Routine and Subroutine
A “routine” and “subroutine” often refer to the same thing in modern programming.
Perhaps more correctly, a routine is a program, whereas a subroutine is a function in the program.
A routine has subroutines.
It is a discrete module of expressions that is assigned a name, may take arguments and may return a value.
- Subroutine: A module of instructions that can be executed on demand, typically named, and may take arguments and return a value. also called a function
A subroutine is executed, runs through the expressions, and returns somehow. Typically, a subroutine is called by another subroutine.
A coroutine is an extension of a subroutine. This means that a subroutine is a special type of a coroutine.
A coroutine is like a subroutine in many ways, such as:
- They both are discrete named modules of expressions.
- They both can take arguments, or not.
- They both can return a value, or not.
The main difference is that it chooses to suspend and resume its execution many times before returning and exiting.
Both coroutines and subroutines can call other examples of themselves. A subroutine can call other subroutines. A coroutine executes other coroutines. However, a coroutine can also execute other subroutines.
When a coroutine executes another coroutine, it must suspend its execution and allow the other coroutine to resume once the other coroutine has completed.
This is like a subroutine calling another subroutine. The difference is the suspension of the coroutine may allow any number of other coroutines to run as well.
This makes a coroutine calling another coroutine more powerful than a subroutine calling another subroutine. It is central to the cooperating multitasking facilitated by coroutines.
Coroutine vs Generator
A generator is a special function that can suspend its execution.
generator: A function which returns a generator iterator. It looks like a normal function except that it contains yield expressions for producing a series of values usable in a for-loop or that can be retrieved one at a time with the next() function.
— Python Glossary
A generator function can be defined like a normal function although it uses a yield expression at the point it will suspend its execution and return a value.
A generator function will return a generator iterator object that can be traversed, such as via a for-loop. Each time the generator is executed, it runs from the last point it was suspended to the next yield statement.
generator iterator: An object created by a generator function. Each yield temporarily suspends processing, remembering the location execution state (including local variables and pending try-statements). When the generator iterator resumes, it picks up where it left off (in contrast to functions which start fresh on every invocation).
— Python Glossary
A coroutine can suspend or yield to another coroutine using an “await” expression. It will then resume from this point once the awaited coroutine has been completed.
Using this paradigm, an await statement is similar in function to a yield statement; the execution of the current function gets paused while other code is run. Once the await or yield resolves with data, the function is resumed.
— Page 218, High Performance Python, 2020.
We might think of a generator as a special type of coroutine and cooperative multitasking used in loops.
Generators, also known as semicoroutines, are a subset of coroutines.
— Coroutine, Wikipedia.
Before coroutines were developed, generators were extended so that they might be used like coroutines in Python programs.
This required a lot of technical knowledge of generators and the development of custom task schedulers.
To implement your own concurrency using generators, you first need a fundamental insight concerning generator functions and the yield statement. Specifically, the fundamental behavior of yield is that it causes a generator to suspend its execution. By suspending execution, it is possible to write a scheduler that treats generators as a kind of “task” and alternates their execution using a kind of cooperative task switching.
— Page 524, Python Cookbook, 2013.
This was made possible via changes to the generators and the introduction of the “yield from” expression.
These were later deprecated in favor of the modern async/await expressions.
Coroutine vs Task
A subroutine and a coroutine may represent a “task” in a program.
However, in Python, there is a specific object called an asyncio.Task object.
A Future-like object that runs a Python coroutine. […] Tasks are used to run coroutines in event loops.
— Asyncio Task Object
A coroutine can be wrapped in an asyncio.Task object and executed independently, as opposed to being executed directly within a coroutine. The Task object provides a handle on the asynchronously execute coroutine.
- Task: A wrapped coroutine that can be executed independently.
This allows the wrapped coroutine to execute in the background. The calling coroutine can continue executing instructions rather than awaiting another coroutine.
A Task cannot exist on its own, it must wrap a coroutine.
Therefore a Task is a coroutine, but a coroutine is not a task.
You can learn more about asyncio.Task objects in the tutorial:
Coroutine vs Thread
A coroutine is more lightweight than a thread.
- Thread: heavyweight compared to a coroutine
- Coroutine: lightweight compared to a thread.
A coroutine is defined as a function.
A thread is an object created and managed by the underlying operating system and represented in Python as a threading.Thread object.
- Thread: Managed by the operating system, represented by a Python object.
This means that coroutines are typically faster to create and start executing and take up less memory. Conversely, threads are slower than coroutines to create and start and take up more memory.
The cost of starting a coroutine is a function call. Once a coroutine is active, it uses less than 1 KB of memory until it’s exhausted.
— Page 267, Effective Python, 2019.
Coroutines execute within one thread, therefore a single thread may execute many coroutines.
Many separate async functions advanced in lockstep all seem to run simultaneously, mimicking the concurrent behavior of Python threads. However, coroutines do this without the memory overhead, startup and context switching costs, or complex locking and synchronization code that’s required for threads.
— Page 267, Effective Python, 2019.
You can learn more about threads in the guide:
- Python Threading: The Complete Guide
Coroutine vs Process
A coroutine is more lightweight than a process.
In fact, a thread is more lightweight than a process.
A process is a computer program. It may have one or many threads.
A Python process is in fact a separate instance of the Python interpreter.
Processes, like threads, are created and managed by the underlying operating system and are represented by a multiprocessing.Process object.
- Process: Managed by the operating system, represented by a Python object.
This means that coroutines are significantly faster than a process to create and start and take up much less memory.
A coroutine is just a special function, whereas a Process is an instance of the interpreter that has at least one thread.
You can learn more about Python processes in the guide:
- Python Multiprocessing: The Complete Guide
When Were Coroutines Added to Python
Coroutines extend generators in Python.
Generators have slowly been migrating towards becoming first-class coroutines for a long time.
We can explore some of the major changes to Python to add coroutines, which we might consider a subset of the probability addition of asyncio.
New methods like send() and close() were added to generator objects to allow them to act more like coroutines.
These were added in Python 2.5 and described in PEP 342.
This PEP proposes some enhancements to the API and syntax of generators, to make them usable as simple coroutines.
— PEP 342 – Coroutines via Enhanced Generators
Later, allowing generators to emit a suspension exception as well as a stop exception described in PEP 334.
This PEP proposes a limited approach to coroutines based on an extension to the iterator protocol. Currently, an iterator may raise a StopIteration exception to indicate that it is done producing values. This proposal adds another exception to this protocol, SuspendIteration, which indicates that the given iterator may have more values to produce, but is unable to do so at this time.
— PEP 334 – Simple Coroutines via SuspendIteration
The vast majority of the capabilities for working with modern coroutines in Python via the asyncio module were described in PEP 3156, added in Python 3.3.
This is a proposal for asynchronous I/O in Python 3, starting at Python 3.3. Consider this the concrete proposal that is missing from PEP 3153. The proposal includes a pluggable event loop, transport and protocol abstractions similar to those in Twisted, and a higher-level scheduler based on yield from (PEP 380). The proposed package name is asyncio.
— PEP 3156 – Asynchronous IO Support Rebooted: the “asyncio” Module
A second approach to coroutines, based on generators, was added to Python 3.4 as an extension to Python generators.
A coroutine was defined as a function that used the @asyncio.coroutine decorator.
Coroutines were executed using an asyncio event loop, via the asyncio module.
A coroutine could suspend and execute another coroutine via the “yield from” expression
For example:
|
# define a custom coroutine in Python 3.4 @asyncio.coroutine def custom_coro(): # suspend and execute another coroutine yield from asyncio.sleep(1) |
The “yield from” expression was defined in PEP 380.
A syntax is proposed for a generator to delegate part of its operations to another generator. This allows a section of code containing ‘yield’ to be factored out and placed in another generator.
— PEP 380 – Syntax for Delegating to a Subgenerator
The “yield from” expression is still available for use in generators, although is a deprecated approach to suspending execution in coroutines, in favor of the “await” expression.
Note: Support for generator-based coroutines is deprecated and is removed in Python 3.11. Generator-based coroutines predate async/await syntax. They are Python generators that use yield from expressions to await on Futures and other coroutines.
— Asyncio Coroutines and Tasks
We might say that coroutines were added as first-class objects to Python in version 3.5.
This included changes to the Python language, such as the “async def“, “await“, “async with“, and “async for” expressions, as well as a coroutine type.
These changes were described in PEP 492.
It is proposed to make coroutines a proper standalone concept in Python, and introduce new supporting syntax. The ultimate goal is to help establish a common, easily approachable, mental model of asynchronous programming in Python and make it as close to synchronous programming as possible.
— PEP 492 – Coroutines with async and await syntax
Now that we know what a coroutine is, let’s take a closer look at how to use them in Python.
Define, Create and Run Coroutines
We can define coroutines in our Python programs, just like defining new subroutines (functions).
Once defined, a coroutine function can be used to create a coroutine object.
The “asyncio” module provides tools to run our coroutine objects in an event loop, which is a runtime for coroutines.
How to Define a Coroutine
A coroutine can be defined via the “async def” expression.
This is an extension of the “def” expression for defining subroutines.
It defines a coroutine that can be created and returns a coroutine object.
For example:
|
# define a coroutine async def custom_coro(): # … |
A coroutine defined with the “async def” expression is referred to as a “coroutine function“.
coroutine function: A function which returns a coroutine object. A coroutine function may be defined with the async def statement, and may contain await, async for, and async with keywords.
— Python Glossary
A coroutine can then use coroutine-specific expressions within it, such as await, async for, and async with.
Execution of Python coroutines can be suspended and resumed at many points (see coroutine). await expressions, async for and async with can only be used in the body of a coroutine function.
— Coroutine function definition
For example:
|
# define a coroutine async def custom_coro(): # await another coroutine await asyncio.sleep(1) |
How to Create a Coroutine
Once a coroutine is defined, it can be created.
This looks like calling a subroutine.
For example:
|
... # create a coroutine coro = custom_coro() |
This does not execute the coroutine.
It returns a “coroutine” object.
You can think of a coroutine function as a factory for coroutine objects; more directly, remember that calling a coroutine function does not cause any user-written code to execute, but rather just builds and returns a coroutine object.
— Page 516, Python in a Nutshell, 2017.
A “coroutine” Python object has methods, such as send() and close(). It is a type.
We can demonstrate this by creating an instance of a coroutine and calling the type() built-in function in order to report its type.
For example:
|
# SuperFastPython.com # check the type of a coroutine # define a coroutine async def custom_coro(): # await another coroutine await asyncio.sleep(1) # create the coroutine coro = custom_coro() # check the type of the coroutine print(type(coro)) |
Running the example reports that the created coroutine is a “coroutine” class.
We also get a RuntimeError because the coroutine was created but never executed, we will explore that in the next section.
|
<class ‘coroutine’> sys:1: RuntimeWarning: coroutine ‘custom_coro’ was never awaited |
A coroutine object is an awaitable.
This means it is a Python type that implements the __await__() method.
An awaitable object generally implements an __await__() method. Coroutine objects returned from async def functions are awaitable.
— Awaitable Objects
You can learn more about awaitables in the tutorial:
- What is an Asyncio Awaitable in Python
How to Run a Coroutine From Python
Coroutines can be defined and created, but they can only be executed within an event loop.
The event loop is the core of every asyncio application. Event loops run asynchronous tasks and callbacks, perform network IO operations, and run subprocesses.
— Asyncio Event Loop
The event loop that executes coroutines, manages the cooperative multitasking between coroutines.
Coroutine objects can only run when the event loop is running.
— Page 517, Python in a Nutshell, 2017.
The typical way to start a coroutine event loop is via the asyncio.run() function.
This function takes one coroutine and returns the value of the coroutine. The provided coroutine can be used as the entry point into the coroutine-based program.
For example:
|
# SuperFastPython.com # example of running a coroutine import asyncio # define a coroutine async def custom_coro(): # await another coroutine await asyncio.sleep(1) # main coroutine async def main(): # execute my custom coroutine await custom_coro() # start the coroutine program asyncio.run(main()) |
Now that we know how to define, create, and run a coroutine, let’s take a moment to understand the event loop.
What is the Event Loop
The heart of asyncio programs is the event loop.
In this section, we will take a moment to look at the asyncio event loop.
What is the Asyncio Event Loop
The event loop is an environment for executing coroutines in a single thread.
asyncio is a library to execute these coroutines in an asynchronous fashion using a concurrency model known as a single-threaded event loop.
— Page 3, Python Concurrency with asyncio, 2022.
The event loop is the core of an asyncio program.
It does many things, such as:
- Execute coroutines.
- Execute callbacks.
- Perform network input/output.
- Run subprocesses.
The event loop is the core of every asyncio application. Event loops run asynchronous tasks and callbacks, perform network IO operations, and run subprocesses.
— Asyncio Event Loop
Event loops are a common design pattern and became very popular in recent times given their use in JavaScript.
JavaScript has a runtime model based on an event loop, which is responsible for executing the code, collecting and processing events, and executing queued sub-tasks. This model is quite different from models in other languages like C and Java.
— The event loop, Mozilla.
The event loop, as its name suggests, is a loop. It manages a list of tasks (coroutines) and attempts to progress each in sequence in each iteration of the loop, as well as perform other tasks like executing callbacks and handling I/O.
The “asyncio” module provides functions for accessing and interacting with the event loop.
This is not required for typical application development.
Instead, access to the event loop is provided for framework developers, those that want to build on top of the asyncio module or enable asyncio for their library.
Application developers should typically use the high-level asyncio functions, such as asyncio.run(), and should rarely need to reference the loop object or call its methods.
— Asyncio Event Loop
The asyncio module provides a low-level API for getting access to the current event loop object, as well as a suite of methods that can be used to interact with the event loop.
The low-level API is intended for framework developers that will extend, complement and integrate asyncio into third-party libraries.
We rarely need to interact with the event loop in asyncio programs, in favor of using the high-level API instead.
Nevertheless, we can briefly explore how to get the event loop.
How To Start and Get An Event Loop
The typical way we create an event loop in asyncio applications is via the asyncio.run() function.
This function always creates a new event loop and closes it at the end. It should be used as a main entry point for asyncio programs, and should ideally only be called once.
— Asyncio Coroutines and Tasks
The function takes a coroutine and will execute it to completion.
We typically pass it to our main coroutine and run our program from there.
There are low-level functions for creating and accessing the event loop.
The asyncio.new_event_loop() function will create a new event loop and return access to it.
Create and return a new event loop object.
— Asyncio Event Loop
For example:
|
... # create and access a new asyncio event loop loop = asyncio.new_event_loop() |
We can demonstrate this with a worked example.
In the example below we will create a new event loop and then report its details.
|
# SuperFastPython.com # example of creating an event loop import asyncio # create and access a new asyncio event loop loop = asyncio.new_event_loop() # report defaults of the loop print(loop) |
Running the example creates the event loop, then reports the details of the object.
We can see that in this case the event loop has the type _UnixSelectorEventLoop and is not running, but is also not closed.
|
<_UnixSelectorEventLoop running=False closed=False debug=False> |
If an asyncio event loop is already running, we can get access to it via the asyncio.get_running_loop() function.
Return the running event loop in the current OS thread. If there is no running event loop a RuntimeError is raised. This function can only be called from a coroutine or a callback.
— Asyncio Event Loop
For example:
|
... # access he running event loop loop = asyncio.get_running_loop() |
There is also a function for getting or starting the event loop called asyncio.get_event_loop(), but it was deprecated in Python 3.10 and should not be used.
What is an Event Loop Object
An event loop is implemented as a Python object.
The event loop object defines how the event loop is implemented and provides a common API for interacting with the loop, defined on the AbstractEventLoop class.
There are different implementations of the event loop for different platforms.
For example, Windows and Unix-based operations systems will implement the event loop in different ways, given the different underlying ways that non-blocking I/O is implemented on these platforms.
The SelectorEventLoop type event loop is the default on Unix-based operating systems like Linux and macOS.
The ProactorEventLoop type event loop is the default on Windows.
Third-party libraries may implement their own event loops to optimize for specific features.
Why Get Access to The Event Loop
Why would we want access to an event loop outside of an asyncio program?
There are many reasons why we may want access to the event loop from outside of a running asyncio program.
For example:
- To monitor the progress of tasks.
- To issue and get results from tasks.
- To fire and forget one-off tasks.
An asyncio event loop can be used in a program as an alternative to a thread pool for coroutine-based tasks.
An event loop may also be embedded within a normal asyncio program and accessed as needed.
Now that we know a little about the event loop, let’s look at asyncio tasks.
Create and Run Asyncio Tasks
You can create Task objects from coroutines in asyncio programs.
Tasks provide a handle on independently scheduled and running coroutines and allow the task to be queried, canceled, and results and exceptions to be retrieved later.
The asyncio event loop manages tasks. As such, all coroutines become and are managed as tasks within the event loop.
Let’s take a closer look at asyncio tasks.
What is an Asyncio Task
A Task is an object that schedules and independently runs an asyncio coroutine.
It provides a handle on a scheduled coroutine that an asyncio program can query and use to interact with the coroutine.
A Task is an object that manages an independently running coroutine.
— PEP 3156 – Asynchronous IO Support Rebooted: the “asyncio” Module
A task is created from a coroutine. It requires a coroutine object, wraps the coroutine, schedules it for execution, and provides ways to interact with it.
A task is executed independently. This means it is scheduled in the asyncio event loop and will execute regardless of what else happens in the coroutine that created it. This is different from executing a coroutine directly, where the caller must wait for it to complete.
Tasks are used to schedule coroutines concurrently. When a coroutine is wrapped into a Task with functions like asyncio.create_task() the coroutine is automatically scheduled to run soon
— Coroutines and Tasks
The asyncio.Task class extends the asyncio.Future class and an instance are awaitable.
A Future is a lower-level class that represents a result that will eventually arrive.
A Future is a special low-level awaitable object that represents an eventual result of an asynchronous operation.
— Coroutines and Tasks
Classes that extend the Future class are often referred to as Future-like.
A Future-like object that runs a Python coroutine.
— Coroutines and Tasks
Because a Task is awaitable it means that a coroutine can wait for a task to be done using the await expression.
For example:
|
... # wait for a task to be done await task |
Now that we know what an asyncio task is, let’s look at how we might create one.
How to Create a Task
A task is created using a provided coroutine instance.
Recall that a coroutine is defined using the async def expression and looks like a function.
For example:
|
# define a coroutine async def task_coroutine(): # … |
A task can only be created and scheduled within a coroutine.
There are two main ways to create and schedule a task, they are:
- Create Task With High-Level API (preferred)
- Create Task With Low-Level API
Let’s take a closer look at each in turn.
Create Task With High-Level API
A task can be created using the asyncio.create_task() function.
The asyncio.create_task() function takes a coroutine instance and an optional name for the task and returns an asyncio.Task instance.
For example:
|
... # create a coroutine coro = task_coroutine() # create a task from a coroutine task = asyncio.create_task(coro) |
This can be achieved with a compound statement on a single line.
For example:
|
... # create a task from a coroutine task = asyncio.create_task(task_coroutine()) |
This will do a few things:
- Wrap the coroutine in a Task instance.
- Schedule the task for execution in the current event loop.
- Return a Task instance
The task instance can be discarded, interacted with via methods, and awaited by a coroutine.
This is the preferred way to create a Task from a coroutine in an asyncio program.
Create Task With Low-Level API
A task can also be created from a coroutine using the lower-level asyncio API.
The first way is to use the asyncio.ensure_future() function.
This function takes a Task, Future, or Future-like object, such as a coroutine, and optionally the loop in which to schedule it.
If a loop is not provided, it will be scheduled in the current event loop.
If a coroutine is provided to this function, it is wrapped in a Task instance for us, which is returned.
For example:
|
... # create and schedule the task task = asyncio.ensure_future(task_coroutine()) |
Another low-level function that we can use to create and schedule a Task is the loop.create_task() method.
This function requires access to a specific event loop in which to execute the coroutine as a task.
We can acquire an instance to the current event loop within an asyncio program via the asyncio.get_event_loop() function.
This can then be used to call the create_task() method to create a Task instance and schedule it for execution.
For example:
|
... # get the current event loop loop = asyncio.get_event_loop() # create and schedule the task task = loop.create_task(task_coroutine()) |
When Does a Task Run?
A common question after creating a task is when does it run?
This is a good question.
Although we can schedule a coroutine to run independently as a task with the create_task() function, it may not run immediately.
In fact, the task will not execute until the event loop has an opportunity to run.
This will not happen until all other coroutines are not running and it is the task’s turn to run.
For example, if we had an asyncio program with one coroutine that created and scheduled a task, the scheduled task will not run until the calling coroutine that created the task is suspended.
This may happen if the calling coroutine chooses to sleep, chooses to await another coroutine or task, or chooses to await the new task that was scheduled.
For example:
|
... # create a task from a coroutine task = asyncio.create_task(task_coroutine()) # await the task, allowing it to run await task |
You can learn more about how to create asyncio tasks in the tutorial:
- How to Create Asyncio Tasks in Python
Now that we know what a task is and how to schedule them, next, let’s look at how we may use them in our programs.
Work With and Query Tasks
Tasks are the currency of asyncio programs.
In this section, we will take a closer look at how to interact with them in our programs.
Task Life-Cycle
An asyncio Task has a life cycle.
Firstly, a task is created from a coroutine.
It is then scheduled for independent execution within the event loop.
At some point, it will run.
While running it may be suspended, such as awaiting another coroutine or task. It may finish normally and return a result or fail with an exception.
Another coroutine may intervene and cancel the task.
Eventually, it will be done and cannot be executed again.
We can summarize this life-cycle as follows:
- 1. Created
- 2. Scheduled
- 2a Canceled
- 3. Running
- 3a. Suspended
- 3b. Result
- 3c. Exception
- 3d. Canceled
- 4. Done
Note that Suspended, Result, Exception, and Canceled are not states per se, they are important points of transition for a running task.
The diagram below summarizes this life cycle showing the transitions between each phase.
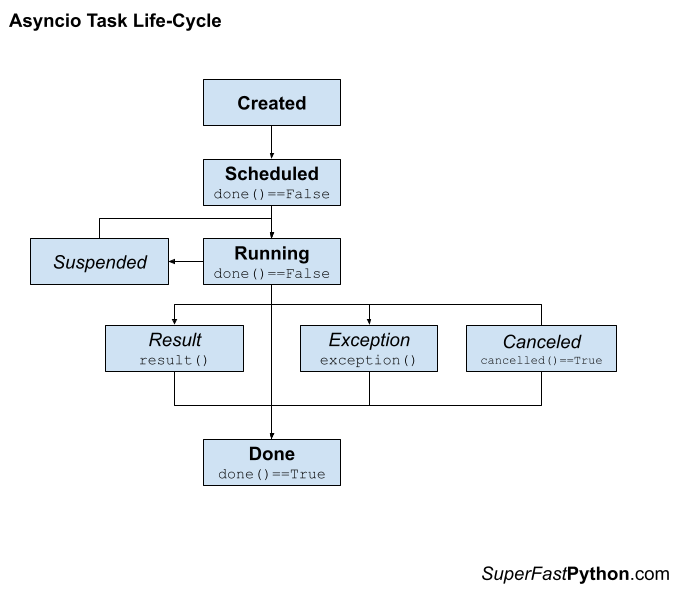
You can learn more about the asyncio task life-cycle in the tutorial:
- Asyncio Task Life-Cycle
Now that we are familiar with the life cycle of a task from a high level, let’s take a closer look at each phase.
How to Check Task Status
After a Task is created, we can check the status of the task.
There are two statuses we might want to check, they are:
- Whether the task is done.
- Whether the task was canceled.
Let’s take a closer look at each in turn.
Check if a Task is Done
We can check if a task is done via the done() method.
The method returns True if the task is done, or False otherwise.
For example:
|
... # check if a task is done if task.done(): # … |
A task is done if it has had the opportunity to run and is now no longer running.
A task that has been scheduled is not done.
Similarly, a task that is running is not done.
A task is done if:
- The coroutine finishes normally.
- The coroutine returns explicitly.
- An unexpected error or exception is raised in the coroutine
- The task is canceled.
Check if a Task is Canceled
We can check if a task is canceled via the cancelled() method.
The method returns True if the task was canceled, or False otherwise.
For example:
|
... # check if a task was canceled if task.cancelled(): # … |
A task is canceled if the cancel() method was called on the task and completed successfully, e..g cancel() returned True.
A task is not canceled if the cancel() method was not called, or if the cancel() method was called but failed to cancel the task.
How to Get Task Result
We can get the result of a task via the result() method.
This returns the return value of the coroutine wrapped by the Task or None if the wrapped coroutine does not explicitly return a value.
For example:
|
... # get the return value from the wrapped coroutine value = task.result() |
If the coroutine raises an unhandled error or exception, it is re-raised when calling the result() method and may need to be handled.
For example:
|
... try: # get the return value from the wrapped coroutine value = task.result() except Exception: # task failed and there is no result |
If the task was canceled, then a CancelledError exception is raised when calling the result() method and may need to be handled.
For example:
|
... try: # get the return value from the wrapped coroutine value = task.result() except asyncio.CancelledError: # task was canceled |
As such, it is a good idea to check if the task was canceled first.
For example:
|
... # check if the task was not canceled if not task.cancelled(): # get the return value from the wrapped coroutine value = task.result() else: # task was canceled |
If the task is not yet done, then an InvalidStateError exception is raised when calling the result() method and may need to be handled.
For example:
|
... try: # get the return value from the wrapped coroutine value = task.result() except asyncio.InvalidStateError: # task is not yet done |
As such, it is a good idea to check if the task is done first.
For example:
|
... # check if the task is not done if not task.done(): await task # get the return value from the wrapped coroutine value = task.result() |
How to Get Task Exception
A coroutine wrapped by a task may raise an exception that is not handled.
This will cancel the task, in effect.
We can retrieve an unhandled exception in the coroutine wrapped by a task via the exception() method.
For example:
|
... # get the exception raised by a task exception = task.exception() |
If an unhandled exception was not raised in the wrapped coroutine, then a value of None is returned.
If the task was canceled, then a CancelledError exception is raised when calling the exception() method and may need to be handled.
For example:
|
... try: # get the exception raised by a task exception = task.exception() except asyncio.CancelledError: # task was canceled |
As such, it is a good idea to check if the task was canceled first.
For example:
|
... # check if the task was not canceled if not task.cancelled(): # get the exception raised by a task exception = task.exception() else: # task was canceled |
If the task is not yet done, then an InvalidStateError exception is raised when calling the exception() method and may need to be handled.
For example:
|
... try: # get the exception raised by a task exception = task.exception() except asyncio.InvalidStateError: # task is not yet done |
As such, it is a good idea to check if the task is done first.
For example:
|
... # check if the task is not done if not task.done(): await task # get the exception raised by a task exception = task.exception() |
How to Cancel a Task
We can cancel a scheduled task via the cancel() method.
The cancel method returns True if the task was canceled, or False otherwise.
For example:
|
... # cancel the task was_cancelled = task.cancel() |
If the task is already done, it cannot be canceled and the cancel() method will return False and the task will not have the status of canceled.
The next time the task is given an opportunity to run, it will raise a CancelledError exception.
If the CancelledError exception is not handled within the wrapped coroutine, the task will be canceled.
Otherwise, if the CancelledError exception is handled within the wrapped coroutine, the task will not be canceled.
The cancel() method can also take a message argument which will be used in the content of the CancelledError.
How to Use Callback With a Task
We can add a done callback function to a task via the add_done_callback() method.
This method takes the name of a function to call when the task is done.
The callback function must take the Task instance as an argument.
For example:
|
# done callback function def handle(task): print(task) ... # register a done callback function task.add_done_callback(handle) |
Recall that a task may be done when the wrapped coroutine finishes normally when it returns, when an unhandled exception is raised or when the task is canceled.
The add_done_callback() method can be used to add or register as many done callback functions as we like.
We can also remove or de-register a callback function via the remove_done_callback() function.
For example:
|
... # remove a done callback function task.remove_done_callback(handle) |
How to Set the Task Name
A task may have a name.
This name can be helpful if multiple tasks are created from the same coroutine and we need some way to tell them apart programmatically.
The name can be set when the task is created from a coroutine via the “name” argument.
For example:
|
... # create a task from a coroutine task = asyncio.create_task(task_coroutine(), name=‘MyTask’) |
The name for the task can also be set via the set_name() method.
For example:
|
... # set the name of the task task.set_name(‘MyTask’) |
We can retrieve the name of a task via the get_name() method.
For example:
|
... # get the name of a task name = task.get_name() |
You can learn more about checking the status of tasks in the tutorial:
- How to Check Asyncio Task Status
Current and Running Tasks
We can introspect tasks running in the asyncio event loop.
This can be achieved by getting an asyncio.Task object for the currently running task and for all tasks that are running.
How to Get the Current Task
We can get the current task via the asyncio.current_task() function.
This function will return a Task object for the task that is currently running.
For example:
|
... # get the current task task = asyncio.current_task() |
This will return a Task object for the currently running task.
This may be:
- The main coroutine passed to asyncio.run().
- A task created and scheduled within the asyncio program via asyncio.create_task().
A task may create and run another coroutine (e.g. not wrapped in a task). Getting the current task from within a coroutine will return a Task object for the running task, but not the coroutine that is currently running.
Getting the current task can be helpful if a coroutine or task requires details about itself, such as the task name for logging.
We can explore how to get a Task instance for the main coroutine used to start an asyncio program.
The example below defines a coroutine used as the entry point into the program. It reports a message, then gets the current task and reports its details.
This is an important first example, as it highlights that all coroutines can be accessed as tasks within the asyncio event loop.
The complete example is listed below.
|
# SuperFastPython.com # example of getting the current task from the main coroutine import asyncio # define a main coroutine async def main(): # report a message print(‘main coroutine started’) # get the current task task = asyncio.current_task() # report its details print(task) # start the asyncio program asyncio.run(main()) |
Running the example first creates the main coroutine and uses it to start the asyncio program.
The main() coroutine runs and first reports a message.
It then retrieves the current task, which is a Task object that represents itself, the currently running coroutine.
It then reports the details of the currently running task.
We can see that the task has the default name for the first task, ‘Task-1‘ and is executing the main() coroutine, the currently running coroutine.
This highlights that we can use the asyncio.current_task() function to access a Task object for the currently running coroutine, that is automatically wrapped in a Task object.
|
main coroutine started <Task pending name=’Task-1′ coro=<main() running at …> cb=[_run_until_complete_cb() at …]> |
You can learn more about getting the current task in the tutorial:
- How to Get the Current Asyncio Task in Python
How to Get All Tasks
We may need to get access to all tasks in an asyncio program.
This may be for many reasons, such as:
- To introspect the current status or complexity of the program.
- To log the details of all running tasks.
- To find a task that can be queried or canceled.
We can get a set of all scheduled and running (not yet done) tasks in an asyncio program via the asyncio.all_tasks() function.
For example:
|
... # get all tasks tasks = asyncio.all_tasks() |
This will return a set of all tasks in the asyncio program.
It is a set so that each task is only represented once.
A task will be included if:
- The task has been scheduled but is not yet running.
- The task is currently running (e.g. but is currently suspended)
The set will also include a task for the currently running task, e.g. the task that is executing the coroutine that calls the asyncio.all_tasks() function.
Also, recall that the asyncio.run() method that is used to start an asyncio program will wrap the provided coroutine in a task. This means that the set of all tasks will include the task for the entry point of the program.
We can explore the case where we have many tasks within an asyncio program and then get a set of all tasks.
In this example, we first create 10 tasks, each wrapping and running the same coroutine.
The main coroutine then gets a set of all tasks scheduled or running in the program and reports their details.
The complete example is listed below.
|
1 2 3 4 5 6 7 8 9 10 11 12 13 14 15 16 17 18 19 20 21 22 23 24 25 26 27 28 29 30 |
# SuperFastPython.com # example of starting many tasks and getting access to all tasks import asyncio # coroutine for a task async def task_coroutine(value): # report a message print(f‘task {value} is running’) # block for a moment await asyncio.sleep(1) # define a main coroutine async def main(): # report a message print(‘main coroutine started’) # start many tasks started_tasks = [asyncio.create_task(task_coroutine(i)) for i in range(10)] # allow some of the tasks time to start await asyncio.sleep(0.1) # get all tasks tasks = asyncio.all_tasks() # report all tasks for task in tasks: print(f‘> {task.get_name()}, {task.get_coro()}’) # wait for all tasks to complete for task in started_tasks: await task # start the asyncio program asyncio.run(main()) |
Running the example first creates the main coroutine and uses it to start the asyncio program.
The main() coroutine runs and first reports a message.
It then creates and schedules 10 tasks that wrap the custom coroutine,
The main() coroutine then blocks for a moment to allow the tasks to begin running.
The tasks start running and each reports a message and then sleeps.
The main() coroutine resumes and gets a list of all tasks in the program.
It then reports the name and coroutine of each.
Finally, it enumerates the list of tasks that were created and awaits each, allowing them to be completed.
This highlights that we can get a set of all tasks in an asyncio program that includes both the tasks that were created as well as the task that represents the entry point into the program.
|
1 2 3 4 5 6 7 8 9 10 11 12 13 14 15 16 17 18 19 20 21 22 |
main coroutine started task 0 is running task 1 is running task 2 is running task 3 is running task 4 is running task 5 is running task 6 is running task 7 is running task 8 is running task 9 is running > Task-9, <coroutine object task_coroutine at 0x10e186e30> > Task-2, <coroutine object task_coroutine at 0x10e184e40> > Task-11, <coroutine object task_coroutine at 0x10e186f10> > Task-7, <coroutine object task_coroutine at 0x10e186d50> > Task-4, <coroutine object task_coroutine at 0x10e185700> > Task-10, <coroutine object task_coroutine at 0x10e186ea0> > Task-8, <coroutine object task_coroutine at 0x10e186dc0> > Task-5, <coroutine object task_coroutine at 0x10e186ab0> > Task-1, <coroutine object main at 0x10e1847b0> > Task-3, <coroutine object task_coroutine at 0x10e184f90> > Task-6, <coroutine object task_coroutine at 0x10e186ce0> |
You can learn more about getting all tasks. in the tutorial:
- How to Get All Asyncio Tasks in Python
Next, we will explore how to run many coroutines concurrently.
Run Many Coroutines Concurrently
A benefit of asyncio is that we can run many coroutines concurrently.
These coroutines can be created in a group and stored, then executed all together at the same time.
This can be achieved using the asyncio.gather() function.
Let’s take a closer look.
What is Asyncio gather()
The asyncio.gather() module function allows the caller to group multiple awaitables together.
Once grouped, the awaitables can be executed concurrently, awaited, and canceled.
Run awaitable objects in the aws sequence concurrently.
— Coroutines and Tasks
It is a helpful utility function for both grouping and executing multiple coroutines or multiple tasks.
For example:
|
... # run a collection of awaitables results = await asyncio.gather(coro1(), asyncio.create_task(coro2())) |
We may use the asyncio.gather() function in situations where we may create many tasks or coroutines up-front and then wish to execute them all at once and wait for them all to complete before continuing on.
This is a likely situation where the result is required from many like-tasks, e.g. same task or coroutine with different data.
The awaitables can be executed concurrently, results returned, and the main program can resume by making use of the results on which it is dependent.
The gather() function is more powerful than simply waiting for tasks to complete.
It allows a group of awaitables to be treated as a single awaitable.
This allows:
- Executing and waiting for all awaitables in the group to be done via an await expression.
- Getting results from all grouped awaitables to be retrieved later via the result() method.
- The group of awaitables to be canceled via the cancel() method.
- Checking if all awaitables in the group are done via the done() method.
- Executing callback functions only when all tasks in the group are done.
And more.
How to use Asyncio gather()
In this section, we will take a closer look at how we might use the asyncio.gather() function.
The asyncio.gather() function takes one or more awaitables as arguments.
Recall an awaitable may be a coroutine, a Future or a Task.
Therefore, we can call the gather() function with:
- Multiple tasks
- Multiple coroutines
- Mixture of tasks and coroutines
For example:
|
... # execute multiple coroutines asyncio.gather(coro1(), coro2()) |
If Task objects are provided to gather(), they will already be running because Tasks are scheduled as part of being created.
The asyncio.gather() function takes awaitables as position arguments.
We cannot create a list or collection of awaitables and provide it to gather, as this will result in an error.
For example:
|
... # cannot provide a list of awaitables directly asyncio.gather([coro1(), coro2()]) |
A list of awaitables can be provided if it is first unpacked into separate expressions using the star operator (*).
For example:
|
... # gather with an unpacked list of awaitables asyncio.gather(*[coro1(), coro2()]) |
If coroutines are provided to gather(), they are wrapped in Task objects automatically.
The gather() function does not block.
Instead, it returns an asyncio.Future object that represents the group of awaitables.
For example:
|
... # get a future that represents multiple awaitables group = asyncio.gather(coro1(), coro2()) |
Once the Future object is created it is scheduled automatically within the event loop.
The awaitable represents the group, and all awaitables in the group will execute as soon as they are able.
This means that if the caller did nothing else, the scheduled group of awaitables will run (assuming the caller suspends).
It also means that you do not have to await the Future that is returned from gather().
For example:
|
... # get a future that represents multiple awaitables group = asyncio.gather(coro1(), coro2()) # suspend and wait a while, the group may be executing.. await asyncio.sleep(10) |
The returned Future object can be awaited which will wait for all awaitables in the group to be done.
For example:
|
... # run the group of awaitables await group |
Awaiting the Future returned from gather() will return a list of return values from the awaitables.
If the awaitables do not return a value, then this list will contain the default “None” return value.
For example:
|
... # run the group of awaitables and get return values results = await group |
This is more commonly performed in one line.
For example:
|
... # run tasks and get results on one line results = await asyncio.gather(coro1(), coro2()) |
Example of gather() For Many Coroutines in a List
It is common to create multiple coroutines beforehand and then gather them later.
This allows a program to prepare the tasks that are to be executed concurrently and then trigger their concurrent execution all at once and wait for them to complete.
We can collect many coroutines together into a list either manually or using a list comprehension.
For example:
|
... # create many coroutines coros = [task_coro(i) for i in range(10)] |
We can then call gather() with all coroutines in the list.
The list of coroutines cannot be provided directly to the gather() function as this will result in an error.
Instead, the gather() function requires each awaitable to be provided as a separate positional argument.
This can be achieved by unwrapping the list into separate expressions and passing them to the gather() function. The star operator (*) will perform this operation for us.
For example:
|
... # run the tasks await asyncio.gather(*coros) |
Tying this together, the complete example of running a list of pre-prepared coroutines with gather() is listed below.
|
1 2 3 4 5 6 7 8 9 10 11 12 13 14 15 16 17 18 19 20 21 22 23 24 |
# SuperFastPython.com # example of gather for many coroutines in a list import asyncio # coroutine used for a task async def task_coro(value): # report a message print(f‘>task {value} executing’) # sleep for a moment await asyncio.sleep(1) # coroutine used for the entry point async def main(): # report a message print(‘main starting’) # create many coroutines coros = [task_coro(i) for i in range(10)] # run the tasks await asyncio.gather(*coros) # report a message print(‘main done’) # start the asyncio program asyncio.run(main()) |
Running the example executes the main() coroutine as the entry point to the program.
The main() coroutine then creates a list of 10 coroutine objects using a list comprehension.
This list is then provided to the gather() function and unpacked into 10 separate expressions using the star operator.
The main() coroutine then awaits the Future object returned from the call to gather(), suspending and waiting for all scheduled coroutines to complete their execution.
The coroutines run as soon as they are able, reporting their unique messages and sleeping before terminating.
Only after all coroutines in the group are complete does the main() coroutine resume and report its final message.
This highlights how we might prepare a collection of coroutines and provide them as separate expressions to the gather() function.
|
main starting >task 0 executing >task 1 executing >task 2 executing >task 3 executing >task 4 executing >task 5 executing >task 6 executing >task 7 executing >task 8 executing >task 9 executing main done |
You can learn more about how to use the gather() function in the tutorial:
- How to Use asyncio.gather() in Python
Next, we will explore how to wait on a group of asyncio tasks.
Wait for A Collection of Tasks
We can wait for asyncio tasks to complete via the asyncio.wait() function.
Different conditions can be waited for, such as all tasks to complete, the first task to complete, and the first task to fail with an exception.
Let’s take a closer look.
What is asyncio.wait()
The asyncio.wait() function can be used to wait for a collection of asyncio tasks to complete.
Recall that an asyncio task is an instance of the asyncio.Task class that wraps a coroutine. It allows a coroutine to be scheduled and executed independently, and the Task instance provides a handle on the task for querying status and getting results.
You can learn more about asyncio tasks in the tutorial:
- What is an Asyncio Task
The wait() function allows us to wait for a collection of tasks to be done.
The call to wait can be configured to wait for different conditions, such as all tasks being completed, the first task completed and the first task failing with an error.
Next, let’s look at how we might use the wait() function.
How to Use asyncio.wait()
The asyncio.wait() function takes a collection of awaitables, typically Task objects.
This could be a list, dict, or set of task objects that we have created, such as via calls to the asyncio.create_task() function in a list comprehension.
For example:
|
... # create many tasks tasks = [asyncio.create_task(task_coro(i)) for i in range(10)] |
The asyncio.wait() will not return until some condition on the collection of tasks is met.
By default, the condition is that all tasks are completed.
The wait() function returns a tuple of two sets. The first set contains all task objects that meet the condition, and the second contains all other task objects that do not yet meet the condition.
These sets are referred to as the “done” set and the “pending” set.
For example:
|
... # wait for all tasks to complete done, pending = await asyncio.wait(tasks) |
Technically, the asyncio.wait() is a coroutine function that returns a coroutine.
We can then await this coroutine which will return the tuple of sets.
For example:
|
... # create the wait coroutine wait_coro = asyncio.wait(tasks) # await the wait coroutine tuple = await wait_coro |
The condition waited for can be specified by the “return_when” argument which is set to asyncio.ALL_COMPLETED by default.
For example:
|
... # wait for all tasks to complete done, pending = await asyncio.wait(tasks, return_when=asyncio.ALL_COMPLETED) |
We can wait for the first task to be completed by setting return_when to FIRST_COMPLETED.
For example:
|
... # wait for the first task to be completed done, pending = await asyncio.wait(tasks, return_when=asyncio.FIRST_COMPLETED) |
When the first task is complete and returned in the done set, the remaining tasks are not canceled and continue to execute concurrently.
We can wait for the first task to fail with an exception by setting return_when to FIRST_EXCEPTION.
For example:
|
... # wait for the first task to fail done, pending = await asyncio.wait(tasks, return_when=asyncio.FIRST_EXCEPTION) |
In this case, the done set will contain the first task that failed with an exception. If no task fails with an exception, the done set will contain all tasks and wait() will return only after all tasks are completed.
We can specify how long we are willing to wait for the given condition via a “timeout” argument in seconds.
If the timeout expires before the condition is met, the tuple of tasks is returned with whatever subset of tasks do meet the condition at that time, e.g. the subset of tasks that are completed if waiting for all tasks to complete.
For example:
|
... # wait for all tasks to complete with a timeout done, pending = await asyncio.wait(tasks, timeout=3) |
If the timeout is reached before the condition is met, an exception is not raised and the remaining tasks are not canceled.
Now that we know how to use the asyncio.wait() function, let’s look at some worked examples.
Example of Waiting for All Tasks
We can explore how to wait for all tasks using asyncio.wait().
In this example, we will define a simple task coroutine that generates a random value, sleeps for a fraction of a second, then reports a message with the generated value.
The main coroutine will then create many tasks in a list comprehension with the coroutine and then wait for all tasks to be completed.
The complete example is listed below.
|
1 2 3 4 5 6 7 8 9 10 11 12 13 14 15 16 17 18 19 20 21 22 23 24 25 |
# SuperFastPython.com # example of waiting for all tasks to complete from random import random import asyncio # coroutine to execute in a new task async def task_coro(arg): # generate a random value between 0 and 1 value = random() # block for a moment await asyncio.sleep(value) # report the value print(f‘>task {arg} done with {value}’) # main coroutine async def main(): # create many tasks tasks = [asyncio.create_task(task_coro(i)) for i in range(10)] # wait for all tasks to complete done,pending = await asyncio.wait(tasks) # report results print(‘All done’) # start the asyncio program asyncio.run(main()) |
Running the example first creates the main() coroutine and uses it as the entry point into the asyncio program.
The main() coroutine then creates a list of ten tasks in a list comprehension, each providing a unique integer argument from 0 to 9.
The main() coroutine is then suspended and waits for all tasks to complete.
The tasks execute. Each generates a random value, sleeps for a moment, then reports its generated value.
After all tasks have been completed, the main() coroutine resumes and reports a final message.
This example highlights how we can use the wait() function to wait for a collection of tasks to be completed.
This is perhaps the most common usage of the function.
Note, that the results will differ each time the program is run given the use of random numbers.
|
>task 5 done with 0.0591009105682192 >task 8 done with 0.10453715687017351 >task 0 done with 0.15462838864295925 >task 6 done with 0.4103492027393125 >task 9 done with 0.45567100006991623 >task 2 done with 0.6984682905809402 >task 7 done with 0.7785363531316224 >task 3 done with 0.827386088873161 >task 4 done with 0.9481344994700972 >task 1 done with 0.9577302665040541 All done |
You can learn more about the wait() function in the tutorial:
- How to Use Asyncio wait() in Python
Next, we will explore how to wait for a single coroutine with a time limit.
Wait for a Coroutine with a Time Limit
We can wait for an asyncio task or coroutine to complete with a timeout using the asyncio.wait_for() function.
If the timeout elapses before the task completes, the task is canceled.
Let’s take a closer look.
What is Asyncio wait_for()
The asyncio.wait_for() function allows the caller to wait for an asyncio task or coroutine to complete with a timeout.
If no timeout is specified, the wait_for() function will wait until the task is completed.
If a timeout is specified and elapses before the task is complete, then the task is canceled.
Wait for the aw awaitable to complete with a timeout.
— Coroutines and Tasks
This allows the caller to both set an expectation about how long they are willing to wait for a task to complete, and to enforce the timeout by canceling the task if the timeout elapses.
Now that we know what the asyncio.wait_for() function is, let’s look at how to use it.
How to Use Asyncio wait_for()
The asyncio.wait_for() function takes an awaitable and a timeout.
The awaitable may be a coroutine or a task.
A timeout must be specified and may be None for no timeout, an integer or floating point number of seconds.
The wait_for() function returns a coroutine that is not executed until it is explicitly awaited or scheduled as a task.
For example:
|
... # wait for a task to complete await asyncio.wait_for(coro, timeout=10) |
If a coroutine is provided, it will be converted to the task when the wait_for() coroutine is executed.
If the timeout elapses before the task is completed, the task is canceled, and an asyncio.TimeoutError is raised, which may need to be handled.
For example:
|
... # execute a task with a timeout try: # wait for a task to complete await asyncio.wait_for(coro, timeout=1) except asyncio.TimeoutError: # … |
If the waited-for task fails with an unhandled exception, the exception will be propagated back to the caller that is awaiting on the wait_for() coroutine, in which case it may need to be handled.
For example
|
... # execute a task that may fail try: # wait for a task to complete await asyncio.wait_for(coro, timeout=1) except asyncio.TimeoutError: # … except Exception: # … |
Next, let’s look at how we can call wait_for() with a timeout.
Example of Asyncio wait_for() With a Timeout
We can explore how to wait for a coroutine with a timeout that elapses before the task is completed.
In this example, we execute a coroutine as above, except the caller waits a fixed timeout of 0.2 seconds or 200 milliseconds.
Recall that one second is equal to 1,000 milliseconds.
The task coroutine is modified so that it sleeps for more than one second, ensuring that the timeout always expires before the task is complete.
The complete example is listed below.
|
1 2 3 4 5 6 7 8 9 10 11 12 13 14 15 16 17 18 19 20 21 22 23 24 25 26 27 28 |
# SuperFastPython.com # example of waiting for a coroutine with a timeout from random import random import asyncio # coroutine to execute in a new task async def task_coro(arg): # generate a random value between 0 and 1 value = 1 + random() # report message print(f‘>task got {value}’) # block for a moment await asyncio.sleep(value) # report all done print(‘>task done’) # main coroutine async def main(): # create a task task = task_coro(1) # execute and wait for the task without a timeout try: await asyncio.wait_for(task, timeout=0.2) except asyncio.TimeoutError: print(‘Gave up waiting, task canceled’) # start the asyncio program asyncio.run(main()) |
Running the example first creates the main() coroutine and uses it as the entry point into the asyncio program.
The main() coroutine creates the task coroutine. It then calls wait_for() and passes the task coroutine and sets the timeout to 0.2 seconds.
The main() coroutine is suspended and the task_coro() is executed. It reports a message and sleeps for a moment.
The main() coroutine resumes after the timeout has elapsed. The wait_for() coroutine cancels the task_coro() coroutine and the main() coroutine is suspended.
The task_coro() runs again and responds to the request to be terminated. It raises a TimeoutError exception and terminates.
The main() coroutine resumes and handles the TimeoutError raised by the task_coro().
This highlights how we can call the wait_for() function with a timeout and to cancel a task if it is not completed within a timeout.
The output from the program will differ each time it is run given the use of random numbers.
|
>task got 0.685375224799321 Gave up waiting, task canceled |
You can learn more about the wait_for() function in the tutorial:
- Asyncio wait_for() to Wait With a Timeout
Next, we will explore how we might protect an asyncio task from being canceled.
Shield Tasks from Cancellation
Asyncio tasks can be canceled by calling their cancel() method.
We can protect a task from being canceled by wrapping it in a call to asyncio.shield().
Let’s take a closer look.
What is Asyncio shield()
The asyncio.shield() function wraps an awaitable in Future that will absorb requests to be canceled.
Protect an awaitable object from being cancelled.
— Coroutines and Tasks
This means the shielded future can be passed around to tasks that may try to cancel it and the cancellation request will look like it was successful, except that the Task or coroutine that is being shielded will continue to run.
It may be useful in asyncio programs where some tasks can be canceled, but others, perhaps with a higher priority cannot.
It may also be useful in programs where some tasks can safely be canceled, such as those that were designed with asyncio in mind, whereas others cannot be safely terminated and therefore must be shielded from cancellation.
Now that we know what asyncio.shield() is, let’s look at how to use it.
How to Use Asyncio shield()
The asyncio.shield() function will protect another Task or coroutine from being canceled.
It takes an awaitable as an argument and returns an asyncio.Future object.
The Future object can then be awaited directly or passed to another task or coroutine.
For example:
|
... # shield a task from cancellation shielded = asyncio.shield(task) # await the shielded task await shielded |
The returned Future can be canceled by calling the cancel() method.
If the inner task is running, the request will be reported as successful.
For example:
|
... # cancel a shielded task was_canceld = shielded.cancel() |
Any coroutines awaiting the Future object will raise an asyncio.CancelledError, which may need to be handled.
For example:
|
... try: # await the shielded task await asyncio.shield(task) except asyncio.CancelledError: # … |
Importantly, the request for cancellation made on the Future object is not propagated to the inner task.
This means that the request for cancellation is absorbed by the shield.
For example:
|
... # create a task task = asyncio.create_task(coro()) # create a shield shield = asyncio.shield(task) # cancel the shield (does not cancel the task) shield.cancel() |
If a coroutine is provided to the asyncio.shield() function it is wrapped in an asyncio.Task() and scheduled immediately.
This means that the shield does not need to be awaited for the inner coroutine to run.
If aw is a coroutine it is automatically scheduled as a Task.
— Coroutines and Tasks
If the task that is being shielded is canceled, the cancellation request will be propagated up to the shield, which will also be canceled.
For example:
|
... # create a task task = asyncio.create_task(coro()) # create a shield shield = asyncio.shield(task) # cancel the task (also cancels the shield) task.cancel() |
Now that we know how to use the asyncio.shield() function, let’s look at some worked examples.
Example of Asyncio shield() for a Task
We can explore how to protect a task from cancellation using asyncio.shield().
In this example, we define a simple coroutine task that takes an integer argument, sleeps for a second, then returns the argument. The coroutine can then be created and scheduled as a Task.
We can define a second coroutine that takes a task, sleeps for a fraction of a second, then cancels the provided task.
In the main coroutine, we can then shield the first task and pass it to the second task, then await the shielded task.
The expectation is that the shield will be canceled and leave the inner task intact. The cancellation will disrupt the main coroutine. We can check the status of the inner task at the end of the program and we expect it to have been completed normally, regardless of the request to cancel made on the shield.
The complete example is listed below.
|
1 2 3 4 5 6 7 8 9 10 11 12 13 14 15 16 17 18 19 20 21 22 23 24 25 26 27 28 29 30 31 32 33 34 35 36 37 38 39 40 41 42 43 44 45 |
# SuperFastPython.com # example of using asyncio shield to protect a task from cancellation import asyncio # define a simple asynchronous async def simple_task(number): # block for a moment await asyncio.sleep(1) # return the argument return number # cancel the given task after a moment async def cancel_task(task): # block for a moment await asyncio.sleep(0.2) # cancel the task was_cancelled = task.cancel() print(f‘cancelled: {was_cancelled}’) # define a simple coroutine async def main(): # create the coroutine coro = simple_task(1) # create a task task = asyncio.create_task(coro) # created the shielded task shielded = asyncio.shield(task) # create the task to cancel the previous task asyncio.create_task(cancel_task(shielded)) # handle cancellation try: # await the shielded task result = await shielded # report the result print(f‘>got: {result}’) except asyncio.CancelledError: print(‘shielded was cancelled’) # wait a moment await asyncio.sleep(1) # report the details of the tasks print(f‘shielded: {shielded}’) print(f‘task: {task}’) # start asyncio.run(main()) |
Running the example first creates the main() coroutine and uses it as the entry point into the application.
The task coroutine is created, then it is wrapped and scheduled in a Task.
The task is then shielded from cancellation.
The shielded task is then passed to the cancel_task() coroutine which is wrapped in a task and scheduled.
The main coroutine then awaits the shielded task, which expects a CancelledError exception.
The task runs for a moment then sleeps. The cancellation task runs for a moment, sleeps, resumes then cancels the shielded task. The request to cancel reports that it was successful.
This raises a CancelledError exception in the shielded Future, although not in the inner task.
The main() coroutine resumes and responds to the CancelledError exception, reporting a message. It then sleeps for a while longer.
The task resumes, finishes, and returns a value.
Finally, the main() coroutine resumes, and reports the status of the shielded future and the inner task. We can see that the shielded future is marked as canceled and yet the inner task is marked as finished normally and provides a return value.
This example highlights how a shield can be used to successfully protect an inner task from cancellation.
|
cancelled: True shielded was cancelled shielded: <Future cancelled> task: <Task finished name=’Task-2′ coro=<simple_task() done, defined at …> result=1> |
You can learn more about the shield() function in the tutorial:
- Asyncio Shield From Cancellation
Next, we will explore how to run a blocking task from an asyncio program.
Run a Blocking Task in Asyncio
A blocking task is a task that stops the current thread from progressing.
If a blocking task is executed in an asyncio program it stops the entire event loop, preventing any other coroutines from progressing.
We can run blocking calls asynchronously in an asyncio program via the asyncio.to_thread() and loop.run_in_executor() functions.
Need to Run Blocking Tasks in Asyncio
The focus of asyncio is asynchronous programming and non-blocking IO.
Nevertheless, we often need to execute a blocking function call within an asyncio application.
This could be for many reasons, such as:
- To execute a CPU-bound task like calculating something.
- To execute a blocking IO-bound task like reading or writing from a file.
- To call into a third-party library that does not support asyncio yet.
Making a blocking call directly in an asyncio program will cause the event loop to stop while the blocking call is executing. It will not allow other coroutines to run in the background.
How can we execute a blocking call in an asyncio program asynchronously?
How to Run Blocking Tasks
The asyncio module provides two approaches for executing blocking calls in asyncio programs.
The first is to use the asyncio.to_thread() function.
This is in the high-level API and is intended for application developers.
The asyncio.to_thread() function takes a function name to execute and any arguments.
The function is executed in a separate thread. It returns a coroutine that can be awaited or scheduled as an independent task.
For example:
|
... # execute a function in a separate thread await asyncio.to_thread(task) |
The task will not begin executing until the returned coroutine is given an opportunity to run in the event loop.
The asyncio.to_thread() function creates a ThreadPoolExecutor behind the scenes to execute blocking calls.
As such, the asyncio.to_thread() function is only appropriate for IO-bound tasks.
An alternative approach is to use the loop.run_in_executor() function.
This is in the low-level asyncio API and first requires access to the event loop, such as via the asyncio.get_running_loop() function.
The loop.run_in_executor() function takes an executor and a function to execute.
If None is provided for the executor, then the default executor is used, which is a ThreadPoolExecutor.
The loop.run_in_executor() function returns an awaitable that can be awaited if needed. The task will begin executing immediately, so the returned awaitable does not need to be awaited or scheduled for the blocking call to start executing.
For example:
|
... # get the event loop loop = asyncio.get_running_loop() # execute a function in a separate thread await loop.run_in_executor(None, task) |
Alternatively, an executor can be created and passed to the loop.run_in_executor() function, which will execute the asynchronous call in the executor.
The caller must manage the executor in this case, shutting it down once the caller is finished with it.
For example:
|
... # create a process pool with ProcessPoolExecutor as exe: # get the event loop loop = asyncio.get_running_loop() # execute a function in a separate thread await loop.run_in_executor(exe, task) # process pool is shutdown automatically… |
These two approaches allow a blocking call to be executed as an asynchronous task in an asyncio program.
Now that we know how to execute blocking calls in an asyncio program, let’s look at some worked examples.
Example of Running I/O-Bound Task in Asyncio with to_thread()
We can explore how to execute a blocking IO-bound call in an asyncio program using asyncio.to_thread().
In this example, we will define a function that blocks the caller for a few seconds. We will then execute this function asynchronously in a thread pool from asyncio using the asyncio.to_thread() function.
This will free the caller to continue with other activities.
The complete example is listed below.
|
1 2 3 4 5 6 7 8 9 10 11 12 13 14 15 16 17 18 19 20 21 22 23 24 25 26 27 28 29 30 31 |
# SuperFastPython.com # example of running a blocking io-bound task in asyncio import asyncio import time # a blocking io-bound task def blocking_task(): # report a message print(‘Task starting’) # block for a while time.sleep(2) # report a message print(‘Task done’) # main coroutine async def main(): # report a message print(‘Main running the blocking task’) # create a coroutine for the blocking task coro = asyncio.to_thread(blocking_task) # schedule the task task = asyncio.create_task(coro) # report a message print(‘Main doing other things’) # allow the scheduled task to start await asyncio.sleep(0) # await the task await task # run the asyncio program asyncio.run(main()) |
Running the example first creates the main() coroutine and runs it as the entry point into the asyncio program.
The main() coroutine runs and reports a message. It then issues a call to the blocking function call to the thread pool. This returns a coroutine,
The coroutine is then wrapped in a Task and executed independently.
The main() coroutine is free to continue with other activities. In this case, it sleeps for a moment to allow the scheduled task to start executing. This allows the target function to be issued to the ThreadPoolExecutor behind the scenes and start running.
The main() coroutine then suspends and waits for the task to complete.
The blocking function reports a message, sleeps for 2 seconds, then reports a final message.
This highlights how we can execute a blocking IO-bound task in a separate thread asynchronously from an asyncio program.
|
Main running the blocking task Main doing other things Task starting Task done |
You can learn more about the to_thread() function in the tutorial:
- How to Use Asyncio to_thread()
Next, we will explore how to develop and use asynchronous iterators.
Asynchronous Iterators
Iteration is a basic operation in Python.
We can iterate lists, strings, and all manner of other structures.
Asyncio allows us to develop asynchronous iterators.
We can create and use asynchronous iterators in asyncio programs by defining an object that implements the __aiter__() and __anext__() methods.
Let’s take a closer look.
What Are Asynchronous Iterators
An asynchronous iterator is an object that implements the __aiter__() and __anext__() methods.
Before we take a close look at asynchronous iterators, let’s review classical iterators.
Iterators
An iterator is a Python object that implements a specific interface.
Specifically, the __iter__() method that returns an instance of the iterator and the __next__() method that steps the iterator one cycle and returns a value.
iterator: An object representing a stream of data. Repeated calls to the iterator’s __next__() method (or passing it to the built-in function next()) return successive items in the stream. When no more data are available a StopIteration exception is raised instead.
— Python Glossary
An iterator can be stepped using the next() built-in function or traversed using a for loop.
Many Python objects are iterable, most notable are containers such as lists.
Asynchronous Iterators
An asynchronous iterator is a Python object that implements a specific interface.
asynchronous iterator: An object that implements the __aiter__() and __anext__() methods.
— Python Glossary
An asynchronous iterator must implement the __aiter__() and __anext__() methods.
- The __aiter__() method must return an instance of the iterator.
- The __anext__() method must return an awaitable that steps the iterator.
An asynchronous iterator may only be stepped or traversed in an asyncio program, such as within a coroutine.
Asynchronous iterators were introduced in PEP 492 – Coroutines with async and await syntax.
An asynchronous iterator can be stepped using the anext() built-in function that returns an awaitable that executes one step of the iterator, e.g. one call to the __anext__() method.
An asynchronous iterator can be traversed using the “async for” expression that will automatically call anext() each iteration and await the returned awaitable in order to retrieve the return value.
An asynchronous iterable is able to call asynchronous code in its iter implementation, and asynchronous iterator can call asynchronous code in its next method.
— PEP 492 – Coroutines with async and await syntax
What is the “async for” loop?
The async for expression is used to traverse an asynchronous iterator.
It is an asynchronous for-loop statement.
An asynchronous iterator is an iterator that yields awaitables.
You may recall that an awaitable is an object that can be waited for, such as a coroutine or a task.
awaitable: An object that can be used in an await expression.
— Python Glossary
An asynchronous generator will automatically implement the asynchronous iterator methods, allowing it to be iterated like an asynchronous iterator.
The await for expression allows the caller to traverse an asynchronous iterator of awaitables and retrieve the result from each.
This is not the same as traversing a collection or list of awaitables (e.g. coroutine objects), instead, the awaitables returned must be provided using the expected asynchronous iterator methods.
Internally, the async for loop will automatically resolve or await each awaitable, scheduling coroutines as needed.
Because it is a for-loop, it assumes, although does not require, that each awaitable being traversed yields a return value.
The async for loop must be used within a coroutine because internally it will use the await expression, which can only be used within coroutines.
The async for expression can be used to traverse an asynchronous iterator within a coroutine.
For example:
|
... # traverse an asynchronous iterator async for item in async_iterator: print(item) |
This does not execute the for-loop in parallel. The asyncio is unable to execute more than one coroutine at a time within a Python thread.
Instead, this is an asynchronous for-loop.
The difference is that the coroutine that executes the for loop will suspend and internally await for each awaitable.
Behind the scenes, this may require coroutines to be scheduled and awaited, or tasks to be awaited.
We may also use the async for expression in a list comprehension.
For example:
|
... # build a list of results results = [item async for item async_iterator] |
This would construct a list of return values from the asynchronous iterator.
Next, let’s look at how to define, create and use asynchronous iterators.
How to Use Asynchronous Iterators
In this section, we will take a close look at how to define, create, step, and traverse an asynchronous iterator in asyncio programs.
Let’s start with how to define an asynchronous iterator.
Define an Asynchronous Iterator
We can define an asynchronous iterator by defining a class that implements the __aiter__() and __anext__() methods.
These methods are defined on a Python object as per normal.
Importantly, because the __anext__() function must return an awaitable, it must be defined using the “async def” expression.
object.__anext__(self): Must return an awaitable resulting in a next value of the iterator. Should raise a StopAsyncIteration error when the iteration is over.
— Asynchronous Iterators
When the iteration is complete, the __anext__() method must raise a StopAsyncIteration exception.
For example:
|
1 2 3 4 5 6 7 8 9 10 11 12 13 14 15 16 17 18 19 |
# define an asynchronous iterator class AsyncIterator(): # constructor, define some state def __init__(self): self.counter = 0 # create an instance of the iterator def __aiter__(self): return self # return the next awaitable async def __anext__(self): # check for no further items if self.counter >= 10: raise StopAsyncIteration # increment the counter self.counter += 1 # return the counter value return self.counter |
Because the asynchronous iterator is a coroutine and each iterator returns an awaitable that is scheduled and executed in the asyncio event loop, we can execute and await awaitables within the body of the iterator.
For example:
|
... # return the next awaitable async def __anext__(self): # check for no further items if self.counter >= 10: raise StopAsyncIteration # increment the counter self.counter += 1 # simulate work await asyncio.sleep(1) # return the counter value return self.counter |
Next, let’s look at how we might use an asynchronous iterator.
Create Asynchronous Iterator
To use an asynchronous iterator we must create the iterator.
This involves creating the Python object as per normal.
For example:
|
... # create the iterator it = AsyncIterator() |
This returns an “asynchronous iterable“, which is an instance of an “asynchronous iterator“.
Step an Asynchronous Iterator
One step of the iterator can be traversed using the anext() built-in function, just like a classical iterator using the next() function.
The result is an awaitable that is awaited.
For example:
|
... # get an awaitable for one step of the iterator awaitable = anext(it) # execute the one step of the iterator and get the result result = await awaitable |
This can be achieved in one step.
For example:
|
... # step the async iterator result = await anext(it) |
Traverse an Asynchronous Iterator
The asynchronous iterator can also be traversed in a loop using the “async for” expression that will await each iteration of the loop automatically.
For example:
|
... # traverse an asynchronous iterator async for result in AsyncIterator(): print(result) |
You can learn more about the “async for” expression in the tutorial:
- Asyncio async for loop
We may also use an asynchronous list comprehension with the “async for” expression to collect the results of the iterator.
For example:
|
... # async list comprehension with async iterator results = [item async for item in AsyncIterator()] |
Example of an Asynchronous Iterator
We can explore how to traverse an asynchronous iterator using the “async for” expression.
In this example, we will update the previous example to traverse the iterator to completion using an “async for” loop.
This loop will automatically await each awaitable returned from the iterator, retrieve the returned value, and make it available within the loop body so that in this case it can be reported.
This is perhaps the most common usage pattern for asynchronous iterators.
The complete example is listed below.
|
1 2 3 4 5 6 7 8 9 10 11 12 13 14 15 16 17 18 19 20 21 22 23 24 25 26 27 28 29 30 31 32 33 34 |
# SuperFastPython.com # example of an asynchronous iterator with async for loop import asyncio # define an asynchronous iterator class AsyncIterator(): # constructor, define some state def __init__(self): self.counter = 0 # create an instance of the iterator def __aiter__(self): return self # return the next awaitable async def __anext__(self): # check for no further items if self.counter >= 10: raise StopAsyncIteration # increment the counter self.counter += 1 # simulate work await asyncio.sleep(1) # return the counter value return self.counter # main coroutine async def main(): # loop over async iterator with async for loop async for item in AsyncIterator(): print(item) # execute the asyncio program asyncio.run(main()) |
Running the example first creates the main() coroutine and uses it as the entry point into the asyncio program.
The main() coroutine runs and starts the for loop.
An instance of the asynchronous iterator is created and the loop automatically steps it using the anext() function to return an awaitable. The loop then awaits the awaitable and retrieves a value which is made available to the body of the loop where it is reported.
This process is then repeated, suspending the main() coroutine, executing a step of the iterator and suspending, and resuming the main() coroutine until the iterator is exhausted.
Once the internal counter of the iterator reaches 10, a StopAsyncIteration is raised. This does not terminate the program. Instead, it is expected and handled by the “async for” expression and breaks the loop.
This highlights how an asynchronous iterator can be traversed using an async for expression.
You can learn more about async iterators in the tutorial:
- Asynchronous Iterators in Python
Next, we will explore asynchronous generators.
Asynchronous Generators
Generators are a fundamental part of Python.
A generator is a function that has at least one “yield” expression. They are functions that can be suspended and resumed, just like coroutines.
In fact, Python coroutines are an extension of Python generators.
Asyncio allows us to develop asynchronous generators.
We can create an asynchronous generator by defining a coroutine that makes use of the “yield” expression.
Let’s take a closer look.
What Are Asynchronous Generators
An asynchronous generator is a coroutine that uses the yield expression.
Before we dive into the details of asynchronous generators, let’s first review classical Python generators.
Generators
A generator is a Python function that returns a value via a yield expression.
For example:
|
# define a generator def generator(): for i in range(10): yield i |
The generator is executed to the yield expression, after which a value is returned. This suspends the generator at that point. The next time the generator is executed it is resumed from the point it was resumed and runs until the next yield expression.
generator: A function which returns a generator iterator. It looks like a normal function except that it contains yield expressions for producing a series of values usable in a for-loop or that can be retrieved one at a time with the next() function.
— Python Glossary
Technically, a generator function creates and returns a generator iterator. The generator iterator executes the content of the generator function, yielding and resuming as needed.
generator iterator: An object created by a generator function. Each yield temporarily suspends processing, remembering the location execution state […] When the generator iterator resumes, it picks up where it left off …
— Python Glossary
A generator can be executed in steps by using the next() built-in function.
For example:
|
... # create the generator gen = generator() # step the generator result = next(gen) |
Although, it is more common to iterate the generator to completion, such as using a for-loop or a list comprehension.
For example:
|
... # traverse the generator and collect results results = [item for item in generator()] |
Next, let’s take a closer look at asynchronous generators.
Asynchronous Generators
An asynchronous generator is a coroutine that uses the yield expression.
Unlike a function generator, the coroutine can schedule and await other coroutines and tasks.
asynchronous generator: A function which returns an asynchronous generator iterator. It looks like a coroutine function defined with async def except that it contains yield expressions for producing a series of values usable in an async for loop.
— Python Glossary
Like a classical generator, an asynchronous generator function can be used to create an asynchronous generator iterator that can be traversed using the built-in anext() function, instead of the next() function.
asynchronous generator iterator: An object created by a asynchronous generator function. This is an asynchronous iterator which when called using the __anext__() method returns an awaitable object which will execute the body of the asynchronous generator function until the next yield expression.
— Python Glossary
This means that the asynchronous generator iterator implements the __anext__() method and can be used with the async for expression.
This means that each iteration of the generator is scheduled and executed as awaitable. The “async for” expression will schedule and execute each iteration of the generator, suspending the calling coroutine and awaiting the result.
You can learn more about the “async for” expression in the tutorial:
- Asyncio async for loop
How to Use an Asynchronous Generator
In this section, we will take a close look at how to define, create, step, and traverse an asynchronous generator in asyncio programs.
Let’s start with how to define an asynchronous generator.
Define an Asynchronous Generator
We can define an asynchronous generator by defining a coroutine that has at least one yield expression.
This means that the function is defined using the “async def” expression.
For example:
|
# define an asynchronous generator async def async_generator(): for i in range(10) yield i |
Because the asynchronous generator is a coroutine and each iterator returns an awaitable that is scheduled and executed in the asyncio event loop, we can execute and await awaitables within the body of the generator.
For example:
|
# define an asynchronous generator that awaits async def async_generator(): for i in range(10) # suspend and sleep a moment await asyncio.sleep(1) # yield a value to the caller yield i |
Next, let’s look at how we might use an asynchronous generator.
Create Asynchronous Generator
To use an asynchronous generator we must create the generator.
This looks like calling it, but instead creates and returns an iterator object.
For example:
|
... # create the iterator it = async_generator() |
This returns a type of asynchronous iterator called an asynchronous generator iterator.
Step an Asynchronous Generator
One step of the generator can be traversed using the anext() built-in function, just like a classical generator using the next() function.
The result is an awaitable that is awaited.
For example:
|
... # get an awaitable for one step of the generator awaitable = anext(gen) # execute the one step of the generator and get the result result = await awaitable |
This can be achieved in one step.
For example:
|
... # step the async generator result = await anext(gen) |
Traverse an Asynchronous Generator
The asynchronous generator can also be traversed in a loop using the “async for” expression that will await each iteration of the loop automatically.
For example:
|
... # traverse an asynchronous generator async for result in async_generator(): print(result) |
You can learn more about the “async for” expression in the tutorial:
We may also use an asynchronous list comprehension with the “async for” expression to collect the results of the generator.
For example:
|
... # async list comprehension with async generator results = [item async for item in async_generator()] |
Example of an Asynchronous Generator
We can explore how to traverse an asynchronous generator using the “async for” expression.
In this example, we will update the previous example to traverse the generator to completion using an “async for” loop.
This loop will automatically await each awaitable returned from the generator, retrieve the yielded value, and make it available within the loop body so that in this case it can be reported.
This is perhaps the most common usage pattern for asynchronous generators.
The complete example is listed below.
|
1 2 3 4 5 6 7 8 9 10 11 12 13 14 15 16 17 18 19 20 21 |
# SuperFastPython.com # example of asynchronous generator with async for loop import asyncio # define an asynchronous generator async def async_generator(): # normal loop for i in range(10): # block to simulate doing work await asyncio.sleep(1) # yield the result yield i # main coroutine async def main(): # loop over async generator with async for loop async for item in async_generator(): print(item) # execute the asyncio program asyncio.run(main()) |
Running the example first creates the main() coroutine and uses it as the entry point into the asyncio program.
The main() coroutine runs and starts the for loop.
An instance of the asynchronous generator is created and the loop automatically steps it using the anext() function to return an awaitable. The loop then awaits the awaitable and retrieves a value which is made available to the body of the loop where it is reported.
This process is then repeated, suspending the main() coroutine, executing an iteration of the generator, and suspending, and resuming the main() coroutine until the generator is exhausted.
This highlights how an asynchronous generator can be traversed using an async for expression.
You can learn more about async generators in the tutorial:
- Asynchronous Generators in Python
Next, we will explore asynchronous context managers.
Asynchronous Context Managers
A context manager is a Python construct that provides a try-finally like environment with a consistent interface and handy syntax, e.g. via the “with” expression.
It is commonly used with resources, ensuring the resource is always closed or released after we are finished with it, regardless of whether the usage of the resources was successful or failed with an exception.
Asyncio allows us to develop asynchronous context managers.
We can create and use asynchronous context managers in asyncio programs by defining an object that implements the __aenter__() and __aexit__() methods as coroutines.
Let’s take a closer look.
What is an Asynchronous Context Manager
An asynchronous context manager is a Python object that implements the __aenter__() and __aexit__() methods.
Before we dive into the details of asynchronous context managers, let’s review classical context managers.
Context Manager
A context manager is a Python object that implements the __enter__() and __exit__() methods.
A context manager is an object that defines the runtime context to be established when executing a with statement. The context manager handles the entry into, and the exit from, the desired runtime context for the execution of the block of code.
— With Statement Context Managers
- The __enter__() method defines what happens at the beginning of a block, such as opening or preparing resources, like a file, socket or thread pool.
- The __exit__() method defines what happens when the block is exited, such as closing a prepared resource.
Typical uses of context managers include saving and restoring various kinds of global state, locking and unlocking resources, closing opened files, etc.
— With Statement Context Managers
A context manager is used via the “with” expression.
Typically the context manager object is created in the beginning of the “with” expression and the __enter__() method is called automatically. The body of the content makes use of the resource via the named context manager object, then the __aexit__() method is called automatically when the block is exited, normally or via an exception.
For example:
|
... # open a context manager with ContextManager() as manager: # … # closed automatically |
This mirrors a try-finally expression.
For example:
|
... # create the object manager = ContextManager() try: manager.__enter__() # … finally: manager.__exit__() |
Next, let’s take a look at asynchronous context managers.
Asynchronous Context Manager
Asynchronous context managers were introduced in “PEP 492 – Coroutines with async and await syntax“.
They provide a context manager that can be suspended when entering and exiting.
An asynchronous context manager is a context manager that is able to suspend execution in its __aenter__ and __aexit__ methods.
— Asynchronous Context Managers
The __aenter__ and __aexit__ methods are defined as coroutines and are awaited by the caller.
This is achieved using the “async with” expression.
You can learn more about the “async with” expression in the tutorial:
- What is Asyncio async with
As such, asynchronous context managers can only be used within asyncio programs, such as within calling coroutines.
What is “async with”
The “async with” expression is for creating and using asynchronous context managers.
It is an extension of the “with” expression for use in coroutines within asyncio programs.
The “async with” expression is just like the “with” expression used for context managers, except it allows asynchronous context managers to be used within coroutines.
In order to better understand “async with“, let’s take a closer look at asynchronous context managers.
The async with expression allows a coroutine to create and use an asynchronous version of a context manager.
For example:
|
... # create and use an asynchronous context manager async with AsyncContextManager() as manager: # … |
This is equivalent to something like:
|
... # create or enter the async context manager manager = await AsyncContextManager() try: # … finally: # close or exit the context manager await manager.close() |
Notice that we are implementing much the same pattern as a traditional context manager, except that creating and closing the context manager involve awaiting coroutines.
This suspends the execution of the current coroutine, schedules a new coroutine and waits for it to complete.
As such an asynchronous context manager must implement the __aenter__() and __aexit__() methods that must be defined via the async def expression. This makes them coroutines themselves which may also await.
How to Use Asynchronous Context Managers
In this section, we will explore how we can define, create, and use asynchronous context managers in our asyncio programs.
Define an Asynchronous Context Manager
We can define an asynchronous context manager as a Python object that implements the __aenter__() and __aexit__() methods.
Importantly, both methods must be defined as coroutines using the “async def” and therefore must return awaitables.
For example:
|
# define an asynchronous context manager class AsyncContextManager: # enter the async context manager async def __aenter__(self): # report a message print(‘>entering the context manager’) # exit the async context manager async def __aexit__(self, exc_type, exc, tb): # report a message print(‘>exiting the context manager’) |
Because each of the methods are coroutines, they may themselves await coroutines or tasks.
For example:
|
# define an asynchronous context manager class AsyncContextManager: # enter the async context manager async def __aenter__(self): # report a message print(‘>entering the context manager’) # block for a moment await asyncio.sleep(0.5) # exit the async context manager async def __aexit__(self, exc_type, exc, tb): # report a message print(‘>exiting the context manager’) # block for a moment await asyncio.sleep(0.5) |
Use an Asynchronous Context Manager
An asynchronous context manager is used via the “async with” expression.
This will automatically await the enter and exit coroutines, suspending the calling coroutine as needed.
For example:
|
... # use an asynchronous context manager async with AsyncContextManager() as manager: # … |
As such, the “async with” expression and asynchronous context managers more generally can only be used within asyncio programs, such as within coroutines.
Now that we know how to use asynchronous context managers, let’s look at a worked example.
Example of an Asynchronous Context Manager and “async with”
We can explore how to use an asynchronous context manager via the “async with” expression.
In this example, we will update the above example to use the context manager in a normal manner.
We will use an “async with” expression and on one line, create and enter the context manager. This will automatically await the enter method.
We can then make use of the manager within the inner block. In this case, we will just report a message.
Exiting the inner block will automatically await the exit method of the context manager.
Contrasting this example with the previous example shows how much heavy lifting the “async with” expression does for us in an asyncio program.
The complete example is listed below.
|
1 2 3 4 5 6 7 8 9 10 11 12 13 14 15 16 17 18 19 20 21 22 23 24 25 26 27 28 29 |
# SuperFastPython.com # example of an asynchronous context manager via async with import asyncio # define an asynchronous context manager class AsyncContextManager: # enter the async context manager async def __aenter__(self): # report a message print(‘>entering the context manager’) # block for a moment await asyncio.sleep(0.5) # exit the async context manager async def __aexit__(self, exc_type, exc, tb): # report a message print(‘>exiting the context manager’) # block for a moment await asyncio.sleep(0.5) # define a simple coroutine async def custom_coroutine(): # create and use the asynchronous context manager async with AsyncContextManager() as manager: # report the result print(f‘within the manager’) # start the asyncio program asyncio.run(custom_coroutine()) |
Running the example first creates the main() coroutine and uses it as the entry point into the asyncio program.
The main() coroutine runs and creates an instance of our AsyncContextManager class in an “async with” expression.
This expression automatically calls the enter method and awaits the coroutine. A message is reported and the coroutine blocks for a moment.
The main() coroutine resumes and executes the body of the context manager, printing a message.
The block is exited and the exit method of the context manager is awaited automatically, reporting a message and sleeping a moment.
This highlights the normal usage pattern for an asynchronous context manager in an asyncio program.
|
>entering the context manager within the manager >exiting the context manager |
You can learn more about async context managers in the tutorial:
- Asynchronous Context Managers in Python
Next, we will explore asynchronous comprehensions.
Asynchronous Comprehensions
Comprehensions, like list and dict comprehensions are one feature of Python when we think of “pythonic“.
It is a way we do loops that is different to many other languages.
Asyncio allows us to use asynchronous comprehensions.
We can traverse an asynchronous generators and asynchronous iterators using an asynchronous comprehension via the “async for” expression.
Let’s take a closer look.
What are Asynchronous Comprehensions
An async comprehension is an asynchronous version of a classical comprehension.
Asyncio supports two types of asynchronous comprehensions, they are the “async for” comprehension and the “await” comprehension.
PEP 530 adds support for using async for in list, set, dict comprehensions and generator expressions
— PEP 530: Asynchronous Comprehensions, What’s New In Python 3.6.
Before we look at each, let’s first recall classical comprehensions.
Comprehensions
Comprehensions allow data collections like lists, dicts, and sets to be created in a concise way.
List comprehensions provide a concise way to create lists.
— List Comprehensions
A list comprehension allows a list to be created from a for expression within the new list expression.
For example:
|
... # create a list using a list comprehension result = [a*2 for a in range(100)] |
Comprehensions are also supported for creating dicts and sets.
For example:
|
... # create a dict using a comprehension result = {a:i for a,i in zip([‘a’,‘b’,‘c’],range(3))} # create a set using a comprehension result = {a for a in [1, 2, 3, 2, 3, 1, 5, 4]} |
Asynchronous Comprehensions
An asynchronous comprehension allows a list, set, or dict to be created using the “async for” expression with an asynchronous iterable.
We propose to allow using async for inside list, set and dict comprehensions.
— PEP 530 – Asynchronous Comprehensions
For example:
|
... # async list comprehension with an async iterator result = [a async for a in aiterable] |
This will create and schedule coroutines or tasks as needed and yield their results into a list.
Recall that the “async for” expression may only be used within coroutines and tasks.
Also, recall that an asynchronous iterator is an iterator that yields awaitables.
The “async for” expression allows the caller to traverse an asynchronous iterator of awaitables and retrieve the result from each.
Internally, the async for loop will automatically resolve or await each awaitable, scheduling coroutines as needed.
An async generator automatically implements the methods for the async iterator and may also be used in an asynchronous comprehension.
For example:
|
... # async list comprehension with an async generator result = [a async for a in agenerator] |
Await Comprehensions
The “await” expression may also be used within a list, set, or dict comprehension, referred to as an await comprehension.
We propose to allow the use of await expressions in both asynchronous and synchronous comprehensions
— PEP 530 – Asynchronous Comprehensions
Like an async comprehension, it may only be used within an asyncio coroutine or task.
This allows a data structure, like a list, to be created by suspending and awaiting a series of awaitables.
For example:
|
... # await list compression with a collection of awaitables results = [await a for a in awaitables] |
This will create a list of results by awaiting each awaitable in turn.
The current coroutine will be suspended to execute awaitables sequentially, which is different and perhaps slower than executing them concurrently using asyncio.gather().
You can learn more about async comprehensions in the tutorial:
- Asynchronous Comprehensions in Python
Next, we will explore how to run commands using subprocesses from asyncio.
Run Commands in Non-Blocking Subprocesses
We can execute commands from asyncio.
The command will run in a subprocess that we can write to and read from using non-blocking I/O.
Let’s take a closer look.
What is asyncio.subprocess.Process
The asyncio.subprocess.Process class provides a representation of a subprocess run by asyncio.
It provides a handle on a subprocess in asyncio programs, allowing actions to be performed on it, such as waiting and terminating it.
Process is a high-level wrapper that allows communicating with subprocesses and watching for their completion.
— Interacting with Subprocesses
The API is very similar to the multiprocessing.Process class and perhaps more so with the subprocess.Popen class.
Specifically, it shares methods such as wait(), communicate(), and send_signal() and attributes such as stdin, stdout, and stderr with the subprocess.Popen.
Now that we know what the asyncio.subprocess.Process class is, let’s look at how we might use it in our asyncio programs.
We do not create a asyncio.subprocess.Process directly.
Instead, an instance of the class is created for us when executing a subprocess in an asyncio program.
An object that wraps OS processes created by the create_subprocess_exec() and create_subprocess_shell() functions.
— Interacting with Subprocesses
There are two ways to execute an external program as a subprocess and acquire a Process instance, they are:
- asyncio.create_subprocess_exec() for running commands directly.
- asyncio.create_subprocess_shell() for running commands via the shell.
Let’s look at examples of each in turn.
How to Run a Command Directly
A command is a program executed on the command line (terminal or command prompt). It is another program that is run directly.
Common examples on Linux and macOS might be:
- ‘ls‘ to list the contents of a directory
- ‘cat‘ to report the content of a file
- ‘date‘ to report the date
- ‘echo‘ to report back a string
- ‘sleep‘ to sleep for a number of seconds
And so on.
We can execute a command from an asyncio program via the create_subprocess_exec() function.
The asyncio.create_subprocess_exec() function takes a command and executes it directly.
This is helpful as it allows the command to be executed in a subprocess and for asyncio coroutines to read, write, and wait for it.
Because all asyncio subprocess functions are asynchronous and asyncio provides many tools to work with such functions, it is easy to execute and monitor multiple subprocesses in parallel.
— Asyncio Subprocesses
Unlike the asyncio.create_subprocess_shell() function, the asyncio.create_subprocess_exec() will not execute the command using the shell.
This means that the capabilities provided by the shell, such as shell variables, scripting, and wildcards are not available when executing the command.
It also means that executing the command may be more secure as there is no opportunity for a shell injection.
Now that we know what asyncio.create_subprocess_exec() does, let’s look at how to use it.
How to Use Asyncio create_subprocess_exec()
The asyncio.create_subprocess_exec() function will execute a given string command in a subprocess.
It returns a asyncio.subprocess.Process object that represents the subprocess.
Process is a high-level wrapper that allows communicating with subprocesses and watching for their completion.
— Interacting with Subprocesses
The create_subprocess_exec() function is a coroutine, which means we must await it. It will return once the subprocess has been started, not when the subprocess is finished.
For example:
|
... # execute a command in a subprocess process = await asyncio.create_subprocess_exec(‘ls’) |
Arguments to the command being executed must be provided as subsequent arguments to the create_subprocess_exec() function.
For example:
|
... # execute a command with arguments in a subprocess process = await asyncio.create_subprocess_exec(‘ls’, ‘-l’) |
We can wait for the subprocess to finish by awaiting the wait() method.
For example:
|
... # wait for the subprocess to terminate await process.wait() |
We can stop the subprocess directly by calling the terminate() or kill() methods, which will raise a signal in the subprocess.
For example:
|
... # terminate the subprocess process.terminate() |
The input and output of the command will be handled by stdin, stderr, and stdout.
We can have the asyncio program handle the input or output for the subprocess.
This can be achieved by specifying the input or output stream and specifying a constant to redirect, such as asyncio.subprocess.PIPE.
For example, we can redirect the output of a command to the asyncio program:
|
... # start a subprocess and redirect output process = await asyncio.create_subprocess_exec(‘ls’, stdout=asyncio.subprocess.PIPE) |
We can then read the output of the program via the asyncio.subprocess.Process instance via the communicate() method.
This method is a coroutine and must be awaited. It is used to both send and receive data with the subprocess.
For example:
|
... # read data from the subprocess line = process.communicate() |
We can also send data to the subprocess via the communicate() method by setting the “input” argument in bytes.
For example:
|
... # start a subprocess and redirect input process = await asyncio.create_subprocess_exec(‘ls’, stdin=asyncio.subprocess.PIPE) # send data to the subprocess process.communicate(input=b‘Hellon’) |
Behind the scenes the asyncio.subprocess.PIPE configures the subprocess to point to a StreamReader or StreamWriter for sending data to or from the subprocess, and the communicate() method will read or write bytes from the configured reader.
If PIPE is passed to stdin argument, the Process.stdin attribute will point to a StreamWriter instance. If PIPE is passed to stdout or stderr arguments, the Process.stdout and Process.stderr attributes will point to StreamReader instances.
— Asyncio Subprocesses
We can interact with the StreamReader or StreamWriter directly via the subprocess via the stdin, stdout, and stderr attributes.
For example:
|
... # read a line from the subprocess output stream line = await process.stdout.readline() |
Now that we know how to use the create_subprocess_exec() function, let’s look at some worked examples.
Example of Asyncio create_subprocess_exec()
We can explore how to run a command in a subprocess from asyncio.
In this example, we will execute the “echo” command to report back a string.
The echo command will report the provided string on standard output directly.
The complete example is listed below.
Note, this example assumes you have access to the “echo” command, I’m not sure it will work on Windows.
|
# SuperFastPython.com # example of executing a command as a subprocess with asyncio import asyncio # main coroutine async def main(): # start executing a command in a subprocess process = await asyncio.create_subprocess_exec(‘echo’, ‘Hello World’) # report the details of the subprocess print(f‘subprocess: {process}’) # entry point asyncio.run(main()) |
Running the example first creates the main() coroutine and executes it as the entry point into the asyncio program.
The main() coroutine runs and calls the create_subprocess_exec() function to execute a command.
The main() coroutine suspends while the subprocess is created. A Process instance is returned.
The main() coroutine resumes and reports the details of the subprocess. The main() process terminates and the asyncio program terminates.
The output of the echo command is reported on the command line.
This highlights how we can execute a command from an asyncio program.
|
Hello World subprocess: <Process 50249> |
How to Run a Command Via the Shell
We can execute commands using the shell.
The shell is a user interface for the command line, called a command line interpreter (CLI).
It will interpret and execute commands on behalf of the user.
It also offers features such as a primitive programming language for scripting, wildcards, piping, shell variables (e.g. PATH), and more.
For example, we can redirect the output of one command as input to another command, such as the contents of the “/etc/services” file into the word count “wc” command and count the number of lines:
|
cat /etc/services | wc -l |
Examples of shells in the Unix based operating systems include:
- ‘sh’
- ‘bash’
- ‘zsh’
- And so on.
On Windows, the shell is probably cmd.exe.
See this great list of command line shells:
- List of command-line interpreters, Wikipedia
The shell is already running, it was used to start the Python program.
You don’t need to do anything special to get or have access to the shell.
We can execute a command from an asyncio program via the create_subprocess_shell() function.
The asyncio.create_subprocess_shell() function takes a command and executes it using the current user shell.
This is helpful as it not only allows the command to be executed, but allows the capabilities of the shell to be used, such as redirection, wildcards and more.
… the specified command will be executed through the shell. This can be useful if you are using Python primarily for the enhanced control flow it offers over most system shells and still want convenient access to other shell features such as shell pipes, filename wildcards, environment variable expansion, and expansion of ~ to a user’s home directory.
— subprocess — Subprocess management
The command will be executed in a subprocess of the process executing the asyncio program.
Importantly, the asyncio program is able to interact with the subprocess asynchronously, e.g. via coroutines.
Because all asyncio subprocess functions are asynchronous and asyncio provides many tools to work with such functions, it is easy to execute and monitor multiple subprocesses in parallel.
— Asyncio Subprocesses
There can be security considerations when executing a command via the shell instead of directly.
This is because there is at least one level of indirection and interpretation between the request to execute the command and the command being executed, allowing possible malicious injection.
Important It is the application’s responsibility to ensure that all whitespace and special characters are quoted appropriately to avoid shell injection vulnerabilities.
— Asyncio Subprocesses
Now that we know what asyncio.create_subprocess_shell() does, let’s look at how to use it.
How to Use Asyncio create_subprocess_shell()
The asyncio.create_subprocess_shell() function will execute a given string command via the current shell.
It returns a asyncio.subprocess.Process object that represents the process.
It is very similar to the create_subprocess_shell() function we saw in a previous section. Nevertheless, we will review how to use the function and interact with the process via the Process instance (in case you skipped straight to this section).
The create_subprocess_shell() function is a coroutine, which means we must await it. It will return once the subprocess has been started, not when the subprocess is finished.
For example:
|
... # start a subprocess process = await asyncio.create_subprocess_shell(‘ls’) |
We can wait for the subprocess to finish by awaiting the wait() method.
For example:
|
... # wait for the subprocess to terminate await process.wait() |
We can stop the subprocess directly by calling the terminate() or kill() methods, which will raise a signal in the subprocess.
The input and output of the command will be handled by the shell, e.g. stdin, stderr, and stdout.
We can have the asyncio program handle the input or output for the subprocess.
This can be achieved by specifying the input or output stream and specifying a constant to redirect, such as asyncio.subprocess.PIPE.
For example, we can redirect the output of a command to the asyncio program:
|
... # start a subprocess and redirect output process = await asyncio.create_subprocess_shell(‘ls’, stdout=asyncio.subprocess.PIPE) |
We can then read the output of the program via the asyncio.subprocess.Process instance via the communicate() method.
This method is a coroutine and must be awaited. It is used to both send and receive data with the subprocess.
For example:
|
... # read data from the subprocess line = process.communicate() |
We can also send data to the subprocess via the communicate() method by setting the “input” argument in bytes.
For example:
|
... # start a subprocess and redirect input process = await asyncio.create_subprocess_shell(‘ls’, stdin=asyncio.subprocess.PIPE) # send data to the subprocess process.communicate(input=b‘Hellon’) |
Behind the scenes the asyncio.subprocess.PIPE configures the subprocess to point to a StreamReader or StreamWriter for sending data to or from the subprocess, and the communicate() method will read or write bytes from the configured reader.
If PIPE is passed to stdin argument, the Process.stdin attribute will point to a StreamWriter instance. If PIPE is passed to stdout or stderr arguments, the Process.stdout and Process.stderr attributes will point to StreamReader instances.
— Asyncio Subprocesses
We can interact with the StreamReader or StreamWriter directly via the subprocess via the stdin, stdout, and stderr attributes.
For example:
|
... # read a line from the subprocess output stream line = await process.stdout.readline() |
Now that we know how to use the create_subprocess_shell() function, let’s look at some worked examples.
Example of Asyncio create_subprocess_shell()
We can explore how to run a command in a subprocess from asyncio using the shell.
In this example, we will execute the “echo” command to report back a string.
The echo command will report the provided string on standard output directly.
The complete example is listed below.
Note, this example assumes you have access to the “echo” command, I’m not sure it will work on Windows.
|
# SuperFastPython.com # example of executing a shell command as a subprocess with asyncio import asyncio # main coroutine async def main(): # start executing a shell command in a subprocess process = await asyncio.create_subprocess_shell(‘echo Hello World’) # report the details of the subprocess print(f‘subprocess: {process}’) # entry point asyncio.run(main()) |
Running the example first creates the main() coroutine and executes it as the entry point into the asyncio program.
The main() coroutine runs and calls the create_subprocess_shell() function to execute a command.
The main() coroutine suspends while the subprocess is created. A Process instance is returned.
The main() coroutine resumes and reports the details of the subprocess. The main() process terminates and the asyncio program terminates.
The output of the echo command is reported on the command line.
This highlights how we can execute a command using the shell from an asyncio program.
|
subprocess: <Process 43916> Hello World |
Non-Blocking Streams
A major benefit of asyncio is the ability to use non-blocking streams.
Let’s take a closer look.
Asyncio Streams
Asyncio provides non-blocking I/O socket programming.
This is provided via streams.
Streams are high-level async/await-ready primitives to work with network connections. Streams allow sending and receiving data without using callbacks or low-level protocols and transports.
— Asyncio Streams
Sockets can be opened that provide access to a stream writer and a stream writer.
Data can then be written and read from the stream using coroutines, suspending when appropriate.
Once finished, the socket can be closed.
The asyncio streams capability is low-level meaning that any protocols required must be implemented manually.
This might include common web protocols, such as:
- HTTP or HTTPS for interacting with web servers
- SMTP for interacting with email servers
- FTP for interacting with file servers.
The streams can also be used to create a server to handle requests using a standard protocol, or to develop your own application-specific protocol.
Now that we know what asyncio streams are, let’s look at how to use them.
How to Open a Connection
An asyncio TCP client socket connection can be opened using the asyncio.open_connection() function.
Establish a network connection and return a pair of (reader, writer) objects. The returned reader and writer objects are instances of StreamReader and StreamWriter classes.
— Asyncio Streams
This is a coroutine that must be awaited and will return once the socket connection is open.
The function returns a StreamReader and StreamWriter object for interacting with the socket.
For example:
|
... # open a connection reader, writer = await asyncio.open_connection(...) |
The asyncio.open_connection() function takes many arguments in order to configure the socket connection.
The two required arguments are the host and the port.
The host is a string that specifies the server to connect to, such as a domain name or an IP address.
The port is the socket port number, such as 80 for HTTP servers, 443 for HTTPS servers, 23 for SMTP and so on.
For example:
|
... # open a connection to an http server reader, writer = await asyncio.open_connection(‘www.google.com’, 80) |
Encrypted socket connections are supported over the SSL protocol.
The most common example might be HTTPS which is replacing HTTP.
This can be achieved by setting the “ssl” argument to True.
For example:
|
... # open a connection to an https server reader, writer = await asyncio.open_connection(‘www.google.com’, 443, ssl=True) |
How to Start a Server
An asyncio TCP server socket can be opened using the asyncio.start_server() function.
Create a TCP server (socket type SOCK_STREAM) listening on port of the host address.
— Asyncio Event Loop
This is a coroutine that must be awaited.
The function returns an asyncio.Server object that represents the running server.
For example:
|
... # start a tcp server server = await asyncio.start_server(...) |
The three required arguments are the callback function, the host, and the port.
The callback function is a custom function specified by name that will be called each time a client connects to the server.
The client_connected_cb callback is called whenever a new client connection is established. It receives a (reader, writer) pair as two arguments, instances of the StreamReader and StreamWriter classes.
— Asyncio Streams
The host is the domain name or IP address that clients will specify to connect. The port is the socket port number on which to receive connections, such as 21 for FTP or 80 for HTTP.
For example:
|
# handle connections async def handler(reader, writer): # … ... # start a server to receive http connections server = await asyncio.start_server(handler, ‘127.0.0.1’, 80) |
How to Write Data with the StreamWriter
We can write data to the socket using an asyncio.StreamWriter.
Represents a writer object that provides APIs to write data to the IO stream.
— Asyncio Streams
Data is written as bytes.
Byte data can be written to the socket using the write() method.
The method attempts to write the data to the underlying socket immediately. If that fails, the data is queued in an internal write buffer until it can be sent.
— Asyncio Streams
For example:
|
... # write byte data writer.write(byte_data) |
Alternatively, multiple “lines” of byte data organized into a list or iterable can be written using the writelines() method.
For example:
|
... # write lines of byte data writer.writelines(byte_lines) |
Neither method for writing data blocks or suspends the calling coroutine.
After writing byte data it is a good idea to drain the socket via the drain() method.
Wait until it is appropriate to resume writing to the stream.
— Asyncio Streams
This is a coroutine and will suspend the caller until the bytes have been transmitted and the socket is ready.
For example:
|
... # write byte data writer.write(byte_data) # wait for data to be transmitted await writer.drain() |
How to Read Data with the StreamReader
We can read data from the socket using an asyncio.StreamReader.
Represents a reader object that provides APIs to read data from the IO stream.
— Asyncio Streams
Data is read in byte format, therefore strings may need to be encoded before being used.
All read methods are coroutines that must be awaited.
An arbitrary number of bytes can be read via the read() method, which will read until the end of file (EOF).
|
... # read byte data byte_data = await reader.read() |
Additionally, the number of bytes to read can be specified via the “n” argument.
Read up to n bytes. If n is not provided, or set to -1, read until EOF and return all read bytes.
— Asyncio Streams
This may be helpful if you know the number of bytes expected from the next response.
For example:
|
... # read byte data byte_data = await reader.read(n=100) |
A single line of data can be read using the readline() method.
This will return bytes until a new line character ‘n’ is encountered, or EOF.
Read one line, where “line” is a sequence of bytes ending with n. If EOF is received and n was not found, the method returns partially read data. If EOF is received and the internal buffer is empty, return an empty bytes object.
— Asyncio Streams
This is helpful when reading standard protocols that operate with lines of text.
|
... # read a line data byte_line = await reader.readline() |
Additionally, there is a readexactly() method to read an exact number of bytes otherwise raise an exception, and a readuntil() that will read bytes until a specified character in byte form is read.
How to Close Connection
The socket can be closed via the asyncio.StreamWriter.
The close() method can be called which will close the socket.
The method closes the stream and the underlying socket.
— Asyncio Streams
This method does not block.
For example:
|
... # close the socket writer.close() |
Although the close() method does not block, we can wait for the socket to close completely before continuing on.
This can be achieved via the wait_closed() method.
Wait until the stream is closed. Should be called after close() to wait until the underlying connection is closed.
— Asyncio Streams
This is a coroutine that can be awaited.
For example:
|
... # close the socket writer.close() # wait for the socket to close await writer.wait_closed() |
We can check if the socket has been closed or is in the process of being closed via the is_closing() method.
For example:
|
... # check if the socket is closed or closing if writer.is_closing(): # … |
Now that we know how to use asyncio streams, let’s look at a worked example.
Example of Checking Website Status
We can query the HTTP status of websites using asyncio by opening a stream and writing and reading HTTP requests and responses.
We can then use asyncio to query the status of many websites concurrently, and even report the results dynamically.
Let’s get started.
How to Check HTTP Status with Asyncio
The asyncio module provides support for opening socket connections and reading and writing data via streams.
We can use this capability to check the status of web pages.
This involves perhaps four steps, they are:
- Open a connection
- Write a request
- Read a response
- Close the connection
Let’s take a closer look at each part in turn.
Open HTTP Connection
A connection can be opened in asyncio using the asyncio.open_connection() function.
Among many arguments, the function takes the string hostname and integer port number
This is a coroutine that must be awaited and returns a StreamReader and a StreamWriter for reading and writing with the socket.
This can be used to open an HTTP connection on port 80.
For example:
|
... # open a socket connection reader, writer = await asyncio.open_connection(‘www.google.com’, 80) |
We can also open an SSL connection using the ssl=True argument. This can be used to open an HTTPS connection on port 443.
For example:
|
... # open a socket connection reader, writer = await asyncio.open_connection(‘www.google.com’, 443) |
Write HTTP Request
Once open, we can write a query to the StreamWriter to make an HTTP request.
For example, an HTTP version 1.1 request is in plain text. We can request the file path ‘/’, which may look as follows:
|
GET / HTTP/1.1 Host: www.google.com |
Importantly, there must be a carriage return and a line feed (rn) at the end of each line, and an empty line at the end.
As Python strings this may look as follows:
|
‘GET / HTTP/1.1rn’ ‘Host: www.google.comrn’ ‘rn’ |
You can learn more about HTTP v1.1 request messages here:
- HTTP/1.1 request messages
This string must be encoded as bytes before being written to the StreamWriter.
This can be achieved using the encode() method on the string itself.
The default ‘utf-8‘ encoding may be sufficient.
For example:
|
... # encode string as bytes byte_data = string.encode() |
You can see a listing of encodings here:
- Python Standard Encodings
The bytes can then be written to the socket via the StreamWriter via the write() method.
For example:
|
... # write query to socket writer.write(byte_data) |
After writing the request, it is a good idea to wait for the byte data to be sent and for the socket to be ready.
This can be achieved by the drain() method.
This is a coroutine that must be awaited.
For example:
|
... # wait for the socket to be ready. await writer.drain() |
Read HTTP Response
Once the HTTP request has been made, we can read the response.
This can be achieved via the StreamReader for the socket.
The response can be read using the read() method which will read a chunk of bytes, or the readline() method which will read one line of bytes.
We might prefer the readline() method because we are using the text-based HTTP protocol which sends HTML data one line at a time.
The readline() method is a coroutine and must be awaited.
For example:
|
... # read one line of response line_bytes = await reader.readline() |
HTTP 1.1 responses are composed of two parts, a header separated by an empty line, then the body terminating with an empty line.
The header has information about whether the request was successful and what type of file will be sent, and the body contains the content of the file, such as an HTML webpage.
The first line of the HTTP header contains the HTTP status for the requested page on the server.
You can learn more about HTTP v1.1 responses here:
- HTTP/1.1 response messages
Each line must be decoded from bytes into a string.
This can be achieved using the decode() method on the byte data. Again, the default encoding is ‘utf_8‘.
For example:
|
... # decode bytes into a string line_data = line_bytes.decode() |
Close HTTP Connection
We can close the socket connection by closing the StreamWriter.
This can be achieved by calling the close() method.
For example:
|
... # close the connection writer.close() |
This does not block and may not close the socket immediately.
Now that we know how to make HTTP requests and read responses using asyncio, let’s look at some worked examples of checking web page statuses.
Example of Checking HTTP Status Sequentially
We can develop an example to check the HTTP status for multiple websites using asyncio.
In this example, we will first develop a coroutine that will check the status of a given URL. We will then call this coroutine once for each of the top 10 websites.
Firstly, we can define a coroutine that will take a URL string and return the HTTP status.
|
# get the HTTP/S status of a webpage async def get_status(url): # … |
The URL must be parsed into its constituent components.
We require the hostname and file path when making the HTTP request. We also need to know the URL scheme (HTTP or HTTPS) in order to determine whether SSL is required nor not.
This can be achieved using the urllib.parse.urlsplit() function that takes a URL string and returns a named tuple of all the URL elements.
|
... # split the url into components url_parsed = urlsplit(url) |
We can then open the HTTP connection based on the URL scheme and use the URL hostname.
|
... # open the connection if url_parsed.scheme == ‘https’: reader, writer = await asyncio.open_connection(url_parsed.hostname, 443, ssl=True) else: reader, writer = await asyncio.open_connection(url_parsed.hostname, 80) |
Next, we can create the HTTP GET request using the hostname and file path and write the encoded bytes to the socket using the StreamWriter.
|
... # send GET request query = f‘GET {url_parsed.path} HTTP/1.1rnHost: {url_parsed.hostname}rnrn’ # write query to socket writer.write(query.encode()) # wait for the bytes to be written to the socket await writer.drain() |
Next, we can read the HTTP response.
We only require the first line of the response that contains the HTTP status.
|
... # read the single line response response = await reader.readline() |
The connection can then be closed.
|
... # close the connection writer.close() |
Finally, we can decode the bytes read from the server, remote trailing white space, and return the HTTP status.
|
... # decode and strip white space status = response.decode().strip() # return the response return status |
Tying this together, the complete get_status() coroutine is listed below.
It does not have any error handling, such as the case where the host cannot be reached or is slow to respond.
These additions would make a nice extension for the reader.
|
1 2 3 4 5 6 7 8 9 10 11 12 13 14 15 16 17 18 19 20 21 22 23 |
# get the HTTP/S status of a webpage async def get_status(url): # split the url into components url_parsed = urlsplit(url) # open the connection if url_parsed.scheme == ‘https’: reader, writer = await asyncio.open_connection(url_parsed.hostname, 443, ssl=True) else: reader, writer = await asyncio.open_connection(url_parsed.hostname, 80) # send GET request query = f‘GET {url_parsed.path} HTTP/1.1rnHost: {url_parsed.hostname}rnrn’ # write query to socket writer.write(query.encode()) # wait for the bytes to be written to the socket await writer.drain() # read the single line response response = await reader.readline() # close the connection writer.close() # decode and strip white space status = response.decode().strip() # return the response return status |
Next, we can call the get_status() coroutine for multiple web pages or websites we want to check.
In this case, we will define a list of the top 10 web pages in the world.
|
... # list of top 10 websites to check sites = [‘https://www.google.com/’, ‘https://www.youtube.com/’, ‘https://www.facebook.com/’, ‘https://twitter.com/’, ‘https://www.instagram.com/’, ‘https://www.baidu.com/’, ‘https://www.wikipedia.org/’, ‘https://yandex.ru/’, ‘https://yahoo.com/’, ‘https://www.whatsapp.com/’ ] |
We can then query each, in turn, using our get_status() coroutine.
In this case, we will do so sequentially in a loop, and report the status of each in turn.
|
... # check the status of all websites for url in sites: # get the status for the url status = await get_status(url) # report the url and its status print(f‘{url:30}:t{status}’) |
We can do better than sequential when using asyncio, but this provides a good starting point that we can improve upon later.
Tying this together, the main() coroutine queries the status of the top 10 websites.
|
1 2 3 4 5 6 7 8 9 10 11 12 13 14 15 16 17 18 19 20 |
# main coroutine async def main(): # list of top 10 websites to check sites = [‘https://www.google.com/’, ‘https://www.youtube.com/’, ‘https://www.facebook.com/’, ‘https://twitter.com/’, ‘https://www.instagram.com/’, ‘https://www.baidu.com/’, ‘https://www.wikipedia.org/’, ‘https://yandex.ru/’, ‘https://yahoo.com/’, ‘https://www.whatsapp.com/’ ] # check the status of all websites for url in sites: # get the status for the url status = await get_status(url) # report the url and its status print(f‘{url:30}:t{status}’) |
Finally, we can create the main() coroutine and use it as the entry point to the asyncio program.
|
... # run the asyncio program asyncio.run(main()) |
Tying this together, the complete example is listed below.
|
1 2 3 4 5 6 7 8 9 10 11 12 13 14 15 16 17 18 19 20 21 22 23 24 25 26 27 28 29 30 31 32 33 34 35 36 37 38 39 40 41 42 43 44 45 46 47 48 49 50 51 52 |
# SuperFastPython.com # check the status of many webpages import asyncio from urllib.parse import urlsplit # get the HTTP/S status of a webpage async def get_status(url): # split the url into components url_parsed = urlsplit(url) # open the connection if url_parsed.scheme == ‘https’: reader, writer = await asyncio.open_connection(url_parsed.hostname, 443, ssl=True) else: reader, writer = await asyncio.open_connection(url_parsed.hostname, 80) # send GET request query = f‘GET {url_parsed.path} HTTP/1.1rnHost: {url_parsed.hostname}rnrn’ # write query to socket writer.write(query.encode()) # wait for the bytes to be written to the socket await writer.drain() # read the single line response response = await reader.readline() # close the connection writer.close() # decode and strip white space status = response.decode().strip() # return the response return status # main coroutine async def main(): # list of top 10 websites to check sites = [‘https://www.google.com/’, ‘https://www.youtube.com/’, ‘https://www.facebook.com/’, ‘https://twitter.com/’, ‘https://www.instagram.com/’, ‘https://www.baidu.com/’, ‘https://www.wikipedia.org/’, ‘https://yandex.ru/’, ‘https://yahoo.com/’, ‘https://www.whatsapp.com/’ ] # check the status of all websites for url in sites: # get the status for the url status = await get_status(url) # report the url and its status print(f‘{url:30}:t{status}’) # run the asyncio program asyncio.run(main()) |
Running the example first creates the main() coroutine and uses it as the entry point into the program.
The main() coroutine runs, defining a list of the top 10 websites.
The list of websites is then traversed sequentially. The main() coroutine suspends and calls the get_status() coroutine to query the status of one website.
The get_status() coroutine runs, parses the URL, and opens a connection. It constructs an HTTP GET query and writes it to the host. A response is read, decoded, and returned.
The main() coroutine resumes and reports the HTTP status of the URL.
This is repeated for each URL in the list.
The program takes about 5.6 seconds to complete, or about half a second per URL on average.
This highlights how we can use asyncio to query the HTTP status of webpages.
Nevertheless, it does not take full advantage of the asyncio to execute tasks concurrently.
|
https://www.google.com/ : HTTP/1.1 200 OK https://www.youtube.com/ : HTTP/1.1 200 OK https://www.facebook.com/ : HTTP/1.1 302 Found https://twitter.com/ : HTTP/1.1 200 OK https://www.instagram.com/ : HTTP/1.1 200 OK https://www.baidu.com/ : HTTP/1.1 200 OK https://www.wikipedia.org/ : HTTP/1.1 200 OK https://yandex.ru/ : HTTP/1.1 302 Moved temporarily https://yahoo.com/ : HTTP/1.1 301 Moved Permanently https://www.whatsapp.com/ : HTTP/1.1 302 Found |
Next, let’s look at how we might update the example to execute the coroutines concurrently.
Example of Checking Website Status Concurrently
A benefit of asyncio is that we can execute many coroutines concurrently.
We can query the status of websites concurrently in asyncio using the asyncio.gather() function.
This function takes one or more coroutines, suspends executing the provided coroutines, and returns the results from each as an iterable. We can then traverse the list of URLs and iterable of return values from the coroutines and report results.
This may be a simpler approach than the above.
First, we can create a list of coroutines.
|
... # create all coroutine requests coros = [get_status(url) for url in sites] |
Next, we can execute the coroutines and get the iterable of results using asyncio.gather().
Note that we cannot provide the list of coroutines directly, but instead must unpack the list into separate expressions that are provided as positional arguments to the function.
|
... # execute all coroutines and wait results = await asyncio.gather(*coros) |
This will execute all of the coroutines concurrently and retrieve their results.
We can then traverse the list of URLs and returned status and report each in turn.
|
... # process all results for url, status in zip(sites, results): # report status print(f‘{url:30}:t{status}’) |
Tying this together, the complete example is listed below.
|
1 2 3 4 5 6 7 8 9 10 11 12 13 14 15 16 17 18 19 20 21 22 23 24 25 26 27 28 29 30 31 32 33 34 35 36 37 38 39 40 41 42 43 44 45 46 47 48 49 50 51 52 53 54 |
# SuperFastPython.com # check the status of many webpages import asyncio from urllib.parse import urlsplit # get the HTTP/S status of a webpage async def get_status(url): # split the url into components url_parsed = urlsplit(url) # open the connection if url_parsed.scheme == ‘https’: reader, writer = await asyncio.open_connection(url_parsed.hostname, 443, ssl=True) else: reader, writer = await asyncio.open_connection(url_parsed.hostname, 80) # send GET request query = f‘GET {url_parsed.path} HTTP/1.1rnHost: {url_parsed.hostname}rnrn’ # write query to socket writer.write(query.encode()) # wait for the bytes to be written to the socket await writer.drain() # read the single line response response = await reader.readline() # close the connection writer.close() # decode and strip white space status = response.decode().strip() # return the response return status # main coroutine async def main(): # list of top 10 websites to check sites = [‘https://www.google.com/’, ‘https://www.youtube.com/’, ‘https://www.facebook.com/’, ‘https://twitter.com/’, ‘https://www.instagram.com/’, ‘https://www.baidu.com/’, ‘https://www.wikipedia.org/’, ‘https://yandex.ru/’, ‘https://yahoo.com/’, ‘https://www.whatsapp.com/’ ] # create all coroutine requests coros = [get_status(url) for url in sites] # execute all coroutines and wait results = await asyncio.gather(*coros) # process all results for url, status in zip(sites, results): # report status print(f‘{url:30}:t{status}’) # run the asyncio program asyncio.run(main()) |
Running the example executes the main() coroutine as before.
In this case, a list of coroutines is created in a list comprehension.
The asyncio.gather() function is then called, passing the coroutines and suspending the main() coroutine until they are all complete.
The coroutines execute, querying each website concurrently and returning their status.
The main() coroutine resumes and receives an iterable of status values. This iterable along with the list of URLs is then traversed using the zip() built-in function and the statuses are reported.
This highlights a simpler approach to executing the coroutines concurrently and reporting the results after all tasks are completed.
It is also faster than the sequential version above, completing in about 1.4 seconds on my system.
|
https://www.google.com/ : HTTP/1.1 200 OK https://www.youtube.com/ : HTTP/1.1 200 OK https://www.facebook.com/ : HTTP/1.1 302 Found https://twitter.com/ : HTTP/1.1 200 OK https://www.instagram.com/ : HTTP/1.1 200 OK https://www.baidu.com/ : HTTP/1.1 200 OK https://www.wikipedia.org/ : HTTP/1.1 200 OK https://yandex.ru/ : HTTP/1.1 302 Moved temporarily https://yahoo.com/ : HTTP/1.1 301 Moved Permanently https://www.whatsapp.com/ : HTTP/1.1 302 Found |
Next, let’s explore common errors when getting started with asyncio.
Python Asyncio Common Errors
This section gives examples of general errors encountered by developers when using asyncio in Python.
The 5 most common asyncio errors are:
- Trying to run coroutines by calling them.
- Not letting coroutines run in the event loop.
- Using the asyncio low-level API.
- Exiting the main coroutine too early.
- Assuming race conditions and deadlocks are not possible.
Let’s take a closer look at each in turn.
Error 1: Trying to Run Coroutines by Calling Them
The most common error encountered by beginners to asyncio is calling a coroutine like a function.
For example, we can define a coroutine using the “async def” expression:
|
# custom coroutine async def custom_coro(): print(‘hi there’) |
The beginner will then attempt to call this coroutine like a function and expect the print message to be reported.
For example:
|
... # error attempt at calling a coroutine like a function custom_coro() |
Calling a coroutine like a function will not execute the body of the coroutine.
Instead, it will create a coroutine object.
This object can then be awaited within the asyncio runtime, e.g. the event loop.
We can start the event loop to run the coroutine using the asyncio.run() function.
For example:
|
... # run a coroutine asyncio.run(custom_coro()) |
Alternatively, we can suspend the current coroutine and schedule the other coroutine using the “await” expression.
For example:
|
... # schedule a coroutine await custom_coro() |
You can learn more about running coroutines in the tutorial:
- How to Run an Asyncio Coroutine in Python
Error 2: Not Letting Coroutines Run in the Event Loop
If a coroutine is not run, you will get a runtime warning as follows:
|
sys:1: RuntimeWarning: coroutine ‘custom_coro’ was never awaited |
This will happen if you create a coroutine object but do not schedule it for execution within the asyncio event loop.
For example, you may attempt to call a coroutine from a regular Python program:
|
... # attempt to call the coroutine custom_coro() |
This will not call the coroutine.
Instead, it will create a coroutine object.
For example:
|
... # create a coroutine object coro = custom_coro() |
If you do not allow this coroutine to run, you will get a runtime error.
You can let the coroutine run, as we saw in the previous section, by starting the asyncio event loop and passing it the coroutine object.
For example:
|
... # create a coroutine object coro = custom_coro() # run a coroutine asyncio.run(coro) |
Or, on one line in a compound statement:
|
... # run a coroutine asyncio.run(custom_coro()) |
You can learn more about running coroutines in the tutorial:
- How to Run an Asyncio Coroutine in Python
If you get this error within an asyncio program, it is because you have created a coroutine and have not scheduled it for execution.
This can be achieved using the await expression.
For example:
|
... # create a coroutine object coro = custom_coro() # suspend and allow the other coroutine to run await coro |
Or, you can schedule it to run independently as a task.
For example:
|
... # create a coroutine object coro = custom_coro() # schedule the coro to run as a task interdependently task = asyncio.create_task(coro) |
You can learn more about creating tasks in the tutorial:
- How to Create an Asyncio Task in Python
Error 3: Using the Low-Level Asyncio API
A big problem with beginners is that they use the wrong asyncio API.
This is common for a number of reasons.
- The API has changed a lot with recent versions of Python.
- The API docs page makes things confusing, showing both APIs.
- Examples elsewhere on the web mix up using the different APIs.
Using the wrong API makes things more verbose (e.g. more code), more difficult, and way less understandable.
Asyncio offers two APIs.
- High-level API for application developers (us)
- Low-level API for framework and library developers (not us)
The lower-level API provides the foundation for the high-level API and includes the internals of the event loop, transport protocols, policies, and more.
… there are low-level APIs for library and framework developers
— asyncio — Asynchronous I/O
We should almost always stick to the high-level API.
We absolutely must stick to the high-level API when getting started.
We may dip into the low-level API to achieve specific outcomes on occasion.
If you start getting a handle on the event loop or use a “loop” variable to do things, you are doing it wrong.
I am not saying don’t learn the low-level API.
Go for it. It’s great.
Just don’t start there.
Drive asyncio via the high-level API for a while. Develop some programs. Get comfortable with asynchronous programming and running coroutines at will.
Then later, dip in and have a look around.
Error 4: Exiting the Main Coroutine Too Early
A major point of confusion in asyncio programs is not giving tasks enough time to complete.
We can schedule many coroutines to run independently within an asyncio program via the asyncio.create_task() method.
The main coroutine, the entry point for the asyncio program, can then carry on with other activities.
If the main coroutine exits, then the asyncio program will terminate.
The program will terminate even if there are one or many coroutines running independently as tasks.
This can catch you off guard.
You may issue many tasks and then allow the main coroutine to resume, expecting all issued tasks to complete in their own time.
Instead, if the main coroutine has nothing else to do, it should wait on the remaining tasks.
This can be achieved by first getting a set of all running tasks via the asyncio.all_tasks() function, removing itself from this set, then waiting on the remaining tasks via the asyncio.wait() function.
For example:
|
... # get a set of all running tasks all_tasks = asyncio.all_tasks() # get the current tasks current_task = asyncio.current_task() # remove the current task from the list of all tasks all_tasks.remove(current_task) # suspend until all tasks are completed await asyncio.wait(all_tasks) |
Error 5: Assuming Race Conditions and Deadlocks are Impossible
Concurrent programming has the hazard of concurrency-specific failure modes.
This includes problems such as race conditions and deadlocks.
A race condition involves two or more units of concurrency executing the same critical section at the same time and leaving a resource or data in an inconsistent or unexpected state. This can lead to data corruption and data loss.
A deadlock is when a unit of concurrency waits for a condition that can never occur, such as for a resource to become available.
Many Python developers believe these problems are not possible with coroutines in asyncio.
The reason being that only one coroutine can run within the event loop at any one time.
It is true that only one coroutine can run at a time.
The problem is, coroutines can suspend and resume and may do so while using a shared resource or shared variable.
Without protecting critical sections, race conditions can occur in asyncio programs.
Without careful management of synchronization primitives, deadlocks can occur
As such, it is important that asyncio programs are created ensuring coroutine-safety, a concept similar to thread-safety and process-safety, applied to coroutines.
Python Asyncio Common Questions
This section answers common questions asked by developers when using asyncio in Python.
Do you have a question about asyncio?
Ask your question in the comments below and I will do my best to answer it and perhaps add it to this list of questions.
How to Stop a Task?
We can cancel a task via the cancel() method on an asyncio.Task object.
The cancel() method returns True if the task was canceled, or False otherwise.
For example:
|
... # cancel the task was_cancelled = task.cancel() |
If the task is already done, it cannot be canceled and the cancel() method will return False and the task will not have the status of canceled.
The next time the task is given an opportunity to run, it will raise a CancelledError exception.
If the CancelledError exception is not handled within the wrapped coroutine, the task will be canceled.
Otherwise, if the CancelledError exception is handled within the wrapped coroutine, the task will not be canceled.
The cancel() method can also take a message argument which will be used in the content of the CancelledError.
We can explore how to cancel a running task.
In this example, we define a task coroutine that reports a message and then blocks for a moment.
We then define the main coroutine that is used as the entry point into the asyncio program. It reports a message, creates and schedules the task, then waits a moment.
The main coroutine then resumes and cancels the task while it is running. It waits a moment more to allow the task to respond to the request to cancel. The main coroutine then reports whether the request to cancel the task was successful.
The task is canceled and is then done.
The main coroutine then reports whether the status of the task is canceled before closing the program.
The complete example is listed below.
|
1 2 3 4 5 6 7 8 9 10 11 12 13 14 15 16 17 18 19 20 21 22 23 24 25 26 27 28 29 30 31 32 |
# SuperFastPython.com # example of canceling a running task import asyncio # define a coroutine for a task async def task_coroutine(): # report a message print(‘executing the task’) # block for a moment await asyncio.sleep(1) # custom coroutine async def main(): # report a message print(‘main coroutine started’) # create and schedule the task task = asyncio.create_task(task_coroutine()) # wait a moment await asyncio.sleep(0.1) # cancel the task was_cancelled = task.cancel() # report whether the cancel request was successful print(f‘was canceled: {was_cancelled}’) # wait a moment await asyncio.sleep(0.1) # check the status of the task print(f‘canceled: {task.cancelled()}’) # report a final message print(‘main coroutine done’) # start the asyncio program asyncio.run(main()) |
Running the example starts the asyncio event loop and executes the main() coroutine.
The main() coroutine reports a message, then creates and schedules the task coroutine.
It then suspends and awaits a moment to allow the task coroutine to begin running.
The task runs, reports a message and sleeps for a while.
The main() coroutine resumes and cancels the task. It reports that the request to cancel the task was successful.
It then sleeps for a moment to allow the task to respond to the request to be canceled.
The task_coroutine() resumes and a CancelledError exception is raised that causes the task to fail and be done.
The main() coroutine resumes and reports whether the task has the status of canceled. In this case, it does.
This example highlights the normal case of canceling a running task.
|
main coroutine started executing the task was canceled: True canceled: True main coroutine done |
How to Wait for a Task To Finish?
We can wait for a task to finish by awaiting the asyncio.Task object directly.
For example:
|
... # wait for the task to finish await task |
We may create and wait for the task in a single line.
For example:
|
... # create and wait for the task to finish await asyncio.create_task(custom_coro()) |
How to Get a Return Value from a Task?
We may need to return values from coroutines to the caller.
We can retrieve a return value from a coroutine by awaiting it.
It assumes that the other coroutine being awaited returns a value.
For example:
|
# coroutine that returns a value async def other_coro(): return 100 |
Awaiting the other coroutine will suspend the calling coroutine and schedule the other coroutine for execution. Once the other coroutine has been completed, the calling coroutine will resume. The return value will be passed from the other coroutine to the caller.
For example:
|
... # execute coroutine and retrieve return value value = await other_coro() |
A coroutine can be wrapped in an asyncio.Task object.
This is helpful for independently executing the coroutine without having the current coroutine await it.
This can be achieved using the asyncio.create_task() function.
For example:
|
... # wrap coroutine in a task and schedule it for execution task = asyncio.create_task(other_coro()) |
You can learn more about how to create tasks in the tutorial:
- How to Create an Asyncio Task in Python
There are two ways to retrieve the return value from an asyncio.Task, they are:
- Await the task.
- Call the result() method.
We can await the task to retrieve the return value.
If the task is scheduled or running, then the caller will suspend until the task is complete and the return value will be provided.
If the task is completed, the return value will be provided immediately.
For example:
|
... # get the return value from a task value = await task |
Unlike a coroutine, we can await a task more than once without raising an error.
For example:
|
... # get the return value from a task value = await task # get the return value from a task value = await task |
We can also get the return value from the task by calling the result() method on the asyncio.Task object.
For example:
|
... # get the return value from a task value = task.result() |
This requires that the task is done. If not, an InvalidStateError exception will be raised.
If the task was canceled a CancelledError exception will be raised.
You can learn more about getting the result from tasks in the tutorial:
- How to Get Asyncio Task Results
How to Run a Task in the Background?
We can run a coroutine in the background by wrapping it in an asyncio.Task object.
This can be achieved by calling the asyncio.create_task() function and passing it the coroutine.
The coroutine will be wrapped in a Task object and will be scheduled for execution. The task object will be returned and the caller will not suspend.
For example:
|
... # schedule the task for execution task = asyncio.create_task(other_coroutine()) |
The task will not begin executing until at least the current coroutine is suspended, for any reason.
We can help things along by suspending for a moment to allow the task to start running.
This can be achieved by sleeping for zero seconds.
For example:
|
... # suspend for a moment to allow the task to start running await asyncio.sleep(0) |
This will suspend the caller only for a brief moment and allow the ask an opportunity to run.
This is not required as the caller may suspend at some future time or terminate as part of normal execution.
We may also await the task directly once the caller has run out of things to do.
For example:
|
... # wait for the task to complete await task |
How to Wait for All Background Tasks?
We can wait for all independent tasks in an asyncio program.
This can be achieved by first getting a set of all currently running tasks via the asyncio.all_tasks() function.
For example:
|
... # get a set of all running tasks all_tasks = asyncio.all_tasks() |
This will return a set that contains one asyncio.Task object for each task that is currently running, including the main() coroutine.
We cannot wait on this set directly, as it will block forever as it includes the task that is the current task.
Therefore we can get the asyncio.Task object for the currently running task and remove it from the set.
This can be achieved by first calling the asyncio.current_task() method to get the task for the current coroutine and then remove it from the set via the remove() method.
For example:
|
... # get the current tasks current_task = asyncio.current_task() # remove the current task from the list of all tasks all_tasks.remove(current_task) |
Finally, we can wait on the set of remaining tasks.
This will suspend the caller until all tasks in the set are complete.
For example:
|
... # suspend until all tasks are completed await asyncio.wait(all_tasks) |
Tying this together, the snippet below added to the end of the main() coroutine will wait for all background tasks to complete.
|
... # get a set of all running tasks all_tasks = asyncio.all_tasks() # get the current tasks current_task = asyncio.current_task() # remove the current task from the list of all tasks all_tasks.remove(current_task) # suspend until all tasks are completed await asyncio.wait(all_tasks) |
Does a Running Task Stop the Event Loop from Exiting?
No.
A task that is scheduled and run independently will not stop the event loop from exiting.
If your main coroutine has no other activities to complete and there are independent tasks running in the background, you should retrieve the running tasks and wait on them
The previous question/answer shows exactly how to do this.
How to Show Progress of Running Tasks?
We can show progress using a done callback function on each task.
A done callback is a function that we can register on an asyncio.Task.
It is called once the task is done, either normally or if it fails.
The done callback function is a regular function, not a coroutine, and takes the asyncio.Task that it is associated with as an argument.
We can use the same callback function for all tasks and report progress in a general way, such as by reporting a message.
For example:
|
# callback function to show progress of tasks def progress(task): # report progress of the task print(‘.’, end=») |
We can register a callback function on each asyncio.Task that we issue.
This can be achieved using the add_done_callback() method on each task and passing it the name of the callback function.
For example:
|
... # add a done callback to a task task.add_done_callback(progress) |
How to Run a Task After a Delay?
We can develop a custom wrapper coroutine to execute a target coroutine after a delay.
The wrapper coroutine may take two arguments, a coroutine and a time in seconds.
It will sleep for the given delay interval in seconds, then await the provided coroutine.
The delay() coroutine below implements this.
|
# coroutine that will start another coroutine after a delay in seconds async def delay(coro, seconds): # suspend for a time limit in seconds await asyncio.sleep(seconds) # execute the other coroutine await coro |
To use the wrapper coroutine, a coroutine object can be created and either awaited directly or executed independently as a task.
For example, the caller may suspend and schedule the delayed coroutine and wait for it to be done:
|
... # execute a coroutine after a delay await delay(coro, 10) |
Alternatively, the caller may schedule the delayed coroutine to run independently:
|
... # execute a coroutine after a delay independently _ = asyncio.create_task(delay(coro, 10)) |
How to Run a Follow-Up Task?
There are three main ways to issue follow-up tasks in asyncio.
They are:
- Schedule the follow-up task from the completed task itself.
- Schedule the follow-up task from the caller.
- Schedule the follow-up task automatically using a done callback.
Let’s take a closer look at each approach.
The task that is completed can issue its own follow-up task.
This may require checking some state in order to determine whether the follow-up task should be issued or not.
The task can then be scheduled via a call to asyncio.create_task().
For example:
|
... # schedule a follow-up task task = asyncio.create_task(followup_task()) |
The task itself may choose to await the follow-up task or let it complete in the background independently.
For example:
|
... # wait for the follow-up task to complete await task |
The caller that issued the task can choose to issue a follow-up task.
For example, when the caller issues the first task, it may keep the asyncio.Task object.
It can then check the result of the task or whether the task was completed successfully or not.
The caller can then decide to issue a follow-up task.
It may or may not await the follow-up task directly.
For example:
|
... # issue and await the first task task = await asyncio.create_task(task()) # check the result of the task if task.result(): # issue the follow-up task followup = await asyncio.create_task(followup_task()) |
We can execute a follow-up task automatically using a done callback function.
For example, the caller that issues the task can register a done callback function on the task itself.
The done callback function must take the asyncio.Task object as an argument and will be called only after the task is done. It can then choose to issue a follow-up task.
The done callback function is a regular Python function, not a coroutine, so it cannot await the follow-up task
For example, the callback function may look as follows:
|
# callback function def callback(task): # schedule and await the follow-up task _ = asyncio.create_task(followup()) |
The caller can issue the first task and register the done callback function.
For example:
|
... # schedule and the task task = asyncio.create_task(work()) # add the done callback function task.add_done_callback(callback) |
How to Execute a Blocking I/O or CPU-bound Function in Asyncio?
The asyncio module provides two approaches for executing blocking calls in asyncio programs.
The first is to use the asyncio.to_thread() function.
This is in the high-level API and is intended for application developers.
The asyncio.to_thread() function takes a function name to execute and any arguments.
The function is executed in a separate thread. It returns a coroutine that can be awaited or scheduled as an independent task.
For example:
|
... # execute a function in a separate thread await asyncio.to_thread(task) |
The task will not begin executing until the returned coroutine is given an opportunity to run in the event loop.
The asyncio.to_thread() function creates a ThreadPoolExecutor behind the scenes to execute blocking calls.
As such, the asyncio.to_thread() function is only appropriate for IO-bound tasks.
An alternative approach is to use the loop.run_in_executor() function.
This is in the low-level asyncio API and first requires access to the event loop, such as via the asyncio.get_running_loop() function.
The loop.run_in_executor() function takes an executor and a function to execute.
If None is provided for the executor, then the default executor is used, which is a ThreadPoolExecutor.
The loop.run_in_executor() function returns an awaitable that can be awaited if needed. The task will begin executing immediately, so the returned awaitable does not need to be awaited or scheduled for the blocking call to start executing.
For example:
|
... # get the event loop loop = asyncio.get_running_loop() # execute a function in a separate thread await loop.run_in_executor(None, task) |
Alternatively, an executor can be created and passed to the loop.run_in_executor() function, which will execute the asynchronous call in the executor.
The caller must manage the executor in this case, shutting it down once the caller is finished with it.
For example:
|
... # create a process pool with ProcessPoolExecutor as exe: # get the event loop loop = asyncio.get_running_loop() # execute a function in a separate thread await loop.run_in_executor(exe, task) # process pool is shutdown automatically… |
These two approaches allow a blocking call to be executed as an asynchronous task in an asyncio program.
Common Objections to Using Asyncio
Asyncio and coroutines may not be the best solution for all concurrency problems in your program.
That being said, there may also be some misunderstandings that are preventing you from making full and best use of the capabilities of the asyncio in Python.
In this section, we review some of the common objections seen by developers when considering using the asyncio.
What About the Global Interpreter Lock (GIL)?
The GIL protects the internals of the Python interpreter from concurrent access and modification from multiple threads.
The asyncio event loop runs in one thread.
This means that all coroutines run in a single thread.
As such the GIL is not an issue when using asyncio and coroutine.
Are Python Coroutines “Real“?
Coroutines are managed in software.
Coroutines run and are managed (switched) within the asyncio event loop in the Python runtime.
They are not a software representation of a capability provided by the underlying operating system, like threads and processes.
In this sense, Python does not have support for “native coroutines”, but I’m not sure such things exist in modern operating systems.
Isn’t Python Concurrency Buggy?
No.
Python provides first-class concurrency with coroutines, threads, and processes.
It has for a long time now and it is widely used in open source and commercial projects.
Isn’t Python a Bad Choice for Concurrency?
Developers love python for many reasons, most commonly because it is easy to use and fast for development.
Python is commonly used for glue code, one-off scripts, but more and more for large-scale software systems.
If you are using Python and then you need concurrency, then you work with what you have. The question is moot.
If you need concurrency and you have not chosen a language, perhaps another language would be more appropriate, or perhaps not. Consider the full scope of functional and non-functional requirements (or user needs, wants, and desires) for your project and the capabilities of different development platforms.
Why Not Use Threads Instead?
You can use threads instead of asyncio.
Any program developed using threads can be rewritten to use asyncio and coroutines.
Any program developed using coroutines and asyncio can be rewritten to use threads.
Adopting asyncio in a project is a choice, the rationale is yours.
For the most part, they are functionally equivalent.
Many use cases will execute faster using threads and may be more familiar to a wider array of Python developers.
Some use cases in the areas of network programming and executing system commands may be simpler (less code) when using asyncio, and significantly more scalable than using threads.
Further Reading
This section lists helpful additional resources on the topic.
Python Asyncio Books
This section lists my books on Python asyncio, designed to help you get started and get good, super fast.
- Python Asyncio Jump-Start, Jason Brownlee, 2022. (my book!)
- Python Asyncio Interview Questions
- Asyncio Module API Cheat Sheet
Other books on asyncio include:
- Python Concurrency with asyncio, Matthew Fowler, 2022.
- Using Asyncio in Python, Caleb Hattingh, 2020.
APIs
- asyncio — Asynchronous I/O
- Asyncio Coroutines and Tasks
- Asyncio Streams
- Asyncio Subprocesses
- Asyncio Queues
- Asyncio Synchronization Primitives
References
- Asynchronous I/O, Wikipedia.
- Coroutine, Wikipedia.
Conclusions
This is a large guide, and you have discovered in great detail how asyncio and coroutines work in Python and how to best use them in your project.
Did you find this guide useful?
I’d love to know, please share a kind word in the comments below.
Have you used asyncio on a project?
I’d love to hear about it, please let me know in the comments.
Do you have any questions?
Leave your question in a comment below and I will reply fast with my best advice.
Join the discussion on reddit and hackernews.